
FO-2080 - Printer SHARP - Free user manual and instructions
Find the device manual for free FO-2080 SHARP in PDF.


| Product Type | Laser Printer / Fax Machine |
| Brand | Sharp |
| Model | FO-2080 |
| Dimensions (W x D x H) | 400 x 350 x 250 mm (15.7 x 13.8 x 9.8 in) |
| Weight | 12 kg (26.5 lbs) |
| Power Supply | AC 220-240V, 50/60Hz |
| Power Consumption (Standby) | 15 W |
| Power Consumption (Operating) | 300 W |
| Print Technology | Laser |
| Print Resolution | 600 x 600 dpi |
| Print Speed | Up to 20 pages per minute |
| Copy Function | Yes, up to 99 copies |
| Fax Function | Yes, with memory |
| Scan Function | Yes, to PC |
| Paper Input Capacity | 250 sheets (standard) |
| Paper Output Capacity | 100 sheets |
| Connectivity | USB 2.0, Telephone line (RJ11) |
| Display | LCD panel |
| Toner Cartridge | Compatible with Sharp FO-2080 toner |
| Duty Cycle | Up to 10,000 pages per month |
| Maintenance | Replace toner and drum as needed; clean corona wire |
| Safety | Do not use near water; unplug before cleaning |
| Repairability | Toner and drum user-replaceable; other repairs by qualified technician |
| Environmental | Operating temperature 10-32°C |
Frequently Asked Questions - FO-2080 SHARP
User questions about FO-2080 SHARP
0 question about this device. Answer the ones you know or ask your own.
Ask a new question about this device
Download the instructions for your Printer in PDF format for free! Find your manual FO-2080 - SHARP and take your electronic device back in hand. On this page are published all the documents necessary for the use of your device. FO-2080 by SHARP.
USER MANUAL FO-2080 SHARP
(for general information)
Page
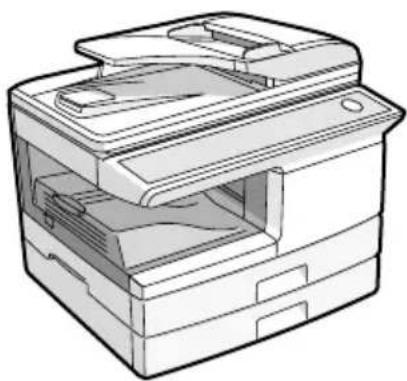
natural_image
Line drawing of a printer with internal components (no text or symbols)PREPARATIONS......9
LOADING PAPER 18
MAKING COPIES 24
CONVENIENT COPY
FUNCTIONS 30
INSTALLING THE
SOFTWARE 40
PRINTER/SCANNER
FUNCTIONS 57
USER SETTINGS....62
TROUBLESHOOTING AND
MAINTENANCE 69
APPENDIX 91
For users in the USA
To protect against loss or theft, record and retain for reference the serial number located on the back of the unit.
Model Number ____
Serial Number
Date of Purchase ____
Authorized Sharp Service Department Number ____
NOTICE
BE SURE TO ASK YOUR AUTHORIZED SHARP DEALER ABOUT THE WARRANTY THAT YOUR SELLING DEALER EXTENDS TO YOU. In order to assure you, the end-user, of warranty protection, Sharp extends a limited warranty to each of its authorized dealers and, in turn, requires each of its authorized dealers to extend its own warranty to you on terms that are no less favorable than those given to the dealer by Sharp. You should be aware, however, that Sharp does not itself extend any warranties, either express or implied, directly to you, the end-user, and no one is authorized to make any representations or warranties on behalf of Sharp. Specifically, SHARP DOES NOT EXTEND TO YOU, THE END-USER, ANY EXPRESS WARRANTY OR ANY IMPLIED WARRANTY OF MERCHANTABILITY, FITNESS FOR USE OR FITNESS FOR ANY PARTICULAR PURPOSE IN CONNECTION WITH THE HARDWARE, SOFTWARE OR FIRMWARE EMBODIED IN, OR USED IN CONJUNCTION WITH THIS PRODUCT. Sharp is not responsible for any damages or loss, either direct, incidental or consequential, which you, the end-user, may experience as a result of your purchase or use of the hardware, software or firmware embodied in or used in conjunction with this Product. Your sole remedy, in the event that you encounter any difficulties with this Product, is against the authorized dealer from which you purchased the Product.
FO-2080 Digital Multifunctional System
In the event that this authorized dealer does not honor its warranty commitments, please contact the General Manager, Business Products Group, Sharp Electronics Corporation, Sharp Plaza, Mahwah, New Jersey 07495, so that Sharp can try to help assure complete satisfaction of the warranty rights to which you are entitled from the authorized dealer.
Shielded interface cables must be used with this equipment to maintain compliance with EMC regulations.
Do not make copies of anything which is prohibited from copying by law. The following items are normally prohibited from copying by national law. Other items may be prohibited by local law.
- Money
- Stamps
●
Bonds
Stocks
Bank
- Checks
- Passports
- Driver's
licenses
drafts
CONTENTS
CAUTIONS 3
SOFTWARE LICENSE....4
ENVIRONMENTAL INFORMATION 5
INTRODUCTION 6
MAIN FEATURES....7
1PREPARATIONS
PART NAMES....9
CHECKING PACKED COMPONENTS AND ACCESSORIES.... 12
PREPARING THE MACHINE FOR INSTALLATION.... 12
INSTALLING THE TD (TONER/DEVELOPER) CARTRIDGE 14
POWER ON AND OFF 16
2LOADING PAPER
PAPER....18
LOADING THE PAPER TRAY 19
BYPASS FEED (including special paper) 21
CHANGING A TRAY'S PAPER SIZE SETTING 23
3MAKING COPIES
NORMAL COPYING.... 24
SELECTING THE TRAY.... 27
MAKING A COPY DARKER OR LIGHTER 28
REDUCTION/ENLARGEMENT/ZOOM 29
4CONVENIENT COPY FUNCTIONS
AUTOMATIC TWO-SIDED COPYING 30
SORT COPY 33
COPYING MULTIPLE ORIGINALS ONTO A SINGLE SHEET OF PAPER
(2 IN 1 copy) 35
CREATING MARGINS WHEN COPYING (Margin shift) 38
5INSTALLING THE SOFTWARE
SOFTWARE 40
BEFORE INSTALLATION 41
INSTALLING THE SOFTWARE.... 42
SETTING UP BUTTON MANAGER 53
6PRINTER/SCANNER FUNCTIONS
USING THE PRINTER MODE 58
BASIC PROCEDURE FOR PRINTING 58
USING THE SCANNER MODE....59
SCANNING USING THE KEYS ON THE MACHINE 59
SCANNING FROM YOUR COMPUTER 60
OPERATION IN COPY, PRINTER, AND SCANNER MODES 60
HOW TO USE THE ONLINE MANUAL 61
7USER SETTINGS
USER PROGRAMS....62
SELECTING A SETTING FOR A USER PROGRAM.... 67
8TROUBLESHOOTING AND MAINTENANCE
DISPLAY MESSAGES....69
TROUBLESHOOTING THE MACHINE....71
PROBLEMS DURING SETUP OF THE SOFTWARE 75
MISFEED REMOVAL 78
TD (TONER/DEVELOPER) CARTRIDGE REPLACEMENT 82
DRUM CARTRIDGE REPLACEMENT 84
CHECKING THE TOTAL COUNT AND DRUM CARTRIDGE LIFE...... 86
CLEANING THE MACHINE 87
ABOUT SUPPLIES AND OPTIONS....90
9APPENDIX
SPECIFICATIONS 91
MATERIAL SAFETY DATA SHEET 95
INDEX....103
CAUTIONS
Caution label on the machine
The label ( ) In the fusing area of the machine indicates the following:
⚠️: Caution, risk of danger ⚠️: Caution, hot surface
Cautions on using the machine
Follow the cautions below when using this machine.
Warning:
- The fusing area is hot. Exercise care in this area when removing misfed paper.
- Do not look directly at the light source. Doing so may damage your eyes.
Caution:
- Place the machine on a firm, level surface.
- Do not install the machine in a humid or dusty location.
- When the machine is not used for a long time, for example during prolonged holidays, turn the power switch off and remove the power cord from the outlet.
- When moving the machine, be sure to turn the power switch off and remove the power cord from the outlet.
- Do not switch the machine rapidly on and off. After turning the machine off, wait 10 to 15 seconds before turning it back on.
- Do not cover the machine with a dust cover, cloth or plastic film while the power is on. Doing so may prevent heat radiation, damaging the machine.
- Use of controls or adjustments or performance of procedures other than those specified herein may result in hazardous radiation exposure.
- The socket-outlet shall be installed near the machine and shall be easily accessible.
Important points when selecting an installation site
Do not install your machine in areas that are:
- damp, humid, or very dusty
• exposed to direct sunlight - poorly ventilated
- subject to extreme temperature or humidity changes, e.g., near an air conditioner or heater.
Be sure to allow the required space around the machine for servicing and proper ventilation.
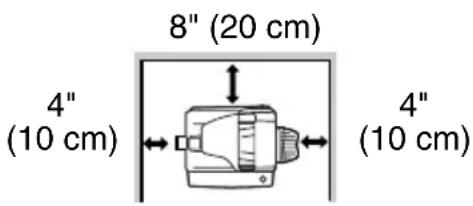
Cautions on handling the machine
Be careful in handling the machine as follows to maintain the performance of this machine.
Do not drop the machine, subject it to shock or strike it against any object.
Do not expose the drum cartridge to direct sunlight.
- Doing so will damage the surface (green portion) of the drum cartridge, causing smudges on copies.
Store spare supplies such as drum cartridges and TD (Toner/Developer) cartridges in a cool dry place without removing from the package before use.
- If they are exposed to direct sunlight, or excessive heat, poor copies may result.
Do not touch the surface (green portion) of the drum cartridge.
- Scratches or smudges on the drum will cause dirty copies.
Supply and Consumables
The supply of spare parts for a repair of the appliance is guaranteed for at least 7 years following the termination of production. Spare parts are those parts of the apparatus which may break down within the scope of ordinary use of the product, whereas those parts which normally exceed the life of the product are not considered spare parts. Consumables also, are available for 7 years following the termination of production.
Trademark acknowledgements
- Micr ^ Windows ^ , Windows ^ 2000, Windows ^ XP, Windows Vista ^ and Internet Explorer ^ are registered trademarks or trademarks of Microsoft Corporation in the U.S.A. and other countries.
• Macintosh is a trademark of Apple Inc., registered in the U.S. and other countries. - IBM, PC/AT, and PowerPC are trademarks of International Business Machines Corporation.
- Adobe, the Adobe logo, Acrobat, the Adobe PDF logo, and Reader are registered trademarks or trademarks of Adobe Systems Incorporated in the United States and other countries.
- Sharpdesk is a trademark of Sharp Corporation.
- All other trademarks and copyrights are the property of their respective owners.
SOFTWARE LICENSE
The SOFTWARE LICENSE will appear when you install the software from the CD-ROM. By using all or any portion of the software on the CD-ROM or in the machine, you are agreeing to be bound by the terms of the SOFTWARE LICENSE.
ENVIRONMENTAL INFORMATION
Laser information
| Wave length 780 nm +15 nm | -10 nm |
| Pulse times (North America) 1 | 2.88 μs ±12.88 ns/7 mm |
| Output power Max 0.2 mW |
At the production line, the output power of the scanner unit is adjusted to 0.18 MILLIWATT PLUS 5% and is maintained constant by the operation of the Automatic Power Control (APC).
Caution
Use of controls or adjustments or performance of procedures other than those specified herein may result in hazardous radiation exposure.
This Digital Equipment is CLASS 1 LASER PRODUCT (IEC 60825-1 Edition 1.2-2001)
SAFETY PRECAUTIONS
This Digital Copier is rated Class 1 and complies with 21 CFR 1040.10 and 1040.11 of the CDRH standards. This means that the equipment does not produce hazardous laser radiation. For your safety, observe the precautions below.
- Do not remove the cabinet, operation panel or any other covers.
- The equipment's exterior covers contain several safety interlock switches. Do not bypass any safety interlock by inserting wedges or other items into switch slots.
CAUTION:
Do not install the machine in a location with poor air circulation.
A small amount of ozone is created inside the machine during printing. The amount of ozone created is not sufficient to be harmful; however, an unpleasant odor may be noticed during large copy runs, and thus the machine should be installed in a room with a ventilation fan or windows that provide sufficient air circulation. (The odor may occasionally cause headaches.)
* Install the machine so that people are not directly exposed to exhaust from the machine. If installed near a window, ensure that the machine is not exposed to direct sunlight.
INTRODUCTION

Some model may not be available in some countries.
Using the manual
This machine has been designed to provide convenient copying features in a minimum amount of office space and with maximum operational ease. To get full use of all machine features, be sure to familiarize yourself with this manual and the machine. For quick reference during machine use, keep this manual in a handy location.
About the operation manuals
The operation manuals for the machine are as follows:
Operation Manual (this manual)
Explains the machine and how to use it as a copier. Also explains how to install the software that allows the machine to be used as a printer and scanner for your computer.
Online Manual (on the accessory CD-ROM)
This manual explains the procedures for using the machine as a printer or a scanner.
Conventions used in this manual and online manual
- Illustrations of driver screens and other computer screens show the screens that appear in Windows XP Home Edition. Some of the names that appear in these illustrations may differ slightly from the screens that appear in other operating systems.
- The explanations in this manual assume that the person who will install the product and the users of the product have a working knowledge of Microsoft Windows.
- This operation manual refers to the Reversing Single Pass Feeder as the "RSPF".
- In this manual, the following icons are used to provide the user with information pertinent to the use of the machine.

Warns that injury may result if the contents of the warning are not properly followed.

Cautions that damage to the machine or one of its components may result if the contents of the caution are not properly followed.

Notes provide useful information on the specifications, functions, performance, and operation of the machine.
The display screens, messages, and key names shown in the manual may differ from those on the actual machine due to product improvements and modifications.
MAIN FEATURES
High-speed laser copying
First-copy time ^1 is only 8.0 ^2 seconds.
Copying speed is 20 copies per minute. This is ideal for business use and provides a big boost to workplace productivity.
*1 The first-copy time is measured after the power save indicator turns off following power on, using the document glass with the polygon rotating in the copy ready state and "LSU SETTING" set to ON in the user programs (8-1/2" x 11", paper fed from paper tray).
*2 When user program 24 is set to OFF.
High-quality digital image
• High-quality copying at 600 dpi is performed.
- In addition to automatic exposure adjustment, two original modes can be selected: "TEXT" for text-only originals, and "PHOTO" for photographs. The exposure can be adjusted to five levels in each mode.
- The photo mode copying function allows clear copying of delicate halftone original images such as monochrome photos and color photos.
Enhanced copying features
- Zoom copies can be made from 25% to 400% in increments of 1%. (When the RSPF is being used, the zoom copy ratio range is 50% to 200%.)
- Continuous copying of up to 99 copies is possible.
- Sets of output can be offset from each other for easy separation (offset function).
- Sorting by sets is possible without the need for a sorter or other special device (Sort copy).
- Includes convenient features such as margin shift, 2 IN 1 copy, and automatic two-sided copying.

flowchart
graph TD
    A["1, 2, 3"] --> B["Stacked Blocks"]
    B --> C["1, 2, 3"]
    C --> D["Stacked Blocks"]
    D --> E["7, 8"]
Sort copy Offset function
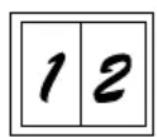
2 IN 1 copy

Margin shift
Scan once/Print many
- The machine is equipped with a memory buffer allowing the machine to scan an original once and make up to 99 copies of the scanned image. This improves workflow, reduces operating noise from the machine and reduces wear and tear on the scanning mechanism, which provides for a higher reliability.
LCD panel displays messages
- The LCD panel displays messages that show function settings and the status of the machine.
Fax function
- The machine is equipped with a plain paper laser fax function that is Super G3 compatible and includes a print hold feature.
Laser printer function
- Printer function
The accompanying printer driver can be installed to enable use of the machine as a printer.
• Network printer function
A LAN connector is provided as a standard feature that allows the machine to be used as a network printer.
Color scanner function
- The accompanying scanner driver can be installed and the machine connected to a computer using a USB cable to enable use as a scanner.
Environment and people friendly design
- Preheat mode and auto power shut-off mode are provided to reduce power consumption when the machine is not in use.
- A universal design has been implemented in the product whereby the height of the operation panel and shape of the keys are designed to be usable by as many people as possible.
This chapter provides basic information that you should know before using the machine.
PART NAMES
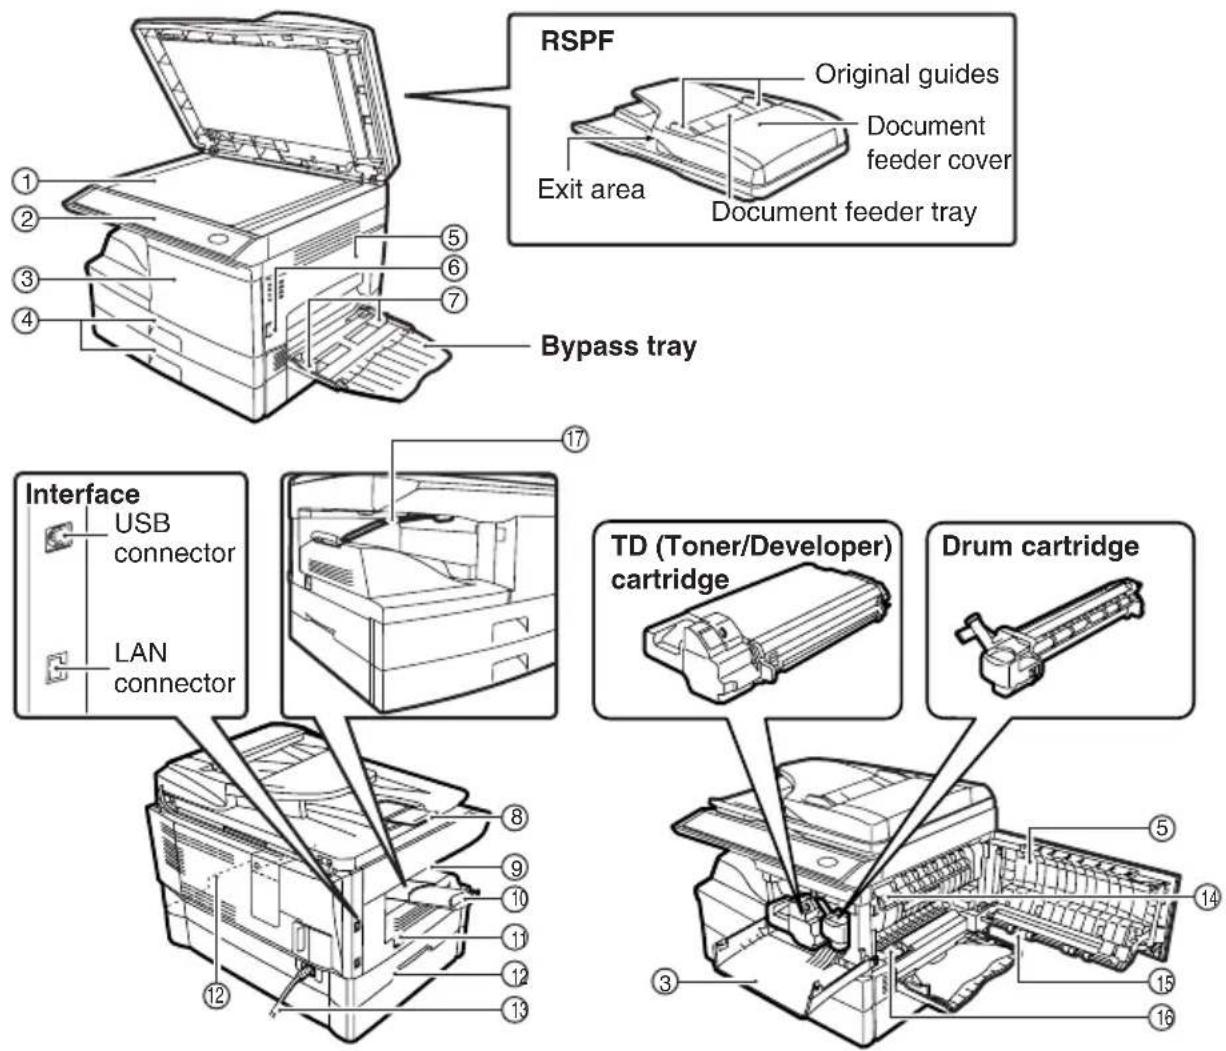
① Document glass Paper output tray extension
② Operation panel Power switch ⑪
③ Front cover Handles ⑫
④ Paper trays Power cord ⑬
⑤ Side cover ⑭ Fusing unit release lever
⑥ Side cover open button Transfer charger
⑦ Bypass tray paper guides Charger cleaner
⑧ Original output tray extension Paper holder arm
⑨ Paper output tray
Operation panel

① [MODE SELECT] key / Mode indicators
Press this key to select the mode. The indicator of the selected mode lights (copy, printer, scanner, fax mode indicators).
② Display
This shows messages indicating the machine status and any problems that occur, as well as user programs and function setting menus.
③ Numeric keys
Use these to enter the number of copies and other numerical settings.
The keys can also be used to select items in function setting menus.
④ [CLEAR] key ( )C
Use this to clear the set number of copies, as well as cancel a job that is in progress. When a setting menu appears, use this key to move back to the previous menu level.
⑤ Power save indicator
This lights up when the power save function is activated.
⑥ RSPF indicator
This lights up when an original is placed in the RSPF.
⑦ Error indicator
This lights steadily or blinks when a paper misfeed or other error occurs.
⑧[TRAY SELECT] key ()=
Use to select the paper tray that has the desired paper for copying.
⑨ Tray location indicator
Indicates the selected paper tray. The indicator blinks when the tray is out of paper during operation or is not closed properly.
⑩ [MENU] key
Press this key to select the paper size for copying, to configure a user program or to display the total count.
⑪ [2-SIDED COPY] key
Press to select the automatic two-sided copying mode.
⑫ [E-SORT/SP.FUN] key
Press to select the sort function, 2 IN 1 copy function, or margin shift function.
⑬ [ ] key (), [ ] key (),
[ENTER] key
Press the [] key () or [] key ▶() to select an item in a function setting menu.
Press the [ENTER] key to enter a selection.
⑭ [EXPOSURE] key
Use to switch from auto exposure adjustment to text mode or photo mode.


1
⑮ [COPY RATIO] key
Press to select an enlargement or reduction ratio.
To select a preset ratio setting, press the [COPY RATIO] key and select the desired preset ratio. To select a ratio that is not preset, press the [COPY RATIO] key, select the preset ratio that is closest to the desired ratio, and then press the []key () or ▼ []key () to increase or decrease the ratio in increments of 1%.
⑯ [CLEAR ALL] key (CA)
This returns all functions to the default settings. When pressed in a setting menu, this returns the settings and display to the initial state.
⑰ [START] key ( )7 Ready indicator
The ready indicator lights up when copying or scanning is possible.
To begin copying, press the [START] key ( )
The [START] key ( ) is also pressed to return to normal operation from auto power shut-off mode.
⑱ Shows the current copy ratio.
⑲ Shows the selected paper size.
⑳ Shows the number of copies that has been entered with the numeric keys.
② A checkmark "√" appears when the exposure has been changed, or when two-sided copying, sort, 2 IN 1, or margin shift is selected.
CHECKING PACKED COMPONENTS AND ACCESSORIES
Open the carton and check if the following components and accessories are included. If anything is missing or damaged, contact our Technical Assistance Department at 1-(630)378-3590 in the USA.

If the machine does not function properly during setup or use, or if a function cannot be used, see "TROUBLESHOOTING AND MAINTENANCE" (p.69).
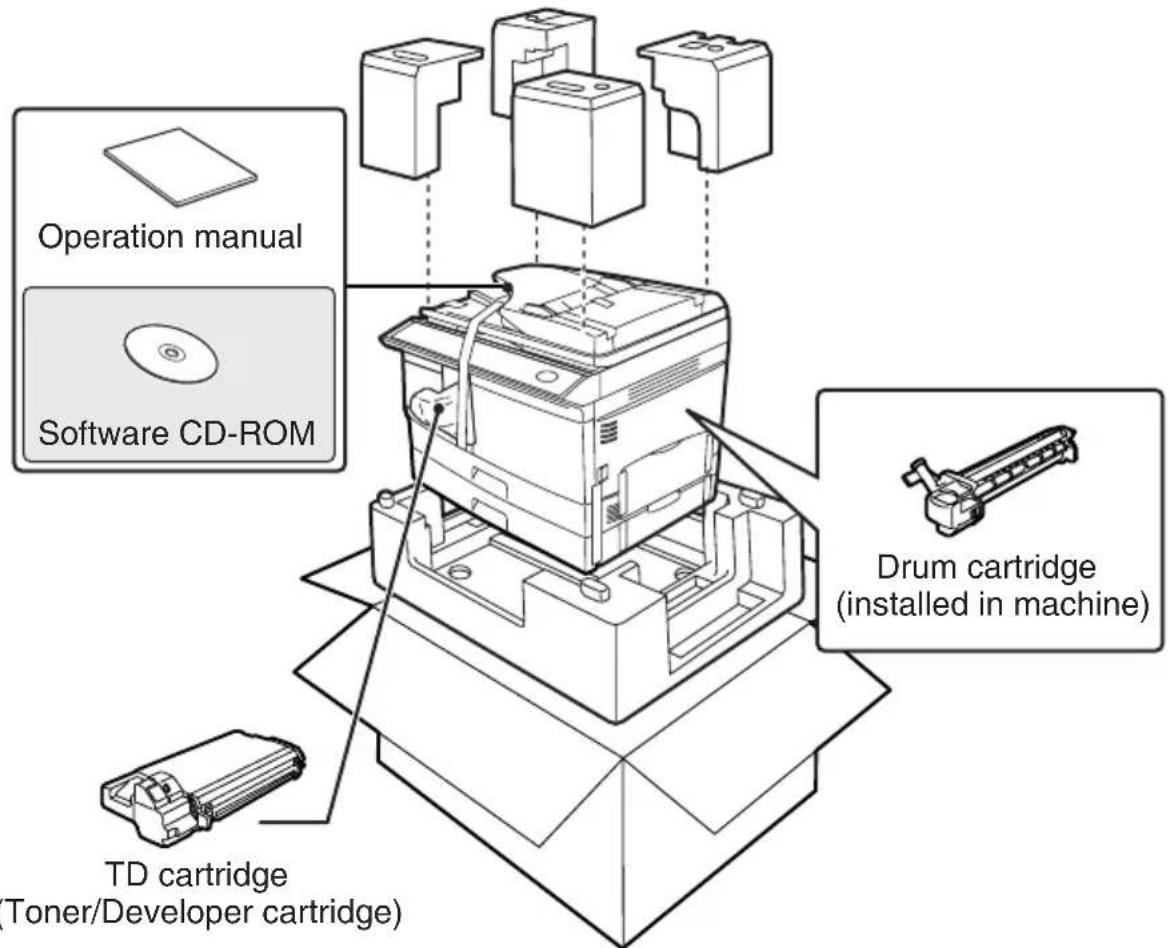
PREPARING THE MACHINE FOR INSTALLATION
1 Be sure to hold the handles on both sides of the machine to unpack the machine and carry it to the installation location.
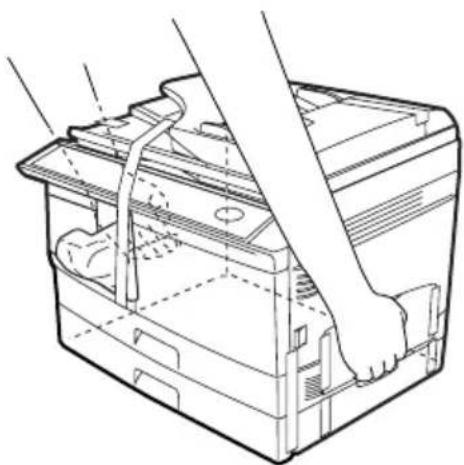
natural_image
Line drawing of a hand inserting a component into a battery pack (no text or symbols)2 Remove all pieces of tape shown in the illustration below and then open the RSPF and remove protective materials. Take out the bag containing the TD (Toner/Developer) cartridge.
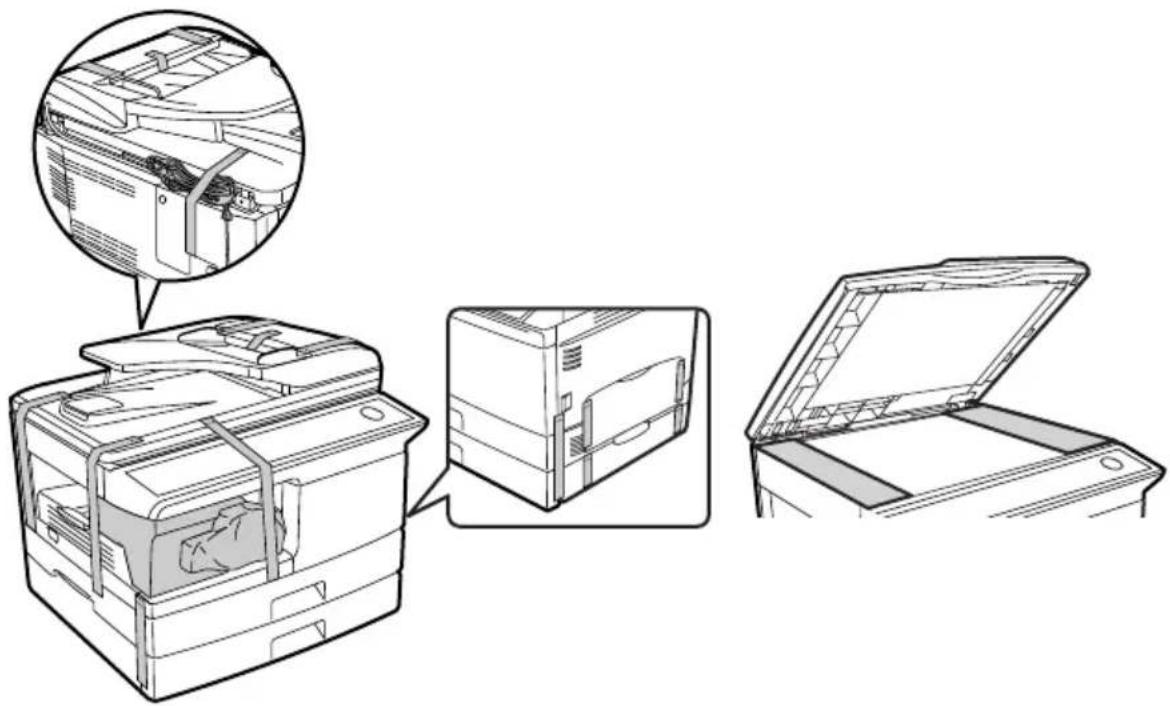
1
3 Release the scan head locking switch.
The scan head locking switch is under the document glass. If the switch is locked ( ), the machine will not operate. Unlock the switch () as shown below.
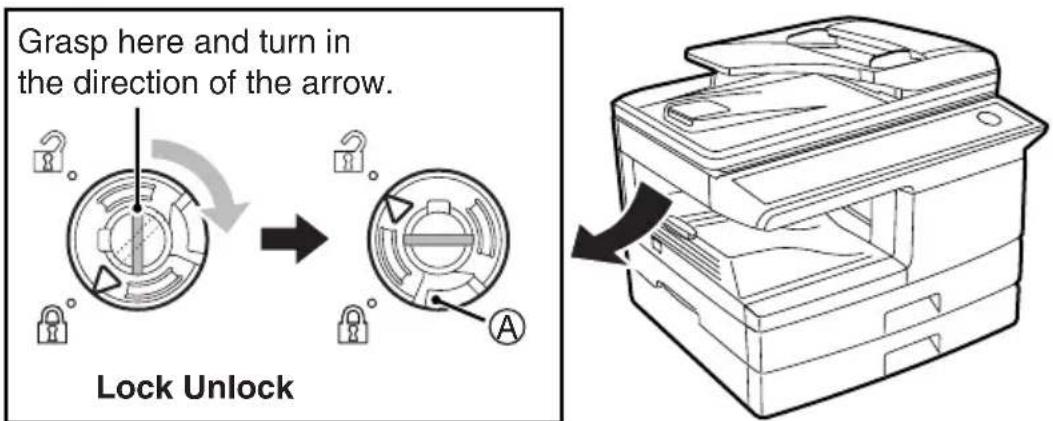
To lock the scan head locking switch, hold up the catch in illustration ④ and turn the center knob counter-clockwise 90 degrees until you hear a click.
INSTALLING THE TD (TONER/DEVELOPER) CARTRIDGE
1 Open the bypass tray, and then open the side cover.

natural_image
Illustration of a printer's internal structure with a hand inserting a button to a device (no text or symbols visible)2 Remove the CAUTION tape from the front cover and remove the two protective pins from the fusing machine by pulling the strings upward one at a time.


3 Press gently on both sides of the front cover to open the cover.

natural_image
Diagram of a printer's internal structure showing paper feeding into a container with a handle (no text or symbols present)4 Remove the TD (Toner/Developer) cartridge from the bag. Remove the protective paper. Hold the cartridge on both sides and shake it horizontally four or five times. Hold the tab of the protective cover and pull the tab to your side to remove the cover.
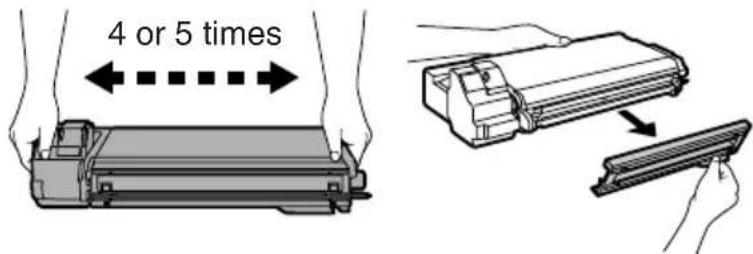
5 While pushing the lock release button, gently insert the TD (Toner/Developer) cartridge until it locks into place.
Lock release button

natural_image
Diagram of a printer's internal structure showing hand operating a component with an arrow indicating motion (no text or symbols present)1
6 Close the front cover and then the side cover by pressing the round projections near the side cover open button.

When closing the covers, be sure to close the front cover securely and then close the side cover. If the covers are closed in the wrong order, the covers may be damaged.
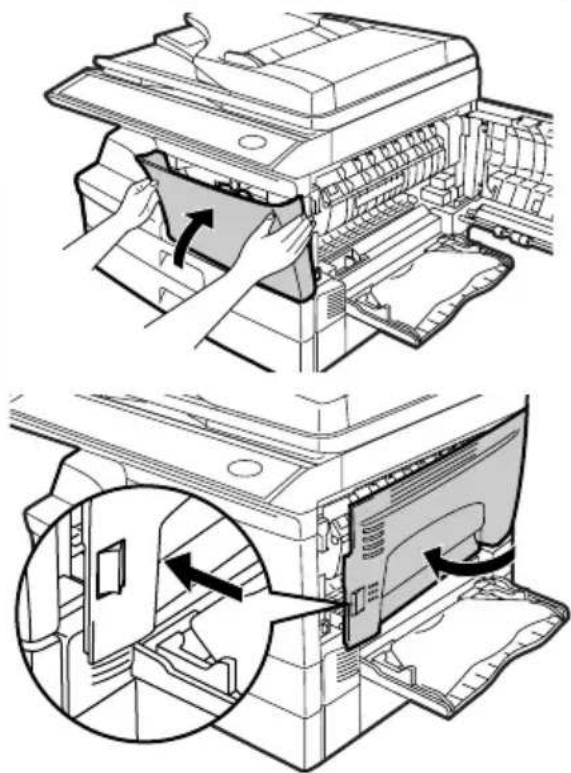
7 Ensure that the power switch of the machine is in the OFF position. Plug the other end of the power cord into the nearest outlet.
POWER ON AND OFF
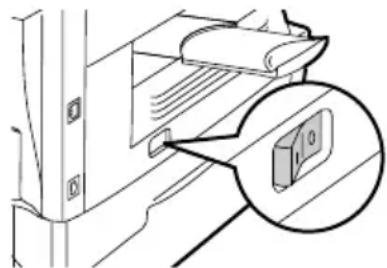
The power switch is located on the left side of the machine.

If you use the machine in a country other than the country where the machine was purchased, you will need to make sure that your local power supply is compatible with your model. If you plug the machine into an incompatible power supply, irreparable damage to the machine will result.
Power on
Turn the power switch to the "ON" position.

natural_image
Technical line drawing of a mechanical assembly with a magnified inset showing a component detail (no text or symbols)The ready indicator will light up and other indicators which show the initial settings of the display will also light up to indicate the ready condition. For the initial settings, see "Initial settings" (below).
You can select copy settings and press the [START] key ( ) after the power switch is turned on. Copying will start automatically.

Only insert the power cord into a properly grounded wall socket. Do not use extension cords or power strips.
Language setting
The first time the power is turned on after shipment from the factory, a message will appear in English in the display prompting you to select the language. Select the language with the []key () or []key () and then press the [ENTER] key.
The language can also be changed in the user programs (p.65).
Initial settings
The machine reverts to the initial settings when it is first turned on, when the [CLEAR ALL] key (CA) is pressed, or when no keys are pressed for the preset "AUTO CLEAR" time following the end of a copy job. When the machine reverts to the initial settings, all settings and functions selected to that point are canceled. The "AUTO CLEAR" can be changed in the user programs. (p.62)
When in the copy mode
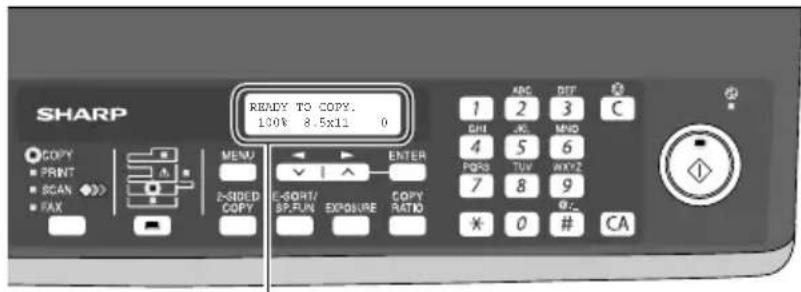
The main screen of copy mode appears.
Copy ratio: 100%, Exposure: Automatic
Copy quantity: 0, All special copier modes: Off
Scanning unit (scan head)
When the machine is able to copy or scan (the ready indicator is on), the scanning unit is lit.
Power off
Make sure that the machine is not in operation and then turn the power switch to the "OFF" position.
natural_image
Diagram of a door handle with a magnified inset showing a small object (no text or symbols present)If the power switch is turned off while the machine is in operation, a misfeed may occur and the job that was in progress will be canceled.
In cases where the machine will not be used for a long time, turn off the power switch and remove the power cord from the outlet.
Check the following to make sure the machine is not in operation:
• The ready indicator is lit. (Initial state)
- The power save indicator is lit. (preheat mode or auto power shut-off mode)
Power save modes
The machine has two power save modes to reduce overall power consumption and thereby reduce the cost of operation. In addition, these modes conserve natural resources and help reduce environmental pollution. The two power save modes are preheat mode and auto power shut-off mode.
Preheat mode
This function automatically switches the machine to a low power consumption state if the set duration of time elapses without the machine being used when the power is on. In this mode, the power save indicator lights up. Normal operation automatically resumes when a key on the operation panel is pressed, an original is placed, a print job is received.
Auto power shut-off mode
This function automatically switches the machine to a state that consumes even less power than preheat mode if the set duration of time elapses without the machine being used when the power is on. The power save indicator lights up, the display shows a message indicating that the machine is in auto power shut-off mode. To resume normal operation, press the [START] key ( ) Normal operation also resumes automatically when a print job is received or scanning is begun from a computer. While in auto power shut-off mode, no keys (except the [START] key ( ) can be used.

The preheat activation time and the auto power shut-off time can be changed with "PREHEAT MODE" and "AUTO SHUT-OFF TIME" in the user programs. It is suggested that you set times that are appropriate for your usage of the machine. (p.62 and p.63)
The tray location indicator will blink when there is no paper in the selected paper tray, or when the selected paper tray is not closed or is improperly closed.
PAPER
For best results, use only SHARP recommended paper.
| Paper tray type | Paper type | Size | Weight | Capacity |
| Paper tray Stand | ard paperRecycled paper | 5-1/2" x 8-1/2"(Invoice)8-1/2" x 11" (Letter)8-1/2" x 13"(Foolscap)8-1/2" x 14" (Legal) | 15 lbs. to 21 lbs.(56 g/m2to80 g/m2) | 250 sheets *1(The paper should not exceed the line on the tray) |
| Bypass tray Stand | dard paperRecycled paper | 3-1/2" x 5-1/2" to8-1/2" x 14" | 15 lbs. to 21 lbs.(56 g/m2to80 g/m2) | 50 sheets *1 |
| Thick paper 15 lbs. to 34.5 lbs. | (56 g/m2to128 g/m2)*3 | Load one sheet at a time in the bypass tray. | ||
| Transparencyfilm/Labels | ||||
| Envelopes *2 | Monarch(3-7/8" x 7-1/2")Commercial 9(3-7/8" x 8-7/8")Commercial 10(4-1/8" x 9-1/2") | |||
*1 The number of sheets of paper that can be loaded varies depending on the weight of the paper.
*2 Do not use non-standard envelopes or envelopes that have metal clasps, plastic snappers, strings, windows, linings, self-adhesive strips, patches or synthetic materials. Do not use envelopes that are filled with air or envelopes that have labels or stamps attached. These will damage the machine.
*3 When using paper heavier than 28 lbs. (104 g/m²), use paper that is 8-1/2" x 11" or smaller.
Special papers
Follow these guidelines when using special papers.
- Use SHARP recommended transparency film and label sheets. Using other than SHARP recommended paper may result in misfeeds or smudges on the output. If other than SHARP recommended media must be used, feed each sheet one at a time using the bypass tray (do not attempt continuous copying or printing).
●There are many varieties of special paper available on the market, and some cannot be used with this machine. Before using special paper, contact a SHARP service center.
● Before using other than SHARP recommended paper, make a test copy to see if the paper is suitable.
LOADING THE PAPER TRAY

Make sure that the paper is not torn, is free of dust, and has no wrinkles or curled edges.
1 Raise the handle of the paper tray and pull the paper tray out until it stops.

natural_image
Diagram of a hand pressing down on a device component with an arrow indicating motion (no text or symbols present)2 Remove the pressure plate lock. Rotate the pressure plate lock in the direction of the arrow to remove it while pressing down the pressure plate of the paper tray.
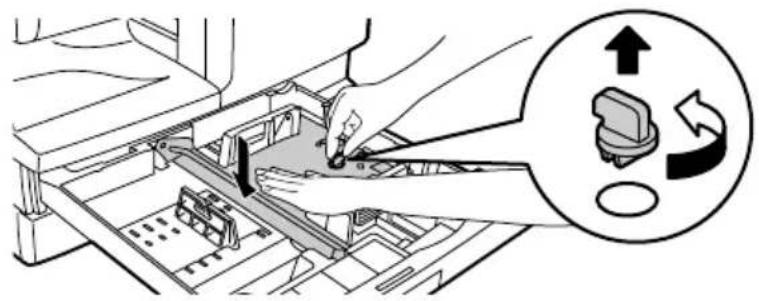
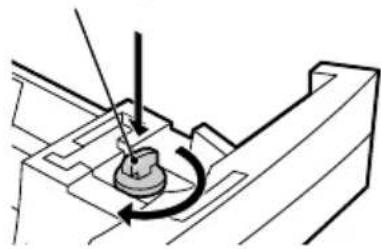
3 Store the pressure plate lock which has been removed in step 2. To store the pressure plate lock, rotate the lock to secure it as shown below.
Pressure plate lock
natural_image
Mechanical assembly diagram showing a rotating component with a curved arrow indicating rotation (no text or symbols)4 Fan the paper and insert it into the tray. Make sure that the edges go under the corner hooks.

- Do not load paper above the maximum height line ( ) Exceeding the line will cause a paper misfeed.
- If the paper is not fanned, double-feeds or misfeeds may occur.
- Make sure the stack of paper is straight before loading it. When adding paper, take the remaining paper out and combine it into a single stack with the new paper.
- Make sure that all the paper in the stack is the same size and type.
- When loading paper, ensure that there is no space between the paper and the guide, and make sure that the guide is not set too narrow and causes the paper to bend. Incorrect loading will cause the paper to skew or misfeed.
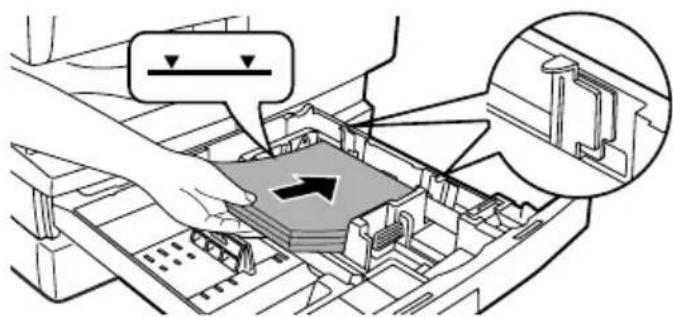
5 Gently push the paper tray back into the machine.

- If you loaded a paper size that is different from the previously loaded paper size, change the paper size setting as explained in "CHANGING A TRAY'S PAPER SIZE SETTING" (p.23)
- When not using the machine for an extended period, remove all paper from the paper tray and store it in a dry place. If paper is left in the machine for an extended period, the paper will absorb moisture from the air, resulting in paper jams.
BYPASS FEED (including special paper)
The bypass tray can be used to feed standard paper, transparency film, labels, envelopes, and other special purpose paper.
Important points when inserting paper in the bypass tray
Up to 50 sheets of standard copy paper can be inserted in the bypass tray. (Capacity will vary depending on the type of paper loaded.)
Be sure to place envelopes horizontally as shown in the following diagram.

- When loading envelopes, make sure that they are straight and flat and do not have loosely glued construction flaps (not the closure flap).
- Special papers such as SHARP recommended transparency film, labels, and envelopes must be fed one sheet at a time through the bypass tray.
- When adding paper, first remove any paper remaining in the tray, combine it with the paper to be added and then reload as a single stack. The paper to be added must be the same size and type as the paper already in the tray.
- Do not use paper that is smaller than the original. This may cause smudges or unclean images.
- Do not use paper that has already been printed on by a laser printer or plain paper fax machine. This may cause smudges or unclean images.
Envelopes
Do not use the following envelopes, as misfeeds will occur.
- Envelopes with metal tabs, clasps, strings, holes, or windows.
- Envelopes with rough fibers, carbon paper, or glossy surfaces.
- Envelopes with two or more flaps.
- Envelopes with tape, film, or paper attached to the flap.
- Envelopes with a fold in the flap.
- Envelopes with glue on the flap to be moistened for sealing.
- Envelopes with labels or stamps.
- Envelopes that are slightly inflated with air.
- Envelopes with glue protruding from the seal area.
- Envelopes with part of the seal area peeled off.
- Be sure to select com9, com10 or Monarch in the paper size setting of the printer driver. (For detailed information on the printer driver, refer to the online manual.)
Loading paper in the bypass tray

- Paper must be fed narrow side first into the feed slot.
- Special papers such as transparency film, labels, and envelopes must be fed one sheet at a time through the bypass tray.
- When copying onto transparency film, remove each copy promptly. Do not let copies stack up.
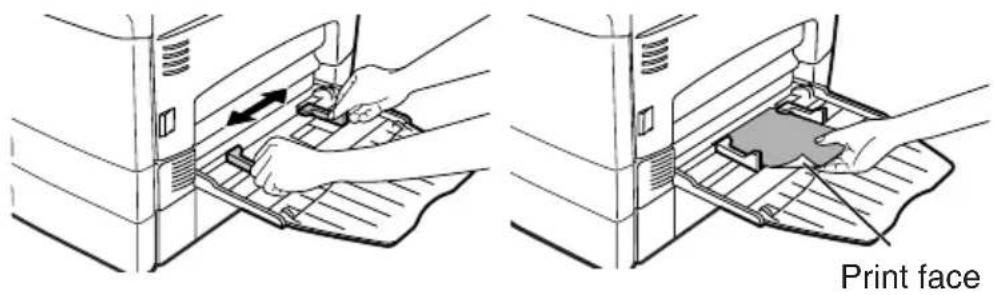
1 Open the bypass tray and extend the tray.


To close the bypass tray, perform step 1 and then step in the illustration and push the round projections at the right of the tray until they click.
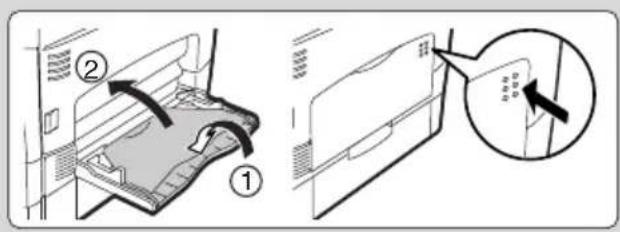
2 Set the bypass tray paper guides to the paper width. Insert the paper (print face down) all the way into the bypass tray.
3 Press the [TRAY SELECT] key ( ) to select the bypass tray.
Note for loading thick paper
Confirm that user program 29 is set to "2 (HEAVY PAPER)" when using thick paper. (See page 65.)
CHANGING A TRAY'S PAPER SIZE SETTING
Follow these steps to change a tray's paper size setting.

- The paper size setting cannot be changed when the machine has stopped temporarily due to running out of paper or a misfeed.
- During printing (even in copy mode), the paper size setting cannot be changed.
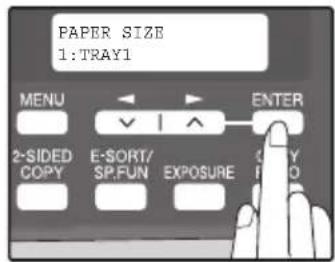
1 Press the [MENU] key. Press the [] key () or [] key() until "PAPER SIZE" appears, and then press the [ENTER] key.
2 Press the [] key () or [] key () to select the tray, and then press the [ENTER] key.

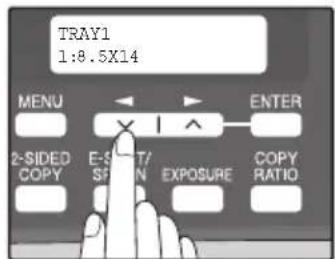
3 Press the [] key () or [] key () to select the paper size, and then press the [ENTER] key.
The paper size changes as follows each time the []key() or []key( ) is pressed: "8.5x14"→"8.5x13"→"8.5x11"→"5.5x8.5" →"A4"→"B5"→"A5".

When you have finished configuring the tray's paper size setting, press the [MENU] key.
4 Squeeze the lock lever of the front guide and slide the front guide to match the width of the paper, and move the left guide to the appropriate slot as marked on the tray.

- The front guide is a slide-type guide. Grasp the locking knob on the guide and slide the guide to the indicator line of the paper to be loaded.
- The left guide is an insert-type guide. Remove it and then insert it at the indicator line of the paper to be loaded.
This chapter explains basic copying functions.
NORMAL COPYING
Using the document glass

- The document glass can scan up to 8-1/2" x 14" original.
- When a copy is made, the edges will not be copied (image loss). For the image loss, see the "SPECIFICATIONS" (p.91).
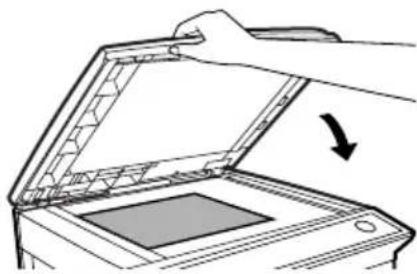
1 Open the RSPF, and place the original face down on the document glass.
[How to place the original]
Align the original with the original scale and the centering (▶mark.

2 Gently close the RSPF.
By factory default, when a copy is made with the RSPF cover open, the function for preventing excessive toner use activates and "CHECK ORIGINAL" appears in the display. (See the "Check RSPF open function" (p.25).)
natural_image
Line drawing of a printer with an open lid and a hand holding the lid, showing a right-hand arrow (no text or symbols)3 Select the number of copies and any other copy settings, and then press the [START] key ( )
![SHARP FO-2080 - Select the number of copies and any other copy settings, and then press the [START] key ( ) - 1](/content/2026/05/1000796/images/24d305e453debdb895616bc854e2635f0a9dcc344aa9c212dbcf74d8330aea63.jpg)
- To stop copying in the middle of a run, press the [CLEAR] key ( ).C
- For the copy settings, see pages 27 through 39.
Copying books or originals with folds or creases
Press down on the RSPF while copying as shown. If the RSPF is not completely closed, shadows may appear on the copy or it may be fuzzy. Straighten originals that have folds or creases before placing it on the document glass.

natural_image
Line drawing of a printer with a hand inserting a paper into the cover (no text or symbols)Check RSPF open function
When enabled in program number 24 (p.65), this function may help prevent wasteful use of toner that occurs when the RSPF cover is not completely closed.
If the start ( ) key is pressed when the RSPF cover is not completely closed, "CHECK ORIGINAL" will appear in the display and copying may not take place. If copying does not take place, copying can be performed by pressing the start ( ) key again, however, the scan size set in "CHANGING A TRAY'S PAPER SIZE SETTING" (p.23) or "VALID COPY WIDTH" (program number 25) (p.65) will be used.
If the RSPF cover is completely closed after "CHECK ORIGINAL" appears, copying will take place at the normal size.

When this function is off, if the [Start] key ( ) is pressed to make a copy with the RSPF cover open, parts outside of the original will be copied black. Even when this function is on, if the [Start] key ( ) is pressed twice to make a copy with the RSPF cover open, parts outside the original may be copied black. To prevent excessive use of toner, make sure that the RSPF cover is closed when making a copy.
Using the RSPF

- Originals that are 5-1/2" x 8-1/2" to 8-1/2" x 14" and 15 lbs. to 24 lbs. (56 g/m ^2 to 90 g/m ^2 ) can be used. A maximum of 50 pages can be placed at once.
- Straighten curled originals before placing them in the document feeder tray. Curled originals may cause misfeeds.
- Place originals horizontally.
- Before placing originals in the document feeder tray, be sure to remove any staples or paper clips from them.
- When a copy is made, the edges will not be copied (image loss). For the image loss, see the "SPECIFICATIONS" (p.91).
- When using the margin shift function, check the position of the margins carefully. (p.38)
1 Make sure that an original has not been left on the document glass.
2 Adjust the original guides to the size of the originals.

natural_image
Line drawing of hands using a tool to cut or spread a rectangular object on a base (no text or symbols)3 Place the original(s) face up in the document feeder tray without trying to force them in.
The RSPF indicator on the operation panel will light up. If this indicator does not light up, the originals are not properly set or the RSPF is not properly closed.

4 Select the number of copies and any other copy settings, and then press the [START] key ( )

- The default output mode for copying from the RSPF is sort mode (P.33), and a checkmark "will automatically appear in the display (P.11). If "SORT AUTO SELECT" is disabled in the user programs, the default output mode will be non-sort mode. (P.65)
- To stop copying in the middle of a run, press the [CLEAR] key ( ).C
- For the copy settings, see pages 27 through 39.
Originals that cannot be used in the RSPF
The following originals cannot be used. These may cause misfeeds or smudging and unclear images.
• Transparencies, tracing paper, other transparent or translucent paper, and photographs.
• Carbon paper, thermal paper.
• Originals that are creased, folded, or torn.
- Glued originals, cut-out originals.
• Originals with binder holes.
- Originals printed using an ink ribbon (thermal transfer printing), originals on thermal transfer paper.
Original output tray extension
When placing an original larger than 8-1/2" x 11" size, pull out the original output tray extension of the RSPF.

natural_image
Diagram showing a hand using a tool to press down a table, then to press or adjust the table (no text or symbols present)Capacity of paper output tray
natural_image
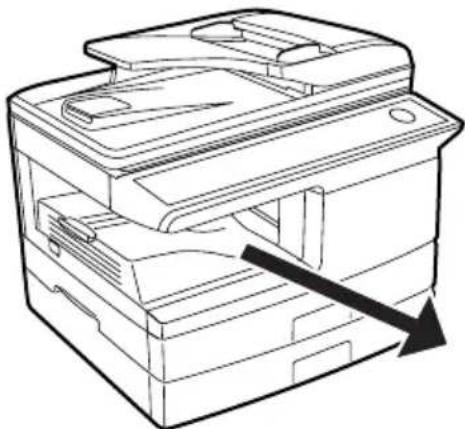
Line drawing of a printer with an arrow indicating compression or disassembly (no text or symbols present)The paper output tray can hold a maximum of 200 pages. If more than 200 pages are allowed to accumulate, a paper jam may occur.
Paper output tray extension
When copying onto paper larger than 8-1/2" x 11" size, pull out the paper output tray extension.

natural_image
Diagram showing a hand inserting a component into a device, with an arrow indicating the process (no text or symbols present)Paper holder arm
The paper output tray has a paper holder arm. The paper holder arm presses gently on the output paper to stack it (p.9).

After removing paper, if you need to return the paper to the paper output tray, lift up the paper holder arm and place the paper under the arm.
Setting the number of copies
Press the numeric keys to set the number of copies.

- The set number of copies appears in the display. A maximum of 99 copies can be set.
- If you wish to make only a single copy, copying is possible with the display showing "0".

If you enter the wrong number, press the [CLEAR] key ( ) and enter the correct number.
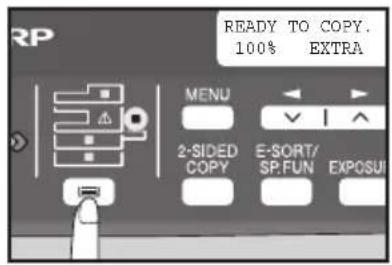
SELECTING THE TRAY
Press the [TRAY SELECT] key (☐)
Each time, you press the [TRAY SELECT] key ( ), the location indicated by the tray location indicator changes in the following order: paper tray→lower paper tray→bypass tray.
![SHARP FO-2080 - Press the [TRAY SELECT] key (☐) - 2](/content/2026/05/1000796/images/59fd83940cddcb53d3e7f84706c1127ce1d36b3f4e28931e7f18494da90032b4.jpg)
The tray location indicator will blink when there is no paper in the paper tray during operations, or when the tray is not closed or is improperly closed.
MAKING A COPY DARKER OR LIGHTER
Automatic exposure adjustment is initially enabled. This function automatically adjusts the copy image according to the original being copied. If you wish to select the exposure level yourself, follow the steps below. (Select from 2 original types and 5 exposure levels for each original type.) The exposure level used in automatic exposure adjustment can also be changed with "AE LEVEL ADJUST" in the user programs (p.65).
Original types
●AUTO ..... Automatic exposure adjustment is enabled and the exposure is automatically adjusted according to the original being copied. The exposure is lowered for colored areas and background shadows.
- TEXT...... The exposure is raised for light areas and lowered for dark backgrounds to make text easier to read.
●PHOTO ... Halftones in the photo are reproduced with greater clarity.
1 Place the original(s).
2 Press the [EXPOSURE] key to select the original type.
The original image type changes as follows each time the [EXPOSURE] key is pressed: "AUTO" → "TEXT" → "PHOTO".

![SHARP FO-2080 - Press the [EXPOSURE] key to select the original type. - 2](/content/2026/05/1000796/images/78d668118cb65d50b7b9a47f347dcdbc88db011d04d19a005f1d14cf105436dc.jpg)
To return to auto exposure adjustment, press the [EXPOSURE] key until "AUTO" appears.
3 If needed, adjust the exposure level for TEXT or PHOTO.
For a darker image, press the []key(). For a lighter image, press the []key().
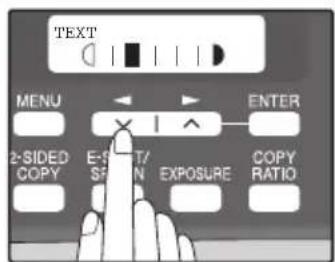
4 Press the [ENTER] key.
5 Select the number of copies and any other copy settings, and then press the [START] key ( )
![SHARP FO-2080 - Select the number of copies and any other copy settings, and then press the [START] key ( ) - 1](/content/2026/05/1000796/images/a8a6e014aa3a872855fc3a207ee2777210d65a994394abdcd1d31f31ee2056c2.jpg)
Exposure value guidelines (When in "TEXT" setting)

Colored text or text written in pencil
Normal originals
Dark originals like newspapers
REDUCTION/ENLARGEMENT/ZOOM
Copies can be reduced down to 25% or enlarged up to 400%. (When the RSPF is being used, the zoom copy ratio range is 50% to 200%.) The [COPY RATIO] key can be pressed to quickly select a ratio from among eight preset ratios. In addition, the []key() and[]key() can be pressed to select the ratio in increments of 1%.
1 Place the original(s) and check the paper size.
2 Press the [COPY RATIO] key.
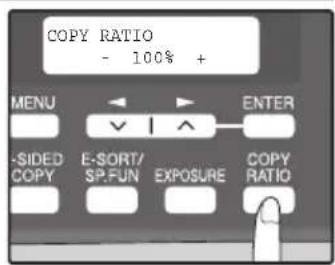
3 Press the [COPY RATIO] key and/or [ ] key ( ) or [ ] key ( ) to select the desired copy ratio and then press the [ENTER] key.
Selecting a preset ratio
The preset ratios change as follows each time the [COPY RATIO] key is pressed:
"100%" → "78%" → "64%" → "50%" → "25%" →
"400%" → "200%" → "129%"

Fine adjustment of the ratio
The ratio can be adjusted from 25% to 400% in increments of 1%.
Use the [] key () or the [] key ( ) for fine adjustment.


- To return the ratio to 100% , press the [COPY RATIO] key until 100% appears.
- Press the [COPY RATIO] key to set the approximate ratio, then press the [] key () or [] key ().
- To decrease or increase the zoom ratio rapidly, hold down the [] key () or [] key ().
The ratio will stop changing at each of the preset ratios. To continue changing the ratio, release the key and then hold it down again.
4 Select the number of copies and any other copy settings, and then press the [START] key ( )
The copy will be delivered to the paper output tray.
AUTOMATIC TWO-SIDED COPYING
Two originals can be automatically copied onto both sides of a single sheet of paper. When the RSPF is used, two-sided copies of two-sided originals can easily be made.
| Original → Paper Usable paper | ||||
| Document glass | One-sided original → Two sides | 5-1/2" x 8-1/2", 8-1/2" x 11", 8-1/2" x 13", 8-1/2" x 14"• The bypass tray cannot be used. | ||
| RSPF | One-sided original → Two sides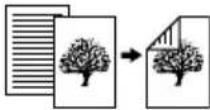 | Two-sided original → One side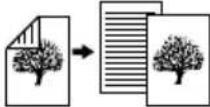 | Two-sided original → Two sides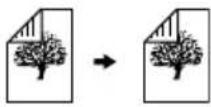 | 5-1/2" x 8-1/2", 8-1/2" x 11", 8-1/2" x 13", 8-1/2" x 14"• Special paper cannot be used.• The bypass tray can only be used when making one-sided copies from two-sided originals. |
When performing automatic two-sided copying of one-sided originals, the orientation of the copied image can be selected according to the binding position of the paper.
SHORT EDGE: Select when binding the paper at the short edge.


(Paper orientation: Landscape) (Paper orientation: Portrait)
LONG EDGE: Select when binding the paper at the long edge.


(Paper orientation: Landscape) (Paper orientation: Portrait)
Using the document glass
1 Place the original that you wish to copy onto the front side of the paper on the document glass and close the RSPF.
2 Press the [2-SIDED COPY] key until "1 TO 2" appears, and then press the [ENTER] key.
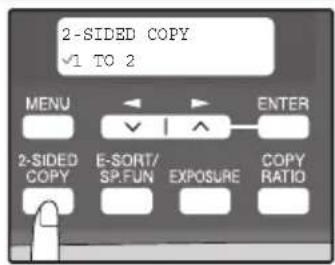
3 Press the [] key () or [] key () to select the binding edge and then press the [ENTER] key.
Select "LONG EDGE" or "SHORT EDGE". The "LONG EDGE" and "SHORT EDGE" are shown in the illustration on the preceding page.

4 Select the number of copies and any other settings, and then press the [START] key ( )
"[START] : NEXT SCAN [#] : START PRINT" appears and the original is scanned into memory. To immediately print the scanned image, press the [ ]key.
5 Replace the original with the next original and close the RSPF, and then press the [START] key ( )
Repeat step 5 until all originals have been scanned.
Copies will be output each time two originals have been scanned.
When the number of original pages is odd and "[START]: NEXT SCAN [#]: START
PRINT" appears, press the [#key after all pages have been scanned.


- If you need to clear the data scanned into memory, press the [CLEAR] key ( ) When the [CLEAR] key ( ) is pressed, the number of copies setting is also cleared.
- To cancel automatic two-sided copying, press the [CLEAR ALL] key (☐) or press the [2-SIDED COPY] key, select the "1 TO 1", and then press the [ENTER] key.
- If the special function sort mode was selected in step 4, copying will not begin until the []#key is pressed.
Using the RSPF
1 Place the original(s) in the RSPF. (p.25)
If you place an odd number of originals for one-sided to two-sided copying, the last page will be one-sided.
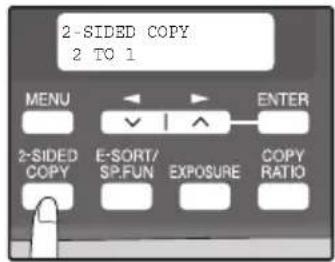
2 Press the [2-SIDED COPY] key and select the two-sided copy mode that you wish to use.
The mode changes as follows each time you press the [2-SIDED COPY] key:
"1 TO 1" → "1 TO 2" → "2 TO 2" → "2 TO 1"
- "1 TO 2": Two-sided copies from one-sided originals
- "2 TO 2": Two-sided copies from two-sided originals
- "2 TO 1": One-sided copies from two-sided originals
3 Press the [ENTER] key.
If you selected "1 TO 2" in step 2, select "LONG EDGE" or "SHORT EDGE" and press the [ENTER] key. LONG EDGE and SHORT EDGE are shown in the illustration on page 30.
4 If you selected "2 TO 1" or "2 TO 2", press the [] key () or [] key () to select the original size and then press the [ENTER] key.
The following original sizes can be selected: "8.5x14", "8.5x13", "8.5x11", "5.5x8.5", "A4", "B5", "A5"

5 Select the number of copies and any other settings, and then press the [START] key ( )
The copy will be delivered to the paper output tray.
![SHARP FO-2080 - Select the number of copies and any other settings, and then press the [START] key ( ) - 1](/content/2026/05/1000796/images/9e1d89f9e4d830b6f57a1cade3b9c7fe3de71e20eb2994fb03dcc1eba511b98d.jpg)
To cancel automatic two-sided copying, press the [CLEAR ALL] key (or press the [2-SIDED COPY] key, select the "1 TO 1", and then press the [ENTER] key.
SORT COPY
Copies of multiple original pages can be sorted into sets.

The number of pages that can be scanned varies depending on the original type (photo, text, etc.) and the amount of memory allocated to the printer. The amount of memory allocated to the printer can be changed with "MEM. FOR PRINTER" in the user programs. (p.64)

flowchart
graph TD
    A["1"] --> B["2"]
    A --> C["3"]
    B --> D["4"]
    B --> E["5"]
    B --> F["6"]
Sort copy
Using the document glass
1 Place the first original. (p.24)
2 Press the [E-SORT/SP.FUN] key until "SORT" appears and then press the [ENTER] key.

3 Press the [] key () to move " " to √ the "ON" position and then press the [ENTER] key.

4 Select the number of copies and any other settings, and then press the [START] key ( )
"[START] : NEXT SCAN [#] : START PRINT" appears and the original is scanned into memory.
5 Replace the original with the next original, and then press the [START] key ( )
Repeat step 5 until all originals have been scanned into memory.

To clear the data in memory, press the [CLEAR] key ☐. When the [CLEAR] key () is pressed, the number of copies setting is also cleared.
6 When all originals have been scanned, press the [ ]key.
The copies are delivered to the paper output tray.

- To cancel the sort copy job, press the [CLEAR] key ( )C
- To cancel sort copy mode, press the [CLEAR ALL] key (CA)
Using the RSPF
1 Place the originals. (p.25)

- If "SORT AUTO SELECT" is enabled in the user programs, the default output mode for copying from the RSPF is sort mode (p.65). In this case go directly to step 4. A checkmark "will automatically appear in the display (p.11).
- If "SORT AUTO SELECT" is disabled, the default output mode will be non-sort mode. Follow the steps below to select sort mode.
2 Press the [E-SORT/SP.FUN] key until "SORT" appears and then press the [ENTER] key.
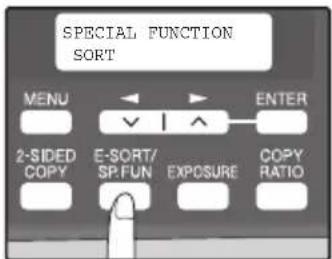
3 Press the [] key () to move " " to √ the "ON" position and then the [ENTER] key.
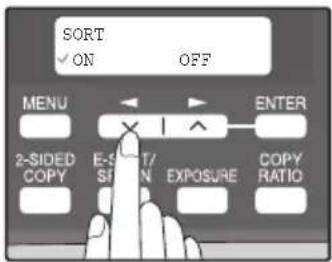
4 Select the number of copies and any other settings, and then press the [START] key ( )
The copies are delivered to the paper output tray.
![SHARP FO-2080 - Select the number of copies and any other settings, and then press the [START] key ( ) - 1](/content/2026/05/1000796/images/ed8acc9485165745360f47ebdd3d07a4bd8d0e317cf297f5b0e1dd2e00591cf9.jpg)
- To cancel the sort copy job, press the [CLEAR] key ( )c
- To cancel sort copy mode, press the [CLEAR ALL] key (CA)
If the memory becomes full
- If the memory becomes full while scanning the originals, "MEMORY FULL, PRESS START TO RESUME" will appear in the display, and the machine will stop copying.
- To copy the originals that have been scanned up to that point, press the [START] key ( )
- To clear the data that has been scanned into memory, press the [CLEAR ALL] key (☐) or the [CLEAR] key (). ☐
Offset function during sort copy
The offset function shifts the position of each set of copies in the paper output tray for easy separation.
The offset function can be changed with "OFFSET FUNCTION" in the user programs. (p.63)

flowchart
graph LR
    A["1"] --> B["2"]
    B --> C["3"]
Offset function

flowchart
graph LR
    A["1"] --> B["2"]
    B --> C["3"]
When offset function is disabled
COPYING MULTIPLE ORIGINALS ONTO A SINGLE SHEET OF PAPER (2 IN 1 copy)
Multiple originals can be copied onto a single sheet of paper in a selected layout pattern.
This function is convenient for compiling multi-page reference materials into a compact format, or for providing an overview of all pages of a document on a single page.
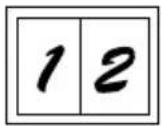
Pattern 1

Pattern 2

- An appropriate ratio setting will be automatically selected based on the size of the originals, the size of the paper. When using the document glass, reduction is possible to 25% . When using the RSPF, reduction is possible to 50% . Certain combinations of original size and paper size may result in images being cut off.
- 2 IN 1 copying cannot be used in combination with the margin shift copying.
- The 2 IN 1 layout pattern can be changed with "LAYOUT IN 2IN1" in the user programs (p.63).
- The bypass tray cannot be used for 2 IN 1 copying.
Using the document glass
1 Place the first original. (p.24)
2 Press the [E-SORT/SP.FUN] key until "2IN1" appears and then press the [ENTER] key.

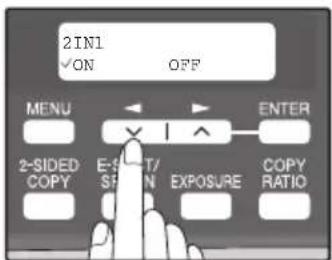
3 Press the [ ] key ( ) to move " " to √ the "ON" position and then press the [ENTER] key.
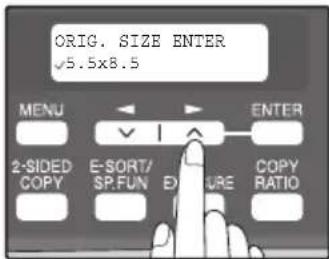
4 Press the [ ] key ( ) or [ ] key ( ) to select the original size and then press the [ENTER] key.
The following original sizes can be selected: "8.5x14", "8.5x13", "8.5x11", "5.5x8.5", "A4", "B5", "A5"
5 Select the number of copies and any other settings, and then press the [START] key ( )
"[START] : NEXT SCAN [#] : START PRINT" appears and the original is scanned into memory. To immediately print the scanned image, press the [ ]key.
6 Replace the original with the next original, and then press the [START] key (💡)
Repeat step 6 until all originals have been scanned. Copies will be output each time two originals have been scanned. When the number of original pages is odd and "[START] : NEXT SCAN [#] : START PRINT" appears, press the [ ] key after all pages have been scanned.
![SHARP FO-2080 - Replace the original with the next original, and then press the [START] key (💡) - 1](/content/2026/05/1000796/images/40d2660a99d6296d6236378719b2b33a4341dd4e8ddf2d4946913367e931e054.jpg)
- To clear the data in memory, press the [CLEAR] key (☐) When the [CLEAR] key (☐) is pressed, the number of copies setting is also cleared.
- To cancel 2 IN 1 copying, press the [CLEAR] key ( )
- To cancel 2 IN 1 copy mode, press the [CLEAR ALL] key ( ).A
Using the RSPF
1 Place the originals. (p.25)
2 Press the [E-SORT/SP.FUN] key until "2IN1" appears and then press the [ENTER] key.

3 Press the [] key () to move " " to √ the "ON" position and then press the [ENTER] key.

4 Press the [] key () or [] key() to select the original size and then press the [ENTER] key.
The following original sizes can be selected: "8.5x14", "8.5x13", "8.5x11", "5.5x8.5", "A4", "B5", "A5"

5 Select the number of copies and any other settings, and press the [START] key ( )
The copy is delivered to the paper output tray.

- To cancel 2 IN 1 copying, press the [CLEAR] key ( ).C
- To cancel 2 IN 1 copy mode, press the [CLEAR ALL] key (CA)
CREATING MARGINS WHEN COPYING
(Margin shift)
The margin shift function is used to automatically shift the text or image or the copy paper approximately 1/2".
As shown below, LONG EDGE or SHORT EDGE can be selected.
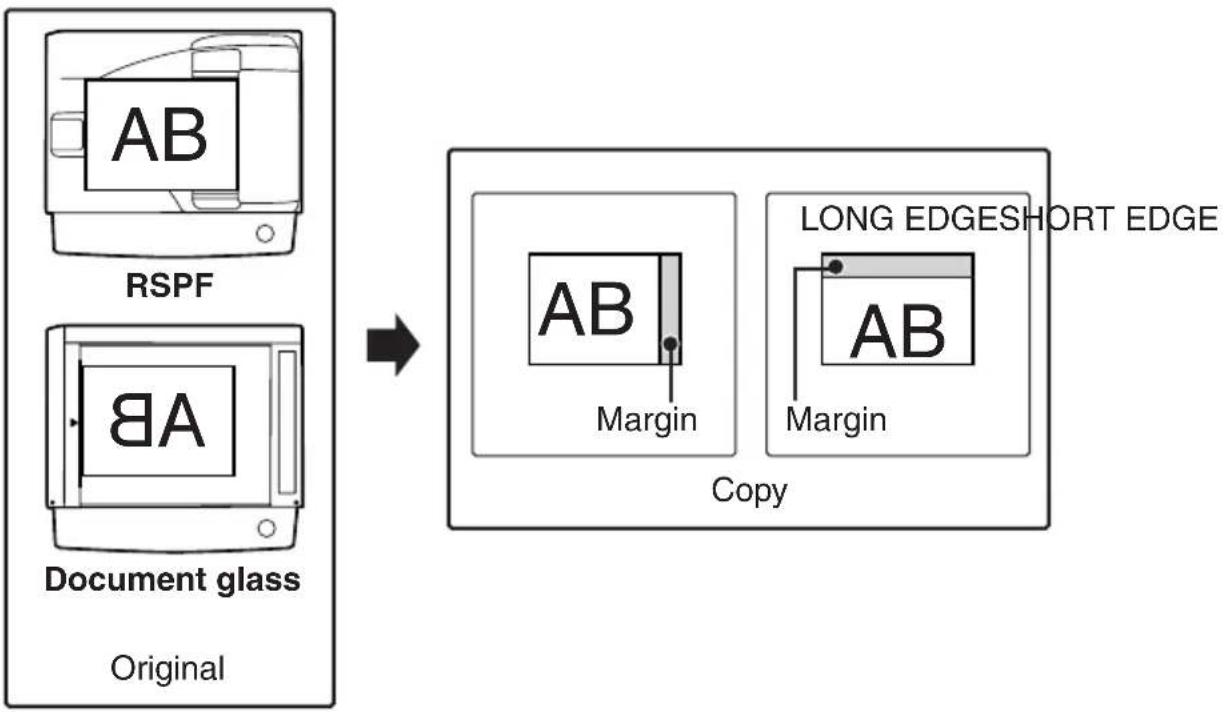
flowchart
graph LR
    A["Original Document glass"] --> B["RSPF"]
    A --> C["Copy"]
    B --> D["Document glass"]
    C --> E["Document glass"]
    D --> F["AB Margin"]
    E --> G["AB Margin"]
    style A fill:#f9f,stroke:#333
    style B fill:#ccf,stroke:#333
    style C fill:#cfc,stroke:#333
    style D fill:#fcc,stroke:#333
    style E fill:#cff,stroke:#333

- This feature cannot be used with the 2 IN 1 feature.
- The margin width can be changed with "MARGIN WIDTH" in the user programs. (p.64)
- Note that a margin is created by shifting the image, and thus if the image is shifted too far, the edge of the image may be cut off.
1 Place the original(s).
2 Press the [E-SORT/SP.FUN] key until "MARGIN SHIFT" appears and then press the [ENTER] key.

3 Press the [] key () to move " " to √ the "ON" position and then press the [ENTER] key.

4 Press the [ ] key ( ) or [ ] key ( ) to select the margin position and then press the [ENTER] key.
Select "LONG EDGE" or "SHORT EDGE". For the margin position, see the previous page.
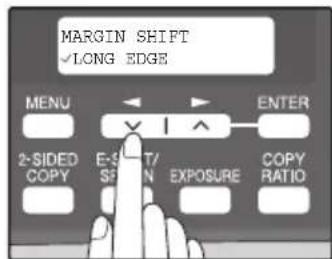
5 Select the number of copies and any other settings, and then press the [START] key ( )
The copy is delivered to the paper output tray.

- To cancel margin shift copying, press the [CLEAR] key ( ).C
- To cancel margin shift mode, press the [CLEAR ALL] key (CA)
This chapter explains how to install and configure the software that is required for the printer and scanner functions of the machine. The procedure for viewing the Online Manual is also explained.

- The explanations of screens and procedures in this manual are primarily for Windows Vista.
- This manual refers to the CD-ROM that accompanied the machine simply as "CD-ROM".
SOFTWARE
The CD-ROM that accompanies the machine contains the following software:
MFP driver
Printer driver
The printer driver enables you to use the printer function of the machine.
The printer driver includes the Print Status Window. This is a utility that monitors the machine and informs you of the printing status, the name of the document currently being printed, and error messages.
Please note that the Print Status Window does not operate when the machine is used as a network printer.
Scanner driver\*
The scanner driver allows you to use the scanning function of the machine with TWAIN-compliant and WIA-compliant applications.
Sharpdesk\*
Sharpdesk is an integrated software environment that makes it easy to manage documents and image files, and launch applications.
Button Manager\*
Button Manager allows you to use the scanner menus on the machine to scan a document.
BEFORE INSTALLATION
Hardware and software requirements
Check the following hardware and software requirements in order to install the software.
| Computer type IBM PC | /AT or compatible computer equipped with a USB2.0*1/1.1*2 or 10Base-T LAN interface |
| Operating system*3 *4 | Windows 2000 Professional*5, Windows XP*5, Windows Vista*5 |
| Display 1024 x 768 dots | s resolution and 16-bit color or higher is recommended. |
| Hard disk free space 1 | 50 MB or more |
| Other hardware requirements | An environment on which any of the operating systems listed above can fully operate |
*1 The machine's USB connector will transfer data at the speed specified by the USB 2.0 (Hi-Speed) only if the Microsoft USB 2.0 driver is installed in the computer.
*2 Compatible with Windows 2000 Professional, Windows XP or Windows Vista preinstalled model standardly equipped with a USB port.
*3 Printing is not available in MS-DOS mode.
*4 The machine does not support printing from a Macintosh environment.
*5 Administrator's rights are required to install the software using the installer.
Installation environment and usable software
The following table shows the drivers and software that can be installed for each version of Windows and interface connection method.
| Cable | Operating system | Printer driver | Scanner driver | Button Manager | Sharpdesk |
| USB | Windows 2000/XP/Vista | Available* | Available | ||
| LAN | Windows 2000/XP/Vista | Not Available | |||
* The printer driver that is installed will vary depending on the type of connection between the machine and your computer.
INSTALLING THE SOFTWARE

- If you need to use a different connection method after installing the software using a USB or network connection, you must first uninstall the software and then install it using the new connection method.
- The screen images in this manual are mainly for Windows XP. With other versions of Windows, some screen images may be different from those in this manual.
- In the following explanations it is assumed that the mouse is configured for right hand operation.
- The scanner function only works when using a USB cable.
- If an error message appears, follow the instructions on the screen to solve the problem. After the problem is solved, the installation procedure will continue. Depending on the problem, you may have to click the "Cancel" button to exit the installer. In this case, reinstall the software from the beginning after solving the problem.
Using the machine with a USB connection
1 The USB cable must not be connected to the machine. Make sure that the cable is not connected before proceeding.
If the cable is connected, a Plug and Play window will appear. If this happens, click the "Cancel" button to close the window and disconnect the cable.

The cable will be connected in step 13.
2 Insert the CD-ROM into your computer's CD-ROM drive.
3 Click the "Start" button (), click "Computer", and then double-click the CD-ROM icon ().
- In Windows XP, click the "start" button, click "My Computer", and then double-click the CD-ROM icon.
- In Windows 2000, double-click "My Computer", and then double-click the CD-ROM icon.
4 Double-click the "setup" icon ( )
In Windows Vista, if a message screen appears asking you for confirmation, click "Allow".
5 The "SOFTWARE LICENSE" window will appear. Make sure that you understand the contents of the software license, and then click the "Yes" button.

You can show the "SOFTWARE LICENSE" in a different language by selecting the desired language from the language menu. To install the software in the selected language, continue the installation with that language selected.
6 Read the "Readme First" in the "Welcome" window and then click the "Next" button.
7 To install all of the software, click the "Standard" button and go to step 12. To install particular packages, click the "Custom" button and go to next step.

8 Click the "MFP Driver" button.
Click the "Display Readme" button to show information on packages that are selected.
![Setup Type Selection Select a software to be installed. [Software] [Display Readine] MFP Driver(Printer/Scanner) The Scanner feature only works when using a USB Interface Cable. Utility Software... [Button Manager] / [Shapdesk] < Back Next > Close](/content/2026/05/1000796/images/097421de0f6afbca6520ac94f807f71ae75ce8d0bd15e27eb01925feae6b4271.jpg)
9 The files required for installation of the MFP driver are copied.
Follow the on-screen instructions.
When "The installation of the SHARP software is complete." appears, click the "OK" button.

- If you are using Windows Vista and a security warning window appears, be sure to click "Install this driver software anyway".
- If you are running Windows 2000/XP and a warning message appears regarding the Windows logo test or digital signature, be sure to click "Continue Anyway" or "Yes".
10 You will return to the window of step 8. If you wish to install Button Manager or Sharpdesk, click the "Utility Software" button.
If you do not wish to install the Utility Software, click the "Close" button and go to step 12.

After the installation, a message prompting you to restart your computer may appear. In this case, click the "Yes" button to restart your computer.
Installing the Utility Software
11 Click the "Button Manager" or the "Sharpdesk" button.
Click the "Display Readme" button to show information on packages that are selected.
Follow the on-screen instructions.
![Setup Type Selection Select a software to be installed. [Software] [Display Readine] Button Manager Button Manager allows you to use the scanner keys on the machine to scan a document. Sharpdesk Sharpdesk is an integrated software environment that makes it easy to manage documents and image files, and launch applications.](/content/2026/05/1000796/images/b6adceec05b4d2335f82b6dae9bc810f290ed66db8d2c073074e59ad0db60dde.jpg)

In Windows 2000, if the following screen appears, click the "Skip" button or the "Continue" button as appropriate to continue the Sharpdesk installation.
If "Skip" is selected, the Sharpdesk installation will continue without installing Sharpdesk Imaging. If "Continue" is selected, Sharpdesk Imaging will be installed. If Imaging for Windows is installed on your computer, Sharpdesk Imaging will overwrite Imaging for Windows.

12 When installing is finished, click the "Close" button.

- If you are using Windows Vista and a security warning window appears, be sure to click "Install this driver software anyway".
- If you are running Windows 2000/XP and a warning message appears regarding the Windows logo test or digital signature, be sure to click "Continue Anyway" or "Yes".
A message will appear instructing you to connect the machine to your computer. Click the "OK" button.

After the installation, a message prompting you to restart your computer may appear. In this case, click the "Yes" button to restart your computer.
13 Make sure that the power of the machine is turned on, and then connect the USB cable (p.46).
Windows will detect the machine and a Plug and Play screen will appear.
14 Follow the instructions in the plug and play window to install the driver.
Follow the on-screen instructions.

- If you are using Windows Vista and a security warning window appears, be sure to click "Install this driver software anyway".
- If you are running Windows 2000/XP and a warning message appears regarding the Windows logo test or digital signature, be sure to click "Continue Anyway" or "Yes".
This completes the installation of the software.
- If you installed Button Manager, set up Button Manager as explained in "SETTING UP BUTTON MANAGER" (p.53).
- If you installed Sharpdesk, the Sharpdesk setup screen will appear. Follow the instructions in the screen to set up Sharpdesk.
Connecting a USB cable
Follow the procedure below to connect the machine to your computer.
A USB cable for connecting the machine to your computer is not included with the machine. Please purchase the appropriate cable for your computer.

- USB is available with a PC/AT compatible computer that was originally equipped with USB and had Windows 2000 Professional, Windows XP or Windows Vista preinstalled.
- Do not connect the USB cable before installing the printer driver. The USB cable should be connected during installation of the printer driver.

- If the machine will be connected using a USB 2.0 port of your computer, please purchase a USB cable that supports USB 2.0.
- To obtain the fastest USB 2.0 data transfer speed, "USB2.0 MODE SWITCH" in the machine's user programs must be set to "HI-SPEED". For more information, see "USER PROGRAMS" (p.66).
- Use the machine's "HI-SPEED" mode only when using a computer that is running Windows 2000/XP/Vista.
- Even when the Microsoft USB 2.0 driver is used, it may not be possible to obtain full USB 2.0 speed if a PC card supporting USB 2.0 is used. To obtain the latest driver (which may enable a higher speed), contact the manufacturer of your PC card.
- Connection is also possible using a USB 1.1 port on your computer. However, the specifications will be USB 1.1 specifications (Full-Speed).
1 Insert the cable into the USB connector on the machine.

natural_image
Diagram showing a device with an internal component and a magnified inset view of its ports (no text or symbols present)2 Insert the other end of the cable into your computer's USB port.
Using the machine as a network printer

- Interface cables for connecting the machine to your computer are not included with the machine. Please purchase the appropriate cable for your computer.
- If you intend to use the machine as a scanner, it must be connected to your computer with a USB interface cable. The scanner function cannot be used if the machine is connected with a LAN cable.
1 Insert the LAN cable into the LAN connector on the machine.
Use a network cable that is shielded.

natural_image
Technical line drawing of a mechanical assembly with a circular component and tool (no text or symbols)2 Turn on the machine.
3 Insert the CD-ROM into your computer's CD-ROM drive.
4 Click the "Start" button (), click "Computer", and then double-click the CD-ROM icon ().
- In Windows XP, click the "start" button, click "My Computer", and then double-click the CD-ROM icon.
- In Windows 2000, double-click "My Computer", and then double-click the CD-ROM icon.
5 Double-click the "setup" icon ( )
In Windows Vista, if a message screen appears asking you for confirmation, click "Allow".
6 The "SOFTWARE LICENSE" window will appear. Make sure that you understand the contents of the software license, and then click the "Yes" button.

You can show the "SOFTWARE LICENSE" in a different language by selecting the desired language from the language menu. To install the software in the selected language, continue the installation with that language selected.
7 Read the "Readme First" in the "Welcome" window and then click the "Next" button.

To set the IP address of the machine, follow the steps below. If the machine is already connected to the network and its IP address has been set, go to "LPR (TCP/IP) direct printing" (p.49).
Set the IP Address
This setting is only required once when using the machine on a network.
8 Click the "Set the IP Address" button.

9 The printer or printers connected to the network will be detected. Click the printer to be configured (the machine) and click the "Next" button.


- The "Ethernet Address" is indicated on the left side of the machine near the LAN connector.
- If the machine can not be recognized, enter the Ethernet Address and click the "Initialize" button to initialize the IP address. Follow the on-screen instructions to click the "OK" button and then the "Search" button. If the machine is still not recognized, disable your computer's firewall and then repeat the installation from the beginning.
10 Enter the IP address, subnet mask, and default gateway.
The settings in the above window are examples.
Be sure to ask your network administrator for the correct IP address, subnet mask, and default gateway to be entered.
![Set a network configuration to the printer. ○ Get IP Address Automatically ● Assign IP Address IP Address 192 . 168 . 1 . 43 Subnet Mask 255 . 255 . 255 . 0 Gateway Address 192 . 198 . 1 . 1 MEMO If you select [Get IP Address Automatically], the DHCP server assigns an IP address to this printer. If a DHCP server is not available, please manually assign an IP address. < Back Next > Cancel](/content/2026/05/1000796/images/93ae06f14f554811f30399698253799d9aac07e258d2d01ebd8211186947f256.jpg)

When "Get IP Address Automatically" is selected, the IP address may at times change automatically. This will prevent printing. In this event, select "Assign IP Address" and enter the IP address.
11 Click the "Next" button.
12 Click the "Yes" button in the confirmation dialog box that appears.
Go to step 11.
LPR (TCP/IP) direct printing
After step 1-7 on page 47
8 Click the "Printer Driver" button.
If you have not set the IP Address, click the "Set the IP Address" button first and go to step 8 on page 48.

9 Read the message in the "Welcome" window and then click the "Next" button.
10 Select "LPR Direct Print" and click the "Next" button.

11 The printer or printers connected to the network will be detected. Click the printer to be configured (the machine) and click the "Next" button.
![Please select the printer for which you want to add a port. If the printer is on the different network, please click [Configuration] and register the proper broadcast address. Then click [Search]. IP Address or Printer Name: 192.168.1.43 IP Address Ethermel Address Model Name 192.168.1.43 88.00 1F:82.3E.98 PS-xxx Configuration... Search * Back Next > Cancel](/content/2026/05/1000796/images/f93ad443e9b7f9a9443610073f1ad491aa968d49192c3a9ebc7741ca52b0c5e8.jpg)

If the machine's IP address cannot be found, make sure the machine is powered on, make sure the network cable is connected correctly, and then click the "Search" button.
12 In the window for setting the destination print port name, make sure that ":lp" appears at the end of the IP address and click the "Next" button.


Any name can be entered in "Printer Port Name" (maximum of 38 characters).
13 A window appears to let you check your entries. Make sure that the entries are correct and then click the "Finish" button.
If any of the entries are incorrect, click the "Back" button to return to the appropriate window and correct the entry.

14 Select the port you want to use with the machine, and click the "Next" button.
15 Select whether or not you wish the printer to be your default printer and click the "Next" button.
Follow the on-screen instructions.

- If you are using Windows Vista and a security warning window appears, be sure to click "Install this driver software anyway".
- If you are running Windows 2000/XP and a warning message appears regarding the Windows logo test or digital signature, be sure to click "Continue Anyway" or "Yes".
16 When "The installation of the SHARP software is complete." appears, click the "OK" button.
17 When the "Finish" screen appears, click the "Close" button.

After the installation, a message prompting you to restart your computer may appear. In this case, click the "Yes" button to restart your computer.
This completes the installation of the software.
Sharing the printer using windows networking
If the machine will be used as a shared printer on a network, follow these steps to install the printer driver in the client computer.

To configure the appropriate settings in the print server, see the operation manual or help file of your operating system.
1 Perform steps 3 through 7 in "Using the machine as a network printer" (p.47).
2 Click the "Printer Driver" button.

3 Select "Shared Printer" and click the "Next" button.

4 For the port to be used, select the machine set as a shared printer, and click the "Next" button.
If you are using Windows 2000/XP, you can also click the "Add Network Port" button and select the printer to be shared by browsing the network in the window that appears. (In Windows Vista, the "Add Network Port" button does not appear.)


If the shared printer does not appear in the list, check the settings in the printer server.
5 Follow the on-screen instructions.
6 When the "Finish" screen appears, click the "Close" button.

After the installation, a message prompting you to restart your computer may appear. In this case, click the "Yes" button to restart your computer.
This completes the installation of the software.
SETTING UP BUTTON MANAGER
Button Manager is a software program that works with the scanner driver to enable scanning from the machine.
To scan using the machine, Button Manager must be linked with the scan menu on the machine. Follow the steps below to link Button Manager to scanner events.
Windows XP/Vista
1 Click the "Start" button, click "Control Panel", click "Hardware and Sound", and then click "Scanners and Cameras".
In Windows XP, click the "start" button, select "Control Panel" and click "Printers and Other Hardware", and then click "Scanners and Cameras".
2 Click the "SHARP FO-xxxx" icon and select "Properties" from the "Organize" menu.
In Windows XP, select "Properties" from the "File" menu.
3 In the "Properties" screen, click the "Events" tab.
4 Select "SC1:" from the "Select an event" pull-down menu.

5 Select "Start this program" and then select "Sharp Button Manager X" from the pull-down menu.
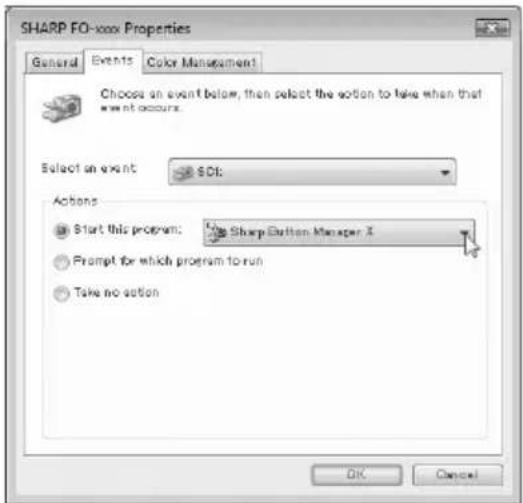
6 Click the "Apply" button.
7 Repeat Steps 4 through 6 to link Button Manager to "SC2:" through "SC6:".
Select "SC2:" from the "Select an event" pull-down menu. Select "Start this program", select "Sharp Button Manager X" from the pull-down menu, and then click the "Apply" button. Do the same for each ScanMenu through "SC6:".
When the settings have been completed, click the "OK" button to close the screen.
Button Manager is now linked to the scan menu (1 through 6).
The scan settings for each of scan menu 1 through 6 can be changed with the setting window of Button Manager.
For the factory default settings of the scan menu and the procedures for configuring Button Manager settings, see "Button Manager Settings" in the Online Manual.
Windows 2000
1 Click the "Start" button, select "Settings", and then click "Control Panel".
2 Double-click the "Scanners and Cameras" icon.
3 Select "SHARP FO-xxxx" and click the "Properties" button.
4 In the "Properties" screen, click the "Events" tab.
5 Select "SC1:" from the "Scanner events" pull-down menu.
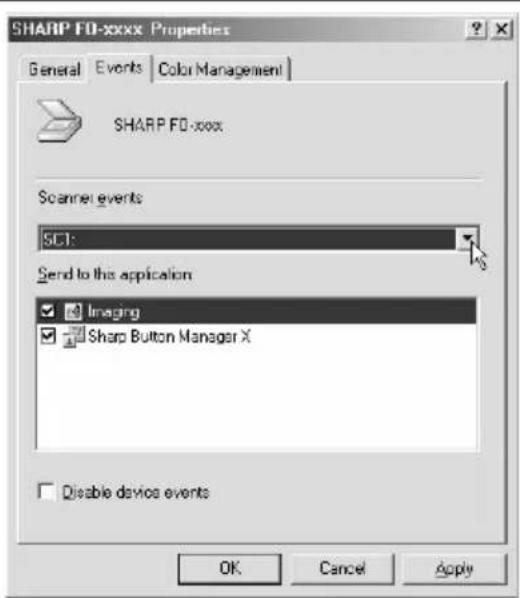
6 Select "Sharp Button Manager X" in "Send to this application".
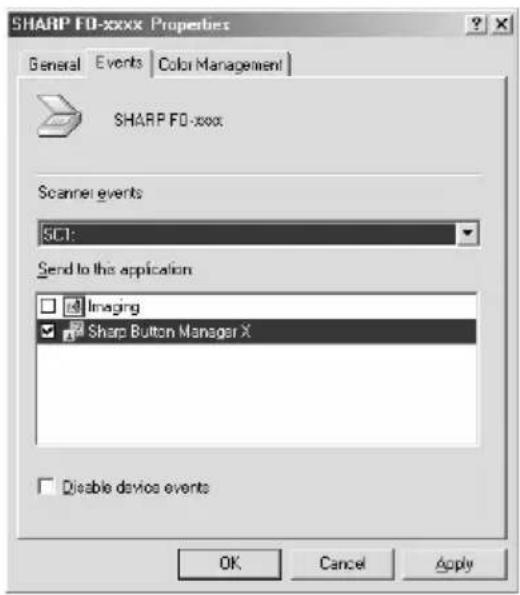

If other applications are shown, deselect the checkboxes for the other applications and leave only the Button Manager checkbox selected.
7 Click the "Apply" button.
8 Repeat Steps 5 through 7 to link Button Manager to "SC2:" through "SC6:".
Select "SC2:" from the "Scanner events" pull-down menu. Select "Sharp Button Manager X" in "Send to this application" and click the "Apply" button. Do the same for each ScanMenu through "SC6:". When the settings have been completed, click the "OK" button to close the screen.
Button Manager is now linked to the scan menu (1 through 6). The scan settings for each of scan menus 1 through 6 can be changed with the setting window of Button Manager. For the factory default settings of the scan menu and the procedures for configuring Button Manager settings, see "Button Manager Settings" in the Online Manual.
The machine includes a USB connector and a LAN connector as standard equipment.
When the USB connector is used, the printer and scanner functions can be used. When the LAN connector is used, the printer function can be used.
The machine has the following features:
• High-speed data transfer (when connected to a USB 2.0 connector)
- ROPM* function
* ROPM is an acronym for "Rip Once Print Many" processing. The ROPM function stores multiple pages of print data in memory before printing. When printing multiple copies, this eliminates the need for the computer to repeatedly transmit the print data.
To use the machine as a printer or scanner, the printer driver or scanner driver must first be installed as explained in the "INSTALLING THE SOFTWARE".

- If a problem occurs in printer or scanner mode, see the Online Manual.
- When using USB 2.0 (Hi-Speed mode), be sure to read "System requirements for USB 2.0 (Hi-Speed mode)" (below) to verify that your system and the machine settings are configured appropriately.
System requirements for USB 2.0 (Hi-Speed mode)
The following system is required to use USB 2.0 (Hi-Speed mode):
- Your computer must be running Windows 2000 Professional/XP/Vista and the Microsoft USB 2.0 driver must be installed.
- The "USB 2.0 MODE SWITCH" setting in the machine's user programs must be set to "HI-SPEED". To change the setting, see "USB 2.0 MODE SWITCH" in the user programs (p.66).
* Even when the Microsoft USB 2.0 driver is installed, some USB 2.0 expansion cards are not capable of attaining the speed stipulated by the Hi-Speed standard. This problem can often be fixed by installing a more recent driver for the card. To obtain the most recent driver for your card, contact the card's manufacturer.
USING THE PRINTER MODE
The procedure for loading paper for printing is the same as for loading copy paper. See "LOADING PAPER" (p.18).

- Print jobs received while the machine is copying will be stored in memory. When the copy job is finished, the print jobs will begin printing.
- Printing is not possible when the front or side cover is opened for machine maintenance, or when a misfeed occurs or the machine runs out of paper or toner, or when the drum cartridge reaches its replacement time.
BASIC PROCEDURE FOR PRINTING
The basic procedure for printing is explained in the following. To use convenient printer functions, see the "Online Manual" or the printer driver help file.
1 Make sure that paper is loaded in the tray.
The procedure for loading paper is the same as for copying. See "LOADING PAPER" (p.18) and make sure that the paper you wish to use is loaded.

Make sure that the paper size setting on the machine is the same as the paper size set in the printer driver.
2 Open the file that you wish to print and select "Print" from the File menu.
3 Make sure that the printer driver for the machine is selected, and select print settings in the printer driver.
For information on the settings in the printer driver, see the "Online Manual" or the printer driver help file.
4 Click the "Print" button or the "OK" button to begin printing.
The print job will be delivered to the paper output tray.
Canceling a print job
1 Select printer mode with the [MODE SELECT] key on the operation panel of the machine, and then press the [CLEAR] key ( ) or the [CLEAR ALL] key ( ). CA
2 "CANCEL PRINT JOB?" will appear in the display. Make sure that a checkmark appears in front of "YES" and press the [ENTER] key.
![SHARP FO-2080 - "CANCEL PRINT JOB?" will appear in the display. Make sure that a checkmark appears in front of "YES" and press the [ENTER] key. - 1](/content/2026/05/1000796/images/f3dc317aceb8981fcc1e9d21f59cada8db6fa83887cf91cb91d6c67c45ee6b12.jpg)
For limitations on copying in print mode, scanner mode limitations, and print mode limitations in copy and scanner mode, see "OPERATION IN COPY, PRINTER, AND SCANNER MODES" (p.60).
USING THE SCANNER MODE
The procedure for placing the original is the same as for copying. See "NORMAL COPYING" (p.24).

Scanner mode cannot be used at the following times:
- A misfeed has occurred (paper misfeed or original misfeed in the RSPF).
- The user programs are being used.
• The tray paper size is being set. - The machine is being used in copy mode.
- The front cover or side cover is open.
SCANNING USING THE KEYS ON THE MACHINE
When scanning is performed by this method, the application that has been set in Button Manager will automatically start and the scanned image will be pasted into the application.

If the machine is in copy mode, press the [MODE SELECT] key to switch to scanner mode and clear the previously set copy settings.
Scanning from the operation panel of the machine
1 Press the [MODE SELECT] key to select scanner mode.
The "SCAN" indicator lights up to indicate that scanner mode is selected.
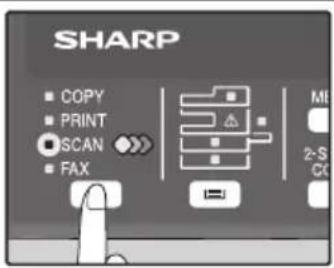
2 Place the original. (p.24)
3 Press the []key() or []key() to select the desired Button Manager scan menu setting.
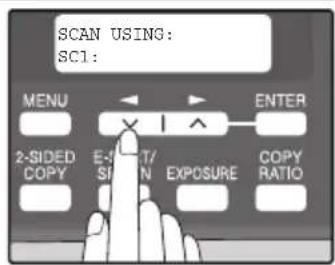
4 Press the [START] key ( ) to begin scanning.
![SHARP FO-2080 - Press the [START] key ( ) to begin scanning. - 1](/content/2026/05/1000796/images/4b77ed8f968fd272a63239f2689af1aff90b1ad42c8606f2ff3de9faa305d9df.jpg)
Scanner mode remains selected after scanning is finished. (To change to a different mode, use the [MODE SELECT] key.)
Button Manager scan menu
For information on Button Manager settings, see the Button Manager help file. The names in the Button Manager menu ("xxxx" in "SC1:xxxx", etc.) can be changed. See the online manual.
SCANNING FROM YOUR COMPUTER
The machine supports the TWAIN standard, making it possible to scan from TWAIN-compliant applications. The machine also supports WIA (Windows Image Acquisition), making it possible to scan from the "Scanner and Camera Wizard" in Windows XP. See the Online Manual for the procedures for TWAIN and WIA scanning. For information on TWAIN and WIA settings, see the help file for the scanner driver or Windows Help.
OPERATION IN COPY, PRINTER, AND SCANNER MODES
Some operations cannot be performed simultaneously when the machine is being used in printer mode, copy mode, or scanner mode.
| Modes Copying Printing | Scanning from a computer | Scanning from the machine | |||
| Copy | Copy key input | Yes | Yes | Yes | No |
| During copying No No No | |||||
| Printer | During printing | Yes^*1 | Yes^*3 | Yes^*3 | |
| Scanner | During scan preview/ during scanning | No Yes* | 2 | ||
*1 During two-sided printing, the copy job begins after the print job finishes.
*2 Printing is possible while scanning is taking place. Printing begins after scanning ends when connected by the LAN connector.
*3 Scanning begins after printing ends when connected by the LAN connector and two-sided printing is taking place.

For operations that cannot be performed simultaneously in fax mode, see the Operation Manual (for facsimile).
HOW TO USE THE ONLINE MANUAL
The online manual provides detailed instructions for operating the unit as a printer and scanner. It also provides methods for dealing with printing or scanner problems.
1 Turn on your computer.
2 Insert the supplied CD-ROM into your CD-ROM drive.
3 Click the "Start" button ( ), click "Computer", and then double-click the CD-ROM icon ( ).
- In Windows XP, click the "start" button, click "My Computer", and then double-click the CD-ROM icon.
- In Windows 2000, double-click "My Computer" and then double-click the CD-ROM icon.
4 Double-click the "Manual" folder, double-click the "EnglishA" folder, and then double-click the "FO_2080.pdf" icon.
5 Click to read the online manual.
To close the online manual, click the ( ) button located at the top-right of the window.

- The online manual can be printed out using Acrobat Reader. It is useful to print out sections that you refer to frequently.
- Refer to Acrobat Reader "Help" for more details on the operation and functions of Acrobat Reader.
Viewing the online manual
The "CD-ROM" that accompanies the machine contains an online manual in PDF format. To view the manual in PDF format, Acrobat Reader or Adobe Reader of Adobe Systems Incorporated is required. If neither program is installed on your computer, the programs can be downloaded from the following URL:
http://www.adobe.com/
The user settings allow you to customize machine settings to better meet your needs.
USER PROGRAMS
The user settings consist of the following items.
To change a user program setting, see "SELECTING A SETTING FOR A USER PROGRAM" (p.67).
Copy mode
| Program number | Program name | Setting codes (factory default setting appears in bold) | Explanation |
| 1 AUTO CLEAR | 1: 10 SEC.2: 30 SEC.3: 60 SEC.4: 90 SEC.5: 120 SEC.6: OFF | • Auto clear time automatically returns the copy settings to the initial settings (p.16) if no keys are pressed for a preset period of time following the end of a copy job.• This program is used to select the period of time. Auto clear time can also be disabled. | |
| 2 PREHEAT MODE | 1: 30 SEC.2: 1 MIN.3: 5 MIN.4: 30 MIN.5: 60 MIN.6: 120 MIN.7: 240 MIN. | • This function automatically switches the machine to a low power consumption state if the set duration of time elapses without the machine being used when the power is on. The power save indicator lights up, however, the keys on the operation panel can be used. Normal operation automatically resumes when a key on the operation panel is pressed, an original is placed, a print job is received. | |
| 3 | A U T | 1: ON2: OFF S H | • Use this setting to enable or disable auto power shut-off mode. |
F F
| Program number | Program name | Setting codes (factory default setting appears in bold) | Explanation |
| 4 | AUTO SHUT-OFF TIME | 1: 5 MIN.2: 30 MIN.3: 60 MIN.4: 120 MIN.5: 240 MIN. | This function automatically switches the machine to a state that consumes even less power than preheat mode if the set duration of time elapses without the machine being used when the power is on. All lights except the power save indicator go off. To resume normal operation, press the [START] key ( ) Normal operation also resumes automatically when a print job is received or scanning is begun from a computer. While in auto power shut-off mode, no keys (except the [START] key ( ) can be used. |
| 7 | L A Y | 1: PATTERN 12: PATTERN 2 T | Use this setting to select the layout pattern when two original pages are copied onto a single sheet of paper (see page 35 for the layout patterns). |
| 8 | OFFSET FUNCTION | 1: ON2: OFF | When enabled, this function offsets the position of each set of copies in the output tray in copy mode, and each print job in printer mode. |
| 9 | ROTATE ORIG. IMAGE | 1: ON2: OFF | When two-sided copying is performed, this function rotates the image on the back of the original. This is convenient when binding the copies at the top (tablet binding). |
| 10 | AE/TEXT RESOLUTION | 1: 300dpi2: 600dpi | This setting is used to change the copy resolution in AUTO and TEXT mode from 600 x 300 dpi to 600 x 600 dpi (high-quality mode). Scanning is slower when high-quality mode is used. |

| Program number | Program name | Setting codes (factory default setting appears in bold) | Explanation |
| 11 | 2-SIDED COPY MODE | 1: HI-SPEED2: NORMAL | ·If the memory fills up when two-sided copying is performed, "NORMAL" can be selected to make copying possible. However, "NORMAL" results in a slower copying speed. Normally "HI-SPEED" is selected to enable fast two-sided copying. |
| 12 MARGIN WIDTH | 1: 1/4"2: 1/2"3: 3/4"4: 1" | ·Use this setting to set the margin width. | |
| 13 | MEM. FOR PRINTER | 1: 30%2: 40%3: 50%4: 60%5: 70% | ·Use this to change the proportion of machine memory used for printer mode. |
| 14 | AUTO KEY REPEAT | 1: ON2: OFF | ·Use this setting to select whether or not holding down a key causes repeated input of the key. For keys that normally cause a set value to decrease or increase when held down (for example, the []key ()or []key ( ), this program can be used to have the set value not change when the key is held down. |
| 15 KEY PRESS TIME | 1: NORMAL2: 0.5 SEC.3: 1.0 SEC.4: 1.5 SEC.5: 2.0 SEC. | ·Use this setting to select how long a key must be pressed for the input to be accepted. By selecting a longer time, you can prevent settings from being changed by the accidental pressing of a key. | |
| 16 | KEY TOUCH SOUND | 1: LOW2: HIGH3: OFF | ·This sets the volume of beep signals. (p.68) |
| 17 | SOUND AT DEFAULT | 1: ON2: OFF | ·Use this to sound a beep when a base setting is selected. (p.68) |
| 18 | TONER SAVE MODE | 1: ON2: OFF | ·This mode reduces toner usage by about 10% when copying. Toner save mode is effective when the exposure mode is AUTO or TEXT. |
| 19 AE | LEVEL ADJUST | 1: SPF/RSPF (Adjustment to 5 levels is possible.)2: DOCUMENT GLASS (Adjustment to 5 levels is possible.) | This is used to adjust the exposure level.The automatic exposure level can be adjusted separately for the document glass and the RSPF.For the procedure for adjusting the exposure and guidelines for numeric values, see page 28. The factory default setting for the exposure level is center. |
| 20 LANGUAGE | 1: AMERICAN ENGLISH2: ENGLISH3: FRENCH4: SPANISH | This is used to set the language used in the display. | |
| 21 RESET FACTORY | 1: YES2: NO | This is used to return all settings to the factory default settings. | |
| 22 | SORT AUTO SELECT | 1: ON2: OFF | Use this setting to enable or disable sort auto select mode. |
| 24 | CHECK RSPF OPEN | 1: ON2: OFF | You can set the operation that takes place if the [START] key (is pressed when the RSPF is not completely closed. (For details on the "Check RSPF open function", see page 25.) |
| 25 | VALID COPY WIDTH | 1: 8.5x112: 5.5x8.5 | Set the allowed paper sizes for copying from the bypass tray. When "5.5x8.5" is selected, a copy of a letter size original will only be printed up to invoice size. |
| 28 LSU SETTING | 1: ON2: OFF | Select whether copying is only allowed when the polygon motor is rotating, or also when the polygon motor is stopped. | |
| 29 PAPER TYPE | 1: PLAIN PAPER2: HEAVY PAPER | Set the temperature of the fusing unit when the bypass tray is used. | |
| 30 | DISPLAY CONTRAST | 1: LIGHTER2: LIGHT3: NORMAL4: DARK5: DARKER | Set the contrast of the display. |

Print mode
| Program number | Program name | Setting codes (factory default setting appears in bold) | Explanation |
| 1 | FORCED OUTPUT | 1: ON2: OFF | ·When this function is enabled, printing in printer mode will automatically continue using a different size of paper if the specified size of paper runs out in all trays. This feature does not function in copy mode. |
| 2 | USB 2.0 MODE SWITCH* | 1: FULL-SPEED2: HI-SPEED | ·This sets the USB 2.0 data transfer speed. To obtain the fastest speed when using the USB 2.0 connector, first verify that your computer meets the system requirements (operating system and driver), and then use this program to change the USB 2.0 mode to "Hi-Speed". Note that the setting should not be changed while running a TWAIN driver. (For the system requirements, see "System requirements for USB 2.0 (Hi-Speed mode)" (p.57).) |
| 3 | AUTO TRAY SWITCH | 1: ON2: OFF | ·If the paper runs out during printing and there is paper of the same size in another tray, this function automatically switches to that tray (excluding the bypass tray). The function can be disabled. |
* The scanning speed increases when the USB 2.0 mode is set to "HI-SPEED", however, the printing speed does not increase considerably.
SELECTING A SETTING FOR A USER PROGRAM
1 Press the [MENU] key and then press the [ENTER] key.
In printer mode, the user programs are accessed by simply pressing the [MENU] key.

2 Press the [ ] key () or [ ] key() to select the item that you wish to configure in the USER PROGRAM items, and then press the [ENTER] key.
- See "USER PROGRAM" (p.62 to p.66) for the program name and program code.
- You can also select a program by directly entering the program number with the numeric keys.

3 Press the [] key () or [] key() to change the setting of the selected item.
See "USER PROGRAM" (p.62 to p.66) for the program code.
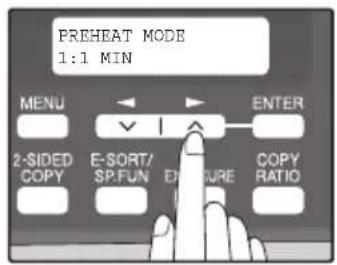
![SHARP FO-2080 - Press the [] key () or [] key() to change the setting of the selected item. - 2](/content/2026/05/1000796/images/ab91b7d86de9cb05970e41023288cea78660db9b4f1827bb30afed453f19b46e.jpg)
- If you mistakenly select the wrong item, press the [CLEAR] key ( ) and repeat the procedure from step 2.
- To cancel a setting for a user program, press the [MENU] key.
4 Press the [ENTER] key.
Your selection appears briefly and then the previous screen appears.
![SHARP FO-2080 - Press the [ENTER] key. - 1](/content/2026/05/1000796/images/c03e5149c0b6afbac693b7e09a76845d528a84b6448913186c2a104d9ca44628.jpg)
When "AE LEVEL ADJUST" is selected in the user programs and the [ENTER] key is pressed, the automatic exposure adjustment screen appears. Adjust the exposure and press the [ENTER] key.
Audible signals (key entry beep, invalid key beep, base setting beep)
The machine sounds three different types of beep signals: a key entry beep that sounds when a valid key is pressed, an invalid key beep that sounds when an invalid key is pressed, and a base setting beep that sounds when a setting is the same as the base setting (base settings are explained below). The base setting beep is initially disabled. If you wish to enable the base setting beep, see "SOUND AT DEFAULT" on page 64. If you wish to change the volume of the beep signals or disable them, see "KEY TOUCH SOUND" on page 64. The beep patterns of each type of beep signal are as follows:
Key entry beep....One beep Invalid key beep.... Two beeps Base setting beep.... Three beeps
Base settings
The base settings are preset standard selections for each copy setting. The base settings are as follows:
Copy ratio.... 100%
Light and Dark level ......Center
Paper feed location ....Tray 1 (Upper paper tray)
AUTO/TEXT/PHOTO ......AUTO
Problems related to general use of the machine, the copy function, and software setup are explained here. Be sure to check the problem carefully before calling for service, as many problems can be solved by the user.
If you are unable to solve the problem, turn off the main switch, unplug the power cord from the outlet, and contact your dealer.

For problems related to the fax, printer and scanner functions, see the corresponding operation manual.
DISPLAY MESSAGES
When the following indicators light up or blink on the operation panel or the following alphanumeric codes appear in the display, solve the problem immediately referring to both the table below and the indicated page.

Be sure to use only genuine SHARP parts and supplies.
| Indication | Cause and remedy Page | |||
| Lamp indicator Display | ||||
| Tray location indicator | Blinks | BYPASS: ADD PAPER | The indicated paper tray is not attached, is attached incorrectly, or has run out of paper. (The tray is indicated in <*>.) | 19 |
| TRAY<*>: ADD PAPER | ||||
| CLOSE PAPER TRAY<*> | ||||
| Error indicator | Blinks | CLEAR PAPER JAM. | A paper misfeed has occurred.Remove the misfeed as explained in "MISFEED REMOVAL". | 78 |
| SPF/RSPF JAM. | ||||
| FRONT OR SIDE COVER OPEN. CLOSE COVERS. | The cover is open. Close the cover. - | |||
| CLOSE THE SPF/ RSPF COVER. | The document feeder cover is open. Close the document feeder cover. | - | ||
| REPLACE THE TD CARTRIDGE. | The TD (Toner/Developer) cartridge is empty. Replace the TD cartridge with a new cartridge. | 82 | ||
| SYSTEM ERROR [XX - XX] REFER TO USER GUIDE | When [L1-00] appears, the scan head locking switch is locked. Turn off the power, release the scan head locking switch, and turn the power back on. | 13 | ||
| The machine will not function. Turn the power switch off, wait about 10 seconds, and then turn on the switch again. If this does not clear the error, remove the power cord from the outlet, and contact your SHARP service center. | - | |||
| Error indicator | Blinks | INSTALL A TD CARTRIDGE. | The TD (Toner/Developer) cartridge is not installed correctly. Reinstall the TD cartridge. | 82 |
| REPLACE THE DRUM CARTRIDGE. | The drum cartridge has reached the end of its life. Replace it with a new drum cartridge. | 84 | ||
| Steadily lit | TD CARTRIDGE IS NEAR EMPTY. | Toner is low. Purchase a new TD (Toner/Developer) cartridge. | 82 | |
| A DRUM CARTRIDGE WILL BE NEEDED SOON. | Less than 1000 sheets can be printed with the current drum cartridge. Purchase a new drum cartridge. | 84 | ||
| MEMORY FULL, PRESS START TO RESUME. | Data is being held in memory. Print the data or clear it from memory. | 34 | ||
| NO 2-SIDED COPY FROM BYPASS TRAY. | Two sided printing or 2 IN 1 copying is selected when the bypass tray is already selected ,or the bypass tray is selected when two-sided printing or 2 IN 1 copying is already selected. The bypass tray cannot be used. Press the [TRAY SELECT] key ( )to select a paper tray. | 3035 | ||
| NO 2IN1 COPY FROM BYPASS TRAY. | ||||
| NO 2IN1 COPY WITH MARGIN SHIFT. | 2 IN 1 copy and margin shift cannot be used in combination. Cancel the function that was selected last. | 3538 | ||
| COPY RATIO CAN NOT BE CHANGED IN 2IN1. | Copy ratio can not be changed in 2 IN 1 copy. | 2935 | ||
| THIS MENU IS NOT SELECTABLE WITH DATA. | This appears if you attempt to change a user program setting while a print job is in progress. | 62 | ||
| NO XXXX SIZE TRAY | There is no paper for printing. Press the [MODE SELECT] key to switch to printer mode and follow the instructions in the display. ("XXXX" indicates paper size) | - | ||
| CHECK SPF/RSPF. START TO RESUME. | An original remains on the document glass, or the original is too thick to scan. Remove the original. | 25 | ||
| If the message is not cleared when there is no original on the document glass, the underside of the RSPF is dirty. Clean the underside of the RSPF. (especially areas where black lines appear.) | 87 | |||
| LOAD XXXX PAPER INTO TRAY<*>. | Printing is not possible if the paper size setting is different from the size of paper loaded in the tray. Load the same size of paper as the paper size setting and then press the [START] key ( )Printing will begin. ("XXXX" indicates paper size. The tray is indicated in <*>.) | 19 | ||
| NO PC COMMUNICATION; CHECK CABLE. | The machine is not correctly connected to the computer. Check the cable (when using the scanner function). | 46 | ||
TROUBLESHOOTING THE MACHINE
The following problems are related to the general operation of the machine and copying.
| Problem Cause and solution Page | ||
| The machine does not operate. | The machine is not plugged into a power outlet.→ Plug the machine into a grounded outlet. | - |
| Power switch OFF.→ Turn the power switch ON. | 16 | |
| The power save indicator is blinking. Indicates that the machine is warming up.→ Copies cannot be made until the machine has finished warming up. | - | |
| The front cover or the side cover is not completely closed.→ Close the front cover or the side cover. | - | |
| The machine is in auto power shut-off mode.→ In auto power shut-off mode, all lights are off except the power save indicator. Press the [START] key ( ) to resume normal operation. | 17 | |
| The scan head locking switch is locked.→ Unlock the scan head locking switch. | 13 | |
| Copies are too dark or too light. | Select the correct original type for the original.→ Select AUTO with the [EXPOSURE] key or press the [ ] key ( ) or [ ] key ▶( ) to manually select an appropriate exposure.→ If the copy is too light or too dark even though AUTO was selected with the [EXPOSURE] key, adjust the automatic exposure level. | 2865 |
| Blank copies. | The original is not placed face up in the RSPF or face down on the document glass.→ Place the original face up in the RSPF or face down on the document glass. | 24, 25 |
| The scan head locking switch is locked.→ Unlock the scan head locking switch. | 13 | |
| Part of the image is cut off or there is too much blank space. | The original was not placed in the correct position.→ Place the original correctly. | 24, 25 |
| An appropriate ratio was not used for the size of the original and the size of the paper.→ Press the [COPY RATIO] key to change the ratio to a setting that is suitable for the original and the copy paper. | 29 | |
| The size of paper loaded in the tray was changed without changing the tray's paper size setting.→ Be sure to change the tray's paper size setting whenever you change the size of paper loaded in the tray. | 23 | |
| Wrinkles appear in the paper or the image disappears in places. | The paper is outside of the specified size and weight range.→ Use copy paper within the specified range. | 18 |
| Paper curled or damp.→ Do not use curled or crimped paper. Replace with dry copy paper. During periods when the machine is not used for a long time, remove the paper from the tray and store it in a dark place in a bag to prevent moisture absorption. | - | |
| Copies are smudged or dirty. | The document glass or the underside of the RSPF is dirty.→ Clean regularly. | 87 |
| Original smudged or blotchy.→ Use a clean original. | - | |
| Images rub off the copy easily. | The fusing temperature is not appropriate.→ In the user programs, set "PAPER TYPE" (program 29) to "2 (HEAVY PAPER)". | 65 |
| Printing is not uniform between the edges of the paper and the center. | The fusing temperature is not appropriate.→ In the user programs, set "PAPER TYPE" (program 29) to "1 (PLAIN PAPER)". | 65 |
| Paper misfeed. | Misfeed occur.→ To remove the misfeed, see "MISFEED REMOVAL". | 78 |
| The paper is outside of the specified size and weight range.→ Use copy paper within the specified range. | 18 | |
| Paper curled or damp.→ Do not use curled or crimped paper.Replace with dry copy paper. During periods when the machine is not used for a long time, remove the paper from the tray and store it in a dark place in a bag to prevent moisture absorption. | - | |
| Paper is not loaded properly.→ Make sure that the paper is properly loaded. | 19 | |
| Pieces of paper inside machine.→ Remove all pieces of misfed paper. | 79 | |
| Too much paper is loaded in the tray.→ If the stack of paper is higher than the indicator line on the tray, remove some of the paper and reload so that the stack does not exceed the line. | 19 | |
| Some sheets of paper stick together.→ Fan the paper well before loading it. | 19 | |
| The guides on the bypass tray do not match the width of the paper.→ Adjust the guides to match the width of the paper. | 22 | |
| The bypass tray extension is not opened.→ When loading a large size of paper, open the extension. | 22 | |
| White or black lines appear on copies. | The scanner glass for the RSPF is dirty.→ Clean the long, narrow scanning window. | 87 |
| The TD (Toner/Developer) cartridge or drum cartridge is dirty.→ Clean the TD cartridge or drum cartridge. | 88 | |
| The transfer charger is dirty.→ Clean the transfer charger. | 89 | |
| Paper size for a paper tray cannot be set. | Copying or printing is performed.→ Set the paper size after copying or printing is complete. | - |
| The machine has stopped temporarily due to running out of paper or a misfeed.→ Load paper or remove the misfeed, and then set the paper size. | 19, 23, 78 | |
| Output does not stack neatly in the paper output tray. | Both ends of the paper are curled upward.→ Turning the paper over in the paper tray may help. | 19 |
| A copy job stops before it is finished. | "MEMORY FULL, PRESS START TO RESUME." appears in the display.→ The memory became full during sort copy. Copy only the originals that have been scanned to that point, or cancel the job and clear the data from memory. | 34 |
| The tray is out of paper.→ Load paper. | 19 | |
| The power save indicator is lit. | Other indicators are lit.→ If other indicators are lit, the machine is in preheat mode. Press any key on the operation panel to resume normal operation. | 17 |
| Only the power save indicator is lit.→ If only the power save indicator is lit, the machine is in auto power shut-off mode. Press the [START] key 🎨to resume normal operation. | 17 | |
| Error indicator ( )is lit or blinking. | See "DISPLAY MESSAGES" to check the meaning of the error indicator and error message in the display, and take appropriate action. | 69 |
| Lighting fixture flickers. | The same power outlet is used for the lighting fixture and the machine.→ Connect the machine to a power outlet which is not used for other electric appliances. | - |
PROBLEMS DURING SETUP OF THE SOFTWARE
If the software does not install correctly, check the following items on your computer. To remove the software, see "Removing the software" (p.77).
MFP driver cannot be installed (Windows 2000/XP)
If the MFP driver cannot be installed in Windows 2000/XP, follow these steps to check your computer's settings.
1 Click the "start" button and then click "Control Panel".
In Windows 2000, click the "Start" button, select "Settings", and then click "Control Panel".
2 Click "Performance and Maintenance", and then click "System".
In Windows 2000, double-click the "System" icon.
3 Click the "Hardware" tab and then click the "Driver Signing" button.
4 Check "What action do you want Windows to take?" ("File signature verification" in Windows 2000).
If "Block" has been selected, it will not be possible to install the MFP driver. Select "Warn" and then install the MFP driver as explained in "INSTALLING THE SOFTWARE".

Plug and play screen does not appear (USB only)
If the Plug and Play screen does not appear after you connect the machine to your computer with a USB cable and turn on the machine, follow the steps below to verify that the USB port is available.
1 Click the "Start" button, select "Control Panel", and then click "System and Maintenance".
- In Windows XP, click the "start" button, click "Control Panel", and then click "Performance and Maintenance".
- In Windows 2000, click the "Start" button, select "Settings", and then click "Control Panel".
2 Click "System", click the "Hardware" tab, and click the "Device Manager" button.
"Universal Serial Bus controllers" will appear in the list of devices.

- In Windows 2000, double-click the "System" icon, click the "Hardware" tab, and click the "Device Manager" button.
- In Windows Vista, click the "Device Manager", and if a message screen appears asking you for confirmation, click "Continue".
3 Click the icon beside "Universal Serial Bus controllers".
Universal Serial Bus controllers
Standard OpenHCD USB Host Controller
USB Root Hub
Two items should appear: your controller chipset type and Root Hub. If these items appear, you can use the USB port. If the "Universal Serial Bus controllers" shows a yellow exclamation point or does not appear, you must check your computer manual for USB troubleshooting or contact your computer manufacturer.
4 Once you have verified that the USB port is enabled, install the software as explained in "INSTALLING THE SOFTWARE".
The MFP driver cannot be correctly installed by Plug and Play (Windows 2000/XP/Vista) (USB only)
In Windows 2000/XP/Vista, if the MFP driver cannot be correctly installed by Plug and Play (for example, Plug and Play takes place without copying the required files for the MFP driver installation), follow these steps to remove unneeded devices and then install the MFP driver as explained in "INSTALLING THE SOFTWARE" (p.40).
1 Click the "Start" button, select "Control Panel", and then click "System and Maintenance".
- In Windows XP, click the "start" button, click "Control Panel", and then click "Performance and Maintenance".
- In Windows 2000, click the "Start" button, select "Settings", and then click "Control Panel".
2 Click "System", click the "Hardware" tab, and click the "Device Manager" button.

- In Windows 2000, double-click the "System" icon, click the "Hardware" tab, and click the "Device Manager" button.
- In Windows Vista, click the "Device Manager", and if a message screen appears asking you for confirmation, click "Continue".
3 Click the icon beside "Other devices".
If "FO-xxxx Scanner" and "SHARP FO-xxxx" appear, select and delete both of these items.
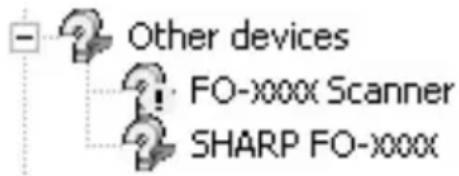

If "Other devices" does not appear, close the "Device Manager" window.
4 Install the software as explained in "INSTALLING THE SOFTWARE".
Removing the software
If you need to remove the software, follow these steps.
1 Click the "Start" button and then click "Control Panel".
In Windows 2000, click the "Start" button, select "Settings", and then click "Control Panel".
2 Click "Uninstall a program".
- In Windows XP, click "Add or Remove Programs".
- In Windows 2000, double-click the "Add/Remove Programs" icon.
3 Select "SHARP FO-2080 Series MFP Driver" and Button Manager from the list, and remove the software.
For more information, refer to your operating manual or to the help files for your operating system.
MISFEED REMOVAL
When a misfeed occurs, the error indicator blinks, "CLEAR PAPER JAM" appears in the display, and the machine stops operating. If a misfeed occurs when using the RSPF, "RETURN X ORIGINAL(S) START TO RESUME" will appear in the display. ("X" indicates the number of pages to be returned.). This indicates the number of the originals that must be returned to the document feeder tray after a misfeed. Return the required number of originals. This number will be cleared when copying is resumed or the [CLEAR] key (dis pressed. If an original misfeed occurs in the RSPF, the machine will stop and the error indicator will blink. To remove a misfeed from the RSPF, see "D: Misfeed in the RSPF" (p.81).
1 Open the bypass tray, and then open the side cover.

natural_image
Illustration of a printer's door panel being inserted, showing hand positioning and scroll wheel (no text or symbols)2 Check the misfeed location. Remove the misfed paper following the instructions for each location in the illustration below. If the error indicator blinks, proceed to "A: Misfeed in the paper feed area" (p.79).
If the misfed paper is seen from this side, proceed to "C: Misfeed in the transport area". (p.80)
If paper is misfed here, proceed to "B: Misfeed in the fusing area". (p.79)

If paper is misfed here, proceed to "A: Misfeed in the paper feed area". (p.79)
A: Misfeed in the paper feed area
Gently remove the misfed paper from the paper feed area as shown in the illustration. If the error indicator blinks and the misfed paper is not visible in the paper feed area, pull out the paper tray and remove the misfed paper. If the paper cannot be removed, proceed to "B: Misfeed in the fusing area".

The fusing unit is hot. Do not touch the fusing unit when removing misfed paper. Doing so may cause a burn or other injury.

- Do not touch the surface (green portion) of the drum cartridge when removing the misfed paper. Doing so may damage the drum and cause smudges on copies.
- If the paper has been fed through the bypass tray, do not remove the misfed paper through the bypass tray. Toner on the paper may stain the paper transport area, resulting in smudges on copies.
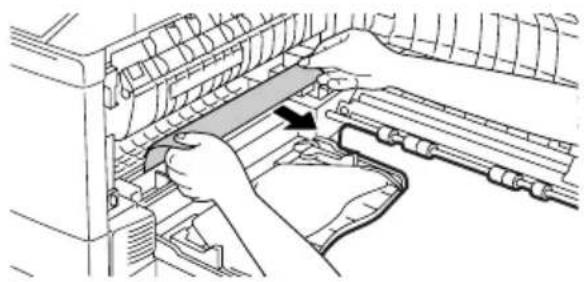
natural_image
Illustration of a hand operating a mechanical device with a tool, no text or symbols visible2 Close the side cover by pressing the round projections near the side cover open button. The error indicator will go out and the ready indicator will light up.
B: Misfeed in the fusing area
1 Lower the fusing unit release lever.

2 Gently remove the misfed paper from under the fusing unit as shown in the illustration. If the paper cannot be removed, proceed to "C: Misfeed in the transport area".

natural_image
Line drawing of a printer's internal structure with a hand operating it (no text or symbols present)
The fusing unit is hot. Do not touch the fusing unit when removing misfed paper. Doing so may cause a burn or other injury.

- Do not touch the surface (green portion) of the drum cartridge when removing the misfed paper. Doing so may damage the drum and cause smudges on copies.
- Do not remove the misfed paper from above the fusing unit. Unfixed toner on the paper may stain the paper transport area, resulting in smudges on copies.
3 Raise the fusing unit release lever and then close the side cover by pressing the round projections near the side cover open button. The error indicator will go out and the ready indicator will light up.
C: Misfeed in the transport area
1 Lower the fusing unit release lever.
See "B: Misfeed in the fusing area" (p.79).
2 Open the front cover.
To open the front cover, see "INSTALLING THE TD (TONER/DEVELOPER) CARTRIDGE" (p.14).
3 Rotate the roller rotating knob in the direction of the arrow and gently remove the misfed paper from the exit area.

4 Raise the fusing unit release lever, close the front cover and then close the side cover by pressing the round projections near the side cover open button. The error indicator will go out and the ready indicator will light up.

When closing the covers, be sure to close the front cover securely and then close the side cover. If the covers are closed in the wrong order, the covers may be damaged.
D: Misfeed in the RSPF
If the misfed original is at the top of the document feeder tray or in the exit area, follow procedure (A) to remove the misfeed. If the misfed original is inside the document feeder and is not visible, follow procedure (B).
(A) If the misfed original is at the top of the document feeder tray or in the exit area, open the document feeder cover and pull out the original. If the original resists your pulling, press down on the RSPF jam release lever while pulling out the original. When finished, close the document feeder cover.
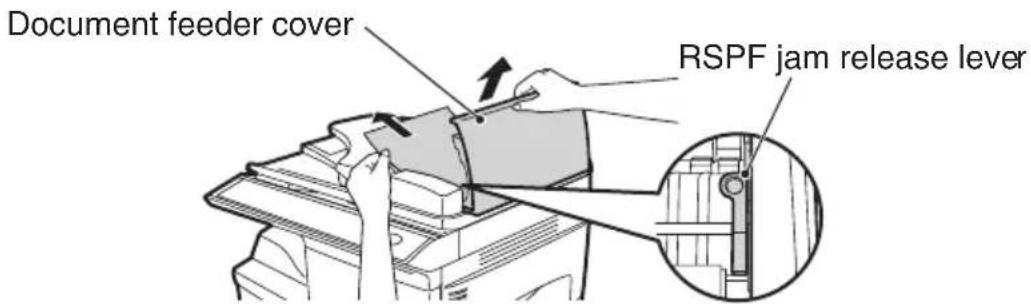
(B) Open the document feeder cover. Next, open the RSPF and rotate the roller in the direction of the arrow. If the misfed original is in the state (X), pull the original out as it feeds out into the exit area. If the misfed original is in the state (Y), pull the original down and out. When finished, lower the RSPF and close the document feeder cover.


Open and close the RSPF to clear the error indicator. "RETURN X ORIGINAL(S) START TO RESUME" will appear in the display. Return the indicated number of pages to the document feeder tray. Press the [START] key ( ) to resume copying.
TD (TONER/DEVELOPER) CARTRIDGE REPLACEMENT
When toner is low, the error indicator will light up and "TD CARTRIDGE IS NEAR EMPTY." will appear in the display. For information on purchasing a new TD (Toner/Developer) cartridge, see "ABOUT SUPPLIES AND OPTIONS" (p.90). If copying is continued while the indicator is lit, copies will gradually become lighter until the toner runs out. When the toner runs out, the machine will stop operating, the error indicator will blink, and "REPLACE THE TD CARTRIDGE" will appear in the display. Follow the procedure below to replace the TD (Toner/Developer) cartridge.

- After the machine stops, it may be possible to make a few more copies by taking the TD cartridge out of the machine, shaking it horizontally, then reinstalling it. If copying is not possible after this operation, replace the TD cartridge.
- During a long copy run of a dark original, "TONER REPLENISHMENT IN PROGRESS" appears in the display, and the machine may stop even though toner is left. The machine will feed toner up to 2 minutes and then the ready indicator will light up. Press the [START] key ( ) to resume copying.
1 Open the bypass tray, and then open the side cover while pressing the side cover open button.
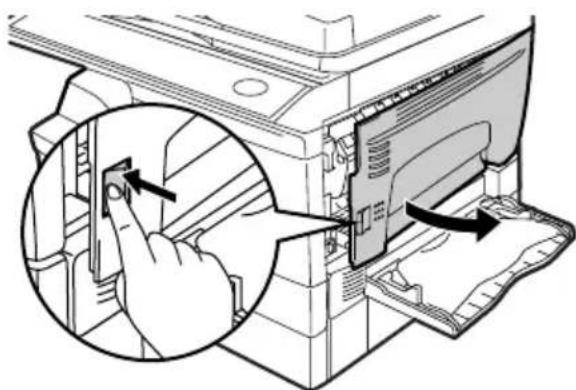
natural_image
Illustration of a printer's internal structure with a hand interacting with a button, showing no text or symbols.2 Push gently on both sides of the front cover to open the cover.

natural_image
Diagram of a printer's internal structure showing paper feeding into a container (no text or symbols present)3 Gently pull the TD (Toner/Developer) cartridge out while pressing the lock release button.
Lock release button
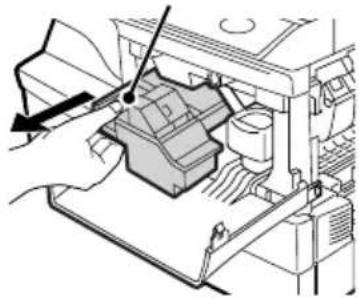
natural_image
Diagram of a printer's internal structure showing paper feeding into a box (no text or symbols visible)
- After removing the TD cartridge, do not shake it or tap on it. Doing so may cause toner to leak from the cartridge. Put the old cartridge immediately in the bag contained in the box of the new cartridge.
- Dispose of the old TD cartridge in accordance with local regulations.
4 Remove the TD (Toner/Developer) cartridge from the bag. Remove the protective paper. Hold the cartridge on both sides and shake it horizontally four or five times. Hold the tab of the protective cover and pull the tab to your side to remove the cover.
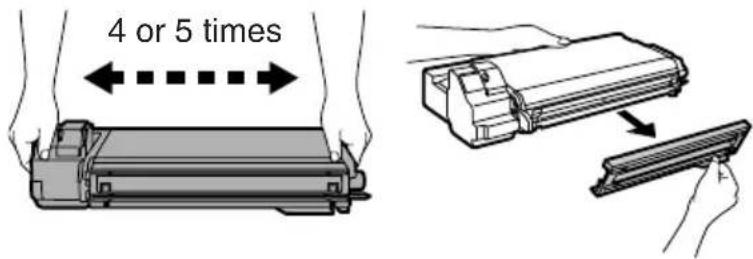
5 While pushing the lock release button, gently insert the TD (Toner/Developer) cartridge until it locks into place.
Lock release button
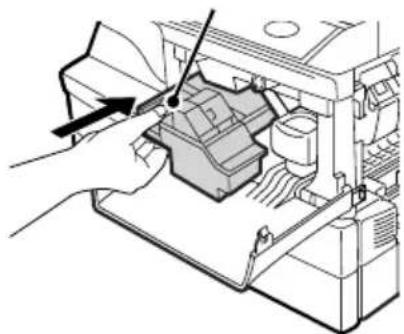
natural_image
Diagram of a printer internal structure with a hand operating the component (no text or symbols visible)6
Close the front cover and then the side cover by pressing the round projections near the side cover open button. The error indicator will go out and the ready indicator will light up.


When closing the covers, be sure to close the front cover securely and then close the side cover. If the covers are closed in the wrong order, the covers may be damaged.
DRUM CARTRIDGE REPLACEMENT
The useful life of the drum cartridge is approximately 18,000 copies*. When the internal counter reaches approximately 17,000 copies, the error indicator will light up and "A DRUM CARTRIDGE WILL BE NEEDED SOON" will appear in the display. For more information on purchasing a drum cartridge, see "ABOUT SUPPLIES AND OPTIONS" (p.90). When the error indicator blinks and "REPLACE THE DRUM CARTRIDGE" appears in the display, the machine will stop operating until the cartridge is replaced. Replace the drum cartridge at this time.
* Based on copying onto letter size paper at 5% toned area.

Do not remove the protective cover on the drum portion (black paper) of a new drum cartridge before use. The cover protects the drum against external light.
1
Remove the TD (Toner/Developer) cartridge (see "TD (TONER/DEVELOPER) CARTRIDGE REPLACEMENT" (p.82)).
2 Hold the drum cartridge handle and gently pull the cartridge out. Dispose of the old drum cartridge in accordance with local regulations.

3 Remove the new drum cartridge from the protective bag and remove the protective cover from the cartridge. Gently install the new drum cartridge.

Do not touch the surface of the drum (green portion).
Doing so may cause smudges on the copies.
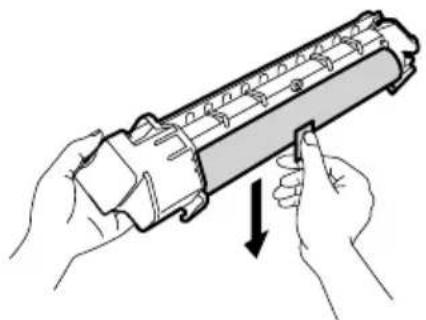
natural_image
Illustration of hands holding a cylindrical mechanical component with a downward arrow indicating force or movement (no text or symbols present)
natural_image
Diagram of a hand operating a mechanical device with an arrow indicating direction (no text or symbols present)4 Gently install the TD (Toner/Developer) cartridge. To install the TD cartridge, see "INSTALLING THE TD (TONER/DEVELOPER) CARTRIDGE" (p.14).
5 Close the front cover and then the side cover by pressing the round projections near the side cover open button. The drum replacement required error indicator will go out and the ready indicator will light up.

When closing the covers, be sure to close the front cover securely and then close the side cover. If the covers are closed in the wrong order, the covers may be damaged.
CHECKING THE TOTAL COUNT AND DRUM CARTRIDGE LIFE
You can check the total number of pages output by the machine (all pages printed by the copy function and printer function), as well as the output counts of each function (number of copies, number of scanned pages, number of faxes, etc.) and drum cartridge life. When a count reaches 999,999 it returns to 0.
1 Press the [MENU] key. Press the []key() or []key() until "TOTAL COUNT" appears, and then press the [ENTER] key.

2 Press the [] key () or [] key () to display the count of each function.
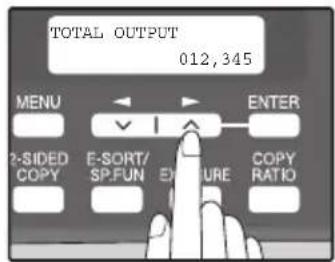
The count of each function changes as follows each the [ ] key ( ) or [ ] key ( ) is pressed:
- "TOTAL OUTPUT": Total number of pages output by the machine
• "COPIES": Total number of copies - "SPF/RSPF": Total number of pages scanned using the RSPF
- "2-SIDED PRINT": Total number of pages printed by two-sided print
- "PRINTS": Total number of pages printed the printer function
- "FAX": Total number of sent and received faxes
- "FAX SEND": Total number of sent faxes
- "SCAN SEND": Total number of scans
- "REMAINING DRUM LIFE": The remaining number of pages that can be printed with the drum cartridge is displayed.
When the error indicator will blink and "MAINTENANCE REQUIRED CALL FOR SERVICE" will appear in the display, service by an authorized SHARP service technician is required. Contact your service center as soon as possible.
CLEANING THE MACHINE
Proper care is essential in order to get clean, sharp copies. Be sure to take a few minutes to clean the machine on a regular basis.

Do not spray flammable cleaner gas. Gas from the spray may come in contact with the internal electrical components or high-temperature parts of the fusing unit, creating a risk of fire or electrical shock.

- Before cleaning, be sure to turn the power switch off and remove the power cord from the outlet.
- Do not use thinner, benzene or other volatile cleaning agents. Doing so may cause deformation, discoloration, deterioration or malfunction.
Cabinet
Wipe the cabinet with a soft, clean cloth.
Document glass and the back side of the RSPF
Stains on the glass, RSPF scanning window, cover or RSPF roller will also be copied. Wipe the glass, RSPF scanning window, cover and RSPF roller with a soft, clean cloth. If necessary, dampen the cloth with a glass cleaner.
Document glass/scanning window RSPF


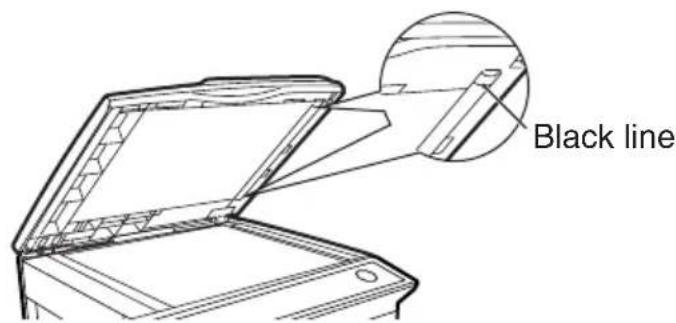
If this area is dirty, copying from the RSPF will not be possible.
TD (Toner/Developer) cartridge and drum cartridge
1 Remove the TD (Toner/Developer) cartridge and drum cartridge as explained in "TD (TONER/DEVELOPER) CARTRIDGE REPLACEMENT" (p.82) and "DRUM CARTRIDGE REPLACEMENT" (p.84).
2 Wipe the parts of the TD (Toner/Developer) cartridge and drum cartridge shown below with a clean cloth.
Wipe only the parts that are indicated in the illustration.
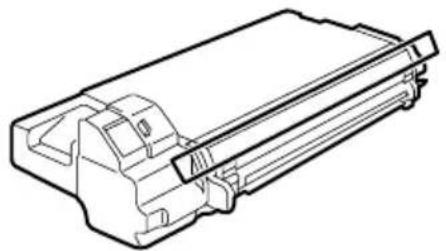
natural_image
Technical line drawing of a mechanical component or housing (no text or symbols)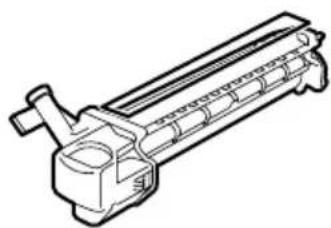
natural_image
Technical line drawing of a mechanical device with no visible text or symbols
- Do not touch the surface of the drum (green portion). Doing so may cause smudges on the copies.
- When cleaning the TD cartridge, do not tilt or shake it. Toner may spill out and soil your clothes.
3 Replace the TD (Toner/Developer) cartridge and drum cartridge as explained in "TD (TONER/DEVELOPER) CARTRIDGE REPLACEMENT" (p.82) and "DRUM CARTRIDGE REPLACEMENT" (p.84).
If copies start becoming streaky or blotchy, the transfer charger may be dirty. Clean the charger using the following procedure.
Transfer charger
1 Turn the power switch off. (p.17)
2 Ensure that the bypass tray is open and then open the side cover while pressing the side cover open button. (p.14)
3 Take the charger cleaner out by holding the tab. Set the charger cleaner onto the right end of the transfer charger, gently slide the cleaner to the left end, and then remove it. Repeat this operation two or three times.

Slide the charger cleaner from the right end to the left end along the groove of the transfer charger. If the cleaner is stopped on the way, smudges on copies may occur.

natural_image
Technical line drawing of a mechanical assembly with a hand inserting a component into a housing (no text or symbols visible)
natural_image
Technical diagram of a mechanical assembly with hands operating a component (no visible text or symbols)4 Return the charger cleaner to its original position. Close the side cover by pressing the round projections near the side cover open button.

natural_image
Technical diagram of a mechanical assembly with a magnified inset showing a component detail (no text or symbols present)5 Turn the power switch on. (p.16)
ABOUT SUPPLIES AND OPTIONS
When ordering supplies, please use the correct part numbers as listed below.

Be sure to use only genuine SHARP parts and supplies.

For best copying results, be sure to use only SHARP Genuine Supplies which are designed, engineered, and tested to maximize the life and performance of SHARP copiers. Look for the Genuine Supplies label on the toner package.
Supply list
| Supply Part number Usable life | ||
| TD (Toner/Developer) cartridge | FO-55ND Approx. | 6,000 sheets |
| Drum cartridge FO-55DR | Approx. 18,000 sheets | |
* Based on copying onto letter-type paper at 5% toned area (The life of the TD cartridge which has been included in the machine at the factory is approximately 2,000 sheets.)
Interface cable
Please purchase the appropriate cable for your computer.
USB interface cable
USB cable that supports USB 2.0.
LAN interface cable
Shielded type cable.
SPECIFICATIONS
| Model FO-2080 | |
| Type Digital Multifunctional System, Desktop | |
| Photoconductive type | OPC drum |
| Document glass type | Fixed |
| Copy/printing system | Dry, electrostatic transfer |
| Originals Sheets, bound documents | |
| Originals size Max. 8-1/2" x 14" | |
| Copy size | Max. 8-1/2" x 14"Min. 3-1/2" x 5-1/2"Image loss: Max. 11/64" (4 mm) (leading and trailing edges)Max. 3/16" (4.5 mm) (along other edges in total) |
| Copying speed*1 | 20 copies/min.(8-1/2" x 11", one-sided copying at 100% copy ratio) |
| Continuous copy Max. 99 copies; subtractive counter | |
| First-copy time*2 | 8.0 seconds (When user program 24 is set to OFF)10.7 seconds (When user program 24 is set to ON)(paper: 8-1/2" x 11", exposure mode: AUTO,copy ratio: 100%) |
| Warm-up time*3 | Approx. 0 sec. |
| Copy ratio | Document glass:Variable: 25% to 400% in 1% increments (total 376 steps)Fixed preset: 25%, 50%, 64%, 78%, 100%, 129%, 200%,400%RSPF:Variable: 50% to 200% in 1% increments (total 151 steps)Fixed preset: 50%, 64%, 78%, 100%, 129%, 200% |
| Exposure system | Document glass: Moving optical source, slit exposure(stationary platen) with automaticexposure functionRSPF: Moving original |
| Paper feed | Two automatic feeding paper trays (250 sheets each) + bypass tray (50 sheets) |
| Fusing system Heat rollers | |
| Developer system M | Magnetic brush development |
| Light source | Cold cathode fluorescent lamp(CCD: 3 components; R, G, and B) |
| Resolution | Scan: 600 x 300 dpi Output: 600 x 600 dpi(AUTO/TEXT mode)Scan: 600 x 600 dpi Output: 600 x 600 dpi(PHOTO mode) |
| Gradation 256 tones (8 bits) | |
| Power supply 120 V, 60 Hz, 8.0 A | |
| Power consumption | Max. 1.0 kW |
| Space requirements(with trays extended) | 31.6" (W) x 17.6" (D) (802 mm (W) x 445 mm (D)) |
| Weight*4 | Approx. 50.6 lbs. (22.9 kg) |
| Dimensions | 20.4" (W) x 17.6" (D) x 18.1" (H)(518 mm (W) x 445 mm (D) x 459 mm (H)) |
| Operating conditions | Temperature: 50°F to 86°F (10°C to 30°C)Humidity: 20% to 85% |
| Acoustic noise emission(measurement according to ISO7779) | Sound power level LwAPrinting mode(continuous printing): 6.1 BStandby mode: 3.0 BSound pressure level LpA (actual measurement)Printing mode (Bystander positions): 47 dB (A)Printing mode (Operator position): 50 dB (A)Standby mode (Bystander positions): 15 dB (A)Standby mode (Operator position): 16 dB (A) |
*1 When making multiple duplex copies, the copy speed will vary based on the environment conditions.
*2 The first-copy time is measured after the power save indicator turns off following power on, using the document glass with the polygon rotating in the copy ready state and "LSU SETTING" set to ON in the user programs (8-1/2" x 11", paper fed from paper tray).
The first-copy time may vary depending on machine operating conditions and ambient conditions such as temperature.
The time from power on until the first copy is output varies depending on the installation site and the state of the machine in use.
*3 The warm-up time may vary depending on machine operating conditions and ambient conditions such as temperature.
*4 Not including TD and drum cartridges.
Printer Function
| Print speed*1 | 20 ppm |
| Resolution 600 dpi | |
| Memory Approx. 30 MB | |
| Emulation SPLC (Sharp Printer Language with Compression) | |
| Interface | 10BASE-T Network Interface*2USB 2.0 (Full-Speed/Hi-Speed compatible interface) |
| Interface cables | [USB cable]USB cable that supports USB 2.0.Please purchase a commercially available USB cable.[LAN cable]Shielded type cablePlease purchase a commercially available LAN cable. |
*1 When printing same document continuously on 8-1/2" x 11" plain paper in non-offset mode, excluding processing time.
^*2 Cannot be connected to an exclusive 100BASE hub.
Scanner Function
| Type Flatbed scanner | |
| Scanning method Document glass/RSPF | |
| Light source | Cold cathode fluorescent lamp(CCD: 3 components; R, G, and B) |
| Resolution | Basic: 600 dpi x 1200 dpiSetting range: 50dpi - 9600dpi |
| Original types Sheet | media, books |
| Effective scanning area | 8.5" (216 mm) (Lengthwise) x 14" (356 mm) (Width) |
| Scanning speed 2.88 | msec/line |
| Input Data 1 bit or 12 | bit |
| Output Data R.G.B 1 | or 8 bits / pixel / A/D 16 bit |
| Scanning colors | Black and white 2 value, Grayscale, Full color |
| Protocol | TWAINWIA (Windows XP/Vista only)STI |
| Interface USB 2.0 (Full-Speed/Hi-Speed compatible interface) | |
| Drop out color Yes | |
| Supported operating systems | Windows 2000 Professional/XP/Vista(Detailed information can be found in "BEFORE INSTALLATION" (p.41)) |
| Void area None | |
| Interface cables | [USB cable]USB cable that supports USB 2.0.Please purchase a commercially available USB cable. |
| Scanner utilities Button Manager / Sharpdesk | |
Date Revised : Jun . 1. 2009
Date Issued : Sep . 1. 2003
MSDS No. F-01231
1.PRODUCT AND COMPANY IDENTIFICATION
| Product Name | : AL-1651CS/AL-1661CS/AL-1631/ AL-1641CS/AL-1642CS/AL-1217D/AL-1457D/FO-DC550/ AL-1655CS/FO-2080FO-55ND/ /AL-100TD/AL-110TD/AL-100TDN (Black Toner) |
| Supplier Identification : Sharp Corporation22-22 Nagaike-cho, Abeno-ku, Osaka, Japan |
Local suppliers are listed below. Please contact the nearest supplier for additional information.
| Area (Country) (Name and Telephone Number) | |
| North America | U.S.A. Sharp Electronics CorporationSharp Plaza, Mahwah, NJTelephone number for information : 1-800-237-4277Emergency telephone number : 1-800-255-3924 |
| Canada Sharp Electronics of Canada Ltd.Telephone number for information : 905-890-2100Emergency telephone number : 1-800-255-3924 | |
| Oceania | Australia Sharp Corporation of Australia PTY. Ltd.No1 Huntingwood Drive Huntingwood Blacktown N.S.W.Telephone number for information : 1300-13-50-22 |
| Europe | Germany Sharp Electronics (Europe) GMBHSonninstrasse 3, 20097 HamburgTelephone number to access MSDS : 040-2376-2185For more information : 040-2376-2613 |
| United Kingdom Sharp Electronics (U. K.) Ltd.Telephone number for information : 08705-274-277 | |
| France Sharp Electronics France S.A.Telephone number for information : 01-49-90-34-00 | |
| Austria Sharp Electronics GMBHTelephone number for information : 01-727-19-0 | |
| Italy Sharp Electronics (Italy) S.P.A.Telephone number for information : 02895951 | |
| Spain Sharp Electronics (Espana) S.A.Telephone number for information : 93-581-97-00 | |
| Netherlands Sharp Electronics Benelux B.V.Telephone number for information : 30-6359500 | |
| Sweden Sharp Electronics Nordic ABTelephone number for information : 08-634-36-00 | |
| Switzerland Sharp Electronics(Schweiz)AGTelephone number for information : 01-846-6111 | |
| Middle East | U.A.E. Sharp Middle East FZEP.O.Box 17115 Jebel Ali, DubaiTelephone number for information : 04-815311 |
2.COMPOSITION / INFORMATION ON INGREDIENTS
| Substance[ ] | Preparation[X] | |||||
| Ingredient | CAS No. | Proportion | OSHA PEL | ACGIH TLV | MAK-TWA | NOHSC- TWA |
| Styrene-Acrylate copolymer | Confidential | 85-90% | Not listed | Not listed | Not listed | Not listed |
| Carbon black | 1333-86-4 | 5-8% | 3.5mg/m^3 | 3.5mg/m^3 | Not listed | 3mg/m^3 |
| Iron oxide | 1317-61-9 | 1-5% | Not listed | Not listed | Not listed | Not listed |
| Paraffin wax | 8002-74-2 | 1-3% | Not listed | Not listed | Not listed | Not listed |
| Polypropylene | Confidential | 0.5-3% | Not listed | Not listed | Not listed | Not listed |
Date Revised : Jun . 1. 2009
Most Important Hazards and Effects of the Products
Human Health Effects : There are no anticipated carcinogenic effects from exposure based on animal tests performed using toner. When used as intended according to instructions, studies do not indicate any symptoms of fibrosis will occur.
Environmental Effects : No data are available.
Specific Hazards : Dust explosion (like most finely divided organic powders)
Directive 1999/45/EC(Europe) : Not classified as dangerous
4. FIRST-AID MEASURES
Route(s) of Entry : Inhalation?
Skin?
Ingestion?
Yes No Possible but very unusual.
Inhalation : Remove to fresh air. If symptoms occur, consult medical personnel.
Skin Contact : Wash with soap and water for 15 minutes or until particle is removed. If irritation does occur, consult medical personnel.
Eye Contact : Flush eyes immediately with water for 15 minutes. If irritation does occur, consult medical personnel.
Ingestion : Rinse with water and drink several glasses of water. If irritation or discomfort does occur, consult medical personnel.
5.FIRE-FIGHTING MEASURES
Extinguishing Media : Water, CO
_2 , foam and dry chemicals
Special Fire Fighting Procedures : None
Fire and Explosion Hazards : Toner material, like most finely divided organic powders, may form an explosive mixture.
6.ACCIDENTAL RELEASE MEASURES
Personal Precautions : None
Environmental Precautions : None
Methods for Cleaning Up
: Wipe off with paper or cloth. Do not use vacuum cleaner when a large amount is released. It, like most finely divided organic powders, is capable of creating a dust explosion.
7. HANDLING AND STORAGE
Handling
Technical Measures : None
Precautions : None
Safe Handling Advice : Use of a dust mask is recommended when handling a large quantity of toner or during long term exposure, as with any non-toxic dust. Try not to disperse the particles.
Storage
Technical Measures : None
Storage Conditions : Keep container closed and Store in a cool and dry place. Keep out of the reach of children.
Incompatible Products : None
Date Revised : Jun . 1. 2009
Engineering Measures
Ventilation : Not required under intended use.
Exposure Limit Values
| OSHA-PEL(USA) | : | ^3 (Total Dust/g/6mg/m ^3 (Respirable Dust) |
| ACGIH-TLV(USA) | : | ^3 (Total Dust/g/8mg/m ^3 (Respirable Dust) |
Personal Protective Equipment
Respiratory Protection : Not required under intended use.
Hand Protection : Not required under intended use.
Eye Protection : Not required under intended use.
Skin Protection : Not required under intended use.
Other Protective Equipment : Use of a dust mask and goggles are recommended when handling a large quantity of toner or during long term exposure, as with any non-toxic dust.
9. PHYSICAL AND CHEMICAL PROPERTIES
Appearance
Physical State : Solid Form : Powder Color : Black Odor : faint odor
Ph : Not applicable
Boiling / Melting Point : Not applicable
Softening Point(°C) : 130°C
Flash Point(°C) : Not applicable
Ignition Point(°C) : No data
Explosion Properties : No data
Density(g/cm³) : 1.1
Solubility in Water : Negligible
10.STABILITY AND REACTIVITY
| Stability | : Stable |
| Hazardous Reactions | : Dust explosion, like most finely divided organic powders. |
| Conditions to Avoid | : Electric discharge, throwing into fire. |
| Materials to Avoid | : Oxidizing Materials |
| Hazardous Decomposition Products | : CO , CO_2 and NO_x |
| Further Information | : None |
11. TOXICOLOGICAL INFORMATION
Acute Toxicity
| Ingestion(oral) | : LD_50 > 2000mg/kg (Rats) |
| Inhalation | : LC_50 > 5.14mg/L (Rats) |
| Eye irritation | : Not an irritant (Rabbits) |
| Skin irritation | : Not an irritant (Rabbits) |
| Skin sensitizer | : No sensitization |
Mutagenicity : Negative(Ames Test).
Carcinogenicity : In 1996 the IARC reevaluated carbon black as a Group 2B carcinogen (possible human carcinogen). This classification is given to chemicals for which there is inadequate human evidence, but sufficient animal evidence on which to base an opinion of carcinogenicity. The classification is based upon the development of lung tumors in rats receiving chronic inhalation exposures to free carbon black at levels that induce particle overload of the lung. Studies performed in animal models other than rats did not show any association between carbon black
MATERIAL SAFETY DATA SHEET
| Date Revised: Jun. 1. 2009Date Issued: Sep. 1. 2003MSDS No. F-01231 | ||
| Chronic Effect | and lung tumors. Moreover, a two-year cancer bioassay using a typical toner preparation containing carbon black demonstrated no association between toner exposure and tumor development in rats.: In a study in rats of chronic inhalation exposure to a typical toner, a mild to moderate degree of lung fibrosis was observed in 92% of the rats in the high concentration ( 16mg/m^3 ) exposure group, and a minimal to mild degree of fibrosis was noted in 22% of the animals in the middle ( 4mg/m^3 ) exposure group, but no pulmonary change was reported in the lowest ( 1mg/m^3 ) exposure group, the most relevant level to potential human exposures. | |
12.ECOLOGICAL INFORMATION
No data are available.
13.DISPOSAL CONSIDERATIONS
| Waste from Residues | : Waste material may be dumped or incinerated under conditions which meet all federal, state and local environmental regulations. |
| Contaminated Packaging | : Waste may be disposed or incinerated under conditions which meet all federal, state and local environmental regulations. |
14. TRANSPORT INFORMATION
| UN Classification : None |
| Not classified as hazardous for transport. |
15.REGULATORY INFORMATION
| US Information |
| TSCA(Toxic Substances Control Act) :All chemical substances in this product comply with all applicable rules or order under TSCA. |
| SARA(Superfund Amendments and Reauthorization Act) Title III |
| 302 Extreme Hazardous Substance : None |
| 311/312 Hazard Classification : None |
| EU Information |
| 1999/45/EC and 67/548/EEC |
| Symbol & Indication : Not required |
| R-Phrase : Not required |
| 76/769/EEC : All chemical substances in this product comply with all applicable rules or order under 76/769/EEC. |
16. OTHER INFORMATION
NFPA Rating (USA) : Health=1 Flammability=1 Reactivity=0 WHMIS Legislation (Canada) : This product is not a controlled product.
References
IARC(1996): IARC monographs on the Evaluation of the Carcinogenic Risk of Chemicals to Humans, Vol. 65, Printing Process And Printing Inks, Carbon Black and Some Nitro Compounds, Lyon, pp.149-261 H.Muhle, B.Bellmann, O.Creutzenberg, C.Dasenbrock, H.Ernst, R.Kilpper, J.C.MacKenzie, P.Morrow, U.Mohr, S.Takenaka, and R.Mermelstein(1991) Pulmonary Response to Toner upon Chronic Inhalation Exposure in Rats. Fundamental and Applied Toxicology 17, pp.280-299.
The information on this data sheet represents our current data and best opinion as to the proper use in handling of this product under normal conditions. However, all materials may present unknown hazards and should be used with caution. Although certain hazards are described herein, we do not guarantee that these are the only hazards which exist.
Date Revised : Jun . 1. 2009
Date Issued : Sep . 1. 2003
MSDS No. F-31231
1.PRODUCT AND COMPANY IDENTIFICATION
Product Name : AL-1651CS/ AL-1661CS/AL-1631/AL-1641CS/AL-1642CS/ AL-1217D
/AL-1457D/FO-DC550/ AL-1655CS/FO-2080
FO-55ND /AL-100TD /AL-110TD/AL-100TDN(Black Developer)
Supplier Identification : Sharp Corporation
22-22 Nagaike-cho, Abeno-ku, Osaka, Japan
Local suppliers are listed below. Please contact the nearest supplier for additional information.
| Area (Country) (Name and Telephone Number) | |
| North America | U.S.A. Sharp Electronics CorporationSharp Plaza, Mahwah, NJTelephone number for information : 1-800-237-4277Emergency telephone number : 1-800-255-3924 |
| Canada Sharp Electronics of Canada Ltd.Telephone number for information : 905-890-2100Emergency telephone number : 1-800-255-3924 | |
| Oceania | Australia Sharp Corporation of Australia PTY. Ltd.No1 Huntingwood Drive Huntingwood Blacktown N.S.W.Telephone number for information : 1300-13-50-22 |
| Europe | Germany Sharp Electronics (Europe) GMBHSonninstrasse 3, 20097 HamburgTelephone number to access MSDS : 040-2376-2185For more information : 040-2376-2613 |
| United Kingdom Sharp Electronics (U. K.) Ltd.Telephone number for information : 08705-274-277 | |
| France Sharp Electronics France S.A.Telephone number for information : 01-49-90-34-00 | |
| Austria Sharp Electronics GMBHTelephone number for information : 01-727-19-0 | |
| Italy Sharp Electronics (Italy) S.P.A.Telephone number for information : 02895951 | |
| Spain Sharp Electronics (Espana) S.A.Telephone number for information : 93-581-97-00 | |
| Netherlands Sharp Electronics Benelux B.V.Telephone number for information : 30-6359500 | |
| Sweden Sharp Electronics Nordic ABTelephone number for information : 08-634-36-00 | |
| Switzerland Sharp Electronics(Schweiz)AGTelephone number for information : 01-846-6111 | |
| Middle East | U.A.E. Sharp Middle East FZEP.O.Box 17115 Jebel Ali, DubaiTelephone number for information : 04-815311 |
2.COMPOSITION / INFORMATION ON INGREDIENTS
| Substance[ ] | Preparation[X] | |||||
| Ingredient | CAS No. | Proportion | OSHA PEL | ACGIH TLV | MAK-TWA | NOHSC- TWA |
| Iron powder | 7439-89-6 | 90-95% | Not listed | Not listed | Not listed | Not listed |
| Styrene-Acrylate copolymer | Confidential | 5-10% | Not listed | Not listed | Not listed | Not listed |
| Carbon black | 1333-86-4 | 0.1-0.9% | 3.5mg/m^3 | 3.5mg/m^3 | Not listed | 3mg/m^3 |
Date Revised : Jun . 1. 2009
Date Issued : Sep . 1. 2003
MSDS No. F-31231
3.HAZARDS IDENTIFICATION
Most Important Hazards and Effects of the Products
Human Health Effects : There are no anticipated carcinogenic effects from exposure based on animal tests performed using toner. When used as intended according to instructions, studies do not indicate any symptoms of fibrosis will occur.
Environmental Effects : No data are available.
Specific Hazards : Dust explosion (like most finely divided organic powders)
Directive 1999/45/EC(Europe) : Not classified as dangerous
4. FIRST-AID MEASURES
Route(s) of Entry : Inhalation?
Skin?
Ingestion?
No No Possible but very unusual.
Inhalation : Remove to fresh air. If symptoms occur, consult medical personnel.
Skin Contact : Wash with soap and water for 15 minutes or until particle is removed. If irritation does occur, consult medical personnel.
Eye Contact : Flush eyes immediately with water for 15 minutes. If irritation does occur, consult medical personnel.
Ingestion : Rinse with water and drink several glasses of water. If irritation or discomfort does occur, consult medical personnel.
5. FIRE-FIGHTING MEASURES
Extinguishing Media : Water, CO
_2 , foam and dry chemicals
Special Fire Fighting Procedures : None
Fire and Explosion Hazards
: Toner material, like most finely divided organic powders, may form an explosive mixture.
6.ACCIDENTAL RELEASE MEASURES
Personal Precautions : None
Environmental Precautions : None
Methods for Cleaning Up
: Wipe off with paper or cloth. Do not use vacuum cleaner when a large amount is released. It, like most finely divided organic powders, is capable of creating a dust explosion.
7. HANDLING AND STORAGE
Handling
Technical Measures : None
Precautions : None
Safe Handling Advice : Use of a dust mask is recommended when handling a large quantity of toner or during long term exposure, as with any non-toxic dust. Try not to disperse the particles.
Storage
Technical Measures : None
Storage Conditions : Keep container closed and Store in a cool and dry place.
Keep out of the reach of children.
Incompatible Products : None
8. EXPOSURE CONTROLS / PERSONAL PROTECTION
Engineering Measures
Ventilation
: Not required under intended use.
Date Revised : Jun . 1. 2009
Date Issued : Sep . 1. 2003
MSDS No. F-31231
Exposure Limit Values
| OSHA-PEL(USA) | : | ^3 (Total Dust/g/5mg/m ^3 (Respirable Dust) |
| ACGIH-TLV(USA) | : | ^3 (Total Dust/g/3mg/m ^3 (Respirable Dust) |
Personal Protective Equipment
Respiratory Protection : Not required under intended use.
Hand Protection : Not required under intended use.
Eye Protection : Not required under intended use.
Skin Protection : Not required under intended use.
Other Protective Equipment : Use of a dust mask and goggles are recommended when handling a large quantity of toner or during long term exposure, as with any non-toxic dust.
- PHYSICAL AND CHEMICAL PROPERTIES
Appearance
| Physical State : Solid Form : Powder Color : Black Odor : faint odor |
| Ph | : Not applicable |
Boiling / Melting Point : Not applicable
Softening Point(°C) : 130°C(toner)
Flash Point(°C) : Not applicable
Ignition Point(°C) : No data
Explosion Properties : No data
Density(g/cm³) : 7
Solubility in Water : Negligible
10.STABILITY AND REACTIVITY
| Stability | : Stable |
| Hazardous Reactions | : Dust explosion, like most finely divided organic powders. |
| Conditions to Avoid | : Electric discharge, throwing into fire. |
| Materials to Avoid | : Oxidizing Materials |
| Hazardous Decomposition Products | : CO, CO_2 and NO_x |
| Further Information | : None |
- TOXICOLOGICAL INFORMATION
Acute Toxicity
| Ingestion(oral) | : LD_50 > 2000mg/kg (Rats) |
| Inhalation | : LC_50 > 5.14mg/L (Rats) |
| Eye irritation | : Not an irritant (Rabbits) |
| Skin irritation | : Not an irritant (Rabbits) |
| Skin sensitizer | : No sensitization |
Mutagenicity : Negative(Ames Test).
Carcinogenicity : In 1996 the IARC reevaluated carbon black as a Group 2B carcinogen (possible human carcinogen). This classification is given to chemicals for which there is inadequate human evidence, but sufficient animal evidence on which to base an opinion of carcinogenicity. The classification is based upon the development of lung tumors in rats receiving chronic inhalation exposures to free carbon black at levels that induce particle overload of the lung. Studies performed in animal models other than rats did not show any association between carbon black and lung tumors. Moreover, a two-year cancer bioassay using a typical toner preparation containing carbon black demonstrated no association between toner exposure and tumor development in rats.
MATERIAL SAFETY DATA SHEET
Date Revised : Jun . 1. 2009
Date Issued : Sep . 1. 2003
MSDS No. F-31231
| Chronic Effect | : In a study in rats of chronic inhalation exposure to a typical toner, a mild to moderate degree of lung fibrosis was observed in 92% of the rats in the high concentration ( 16mg/m^3 ) exposure group, and a minimal to mild degree of fibrosis was noted in 22% of the animals in the middle ( 4mg/m^3 ) exposure group, but no pulmonary change was reported in the lowest ( 1mg/m^3 ) exposure group, the most relevant level to potential human exposures. |
12.ECOLOGICAL INFORMATION
No data are available.
13.DISPOSAL CONSIDERATIONS
| Waste from Residues | : Waste material may be dumped or incinerated under conditions which meet all federal, state and local environmental regulations. |
| Contaminated Packaging | : Waste may be disposed or incinerated under conditions which meet all federal, state and local environmental regulations. |
14. TRANSPORT INFORMATION
UN Classification : None
Not classified as hazardous for transport.
15.REGULATORY INFORMATION
US Information
TSCA(Toxic Substances Control Act) :
All chemical substances in this product comply with all applicable rules or order under TSCA.
SARA(Superfund Amendments and Reauthorization Act) Title III
302 Extreme Hazardous Substance : None
311/312 Hazard Classification : None
EU Information
1999/45/EC and 67/548/EEC
Symbol & Indication : Not required
R-Phrase : Not required
76/769/EEC : All chemical substances in this product comply with all applicable rules or
order under 76/769/EEC.
16. OTHER INFORMATION
NFPA Rating (USA) : Health=1 Flammability=1 Reactivity=0
WHMIS Legislation (Canada) : This product is not a controlled product.
References
IARC(1996): IARC monographs on the Evaluation of the Carcinogenic Risk of Chemicals to Humans, Vol. 65, Printing Process And Printing Inks, Carbon Black and Some Nitro Compounds, Lyon, pp.149-261
H.Muhle, B.Bellmann, O.Creutzenberg, C.Dasenbrock, H.Ernst, R.Kilpper, J.C.MacKenzie, P.Morrow, U.Mohr, S.Takenaka, and R.Mermelstein(1991) Pulmonary Response to Toner upon Chronic Inhalation Exposure in Rats. Fundamental and Applied Toxicology 17, pp.280-299.
The information on this data sheet represents our current data and best opinion as to the proper use in handling of this product under normal conditions. However, all materials may present unknown hazards and should be used with caution. Although certain hazards are described herein, we do not guarantee that these are the only hazards which exist.
INDEX
Symbols
[#key.... 10, 31, 33, 36
[]key 10
[]key 10
2
2 IN 1 copy 35
[2-SIDED COPY] key ..... 10, 31, 32
A
About the operation manuals ...... 6
Appendix 91
Audible signals 68
Auto clear 16
Auto power shut-off mode 17
Automatic two-sided copying...... 30
B
Base setting.... 68
Basic procedure for printing 58
Before installation.... 41
Button Manager.... 40
Button Manager scan menu 60
Bypass feed.... 21
Bypass tray.... 9, 21, 22, 78, 82
Bypass tray paper guides.... 9, 22
C
Cabinet 87
Canceling a print job.... 58
Capacity of paper output tray 26
Caution
- Handling the machine...... 4
- Label on the machine 3
- Selecting an installation site ...... 3
- Using the machine.... 3
Changing a tray's paper size setting.... 23
Charger cleaner.... 9, 89
Checking packed components and accessories 12
Checking the total count and drum cartridge life.... 86
Cleaning the machine.... 87
Cleaning the TD (Toner/Developer) cartridge and drum cartridge .... 88
[CLEAR ALL] key 11, 16, 58
[CLEAR] key ..... 10, 24, 25, 27, 33, 34, 58, 78
Connecting a USB cable 46
Convenient copy functions ...... 30
Conventions used in this manual and online manual 6
[COPY RATIO] key.... 11, 29
D
Display.... 10
Display messages 69
Document feeder cover 9,81
Document feeder tray.... 9, 25
Document glass.... 9, 35
Drum cartridge.... 9, 84, 88
Drum cartridge handle.... 85
Drum cartridge replacement...... 84
E
[ENTER] key.... 10
Envelopes.... 21
Environmental information.... 5
Error indicator.... 10, 69, 78
[E-SORT/SP.FUN] key ..... 10, 33, 34, 35, 37, 38
Exit area 9
[EXPOSURE] key.... 10, 28
Exposure value guidelines 28
F
Factory default settings 65
Front cover 9,80,82
Fusing unit release lever ..... 9, 79, 80
H
Handles 9
Hardware and software requirements 41
How to place the original 24
How to use the online manual ...... 61
|
Initial settings.... 16
Installing the software.... 40
Installing the TD cartridge 14
Interface cable.... 90
Introduction...... 6
IP address 48
L
Labels.... 18, 19, 21
Language setting 16
LAN connector.... 9, 47
Loading paper 18
Loading paper in the bypass tray ..... 22
Loading the paper tray 19
Long edge 30
LPR (TCP/IP) direct printing..... 49
M
Main features.... 7
Making copies 24
Margin shift.... 38
Margin width 64
Memory full.... 34
[MENU] key 10
MFP driver.... 40
Misfeed removal
- Misfeed in the fusing area ...... 69
- Paper feed area.... 79
- RSPF 81
- Transport area.... 80
Mode indicators 10
[MODE SELECT] key 10
N
Normal copying 28
Numeric keys.... 10, 27
0
Offset function during sort copy...... 34
Online Manual 6
Operation in copy, printer, and scanner modes.... 60
Operation manual.... 6
Operation panel.... 9, 10
Original guides 9,25
Original output tray extension..... 9, 26
Original types 28
Originals that cannot be used in the RSPF.... 26
P
Paper.... 18
Paper holder arm.... 9, 26
Paper output tray.... 9
Paper output tray extension ..... 9, 26
Paper size setting.... 23
Paper tray.... 9, 19
Part names 9
Paper type 18
Plug and play screen does not appear 76
Power cord 9
Power off 17
Power on 16
Power save indicator 10
Power save modes.... 17
Power switch 9, 16, 17
Preheat mode.... 17
Preparations 9
Preparing the machine for installation 12
Preset ratio 29
Pressure plate lock.... 19
Printer driver.... 40
Printer/scanner functions.... 57
Problems during setup of the software.... 75
Protective materials.... 13
R
Ready indicator 11, 16, 84
Recycled paper 18
Reduction/enlargement/zoom 29
Removing the software.... 77
Roller 81
Roller rotating knob 80
ROPM.... 57
RSPF....9
RSPF indicator 10
RSPF roller.... 87
RSPF scanning window 87
s
Scan head locking switch 13
Scanner driver 40
Scanning from the operation panel .. 59
Scanning from your computer ...... 60
Scanning unit (scan head).... 16
Selecting a setting for a user program 67
Selecting the tray.... 23
Set the IP address.... 48
Setting the number of copies...... 27
Setting up button manager 53
Sharpdesk 40
Short edge.... 30
Side cover 9,78,82
Side cover open button 9
Sort copy 33
Special papers.... 19
Specifications 91
Standard paper.... 18
[START] key 11, 24, 25
Supply list 90
System requirements for USB 2.0 .... 57
T
TD cartridge.... 9,82
TD cartridge replacement.... 82
Thick paper.... 18
Transfer charger.... 9
Transparency film.... 18, 19, 21
Tray location indicator 10, 69
[TRAY SELECT] key 10, 22, 27
Troubleshooting.... 69
U
USB 42, 45, 57, 66
USB connector 9,46
User programs
- Copy mode.... 62
- Print mode.... 66
User settings 62
Using the manual 6
Using the printer mode 58
Using the scanner mode 59
Z
Zoom setting.... 29
INDEX BY PURPOSE
Preparations
Installation the machine, preparing .... 12
Packed components and accessories, checking 12
Paper, loading - Bypass tray.... 21 - Paper tray.... 19
Power, turn off 17
Power, turn on 16
Scan head locking switch, releasing.... 13
TD (Toner/Developer) cartridge, Installing 14
Tray's paper size, setting.... 23 User program, setting.... 62
Making copies
Copying - Document glass.... 24 - RSPF.... 25
Enlarging/reducing copies 29
Exposure, adjusting.... 28
Exposure, selecting 28
Setting the number of copies.... 27
Tray, selecting 27
Using convenient copy functions
2 IN 1 copying, using - Document glass.... 35 - RSPF.... 37
Automatic two-sided copying - Document glass.... 31 - RSPF.... 32
Margin shift, using 38
Sort copying, using - Document glass.... 33 - RSPF.... 34
Connecting the computer
Basic procedure for printing 58
Button Manager, setting up
- Windows 2000.... 55
- Windows XP/Vista.... 53
Installing the software-Network connection 47
Installing the software.... 42
Online manual, using.... 61
Print job, canceling 58
Printer mode, using 58
Scanner mode, using 59
Scanning from your computer ...... 60
Scanning using the keys on the machine.... 59
Troubleshooting and maintenance
Checking the total count and drum cartridge life.... 86
Cleaning the machine - Cabinet...... 87
- Document glass.... 87
- Drum cartridge.... 88
- RSPF 87
- TD (Toner/Developer) cartridge ..... 88
- Transfer charger.... 89
Drum cartridge, replacing 84 Misfeeds, removing
- Fusing area 79
- RSPF.... 81
- Paper feed area.... 79
- Transport area.... 80
TD (Toner/Developer) cartridge, replacing.... 82
MEMO
MEMO
For users in the USA
This device complies with Part 15 of the FCC Rules. Operation is subject to the following two conditions: (1) This device may not cause harmful interference, and (2) this device must accept any interference received, including interference that may cause undesired operation.
WARNING:
FCC Regulations state that any unauthorized changes or modifications to this equipment not expressly approved by the manufacturer could void the user's authority to operate this equipment.
Note:
This equipment has been tested and found to comply with the limits for a Class B digital device, pursuant to Part 15 of the FCC Rules. These limits are designed to provide reasonable protection against harmful interference in a residential installation. This equipment generates, uses and can radiate radio frequency energy and, if not installed and used in accordance with the instructions, may cause harmful interference to radio communications.
However, there is no guarantee that interference will not occur in a particular installation. If this equipment does cause harmful interference to radio or television reception, which can be determined by turning the equipment off and on, the user is encouraged to try to correct the interference by one or more of the following measures:
● Reorient or relocate the receiving antenna.
- Increase the separation between the equipment and receiver.
- Connect the equipment into an outlet on a circuit different from that to which the receiver is connected.
- Consult the dealer or an experienced radio/TV technician for help.
Notice for Users in U.S.A.
Declaration of Conformity
SHARP Digital Multifunctional System, FO-2080
This device complies with Part 15 of the FCC Rules. Operation is subject to the following two conditions: (1) This device may not cause harmful interference, and (2) this device must accept any interference received, including interference that may cause undesired operation.
Responsible Party: SHARP ELECTRONICS CORPORATION
Sharp Plaza, Mahwah, New Jersey 07495
TEL: 1-800-BE-SHARP
This product utilizes tin-lead solder, and fluorescent lamp containing a small amount of mercury. Disposal of these materials may be regulated due to environmental consideration. For disposal or recycling information, please contact your local authorities, the Electronics Industries Alliance: www.eiae.org, the lamp recycling organization: www.lamprecycle.org or Sharp at 1-800-BE-SHARP. (For U.S.A. Only)
SHARP®
SHARP ELECTRONICS CORPORATION
1 Sharp Plaza, Mahwah, New Jersey 07495-1163.
www.sharpusa.com
SHARP CORPORATION
- For users in the USA
- NOTICE
- CONTENTS
- 1PREPARATIONS
- 2LOADING PAPER
- 3MAKING COPIES
- 4CONVENIENT COPY FUNCTIONS
- 5INSTALLING THE SOFTWARE
- 6PRINTER/SCANNER FUNCTIONS
- 7USER SETTINGS
- 8TROUBLESHOOTING AND MAINTENANCE
- 9APPENDIX
- CAUTIONS
- Caution label on the machine
- Cautions on using the machine
- Warning:
- Caution:
- Important points when selecting an installation site
- Cautions on handling the machine
- Supply and Consumables
- Trademark acknowledgements
- SOFTWARE LICENSE
- ENVIRONMENTAL INFORMATION
- Caution
- SAFETY PRECAUTIONS
- INTRODUCTION
- Using the manual
- About the operation manuals
- Operation Manual (this manual)
- Online Manual (on the accessory CD-ROM)
- Conventions used in this manual and online manual
- MAIN FEATURES
- High-speed laser copying
- High-quality digital image
- Enhanced copying features
- Scan once/Print many
- LCD panel displays messages
- Fax function
- Laser printer function
- - Printer function
- • Network printer function
- Color scanner function
- Environment and people friendly design
- Operation panel
- ⑮ [COPY RATIO] key
- ⑯ [CLEAR ALL] key (CA)
- ⑰ [START] key ( )7 Ready indicator
- CHECKING PACKED COMPONENTS AND ACCESSORIES
- PREPARING THE MACHINE FOR INSTALLATION
- Remove all pieces of tape shown in the illustration below and then open the RSPF and remove protective materials. Take out the bag containing the TD (Toner/Developer) cartridge.
- Release the scan head locking switch.
- INSTALLING THE TD (TONER/DEVELOPER) CARTRIDGE
- POWER ON AND OFF
- Power on
- Language setting
- Initial settings
- Scanning unit (scan head)
- Power off
- Power save modes
- Preheat mode
- Auto power shut-off mode
- PAPER
- Special papers
- LOADING THE PAPER TRAY
- Store the pressure plate lock which has been removed in step 2. To store the pressure plate lock, rotate the lock to secure it as shown below.
- Fan the paper and insert it into the tray. Make sure that the edges go under the corner hooks.
- Gently push the paper tray back into the machine.
- BYPASS FEED (including special paper)
- Important points when inserting paper in the bypass tray
- Envelopes
- Loading paper in the bypass tray
- Open the bypass tray and extend the tray.
- Set the bypass tray paper guides to the paper width. Insert the paper (print face down) all the way into the bypass tray.
- Press the [TRAY SELECT] key ( ) to select the bypass tray.
- Note for loading thick paper
- CHANGING A TRAY'S PAPER SIZE SETTING
- NORMAL COPYING
- Using the document glass
- Open the RSPF, and place the original face down on the document glass.
- [How to place the original]
- Gently close the RSPF.
- Select the number of copies and any other copy settings, and then press the [START] key ( )
- Copying books or originals with folds or creases
- Check RSPF open function
- Using the RSPF
- Originals that cannot be used in the RSPF
- Original output tray extension
- Paper output tray extension
- Paper holder arm
- Setting the number of copies
- SELECTING THE TRAY
- Press the [TRAY SELECT] key (☐)
- MAKING A COPY DARKER OR LIGHTER
- Original types
- Place the original(s).
- Press the [EXPOSURE] key to select the original type.
- If needed, adjust the exposure level for TEXT or PHOTO.
- Press the [ENTER] key.
- Select the number of copies and any other copy settings, and then press the [START] key ( )
- REDUCTION/ENLARGEMENT/ZOOM
- Selecting a preset ratio
- Fine adjustment of the ratio
- AUTOMATIC TWO-SIDED COPYING
- Place the original(s) in the RSPF. (p.25)
- Press the [2-SIDED COPY] key and select the two-sided copy mode that you wish to use.
- Press the [ENTER] key.
- If you selected "2 TO 1" or "2 TO 2", press the [] key () or [] key () to select the original size and then press the [ENTER] key.
- Select the number of copies and any other settings, and then press the [START] key ( )
- SORT COPY
- Place the originals. (p.25)
- Press the [E-SORT/SP.FUN] key until "SORT" appears and then press the [ENTER] key.
- Press the [] key () to move " " to √ the "ON" position and then the [ENTER] key.
- Select the number of copies and any other settings, and then press the [START] key ( )
- If the memory becomes full
- Offset function during sort copy
- COPYING MULTIPLE ORIGINALS ONTO A SINGLE SHEET OF PAPER (2 IN 1 copy)
- Press the [ ] key ( ) or [ ] key ( ) to select the original size and then press the [ENTER] key.
- Replace the original with the next original, and then press the [START] key (💡)
- CREATING MARGINS WHEN COPYING
- (Margin shift)
- SOFTWARE
- MFP driver
- Printer driver
- Scanner driver\*
- Sharpdesk\*
- Button Manager\*
- BEFORE INSTALLATION
- Hardware and software requirements
- Installation environment and usable software
- INSTALLING THE SOFTWARE
- Using the machine with a USB connection
- The USB cable must not be connected to the machine. Make sure that the cable is not connected before proceeding.
- Insert the CD-ROM into your computer's CD-ROM drive.
- Click the "Start" button (), click "Computer", and then double-click the CD-ROM icon ().
- Double-click the "setup" icon ( )
- The "SOFTWARE LICENSE" window will appear. Make sure that you understand the contents of the software license, and then click the "Yes" button.
- You will return to the window of step 8. If you wish to install Button Manager or Sharpdesk, click the "Utility Software" button.
- Installing the Utility Software
- Click the "Button Manager" or the "Sharpdesk" button.
- When installing is finished, click the "Close" button.
- Make sure that the power of the machine is turned on, and then connect the USB cable (p.46).
- Follow the instructions in the plug and play window to install the driver.
- This completes the installation of the software.
- Connecting a USB cable
- Insert the cable into the USB connector on the machine.
- Insert the other end of the cable into your computer's USB port.
- Using the machine as a network printer
- Insert the LAN cable into the LAN connector on the machine.
- Turn on the machine.
- Insert the CD-ROM into your computer's CD-ROM drive.
- Click the "Start" button (), click "Computer", and then double-click the CD-ROM icon ().
- Double-click the "setup" icon ( )
- The "SOFTWARE LICENSE" window will appear. Make sure that you understand the contents of the software license, and then click the "Yes" button.
- Read the "Readme First" in the "Welcome" window and then click the "Next" button.
- Set the IP Address
- Click the "Set the IP Address" button.
- The printer or printers connected to the network will be detected. Click the printer to be configured (the machine) and click the "Next" button.
- Enter the IP address, subnet mask, and default gateway.
- LPR (TCP/IP) direct printing
- Click the "Printer Driver" button.
- Sharing the printer using windows networking
- For the port to be used, select the machine set as a shared printer, and click the "Next" button.
- Follow the on-screen instructions.
- When the "Finish" screen appears, click the "Close" button.
- SETTING UP BUTTON MANAGER
- Windows XP/Vista
- Select "Start this program" and then select "Sharp Button Manager X" from the pull-down menu.
- Click the "Apply" button.
- Repeat Steps 4 through 6 to link Button Manager to "SC2:" through "SC6:".
- Windows 2000
- Select "Sharp Button Manager X" in "Send to this application".
- Click the "Apply" button.
- Repeat Steps 5 through 7 to link Button Manager to "SC2:" through "SC6:".
- System requirements for USB 2.0 (Hi-Speed mode)
- USING THE PRINTER MODE
- BASIC PROCEDURE FOR PRINTING
- Make sure that paper is loaded in the tray.
- Open the file that you wish to print and select "Print" from the File menu.
- Make sure that the printer driver for the machine is selected, and select print settings in the printer driver.
- Click the "Print" button or the "OK" button to begin printing.
- Canceling a print job
- Select printer mode with the [MODE SELECT] key on the operation panel of the machine, and then press the [CLEAR] key ( ) or the [CLEAR ALL] key ( ). CA
- "CANCEL PRINT JOB?" will appear in the display. Make sure that a checkmark appears in front of "YES" and press the [ENTER] key.
- USING THE SCANNER MODE
- SCANNING USING THE KEYS ON THE MACHINE
- Scanning from the operation panel of the machine
- Press the [MODE SELECT] key to select scanner mode.
- Place the original. (p.24)
- Press the []key() or []key() to select the desired Button Manager scan menu setting.
- Press the [START] key ( ) to begin scanning.
- Button Manager scan menu
- SCANNING FROM YOUR COMPUTER
- OPERATION IN COPY, PRINTER, AND SCANNER MODES
- HOW TO USE THE ONLINE MANUAL
- Viewing the online manual
- USER PROGRAMS
- SELECTING A SETTING FOR A USER PROGRAM
- Press the [MENU] key and then press the [ENTER] key.
- Press the [ ] key () or [ ] key() to select the item that you wish to configure in the USER PROGRAM items, and then press the [ENTER] key.
- Press the [] key () or [] key() to change the setting of the selected item.
- Audible signals (key entry beep, invalid key beep, base setting beep)
- Base settings
- DISPLAY MESSAGES
- TROUBLESHOOTING THE MACHINE
- PROBLEMS DURING SETUP OF THE SOFTWARE
- MFP driver cannot be installed (Windows 2000/XP)
- Click the "start" button and then click "Control Panel".
- Click "Performance and Maintenance", and then click "System".
- Click the "Hardware" tab and then click the "Driver Signing" button.
- Check "What action do you want Windows to take?" ("File signature verification" in Windows 2000).
- Plug and play screen does not appear (USB only)
- Click the "Start" button, select "Control Panel", and then click "System and Maintenance".
- Click "System", click the "Hardware" tab, and click the "Device Manager" button.
- Click the icon beside "Universal Serial Bus controllers".
- Universal Serial Bus controllers
- Once you have verified that the USB port is enabled, install the software as explained in "INSTALLING THE SOFTWARE".
- The MFP driver cannot be correctly installed by Plug and Play (Windows 2000/XP/Vista) (USB only)
- Click the icon beside "Other devices".
- Install the software as explained in "INSTALLING THE SOFTWARE".
- Removing the software
- Click "Uninstall a program".
- Select "SHARP FO-2080 Series MFP Driver" and Button Manager from the list, and remove the software.
- MISFEED REMOVAL
- Open the bypass tray, and then open the side cover.
- Check the misfeed location. Remove the misfed paper following the instructions for each location in the illustration below. If the error indicator blinks, proceed to "A: Misfeed in the paper feed area" (p.79).
- A: Misfeed in the paper feed area
- B: Misfeed in the fusing area
- C: Misfeed in the transport area
- D: Misfeed in the RSPF
- TD (TONER/DEVELOPER) CARTRIDGE REPLACEMENT
- Gently pull the TD (Toner/Developer) cartridge out while pressing the lock release button.
- Remove the TD (Toner/Developer) cartridge from the bag. Remove the protective paper. Hold the cartridge on both sides and shake it horizontally four or five times. Hold the tab of the protective cover and pull the tab to your side to remove the cover.
- While pushing the lock release button, gently insert the TD (Toner/Developer) cartridge until it locks into place.
- 6
- DRUM CARTRIDGE REPLACEMENT
- 1
- CHECKING THE TOTAL COUNT AND DRUM CARTRIDGE LIFE
- CLEANING THE MACHINE
- Cabinet
- Document glass and the back side of the RSPF
- TD (Toner/Developer) cartridge and drum cartridge
- Transfer charger
- ABOUT SUPPLIES AND OPTIONS
- Interface cable
- USB interface cable
- LAN interface cable
- FIRST-AID MEASURES
- 5.FIRE-FIGHTING MEASURES
- 6.ACCIDENTAL RELEASE MEASURES
- HANDLING AND STORAGE
- Engineering Measures
- Exposure Limit Values
- Personal Protective Equipment
- PHYSICAL AND CHEMICAL PROPERTIES
- Appearance
- 10.STABILITY AND REACTIVITY
- TOXICOLOGICAL INFORMATION
- Acute Toxicity
- 12.ECOLOGICAL INFORMATION
- 13.DISPOSAL CONSIDERATIONS
- TRANSPORT INFORMATION
- 15.REGULATORY INFORMATION
- OTHER INFORMATION
- References
- 3.HAZARDS IDENTIFICATION
- Most Important Hazards and Effects of the Products
- FIRE-FIGHTING MEASURES
- Handling
- Storage
- EXPOSURE CONTROLS / PERSONAL PROTECTION
- INDEX
- Symbols
- 2
- A
- B
- C
- D
- E
- F
- H
- |
- L
- M
- N
- 0
- P
- R
- s
- T
- U
- Z
- INDEX BY PURPOSE
- Preparations
- Making copies
- Using convenient copy functions
- Connecting the computer
- Troubleshooting and maintenance
- MEMO
- Note:
- Notice for Users in U.S.A.
- Declaration of Conformity
- SHARP Digital Multifunctional System, FO-2080
- SHARP®
- SHARP ELECTRONICS CORPORATION
Brand : SHARP
Model : FO-2080
Category : Printer