
ORU52MB - Range hood OMEGA - Free user manual and instructions
Find the device manual for free ORU52MB OMEGA in PDF.


| Product Type | Under-cabinet range hood |
| Brand | Omega |
| Model | ORU52MB |
| Width | 52 cm (approx. 20.5 inches) |
| Depth | ~500 mm (19.7 inches) |
| Height | Adjustable, ~150-300 mm |
| Weight | Approx. 12 kg (26.5 lbs) |
| Power Supply | 220-240 V, 50 Hz |
| Motor Power | ~200 W |
| Extraction Rate | Up to 600 m³/h |
| Noise Level | ~65 dB (max speed) |
| Lighting | LED, 2 x 1.5 W |
| Controls | Mechanical push buttons |
| Number of Speeds | 3 speeds |
| Filter Type | Aluminum grease filter (washable) |
| Exhaust Outlet | 150 mm diameter |
| Material | Stainless steel |
| Installation | Under cabinet or wall mounted |
| Energy Efficiency Class | A+ (typical) |
| Safety Features | Thermal overload protection, auto-off timer |
| Cleaning | Grease filter washable in dishwasher; stainless steel surface wipe with mild detergent |
| Spare Parts | Grease filters, LED bulbs, remote control (if applicable) |
| Warranty | 2 years (may vary by region) |
Frequently Asked Questions - ORU52MB OMEGA
User questions about ORU52MB OMEGA
0 question about this device. Answer the ones you know or ask your own.
Ask a new question about this device
Download the instructions for your Range hood in PDF format for free! Find your manual ORU52MB - OMEGA and take your electronic device back in hand. On this page are published all the documents necessary for the use of your device. ORU52MB by OMEGA.
USER MANUAL ORU52MB OMEGA
52cm Undermount Rangehood
ORU52MB
Thank you for purchasing an Omega appliance
Tailored for the modern aesthetic and lifestyle of busy people, your new Omega Appliance will make a welcome addition to the family.
Omega caters to style-savvy customers who look for balance between stunning form and clever function. This means a combination of sleek, chic, sophisticated design yet effortless functionality.
And we source from the best. The best craftsmanship. The best innovation. From the best international design-houses.
All brought together under an appliance that stands for design-led balance.
Please take the time to read through the following instruction manual to familiarise yourself with the installation, operation requirements and maintenance to ensure optimum performance.
Further Information
For important information about your Omega Appliance such as warranty registration, manuals, features, and specifications please visit omegaappliances.com.au (if you are in Australia) and omegaappliances.co.nz (if you are in New Zealand) or contact our Customer Care team on the below email or phone numbers.
Registering Your Warranty
For peace of mind you can register your warranty at omegaappliances.com.au. Further information on the Warranty can be found at the end of this manual.
Contact Us
Our customer service team is here to help you with any question or concern.
Both teams are on call Monday to Friday 9.00am to 5.00pm and of course you can always send an email at your convenience.
Australia Contact Details
Monday to Friday 9.00am – 5.00pm
Email: support@residentiagroup.com.au
Phone: 1300 11 4357
New Zealand Contact Details
Monday to Friday 9.00am – 5.00pm
Email: customercare@monacocorp.co.nz
Phone: 09 415 6000
To stay up to date and find simple and easy recipes, follow us on our socials:
facebook.com/omegaappliances
instagram.com/omegaappliances_aus
READ THE INSTRUCTION BOOKLET BEFORE INSTALLING AND USING THE APPLIANCE.
It is important that you retain these instructions, proof of purchase as well as other important documents about this product for future reference.
The manufacturer will not be responsible for any damage to property or to persons caused by incorrect installation or improper use of the appliance.
Due to continual product development, Omega reserves the right to alter specifications and appearances without notice.
Contents
Important Safety Warnings ....1
Appliance Details 2
Lamp Replacement 2
Installation Instructions....3
Operating Instructions .... 4
Cleaning....5
Troubleshooting....6
Warranty....7
Disposal Information
- Most of the packaging materials are recyclable. Please dispose of these materials through your local recycling depot or by placing them into appropriate collection containers.
- If you wish to discard this product, please contact your local authorities and ask for the correct method of disposal.
IMPORTANT: Read the assembly instruction section and safety precautions of this booklet carefully before removing the contents of this carton.
- This appliance is not intended for use by persons (including children) with reduced physical, sensory or mental capabilities, or lack of experience or knowledge, unless they have been given supervision or instruction concerning the use of the appliance by a person responsible for their safety. Young children should be supervised to ensure that they do not play with the appliance.
- Do not check the status of the filters whilst the cooker hood is operating.
- Do not touch the light bulbs after use.
- Do not disconnect the appliance with wet hands.
- Do not disconnect the power supply by pulling on the cable.
- Do not flambé underneath the range hood.
- Avoid free flame, as it may cause damage to the filters and can be a fire hazard.
- Unplug the appliance before carrying out maintenance, cleaning or replacing lamps.
- If the power cord is damaged, it must be replaced by the manufacturer, an authorised service centre or similarly qualified persons to avoid a hazard.
- For indoor use only.
- It is recommended to operate the range hood prior to cooking.
- It is recommended to leave the range hood in operation for 15 minutes after cooking is terminated in order to completely eliminate cooking vapours and odours.
- Turn off the range hood when not in use.
- Do not use the range hood if it is damaged, especially the supply cord and the case.
- Do not immerse the range hood in liquid.
- The exhaust air must not be discharged into a flue which is used for exhausting fumes from an appliance burning gas or other fuels.
- Regulations concerning the discharge of air have to be fulfilled.
- There shall be adequate ventilation of the room when the range hood is used at the same time as appliances burning gas of other fuels (not applicable to appliances that only discharge the air back into the room).
- Clean the surface of the cooker hood regularly using a cloth moistened with denatured alcohol or a non-abrasive liquid detergent.
- There is a fire risk if cleaning is not carried out in accordance with the instructions.
- The range hood must be mounted at a minimum distance of 600mm above the cooking surface.
- CAUTION: Accessible parts may become hot when used with cooking appliances.
- Warning: Failure to install the screws or fixing device in accordance with these instructions may result in electrical hazards.
Electrical Details
| Voltage | 220 – 240V 50Hz |
| Rated Power Input | 271W |
| Lamp Max | 2x3W GU10 LED |
Lamp Replacement
Warning: Before attempting to replace the lights, ensure that the appliance is switched off and unplugged from the wall.
- Remove the aluminium filter.
- Press the lamp face and turn anti-clockwise to remove.
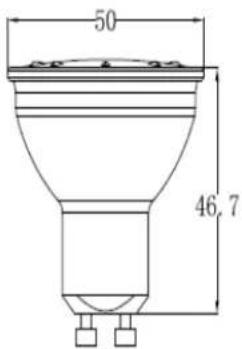
- Replace with the same type of bulb (GU10 Base, 3W MAX).
○ Max Wattage: 2 x 3W
○ Voltage Range: 220 – 240V AC
○ ILCOS D Code: DR-3/65/1B-H-GU10-46/50 - Replace the aluminium filter.
Warning: Failure to install the screws or fixing device in accordance with these instructions may result in electrical hazards.
- Please ensure that all power is switched off before installing the range hood.
• Installation must be in accordance to the local electrical authority and codes. - The switched power outlet for the range hood should be positioned to enable the user to turn the power off, to enable cleaning and any maintenance required.
- The switched power outlet should be installed within 600mm from the rear of the unit.
- Ensure that when installing the range hood, that it is protected from any possible damage from tools etc.
- Ducting for this unit must be installed in accordance to the local authority.
- Ensure that the fixings used for this range hood are suitable.
- Check the area where the range hood is to be fitted, to ensure that it is structurally sound.
- Before using the appliance, remove the plastic coatings protecting the stainless steel finish.
- These models are intended to be installed into kitchen cabinetry. Take care that the cabinetry and supporting wall can carry the weight of the rangehood.
• Always double-check dimensions in this manual against the appliance before commencing.
The rangehood should be placed at a minimum distance of 600mm from the cooking surface of the cooker below. Any more than 750mm could compromise the performance of the appliance.
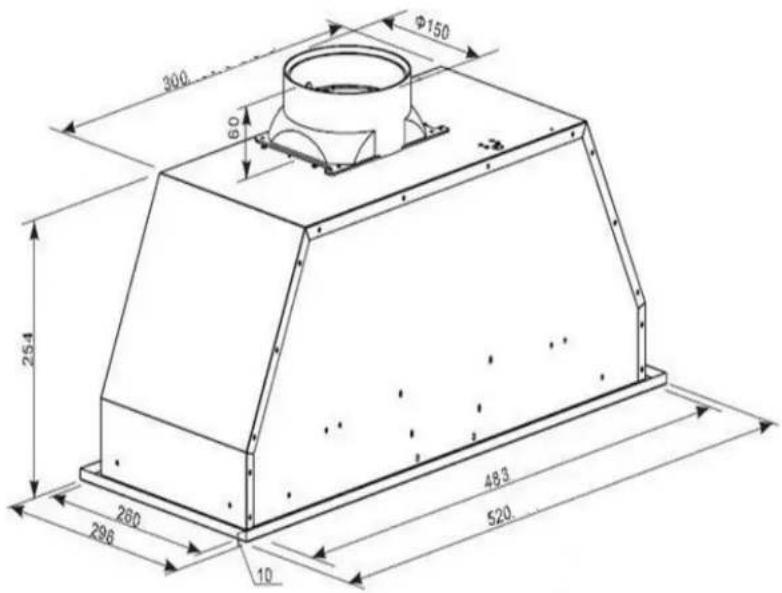
- Drill a hole in the cupboard, 490*265mm. Make sure the distance between the edge of the hole and the edge of the cupboard edge is at least 35mm.
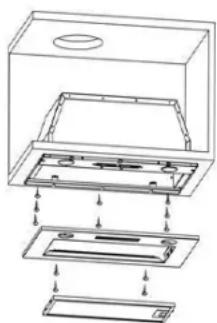
- Remove the filter and remove the four screws holding the front panel in place. Lift the appliance into the hole and check that it fits correctly (no gaps, does not interfere with anything above it etc.).
- Mark the hole positions with a pencil, remove the appliance and pre-drill the holes using a small drill bit. Place the appliance back into position, line up the holes and fix into place using the 8 screws provided. Replace the cover & fix into position with the 4 screws and fit the filter. Fit the one way filter to the top of the unit.
- The exhaust air vents through the one way valve at the top. If the exhaust is to be vented away, cut a hole ( 160mm ) in the top of the cupboard, and connect 150mm ducting to the one way valve & pass it through the hole to wherever it is going. If the exhaust air is to be recirculated back into the room, either cut vents into the cupboard (with a minimum area of 800cm^2 ), or leave the cupboard door open when in use.
- Once assembled in place, the appliance can be connected to the power supply.
natural_image
Technical line drawing of a mechanical assembly with no visible text or symbolsOperating Instructions
With the appliance fully installed and the power connected, the appliance can be used.
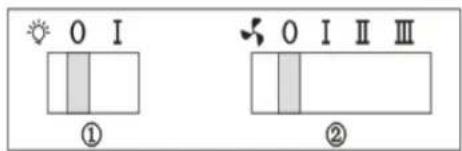
- Lamp – Turn on/off light
O – to switch off light
I – to switch on light
- Speed - Select speed to suit cooking conditions
O – to switch off motor
I (Low) – light frying/boiling
II (Medium) – frying/wok cooking/heavy boiling
III (High) – grilling, intensive frying and wok cooking
Power – Slide out drawer to power on
- Slide in drawer to power off
Cleaning
SAFETY PRECAUTION
Before cleaning your rangehood or performing any maintenance, please ensure that the rangehood is turned off at the power point.
Do not use abrasive cleaners to clean the rangehood. The use of warm soapy water and a cloth are recommended. Ensure that the rangehood is cleaned regularly, as a build-up of grease and fat may occur otherwise.
The filters on the rangehood must be cleaned regularly to maintain efficiency, and prevent grease build up. The filter mesh is made of a high density Stainless Steel. It is recommended that this is undertaken every 4 – 6 weeks, depending on frequency of use. The filters can be cleaned with warm soapy water or a cloth.
Cleaning of the rangehood must be performed as described above; otherwise there is a possibility of a fire hazard due to grease and fat build up.
| Fault | Possible Cause | Solution |
| Light on, but motor does not work | Fan switch turned off | Select a fan switch position |
| Fan switch failed | Contact Omega Service | |
| Motor failed | Contact Omega Service | |
| Light does not work, motor does not work | House fuses blown | Reset/replace fuses |
| Power cord loose or disconnected | Refit cord to power outletSwitch power outlet on | |
| Oil Leakage | One-way valve and the air ventilation entrance are not tightly sealed | Take down the one-way valve and seal with sealant |
| Leakage from the connection of U-shaped section and cover | Take U-shaped section down and seal | |
| Lights not working | Broken/faulty LED lamp | Contact Omega Service |
| Insufficient suction | The distance between the rangehood and gas top is too far | Refit the rangehood to the correct distance |
| The rangehood inclines | The fixing screws are not tight enough | Tighten the hanging screw and make it horizontal |
WARRANTY TERMS AND CONDITIONS RANGEEDS
This document sets out the terms and conditions of the product warranties for Residentia Group Appliances. It is an important document. Please keep it with your proof of purchase documents in a safe place for future reference should you require service for your Appliance.
1. IN THIS WARRANTY
(a) ‘acceptable quality’ as referred to in clause 10 of this warranty has the same meaning referred to in the ACL;
(b) 'ACL' means Trade Practices Amendment (Australian Consumer Law) Act (No.2) 2010;
(c) 'Appliance' means any Residentia Group product purchased by you accompanied by this document;
(d) 'ASR' means Residentia Group authorised service representative;
(e) ‘Residentia Group’ means Residentia Group Pty Ltd of 165 Barkly Ave, Burnley VIC 3121, ACN 600 546 656 in respect of Appliances purchased in Australia;
(f) ‘major failure’ as referred to in clause 10 of this warranty has the same meaning referred to in the ACL and includes a situation when an Appliance cannot be repaired or it is uneconomic for Residentia Group, at its discretion, to repair an Appliance during the Warranty Period;
(g) 'Warranty Period' means: (i) where the Appliance is used for personal, domestic or household use (i.e. normal single family use) as set out in the instruction manual, the Appliance is warranted against manufacturing defects for 24 months, following the date of original purchase of the Appliance;
(h) ‘you’ means the purchaser of the Appliance not having purchased the Appliance for re-sale, and ‘your’ has a corresponding meaning.
-
This warranty only applies to Appliances purchased and used in Australia and is in addition to (and does not exclude, restrict, or modify in any way) any non-excludable statutory warranties in Australia.
-
During the Warranty Period Residentia Group or its ASR will, at no extra charge if your Appliance is readily accessible for service, without special equipment and subject to these terms and conditions, repair or replace any parts which it considers to be defective. Residentia Group or its ASR may use remanufactured parts to repair your Appliance. You agree that any replaced Appliances or parts become the property of Residentia Group. This warranty does not apply to light globes, batteries, filters, seals or similar perishable parts.
-
Parts and Appliances not supplied by Residential Group are not covered by this warranty.
-
You will bear the cost of transportation, travel and delivery of the Appliance to and from Residentia Group or its ASR. If you reside outside of the service area, you will bear the cost of:
(a) travel of an authorised representative;
(b) transportation and delivery of the Appliance to and from Residentia Group or its ASR, in all instances, unless the Appliance is transported by Residentia Group or its ASR, the Appliance is transported at the owner's cost and risk while in transit to and from Residentia Group or its ASR.
-
Proof of purchase is required before you can make a claim under this warranty.
-
You may not make a claim under this warranty unless the defect claimed is due to faulty or defective parts or workmanship. Residentia Group is not liable in the following situations (which are not exhaustive):
(a) the Appliance is damaged by:
(i) accident
(ii) misuse or abuse, including failure to properly maintain or service
(iii) normal wear and tear
(iv) power surges, electrical storm damage or incorrect power supply
(v) incomplete or improper installation
(vi) incorrect, improper or inappropriate operation
(vii) insect or vermin infestation
(viii) failure to comply with any additional instructions supplied with the Appliance;
— THIS WARRANTY IS VALID IN AUSTRALIA ONLY —
Warranty
(b) the Appliance is modified without authority from Residentia Group in writing;
(c) the Appliance's serial number or warranty seal has been removed or defaced;
(d) the Appliance was serviced or repaired by anyone other than Residentia Group, an authorised repairer or ASR.
8. This warranty, the contract to which it relates and the relationship between you and Residentia Group are governed by the law applicable where the Appliance was purchased.
9. To the extent permitted by law, Residentia Group excludes all warranties and liabilities (other than as contained in this document) including liability for any loss or damage whether direct or indirect arising from your purchase, use or non use of the Appliance.
10. For Appliances and services provided by Residentia Group in Australia, the Appliances come with a guarantee by Residentia Group that cannot be excluded under the Australian Consumer Law. You are entitled to a replacement or refund for a major failure and for compensation for any other reasonably foreseeable loss or damage. You are also entitled to have the Appliance repaired or replaced if the Appliance fails to be of acceptable quality and the failure does not amount to a major failure. The benefits to you given by this warranty are in addition to your other rights and remedies under a law in relation to the Appliances or services to which the warranty relates.
11. At all times during the Warranty Period, Residentia Group shall, at its discretion, determine whether repair, replacement or refund will apply if an Appliance has a valid warranty claim applicable to it.
- Missing parts are not covered by warranty. Residentia Group reserves the right to assess each request for missing parts in a case by case basis. Any parts that are not reported missing in the first week after purchase will not provide free of charge.
- To enquire about claiming under this warranty, please follow these steps:
(a) carefully check the operating instructions, user manual and the terms of this warranty;
(b) have the model and serial number of the Appliance available;
(c) have the proof of purchase (e.g. an invoice) available;
(d) telephone the numbers shown below. - You accept that if you make a warranty claim, Residentia Group and its ASR may exchange information in relation to you to enable Residentia Group to meet its obligations under this warranty.
IMPORTANT
Before calling for service, please ensure that the steps in point 13 have been followed.
CONTACT SERVICE
→ Service: 1300 11 HELP (4357)
The Australian Consumer Law requires the inclusion of the following statement with this warranty:
Our goods come with guarantees that cannot be excluded under the Australian Consumer Law. You are entitled to a replacement or refund for a major failure and for compensation for any other reasonably foreseeable loss or damage. You are also entitled to have the goods repaired or replaced if the goods fail to be of acceptable quality and the failure does not amount to a major failure.
— THIS WARRANTY IS VALID IN AUSTRALIA ONLY —


- Thank you for purchasing an Omega appliance
- Further Information
- Registering Your Warranty
- Contact Us
- Australia Contact Details
- New Zealand Contact Details
- READ THE INSTRUCTION BOOKLET BEFORE INSTALLING AND USING THE APPLIANCE.
- Contents
- Disposal Information
- Electrical Details
- Lamp Replacement
- Operating Instructions
- Cleaning
- SAFETY PRECAUTION
- WARRANTY TERMS AND CONDITIONS RANGEEDS
- IN THIS WARRANTY
- — THIS WARRANTY IS VALID IN AUSTRALIA ONLY —
- Warranty
- IMPORTANT
- CONTACT SERVICE
Brand : OMEGA
Model : ORU52MB
Category : Range hood