
Sentinel III - Computermaus CM Storm - Kostenlose Bedienungsanleitung
Finden Sie kostenlos die Bedienungsanleitung des Geräts Sentinel III CM Storm als PDF.


| Produkttyp | Gaming-Maus |
| Marke | CM Storm |
| Modell | Sentinel III |
| Schnittstelle | USB 2.0 |
| Sensor | Optisch (Avago 9800) |
| Auflösung (DPI) | Bis zu 8200 DPI (einstellbar) |
| Abtastrate | 1000 Hz (1 ms) |
| Tastenanzahl | 7 programmierbare Tasten |
| Beleuchtung | RGB (16,8 Millionen Farben) |
| Gewicht | Ca. 140 g (mit Gewichtsanpassung) |
| Abmessungen (L x B x H) | 130 x 70 x 40 mm |
| Kabel | 1,8 m geflochtenes USB-Kabel |
| Stromversorgung | USB (5 V, 500 mA) |
| Kompatibilität | Windows 7/8/10, Mac OS X (eingeschränkt) |
| Gewichtsanpassung | 6 x 4,5 g Gewichte enthalten |
| Sonstige Funktionen | Onboard-Speicher für Profile, Makro-Recording |
| Reinigung | Mit weichem, trockenem Tuch reinigen; keine aggressiven Reiniger |
| Sicherheit | Verwendung nur mit USB-Ports; kein Öffnen des Gehäuses |
| Ersatzteile | Gleitfüße und Kabel separat erhältlich |
| Reparierbarkeit | Batterie nicht austauschbar; Fachmann empfohlen |
Häufig gestellte Fragen - Sentinel III CM Storm
Benutzerfragen zu Sentinel III CM Storm
0 Frage zu diesem Gerät. Beantworten Sie die, die Sie kennen, oder stellen Sie Ihre eigene.
Eine neue Frage zu diesem Gerät stellen
Laden Sie die Anleitung für Ihr Computermaus kostenlos im PDF-Format! Finden Sie Ihr Handbuch Sentinel III - CM Storm und nehmen Sie Ihr elektronisches Gerät wieder in die Hand. Auf dieser Seite sind alle Dokumente veröffentlicht, die für die Verwendung Ihres Geräts notwendig sind. Sentinel III von der Marke CM Storm.
BEDIENUNGSANLEITUNG Sentinel III CM Storm
SENTINEL III - User Manual
Ergonomic palm grip mouse designed for FPS gaming
March 10, 2016

Make It Yours.
Never Retreat. Advance!
Sentinel III introduces a host of improvements, building upon the ergonomic, palm grip design that fans have come to love.
2 | Copyright 2011-8-Core Master Corporation, All Rights Reserved.

TABLE OF CONTENTS
1.Features 4
2. Buttons Overview 7
3. Specification 8
4. On-the-fly Adjustments by Hardware 9
5. Software Guide 14
6.Main Button Assignment 15
7.Configuring the Storm TX Button 18
8.Mouse LED and Custom OLED Logo Setting 20
9.Mouse DPI and Sensor Setting 22
10.USB Polling Rate and OS Setting 23
11. Create a Macro 24
12.Library Management 25
13. Setting the Language of Tool Tips 26
14.Edit Profile and Custom Image 27
15.Support Tab 28
16. Legal Information 29
Features
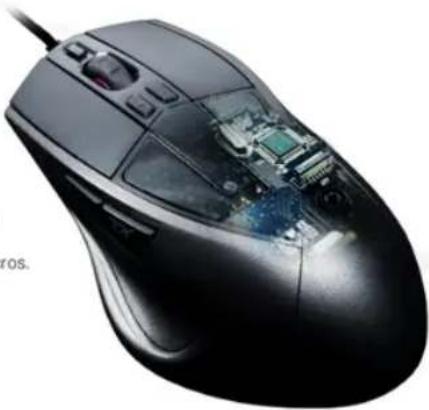
• High-End Gaming Optical Sensor
- Avago S3988 precision optical sensor
DPI up to 6400
○ Auto-adjust lift off distance for different mousepads
○ Adjustments by steps of 50 DPI
• Durable and Best Click Feeling Switches
Omron D2FC-F-7N
- 20 million clicks life cycle
• Powerful ARM 32bit Processor
- SONIX ARM Cortex-M0
- 512KB on-board memory
• Full Speed Response
- 1000 Hz Polling Rate
- 1ms Response Rate
• RGB - up to 16.7M Colors
- Two zones: headlights and acrylic top
• Storm TX and Advanced Macro Programming with
Five Profiles
- Every single button can be customized with macros.
- Double button count with Storm TX feature
• Adjustable Weight Design
- Five 4.5g disks to adjust
• Two Textured Surfaces Combined
- Mouse body is covered in a matte UV coating
- Main keys housing with matte texture
• Easily changeable mouse feet
- Easily removable mouse feet by small nudges
natural_image
Close-up of a black computer mouse with visible internal circuitry and ports (no text or symbols)Features

WEIGHT
SYSTEM

LIGHTING
COLORS

OLED
DISPLAY
LOD TUNE
AUTO ADJUST

DPI
ON-THE-FLY

5 PROFILES
512KB MEMORY

8 BUTTONS
PROGRAMMABLE

STORM TX
COMBINE
RGB Lighting System
Never Retreat. Advance!
The Sentinel III radiates any color you want, like a neon sign announcing your presence. Two different areas (the headlights and the top) can glow crimson red, burnt orange, gunmetal grey, or any color that piques your fancy. With 16.7 million color options, you'll tinker till you drop. Want something a little more subtle?
You can also completely switch off all LED lighting.

HEADLIGHTS

Copyright © Cooke Maine Corporation All Rights Reserved

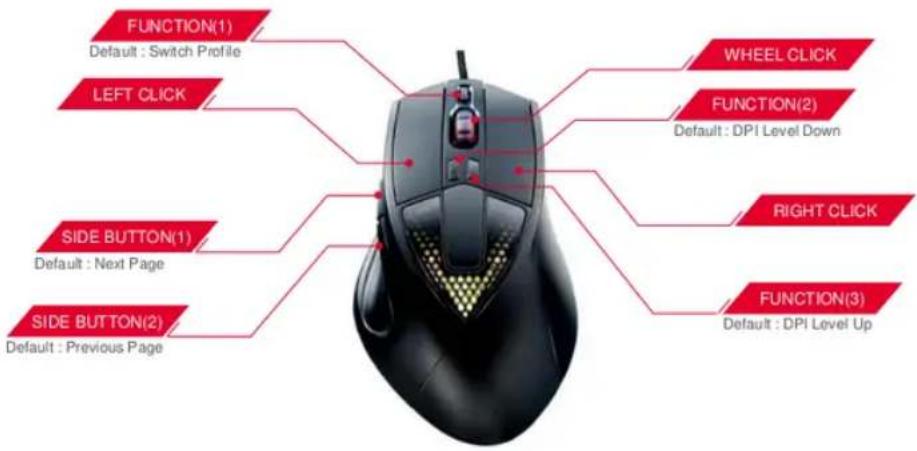
Buttons Overview
Sentinel III | Cooler Master Gaming Mouse
Specification

natural_image
Close-up of a black computer mouse with visible lens and control buttons (no text or symbols on the mouse itself)| Grip Type | Palm |
| Material | Plastic / Rubber |
| Color | MasterCase 5 - Black |
| LED Color | RGB |
| Sensor | Avago 3988 Optical Sensor |
| CPI / DPI | 4 Levels and up to 6400 DPI setting |
| Tracking Speed | 200 IPS / 50 g |
| Lift Off Distance | < 2mm (adjustable) |
| Polling Rate | 1000 Hz / 1 ms |
| Angle Snapping | Yes (adjustable) |
| Mouse acceleration | 50 g |
| Programming Profiles | 5 |
| On-board Memory | 512KB |
| Programmable buttons | 8 (15 with Storm TX) |
| Connector Cable | USB 2.0 |
| Cable Length | 1.8 Meters |
| Dimensions | 135 x 83.6 x 40 mm(5.3 x 3.3 x 1.6 inch) |
| Weight w/o weights | 155 g / 0.342 lbs |
| w/o cable | 115 g / 0.254 lbs |
| Additional Weights | 5x 4.5 g / 5x 0.009 lbs |
| Additional Weights | 22.5 g / 0.049 lbs (5 x 4.5g weights) |
| Warranty | 2 Years |
On-The-Fly Adjustments: Overview

On-The-Fly Adjustments: LOD Auto

* We suggest recalibrating the LOD when tracking on different surface.
On-The-Fly Adjustments: LOD

On-The-Fly Adjustments: DPI

Software Features
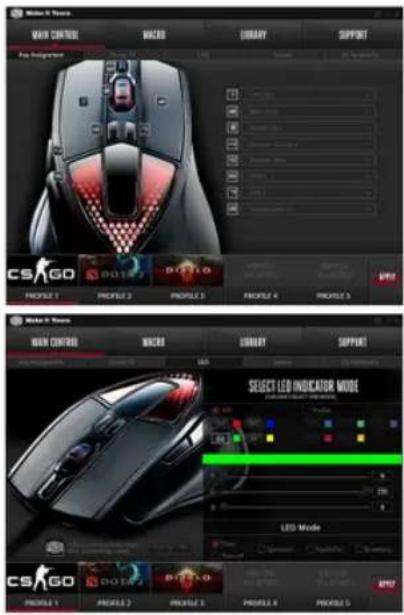
Main Control for key mapping & sync with setting in system.
- Key Assignment
- OS Sensitivity
Adjustment with LED color & lighting effects.
- Full color tuning of DPI indicator
- Four modes of lighting effects
- Including Spectrum LED mode
Change sensor performance
- DPI tuning
- LOD tuning
User can get the information of mouse & link to official support page.
- Online Support
- Version Information
- Automatically start at launch option
- Multi language Support
* Download from coolermaster.com

Software Guide
The Main Control is the default tab when opening the Sentinel III software. On this page, you can change the functions of every button your Sentinel III. Main Tab Main Control | Macro setting | Library setting | Support Info

14 | Copyright 2015-9-Center Master Corporation: All Rights Reserved.
APPLY : Apply Current Setting to Mouse
GUI Control
Language | Minimize | Close AP Switch AP

Pull down Menu
Disable Keys
Mouse Clicks
Keyboard Keys
Macro Keys
Multi-media Control
Rapid Fire
Profile
DPI
Sensor Control
Storm TX key
Can be set on Burton's only
OLED Control
OLED Wake Up

Main Button Assignment - 1

Copyright 2015 © Cookie Master Corporation All Rights Reserved
| Disable | Disable a button. |
| Mouse | |
| Left ClickNote: | Set a button to function as the Left Click.One button must always be set as the left click button. |
| Right Click | Set a button to function Right Click. |
| Wheel Click | Set a button to function as Mouse Wheel Click. |
| Browser Forward | Set a button to function as the browser page forward button. |
| Browser Backward | Set a button to function as the browser page backward button. |
| Keyboard | Set a button to perform a selected key stroke. |
| Macro | Set a button to function as a macro key combination. |
| Multimedia | |
| Web BrowserE-Mail | Set a button to open the default web browser.Set a button to open the default email program. |
| Media Player | Set a button to open the default media player program. |
| Play/ Pause | Set a button to function as the play/pause media function. |
| Stop | Set a button to function as the stop media function. |
| Next Track | Set a button to function as the next track media function. |
| Prev Track | Set a button to function as the previous track media function. |
| Volume Up | Set a button to function as the volume up media function. |
| Volume Down | Set a button to function as the volume down media function. |
| Mute Speaker | Set a button to function as the volume mute media function. |
| Calculator | Set a button to open the windows Calculator program. |
| My Computer | Set a button to open Window's My Computer file explorer. |
Main Button Assignment - 2

Rapid Fire
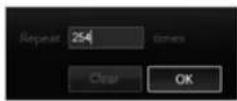
Mouse Set a button to function as a repeating mouse button clicks.
Selecting a mouse button. Enter a number for the amount of times (from 1 to 254) to repeat the clicks.
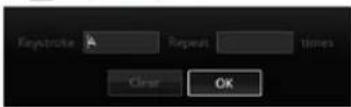
Keyboard Set a button to function as a repeating key stroke.
Press a key on the keyboard. Enter a number for the amount of times (from 1 to 254) to repeat the keystroke.
Profile
Set a button to switching Profile.

Main Button Assignment - 3

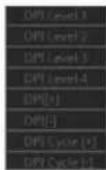
DPI
Set a button to switch DPI.
Sensor ON/OFF
Set a button to toggle sensor ON or OFF
Storm TactiX
Set button 5 (default function: browser back) to a combo button for multiple commands at once.
* Can be set on Button-5 only.
OLED ON/OFF
Set a button to toggle OLED display ON or OFF Set a button to wake up the OLED display for 5 seconds.
OLED Wake up
Configuring the Storm TX Button
Not having enough keys on your mouse is a pain. Storm TactiX solves this problem by letting you assign secondary functions to your mouse. During a game, simply press one button to trigger secondary functions for every mouse button. This essentially increases your button count from 9 to 15.


1
2
3
4
6
7
8
Create key combinations with Storm TactiX.
Press
ASSIGN 2 nd Functions
(examples)
9
Left Click
10
Right Click
11
Wheel Click
12
Browser Forward
13
DPI[•]
14
DPI[·]
15
Profile Cycle [+]

Configuring the Storm TX Button
Click the 'Storm TX' tab. This section turns button 5 (default function: browser backward) into a combo button for multiple commands at once.
2 Click and select which button you would like to add to the combo setting.
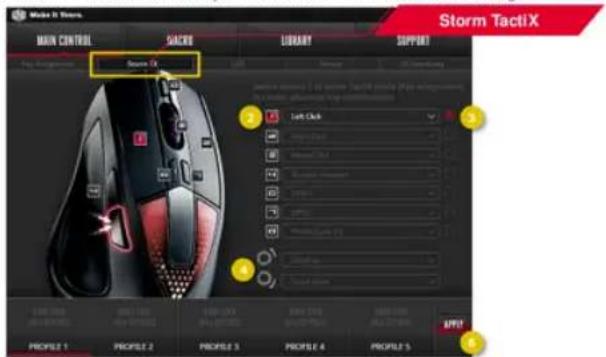
Click the checkbox next to the drop-down list that you would like to configure and use (activate).
4 The mouse wheel can be applied to a combo button by scrolling the mouse wheel up or down.
5 Repeat these steps for each of the settings that you would like to setup.
When all desired changes have been made, click the 'Apply' button.
特] Copyright 2015-6-Goodie Master Corporation, All Rights Reserved

LED and Custom OLED Logo Setting


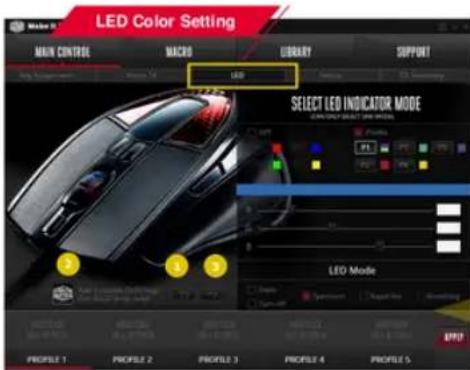
Setting LED Colors
Click on check box of DPI or Profile for setting color.
Sliding bars change the RGB colors for different DPI indicator. (From 0 to 255)
By sliding the bars back and forth, you can create a total of 16.8 million colors. The possibilities are endless and you can play around with it to find the perfect color for you.

LED and Custom OLED Logo Setting
Custom OLED Logo
Click the folder icon upload to the mouse. to open the image that you want to
2 Preview the uploaded custom logo.
* The maximum image size is 32 x 32 pixels, and image must be black & white.
2 Resets the custom logo to Cooler Master logo.
21 | Copyright 2015 © Cook@ Master Corporation AF Rights Reserved
LED Modes
There are five LED modes. Static / Spectrum / Rapid Fire / Breathing / Turn Off
With Static – the color stays solid.
Spectrum mode – the LED will cycle through all the colors of the rainbow.

Rapid fire – the rapid fire mode is a cool responsive effect and will make the LEDs flash when the left and right mouse buttons are clicked.
Breathing – the LED color slowly fades in and out.
Tum off - the LED will be off.

Mouse DPI and Sensor Setting

DPI Settings
Choose which DPI level you want to set the DPI.
Slide the bar right to increase the mouse sensitivity. The DPI can be set from 50 to 6400 DPI with 50 DPI per step.
*The further the tab is to the right, the faster the mouse cursor will move.
The X and Y axis can be adjusted independently by clicking the lock icon. 📋: Lock X&Y axis 🕒: Unlock X&Y axis
22 | Copyright 2015-8 Cooke Maker Corporation. All Rights Reserved.
Angle Snapping
There are ten levels of angle snapping. The angle snapping can be set from Low(1) to High(5). You can slide the bar right to decrease the motion data output of Y-axis

Lift Off Distance (LOD) Settings
There are five LOD levels. The LOD of sensor can be set from Low(1) to High(5). You can slide the bar right to increase the sensor LOD.

Angle Tuning
There are twelve levels to set the angle of the sensor. The angle tune ranges from -30° to +30° with steps of 5°. You can slide the bar right to increase the rotated angle of the sensor.


USB Polling Rate and OS Setting

| USB Polling Rate | The polling rate determines how often the mouse sends information to your computer. Increasing the polling interval will improve precision at the tradeoff of using more CPU resources. |
| OS Sensitivity | Mouse sensitivity is how far the mouse moves with a certain movement. |
| OS Double Click Speed | Adjust this setting to change how fast the left click buttons must be pressed to register a Double Click.The lower the number, the slower the presses to complete a Double Click will be.Set the number higher to require faster presses of the buttons to complete a Double Click. |
| Button Response Time | The delay time between the clicking of the mouse button and the system executing the button press.Set the slider to the left for faster response time. |
| Lock OS Setting | Locks the software from controlling the setting. The operating system mouse settings will control how the mouse functions. |
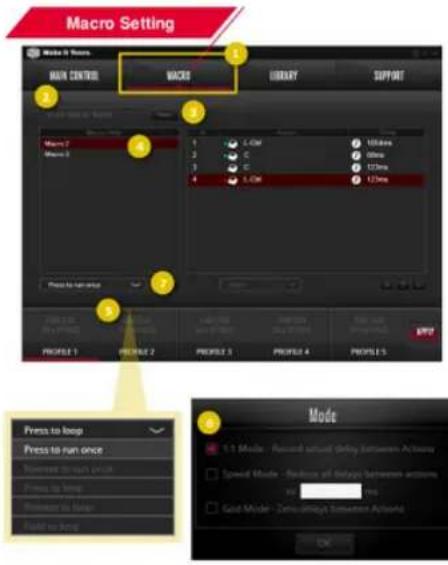
Create a Macro
Copyright 2015-9-Cooler Master Corporation. All Rights Reserved.
Macro
1 Click on the Macro tab to edit your Macros.
2 Click on Entry Master Name and give a name to the
3 Click on New to create a new macro.
Click on the Macro name in the list.
Click on the drop-down list to select an execution mode for this macro.
Click on the check box to choose the mode of delay time.
7 Click on Start. Execute your macro. In this example, we use the keyboard short-cut commands for copy.
Click on Step. The Macro is now stored.
The execution dropdown affects how the macro is triggered and how it runs:
| Press to run once | The macro is run through a single cycle as soon as the button is pressed down |
| Release to run once | The macro is run through a single cycle as soon as the button is released from a click |
| Press to loop | The macro runs and repeats on continuous cycles as soon as the button is pressed down. Pressing again will stop the cycle. |
| Release to loop | The macro runs and repeats on continuous cycles as soon as the button is released from a click. Press and release to stop the cycle. |
| Hold to loop | The macro will run and repeat on a continuous cycle as long as the button is held down. Releasing the button will stop the loop. |
Library Management

The Library tab allows you to manage your macro and profile database.
Macro
Utilize the 'Import' button to import downloaded or saved macros. Use the 'Export' button to store mouse macros in another location or so that you can share them with others.
The 'Macro Backup Files' section lists all saved macro-files that are not currently stored on the mouse.
Use these buttons to transfer macros to or from the onboard mouse memory.
Profile
1 Click the 'Profile' tab.
2 Import, Export or Delete profiles from this section.
3 Utilize these buttons to transfer macros to or from the onboard mouse memory.
Manage onboard mouse profiles from this section. Profiles can be individually reset back to factory defaults through the Reset button.

Setting the Language of Tool Tips

Language Settings
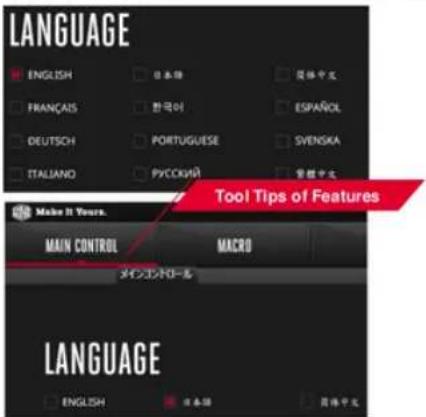
There are twelve different languages.
When you set the language in ENGLISH, the tool tips won't pop up for reference.
You can click the box next to language options to display translated tool tips for all the functions and features in the software.
You won't have to APPLY this setting.
The tool tips will pop up when you move the cursor near text.
Edit Profile and Custom Image
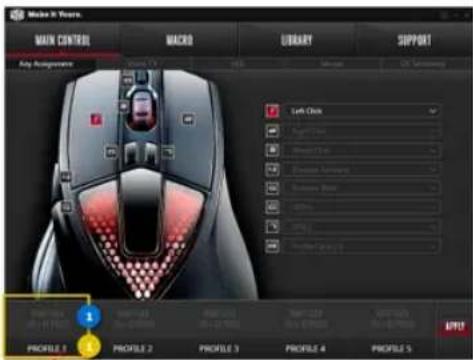
Profile Editing
Once all setting have been completed, click the 📄RTL button. The profile names and images will be updated to reflect your preferences.
The software allows you to edit your own profile name and image, and can you can disable/enable profiles.
Profile Setting
Select the Profile that you would like to edit the name or disable.
Right click on the profile and select Rename: then give a name to the profile. *Profile name only supported with ENGLISH and NUMBERS, can be no longer than 11 characters.
Right click on the profile and select Disable then the profile will be disabled. Please duplicate the process to reactivate the profile.
Profile Image
1 Select the Profile that you would like to upload your customized image:
2 Right click on the profile and select Image that you intend to upload. Load picture to open the The maximum size of a Profile Image is 145 x 62 pixels. Larger pictures will be scaled to fit this size.
3 Right click on the profile and select image of the profile. Clear to clear the COOLER MASTER
Support Tab

The support tab will give you information on further support with a button to the CM page which contains the latest drivers and updates for your Sentinel III and other CM products. The Version Info button will provide current information for both the software and the firmware on the mouse.
Download the latest drivers from
http://gaming.coolermaster.com/en/products/mice/sentinel-iv/
LEGAL INFORMATION
Cooler Master Warranty
Warranty all (non-networking) products purchased from COOLER MASTER as free from defects in material and workmanship for normal use by the original purchaser for warranty period.
The Cooler Master Warranty would like to assure all of the users of Cooler Master Products to be free from any defects as a result of faulty manufacturing or faulty components under the following terms and conditions:
COOLER MASTER is not responsible for damage to or loss of any programs, data, or removable storage media. You are responsible for backing up any programs or data on removable storage media.
Except for the warranties set forth herein, COOLER MASTER disclaims all other warranties, expressed or implied or statutory, including but not limited to the implied warranties of merchantability or fitness for a particular purpose.
Any implied warranties that may be imposed by applicable law are limited to the terms of this limited warranty. In no event shall COOLER MASTER be liable for any incidental, special or consequential damages, including but not limited to loss of business, profits, data or use, whether in an action in contract or tort or based on a warranty, arising out of or in connection with the use or performance of the product, even if COOLER MASTER has been advised of the possibility of such damages.
You agree that repair, replacement, as applicable, under the warranty services described herein is your sole and exclusive remedy with respect to any breach of the COOLER MASTER limited warranty set forth herein. if, despite the foregoing limitations, for any reason COOLER MASTER becomes liable to you for damages incurred by you in connection with this agreement, then, the liability of COOLER MASTER will be limited to the amount equal to the latest distributors price.
Some states or provinces/jurisdictions do not allow the exclusion or limitation of incidental or consequential damages for consumer products, and some states or provinces/jurisdictions do not allow limitations on how long an implied warranty lasts.
In such states or provinces/jurisdictions, the exclusions or limitations of this limited warranty may not apply to you. This limited warranty gives you specific legal rights.
You may also have other rights that vary from state to state/jurisdiction to jurisdiction. You are advised to consult applicable state and provincial/local laws.
LEGAL INFORMATION
1. Warranty Length
All products from Cooler Master at least carry 1 year warranty from the date of purchase, with the exception of power supply units which carry a 2-5 year warranty. If no proof of purchase (receipt or invoice of purchase) can be presented upon request, Cooler Master cannot be held responsible for warranty service.
2. Who is Protected?
The original customer purchasing the Cooler Master Product is covered under the Cooler Master Warranty Program.
3. What is and is NOT Covered
It is important to note that our warranty is not an unconditional guarantee for the duration of the Program. Any replaced parts become the property of Cooler Master. The Program does not apply to the software component of a product or a product which has been damaged due to accident, misuse, abuse, improper installation, usage not in accordance with product specifications and instructions, natural or personal disaster, or unauthorized alterations, repairs or modifications. The Program does not cover any events such as below:
• Any damages unrelated to manufacturing defects.
• Any unsuitable environment or use of the product in Cooler Master Opinion.
- Any product which has been modified without official permission from Cooler Master, or on which the serial number or warranty sticker has been defaced, modified, or removed.
Damage, deterioration or malfunction resulting from:
- Accident, abuse, misuse, neglect, fire, water, lightning, or other acts of god, commercial or industrial use, unauthorized product modification or failure to follow instructions included with the product.
• Third party products using Cooler Master Components will not be covered by warranty. See your vendor or the manufacturer for information about servicing.
• Repair or attempted repair by anyone not authorized by Cooler Master, Inc.
• Any shipment damages (claims MUST be made with the carrier).
LEGAL INFORMATION
- Unauthorized repairs to a Cooler Master product (power supplies) will void the warranty offered by the Program. Cooler Master reserves the right to refuse to service any product which has been altered, modified or repaired by non-Cooler Master Service personnel.
- Cooler Master does not warrant that this product will meet your requirements. It is your responsibility to determine the suitability of this product for your purpose.
- Removal or installation charges.
- You are responsible for the cost of shipping the product to Cooler Master. Cooler Master pays the cost of returning a product to you.
• Cooler Master reserves the right to replace the product with a service product at their sole discretion at any time.
4. Local Law and Your Warranty
This warranty gives you specific legal rights. You may also have other rights granted under local law. These rights may vary.
5. Limitations of Implied Warranties
There are no other oral or written warranties, expressed or implied, including but not limited to those of merchantability or fitness for a particular purpose. The duration of implied warranties is limited to the warranty length specified in Paragraph one.
6. To Obtain Technical Support
If you need help installing or troubleshooting a product please submit a technical support request form here.
LEGAL INFORMATION(continued)
7. Shipping
Based on company policy, customers are responsible for shipping costs to ship back the defective item for RMA repair/replace. Once the item is repaired/replaced, Cooler Master will ship the item back to the customer. Shipping methods will be at Cooler Master's discretion. Cooler Master will not be able to ship repaired/replaced items in the same method as the customer's because not only would this not be efficient, but it may delay the return of the repaired/replaced item. Therefore, Cooler Master reserves the rights to ship according to what it deems the most efficient standard method of shipping.
8. Exclusion of Damages (Disclaimer)
Cooler Master's sole obligation and liability under this Program is limited to the repair or replacement of a defective product at our discretion. Cooler Master shall not, in any event, be liable to the purchaser or any third party for any incidental or consequential damage, (including, but not limited to, damages resulting from interruption of service and loss of business), or liability in tort relating to this product or resulting from its use or possession.
Thank You.


- SENTINEL III - User Manual
- TABLE OF CONTENTS
- Features
- RGB Lighting System
- Never Retreat. Advance!
- Buttons Overview
- Specification
- Software Features
- Software Guide
- GUI Control
- Pull down Menu
- Main Button Assignment - 1
- Main Button Assignment - 2
- Rapid Fire
- Profile
- Main Button Assignment - 3
- Configuring the Storm TX Button
- ASSIGN 2 nd Functions
- LED and Custom OLED Logo Setting
- LED Modes
- Mouse DPI and Sensor Setting
- Angle Snapping
- Lift Off Distance (LOD) Settings
- Angle Tuning
- USB Polling Rate and OS Setting
- Macro
- Library Management
- Setting the Language of Tool Tips
- Edit Profile and Custom Image
- Profile Editing
- Support Tab
- LEGAL INFORMATION
- Cooler Master Warranty
- Warranty Length
- Who is Protected?
- What is and is NOT Covered
- Local Law and Your Warranty
- Limitations of Implied Warranties
- To Obtain Technical Support
- LEGAL INFORMATION(continued)
- Shipping
- Exclusion of Damages (Disclaimer)
Marke : CM Storm
Modell : Sentinel III
Kategorie : Computermaus