
EP22680BK - Kühlschrank COSTWAY - Kostenlose Bedienungsanleitung
Finden Sie kostenlos die Bedienungsanleitung des Geräts EP22680BK COSTWAY als PDF.


| Produkttyp | Kühlschrank |
| Marke | Costway |
| Modell | EP22680BK |
| Spannung | 115 V |
| Frequenz | 60 Hz |
| Stromaufnahme | ca. 1,5 A |
| Kältemittel | Brennbares Kältemittel (R600a oder ähnlich) |
| Temperaturregelung | Drehregler mit 7 Stufen (1 = wärmste, 7 = kälteste) und Aus-Stellung |
| Innenbeleuchtung | Nicht vorhanden (keine Angabe) |
| Ablageflächen | Herausnehmbare Glasablagen |
| Türfächer | Gallon-Türfach (für große Flaschen), Dose-Ausgabe-Fach |
| Türanschlag wechselbar | Ja |
| Abtauen | Manuell (Abtauwannensystem) |
| Nutzinhalt | Ca. 100 Liter (geschätzt) |
| Gewicht | Ca. 30 kg (geschätzt) |
| Geräuschemission | Typische Betriebsgeräusche (Kühlmittelzirkulation, Thermostat-Klicken) |
| Reinigungsmethode | Innen mit Backpulverlösung reinigen; Türdichtungen alle 3 Monate reinigen und mit Vaseline pflegen |
| Sicherheitshinweise | Kindersicherung (Türen entfernen bei Entsorgung), brennbares Kältemittel, keine Verwendung von Verlängerungskabeln empfohlen |
| Reparatur | Nur durch zertifiziertes Fachpersonal |
| Garantie | Siehe beiliegende Garantiekarte |
Häufig gestellte Fragen - EP22680BK COSTWAY
Benutzerfragen zu EP22680BK COSTWAY
0 Frage zu diesem Gerät. Beantworten Sie die, die Sie kennen, oder stellen Sie Ihre eigene.
Eine neue Frage zu diesem Gerät stellen
Laden Sie die Anleitung für Ihr Kühlschrank kostenlos im PDF-Format! Finden Sie Ihr Handbuch EP22680BK - COSTWAY und nehmen Sie Ihr elektronisches Gerät wieder in die Hand. Auf dieser Seite sind alle Dokumente veröffentlicht, die für die Verwendung Ihres Geräts notwendig sind. EP22680BK von der Marke COSTWAY.
BEDIENUNGSANLEITUNG EP22680BK COSTWAY
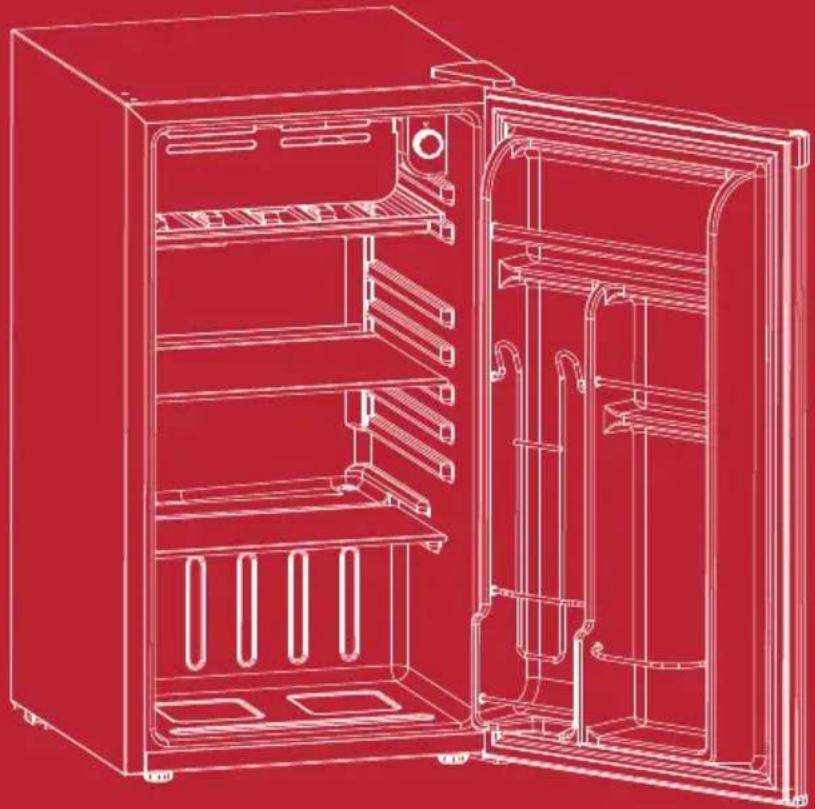
natural_image
Line drawing of an open refrigerator with shelves and doors, no text or symbols presentSAFETY PRECAUTIONS
When using this appliance, always exercise basic safety precautions, including the following:
1) Use this appliance only for its intended purpose as described in this use and care guide.
2) This refrigerator must be properly installed in accordance with the installation instructions before it is used. See grounding instructions in the installation section.
3) Never unplug your refrigerator by pulling on the power cord. Always grasp the plug firmly and pull straight out from the outlet.
4) Repair or replace immediately, all electric service cords that have become frayed or otherwise damaged. Do not use a cord that shows cracks or abrasion damage along its length, the plug or the connector end.
5) Unplug your refrigerator before cleaning or before making any repairs.
Note: If for any reason this product requires service, we strongly recommend that a certified technician performs the service.
6) Do not use any electrical device or any sharp instrument in defrosting your refrigerator.
7) If your old refrigerator is not being used, we recommend that you remove the doors and leave the shelves in place. This will reduce the possibility of danger to children.
8) After your refrigerator is in operation, do not touch the cold surfaces in the refrigerator compartment, particularly when hands are damp or wet. Skin may adhere to these extremely cold surfaces.
9) This refrigerator should not be recessed or built-in an enclosed cabinet. It is designed for freestanding installation only.
10) Do not operate your refrigerator in the presence of explosive fumes.
SAVE THESE INSTRUCTIONS
DANGER
Risk of child entrapment. Before you throw away your old refrigerator or refrigerator, take off the doors. Leave the shelves in place so that children may not easily climb inside.
Thank you for using our product. This easy-to-use manual will guide you in getting the best use of your refrigerator.
Remember to record the model and serial number. They are on a label in back of the refrigerator.
Model number
Serial number
Date of purchase
Staple your receipt to your manual.
You will need it to obtain warranty service.
DANGER – Risk Of Fire Or Explosion. Flammable Refrigerant Used. To Be Repaired Only By Trained Service Personnel. Do Not Puncture Refrigerant Tubing.
CAUTION – Risk Of Fire Or Explosion. Flammable Refrigerant Used. Consult Repair Manual/Owner's Guide Before Attempting To Service This Product. All Safety Precautions Must be Followed.
CAUTION – Risk Of Fire Or Explosion. Dispose Of Prop- erty In Accordance With Federal Or Local Regulations. Flammable Refrigerant Used.
CAUTION – Risk Of Fire Or Explosion Due To Puncture Of Refrigerant Tubing; Follow Handling Instructions Carefully. Flammable Refrigerant Used.
Table Of Contents
PAGE
Safety Precautions....1
Parts And Features 4
Installing Your Refrigerator 5
Unpacking Your Refrigerator 5
Proper Air Circulation 5
Electrical Requirements 5
Use of Extension Cords 6
Install Limitations 6
Door Reversal 6
Door Alignment 7
Refrigerator Features And Use 8
Operating Your Refrigerator 8
General Features 8
Eraser Board Use 8
Defrosting And Draining 9
Normal Operating Sounds 9
Proper Refrigerator Care and Cleaning 10
Cleaning and Maintenance....10
Power Interruptions....11
Vacation and Moving Care....11
Troubleshooting 12
Parts And Features
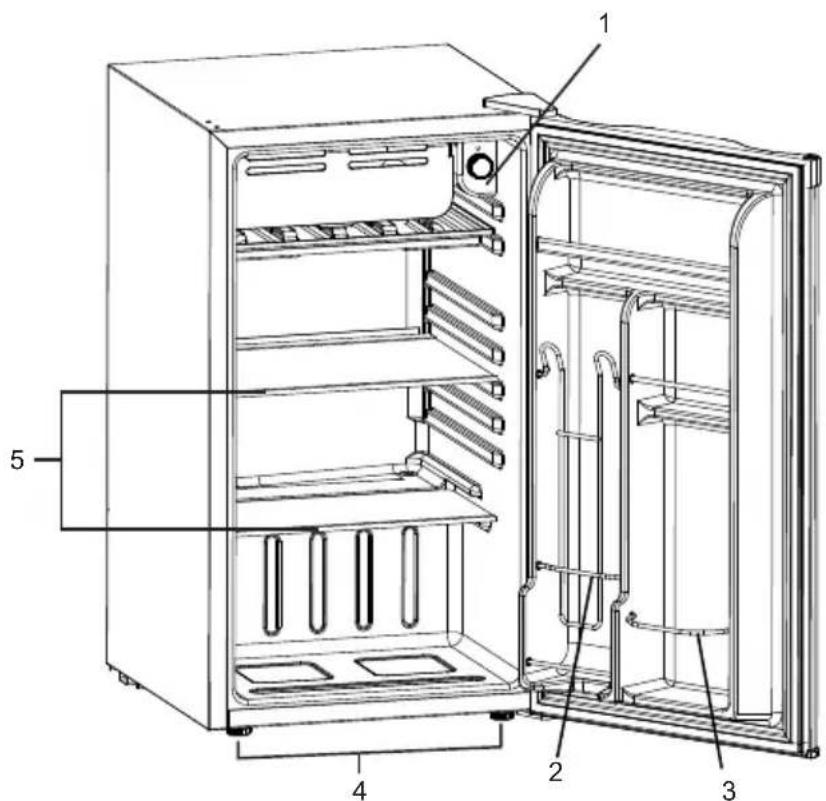
- Adjustable Temperature Control
- Dispense-A-Can
- Gallon Door Bin Accomodates Tall Bottles
- Adjustable Front Leveling Legs
- Removable Glass Shelves
Installing Your Refrigerator
Unpacking Your Refrigerator
-
Remove all packaging material. This includes the foam base and all adhesive tape holding the refrigerator accessories inside and outside.
-
Inspect and remove any remains of packing, tape or printed materials before powering on the refrigerator.
Proper Air Circulation
- To assure your refrigerator works at the maximum efficiency it was designed for, you should install it in a location where there is proper air circulation, plumbing and electrical connections.
- The following are recommended clearances around the refrigerator:
Sides....3/4"(19mm)
Top 2" (50mm)
Back 2" (50mm)
Electrical Requirements
- Make sure there is a suitable power Outlet (115 volts, 15 amps outlet) with proper grounding to power the refrigerator.
- Avoid the use of three plug adapters or cutting off the third grounding in order to accommodate a two plug outlet. This is a dangerous practice since it provides no effective grounding for the refrigerator and may result in shock hazard.
DANGER – Risk Of Fire Or Explosion. Flammable Refrigerant Used. To Be Repaired Only By Trained Service Personnel. Do Not Puncture Refrigerant Tubing
CAUTION – Risk Of Fire Or Explosion. Flammable Refrigerant Used. Consult Repair Manual/Owner's Guide Before Attempting To Service This Product. All Safety Precautions Must be Followed
CAUTION – Risk Of Fire Or Explosion. Dispose Of Property In Accordance With Federal Or Local Regulations. Flammable Refrigerant Used
CAUTION – Risk Of Fire Or Explosion Due To Puncture Of Refrigerant Tubing; Follow Handling Instructions Carefully. Flammable Refrigerant Used
Use of Extension Cord
- Avoid the use of an extension cord because of potential safety hazards under certain conditions. If it is necessary to use an extension cord, use only a 3-wire extension cord that has a 3-blade grounding plug and a 3-slot outlet that will accept the plug. The marked rating of the extension cord must be equal to or greater than the electrical rating of the appliance.
Install Limitations
- Donot install your refrigerator in any location not properly insulated or heated e.g. garage etc. Your refrigerator was not designed to operate in temperature settings below 55° Fahrenheit.
- Selecta suitable location for the refrigerator on a hard even surface away from direct sunlight or heat source e.g. radiators, baseboard heaters, cooking appliances etc.
Reversing the Door Hinge
- Remove the top hinge cover.
- Using Phillips Head Screwdriver, loosen and remove the screws holding the top hinge in place.
- Remove top hinge and carefully lift off the door.
- Remove the screw hole plugs from the opposite side and insert the plugs in the screw hole openings of the just removed screws.
- Remove any loose items in the refrigerator and carefully turn refrigerator on its back and place in a secure area.
- Loosen the screws holding the lower hinge bracket to the refrigerator and remove screws and bracket.
- Remove (2) screws from the other side and insert in the previously removed screw holes.
- Remove door pin by turning counter clockwise and reinsert to the underside of the bracket and tighten.
- Align bracket and insert (2) remaining screws into the holes provided.
- Align hole in the door with the door pin and washer and gently push down until firm.
- Align upper hinge bracket with screw holes insert screws and partially secure, check that door and cabinet are properly aligned and then secure tightly.
- Replace hinge cap.
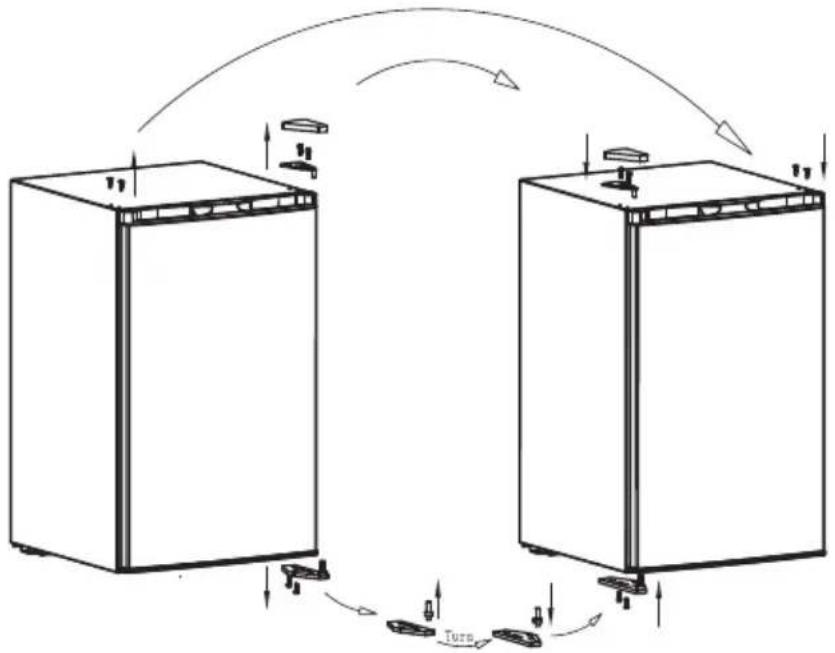
flowchart
graph TD
    A["Left Chamber"] --> B["Right Chamber"]
    B --> C["Turb"]
    C --> A
    style A fill:#f9f,stroke:#333
    style B fill:#f9f,stroke:#333
    style C fill:#ccf,stroke:#333
NOTE: As the door gets pressed in during shipping, after reversing the door, the gasket may have to be reset. This is done to prevent the cool refrigerated air from escaping. If there is a gap between the door gasket and the cabinet, set the gasket by gently pulling it out to seal the gap.
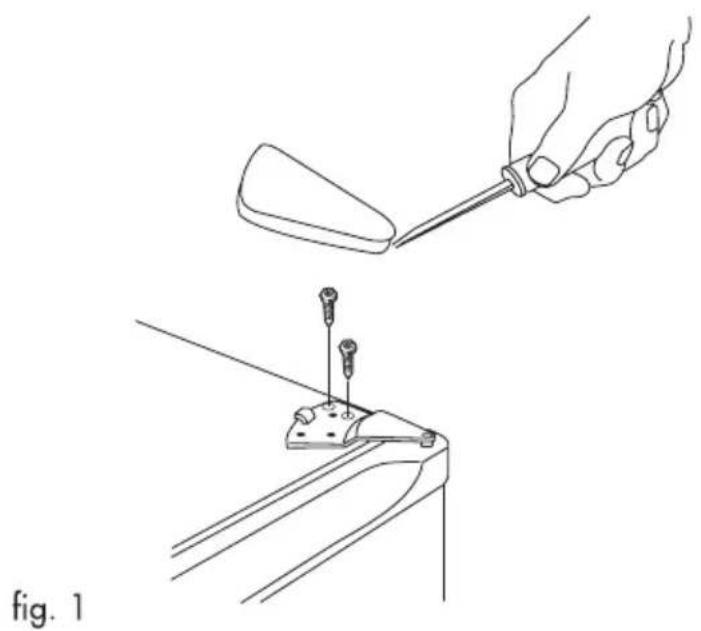
Door Alignment (see fig. #1)
- Remove the top hinge cover by using a flathead screwdriver. Place the head under the front edge of the cap and gently lift.
- Loosen the top hinge screws using a Phillips head screw driver.
- Adjust the door or put a spacer in between and tighten the screws.
- Replace the top hinge cover by aligning the rear of the cover with the rear of the hinge. Press firmly on the front of the cover until it snaps in place.
natural_image
Technical line drawing showing two mechanical assembly steps: one with a hand holding a tool, the other with a tool inserted into a bracket (no text or symbols)Refrigerator Features And Use
General Features
Your refrigerator will automatically maintain the temperature level you select. The temperature control dial has 7 settings plus off. 1 is the warmest. 7 is the coldest. Turning the dial to 0 stops cooling in both the refrigeration and freezer sections. At first, set the dial to 4 and allow 24 hours to pass before adjusting the temperature to your needs.
(Note: If the refrigerator has been placed in a horizontal or tilted position for any period of time wait 24 hours before plugging the unit in.)
Refrigerator Interior Shelves
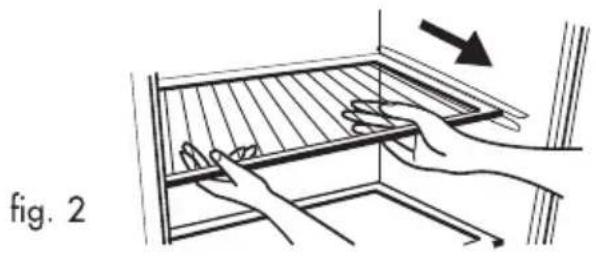
To remove or replace a full-width slide-out shelf: (see fig. # 2)
- Gently tilt the shelf up and slide forward until the shelf has been completely removed.
- To replace the shelf, gently slide the shelf back.
natural_image
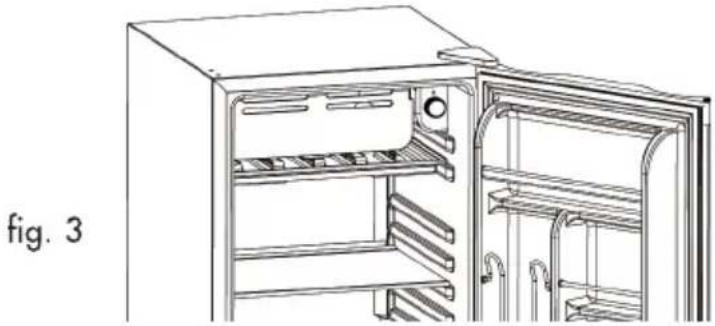
Illustration of hands installing or adjusting a grid-like structure with an arrow indicating direction (no text or symbols)Defrosting Your Refrigerator (see fig. # 3)
- For maximum energy efficiency, defrost freezer section whenever frost accumulates to a thickness of 1/4" or more on freezer walls. Note that frost tends to accumulate more during the summer months.
- To defrost freezer, remove food and ice cube tray from the freezer section. Your model requires you to place the drip tray under the freezer section (see Fig. 3). To defrost turn the temperature control dial to the O position. Defrosting may take a few hours. To speed up defrost time, keep the door open and place a bowl of warm water in the refrigerator.
- During the defrost cycle, water will accumulate in the drip tray. The drip tray may also need to be emptied during the defrost process. Do not leave unattended.
• After defrosting, empty and wipe down the drip tray, as well as the interior of the refrigerator. You may now reset your refrigerator to the desired temperature and return food.
natural_image
Line drawing of an open refrigerator with doors and shelves, labeled 'fig. 3' (no text or symbols on the diagram itself)Normal Operating Sounds You May Hear
- Boiling water, gurgling sounds or slight vibrations that are the result of the refrigerant circulating through the cooling coils.
• The thermostat control will click when it cycles on and off.
Proper Refrigerator Care and Cleaning
Cleaning and Maintenance
Warning:
To avoid electric shock always unplug your refrigerator before cleaning. Ignoring this warning may result in death or injury.
Caution:
Before using cleaning products, always read and follow manufacturer's instructions and warnings to avoid personal injury or product damage.
General:
- Prepare a cleaning solution of 3-4 tablespoons of baking soda mixed with warm water. Use sponge or soft cloth, dampened with the cleaning solution, to wipe down your refrigerator.
- Rinse with clean warm water and dry with a soft cloth.
- Do not use harsh chemicals, abrasives, ammonia, chlorine bleach, concentrated detergents, solvents or metal scouring pads. SOME of these chemicals may dissolve, damage and/or discolor your refrigerator.
Door Gaskets:
- Clean door gaskets every three months according to general instructions. Gaskets must be kept clean and pliable to assure a proper seal.
- Petroleum jelly applied lightly on the hinge side of gaskets will keep the gasket pliable and assure a good seal.
Power Interruptions
- Occasionally there may be power interruptions due to thunderstorms or other causes. Remove the power cord from AC outlet when a power outage occurs. When power has been restored, replug power cord to AC outlet. If outage is for a prolonged period, inspect and discard spoiled or thawed food in freezer. Clean freezer before reusing.
Vacation and Moving Care
- For long vacations or absences, empty food from refrigerator, move the temperature DIAL to the "O" position and clean the door gaskets according to "General cleaning" section. Prop doors open, so air can circulate inside. When moving always move the refrigerator vertically. Do not move with the unit lying down. Possible damage to the sealed system could occur.
TroubleShooting
Refrigerator Does Not Operate
- Check if thermostat control is not in the "0" position.
- Check if refrigerator is plugged in.
- Check if there is power at the ac outlet, by checking the circuit breaker.
Food temperature appears too warm
• Frequent door openings.
- Allow time for recently added warm food to reach fresh food or freezer temperature.
- Check gaskets for proper seal.
- Adjust temperature control to colder setting.
Food temperature is too cold
- If temperature control setting is too cold, adjust to a warmer setting and allow several hours for temperature to adjust.
Refrigerator runs too frequently
- Make sure the refrigerator is not in direct contact with sunlight.
- This may be normal to maintain constant temperature during high temperature and humid days.
- Doors may have been opened frequently or for an extended period of time.
- Check gasket for proper seal.
- Check to see if doors are completely closed.
Moisture build up on interior or exterior of the refrigerator:
• This is normal during high humidity periods.
- Prolonged or frequent door openings.
- Check door gaskets for proper seal.
Refrigerator has an odor:
- Interior needs cleaning.
- Foods improperly wrapped or sealed are giving off odors.
Refrigerator door does not shut properly:
- Place a level on top of the refrigerator. If the refrigerator is not level, adjust the front leveling legs.
• Re-align refrigerator door. - Check for blockages e.g. food containers, crisper cover, shelves, bins etc...

TIPS:
Your suggestions and comments for Costway are really important to us! We sincerely solicit you to go back to our shop and leave a good rating in just a simple click. It would be quite encouraging if you could kindly do so like below:
★★★★★ Great products so far
February 24, 2018
Great product so far. Fast delivery, easy setup, and working without any issues.
With your inspiring rating, Costway will be more consistent to offer you EASY SHOPPING EXPERIENCE, GOOD PRODUCTS and EFFICIENT SERVICE!



- SAFETY PRECAUTIONS
- SAVE THESE INSTRUCTIONS
- DANGER
- Table Of Contents
- PAGE
- Parts And Features
- Installing Your Refrigerator
- Unpacking Your Refrigerator
- Proper Air Circulation
- Electrical Requirements
- Use of Extension Cord
- Install Limitations
- Reversing the Door Hinge
- Door Alignment (see fig. #1)
- Refrigerator Features And Use
- General Features
- Refrigerator Interior Shelves
- Defrosting Your Refrigerator (see fig. # 3)
- Normal Operating Sounds You May Hear
- Proper Refrigerator Care and Cleaning
- Cleaning and Maintenance
- Warning:
- Caution:
- General:
- Door Gaskets:
- Power Interruptions
- Vacation and Moving Care
- TroubleShooting
- Refrigerator Does Not Operate
- Food temperature appears too warm
- Food temperature is too cold
- Refrigerator runs too frequently
- Moisture build up on interior or exterior of the refrigerator:
- Refrigerator has an odor:
- Refrigerator door does not shut properly:
- TIPS:
Marke : COSTWAY
Modell : EP22680BK
Kategorie : Kühlschrank