
FP10023US-DK - Eismaschine COSTWAY - Kostenlose Bedienungsanleitung
Finden Sie kostenlos die Bedienungsanleitung des Geräts FP10023US-DK COSTWAY als PDF.


| Produkttyp | Portable Eismaschine |
| Marke | Costway |
| Modell | FP10023US-DK |
| Wassertankkapazität | 3,7 Liter |
| Eisproduktion (ca.) | 12 kg pro 24 Stunden |
| Eisvorratsbehälter | Schublade mit Sichtfenster |
| Stromversorgung | 115 V, 60 Hz, geerdeter Stecker |
| Bedienfeld | Touch-Tasten: Eis, Reinigung, Licht |
| Anzeigen | Wassermangel, Eis voll, Betrieb |
| Gehäuse | Metall |
| Sicherheit | Automatische Abschaltung bei vollem Eisbehälter oder Wassermangel; Kindersicherung nicht spezifiziert |
| Reinigung | Manuell mit mildem Reinigungsmittel; Wasser über Ablassstopfen ablassen |
| Wartung | Wasser alle 24 Stunden wechseln; Gerät bei Nichtgebrauch entleeren |
| Abmessungen (ca.) | Nicht angegeben; typisch ca. 30 x 25 x 35 cm |
| Gewicht (ca.) | Nicht angegeben; typisch ca. 10 kg |
| Zubehör | Abtropfschale, Wasserauffangbehälter (im Lieferumfang) |
| Garantie | Kundendienst kontaktieren; Austausch defekter Teile |
Häufig gestellte Fragen - FP10023US-DK COSTWAY
Benutzerfragen zu FP10023US-DK COSTWAY
0 Frage zu diesem Gerät. Beantworten Sie die, die Sie kennen, oder stellen Sie Ihre eigene.
Eine neue Frage zu diesem Gerät stellen
Laden Sie die Anleitung für Ihr Eismaschine kostenlos im PDF-Format! Finden Sie Ihr Handbuch FP10023US-DK - COSTWAY und nehmen Sie Ihr elektronisches Gerät wieder in die Hand. Auf dieser Seite sind alle Dokumente veröffentlicht, die für die Verwendung Ihres Geräts notwendig sind. FP10023US-DK von der Marke COSTWAY.
BEDIENUNGSANLEITUNG FP10023US-DK COSTWAY
COSTWAY
USER'S MANUAL
Portable ice maker FP10023US-DK
THIS INSTRUCTION BOOKLET CONTAINS IMPORTANT SAFETY INFORMATION. PLEASE READ AND KEEP FOR FUTURE REFERENCE.
Please give us a chance to make it right and do better!
Contact our friendly customer service department for help first.
Replacements for missing or damaged parts will be shipped ASAP!
Follow Costway
Visit us: www.costway.com


TABLE OF CONTENTS
IMPORTANT SAFETY INSTRUCTIONS....3
PREPARING YOUR ICE MAKER FOR USE
IMPORTANT SAFETY TIPS....4
GETTING TO KNOW YOUR UNIT....5
OPERATING PROCEDURES & MAINTENANCE
UNPACKING YOUR ICE MAKER....5
CONNECTING YOUR ICE MAKER....6
CLEANING AND MAINTAINING YOUR ICE MAKER....6
USING YOUR ICE MAKER....6-9
TROUBLESHOOTING....10
DISPOSAL 10
Contact Us!
Do NOT return this item.
Contact our friendly customer service department for help first.

Before You StartBefore Y
⚠️ Please read all instructions carefully.
⚠️ Retain instructions for future reference.
Separate and count all parts and hardware.
Read through each step carefully and follow the proper order.
We recommend that, where possible, all items are assembled near to the area in which they will be placed in use, to avoid moving the product unnecessarily once assembled.
Always place the product on a flat, steady and stable surface.
Keep all small parts and packaging materials for this product away from babies and children as they potentially pose a serious choking hazard.
IMPORTANT SAFETY INSTRUCTIONS
Your safety and the safety of others are very important.
We provide many important safety information for your appliance in this manual.
Always read and obey all safety messages.
This is the safety alert symbol:

All safety messages will follow the safety alert symbol and the word "DANGER" or "WARNING".

DANGER

WARNING
These words mean:
Failure to follow the instructions immediately may result in death or serious injury.
All safety information will tell you about potential hazards, how to reduce the likelihood of injury, and tell you what will happen if you don't follow the instructions.
PREPARING YOUR ICE MAKER FOR USE
IMPORTANT SAFETY TIPS
When using electrical appliances, basic safety precautions should be followed to reduce the risk of fire, electric shock, and injury to persons or property. Read all instructions before using any appliance.
- Do not operate this, or any other appliance with a damaged cord.
If the supply cord is damaged, it must be replaced by qualified person in order to avoid a hazard.
This ice-maker must be positioned so that the plug is accessible.
Connect to properly grounded outlets only. No other appliance should be plugged into the same outlet. Be sure that the plug is fully inserted into the receptacle.
- Do not run the power cord over carpeting or other heat insulators. Do not cover the cord. Keep cord away from traffic areas, and do not submerge in water.
- We do not recommend the use of an extension cord, as it may overheat and become a risk of fire. If you must use an extension cord, use No.14AWG minimum size and rated no less than 1875 watts.
● Unplug the ice maker before cleaning or making any repairs or servicing.
● Exercise caution and use reasonable supervision when appliance is used near children.
- Do not use your ice-maker outdoors. Place the ice-maker away from direct sunlight and make sure that there is at least 6 inches of space between the back of your unit and wall. Keep a minimum distance of 6 inches on each side of your unit free.
- Do not use other liquid to make the ice-cube other than water.
- Do not clean your ice maker with flammable fluids. The fumes can create a fire hazard or explosion.
- Do not tip over.
- If the ice maker is brought in from outside in wintertime, give it a few hours to warm up to room temperature before plugging it in.
WARNING: This appliance must be earthed.
IMPORTANT:
The wires in this mains lead are colored in accordance with the following code:
Green or Green with a strip yellow: Grounding
White: Neutral
Black: Live
To avoid a hazard due to instability of the appliance, it must be placed at an even or flat surface.
GETTING TO KNOW YOUR UNIT
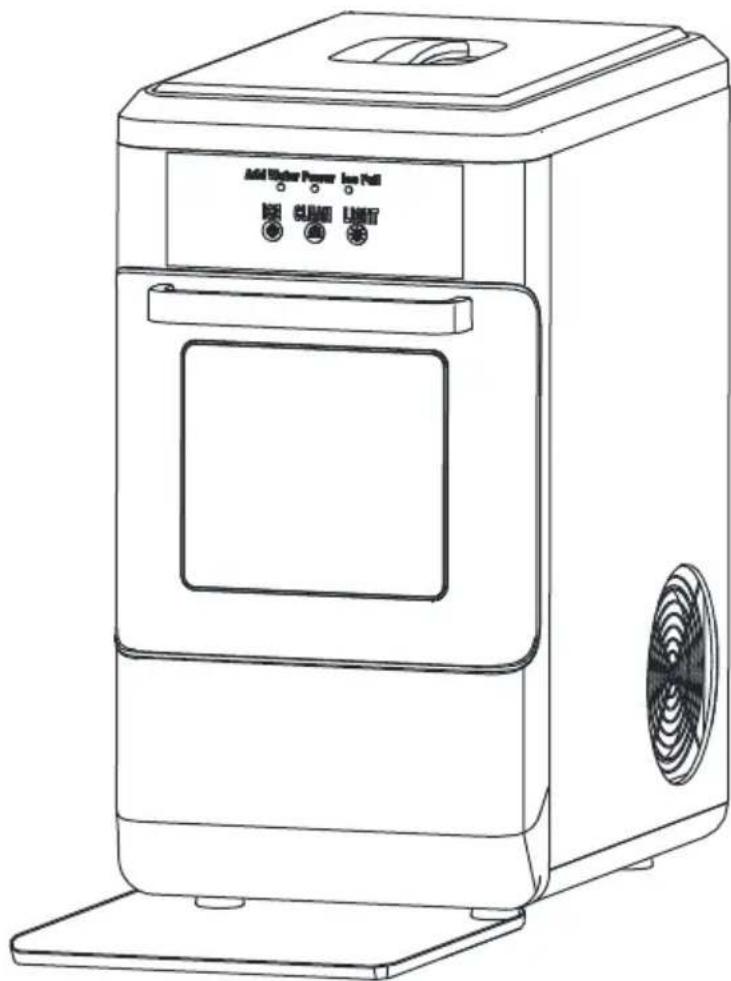
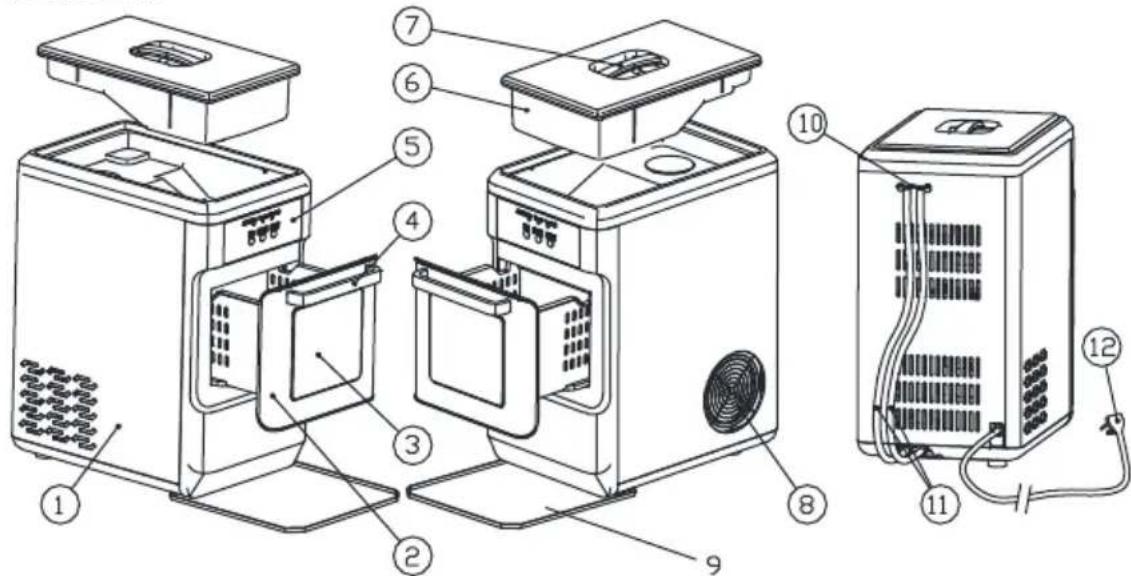
- Metal shell
- Drawer
- Observation window: See how much ice has been stored in the drawer.
- Handle for drawer.
- Control panel:
Indicator light: Lack of water in reservoir, Power, Ice full
Button: ICE, CLEAN, LIGHT
- Water reservoir
- Handle for water reservoir
- Hot air outlet
- Drip tray
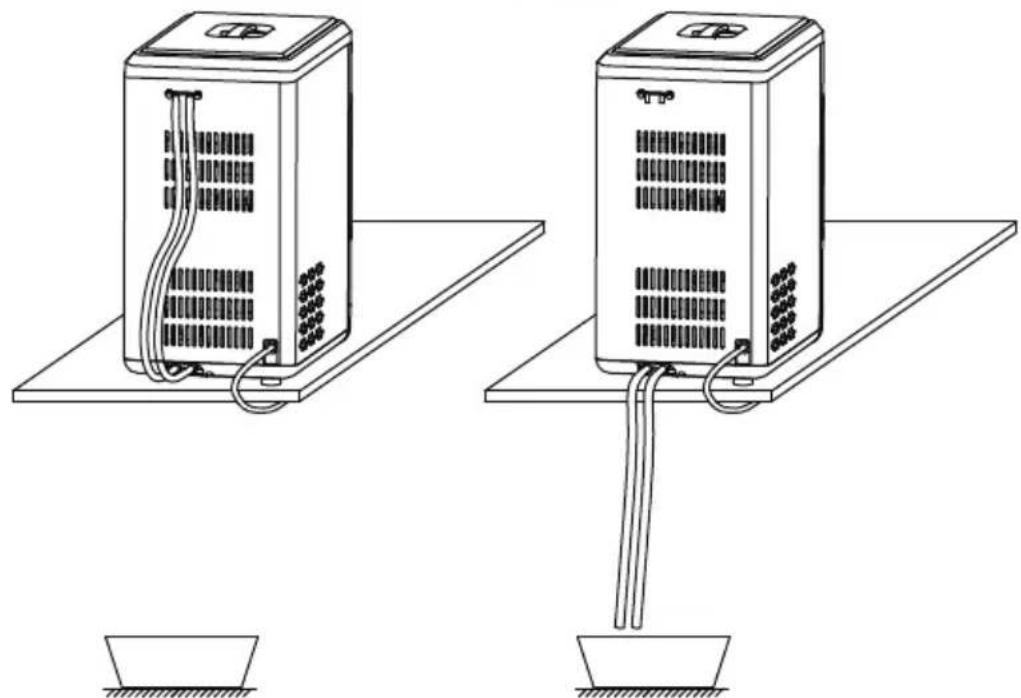
- Water drain cap: After cleaning procedure, remove drain cap from the back of the appliance, pull out the cap from the drainpipe, empty the tank under the drawer, then reinsert the cap and put it back again.
- Drainpipe: After cleaning procedure, you can collect dirty water from the drainpipe (there are two pipes: one connects to the evaporator, the other one connects to the water tank under the drawer).
- Power cord
OPERATING PROCEDURES & MAINTENANCE
UNPACKING YOUR ICE MAKER
- Remove the exterior and interior packaging, and then check all the accessories are included. If any parts are missing, please contact our customer service.
- Remove all the tapes on the unit; take out the accessory parts inside.
- Clean the interior with lukewarm water and a soft cloth.
- Locating your ice maker on a level counter table far from direct sunlight and other sources of heat (i.e.: stove, furnace, and radiator). Make sure that there is at least 6 inches between the back and
sides of your ice maker with the wall.
- Allow one hour for the refrigerant fluid to settle down before plugging your ice maker in.
- The power plug must be accessible directly.
WARNING: fill with potable water only. Only use drinking water.
CONNECTING YOUR ICE MAKER
DANGER

*Improper use of the grounded plug can result in the risk of electrical shock. If the power cord is damaged please call our customer service.
- This unit should be properly grounded for your safety. The power cord of this appliance is equipped with a grounding plug which mates with standard grounding wall outlets to minimize the possibility of electric shock.
- Plug your appliance into an exclusive, properly installed, grounding wall outlet. Do not under any circumstances; damage the grounding means of the plug. Any questions concerning power and/or grounding should be directed toward a certified electrician.
CLEANING AND MAINTAINING YOUR ICE MAKER
- This appliance requires a standard 115 Volt, 60 Hz electrical outlet with good grounding means.
Before using your ice maker, it is strongly recommended to clean it thoroughly. Unplug the unit before cleaning or making any maintenance.
- Take out the drawer and water reservoir on the top.
- Clean the interior with diluted detergent, warm water and a soft cloth. First pour the warm water with diluted detergent into the internal water reservoir, and then use the soft cloth to wipe the surface.
- Again use the water to rinse the inside parts, and drain out the water by unplugging the drain cap on the back.
- The outside of the ice maker should be cleaned regularly with a mild detergent solution and warm water.
- Dry the interior and exterior with a soft cloth.
- When the appliance is not in use for a long time, open water drain cap to drain out water completely from water reservoir.
USING YOUR ICE MAKER
How to start the unit
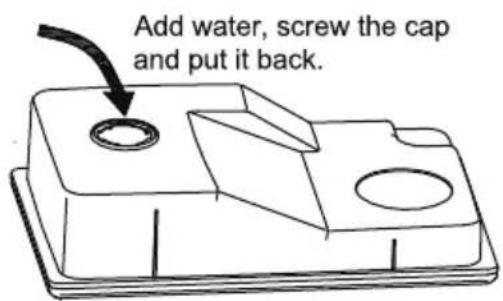
- Take out the water reservoir on the top, place the bottom up, open the cap, pour potable water into water reservoir, 0.97 gallon (3.7 liters) water at most at one time. Screw the cap on to the reservoir,
and put it back on the top of the appliance again.
-
Before you put back the drawer, please make sure the water tank under the drawer is empty, if is not, unplug water drain cap to drain out water completely.
-
Put the drip tray in position.
natural_image
Line drawing of a microwave oven with airflow arrows indicating process flow (no text or symbols)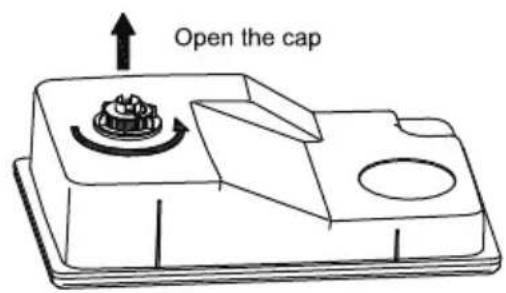
Operation and display areas
Add water Power Ice Full


ICE CLEAN LIGHT


Plug in the power cord, the power indicator is on: you can operate this appliance by touch the button on panel as shown above, the main function includes: ice, clean and light.
CLEAN
For the first time, or the clean procedure has not been ran for a long time, it is highly recommended to run this procedure at first.
-
Before clean procedure, please check the drainpipe behind the appliance, make sure the water drain cap has been inserted into the drainpipe; otherwise the appliance will not work properly.
-
Press "CLEAN" button "💡", the icon lights up, 5 seconds later, this icon flashes, it will run cleaning
procedure for at least 20 minutes, then the icon goes out. Press this button again, it will stop cleaning.
- After cleaning procedure, move the appliance to the edge of the desktop, make sure that the appliance is placed steady, place a water container under the appliance, remove drain plug from the back, pull out the plug from the drainpipe, water in the tank under the drawer and the evaporator will drain into the water container, then reinsert the plug and put it back again.
natural_image
Two identical electrical heating units with wiring and a cup, connected to a base plate (no text or symbols visible)Change water in the water reservoir every 24 hours to ensure a reasonable hygiene level. If the unit isn't to be used, drain all water & dry the water reservoir.
How to obtain the ice-cube
-
Before we start making ice, please check the drainpipe behind the appliance, make sure the water drain cap has been inserted into the drainpipe; otherwise the appliance will not work properly.
-
Press the "ICE" button " ", the icon lights up, 5 seconds later, this icon flashes, it begins to work, Press this button again, it will stop making ice. During ice making procedure, you can see how much ice has been stored in the drawer through the observation window.
-
For the first time, or if the appliance has not been used for a long time, it is recommended to clean this appliance before you start to make ice.
-
While the ice-maker is on, verify water level periodically. If water pump can't pump out water, the ice maker will stop automatically, and the "Add water" indicator will on. Need to pour water into the water reservoir inside.
Light on/off
- Press the “LIGHT” button “💡”, the light inside the appliance is on, press this button again, the light is off.
When Ice Full indicator is on
- The ice maker automatically stops working when the ice-cube is full inside and the "ice full" Indicator is on.
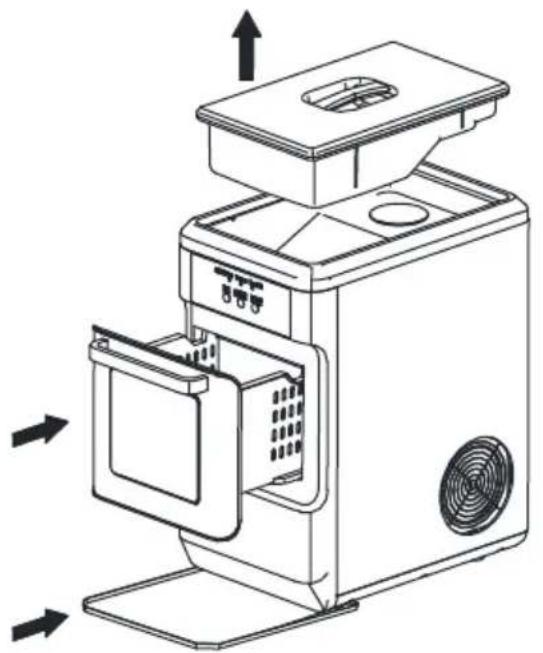
Open the drawer
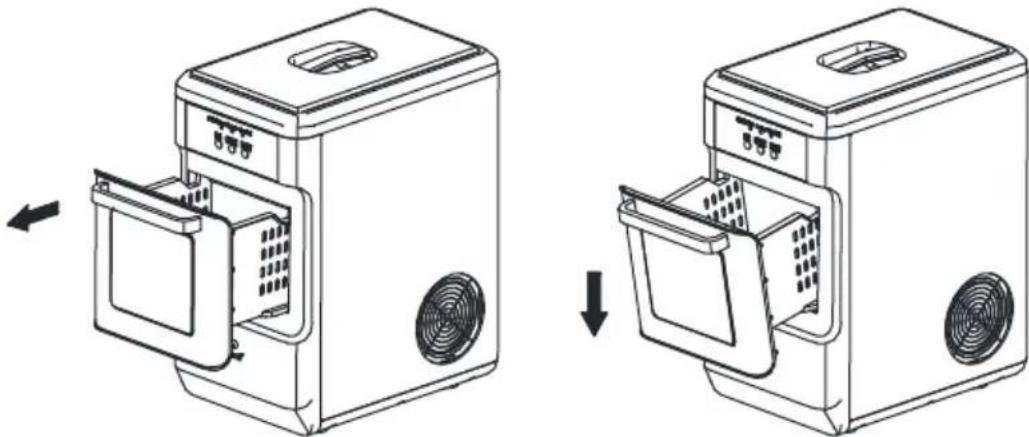
- Hold the drawer handle gently and pull it out along the horizontal direction, until the back of the drawer contacts the front panel and then gently put it down, the drawer will have a certain angle hanging in the front panel. Instead, when you need to close the drawer, hold the drawer handle and place the drawer horizontally, then gently push it into full closure.
natural_image
Line drawing of two different kitchen appliances with ventilation grilles, shown from front and side views (no text or symbols)Take out the drawer
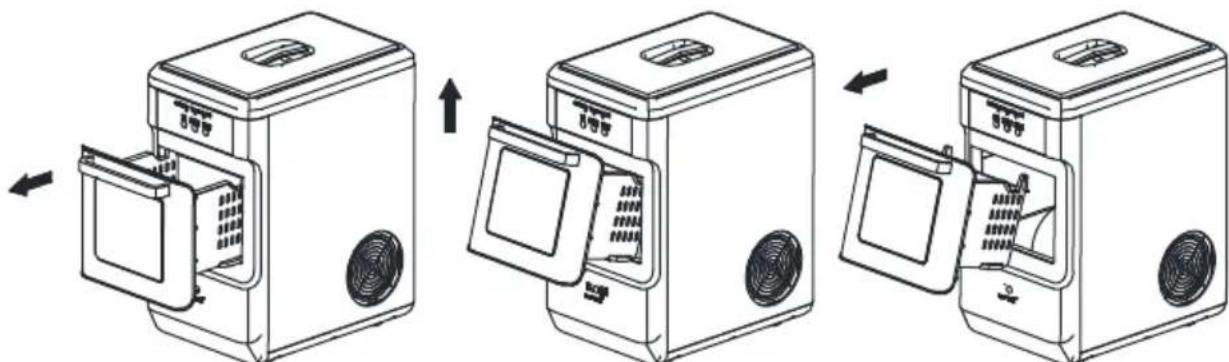
- Hold the drawer handle gently and pull it out along the horizontal direction, until the back of the drawer contacts the front panel, and then gently lifted it up at a certain angle and pulled it out. Instead, when you need to reload the drawer, you tilt the drawer in the same direction at a certain angle. First, you put the back side of the drawer into the front panel, slowly flatten the drawer, and then gently push it into full closure.
natural_image
Three-step line drawing of a washing machine with open doors and fan openings, showing internal components and mounting mechanism (no text or symbols)TROUBLESHOOTING
| PROBLEM | POSSIBLE CAUSE | SOLUTION |
| "Add Water" indicator lights up | Lack of Water. | Stop the ice maker, fill water, and press "ICE"/"CLEAN" button again to restart the unit. |
| "Ice-Full" indicator lights up | There is too much ice. | Suggest you to obtain the ice-cube. |
| (No ice cube inside). | Remove the probable obstacle inside or clean the inside wall of the ice storage | |
| Press "ICE" button for 5 seconds, it will work for 80 minutes. | ||
| Light and ICE icon flashing | Ambient temperature or water temperature in inner tank is too high. | Please run the ice maker below 90 Fahrenheit degree ambient and pour colder water into tank. |
| Refrigerant liquid leakage. | Press the ICE button twice, restart ice making program, wait for 50 minutes, if this problem shows up again, verify by a qualified technician. | |
| Cover motor is broken | ||
| Pipe in the cooling system is blocked. | ||
| Making Ice too slowly | Hot Air outlet has been blocked by something. | Hot Air outlet must be guaranteed to have more than 6inches of ventilation distance. |
| Water temperature in inner tank is too high. | Water temperature requirement between 7°C-32°C(45°F -89°F) | |
| Refrigeration system malfunctions. | Verify by a qualified technician. | |
| Water leakage | Drain plug not in place | Put the drain plug in place. |
| Pipe Joint in the appliance may Loose | Verify by a qualified technician. | |
| The seal has reached service life | Verify by a qualified technician. |
Disposal
When the unit is not to be used again, disposal of this unit's material shall be in accordance with national regulations.
Welcome to visit our website and purchase our quality products!
With your inspiring rating, COSTWAY will be more consistent to offer you EASY SHOPPING EXPERIENCE, GOOD PRODUCTS and EFFICIENT SERVICE!
US office: Fontana, California
UK office: Ipswich

* Reward Points
* Exclusive Customer Service
* Personalized Recommendations
* Permanent Shopping Cart
* Order History
5 Star Rating

natural_image
Five outlined stars in a horizontal row, no text or symbols presentWe would like to extend our heartfelt thanks toall of our customers for taking time to assemblethis product and giving us valuable feedbacks.


COSTWAY
SHOP EASY, SAVE MONEY.

- COSTWAY
- TABLE OF CONTENTS
- Contact Us!
- Do NOT return this item.
- Before You StartBefore Y
- IMPORTANT SAFETY INSTRUCTIONS
- PREPARING YOUR ICE MAKER FOR USE
- IMPORTANT SAFETY TIPS
- IMPORTANT:
- GETTING TO KNOW YOUR UNIT
- OPERATING PROCEDURES & MAINTENANCE
- UNPACKING YOUR ICE MAKER
- CONNECTING YOUR ICE MAKER
- DANGER
- CLEANING AND MAINTAINING YOUR ICE MAKER
- USING YOUR ICE MAKER
- How to start the unit
- CLEAN
- How to obtain the ice-cube
- Light on/off
- When Ice Full indicator is on
- Open the drawer
- Take out the drawer
- Disposal
- Welcome to visit our website and purchase our quality products!
- Star Rating
Marke : COSTWAY
Modell : FP10023US-DK
Kategorie : Eismaschine