
CX-3MkII - Audioverstärker DBX - Kostenlose Bedienungsanleitung
Finden Sie kostenlos die Bedienungsanleitung des Geräts CX-3MkII DBX als PDF.


| Produkttyp | Steuerverstärker (Control Amplifier) |
| Marke | DBX (Carillon Technology Inc.) |
| Modell | CX-3MkII |
| Abmessungen (B x H x T) | 18-3/4" x 4" x 12-5/8" (ca. 47,6 x 10,2 x 32,1 cm) |
| Gewicht | 15,7 lbs (ca. 7,1 kg) |
| Stromversorgung | 120/220/240 V AC, 50/60 Hz, 11 W |
| Eingangsempfindlichkeit (Phono MM) | 2,5 mV |
| Eingangsempfindlichkeit (Phono MC) | 0,25 mV |
| Eingangsempfindlichkeit (Line) | 150 mV |
| Frequenzgang (Phono MM) | 20 Hz – 20 kHz (±0,25 dB) |
| Frequenzgang (Line) | 10 Hz – 50 kHz (+0, -3 dB) |
| Signal-Rauschabstand (Phono MM) | >78 dB (IMF-A) |
| Signal-Rauschabstand (Line) | >105 dB (IMF-A) |
| Klirrfaktor (Line) | <0,008% (20 Hz – 20 kHz, 5 V) |
| Klangregelung (Bass/Mitten/Höhen) | ±10 dB |
| Surround-Modi | Dolby Surround, Hall, Matrix, Simuliert, Bypass |
| Kopfhörerausgang | Ja, 6,35 mm Klinke |
| Phono-Vorverstärker | Umschaltbar MM/MC |
| Video-Durchschleifung | Ja, Composite Video |
| Fernbedienung | Ja (für TX-3MkII Tuner über DIN-Anschluss) |
| Sicherheitshinweise | Nicht Regen oder Feuchtigkeit aussetzen; keine eigenmächtigen Reparaturen |
| Reinigung | Mit trockenem Tuch; keine Lösungsmittel |
| Reparatur | Nur durch autorisiertes Fachpersonal; Garantie bei eigenmächtigen Eingriffen ungültig |
Häufig gestellte Fragen - CX-3MkII DBX
Benutzerfragen zu CX-3MkII DBX
0 Frage zu diesem Gerät. Beantworten Sie die, die Sie kennen, oder stellen Sie Ihre eigene.
Eine neue Frage zu diesem Gerät stellen
Laden Sie die Anleitung für Ihr Audioverstärker kostenlos im PDF-Format! Finden Sie Ihr Handbuch CX-3MkII - DBX und nehmen Sie Ihr elektronisches Gerät wieder in die Hand. Auf dieser Seite sind alle Dokumente veröffentlicht, die für die Verwendung Ihres Geräts notwendig sind. CX-3MkII von der Marke DBX.
BEDIENUNGSANLEITUNG CX-3MkII DBX
dbx
CX-3MkII
CONTROL AMPLIFIER
OPERATING MANUAL
Congratulations upon your purchase of the dbx CX-3MkII Control Amplifier.
Your new CX-3MkII is the most flexible control amplifier available today.
Equipped with abundant input and output connectors, the CX-3MklI can be used not only as an audio pre-amplifier in hi-fi stereo system but also as a control center for your video system.
In order to understand its unique features like three types of surround processing, and to familiarize yourself with the CX-3MkII, it is recommended that you read this manual once through carefully prior to use.
WARNING
TO PREVENT FIRE OR SHOCK HAZARD,
DO NOT EXPOSE THIS COMPONENT
TO RAIN OR MOISTURE.
This triangle,
which appears on your component, alerts you to the presence of uninsulated dangerous voltage inside the enclosure—voltage that may be sufficient to constitute a risk of shock.


This triangle
also appears on your component, and it alerts you to important operating and maintenance instructions in this accompanying literature.
CAUTION
To Reduce Further the Risk of Shock, Do Not Remove the Cover or Back. There Are No User-Serviceable Parts Inside; Refer All Servicing to Qualified Personnel.
WARRANTY and FACTORY SERVICE
All dbx products are covered by a limited warranty (warranties for products purchased outside the U.S.A. are valid only in the country of purchase and the U.S.A.). For details, consult your warranty/registration card or your dealer/distributor.
The dbx Customer Service Dept. will help you use your new product. For answers to questions and information beyond what's in this manual, write to:
dbx
707 E. Evelyn Ave.
Sunnyvale, CA., 94086 U.S.A.
Attn: Customer Service
You also may call (408) 648-7939 during business hours (U.S.A. Pacific Standard time).
Should problems arise, consult your dealer or distributor. If it becomes necessary to have your equipment serviced at the factory, repack the unit, including a note with a description of the problem and the date of purchase, and send the unit freight prepaid to the above address, marking it Attn: Repairs.
"dbx" is a registered trademark of Carillon Technology Inc., Sunnyvale, CA., U.S.A.
- POWER PLUG
When disconnecting the power cable from the power outlet, be sure to take hold the plug, not the wire. Never handle the power plug with wet hands since you may receive an electric shock. When you do not intend to use the amplifier for a prolonged period of time, keep the power plug disconnected from the power outlet.
AC OUTLETS ON REAR PANEL
The AC outlets provided on the rear panel of the CX-3Mkll are for connecting audio and video components only. Never connect other electrical appliances or heat appliances. Be very certain that the total power requirement of the components to be connected does not exceed 350W.
Avoid connecting the power cord of the television set. Since the high current which passes when the television set is powered may result in damaging power supply circuit of the CX-3MkII.
NOTICE: Due to European regulatory standards, the A.C. outlets on the rear panel are connected only in the U.S. and Japanese models.
• INSTALLATION
Do not install the unit in the area exposed to direct sunlight, dust, dirt, moisture or humidity. Installation in the location which is susceptible to vibration should be also avoided since this may result in deterioration in performance or malfunction.
• INSIDE THE UNIT
If a hairpin, coin or any other metal object finds it way inside the unit or if water is splashed over the unit, disconnect the power plug from the power outlet immediately and notify your nearest dbx dealer. Continued use may cause trouble or an electric shock.
• NO USER-ADJUSTABLE PARTS INSIDE
Never check nor adjust the parts inside the unit since this may result in trouble or an electric shock. Guarantee will be invalid for malfunction or performance deterioration due to the alteration, modification or substitution other than specified.
REAR

AUDIO SOURCE IN jacks
These jacks receive audio signals from your equipment: PHONO turntable, TUNER, CD player, CDV player/VDP, TAPE recorder 1/2, VIDEO Cassette Recorder 1/2. The knurled GrouND knob fastens turntable's grounding wire.
AUDIO REC/OUT jacks
Connect these jacks to your audio/video tape recorder's inputs: TAPE recorder 1/2, VIDEO Cassette Recorder 1/2.
AUDIO PROCESSOR
This is a loop for certain audio signal processors (such as dbx dynamics controllers, bass-enhancement units, etc.), an outboard remote control, outboard ambience/delay units, and so on. Although most Audio Processors are used for playback, the EXT PROCESSOR (MONITOR/OFF/REC) switch on the front can put yours in front of any recording deck, for processing the sound while it is getting recording onto the tape. Note that spectrum-altering processors should not be used here because they will interfere with the Dolby Surround decoding,
causing mistracking. Graphic equalizers and similar components should go after the CX-3MkII, between it and the appropriate power amp.
Similarly, we recommend not putting a dedicated speaker equalizer here, for its action will almost surely be too drastic, even if your four speakers are the same model and you could use a single speaker EQ for all of them.
AUDIO OUT jacks
Connect these jacks to your power amps' inputs: FRONT, REAR.
VIDEO IN jacks
These jacks receive VIDEO signals from your video equipments: CDV player/VDP, VIDEO Cassette Recorder 1/2.
VIDEO OUT jacks
Connect these jacks to your video equipment's VIDEO input: TV MONITOR, VIDEO Cassette Recorder 1/2.
● AC power cord, OPERATING VOLTAGE switch
• POWER REQUIREMENT
Power requirements for electrical equipment differ from area to area. Ensure that your amplifier meets the power requirements in your area.
120V, 60Hz for U.S.A.
220V, 50Hz for Europe except U.K.
240V, 50Hz for U.K. and Australia.
If the voltage specified in the voltage selector on the rear panel does not conform to the voltage available in your area, change the setting of the voltage selector as follows.
Using a screwdriver, remove the screws holding the cover to the rear panel, and set the selector to the correct position. After changing the setting, replace the cover with the screws.

NOTE: Be sure to disconnect the power cord when changing the setting.
AC OUTLETS
On condition that the unit is powered, the AC power can be supplied to the audio components connected to these outlets. One SWITCHED outlet and two UNSWITCHED outlets are provided.
SWITCHED : An audio component connected to this outlet can be powered on/off with the POWER Switch ON/OFF operation of the CX-3MkII. Avoid connecting the component of which power requirement exceeds 100W.
UNSWITCHED: The AC power is always supplied to the audio components connected to these outlets regardless of the POWER Switch ON/OFF operation of the CX-3MkII. The total power requirement of the components connected to these outlets must not exceed 250W.
● REMOTE CONTROL FOR TX-3Mkll jack
The CX-3Mkll's remote control system can also command the dbx TX-3Mkll tuner. Connect the matching DIN type connector on the TX-3Mkll to this jack with a DIN cable.
FRONT
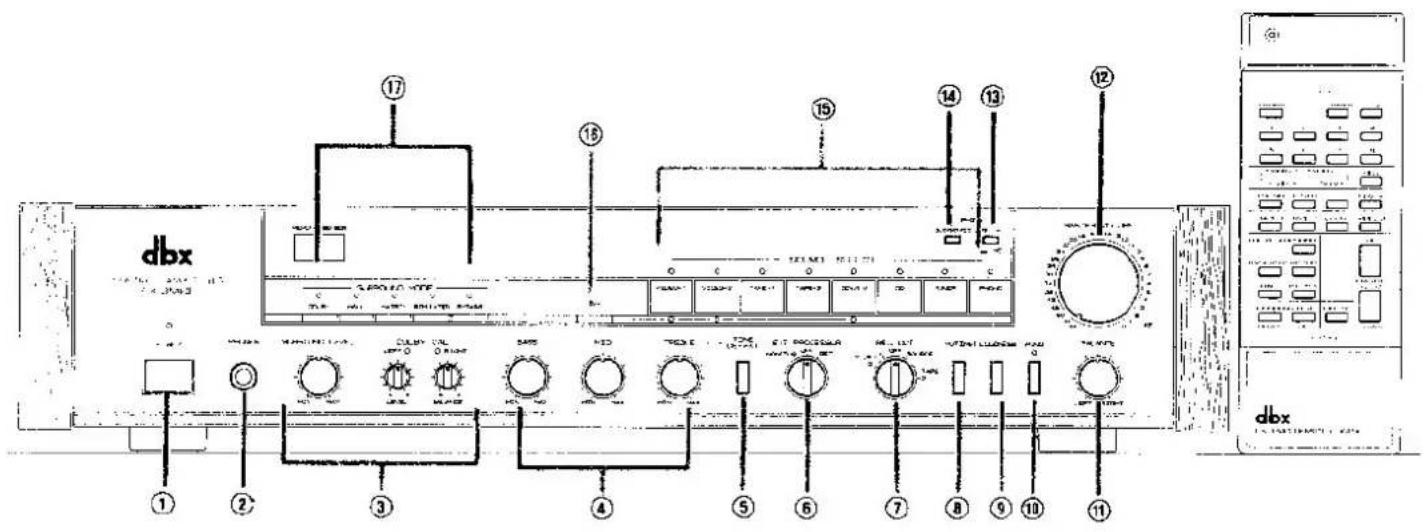
① POWER-Power Switch
Pressing this switch causes the AC power to be supplied to the CX-3MkII. The LED indicator will become illuminated.
② PHONES—Headphone Jack
When a headphone is used, plug it into this jack. The output is not cut off while using the headphone, and the volume of the headphone as well as the speakers can be adjusted by the MASTER VOLUME Control (12).
③ Surround
DOLBY CAL/LEVEL
This is generally a "set it and forget it" knob. Turn it until the green LED comes on during middle-level passages. Some Dolby surround tapes and discs have a tone at the end for use in setting this input level; with such material, turn the Input Level control so the green LED just comes on while the tone is playing.
Also, this level controller adjusts stereo width in the SIMULATED STEREO mode. Turn it clockwise to increase the stereo effect.
DOLBY CAL/BALANCE
For adjusting interchannel levels in Dolby surround mode. Find some moments of dialog in the movie and turn it until the dialog from rear speakers is least-audible — “nulled out.” This is a “set and forget” function except for longitudinal VCR audio tracks (edgetracks), which often vary in balance. Pinch the knob ridge top and bottom if you find grasping the sides too difficult.
SURROUND LEVEL
Controls the level of the HALL, MATRIX, Dolby surround sound relative to the overall volume. Set the level so the sound is just audible, filling out the space — you'd sense if it were turned off, but you don't hear it specifically as a source.
④ BASS, MID, TREBLE—Tone Controllers
These three knobs are used when adjusting the sound quality in the range of ±10dB . Turning each knob clockwise causes the corresponding frequencies to be boosted, and turning it counterclockwise causes the frequencies to be cut.
BASS : For low frequencies adjustment.
MID : For middle frequencies adjustment.
TREBLE: For high frequencies adjustment.
⑤ TONE DEFEAT-Tone Controller Defeat Switch
Pressing this switch deactivates the Tone Controllers (④), and releasing it causes them to be activated all together.
⑥ EXT PROCESSOR Switch
This lets you hear (or bypass) the processing done by any equipment connected to the AUDIO PROCESSOR loop jacks in the back. Set this switch to REC position when processing the signal which is being recorded, and set it to MONITOR position when processing the playback signal.
⑦ REC OUT
This knob controls what programs (video as well as audio) can go to the tape decks and VCRs. Source denotes the sources selected by the buttons (CDV, CD, TUNER, PHONO) above the knob. Audio dubbing among the decks is given by the other four settings, and video dubbing likewise, except that Source Video (CDV). In is sent to VIDEO 1/2 as its video out unless VIDEO 1→2, 2→1 are selected.
⑧ MUTING Button
Pressing this button causes the input volume to be attenuated by 20dB. This will be convenient when temporarily reducing the volume without changing the MASTER VOLUME (12) setting.
⑨ LOUDNESS Button
Pressing this button will cause the low frequencies to be boosted. This will be convenient when listening at the low volume level, since the low frequencies may sound weak and insufficient at the low volume listening level.
⑩ MONO Button
Pressing this button sends L+R mono signal to both front speakers.
⑪ BALANCE Control
The volume of the left and right speakers can be adjusted by this control. Turning the control clockwise makes the right speaker volume louder than that of the left speaker, and the left speaker volume becomes louder than that of the right speaker by turning the control counterclockwise.
⑫ MASTER VOLUME Control
For adjusting the final output level of the unit.
⑬ MM/MC Phono Cartridge Selector Switch
When a low output MC (Moving Coil) type of phono cartridge is in use, set this switch to MC position by pressing it.
⑭ SUBSONIC Filter Button
This button inserts a steep infrasonic filter (below audible frequencies) into the signal path, getting rid of low rumble and other useless, power-robbing, potentially speaker-damaging non-musical information.
⑮ SOURCE SELECT Buttons
These buttons select your desired program source. The four buttons on the right, i.e., CDV/LV, CD, TUNER and PHONO, are for selecting an input source for the amplifier. Input sources selected by these buttons become recording sources when the REC OUT switch is at the SOURCE position. The four buttons on the left, i.e., VIDEO 1, VIDEO 2, TAPE 1 and TAPE 2, are for selecting an input source for simultaneous recording/monitoring. If CD is selected and TAPE 1 button depressed, the CD source can be recorded via TAPE 1 outputs while the recorded sound can be simultaneously monitored via TAPE 1 inputs. LEDs on both CD and TAPE 1 buttons are lighted. Depress the CD button again to listen to the direct CD source. LED on TAPE 1 goes off.
⑯ BGV Button
This button changes video signals only by overriding a source selected by the VIDEO 1, VIDEO 2 or CDV button. It is a cyclic switch which changes from OFF, VIDEO 1, VIDEO 2, and to OFF again as you depress it. At the OFF mode, a video source selected by SOURCE SELECT button is reproduced.
⑰ SURROUND MODE Selector Switch
SIMULATED : Pressing this switch will give the stereo-like spaciousness to the flat monaural sound source. This is effective for the FRONT speakers only.
MATRIX : Pressing this switch provides the surround signals with no delay but with phase shift to the REAR speakers. The REAR speakers output level is adjusted by the SURROUND LEVEL Control (③).
HALL : Use this position to enjoy a music source or movie without Dolby Surround. The front channels reproduce stereo and the rear channels reproduce echoes to simulate a concert hall. Adjust the echo level by the SURROUND LEVEL control.
DOLBY : When the Dolby* Surround encoded video program is used, press this switch to activate the integral Dolby* Surround decoder circuit. The REAR speakers output level is adjusted by the SURROUND LEVEL Control (③).
BYPASS : When you do not intend to use the Surround Mode, always press this switch in order that the REAR output is by-passed.
***Dolby** and the double-D symbol are trademarks of Dolby Laboratories Licensing Corporation.
SPECIFICATIONS
| Input Sensitivity | |
| Phono (MM) | 2.5 mV |
| (MC) | 0.25 mV |
| Line | 150 mV |
| Maximum Input Signal | |
| Phono (MM) | 180 mV |
| (MC) | 18 mV |
| Input Impedance | |
| Phono (MM) | 47 k-ohms |
| (MC) | 100 ohms |
| Line | 47 k-ohms |
| Frequency Response | |
| Phono (MM) | 20 Hz - 20 kHz (±0.25 dB) |
| Line | 10 Hz - 50 kHz (+0, -3 dB) |
| Signal to Noise Ratio (IMF-A) | |
| Phono (MM) | >78 dB |
| (MC) | >70 dB |
| Line | >105 dB |
| Total Harmonic Distortion | |
| Phono (MM) | <0.01% (20 Hz ~ 20 kHz, 3V) |
| (MC) | <0.02% (20 Hz ~ 20 kHz, 3V) |
| Line | <0.008% (20 Hz - 20 kHz, 5V) |
| Maximum Output Level | 10 V (20 Hz ~ 20 kHz) |
| Output Impedance | 600 ohms |
| Tone Control | |
| Bass | ±10 dB |
| Mid | ±10 dB |
| Treble | ±10 dB |
| Loudness | +8 dB (100 Hz) |
| Surround Section | |
| Dolby Surround | delay time: 20 msTHD: <0.02% (1 kHz) |
| Power Requirements | 120/220/240 VAC,50/60 Hz, 11 W |
| Dimensions (W x H x D) | 18-3/4" x 4" x 12-5/8" |
| Weight | 15.7 lbs |
Specifications are subject to change without notice.
"dbx" is a registered trademark of Carillon Technology Inc., Sunnyvale, CA., U.S.A.
*“Dolby” and the double-D symbol are trademarks of Dolby Laboratories Licensing Corporation.
Manufactured under license from Dolby Laboratories Licensing Corporation. Additionally licensed under one or more of the following patents: U.S. numbers 3,632,886, 3,746,792, and 3,959,590; Canada numbers 1,004,603 and 1,037,877. "Dolby" and the double-D symbol are trademarks of Dolby Laboratories Licensing Corporation.
WARRANTY and SERVICE (U.S.A. only)
dbx warrants this product to be free from defective materials and workmanship for a period of three (3) years from the date of first consumer purchase from an authorized dealer. If you are uncertain as to whether a dealer is authorized, contact us. The unit must be delivered by you or your representative with proof of purchase to one of our authorized service agencies.
Please save your sales slip, and please return the warranty registration card (doing so will establish a convenient proof-of-purchase date in case your sales slip gets lost). Note that not doing so doesn't affect your rights under this warranty; we ask you to simply because it's helpful to us.
For shipping, pack the unit carefully, in its original or other suitable packing. All merchandise must be prepaid and will be returned freight-paid. Include your or the sender's name and address, telephone number, and reason for return. Insure your shipment, and in the U.S.A. use UPS or similar carrier, not Parcel Post.
FOR INFORMATION ON YOUR NEAREST SERVICE STATION, contact your authorized dealer or call 1-800-648-7939.
For non-service problems and questions NOT covered in this manual, call (U.S.A. Pacific Standard time, business hours) our Customer Service, at 1 (408) 749-8400.
This warranty automatically transfers to subsequent owners, but does not extend to any of our products that have been subject to misuse, abuse, modification, neglect, accident, incorrect wiring not our own, or to use in violation of operating instructions furnished by us. Nor does it extend to any units altered or repaired for warranty defect by anyone other than an authorized service agency, nor to units with defaced, removed, or modified serial numbers. It is limited to, at our discretion, repair or replacement of the product.
This warranty does not cover any incidental or consequential damages and is in lieu of all other warranties expressed or implied, including those of merchantability and fitness, and no representative or person is authorized to assume for us any other liability in connection with the sale of our products.
Some states don't allow limitations on how long an implied warranty lasts and/or on exclusion or limitation of incidental or consequential damages, so the above limitations or exclusions may not apply to you. This warranty gives you specific rights; you may also have other rights, which vary from state to state.
For products purchased outside the U.S.A., this warranty is valid only in the country of purchase and the U.S.A.
NOTE again: For information on your NEAREST U.S.A. SERVICE STATION, contact your authorized dealer or call 1-800-648-7939.
dbx
707 E. Evelyn Ave.
Sunnyvale, CA., 94086 U.S.A.
Tel: (408) 749-8400 Fax: (408) 749-8456
- CX-3MKII
- CONTROL AMPLIFIER
- WARNING
- TO PREVENT FIRE OR SHOCK HAZARD
- DO NOT EXPOSE THIS COMPONENT
- TO RAIN OR MOISTURE
- WARRANTY AND FACTORY SERVICE
- POWER PLUG
- AC OUTLETS ON REAR PANEL
- INSTALLATION
- INSIDE THE UNIT
- NO USER-ADJUSTABLE PARTS INSIDE
- AUDIO SOURCE IN JACKS
- AUDIO REC/OUT JACKS
- AUDIO PROCESSOR
- AUDIO OUT JACKS
- VIDEO IN JACKS
- VIDEO OUT JACKS
- ● AC POWER CORD, OPERATING VOLTAGE SWITCH
- POWER REQUIREMENT
- AC OUTLETS
- ● REMOTE CONTROL FOR TX-3MKLL JACK
- FRONT
- DOLBY CAL/BALANCE
- SURROUND LEVEL
- ⑭ SUBSONIC FILTER BUTTON
- ⑮ SOURCE SELECT BUTTONS
- ⑯ BGV BUTTON
- ⑰ SURROUND MODE SELECTOR SWITCH
- WARRANTY AND SERVICE (U.S.A. ONLY)
Marke : DBX
Modell : CX-3MkII
Kategorie : Audioverstärker