
Instamatic 304 - Nicht kategorisiert KODAK - Kostenlose Bedienungsanleitung
Finden Sie kostenlos die Bedienungsanleitung des Geräts Instamatic 304 KODAK als PDF.

| Produkttyp | Analoge Sofortbildkamera (Kodak Instamatic 304) |
| Marke | Kodak |
| Filmformat | 126-Film in KODAPAK-Kassette |
| Belichtungssteuerung | Automatisch durch eingebautes elektrisches Auge |
| Blitzsystem | Blitzwürfel (Flashcube) mit automatischem Vorschub, 4 Blitze |
| Batterien | 2x AAA (Mangan-Alkaline empfohlen) für Blitz |
| Objektiv | Festbrennweite, fester Fokus |
| Sucher | Durchsicht-Sucher (Eye-Level) mit Warnanzeige |
| Filmtransport | Manueller Hebel, Doppelbelichtungssperre |
| Bildformat | 28 x 28 mm (Negativ) |
| Anzahl Aufnahmen | 12 (Schwarzweiß oder Farbabzüge) oder 20 (Farbdia) je nach Filmtyp |
| Automatikfunktionen | Automatische Belichtung, Blitzwürfel-Drehung nach Auslösung |
| Entfernungseinstellung | Festfokus: mindestens 1,5 m (5 ft) für scharfe Bilder |
| Blitzreichweite | 1,2 bis 2,7 m (4 bis 9 ft) |
| Zubehör | KODAK INSTAMATIC Field Case (Modell B), Nahaufnahme-Vorsatz Nr. 13, Cloud Filter Nr. 13 |
| Garantie | 1 Jahr auf Material- und Verarbeitungsfehler |
| Service | Eastman Kodak Company und autorisierte Reparaturbetriebe |
Häufig gestellte Fragen - Instamatic 304 KODAK
Benutzerfragen zu Instamatic 304 KODAK
0 Frage zu diesem Gerät. Beantworten Sie die, die Sie kennen, oder stellen Sie Ihre eigene.
Eine neue Frage zu diesem Gerät stellen
Laden Sie die Anleitung für Ihr Nicht kategorisiert kostenlos im PDF-Format! Finden Sie Ihr Handbuch Instamatic 304 - KODAK und nehmen Sie Ihr elektronisches Gerät wieder in die Hand. Auf dieser Seite sind alle Dokumente veröffentlicht, die für die Verwendung Ihres Geräts notwendig sind. Instamatic 304 von der Marke KODAK.
BEDIENUNGSANLEITUNG Instamatic 304 KODAK
GUARANTEE
Within a year after purchase, any repairs necessary to this KODAK INSTAMATIC Camera due to a defect in materials or workmanship will be made or, at our option, the camera will be replaced without charge. No other warranty or guarantee, express or implied, shall be applicable to this equipment. Nor are we responsible for loss of film, for other expenses or inconveniences, or for any consequential damages occasioned by the equipment.
In case of a defect, the camera should be sent directly or through a Kodak dealer to Eastman Kodak Company or a repair firm authorized by us to make such repairs. It should be accompanied by a description of the trouble encountered and other available information regarding the camera, including the date and place of purchase.
EASTMAN KODAK COMPANY, Rochester, N. Y. 14650
Pl. No. 633018
B-65-CH-BXX
Printed in the United States of America
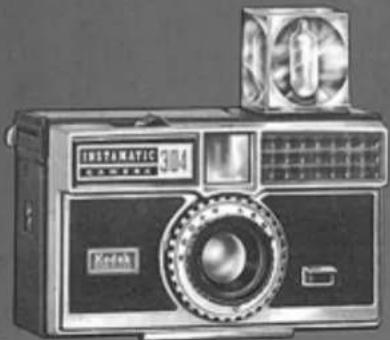
KODAK INSTAMATIC 304 CAMERA
natural_image
Vintage digital camera with front panel and display (no visible text or symbols on body)KODAK INSTAMATIC 304 Camera
2
There are no exposure settings to make with your KODAK INSTAMATIC 304 Camera—the built-in electric eye does it automatically. This, and many other features, such as automatic flashbulb advance with the new Flashcube, combine to give you instant, effortless picturetaking.
Simply do this...
- Drop in KODAPAK Cartridge-camera is loaded
- Operate Film Advance Lever – first exposure is ready
- Aim through Eye-level Finder – you see a bright, clear image of your subject
- Press the Shutter Release – you've snapped the picture
...read on for the important details
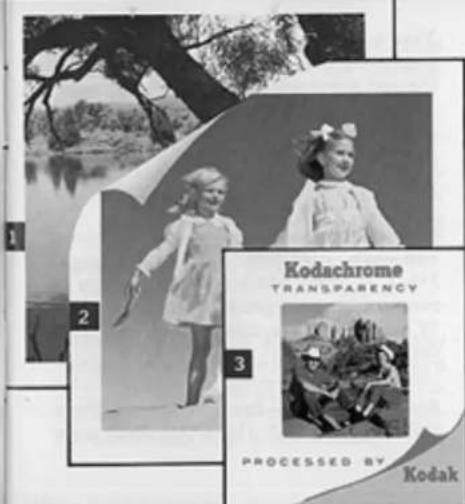

Your camera takes all three—
1 Black-and-white snapshots
2 Color snapshots
3 Color slides
Before making any important pictures — of a trip or some special event — it is well to shoot a cartridge of film outdoors, and indoors with flash. This will give you practice in camera operation and provide a check on your equipment.
(Pictures shown here are approximately 23 actual size.)
3
FILM
Your camera accepts KODAK 126 Film in the KODAPAK Cartridge, for instant loading and unloading.
You can make black-and-white snapshots, color snapshots or color slides, depending on which of four film types is loaded in the camera.
Kodak Verichrome Pan Film—For 12 black-and-white snapshots. Standard enlarged 3 12 × 3 12 -inch black-and-white prints or even greater enlargements from your 28 x 28 mm negatives can be ordered from your photo dealer.
Kodacolor-X Film—For 12 color snapshots. Standard enlarged 3½ x 3½-inch color
prints, or even greater enlargements from your 28 x 28 mm negatives are available from your photo dealer.
Kodochrome-X Film—For 20 color slides. Color slides, mounted in standard 2 x 2-inch cardboard mounts, are for showing in slide projectors and can be obtained through your photo dealer.
Kodak Ektachrome-X Film—For 20 color slides. Color slides, mounted in standard 2 x 2-inch cardboard mounts, are for showing in slide projectors and can be obtained through your photo dealer.
NOTE:
You always obtain color negatives from KODA- color-X. Film. These negatives are primarily for enlarged color prints, but you can also obtain color slides from the negatives. From KODACHROME-X or KODAK EKTACHROME-X, you obtain color slides, ready for projection. You can also have duplicate slides or enlarged color prints made from the original slides.
LOADING
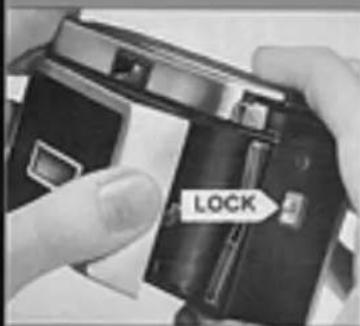
1
Open the back of the camera by sliding up the LOCK button and swinging out the hinged cover.
natural_image
Close-up of a black electronic device with a label and paper clip, no visible text or symbols on the device itself.2
Place a KODAPAK Cartridge in the camera with the larger cylindrical end down and toward the lock button, as illustrated.
3
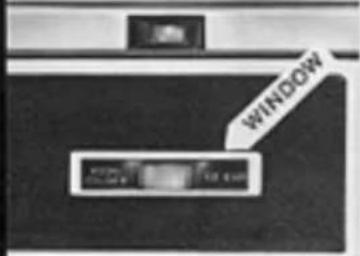
Close the back of the camera by pressing the back against the body until it locks. The film speed is now automatically set. The film name and number of exposures per cartridge appear in the WINDOW on the back of the camera.
4
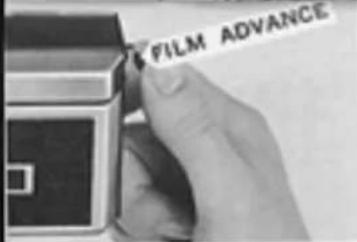
Push the FILM ADVANCE lever toward the front of the camera and allow it to return; repeat until the lever locks (about a dozen full strokes). The appearance of a series of arrows in the
center of the window indicates that the film is advancing toward the first exposure.
The number that appears in the center of the window on the back of the camera (the same number may appear in duplicate) serves as your exposure counter. Important: Disregard this exposure number when advancing film; the film advance lever must always be operated repeatedly until locked, otherwise the shutter release cannot be depressed.
UNLOADING
1 After the last picture, operate the film advance lever until all of the yellow paper has been wound past the window before you open the back of the camera. The appearance of an "X" in the center of the window indicates that the film has been exposed, but that the backing paper has not been wound into the take-up chamber.
2. Slide up the lock button and open the camera.
3 Lift out the cartridge and close the camera. For processing, send entire cartridge.
NOTE: Do not remove the cartridge from the camera until all the yellow paper, with the "Xs," has been moved past the window; otherwise several exposures will be "light-fogged." Removing and replacing partially-exposed cartridges, even under darkroom conditions, may result in loss of one exposure.
8
OUTDOOR PICTURES
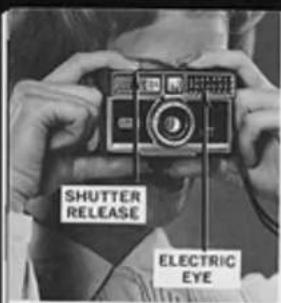
• The size of the lens opening is automatically controlled by the amount of light reflected to the electric eye by the subject. Make sure that the ELECTRIC EYE is not obstructed, during picturetaking, by the fingers or any other object, and that the camera is not pointed toward the sun or other bright light-source.
NOTE: Look through the viewfinder window. If there is not sufficient light to take a properly exposed picture, a WARNING BAR will appear in the light rectangle to the right of the viewfinder. Also, see note, page 11.
- Keep at least 5 feet from your subject for sharp pictures.
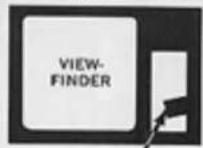
• View the subject by bringing the rear opening of the viewfinder just close enough to
your eye (about an inch) to see the entire outline of the front view-finder frame. See illustration. When adjusting the field of view, move the head and camera as a unit.
- Hold the camera steady and take the picture by slowly pressing down the SHUTTER RELEASE all the way.*
- Operate the film advance repeatedly until it locks (1½ to 2 strokes). The next exposure is ready.
Double Exposure Prevention: The shutter release cannot be depressed after tripping until the film advance lever is again operated until it locks.
FLASH PICTURES
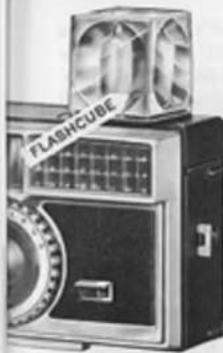
Your camera features easy, rapid flash picturetaking with the new Flashcube which incorporates 4 blue bulbs, reflectors and flashguards. As pressure is removed from the shutter release, after taking a flash shot, the Flashcube rotates one quarter turn clockwise to bring another flashbulb into firing position.
*Make sure that the lens is clean and unobstructed by fingers, case, or strap.
- For color slides, use KODAK EKTACHROME-X or KODACHROME-X Film. For color prints, use KODACOLOR-X Film. For black-and-white prints, use KODAK VERICHROME Pan Film.
• The camera-to-subject distance, indoors, must be between 4 and 9 feet for proper flash exposure.
Batteries: Two fresh photoflash or flashlight, size AAA, batteries* (manganese alkaline-type recommended) are required. Weak batteries may cause flash failures. To install batteries, first open the battery compartment on the bottom of the camera, as shown below, by sliding the raised rib of the battery cover to the opposite

end of the recess. Insert the batteries - one base down; the other base up - as illustrated. Press down slightly against the batteries while sliding the cover back to close the compartment. The cover must be entirely closed to complete the electrical circuit.
*To insure most dependable service, clean battery contacts periodically with a rough cloth. For maximum protection of camera contacts, batteries may be removed if the camera is stored.
natural_image
Vintage black-and-white photo of a vintage flashcube with visible branding and control panel (no readable text or symbols)Important: Do not obstruct rotation of Flashcube.
Taking Flash Pictures
- Insert the Flashcube—Fit the hollow stem on the base of the FLASHcube over the center hub of the socket on the top of the camera with the 4 wings of the Flashcube stem aligned with the cross around the socket hub; then press down the Flashcube until it snap-locks in place with one of its four sides facing forward. Flash exposure is not controlled by the electric eye, but depends on the distance from the flashbulb to the subject. Disregard the appearance of the warning bar.
NOTE: If in outdoor picture-taking, the warning bar (in viewfinder window) indicates insufficient light for proper exposure because of heavy overcast or shaded light conditions, take a flash picture. Under these conditions, acceptable exposure of subjects, 4 to 9 feet from the camera, can be made.
natural_image
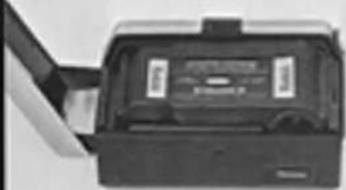
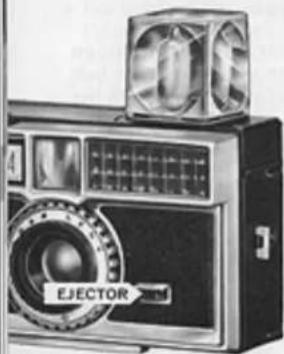
Black-and-white photo of a vintage camera with a labeled 'EJECTOR' button and fan (no readable text beyond label)12
The cube revolves one quarter turn as pressure is removed from the shutter release after making an exposure, thus providing flash for 4 successive exposures if a fresh cube is in place. To use a partially used cube, insert the cube with a fresh bulb forward, keeping in mind the clockwise rotation of the cube to bring succeeding fresh bulbs to the frontal firing position. The cube can also be rotated clockwise (arrow on top of the camera) by hand to position a bulb for firing.
To release the Flashcube, press the EJECTOR bar.
- Check Camera-to-Subject Distance—The distance from the Flashcube to the subject is important for proper exposure. There-
fore, make sure that the subject is no closer than 4 feet or farther away than 9 feet.* See illustration, opposite.
- Flash the Picture—View the subject by bringing the rear opening of the viewfinder just close enough to your eye (about an inch) to see the entire outline of the front viewfinder frame; move head and camera as a unit when adjusting the field of view—then, slowly press the shutter release to flash the bulb and take the picture.
When pressure is removed from the shutter release, the cube will revolve one quarter turn to bring another bulb into firing position for the next exposure.
*For handy reference, this distance range is shown on the flash socket on the top of the camera.

KEEP WITHIN THE FLASH RANGE
- Closer than 4 feet? Unsharp, overexposed pictures.
• Farther than 9 feet? Underexposed pictures.
Don't Waste Film on These Extremes
PHOTO AIDS
You can extend your picturetaking scope and enjoyment with the photo aids described below. See your Kodak dealer for these and others.
KODAK INSTAMATIC Field Case, Model B—This attractively lined, simulated leather field case will provide maximum protection for your camera. The special drop-front feature permits instant picturetaking without removing the camera from its case. Neck strap supplied with case.
KODAK Lens Attachments—For extra-close pictures of people, flowers, etc., merely slip a KODAK Close-Up Attachment, No. 13 over the lens. The subject can then be as close to the camera as 2 12 ft., or as far away as 4 ft.
With a KODAK Cloud Filter No. 13 over the lens, you can picture fluffy clouds by making the blue sky appear darker. Use this filter with KODAK VERICHROME Pan Film—never with Kodak color films.
KODAK Projectors—A Kodak projector will show your color slides big, bright, and sharp on the screen. Ask your dealer to see the low-cost, compact KODAK READYMATIC 500 Projector which provides powerful 500-watt projection and handles up to 36 slides in its changer at one time.
SERVICE FACILITIES
If your KODAK camera should require attention, complete service facilities are provided at Rochester and in KODAK Regional Sales Divisions at the addresses, opposite. Also, service, covered under the guarantee, is available through independent service shops in many cities. For such local, guarantee-covered service, please see your KODAK dealer or refer to the yellow pages of your telephone directory under Photographic Equipment and Supplies — Factory Approved Warranty Service.
Eastman Kodak Company Apparatus Service 800 Lee Road Rochester, New York 14650
Eastman Kodak Company Apparatus Service 1901 West 22nd Street Oak Brook, Illinois 60523
Eastman Kodak Company Apparatus Service 6300 Cedar Springs Road Dallas, Texas 75235
Eastman Kodak Company Apparatus Service 5315 Peachtree Industrial Blvd. Chamblee, Georgia 30005
Eastman Kodak Company Apparatus Service 3250 Van Ness Avenue San Francisco, California 94119
Eastman Kodak Company Apparatus Service 1334 York Avenue New York, New York 100
Eastman Kodak Company Apparatus Service 808 Rivera Road Whittler, California 90606
Eastman Kodak Company Apparatus Service 1065 Kapiolani Blvd. Honolulu, Hawaii 95807