
RD-1010 - Kassettenabspieler ROTEL - Kostenlose Bedienungsanleitung
Finden Sie kostenlos die Bedienungsanleitung des Geräts RD-1010 ROTEL als PDF.


| Produkttyp | Stereo-Kassettendeck |
| Modell | RD-1010 |
| Abmessungen (B x H x T) | 430 mm x 115 mm x 294 mm |
| Gewicht (netto) | 6,2 kg |
| Stromversorgung | 120 V/60 Hz, 220 V/50 Hz, 240 V/50 Hz (umschaltbar) |
| Leistungsaufnahme | 23 W |
| Kopftyp | 3-Kopf-System: Sendust-Kern (Wiedergabe), Sendust-Kern (Aufnahme), Sendust-Spitze (Löschen) |
| Spurformat | 4-Spur / 2-Kanal |
| Bandgeschwindigkeit | 4,8 cm/s |
| Gleichlaufschwankungen | 0,1 % (DIN) / 0,045 % (WRMS) |
| Frequenzgang (Aufnahme/Wiedergabe) | Normal/LH: 30–17.000 Hz ±3 dB; Chrom: 30–18.000 Hz ±3 dB; FeCr: 30–19.000 Hz ±3 dB; Metall: 30–19.000 Hz ±3 dB |
| Signal-Rauschabstand (Chrom-Band) | Dolby NR ein: 64 dB; Dolby NR aus: 56 dB |
| Klirrfaktor (Aufnahme/Wiedergabe, 400 Hz, Metallband) | 0,5 % |
| Eingangsempfindlichkeit/-impedanz | Mikrofon: 0,3 mV / 10 kΩ; Line: 30 mV / 27 kΩ |
| Ausgangspegel/-impedanz | 580 mV / 2,5 kΩ |
| Bandgeschwindigkeit (C-60) | 80 s (Vor-/Rücklauf) |
| Bandsortenschalter | Normal, CrO₂, FeCr, Metal; mit Feineinstellung der Vormagnetisierung |
| Dolby-Rauschunterdrückung | Dolby NR (ein/aus) |
| Kopfhörerausgang | 6,3-mm-Klinke, Lautstärke regelbar |
| Besondere Funktionen | Auto-Rewind, Auto-Repeat, Memory-Funktion, Timer-Bereitschaft, Aufnahme-Stummschaltung, MPX-Filter |
| Anschlüsse | Line-Eingang (Cinch), Line-Ausgang (Cinch), Mikrofon (2x Klinke), Kopfhörer |
| Reinigung | Köpfe, Tonwelle, Andruckrolle und Bandführung mit Reinigungsalkohol oder handelsüblichem Reiniger säubern |
| Entmagnetisierung | Nach je 20–30 Betriebsstunden mit einem Entmagnetisierer durchführen |
| Automatische Abschaltung | Bei Bandende oder mechanischem Stopp |
| Lieferumfang (Zubehör) | 2 Cinch-Verbindungskabel, Bedienungsanleitung |
Häufig gestellte Fragen - RD-1010 ROTEL
Benutzerfragen zu RD-1010 ROTEL
0 Frage zu diesem Gerät. Beantworten Sie die, die Sie kennen, oder stellen Sie Ihre eigene.
Eine neue Frage zu diesem Gerät stellen
Laden Sie die Anleitung für Ihr Kassettenabspieler kostenlos im PDF-Format! Finden Sie Ihr Handbuch RD-1010 - ROTEL und nehmen Sie Ihr elektronisches Gerät wieder in die Hand. Auf dieser Seite sind alle Dokumente veröffentlicht, die für die Verwendung Ihres Geräts notwendig sind. RD-1010 von der Marke ROTEL.
BEDIENUNGSANLEITUNG RD-1010 ROTEL
OWNER'S MANUAL
Quality. Uncompromised.
ROTEL®
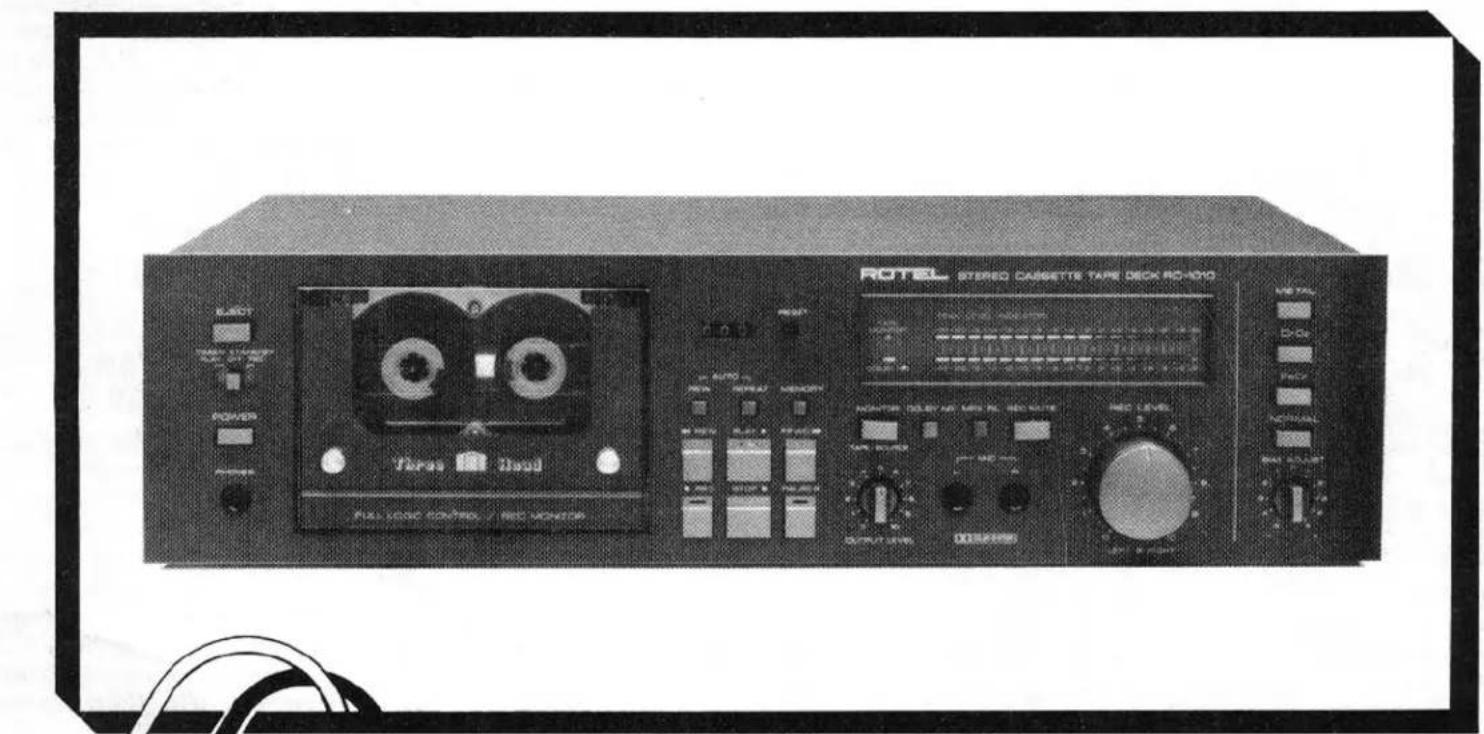
METAL CAPABILITY
3-HEAD STEREO CASSETTE DECK
RD-1010
WARNING: TO PREVENT FIRE OR SHOCK HAZARD, DO NOT EXPOSE THIS APPLIANCE TO RAIN OR MOISTURE

Write your SERIAL NUMBER here. The number is located near the name plate on the unit's rear panel.
THE ROTEL CO., LTD.
1-36-8 Ohokayama, Meguro-ku, Tokyo, Japan
INTRODUCTION
We at Rotel want to thank you for purchasing our audio product.
Rotel audio products are designed to use the latest electronic technology, and they incorporate our long experience as a specialist manufacturer of audio equipment. We are confident that you will find satisfaction in the high quality sound and top performance, and that you will find pleasure in the functional beauty achieved through human-engineering concept. Before starting operation, please read this instruction manual thoroughly and acquaint yourself with the proper mode of using the unit and all its connections.
We hope you will enjoy top-notch performance for many years to come.
POWER SUPPLY
For power the unit requires the normal house electrical current (AC). You may simply plug the unit into a wall outlet, or into your amplifier's switched or unswitched AC outlet. If it is plugged into a switched outlet, by leaving the power switch of the unit on, you will be able to maintain switching control for the RD-1010 with your amplifier. If it is connected to an unswitched outlet, like connecting to a wall outlet you must use the RD-1010's own power switch for switching control.
CAUTION: Do not apply power without first making sure the proper connections are completed. If you live in U.K. and your unit comes with 2-core cord without a plug, be sure to read the exclusive caution for U.K.
INSTALLATION
Be sure to place the unit in a level and flat place where it is free from humidity, vibration, high temperature and not exposed to direct sunlight. Be careful not to place the unit in a highly enclosed place such as near a wall or on a bookshelf. A poor ventilation will cause undesirable effects to the unit.
CONNECTION TO INTEGRATED AMPLIFIER
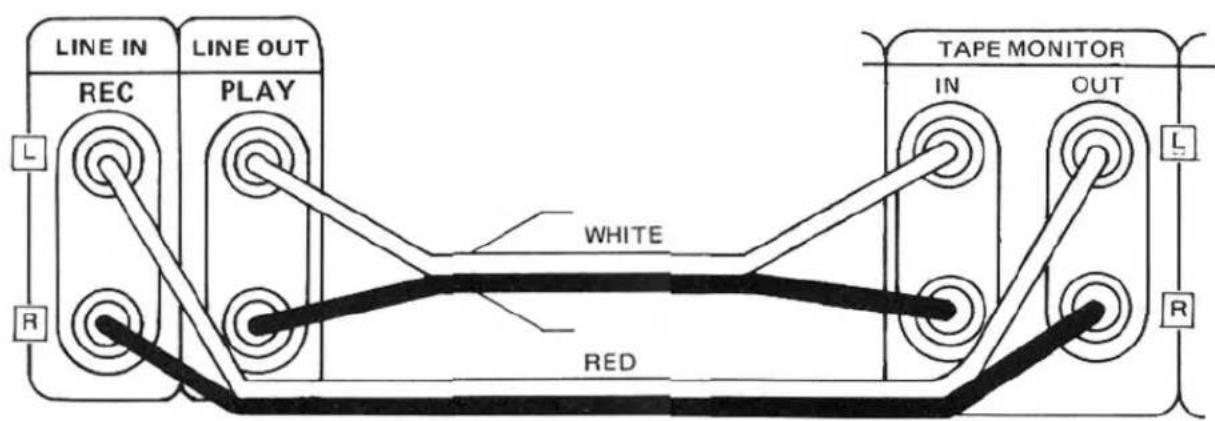
Using the two accompanying pairs of RCA pin cords, connect LINE IN and OUT terminals on the back of deck with TAPE MONITOR terminals of the amplifier. Make sure LINE IN terminals are connected to TAPE MONITOR OUT terminals, and LINE OUT terminals to TAPE MONITOR IN terminals. Be sure to match L (left) and R (right) terminals of the components. To make correct connections, use cords with white plugs for left channel connections, and cords with red plugs for right channel connections.
EXCLUSIVE NOTE FOR U.K.
If your unit comes with a 2-core cable without a plug, make certain live and neutral leads are connected to the proper terminals. Check that the terminals are screwed down firmly and no loose strands of wire are present.
IMPORTANT: The wires in this mains lead are coloured in accordance with the following code:
BLUE: NEUTRAL
BROWN: LIVE
As the colours of the wires in the mains lead of this apparatus may not correspond with the coloured markings identifying the terminals in your plug proceed as follows.
The wire which is coloured BLUE must be connected to the terminal which is marked with the letter N or coloured BLUE or BLACK. The wire which is coloured BROWN must be connected to the terminal which is marked with the letter L or coloured BROWN or RED.
RD-1010
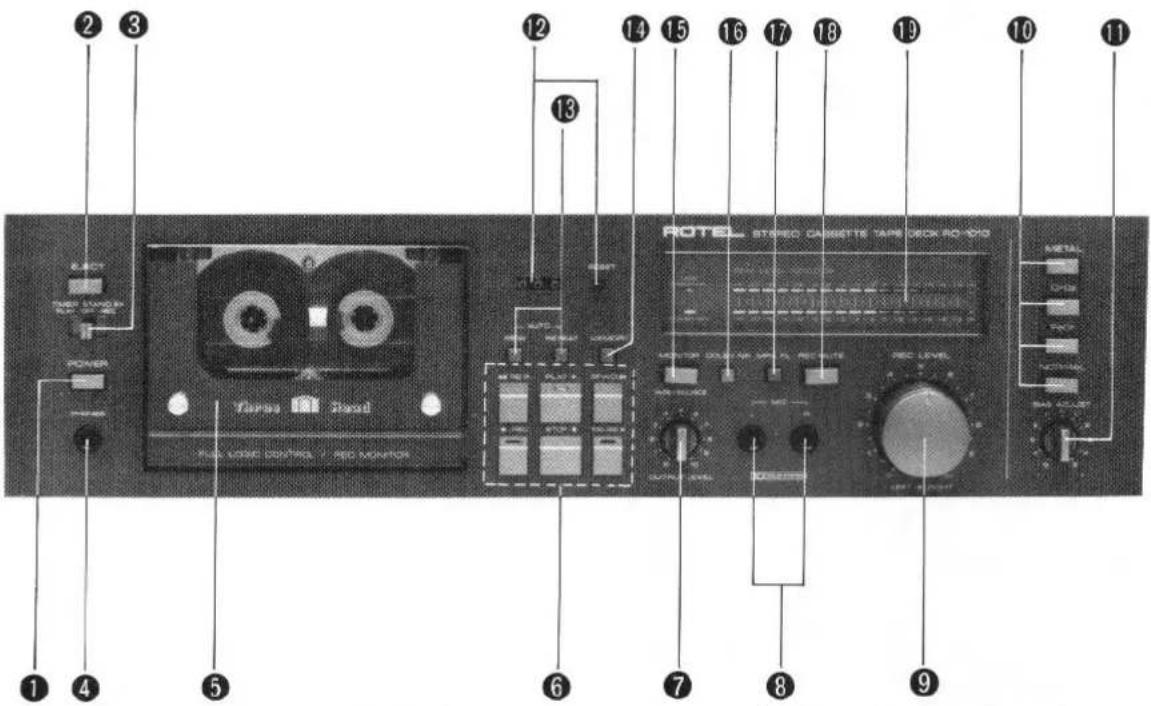
SWITCHES AND CONTROLS
(1) Power Button
Depressed once, this button turns on power in the tape deck. Pressed a second time, the button is released and the unit is turned off.
(2) Eject Button
Press this button to open the cassette door when loading or unloading the cassette tape. To load the cassette tape, gently insert the cassette into the cassette holder, exposed tape side down, and the label for the side to be recorded or played back facing you. To close the cassette door, push it in lightly.
(3) Timer Standby Switch
Used when recording or playing back using a timer. In normal operation, leave the switch in OFF position.
(4) Headphone Jack
For headphone listening from the deck, the headset is plugged into this jack. Before beginning, make sure the volume control of your amplifier is set to minimum. The Output Level Control (7) controls the volume level in headphone listening.
(5) Cassette Door
Cassette tape is loaded into the cassette door. Press the EJECT button to open the door.
(6) Cassette Controls
REW Button
For rapid tape rewind, depress this button.
PLAY Button
Depress this button to start the cassette for playback of recorded tape. The LED provided on the button will be illuminated.
F.FWD Button
Depress this button to advance the tape rapidly forward.
REC Button
To record, depress this and PLAY button. The deck is now in the recording mode, and the tape should be winding. The LED provided on the button glows during recording.
STOP Button
Depress this button to stop the tape in any mode: record, playback, rewind or fast-forward. This button will release any transport button currently engaged.
PAUSE Button
Depress this button to stop the tape temporarily during recording or playback. To restart the tape, press this button a second time and return to the interrupted mode.
(7) Output Level Control
Used in playback. Turn the knob clockwise to increase level of output to be sent to the amplifier, and counterclockwise to decrease it. This control may be conveniently used to coordinate the output level of the deck with that of other program sources connected to the amplifier, such as tuner or turntable. In normal use, it is recommended to set to maximum position "10."
(8) Microphone Jacks
When making live recording with stereo microphones, insert the microphone plugs into these jacks. Make sure the right-hand microphone is connected to the right channel jack, and the left-hand microphone to the left channel jack. Be sure to unplug the microphones when recording from other sources.
(9) Recording Level Control
Used to control the recording level of incoming signals, such as from a turntable, tuner, or microphones. This is a dual concentric knob which permits either separate or combined adjustment of both channels.
(10) Tape Selector
Used to select the appropriate recording bias and playback equalization, according to type of cassette tape used. Use the METAL button for metal tape, the CrO_2 button for chromium dioxide tape, the FeCr button for ferrichrome tape, and the NORMAL button for normal tape. See "TAPE SELECTOR SETTING GUIDE" for details of various brands of cassette tapes and their proper selector positions.
(11) Bias Fine-adjust Control
This control lets you to obtain the optimum bias setting to match the property of tape being used when recording. Turn the knob towards the "+" side to increase the bias and towards "-" to decrease it. See "TAPE SELECTOR SETTING GUIDE" for details.
(12) Tape Counter and Reset Button
The three-digit tape counter indicates the amount of tape travel. Push the reset button to set the counter to "000." This counter is convenient in finding the beginning of a specific section of the tape or checking the amount of the remaining tape on the cassette.
(13) AUTO REW/REPEAT Buttons
When the automatic rewind (AUTO REW) button is pressed while the MEMORY button is depressed, the tape will start rewind automatically at the end of the tape, and stop when the counter reaches "999." If the MEMORY button is not depressed, the tape will rewind to its beginning. When the automatic repeat button (AUTO REPEAT) is pressed while the MEMORY button is depressed, the tape will start rewinding automatically at the end of the tape, and stop when the counter reaches "999." From that point, the tape will repeat the play. If the MEMORY button is not depressed, the tape will rewind to its beginning and repeat from there.
(14) Memory Button
This button activates the unit memory of a starting position for playback or recording. When the button is depressed, the unit memorizes the "000" position on the tape counter. When REW button is depressed, the tape keeps winding until the counter reaches "999," at which point the tape stops automatically. When AUTO REW or REPEAT button is depressed, the cassette rewinds itself to "999" position after the end of tape is reached. Play will be repeated from that position if AUTO REPEAT button is in the depressed position.
(15) MONITOR TAPE/ SOURCE Button
This deck is a 3-sendust-core-head type allowing monitoring: When the MONITOR TAPE/SOURCE button is set at TAPE position (released position) in the record mode, the TAPE MONITOR indicator will glow and you may listen to the sound being recorded as you record it. When this button is depressed to SOURCE position, the signal immediately preceding present recording will be heard.
Monitoring with headphones is recommended, as you can block room noise. If you use speakers for monitoring, be sure to set the monitor switch on the amplifier to ON or to the position to which the deck is connected.
(16) Dolby NR Switch
Depress this button to switch in the built-in Dolby NR circuit provided for high-frequency range noise reduction when you wish to record or
play back through Dolby NR circuit. Dolby NR indicator glows when Dolby NR switch is depressed.
(17) MPX Filter Button
Depress this button when recording stereo FM broadcasts. FM stereo broadcasting system uses a 19kHz pilot signal which may adversely affect the sound quality in some case. When the MPX filter button is depressed to ON, the MPX filter is activated to eliminate the 19kHz pilot signal, and clean stereo FM recording is achieved.
(18) REC MUTE Button
This button cuts the input signal. When the button is depressed during recording, no signal is recorded while tape travel continues, creating a blank section on your tape. This button is useful to avoid recording unnecessary parts of the source, or to insert no-signal sections when dubbing or editing.
(19) Peak Level Indicator
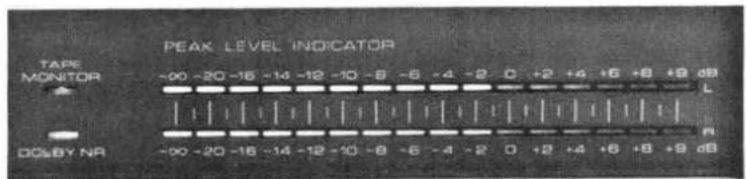
The two banks of 16-segment LEDs indicate, for left and right channels separately, peak levels in recording or playback. Since the peak level indication is important in achieving the best recording, follow the instructions carefully for proper use of the indicator.
CASSETTE TAPES
High-performance tapes ranging from notmal to metal types are suitable for this component. In addition, tape, tension and capstan tolerance for this unit have been carefully adjusted to the specific tape thickness of C30, C60 and C90 cassettes. For this reason, the use of C120 cassettes is not recommended. As cleanness and precision are necessary for accurate sound reproduction, cassettes should always be handled with care, and kept away from dust and magnetic influences which might cause sound distortion.
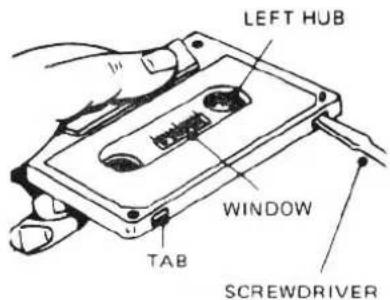
Cassette tapes are provided with a safety feature which prevents against accidental erasure of previously recorded material. This feature consists of two small tabs located on both sides at the rear of the cassette housing. After a recording has been made, these tabs are removed, leaving two small, square openings which prevent further recording on that tape. (You will notice that these tabs are absent on any pre-recorded tapes you may have.) If you wish to guard against erasure on a recording you have made on a blank cassette, it is necessary to remove one or both of these tabs as follows:
-
If both sides have been recorded, insert a thin bladed screwdriver in the opening around each tab and gently pry the tab off. Be sure the tab falls free from the cassette.
-
If one side only has been recorded, place the cassette on a table just as it has been removed from the recorder, with the side recorded facing up and the exposed tape area facing you. You should then remove the tab in the left-hand corner to prevent erasure of that side of the tape.
If you later wish to record over a previously recorded tape, simply place a piece of adhesive tape over
natural_image
Line drawing of a cassette tape with a handle and screwdriver, showing mechanical components (no text or symbols)the opening. This will allow you to make a new recording. Removal of the tape after recording will again insure against accidental erasure.
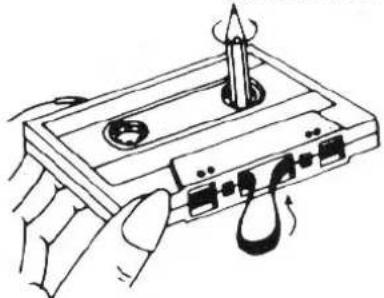
The cassette tape, when wound loosely on either hub, is likely to jam around the capstan and pinch roller during recording or playback. Therefore, if the tape is loose, insert a pencil into the more tightly wound hub, and turn it with the pencil until the slack is taken up. Always be sure to check that the tape is wound tightly before inserting a cassette in your deck.
AUTOMATIC SHUTOFF SYSTEM
To protect the RD-1010's motor and drive mechanism against unnecessary wear, an automatic shut-off device has been built into the machine. When the supply hub stops for any reason the motor and drive mechanism will automatically shut off after a short period of time. The machine is also automatically shutoff at the end of tape (PLAY, REC/PLAY, FAST FORWARD and REWIND modes), disengaging all locked buttons.
Note: Since this device will not affect the electronic circuits of the machine it will still be necessary to turn off the entire unit by pushing the power switch.
BEFORE RECORDING OR PLAYBACK
-
Be certain that power connection and connection with amplifier are properly made.
-
When recording, be sure the safety tabs on the cassette tape are not removed.
-
Be sure to unplug the microphones from the deck when recording from other sources.
-
To load the cassette tape, press the EJECT button to open the cassette door. Hold the cassette tape with the side to be recorded or played back facing you and the exposed tape side down, and gently slide in the cassette down the inner side of the cassette door. Then push the door closed.
-
The TIMER STANDBY switch should be set to OFF when timer is not used.
RECORDING
- When recording with microphones, the microphone plugs must be inserted properly into the left and right microphone jacks.
- When recording from line sources, choose the desired program (tuner, turntable, etc.) on your amplifier.
-
When you wish to record using Dolby NR circuit, set the Dolby NR switch to ON position.
-
Set the Tape Selector according to type of tape used.
Note: When setting the Tape Selector, also set the Bias Fine-adjust control to the appropriate position. See "TAPE SELECTOR SETTING GUIDE" for optimal setting.
When recording stereo FM broadcasts, depress MPX FIL button to eliminate pilot signal.
-
Turn on the deck Power switch.
-
Depress PAUSE button. Then depress REC and PLAY buttons simultaneously.
-
Adjust the recording level for left and right channels with Recording Level control so that the level indicator reading does not exceed 0dB position frequently or only briefly. (See figure.)
-
After adjusting recording level, press the PAUSE button again to put the unit into recording mode
and to start the tape.
-
Be careful to watch the level indication during recording as well. PAUSE button may be used to halt recording temporarily.
-
To make no-signal section on your tape during recording, depress REC MUTE button. When this button is in the depressed position, no signal is recorded while the tape continues to travel.
-
Press STOP button when recording is finished. When the end of the tape is reached, the REC button will automatically disengage and the tape stops.
TO MONITOR RECORDING
RD-1010 is a 3-head type letting you perform monitoring (i.e. playing back the recorded sound off the tape while the recording is being made). This function is possible only with the 3-head type deck with a monitor head. It is not possible with 2-head decks or 3-head decks without monitor head. Use this function effectively and enjoy high quality recording.
Normally, monitoring is performed using headphones. The closed type headset is recommended because the sound quality can be checked without interruption by surrounding noise.
-
Set the Output Level control to minimum. Insert your headset plug into the PHONES jack. Set the volume control on the amplifier to minimum. The MONITOR TAPE/ SOURCE button should be in the TAPE position (released position). Check that the TAPE MONITOR indicator is illuminated.
-
Adjust volume level of headphones using OUTPUT LEVEL control.
-
Recorded sound will be heard through the headphones. By pressing the MONITOR TAPE/SOURCE button, you can hear the sound (source) before recording it.
PLAYBACK
- When using Dolbyized tapes, set the Dolby NR switch to ON. For non-Dolbyized tapes, set the switch to OFF.
- Set the Tape Selector to match the type of tape used.
- Turn on the power switch on your amplifier, keeping its volume control set to minimum. When using headphones connected to the tape deck, the amplifier is not necessary.
- Turn on the Power switch on the deck.
- Depress PLAY button and play-back will begin.
- Using the Output Level Control, adjust the output of the deck to the same level as other source, such as tuner or turntable, and set the volume control on the amplifier as desired. In headphone listening, the Output Level control will act as volume control.
- To momentarily halt playback, depress the PAUSE button. When you wish to end playback, press the STOP button. When the tape comes to an end, it stops automatically and playback mode is disengaged.
AUTOMATIC MECHANISM
- Auto Rewind
When AUTO REW button is depressed, the deck automatically disengage from the play mode the instant the tape reaches its end and immediately enters the rewind mode.
- Auto Repeat
When AUTO REPEAT button is depressed, the deck will start rewinding at the end of the tape until the tape reaches the starting position. Then the play is repeated. As long as the button is depressed, repeating will continue.
• Memory Function
When the MEMORY button is depressed, the "000" position on the tape counter can be entered into the memory. The memory function works in the following manner.
-
When buttons AUTO REW and AUTO RETURN are in the released position, depressing REW button will start rewinding and stop it when the tape counter reaches "999."
-
When AUTO REW button is depressed, the tape rewinds itself after completing play until "999" is reached on the tape counter.
- If AUTO REPEAT button is depressed, the tape rewinds itself after play until "999" is reached on the tape counter, then the play is repeated.
- The memory of "000" position can be established at any point on the tape by pressing the RESET button.
HOW TO OPERATE THE DECK WITH TIMER
A. Recording with timer
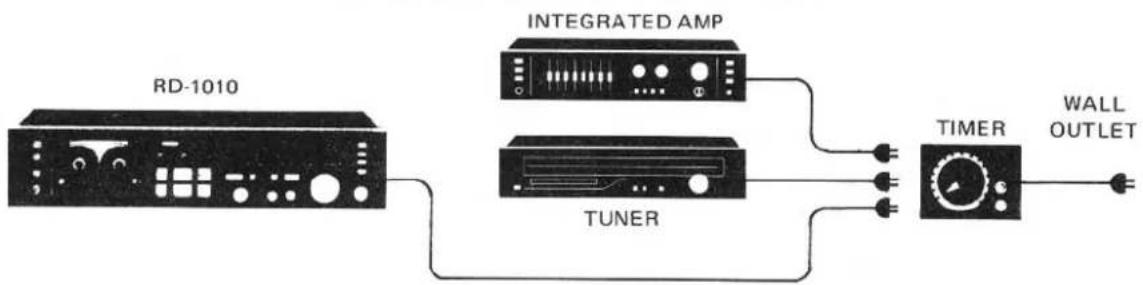
- Plug the timer into a wall outlet, and connect the cassette deck and related components (receiver, tuner, etc.) to the timer following the instructions provided with it.
- Insert a cassette into the holder.
- Turn on the cassette deck and related components (tuner, etc.).
-
Depress PAUSE button, and set the unit at record mode. Maintaining this state, adjust recording level and tune in the audio source (tuner, etc.).
-
Set TIMER STANDBY switch to REC.
-
Preset the timer to the desired time to activate the system, following the instructions provided with it.
- The unit will begin recording at the preset time.
B. Playback with timer
- Plug the timer into a wall outlet, and connect the cassette deck and related components (amplifier, receiver, etc.) to the timer, following the instructions provided with it.
- Insert a recorded cassette into the holder.
- Make sure that the volume control on the amplifier or receiver is set to proper level to prevent overload on the speaker system.
- Preset the timer to the desired time to activate the system, following the instructions provided with it.
- Turn power switches on the deck and amplifier (or receiver) to ON. (As the timer is already in operation, power is not supplied at this time.)
- Set TIMER STANDBY switch to PLAY.
- The unit will begin playback operation at the preset time.
HEAD CLEANING
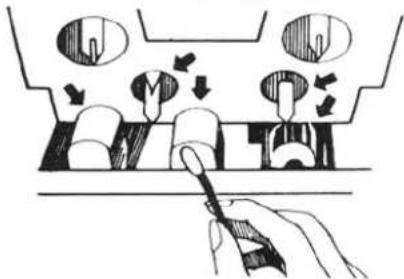
The most frequent cause of failure to record in one or both channels, or of weak, distorted sound, is dirty tape heads and capstan. So, be sure to clean the heads, capstan, pinch roller and tape guides as often as possible using a "Q" tip dipped in ordinary rubbing alcohol or commercial liquid tape head cleaner. Thoroughly wipe the surface of the heads, cpastan, roller and tape guide.
HEAD CLEANING
HEAD DEMAGNETIZING
The tape heads, capstan and tape guides gradually become magnetized with use, which will eventually affect the sound quality of your tapes. Demagnetizing should follow cleaning, but need not take place as often as cleaning, once after every 20 to 30 hours of use should suffice.
A demagnetizer may be purchased at a moderate cost from any dealer carrying tape recording accessories. Follow the instruction supplied with the demagnetizer.
Caution: Push the power switch off before you attempt demagnetizing.
POWER SUPPLY CONNECTION WITH TIMER
flowchart
graph LR
    A["RD-1010"] --> B["TUNER"]
    A --> C["INTEGRATED AMP"]
    C --> D["TIMER"]
    D --> E["WALL OUTLET"]
VOLTAGE SELECTION
Not available for U.K., Canada and Scandinavia
The unit is a variable voltage equipment that can run on 120V, 220V or 240V power supply. Your unit should already be preset at the proper voltage for use in your area. However, if you move to an area where the power supply voltage is different, the voltage setting can be manually changed. BE SURE THAT YOUR UNIT IS NOT CONNECTED TO THE POWER SOURCE BEFORE ATTEMPTING TO MAKE THIS CHANGE. To check the voltage setting, remove the name plate on the rear panel and locate the VOLTAGE SELECTOR. Use a screwdriver to turn the voltage selector to the required voltage.
Heads....Sendust-core (PLAYBACK)
Sendust-core (REC)
Sendust-tip (ERASE)
Track 4-track/2-channel
Tape Speed . . . . . . . . . . . . . . . . . . . . . . . . . . . . . . . . . . . . . . . . 4.8cm/sec.
Motor. . . . . . . . . . . . . . . . . . . . . . Electronic Governor DC Motor
Wow and Flutter . . . . . . . . . . 0.1% (DIN)
0.045% (WRMS)
Distortion (REC/PB, 400Hz) ...0.5% (METAL)
Frequency Response (MPX Filter OFF) (REC/PB):
Normal, LH . . . . . . . . . . . . . . 30 to 17,000Hz±3dB
Chromium . . . . . . . . . . . . . . 30 to 18,000Hz±3dB
FeCr . . . . . . . . . . . . . . . . . . . . . . . 30 to 19,000Hz±3dB
Metal .30 to 19,000Hz±3dB
Signal-to-Noise Ratio.....Dolby NR IN: 64dB
(Chromium) Dolby NR OUT: 56dB
Input Sensitivity/Impedance:
MIC. . . . . . . . . . . . . . . . . . . . . . . . . . 0.3mV/10 kohms
LINE....30mV/27 kohms
Output Level/Impedance.....580mV/2.5kohm
Fast Wind Time (C-60)....80 seconds
| Tape Selector: | BIAS | EQUALIZER | BIAS ADJ. |
| Normal, LH | 100% | 120μS | ±10% |
| Chromium | 150% | 70μS | ±10% |
| FeCr | 110% | 70μS | ±10% |
| Metal | 240% | 70μS | ±10% |
MISCELLANEOUS
Power Requirement.....120V/60Hz, 220V/50Hz, 240V/50Hz
120, 220, 240V/50-60Hz
Power Consumption .....23 watss
Dimensions (overall) . . . . . . . W 430mm/16-15/16"
H 115mm/4-17/32"
D 294mm/11-9/16"
Weight (net) 6.2kg/13.6 lbs
Note: Specifications and design subject to modification without prior notice.
"Dolby," "Dolbyized" and the Double-D symbol are trademarks of Dolby Laboratories.
Noise reduction system manufactured under license from Dolby Laboratories.
TAPE SELECTOR SETTING GUIDE
| TAPE SELECTOR POSITION | MANUFACTURER | BRAND | BIAS ADJUST CONTROL | |||||||||||
| -5 | -4 | -3 | -2 | -1 | 0 | +1 | +2 | +3 | +4 | +5 | ||||
| NORMAL | TDK | AD | ||||||||||||
| OD | ||||||||||||||
| FUJI | RANGE-2 | |||||||||||||
| RANGE-4 | ||||||||||||||
| RANGE-6 | ||||||||||||||
| SONY | AHF | |||||||||||||
| BHF | ||||||||||||||
| MAXELL | UD | |||||||||||||
| XLI | ||||||||||||||
| SCOTCH | MASTER 120 | |||||||||||||
| FeCr | SONY | DUAD | ||||||||||||
| BASF | FCR | |||||||||||||
| CrO_2 | TDK | SA | ||||||||||||
| FUJI | RANGE-4X | |||||||||||||
| SONY | JHF | |||||||||||||
| MAXELL | XLII | |||||||||||||
| SCOTCH | MASTER II | |||||||||||||
| BASF | SCR | |||||||||||||
| METAL | TDK | MA | ||||||||||||
| FUJI | SUPER RANGE | |||||||||||||
| SONY | METALLIC | |||||||||||||
| MAXELL | MX | |||||||||||||
- OWNER'S MANUAL
- ROTEL®
- RD-1010
- INTRODUCTION
- POWER SUPPLY
- INSTALLATION
- CONNECTION TO INTEGRATED AMPLIFIER
- EXCLUSIVE NOTE FOR U.K.
- SWITCHES AND CONTROLS
- Power Button
- Eject Button
- Timer Standby Switch
- Headphone Jack
- Cassette Door
- Cassette Controls
- REW Button
- PLAY Button
- F.FWD Button
- REC Button
- STOP Button
- PAUSE Button
- Output Level Control
- Microphone Jacks
- Recording Level Control
- Tape Selector
- Bias Fine-adjust Control
- Tape Counter and Reset Button
- AUTO REW/REPEAT Buttons
- Memory Button
- MONITOR TAPE/ SOURCE Button
- Dolby NR Switch
- MPX Filter Button
- REC MUTE Button
- Peak Level Indicator
- CASSETTE TAPES
- AUTOMATIC SHUTOFF SYSTEM
- BEFORE RECORDING OR PLAYBACK
- RECORDING
- TO MONITOR RECORDING
- PLAYBACK
- AUTOMATIC MECHANISM
- - Auto Rewind
- - Auto Repeat
- • Memory Function
- HOW TO OPERATE THE DECK WITH TIMER
- Recording with timer
- Playback with timer
- HEAD CLEANING
- HEAD DEMAGNETIZING
- VOLTAGE SELECTION
- Not available for U.K., Canada and Scandinavia
Marke : ROTEL
Modell : RD-1010
Kategorie : Kassettenabspieler