
NetShelter AR106 - Nicht kategorisiert APC - Kostenlose Bedienungsanleitung
Finden Sie kostenlos die Bedienungsanleitung des Geräts NetShelter AR106 APC als PDF.


| Produkttyp | Rack-Schrank |
| Modell | APC NetShelter AR106 |
| Höheneinheiten | 42 HE |
| Außenmaße (H x B x T) | 1991 mm x 600 mm x 1070 mm |
| Gewicht (netto) | ca. 105 kg |
| Maximale Traglast | ca. 1000 kg |
| Material | Stahl |
| Oberfläche | Pulverbeschichtet, schwarz |
| Tür | Verglaste Vordertür, Rücktür massiv |
| Seitenwände | Abnehmbar, abschließbar |
| Lüftung | Optional mit Lüftermodul erweiterbar |
| Kabeleinführung | Oben und unten, mit Bürstenleisten |
| Belastbarkeit Boden | Geeignet für Fliesen oder Estrich |
| Zertifizierungen | UL, CE, RoHS |
| Lieferumfang | Rack mit Türen, Seitenteile, Montagematerial |
| Reinigung | Mit feuchtem Tuch und mildem Reinigungsmittel |
| Wartung | Regelmäßige Überprüfung der Schrauben und Belüftung |
| Sicherheit | Abschließbare Türen und Seitenteile |
| Ersatzteile | Türen, Schlösser, Lüftermodule separat erhältlich |
| Reparatur | Ersatzteile online bestellbar |
| Garantie | 2 Jahre Herstellergarantie |
| Hersteller | APC (American Power Conversion) |
Häufig gestellte Fragen - NetShelter AR106 APC
Benutzerfragen zu NetShelter AR106 APC
0 Frage zu diesem Gerät. Beantworten Sie die, die Sie kennen, oder stellen Sie Ihre eigene.
Eine neue Frage zu diesem Gerät stellen
Laden Sie die Anleitung für Ihr Nicht kategorisiert kostenlos im PDF-Format! Finden Sie Ihr Handbuch NetShelter AR106 - APC und nehmen Sie Ihr elektronisches Gerät wieder in die Hand. Auf dieser Seite sind alle Dokumente veröffentlicht, die für die Verwendung Ihres Geräts notwendig sind. NetShelter AR106 von der Marke APC.
BEDIENUNGSANLEITUNG NetShelter AR106 APC
Schneider
Electric
Assembly and Installation
NetShelter WX Cabinet AR106, AR109, AR112
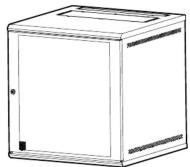
990-9652B
4/2016
Model Height
t
U/mm
Width
mm
Depth
mm
Weight
lb/kg
Shipping Weight
lb/kg
AR106 6/355 600 400 20.7/9.4 32.1/14.6
AR109 9/485 600 400 28.0/12.7 35.3/16.0
AR112 12/620 600 600 40.3/18.3 51.0/23.1
For all three Models: Loading rate, (lb/kg) 200/90.7
Unpacking
Inspection
Move the product to a firm, level surface. Inspect the packaging for signs of damage.
Contact the shipping company to report any damage and then contact
your local distributor or Schneider Electric Customer Support at
www.schneider-electric.com.

Please Recycle
Dispose of all packaging in a responsible manner.
Inventory
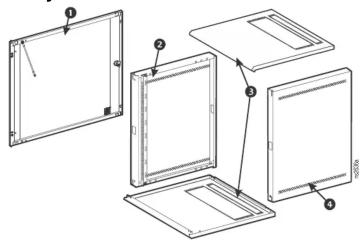
Item Description Quantity
1 Door 1
2 Left side panel 1
3 Top/bottom cover 2
4 Right side panel 1
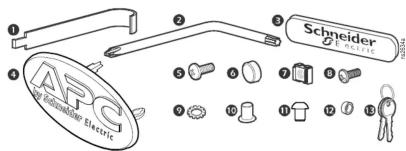
Item Description
① Cage nut tool 1
② Wrench, T30/#2 Phillips 1
③ Schneider Electric badge 1
④ APC badge 1
5 Screw, Phillips/Slot, M6 x 16 24 (AR106)
36 (AR109)
6 Cup, M6, black plastic 24 (AR106)
36 (AR109)
⑦ Caged nut M6 24 (AR106)
36 (AR109)
48 (AR112)
8 Screw, Phillips, M6 x 12 10
⑨ Washer, serrated, M6 1
10 Bushing, door, plastic 3
11 Hole plug, door, 4mm, plastic 2
12 Washer, plastic 2
⑬ Keys 2
Tools Required (Not Provided)
Level
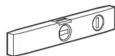
Assembly
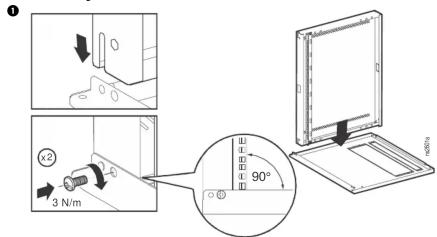
2
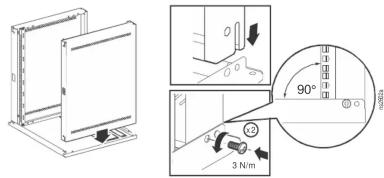
4/2016
990-9652B
© 2016 Schneider Electric. All rights reserved.
Contact www.schneider-electric.com for more information.
Woridwide Customer Support
3
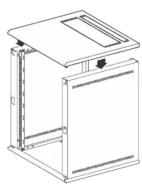
4
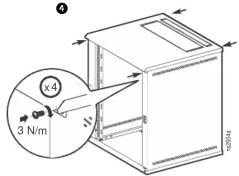
5
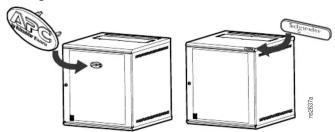
Select a badge
Installation
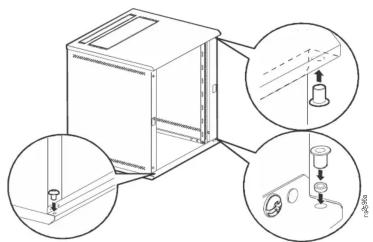
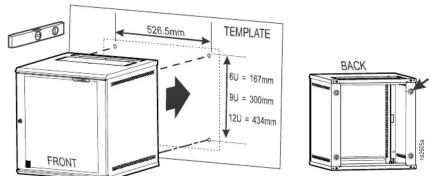
Use the template to mark the location of mounting hardware to your wall. Install the appropriate hardware (not included) to the wall, following all local regulations. There are four (4) keyhole cutouts on the back of the side panels that will accommodate up to a M6 or 1/4 in. bolt.
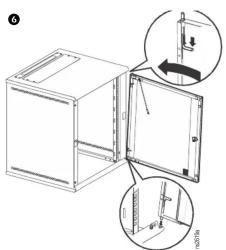
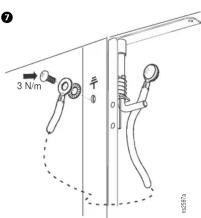
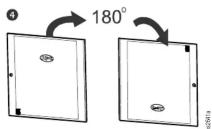
Reverse the door
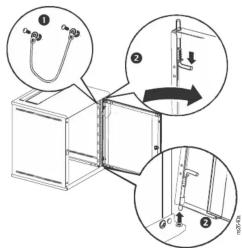
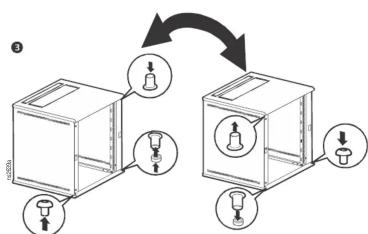
flowchart
graph TD
    A["Step 1: Labeled box with bell icon"] --> B["Step 2: Reordering box with bell icon"]
    B --> C["Step 3: Labeled box with bell icon"]
    C --> D["Step 4: Labeled box with bell icon"]
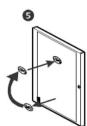
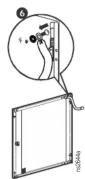
7
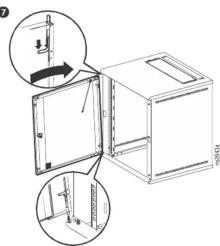
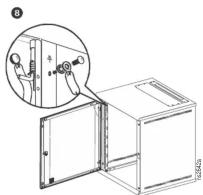
Rail Adjustment
The rails can be adjusted to 6 positions using the square holes ^2 with cage nuts installed. The forward most position includes a threaded PEM nut ^1 for rapid installation. The other 5 mounting locations use a cage nut to mount the vertical mounting rail into position. The slotted hole ^3 in the vertical mounting rail allows for 0 to 23mm (0.9 in.) adjustment at each position.
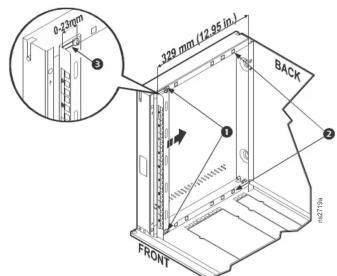
NOTE: AR109 is shown in the cutaway illustration. The door and top panel have been removed for clarity.
NOTE: Position dimensions in the table below are listed from the front (maximum) of the cabinet to the back (minimum).
| AR106 / AR109 | AR112 | AR106 / AR109 | AR112 | ||||||
| Position | mm | in. | mm | in. | Position | mm | in. | mm | in. |
| 1 | 329 | 13.0 | 529 | 20.8 | 4 | 153 | 6.0 | 153 | 6.0 |
| 2 | 289 | 11.4 | 489 | 19.3 | 5 | 113 | 4.4 | 113 | 4.4 |
| 3 | 249 | 9.8 | 449 | 17.7 | 6 | 73 | 2.9 | 73 | 2.9 |


Marke : APC
Modell : NetShelter AR106
Kategorie : Nicht kategorisiert