
APCRBCV201 - Wechselrichter APC - Kostenlose Bedienungsanleitung
Finden Sie kostenlos die Bedienungsanleitung des Geräts APCRBCV201 APC als PDF.


| Produkttyp | Ersatzbatterie für USV |
| Marke | APC |
| Modell | APCRBCV201 |
| Kompatible USV-Modelle | SRV/SRVS Rack-Mount 1000/2000/3000 VA |
| Batterietechnologie | Verschlossene Blei-Säure (VRLA) |
| Nennspannung | 48 V |
| Kapazität | 9 Ah |
| Anzahl der Zellen | 4 (je 12 V) |
| Abmessungen (ca.) | 18 x 13 x 8 cm |
| Gewicht (ca.) | 10 kg |
| Lebensdauer | 3–5 Jahre (abhängig von Umgebungsbedingungen) |
| Betriebstemperatur | 0–40 °C |
| Lagertemperatur | −15–45 °C |
| Schutzart | IP20 |
| Lieferumfang | 1 Batteriekassette, Schnellinstallationsanleitung |
| Wartung | Wartungsfrei; regelmäßiger Austausch alle 3–5 Jahre empfohlen |
| Sicherheit | Nur von qualifiziertem Personal wechseln; Batterie nicht kurzschließen; nur APC autorisierte Batterien verwenden |
| Entsorgung | Über autorisierte Recyclingstellen gemäß www.apc.com/recycle |
| Garantie | 2 Jahre |
| Zertifizierungen | CE, UL, RoHS |
Häufig gestellte Fragen - APCRBCV201 APC
Benutzerfragen zu APCRBCV201 APC
0 Frage zu diesem Gerät. Beantworten Sie die, die Sie kennen, oder stellen Sie Ihre eigene.
Eine neue Frage zu diesem Gerät stellen
Laden Sie die Anleitung für Ihr Wechselrichter kostenlos im PDF-Format! Finden Sie Ihr Handbuch APCRBCV201 - APC und nehmen Sie Ihr elektronisches Gerät wieder in die Hand. Auf dieser Seite sind alle Dokumente veröffentlicht, die für die Verwendung Ihres Geräts notwendig sind. APCRBCV201 von der Marke APC.
BEDIENUNGSANLEITUNG APCRBCV201 APC
Quick Installation Guide for Battery Cartridge Replacement
CAUTION:
- Only qualified persons should remove the battery.
- Use APC authorized batteries only.
- Use authorized battery recycler. See www.apc.com/recycle for information on recycling services offered in your country.
SRV/SRVS Rack-Mount 1000/2000/3000 VA
- Remove the front bezel of the UPS and disconnect the battery cable.
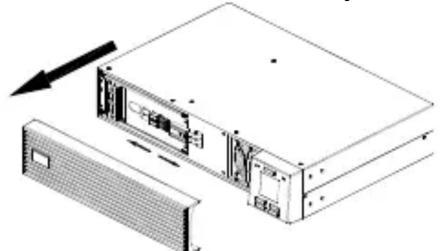
natural_image
Technical line drawing of a server rack with an attached drive unit and a separate storage unit (no text or symbols)- Remove the battery plate.
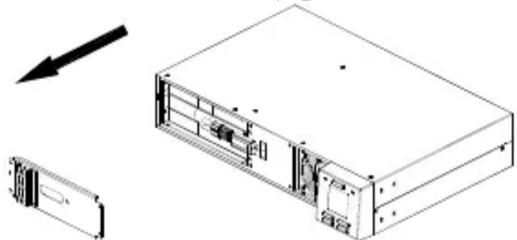
natural_image
Technical line drawing of a server rack unit with internal components and an arrow indicating direction (no text or symbols)- Insert the new battery.
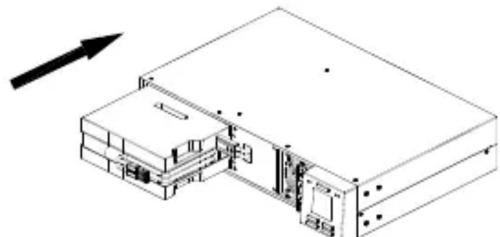
natural_image
Isometric line drawing of a mechanical or electronic device with internal components and an arrow indicating direction (no text or symbols)- Secure the battery plate by fastening the screws (4 nos.).
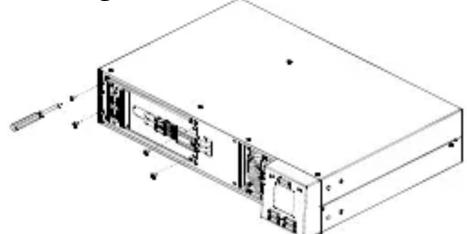
natural_image
Technical line drawing of a computer chassis with internal components and mounting holes (no text or symbols)- Locate the screws (4 nos.) securing the battery plate and unfasten them.
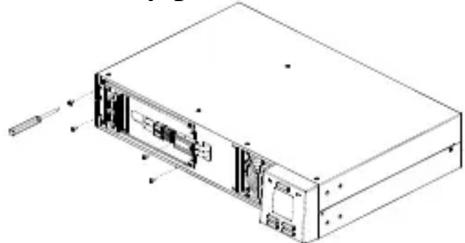
natural_image
Technical line drawing of a computer rack unit with internal components and mounting holes (no text or labels)- Slide out the old battery.
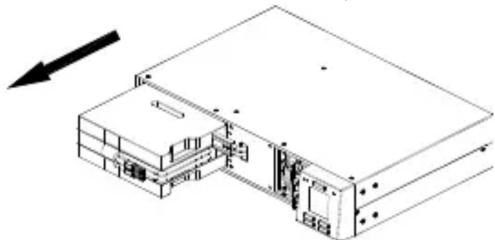
natural_image
Technical line drawing of a mechanical assembly with internal components and an arrow indicating direction (no text or symbols)- Re-install the battery plate removed in step 2.
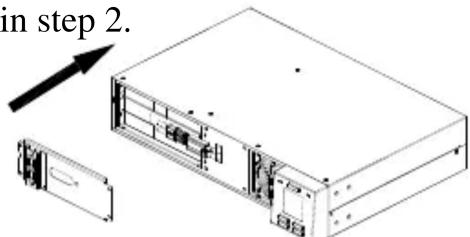
- Re -connect battery cable and re-install the front bezel of the UPS.
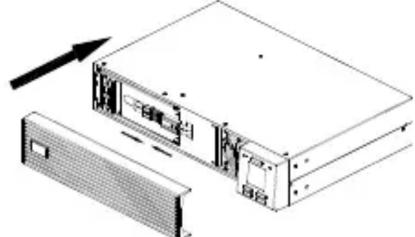
natural_image
Diagram of a computer chassis with an arrow indicating direction, showing internal components and a separate storage unit (no text or symbols present)NOTE: The above illustrations are for representation only. The battery replacement procedure remains the same for all the UPS ratings.

Marke : APC
Modell : APCRBCV201
Kategorie : Wechselrichter