Trinity System - Mikrofon K&K Sound - Kostenlose Bedienungsanleitung
Finden Sie kostenlos die Bedienungsanleitung des Geräts Trinity System K&K Sound als PDF.


Benutzerfragen zu Trinity System K&K Sound
0 Frage zu diesem Gerät. Beantworten Sie die, die Sie kennen, oder stellen Sie Ihre eigene.
Eine neue Frage zu diesem Gerät stellen
Laden Sie die Anleitung für Ihr Mikrofon kostenlos im PDF-Format! Finden Sie Ihr Handbuch Trinity System - K&K Sound und nehmen Sie Ihr elektronisches Gerät wieder in die Hand. Auf dieser Seite sind alle Dokumente veröffentlicht, die für die Verwendung Ihres Geräts notwendig sind. Trinity System von der Marke K&K Sound.
BEDIENUNGSANLEITUNG Trinity System K&K Sound

K&K SOUND
NATURAL PICKUP POWER
PRODUCT MANUAL
TRINITY SYSTEM
Thank you for choosing the K&K Trinity Pickup/Microphone Combination System!
In this installation packet, you will find:
• Trinity Microphone Installation (follows on p. 2)
• Pure Pickup installation (separate manual)
- Preamp installation and use (separate manual)
TRINITY MICROPHONE
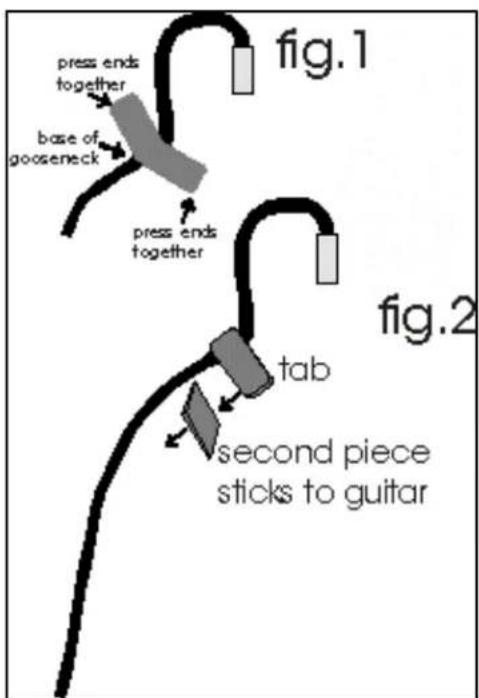
- Cut a 2 1/2" piece of the supplied dual-lock and locate the base of the gooseneck (gooseneck is thicker and stiffer than the mic cable). Loop the dual-lock piece around the base of the gooseneck. Pinch the sticky sides together to get a tab as shown in fig. 1.
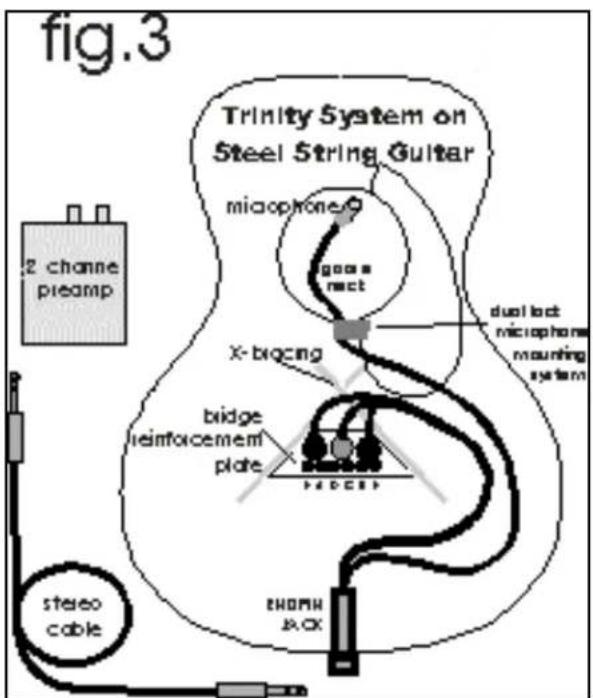
- Cut a second piece of dual-lock approx. 1" long (see fig. 2) and stick it to a suitable spot inside your guitar close to the edge of the sound hole (fig. 3).
- Form the gooseneck to achieve a mic position as shown in fig. 3. This position is recommended to avoid picking directly over the mic. The mic should aim outwards, towards the strings, between the G and B string. The distance between strings and mic should be about 3/8 inch (ca 10 mm).
- Press the dual-lock mic tab onto the second dual-lock piece inside your guitar and re-adjust the mic's gooseneck.(fig. 3) The dual-lock works like "super" velcro and can be re-opened.
- You have the option to experiment with different mic angles and positions to obtain your personal best sound.
- Secure all wiring inside guitar with tape.
text_image
press ends together base of gooseneck press ends together fig.1 tab second piece sticks to guitar fig.2