
Sx100+E - Lautsprecher ELECTRO-VOICE - Kostenlose Bedienungsanleitung
Finden Sie kostenlos die Bedienungsanleitung des Geräts Sx100+E ELECTRO-VOICE als PDF.


| Produkttyp | Passiver Lautsprecher |
| Marke | Electro-Voice |
| Modell | Sx100+E |
| Kategorie | Lautsprecher |
| Lautsprechertyp | 2-Wege, Bassreflex |
| Treiber | 15" Tieftöner, 1" Hochtöner (Kompressions) |
| Frequenzgang | 55 Hz – 20 kHz |
| Nennbelastbarkeit (RMS) | 400 W |
| Programmbelastbarkeit | 800 W |
| Impedanz | 8 Ω |
| Empfindlichkeit (1W/1m) | 98 dB |
| Abmessungen (HxBxT) | 700 x 430 x 390 mm |
| Gewicht | 25 kg |
| Gehäusematerial | Sperrholz, schwarz beschichtet |
| Schutzgitter | Stahl, pulverbeschichtet |
| Anschlüsse | 2x SpeakON (parallel) |
| Aufstellungsoptionen | Boden, Stativ (Flansch 35 mm) |
| Anwendungsbereich | Beschallung, Live, Installation |
Häufig gestellte Fragen - Sx100+E ELECTRO-VOICE
Benutzerfragen zu Sx100+E ELECTRO-VOICE
0 Frage zu diesem Gerät. Beantworten Sie die, die Sie kennen, oder stellen Sie Ihre eigene.
Eine neue Frage zu diesem Gerät stellen
Laden Sie die Anleitung für Ihr Lautsprecher kostenlos im PDF-Format! Finden Sie Ihr Handbuch Sx100+E - ELECTRO-VOICE und nehmen Sie Ihr elektronisches Gerät wieder in die Hand. Auf dieser Seite sind alle Dokumente veröffentlicht, die für die Verwendung Ihres Geräts notwendig sind. Sx100+E von der Marke ELECTRO-VOICE.
BEDIENUNGSANLEITUNG Sx100+E ELECTRO-VOICE

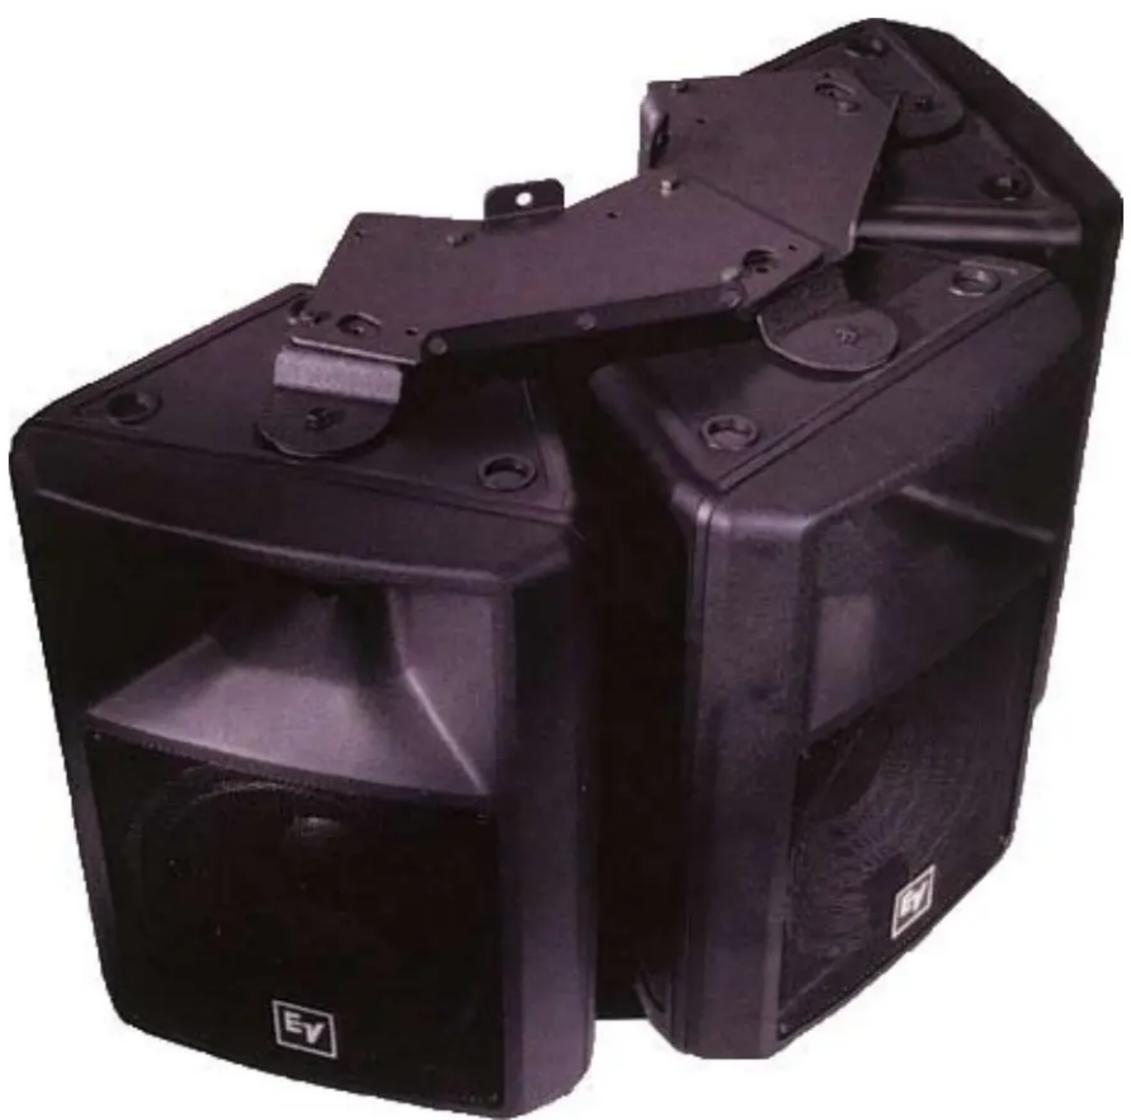
Sx/Sb-Series 12" Systems Rigging Manual
natural_image
Exterior view of a black electric shock absorber with mounting bracket and mounting holes (no text or symbols visible)Sx-Series
Sb-Series
Electro-Voice® Sx/Sb-Series 12" Systems Rigging Manual
Live For Sound
www.electrovoice.com


WARNING: Suspending any object is potentially dangerous and should only be attempted by individuals who have a thorough knowledge of the techniques and regulations of rigging objects overhead. Electro-Voice strongly recommends that the Sx/Sb-Series enclosures be suspended taking into account all current national, federal, state and local regulations. It is the responsibility of the installer to ensure the loudspeaker is safely installed and in compliance with all regulations. If the loudspeaker is suspended, Electro-Voice strongly recommends that the system be inspected at least once a year. If any sign of weakness or damage is detected, remedial action should be taken immediately.
The Mb Kits
Electro-Voice® manufactures three accessories to make the suspension of Sx/Sb-Series enclosures safe, easy and cost-effective: the Mb100 Eyebolt Attachment Kit, the Mb200 Installation Kit and the Mb300 Horizontal Array Kit. This instruction sheet gives a brief overview of how each of these suspension kits could be used so the correct kit can be selected. In addition, each of the suspension kits includes a separate instruction sheet with complete dimensions and full details for use.
Suspending Sx/Sb-Series Enclosures
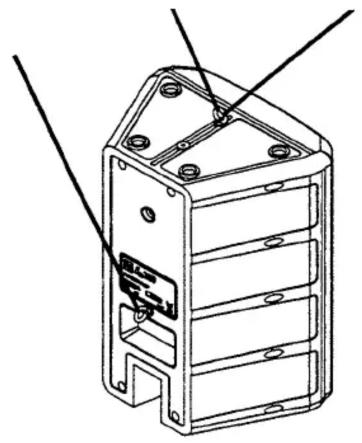
The molded enclosures used in Sx/Sb-Series are lightweight and structurally sound. Each enclosure has four metric M8 x 1.25 metal inserts molded into the enclosure to aid in suspension and aiming. A single insert, correctly used, will safely suspend the weight of one enclosure with a safety factor in excess of 5 to 1. It will not support additional weight with a sufficient safety factor for overhead lifting. If multiple Sx/Sb-Series enclosures are suspended, Mb200 Installation Kits must be used to support and aim each enclosure.
Mb100 Eyebolt Attachment Kit
The Mb100 Eyebolt Attachment Kit is intended for very simple installations only, to suspend an individual Sx/Sb-Series loudspeaker in a near-vertical orientation (see Figure 1). A second, redundant insert point is provided in the top of the enclosure so a supplementary independent means of suspension can be attached when regulations specify. The enclosure can be positioned to angle downward slightly through the use of the pull-up point at the back of the enclosure.
Note that two top suspension cables should be used at all times to provide needed stability to the installation (see Figure 1).
Do not suspend Sx/Sb-Series enclosures face down from the ceiling using the Mb100 Eyebolt Attachment Kit. The M8 eyebolts are not rated for lifting loads at 90°, and such a configuration makes stabilization of the enclosure difficult. Instead, use the Mb200 Installation Kit for this and most other situations (see the Mb200 Installation Kit section).
Mb200 Installation Kit
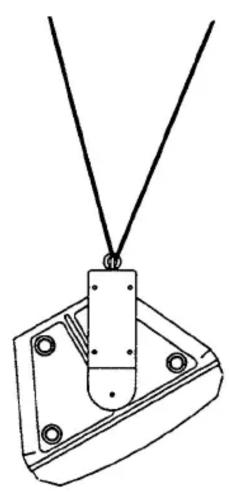
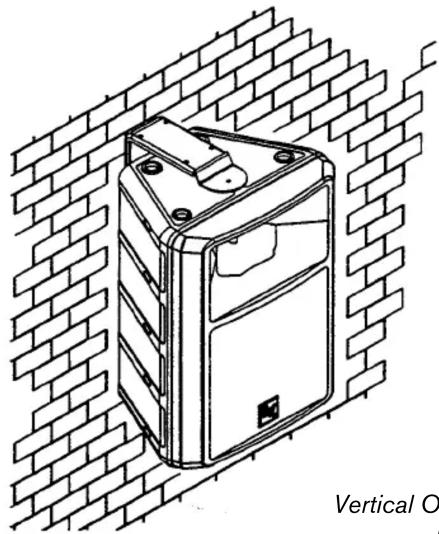
The Mb200 Installation Kit provides a cost-effective and safe means of attaching Sx/Sb-Series loudspeakers to walls or suspending them overhead (see Figure 2). The kit contains a large, reinforced-steel bracket with a selection of thru-holes which allow the bracket to be mounted to different surfaces in a range of orientations. This kit is recommended for most installations, and is essential when arraying Sx/Sb-Series loudspeakers.
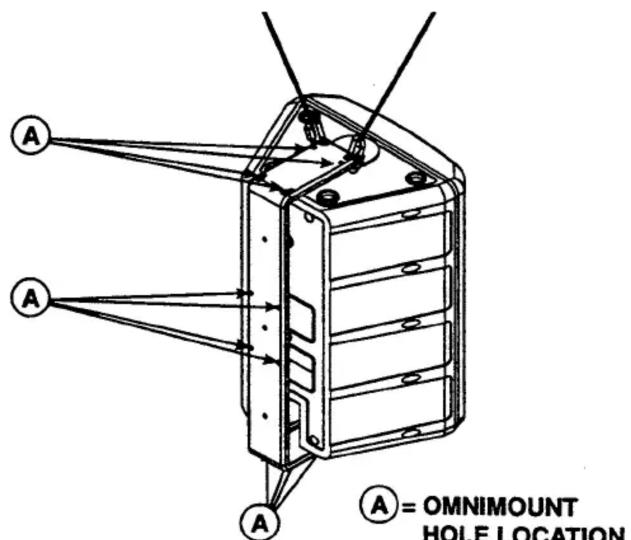
The Mb200 U-bracket extends from top to bottom of the Sx/Sb-Series loudspeaker and attaches at both ends. This securely “captures” the enclosure, allowing further loudspeaker systems to be added without increasing the stress on the first enclosure. It also allows the loudspeaker to be aimed in the desired direction and locked in place. For even greater flexibility, three-hole-pattern groups compatible with the OmniMount® 60.0 (originally Series 100) ^1 support system have also been incorporated into the Mb200 Installation Kit’s U-bracket (see Figure 2B, reference A).
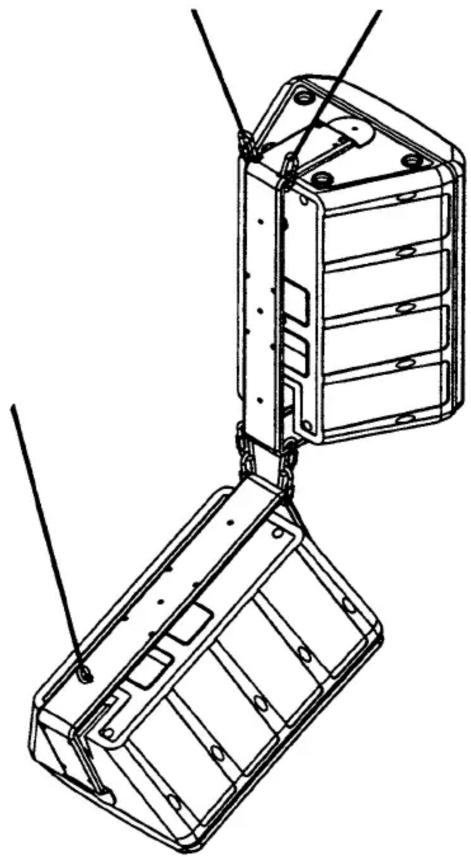
Vertical arrays can be constructed by "daisy chaining" Mb200's together (see Figure 3). To achieve a slight downward angle, attach an additional cable to the lower Mb200 and use this cable to pull up the array, securing the cable at the desired angle and position.
No more than two enclosures should be suspended in a vertical array in this manner. If a taller array is required, you should provide a means of independent suspension for the remaining enclosures.
Again, note the use of two top suspension cables (see Figure 3) which provide stability and should be used at all times.

NOTE: The Mb200 mounting brackets will not work with powered (amplified) versions of the Sx/Sb-Series. Flush-mounted input panels (as opposed to recessed input panels on passive versions) cause the U-bracket to interfere with cables connected to the rear of the loudspeaker.
Mb300 Horizontal Array Kit
The Mb300 Horizontal Array Kit must be used in conjunction with the Mb200 Installation Kit. Select the required number of kits from the chart below:
| Horizontal Array | ||
| Number of Enclosures in Array: | Number of Kits Required | |
| Mb200 Mb300 | ||
| 2 2 1 | ||
| 3 3 2 | ||
| 4 4 3 | ||
| 5 5 4 | ||
| 6 (Complete Circle) | 6 | 6 |
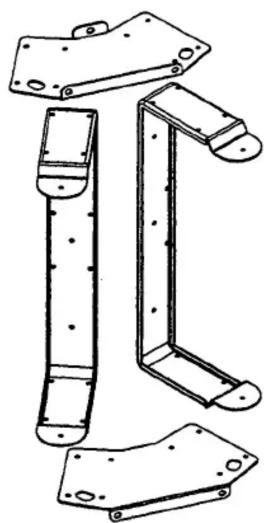
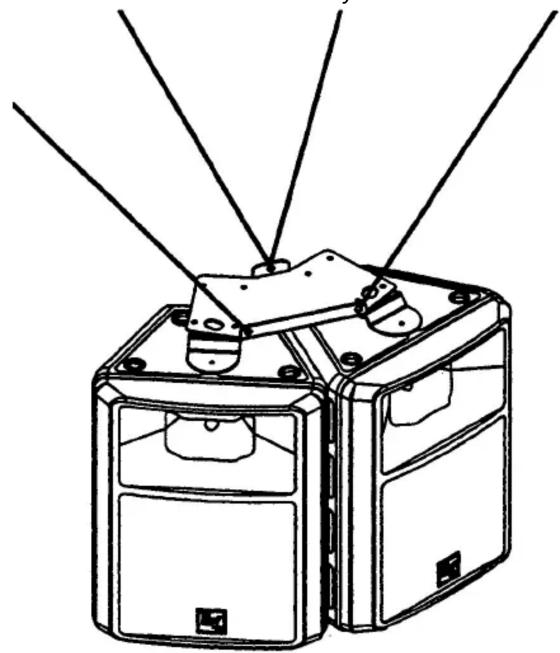
Each Mb300 Horizontal Array Kit consists of two connector brackets (one top, one bottom) plus the hardware required to join these brackets to the U-brackets from two Mb200 Installation Kits. This combination of one Mb300 Horizontal Array Kit plus two Mb200 Installation Kits forms a solid frame suitable for suspending two Sx/Sb-Series loudspeakers in a horizontal array (see Figure 4). Holes are provided in the Mb300 brackets for attaching cables for suspension.
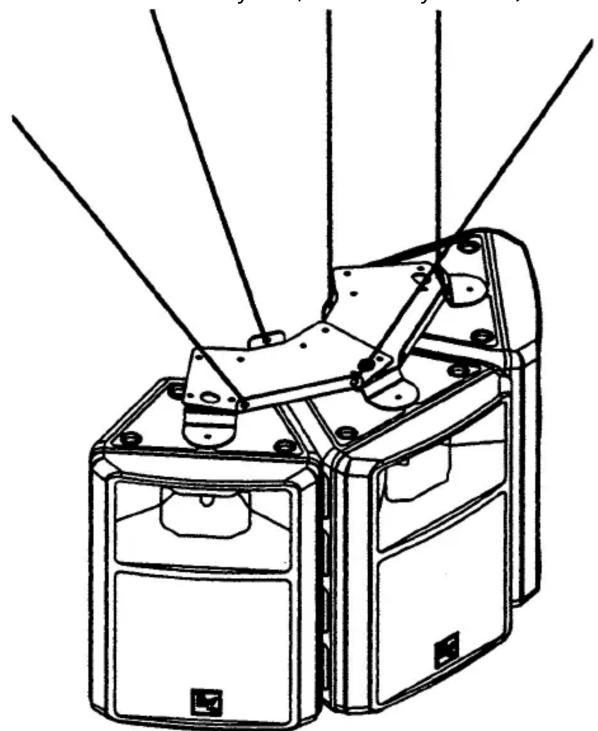
Two mounting angles, 50^ and 60^ , are possible using the Mb300 Horizontal Array Kit. Use of the 50^ angle results in a tight array with speaker sides touching (see Figure 5); use of the wider orientation results in improved coverage for multiple loudspeakers and allows construction of a complete, 360^ array (see Figure 6 for diagram of one half of a 360^ array). A vertical array can also be constructed using the Mb300 Horizontal Array Kit, but relatively few aiming angles are available.
- OmniMount® is a registered trademark of OmniMount Systems, Inc. For more information, visit www.omnimountpro.com
Electro-Voice® Sx/Sb-Series 12" Systems Rigging Manual1
Figure 1:
Overhead Suspension Using the Mb100 Eyebolt Attachment Kit
natural_image
Technical line drawing of a mechanical housing or enclosure with mounting holes and internal compartments (no text or symbols)Figure 2c:
Horizontal Overhead Suspension
Using the Mb200 Installation Kit
natural_image
Technical line drawing of a mechanical clamp or bracket with metal components and connecting rods (no text or symbols)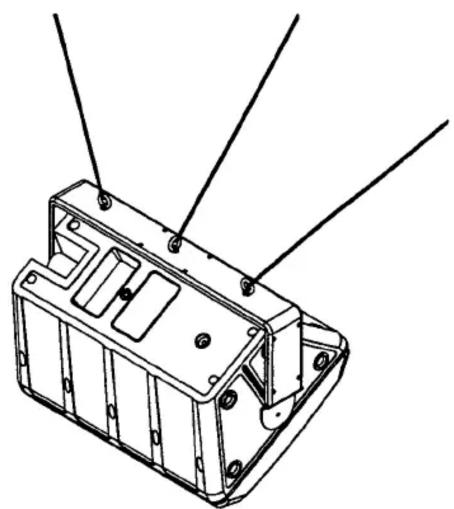
natural_image
Technical line drawing of a mechanical housing component with three inserted pins (no text or symbols)Figure 2a:
Wall Mounting Using the Mb200 Installation Kit
natural_image
Technical line drawing of a mechanical device mounted on a brick wall (no text or symbols)Figure 2b:
Figure 3:
Vertical Array Using the Mb200 Installation Kit
Vertical Overhead Suspension Using the Mb200 Installation Kit
natural_image
Technical line drawing of a mechanical assembly with two views (top and side), showing internal components and mounting brackets (no text or symbols)Electro-Voice® Sx/Sb-Series 12" Systems Rigging Manual 2
Figure 4a:
Brackets from One Mb300 Horizontal Array Kit and Two Mb200 Installation Kits, Positioned for Assembly
Figure 4b:
Assembled Horizontal Array Mounting Frame Consisting of One Mb300 Horizontal Array Kit and Two Mb200 Installation Kits
natural_image
Technical line drawing of three mechanical bracket assemblies (no text or symbols)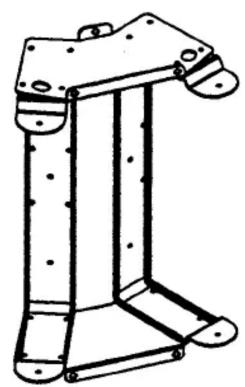
natural_image
Technical line drawing of a mechanical bracket or frame structure (no text or symbols)Figure 4c:
Two Enclosure Horizontal Array Using the Mb300 Horizontal Array Kit
natural_image
Line drawing of a mechanical device with multiple blades and mounting holes (no text or symbols)Figure 4d:
Orientation for Full Circle (360°) Array Using the Mb300 Horizontal Array Kit (Partial Array Shown)
natural_image
Technical line drawing of a mechanical device with multiple arms and mounting holes (no text or symbols)Electro-Voice®
12000 Portland Avenue South, Burnsville, MN 55337
Phone: 952/884-4051, Fax: 952/884-0043
www.electrovoice.com
© Bosch Communications Systems 02/2008
Part Number 534780 Rev B
U.S.A. and Canada only. For customer orders, contact Customer Service at:
800/392-3497 Fax: 800/955-6831
Europe, Africa, and Middle East only. For customer orders, contact Customer Service at:
+ 49 9421-706 0 Fax: + 49 9421-706 265
Other International locations. For customer orders, Contact Customer Service at:
+ 1 952 884-4051 Fax: + 1 952 887-9212
For warranty repair or service information, contact the Service Repair department at:
Electro-Voice® Sx/Sb-Series 12" Systems Rigging/45-2605
For technical assistance, contact Technical Support at: 866/78AUDIO



Marke : ELECTRO-VOICE
Modell : Sx100+E
Kategorie : Lautsprecher