
SPG 406X - Herd SCHNEIDER - Kostenlose Bedienungsanleitung
Finden Sie kostenlos die Bedienungsanleitung des Geräts SPG 406X SCHNEIDER als PDF.


| Produkttyp | Gas-Kochfeld (Einbau) |
| Marke | Schneider |
| Modell | SPG 406X |
| Maße (B x T x H) | 580 x 500 x 100 mm |
| Ausschnittmaße (B x T) | 555 x 475 mm |
| Gasart | Erdgas (G20) / Flüssiggas (G30/G31) |
| Gasdruck | G20: 20 mbar; G30: 28–30 mbar; G31: 37 mbar |
| Anzahl der Brenner | 4 |
| Brennerleistungen | Schnellbrenner (95 mm): 3,0 kW; Halbschnellbrenner (65 mm): 2× 1,75 kW; Hilfsbrenner (45 mm): 1,0 kW |
| Gesamtleistung | 7,5 kW |
| Zündung | Manuelle Zündung (Streichholz oder Zünder) |
| Sicherheit | Thermoelektrische Flammenüberwachung (Sicherheitsventil) |
| Stromversorgung | 110–240 V, 50/60 Hz, 11 mA (nur für Zündung) |
| Einbau | Freistehend oder über Einbaubackofen |
| Gehäusematerial | Edelstahl |
| Gewicht | ca. 10 kg |
| Reinigung | Vor Reinigung vom Stromnetz trennen; am besten lauwarm reinigen |
| Mitgeliefertes Zubehör | Düsenset für Flüssiggas (G30/G31) |
| Garantie | Entspricht den gesetzlichen Bestimmungen |
Häufig gestellte Fragen - SPG 406X SCHNEIDER
Benutzerfragen zu SPG 406X SCHNEIDER
0 Frage zu diesem Gerät. Beantworten Sie die, die Sie kennen, oder stellen Sie Ihre eigene.
Eine neue Frage zu diesem Gerät stellen
Laden Sie die Anleitung für Ihr Herd kostenlos im PDF-Format! Finden Sie Ihr Handbuch SPG 406X - SCHNEIDER und nehmen Sie Ihr elektronisches Gerät wieder in die Hand. Auf dieser Seite sind alle Dokumente veröffentlicht, die für die Verwendung Ihres Geräts notwendig sind. SPG 406X von der Marke SCHNEIDER.
BEDIENUNGSANLEITUNG SPG 406X SCHNEIDER

SCHNEIDER
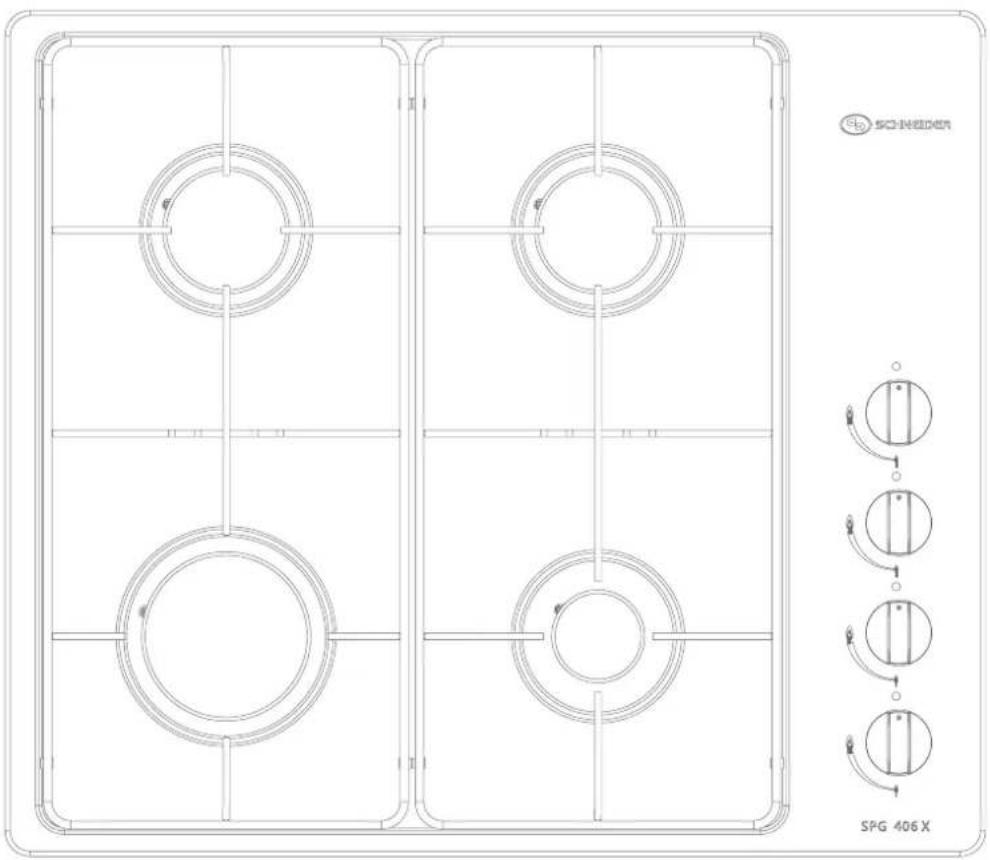
SPG 406 X
MANUAL DE INSTRUCCIONES
Este electrodoméstico no debe ser utilizado, manipulado o limpiado por niños o personas con sus capacidades físicas o mentales disminuídas sin la ayuda de un adulto responsable de su seguridad.
Lea detenidamente estas instrucciones antes de instalar y/o utilizar el aparato.
Instale este electrodoméstico de acuerdo con la normativa vigente aplicable a cocinas de gas de uso doméstico. La instalación sólo debe realizarla personal cualificado que conozca la normativa y disponga de los conocimientos técnicos necesarios.
Si el cable de alimentación eléctrica está dañado o la cocina de gas no funciona correctamente no intente manipular ninguna de las piezas por su cuenta. No use el electrodoméstico y contacte con un servicio técnico autorizado. Si huele a gas no lo encienda ni lo enchufe o desenchufe.
Antes de instalar esta cocina de gas compruebe que el lugar cumple con los siguientes requisitos del electrodoméstico:
| RED ELÉCTRICA: | 110~240V | 50/60Hz | 11mA |
| CATEGORÍA DEL GAS: | I2H (20) | I3+(28~30/37) | |
| TIPO DE GAS: | G20 | G30 | G31 |
| PRESIÓN DEL GAS: | 20 mbar | 28~30 mbar | 37 mbar |
(Consulte la etiqueta del propio producto)
Conecte la cocina de gas a una salida de gases adecuada acorde con la normativa vigente. Instale este electrodoméstico de acuerdo con la normativa vigente aplicable a cocinas de gas de uso doméstico.
Úsese únicamente en lugares bien ventilados. Durante un uso prolongado puede necesitar recurrir a ventilación extra, por ejemplo abriendo una ventana o aumentando la potencia de la campana extractora si la hubiere.
Si usa gases licuados del petróleo utilice un regulador de presión exclusivo para este electrodoméstico. Compruebe siempre el buen estado de este regulador y remplácelo junto con el conducto de gas cada 5 años. Especificaciones del regulador de presión:
- Presión: Según etiqueta
- Consumo máximo: 2 Kg/h
- Debe ser conforme con la normativa vigente y estar certificado EN12864
El conducto del gas debe cumplir con la normativa vigente, cumplir con los estándares EN aplicables y no medir más de 1.5 metros.
Retire todos los envoltorios antes de proceder a la instalación.
Asegúrese de que el gas de su domicilio es del tipo correspondiente a los inyectores instalados. La placa viene preparada de fábrica para gas natural, pero puede adaptarse a gas butano si fuera necesario.
INDICE
- Avisos de seguridad importantes.
- Indice.
- Descripción del producto.
- Instrucciones de Instalación.
- Instrucciones de Uso.
- Mantenimiento y Limpieza
- Asistencia técnica
Gracias por su confianza en Schneider. Puede consultar otros productos de nuestra marca en www.schneiderespana.es
![SODDER A B C D ] A ] B ] C ] D SPG 406 X](/content/2026/05/801152/images/0f3828cb196ca348c5e1fdf7e4263d5c754f85e08390b3abd1db7713fd29a441.jpg)
7.5545(/)kWgh
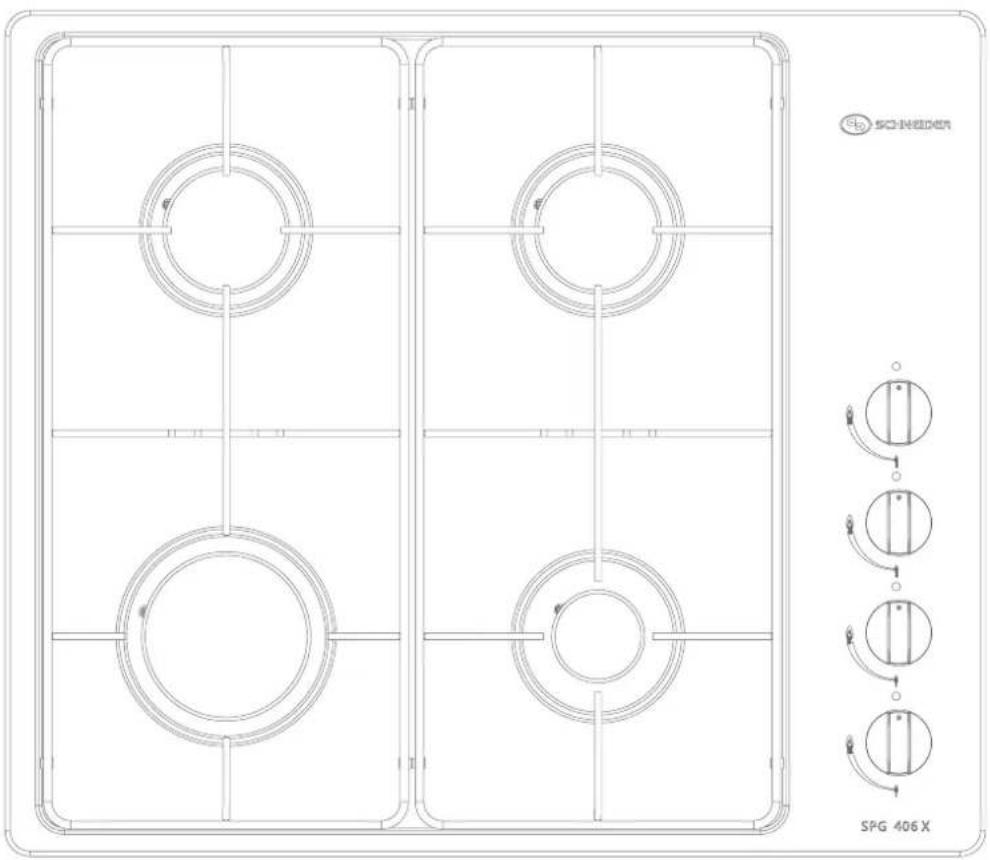
Ⓐ 65 mm. burner: 1.75 kW (127 g/h)
⑧ 65 mm. burner: 1.75 kW (127 g/h)
© 95 mm. burner: 3.0 kW (218 g/h)
(D) 45 mm. burner: 1.0 kW (73 g/h)
Cuando utilice este producto tome las debidas precauciones para evitar incendios y quemaduras.
Utilícese únicamente para cocinar.
Sólo para uso doméstico.
No utilice este electrodoméstico si está en contacto con agua o con las manos mojadas.
Asegúrese de que los controles están en posición "0" cuando no se usan,
Si la llama se apaga accidentalmente ponga a "0" el mando correspondiente y espere al menos un minuto antes de volver a ecenderlo.
INSTRUCCIONES DE INSTALACIÓN:
IMPORTANTE: La instalación sólo debe llevarla a cabo personal cualificado.
CARACTERÍSTICAS DEL PRODUCTO:
Dimensiones del producto: 580 x 500 x 100 mm
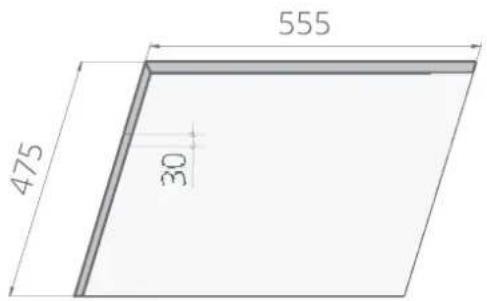
Dimensiones del hueco de la encimera: 555 x 475 mm
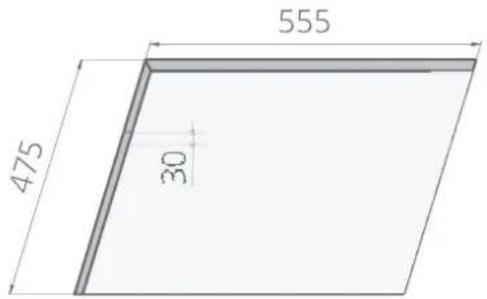
Información técnica:
| GAS NATURAL | LICUADOS PETRÓLEO | |||
| Diámetro inyector (mm) | kW | Diámetro inyector (mm) | kW | |
| Categoría del gas | I_2H(20) | I_3+(28-30/37) | ||
| Quemador rápido (218 g/h) | 1.28 | 3.0 | 0.85 | 3.0 |
| Quemador semi-rápidos (127 g/h) | 0.97 | 1.75 | 0.65 | 1.75 |
| Quemador auxiliar (73 g/h) | 0.72 | 1.0 | 0.5 | 1.0 |
Cuando cambie los inyectores los nuevos deberían ser marcados por un técnico. Los inyectores deben ser cambiados siempre por personal cualificado
Categoría del gas y presión recomendada:
- I2H(20): G20 a 20 mBar
- 13+(28\~30/37): G30 a 28\~30 mBar, G31 a 37 mBar
DÓNDE COLOCAR LA PLACA DE GAS
Instálese únicamente en interiores, en una cocina o habitación habilitada para tal fin, ventilada y con todas las medidas de seguridad necesarias. Nunca la instale en exteriores, estancias supletorias, garajes, baños, etc.
La distancia entre la pared y la parte trasera del aparato debe ser de, al menos, 55 mm.
Se debe dejar una distancia mínima de 100 mm. entre los laterales de esta cocina de gas y cualquier cajón, armario o pared adyacente.
No acerque ningún material combustible (madera, plásticos, etc.) a menos de 50 mm de los
laterales y a menos de 400 mm. en línea vertical de esta cocina de gas. Por encima de los quemadores no debe encontrarse ningún objeto inflamable a menos de 700mm. Deje un espacio libre debajo de la placa de gas de al menos 150mm.
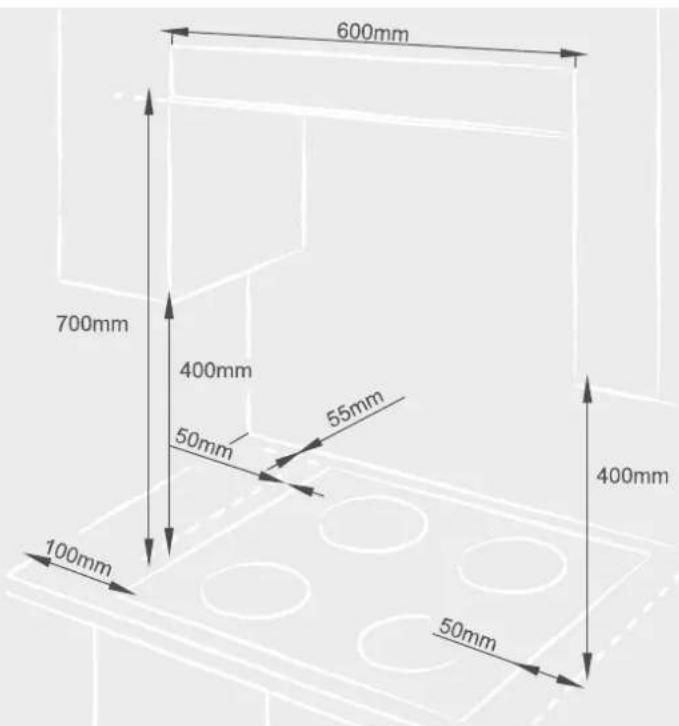
Es muy aconsejable el uso conjunto de ventilación natural y campana extractora para eliminar el humo, el vapor, el calor y la posible exposición a gas que se pudiera producir.
Retire todos los envoltorios antes de proceder a la instalación.
La placa va apoyada directamente sobre la encimera. Asegúrese de que está correctamente fijada en posición horizontal y que no hay suciedad, restos o ningún material o producto interpuesto entre la placa y la encimera.
Cuando instale la placa de gas sobre un horno encastrado éste debe estar fijado de forma independiente y, en la parte trasera de la balda que lo separa de la placa de gas (si la hubiere), debe dejar un espacio mínimo de 45x560 mm. Si el horno dispone de ventilador tangencial asegúrese de que dispone de entradas y salidas de aire adecuadas e independientes para dicha función.
CONEXIÓN DEL GAS:
Realice la conexión tal y como se muestra en el siguiente diagrama:
ATENCIÓN INSTALADOR
La instalación de este producto debe ser realizada únicamente por personal profesional cualificado para instalaciones de gas. Aténgase a la normativa vigente a la hora de instalar esta placa de gas.
Consulte el manual de usuario para comprobar la información técnica del aparato y las medidas de encastre. Compruebe que no haya escapes y cierre la llave del gas durante la instalación.
Esta placa de gas viene preparada para funcionar con gas natural. Para una instalación de gases derivados del pretróleo se incluye el kit adaptador con los inyectores correspondientes.
Si usa gases licuados del petróleo utilice un regulador de presión exclusivo para este aparato.
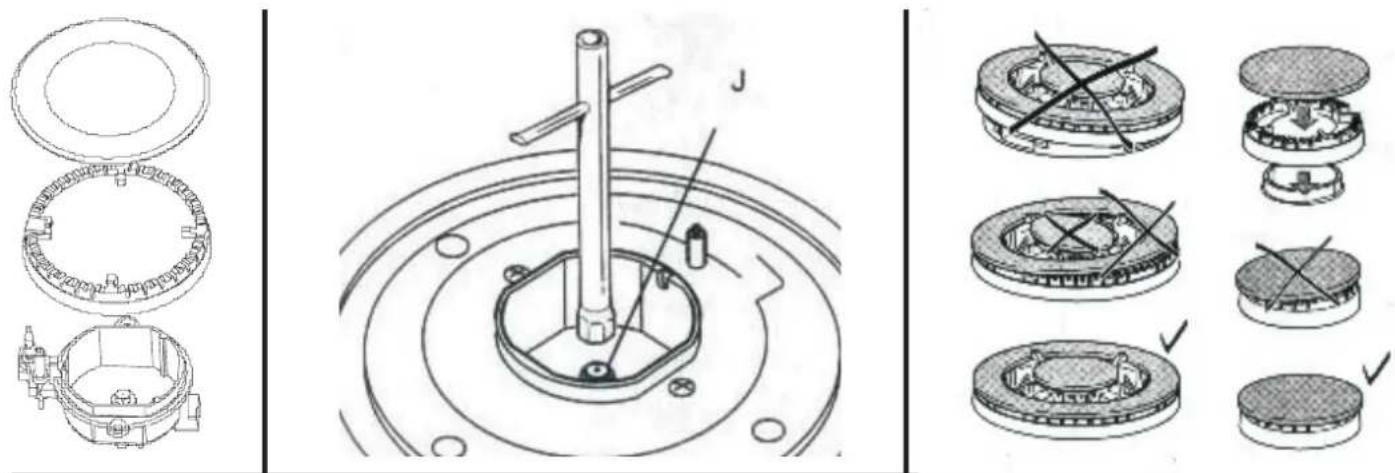
Para remplazar los inyectores:
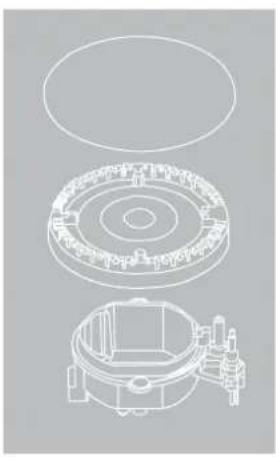
- Retire la tapa del quemador y la cubierta de aluminio
- Utilice una llave M7 para remplazar el inyector. Desatornille los inyectores preinstalados y atornille los que se incluyen en la caja (ver J en el diagrama)
- Atornille con fuerza suficiente para asegurarse de que no hay escapes (puede usar para ello agua jabonosa entorno al inyector tapando el mismo).
- Vuelva a colocar correctamente la cubierta de aluminio y la tapa del quemador
natural_image
Technical line drawing of a mechanical assembly with three views (top, front, side), showing internal components without any text or symbols.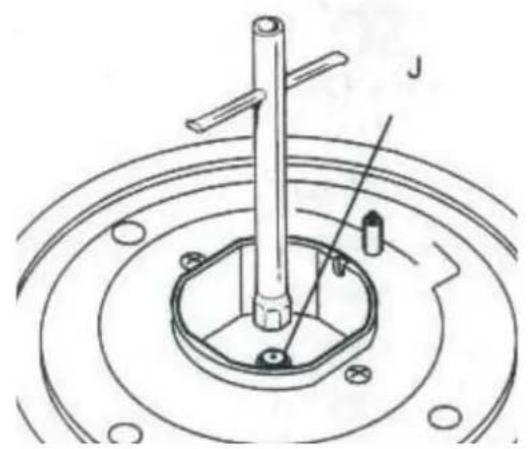
natural_image
Technical line drawing of a mechanical assembly with concentric rings and a central shaft (no text or symbols)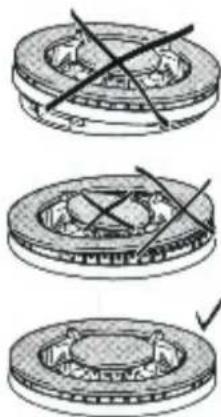
natural_image
Three-step diagram showing mechanical assembly with cross-bracing and a checkmark (no text or symbols)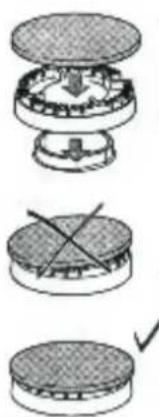
natural_image
Three-step diagram showing a mechanical assembly with a central component and cross-sections, no text or symbols present.INSTRUCCIONES DE USO:
ENCENDIDO:
- Presione el mando correspondiente al fuego que desea encender y gírelo al máximo en sentido contrario a las agujas del reloj.
- Acerque un encendedor especial para cocinas encendido al borde del fuego hasta que se produzca la combustión con cuidado de no quemarse.
- Espere a que se estabilice el fuego y suelte entonces el mando.
- Si no se produce la combustión en un primer intento vuelva a la posición inicial y pruebe de nuevo los pasos anteriores.
No mantenga el gas abierto sin encenderse más de 15 segundos seguidos. Si transcurridos 15 segundos no combustiona el gas, o si en algún momento se apaga accidentalmente, vuelva a poner el mando en la posición inicial, ventile la estancia durante al menos un minuto.
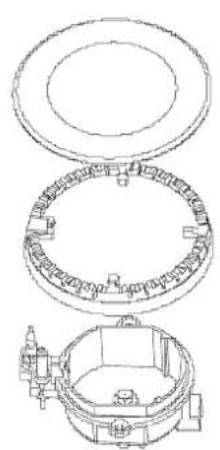
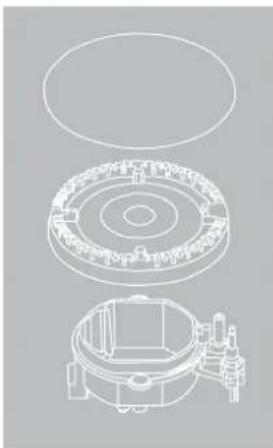
Si no consigue encender el fuego tras varios intentos compruebe que las piezas desmontables del quemador estén limpias y correctamente colocadas:
natural_image
Exploded view diagram of a mechanical assembly (no text or labels)Notas:
Cuando hierva el líquido que esté cocinando baje el fuego y evite llenar demasiado el recipiente para evitar derrames.
Si en algún momento encuentra dificultad en girar los controles contacte con su servicio técnico local.
Para asegurar la máxima eficiencia de los quemadores use ellas con la base perfectamente plana que se ajusten a las medidas siguientes:
| Diámetro quemador | Diámetro Mín. olla | Diámetro Máx. olla |
| 95 mm. | 180 mm. | 260 mm. |
| 65 mm. | 120 mm. | 220 mm. |
| 45 mm. | 80 mm. | 160 mm. |
No use en ningún caso recipientes que sobrepasen los bordes del propio electrodoméstico.
La llama podría apagarse accidentalmente. Si esto ocurriera este aparato dispone de un sistema de seguridad que bloqueará la salida del gas. Ponga el mando en su posición inicial, ventile por precaución la estancia durante un minuto. Después ponga el mando en posición de máxima potencia y acerque un encendedor para encender la llama de nuevo.
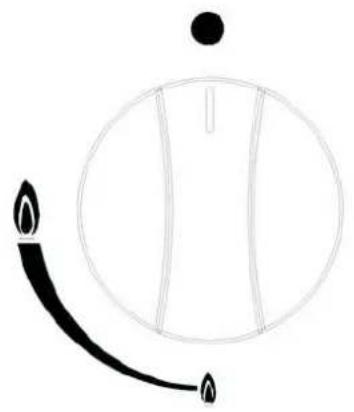
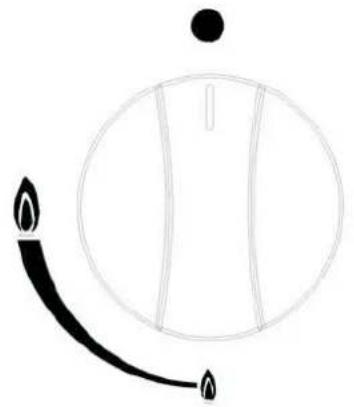
DESCRIPCIÓN DE LOS CONTROLES

Gas cerrado

Máxima potencia

Mínima potencia
natural_image
Simple line drawing of a circular object with a curved black line and a dot above it, no text or symbols present.MANTENIMIENTO Y LIMPIEZA:
Antes de proceder a realizar cualquier operación de mantenimiento o limpieza DESCONECTE el electrodoméstico de la corriente eléctrica.
La superficie se limpiará mejor mientras se mantenga ligeramente caliente.
ASISTENCIA TÉCNICA:
Si se presentara alguna incidencia que requiera de la intervención de personal técnico cualificado puede consultar su oficina técnica local de Schneider en nuestra web:
www.schneiderespana.es
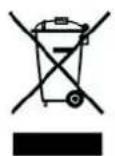
Este símbolo en el producto o en su material de embalaje indica que este producto no debe tratarse como residuo doméstico. En su lugar, debe entregarse en el punto de recogida selectiva adecuado para el reciclaje de equipos eléctricos y electrónicos. Al desechar este producto de forma correcta evitará las posibles consecuencias nocivas para el medio ambiente y la salud de las personas que podrían derivar de la mala gestión del producto como residuo. Para obtener más información sobre el reciclaje de este producto, póngase en contacto con su ayuntamiento, con su servicio de recogida selectiva de desechos o con la tienda donde adquirió el producto.
Todas las informaciones contenidas en este manual de usuario, imágenes incluidas, son de mera referencia y podrían verse afectadas por errores tipográficos o de otra índole, haciéndolas diferir del producto real.

SCHNEIDER
SPG 406 X
USER MANUAL
This appliance is not intended to be used by children and/or persons with reduced physical, sensory or mental capabilities or lack of experience and knowledge if they have not been given supervision and instruction concerning use of the appliance in a safe way and understand the hazards involved. Children shall not play with the appliance.
Read the instructions before installing or using this appliance.
Install this appliance in compliance with current regulations applicable to domestic gas hobs in your area. Installation shall be made by experts with related technical and local regulations knowledge.
If the electric cord or the appliance itself are not working properly or look damaged in any way do not try to manipulate or repair it yourself. Don't use the appliance and call a qualified technician. If you smell gas open all windows and do not turn on or off, nor plug in or unplug any device, including this appliance.
Prior to installation please check that its location complies with the following requirements:
| MAINS: | 110~240V | 50/60Hz | 11mA |
| GAS CATEGORY: | I2H (20) | I3+(28~30/37) | |
| GAS TYPE: | G20 | G30 | G31 |
| GAS PRESSURE: | 20 mbar | 28~30 mbar | 37 mbar |
(Please check the product rating label)
This appliance is not connected to a combustion products evacuation device. It shall be installed and connected in accordance with current installation regulations. Particular attention shall be given to the relevant requirements regarding ventilation.
When in use this appliance may produce heat and moisture in the room. Ensure there is a continuous air supply, keeping air vents in good condition or installing a cooker hood with a venting hose. For long usage the ventilation should be improved, by opening a window or increasing the extractor speed..
For LPG gases always use a pressure regulator exclusive for your gas cooker. The lack of pressure regulator might cause excess of pressure and leak of gas. Always check for the validity of the pressure regulator. Hose and regulator should be replaced every 5 years. Technical specification of the pressure regulator:
- Pressure: 20 mbar
- Max. consumption: 2 Kg/h
- Should be certified according to EN12864 and comply with local code
The appliance shall be used with an approved hose which is certified to applicable EN standards and in conformity with the National standards and regulations. The length of the hose shall not exceed 1.5m.
Remove all packaging before using the gas cooker.
INDEX
- Important safety notes.
- Index.
- Product description.
- Installation instructions.
- Operation instructions.
- Cleaning and maintenance.
- Technical Service.
Thank you for trusting Schneider as your home appliances brand. You can check all our new releases in our website: www.schneiderespana.es
PRODUCT DESCRIPTION:
![B A C D SPG 406 X ] A ] B ] C ] D](/content/2026/05/801152/images/42555b31c3a80b41bd845ce5273bce6c10e863c5be647af7ed7f0133b37b16d5.jpg)
7.5545(/)kWgh
Ⓐ 65 mm. burner: 1.75 kW (127 g/h)
⑧ 65 mm. burner: 1.75 kW (127 g/h)
© 95 mm. burner: 3.0 kW (218 g/h)
(D) 45 mm. burner: 1.0 kW (73 g/h)
When using this product take due precautions to void burns and/or fire.
Only intended for domestic cooking use.
Do not use this device while it is in contact with water o with your hands wet.
Ensure that he control knobs are in the closed position when not in use.
In the event of the burner flames being accidentally extinguished, turn off the burner control and do not attempt to re-ignite the burner for at least 1 min.
INSTALLATION INSTRUCTIONS:
IMPORTANT: The gas cooker must be installed by a qualified technician
PRODUCT SPECIFICATIONS:
Product dimensions: 610 x 525 x 100 mm
Cut Out dimensions: 555 x 475 mm
Technical specifications:
| NG | LPG | |||
| Diámetro inyector (mm) | kW | Diámetro inyector (mm) | kW | |
| Gas category | I_2H(20) | I_3+(28 - 30/37) | ||
| 1.28 | 3.0 | 0.85 | 3.0 | |
| Semi-rapid burner (127 g/h) | 0.97 | 1.75 | 0.65 | 1.75 |
| Auxiliary burner (73 g/h) | 0.72 | 1.0 | 0.5 | 1.0 |
when injectors are replaced, the new injectors should be marked by a gas technician. Injectors should only be replaced by qualified technicians
Gas category and working pressure:
12H(20): G20 at 20 mBar
13+(28\~30/37): G30 at 28\~30 mBar, G31 at 37 mBar
LOCATION
The hobs may be located in a kitchen, never in a bathroom, shower room or garage. Before making the cut out in the worktop ensure that there is a minimum distance of 55 mm between the rear edge of the hobs and the wall. A minimum distance of 100 mm must be left between the side edges of the hobs and any adjacent cabinets or walls. The minimum distance combustible material can be fitted above the hobs in line with the edges of the hobs is 400 mm. If it is fitted below 400 mm a space of 50 mm must be allowed from the edges of the hobs. The minimum distance combustible material can be fitted directly above the hobs is 700 mm.
Notice that a horizontal separation below the base of the hotplate is needed.
The minimum distance between this separation shall not exceed 150mm.
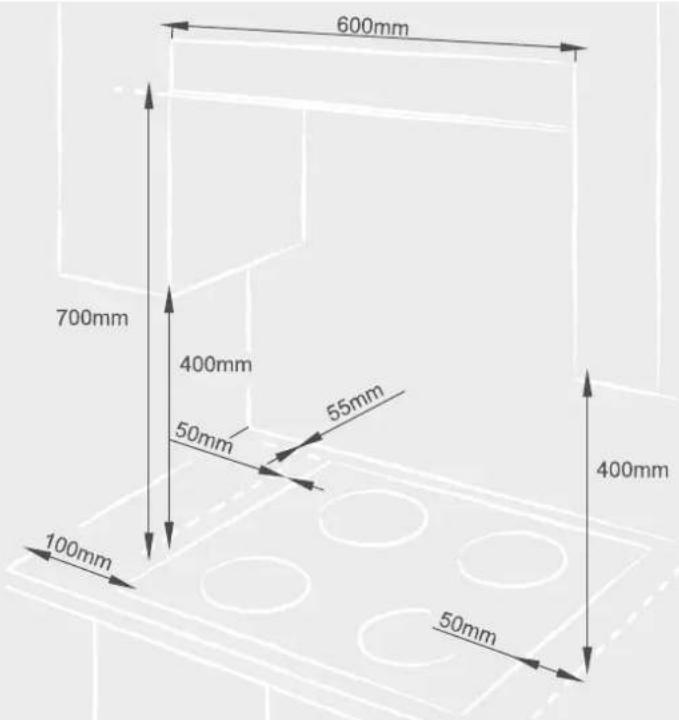
It is strongly advised to have in place both natural ventilation (window) and a range hood so that generated smoke or moisture and, eventually, any escape of gas can be easily eliminated using them in combination if needed.
Once the gas cooker has been installed, it is important to remove any protective materials, which were put on in the factory.
The base of the appliance should be protected from contact by a horizontal partition or plate.
When installing the gas cooker above a built-in oven, the oven should be placed on two wooden strips; in the case of a joining cabinet surface, remember to leave a space of at least 45 x 560 mm at the back. When installing on a built-in oven without forced ventilation, ensure that there are air inlets and outlets for ventilating the interior of the cabinet adequately.
GAS CONNECTION:
For gas connection please follow below diagram:
ATTENTION INSTALLER
The installation of this home appliance must be held only by a qualified gas appliances installer. Always install gas appliances such as this gas hob in compliance with current applicable regulations.
Check the user manual for product technical specifications, gas requirements, and built in instructions. Prior to install please check that there is no gas leakage and close the general gas valve.
This appliance is ready to work with natural gas. If you want to use it with LPG please use the adapter kit included in the packaging. If you have any doubt on how to make the installation please contact our technical services.
For LPG gas always use a pressure regulator exclusive for this gas cooker.
To replace the injectors:
- Take off the fire burner cap and the aluminium cap from each hob.
- Use M7 wrench to unscrew the nozzle then screw and tighten the correct nozzle with the same instrument (see J).
- Open the gas supply and turn on the valve use some material to block the nozzle then use soapy water to test whether there is bubbles around if yes there means the nozzle have gas leakage you need to screw tighten the nozzle again.
- Put back in place the fire burner cap and the aluminium cap.
OPERATION INSTRUCTIONS:
LIGHTING:
- Press in the knob you want to light and turn it to maximum anticlockwise.
- Approach a lighting device and hold the knob till the gas is ignited.
- Before releasing knob, ensure a flame is well established.
- If the burner fails to ignite, put into off position and try again.
The device shall not release gas without ignition for more than 15s. If after 15s the burner has not lit, stop operating the device and open the compartment door and wait at least 1 min before attempting a further ignition of the burner.
In the event of the burner flames being accidentally extinguished, turn off the burner control and do not attempt to re-ignite the burner for at least 1 min.
If you cannot light the flame even after several attempts, check the "cap" and "crown" are in the correct position. To put the flame out, turn the knob to the symbol "O"
natural_image
Technical line drawing of a mechanical assembly with three views: top view, middle view, and bottom view (no text or symbols)Note:
As soon as a liquid starts boiling, turn down the flame so that it will barely keep the liquid simmering.
If the control knobs become difficult to turn, please contact your local service centre
To ensure maximum burner efficiency, do not use rim based or convex-based vessels on the hotplate burners, use instead pots and pans with a flat bottom fitting the size of the burner used as follows:
| Burner diameter | Min. pan diameter | Max. pan diameter |
| 95 mm. | 180 mm. | 260 mm. |
| 65 mm. | 120 mm. | 220 mm. |
| 45 mm. | 80 mm. | 160 mm. |
Users should not use cooking vessels on the hotplate that overlap its edges.
If the flame is out for certain reasons, the safety device will cut off the gas power automatically. Turn the switch to "largest flame" position, then ignite again, you should wait for 30 seconds when you do that; Due to the air in the tong, there may be unsmooth ignition, revolve the switch to "largest flame" position and ignite again.
CONTROL PANEL

Off position

Max. power

Min power
natural_image
Simple line drawing of a circular object with a curved black line and a dot above it, no text or symbols present.MAINTENANCE AND CLEANING:
Before any maintenance or cleaning can be carried out, you must DISCONNECT the gas cooker from the electricity supply.
The gas cooker is best cleaned whilst it is still warm; as spillage can be removed more easily than if it is left to cool.
TECHNICAL SERVICE:
If you need any assistance or your appliance presents any malfunction please contact immediately your local technical service office. You can find all Schneider offices in our website:
www.schneiderespana.es
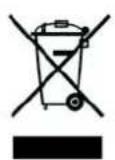
The symbol on the product or on its packaging indicates that this product may not be treated as household waste. Instead it shall be handed over to the applicable collection point for the recycling of electrical and electronic equipment. By ensuring this product is disposed of correctly, you will help prevent potential negative consequences for the environment and human health, which could otherwise be caused by inappropriate waste handling of this product. For more detailed information about recycling of this product, please contact your local city office, your household waste disposal service or the shop where you purchased the product.
All informations contained in this user manual, including images, are for your own reference only and might be affected by misprints or other kind of error. Therefore they could differ from the real product.
Atención en Postventa
Podrá encontrar nuestro servicio de asistencia técnica más próximo en:
www.schneiderespana.es
Si lo desea también puede hacernos llegar su solicitud de asistencia en postventa a la dirección: postventa@schneiderespana.es.
Todos los modelos distribuidos por Schneider España de I. S.A. cuentan con las condiciones de garantía aplicables a bienes de consumo según la legislación que a tal efecto se encuentre en vigor en el momento de su adquisición.
- SCHNEIDER
- MANUAL DE INSTRUCCIONES
- INDICE
- INSTRUCCIONES DE INSTALACIÓN:
- CARACTERÍSTICAS DEL PRODUCTO:
- DÓNDE COLOCAR LA PLACA DE GAS
- CONEXIÓN DEL GAS:
- ATENCIÓN INSTALADOR
- La instalación de este producto debe ser realizada únicamente por personal profesional cualificado para instalaciones de gas. Aténgase a la normativa vigente a la hora de instalar esta placa de gas.
- Para remplazar los inyectores:
- INSTRUCCIONES DE USO:
- ENCENDIDO:
- Notas:
- DESCRIPCIÓN DE LOS CONTROLES
- MANTENIMIENTO Y LIMPIEZA:
- ASISTENCIA TÉCNICA:
- USER MANUAL
- INDEX
- PRODUCT DESCRIPTION:
- INSTALLATION INSTRUCTIONS:
- PRODUCT SPECIFICATIONS:
- LOCATION
- GAS CONNECTION:
- ATTENTION INSTALLER
- The installation of this home appliance must be held only by a qualified gas appliances installer. Always install gas appliances such as this gas hob in compliance with current applicable regulations.
- To replace the injectors:
- OPERATION INSTRUCTIONS:
- LIGHTING:
- Note:
- CONTROL PANEL
- MAINTENANCE AND CLEANING:
- TECHNICAL SERVICE:
- Atención en Postventa
Marke : SCHNEIDER
Modell : SPG 406X
Kategorie : Herd