
NV-DCF7 - Kamera PANASONIC - Kostenlose Bedienungsanleitung
Finden Sie kostenlos die Bedienungsanleitung des Geräts NV-DCF7 PANASONIC als PDF.


| Produkttyp | Digitalkamera |
| Marke | Panasonic |
| Modell | NV-DCF7 |
| Sensor | 1/2,7-Zoll-CCD mit 1.320.000 Pixeln |
| Objektiv | f=5,2-15,6 mm (entspricht 34-102 mm bei Kleinbild), F2,8-4,7 |
| Fokus | Automatisch / Voreingestellt (Zonenfokus) |
| Fokusbereich | 20 cm bis unendlich |
| Blende | F2,8/F8 |
| Verschlusszeit | 1/4 - 1/750 Sek. |
| Weißabgleich | Auto / Innen / Außen |
| Sucher | 1,8-Zoll-TFT-Farb-LCD |
| Speicher | CompactFlash-Karte (8 MB mitgeliefert) |
| Bildauflösungen | 1.280 x 960, 640 x 480, 320 x 240 Pixel |
| Bildformate | JPEG (Design Rule for Camera File System) |
| Videoausgang | PAL Composite |
| Stromversorgung | 4 AA-Batterien (Alkali, Ni-Cd, Ni-MH) oder Netzteil |
| Leistungsaufnahme | Kamera: 6V DC, 1,0A; Netzteil: 100V AC, 9W |
| Betriebstemperatur | 0 - 40 °C |
| Abmessungen (Kamera) | 118 x 68 x 52 mm |
| Gewicht (Kamera) | ca. 280 g |
| Sonderfunktionen | Schwarz-Weiß-Aufnahme, Selbstauslöser, manuelle Blende, Zeitrafferaufnahme, Diashow, Bildkopie, Bildlöschung, CF-Karte formatieren, DPOF-Druckmarkierung |
| Lieferumfang | Netzteil, Videokabel, PC-Verbindungskabel, PCMCIA-Adapter, Handschlaufe, Software-CD-ROM, Adobe PhotoDeluxe 2.0 |
Häufig gestellte Fragen - NV-DCF7 PANASONIC
Benutzerfragen zu NV-DCF7 PANASONIC
0 Frage zu diesem Gerät. Beantworten Sie die, die Sie kennen, oder stellen Sie Ihre eigene.
Eine neue Frage zu diesem Gerät stellen
Laden Sie die Anleitung für Ihr Kamera kostenlos im PDF-Format! Finden Sie Ihr Handbuch NV-DCF7 - PANASONIC und nehmen Sie Ihr elektronisches Gerät wieder in die Hand. Auf dieser Seite sind alle Dokumente veröffentlicht, die für die Verwendung Ihres Geräts notwendig sind. NV-DCF7 von der Marke PANASONIC.
BEDIENUNGSANLEITUNG NV-DCF7 PANASONIC
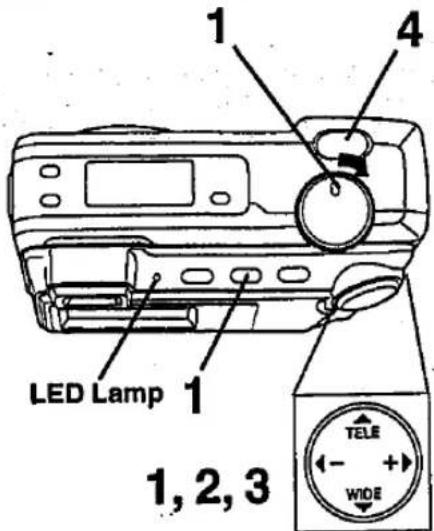
Capture B/W Images

You can also capture images in black and white using this mode.
1 Set POWER to MANUAL REC.
• The LED Lamp lights up.
2 Press MENU to display MANUAL REC menu.
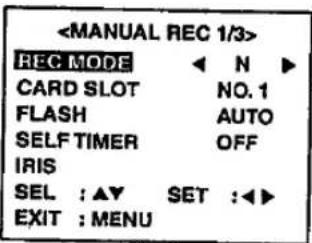
3 Press ▲ or ▼ to select B/W.
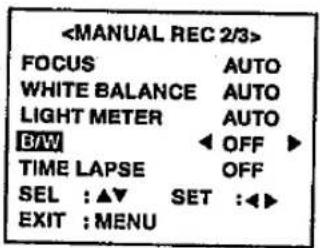
4 Press ◀ or ▶ to select ON.

5 Press MENU to exit.

- B/W indication will be displayed on the LCD Viewfinder (see page 8) and B/W Display (see page 7).
• To return to normal recording, select OFF in step 4.
Self Timer Recording
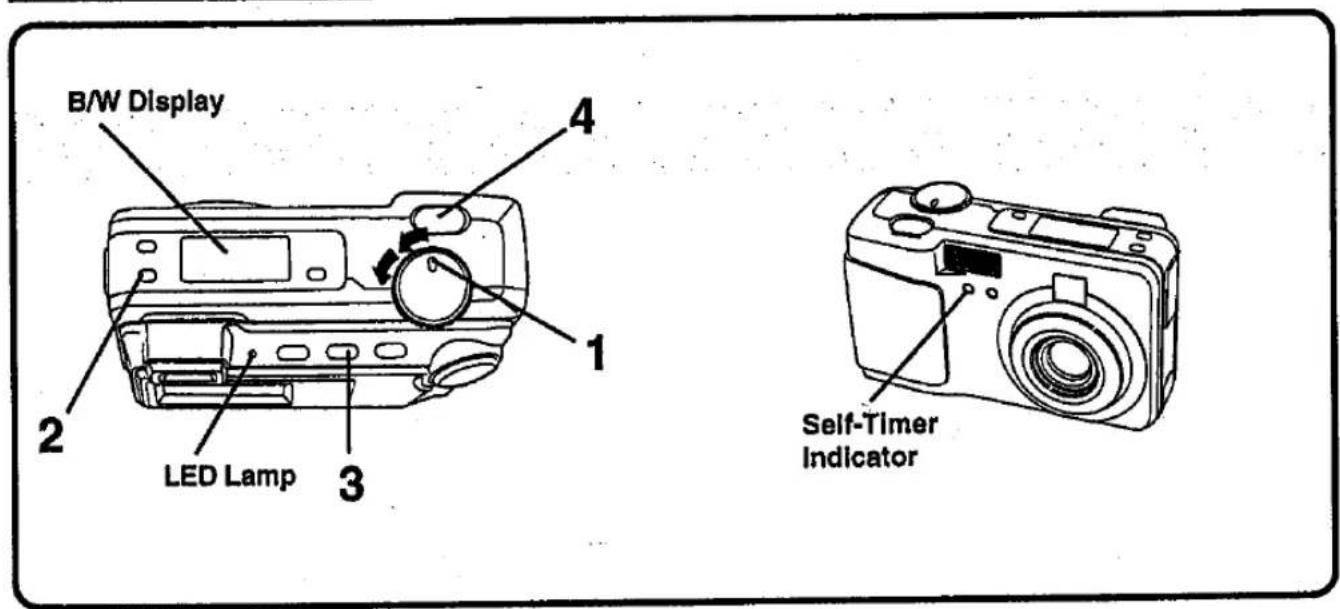
The Self-Timer allows you to capture an image about 10 seconds after pressing the shutter.
1 Set POWER to MANUAL REC.
• The LED Lamp lights up.
2 Press Ⓧ to set self-timer recording mode.
• 📍 will be displayed on the B/W Display (see page 7).
3 Press MENU to exit.
4 Press SHTR.
- The self-timer indicator lights. The indicator starts flashing rapidly after about 8 seconds and the image is captured about 2 seconds later.
Adjusting the Iris Manually

Normally, the camera adjusts the exposure automatically. However, when the background is extremely bright, or when the subject is backlit, you can compensate by adjusting the Iris manually.
1 Set POWER to MANUAL REC.
• The LED Lamp lights up.
2 Press MENU to display MANUAL REC menu.

3 Press ▲ or ▼ to select IRIS.
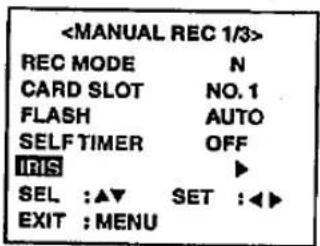
4 Press ▶ to display IRIS screen.

5 Press ◀(-) or ▶(+) to change the IRIS; Press (+) to increase the brightness, Press (-) to decrease the brightness.
6 Press MENU to exit.
Note:
- There are 7 brightness compensation levels ranging from -3 to +3.
- A blue sky may appear somewhat whiter when the brightness is increased.
• The brightness cannot be adequately compensated for in extreme backlight conditions. - The original exposure is automatically restored when the power is turned off.
Time Lapse Recording
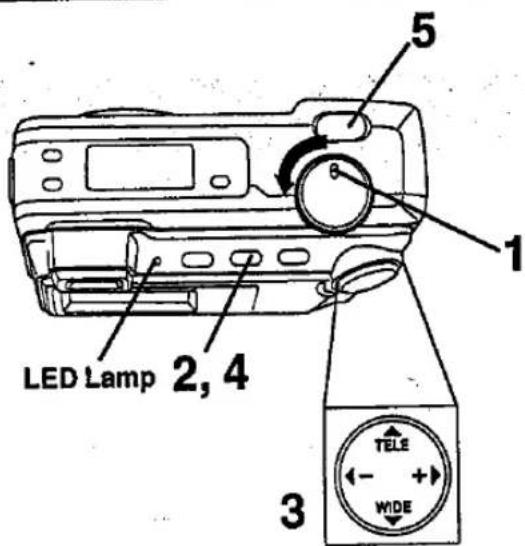
Time Lapse enables you to set the camera to automatically capture an image from once every minute to once every 24 hours.
1 Set POWER to MANUAL REC.
• The LED Lamp lights up.
2 Press MENU to display MANUAL REC menu.

3 Press ▲ or ▼ to select TIME LAPSE and press
▶ to select time interval. You can select a capture rate of 1MIN, 5MIN, 10MIN, 30MIN, 1HOUR, 6HOUR, 12HOUR, or 24HOUR.
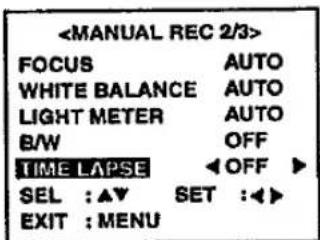
- Time Lapse feature is available with Super Fine (SF), Fine (F), Normal (N) and Zoom mode.
If the REC mode is set to ☐ or ☒, please change REC mode (see page 19).
4 Press MENU to set time lapse mode.

5 Press SHTR to start time lapse mode recording.

- LED Lamp will flash while the Digital Camera processes the image.
- Press MENU to exit this mode.
Note :
- During time lapse recording (even during non-recording intervals), the battery may become depleted. Therefore, using an AC Adaptor (supplied) is recommended.
To Delete Specific Images

You can delete unwanted images and increase the remaining image memory.
Warning: Once deleted, images cannot be restored.
1 Set POWER to PLAY.
• The LED Lamp lights up.
2 Press MENU to display the PLAY menu.

3 Press ▲ or ▼ to select DELETE and press ▶ to display DELETE PAGE menu.


4 Press ▶ to display DELETE PAGE menu.
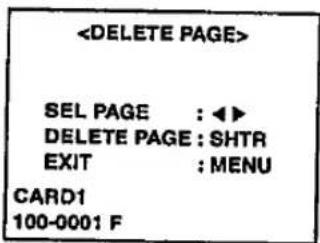
5 Press ◀ or ▶ to select the image page to be deleted.
6 Press SHTR to delete an image.
• Image page numbers are adjusted automatically as images are deleted.
- To delete other specific image pages, please repeat steps 5–6.
- Press MENU to exit.
Important:
- While deleting image, do not turn off the Digital Camera or unplug the AC Adaptor (supplied) because this will cause irreversible damage to the memory, resulting in reduced image storage capacity.
To Delete All Images
You can delete all images from memory easily with this operation.
Warning: Once deleted, images cannot be restored.
1 Repeat Steps 1 to 3 on page 35.
2 Press ▲ or ▼ to select DELETE ALL and press ▶ to display DELETE ALL menu.

3 Press ▲ or ▼ to select YES.
- To exit this menu, press ▲ or ▼ to select NO and press SHTR.
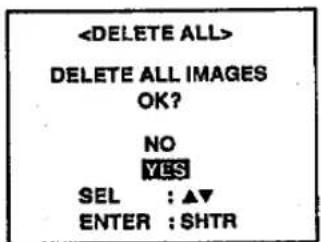
4 Press SHTR to delete all image pages.
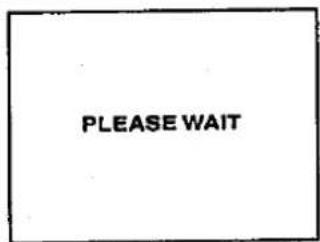

- "PLEASE WAIT" will be displayed on screen as all images are deleted from memory. Deletion is complete when "NO IMAGE" is displayed.
Important:
- While "PLEASE WAIT" is displayed, do not turn off the Digital Camera or unplug the AC Adaptor (supplied) because this will cause irreversible damage to the memory, resulting in reduced image storage capacity.
Formatting CF Card

You can easily format your CF Card using this operation.
Warning: Once formatted, all of your image data will be deleted and cannot be restored.
1 Repeat Steps 1 to 3 on page 35.
2 Press ▲ or ▼ to select FORMAT and press ▶ to display FORMAT menu.

3 Press ▲ or ▼ to select YES.

• To exit this menu, press ▲ or ▼ to select NO and press SHTR.
4 Press SHTR to format.

- "PLEASE WAIT" will be displayed on screen as the CF Card is formatting. Formatting is complete when "NO IMAGE" is displayed.
Important:
- While "PLEASE WAIT" is displayed, do not turn off the Digital Camera or unplug the AC Adaptor (supplied) because this will cause irreversible damage to the memory, resulting in reduced image storage capacity.
To Copy Image Pages
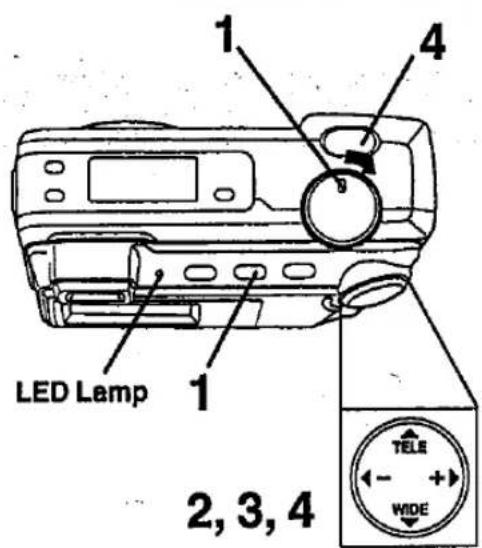
You can copy images from CF card to CF card easily with this operation.
Note: Be sure to insert a CF card into both slots.
1 Set POWER to PLAY, press MENU to display PLAY MENU and select COPY.

- If a CF card is not inserted into both slots, you cannot proceed.
2 Press ▶ to display COPY menu and select COPY PAGE.

3 Press ▶ to display COPY PAGE menu.

• The copy direction of card slot is selected automatically.
4 Press ▲ or ▼ to select image you want to copy and press SHTR to copy.


- "PLEASE WAIT" will be displayed on screen as the image is being copied.
• To copy other specific image pages, please repeat step 4. - Press MENU to exit.
Important:
- While "PLEASE WAIT" is displayed, do not turn off the Digital Camera or unplug the AC Adaptor (supplied) because this will cause irreversible damage to the memory, resulting in reduced image storage capacity.
Note :
• If the memory capacity of the card that you want to copy to is not sufficient, the following message will appear.
To Copy All Images

You can copy all images from CF card to CF card easily with this operation.
Note: Be sure to insert CF cards into both slots.
1 Set POWER to PLAY, press MENU to display PLAY MENU and select COPY.
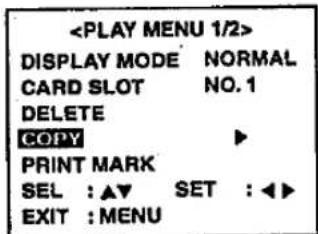
- The currently selected card slot will automatically be chosen as the copy from slot (see page 14).
- If a CF card is not inserted into both slots, you cannot proceed.
2 Press ▶ to display COPY menu and select COPY ALL.

3 Press ▶ to display COPY ALL menu and press ▲ or ▼ to select YES.

- Select NO to return to the Normal Screen.
• The copy direction of card slot is selected automatically.
4 Press SHTR to copy.

- "PLEASE WAIT" will be displayed on screen as the image is being copied.
Important:
- While "PLEASE WAIT" is displayed, do not turn off the Digital Camera or unplug the AC Adaptor (supplied) because this will cause irreversible damage to the memory, resulting in reduced image storage capacity.
Note :
- If the memory capacity of the card that you want to copy to is not sufficient, the following message will appear.
Slide Show

You can playback captured images as a slide show.
1 Set POWER to PLAY.
• The LED Lamp lights up.
2 Press MENU to display the PLAY menu.

3 Press ▲ or ▼ to select SLIDE SHOW.
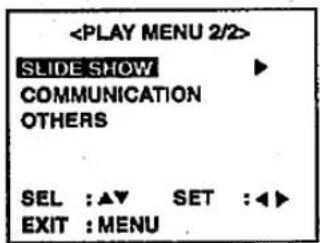
4 Press ▶ to start slide show.

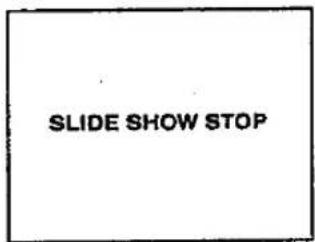
- Press MENU to exit this mode.
Inserting the PCMCIA Adaptor
flowchart
graph TD
    A["Camera"] -->|1| B["Table"]
    B -->|2| C["Laptop"]
    C -->|3| D["Laptop"]
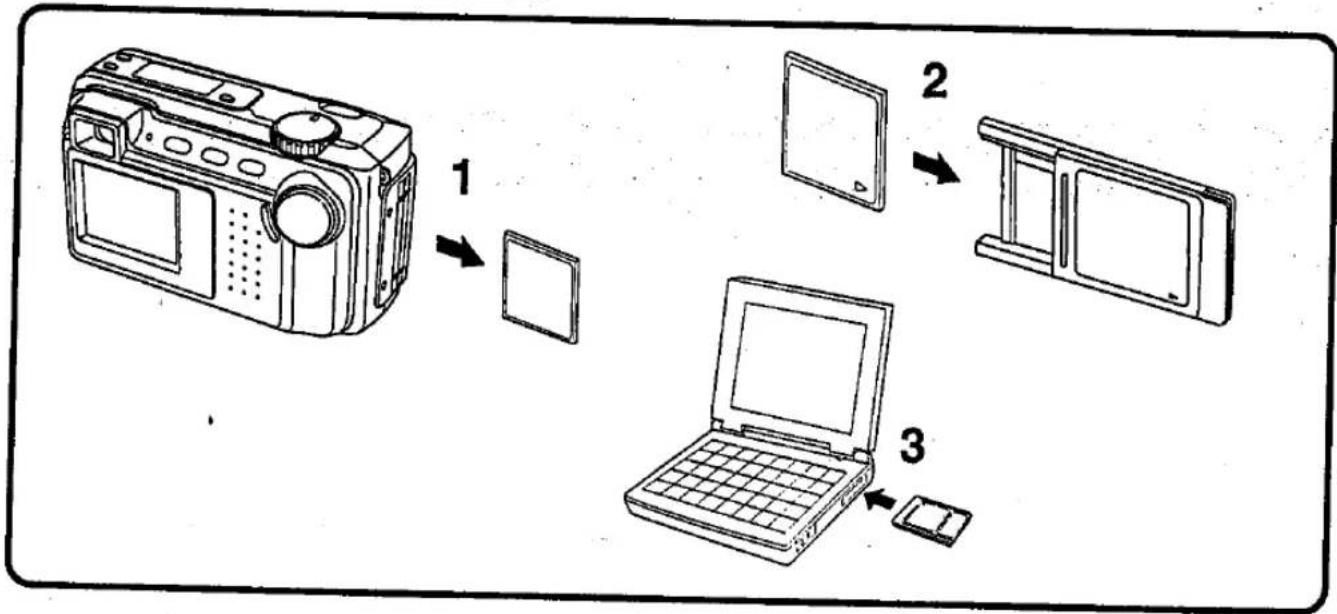
If you are using a computer with a PCMCIA type II slot, you can insert the CompactFlash Card into a PCMCIA adaptor.
■ Inserting the CompactFlash Card
- The adaptor with the CompactFlash Card should be inserted when your computer is in the power on mode.
1 Remove the CompactFlash Card from the camera. (See page 15.)
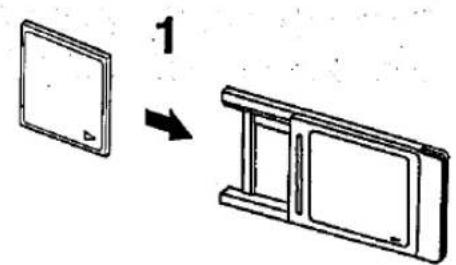
2 Hold the CompactFlash Card so that the arrow side faces up and points toward the PCMCIA Adaptor. Securely insert the card into the PCMCIA Adaptor slot as far as it will go.
3 Hold the PCMCIA Adaptor so that the arrow side points toward the PCMCIA type II slot of your computer. Securely insert the PCMCIA Adaptor as far as it will go.
- Depending on the computer, it may be necessary to turn the PCMCIA Adaptor upside down in order to insert the card.
■ Removing the CompactFlash Card
4 Remove the PCMCIA Adaptor from the computer.
5 Pull the CompactFlash Card out of the PCMCIA adaptor.
Note : Do not remove the PCMCIA Adaptor from the computer while the computer is working or while image data is being transferred between the CompactFlash Card and the computer (including operation such as opening and storing images), this will cause irreversible damage to the memory.
Editing on a Personal Computer (Windows 95/98)
■ Operating environment
This unit's software program can be installed in a personal computer which runs Microsoft® Windows® 95/98 (hereafter referred to as "Windows 95/98").
System Requirements:
• IBM PC/AT or compatible.
• Windows 95/Windows 98.
• 386SX CPU or higher. (486 recommended.)
• RAM: 16 MB on-board memory.
• 10 MB available hard disk space.
• 256 Color monitor or full color recommended (24bit per pixel or 16.7M color).
• CD-ROM drive (for installation).
• RS-232C serial port (D-Sub 9-pin). An adaptor is required for a D-Sub 25-pin.
- Mouse or other pointing device.
■ Concerning the transfer rate
The maximum transfer rate is 115.2 kbps. However, depending on the computer being used, the maximum transfer rate that can be achieved may be considerably lower. For details, refer to the computer's operating instructions.
The basic operations of the computer, the operating system and the terms used are not explained here. Read the computer's operating instructions.
Depending on the operating environment, on-screen Indications shown in the operating instructions may differ somewhat from those actually displayed on your computer.
Transferring Your Images (Windows 95/98)


■ Driver Software Installation
1 Turn on the PC (Personal Computer) and start up Windows.
2 Insert supplied Driver Software CD-ROM into the CD-ROM drive.
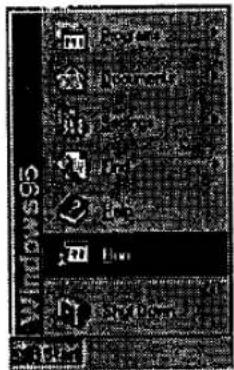
3 Click the "Start" button and then click "Run".
4 Type in "d:\Panasonic\Nvdcf7\Setup.exe" and then click OK.
Note:
- "d" Denotes the CD-ROM drive designation.
5 Follow the instructions as they appear on your PC screen.

Twain Driver for Adobe® PhotoDeluxe™ 2.0 Installation
■ First. Install Adobe® PhotoDeluxe™ 2.0
Insert the supplied Adobe® PhotoDeluxe™ 2.0 CD-ROM into the computer's CD-ROM drive. After a short wait, the setup dialogue box appears. Perform the installation by following the instructions displayed on the screen. For more details, read the "Read Me First" file.
• This TWAIN Driver does not work with PhotoDeluxe versions lower than version 2.0.
- Adobe® PhotoDelux™ 2.0 can be used on a computer with 16MB of RAM. However, 24 MB or more is recommended for better performance.
- After turning on the computer's power, Insert the supplied NV-DCF7 Driver Software/TWAIN Driver Setup CD-ROM Into the computer's CD-ROM drive.
1 Turn on the PC (Personal Computer) and start up Windows.
2 Insert supplied Driver Software CD-ROM into the CD-ROM drive.
3 Click the "Start" button and then click "Run".
4 Type in "d:\Panasonic\Twain\Setup.exe" and click "OK".
Note:
- "d" Denotes the CD-ROM drive designation.
5 When installation is completed, start up PhotoDeluxe 2.0 and refer to HELP file for the instructions on how to transmit images.
Transferring Your Images (Windows 95/98)

■ Connection
1 Turn off your PC.
2 Connect the Digital Camera to your PC (Windows) using the PC connecting cable (supplied).
3 Turn on your PC.
4 Set the Digital Camera POWER to PLAY.
• The LED Lamp lights up.
Note:
- For extended periods of use, it is recommended to use the AC Adaptor (Supplied) as a power source.
- While the PC communicates with the Digital Camera, the Digital Camera cannot be operated.
Editing on a Personal Computer (Macintosh)
■ Operating environment
This software can be installed on a computer running System 7.1 or adobe.
System Requirements:
- System 7.1 or later.
- System 8 or later (for Remote Access).
• 68040 CPU or higher, or Power Macintosh.
• 16 M8 of RAM.
• 10MB available hard disk space.
• 256 Color monitor or full color recommended (24bit per pixel or 16.7M color).
• CD-ROM drive (for installation).
• Modem port or printer port (RS-422). - Mouse or other pointing device.
■ Concerning the Transfer Rate
The maximum transfer rate is 115.2 kbps. However, depending on the computer being used, the maximum transfer rate that can be achieved may be considerably lower. For details, refer to the computer's operating instructions.
■ When using LocalTalk
When the LocalTalk network is being used, connecting the Camera's Station to the printer port is not possible. (To use the printer port, disconnect the LocalTalk, or change the setting of AppleTalk.)
■ When using software that takes control of the serial port
Even if you do not intend to use such programs, they may be launched automatically when the computer is booted. In this case, disable these programs.
The basic operations of the computer, the operating system and the terms used are not explained here. Read the computer's operating instructions. Depending on the operating environment, on-screen Indications shown in the operating instructions may differ somewhat from those actually displayed on your computer.
Transferring Your Images (Macintosh)
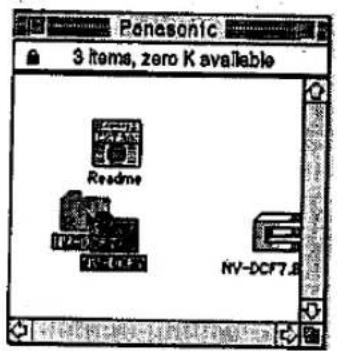
■ Driver Software Installation
1 Turn on the Macintosh.
2 Insert the supplied Driver Software CD-ROM into the CD-ROM drive.
3 Double click the "NV-DCF7".
4 Read the "Read Me" file.
5 Drag the "NV-DCF7" where you want to copy.
Transferring Your Images (Macintosh)
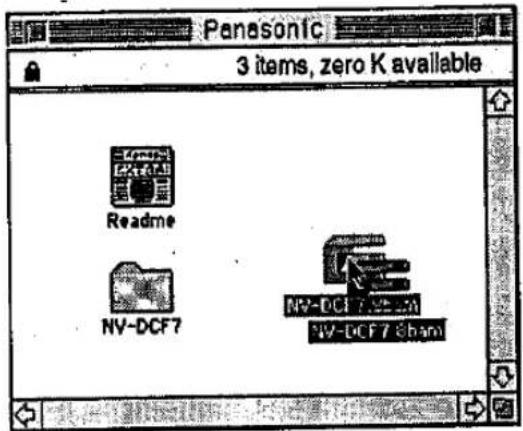
Plug-in Driver for Adobe® PhotoDeluxe™ 2.0 Installation
■ First, Install Adobe® PhotoDeluxe™ 2.0
- Insert the supplied Adobe® PhotoDeluxe™ 2.0 CD-ROM into the computer's CD-ROM drive.
- Double-click [PHOTODELUXE]. [English] and [Adobe PhotoDeluxe installer]. Then, perform the installation by following the instructions displayed on the screen. For more details, read the "ReadMe" file.
- Adobe® PhotoDeluxe™ 2.0 can be used on a computer with 16 MB of RAM. However, 24 MB or more is recommended for better performance.
- After turning on the computer's power, Insert the supplied NV-DCF7 Driver Software/Plug-In Driver Setup CD-ROM into the computer's CD-ROM drive.
1 Turn on the Macintosh.
2 Insert the supplied Driver Software CD-ROM into the CD-ROM drive.
3 Double click the icon for the language to be used.
4 Double click the "Nv-dcf7.8bam".
5 Drag the "NV-DCF7.8bam" file to the "Plug-ins" folder of PhotoDeluxe.
6 When installation is completed, start up PhotoDeluxe 2.0 and refer to HELP file for the instructions on how to transmit images.
Transferring Your Images (Macintosh)

■ Connection
1 Turn off your PC (Macintosh).
2 Connect the Digital Camera to your PC (Macintosh) using the PC connecting cable (supplied) and PC Connecting Cable Adaptor for Macintosh (Supplied).
3 Turn on your PC (MacIntosh).
4 Set the Digital Camera POWER to switch to PLAY.
• The LED Lamp lights up.
Note:
- For extended periods of use, it is recommended to use the AC Adaptor as a power source.
- While the PC communicates with the Digital Camera, the Digital Camera cannot be operated.
Using the Digital Photo Printer

Images can be selected for print out on a digital photo printer (sold separately).
■ Stamp Print Marker
1 Set POWER to PLAY.
• The LED Lamp lights up.
2 Press MENU to display the PLAY MENU.
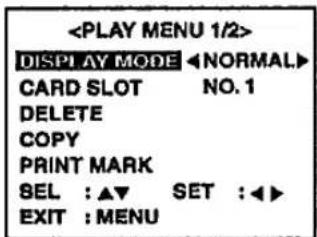
3 Press ▲ or ▼ to select PRINT MARK and press ▶ to display PRINT MARK menu.
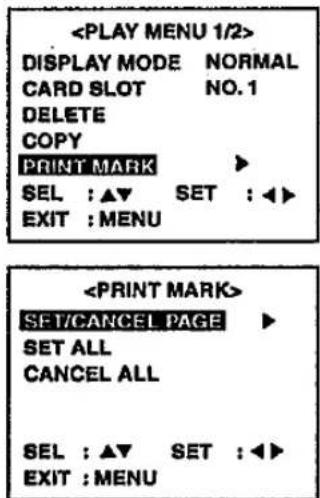
- Select "SET ALL" to mark all images. Select "CANCEL ALL" to cancel all image print marks.
4 Press ▲ or ▼ to select the image page you want to mark for printing and press SHTR to stamp print mark. A "○" mark will appear on the image.

- Repeat step 4 to stamp other images.
- Press SHTR again to cancel print mark.
5 Press SHTR to exit this menu.
D DPOF This print mark is based on DPOF (Digital Print Order Format).
Using the Digital Photo Printer


natural_image
Line drawing of a computer device with a close-up of its front panel and a separate slot, labeled with number 2 (no text or symbols on the device itself)
AUTO PRINT Lever
■ Printing on a Digital Photo Printer
1 Remove the CompactFlash Card containing the captured images from the camera and insert it into the PCMCIA Adaptor (see page 43).
2 Connect the PCMCIA Adaptor to the Digital Photo Printer ^* .
- *Requires a Digital Photo Printer NV-MPD1 (sold separately).
- Insert the adaptor in the direction of the arrow and push the card fully into the printer.
3 Turn on the printer and set the INPUT SELECT (VIDEO/PC CARD) Switch to the PC CARD position.
• The Printer ACCESS Lamp will flash.
4 Slide the AUTO PRINT Lever. Printing of print marked images begins.
• Please refer to the printer's operating instructions for details on printing.
• Moving the AUTO PRINT Lever during the reading of the CompactFlash Card (ACCESS Lamp is flashing) may prevent proper printing of the images. Wait until the ACCESS Lamp turns off before moving the AUTO PRINT Lever.
Precautions
Precautions When Using the Camera
In the event of trouble (if the unit emits smoke or unusual smells), stop operating these units immediately, and consult with a qualified servicing engineer.
■ Handling Precautions
- Do not disassemble or remodel the unit.
- Do not splash the unit with water or make it wet.
- Do not allow metal pieces or highly inflammable objects to fall or enter inside the unit.
- Do not use the unit while driving a car or other vehicle.
- Do not use the unit in unstable locations.
- Do not touch the metal parts of the unit in a thunderstorm.
- Do not place the unit on a wobbly stand, inclined surface or any other unstable location.
- Do not point the unit's lens at the sun or a strong source of light.
- Follow the instructions of the airline company when using the unit on board an airplane.
- Do not place the unit where the temperature will be high.
• Take care not to catch your fingers when closing the battery lid.
- Do not use the unit in location exposed to oily vapors, steam, moisture or dirt, and in locations subjected to strong vibrations.
- Use the unit as far away as possible from sources of magnetic fields and electromagnetic waves (such as a TV set or game machine).
- If noise appears on the LCD screen during taking pictures, place the unit at a distance from other equipment (personal computer, etc.).
- Use the unit as far away as possible from signal towers and high-voltage cables.
- Do not use the unit in the following locations: — In a bathroom or wherever there are high moisture levels
— In a warehouse or wherever there is a high concentration of dust — Near heating appliances or wherever the temperature is high
- Do not expose the Camera to Insecticide sprays or other volatile solvents while they are being used nearby. Doing so may spoil its external casing and cause the paint to peel off.
Do not allow rubber or PVC products to remain in contact with the unit for prolonged of time.
■ Precautions When Moving the Unit
- When carrying the unit, do not drop it or knock it against other objects. Subjecting the unit to strong impact can damage its external casing and lead to malfunctioning. When moving the unit, place it inside the accessory soft case or take hold of the accessory Hand strap or take some other step to ensure that the unit will not be dropped and that it will be handled carefully.
■ Maintenance Precautions
- Do not use benzene, paint thinners or other solvents to clean the Camera.
- Before proceeding with maintenance, remove dry batteries. Also, disconnect the power plug of the AC Adaptor from the AC mains socket.
- The surfaces of the external casing are largely made of plastic. Wiping them with benzene, paint thinners, etc. may spoil the external casing and cause the paint to peel off.
- Use a soft dry cloth to wipe away dust. To remove stubborn dirt, dip a cloth into a neutral kitchen detergent which has been diluted with water, wring it out well, wipe away the dirt, and then use a dry cloth to take up the remaining moisture.
- when using a chemical cleaning cloth, follow the precautions provided.
■ Precautions after Use
- After use, be sure to remove the dry batteries from the Camera. Keeping them inside for a long period of time may result in the electrolyte leaking and cause malfunctioning. When the AC Adaptor have been connected, disconnect the power plug of the AC Adaptor from the AC mains socket.
■ Storage Precautions
- When the Camera is to be stored, remove the dry batteries. Keep the Camera and batteries in a cool, dry place where the temperature is relatively constant.
■ Concerning the CompactFlash Card
Compatible Types
- CompactFlash is a trademark of Sandisk Corporation. Flash Cards are available on the market in a large number of different brands. However, Panasonic only guarantees compatibility with Panasonic brand cards and those bearing the SanDisk logo.
Handling
- Do not bend, drop, apply high pressure or subject the card to strong shocks.
- Do not store it in places with high temperature, high humidity, a lot of dust, or places exposed to direct sunlight, or static electricity and strong electromagnetic waves.
- keep the card's contacts free from dust, water or other foreign substances. Do not touch them with your fingers, etc.
- Do not disassemble or deform the card.
- Be sure to make a buck-up copy of important data.
■ Concerning the Image Data
• The images are recorded digitally. Consequently, recorded images can be deleted and other pictures taken in their place
• The recorded data may be lost when the user or a third party misuses the Camera, when the Camera is affected by static or electric shocks or when the Camera has failed and is being repaired. The manufacturer assumes no responsibility whatsoever for damages resulting from loss of the recorded data.
- While the "PLEASE WAIT" Indication is displayed:
(1) Do not take out the dry batteries.
(2) Do not disconnect the AC Adaptor's power plug from the AC mains socket.
(3) Do not take out the CompactFlash Card. This could damage the card's formatting and make further use of the card impossible.
■ Concerning the LCD Screen
• The LCD Screen is a product of high-precision engineering. Effective pixels cover more than 99.99% of its surface. However, the pixels may be absent or they may remain lighted in less than 0.01% of the surface.
- Do not apply strong pressure to the screen. This may produce an uneven picture or cause malfunctioning.
- When the Camera is used in a cold place, the screen may be slightly darker than usual at the outset. It will reach its normal brightness when the temperature inside the unit has risen.
- Use the LCD Screen cleaning cloth to wipe away fingerprints and other types of dirt on the screen.
- Concerning the fluorescent tube inside the LCD Screen. A dedicated fluorescent tube is used as an internal lighting device inside the LCD Screen. If the screen has become dark or flickers or if the images fail to appear on the screen, it means the tube has reached the end of its service life. Replace a new one.
Consult with your dealer about the replacement of the dedicated fluorescent tube.
■ Concerning Condensation
The lens and LCD Screen appear cloudy when condensation has formed on the Camera. Take care to prevent condensation from forming whenever possible. When it has formed, follow the precautions properly.
• What is condensation? When a bottle is taken out from a refrigerator in summer and left standing for a while, for instance, droplets of water will from on it. This phenomenon is known as condensation.
- Causes of condensation Condensation will be caused by a difference in temperature or humidity in cases, for instance, when: — The unit its brought from a cold outdoor location into a heated room. — The unit is taken out of an air-conditioned car. — A cold room has been heated up rapidly. — The unit has been directly exposed to a cool blast from an air conditioner, etc. — the unit is enveloped in steam or placed in a very humid location.
• To prevent condensation from occurring If you intend to bring the unit from the ski slopes into the ski lodge, for instance, or from any cold place to a much warmer place, put the unit inside a plastic bag and seal it so that no air will get inside.
- if condensation has formed on the lens, etc. Set the POWER switch to OFF, and keep the unit standing for about an hour. The cloudiness will vanish naturally once the unit has become acclimatized to the ambient temperature.
Precautions
Precautions for AC Adaptor
■ Handling Precautions
- If smoke or unusual smells are emitted or if the AC Adaptor is abnormally hot, stop using the adaptor, and disconnect its power plug from the AC mains socket.
- If the AC Adaptor's external casing has been damaged, stop using the AC Adaptor, and disconnect its power plug from the AC mains socket.
- If water has found its way inside the adaptor, stop using the AC Adaptor, and disconnect its power plug from the AC mains socket.
- if the cable has been damaged (if the conductors are exposed, for instance), stop using the AC Adaptor, and disconnect its power plug from the AC mains socket.
- Do not use the AC Adaptor beyond the acceptable AC mains socket and wiring unit ratings, and use only an AC 100-240 V power source to power the AC Adaptor.
- Insert the power plug firmly as far as its base.
- Refrain from any action which will damage the power cord or power plug.
- Regularly remove dirt, etc. on the power plug.
- Do not dissemble or remodel the AC Adaptor.
- Do not touch the power plug or metal parts of the AC Adaptor in a thunderstorm.
- Do not connect or disconnect the power plug while your hands are wet.
- Do not splash the AC Adaptor with water or make it wet.
- Do not place the AC Adaptor on a wobbly stand, inclined surface or any other unstable location.
- Do not move the AC Adaptor while it is still connected to the AC mains socket.
- Do not use the AC Adaptor in locations exposed to oily vapors, steam, moisture or dirt, and in locations subjected to strong vibrations.
- Do not place the AC Adaptor where the temperature will be high.
- During charging or operation, do not bring paper, cloths, etc. into contact with the AC Adaptor.
- Before cleaning the AC Adaptor or when the AC Adaptor is not going to be used for a long time, disconnect its power plug from the AC mains socket to ensure safety.
- When disconnecting the power plug, take hold of the molded part of the plug.
- When the AC Adaptor is used near a radio, interference may be heard during reception (especially when the radio is tuned to an AM station). This is not indicative of a malfunction. Keep the AC Adaptor at least 1 meter away from a radio during use.
- During operation, a vibrating sound may be heard inside the AC Adaptor but this is not indicative of a malfunction.
• After operation, the power plug must be disconnected from the AC mains socket. - Do not short-circuit the power plug.
- Do not bend the power plug out of shape.
- Do not use the AC Adaptor in the following locations: —In a bathroom or wherever there are high moisture levels.
—In a warehouse or wherever there is a high concentration of dust.
—Near heating appliances or wherever the temperature is high. - Do not expose the Adaptor to insecticide spray or other volatile solvents while they are being used nearby. Doing so may spoil its external casing.
- Do not allow rubber or PVC products to remain in contact with the AC Adaptor for prolonged periods of time.
■ Precautions When Moving the Unit
- When carrying the AC adaptor, do not drop it or knock it against other objects. Subjecting the adaptor to strong impact can damage its external casing and lead to malfunctioning.
■ Maintenance Precautions
- First, disconnect the AC Adaptor's power plug from the AC mains socket.
- the surfaces of the external casing are largely made of plastic. Wiping them with benzene, paint thinners, etc. may spill the external casing.
- Use a soft dry cloth to wipe away dust. To remove stubborn dirt, dip a cloth into a neutral kitchen detergent which has been diluted with water, wring it out well, wipe away the dirt, and then use a dry cloth to take up the remaining moisture.
- When using a chemical cleaning cloth, follow the precaution provided.
- After use, the AC Adaptor's power plug must be is connected from the AC mains socket. (If it is left connected, power equivalent to approx. 3 W will be consumed even if the Camera's power has been turned off.)
■ Strong Precautions
• Strong the AC Adaptor in a cool, dry place where the temperature is relatively constant.
Precautions for Dry Batteries
■ Handing Precautions
- Do not throw any of the batteries into a fire or apply heat to them.
- Do not disassemble, repair or remodel the units.
- Do not use batteries whose electrolyte has leaked.
- Do not short-circuit the electrodes using a metal piece, etc.
- When the dry batteries is not going to be used for a long time, remove it from the Camera.
■ Precautions for the Driver Software
- All rights pertaining to these operating instructions and driver software belong to Matsushita-Kotobuki Electronics Industries Ltd. (hereafter referred to as the "Manufacturer").
- It is strictly forbidden to copy, reproduce or transfer these operating instruction and driver software either in part or entirety without written permission.
- Every effort has been made to ensure that these operating instruction and driver software are free from errors, omission or ambiguities. However, should you come across any, please bring them to our notice.
- The Manufacture and its dealers and retail agents, etc. offer no guarantees whatsoever in connection with these operating instructions and driver software. Furthermore, they assume no responsibility for the results or effects which are produced by the use of these operating instructions and driver software.
Before Requesting Service
If you have a problem with your Digital Camera, it may be something you can correct yourself. Check the list below for symptoms and corrections.
| Symptom | Solution |
| No power | Alkaline Battery is worn out. (p. 12)Make sure polarities are aligned properly. (p. 12) |
| Power shuts off automatically. | Alkaline Battery is worn out. (p. 12)The camera will go to Stand By mode.Press STAND BY, or set the POWER to off and then set to FULL AUTO REC or MANUAL REC. (p. 20) |
| Cannot capture the image. | CompactFlash card is not inserted. (p. 14)Make sure the POWER switch is set to FULL AUTO REC or MANUAL REC. (p. 17)No memory. Delete some images before capturing images. (p. 35) |
| No Picture on the LCD Viewfinder | LCD Viewfinder is OFF. (p. 11)The camera will go Stand By mode.Press STAND BY, or set the POWER to off and then set to FULL AUTO REC or MANUAL REC. (p. 20) |
| B/W picture on the LCD Viewfinder | The REC mode is set to B/W mode. (p. 31) |
| LCD Viewfinder image is too bright or dark. | Make sure the LCD Viewfinder brightness setting is adjusted properly. (p. 21) |
| Indication or image on the LCD Viewfinder is not focused. | Make sure the focus mode is properly set. (p. 27) |
| Flash will not light. | The flash mode is set to (OFF) mode. Change flash mode. (p. 28) |
| Cannot playback. | CompactFlash card is not inserted. (p. 14)There are no images on the CF card. (p. 17-19)Make sure the POWER switch is set to PLAY. (p. 22) |
| No picture on the TV (if connected). | Make sure all necessary connections are correct and tight. (p. 26)Make sure the TV is set to video input mode. (p. 26) |
| Can not transfer images on the PC Connection. | Make sure all necessary connections are correct and tight. (p. 44-51)Make sure the Driver Software is installed. (p. 45, 49)Make sure the Camera is in PLAY. (p. 22) |
Specifications
Digital Still Camera
Information for Your Safety
| CCD | 1/2.7 inch (9.34 mm) 1,320,000 Pixels |
| Lens | f=5.2-15.6 mm (equivalent to a 34-102 mm lens on a 35 mm still camera.)/F2.8-4.7 |
| Focus | Auto / Preset (Zone) |
| Focusing Area | 7.9 inch (20cm)-∞ (approx) |
| Iris | F2.8/F8 |
| Shutter Speed | 1/4-1/750 sec. |
| White Balance | Auto/Indoor/Outdoor |
| LCD Viewfinder | 1.8 inch (45.7 mm) TFT Color Liquid Crystal Display |
| Memory | CompactFlash (CF) Card (8 MB) |
| Image Size | 1,280 x 960 pixels (Super Fine, Fine mode)640 x 480 pixels (Normal, Zoom, mode)320 x 240 pixels (mode) |
| Image Storage(Supplied 8MB CF Card) | Approx. 15 images (Super Fine mode)Approx. 30 images (Fine mode)Approx. 100 images (Normal, Zoom, mode)Approx. 6 images (mode) |
| Image Format | JPEG (Design Rule for Camera File System) |
| Digital Signal | Serial |
| Video Signal | PAL Composite |
| Power Supply | 4 AA Alkaline Battery/4 AA Ni-Cd Battery /4 AA nickel-hydride Battery/AC Adaptor |
| Power Consumption | Digital Camera 6V DC, 1.0A (Alkaline Battery)AC Adaptor Input: 100V AC 50/60Hz 9W |
| Operating Temperature | 32 - 104 °F/0 - 40 °C |
| Operating Humidity | 10 % - 75 % |
| Weight | Digital Camera 8.4 oz approx./280 g approx.AC Adaptor 9.20 oz approx./305 g approx. |
| Dimensions | Digital Camera 4.63 (W) x 2.68 (H) x 2.07 (D) inch118 (W) x 68 (H) x 52 (D)mmAC Adaptor 1.97 (W) x 2.83 (H) x 0.79 (D) inch50 (W) x 72 (H) x 20 (D) mm |
Weight and dimensions shown are approximate.
Design and specifications are subject to change without notice.
Index
| A | |
| AC Adaptor (supplied) | 13 |
| Accessory (supplied) | 4 |
| Alkaline Battery | 4, 12 |
| B | |
| Battery Remaining Indication | 9 |
| Beep | 20 |
| Brightness (LCD Viewfinder) | 21 |
| Built-in Flash | 28 |
| B/W Display | 7, 17, 28, 31, 32 |
| C | |
| Capturing Images | 17, 18, 19, 20 |
| Capture B/W Images | 31 |
| CF Card Format | 37 |
| CompactFlash Card | 4, 14, 15 |
| Contents | 5 |
| Copy Image | 38, 39, 40, 41 |
| D | |
| Delete Image | 35, 36 |
| Digital Photo Printer | 53 |
| F | |
| Focus/Macro Recording | 27 |
| H | |
| Hand Strap | 4, 13 |
| I | |
| Iris | 33 |
| L | |
| LCD Viewfinder | 6, 8, 9, 10, 11, 17, 21 |
| Low Light Warning | 8 |
| Light Metering | 30 |
| M | |
| Macintosh Adaptor Cable (supplied) | 4, 51 |
| Manual Playback | 22, 23 |
| Multi Playback | 25 |
| O | |
| On Screen Display (OSD) | 8, 9, 11 |
| Optical Viewfinder | 6, 18 |
| P | |
| PC Connection Cable for Windows | 4, 47, 51 |
| PCMCIA Adaptor | 4, 43 |
| Playback | 22, 23, 24, 25 |
| Playback Menu | 11 |
| POWER Supply | 12, 13 |
| Print Mark | 52 |
| S | |
| Self Timer | 7, 10, 32 |
| Setting the Clock | 16 |
| Slide Show | 42 |
| Specifications | 58 |
| Stand By | 20 |
| Symptom/Solution | 57 |
| T | |
| Transferring Images | 45, 46, 47, 49, 50, 51 |
| Time Lapse | 34 |
| V | |
| Video Cable | 4, 26 |
| W | |
| White Balance | 29 |
| Z | |
| Zoom Playback | 24 |

- Capture B/W Images
- Self Timer Recording
- Adjusting the Iris Manually
- Note:
- Time Lapse Recording
- Set POWER to MANUAL REC.
- Press MENU to display MANUAL REC menu.
- Press ▲ or ▼ to select TIME LAPSE and press
- Press MENU to set time lapse mode.
- Press SHTR to start time lapse mode recording.
- Note :
- To Delete Specific Images
- Important:
- To Delete All Images
- To Copy Image Pages
- To Copy All Images
- Slide Show
- Inserting the PCMCIA Adaptor
- ■ Inserting the CompactFlash Card
- ■ Removing the CompactFlash Card
- Editing on a Personal Computer (Windows 95/98)
- ■ Operating environment
- System Requirements:
- ■ Concerning the transfer rate
- Transferring Your Images (Windows 95/98)
- ■ Driver Software Installation
- Twain Driver for Adobe® PhotoDeluxe™ 2.0 Installation
- ■ First. Install Adobe® PhotoDeluxe™ 2.0
- ■ Connection
- Editing on a Personal Computer (Macintosh)
- ■ When using LocalTalk
- ■ When using software that takes control of the serial port
- Transferring Your Images (Macintosh)
- Plug-in Driver for Adobe® PhotoDeluxe™ 2.0 Installation
- ■ First, Install Adobe® PhotoDeluxe™ 2.0
- Using the Digital Photo Printer
- ■ Stamp Print Marker
- ■ Printing on a Digital Photo Printer
- Precautions
- Precautions When Using the Camera
- ■ Handling Precautions
- ■ Precautions When Moving the Unit
- ■ Maintenance Precautions
- ■ Precautions after Use
- ■ Storage Precautions
- ■ Concerning the CompactFlash Card
- Compatible Types
- Handling
- ■ Concerning the Image Data
- ■ Concerning the LCD Screen
- ■ Concerning Condensation
- Precautions for AC Adaptor
- ■ Strong Precautions
- Precautions for Dry Batteries
- ■ Handing Precautions
- ■ Precautions for the Driver Software
- Before Requesting Service
Marke : PANASONIC
Modell : NV-DCF7
Kategorie : Kamera