
NV-S1B - Camcorder PANASONIC - Kostenlose Bedienungsanleitung
Finden Sie kostenlos die Bedienungsanleitung des Geräts NV-S1B PANASONIC als PDF.

| Produkttyp | Camcorder |
| Marke | Panasonic |
| Modell | NV-S1B |
| Abmessungen (ca.) | 150 x 100 x 200 mm (B x H x T) |
| Gewicht (ca.) | 500 g (ohne Zubehör) |
| Stromversorgung | 7,2 V Gleichspannung, Akku Ni-MH |
| Leistungsaufnahme | ca. 5 W |
| Bildsensor | 1/4-Zoll-CCD, ca. 0,3 Megapixel |
| Objektiv | Panasonic, 10-fach optischer Zoom, 20-fach digital |
| LCD-Monitor | 2,5-Zoll-Farb-LCD, ca. 110.000 Pixel |
| Sucher | Elektronischer Sucher (EVF), Schwarz-Weiß |
| Speichermedium | MiniDV-Band |
| Videoformat | Standardauflösung (720 x 576 Pixel, PAL) |
| Audio | Mono, PCM 16 Bit |
| Bildstabilisierung | Elektronisch (EIS) |
| Anschlüsse | AV-Ausgang (Composite), DV-Eingang/Ausgang (FireWire), externe Mikrofonbuchse |
| Zubehör im Lieferumfang | Akku, Netzteil, AV-Kabel, Fernbedienung, Schultergurt |
| Reinigung und Pflege | Objektiv mit weichem Tuch reinigen; Gehäuse trocken abwischen; Kopfreinigung mit Reinigungskassette |
| Sicherheitshinweise | Nicht in Feuchträumen verwenden; Akku nicht kurzschließen; keinem direkten Sonnenlicht aussetzen |
| Ersatzteile und Reparatur | Ersatzakkus und Netzteile über Fachhandel; Reparatur nur durch autorisiertes Servicecenter |
| Allgemeine Informationen | Bedienungsanleitung in Deutsch als PDF verfügbar; Garantiezeit: 2 Jahre |
Häufig gestellte Fragen - NV-S1B PANASONIC
Benutzerfragen zu NV-S1B PANASONIC
0 Frage zu diesem Gerät. Beantworten Sie die, die Sie kennen, oder stellen Sie Ihre eigene.
Eine neue Frage zu diesem Gerät stellen
Laden Sie die Anleitung für Ihr Camcorder kostenlos im PDF-Format! Finden Sie Ihr Handbuch NV-S1B - PANASONIC und nehmen Sie Ihr elektronisches Gerät wieder in die Hand. Auf dieser Seite sind alle Dokumente veröffentlicht, die für die Verwendung Ihres Geräts notwendig sind. NV-S1B von der Marke PANASONIC.
BEDIENUNGSANLEITUNG NV-S1B PANASONIC
Panasonic
VHS-Compact Movie
NV-S1B
Operating Instructions
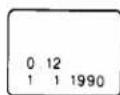
50workshop = 12

Before attempting to connect, operate or adjust this product, please read these instructions completely.
VQT3908
Contents
For Your Safety 3
Easy Operations 4
Preparation
- Controls and Components 5
- Indications in the Electronic Viewfinder (EVF) 8
●Indications in the LCD Display 10
-Accessories 11
●Battery Pack 12
-Video Cassette 14 - Setting The Clock 15
•EVF, Lens Cap and Grip Belt 17 - Eyepiece 18
Camera Recording 19
Shooting Techniques
- Focus 21
- Macro Close-Up 22
- White Balance 23
●High Speed Shutter 23 - Zooming 24
●Fade-In and Fade-Out 24 - Image Stabilizer Function 25
●Still Picture and Strobe Recording Functions .. 26 - Snapshot Recording 27
●Recording Titles 28
Playback 31
●Playback via TV Set (Connections) 32
Other Functions
●Memory Search Function 33
- Counter Indication 33
●Remaining Tape Time Indication 33
-Index Signal (VISS) 33
Editing
- Assemble Editing 34
- Dubbing (Copying) 35
Accessories etc.
●Shoulder Strap 36
- Tripod Mount 36
-Other Connections 36
- AC Adaptor 37
●Car Battery Cord 37
•Cassette Adaptor 38
After Shooting 39
Cautions 40
Before Requesting Service 45
Specifications 46
HQ (High Quality) Picture System
Video recorders carrying the HQ symbol mark feature the new VHS High Quality Picture System. This system assures complete compatibility with VTRs that use the conventional VHS system.
IMPORTANT
Your attention is drawn to the fact that recording of pre-recorded tapes or discs or other published or broadcast material may infringe copyright laws.
WARNING
TO REDUCE THE RISK OF FIRE OR SHOCK HAZARD, DO NOT EXPOSE THIS EQUIPMENT TO RAIN OR MOISTURE.
VHS-C Movie NV-S1
●The rating plate is on the bottom side of the Movie Camera.
AC Adaptor VW-AS1
●The rating plate is on the bottom side of the unit.
●This apparatus was produced to BS800.
FOR YOUR SAFETY
■ DO NOT REMOVE THE OUTER COVER.
To prevent electric shock, do not remove the cover. No user serviceable parts inside. Refer servicing to qualified service personnel.
■ AC MAINS LEAD CONNECTION.
(VW-AS1B U.K. model only.)
The wires in the mains lead of this apparatus are coloured in accordance with the following code.

As the colours of the wires in the mains lead may not correspond with the coloured markings identifying the terminals in your plug, proceed as follows: The wire which is coloured BLUE must be connected to the terminal which is marked with the letter N or coloured BLACK. The wire which is coloured BROWN must be connected to the terminal which is marked with the letter L or coloured RED. Under no circumstances must either of the above wires be connected to the earth terminal of a three pin plug. Under no circumstances must either of the above wires be connected to the earth terminal of a three pin plug.
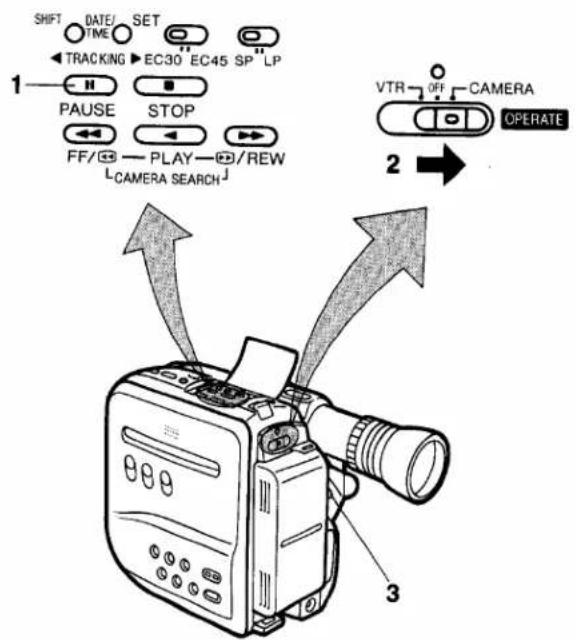
Easy Operations
Camera Recording
1 Press the centre part of the Operation Switch and slide it to the "CAMERA" position.
2 Insert a Video Cassette.
3 Set the Recording Speed Selector to "SP" or "LP".
4 Press the Start/Stop Button.
- Recording starts.
- Press this button again to stop recording.
●The Tally Indicator Lamp lights up.
Playback
1 Insert the recorded cassette.
2 Press the centre part of the Operation Switch and slide it to the "VTR" position.
3 Press the Play Button.
-Playback starts.
- Press the Stop Button to stop playback.
Controls and Components
| No. | Name | Page |
| 1 | Cassette Compartment | 14 |
| 2 | Operation Switch | 4 |
| 3 | Power Zoom Control Buttons | 24 |
| 4 | Eyepiece Corrector Control | 18 |
| 5 | Electronic Viewfinder | 8 |
| 6 | Eyecup | 39 |
| 7 | Recording Start/Stop Button | 4 |
| 8 | Battery Eject Button | 13 |
| 9 | Shoulder Strap Holder | 36 |
| 10 | Focus +/- Buttons | 21 |
| 11 | Still/Strobe Button | 26 |
| 12 | Memory Button | 28 |
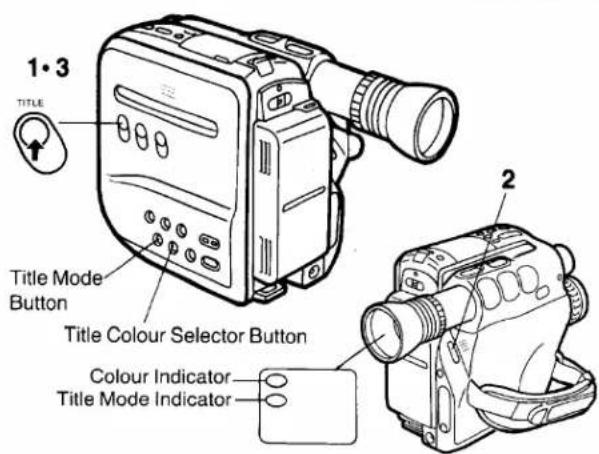
| 13 | Title Color Selector Button | 29 |
| 14 | Titling Mode Selector Button | 29 |
| 15 | High Speed Shutter Button | 23 |
| 16 | White Balance Button | 23 |
| 17 | Focus Button | 21 |
| 18 | Title Function On/Off Button | 28 |
| 19 | Image Stabilizer Button | 25 |
| 20 | Fade Button | 24 |
29 General Operation Controls
| No. | Name | Page |
| 21 | White Cap | — |
| 22 | Microphone | — |
| 23 | LCD Display | 10 |
| 24 | On Screen Display Button | 33 |
| 25 | Date/Time Selector Button | 16 |
| 26 | Rec Review Button | 20 |
| 27 | Display Selector Button | 33 |
| 28 | Reset Button | 33 |
| 29 | General Operation Control | 31 |
| 30 | Eject Button | 14 |
| 31 | Snapshot Rec Button | 27 |
| No. | Name | Page |
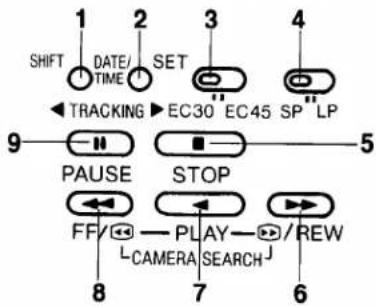
1 Tracking/Date/Time Shift Button 16, 31
2 Tracking/Date/Time Set Button 16, 31
3 Tape Selector Switch 33
4 Recording Speed Selector Switch 19
5 Stop Button 31
6 Rewind/Review Button 31
7 Play Button 31
8 Fast Forward/Cue Button 31
9 Pause Button 31
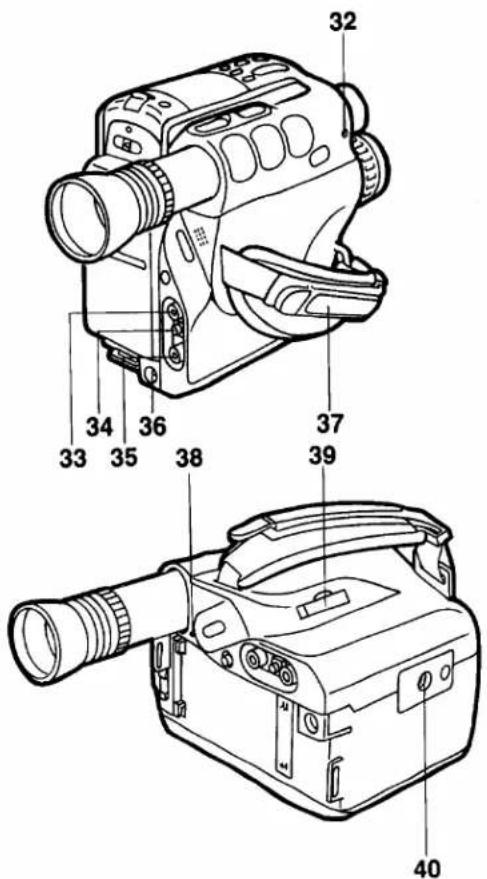
| No. | Name | Page |
| 32 | External Microphone Socket | 36 |
| 33 | Video Output Socket | 32 |
| 34 | RF DC Output Socket | 32 |
| 35 | Audio Output Socket | 32 |
| 36 | DC Input Socket | 37 |
| 37 | Grip Belt | 17 |
| 38 | Tally Lamp Indicator | 4 |
| 39 | Button Battery Holder | 15 |
| 40 | Tripod Receptacle | 36 |
Indications in the Electronic Viewfinder (EVF)
The following indications are displayed in the Electronic Viewfinder (EVF) to inform you of the conditions of the Movie Camera.
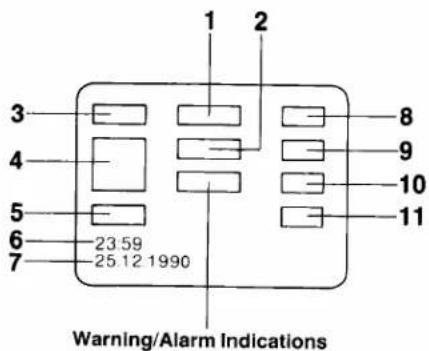
Warning/Alarm Indications

There is little battery power left. Movie Camera will be turned off in a few minutes. Replace the battery pack by a fully recharged one.

There is no cassette tape inserted, or the tab of the inserted cassette is broken out. The indications flashes to warn that recording is not possible.
END
During recording, the tape has reached its end. Replace the tape with a new one. The indication will remain lit when the tape has reached its end.

When condensation has formed inside the Movie Camera, the "DEW" indication will flash and a few seconds later, the unit itself off.

Video Head Clogging (see page 40.)
When the button type Battery for the Title Memory and Auto Date functions is not inserted or when it is exhausted, the indication will flash for 5 seconds after the Movie Camera is turned on.
1 Remaining Battery Power/Index Indication
E--F The “—” indications begin to disappear from right to left as the power of the Battery Pack weakens. - When switching the Movie Camera on with the Battery pack attached, the indication “E--F” will initially be displayed for approx. one minute and then the actual remaining battery power will then be displayed.
INDEX This indication flashes when a recording is started and it indicates that an index signal is being recorded.
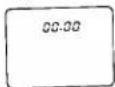
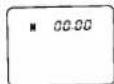
2 Counter Indication
M05.01 Tape Counter with Memory Indication
3 Tape Remaining Indication
4 Digital Memory Indication
WHT Colour Indication
WIPE ↑ Mode Indication (No indication in normal mode.)
5 Electronic Image Stabilizer Indication
6 Time Indication
7 Date Indication
8 Tape Running Indications
REC Recording mode
PAUSE Recording Pause mode, Rec Review
◀ Play mode, Camera Search (In forward direction)
Still mode
◀◀ Fast Froward/Cue mode
▶▶ Rewind/Review mode, Camera Search (In reverse direction)
9 Manual White Balance Indication

W.SET Manual Mode, Hold Mode
10 Recording Mode Indications
SP SP mode
LP LP mode
11 High Speed Shutter Mode Indications
1/120 1/120 sec.
1/250 1/250 sec.
1/500 1/500 sec.
1/1000 1/1000 sec.
1/2000 1/2000 sec.
1/4000 1/4000 sec.
Focus Mode Indication
MF Manual Focus
Mode
- Some of the above indications may light up alternately at the same place in the EVF to indicate the corresponding operating condition or warnings.
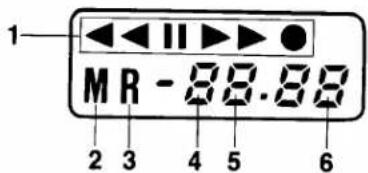
Indications in the LCD Display
natural_image
Line drawing of a vintage digital camera with scroll wheel and control panel (no text or symbols)1 Tape Running Indications
◀●: Recording mode
●: Recording Pause mode
◀◀: Fast Forward/Cue mode
▶▶: Rewind/Review mode, Camera Search (in reverse direction)
◀: Play mode, Camera Search (in forward direction)
II: Still mode
2 Memory Indication
M 00.00
3 Tape Remaining Indication
R 10
4 Remaining Battery Power Indication
A few minutes after the "b" Indicator begins to flash, the power will be turned off.
5 Tape Counter Indication
00.00
6 Dew Indication
(d)
Accessories
Standard Accessories
AC Adaptor
Battery Pack
Cassette Adaptor
RF Adaptor
Shoulder Strap
Audio/Video Cable
DC Input Cable
Battery for Cassette Adaptor Operation
Battery for Clock Operation
Soft Case
BNC/PHOTO Adaptor Plug
Coaxial Cable
CAUTION: TO REDUCE THE RISK OF FIRE OR SHOCK HAZARD AND ANNOYING INTERFERENCE, USE THE RECOMMENDED ACCESSORIES ONLY.
Information for your safety.
Optional Accessories
Battery Pack (VW-VBS2E)
Battery Pack Holder (VW-VH1E)
Car Battery Cord (VW-ACC11E)
System Case (VW-SHCS1E)
Carrying Bag (VW-CBS1E)
Casual Bag (VW-CABS1E)
Casual Rucksack (VW-CARS1E)
Hard Case (VW-HCS1E)
Rain Cover (VW-RCS1E)
Snow Jacket (VW-SJS1E)
Video DC Light (VZ-LDS15E)
Replacement Bulb for DC Light (VZ-LL15E)
Filter Kit (VW-LF27E)
Tele Conversion Lens (VW-LT2714E)
Wide Conversion Lens (VW-LW2707E)
Standard Tripod (VZ-CT55E)
Deluxe Tripod (VZ-CT75E)
Table Tripod (VZ-CTT1E)
L-shaped Shoe Adaptor (VW-SK3E)
Finder Adaptor (VW-FAS1E)
Battery Pack
Charging
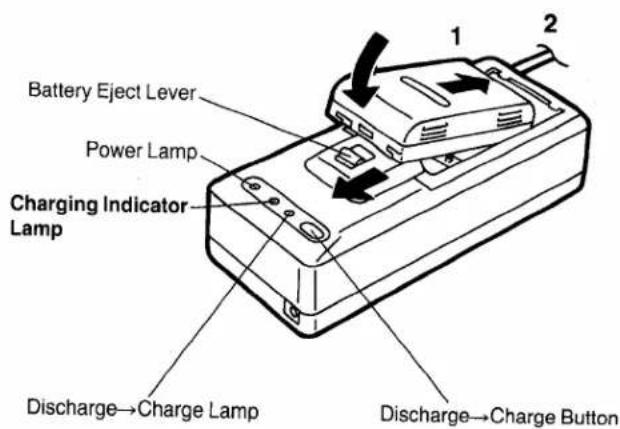
1 Attach the Battery Pack.
2 Connect the AC Adaptor to the Mains.
●Charging Indicator Lamp
Lights while charging is taking place and goes out when charging is finished.
Note:
●The charging takes about 60 minutes.
- The Movie Camera can be used continuously for approx. 45 minutes (Image Stabilizer On) with a fully charged Battery Pack.
- With the VW-VBS2E Battery Pack (optional), the charging as well as possible recording time is twice as long as for the standard supplied Battery Pack.
■ When the charging is completed, slide the Battery Eject Lever in the direction of the arrow and remove the Battery Pack.
■ Discharge→Charge Function
The Battery Pack can be recharged for repeated use. However, if it is recharged repeatedly while there is still some charge left, its charging capacity will be gradually reduced. Therefore, if you often need to recharge semi-discharged Battery Packs, attach the Battery Pack to the AC Adaptor, connect the AC Adaptor to the Mains, and press the Discharge→Charge Button to completely discharge the Battery Pack. (The Discharge→Charge Lamp will light up, and when the discharging is finished, the Charging Indicator Lamp will light up instead.) This will increase the charging capacity and extend the operating life of the Battery Pack. Therefore, if the operating life of the Battery Pack becomes noticeably shorter, refresh it. (It is recommended to refresh the Battery Pack approx. once every five rechargings.)
Attaching
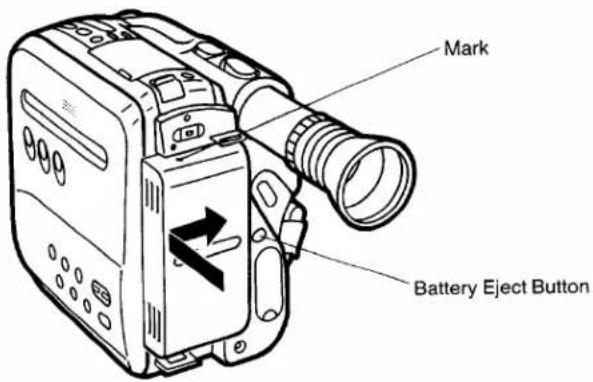
1 Align the grooves of the Battery Pack and the Movie Camera.
2 Insert the Battery Pack until it locks with a click.
- To remove the Battery Pack, press the Battery Eject Button and slide the Battery Pack in the opposite direction of that in operation step 2.
Caution:
- Wait about 10 seconds after turning the Movie Camera off, before removing the Battery Pack.
- If the Battery Pack is removed during recording or playback, the tape remains wound around the video head cylinder and could become damaged.
Charging Confirmation Marker on the Battery Pack
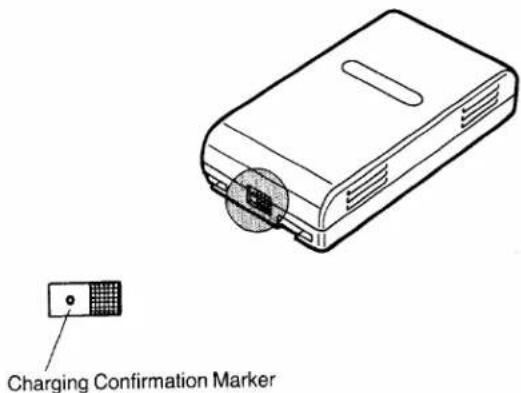
This marker makes it convenient to distinguish between charged and discharged Battery Packs. For example, visible dot means charged Battery Pack, and no dot means discharged Battery Pack. Move the Charging Confirmation Marker to the appropriate position to indicate the condition of the Battery Pack.
●The Battery Pack cannot be recharged while attached to the Movie Camera. The Movie Camera cannot be operated while a Battery Pack is being recharged.
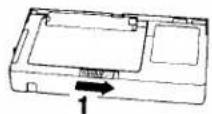
Video Cassette
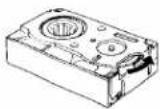
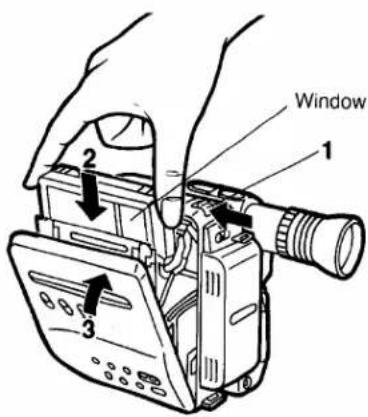
Inserting the Video Cassette
Before Inserting the Cassette
Make sure that the tape is not loose. If it is loose, pull it in by turning the cog wheel on the side of the cassette in the direction of the arrow.
1 Press the Eject Button.
2 Insert the video cassette into the cassette compartment with its window facing outside.
- Insert the video cassette all the way down.
3 Push the cassette compartment cover inward, until it locks with a click.
Removing a Video Cassette
1 Press the Eject Button.
2 Pull out the video cassette.
3 Push the cassette compartment cover inward, until it locks with a click, to close the cassette compartment.
Note:
- Use VHS-C video cassettes only.
- The cassette cover will be opened in two stages. One to two seconds after pressing the Eject Button, the Cassette cover will be completely opened. Do not try to open the Cassette Compartment Cover by force, because it could cause malfunction.
Setting the Clock
How to Insert the Battery for the Clock Operation
The "CR2032" size battery is necessary for the date & time and title to be memorized by the Movie Camera.
natural_image
Line drawing of a vintage flat-screen digital camera with lens and control buttons (no text or symbols)1
2

3
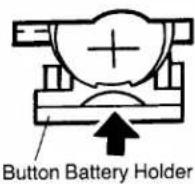
1 Use a small screw driver or similar tool to push the Stopper to the left to release the Battery Holder, and then pull it out completely.
2 Place the "CR2032" size battery on the Battery Holder with (+) mark facing upward.
3 Reinsert the Battery Holder into the Movie Camera.
Note:
- If the battery is not inserted or if it is exhausted, the indication "BACKUP" in the EVF will flash for approximately 5 seconds when turning the Movie Camera on.
- When replacing the battery while the Time & Date Indications are still correct, connect Battery pack or AC Adaptor to Movie Camera for the duration of the battery replacement so that the time will remain unchanged.
CAUTION FOR BATTERY REPLACEMENT
- The life of the battery is about one year. Inspect and if necessary, replace the Battery once a year.
- Load the new battery with its polarities (+ and -) aligned correctly.
- Remove spent battery immediately and dispose of it.
- Do not try to short-circuit, recharge or heat the battery and do not throw it into a fire.
Setting of the Date and Clock

1 When the Date/Time Selector Button is pushed, the indication shown on the right will appear in the EVF.
- If no battery is inserted, the indication "BACKUP" will flash.
2 When the Shift Button is kept pressed for more than about 2 seconds, the "Year" portion will start to flash. Then, at every press of the shift Button, the items to be set will flash in the following sequence.
Year→Month→Date→Hour→Minute→“ ”→...
3 When the Set Button is pushed, the flashing portion displayed will be changed in the following sequence.
YEAR: 1990→1991→....→2089→1990→...
MONTH: 1→2→ ……→12→1→…
DATE: 1→2→ ……→31→1→…
HOUR: 0→1→ ......→23→0→...
MINUTE: 00→01→ ....→59→00→...
- Repeat procedures 2 and 3 until all items have been set.
- Once the time and date are set, press the Shift Button in response to a precise time signal so that the clock may begin to function.
Recording the Date/Time Indications
When the Date/Time Selector is pushed repeatedly, the indications will change in the following sequence:
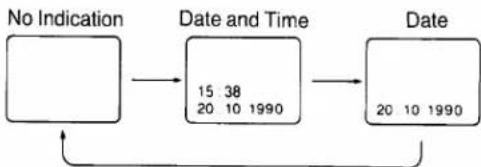
flowchart
graph LR
    A["No Indication"] --> B["Date and Time"]
    B --> C["Date"]
    B --> D["15 38\n20 10 1990"]
    C --> E["20 10 1990"]
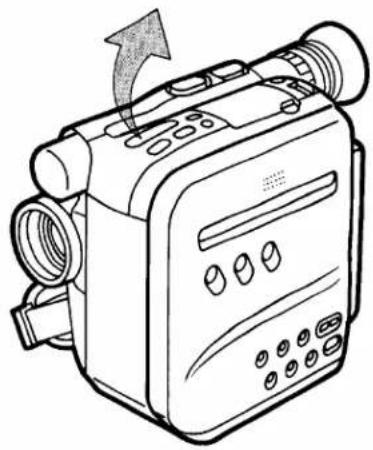
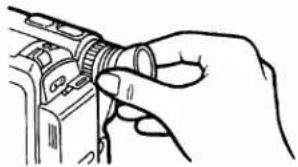
EVF, Lens Cap and Grip Belt
Pulling out the EVF
When pulling out the EVF, do not hold it by the Eyecup, because the Eyecup could become disconnected from the EVF.
Wrong
natural_image
Line drawing of a hand holding a camera lens (no text or symbols)Correct

natural_image
Hand holding a tool interacting with a mechanical component (no text or symbols visible)Note:
- Keep the EVF in its fully extended position during shooting.
- Do not apply any pressure on the EVF except for pulling it out and pushing it back in again.
- Be sure to retract the EVF after shooting.
Removing the Lens Cap
To remove the Lens Cap, press the stoppers on both sides and pull it off.
natural_image
Technical line drawing of a camera with an inset showing the internal components (no text or symbols)Adjusting the Grip Belt
natural_image
Line drawing of a DSLR camera with an inset close-up showing the lens and cable (no text or symbols)●Grasp the Handgrip.
- Adjust the length of the Grip Belt.
- Attach the lens Cap to the Grip Belt.
Eyepiece
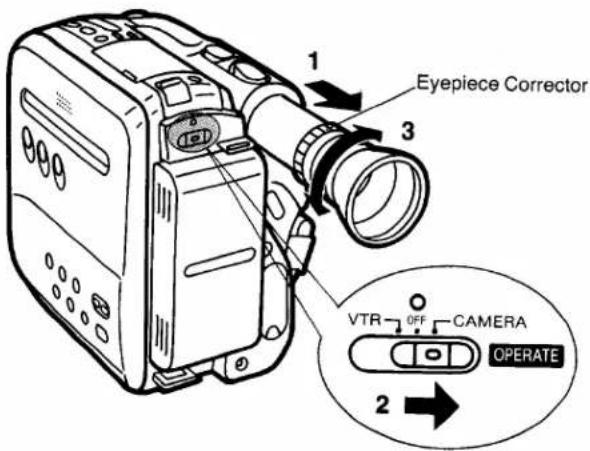
Eyepiece Corrector
This control makes it possible for people who wear glasses to adjust the eyepiece to their eyesight.
1 Pull out the EVF to its fully extended position.
2 Press the centre part of the Operation Switch and slide it to the "CAMERA" position.
3 Adjust the Eyepiece corrector until the indications in the EVF are clearly visible.
Camera Recording
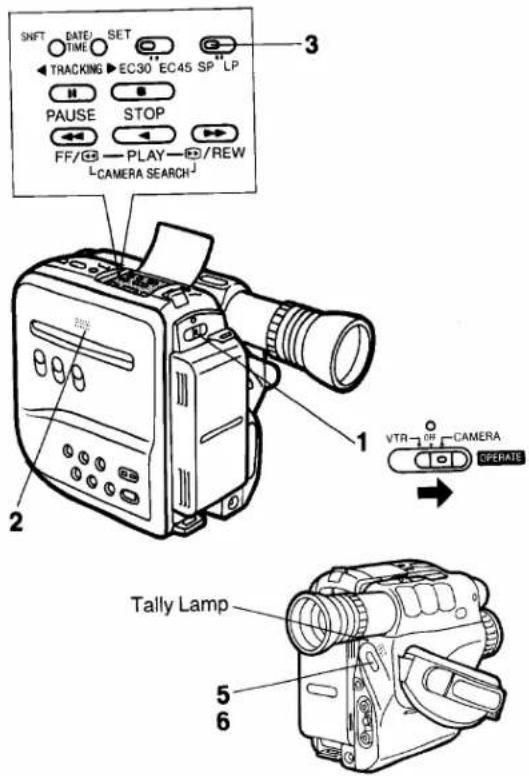
To Start Recording
1 Press the centre part of the Operation Switch and slide it to the "CAMERA" position.
2 Insert a video cassette with the erasure prevention tab intact.
• After a few seconds, the Movie Camera will be in the recording pause mode.
3 Set the Recording Speed Selector to "SP" or "LP".
- SP: For normal tape speed
●LP: For slow tape speed
4 Place the Movie Camera in the shooting position.
5 Press the Start/Stop Button.
●The recording starts.
●The Tally Lamp Indicator is lit.
When carrying the Movie Camera in your hand or suspended from your shoulder, the Tally Lamp lets you confirm at a glance whether the camera is recording or not and thus prevents recording by mistake.
6 Press the Start/Stop Button again to stop the recording temporarily. (Recording pause mode)
- If the unit remains in the recording pause mode for more than 6 minutes, it will automatically turn itself off to protect the tape and save battery power. (See pate 20 for details.)
To Stop Recording
1 Put the Movie Camera in the recording pause mode.
2 To turn off the Movie Camera, press the centre part of the Operation Switch and slide it to "OFF".
Rec Review
For checking the last few seconds of recorded sequences.
1 Put the Movie Camera to the recording pause mode.
2 Press the Rec Review Button.
Camera Search
For checking recorded scenes.
1 Put the Movie Camera in the recording pause mode.
2 Keep the Rewind/Review Button pressed to play back a scene at high speed in reverse direction.
●The sound is not reproduced.
3 Keep the Fast Forward/Cue Button pressed to play a scene at normal speed in forward direction.
●The sound is reproduced.
Recording Lock Function
This function ensures smooth scene-to-scene continuation in assemble recording. Even if the Operation Switch is set to "OFF", the tape remains loaded around the head cylinder. The recording lock mode is activated by setting the Operation Switch to "OFF" during recording pause. This will cancel the memorized title, the Image Stabilizer function as well as the high speed shutter and white balance settings.
- If the unit remains in the recording pause mode for more than 6 minutes, it will automatically turn itself off to protect the tape and save battery power. (The tape remains wound around the head cylinder. This condition is called "Recording Lock".)
To switch it on again, set the Operation Switch to "OFF" and then to "CAMERA".
- If the recording lock mode continues for more than 48 hours, it will be cancelled and the unit will be turned off.
Focus
Continuous Auto Focus
For Continuous Automatic Focus adjustment, press the centre part of the Operation Switch and slide it to the "CAMERA" position.
●The focus will automatically be adjusted to the subject in the center of the EVF.
Manual Focus
1 Press the Focus Button.
●The indication "MF" will appear in the EVF.
2 To zoom in on an object, press the "T" Zoom Button.
3 Adjust the focus with the Focus "+" or "-" Button.
4 To zoom back from an object to show more of it, press the "W" Button.
- When the Operation Switch is set to "OFF" and then again to "CAMERA" in the Manual Focus mode, be sure to repeat operation steps 2 to 4.
Macro Close-Up
For close-up shots of small objects or photos.
natural_image
Illustration of a vintage film camera with an arrow indicating direction, showing no text or symbols on the device itself.1 Keep the "W" Power Zoom Control Button pressed.
- The focus will be adjusted up to a minimum distance of 5 mm between lens and object.
●After focusing all the way to the wide-angle position, the focus can be adjusted simply by approaching the subject. - The focus can be adjusted both in the AUTO and MANUAL mode.
Practical Hint for Shooting
- To change the scale of the object, change the distance from the object.
- As the depth of field is very small in macro shooting, even slight camera movements can cause the object to be out of focus. Therefore, it is recommended to use a tripod.
- When shooting pictures in a photo album or a similar situation with insufficient lighting, use a Video Light (optional).
- When the "T" Power Zoom Control Button is pressed to zoom in on an object, the focus can be adjusted within a range of more than 0.7 m from the object.
White Balance
This adjustment is necessary to assure natural colour rendition. For continuous automatic White Balance adjustment, set the Operation Switch to the "Camera" position. This setting will automatically provide well-balanced natural colour rendition under almost any shooting condition.
Manual White Balance Adjustment
1 Attach the White Cap to the lens.
2 Keep the White Balance Button pressed for more than 0.5 second to activate the Hold mode.
The "WHITE" Indication in the EVF informs about the state of the adjustment:
Flashing slowly.... Not set
Flashing rtapodly .... During setting
The indication "W.SET" is lit .... Setting is finished
●How to Use the White Cap
If there is only one light source, attach the White Cap to the lens for the manual white balance adjustment. If there are several light sources or if the illumination is weak (indoor, etc.), remove the White Cap from the lens and point the Movie Camera at a purely white object, such as white paper, and then adjust the White Balance.
●Automatic Recall of Previous White balance Setting When the Operation On/Off Switch of the Movie Camera is set to "OFF" and later to "CAMERA" again, the "WHITE" Indication will flash slowly in the Hold mode, however, the last previous white balance setting is still maintained. However, to ensure best possible colour reproduction, adjust the white balance anew as explained above. It is also maintained during Playback, Rec Review and Camera Search. However, the previous white balance setting will not longer be maintained when the AC Adaptor is turned off or the Battery Pack is removed from the Movie Camera.
- When moving the Movie Camera from indoor to outdoor or vice versa, be sure to adjust the white balance anew, as clour of the light has changed considerably.
High Speed Shutter
A range of different shutter speeds make possible videographing of scenes with fast movements.
1 By repeatedly pushing the High Speed Shutter Button, the shutter speed can be changed as follows:
| (No indication): | 1/50 sec. (normal) |
| 1/120: | 1/120 sec. |
| 1/250: | 1/250 sec. |
| 1/500: | 1/500 sec. |
| 1/1000: | 1/1000 sec. |
| 1/2000: | 1/2000 sec. |
| 1/4000: | 1/4000 sec. |
For Playback
When scenes recorded with high shutter speed(s) are later played back on a VTR equipped with the playback functions Super Still and Super Fine Slow Motion, etc., still and slow motion pictures with very sharp contours and full details can be obtained.
Note:
See page 44 for details.
Zooming
Power Zooming
To make your zoom shots more impressive and give exactly the desired effect, do it like the professionals: before recording, mocked a trial run of the zooming. Zoom Out (The su
flowchart
graph TD
    A["Zoom In (The subject becomes larger)"] --> B["Zoom Out (The subject becomes smaller)"]
    B --> C["Video Camera Icon"]
For wide-angle: Press the "W" Button. For telephoto: Press the "T" Button.
Fade-In and Fade-Out
flowchart
graph LR
    A["In-"] --> B["Black Box"]
    C["Out"] --> D["White Box 1"]
    E["Out"] --> F["White Box 2"]
    G["Out"] --> H["White Box 3"]
    I["FADE"] --> J["Fake Out Icon"]
Fade-In
Fade-In is used, for example, at the beginning of a performance. After recording the title, gradual fading-in of the first scene is very effective.
1 With the Movie Camera in the recording pause mode, keep the Fade Button pressed.
2 After the picture has disappeared in the EVF, press the Start/Stop Button.
3 3 seconds later, release the Fade Button.
●The picture will appear gradually.
Fade-Out
Fade-Out is used to give a scene a soft ending or for a smooth fade-out/fade-in transition from one scene to another.
1 During recording, keep the Fade Button pressed to the point where you want to fade out.
2 After the picture has disappeared, press the Start/Stop Button to stop the recording.
3 Release the Fade Button.
Image Stabilizer Function
This function automatically corrects the slight shaking of the camera that often occurs during hand-held camera shooting and zooming.
It is especially practical for the following purposes:
- Zooming in on a subject.
●Shooting while walking.
●Shooting from inside a moving car.
1 Press the Image Stabilizer Button.
- The Image Stabilizer Function is activated. At the same time, the subject on the screen will appear slightly enlarged, and the shutter speed will be changed to 1/120 sec.

- If the Image Stabilizer Button is pressed again, the Image Stabilizer mode will be cancelled and the shutter speed will be changed back to the normal speed (1/50 sec).
- In the Image Stabilizer mode, the resolution of the picture will be slightly reduced.
- When shooting under fluorescent light, the brightness of the picture may fluctuate.
- To continue shooting in the Image Stabilizer mode after putting the Movie Camera in recording lock mode during a break in shooting (see page 20), press the Image Stabilizer Button again.
The picture stabilizing effect may not be sufficient, if the shaking of the Movie Camera is too strong or in the following shooting conditions:
●A subject with horizontal or vertical stripes.
●An extremely bright subject.
- A dark subject. (The “☐” Indication will flash in the EVF.) Add more light.
●A subject under many fluorescent lamps.
●A fast-moving subject.
If the High Speed Shutter Button is pressed to change the shutter speed while the Movie Camera is in the Image Stabilizer mode, the shutter speed will remain the same and not return to the normal speed (1/50 sec.) even if the Image Stabilizer mode is cancelled later.
Note:
When shooting with a tripod, do not use the Image Stabilizer Function.
Still Picture and Strobe Recording Functions
STILL: For recording still images.
1 Press the Still/Strobe Button.
●The image in the EVF will stand still.
2 Press the Start/Stop Button.
●The still picture on the EVF screen will be recorded.
● To stop recording, press the Start/Stop Button again.
- Since the still picture is recorded from the memory, the picture quality may be slightly inferior compared to that of normally shot moving pictures.
To cancel the Still Picture Recording mode, press the Still/Strobe Button two times.
By pressing the Still/Strobe Button repeatedly, the mode can be changed as follows:

Note:
Be careful not to move or shake the Movie camera during still picture or strobe recording, because the picture could be distorted during playback.
STROBE: For continuously recording still images at intervals of 1/6th of a second.

1 Press the Still/Strobe Button two times.
●The picture in the EVF will also have a strobe effect.
2 Press the Start/Stop Button.
• Continuous recording is possible.
• To stop recording, press the Start/Stop Button again.
- Since the strobe pictures are recorded from the memory, the picture quality may be slightly inferior compared to that of normally shot moving pictures.
- When shooting under fluorescent lamps, the brightness of the pictures may fluctuate.
To cancel the Strobe Shooting Mode, press the Still/Strobe Button once.
Combining the Strobe function with the High Speed Shutter function makes it possible to amplify the strobe effect. (For outdoor shooting, the 1/250-sec. speed is recommended.)
Snapshot Recording
Simply by pressing the Snapshot Rec Button, a still picture can be recorded for approx. 5 seconds.
1 Press the Snapshot Rec Button when the Movie Camera is in the recording pause mode.
- The still picture will be recorded for approx. 5 seconds and the Movie Camera will then switch back to the recording pause mode.
●The picture in the EVF will stand still during recording. - During recording, the "REC" Indication in the EVF and the "◀●" Indication on the LCD Display will flash.
- Since the still picture is recorded from the memory, the picture quality may be slightly inferior compared to that of normally shot moving pictures.
Snapshot
- Since anyone can use this Movie Camera with the same ease as a still camera, it's easy to ask somebody to take your picture on video by pressing the Snapshot Rec Button. This makes it even easier for you to get into your own movies.
- When combining this function with the High Speed Shutter function, it is possible to shoot still pictures fast actions for motion analysis.
Note:
Be careful not to move or shake the Movie camera during snap shot recording, because the picture could be distorted during playback.
Recording Titles
The titling function makes it possible to input titles into memory and recall them later during shooting at the push of a button for superimposition onto the normal picture (Digital Title Memory Function).
Inputting a Title into Memory
This operation can be performed while the Movie Camera is in the recording pause or stop mode.
1 Prepare a printed illustration or a printed title.
●Make a title with a black felt pen on white paper.
2 Press the center part of the Operation Switch and slide it to the "CAMERA" position.
3 Adjust the focus.
4 Press the Memory Button.
- Keep the button pressed for more than half a second.
●The title is memorized.
While the title is displayed in the EVF, its colour and the titling mode (the way it will be superimposed) can be selected. (See next page for details.)
- Press the Title Function On/Off Button to make the title in the EVF disappear.
Pressing this button repeatedly will make the title appear→ disappear→appear in the EVF.
If this button is pressed by mistake during shooting, the title will be superimposed and recorded.
■ Remarks about Titling
The title remains stored in memory until the Button Type Battery is exhausted. When a new title is input, the title previously memorized on that title page will be erased.
Selecting the Colour of a Title
By repeatedly pressing the Title Colour Selector Button, the colour of the title can be changed in the following order. (This function can also be used while the title is being recorded.)

flowchart
graph TD
    A["Title Mode Selector Button"] --> B["WHT (White)"]
    A --> C["YEL (Yellow)"]
    A --> D["RED (Red)"]
    A --> E["MAG (Magenta)"]
    A --> F["BLU (Blue)"]
    G["Title Colour Selector Button"] --> H["BLK (Black)"]
    G --> I["GRN (Green)"]
    G --> J["CYN (Cyan)"]
    G --> K["BLU"]
Selecting the Titling Mode
By repeatedly pressing the Titling Mode Selector Button, the way in which the title is superimposed onto the picture being recorded can be changed in the following order. (This function can also be used while the title is being recorded.)

flowchart
graph TD
    A["NORMAL\nHAPPY\nThe title appears immediately."] --> B["WIPE ↓"]
    B --> C["The title appears from the top."]
    C --> D["↓"]
    D --> E["WIPE ↑"]
    E --> F["The title scrolls in from the bottom."]
    F --> G["↑"]
    G --> H["SCROL UP"]
When pressing the Title Function On/Off Button, the Title is indicated in the selected mode.
- If another title is indicated, press the Title Function On/Off Button to erase it and then indicated a new title again.
Note:
Since the top and bottom edge of the title screen will be cut off, shoot the title so that it is in the center of the screen.
Recording a Title
■ Inserting a Title in the Normal Titling Mode at the Beginning of a Recording
1 Press the Title Function On/Off Button to make the title appear in the EVF.
- Confirm the Colour Indicator and the Title Mode Indicator. At this time, it is possible to change the colour and titling mode for the title.
2 Press the Start/Stop Button to start shooting.
- To stop the superimposition of the title, press the Title Function On/Off Button again.
■ Inserting a Title in the Normal Titling Mode during Recording
1 After having input a desired title into memory, turn the title function off with the Title Function On/Off Button.
2 Press the Start/Stop Button to start shooting.
3 At the point where you want to insert the title, press the Title Function On/Off Button. (The superimposed title can be seen in the EVF.)
- To stop the superimposition of the title, press the Title Function On/Off Button again.
■ Inserting a Title in the Scroll or Wipe Mode at the Beginning of a Recording
Perform the operation steps 1 and 2 above. After pressing the Start-/Stop Button, wait approx. 2 seconds and then press the Title Function On/Off Button.
Other Functions
Memory Search Function
1 Press the Reset Button at the desired point.
●The Tape Counter is reset to "00.00".
2 Press the Display Selector Button.
●The "M" indication appears in the EVF and in the LCD Display.
3 After pressing the Stop Button, press the Rewind/Review Button.
• The tape will stop automatically at about the point where the tape counter reads "00.00".
Tape Counter Indication
At every push of the Display Selector Button, the Counter Indication will change as follows:
Lap Time Counter Indication (Real Tim appears.
Memory appears with Tape Counter Indication
At this time, the remaining tape time is also shown in the LCD Display.

- To delete the counter indication in the EVF, press the On Screen Display Button. To make this indication appear again, press this button once more.
Remaining Tape Time Indication
During recording and playback, the remaining tape time is indicated in minutes. When the remaining tape time becomes less than 2 minutes, the indication will flash.
- It is indicated in the top left corner of the EVF.
Tape Remaining Switch
When using cassette tapes with long recording time (45 minutes in SP mode, 90 minutes in LP mode), set the Tape Selector Switch to the "EC45" position.
When using 30-minute cassette tapes, set the Tape Selector Switch to the "EC30" position.
Index Signal (VISS)
The recording of index signals at the beginning of and during recordings makes possible the use of the VHS Index Search or the Intro Scan function when playing back the tape on a VTR equipped with these functions.
An index signal is recorded when one of the following operations is performed.
- When recording is started for the first time after the Movie Camera is turned on.
- When recording is restarted after the cassette is exchanged or the tape is played back.
In each of these cases, the "INDEX" indication will flash for a few seconds in the EVF.
- When recording index signals, space the signals at least 5 minutes in the LP mode and 2 minutes in the SP mode.
Assemble Editing
Preparation
- Insert a video cassette with intact erasure prevention tab.
- Press the centre part of the Operation Switch and slide it to the "VTR" position.
Operation
1 Play back the tape to locate the point where the new recording is to be joined (Assemble Editing), and press the Pause Button at the desired point.
2 Press the centre part of the Operation Switch and slide it to the "CAMERA" position.
3 Press the Start/Stop Button to start shooting the new scene.
Dubbing (Copying)
Operation
1 Press the Play Button on the Movie Camera to start playback.
2 Press the Record Button on the VTR to start recording.
Note:
The picture quality of a copied tape is inferior to that of the original tape.
- For details, refer to the operating instructions of the recording VTR.
Accessories, etc.
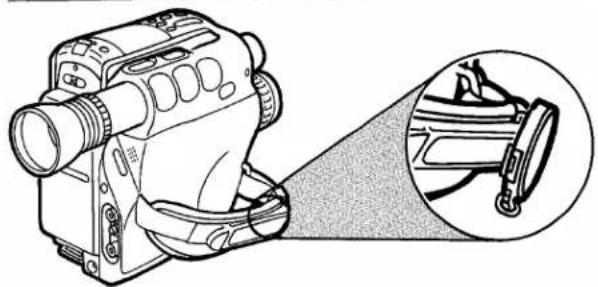
Shoulder Strap
natural_image
Line drawing of a video camera with cable and lens (no text or symbols)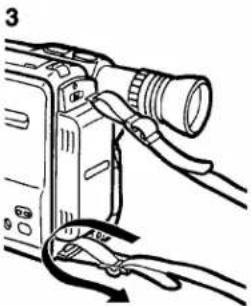
natural_image
Line drawing of a camera with attached cable and lens (no text or symbols)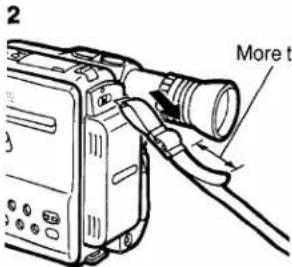
1 Pass the end of the Shoulder Strap through the slit of the Shoulder Strap Holder on the upper part of the rear of the VHS-C Movie.
2 Securely attach the end of the strap.
3 Attach the other end of the Shoulder Strap at the lower part of the rear of the VHS-C Movie in the same way as mentioned above.
Tripod Mount
Bottom side of the Movie Camera
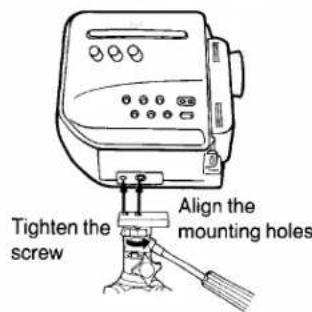

- Place the tripod on a stable surface, with its legs fully spread.
Other Connections
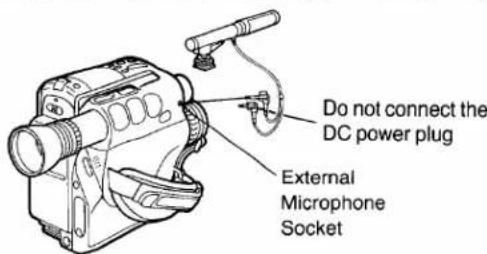
- To attach an external microphone, the L-shaped Shoe Adapter (VW-SK3E; optional) is necessary.
AC Adaptor
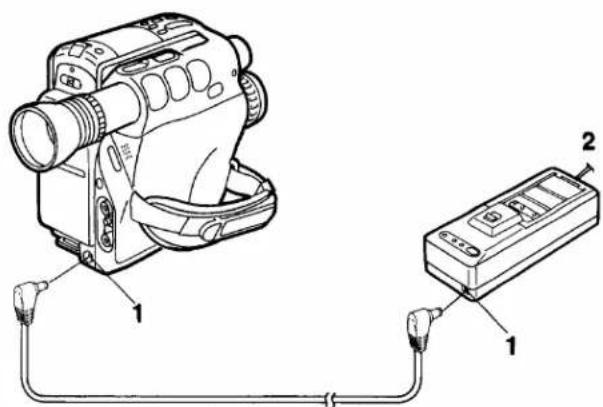
1 Connect the Power Supply Cable from the DC Output Socket on the AC Adaptor to the DC Input Socket on the Movie Camera.
2 Connect to the Mains.
Note:
When a Battery Pack is attached to the AC Adaptor, the Movie Camera cannot be supplied with power.
Car Battery Cord

1 Start the engine and insert the Car Battery Cord into the cigarette lighter socket.
2 Connect the other end to the DC Input Socket on the Movie Camera.
Note:
- The Car Battery Cord can only be used with 12V DC negative-grounded vehicles.
- Do not start the car engine while the Movie Camera is powered by the car battery.
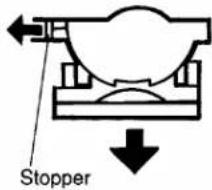
Cassette Adaptor
Loading the Cassette
Before loading the cassette into the Cassette Adaptor, turn the cog wheel in the direction of the arrow to pull in the slack of the tape.
1 Slide the Open Button in the direction of the arrow, and the Compartment Cover will pop open.
2 Insert the Cassette vertically.
3 Close the Compartment Cover firmly.
(Tape loading starts automatically. During loading, do not touch the rotating part on the underside of the Cassette Adaptor.)
4 The Stopper is retracted.
(When the Stopper is completely retracted, the tape loading in the Cassette Adaptor is completed. It can now be inserted into a VHS video recorder.)
Taking Out the Cassette
1 Slide the Open Button in the direction of the arrow.
2 Take out the cassette.
- Pushing the cassette from the underside of the adaptor will make it easier to take it out.
3 Close the Compartment Cover.
How to Load the Battery
1 Slide the Battery Cover upward and remove it.
2 Load one "R6" size battery with the polarities correctly aligned and replace the cover by pushing it down until it locks with a click.
CAUTION FOR BATTERY REPLACEMENT
- If the tape loading time is getting longer, the battery is becoming exhausted. Replace it with a new one.
- Load the new battery with its polarities (+ and -) aligned correctly.
Playback
Preparation
- Insert the recorded cassette.
- Press the centre part of the Operation Switch and slide it to the "VTR" position.
Operations
1 Playback: Press the Play Button.
2 Cue playback: Keep the FF/← Button pressed during playback.
3 Review playback: Keep the 📋/REW Button pressed during playback.
4 Still playback: Press the Pause Button during playback.
• To return to normal playback, press this button again.
5 Press the Stop Button to finish playback.
Fast Forward
Press the FF/◀ Button to rapidly wind the tape forward.
Rewind
Press the ▶/REW Button to rapidly rewind the tape.
Tracking Control
When Picture is distorted by noise bars during playback, the Tracking needs to adjusted.
1 Press both the Tracking ◀ and ▶ Buttons simultaneously.
2 Adjust the Tracking with the Tracking ◀ or ▶ Button.
- When playing back a tape which has been recorded on another movie camera, it may not be possible to completely eliminate this distortion.
- Noise which takes the form of horizontal bars appears in the Cue, Review and Still playback modes. This is not an indication of a malfunction.
- In the Cue, Review and Still modes, the picture may become black and white or distorted. This is not an indication of a malfunction.
Note:
●The sound will be played back only during normal playback.
- Playback: The tape will be rewound automatically when it reaches its end.
- Fast Forward: The tape will be rewound automatically when it reaches its end.
- Rewind: The tape will stop automatically when it reaches its beginning.
- Still Playback: If the Movie Camera is left in this mode for about 6 minutes, it will switch over to the stop mode, to protect the tape and video heads.
Playback via TV Set (Connections)
TV Set with AV Input
Playback on a table Type VTR
Use the Cassette Adaptor.
TV Set without AV Socket
Before connecting the RF Adaptor to the VHS-C Movie, turn the VHS-C Movie off Operation On/Off Switch.
TV
Tune to UHF channel 36.
TV/VTR Selector on the RF Adaptor
VTR: For playing back a cassette
TV: For watching TV.
PAL System Selector
I: For U.K.
G: For continental Europe
After Shooting
natural_image
Line drawing of a vintage-style video camera with a circular dial indicator (no text or symbols)1 Eject the Cassette.
(See page 14 for details.)
2 Set the Operation Switch to the "OFF" position.
3 Remove the Battery Pack.
(See page 13 for details.)
4 Attach the Lens Cap to the lens.
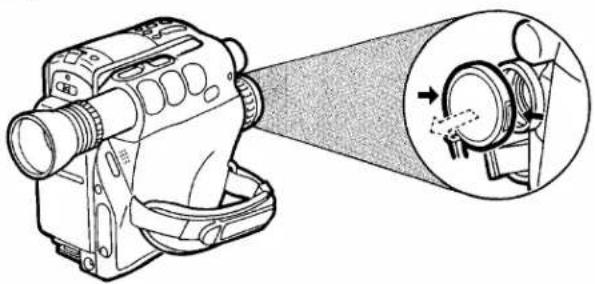
Removing and Attaching the Eyecup
To attach the Finder Adaptor (optional), remove the Eyecup.
Removing the Eyecup
① While pushing back the small knob behind the Eyecup....
② Turn the Eyecup counterclockwise and pull it off.

Attaching the Eyecup
① While pushing back the small knob behind the Eyecup,...
② Align the two marks, insert the Eyecup and turn it clockwise.
3 Return the knob to its original position.
- When attaching the Eyecup, turn the Eyepiece Corrector Control Ring to retract the lens into the Eyecup as shown in the illustration above.
Cautions
Please read these cautions before operating the System.
Video Head Clogging
The video heads are the means by which the System places picture signals on the tape during recording, and reads picture signals from the tape during playback. If these heads become dirty and clogged from long use, the signals can no longer be recorded correctly, and the playback picture will be distorted accordingly. This is the case, for example, during the playback of a tape, the sound of which is reproduced normally, but no picture is seen, or the picture is greatly distorted. When such symptoms occur, have the System checked by qualified service personnel.
The System is equipped with head clogging detection function. When the heads are clogged, the ✗ Indication in the EVF will appear. As the accumulation of dirt on the heads may be dislodged by the movement of the tape, it is possible that this indication sometimes appears, but may not reappear on the next recording starts.
The head clogging detection function will be activated when the shooting is started from the recording pause mode. However, it will not be activated when shooting immediately after replacing the cassette and after performing Camera Search or Playback.
If Condensation Forms Inside the Movie Camera
Condensation (dew) forms when warm air comes in contact with a cold object, for example on a window in a heated room in winter. Condensation may form in the Movie Camera and damage the tape and the video heads, if:
●The System is in a room where the heater has just been turned on.
●The System is in a room with steam or high humidity.
●The System is brought from cold surroundings into a well-heated room.
●The System is suddenly brought from cool surroundings, such as an air-conditioned room or car, to a place which is hot and humid.
- When condensation has formed inside the System, the "DEW"
indication in the EVF will flash (LCD will be lit) and a few seconds later, the unit will turn itself off to protect the tape and the video heads.
After a while, turn the unit on again and make sure that the Dew Mark is not displayed any more. Then, wait about 1 hour before operating the System again. Depending on the surrounding conditions, it may take several hours before the System can be used again.
- As condensation forms gradually, it may take about 10–15 minutes before the System turns itself off after a change of working environment.
- In an extremely cold place, condensation may freeze and turn into frost. In this case, it may take quite some time for the frost to melt, turn into dew and evaporate.
- When you bring the System from a very cold place, e.g. the ski slopes, into a heated room, keep it in a tightly closed plastic bag or similar to prevent condensation from forming inside the System.
Keep the System away from Oily Smoke and Steam
Protect the System from Humidity and dust
Surrounding Conditions
Use the System under conditions where the temperatures are between 0^ C and 40^ C, and where the humidity is between 20% and 80%. To avoid deformation of the outer case or other damage, do not leave it exposed to direct sunlight for any length of time, also never leave it in a closed automobile.
Keep the System away from Heaters
Keep the System away from TV Sets
Do not place the System near a TV set because it might impair the picture and sound quality of the recorded tape, and/or adversely affect the performance of the Movie Camera.
Keep Magnets away
Never bring a magnet or magnetized object such as fluorescent lamps, motors, electric clocks and battery operated toys etc. close to the System.
Keep the System away from Areas with Strong Electric Fields
The picture may become distorted, when the System is used in places with strong electric fields, such as near TV or radio antennas.
Never Put any Objects Inside
Never insert any object other than a video cassette into the System. If any object is dropped into it or if any liquid is spilled into it, consult qualified service personnel. Operating it with some foreign matter inside may cause fire or electric shock.
Not Fingers Inside
Touching internal parts of the System is very dangerous and may cause serious damage to the System. Do not attempt to disassemble it. For internal inspection, adjustment or repairs, consult qualified service personnel.
Handle with Care
Never drop the System or expose it to strong physical shocks. Shocks during use may result in abnormal operation and performance.
Appearance of Smear Distortion
Smear distortion is a peculiar characteristic of the CCD device. It appears as a bright vertical stripe on the screen when the System is aimed at spot lights or other bright light and light reflecting objects. To avoid this problem, make sure not to aim the System at such strong light source during shooting.
Cover the Lens with the Cap after Shooting
Keep the System away from Strong light
Do not expose the System to strong light, because the heat from it may cause deformation or other damage.
When the System Is Not Being Used
Remove the video cassette and turn the System off with the Operation On/Off Switch.
Never Place the System with the Cassette Compartment Side Facing Down
Never use the System with the cassette compartment facing down as this might cause uneven winding and slacking of the tape.
Cleaning the Movie Camera
Wipe the Movie Camera with a clean, dry cloth. Never use cleaning fluid, or other chemicals.
- Clean the lens only with a blower brush (used for photo cameras) or a special lens cleaning tissue (used for glasses and cameras).
For Handgrip
When using this Movie Camera for a long period, the grip portion will get a little hot. However, this is normal and has no effect on the operation.
For Cassette Adaptor
- Do not insert this Cassette Adaptor into a VTR and take it out again without running the tape, because this could cause the tape to get loose.
- When loading the cassette into the Cassette Adaptor, be careful not to touch the tape directly. After use, take out the cassette from the Cassette Adaptor.
- Never insert the Cassette Adaptor into a VTR without a video cassette in it.
For AC Adaptor
- Do not place heavy objects on the unit.
- When unplugging the main cord or other connection cords, be sure to grasp the plug, not the cord.
- When listening to a radio while the AC Adaptor is in operation, the radio reception may be distorted. In this case, move the radio away from the AC Adaptor.
For Battery Pack
Be sure to charge the Battery Pack before using it.
Pay attention to the following points to avoid danger.
- Do not throw the Battery Pack into fire.
- Do not short-circuit the poles of the connector.
- Do not disassemble or reconstruct the Battery Pack.
- Use only the supplied AC Adaptor to charge the Battery Pack.
Follow the instructions below to avoid damage to the Battery Packs or reduction of their service life.
●Never subject the Battery Pack to strong shocks or drop it.
- Do not recharge a Battery Pack that is already fully charged.
- During operation of the System or during recharging, the Battery Pack may become warm however this does not pose any problem.
- The service life of a Battery Pack has its limits. If the operation time of a Battery Pack in spite of normal recharging becomes so short that its normal use for shooting is no longer possible, it should be replaced with a new one.
The function of the Battery Pack is based on a chemical reaction. Use it according to its characteristics.
- Charge the Battery Pack within a temperature range of 10^ - 35^ . If charged at lower temperatures, the chemical reaction cannot take place optimally, causing the performance of the Battery Pack to deteriorate. At higher temperatures, the Battery Pack cannot be charged completely.
- Store the Battery Pack in cool and dry place. If exposed to high temperatures for a long time, the battery life will be shortened and the self-discharging process will be increased.
- Charge the Battery Pack before using it because self-discharging may occur if it has not been used for a long period of time.
- When not using the Battery Pack, remove it from the Movie Camera or the AC Adaptor.
For Auto Focus
The Auto Focus System will not provide stable and accurate focus adjustment if you are shooting:
- A subject behind dirty glass.
- Shiny surfaces.
- A subject with a part of it near and another part far from the Movie Camera.
- An oblique subject.
- A subject with horizontal stripes.
- A flat surface, e.g. a white wall.
- With the macro close-up function, special lenses or filters.
- A fast-moving subject.
- A subject having a dark surface.
In these cases, use manual focusing.
Note:
This Auto Focus System does not measure the actual distance but adjusts the lens to the optimum focusing condition based on the video signal. Therefore, the distance setting on the lens may be different from the actual distance in some cases. However, this is not an indication of a malfunction.
For White Balance
The Auto White Balance Adjustment may not be accurate when:
- When shooting under mercury-vapor, natrium or some types of fluorescent lamps.
- When intense lighting is used, e.g. from a halogen lamp, or when the colour temperature of the light source is low.
- When shooting a subject of a single colour or a subject in front of a single-colour background.
-
When shooting outdoors at sunrise or sunset.
-
When using a gray filter (ND) or other special filters.
- When using a conversion lens.
- When using the Movie Camera under weak illumination.
In these cases, use the manual white balance adjustment mode.
If it is moved from outdoors to indoors during recording, the picture will initially take on a slightly reddish cast but it will gradually regain its natural colours.
For High Speed Shutter
The following conditions are required for shooting with the High Speed Shutter function:
●The subject must be brightly lit, with little shade, under sunlight or some other illumination.
- If shooting under the illumination produced by fluorescent lamps, the picture will be adversely influenced by flickering.
- If the picture is played back in the normal playback mode, the movements may appear to be not very smooth.
●The playback picture will be slightly darker than the picture recorded without using the High Speed Shutter function.
Before Requesting Service
Power Source
●The power does not turn on.
—Is the power supply unit correctly connected to the Movie Camera?
●The power turns on, but it turns off again immediately.
—If the Battery Pack is exhausted, replace it with a fully charged one.
—If condensation has formed, wait until it has dissolved.
Camera Recording
●The power is on, but no picture appears in the EVF.
—Is the lens covered with the lens cap?
●Camera recording cannot be performed.
—If the tab of the cassette is broken out, cover the tab hole with adhesive tape.
●The picture is not clear.
—Is the eyepiece correctly adjusted to your eyesight?
—Is the lens surface dusty?
●The Auto Focus System does not provide optimum focus adjustment.
When the focusing precision is not satisfactory in the Auto Focus mode, press the Focus Button and adjust the focus manually.
Playback
● No playback picture is reproduced.
—Is the connection to the TV set correct?
—Is the TV set tuned to the video playback channel?
●The colours are not correct.
—Is the colour adjustment of the TV set correct?
●The playback picture is not in colour.
—Adjust the Tracking.
—If the tape is old, use a new tape.
Specifications
| NV-S1B Information for your safety | ||
| Power Source: | DC 6 V | |
| Power Consumption: | Recording mode; 7.8 W (Battery Operation)Camera search mode; 8.4 W (Battery Operation) | |
| Video Recording System: | Rotary four heads, helical scanning system | |
| Tape Speed: | SP; 23.39 mm/sLP; 11.7 mm/s | |
| Tape Format: | VHS-C tape | |
| Recording/Playback Time: | 45 min. with NV-EC45E (SP)90 min. with NV-EC45E (LP) | |
| VIDEO | ||
| Television System: | CCIR; 625 lines, 50 fields PAL colour signal | |
| Modulation System: | Luminance; FM azimuth recordingColour signal; Coverted subcarrier phase shift recording | |
| Output Level: | VIDEO OUT (PHONO); 1.0 Vp-p, | 75 ohm unbalanced |
| AUDIO | ||
| Output Level: | AUDIO OUT (PHONO); -8 dB, | 600 ohm unbalanced |
| Audio Track: | 1 track (Normal-Mono) | |
| Image Sensor: | 13 -inch CCD Image Sensor | |
| Lens: | 6:1 Power Zoom Lens with Digital AI Auto FocusFocas Length 6.7–40 mmF1.4Auto IrisFilter Diameter 27 mm | |
| Viewfinder: | 23 -inch Electronic Viewfinder | |
| Standard Illumination: | 1.400 lux | |
| Minimum Required | ||
| Illumination: | 5 lux | |
| Video Horizontal | ||
| Resolution Colour: | VHS; More than 230 lines | |
| Signal-to Noise Ratio: | Video; More than 40 dBAudio; More than 41 dB (A-WTD) | |
Audio Frequency
Response:
Normal; 80–8,000 Hz (SP)
Operating Temperature:
0^ C-40^ C
Operating Humidity:
20%-80%
Weight:
Approx. 780g (without Battery Pack)
Dimensions:
95.3 (W)×133 (H)×145 (D) mm
VW-AS1B
Information for your safety
Power Source:
AC 100–240 V, 50–60 Hz (Automatic voltage adjustment)
Power Consumption:
25 W
DC Output:
DC 6 V 1.8 A (Movie Camera)
DC 6 V 1.3 A (Battery Pack charging)
Weight:
Approx. 0.45 kg
Dimensions:
70 (W)×58 (H)×178 (D) mm
Weight and dimensions shown are approximate.
Specifications are subject to change without notice.
"THE LITHIUM BATTERY IS A CRITICAL COMPONENT (TYPE NUMBER CR2032 MANUFACTURED BY PANASONIC).
IT MUST NEVER BE SUBJECTED TO EXCESSIVE HEAT OR DISCHARGE. IT MUST THEREFORE ONLY BE FITTED IN EQUIPMENT DESIGNED SPECIFICALLY FOR ITS USE.
REPLACEMENT BATTERIES MUST BE OF THE SAME TYPE AND MANUFACTURER. THEY MUST BE FITTED IN THE SAME MANNER AND LOCATION AS THE ORIGINAL BATTERY, WITH THE CORRECT POLARITY CONNECTIONS OBSERVED.
DO NOT ATTEMPT TO RE-CHARGE THE OLD BATTERY OR RE-USE IT FOR ANY OTHER PURPOSE. IT SHOULD BE DISPOSED OF IN WASTE PRODUCTS DESTINED FOR BURIAL RATHER THAN INCINERATION."

Printed in Japan
VQT3908
Matsushita Electric Industrial Co., Ltd.
Central P.O. Box 288, Osaka 530-91, Japan
- Panasonic
- Contents
- HQ (High Quality) Picture System
- IMPORTANT
- WARNING
- FOR YOUR SAFETY
- Easy Operations
- Controls and Components
- Indications in the Electronic Viewfinder (EVF)
- Warning/Alarm Indications
- END
- Remaining Battery Power/Index Indication
- Counter Indication
- Tape Remaining Indication
- Digital Memory Indication
- Time Indication
- Date Indication
- Tape Running Indications
- Manual White Balance Indication
- Recording Mode Indications
- High Speed Shutter Mode Indications
- Focus Mode Indication
- Indications in the LCD Display
- Accessories
- Standard Accessories
- Optional Accessories
- Battery Pack
- Charging
- Note:
- Attaching
- Caution:
- Charging Confirmation Marker on the Battery Pack
- Video Cassette
- Inserting the Video Cassette
- Before Inserting the Cassette
- Removing a Video Cassette
- Setting the Clock
- How to Insert the Battery for the Clock Operation
- CAUTION FOR BATTERY REPLACEMENT
- Recording the Date/Time Indications
- EVF, Lens Cap and Grip Belt
- Pulling out the EVF
- Removing the Lens Cap
- Eyepiece
- Eyepiece Corrector
- Camera Recording
- To Start Recording
- To Stop Recording
- Rec Review
- Camera Search
- Recording Lock Function
- Focus
- Continuous Auto Focus
- Macro Close-Up
- Practical Hint for Shooting
- White Balance
- Manual White Balance Adjustment
- High Speed Shutter
- For Playback
- Zooming
- Power Zooming
- Fade-In and Fade-Out
- Fade-In
- Fade-Out
- Image Stabilizer Function
- Still Picture and Strobe Recording Functions
- Snapshot Recording
- Snapshot
- Recording Titles
- Inputting a Title into Memory
- ■ Remarks about Titling
- Selecting the Colour of a Title
- Selecting the Titling Mode
- ■ Inserting a Title in the Normal Titling Mode at the Beginning of a Recording
- Other Functions
- Memory Search Function
- Tape Counter Indication
- Remaining Tape Time Indication
- Tape Remaining Switch
- Index Signal (VISS)
- Assemble Editing
- Preparation
- Operation
- Dubbing (Copying)
- Accessories, etc.
- Cassette Adaptor
- Loading the Cassette
- Taking Out the Cassette
- How to Load the Battery
- Playback
- Operations
- Fast Forward
- Rewind
- Tracking Control
- Playback via TV Set (Connections)
- Playback on a table Type VTR
- TV Set without AV Socket
- After Shooting
- Removing and Attaching the Eyecup
- Removing the Eyecup
- Attaching the Eyecup
- Cautions
- Video Head Clogging
- If Condensation Forms Inside the Movie Camera
- Keep the System away from Oily Smoke and Steam
- Protect the System from Humidity and dust
- Surrounding Conditions
- Keep the System away from Heaters
- Keep the System away from TV Sets
- Keep Magnets away
- Keep the System away from Areas with Strong Electric Fields
- Never Put any Objects Inside
- Not Fingers Inside
- Handle with Care
- Appearance of Smear Distortion
- Cover the Lens with the Cap after Shooting
- Keep the System away from Strong light
- When the System Is Not Being Used
- Never Place the System with the Cassette Compartment Side Facing Down
- Cleaning the Movie Camera
- For Handgrip
- For Cassette Adaptor
- For AC Adaptor
- For Battery Pack
- The function of the Battery Pack is based on a chemical reaction. Use it according to its characteristics.
- For Auto Focus
- For White Balance
- For High Speed Shutter
- Before Requesting Service
- Power Source
Marke : PANASONIC
Modell : NV-S1B
Kategorie : Camcorder