
NV-MS70B - Camcorder PANASONIC - Kostenlose Bedienungsanleitung
Finden Sie kostenlos die Bedienungsanleitung des Geräts NV-MS70B PANASONIC als PDF.


| Produkttyp | Camcorder |
| Marke | Panasonic |
| Modell | NV-MS70B |
| Abmessungen (ca.) | 100 mm x 100 mm x 200 mm |
| Gewicht (ca.) | 1,0 kg (ohne Akku und Kassette) |
| Stromversorgung | 12 V Gleichstrom (Netzteil) oder Akku |
| Bildaufnahmeformat | VHS |
| Objektiv | Autofokus-Zoomobjektiv |
| Zoom | Optischer Zoom (ca. 6x) |
| Sucher | Elektronischer Sucher (E.V.F.) |
| LCD-Bildschirm | Nicht vorhanden (nur Sucher) |
| Bildstabilisator | Nicht vorhanden |
| Aufnahmequalität | Standard VHS (SP/LP) |
| Ton | Mono-Ton (Hi-Fi Audio optional) |
| Anschlüsse | Videoausgang (RCA), Audioausgang (RCA), Mikrofoneingang |
| Fernbedienung | Optional |
| Entladung | Akku: Ni-Cd (ca. 1 Stunde Betriebszeit) |
| Wartung | Reinigung des Videokopfes mit spezieller Reinigungskassette |
| Sicherheitshinweise | Nicht in feuchter Umgebung verwenden; Netzteil trocken halten |
| Ersatzteile und Reparierbarkeit | Ersatzteile über Fachhändler beziehbar |
Häufig gestellte Fragen - NV-MS70B PANASONIC
Benutzerfragen zu NV-MS70B PANASONIC
0 Frage zu diesem Gerät. Beantworten Sie die, die Sie kennen, oder stellen Sie Ihre eigene.
Eine neue Frage zu diesem Gerät stellen
Laden Sie die Anleitung für Ihr Camcorder kostenlos im PDF-Format! Finden Sie Ihr Handbuch NV-MS70B - PANASONIC und nehmen Sie Ihr elektronisches Gerät wieder in die Hand. Auf dieser Seite sind alle Dokumente veröffentlicht, die für die Verwendung Ihres Geräts notwendig sind. NV-MS70B von der Marke PANASONIC.
BEDIENUNGSANLEITUNG NV-MS70B PANASONIC
Panasonic
S-VHS-Compact Movie
NV-MS70B
Operating Instructions

VHS PAD
Before attempting to connect, operate or adjust this product, please read these instructions completely.
VOT3803
Contents
Easy Operations
Preparation
- Controls and Components .... 5
- Indications in the Electronic Viewfinder (EVF)
●Indications in the LCD Display 10
-Accessories 11
●Battery Pack 12
●Video Cassette 13 - Setting The Clock 14
•Operation Selector Switch 16
Basic Operation
- Camera Recording 17
●Playback 18
●Playback via TV Set (Connections) 19
Editing
●Assemble Editing 20
- Insert Editing 21
●Audio Dubbing 22
- Dubbing (Copying) 23
Shooting Techniques
●Focus 24
- Iris 24
- White Balance 25
●High Speed Shutter 25
- Zooming 26
- Macro Close-Up 26
●Fade-In and Fade-Out 26
-Recording Titles 27
●Electronic Viewfinder 31
Other Functions
●Recording Speed Selector 32
●Memory Search Function 32
- Counter Indication 32
●Remaining Tape Time Indication 32
-Filter Selector 32
Accessories etc.
-Shoulder Strap 33
●Tripod Mount 33
●Other Connections 33
- AC Adaptor 34
●Car Battery Cord 34
- Character Generator 35
●Handgrip 35
•VITC Signals 36
•Cassette Adaptor 40
Others
●S-VHS Format 41
●Hi-Fi (Stereo) Sound 41
●Index Signal (VISS) 41
Cautions
Before Requesting Service 42
Specifications 48
HQ (High Quality) Picture System
Video recorders carrying the HQ symbol mark feature the new VHS High Quality Picture System. This system assures complete compatibility with VTRs that use the conventional VHS system.
IMPORTANT
Your attention is drawn to the fact that recording of pre-recorded tapes or discs or other published or broadcast material may infringe copyright laws.
WARNING
TO REDUCE THE RISK OF FIRE OR SHOCK HAZARD, DO NOT EXPOSE THIS EQUIPMENT TO RAIN OR MOISTURE.
S-VHS-C Movie NV-MS70
●The rating plate is on the bottom side of the Movie Camera.
AC Adaptor VW-AS1
●The rating plate is on the bottom side of the unit.
•This apparatus was produced to BS800.
FOR YOUR SAFETY
■ DO NOT REMOVE THE OUTER COVER.
To prevent electric shock, do not remove the cover. No user serviceable parts inside. Refer servicing to qualified service personnel.
■ AC MAINS LEAD CONNECTION.
(VW-AS1B U.K. model only.)
The wires in the mains lead of this apparatus are coloured in accordance with the following code.

As the colours of the wires in the mains lead may not correspond with the coloured markings identifying the terminals in your plug, proceed as follows: The wire which is coloured BLUE must be connected to the terminal which is marked with the letter N or coloured BLACK. The wire which is coloured BROWN must be connected to the terminal which is marked with the letter L or coloured RED.
Under no circumstances must either of the above wires be connected to the earth terminal of a three pin plug.
Easy Operations
Camera Recording
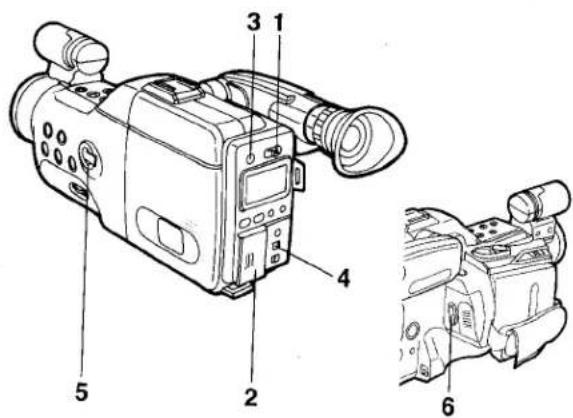
1 Turn the Movie Camera on.
2 Slide the Camera/VTR Selector Cover close so that it covers the Tape Running Buttons.
3 Insert a Video Cassette.
4 Set the Recording Speed Selector to "SP" or "LP".
5 Set the Operation Selector Switch to "AUTO LOCK".
6 Press the Start/Stop Button.
- Recording starts.
- Press this button again to stop recording.
Playback

1 Turn the Movie Camera on.
2 Insert the recorded cassette.
3 Slide the Camera/VTR Selector cover open so that the Tape Running Buttons become accessible.
4 Press the Play Button.
-Playback starts.
- Press the Stop Button to stop playback.
Controls and Components

| No. | Name | Page |
| 1 | Built-in Stereo Microphone | |
| 2 | Title Function On/Off Button | 27 |
| 3 | Titling Mode Selector Button | 28 |
| 4 | Title Color/Color Reverse Selector Button | 28 |
| 5 | Memory Button | 27 |
| 6 | Date/Time Selector | 15 |
| 7 | Accessory Shoe | 33 |
| 8 | Eyepiece Corrector Control | 31 |
| 9 | Electronic Viewfinder | 31 |
| 10 | White Cap | 17 |
| 11 | Lens Hood | |
| 12 | Manual Focus Control | 21 |
| 13 | Push Auto/Zone Selector Button | 24 |
| 14 | Focus Mode Selector Button | 24 |
| 15 | Fade Button | 26 |
| 16 | High Speed Shutter Selector | 25 |
| 17 | Iris Close/Open Control | 24 |
| 18 | White Balance Button | 25 |
| 19 | Operation Selector Switch | 16 |
| 20 | Cassette Compartment | 13 |

| No. | Name | Page |
| 21 | Edit Switch | 23 |
| 22 | Tracking/Date/Time Shift Button | 18 |
| 23 | Tracking/Date/Time Set Button | 18 |
| 24 | Audio Selector Switch | 18 |
| 25 | Digital Tracking Switch | 18 |
| 26 | Power Zoom Control Buttons | 26 |
| 27 | Filter Selector | 32 |
| 28 | External Microphone Socket | 33 |
| 29 | General Operation Control | 7 |
| 30 | Shoulder Strap Holders | 33 |
| 31 | Video Output Socket | 19 |
| 32 | RF DC Output Socket | 19 |
| 33 | Character Generator Socket | 35 |
| 34 | Edit Socket | 33 |
| 35 | Audio Output Socket (L) | 19 |
| 36 | Headphones Socket | 33 |
| 37 | Audio Output Socket (R) | 19 |
| 38 | Remote Control Socket | 33 |
| 39 | DC Input Socket | 34 |
| 40 | S-Video Output Connector | 19 |
| 41 | Recording Start/Stop Button | 17 |
| 42 | On Screen Display Button | 32 |
| 43 | Tripod Mount | 33 |
| 44 | Battery Compartment for Auto Date/Clock | 14 |
| 45 | Battery Holder | 12 |
| 46 | Battery Eject Lever | 12 |
| 47 | Grip Belt | 17 |
29 General Operation Controls

| No. | Name | Page |
| 1 | Eject Button | 13 |
| 2 | LCD Display | 10 |
| 3 | Fast Forward/Cue Button | 18 |
| 4 | Rewind/Review Button | 18 |
| 5 | Play Button | 18 |
| 6 | Stop Button | 18 |
| 7 | Pause/Still Button | 18 |
| 8 | Audio Dubbing Button | 22 |
| 9 | Insert Button | 21 |
| 10 | Operation On/Off Switch | 17 |
| 11 | Display/Memory Button | 21 |
| 12 | Reset Button | 32 |
| 13 | Tape Selector Button | 32 |
| 14 | Recording Speed Selector | 32 |
| 15 | S-VHS System Selector | 41 |
| 16 | Camera/VTR Selector Cover | 17 |
16 Function of the Camera/VTR Selector Cover
| Closed | For camera recording. |
| Open (as illustrated) | For other operations than camera recording. |
Indications in the Electronic Viewfinder (EVF)
The following indications are displayed in the Electronic Viewfinder (EVF) to inform you of the conditions of the Movie Camera.
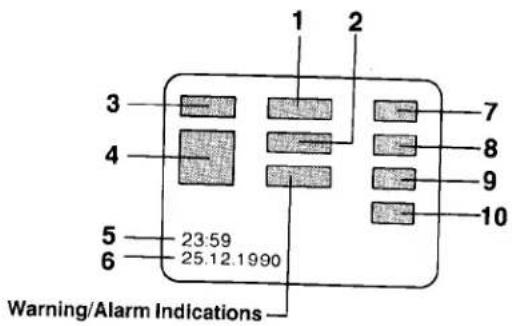
Warning/Alarm Indications

There is little battery power left. Movie Camera will be turned off in a few minutes. Replace the battery pack by a fully recharged one.

It is impossible to record because the erasure prevention tab of the cassette is not intact.
END
During recording, the tape has almost reached its end. Replace the tape with a new one. The indication will remain lit when the tape has reached its end.

When condensation has formed inside the Movie Camera, the "DEW" indication will flash and a few seconds later, the unit itself off.

Video Head Clogging (see page 42.)

When the Battery for Title Memory and Auto Date is not inserted, the indication will flash for 10 seconds after the Movie Camera is turned on.
1 Remaining Battery Power/Index Indication
E--F The “—” indications begin to disappear from right to left as the power of the Battery Pack weakens. INDEX This indication flashes when a recording is started and it indicates that an index signal is being recorded.
2 Counter Indication
M1:23.45 Lap Time Counter
3 Tape Remaining Indication
4 Digital Memory Indication
WHT Colour Indication
WIPE ↑ Mode Indication (No indication in normal mode.)
5 Time Indication
6 Date Indication
7 Tape Running Indications
REC Recording mode
PAUSE Recording Pause mode, Rec Review
Play mode. Camera Search (In forward direction)
Still mode
Fast Froward/Cue mode
≤1≤1 Rewind/Review mode, Camera Search (In reverse
direction)
INST▷ Insert Editing mode
INSTII Insert Editing Pause mode
A.DUB▷ Audio Dubbing mode
A.DUBII Audio Dubbing Pause mode
8 Manual White Balance Indication

W.SET Manual Mode, Hold Mode
9 S-VHS System Indications | Recording Mode Indications
S-VHS System
“ ” VHS System
SP SP mode
LP LP mode
10 High Speed Shutter Mode Indications
1/250 1/250 sec.
1/500 1/500 sec.
1/1000 1/1000 sec.
- Some of the above indications may light up alternately at the same place in the EVF to indicate the corresponding operating condition or warnings.
Indications in the LCD Display
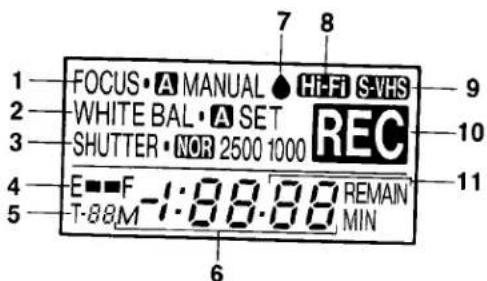
1 Focus Mode Indications
A: Auto Focus
MANUAL: Manual Focus
2 White Balance Indications
A: Auto
SET: Manual mode
3 Shutter Speed Indications
NOR: Normal Speed
250: 1/250 sec.
500: 1/500 sec.
1000: 1/1000 sec.
4 Remaining Battery Power Indications
The “—” indications begin to disappear from right to left as the power of the Battery Pack weakens.
5 Cassette Display
6 Counter Indications
M1:23.45 Lap Time Counter
7 Dew Indication (♦)
8 Hi-Fi Indications
9 S-VHS Mode Indication
10 Recording Indication
11 Tape Remaining Indication
Accessories
Standard Accessories
AC Adaptor
Battery Pack
RF Adaptor
Cassette Adaptor
Shoulder Strap
Carrying Bag
BNC/PHONO Adaptor Plug
Audio/Video Cable
Coaxial Cable
DC Input Cable
S-Video Cord
Battery for Cassette Adaptor Operation
Battery for Clock Operation
Optional Accessories
Car Battery Cord (VW-ACC11E)
Pause Remote Control Unit (VW-RM1)
Character Generator (VW-CG2)
Handgrip (VW-GPC1E)
VITC Generator (VW-VG1E)
VITC Editing Controller System (VW-EC10E)
Editing Controller (VW-EC300E)
Information for your safety.
CAUTION: TO REDUCE THE RISK OF FIRE OR SHOCK HAZARD AND ANNOYING INTERFERENCE, USE THE RECOMMENDANCE ACCESSORIES ONLY.
Battery Pack
Charging
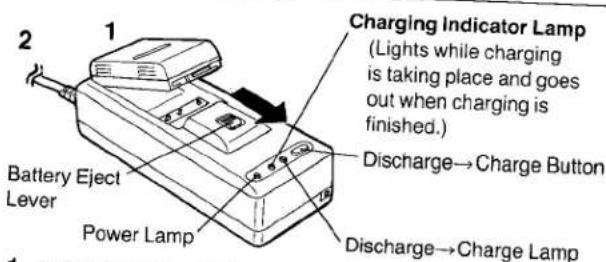
1 Attach the Battery Pack.
2 Connect the AC Adaptor to the Mains.
Note:
• The charging takes about 60 minutes.
• The Movie Camera can be used continuously for approx.
40 minutes with a fully charged Battery Pack.
When the charging is completed, slide the Battery Eject Lever in the direction of the arrow and remove the Battery Pack.
■ Discharge→Charge function
The Battery Pack can be recharged for repeated use. However, if it is recharged repeatedly while there is still some charge left, its charging capacity will be gradually reduced. Therefore, if you often need to recharge semi-discharged Battery Packs, attach the Battery Pack to the AC Adaptor, connect the AC Adaptor Mains, and press the Discharge→Charge Button to completely discharge the Battery Pack. (The Discharge→Charge Lamp will light up, and when the discharging is finished, the Charging Indicator Lamp will light up instead.) This will increase the charging capacity and extend the operating life of the Battery Pack. Therefore, if the operating life of the Battery Pack becomes noticeably shorter, refresh it. (It is recommended to refresh the Battery Pack approx. once every five rechargings.)
Attaching

Battery Eject Lever

1 Align the grooves of the Battery Pack and the Movie Camera
2 Insert the Battery Pack until it locks with a click.
• To remove the Battery Pack, slide it to the front while keeping the Battery Eject Lever pressed.
Caution:
- Wait about 10 seconds after turning the Movie Camera off, before removing the Battery Pack.
- If the Battery Pack is removed during recording or playback, the tape remains wound around the video head cylinder and could become damaged.
Video Cassette
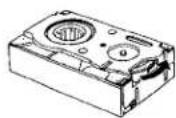

Inserting the Video Cassette
Before Inserting the Cassette
Make sure that the tape is not loose. If it is loose, pull it in by turning the cog wheel on the side of the cassette in the direction of the arrow.
1 Press the Eject Button.
2 Insert the video cassette into the cassette compartment with its window facing outside.
3 Push the cassette compartment cover inward, until it locks with a click.
Removing a Video Cassette
1 Press the Eject Button.
2 Pull out the video cassette.
3 Push the cassette compartment cover inward, until it locks with a click, to close the cassette compartment.
Note:
- Use S-VHS-C/VHS-C video cassettes only.
Setting the Clock
How to Insert the Battery for the Clock Operation
1 Remove the lid.

natural_image
Technical line drawing of a mechanical device with a screwdriver and adjustment knob (no text or symbols)2 Insert the "CR2032" size battery with polarities (+ and -) aligned correctly and then replace the lid.

natural_image
Technical line drawing of a mechanical device with an inset close-up showing a component (no text or symbols)Note:
- This battery is necessary for the Date & Time, Title, S-VHS and White Balance modes to be memorized by the Movie Camera.
- If the battery is not inserted or if it is exhausted, the indication "BACKUP" in the EVF will flash for approximately 10 seconds when turning the Movie Camera on.
- When replacing the battery while the Time & Date Indications are still correct, connect the Movie Camera to the AC Adaptor for the duration of the battery replacement so that the time will remain unchanged.
CAUTION FOR BATTERY REPLACEMENT
- The life of the battery is about one year. Inspect and if necessary, replace the Battery once a year.
- Load the new battery with its polarities (+ and -) aligned correctly.
- Remove spent battery immediately and dispose of it.
- Do not try to short-circuit, recharge or heat the battery and do not throw it into a fire.
Setting of the Date and Clock
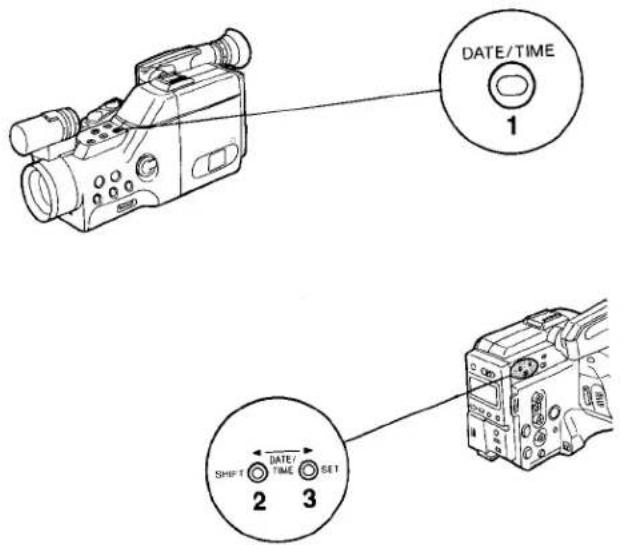
1 When the Date/Time Selector Button is pushed, the indication shown on the right will appear in the EVF.
- If no battery is inserted, the indication "BACKUP" will light up.

2 When the Shift Button is kept pressed for more than about 2 seconds, the "Year" portion will start to flash. Then, at every press of the shift Button, the items to be set will flash in the following sequence.
Year→Month→Date→Hour→Minute→Year→...
3 When the Set Button is pushed, the flashing portion displayed will be changed in the following sequence.
| YEAR: | 1990→1991→ | →2089→1990→ |
| MONTH: | 1→2→ | →12→1→ |
| DATE: | 1→2→ | →31→1→ |
| HOUR: | 0→1→ | →23→0→ |
| MINUTE: | 00→01→ | →59→00→ |
- Repeat procedures 2 and 3 until all items have been set.
- Once the time and date are set, press the Shift Button in response to a precise time signal so hat the clock may begin to function.
Recording the Date/Time Indications
When the Date/Time Selector is pushed repeatedly, the indications will change in the following sequence:
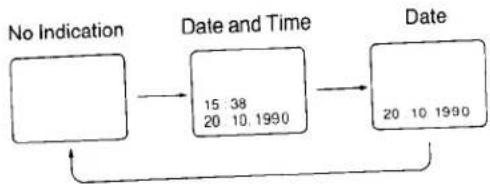
flowchart
graph LR
    A["No Indication"] --> B["Date and Time"]
    B --> C["Date"]
    B --> D["15:38\n20:10, 1990"]
    C --> E["20:10, 1990"]
Operation Selector Switch
When the Operation Selector Switch is set to the "AUTO" or "AUTO LOCK" position, some functions cannot be operated.

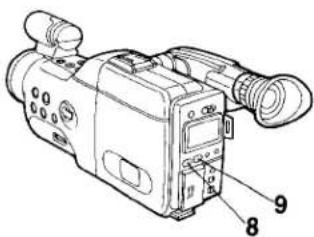
Operation Modes and Usable Functions
When the Operation Selector Switch is set to the "AUTO LOCK" or "AUTO" position, the controls and functions marked with "No" cannot be operated. When using this Movie Camera for the first time, use it with the Operation Selector Switch set to "AUTO LOCK"
- When starting to shoot in a hurry, setting to either of these positions will prevent mistaken operations.
- This switch has nothing to do with operation modes other than those connected with shooting.
| Operation Buttons | Operation Selector Switch | ||
| MANUAL | AUTO | AUTO LOCK | |
| 1 Title Function On/Off Button | Yes | Yes | No |
| 2 Fade Button | Yes | Yes | No |
| 3 Date/Time Selector | Yes | Yes | Yes |
| 4 Focus Adjusting Button Manual Focus Volume | Yes | No (Auto) | No (Auto) |
| 5 High Speed Shutter Selector | Yes | No (Normal) | No (Normal) |
| 6 iris Close/Open Control | Yes | No (Auto) | No (Auto) |
| 7 White Balance Button | Yes | No (Auto) | No (Auto) |
| 8 Rewind/Review Button | Yes | Yes | No |
| 9 Fast Forward/Cue Button | Yes | Yes | No |
Camera Recording
To Start Recording
1 Slide the Operation On/Off Switch to the right to turn the Movie Camera on.
2 Slide the Camera/VTR Selector Cover close so that it covers the Tape Running Buttons.
3 Insert a video cassette with the erasure prevention tab intact.
• After a few seconds, the Movie Camera will be in the recording pause mode.
4 Set the Recording Speed Selector to "SP" or "LP".
5. Set the Operation Selector Switch to "AUTO LOCK".
6. Place the Movie Camera in the shooting position.
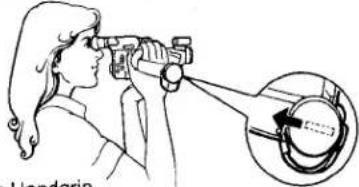
natural_image
Illustration of a person using a telescope to observe a circular object, with no visible text or symbols.●Grasp the Handgrip.
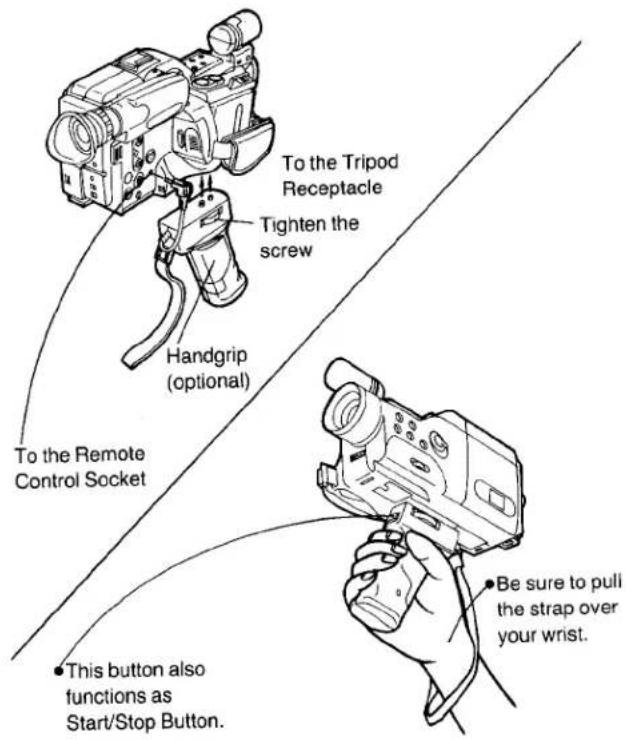
- Adjust the length of the Grip Belt.
- Attach the White Cap to the Grip Belt by inserting it from the end of the Grip Belt.
7 Press the Start/Stop Button.
●The recording starts.
8 Press the Start/Stop Button again to stop the recording temporarily. (Recording pause mode)
To Stop Recording
- Put the Movie Camera in the recording pause mode.
2 Slide the Operation On/Off Switch to the right again to turn the Movie Camera off.
Camera Search
For checking recorded scenes.
- Put the Movie Camera in the recording pause mode.
2 Set the Operation Selector Switch to the "AUTO" or "MANUAL" position.
3 Keep the Camera Search (−) Button pressed to play back a scene at high speed in reverse direction. • The sound is not reproduced.
4 Keep the Camera Search (+) Button pressed to play back a scene at normal speed in forward direction.
Rec Review
For checking the last few seconds of recorded scenes.
- Put the Movie Camera in the recording pause mode.
2 Set the Operation Selector Switch to the "AUTO" or "MANUAL" position.
3 Press the Rec Review Button.
Playback

Preparation
- Slide the Operation On/Off Switch to the right.
- Insert the recorded cassette.
- Set the Edit Switch to "OFF"
- Select the playback sound with the Audio Selector Switch: HiFi: To reproduce the sound on the hi-fi sound track.
NORMAL: To reproduce the sound on the normal sound track. MIX: To reproduce both the sound on the hi-fi and on the normal sound tracks.
- Slide the Camera/VTR Selector Cover open so that the Tape Running Controls become accessible.
Operations
1 Playback: Press the Play Button.
2 Cue playback: Keep the ▶/FF Button pressed during playback.
3 Review playback: Keep the REW/←Button pressed during playback.
4 Still playback: Press the Pause/Still Button during playback.
• To return to normal playback, press this button again.
5 Press the Stop Button to finish playback.
Fast Forward
Press the ▶/FF Button to rapidly wind the tape forward.
Rewind
Press the REW/← Button to rapidly rewind the tape.
Tracking Control
Digital Tracking Switch
Set the Digital Tracking Switch to "ON" for normal use. (The tracking will be adjusted automatically.) If the tracking is not adjusted properly, for example when playing back a tape recorded on another unit, set this switch to "OFF" and adjust in the following way:
1 Press both the Tracking ◀ and ▶ Buttons simultaneously.
2 Adjust the Tracking with the Tracking ◀ or ▶ Button
Note:
- The sound will be played back only during normal playback.
-Playback: The tape will be rewound automatically when it reaches its end. - Fast Forward: The tape will be rewound automatically when it reaches its end.
- Rewind: The tape will stop automatically when it reaches its beginning.
- Still Playback: If the Movie Camera is left in this mode for about 6 minutes, it will switch over to the stop mode, to protect the tape and video heads.
- To ensure optimum sound reproduction, set the Audio Selector Switch to the position "HiFi" for ordinary use.
Playback via TV Set (Connections)
TV Set with AV Input

Playback via S-Video Cable
Connect this cable if the TV set is equipped with an S-Video Input Socket.
Playback on a table Type VTR
Use the Cassette Adaptor.
TV Set without AV Socket

TV
Tune to UHF channel 36.
TV/VTR Selector on the RF Adaptor
VTR: For playing back a cassette
TV: For watching TV.
PAL System Selector
I: For U.K.
G: For continental Europe
Note:
When an RF Adaptor is used, the playback sound will be in mono.
Assemble Editing
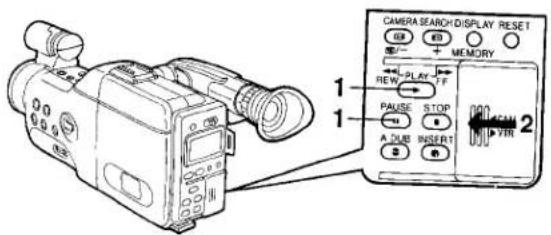
Preparation
- Insert a video cassette with intact erasure prevention tab
- Slide the Camera/VTR Selector Cover open so that the Tape Running Controls become accessible.
Operation
1 Play back the tape to locate the point where the new recording is to be joined (Assemble Editing), and press the Pause/Still Button at the desired point.
2 Slide the Camera/VTR Selector Cover close so that it covers the Tape Running Buttons.
3 Press the Start/Stop Button to start shooting the new scene.
Insert Editing
Replacing pictures and hi-fi sound on a recorded tape with new scenes and sound.

Preparation
- Slide the Camera/VTR Selector Cover open so that the Tape Running Controls become accessible.
- Insert the recorded video cassette with intact erasure prevention tab.
Operation
1 Play back the tape to locate the point where the Insert Editing is to finish, and press the Pause/Still Button at that point.
2 Press the Reset Button, and then the Display/Memory Button.
●The indication "M0:00.00" appears in the EVF and the LCD Display.
3 Press the REW/← Button to locate the point where the Insert Editing is to start, and release the button at that point.
4 Press the Insert Button.
5 Press the Pause/Still Button.
• The Insert Editing starts.
6 The Insert Editing will automatically finish at the point where the counter indicates "M0:00.00".
- To stop the Insert Editing midway, press the Pause/Still Button.
Note:
- As the inserted sound has been recorded on the hi-fi audio track, set the Audio Selector Switch to "HiFi" for playback.
- It is not necessary to set the Recording Speed Selector and the S-VHS System Selector.
Audio Dubbing
Audio Dubbing (replacing the sound on the normal audio track) can be performed by using the built-in microphone or an external microphone.

Operation
1 Insert the recorded cassette.
2 Play back the tape to locate the point where you want to start the Audio Dubbing.
3 Press the Pause/Still Button at that point.
4 Press the Audio Dubbing Button.
5 Operate the audio source unit and then press the Pause/Still Button.
• The Audio Dubbing starts.
6 Press the Stop Button to finish the Audio Dubbing.
Playing Back a Tape on Which Audio dubbing Was Performed
Set the Audio Selector Switch to "NORMAL"
- On the hi-fi track, the original sound remains unchanged.
Dubbing (Copying)
For Playback
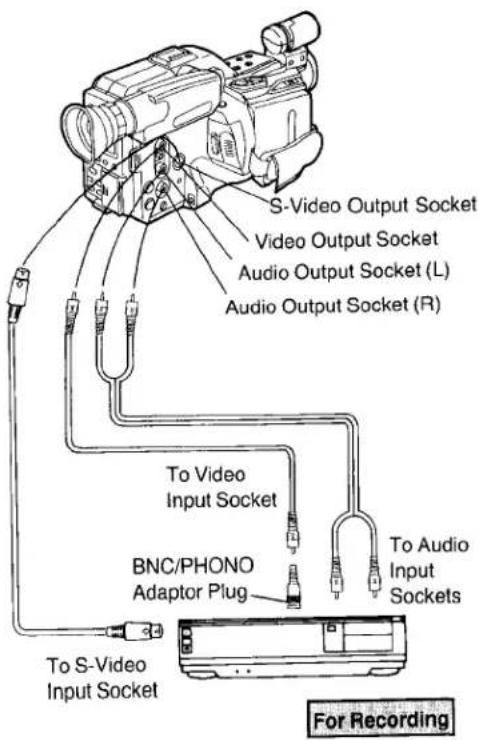
Operation
1 Set the Edit Switch to "ON".
2 Press the Play Button on the Movie Camera to start playback.
3 Press the Record Button on the VTR to start recording.
Note:
The picture quality of a copied tape is inferior to that of the original tape.
Dubbing with the S-Video Cable
Connect this cable, if the recording VTR is equipped with an S-Video Input Socket.
Synchro Editing
Use the Synchro Editing Cable (optional) to connect the Remote Control Socket on the Movie Camera with the synchro edit socket on the recording VTR.
- If the recording VTR is equipped with Synchro-Edit function, this Movie Camera can be operated via the recording VTR, i.e. playback start and stop of the Movie Camera will be synchronize with the recording start and stop on the VTR.
- For details, refer to the operating instructions of the recording VTR.
Focus
Continuous Auto Focus
1 Set the Operation Selector Switch to the "AUTO LOCK" position.
2 Aim the Movie Camera at the subject.
• The focus will automatically be adjusted to the subject within the focusing zone.
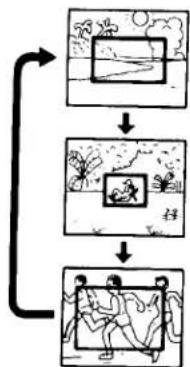
Focusing Zone Selection
- Press the Push Auto/Zone Selector Button.
flowchart
graph TD
    A["自然人图像"] --> B["自然人图片"]
    B --> C["自然人活动"]
For ordinary shooting.
For shooting a small subject.
For shooting moving subjects and for panning and titling.
Note:
Although this Movie Camera is equipped with full range Auto Focus function, the Auto Focus function will not work at a shooting distance of less than 0.7m and with the lens zoomed all the way to "TELE".
Manual Focus
1 Set the Operation Selector Switch to the "MANUAL" position.
2 Press the Focus Mode Selector Button.
3 Turn the Manual Focus Control (below the lens) to adjust the focus.
Note:
See page 46 for details.
Iris
Center click position: Automatic adjustment
- Set the Operation Selector Switch to the "MANUAL" position.
Turn to OPEN: When the subject is backlit.
Turn to CLOSE: When the picture is too bright.

White Balance
This adjustment is necessary to assure natural color rendition.
1 Set the Operation Selector Switch to the "AUTO" or "AUTO LOCK" position.
2 Aim the Movie Camera at the subject and start shooting. The White Balance will automatically and continuously be adjusted.
●For continuous automatic White Balance adjustment.
Manual White Balance Adjustment
1 Attach the White Cap to the lens.
2. Set the Operation Selector Switch to "MANUAL".
3 Keep the White Balance Button pressed for more than 0.5 second to activate the Hold mode.
The "SET" Indication in the LCD Display informs about the state or the adjustment:
Flashing slowly .... Not set
Flashing rapidly .... During setting
Static Indication .... Setting is finished
- How to Use the White Cap If there is only one light source, attach the White Cap to the lens for the manual white balance adjustment. If there are several light sources or if the illumination is weak (indoor, etc.), remove the White Cap from the lens and point the Movie Camera at a purely white object, such as white paper, and then adjust the White Balance.
●Automatic Recall of Previous White balance Setting When the Operation On/Off Switch of the Movie Camera is set to "OFF" and later to "ON" again, the "SET" Indication will flash slowly in the Hold mode, however, the last previous white balance setting is still maintained. It is also maintained during Playback, Rec Review and Camera Search. However, the previous white balance setting will no longer be maintained when the AC Adaptor is turned off or the Battery Pack is removed from the Movie Camera.
High Speed Shutter
A range of different shutter speeds make possible videographing of scenes with fast movements.
1 Set the Operation Selector Switch to the "MANUAL" position.
2 By repeatedly pushing the High Speed Shutter Selector, the shutter speed can be changed as follows:
250: 1/250 sec.
500: 1/500 sec.
1000: 1/1000 sec.
For Playback
When scenes recorded with high shutter speed(s) are later played back on a VTR equipped with the playback functions Super Still and Super Fine Slow Motion, etc., still and slow motion pictures with very sharp contours and full details can be obtained.
Zooming
Power Zooming

natural_image
Line drawing of a digital camera with lens, buttons, and external ports (no text or symbols)For wide-angle: Press the "W" Button.
For telephoto: Press the "T" Button.
Macro Close-Up
For shooting small subjects or photos.

natural_image
Line drawing of a digital camera with no visible text or symbolsWhen pressing the "W" Button to zoom to wide-angle, it is possible to focus on objects that are more than 5 mm away from the front lens surface.
In the extreme Wide-angle setting, you only have to approach the objects and shoot them.
- The focus can be adjusted in the "AUTO" or "MANUAL" focusing mode.
- In the extreme Tele setting, the focus can be adjusted to a distance of more than 0.7m.
Fade-In and Fade-Out
Fade-In


Fade-Out
- Set the Operation Selector Switch to the "AUTO" or "MANUAL" position.
Fade-out:
Keep the button pressed.
Fade-in:
Release the button.
Recording Titles
The titling function makes it possible to input titles into memory and recall them later during shooting at the push of a button for superimposition onto the normal picture (Digital Title Memory Function).
Inputting a Title into Memory
This operation can be performed while the Movie Camera is in the recording pause or stop mode.

1 Set the Operation Selector Switch to the "AUTO" or "MANUAL" position.
2 Use the Macro function to adjust the focus when shooting a small written, printed or painted title.
3. Press the Memory Button.
- Keep the button pressed for more than half a second.
The title is memorized
While the title is displayed in the EVF, its colour and the titling mode (the way it will be superimposed) can be selected. (See next page for details.)
- Press the Title Function On/Off Button to erase memorized titles.
■ Remarks about Titling
The title remains stored in memory until the lithium battery is exhausted. When a new title is input, the title previously memorized on that title page will be erased.
Selecting the Colour of a Title
By repeatedly pressing the Title Colour/Colour Reverse Selector Button, the colour of the title can be changed in the following order. (This function can also be used while the title is being recorded.)
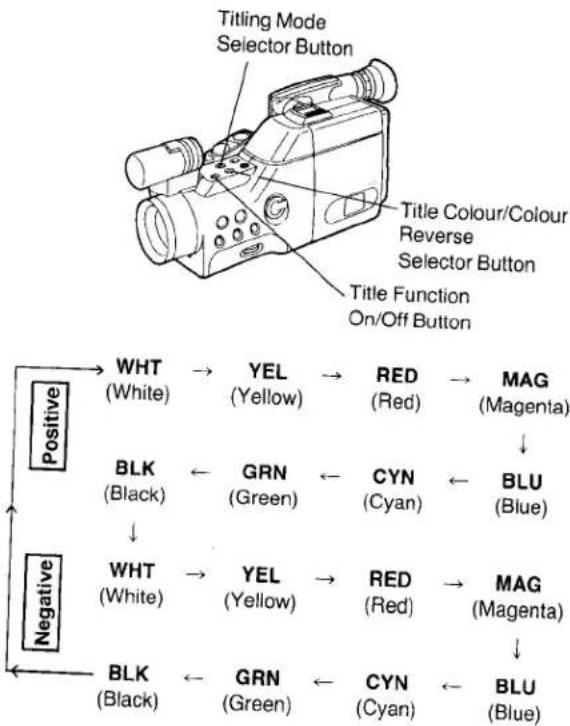
flowchart
graph TD
    A["Camera Icon"] --> B["Title Mode Selector Button"]
    B --> C["WHT (White)"]
    C --> D["YEL (Yellow)"]
    D --> E["RED (Red)"]
    E --> F["MAG (Magenta)"]
    F --> G["BLU (Blue)"]
    G --> H["CYN (Cyan)"]
    H --> I["RED (Red)"]
    I --> J["MAG (Magenta)"]
    J --> K["BLU (Blue)"]
    K --> L["CYN (Cyan)"]
    L --> M["RED (Red)"]
    M --> N["BLK (Black)"]
    N --> O["GRN (Green)"]
    O --> P["YEL (Yellow)"]
    P --> Q["WRK (Black)"]
    Q --> R["WRK (White)"]
    R --> S["WRK (White)"]
    S --> T["WRK (White)"]
    T --> U["WRK (White)"]
    U --> V["WRK (White)"]
    V --> W["WRK (White)"]
    W --> X["WRK (White)"]
    X --> Y["WRK (White)"]
    Y --> Z["WRK (White)"]
    Z --> AA["WRK (White)"]
    AA --> AB["WRK (White)"]
    AB --> AC["WRK (White)"]
Selecting the Titling Mode
By repeatedly pressing the Titling Mode Selector Button, the way in which the title is superimposed onto the picture being recorded can be changed in the following order. (This function can also be used while the title is being recorded.)

flowchart
graph TD
    A["NORMAL"] --> B["SCROL ↑"]
    B --> C["SCROL ←"]
    C --> D["RND-A"]
    D --> E["RND-B"]
    E --> F["WIPE ↓"]
    F --> G["WIPES ↑"]
    G --> H["WIPE +"]
    H --> I["WIPES →"]
    I --> J["WIPE ↑"]
    J --> K["WIPE ≡"]
    K --> L["WIPE ↔"]
    L --> M["WIPE ↑"]
    M --> N["WIPE ≡"]
    N --> O["WIPE ↔"]
    O --> P["WIPE ↑"]
    P --> Q["WIPE →"]
When pressing the Title Function On/Off Button, the Title is indicated in the selected mode.
- If another title is indicated, press the Title Function On/Off Button to erase it and then indicated a new title again.
•Titling Mode's and Resulting Effects
SCROL ↑ :
The title scrolls in from the bottom.

SCROL ←:
The title scrolls in from the right side.

RND-A:
The title appears flickering.

RND-B:
The title appears flickering and continues to flicker.

WIPE ↓
The title gradually appears from the top.

WIPE →:
The title gradually appears from the left side.

WIPE +:
The title appears at the center and expands outward.

WIPE ≡ :
The title is gradually formed by horizontal bars.

WIPE :
The title is gradually formed by vertical bars.

WIPE :
The title is gradually formed by mosaic-like blocks..

WIPE E:
The title appears from the right with a trail.

Recording a Title
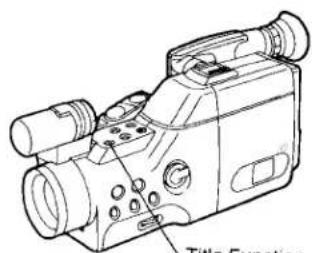
Title Function On/Off Button

natural_image
Line drawing of a digital camera with no visible text or symbolsStart/Stop Button
■ Inserting a Title in the Normal Titling Mode at the Beginning of a Recording
1 Press the Title Function On/Off Button to make the title appear in the EVF.
2 Press the Start/Stop Button to start shooting.
- To stop the superimposition of the title, press the Title Function On/Off Button again.
■ Inserting a Title in the Normal Titling Mode during Recording
At the point where you want to insert the title, press the Title Function On/Off Button. (The superimposed title can be seen in the EVF.)
- To stop the superimposition of the title, press the Title Function On/Off Button again.
Electronic Viewfinder
For Low-angle Shots
The Electronic Viewfinder can be turned upward and forward by a maximum of 180°. This is convenient for taking low-angle shots.
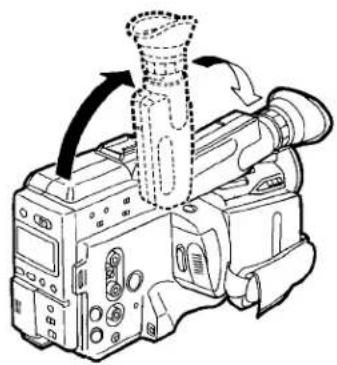
natural_image
Line drawing of a video camera with an arrow indicating motion or direction (no text or symbols present)Eyepiece Corrector
This control makes it possible for people who wear glasses to adjust the eyepiece to their eyesight.

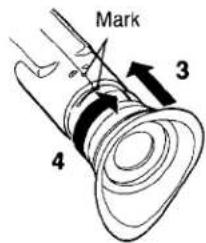
For Viewing the EVF with the Left Eye
- Turn the Eyecap counterclockwise to remove it.

- Turn the Eyecap so that its longer side faces left. Align the marks, and insert and turn the Eyecap clockwise until it locks with a click.
Other Functions
Recording Speed Selector
- SP: For normal tape speed
- LP: For slow tape speed
Memory Search Function
1 Press the Reset Button at the desired point.
●The Tape Counter is reset to "0:00.0".
2 Press the Display/Memory Button.
- The "M" indication appears in the EVF and in the LCD Display.
3 After pressing the Stop Button, press the Rewind/Review Button.
- The tape will stop automatically at about the point where the tape counter reads "0:00.0".
Tape Counter Indication
By repeatedly pressing the Display Memory Button, the Counter Indication can be changed in the following sequence.

flowchart
graph LR
    A["0:00.0"] --> B["M0:00.0"]
    B --> C["Second 0:00.00 Hour Minute"]
    style A fill:#f9f,stroke:#333
    style B fill:#ccf,stroke:#333
    style C fill:#cfc,stroke:#333
- To delete the counter indication in the EVF, press the On Screen Display Button. To make this indication appear again, press this button once more.
Remaining Tape Time Indication
During recording, playback, insert editing, and audio dubbing, the remaining tape time is indicated in minutes. When the remaining tape time becomes less than 2 minutes, the indication will flash.
Tape Selector Button
When using cassette tapes with long recording time (45 minutes in the SP mode, 90 minutes in LP mode), press the Tape Selector Button so that the Cassette Indication "T-45" appears. When the cassette is ejected, the indication will change to "T-30".
Filter Selector
OFF: For normal sensitivity
ON: For increased sensitivity
- Do not change the setting of this switch during recording, otherwise the sound will be interrupted for a few seconds.
Accessories, etc.
Shoulder Strap
1

3

natural_image
Line drawing of a video camera with attached equipment (no text or symbols)2
More than 2 cm.

1 Pull the end of the Shoulder Strap through the slit of the upper Shoulder Strap Holder.
2 Securely attach the end of the strap.
3 Attach the other end of the Shoulder Strap at the lower holder in the same way as mentioned above.
Tripod Mount
Bottom side of the Movie Camera


Other Connections

AC Adaptor

1 Connect the Power Supply Cable from the DC Output Socket on the AC Adaptor to the DC Input Socket on the Movie Camera.
2 Connect to the Mains.
Note:
When a Battery Pack is attached to the AC Adaptor, the Movie Camera cannot be supplied with power.
Car Battery Cord

1 Start the engine and insert the Car Battery Cord into the cigarette lighter socket.
2 Connect the other end to the DC Input Socket on the Movie Camera.
Note:
- The Car Battery Cord can only be used with 12V DC negative-grounded vehicles.
- Do not start the car engine while the Movie Camera is powered by the car battery.
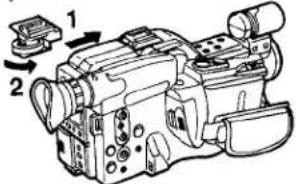
Character Generator
The use of the optional Character Generator makes it possible to record titles, time, date and stopwatch while shooting.
Attaching
Use the Shoe Adaptor that is supplied with the Unit.
- Before attaching the Character Generator, turn the Movie Camera off.
1
3

natural_image
Technical line drawing of a mechanical device with no visible text or symbolsCharacter Generator Socket

natural_image
Line drawing of a digital camera with an attached device (no text or symbols)1 Attach the Shoe Adaptor and tighten the screw.
2 Attach the Character Generator to the Shoe Adaptor.
3 Insert the plug of the Character Generator Cord into the Character Generator Terminal.
- For the operation of the Character Generator, see the operating instructions of the Character Generator.
- Be sure to pass the connection cable outside along the EVF.
Handgrip
VITC signals
This Movie Camera is designed for recording VITC signals (Vertical Interval Time Code) from a VITC Generator which can be mounted on top of the Movie Camera. Using VITC Editing Controller System (optional), cassette tapes that have been recorded with VITC signals can be edited conveniently and fram-by-frame precision.
Note:
For actual editing, refer to the Operating Instructions of the VITC Editing Controller System.
Editing Recorded Scenes into Finished Video Movies.
1 View the original tape to check the recorded content.

2 Locate the exact starting and ending points of all the scenes that you want to edit into a finished movie onto another cassette tape. Make a log with descriptions as well as starting and ending points of these scenes, and determine the order in which they are to be edited.

3 Perform the editing.

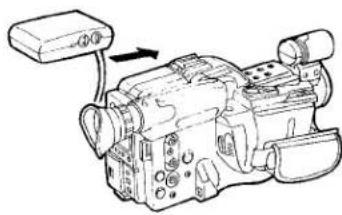
Attaching the VITC Generator
●Before attaching the VITC Generator, turn the Movie Camera off.
1
natural_image
Line drawing of a digital camera with an attached sensor and control panel (no text or symbols)2

natural_image
Technical line drawing of a mechanical device with no visible text or symbolsCharacter
Generator Terminal
1 Attach the VITC Generator to the Accessory Shoe.
2 Insert the plug of the VITC Generator Cord into the Character Generator Terminal.
- Be sure to pass the connection cable outside along the EVF.
Setting the cassette number
The time code additionally includes a cassette number for distinguishing the time code of different cassettes.
- 100 different cassette numbers are available (00 to 99).
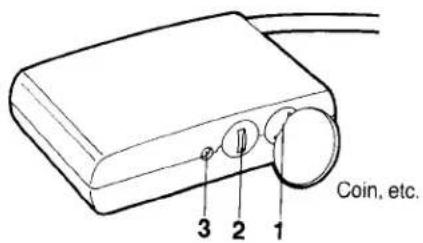
Example for setting cassette number 23:
1 CASS. UNITS. 3
2 CASS.TENS 2
3 Press the RESET key.
4 The VITC Generator is automatically switched on and off with each push of the Start/Stop Button of the Movie Camera.
Resetting the Time Code to Zero
- When a new cassette tape is inserted into the Movie Camera, the RESET Key should be pressed. This resets the time code value to zero. If the time code is not reset, the VITC Generator will continue counting up to a maximum of 24 hours. The time code then automatically starts from zero—perhaps in the middle of a cassette tape.
- An internal battery ensures that the last time code value before the recording was interrupted is always retained in memory. Thus when camera recording is resumed later, the time code sequence continues from the point where it was halted, even if the Movie Camera was switched off or the VITC Generator was disconnected from the Movie Camera in the meantime.
Indicator Lamps
- The green Indicator Lamp "GEN" is lit while the time code is being recorded together with the video signal.
●The red Indicator Lamp "BATT" lights up when the battery is nearly exhausted.

Cautions for Making Camera Recordings with VITC Time Code.
To ensure that the desired scenes can be found during editing, the time code must be recorded continuously without gaps.
- Provide a leader for each video cassette. Leave the lens cover on the camera lens and start recording with the VITC generator connected. Let the Movie Camera run like this for at least 20 seconds.
- Each time you start the Movie Camera, small jumps may appear in the timecode. These jumps would make editing of the first frames of a scene difficult. Thus get into the habit of always starting the camera 5 seconds before the actions you wish to record actually start.
- Do not wind the tape in the video cassette forwards of backwards after taking a shot. The successive shots must be recorded in continuous sequence.
- Do not use the Camera Search or Rec Review function.
- Never make new recordings over parts of a recorded original cassette.
Battery replacement
The battery in the VITC Generator has a life expectancy of 5 to 7 years.
If the red Indicator Lamp "BATT" lights up, there is still enough battery power to continue the time code recording until the end of the inserted video cassette. However, before starting to record on the next cassette, have your video dealer insert a new battery.
Cassette Adaptor
Loading the Cassette

Before loading the cassette into the Cassette Adaptor, turn the cog wheel in the direction of the arrow to pull in the slack of the tape.

1 Slide the Open Button in the direction of the arrow, and the Compartment Cover will pop open.
2 Insert the Cassette vertically.
3 Close the Compartment Cover firmly.
(Tape loading starts automatically. During loading, do not touch the rotating part on the underside of the Cassette Adaptor.)
4 The Stopper is retracted.
(When the Stopper is completely retracted, the tape loading in the Cassette Adaptor is completed. It can now be inserted into a VHS video recorder.)
Taking Out the Cassette
1 Slide the Open Button in the direction of the arrow.
2 Take out the cassette.
- Pushing the cassette from the underside of the adaptor will make it easier to take it out.
3 Close the Compartment Cover.
How to Load the Battery
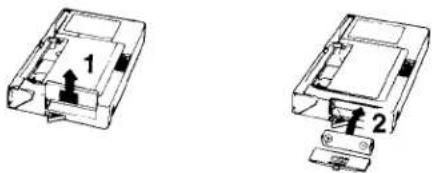
1 Slide the Battery Cover upward and remove it.
2 Load one "R6" size battery with the polarities correctly aligned and replace the cover by pushing it down until it locks with a click.
- If the tape loading time is getting longer, the battery is becoming exhausted. Replace it with a new one.
- Load the new battery with its polarities (+ and -) aligned correctly.
- Remove battery immediately and dispose of it.
CAUTION FOR BATTERY REPLACEMENT
Others
S-VHS Format
This format ensures high resolution and high picture quality by using high performance S-VHS-C video cassette tapes.
For Recording
S-VHS System Selector
ON/AUTO: • On S-VHS-C cassettes, recordings will automatically be made in the S-VHS-C format.
- On VHS-C cassettes, recordings will automatically be made in the VHS format.
OFF: For recording in the conventional VHS format on an S-VHS-C cassette.
When using VHS-C cassettes, the recording is made in the VHS format irrespective of the selected recording format.
For Playback
It is not necessary to select the format.
Note:
If a cassette recorded in S-VHS is played back on a conventional VHS Movie Camera or VTR, it is not possible to obtain a playback picture.
Hi-Fi (Stereo) Sound
Stereo sound can be recorded on the hi-fi audio track via the built-in stereo microphone. At the same time, mono sound is recorded on the normal sound track, making it possible for a tape recorded on this Movie Camera to be played back on a mono-type Movie Camera or VTR.
Index Signal (VISS)
The recording of index signals at the beginning of and during recordings makes possible the use of the VHS Index Search or the Intro Scan function when playing back the tape on a VTR equipped with these functions.
An index signal is recorded when one of the following operations is performed.
- When recording is started for the first time after the Movie Camera is turned on.
- When recording is restarted after the cassette is exchanged or the tape is played back.
In each of these cases, the "INDEX" indication will flash for a few seconds in the EVF.
- When recording index signals, space the signals at least 5 minutes in the LP mode and 2 minutes in the SP mode.
Cautions
Please read these cautions before operating the System.
Video Head Clogging
The video heads are the means by which the System places picture signals on the tape during recording, and reads picture signals from the tape during playback. If these heads become dirty and clogged from long use, the signals can no longer be recorded correctly, and the playback picture will be distorted accordingly. This is the case, for example, during the playback of a tape, the sound of which is reproduced normally, but no picture is seen, or the picture is greatly distorted. When such symptoms occur, have the System checked by qualified service personnel. The System is equipped with head clogging detection function. When the heads are clogged, the Indication in the EVF will appear. As the accumulation of dirt on the heads may be dislodged by the movement of the tape, it is possible that this indication sometimes appears, but may not reappear on the next recording starts. The head clogging detection function will be activated when the shooting is started from the recording pause mode. However, it will not be activated when shooting immediately after replacing the cassette and after performing Camera Search or Playback.
If Condensation Forms Inside the Movie Camera
Condensation (dew) forms when warm air comes in contact with a cold object, for example on a window in a heated room in winter. Condensation may form in the Movie Camera and damage the tape and the video heads, if:
- The System is in a room where the heater has just been turned on.
•The System is in a room with steam or high humidity.
- The System is brought from cold surroundings into a well-heated room.
- The System is suddenly brought from cool surroundings, such as an air-conditioned room or car, to a place which is hot and humid.
- When condensation has formed inside the System, the "DEW" indication in the EVF will flash and a few seconds later, the unit will turn itself off to protect the tape and the video heads. After a while, turn the unit on again and make sure that the Dew Mark is not displayed any more. Then, wait about 1 hour before operating the System again. Depending on the surrounding conditions, it may take several hours before the System can be used again.
- As condensation forms gradually, it may take about 10–15 minutes before the System turns itself off after a change of working environment.
- In an extremely cold place, condensation may freeze and turn into frost. In this case, it may take quite some time for the frost to melt, turn into dew and evaporate.
- When you bring the System from a very cold place, e.g. the ski slopes, into a heated room, keep it in a tightly closed plastic bag or similar to prevent condensation from forming inside the System.
Keep the System away from Oily Smoke and Steam
Protect the System from Humidity and dust
Surrounding Conditions
Use the System under conditions where the temperatures are between 0^ C and 40^ C, and where the humidity is between 20% and 80%. To avoid deformation of the outer case or other damage, do not leave it exposed to direct sunlight for any length of time, also never leave it in a closed automobile.
Keep the System away from Heaters
Keep the System away from TV Sets
Do not place the System near a TV set because it might impair the picture and sound quality of the recorded tape, and/or adversely affect the performance of the Movie Camera.
Keep Magnets away
Never bring a magnet or magnetized object such as fluorescent lamps, motors, electric clocks and battery operated toys etc. close to the System.
Keep the System away from Areas with Strong Electric Fields
The picture may become distorted, when the System is used in places with strong electric fields, such as near TV or radio antennas.
Never Put any Objects Inside
Never insert any object other than a video cassette into the System. If any object is dropped into it or if any liquid is spilled into it, consult qualified service personnel. Operating it with some foreign matter inside may cause fire or electric shock.
Not Fingers Inside
Touching internal parts of the System is very dangerous and may cause serious damage to the System. Do not attempt to disassemble it. For internal inspection, adjustment or repairs, consult qualified service personnel.
Handle with Care
Never drop the System or expose it to strong physical shocks. Shocks during use may result in abnormal operation and performance.
Appearance of Smear Distortion
Smear distortion is a peculiar characteristic of the CCD device. It appears as a bright vertical stripe on the screen when the System is aimed at spot lights or other bright light and light reflecting objects. To avoid this problem, make sure not to aim the System at such strong light source during shooting.
Cover the Lens with the Cap after Shooting
Keep the System away from Strong light
Do not expose the System to strong light, because the heat from it may cause deformation or other damage.
When the System Is Not Being Used
Remove the video cassette and turn the System off with the Operation On/Off Switch.
Never Place the System with the Cassette Compartment Side Facing Down
Never use the System with the cassette compartment facing down as this might cause uneven winding and slacking of the tape.
Cleaning the VTR
Wipe the VTR with a clean, dry cloth. Never use cleaning fluid, or other chemicals.
- Clean the lens only with a blower brush (used for photo cameras) or a special lens cleaning tissue (used for glasses and cameras).
For Cassette Adaptor
- Do not insert this Cassette Adaptor into a VTR and take it out again without running the tape, because this could cause the tape to get loose.
- When loading the cassette into the Cassette Adaptor, be careful not to touch the tape directly. After use, take out the cassette from the Cassette Adaptor.
●Never insert the Cassette Adaptor into a VTR without a video cassette in it.
For AC Adaptor
- Do not place heavy objects on the unit.
- When unplugging the main cord or other connection cords, be sure to grasp the plug, not the cord.
- When listening to a radio while the AC Adaptor is in operation, the radio reception may be distorted. In this case, move the radio away from the AC Adaptor.
For Battery Pack
Be sure to charge the Battery Pack before using it.
Pay attention to the following points to avoid danger.
●Do not throw the Battery Pack into fire.
- Do not short-circuit the poles of the connector.
- Do not disassemble or reconstruct the Battery Pack.
- Use only the supplied AC Adaptor to charge the Battery Pack.
Follow the instructions below to avoid damage to the Battery Packs or reduction of their service life.
●Never subject the Battery Pack to strong shocks or drop it.
- Do not recharge a Battery Pack that is already fully charged.
- During operation of the System or during recharging, the Battery Pack may become warm however this does not pose any problem.
- The service life of a Battery Pack has its limits. If the operation time of a Battery Pack in spite of normal recharging becomes so short that its normal use for shooting is no longer possible, it should be replaced with a new one.
The function of the Battery Pack is based on a chemical reaction. Use it according to its characteristics.
- Charge the Battery Pack within a temperature range of 10°C–35°C. If charged at lower temperatures, the chemical reaction cannot take place optimally, causing the performance of the Battery Pack to deteriorate. At higher temperatures, the Battery Pack cannot be charged completely.
- Store the Battery Pack in cool and dry place. If exposed to high temperatures for a long time, the battery life will be shortened and the self-discharging process will be increased.
- Charge the Battery Pack before using it because self-discharging may occur if it has not been used for a long period of time.
- When not using the Battery Pack, remove it from the Movie Camera or the AC Adaptor.
For Auto Focus
The Auto Focus System will not provide stable and accurate focus adjustment if you are shooting:
- A subject behind dirty glass.
- Shiny surfaces. (The focusing zone frame may disappear.)
- A subject with a part of it near and another part far from the Movie Camera.
- An oblique subject.
- A subject with horizontal stripes.
- A flat surface, e.g. a white wall.
- With the macro close-up function, special lenses or filters.
- A fast-moving subject.
- A subject having a dark surface. (The focusing zone frame may go on and off.)
In these cases, use manual focusing.
For White Balance
The Auto White Balance Adjustment may not be accurate when:
- When shooting under mercury-vapor, natrium or some types of fluorescent lamps.
- When intense lighting is used, e.g. from a halogen lamp, or when the colour temperature of the light source is low.
- When shooting a subject of a single colour or a subject in front of a single-colour background.
- When shooting outdoors at sunrise or sunset.
For High Speed Shutter
The following conditions are required for shooting with the High Speed Shutter function:
- The subject must be brightly lit, with little shade, under sunlight or some other illumination of more than 300 lux.
- If shooting under the illumination produced by fluorescent lamps, the picture will be adversely influenced by flickering.
- If the picture is played back in the normal playback mode, the movements may appear to be not very smooth.
●The playback picture will be slightly darker than the picture recorded without using the High Speed Shutter function.
Before Requesting Service
Power Source
- The power does not turn on. —Is the power supply unit correctly connected to the Movie Camera?
- The power turns on, but it turns off again immediately. —If the Battery Pack is exhausted, replace it with a fully charged one. —If condensation has formed, wait until it has dissolved.
Camera Recording
●The power is on, but no picture appears in the EVF.
—Is the lens covered with the lens cap?
- Camera recording cannot be performed.
—If the tab of the cassette is broken out, cover the tab hole with adhesive tape.
- The picture is not clear.
—Is the eyepiece correctly adjusted to your eyesight?
—Is the lens surface dusty?
●The Auto Focus System does not provide optimum focus adjustment.
—Is the Focus Mode Selector set to "AUTO"?
—For shooting conditions where the "AUTO" setting of the Focus Mode Selector cannot provide optimum focus adjustment, set the selector to "MANUAL" and adjust the focus.
Playback
- No playback picture is reproduced. —Is the connection to the TV set correct? —Is the TV set tuned to the video playback channel?
- The colours are not correct. —Is the colour adjustment of the TV set correct?
- The playback picture is not in colour.
- Adjust the Tracking.
- If the tape is old, use a new tape.
Specifications
NV-MS70B
Information for your safety
| Power Source: | DC 6.0 V |
| Power Consumption: | Recording mode; 8.0 W (Battery Operation) |
| Video Recording System: | Rotary four heads, helical scanning system |
| Tape Speed: | SP; 23.39 mm/s |
| LP; 11.7 mm/s | |
| Tape Format: | S-VHS-C/VHS-C tape |
| Recording/Playback Time: | 45 min. with NV-SEC45 (SP) |
| 90 min. with NV-SEC45 (LP) |
VIDEO
| Television System: Modulation System: | CCIR; 625 lines, 50 fields PAL colour signalLuminance; FM azimuth recordingColour signal; Converted subcarrier phase shift recording |
| Output Level: | VIDEO OUT (PHONO); 1.0 Vp-p,S-VIDEO OUT Terminal; 1.0 Vp-p, |
| AUDIO | |
| Input Level: | MIC IN (M3); -70 dB, |
| Output Level: | AUDIO OUT (PHONO); -8 dB, |
| Audio Track: | 1 track (Normal-Mono only), 2 channels (Hi-Fi Sound-Stereo) |
| Image Sensor: | 12 -inch CCD Image Sensor |
| Lens: | 6:1 Power Zoom Lens with Digital AI Auto FocusAuto Iris |
| Auto Focus System F1.4 (9–54 mm) | |
| Filter Diameter 43 mm | |
| Viewfinder: | 23 -inch Electronic Viewfinder |
| Standard Illumination: | 1.400 lux |
| Minimum Required Illumination: | 5 lux |
75 ohm unbalanced
75 ohm unbalanced
4.7 kohm or more unbalanced
600 ohm unbalanced
| Video Horizontal Resolution Colour: | S-VHS; More than 400 lines (S-Video OUT) (SP)VHS; More than 250 lines (SP) |
| Signal-to Noise Ratio: | Video; More than 43 dB (SP)Audio (Hi-Fi); More than 47 dB (SP)(Normal); More than 43 dB (SP) |
| Audio Frequency Response: | Hi-Fi; 50–20,000 Hz (SP)Normal; 80–8,000 Hz (SP) |
| Operating Temperature: | 0°C–40°C |
| Operating Humidity: | 20%–80% |
| Weight: | Approx. 1.0 kg (without Battery Pack) |
| Dimensions: | 109.5 (W)×128.5 (H)×311.5 (D) mm |
Information for your safety
VW-AS1B
| Power Source: | AC 100-240 V, 50-60 Hz (Automatic voltage adjustment) |
| Power Consumption: | 25 W |
| DC Output: | DC 6 V 1.8 A (Movie Camera) |
| DC 6 V 1.3 A (Battery Pack charging) |
Weight:
Approx. 0.45 kg
Dimensions:
70 (W)×58 (H)×178 (D) mm
Weight and dimensions shown are approximate.
Specifications are subject to change without notice.
"THE LITHIUM BATTERY IS A CRITICAL COMPONENT (TYPE NUMBER CR2032 MANUFACTURED BY PANASONIC).
IT MUST NEVER BE SUBJECTED TO EXCESSIVE HEAT OR DISCHARGE. IT MUST THEREFORE ONLY BE FITTED IN EQUIPMENT DESIGNED SPECIFICALLY FOR ITS USE.
REPLACEMENT BATTERIES MUST BE OF THE SAME TYPE AND MANUFACTURER. THEY MUST BE FITTED IN THE SAME MANNER AND LOCATION AS THE ORIGINAL BATTERY. WITH THE CORRECT POLARITY CONNECTIONS OBSERVED.
DO NOT ATTEMPT TO RE-CHARGE THE OLD BATTERY OR RE-USE IT FOR ANY OTHER PURPOSE. IT SHOULD BE DISPOSED OF IN WASTE PRODUCTS DESTINED FOR BURIAL RATHER THAN INCINERATION."


Printed in Japan VQT3803
Matsushita Electric Industrial Co., Ltd.
Central P.O. Box 288, Osaka 530-91, Japan
- Panasonic
- Contents
- Easy Operations
- Preparation
- Basic Operation
- Editing
- Shooting Techniques
- Other Functions
- Accessories etc.
- Others
- HQ (High Quality) Picture System
- IMPORTANT
- WARNING
- FOR YOUR SAFETY
- Controls and Components
- Indications in the Electronic Viewfinder (EVF)
- Warning/Alarm Indications
- Indications in the LCD Display
- Accessories
- Standard Accessories
- Optional Accessories
- Battery Pack
- Charging
- Note:
- ■ Discharge→Charge function
- Attaching
- Caution:
- Video Cassette
- Inserting the Video Cassette
- Before Inserting the Cassette
- Removing a Video Cassette
- Setting the Clock
- How to Insert the Battery for the Clock Operation
- CAUTION FOR BATTERY REPLACEMENT
- Recording the Date/Time Indications
- Operation Selector Switch
- Operation Modes and Usable Functions
- Camera Recording
- To Start Recording
- To Stop Recording
- Camera Search
- Rec Review
- Playback
- Operations
- Fast Forward
- Rewind
- Tracking Control
- Digital Tracking Switch
- Playback via TV Set (Connections)
- Playback via S-Video Cable
- Playback on a table Type VTR
- TV/VTR Selector on the RF Adaptor
- PAL System Selector
- Assemble Editing
- Operation
- Insert Editing
- Audio Dubbing
- Playing Back a Tape on Which Audio dubbing Was Performed
- Dubbing (Copying)
- For Playback
- Dubbing with the S-Video Cable
- Synchro Editing
- Focus
- Continuous Auto Focus
- Focusing Zone Selection
- Manual Focus
- Iris
- White Balance
- Manual White Balance Adjustment
- High Speed Shutter
- Zooming
- Power Zooming
- Macro Close-Up
- Fade-In and Fade-Out
- Recording Titles
- Inputting a Title into Memory
- ■ Remarks about Titling
- Selecting the Colour of a Title
- Selecting the Titling Mode
- •Titling Mode's and Resulting Effects
- Recording a Title
- Electronic Viewfinder
- For Low-angle Shots
- Eyepiece Corrector
- For Viewing the EVF with the Left Eye
- Recording Speed Selector
- Memory Search Function
- Tape Counter Indication
- Remaining Tape Time Indication
- Tape Selector Button
- Filter Selector
- Accessories, etc.
- Shoulder Strap
- Tripod Mount
- AC Adaptor
- Car Battery Cord
- Character Generator
- VITC signals
- Editing Recorded Scenes into Finished Video Movies.
- Attaching the VITC Generator
- Setting the cassette number
- Example for setting cassette number 23:
- Resetting the Time Code to Zero
- Indicator Lamps
- Cautions for Making Camera Recordings with VITC Time Code.
- Battery replacement
- Cassette Adaptor
- Loading the Cassette
- Taking Out the Cassette
- How to Load the Battery
- S-VHS Format
- For Recording
- S-VHS System Selector
- Hi-Fi (Stereo) Sound
- Index Signal (VISS)
- Cautions
- Video Head Clogging
- If Condensation Forms Inside the Movie Camera
- Keep the System away from Oily Smoke and Steam
- Protect the System from Humidity and dust
- Surrounding Conditions
- Keep the System away from Heaters
- Keep the System away from TV Sets
- Keep Magnets away
- Keep the System away from Areas with Strong Electric Fields
- Never Put any Objects Inside
- Not Fingers Inside
- Handle with Care
- Appearance of Smear Distortion
- Cover the Lens with the Cap after Shooting
- Keep the System away from Strong light
- When the System Is Not Being Used
- Never Place the System with the Cassette Compartment Side Facing Down
- Cleaning the VTR
- For Cassette Adaptor
- For AC Adaptor
- For Battery Pack
- Pay attention to the following points to avoid danger.
- Follow the instructions below to avoid damage to the Battery Packs or reduction of their service life.
- The function of the Battery Pack is based on a chemical reaction. Use it according to its characteristics.
- For Auto Focus
- For White Balance
- For High Speed Shutter
- Before Requesting Service
- Power Source
- Specifications
Marke : PANASONIC
Modell : NV-MS70B
Kategorie : Camcorder