
MC-E761 - Staubsauger PANASONIC - Kostenlose Bedienungsanleitung
Finden Sie kostenlos die Bedienungsanleitung des Geräts MC-E761 PANASONIC als PDF.


Benutzerfragen zu MC-E761 PANASONIC
0 Frage zu diesem Gerät. Beantworten Sie die, die Sie kennen, oder stellen Sie Ihre eigene.
Eine neue Frage zu diesem Gerät stellen
Laden Sie die Anleitung für Ihr Staubsauger kostenlos im PDF-Format! Finden Sie Ihr Handbuch MC-E761 - PANASONIC und nehmen Sie Ihr elektronisches Gerät wieder in die Hand. Auf dieser Seite sind alle Dokumente veröffentlicht, die für die Verwendung Ihres Geräts notwendig sind. MC-E761 von der Marke PANASONIC.
BEDIENUNGSANLEITUNG MC-E761 PANASONIC
Инструкция за употреба
Operating Instructions
Прахосмукачка / Vacuum Cleaner
MC-E760, MC-E761, MC-E762, MC-E763
MC-E783, MC-E785, MC-E787
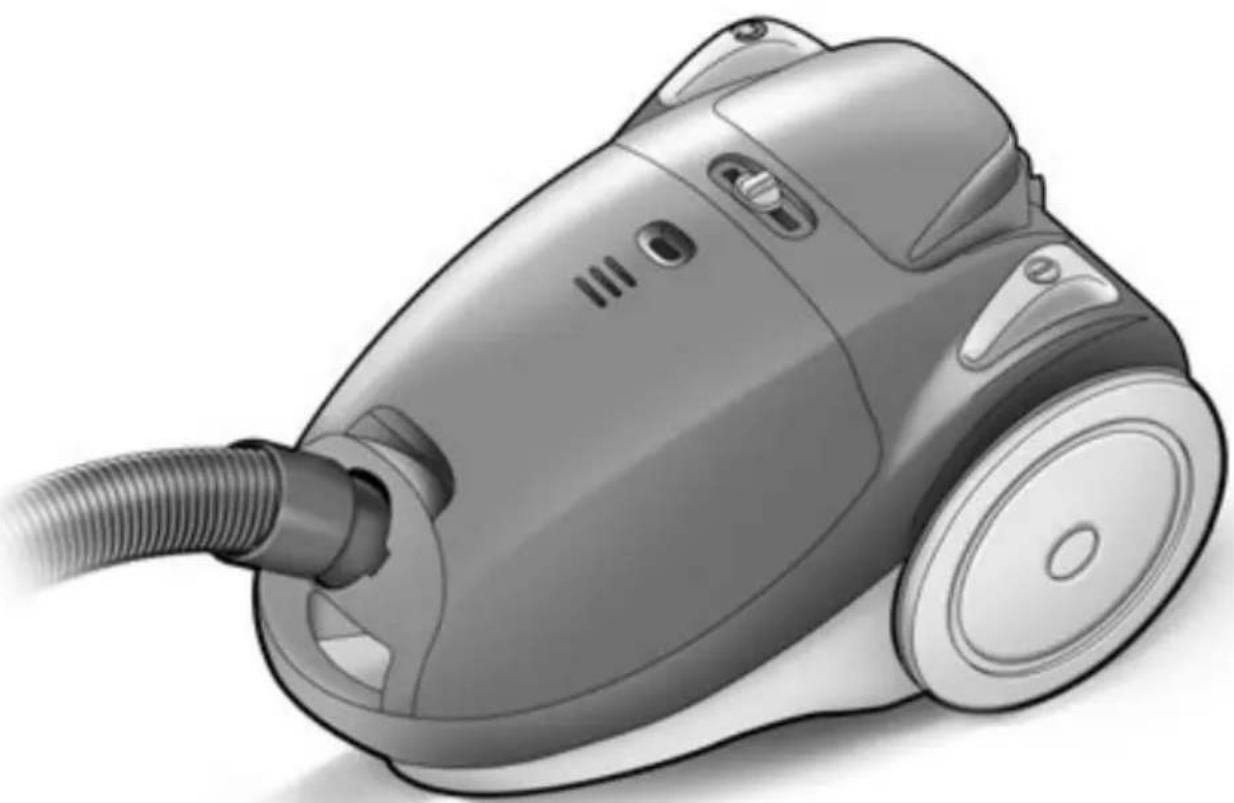
natural_image
Illustration of a vacuum cleaner with a coiled tube and handle (no text or symbols)СЪДЪРЖАНИЕ
TABLE OF CONTENTS
• Важни мерки за безопасност .... Стр. 4
• Предпазни мерки 6
• Основни компоненти 7
A) Как да подготвите прахосмукачката 8
В) Как да използвате прахосмукачката 8-10
C) Как да съхранявате прахосмукачката 10
D) Грижи и поддръжка 11-12
E) Принадлежности (допълнителни). 13
• Спецификации 14
- Important safety instructions for the user.... Page 4
• Cautions for AC Main Lead (only UK, IRL) 5
• Cautions 6 - Identification of main parts 7
A) How to assemble your cleaner 8
B) How to operate your cleaner 8-10
C) How to store your cleaner 10
D) Maintenance 11-12
E) Accessory (Optional). 13 - Specifications.... 14
BG
Преди да използвате този продукт, моля, прочетете внимателно Инструкцията за употреба. Обърнете специално внимание на мерките за безопасност. . . . . . .
Страница 4
Този продукт отговаря напълно на директиви 73/23/CEE и 89/336/CEE.
GB
We would recommend that you carefully study these Operating Instructions before attempting to operate the unit, and that you note the Important Safety Instructions.
Page 4
This product complies with the directives 73/23/EEC and 89/336/EEC.
ВАЖНИ МЕРКИ ЗА БЕЗОПАСНОСТ

Когато използвате прахосмукачката, моля, спазвайте тези указания за безопасност. ВНИМАНИЕ: За да елиминирате риска от пожар, нараняване или токов удар:
- Не оставяйте прахосмукачката включена в контакта. Изключвайте я от контакта след употреба и когато я почиствате или обслужвате.
- Не използвайте прахосмукачката навън и на влажни места.
- Не използвайте прахосмукачката като играчка. Особено внимавайте, когато близо до нея има деца.
- Не използвайте прахосмукачката, ако захранващият й кабел е повреден. Ако прахосмукачката не работи нормално или ако сте я изпускали, удряли или оставяли навън, обърнете се към упълномощен сервизен център на Panasonic.
- Когато изключвате захранващия кабел от контакта, не дърпайте кабела, а хванете щепсела и го извадете внимателно. Не настъпвайте, не прегъвайте и не притискайте захранващия кабел. Пазете захранващия кабел от остри предмети и от горещи предмети и повърхности.
- Не докосвайте щепсела, захранващия кабел и прахосмукачката с влажни ръце.
- Не поставяйте каквито и да е предмети върху отворите на корпуса на прахосмукачката. Пазете ги от прах, косми и каквито и да е други предмети, които могат да ги запушат.
- Преди да изключите прахосмукачката от контакта, изключете всички включени бутони.
- Не използвайте прахосмукачката без филтри или торбичка за прах. Не използвайте прахосмукачката с повредена торбичка за прах.
- Не вкарвайте предмети или пръстите си и в отворите и при движещите се части на прахосмукачката.
- Не всмуквайте течности или лесно запалими материали или вещества с прахосмукачката. Не използвайте прахосмукачката на места, където е възможно да има такива вещества.
- Не се опитвайте да поправяте сами прахосмукачката. При възникване на проблеми се обръщайте към упълномощен сервиз на Panasonic.
- Бъдете особено внимателни, когато чистите стълби. Дръжте с едната си ръка прахосмукачката, за да предотвратите обръщане и падане на прахосмукачката.
ВНИМАНИЕ: Тази прахосмукачка е предназначена само за използване в стандартни жилищни помещения. Не я използвайте в гаражи, складове, градини и на места с повишена влажност.
IMPORTANT SAFETY INSTRUCTIONS FOR THE USER

When using this vacuum cleaner, please observe these basic precautions. WARNING: To reduce the risk of fire, electric shock, or injury:
- Do not leave the vacuum cleaner plugged in to mains outlet. Unplug from the outlet when not in use and before cleaning the appliance or undertaken maintenance operations.
• Electric shocks can occur if used outdoors or on wet surfaces. - Do not allow to be used as a toy. Close attention is necessary when being used near children.
- This appliance is not intended for use by young children or infirm persons without supervision; young children should be supervised to ensure that they do not play with the appliance.
- Do not use with damaged power supply cord or plug. If the vacuum cleaner is not working as it should be, or has been dropped, damaged, left outdoors, or come into contact with water, consult an authorised Panasonic Service Centre.
- Do not pull or carry by power supply cord, use power supply cord as a handle, close a door on power supply cord, pull power supply cord around sharp edges or corners. Keep power supply cord away from heated surfaces.
- Do not handle plug or vacuum cleaner with wet hands.
- Do not put any object into openings. Do not use with any opening blocked; keep free of dust, lint, hair and anything that may block or reduce air flow.
- Turn off all controls before unplugging.
- Do not use the vacuum cleaner without filters and/or dust bag in place. Never try to patch a broken dust bag.
- Keep hair, loose clothing, fingers, and all parts of body away from openings and moving parts.
- Do not use to pick up flammable or combustible liquids such as gasoline or use in areas where they may be present.
- This appliance should be serviced by an authorised Panasonic Service Centre, and only genuine Panasonic spare parts should be used.
- Use extra care when cleaning on stairs. Hold the handle of the cleaner in one hand to avoid overturned the vacuum cleaner.
NOTE: These vacuum cleaners have been designed for general household use and are not suitable for use in a garage, garden or to suck up liquids.

CAUTION FOR AC MAINS LEAD (only UK, IRL)
FOR YOUR SAFETY PLEASE READ THE FOLLOWING TEXT CAREFULLY
This appliance is supplied with a moulded three pin mains plug for your safety and convenience.
A 13 amp fuse is fitted in this plug.
Should the fuse need to be replaced please ensure that the replacement fuse has a rating of 13 amps and that it is approved by ASTA or BSI to BS1362.
Check for the ASTA mark 🎨 or the BSI mark ♥ on the body of the fuse.
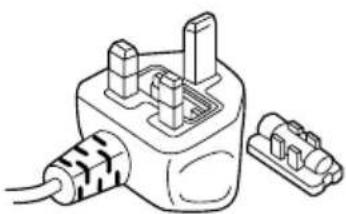
If the plug contains a removable fuse cover you must ensure that it is refitted when the fuse is replaced. If you lose the fuse cover the plug must not be used until a replacement cover is obtained.
A replacement fuse cover can be purchased from your local Panasonic Dealer.
IF THE FITTED MOULDED PLUG IS UNSUITABLE FOR THE SOCKET OUTLET IN YOUR HOME THEN THE FUSE SHOULD BE REMOVED AND THE PLUG CUT OFF AND DISPOSED OF SAFELY.
THERE IS A DANGER OF SEVERE ELECTRICAL SHOCK IF THE CUT OFF PLUG IS INSERTED INTO ANY 13 AMP SOCKET.
If a new plug is to be fitted please observe the wiring code as shown below.
If in any doubt please consult a qualified electrician.
IMPORTANT: The wires in this mains lead are coloured in accordance with the following code:
Blue : Neutral
Brown : Live
As the colours of the wire in the mains lead of this appliance may not correspond with the coloured markings identifying the terminals in your plug, proceed as follows:
The wire which is coloured BLUE must be connected to the terminal in the plug which is marked with the letter N or coloured BLACK.
The wire which is coloured BROWN must be connected to the terminal in the plug which is marked with the letter L or coloured RED.
Under no circumstances should either of these wires be connected to the earth terminal of the three pin plug, marked with the letter E or the Earth Symbol 12
How to replace the Fuse:
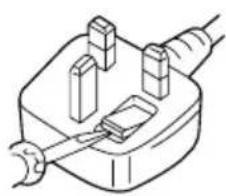
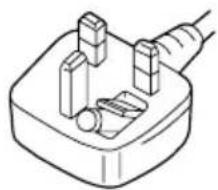
- There are two types of the supplied AC Mains Lead A and B as shown below.
1 Open the fuse compartment with a screwdriver.
2 Replace the fuse and fuse cover if detachable.
natural_image
Line drawing of a plug socket with wires and connectors (no text or symbols)TYPE A
natural_image
Line drawing of a plug socket with three pins and a wire (no text or symbols)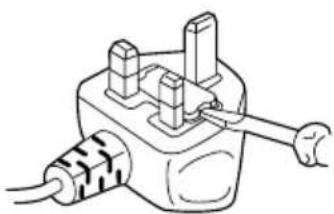
natural_image
Line drawing of a mechanical switch or electrical plug with wires (no text or symbols)TYPE B
natural_image
Line drawing of a small electrical socket with a coiled cable and two terminal blocks (no text or symbols)Прахосмукачката е оборудвана със система за термо-защита, която изключва захранването, в случай на запушване на някой от отворите или тръбите. Ако това се случа, изключете захранващия кабел от контакта, отстранете материалите, причиняващи запушването и изчакайте около 40 минути, преди да използвате прахосмукачката отново.
This cleaner includes an automatic thermal safety device which automatically turns off the power if the suction inlet, hose or extension wand becomes clogged. If this occurs, disconnect from the mains outlet, remove the material responsible for the clogging and then wait about 40 minutes, before operating your cleaner again.

natural_image
Simple line drawing of a crossed-out toilet with a cross symbol (no text or labels)1) Никога не използвайте прахосмукачката за почистване на влажни предмети, кал, пепел и каквито и да е други материали, които могат да я повредят.
Never let the vacuum cleaner pick up wet matter, mud or burning ashes or materials likely to damage the unit.

natural_image
Illustration of crossed tools including a cross and nail, with no visible text or symbols2) Преди да почиствате с прахосмукачката, отстранете големите и острите предмети от пода или килима, за да предотвратите повреждането на прахосмукачката.
Before using the vacuum cleaner, remove large or sharp objects from the floor to avoid damaging the machine or the dust bag.
natural_image
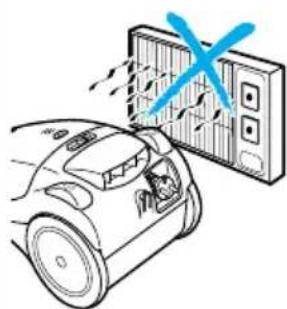
Illustration of a robotic car with a door panel and a blue X mark indicating airflow or damage (no text or symbols)3) Дръжте прахосмукачката далече от източници на топлина като печки, радиатори, директна слънчева светлина и др.
Keep the vacuum cleaner away from heat sources such as radiators, fires, direct sunlight, etc.
natural_image
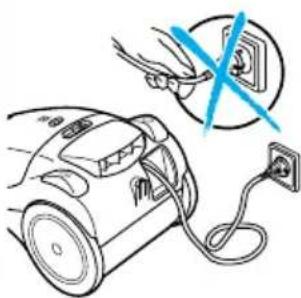
Illustration of a vacuum cleaner connected to an electrical outlet with a blue diagonal line indicating no text or symbols.4) Не дърпайте кабела, когато го изключвате от контакта, а хвашайте щепсела.
Do not pull on the cord when disconnecting the appliance from the mains, always pull on the plug body itself.
Прахосмукачката є оборудвана със захранващ кабел и ако той се повреди, трябва да бъде подменен от Panasonic, упълномощен сервицен център на Panasonic или от квалифициран и упълномощен сервизен специалист.
This appliance is provided with a power supply cord and if this becomes damaged, it must be repaired by Panasonic, or an Authorised Service Centre or a qualified person in order to avoid any hazard.
ОСНОВНИ КОМПОНЕНТИ
IDENTIFICATION OF MAIN PARTS
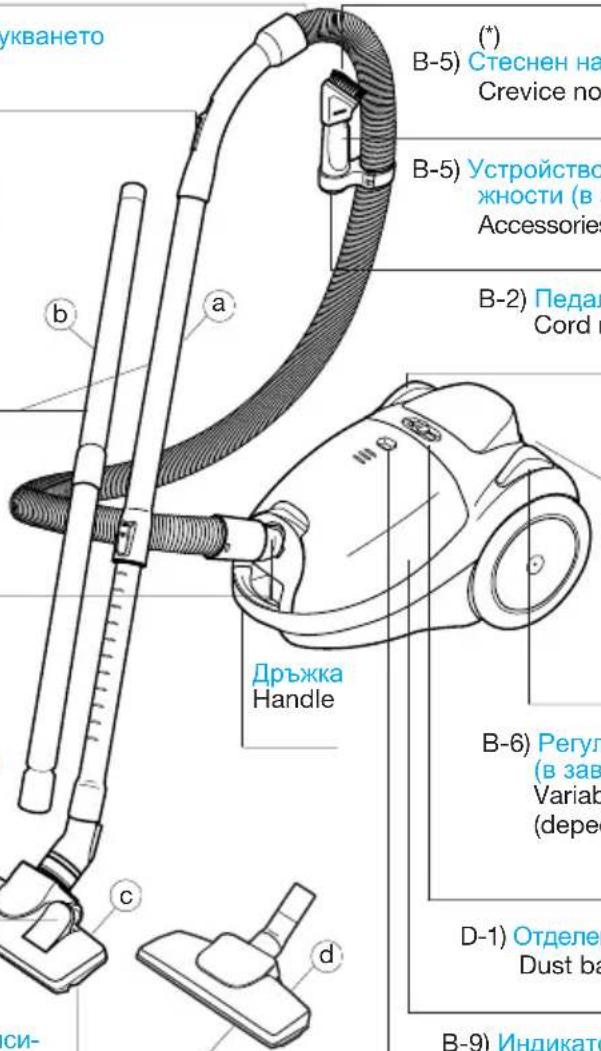
ЗАБЕЛЕЖКА: Когато разопаковате прахосмукачката, уверете се, че принадлежностите, означени на илюстрацията със (*), са включени в комплекта.
NOTE: When unpacking the vacuum cleaner, make sure that the accessories in the illustration marked (*), are supplied with the product.
(*)
A) Маркуч Hose
B-5) Четка за прах (в зависимост от модела) Dusting brush (depending on model)
B-7) Ръчен регулатор на всмукването Manual suction control
(*)
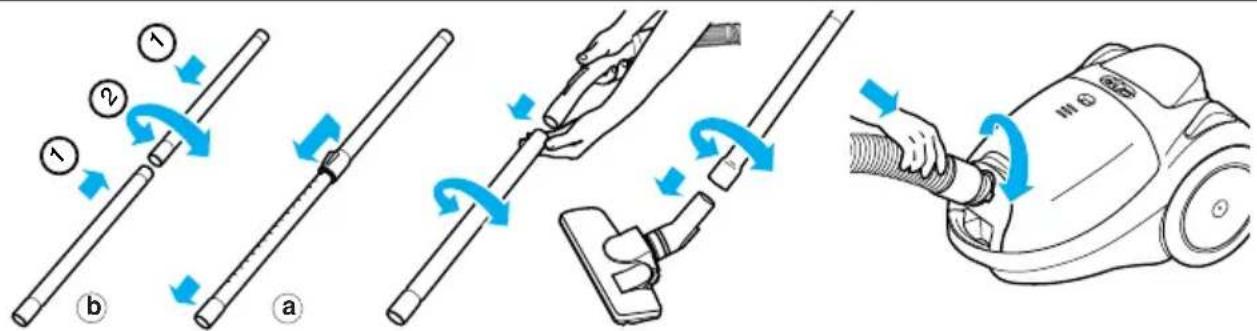
A) Телескопична тръба a Удължителна тръба b (в зависимост от модела) Telescopic tube a Extension tube b (depending on model)
A) Отвор за всмукване Suction inlet
B-4) Pedal за превключване на подовия накрайник Floor nozzle selector pedal
(*) B-4) Подов накрайник (в зависимости от модела ⓒ d) Floor nozzle (depending on model ⓒ d)
text_image
укването (*) Стеснен на Crevice no. B-5) Устройство жности (в з Accessories B-2) Педал Cord r дръжка Handle B-6) Регул (в зав Variab (depec) D-1) Отделе Dust ba B-9) Индикато си-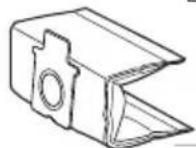
(*)
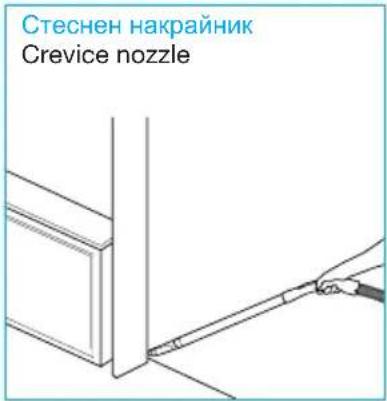
B-5) Стеснен накрайник Crevice nozzle
B-5) Устройство за закрепване на принадлежности (в зависимост от модела) Accessories support (depending on model)
B-2) Pedal за навиване на кабела Cord rewind pedal
D-2) Въздушен филтър Clean air filter
B-3) Pedal за включване/изключване ON/OFF Switch pedal
B-6) Регулатор на мощността (в зависимост от модела) Variable power control (depeding on model)
D-1) Отделение за торбичката за прах Dust bag compartment
B-9) Индикатор за запълването на торбичката за прах Dust bag check indicator
(*) D-1) Торбичка за прах Dust bag
Забележка: Подовият накрайник и тръбите могат да се променят без предупреждение.
NOTE: Floor nozzle and tube are subject to change without notice.
A) КАК ДА ПОДГОТВИТЕ ПРАХОСМУКАЧКАТА
HOW TO ASSEMBLE YOUR CLEANER
text_image
Diagram illustrating four steps of hair cleaning: manual brush, hand tool, brush tip, and vacuum cleaner.В) КАК ДА ИЗПОЛЗВАТЕ ПРАХОСМУКАЧКАТА HOW TO OPERATE YOUR CLEANER
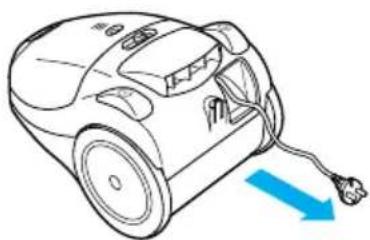
B-1) Изваждане на кабела Cord connection
natural_image
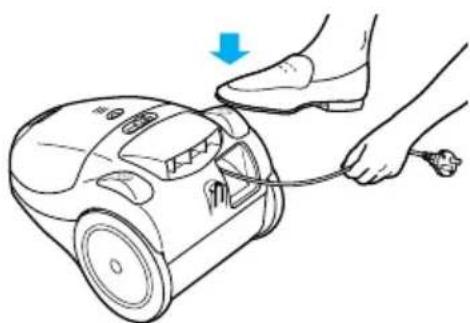
Line drawing of a vacuum cleaner with a blue arrow indicating cable or power input (no text or symbols)B-2) Автоматично прибиране на кабела Automatic cord rewind
natural_image
Line drawing of a hand using a handheld vacuum cleaner to connect a device (no text or symbols present)За да приберете кабела, натиснете педала Rewind the power supply cord, pressing the pedal.
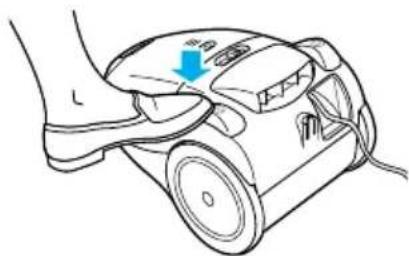
B-3) Педал за включване/изключване ON/OFF Switch
natural_image
Line drawing of a hand using a small robotic vacuum cleaner (no text or symbols)С натискането на този педал се включва и изключва прахосмукачката.
Внимание: При някои модели, оборудвани със система за бавен старт, включването отнема няколко секунди след натискането на педала.
Start or stop the cleaner, pressing the pedal.
Note: Some models attached with a slow start system will take a few seconds to start on the cleaner when pressing the pedal.
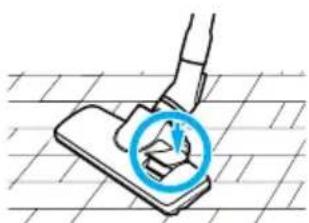
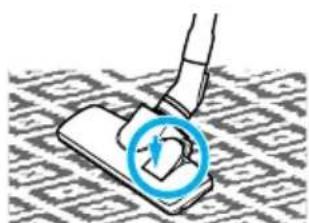
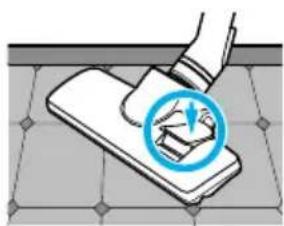
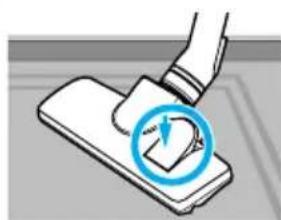
B-4) Pedal за превключване на подовия накрайник © Floor nozzle selector pedal ©
natural_image
Illustration of a hand using a tool to press or mark a circular icon on a tiled floor (no text or symbols)Твърд под / Паркет Hard floor / Parquet
natural_image
Illustration of a hand pressing a blue circular button on a textured surface (no text or symbols)Килим / Мокет / Черга Carpeted floor / Rugs
natural_image
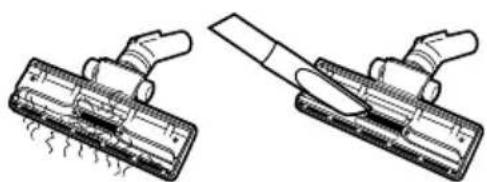
Technical line drawing of two mechanical components with no visible text or symbolsРедовно почиствайте подовия накрайник. Regulary clean the vacuum cleaner head.
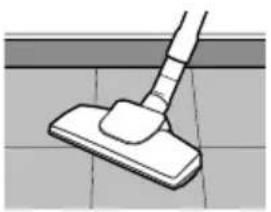
B-4) Подов накрайник d Floor nozzle d
natural_image
Simple line drawing of a tiled floor with a broom and handle (no text or symbols)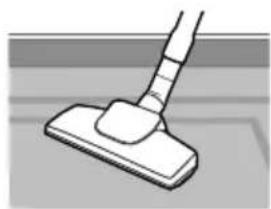
natural_image
Simple line drawing of a hand using a tool to clean or mark a surface (no text or symbols)Позицията на подовия накрайник може да се превключва, в зависимост от почистваната повърхност - твърд под или килим.
The floor nozzle position has been adapted for cleaning carpeted floors, parquet, hard floors and rung.
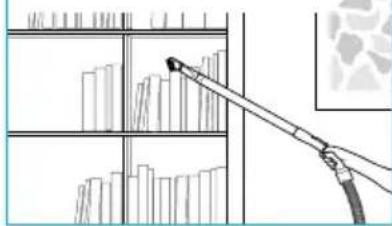
B-5) Принадлежности Accessories
text_image
Стеснен накрайник Crevice nozzle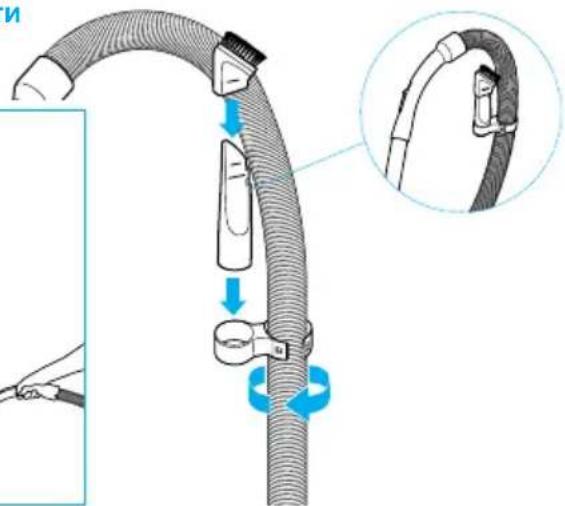
text_image
Diagram illustrating a cable clamp installation with labeled parts and a magnified detail showing the insertion process.Четка за прах (в за- висимост от модела) Dusting brush (depending on model)
natural_image
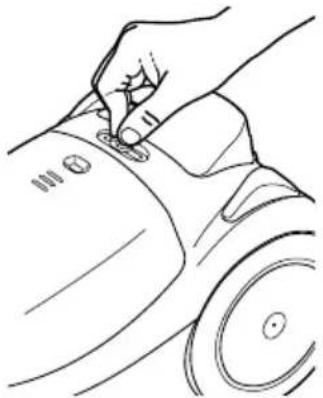
Illustration of a hand using a tool to spray particles into a rack of shelves (no text or symbols visible)B-6) Регулатор на мощността (в зависимост от модела) Variable power control (depending on model)
За да изберете най-подходящата мощност на всмукване, плъзнете регулатора на позицията, най-добре отговаряща на нуждите ви.
To select the power suction, slide the button to the appropriate position required, depending on your cleaning needs.
natural_image
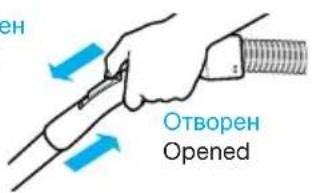
Line drawing of a hand using a tool to mark a button on a mechanical component (no text or symbols)B-7) Ръчен регулатор на всмукването Manual suction contr
За избирането на най-подходящата сила на всмукване при почистването.
To adjust to the right suction for any cleaning operation.
Затворен Closed
text_image
Отворен OpenedMIN MAX
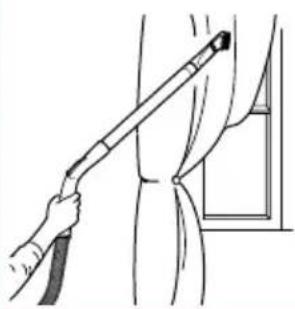
Завеси Curtains
natural_image
Illustration of a hand holding a medical or surgical tool near a window (no text or symbols)Тапицерия Upholstery
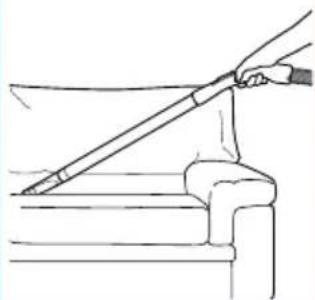
natural_image
Line drawing of a hand holding a long tool over a ladder (no text or symbols)Почистване на твърд под. Cleaning on hard flooring.
natural_image
Illustration of a hand using a tool to press or install a smartphone on tiled floor (no text or symbols)За замърсен, застлан (с килим) под. For more in-grained dirt on carpeted floor.
natural_image
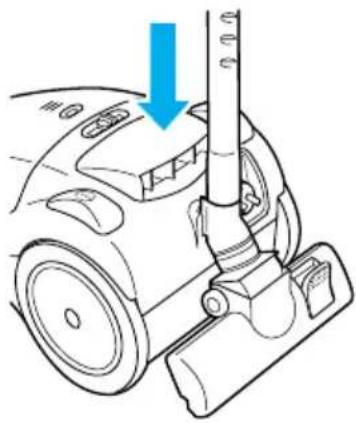
Illustration of a hand pressing a button on a mobile phone (no text or symbols visible)B-8) Система за закрепване Park position
В горната задна част на прахосмукачката се намира гнездо за закрепване на подовия накрайник. То може да се използва за закрепване на накрайника по време на почивка при почистването.
Забележка: Препоръчваме ви при почивка да изключвате прахосмукачката.
Located in the top rear side of the vacuum cleaner, there is a convenient clip for parking the floor nozzle during breaks when vacuuming.
NOTE: When in the park position, we suggest the appliance is switched off.
natural_image
Line drawing of a vacuum cleaner with a blue arrow indicating the component (no text or symbols present)B-9) Индикатор за запълването на торбичката за прах Dust bag check indicator
Забележка: При моделите с регулатор на мощността индикаторът показва правилно при максимальна мощност.
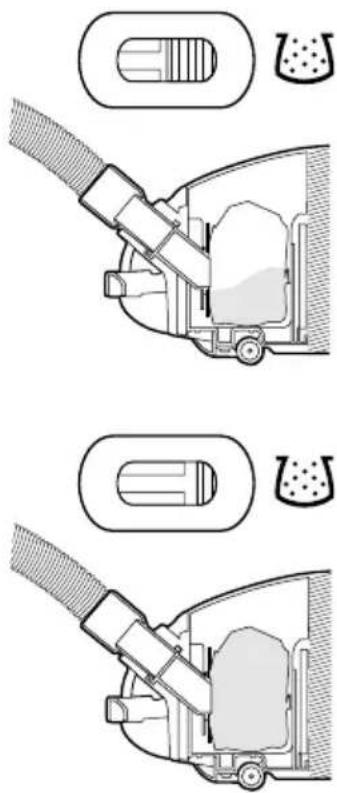
Индикаторът за запълването е предназначен да ви показва състоянието на торбичката за прах. Когато въздухът преминава трудно през торбичката за прах, в индикаторът се появява жълт цвят. В този случай проверете състоянието на торбичката и ако е необходимо, я сменете.
Забележка: Ако след смяната на торбичката индикаторът показва отново жълт цвят, проверете дали тръбите, маркучът или подовият накрайник не са запушени.
Възможно е при използване на стеснения накрайник в индикатора да се появява жълт цвят. Това е нормално.
NOTE: Check the dust bag condition when the cleaner is at MAX position. (Only for models with power control).
The dust bag check indicator is a visual aid to advice you of the condition of the dust bag. A yellow mark will appear in the window when airflow through the dust bag is insufficient. When this happens, check the dust bag, it may be full or blocked with fine dust and needs to be replaced.
NOTE: If after having replaced the dust bag, the yellow mark continues appearing in the window, check to see if the hose or suction inlet is clogged.
The dust indicator mark, can also appear when using the crevice nozzle.
natural_image
Diagram showing three stages of a vehicle exhaust system with no visible text or symbolsC) КАК ДА СЪХРАНЯВАТЕ ПРАХОСМУКАЧКАТА HOW TO STORE YOUR CLEANER
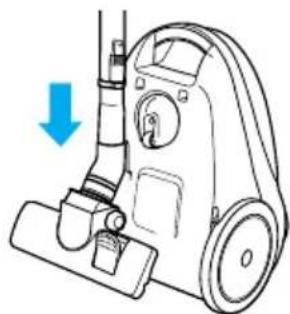
За по-лесно и удобно съхраняване на прахосмукачката, върху корпуса й има гнездо за закрепване на подовия накрайник, позволяващо прахосмукачката, маркуча и тръбите да се поставят във вертикална позиция.
For easy storage, the vacuum cleaner includes a clip system built onto the body of the cleaner, which will keep the extension wand, hose and nozzle in a vertical position.
natural_image
Line drawing of a vacuum cleaner with a blue arrow indicating downward motion (no text or symbols)D) ГРИЖИ И ПОДДРЪЖКА
MAINTENANCE AND SERVICING

ВНИМАНИЕ: Преди да почиствате или обслужвате която и да е част на прахосму- качката, ИЗКЛЮЧЕТЕ захранващия кабел от контакта.
IMPORTANT NOTE: Before servicing any part, always DISCONNECT the cleaner from the electricity supply.
D-1) Как да смените торбичката за прах How to replace the dust bag
natural_image
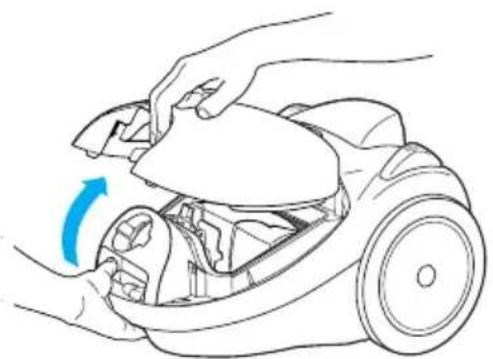
Line drawing of hands assembling a small mechanical component with a blue arrow indicating rotation (no text or symbols)1) Вдигнете нагоре капака, както е показано.
Lift the dust cover up as shown.
text_image
Diagram of a car's internal components with numbered parts and directional arrows indicating motion or movement.3) Поставете новата торбичка, като вкарате картонената подложка в улеите и натиснете напред.
Insert new dust bag by guiding cardboard into the guide slots and push forwards.
text_image
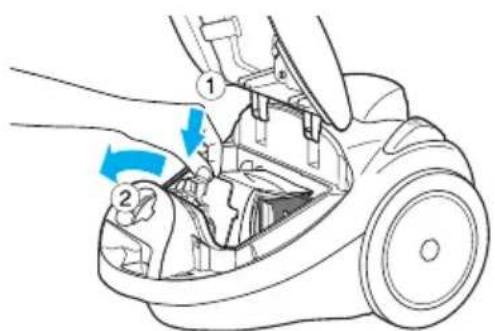
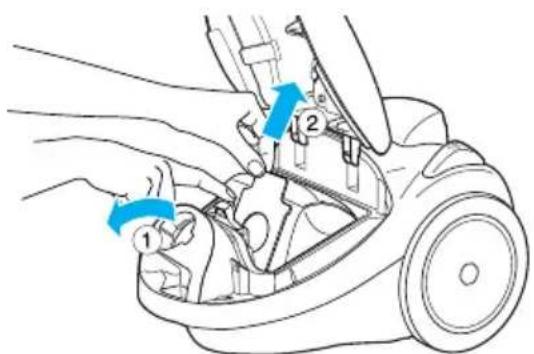
Diagram showing mechanical assembly with numbered components and directional arrows indicating motion or movement2) Натиснете шифта напред и извадете торбичката като издърпате картонената подложка нагоре.
Push clamp forwards and take out dust bag pulling cardboard up.
natural_image
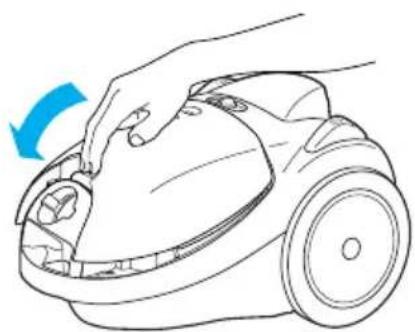
Line drawing of a hand using a vacuum cleaner to clean or remove the air (no text or symbols present)4) Затворете капака.
ВНИМАНИЕ: Ако торбичката за прах не е поставена или е поставена неправилно, капакът няма да може да се затвори.
Close the dust cover.
IMPORTANT: When the dust bag is not in position or it has not been installed correctly, the dust cover will not close.
Използвайте само оригинални торбички Panasonic Tipo C-20E. Използването на други торбички може да повреди прахосмукачката или да намали ефективността й.
Use only original Panasonic dust bags Type C-20E. Use of non-original dust bags may affect the performance of or damage the unit.
D-2) Обслужване на филтрите.
Filter care
Централен филтър (Фиг. 1) Озн.: AMC8F03D1100
Централният филтър се намира в носача на торбичката за прах и е предназначен за предпазване на електромотора от замърсяване.
Когато филтърът се замърси, извадете го, изплакнете го с топла вода, оставете го да изсъхне добре и го поставете обратно.
За да извадите филтъра, хванете горната му част и го издърпайте.
Внимание: Преди да поставите филтъра, уверете се, че напълно сух.
Central Filter (Fig. 1) Part no. AMC8F03D1100
The central filter (foam filter), is installed in the dust bag compartment to protect the motor from dirt.
When it becomes dirty, simply rinse it out in warm water and dry it thoroughly before replacing.
To remove the central filter, hold the filter at the top (as illustrated) and pull it out.
Important: Ensure that the filter is completely dry before re-installing it into the cleaner.

natural_image
Diagram of a hand inserting a component into a car's seat panel, showing mechanical parts and a blue arrow indicating direction (no text or symbols present)Fig. 1
Въздушен филтър (Фиг. 2) Озн.:
AMC8F28T1000 / MC-E760, MC-E761, MC-E762, MC-E763, MC-E785 AMC8F28T3000 / MC-E783, MC-E787
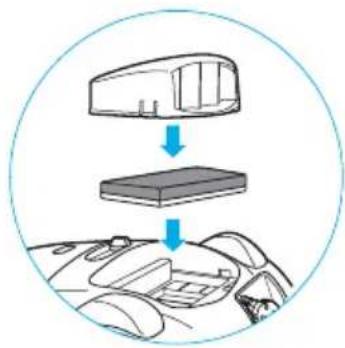
Филтърът за пречистване на въздуха се намира в задната страна на прахосмукачката. Той премахва останалите в излизация въздух частици прах.
Препоръчваме ви да сменяте въздушния филтър, когато се замърси. Ориентировъчно, смяната трябва да се извърша веднъж или два пъти годишно, в зависимост от честотата на употреба на прахосмукачката. За да смените филтъра, хванете капака и го издърпайте.
Clean Air Filter (Fig. 2) Part no.:
AMC8F28T1000 / MC-E760, MC-E761, MC-E762, MC-E763, MC-E785 AMC8F28T3000 / MC-E783, MC-E787
The clean air filter, is installed in the rear side of the cleaner. This filter retains any small dust particles which may be present in the expelled air.
It is advisable to change the clean air filter when it becomes dirty. As a guide, once or twice a year is usually sufficient depending on use.
To change the clean air filter, hold the exhaust cover (as illustrated) and pull it out.
text_image
Diagram showing a car interior with a device component being processed into a dashboard, labeled in Chinese.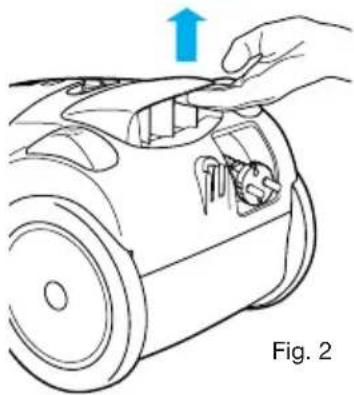
natural_image
Line drawing of a robotic device with a hand adjusting the top part, showing a blue upward arrow and labeled Fig. 2 (no text or symbols on the diagram itself)ВНИМАНИЕ: Никога не използвайте прахосмукачката без филтри или с неправилно
поставени филтри. Това може да я повреди или да влоши работата й.
Никога не хвашайте капака, за да пренасяте прахосмукачката.
IMPORTANT: Never use the cleaner without the correct filters properly installed. Failure to do so may result in motor damaged.
Never hold the exhaust cover to carry the cleaner.
E) ПРИНАДЛЕЖНОСТИ (Допълнителни) ACCESSORY (Optional)
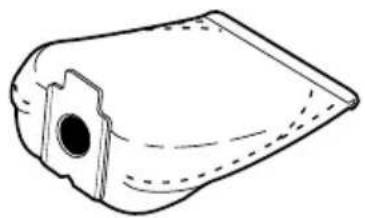
Платнена торбичка за прах Re-usable cloth bag
Озн.: AMC8F99T1000 Part no. AMC8F99T1000
natural_image
Line drawing of a mechanical part with a circular hole and dashed outline (no text or symbols)| СПЕЦИФИКАЦИИ | SPECIFICATIONS | MC-E760 | MC-E761 | MC-E762MC-E763 | MC-E783 | MC-E785 | MC-E787 | |
| Електрическо захранване | Power source | 230V~50Hz(*)230-240~50Hz | ||||||
| Максимална мощност | Max.Output | 1350W | 1500W | 1600W | 1500W | 1600W | 1600W | |
| Номинална мощноат | Nominal output | 1200W | 1350W | 1400W | 1350W | 1400W | 1400W | |
| Размери (ДхШхВ) | Dimensions (LxWxH) | 410 x 282 x 255 | ||||||
| Нето тегло (kg) | Net weight (kg) | 6.1 | 6.1 | 6.1 | 6.1 | 6.1 | 6.1 | |
| Подов накрайник | Floor nozzle | √ | √ | √ | √ | √ | √ | |
| Четка за прах | Dusting brush | - | - | - | √ | √ | √ | |
| Стеснен накрайник | Crevice nozzle | √ | √ | √ | √ | √ | √ | |
| Телескопична тръба | Telescopic tube | - | - | - | √ | - | √ | |
| Удължителна тръба | Extension tube | √ | √ | √ | - | √ | - | |
Забележка: (*) Само при някои модели.
Note: (*) Only in some versions.
ИНФОРМАЦИЯ ЗА ПОКУПКАТА
Модельт и серийният номер на този уред са изписани върху пластина, намираща се на задната му част. За бъдещи справки, запишете модела и серийния номер в съответните графи, както и датата и мястото на покупката.
REMINDER FOR CUSTOMER
The model and serial number of this product may be found on the nameplate located at the back of your cleaner. You should note the model and serial number in the spaces provided and retain this book as a permanent record of your purchase.
Модел:
Сериен номер:
Дата на покупката:
Място на покупката:
Model Number: ....
Serial Number: ....
Date Purchased: ....
Where Purchased: ....