Tiros - Zelt Sierra Designs - Kostenlose Bedienungsanleitung
Finden Sie kostenlos die Bedienungsanleitung des Geräts Tiros Sierra Designs als PDF.


Benutzerfragen zu Tiros Sierra Designs
0 Frage zu diesem Gerät. Beantworten Sie die, die Sie kennen, oder stellen Sie Ihre eigene.
Eine neue Frage zu diesem Gerät stellen
Laden Sie die Anleitung für Ihr Zelt kostenlos im PDF-Format! Finden Sie Ihr Handbuch Tiros - Sierra Designs und nehmen Sie Ihr elektronisches Gerät wieder in die Hand. Auf dieser Seite sind alle Dokumente veröffentlicht, die für die Verwendung Ihres Geräts notwendig sind. Tiros von der Marke Sierra Designs.
BEDIENUNGSANLEITUNG Tiros Sierra Designs
TIROS
SIERRA DESIGNS
Your Sierra Designs TIROS
tent is very easy to pitch
and maintain. Follow these
instructions to pitch your
lent quickly, safely and eas-
TIROS TENT CONTENTS
Tent Body & Rainfly: 1 Line Tighteners: 12
Tent Poles: 5 Pitching Instructions: 1
Tent Stakes: 11* Guy Cord: 12
Stake Sack: 1 Pole Sack: 1
* Sierra Design tests include stakes for pitching the body and fly under normal conditions. Additional stakes may be required in severe conditions.
First Pitch
In order to familiarize yourself with your new tent, we suggest that you "test pitch" it before embarking on a wilderness trip.
Select a Site
Look for a level spot that is protected from the wind in order to ensure sleeping comfort. Clear the area of debris such as sharp stones and sticks which might abrade or puncture the tent floor. Choose an area that will drain well when it rains.
Unfurl the Tent and Assemble the Poles
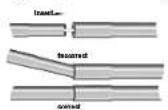
Unfold the rent and lay the floor flat on the ground with the door unzipped. Carefully unfold the shock corded pole sections and allow them to slide together. Do not allow the poles to snap together: This can lead to serious pole damage. Make certain that the insert of each pole section is fully inserted into the next pole section (Figure 1). You will have two straight poles, two arch poles of equal length, and one shorter arch pole.
Stake Out the Floor
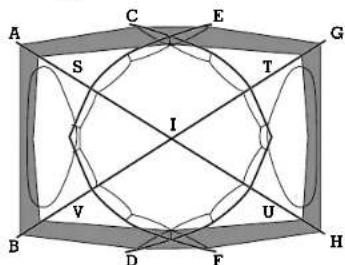
We recommend staking the floor prior to inserting the poles for greater pitching ease. Although the Tirt is a totally freestanding tent, we suggest that you always stake the floor for greater safety and stability, especially in high winds. First stake each of the webbing loops at the back of the tent at points G and H (Figure 2). Next, move to the front of the tent, pull the webbing loops at points A and B until the tent floor is squarely and semi-tautly positioned, and stake them down. Finally, stake the sides at points C, D, E and F, again pulling the tent floor semi-caut.
Erect the Tent
Insert the tips of one of the poles into the grummets at points A and H, and the tips of a second pole into the grummets at points B and G (Figure 2). Pull the two poles up so they intersect at point I and attach the Clip-Lox ^™ over the intersection at the apex (do not attach the cord yet). Now, following the seams along the poles, attach the remaining Swift Clips ^™ . Next, insert a long arched pole at points C and D, arching the pole around the back of the tent. Finally, attach all Swift Clips along this pole's path. Repeat this process with the remaining long arch pole between points E and F. Now that all the long poles have been attached to the tent body, attach the 6 remaining Clip-Locs. Hook the four Clip-Loxs nearest to the doors over the intersection with their opening facing the middle of the tent. Now attach the cord on the Clip-Locs by wrapping the cord in the direction crossing the open gate of the clip. Wrap the cord around the pole intersection two to four times, depending on desired firmness, then slide the cord into the groove on the backside of the clip to hold it taut (Figure 3).
Fly Sheet
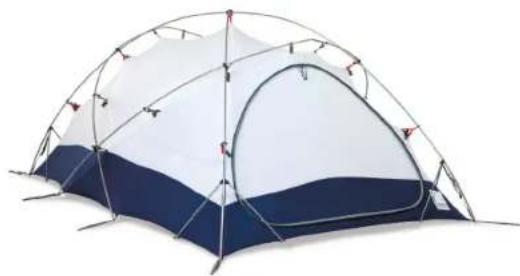
You now have one remaining pole with a bent angle in it. Place the ends of this pole in the buckets at points S and V or T and U. Drape the fly over the tent making sure the vestibule is over the end with the vesti
natural_image
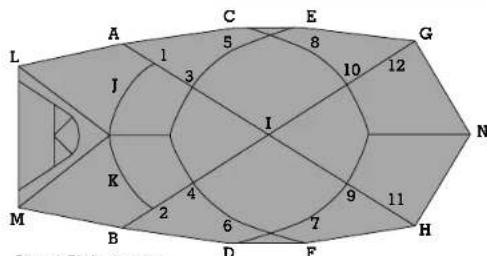
Exterior view of a modern camping tent with blue and white panels (no text or symbols visible)bule pole. Please note that the rent body is symmetrical so the fly can go on with the vestibule over either door. At points 1 to 12 (Figure 4) on the inside of the rent fly you will find L" side release buckles. Attach these points to their mates on the tent body. It is easiest if you start at the points nearest the apex and work down. At points J and K on the fly you will find Velcro" attachments. Attach these to the vestibule pole. At eight perimeter points on the fly are "L" LadderLoc fly attachments (Figure 5). These points correspond to the ends of the poles at points A–H. Working your way around the perimeter of the tent, hook the grommets at the ends of the adjustment straps over the pole ends at points A, B, G and H and then tighten the adjustment straps. Working your way around the tent again, follow the same procedure for points C, D, E and F. Now stake out the adjustable vestibule loops at points L and M. Tighten these to the desired tautness.
Ventilation
Proper ventilation is essential for creating a comfortable living space inside your tent. The vestibule door panel can be rolled away for maximum ventilation, or guyed out in an awning-like fashion. Because the rainfall has an awning over the door, you can often leave the door tied open in a rain storm, provided the door faces away from the wind. When the door in the rear of the rainfall is left fully or partially open, it effectively improves flow-through ventilation. Additionally, the zippers at the top of the vestibule and back door can be used to regulate ventilation. Staking out the center back of the rainfall (point N) further enhances ventilation by increasing airflow under the fly.
Internal Guy System
Years ago, Sierra Designs was the first to introduce the revolutionary Internal Guy System. This system remains a very important feature in our Convertible and 4-Season tents. When installed, this simple system will greatly increase the strength of your tent with the weight of a few guy cords. This system is very useful in extreme weather conditions, but is not necessary under normal conditions.
Installation: All attachments are made inside the tent. All that is needed are 4 pieces of guy cord of 100" lengths or longer, (line tighteners may be used but are optional). Some of these items have been provided complimentary with your tent. There are nine webbing loops sewn to the interior of the tent body; one in each corner of the floor at points A, B, G and H (Figure 6) and one at each of the pole intersection points in the ceiling at points O, P, Q, R and I.
Start by tying one end of a cord through the webbing loop in the ceiling at point Q. Secure the other end at point A with a double half-hitch or one of the complimentary line tighteners (See Figure 7). Repeat this procedure for lines between points B and O, G and R, II and P. Note: Point I is the apex of the tent and it is not part of the Internal Guy System. Use point I as a hang loop. The Internal Guy System will partially obstruct the doorway. If you want to stow the cord out of the way when entering or exiting the tent, simply loosen the cord and pass it through the loop in the ceiling.
Please note that 11 tent stakes and 12 guy cords were provided with this tent as a courtesy. If you choose to use more than this when pitching your tent, additional stakes and cord may be purchased at the store where you originally purchased your tent.
Figure 1: Current Pole Assembly
text_image
A C E G S T I V B D F U HFigure 2: Text Body (top view)
text_image
L A C E G 1 5 8 10 12 J 3 I N K 2 4 6 7 9 11 M B D F H Figure 4: El burs (1st point)Figure 4: Flyshot (top view)
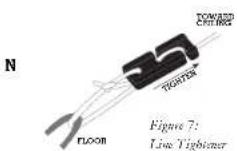
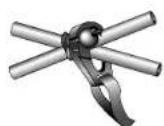
Figure 3: Clip-Loc
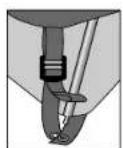
Figure 5: Ladder Lock
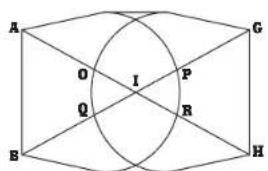
text_image
A O I P Q B R H GFigure 6: Top view