Clip 3 - Zelt Sierra Designs - Kostenlose Bedienungsanleitung
Finden Sie kostenlos die Bedienungsanleitung des Geräts Clip 3 Sierra Designs als PDF.


Benutzerfragen zu Clip 3 Sierra Designs
0 Frage zu diesem Gerät. Beantworten Sie die, die Sie kennen, oder stellen Sie Ihre eigene.
Eine neue Frage zu diesem Gerät stellen
Laden Sie die Anleitung für Ihr Zelt kostenlos im PDF-Format! Finden Sie Ihr Handbuch Clip 3 - Sierra Designs und nehmen Sie Ihr elektronisches Gerät wieder in die Hand. Auf dieser Seite sind alle Dokumente veröffentlicht, die für die Verwendung Ihres Geräts notwendig sind. Clip 3 von der Marke Sierra Designs.
BEDIENUNGSANLEITUNG Clip 3 Sierra Designs
SIERRADA DESIGNS
CLIP 3
SIERRA
DESIGNS
Your Sierra Designs
CLIP 3 tent is very easy
to pitch and maintain.
Follow these instructions to
pitch your tent quickly,
safely and easily.
CLIP 3 TENT CONTENTS
Tent Body & Rainfly: 1 Pitching Instructions: 1
Tent Poles: 2 Stake Sack: 1
Tent Stakes: 9* Pole Sack: 1
Guy Cord: 2
* Sierra Designs tents include stakes for pitching the body and fly under normal conditions. Additional stake may be required in severe conditions.
First Pitch
In order to familiarize yourself with your new rent, we suggest that you "test pitch" it before embarking on a wilderness trip.
Select a Site
Look for a level spot that is protected from the wind in order to ensure sleeping comfort. Clear the area of debris such as sharp stones and sticks which might abrade or puncture the tent floor. Choose an area that will drain well when it rains.
Unfurl the Tent and Assemble the Poles
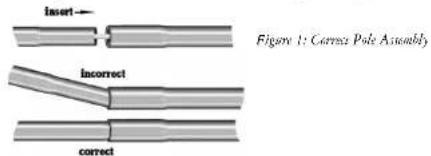
Unfurl the tent and lay the tent floor flat on the ground with the door unzipped. Carefully unfold the shock corded pole sections, and allow them to slide together. Do not allow the poles to snap together. This can lead to serious pole damage. Make certain that the insert of each pole section is fully inserted into the next pole section (Figure 1). You will have one long "front arch" pole and one short "rear arch" pole (Figure 2).
text_image
Insert Figure 1: Correct Pole Assembly incorrect correct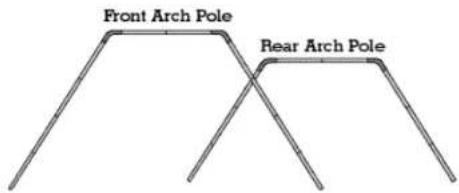
text_image
Front Arch Pole Rear Arch PoleFigure 2: Arch Poler
Stake Out the Tent Floor
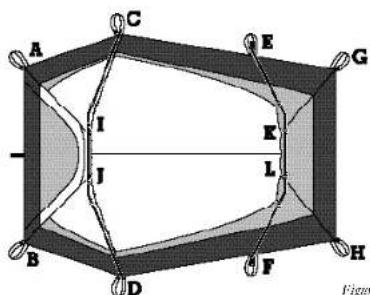
First stake down the webbing loops at the back of the tent at points G and H (Figure 3). Then move to the front of the tent and pull the webbing loops at points A and B until the floor is squarely and semi-tautly positioned, and stake them down. Staking out points C, D, E and F is recommended, especially in high winds.
text_image
A C E G I K L B D F H FigureFigure 3: Tent Body (top view)
natural_image
Illustration of a tent structure with a triangular canopy and a rectangular opening (no text or symbols)Erect the Tent
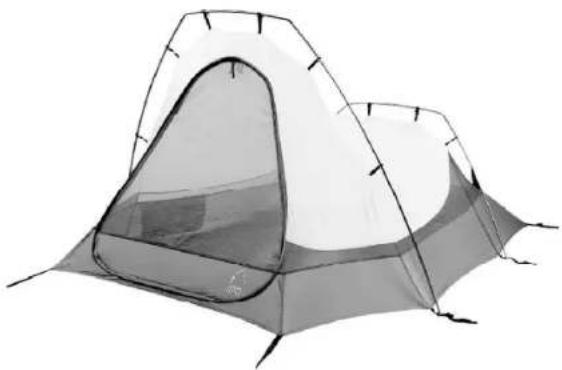
Insert the metal tips of the longer "front arch" pole into the grommets at points C and D (Figure 3). Clip the 2 Cam-Locs™ located above the door at points I and J onto the center section of the pole, taking care not to twist the webbing which connects the Cam-Loc to the tent. Do not engage the Cam-Loc at this time. Attach the remaining Swift Clips™, following the seam along the path of the pole, between points C and D. Now,
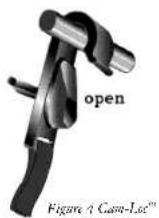
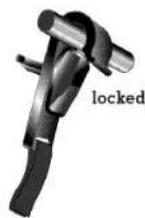
insert the metal tips of the shorter "rear pole" into the grommets at points E and F. Attach the Cam-Locs at points K and L and Swift Clips to this pole in the same manner as the front pole. Once all the clips
are attached to both poles you may engage the Cam-Locs by turning the key 180° until they lock completely onto the pole. When the Cam-Loc is engaged the key should be horizontal. (Figure 4).
Flysheet
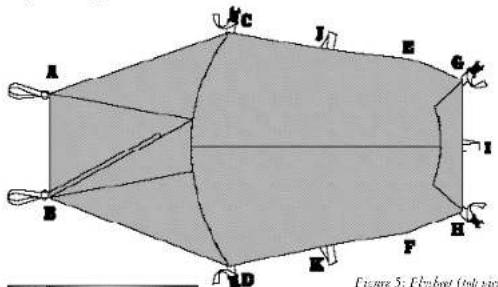
Drape the fly over the tent and position the zipper over the tent door (Figure 5). At points C, D, G and H are 1" side-release "fly clip" buckles. Clip these buckles into their corresponding mares on the tent floor and pull the straps until the fly is taut (Figure 6). By first clipping the blue webbing strap on the rainfly to a blue webbing strap on the body, you are guaranteed a fast, proper rainfly set-up every time. Now pull points A and B out until the vestibule is taut and stake it down in that position. You can use a guy line to guy out the fly at points I, J, and K for increased ventilation.
text_image
A B C D E F G H I J K L M N O P Q R S T U V W X Y Z A B C D E F G H I J K L M N O P Q R S T U V W X Y Z A B C D E F G H I J K L M N O P Q R S T U V W X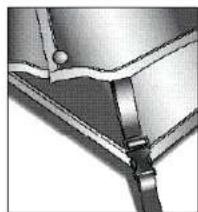
natural_image
Close-up of a metallic mechanical joint or bracket with no visible text or symbolsFigure 6: Fly Clip
Ventilation
The best air flow through the tent is obtained by pitching the tent with the foot area into the wind. With the rainfly on, airflow is increased by guying out the rainfall away from the tent walls. Note that the door can be folded back and tied in an open position.