JA-82M - Sicherheitskamera Jablotron - Kostenlose Bedienungsanleitung
Finden Sie kostenlos die Bedienungsanleitung des Geräts JA-82M Jablotron als PDF.


| Produkttyp | Funk-Magnetkontakt für Fenster/Türen |
| Marke | Joblotron |
| Modell | JA-82M |
| Abmessungen | 192 x 25 x 9 mm |
| Gewicht | ca. 50 g (mit Batterien) |
| Stromversorgung | 2 x CR2354 Lithium-Batterien (3,0 V, 1 Ah) |
| Typische Batterielebensdauer | ca. 3 Jahre (bei max. 5 Aktivitäten/Tag) |
| Funkfrequenz | 868 MHz (Oasis-Protokoll) |
| Reichweite | ca. 200 m (Freifeld) |
| Klassifizierung | Grad 2 nach EN 50131-1, EN 50131-2-6, EN 50131-5-3 |
| Betriebstemperatur | -10 bis +40 °C |
| Schutzart | IP20 (Innenbereich) |
| Erfassungsfunktion | Öffnen von Fenstern/Türen mit Magnetabstand ≥ 2 cm |
| Sabotageschutz | Rückseitige und Gehäuse-Tamper-Sensoren |
| LED-Anzeige | Blinkt bei Auslösung, Dauerlicht bei Tamperauslösung |
| DIP-Schalter | 4 Schalter (Tamper aktivieren, permanente Statusmeldung, Verzögerung) |
| Anlernmodus | Automatische Anmeldung am Oasis-Steuerpanel nach Batterieeinlegen |
| Einbau | Nur durch autorisierten Fachmann; auf Kunststoff oder Holz |
| Wartung | Batteriewechsel bei schwacher Spannung (max. 2 Wochen Verzögerung) |
| Lieferumfang | Detektor, Magnet, Schrauben, Kunststoffplatten, Montageanleitung |
| Entsorgung | Batterien getrennt entsorgen; Gerät an Händler oder Hersteller |
Häufig gestellte Fragen - JA-82M Jablotron
Benutzerfragen zu JA-82M Jablotron
0 Frage zu diesem Gerät. Beantworten Sie die, die Sie kennen, oder stellen Sie Ihre eigene.
Eine neue Frage zu diesem Gerät stellen
Laden Sie die Anleitung für Ihr Sicherheitskamera kostenlos im PDF-Format! Finden Sie Ihr Handbuch JA-82M - Jablotron und nehmen Sie Ihr elektronisches Gerät wieder in die Hand. Auf dieser Seite sind alle Dokumente veröffentlicht, die für die Verwendung Ihres Geräts notwendig sind. JA-82M von der Marke Jablotron.
BEDIENUNGSANLEITUNG JA-82M Jablotron
The JA-82M wireless magnetic door-detector
The JA-82M is a component of Jablotron's Oasis 80 alarm system. It is designed to detect opening windows, doors etc. It can be installed into plastic or wooden frames and is suitable for most types of fitting. The battery-powered detector communicates via OASIS radio protocol.
Installation preliminaries
Installation shall only be undertaken by technicians holding a certificate issued by an authorized distributor.
The detector must not be exposed to bending or other deformation, otherwise it can be damaged.
The product should be installed into a gap between the moving and non-moving parts of windows or doors where the closing mechanism of a fitting is located.
In practice, there exist various window/door frames and fittings. It is therefore wise to verify before installation that the detector fits the given window/door type. In the case of a wooden frame with too narrow a profile it is usually possible to mill out a groove for detector insertion.
This detector reacts to the removal of its magnet unit. The electronics should be installed onto the non-moving part of windows or doors, and the magnet onto the moving part. If the supplied magnet does not exactly match the window/door construction you can call the window/door supplier for a magnet of a suitable type. Alternatively, you can adjust the magnet's position using a suitable back-plate.
Installation
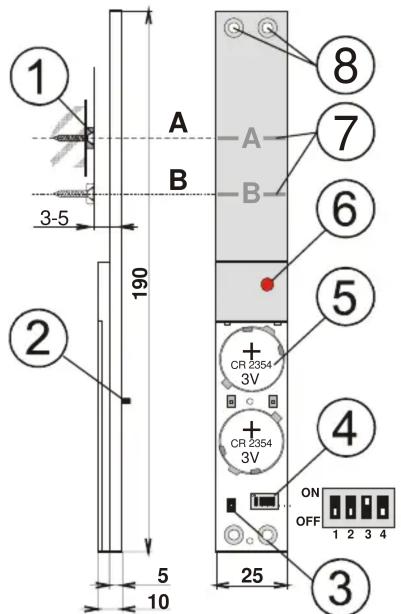
- magnet; 2. rear tamper sensors; 3. cover tamper sensor; 4. DIP switches; 5. battery; 6. led indicator; 7. adjustment lines; 8. fixing holes
LED indicator – 15 minutes after closing the detector's battery cover, the LED indicates detector triggering (a flashing light indicates window opening, a long light indicates that both rear tamper sensors have been triggered).
- Find a suitable place for the detector's location so that the magnet is aligned with the A (or B) adjustment line when the window/door is closed. After opening the window/door, the magnet's distance from the detector should increase by at least 2 cm.
- Avoid locating the detector directly on a metal frame as metal influences the functioning of the magnetic sensor and radio communication. This can be usually achieved by placing the detector on the hinge side of the window/door. In addition, avoid installing the detector onto the bottom part of the window/door frame due to possible water condensation.
- Screw the magnet onto the moving part of the window according to the following picture. Use a non-metallic back-plate if the frame groove is too wide.

- Unscrew the battery cover and screw the detector on so that the magnet is aligned with the A (or B) adjustment line when the window/door is closed, see the picture. Be careful not to use too much force while screwing on, otherwise the detector's plastic body could be damaged.
- You can use the long plastic plates supplied in the package to ensure that the place for detector attachment is sufficiently even. After the detector has been installed, at least one of the rear tamper sensors must be permanently closed (pressed).
- Carefully try out, if the detector (magnet) makes no obstruction when closing the window/door.
- If all is in order, you can configure the detector's functionality (see DIP switches below).
- Enter enrollment mode on the control panel (or on a receiver). Subsequently, install battery cells into the detector and screw the battery cover on (2 screws). After connecting the battery the detector will send an enrollment signal. Up to 10 seconds' delay is to be expected to the detector's response to putting the magnet away/close or pressing/releasing tamper sensors.
- After the detector has been enrolled, you can check its functioning. On the Oasis control panel, you should also check signal strength.
DIP switches
There are four DIP switches located under the battery cover:
| No. | OFF | ON |
| 1 Rear tamper sensors OFF | Rear tamper sensors ON* | |
| 2 | Permanent window/door status signalling | Only window/door opening will be signalled ** |
| 3*** | The system will provide an exit / entrance delay | The system will respond with an instant alarm |
| 4 | No function | |
Default settings are shown in bold
* To detect intrusion the switch should be ON.
** Switching ON (when only window/door opening will be signalled) is suitable for bedrooms, where windows/doors are left open for ventilation during the protection period.
*** This setting will apply if the detector is used with an Oasis control panel with a natural reaction pre-programmed for the detector's address.
Detector functionality
If DIP switch no. 2 is OFF, the detector will indicate whether the window/door is open. When used within an Oasis system and the system is set (armed) while the window/door is open, the detector will be bypassed. However, if somebody closes the window/door while the system is set, then subsequently opening it will trigger an alarm. This also applies to pulling the window/door handle by string. If you do not wish permanent window/door open status to be indicated on the keypad, then DIP switch no. 2 should be ON. This will ensure that only window/door opening will be signalled.
Battery replacement
The detector monitors its battery voltage and if too low, a report is sent to the control panel to inform the installer or user. The detector continues to function, however battery replacement should not be delayed by more than two weeks. Always replace both battery cells. We recommend using a high quality brand-name battery (e.g. Panasonic). After the battery has been replaced, detector functioning should be tested.
Expired batteries should not be thrown into the garbage, but disposed of according to local regulations.
Removing the detector from the system
If a detector is removed, the control panel announces the removal. The detector has to be deleted in the control panel before intentional removal.
Technical specifications
| Voltage Lithium battery type | CR2354 - 2 pc (3.0 V, 1 Ah), power source type C |
| Typical battery lifetime | approx. 3 years (for 5 daily activations maximum) |
| Communication band | 868 MHz, Oasis protocol |
| Communication range | approx. 200m (open area) |
| Dimensions | 192 x 25 x 9 mm |
| Operational environment EN 50131-1 | class II. internal |
| Operational temperature range | -10 to +40 °C |
Classification: grade 2
according to: EN 50131-1, EN 50131-2-6, EN 50131-5-3
Complies with: ETSI EN 300220, EN50130-4, EN55022, and EN 60950-1
Can be operated according to: ERC REC 70-03
FCC ID VL6JA82M
CE JABLOTRON ALARMS a.s. hereby declares that the JA-82M is in compliance with the essential requirements and other relevant provisions of Directive 1999/5/EC and complies with part 15 of the FCC rules. Operation is subject to the following two conditions: 1. This device may not cause harmful interference, and 2. This device must accept any interference received, including interference that may cause undesired operation.
CAUTION: Changes or modifications no expressly approved by Jablotron could void the user's authority to operate the equipment. The original of the conformity assessment can be found at www.jablotron.com, Technical Support section
Note: Although this product does not contain any harmful materials we suggest you return the product to the dealer or directly to the producer after use.
Marke : Jablotron
Modell : JA-82M
Kategorie : Sicherheitskamera