
KH218 - Nähmaschine BROTHER - Kostenlose Bedienungsanleitung
Finden Sie kostenlos die Bedienungsanleitung des Geräts KH218 BROTHER als PDF.


| Produkttyp | Strickmaschine |
| Marke | Brother |
| Modell | KH218 |
| Abmessungen (ca.) | 120 x 30 x 25 cm |
| Gewicht (ca.) | 10 kg |
| Antrieb | Handbetrieben |
| Nadelsystem | Auswechselbare Nadeln im Rippenapparat |
| Hauptfunktionen | Stricken, Rippenmuster (1/1, 2/1, etc.), Glattstrick |
| Zubehör im Lieferumfang | Rippenapparat, Anschlagkamm, Gewichte, Maschenhalter |
| Reinigung | Mit weichem Tuch abwischen; Nadeln und Rippenapparat regelmäßig ölen |
| Wartung | Nadeln bei Beschädigung ersetzen; Rippenapparat auf Spiel prüfen |
| Sicherheitshinweise | Nadeln vorsichtig handhaben; Kinder nicht unbeaufsichtigt lassen |
| Ersatzteile | Ersatznadeln, Rippenapparat-Sets, Gewichte |
| Reparaturfreundlichkeit | Einfach durch austauschbare Komponenten |
| Garantie | 2 Jahre (übliche Herstellergarantie) |
Häufig gestellte Fragen - KH218 BROTHER
Benutzerfragen zu KH218 BROTHER
0 Frage zu diesem Gerät. Beantworten Sie die, die Sie kennen, oder stellen Sie Ihre eigene.
Eine neue Frage zu diesem Gerät stellen
Laden Sie die Anleitung für Ihr Nähmaschine kostenlos im PDF-Format! Finden Sie Ihr Handbuch KH218 - BROTHER und nehmen Sie Ihr elektronisches Gerät wieder in die Hand. Auf dieser Seite sind alle Dokumente veröffentlicht, die für die Verwendung Ihres Geräts notwendig sind. KH218 von der Marke BROTHER.
BEDIENUNGSANLEITUNG KH218 BROTHER
RIBBER OR PURL ATTACHMENT
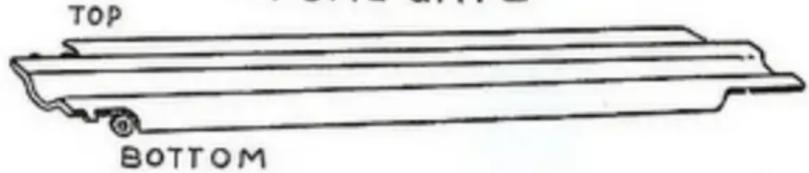
6.PURLGATE
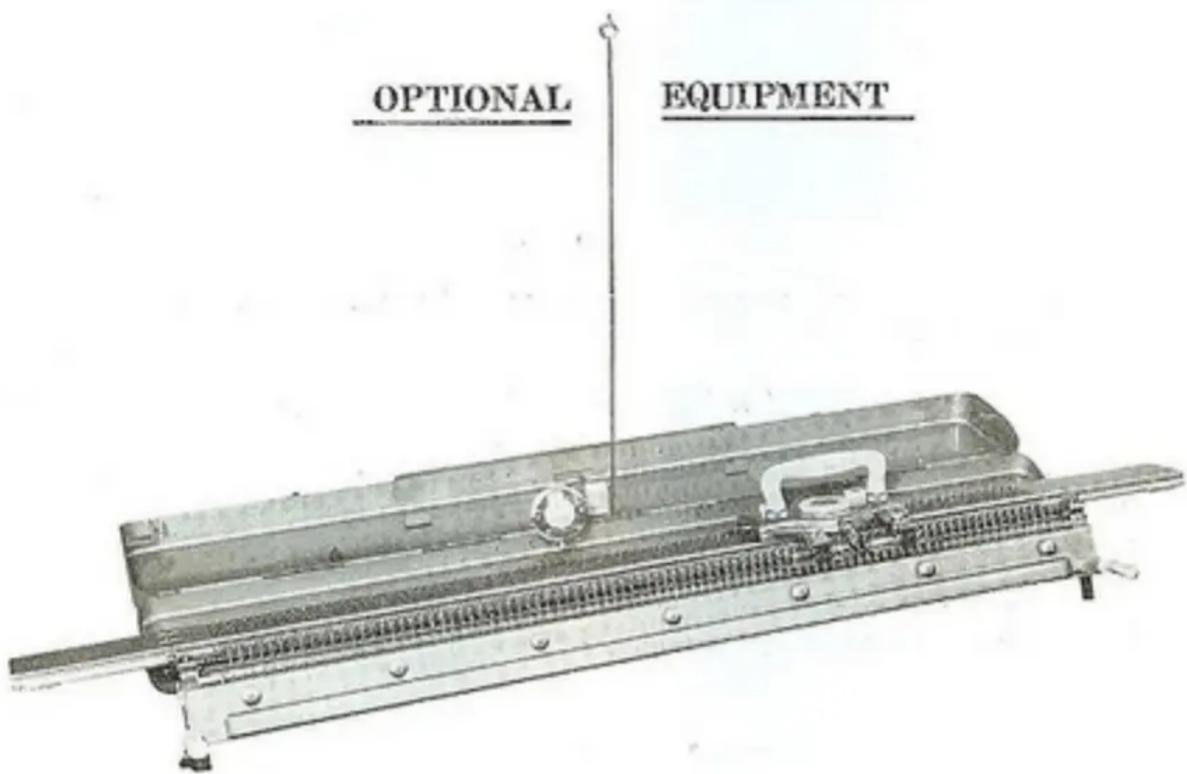
INSTRUCTIONS FOR AUTOMATIC RIBBING ON BROTHER-KNIT
PREPARATION FOR RIBBING:
Ribbing is a basic pattern popular for use in borders, trims, and for any part of a knitted garment where greater elasticity or resilience is desired. Ribbing may be varied from a simple to pattern type rib, and the process is made even faster on your BROTHER-KNIT with the aid of this special attachment. The basic ribbing with this attachment will produce a one knit, one purl, and the needles may be rearranged for other varieties.*
-
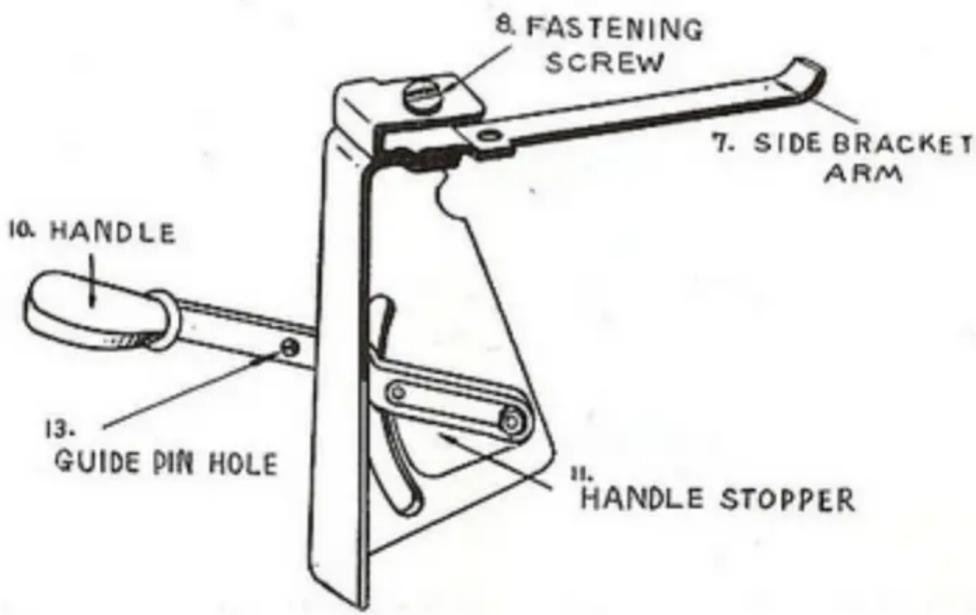
Attach both left and right brackets by lifting needle bed and sliding ( #7 ) arm bracket under it. Tighten screw ( #8 ). Row counter bracket should be bent upward slightly as needle bed is now higher.
-
Arrange needles* on knitter and ribber. The needles which are to pur! on the comb are out of service on the knitter.
-
Knit 20 rows in the usual manner using scrap yarn, as this is discarded. Use tension recommended for the yarn being used.
-
Knit 1 row using any slippery yarn such as buttonhole or embroidery thread. This can easily be pulled out, separating garment from scrap knitting.
-
Hang long weights on cast-on-comb.
-
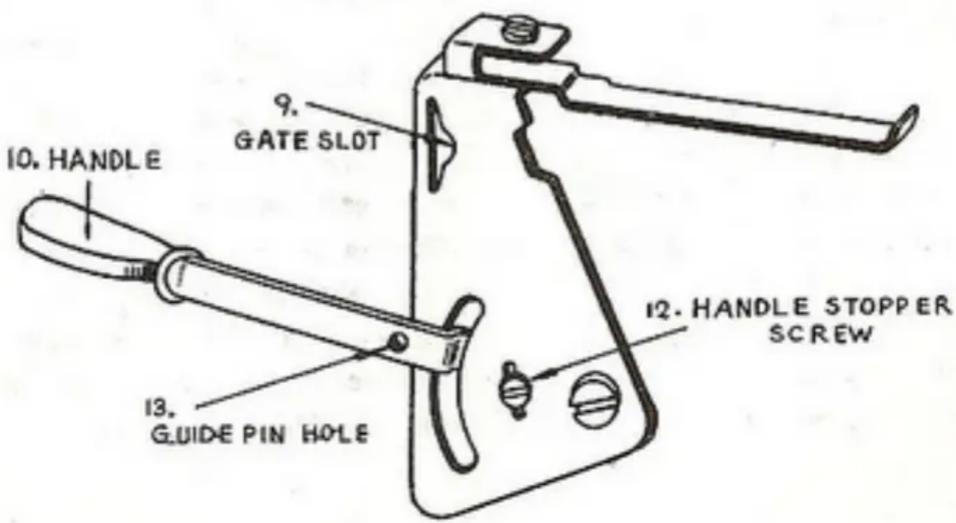
Put gate ( ≥6 ) into slots ( ≥9 ) in side brackets with rounded edge down. Insert long end into right slot first, then notched end into left side.
-
Attach comb with needles arranged to the desired rib. (if other than 1 knit, 1 purl).
CAUTION: Push carriage across slowly up to purl needles to test clearance. If needles are too high, adjust by loosening screw (#12) and by raising handle stopper (#11); this enables a lower pull of purl comb. Ribber has 2 stop positions…one above handle stopper (#11), knitting position… and one below.
Check to see that latches on purl needles are open.
-
Thread yarn feeder on carriage. Push carriage across. Notice that knitter needles have knitted, and purl needles have yarn across latches; actual ribbing process now begins.
-
Grasp handles, raise purl comb so that purl stitches fall below latches. Let purl comb rest in knitting position. Knit 2nd row; always pull purl stitches thru previous row. Double check purl latches. Stitch must always fall below, before knitting.
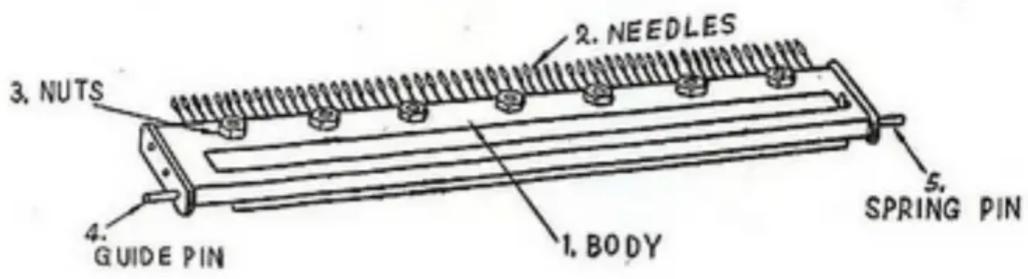
* To remove needles and rearrange them for the desired rib, slightly loosen all nuts on body of comb (#3). Hook one eyed transfer tool into needles, pull back, up, and out. The needles have 2 positions in the comb... out of service, or all the way up, which is working position.
For the popular English rib (2 knit, 1 pur 1) place needles in every 3rd space on comb. Put corresponding needles out of service on Knitter.
TRANSFERRING FROM RIBBING TO PLAIN KNITING
Purl comb should be at lowest point after you have pulled stitch thru. Use latch tool, hook into stitch and transfer to corresponding needle on Knitter. Remove weights, purl comb and gate; continue with knitting.
HELPFUL HINTS FOR SUCCESSFUL RIBBING
- Do not tighten tension as ribbing in itself forms elasticity.
- If groups of purl stitches drop, check position of yarn feeder on carriage and angle of purl comb toward needle bed.
- If end stitches drop or do not pull thru easily, hang small weights to edges of garment close to knitter.
- To pick up a dropped stitch more easily, remove weights from work and purl gate. Then use latch tool in the usual manner as described in our BROTHER-KNIT instruction book.
CAST ON EDGE FINISHES
- If a border of 1 knit and 1 purl is used you will have a finished edge after pulling out silk or buttonhole thread.
- When using other pattern groupings, such as 2 or 3 knit and 1 purl, the first row has open loops which must be finished off with the latch tool or crochet hook and a separate piece of yarn.
Marke : BROTHER
Modell : KH218
Kategorie : Nähmaschine