
KR 551 - Nähmaschine BROTHER - Kostenlose Bedienungsanleitung
Finden Sie kostenlos die Bedienungsanleitung des Geräts KR 551 BROTHER als PDF.


| Produkttyp | Handbetriebene Strickmaschine mit Rippvorrichtung |
| Modell | Brother KR 551 (auch KR 531 kompatibel) |
| Abmessungen (ca.) | ca. 45 x 25 x 35 cm (ohne Zubehör) |
| Gewicht (ca.) | ca. 7 kg |
| Stromversorgung | Keine (rein mechanisch) |
| Nadelanzahl (Hauptbett) | 200 Nadeln (abhängig von der Breite) |
| Nadelanzahl (Rippbett) | 200 Nadeln (identisch) |
| Nadeltypen | Stricknadeln und Linksnadeln |
| Musterfunktionen | 1x1 Rippe, 2x2 Rippe, Vollnadelrippe, 2x1 Rippe, Rundstricken, Englische Rippe, Fischerrippe, Reihmuster, Zickzackmuster, Hebemuster |
| Einstellungen | Spannungsregler (1-10), Halbstufenhebel (P/H), Reihhebel (0-10), Nockenknöpfe (oben/unten), Wechselhebel (I/II) |
| Zubehör (im Lieferumfang) | Anschlagkämme (groß/klein), Gewichte (groß/klein), Gewichtshaken (Draht- und Klauentyp), Bürstenarm, Verstärkungsklammer, Tischklammer, Häkchen, Schlüssel, Schraubendreher, Kunststoffbox für Nadeln |
| Wartung | Reinigung mit Handbürste, ölen der Nadeln und Schienen, trocken lagern |
| Sicherheitshinweise | Nicht bei angehobenen Nadeln reihhebel betätigen; Wagen nicht bei geschlossenen Nadeln bewegen; Halbstufenhebel nur in Position 'H' für Vollnadelrippe |
| Reparierbarkeit | Ersatznadeln und -teile erhältlich; einfacher Austausch der Linksnadeln |
| Besonderheiten | Rippvorrichtung abnehmbar für Flachbettbetrieb; verwendet Standard-Nadelsystem |
Häufig gestellte Fragen - KR 551 BROTHER
Benutzerfragen zu KR 551 BROTHER
0 Frage zu diesem Gerät. Beantworten Sie die, die Sie kennen, oder stellen Sie Ihre eigene.
Eine neue Frage zu diesem Gerät stellen
Laden Sie die Anleitung für Ihr Nähmaschine kostenlos im PDF-Format! Finden Sie Ihr Handbuch KR 551 - BROTHER und nehmen Sie Ihr elektronisches Gerät wieder in die Hand. Auf dieser Seite sind alle Dokumente veröffentlicht, die für die Verwendung Ihres Geräts notwendig sind. KR 551 von der Marke BROTHER.
BEDIENUNGSANLEITUNG KR 551 BROTHER
HOW TO USE OUR
BROTHER DELUXE
RIBBING ATTACHMENT
IFR 531 551
natural_image
Grid of 24 identical square blocks with varying shades of gray, arranged in a 3x3 pattern (no text or symbols)BROTHER INDUSTRIES, LTD.
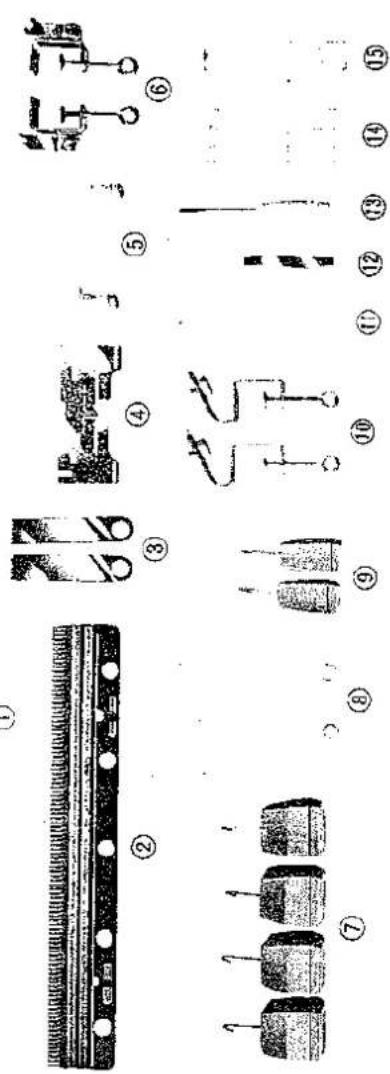
- Large Cast-on Comb
- Small Cast-on Comb
- Weight Hanger (Claw type)
- Brush Arm Assembly
- Handle
- Reinforcing Clamp
- Large Weight
- Weight Hanger (Wire-Loop type)
- Small Weight
- Table Clamp
- Hook.
- Spanner
- Screw Driver
15 Plastic Case for Sporo Needles
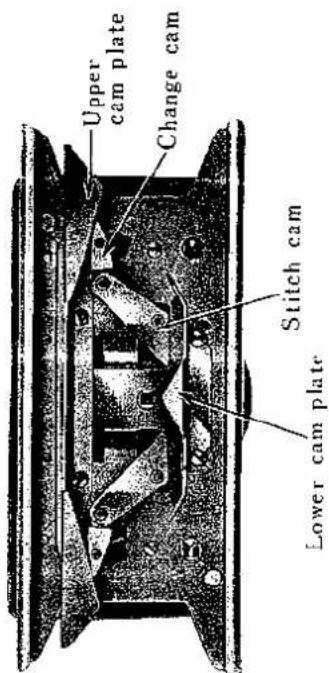
PREPARING THE KNITTING MACHINE TO FIT THE RIBBING ATTACHMENT
natural_image
Close-up of a hand using a tool to adjust or install a mechanical component (no visible text or symbols)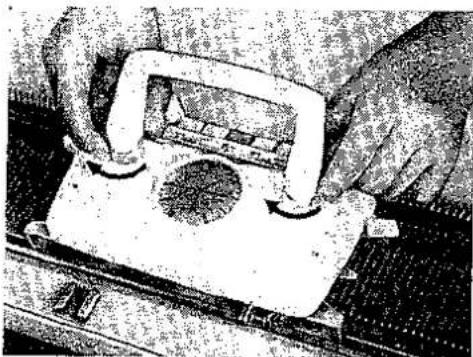
natural_image
Close-up of hands operating a handheld electronic device with a circular button (no visible text or symbols)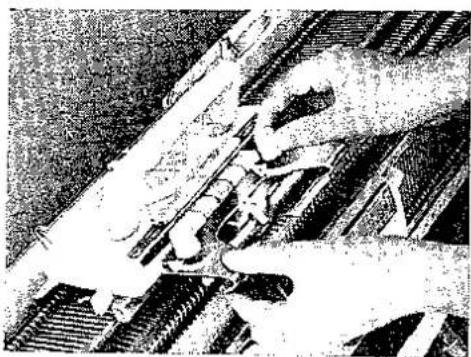
natural_image
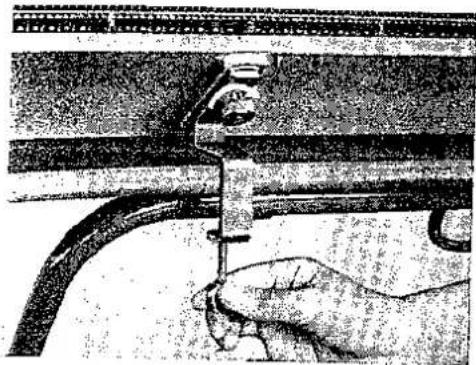
Close-up of hands operating a mechanical device with no visible text or symbols- Secure the knitter onto a flat table.
Use table clamps especially provided as an accessory for the ribber, instead of the regular knitter clamp which is used only when normal knitting work is done.
-
Set the handle onto the carriage of the knitter.
-
Fasten the brush-arm on the knitter's carriage.
Loosen the thumb screws, set the brush arm assembly, onto the knitter's carriage, instead of using the sinker plate assembly.
- Set the row counter, the needle selection set lever and the automatic yarn tension unit.
PREPARING THE RIBBER BEFORE FITTING ONTO KNITTER
natural_image
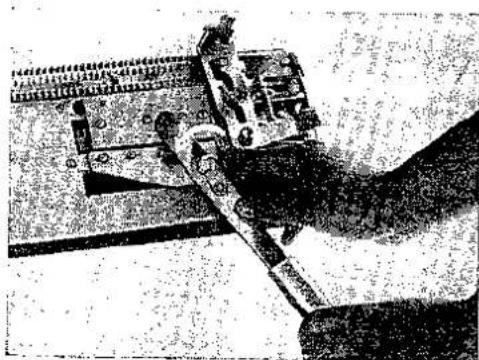
Black-and-white photo of a person using a saw on a mechanical device (no visible text or symbols)- Set the racking lever on the back side of the ribber.
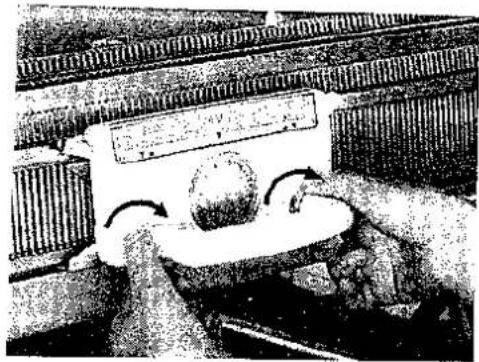
Open the lever lock (A). fit the pin (B) of the lever into the groove of the guide plate (L) and fit the hole (C) on the stud (D) of the guide plate and lock racking lever.
natural_image
Historical black-and-white photo of a stone stele with a globe and decorative elements, no visible text or symbols- Set the handle onto the carriage of the ribber
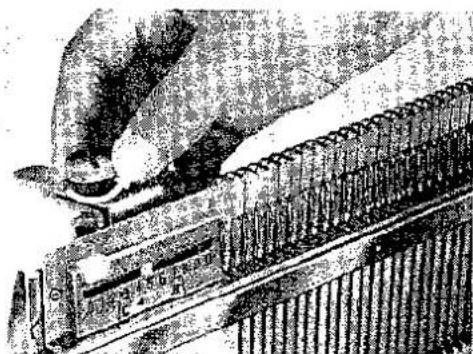
FIXING THE RIBBER TO THE KNITTER
natural_image
Close-up of hands using a tool to adjust or install a mechanical component, no visible text or symbols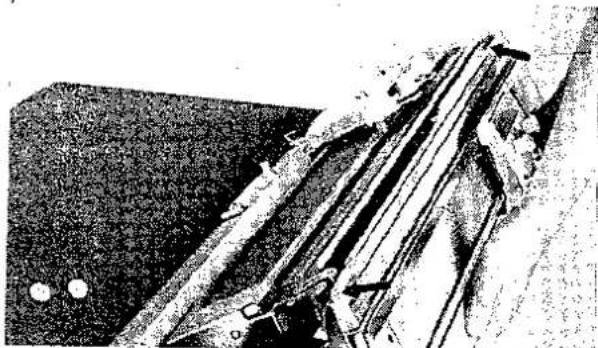
natural_image
Close-up of a mechanical component with no visible text or symbols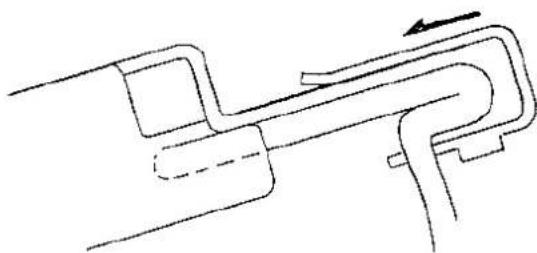
natural_image
Pure mechanical pipe diagram without any text, numbers, or symbolsbrackets.
The ribber will come down one step.
This position is used for picking up dropped stitches.
-
Unscrew the thumbscrews from the brackets on both sides of the ribber
-
Hold the ribber with both hands so that the gates of the ribber is up and the purl needle butts are toward you.
-
Push in both bracket feet into the groove at the ends of the needle bed as far as they will go. Fasten the brackets to the needle bed with the thumb screws.
-
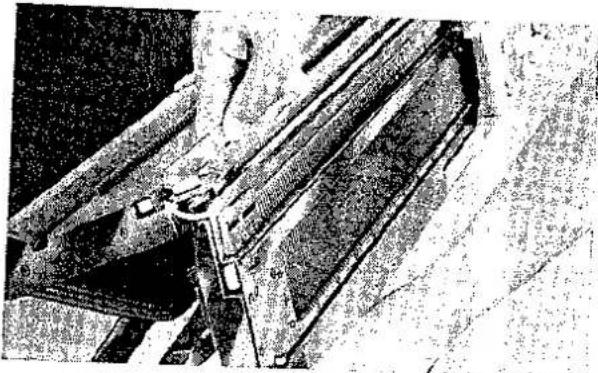
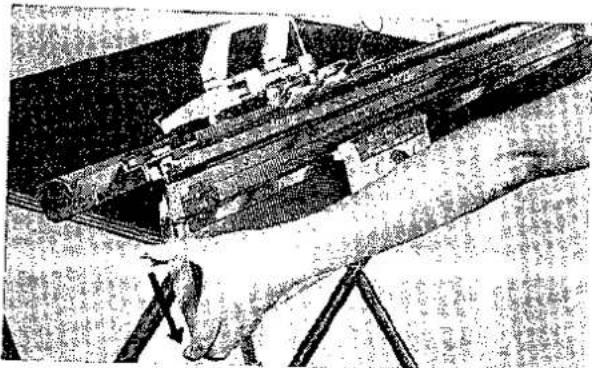
Lift up the ribber with the palm of your hands as high as it will go until it stays in position without holding This position is the normal working position of the ribber
5 With both hands, push down the levers of the
6 Push down the levers again and the ribber will come down one more
natural_image
Close-up of a mechanical component with no visible text or symbolsstep.
At this position the ribber is at rest and single bed knitting work can be done without removing the ribber.
- To return to working position, see item 4 above.
natural_image
Illustration of a person using a telescope to observe a large mechanical component (no text or symbols visible)FIXING THE REINFORCING CLAMP TO THE RIBBER
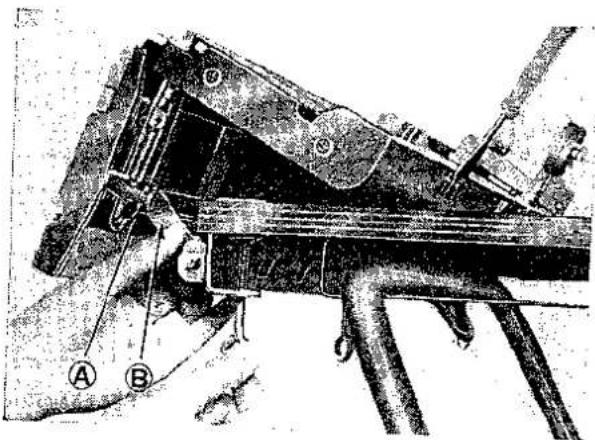
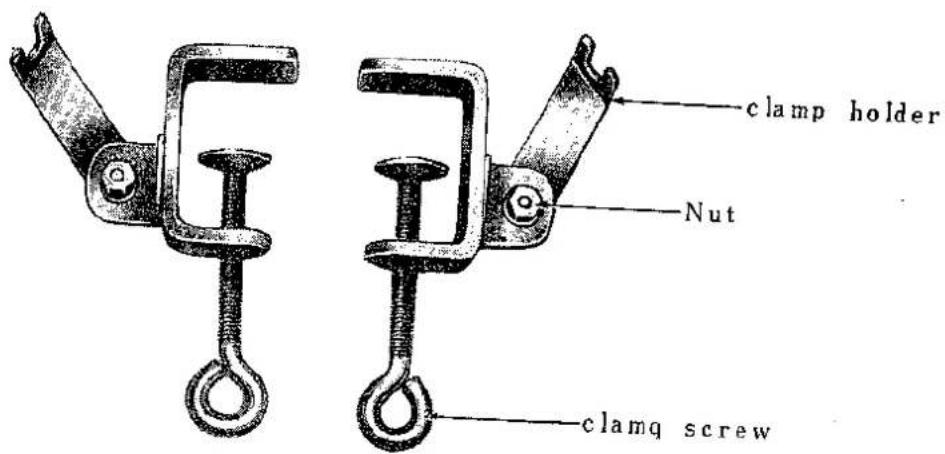
To prevent shimmying of the ribber in operation, use the reinforcing clamps.
The reinforcing clamps are used to secure the ends of the ribber onto the table.
-
Take out the clamps from the box.
-
Unscrew the clamp screws.
-
Loosen the nuts of the clamps with spanner.
-
As shown in figure, slide the fork of the clamp holder into the groove of
the studs (A) on the back of the brackets and secure the clamp screws.
- Tighten down the nuts with spanner.
BASIC KNOWLEDGE OF THE RIBBER
1 PURL NEEDLE POSITION IN THE NEEDLE BED OF THE RIBBER
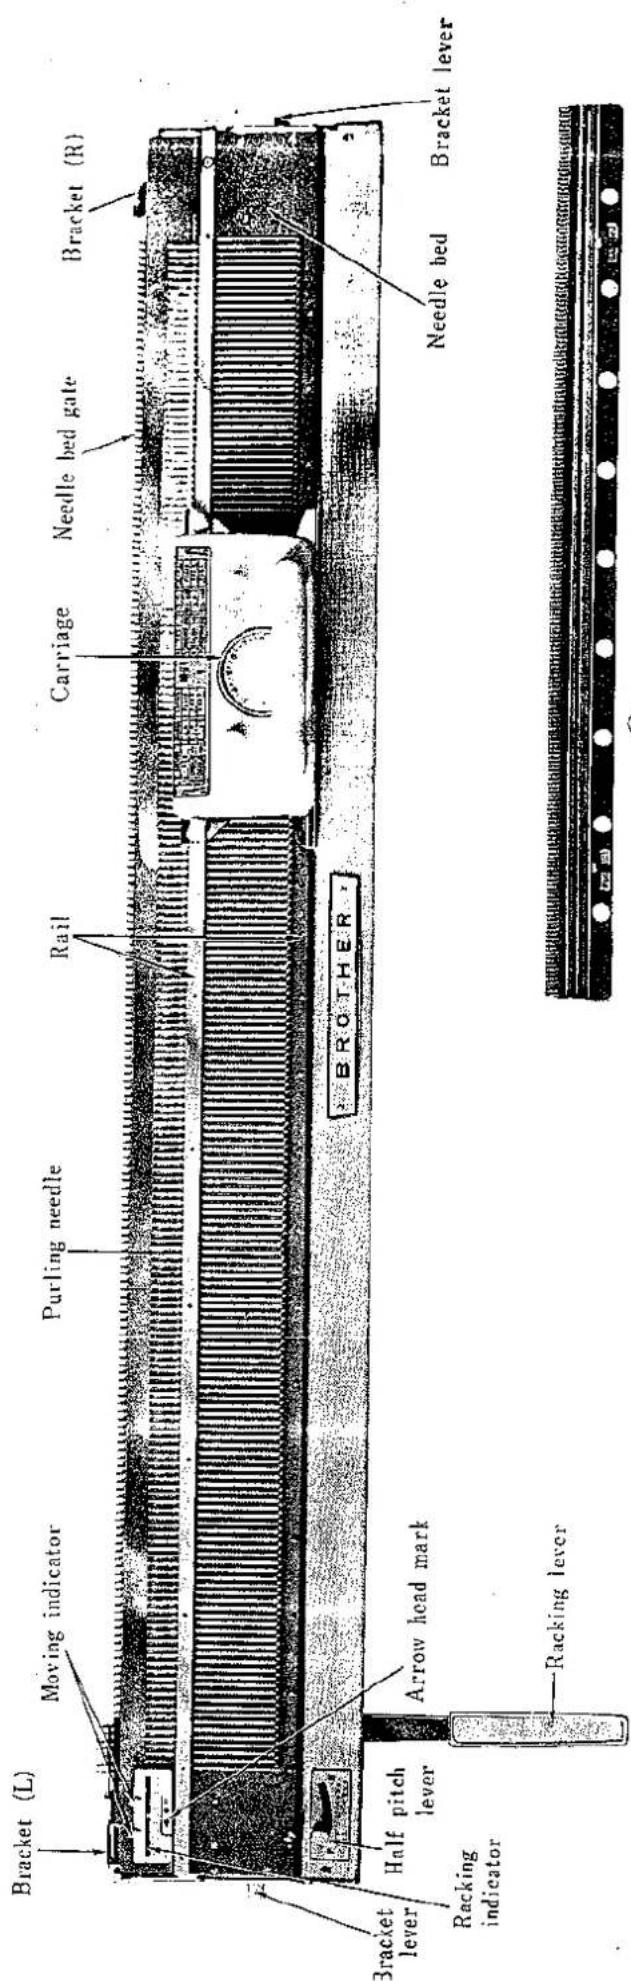
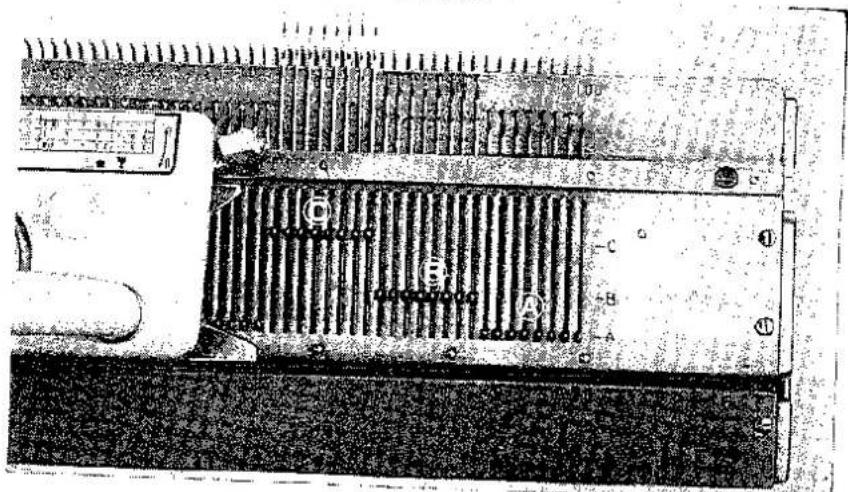
The 3 positions of the purl needles are shown on the needle bed of the ribber as A, B and C.
Position A · Resting or non-knitting position (needles are back all the way to base of needle bed)
Position B: Circular knitting position.
Position C: Knitting or working position.
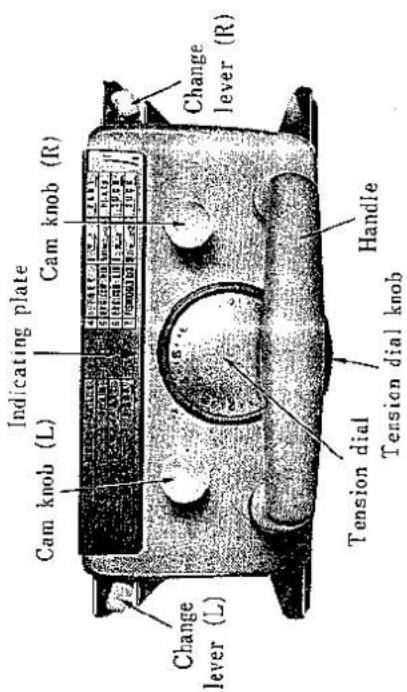
- CAM KNOBS ON THE RIBBER CARRIAGE
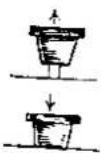
In up position: needles do not work.
In down position: needles operate.
Combination of up and down positions of the two knobs knits fancy stitches.
- CHANGE LEVER ON THE RIBBER CARRIAGE
2 positions (I and II) of the change lever are shown on the indicating
plate on the top side of the carriage.
Position I: Normal Rib.
Position II: English Rib & Fisherman's Rib.
- TENSION DIAL ON THE RIBBER CARRIAGE
| Size of yarn\Pattern | 1 × 1 Rib | Full Needle Rib | 2 × 2 Rib | Circular Knitting |
| 2 ply-yarn | 2 | 3-4 | 4-5 | 2-3 |
| 3 ply-yarn | 5-6 | 5-6 | 6-7 | 5-6 |
| 4 ply-yarn | 7-8 | 8 | 6-8 |
- HALF PITCH LEVER
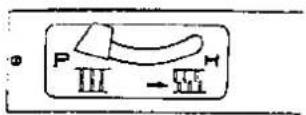
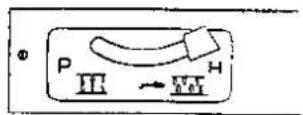
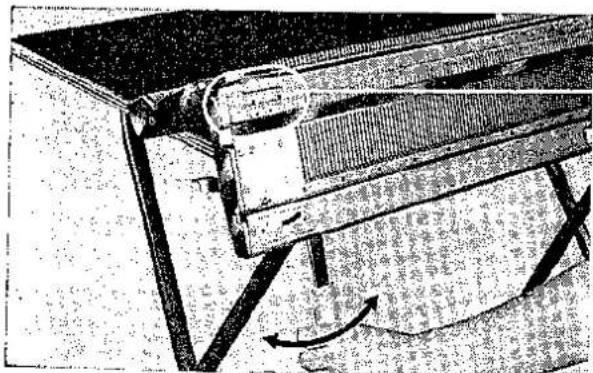
Half pitch lever is on the left side below the needle bed.
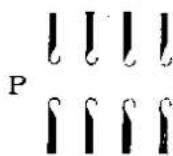
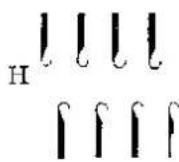
2 positions of the half pitch lever are shown on the indicating plate of the needle bed cover as P and H.
Position P: Knitting needles and purl needles directly opposite to each other.
Position H Purl needles are halfway between two knitting needles.
natural_image
Mechanical assembly diagram showing a component being folded or mounted, with no visible text or symbols.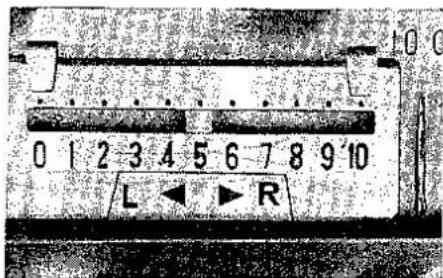
- RACKING LEVER
Racking lever is used for
racking pattern and zigzag pattern.
Lever in vertical position is center position. By moving lever to left or right from vertical position, ribber moves 5 pitches to left or right. Normally, set the indicator to No. 5 which shows center position.
The two moving indicators on the indicating plate for racking are used as an index of the racking range.
Arrow head indicates the direction of racking.
HOW TO USE ACCESSORIES (R)
- CAST-ON COMB (LARGE AND SMALL)
Cast-on comb is used for casting-on the first row of stitches which is the foundation of the knitting.
- WEIGHTS
Number of weights to be used depenps on the width of knitting and pattern.
Hang the weights on the cast-on comb so that they hold the knitting work in balance.
Standard weights chart for knitting stitch width.
| No. of stitches | large weight | small weight |
| — 50 | 1 | — |
| 50—100 | 2 | — |
| 100—150 | 3 | 2 |
| 150—200 | 4 | 2 |
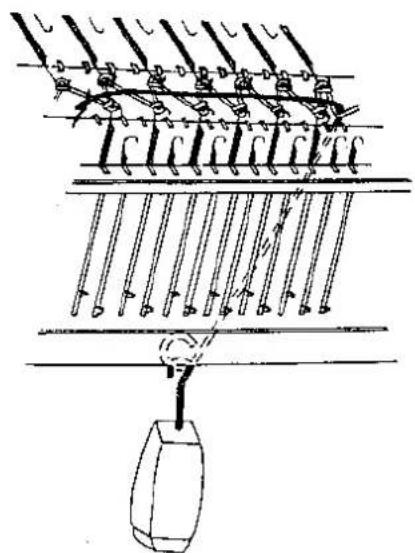
- WIRE-LOOP TYPE WEIGHT HANGERS
The wire loop type weight hangers are used for hanging small weights to give tension to the edges of the knitting work and also used as a small cast-on comb for casting on work of less than 20 stitches.
- HOOK
The hook is used to pick up dropped stitches.
- CLAW-TYPE WEIGHT HANGERS
The claw-type weight hangers are used to hang the small weights to give tension to the edge of the knitting work.
-
HANDLE
-
SPANNER
-
SCREW DRIVER
natural_image
Diagram of a mechanical or electrical device with multiple rods and a hanging weight, no visible text or symbolsNote :
(K) and (R) throughout text means knitter and ribber respectively.
(L) and (R) means left and right.
HOW TO KNIT 1 × 1 RIB
natural_image
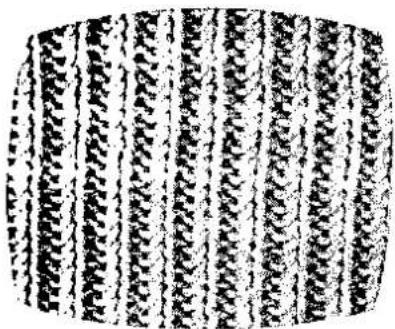
Abstract pattern of vertical black and white lines on a textured background (no text or symbols)1 × 1 RIB is most widely used for waist bands in sweaters, cuffs, collars, pockets and for many other decorative purposes. The rib is produced by having knit stitch over knit stitch and purl stitch over purl stitch, in vertical lines, and is soft and elastic.
1 Casting on for 1 × 1 rib
(1) Setting of carriage
Carriage (K)
Pattern selector button: plain knitting Holding cam levers: (L) I, (R) I Tension dial: 1
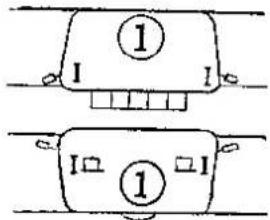
Carriage (R)
Cam knob: (L) down, (R) down Change levers: (L) 1, (R) I Tension dial: 1
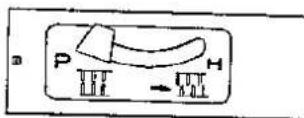
(2) Needle arrangement
a. Set the half pitch lever on "P". b. By using 1 × 1 needle pusher, arrange the knitting needles and purl needles in position "B" alternately.
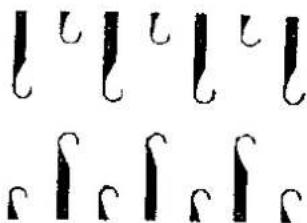
Note: Both end needles must be knitting needles.
(3) Setting of needles in normal position
a. By operating both carriages (K, R) a few times over all arranged needles, the needles on both K and R needle bed
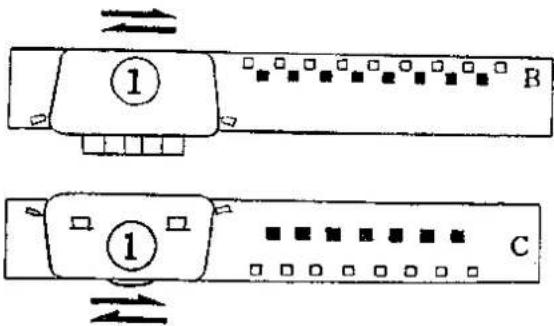
b. Leave both carriages at left side of respective bed.
c. The knitting needles will be set on position "B" and the purl needles will be set on position "C".
d. Make sure that all latches of the needles are open.
(4) First row knitting
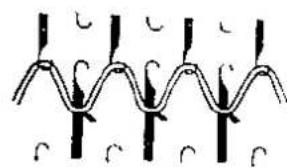
a. Put in the hook in the yarn feeder between the knitter and the ribber from underneath; hook the yarn and pull it down.
b. Operate the carriage (K) from left to right. (The yarn will hang on knitting and purl needles)
c. Operate the carriage (R) from left to right, left cam knob up. (The purl needles will come down in position "B")
(5) Hang on the cast-on comb
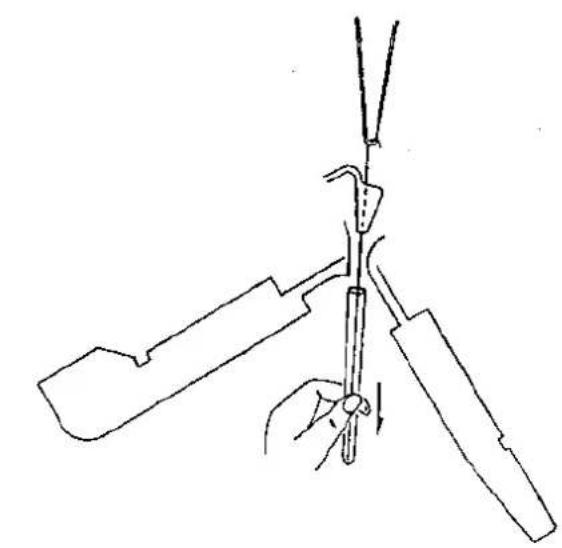
a. Pull out the wire from the cast-on comb. (Select large or small cast-on comb depending on the knitting width) Hang on the cast-on comb with the face having the protrusions facing you and the comb on top.
b. Put in the cast-on comb between the knitter and the ribber from underneath and insert the comb between the
natural_image
Line drawing of a hand holding a tool with three blades, no text or symbols present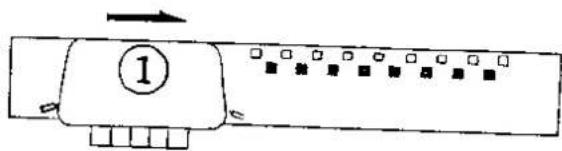
natural_image
Pure diagram of three identical wavy lines with curved ends, no text or symbols present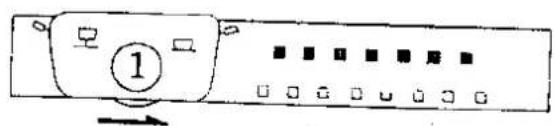
natural_image
Pure electrical circuit lines without any symbols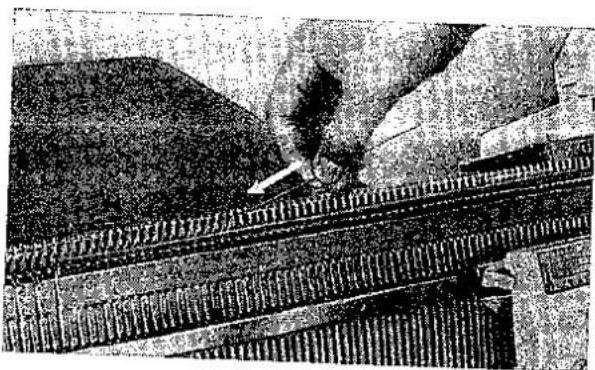
natural_image
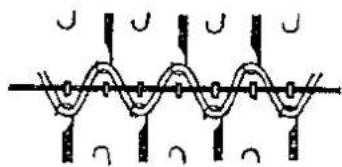
Black-and-white photo of a person climbing a corrugated metal structure with a tree in the background (no visible text or symbols)knitting and purl needles in such a way that the top of the comb does not disturb or drop the yarn hanging between the knitting and purling needles.
Pass the wire through the top of the combs with your right hand, while holding the comb with your left hand.
c. Turn the loose end of the yarn around the cast-on comb knob to keep it out of the way and to tense the first
natural_image
Pure electrical circuit lines without any symbols(6) Hang weights as per standard weight chart (see page 6). Hang weights on the cast-on comb to keep balance.
(7) Perfect selvedge
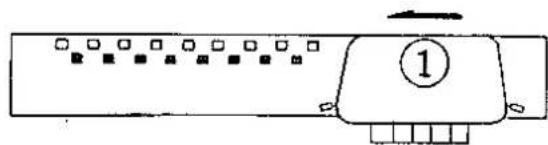
a. Move the carriage (K) from right to left. (Only the knitting needles stitch)
natural_image
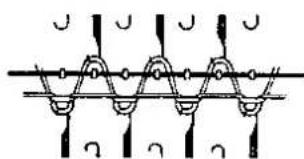
Pure electrical circuit lines without any symbolsb. Move the carriage (R) from right to left. (The purl needles rise to full extent and back to position "C")
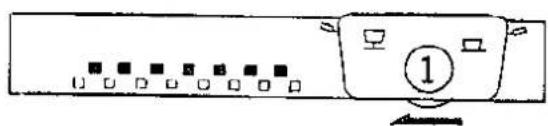
natural_image
Simple line drawing of a computer monitor with indicator lights and a numbered button (no text or symbols)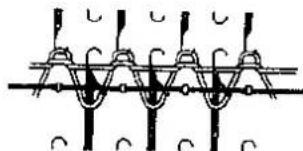
natural_image
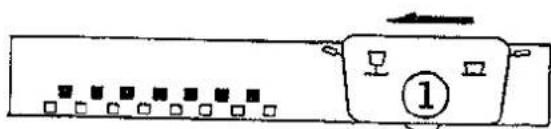
Pure electrical circuit lines without any symbolsc. Depress the PART (—) button of the pattern selector on the carriage (K).
Move the carriage (K) from left to right. (The yarn will lie across the front of the purl needles.)
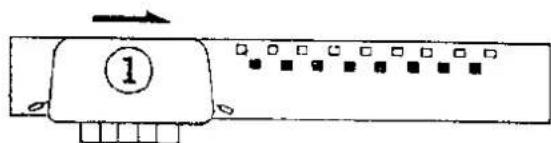
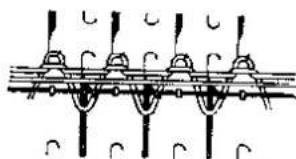
natural_image
Pure electrical circuit lines without any symbolsb. Move the carriage (R) from left to right. (The purl needles stitch and come down to position "B")
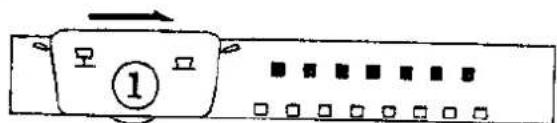
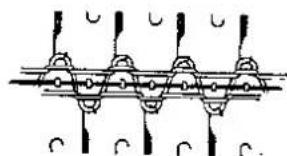
natural_image
Pure electrical circuit lines without any symbolse. Move the carriage (K) from right to left.
(Only knitting needle stitch)
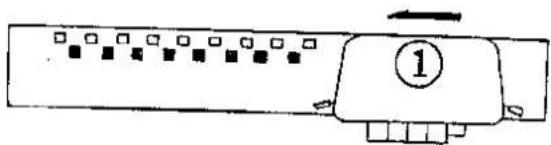
natural_image
Simple line drawing of a rectangular device with multiple square buttons and a numbered label (1), no text or symbols present.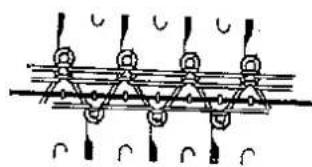
natural_image
Pure electrical circuit lines without any symbolsf. Move the carriage (R) from right to left.
(The purl needles come up to position "C")
natural_image
Simple line drawing of a rectangular device with internal components and a numbered label (1), no text or symbols present.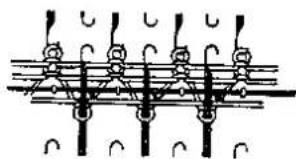
natural_image
Pure electrical circuit lines without any symbolsⅡ 1 × 1 Rib knitting
(1) Setting of carriage
Carriage (K)
Pattern selector
buttons : Plain knitting
Holding cam levers :
(L) I, (R) I
Tension dial: 5
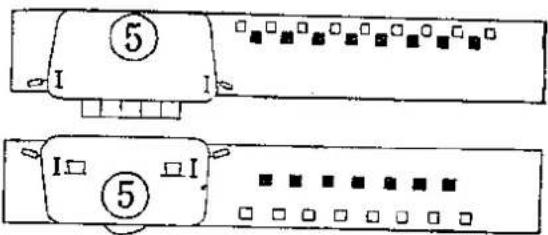
Carriage (R)
Cam knobs: (L) down, (R) down
Change levers: (L) I, (R) I
Tension dial: 5
(2) Knitting
a. Move the carriage (K) from left to right.
(The Knitting needles stitch and the yarn hangs on the purl needles)
b. Move the carriage (R) from left to right.
(The purl needles stitch and rise up to position "C")
c. Move the carriage (K) from right to left.
(The knitting needles stitch and the yarn hangs on the purl needles)
d. Move the carriage (R) from right to left.
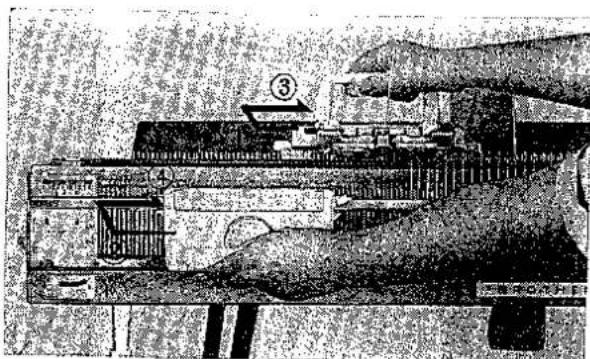
natural_image
Cross-sectional diagram of a mechanical device with internal components and no visible text or symbols(The purl needles stitch and rise up to position "C")
e. Repeat from (a) to (d).
HOW TO KNIT 2 × 2 RIB
natural_image
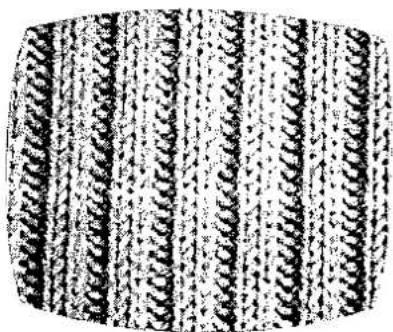
Close-up of a textured, woven fabric with vertical striations and no visible text or symbols2 × 2 Rib is 2 knit and 2 purl rib.
In one row, 2 knit stitches alternate with 2 purl stitches and vertically form knit stitch over knit stitch and purl stitch over purl stitch.
I Casting on for 2 × 2 rib
(1) Setting of carriage
Carriage (K)
Pattern selector button: plain knitting
Holding cam levers: (L) I, (R) I
Tension dial: 1
Carriage (R)
Cam knob: (L) down, (R) down
Change levers: (L) I, (R) I
Tension dial: I
(2) Needle arrangement (one method)
a. Set the racking lever on No. 5.
b. Set the half pitch lever on "P".
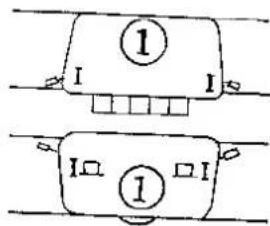
c. By using 2 × 2 needle pusher,
arrange 2 knitting needles every other 2 knitting needles in position "B" and 2 purl needles every other 2 purl needles in position "B" as shown in right figure.
Note: End needles must both be knitting needles.
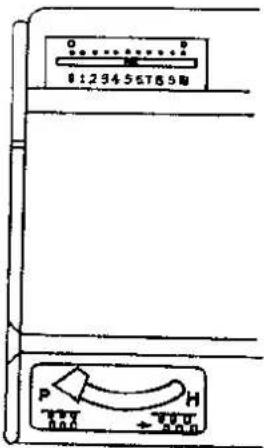
d. Set the half pitch lever on position "H".
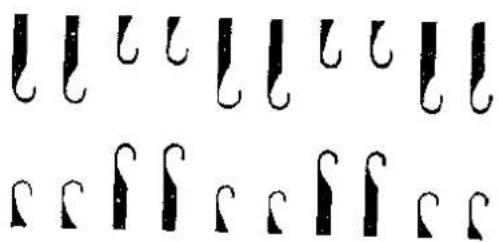
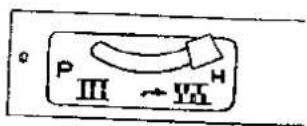
e. Swing the racking lever one pitch to right direction and the racking lever is at No. 4.
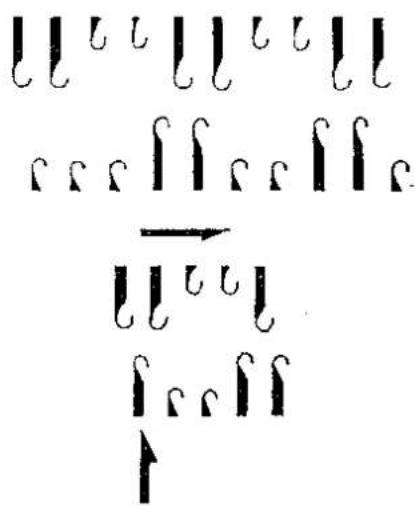
f. Raise purl needle to position "B" in left side.
(3) Setting of needles in normal position
a. By operating both (K) and (R) carriages a few times over all arranged needles, the needles on both needle beds are set in normal position.
b. Leave both carriages at left side of respective beds.
c. The knitting needles will be set on position "B" and the purl needles will be set on position "C".
d. Make sure that all latches of the needles are open.
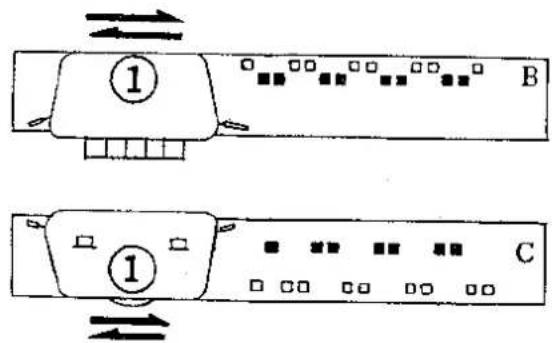
(4) First row knitting
a. Put in the hook in the yarn feeder between the knitter and the ribber from underneath, hook the yarn and pull it down.
b. Operate the carriage (K) from left to right. (The yarn will hang on knitting and purl needles)

c. Operate the carriage (R) from left to right with left cam knob up. (The purl needles will come down to position "B")
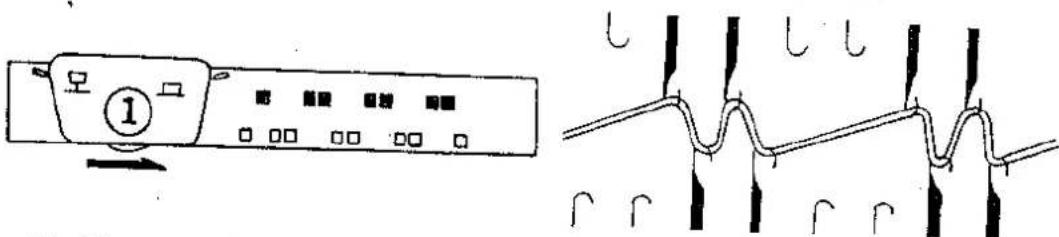
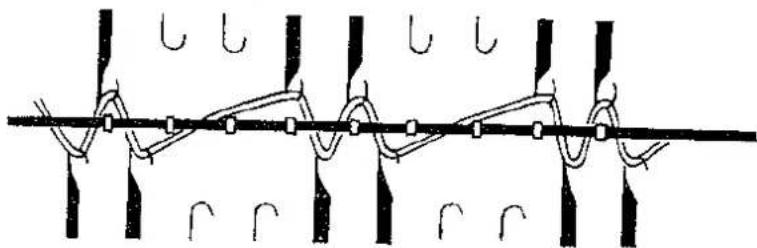
(5) Hang on the cast-on comb
a. Pull out the wire from the cast-on comb. (Select large or small cast-on comb depending on the knitting width)
Hang on the cast-on comb with the face having the protrusions facing you and the comb on top.
b. Put in the cast-on comb without wire, between the knitter and the ribber from underneath and insert the comb between the knitting and purl needles in such a way that the top of the comb does not disturb or drop the yarn of zigzag which is hanging between the needles. Pass the wire through the top of the combs with your right hand.
c. Turn the loose end of the yarn around the cast-on comb knob to keep it out of the way and to tense the first stitch.
natural_image
Pure mechanical diagram showing interlocking gears and rods without any text or symbols(6) Hang on weights.
Hang weights as per standard weight chart (page 6) on the cast-on comb to keep balance.
(7) Perfect selvedge
a. Move the carriage (K) from right to left. (Only the knitting needles stitch)
b. Move the carriage (R) from right to left. The purl needles rise to full extent and back to position "C")
c. Depress the Part (—) button of the pattern selector on the carriage (K).
Move the carriage (K) from left to right.
(The yarn will lie across the front of the purl needles)
d. Move the carriage (R) from left to right. (The purl needles stitch and come down to position "B")
e. Move the carriage (K) from right to left. (Only the knitting needle stitch)
f. Move the carriage (R) from right to left. (The purl needles come up to position "C")
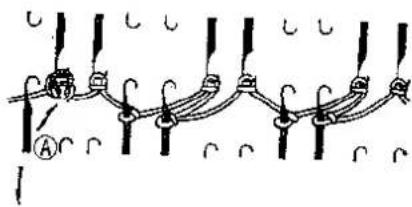
(8) Needle arrangement to change from selvedge to 2 × 2 rib knitting
a. Set the half pitch lever to position "P". b. Swing the racking lever one pitch to left direction and set it on No. 5.
c. Transfer the stitch of left end purl needle to the left end knitting needle which has one stitch, and set down the empty purl needle to position "A".
natural_image
Pure mechanical linkage diagram without any text, numbers, or symbolsII 2 × 2 Rib knitting
(1) Setting of carriage
Carriage (K)
Pattern selector buttons: plain knitting
Holding cam levers: (L) I, (R) I
Tension dial: 7
Carriage (R)
Cam knobs: (L) down, (R) down
Change levers: (L) I, (R) I
Tension dial: 7
(2) Knitting
a. Move the carriage (K) from left to right.
(The knitting needles stitch and the yarn hangs on the purl needles)
b. Move the carriage (R) from left to right.
(The purl needles stitch and rise up to position "C")
c. Move the carriage (K) from right to left.
(The knitting needles stitch and the yarn hang on the
d. Move the carriage (R) from right to left.
(The purl needles stitch and rise up to position "C")
e. Repeat from (a) to (d).
Ⅲ Casting on for 2 × 2 rib
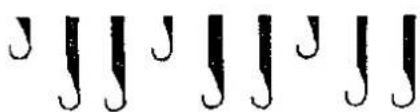
There are two methods in the needle arrangement of 2 × 2 rib. 1st method uses 2/2 needle pusher for needle arrangement and 2nd uses
2/1 needle pusher.
2nd method of 2 × 2 rib
(1) Setting of carriage is the same as for 1st method.
(2) Needle arrangement
a. Set the half pitch lever on "H".
b. By using 2/1 needle pusher, arrange the knitting needles and purl needles in position "B" as shown in figure-below.
c. Swing the racking lever to right direction.
d. Raise up one purl needle to position B on left side.
(3) Setting of needles in normal position is the same as for lst method.
(4) First row knitting is the same as for 1st method.
(5) Hanging of the cast-on comb is the same as for lst method.
(6) Hanging of the weights is the same as for lst method.
(7) Perfect selvedge is the same as for 1st method.
(8) Needle rearrangement for 2 × 2 rib.
Swing the racking lever to left direction.
Transfer the stitch of the left end purl needle to the left end knitting needle.
Ⅱ 2 × 2 rib knitting is the same as for lst method.
natural_image
Repeating pattern of black curved lines on white background (no text or symbols)
HOW TO KNIT FULL NEEDLE RIB
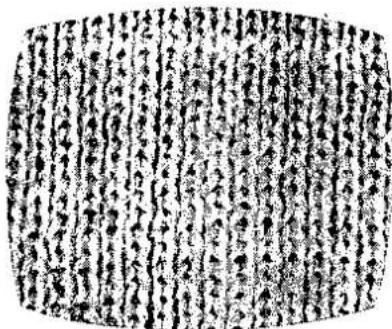
Knitting system of full needle rib is the same as for 1 × 1 rib. Difference is the needle arrangement only. In 1 × 1 rib, every other needle are used but in full needles rib, all needles are used. The rib is used for thin yarn (ex. 2 ply)
I Casting on for full needle rib
(1) Setting of carriage
Carriage (K)
Pattern selector button: plain knitting
Holding cam levers: (L) I, (R) I
Tension dial: 1
Carriage (R)
Cam knob: (L) down, (R) down
Change levers: (L) I, (R) I
Tension dial : 1
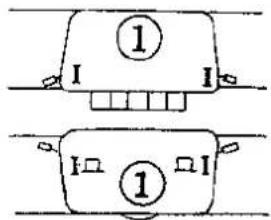
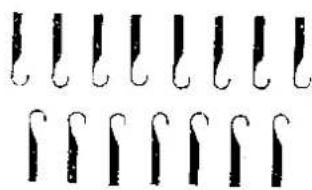
natural_image
Repeating pattern of curved and vertical black shapes (no text or symbols)(2) Needle arrangement
a. Set the half pitch lever on "H".
b. By using the back side of 1 × 1 needle
pusher, arrange all knitting needles and all purl needles in position "B".
Note: Both end needles must be knitting needles.
(3) Setting of needles in normal position
a. By operating both K and R carriages a few times over all arranged needles, set the needles on both needle beds in normal position.
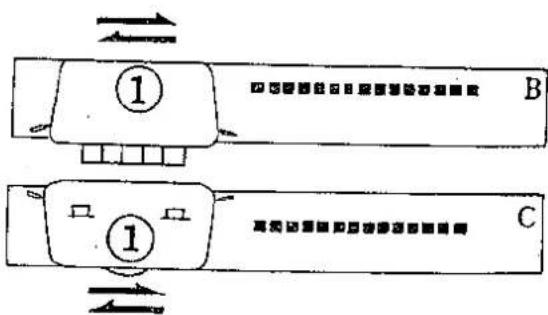
b. Leave both carriages at left side of respective beds.
c. The knitting needles will be set on position "B" and the purl needles will be set on position "C".
d. Make sure that all latches of the needles are open.
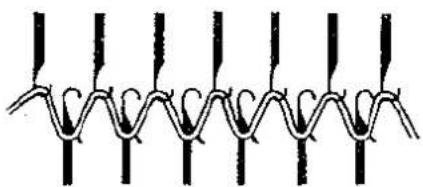
(4) First row knitting
a. Put in the hook in the yarn feeder between the knitter and the ribber from underneath; hook the yarn and pull it down.
b. Operate the carriage (K) from left to right. (The yarn will hang on knitting and purl needles).
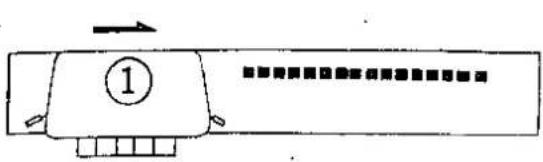
natural_image
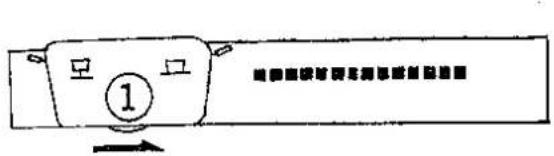
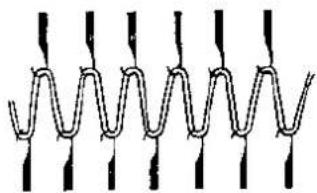
Pure diagram of a coiled wire or filament structure without any text, numbers, or symbolsc. Operate the carriage (R) from left to right with left cam knob up. (The purl needles will come down to position "B")
natural_image
Pure diagram of a coiled wire or spring with vertical supports (no text or symbols)(5) Hang on the cast-on comb
a. Pull out the wire from the cast-on comb. (Select large or small cast-on comb depending on the knitting width).
Hang on the cast-on comb with the face having the protrusions facing you and the comb on top.
b. Put in the cast-on comb between the knitter and the ribber from underneath and insert the comb between the knitting and purl needles in such a way that the top of the comb does not disturb or drop the yarn hanging between the knitting and purl needles. Pass the wire through the top of the combs with your right hand while holding the comb with your left hand.
c. Turn the loose end of the yarn around the cast-on comb knob to keep it out of the way and to tense the first stitch.
(6) Hang weights as per standard weight chart (See page 6). Hang weights on the cast-on comb to keep balance.
(7) Perfect selvedge
a. Move the carriage (K) from right to left. (Only the knitting needles stitch)
b. Move the carriage (R) from right to left. (The purl needles rise to full extent and back to position "C")
c. Depress the PART (—) button of the pattern selector on the carriage (K).
Move the carriage (K) from left to right,
(The yarn will lie across the front of the purl needles)
d. Move the carriage (R) from left to right. (The purl needles stitch and come down to position "B")
e. Move the carriage (K) from right to left. (Only knitting needle stitch)
f. Move the carriage (R) from right to left. (The purl needles come up to positon "C")
II Full needle Rib knitting
(1) Setting of carriage
Carriage (K)
Pattern selector buttons : plain knitting
Holding cam levers :
(L) I, (R) I
Tension dial: 3
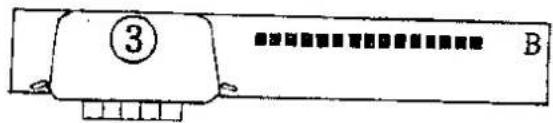

Carriage (R)
Cam knobs: (L) down, (R) down
Change levers: (L) I, (R) I
Tension dial: 3
(2) Knitting
a. Move the carriage (K) from left to right.
(The knitting needles stitch and the yarn hangs on the purl needles)
b. Move the carriage (R) from left to right.
(The purl needles stitch and rise up to position "C")
c. Move the carriage (K) from right to left.
(The knitting needles stitch and the yarn hangs on the purl needles)
d. Move the carriage (R) from right to left.
(The purl needles stitch and rise up to position "C")
e. Repeat from (a) to (d).
HOW TO KNIT 2 × 1 RIB
natural_image
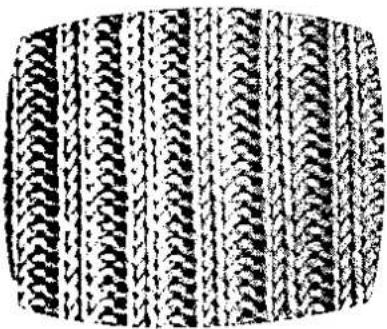
Abstract pattern of repeating black and white wavy lines on a dark background (no text or symbols)2×1 rib is called 2 knit 1 purl rib. In one row, there are 2 knit stitches alternating with 1 purl stitch and, vertically, form knit stitch over knit stitch and purl stitch over purl stitch.
[ Casting on for 2 × 1 rib
(1) Setting of carriage
Carriage (K)
Pattern selector button: plain knitting
Holding cam levers: (L) I, (R) I
Tension dial : 3
Carriage (R)
Cam knob: (L) down, (R) down
Change levers: (L)I, (R) I
Tension dial: 3
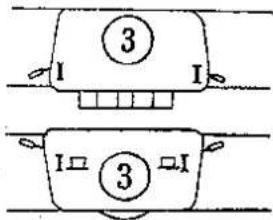
(2) Needle arrangement
a. Set the half pitch lever on "P".
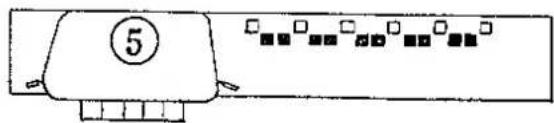
b. By using 2 × 1 needle pusher, arrange the knitting needles and purl needles in position "B" as shown in right figure.
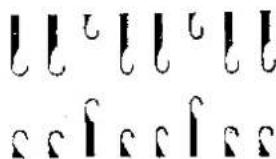
Note Both end needles must be knitting needles.
(3) Setting of needles in normal position
a By operating both (K) and (R) carriages a few times over all arranged needles, set the needles on both needle beds in normal position.
d. Leave both carriages at left side of respective beds.
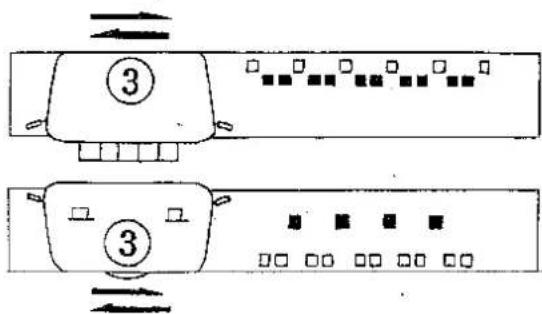
c The knitting needles will be set on position "B" and the purl needles will be set on position "C".
d. Make sure that all latches of the needles are open.
(4) First row knitting
a. Put in the hook in the yarn feeder between the knitter and the ribber from underneath, hook the yarn and pull it down.
b. Operate the carriage (K) from left to right. (The yarn will hang on knitting and purl needles)
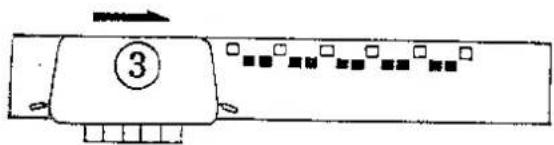
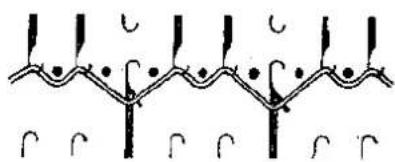
natural_image
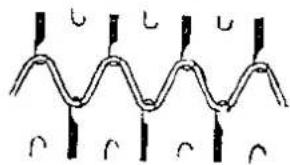
Pure electrical circuit lines without any symbolsc. Operate the carriage (R) from left to right with left cam knob up. (The purl needles will come down to position "B")
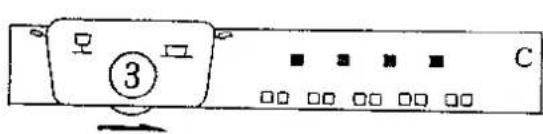
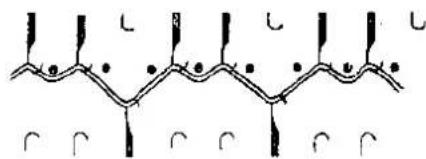
chemical
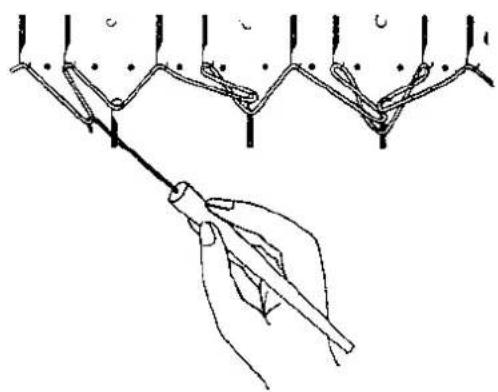
Chemical structure diagram showing a chain of carbon chains with labeled positions and bondsd. By using the hook, hang the loops between 2 knitting needles on the purl needles, as shown in right figure.
natural_image
Illustration of a hand holding a tool interacting with a chain-like structure (no text or symbols present)(5) Hang on the cast-on comb
a. Pull out the wire from the cast-on comb. (Select large or small cast-on comb depending on the knitting width) Hang on the cast-on comb with the face having the protrusions facing you and the comb on top.
b. Put in the cast-on comb between the knitter and the ribber from underneath and insert the comb between the knitting and purl needles in such a way that the top of the comb does not disturb or drop the yarn hanging between the needles.
Pass the wire through the top of the combs with your right hand while holding the comb with your left hand.
c. Turn the loose end of the yarn around the cast-on comb knob to keep it out of the way and to tense the first stitch.
(6) Hang weights.
Hang weights as per standard weight chart (Page 6) on the cast-
on comb to keep balance.
(7) Perfect selvedge
a. Move the carriage (K) from right to left.
(Only the knitting, needles stitch)
b. Move the carriage (R) from right to left.
(The purl needles rise to full extent and back to position "C")
c. Depress the Part (→) button of the pattern selector on the carriage (K).
Move the carriage (K) from left to right.
(The yarn will lie across the front of the purl needles)
d. Move the carriage (R) from left to right.
The purl needles stitch and come down to position "B")
e. Move the carriage (K) from right to left.
(Only the knitting needles stitch)
f. Move the carriage (R) from right to left.
(The purl needles come up to position "C")
II 2 × 1 Rib knitting
(1) Setting of carriage
Carriage (K)
Pattern selector buttons :
plain knitting
Holding cam levers:
(L) I, (R) I
Tension dial: 5
Carriage (R)
Cam knobs: (L) down, (R) down
Change levers: (L) I, (R) I
Tension dial: 5

(2) Knitting
a. Move the carriage (K) from left to right. (The knitting needles stitch and the yarn hangs on the purl needles.)
b. Move the carriage (R) from left to right. (The purl needles stitch and rise up to position "C")
c. Move the carriage (K) from right to left. (The knitting needles stitch and the yarn hangs on the purl needles.)
d. Move the carriage (R) from right to left. (The purl needles stitch and rise to position "C")
e. Repeat from (a) to (d).
HOW TO KNIT CIRCULAR KNITTING
natural_image
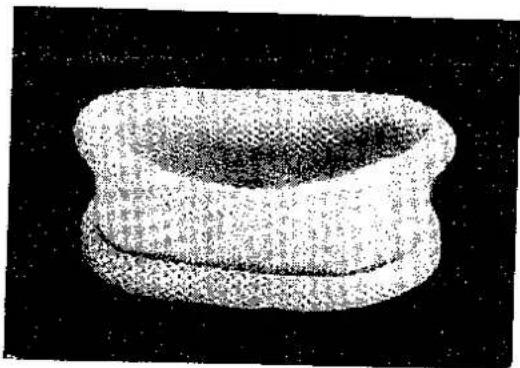
Close-up of a textured, oval-shaped object with a dark central area, possibly a container or mold (no visible text or symbols)Circular knitting is made up of only plain knit stitches, and is a jointless tube.
Size of tube depends on the number of needles
1 Casting on for circular knitting
(1) Setting of carriage
Carriage (K)
Pattern selector button. plain knitting
Holding cam levers: (L) I, (R) I
Tension dial: 1
Carriage (R)
Cam knob: (L) down, (R) down
Change levers: (L) I, (R) I
Tension dial. 1
(2) Needle arrangement
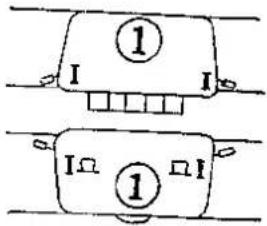
a. Set the half pitch lever on "H".
b. By using back of 1×1 needle pusher, arrange the knitting needles and purl needles in position "B" as shown in right figure.
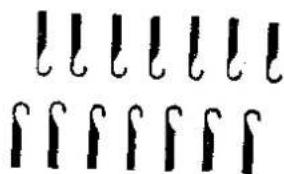
Note. Number of needles on both sides must be same.
(3) Setting of needles in normal position
a. By operating both (K) and (R) carriages a few times over all arranged needles, set the needles on both needle beds in normal position.
b. Leave both carriages at left side of respective beds.
c. The knitting needles will be set on position "B" and the purl needles will be set on position "C"
d. Make sure that all latches of the needles are open.
(4) First row knitting
a. Put in the hook in the yarn feeder between the knitter and the ribber from underneath, hook the yarn and pull it down.
b. Operate the carriage (K) from left to right. (The yarn will hang on knitting and purl needles)
c. Operate the carriage (R) from left to right with left cam knob up. (The purl needles will come down to position "B")
(5) Hang on the cast-on comb
a. Pull out the wire from the cast-on comb. (Select large or small cast-on comb depending on the knitting width)
Hang on the cast-on comb with the face having the protrusions facing you and the comb on top.
b. Put in the cast-on comb between the knitter and the ribber from underneath and insert the comb between the knitting and purl needles in such a way that the top of the comb does not disturb or drop the yarn hanging between the knitting and purl needles.
Pass the wire through the top of the combs with your right hand, while holding the comb with your left hand.
c. Turn the loose end of the yarn around the cast-on comb knob to keep it out of the way and to tense the first stitch.
(6) Hang weights as per standard weight chart (See page 6).
Hang weights on the cast-on comb to keep balance.
I Circular knitting
(1) Setting of carriage
Carriage (K)
Pattern selector buttons :
part →
Holding cam levers :
(L) I, (R) I
Tension dial : 6
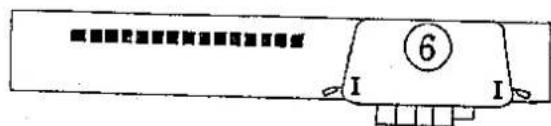

Carriage (R)
Cam knobs: (L) up, (R) down
Change levers: (L) I, (R) I
Tension dial: 6
(2) Knitting
a. Move the carriage (K) from right to left.
(The knitting needles stitch)
b. Move the carriage (R) from right to left.
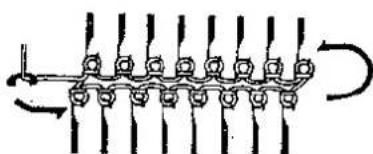
natural_image
Pure mechanical diagram showing a chain of bolts connected by rods, without any text, numbers, or symbols.(The purl needles rise up to position "C")
c. Move the carriage (K) from left to right. The yarn runs across in front of the purl needles.
d. Move the carriage (R) from left to right. (The purI needles rise to position "C")
e. Repeat from (a) to (d).
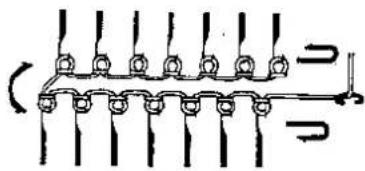
HOW TO KNIT "U" STYLE KNITTING
natural_image
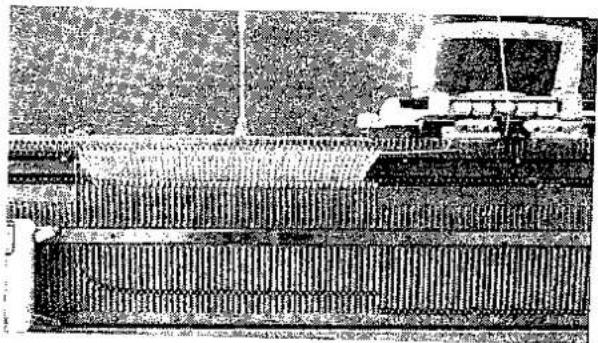
Black-and-white photo of a combine harvester in operation, no visible text or symbolsThis garment is made of all plain knitting stitches. The knitter side and the ribber side are connected at only one side and not connected at the other side. In circular knitting, both sides are connected. This knitting is used for work of more than 200
stitch width. In the following, the garment is knitted with closed left side and open right side.
I Casting on for "U" style knitting.
This is the same as circular knitting.
Ⅱ "U" style knitting
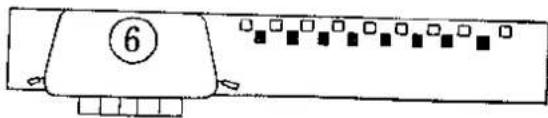
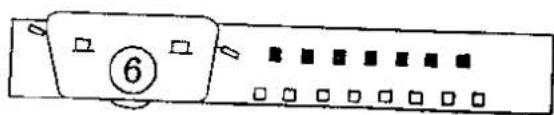
(1) Setting of carriage
Carriage (K)
Pattern selector button: plain knitting
Holding cam lever :
(L) I, (R) I
Tension dial: 6
Carriage (R)
Cam knobs: (L) up, (R) down
Change lever: (L) I, (R) I
Tension dial: 6
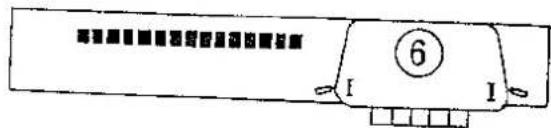
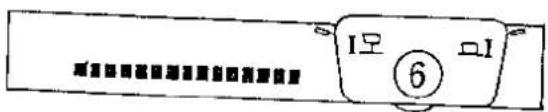
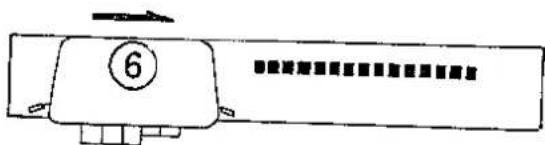
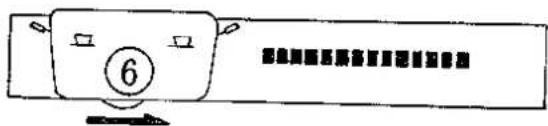
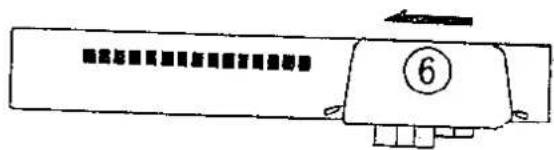
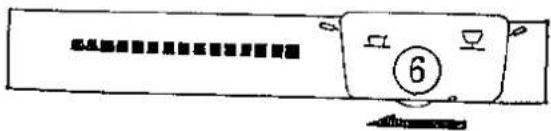
(2) Knitting
a. Move the carriage (K)
from right to left. ←
(The knitting needles stitch)
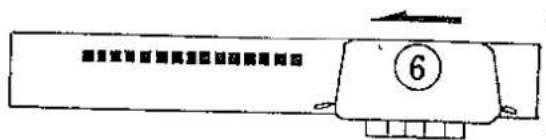
b. Move the carriage (R) from right to left. ← (The purl needles rise and come down to position "C")
c. Push in the pattern selector buttons "Part ← →" of the carriage (K) and move it from left to right →.
(The yarn lies across in front of the purl needles)
d. Set both cam knobs of the carriage.(R) in position "down" and move it from left to right.
(The purl needles stitch and rise up to position "C")
e. Move the carriage (K) from right to left.
(The yarn lies across in front of the purl needles)
f. Set the right cam knob of carriage (R) in position "Up" and move it from right to left.
(The purl needles stitch and come down to position "B")
g. Set the pattern selector button of the carriage (K) to "Plain knitting" and move it from left to right. (Only the knitting needles stitch)
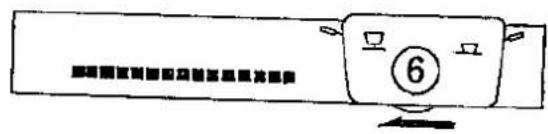
h. Set both cam knobs of the carriage (R) in position
natural_image
Simple line drawing of a rectangular device with ports and a numbered label (6), no text or symbols present."up" and move it from left to right.
Set the right cam knob of the carriage
(R) in position "down".
i. Repeat steps (a) to (h).
natural_image
Pure mechanical diagram showing a chain of bolts and rods without any text, numbers, or symbolsHOW TO KNIT ENGLISH RIB
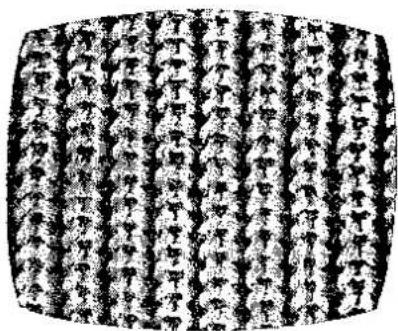
English rib is a variety of 1×1 Rib and knitter side is plain stitch but ribber side is tuck stitch.
I Casting on for English rib.
This is the same as for 1 × 1 rib.
Ⅱ English rib knitting
(1) Setting of carriage
Carriage (K)
Pattern selector button :
plain knitting
Holding cam lever :
(L) I, (R) I
Tension dial: 7
Carriage (R)
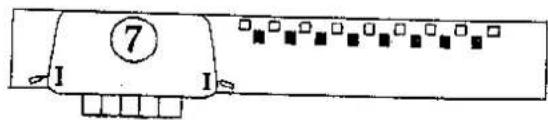
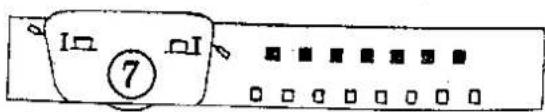
Cam knobs: (L) down, (R) down
Change lever: (L) I, (R) II
Tension dial: 7
(2) Knitting
a. Move the carriage (K) from left to right. (Knitting needles stitch and the yarn hangs on the purl needles)
b. Move the carriage (R) from left to right. (Purl needles rise and come down to position "C")
c. Move the carriage (K) from right to left. (Knitting needles stitch and the yarn hangs on the purl needles)
d. Move the carriage (R) from right to left.
(Purl needles make tucking stitches and come to position "C")
e. Repeat steps (a) to (d).
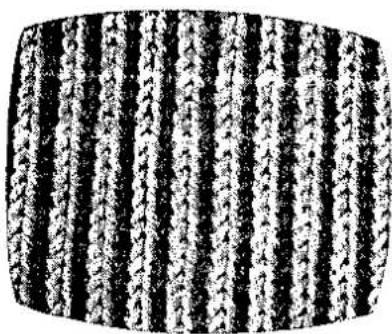
HOW TO KNIT FISHERMAN'S RIB
natural_image
Black and white abstract pattern with vertical stripes (no text or symbols)Fisherman's rib is made of tucking stitches on both sides of garment.
1 Casting on for fisherman's rib
This is the same as for 1 × 1 rib.
II Fisherman's rib knitting
(1) Setting of carriage
Carriage (K)
Pattern selector button :
TUCK →
Holding cam lever :
(L) I, (R) I
Tension dial: 5
Carriage (R)
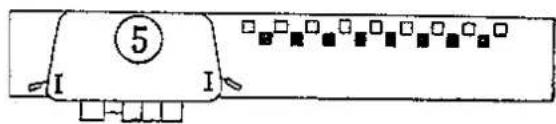

Cam knobs: (L) down, (R) down
Change lever: L I, (R) I
-Tension dial: 5
(2) Knitting
a. Raise the left end needle of the knitting width on the knitter to position "E".
b. Move the carriage (K) from left to right.
(The knitting needles make tuck stitches and the yarn hangs on the purl needles)
c. Move the carriage (R) from left to right.
(The purl needles stitch and come to position "C")
d. Move the carriage (K) from right to left.
(The knitting needles stitch and the yarn hangs on the purl needles)
e. Move the carriage (R) from right to left. (The purl needles rise and come down to position "C")
f. Repeat steps (a) to (e).
HOW TO KNIT RACKING PATTERN
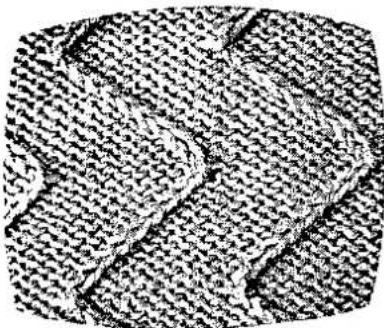
natural_image
Close-up of a textured fabric with interwoven patterns (no visible text or symbols)I Casting on for racking pattern knitting
(1) Setting for carriage
Carriage (K)
Pattern selector button : plain knitting
Holding cam levers :
(L) I, (R) I
Tension dial : 5
Carriage (R)
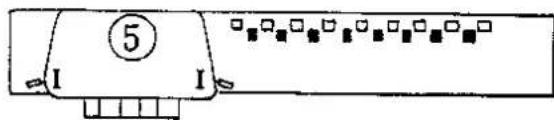

Cam knobs: (L) down, (R) down
Change lever: (L) I, (R) I
Tension dial: 5
(2) Needle arrangement
a. Set the half pitch lever on "H".
b. Set the racking lever on "O".
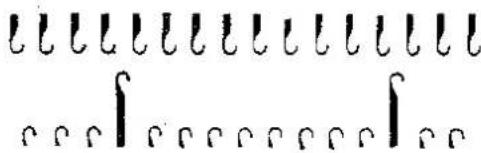
c. Raise all knitting needles of knitting width to position "B".
d. Raise every eighth purl needle as shown in figure above to position "B". By changing the needle arrangement in the purl side, you can get many variation of racking patterns.
(3) Setting of needles in normal position
a. By operating both K and R carriages a few times over all arranged needles, the needles on both needle beds are set in normal position.
b. Leave both carriages at left side of respective beds.
c. The knitting needles will be set in position "B" and the purl needles will be set in position "C".
(4) Thread in the yarn feeder.
(5) Hang on the cast-on comb.
a. Hold the cast-on comb (with wire) with the face having the protrusions facing you and the comb on top.
b. Put in the cast-on comb between the knitter and the ribber from underneath and hang on the back of the ribber in such a way that the comb and the gate of the knitter are directly opposite to each other.
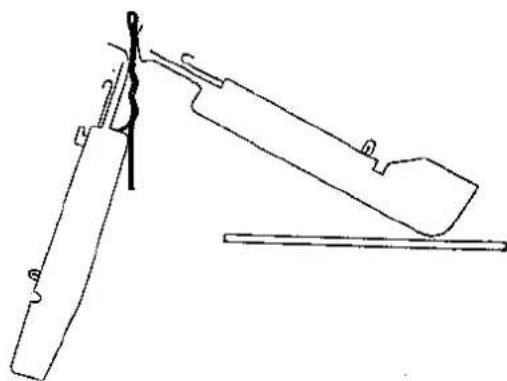
natural_image
Line drawing of a mechanical device with a lever and base plate (no text or symbols)(6) First row knitting.
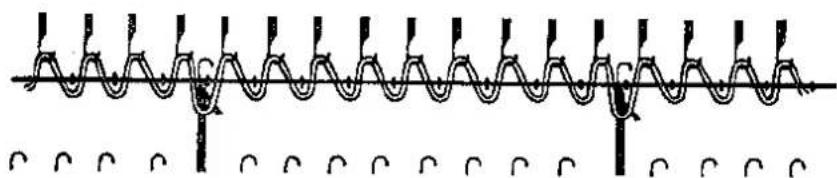
a. Operate the carriage (K) with the yarn from left to right with your right hand while holding the cast-on comb with left hand. (The yarn will hang on the needles of the knitter and the ribber)
natural_image
Pure electrical circuit lines without any symbolsb. Operate the carriage (R) from left to right.
c. Unhang the cast-on comb from the back of the ribber.
d. Cast-on comb will come down and hang on the loops between the knitting and purl needles.
(7) Hang weight. See chart on page 6.
II Knitting of racking pattern
(1). Setting of carriage
This is same as for casting-on for racking pattern.
(2) Knitting
a. Move the carriage (K) from right to left. (The knitting needles stitch and the yarn hangs on the purl needles)
b. Move the carriage (R) from right to left. (The purl needles stitch and come to position "C")
c. Swing the racking lever to left direction. Racking indicator will indicate No. 1.
d. Repeat step (a) to step (c) until racking indicator indicates No. 10.
e. Move the carriage (K) from right to left.
f. Move the carriage (R) from right to left.
g. Swing the racking lever to right direction. Racking indicator will indicate No. 9.
h. Repeat step (e) to step (g) until the racking indicator indicates "O". i. The pattern knitted from step (a) to step (h) is one cycle.
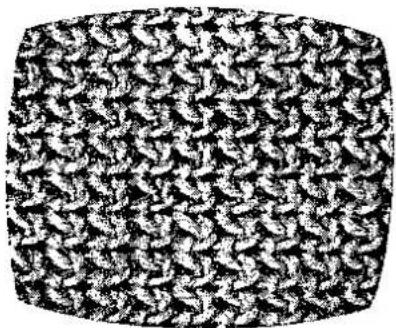
HOW TO KNIT RACKING PATTERN OF ENGLISH RIB
natural_image
Close-up of a textured, grainy surface with no visible text or symbolsI Casting on for racking pattern of English rib
(1) Setting of carriage
Carriage (K)
Pattern selector button: plain knitting
Holding cam levers :
(L) I. (R) I
Tension dial: 5
Carriage (R)
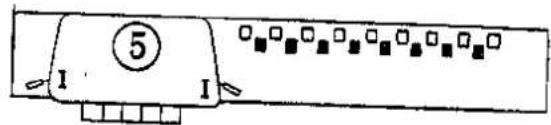
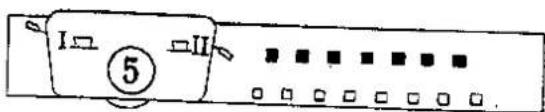
Cam: knobs: (L) down, (R) down
Change-levers: (L) I, (R) II
Tension dial: 5
(2) Needle arrangement
a. Set the racking lever on No. 5.
bar
| Category | Value | |---|---| | Top Row | 100 | | Middle Row | 85 | | Bottom Row | 70 | | Right Row | 65 | | Left Row | 60 |b. Set the cursors on the racking indicator to No. 4, and No. 5.
c. Set the half pitch lever on "P".
d. By using 1 × 1 needle pusher, arrange knitting needles and purl needles in position "B" alternately.
Note: Both end needles must be knitting needles.
(3) Setting of needles in normal position This is the same as for 1 × 1 rib.
(4) First row knitting
This is same as for 1 × 1 rib.
(5) Hang the cast-on comb
This is the same as for 1 × 1 rib.
(6) Hang weights
This is the same as for 1 × 1 rib.
(7) Perfect selvedge
This is the same as for 1 × 1 rib.
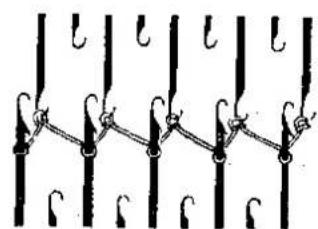
(8) Set the half pitch lever to position "H".
Ⅱ Knitting of racking pattern of English rib
(1) Setting of carriage
Carriage (K)
Pattern selector buttons: plain knitting
Holding cam levers: (L) I, (R) I
Tension dial: 5
Carriage (R)
Cam knobs: (L) down, (R) down
Change lever: (L) I, (R) II
Tension dial: 5
(2) Knitting
a. Move the carriage (K) from left to right. (The knitting needles stitch and the yarn hangs on the purl needles)
b. Move the carriage (R) from left to right. (The purl needles rise up and come to position "C")
c. Swing the racking lever one pitch to right direction. (The racking indicator indicates No. 4)
natural_image
Pure electrical circuit lines without any symbols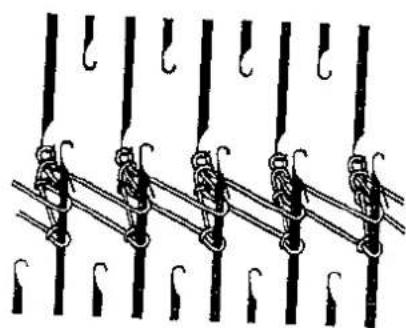
natural_image
Diagram of a rope knot with multiple knots and chains, no text or symbols presentd. Move the carriage (K) from right to left.
e. Move the carriage (R) from right to left. (The purl needles stitch and come to position "C")
f. Move the carriage (K) from left to right.
g. Move the carriage (R) from left to right.
h. Swing the racking lever one pitch to left direction. (The racking indicator indicates No. 5)
i. Move the carriage (K) from right to left.
j. Move the carriage (R) from right to left.
k. Repeat from (a) to (j).
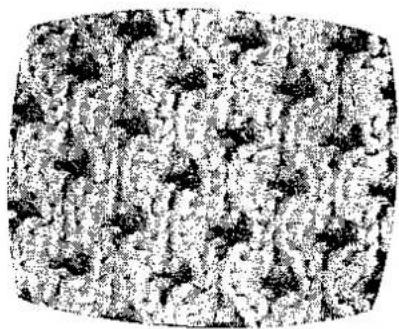
HOW TO KNIT TUCKING PATTERN OF RIB
natural_image
Abstract black-and-white textured pattern with no discernible text or symbolsTucking pattern of rib is a variation of 1 × 1 rib or full needle rib.
In the following description, tucking pattern of 1 × 1 rib is made.
I Casting on for tucking pattern of 1 × 1 rib This is the same as for 1 × 1 rib.
II Knitting of tucking pattern of 1 × 1 rib.
(1) Setting of carriage
Carriage (K)
Pattern selector button :
TUCK ← →
Holding cam levers :
(L) I, (R) I
Tension dial: 5
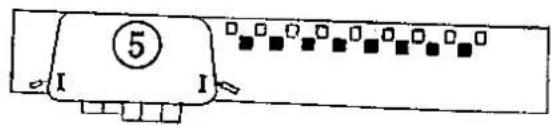
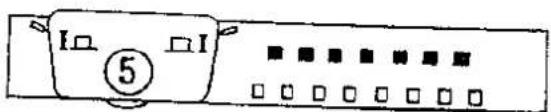
Carriage (R)
Cam knobs: (L) down, (R) down
Change levers. (L) I, (R) I
Tension dial: 5
(2) Knitting
a. Push one of the needle selector buttons and select the needles. In this step, the needles which are on both ends of knitter must be in position "E"
b. Move the carriage (K) from left to right.
c. Move the carriage (R) from left to right.
d. Select the same needles as in step (a) by turning the set lever to left direction.
e. Move the carriage (K) from right to left.
f. Move the carriage (R) from right to left.
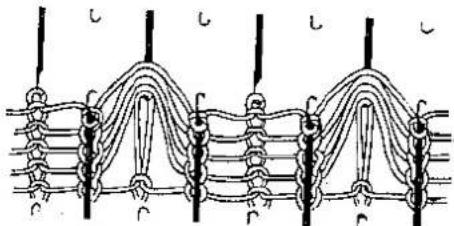
g. Repeat from (a) to (f) 2 times.
natural_image
Pure mechanical diagram showing interlocking gears and rods without any text or symbolsh. Select the needles which were not selected in step (a).
i Move the carriage (K) from left to right.
j Move the carriage (R) from left to right.
k Select the same needles as in step (h) by turning the set lever to left direction.
1 Move the carriage (K) from right to left.
m. Move the carriage (R) from right to left.
n. Repeat from (h) to (m).
HOW TO KNIT ZIGZAG PATTERN
natural_image
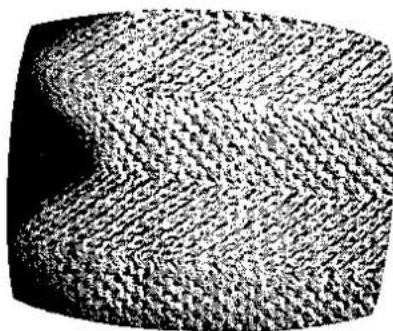
Close-up of a textured, granular surface with no visible text or symbolsZigzag pattern is racking pattern of fisherman's rib. In following description, two ply wool is used to make the racking pattern of all needles using fisherman's rib.
1 Casting on for zigzag pattern
This is the same as for full needle rib.
Set the half pitch lever to position "H".
Set the racking lever to No. 5.
Place the cursors on the racking indicator on No. 4 and No. 5.
I Knitting of zigzag pattern
(1) Setting of carriage
Carriage (K)
Pattern selector button.
TUCK →
Holding cam levers :
(L) I, (R) I
Tension dial: 4
Carriage (R)
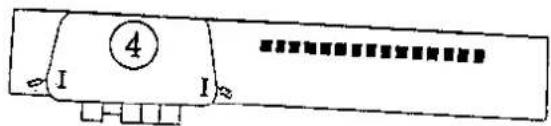
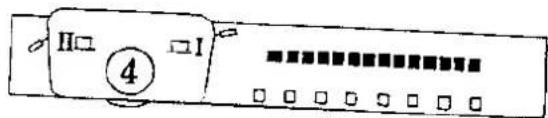
Cam knobs: (L) down, (R) down
Change levers: (L) II, (R) I
Tension dial: 4
(2) Knitting
a. Raise the left end needle of knitting width on the knitter to position "E"
b. Move the carriage (K) from left to right.
(The knitting needles have two loops in their hooks and the yarn hangs on the purl needles)
c. Move the carriage (R) from left to right.
d. Swing the racking lever to right direction. (Racking indicator indicates No. 4)
e. Move the carriage (K) from right to left.
f. Move the carriage (R) from right to left.
g. Swing the racking lever to left direction.
(Racking indicator indicates No. 5)
h. Repeat from (a) to (g), 9 times.
i. Raise the left end needle of knitting width on the knitter to position "E"
j. Move the carriage (K) from left to right.
k. Move the carriage (R) from left to right.
- Swing the racking lever to right direction.
m. Move the carriage (K) from right to left.
n. Move the carriage (R) from right to left.
o. In this step, do not swing the racking lever. From next row, zig-zag direction changes.
p. Raise the left end needle of knitter width on the knitter to position "E".
q. Move the carriage (K) from left to right.
r. Move the carriage (R) from left to right.
s. Swing the racking lever one pitch to left direction.
t. Move the carriage (K) from right to left.
u. Move the carriage (R) from right to left.
v. Swing the racking lever one pitch to right direction.
w. Repeat from (i) to (V) 9 times.
x. Raise the left end needle of knitting width on the knitter to position "E".
y. Move the carriage (K) from left to right.
z. Move the carriage (R) from left to right.
a'. Swing the racking lever one pitch to left direction.
b'. Move the carriage (K) from right to left.
c'. Move the carriage (R) from right to left.
d'. In this row, do not swing the racking lever.
e'. Repeat from (a) to (d')
INCREASING
1 Increasing one stitch on one side of knitting width
(1) Simple method
a. Place the carriage on the side which you want to increase.
b. Raise into action one end needle from the resting position (A) on the side nearest the carriage.
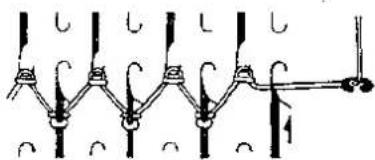
natural_image
Pure mechanical diagram showing a zigzag connection with no text, numbers, or symbolsc. The vacant needle will pick up the yarn as it knits the next row.
(2) Full fashioned method
a. Use 1 needle transfer tool, move the lst stitch (1) out to the adjacent empty needle (2).
Now 2nd needle from the end becomes empty.
b. Onto the empty needle pick up either neighbouring lower loop (3).
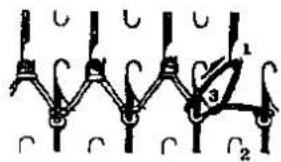
chemical
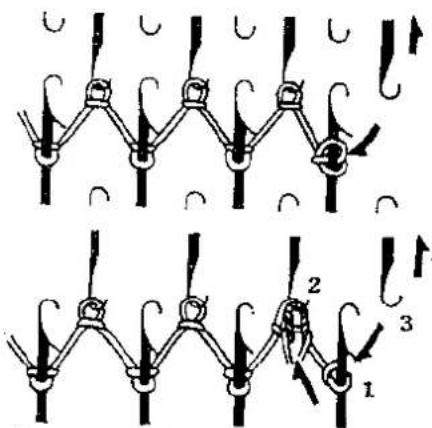
Chemical structure diagram showing interconnected rings with labeled atoms and bondsI Increasing more than two stitches on either side of the garment.
(1) Place the carriage opposite to the side you want to increase.
(2) Bring into action on the side opposite to the carriage as many needles as the number of stitches to be increased.
(3) Move the carriage.
(4) The yarn will hang on increased needles on both sides.
(5) Hang weight hanger for side tension and small weight on the yarn which is shaping zigzag line.
(6) Continue the knitting.
DECREASING
1 Decreasing one stitch on either end.
(1) Simple method is to use the single transfer tool. Transfer the end stitch to the 2nd needle out of action.
(2) 2nd method
a. Use two-needle transfor tool. Transfer the end stitch to the 2nd needle and the 2nd needle to the 3rd needle.
b. Take empty needle out of action.
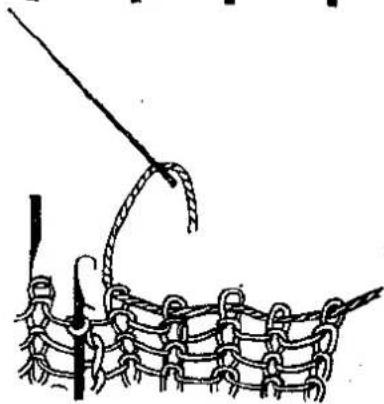
I Decreasing more than 2 stitches
a. Place the carriage opposite to the side you want to decrease.
b. Use the tapestry needle. Transfer the stitches which you want to decrease to the stem of the tapestry needle and pass through loops of stitches to be decreased.
c. Take the empty needle out of action.
natural_image
Diagram of a knotted rope knot with a hook and chain (no text or symbols)PARTIAL KNITTING OF RIBBING
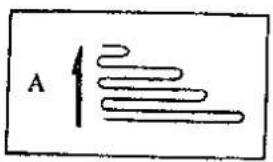
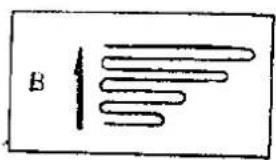
Partial knitting is used for shaping of garment, making darts, shaping of a heel, vertical and horizontal buttonholes, neck opening, pockets, etc.
There are two cases, that is, one is decreasing of knitting part, the other is increasing of knitting part.
This general explanation begins from one row before partial knitting of ribbing, from left to right.
a. Operate the carriage (K)
(The knitting needles make stitches and the yarn hangs on the purl needles)
b. Operate the carriage (R) from left to right with the cam knobs, left cam knob up, and right one down.
(The purl needles make stitches and come down to position "B")
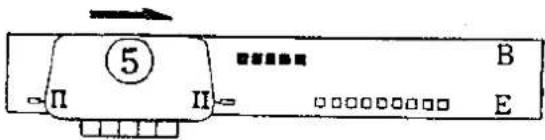
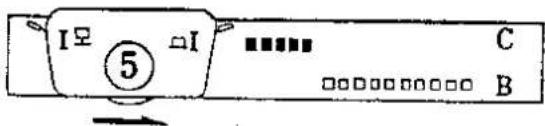
c. Set the carriage (K) to "part ← →"
d. Raise the knitting needles which you want to knit to position "E", and the purl needles which you want to knit to position "C".
e Move the carriage (K)
(The knitting needles in position "E" only make the stitches and come down to position "B". The yarn will hang only on the purl needles in position "C")
f. Move the carriage (R)
(The purl needles in position "C" only make the stitches and come down to position "B")
g. Raise the knitting needles to position "E" as same as step (d).
h. To avoid a hole in the knitting, before knitting on the return course hang the yarn which is lying on the gate of the ribber in the hook of the first unraised needle nearest those not being knitted in step (e).
i. Move the carriage (K) and knit needles in the position "E".
j. Move the carriage (R) and knit needles in position "C".
One row of partial knitting of rib is finishd. Repeat from step (d) to step (j). But in step (d) and (g), number of needles which are raised has to be increased or decreased.
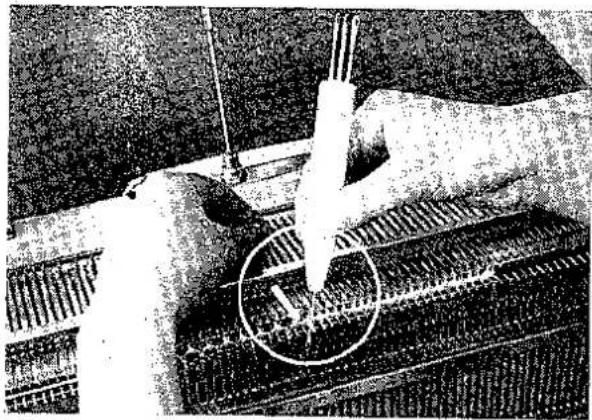
1. HOW TO CONVERT FROM RIB TO PLAIN KNITTING OR FROM PLAIN KNITTING TO RIB
How to convert from 1 × 1 rib to plain knitting.
a. Raise the knitting needles from resting position "A" to position "B" and open the latches.
b. By using the transfer tool, transfer the stitches on the purl needles to the empty knitting needles.
natural_image
Close-up of a mechanical component with a circular inset showing internal structure (no visible text or symbols)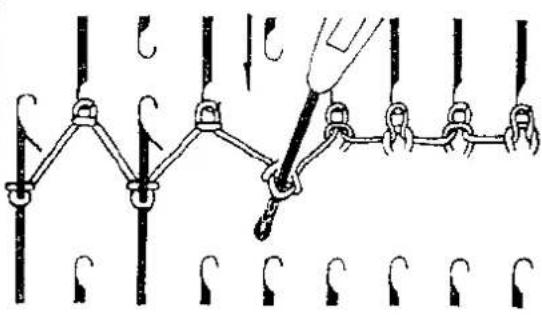
How to convert from plain kitting to rib.
a. By using the transfer tool, transfer the stitches on every other knitting needle to the corresponding puri needle.
natural_image
Aerial view of a large industrial facility with rows of machinery and a central circular object (no visible text or symbols)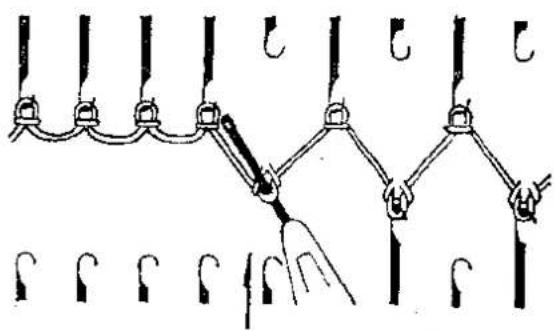
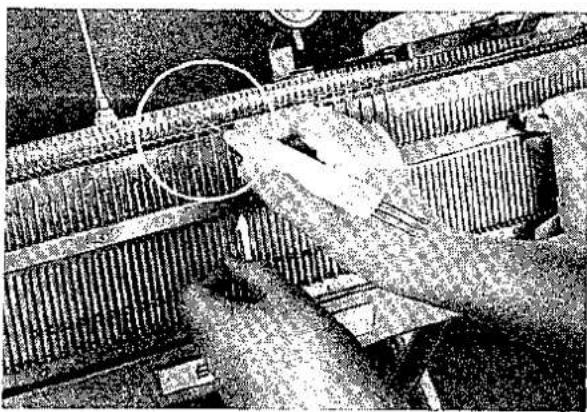
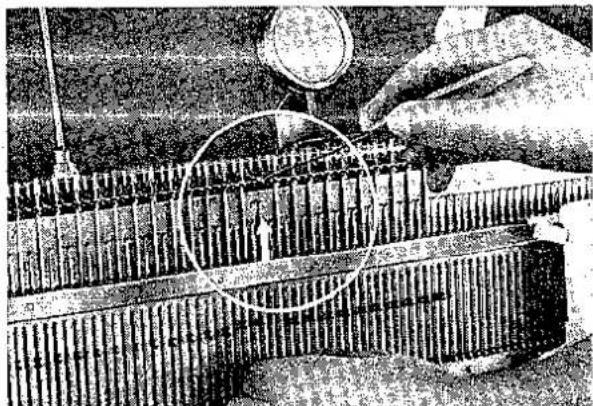
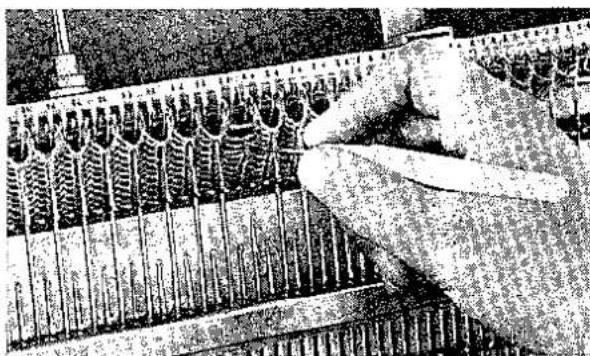
2. HOW TO PICK UP DROPPED STITCH
First, take off the weights and prevent dropping of multiple rows.
A. In case one stitch is dropped.
a. With the single transfer tool, pick up the stitch and the unknitted yarn and put them both on the empty needle.
b. With your finger on the butt of the needle, move the needle and make the stitch.
natural_image
Close-up of a mechanical component with a circular annotation highlighting a section (no visible text or symbols)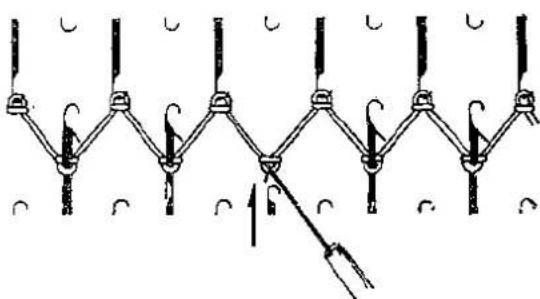
natural_image
Pure mechanical linkage diagram without any text, numbers, or symbolsB. In case multiple rows are dropped.
a. Open the gate by pushing down both bracket levers and catch the lowest loop of the dropped stitches with the latch tool.
b. With the latch tool, make the stitches and hang the final stitch on the empty needle.
natural_image
Close-up of a metal bar with multiple abacus beads arranged in rows, no visible text or symbols3. TO UNLOCK CARRIAGE
In the event carriage (R) jams in the course of ribbing, free it as follows.
a. Pick up both cam knobs of the carriage (R) and the carriage will be free from the purl needles and the jam will be corrected.
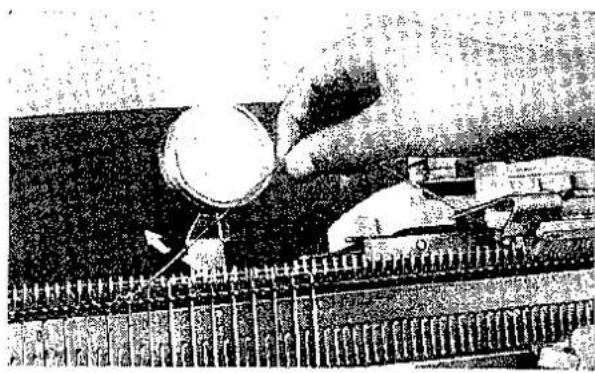
4. UNDOING ROWS OR UNRAVELLING
If yon have knitted more rows than necessary, do not remove work from the knitter. Simply unravel one or several rows by doing the following.
a. Move the carriage (K) and knit one row. b. Pick up the cam knob on the carriage which is opposite to the direction of carriage movement.
c. Move the carriage (R) Purl needles stitch and come down to position "B".
d. Pull the yarn slightly, drawing it out of the stitches. The stitches of the previous row will slip into the hook of the needles automatically as the yarn is raised in an upward movement towards the needle bed.
natural_image
Close-up of a mechanical device with a circular component and attached components, no visible text or symbols5. HOW TO REMOVE THE KNITTING FROM KNITTER
A. Unbound method
a. Take the yarn out of the yarn feeder.
b. Slide the carriage (K) across the needles in action.
c. Slide the carriage (R) across the purl needles in action.
d. The work will be released.
B. To transfer to hand knitting needle.
At first, convert from rib to plain knitting as described in Item "How to convert from 1 × 1 rib to plain knitting". Then transfer the stitches to hand knitting needle.
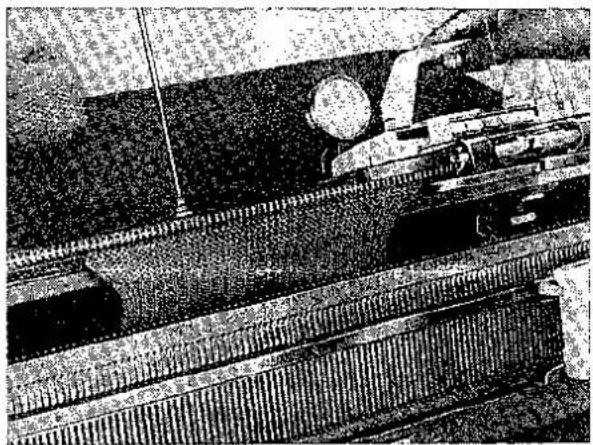
6. HOW TO USE THE KNITTER AS A SINGLE BED WITH THE RIBBER ATTACHED
a. Push down both bracket levers of the ribber and the ribber will come down one step. Push down the levers again and the ribber will come down one more step.
b. Take off the brush arm assembly from the carriage (K) and convert it to the sinker plate assembly.
c. The knitter can be used as a single bed.
natural_image
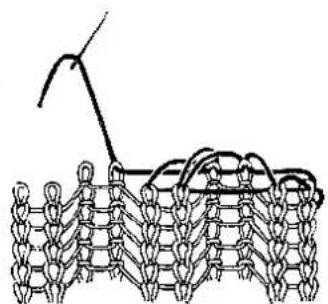
Close-up of a mechanical device with a circular component and textured surfaces (no visible text or symbols)7. BINDING OFF AND FINISHING EDGE OF RIBBING
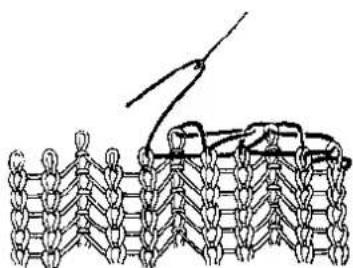
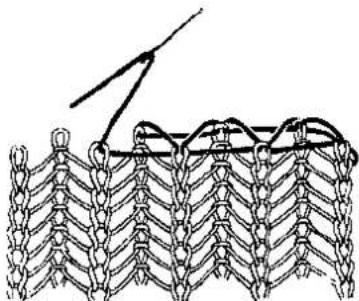
This method is used for binding off the stitches of the last row by using the yarn of rib knitting. Binding off is the same as selvedge.
When you finish ribbing, knit one or three rows of circular knitting. Then bind the last row by using the tapestry needle as shown is following figures. The length of the yarn for binding off is 3 times the width of knitting.
natural_image
Diagram of a knotted fabric structure with layered patterns and a curved line above it (no text or symbols)1 × 1 RIB
natural_image
Diagram of a knotted fabric pattern with a string, showing layered structure and no text or symbols2 × 2 RIB
natural_image
Diagram of a knitted fabric pattern with interwoven threads and a diagonal line (no text or symbols)2 × 1 RIB
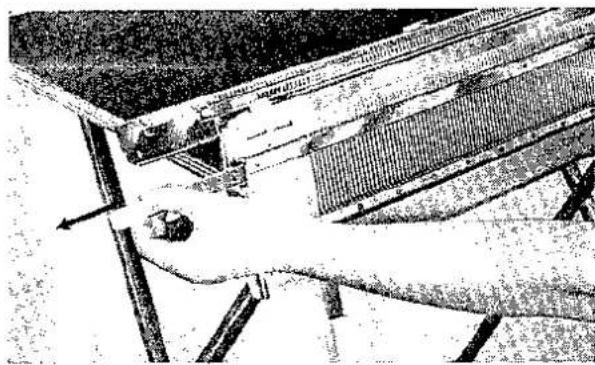
HOW TO REPLACE THE PURL NEEDLE
a Push the needle retaining bar from either side.
b. Slide out by hand from the ribber until the needle you wish to change is freed
c. Bring forward the needle as far as it will go.
d. Push down the hook of the needles until the shank of the needle rises free of the needle bed.
e Grasp the shank and draw it out backwards.
f Replace new needle with latch opened.
g. Push in the bar, making sure that the flat face is down.
natural_image
Technical illustration of a mechanical assembly with no visible text or symbols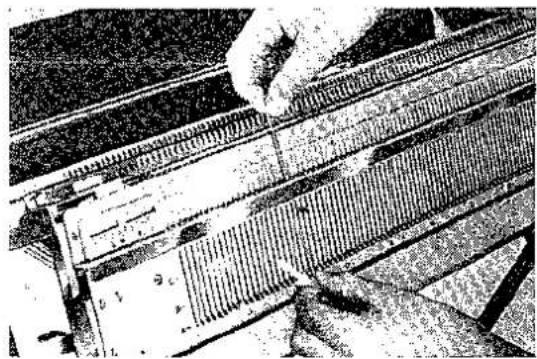
natural_image
Close-up of hands using a computer to adjust or install a physical component (no visible text or symbols)HOW TO TAKE CARE OF YOUR MACHINE
Each time you finish work, service your machine as follows:
a. Clean the machine of all wool lint with hand brush
b. Polish each part with soft oil cloth.
c. Oiling
Oil the following parts.
-
Back side of the carriage
-
Rails of the needle bed
-
Needles
Wipe off excess oil.
d. Keep your machine in a dry place.
natural_image
Technical diagram of a mechanical assembly with labeled components (no readable text or symbols)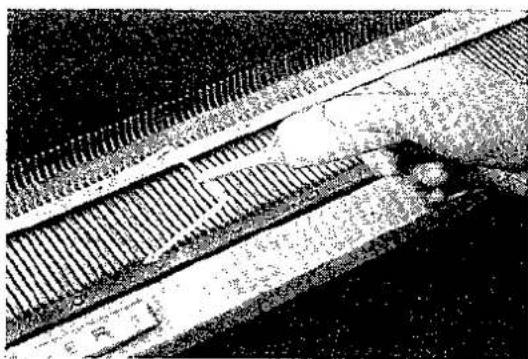
natural_image
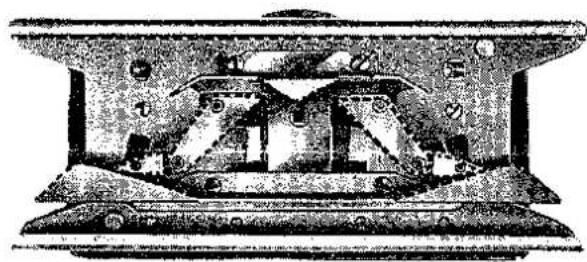
Close-up of railway tracks with visible tracks and tracks, no text or symbols presentIMPORTANT ADVICE
* Casting on combs and weights
Hang these on the garment so that good balance is obtained.
* Dropped stitch
To pick up dropped stitches, first, take off the weights and slide down the ribber one step, then pick up the dropped stitch with hook.
* Knitting with different number of knitting and purl needles.
Always be sure number of needles of the knitter side is more than the purl side.
* When the garment does not come down as you knit row by row, check to see whether some loop hangs on the gate of needle bed, or not.
If a loop is found hanging on the gate, take it off with hook.
Otherwise, increase the number of weights.
* Move the racking lever carefully
Do not move the racking lever when needles are raised above the needle bed gates
* Move the carriage (K) carefully
When you move the carriage (K) the force on the handle must be in downward direction
Otherwise, carriage (K) will rise up and cause dropped stitches.
" Check the needle arrangement before you move the carriage.
When the half pitch lever is set in position 'P', do not knit with knitting needles and the purl needles on the same line because they will crash together and damage
* Move the carriage (R) carefully
Check to see that the yarn lies in the hook of the purl needle before moving carriage (R)
KR531
KR551
421\~551
492551-0\~11
Printed in Japan
natural_image
Grid of 24 identical square images with varying shades of gray and black, arranged in rows (no text or symbols)- HOW TO USE OUR
- BROTHER DELUXE
- RIBBING ATTACHMENT
- PREPARING THE KNITTING MACHINE TO FIT THE RIBBING ATTACHMENT
- PREPARING THE RIBBER BEFORE FITTING ONTO KNITTER
- FIXING THE RIBBER TO THE KNITTER
- FIXING THE REINFORCING CLAMP TO THE RIBBER
- HOW TO USE ACCESSORIES (R)
- Note :
- HOW TO KNIT 1 × 1 RIB
- HOW TO KNIT 2 × 2 RIB
- HOW TO KNIT FULL NEEDLE RIB
- I Casting on for full needle rib
- II Full needle Rib knitting
- HOW TO KNIT 2 × 1 RIB
- HOW TO KNIT CIRCULAR KNITTING
- Casting on for circular knitting
- I Circular knitting
- HOW TO KNIT "U" STYLE KNITTING
- HOW TO KNIT ENGLISH RIB
- HOW TO KNIT FISHERMAN'S RIB
- HOW TO KNIT RACKING PATTERN
- HOW TO KNIT RACKING PATTERN OF ENGLISH RIB
- HOW TO KNIT TUCKING PATTERN OF RIB
- HOW TO KNIT ZIGZAG PATTERN
- INCREASING
- DECREASING
- PARTIAL KNITTING OF RIBBING
- HOW TO CONVERT FROM RIB TO PLAIN KNITTING OR FROM PLAIN KNITTING TO RIB
- HOW TO PICK UP DROPPED STITCH
- TO UNLOCK CARRIAGE
- UNDOING ROWS OR UNRAVELLING
- HOW TO REMOVE THE KNITTING FROM KNITTER
- HOW TO USE THE KNITTER AS A SINGLE BED WITH THE RIBBER ATTACHED
- BINDING OFF AND FINISHING EDGE OF RIBBING
- HOW TO REPLACE THE PURL NEEDLE
- HOW TO TAKE CARE OF YOUR MACHINE
- IMPORTANT ADVICE
Marke : BROTHER
Modell : KR 551
Kategorie : Nähmaschine