
KR710 - Nähmaschine BROTHER - Kostenlose Bedienungsanleitung
Finden Sie kostenlos die Bedienungsanleitung des Geräts KR710 BROTHER als PDF.


| Produkttyp | Rippenaufsatz (Ribbing Attachment) für Strickmaschinen |
| Marke | Brother |
| Modell | KR-710 |
| Kompatibilität | Brother KH-Strickmaschinen (z. B. KH-588, KH-710) |
| Nadelanzahl (Nadelbett) | ca. 200 Nadeln (geeignet für Arbeiten bis 200 Maschen Breite) |
| Musterarten | 1×1 Rippe, 2×2 Rippe, Vollnadelrippe, 5×5 Rippe, Rundstrick, U-Strick, Englische Rippe, Fischerrippe, Tucking-Muster, Racking-Muster |
| Spannungseinstellung | Drehwähler mit Skala 0–8 (0 = fest, 8 = locker) |
| Schiebehebel | Position I (weicher) und II (fester) |
| Halbteilunghebel | P (Nadeln gegenüber) und H (Nadeln versetzt) |
| Racking-Griff | Versatzanzeige 0–10, ermöglicht Zickzack- und Versatzmuster |
| Abmessungen (ca.) | 500 mm × 200 mm × 150 mm (B×T×H) |
| Gewicht (ca.) | 3,0 kg |
| Lieferumfang | Anschlagkamm (kurz/lang), Gewichte (groß/klein), Gewichtshalter (Drahtschlaufentyp, Klauentyp), Nadelpressbürsten (R/L), Feinstrrickstab, Werkzeug (Spanner, Arbeitshaken), Ersatznadeln, Transfernadel, 1/1 und 2/2 Nadel-Schieber, Verbindungsarm, Tischklemmen, Koffer |
| Wartung | Regelmäßige Reinigung mit Bürste, Ölen der Schlittenrückseite, Nadelschienen und Nadelbutts |
| Ersatzteile | Ersatznadeln, Spanner, Transfernadel erhältlich |
| Reparierbarkeit | Anleitung zum Auswechseln der Maschennadeln enthalten, Schrauben lösbar |
| Sicherheitshinweise | Vor dem Reinigen oder Warten Netzstecker ziehen; nur mit Originalzubehör verwenden |
Häufig gestellte Fragen - KR710 BROTHER
Benutzerfragen zu KR710 BROTHER
0 Frage zu diesem Gerät. Beantworten Sie die, die Sie kennen, oder stellen Sie Ihre eigene.
Eine neue Frage zu diesem Gerät stellen
Laden Sie die Anleitung für Ihr Nähmaschine kostenlos im PDF-Format! Finden Sie Ihr Handbuch KR710 - BROTHER und nehmen Sie Ihr elektronisches Gerät wieder in die Hand. Auf dieser Seite sind alle Dokumente veröffentlicht, die für die Verwendung Ihres Geräts notwendig sind. KR710 von der Marke BROTHER.
BEDIENUNGSANLEITUNG KR710 BROTHER
Instruction manual for ribbing attachment Model KR-710
SPECIAL INSTRUCTIONS FOR KR-120 RIBBING ATTACHMENT
The illustrations throughout this manual are of the KR-710, but bearing in mind the slight differences between models this manual is valid for both models.
The accessories list is for the KR-710 only.
The fine knitting bar is not included for the KR-120.
1/1 × 2/2 needle pusher is included instead of 1/2 × 2/2 needle pusher.
The Set screws and Extension rail holders are not included into the accessories for KR-120.
Please note that the model KR-120 is a fine gauge ribbing attachment, therefore please adjust the tension number as follows;
| Yarn | Slide lever | Pattern | |||
| 1×1 Rib | 2×2 Rib | Full needle | Circular | ||
| Super fine | I | 0 ~ 2 | 2 ~ 4 | 3 ~ 5 | 6 |
| II | 3 ~ 4 | 5 ~ 7 | |||
| Fine (ex.2ply) | I | 2 ~ 3 | 3 ~ 4 | 3 ~ 4 | 6 |
| II | 4 ~ 5 | ||||
| Medium fine(ex.3ply) | I | 3 ~ 5 | 3 ~ 5 | 5 ~ 7 | 7 |
| II | 5 ~ 7 | ||||
| Medium(ex.4ply) | I | 4 ~ 6 | 5 ~ 7 | 8 | |
You may change the angle of the yarn tension unit.
(See on page 6)
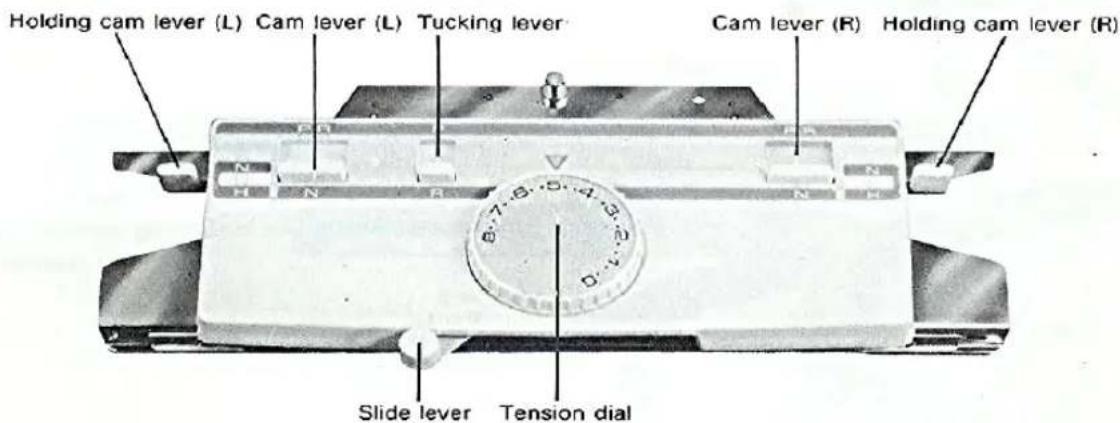
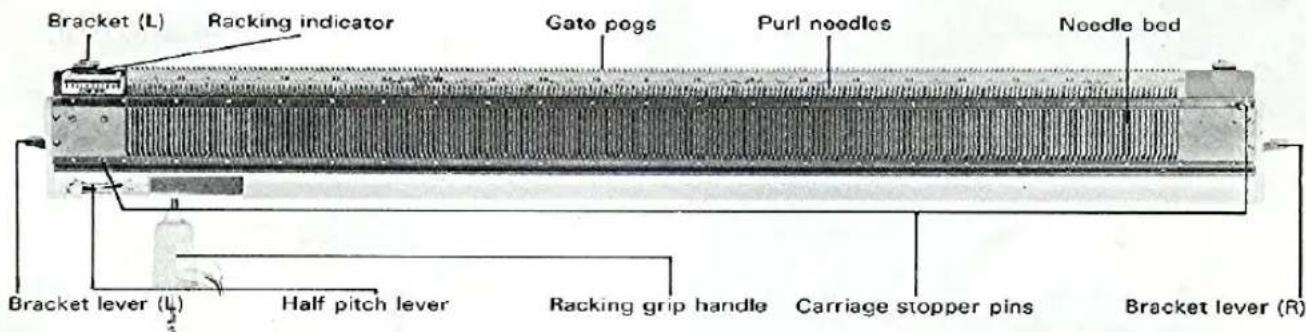
Name of parts
Accessories
2
Connecting arm assembly
Needle presser brush, R & L
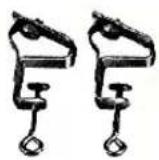
Table clamps

natural_image
Close-up of a metallic cylindrical object with textured surface and no visible text or symbols
Cast on Comb. long short
Fine knitting bar
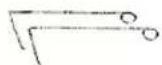
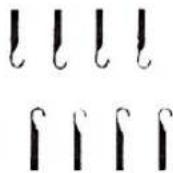
Wire-loop type weight hangers

Claw type weight hangers
Spanner

Work hook
Spare needles
Case

Transfer needle
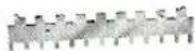
12 × 22 needle pusher
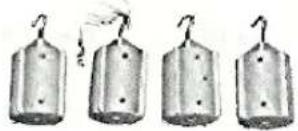
natural_image
Four identical metallic bell-shaped objects with hooks and a string, shown side by side (no text or symbols)Large weights
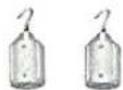
Small weights
OPTIONAL PARTS

Set screw

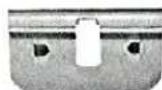
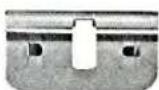
Extension rail holder for KH-588,
Setting up your ribber to the knitter
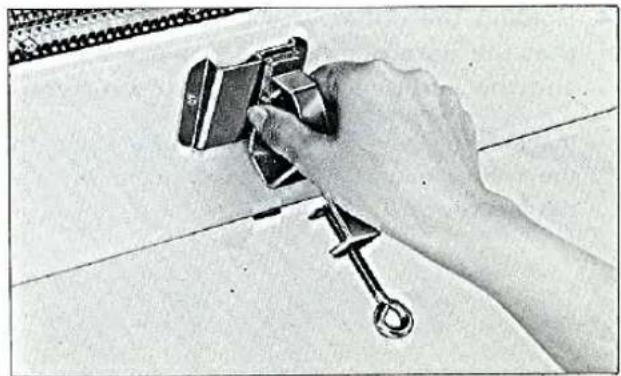
- Take the table clamps out of the accessories box. Raise the front of the knitter, insert the head of screw into the aperture. Press the head of screw upwards and fasten the knob.
Secure the knitter onto a flat table using the Table clamps provided as an accessory for the ribber.
2 Remove the thumb screws from the brackets on both sides of the ribber.
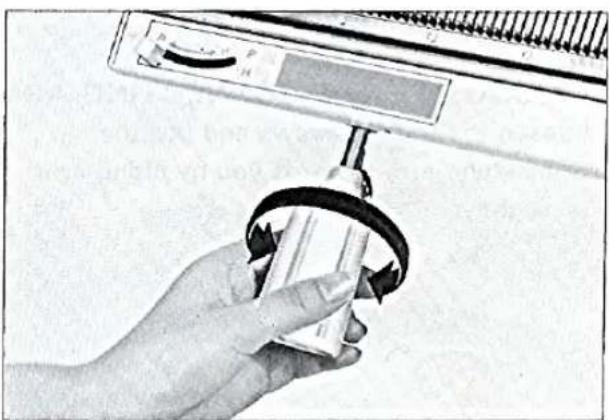
- Insert the Grip shaft into the Racking grip shaft holer, and turning the grip handle, push it in until you hear the "click".
* After setting the grip handle, please check the working of the racking grip handle by turning it.
natural_image
Hand holding a small mechanical device attached to a wall, with a metal clamp and ring handle (no visible text or symbols)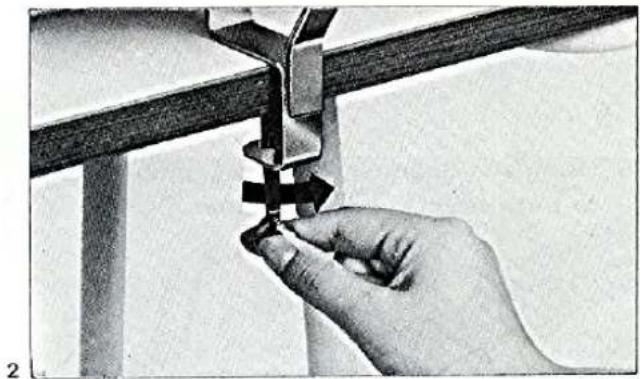
natural_image
Hand holding a metal tool with a spring-like component inserted, against a dark metal frame (no text or symbols visible)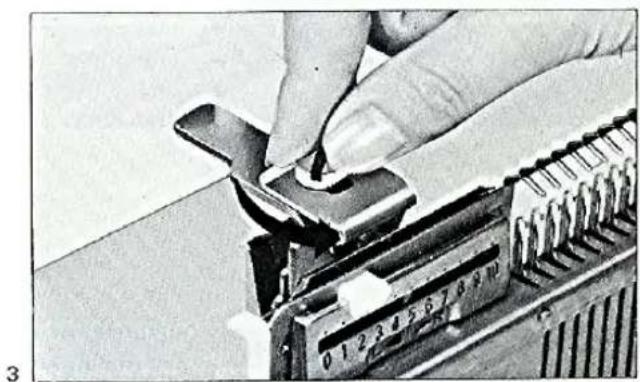
natural_image
Close-up of hands using a computer to adjust or install a small electronic component (no visible text or symbols)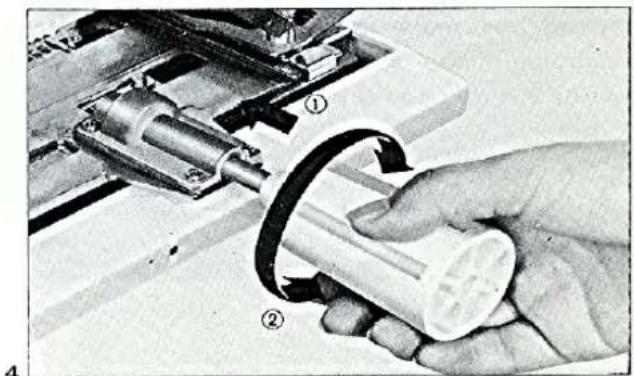
natural_image
Close-up of hands holding a white cylindrical component with black bands, next to an open mechanical device (no visible text or symbols)4
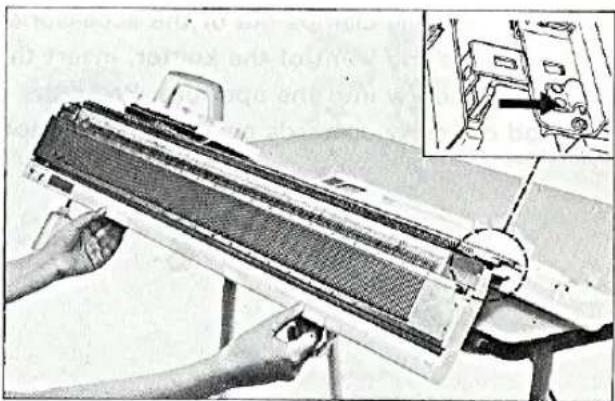
- Holding the ribber with both hands so that the gate pegs of the ribber are up and the purl needle butts are toward you.
Insert the lower lip of right bracket beneath the knitter bed as far as it will go, then insert the left bracket.
5
natural_image
Illustration of hands operating a large air conditioner unit with an inset showing a mechanical component (no text or symbols visible)- Using the Spanner, put the thumb screws to both brackets of the ribber.
6
natural_image
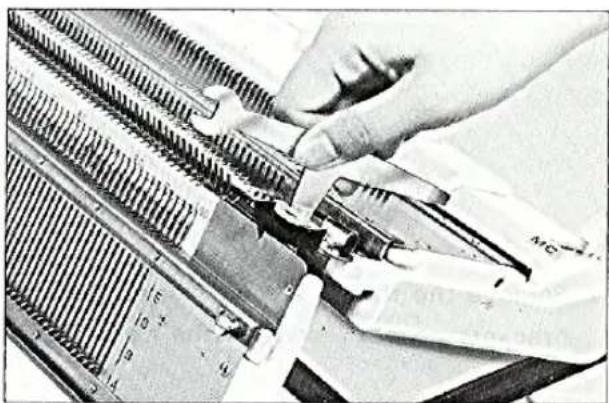
Close-up of hands using a mechanical tool to adjust or install a mechanical component (no visible text or symbols)- Place the rear foot of the KR carriage into left end of the rear rail of the needle bed, and keeping off the front foot from the front rail, move the KR carriage to right as shown in the photograph.
*The KR carriage is packed in an accessories box.
7
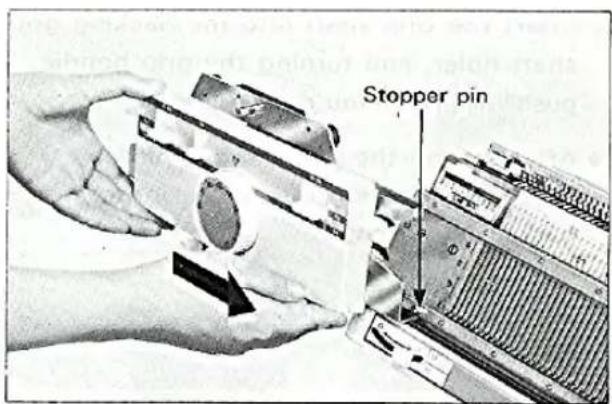
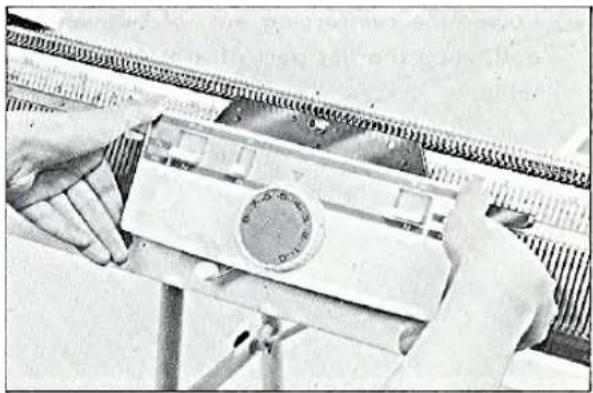
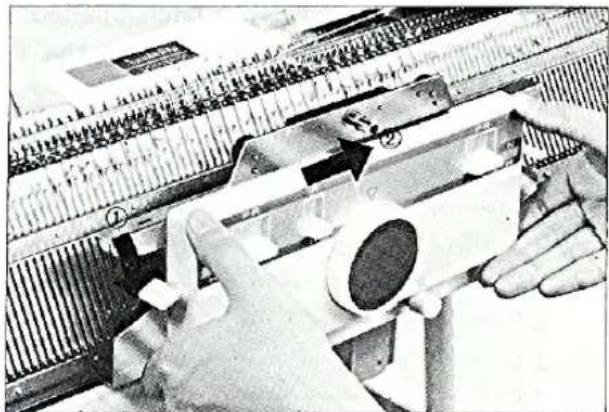
- Set the front foot of the KR carriage to the front rail of the needle bed. Please check whether the KR carriage moves on the needle bed smoothly.
8
natural_image
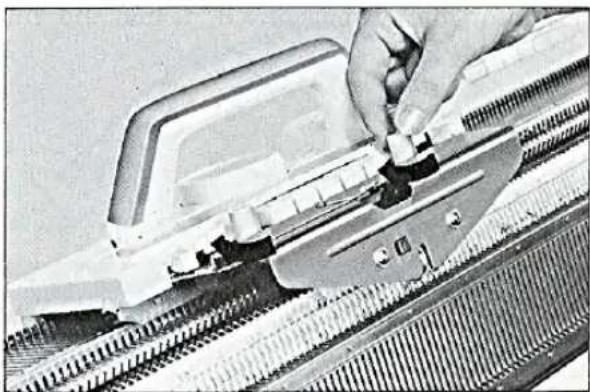
Close-up of a hand operating a mechanical device with a circular dial and ruler, no visible text or symbols.- Loosen both Thumb screws of KH carriage and fit the Connecting arm securely. Then fasten the screws.
9
natural_image
Close-up of a hand using a tool to adjust or install a mechanical component on a metal rack (no visible text or symbols)- Move the KH carriage toward the KR carriage slowly so that both carriages connect with the connecting arm automatically.
10
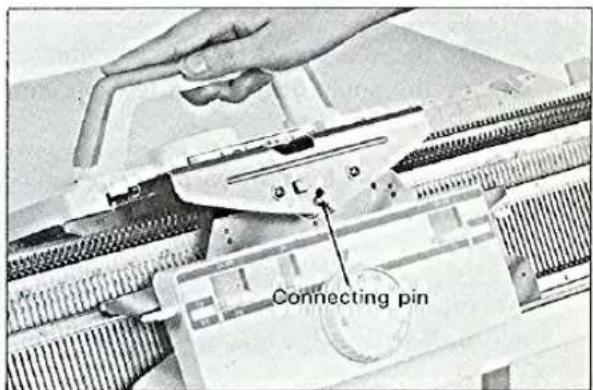
- Lower the reinforcing arm of bracket, and place the flat part of arm on the table.
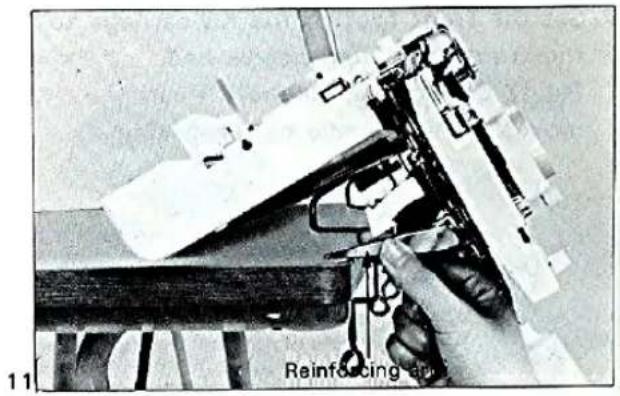
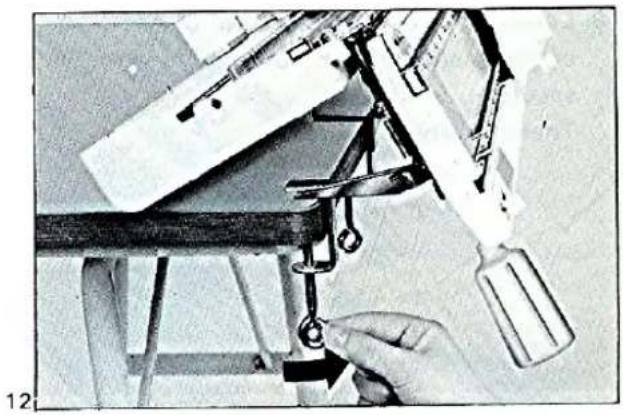
- Using the clamps of KH, fasten the arm to the table.
natural_image
Close-up of a hand using a tool to adjust or install a mechanical component, no visible text or symbols- Set up the Yarn tension unit.
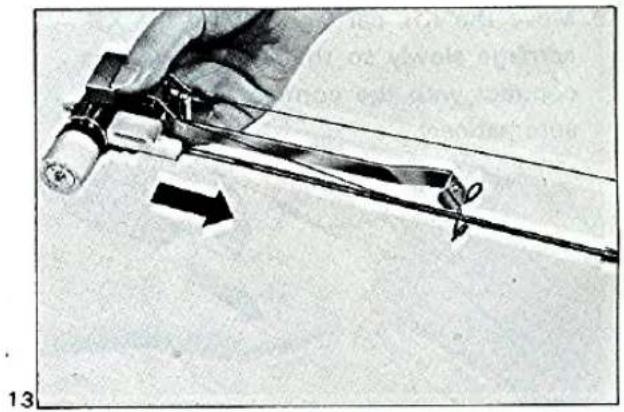
* In case the knitter is KH-710, you may change the angle of the yarn tension unit as follows;
a. Take off the head of yarn tension unit and put it to the rod reversely.
*For the model KH-588, you cannot change the angle. Therefore, please use the yarn tension unit without changes.
natural_image
Close-up of a hand holding a pen with a string and a loop, showing a black arrow indicating direction (no text or symbols present)13
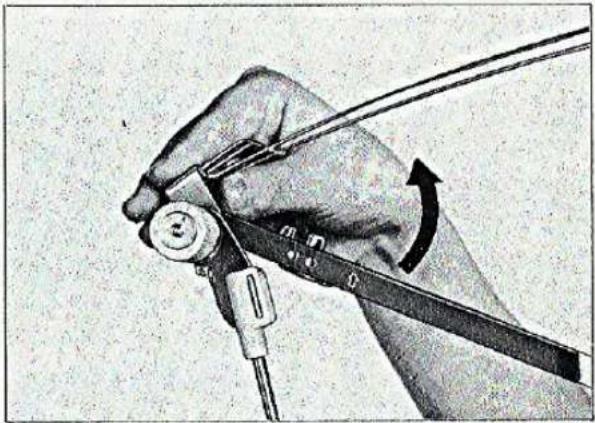
b. Turn back the "Take-up springs" as far as they will go.
14
natural_image
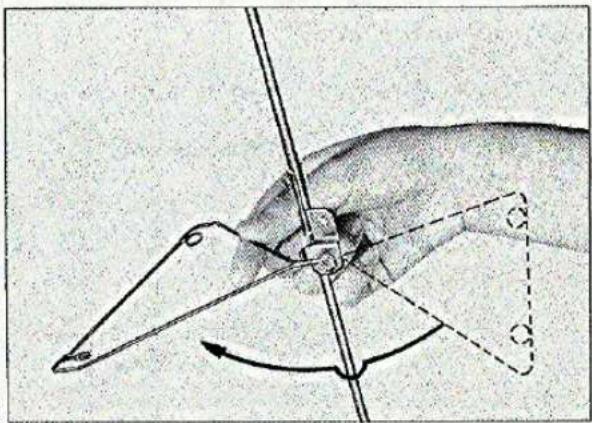
Close-up of a hand using a compass and pen to draw a curved tool, with an arrow indicating rotation (no text or symbols present)c. Turn the Rear yarn guide opposite to the side on which the Rear yarn guide is set when you use the knitter without attaching the ribber.
15
natural_image
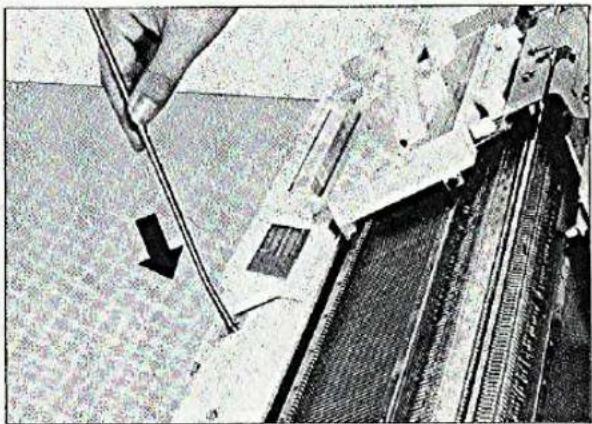
Diagram of a hand holding a windmill with directional arrows indicating motion (no text or labels)d. Insert the end of the rod into the stand hole at the center of the machine.
16
natural_image
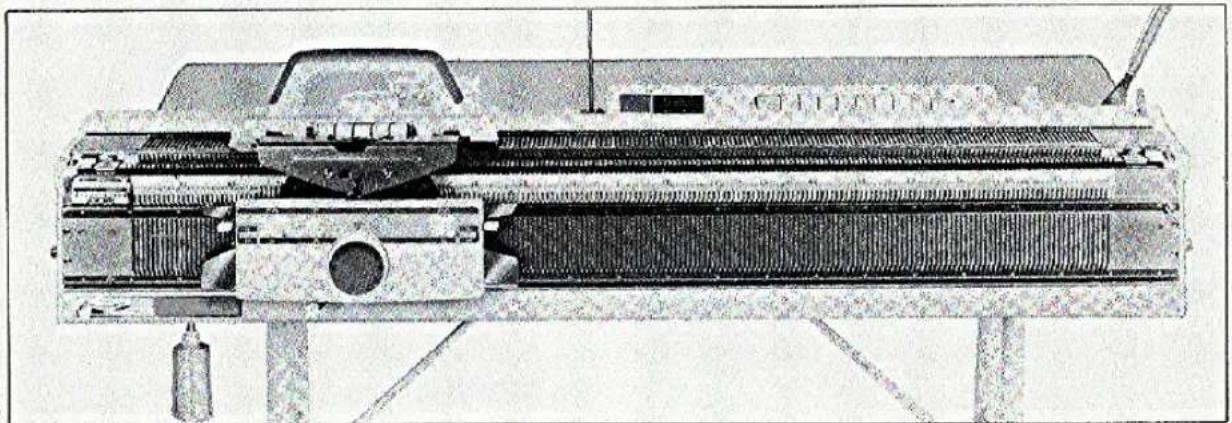
Close-up of a mechanical device with a hand operating a tool, showing a black arrow pointing to a component (no visible text or symbols)- Now you have finished setting up the ribber to the knitter.
17
natural_image
Technical illustration of a mechanical device with internal components and mounting base (no visible text or symbols)Here are a few important points to remember before you start knitting
8
TENSION DIAL
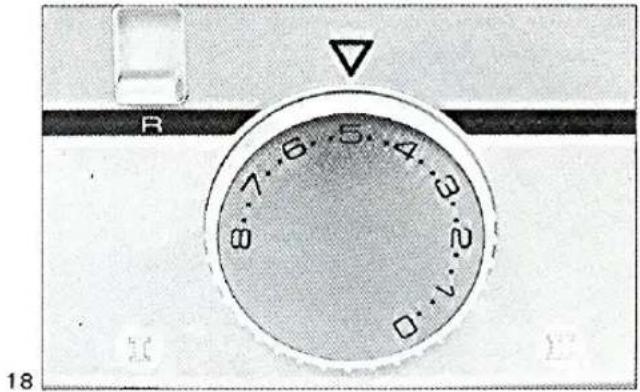
The tension in knitting denotes the size of the stitch. The tension dial on the KR carriage is graduated from "O" to "8", each space between numbers being subdivided into three parts. The figure "O" denotes the tightest tension, i.e. the smallest stitch and the "8" denotes the loosest or largest stitch.
The tension at which a garment is knitted depends not only on personal tast, but also on the type of garment required and the thickness of the wool.
The following tension chart is a guide for your reference.
STANDARD TENSION CHART FOR THE COMBINATION OF KH AND KR
| Yarn | Slide lever | Pattern | |||
| 1×1 Rib | 2×2 Rib | Full needle | Circular | ||
| Fine (ex.2ply) | I | 3 ~ 4 | |||
| II | 0 ~ 1 | 0 ~ 2 | 1 ~ 2 | 3 ~ 4 | |
| Medium(ex.3ply) | I | 0 ~ 1 | 1 ~ 3 | 1 ~ 2 | 4 ~ 5 |
| II | 3 ~ 5 | 3 ~ 5 | 2 ~ 4 | 4 ~ 5 | |
| Medium(ex.4ply) | I | 0 ~ 2 | 2 ~ 4 | 2 ~ 4 | 5 ~ 6 |
| II | 3 ~ 5 | 3 ~ 6 | 3 ~ 5 | 6 ~ 7 | |
| Bulky (ex.5ply) | I | 5 ~ 8 | 5 ~ 8 | 6 ~ 8 | |
19
SLIDE LEVER
The slide lever has two positions, I and II. If a firm automatic cast-on edge is required on ply up to 4 ply, use Slide lever position II. Position I is for thicker ply.
Elasticity and firmness of fabric is also determine by Slide lever position. Position I is for a softer result and position II for a firm one.
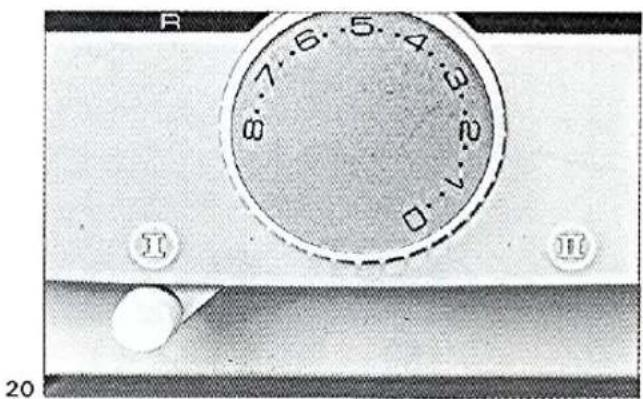
20
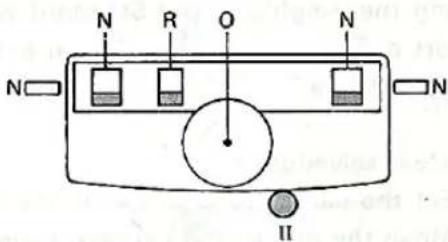
NEEDLE POSITION
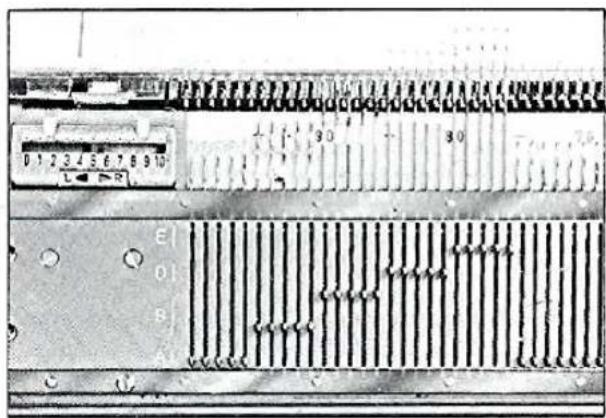
There are 4 positions on the needle bed of the ribber.
Position A: Resting or non-knitting position. (against the base of the needle grooves.)
Position B : Knitting or working position.
Position D: When the needles are brought in this position from the position E, they will automatically back to the position B by operation of the carriage.
Position E : Holding or partial knitting position.
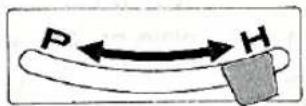
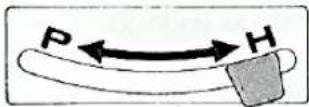
HALF PITCH LEVER
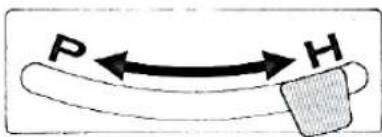
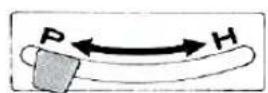
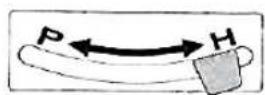
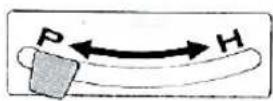
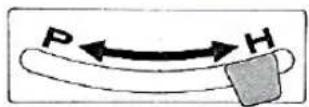
Half pitch lever is on the left end below the needle bed. Two positions of the Half pitch lever are shown on the indicating plate as P and H.
Position P : Plain needles and purl needles directly opposite to each other.
Position H: Purl needles are halfway between two plain needles.
RACKING GRIP HANDLE
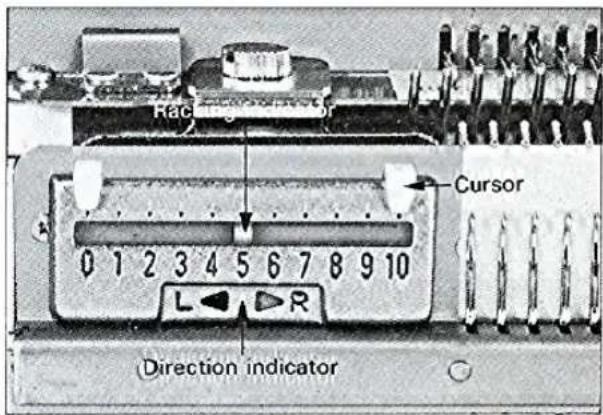
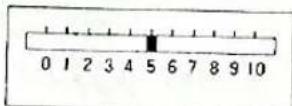
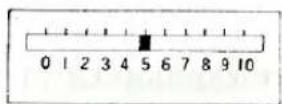
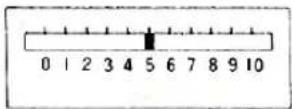
Racking grip handle is used for making the "Racking patterns" and "Zigzag patterns". The racking position is indicated on the racking indicator. By turning the Grip handle, ribber bed is moved right or left. Normally, set the indicator to No. 5 which shows centre position.
The two cursors on the indicator plate are used as an index of the racking range. The arrow head indicates the direction of racking movement.
:
21
natural_image
Close-up of an electronic circuit board with visible traces and components (no readable text or symbols)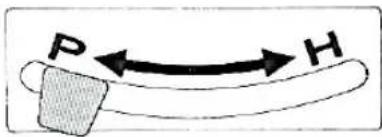
natural_image
Hand holding a handheld device with a curved knob and a control panel (no visible text or symbols)23
24
BRACKET LEVER
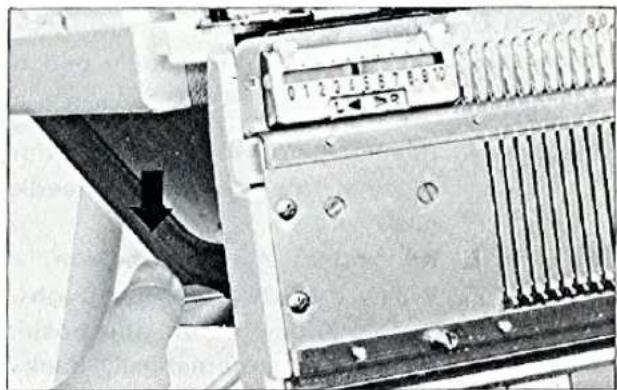
The bracket lever is used to let down the ribber.
With both thumbs, push down the levers of the bracket, the ribber will come down one step.
This position is used for picking up dropped stitches.
Note: Before pushing the levers, disconnect the carriage.
Push down the levers again and the ribber will come down one more step. At this position the ribber is at rest and single bed knitting work can be done without removing the ribber.
To return to working position, lift up the ribber with both hands as high as it will go until it stays in position without holding.
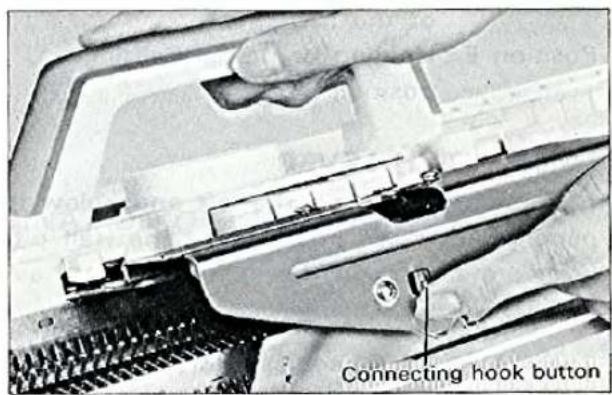
DISCONNECTING THE CARRIAGE
By pressing the connecting hook release button, left up the front of the KH carriage so that you can disconnect the carriage.
TAKING OFF THE CONNECTING ARM
Loosen the thumb screws and pull the Connecting arm towards you by lifting arm up slightly.
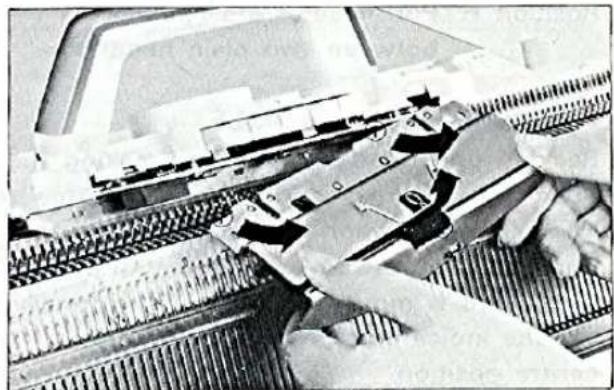
TAKING OFF THE KR CARRIAGE
After disconnecting the KR carriage from the KH carriage, move the KR carriage to left end of the needle bed by keeping off the front foot from the needle bed as shown in the photograph.
IF THE CARRIAGE SHOULD JAM DURING KNITTING, PLEASE REFER TO PAGE 38 TO RELEASE IT.
25
natural_image
Close-up of a computer RAM module with visible slots and connectors (no readable text or symbols)26
natural_image
Close-up of hands using a mechanical tool to adjust or install electronic components (no visible text or symbols)27
28
How to use the accessories
- Cast-on comb
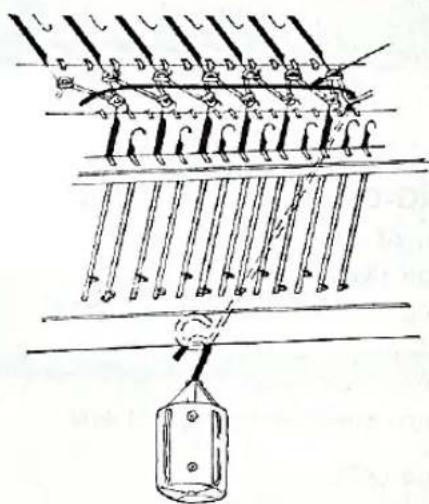
Cast-on comb is used for casting-on the first stitches which is the selvedge of the knitting. Choose long or small comb depending on the knitting width.
- Weights
Number of weights to be used depends on the width of knitting and pattern. Hang the weights on the cast-on comb so that they hold the knitting work in balance.
- Wire-loop type weight hangers
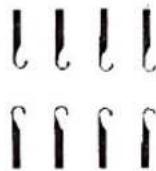
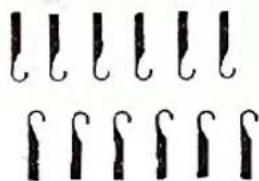
The wire-loop type weight hangers are used for hanging small weights to give tension to the edges of the knitting work and also used as a small cast-on comb for casting-on work of less than 20 stitches.
- Work hook
The hook is used to pick up dropped stitches.
- Claw-type weight hangers
The claw type weight hangers are used to hang the small weights to give tension to the edge of the knitting work.
- Needle presser brushes
When the "TUCK" buttons on the KH carriage are depressed for the pattern, put the Needle presser brush (right and left) onto the carriage by thumb screws.
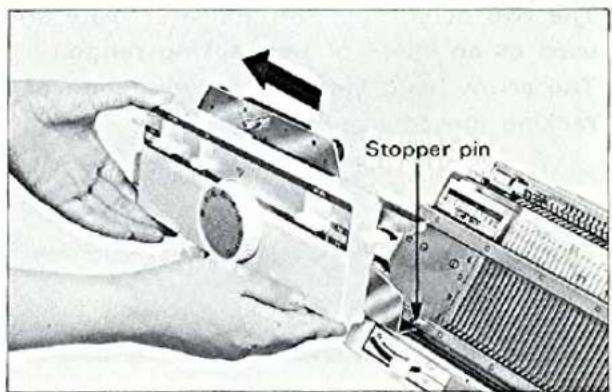
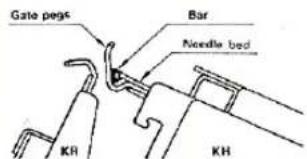
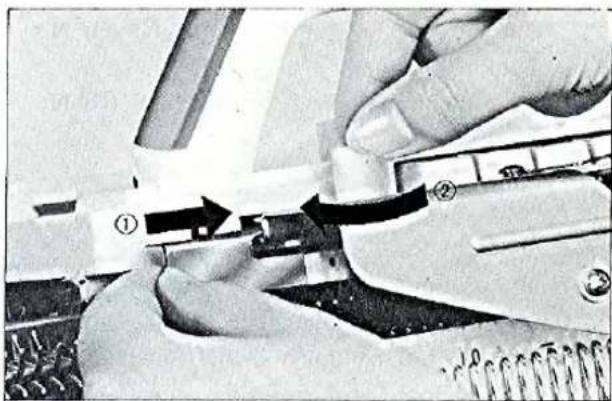
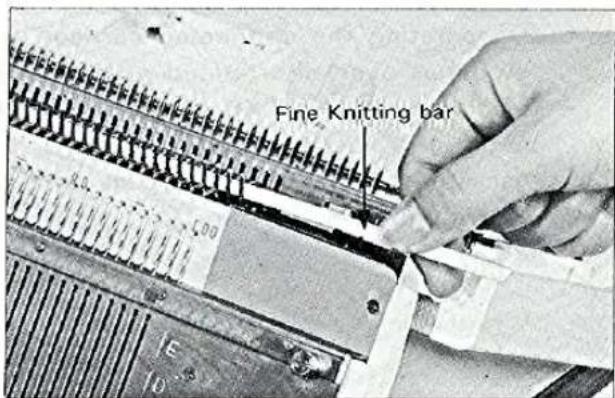
- Fine knitting bar
The fine knitting bar is used only for knitting the thinner yarn at the tension number 0\~2.
Insert the bar from the end of the KH needle bed as shown in the photograph and illustration.
Standard weights chart
| No. of stitches | Large weight | Small weight |
| ~ 50 | 1 | - |
| 50 ~ 100 | 2 | - |
| 100 ~ 150 | 3 | 2 |
| 150 ~ 200 | 4 | 2 |
natural_image
Diagram of a mechanical lifting device with multiple rods and a hanging weight (no text or symbols)29
30
natural_image
Close-up of hands using a tool to adjust or install a component, no visible text or symbols31
32
How to Knit 1×1 rib
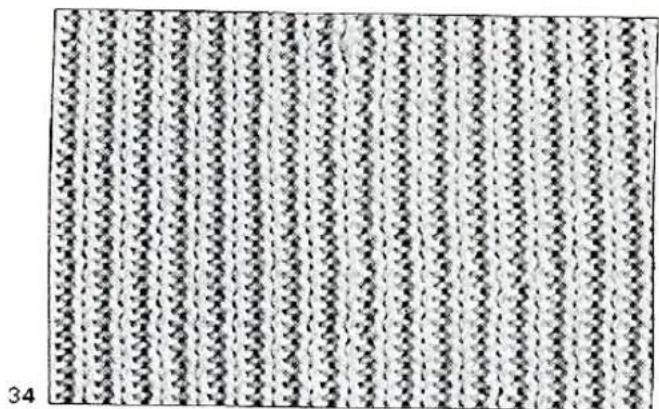
1 × 1 rib is most widely used for waist bands in sweaters, cuffs, collars, pockets and for many other decorative purposes.
The rib is produced by having knit stitch over knit stitch and purl stitch over purl stitch, in vertical lines, and is soft and elastic. In the following example, medium thickness wool is used for the practice.
natural_image
Patterned fabric with repeating diamond and square textures, no text or symbols presentCASTING-ON FOR 1 × 1 RIB
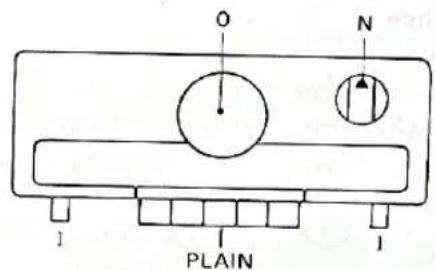
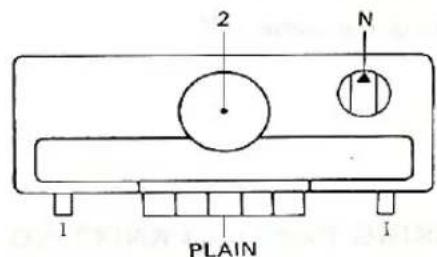
- Setting of carriage
Carriage (KH)
Change knob : N
Tension dial :0
Holding cam lever : (L) I, (R) I
Pattern selector button: PLAIN
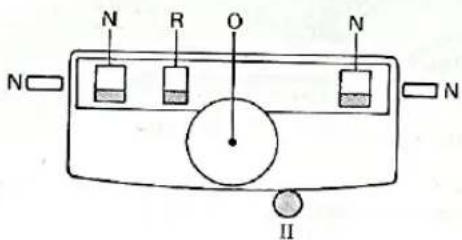
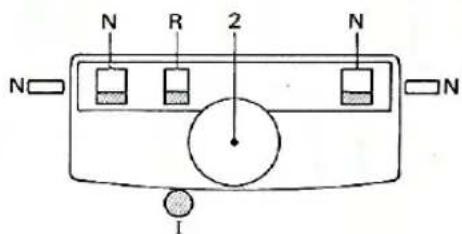
Carriage (KR)
Slide lever : II
Tension dial : 0
Cam lever : (L) N, (R) N
Tucking lever :R
Holding cam lever : (L) N, (R) N
35
- Needle arrangement
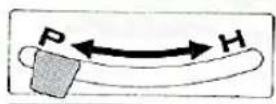
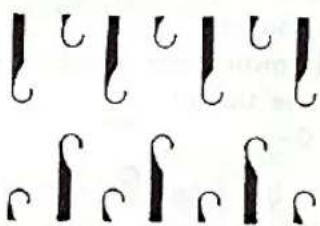
a. Set the half pitch lever on "P".
b. By using 1/1 needle pusher, arrange the plain needles and purl needles in position B of each bed. (See fig. 37.)
Note: Both end needles must be plain needles.
c. By operating the connected carriage a few times over all arranged needles, the needles on KH and KR needle beds will be set in a line on position B.
d. Place the connected carriage at right end of the needle beds.
36
37
3. First row knitting
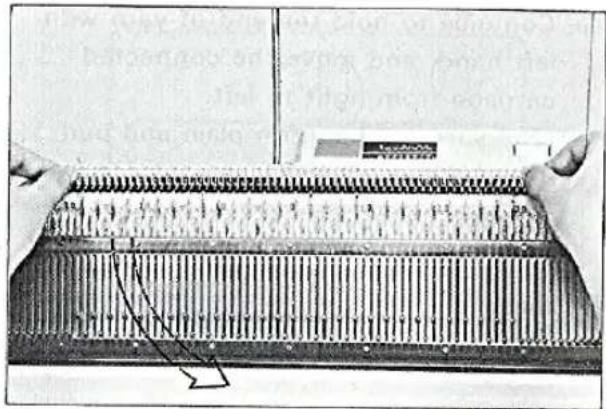
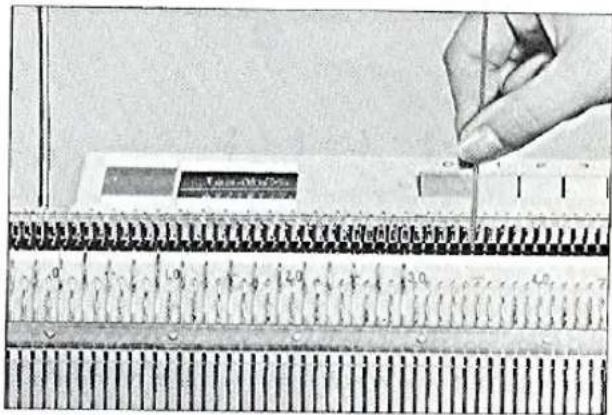
a. Thread the yarn into the Yarn tension unit, and hold the end of yarn as shown in the Fig. 38.
b. Pass the yarn between both gate pegs, and catch the end of yarn underneath with left hand.
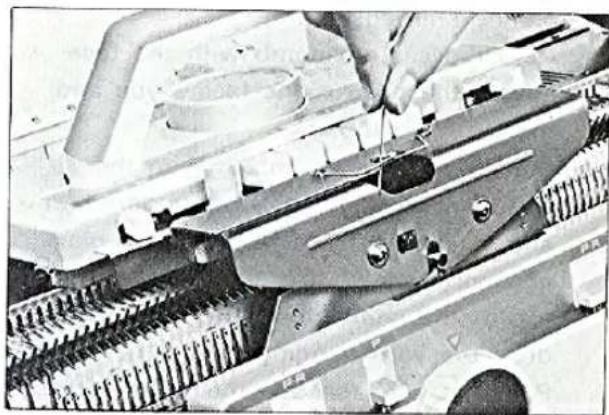
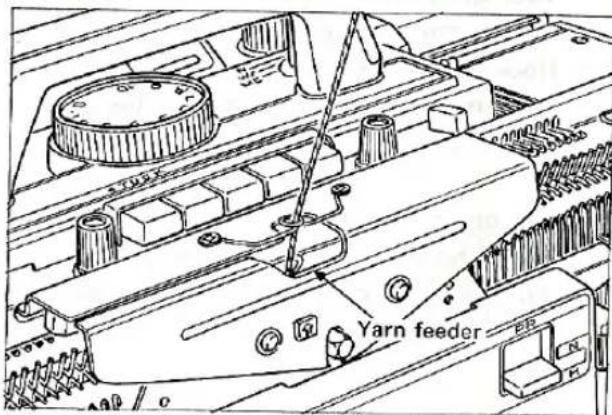
c. Hold the yarn with right hand (continue to hold the end of yarn with left hand), pass to the yarn feeder. (see Fig. 40.)
d. Pass the yarn into the yarn feeder securely.

38
natural_image
Close-up of hands holding a grid-patterned device with no visible text or symbols39
natural_image
Close-up of a hand using a ruler to measure a small object on a surface, no visible text or symbols40
natural_image
Close-up of a hand using a tool to adjust or install a mechanical component (no visible text or symbols)41
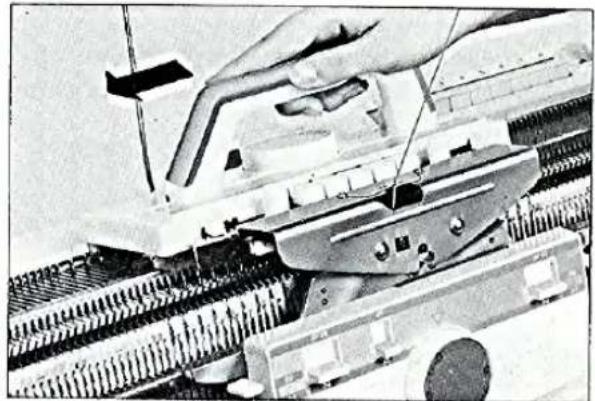
e. Continue to hold the end of yarn with left hand, and move the connected carriage from right to left. (The yarn will hang on plain and purl needles.)
42
natural_image
Close-up of a hand using a tool to adjust or install electronic components on a mechanical device (no visible text or symbols)43
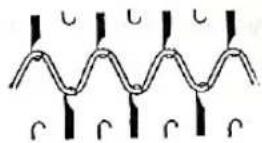
- Hang on the cast-on comb
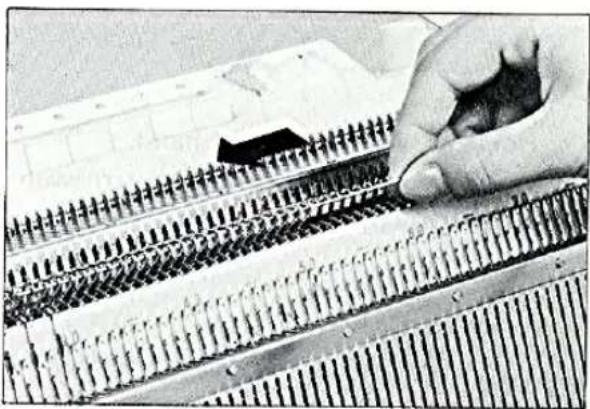
a. Pull out the wire from the cast-on comb. (Choose long or short one depending on the knitting width.) Hold the cast-on comb with the face having the protrusions facing you and the teeth on top.
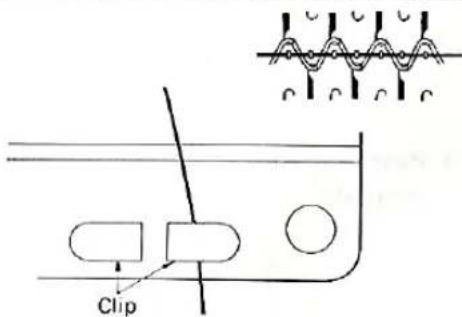
b. Put the cast-on comb between the knitter and the ribber from underneath and insert the teeth between the plain and purl needles in such a way that the top of the comb does not disturb or drop the yarn hanging on the needles. Pass the wire through the teeth with your right hand. While holding the comb with your left hand.
c. Hook the loose end of the yarn around the yarn clip to keep it out of the way and to tense the first stitch.
- Hang on the weights
Hang the weights as per Standard weights chart on page 11 on the cast-on comb to keep balance.
44
natural_image
Close-up of a hand pressing down on a perforated metal component (no visible text or symbols)45
- Perfect selvedge
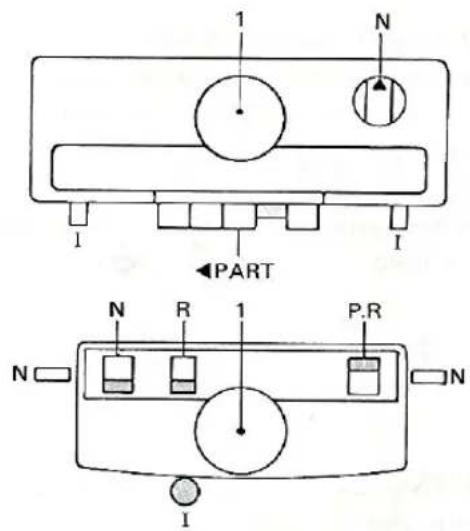
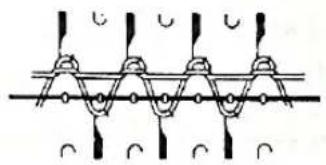
a. Set the carriages as shown in the Fig. 47.
b. Move the connected carriage from left to right. (Only the plain needles knit.)
47
c. Move the connected carriage from right to left.
(The purl needles knit.)
48
d. Move the connected carriage from left to right.
(The plain needles knit.)
The perfect selvedge has completed.
49
1 × 1 RIB KNITTING
* After knitting the selvedge, set the carriages as shown in the Fig. 51.
Then, continue the knitting.
50
Note: Don't take the carriage back until you hear the "click" or the carriage passes the last working needle.
YOU ARE NOW ABLE TO DO A FINISHED END CAST-ON.
THIS METHOD IS VERY IMPORTANT, THEREFORE PLEASE PRACTICE THIS CAST-ON TWO OR THREE TIMES.
IF THE CARRIAGE SHOULD JAM WHILE KNITTING, PLEASE REFFER TO PAGE 38 TO RELEASE IT.
51
natural_image
Pure electrical circuit lines without any symbols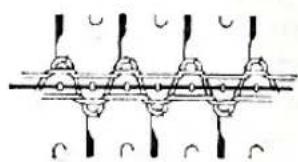
natural_image
Pure electrical circuit lines without any symbols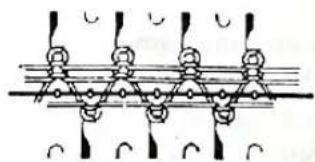
natural_image
Pure electrical circuit lines without any symbols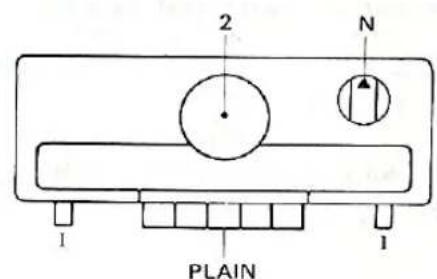
How to knit 2 × 2 rib
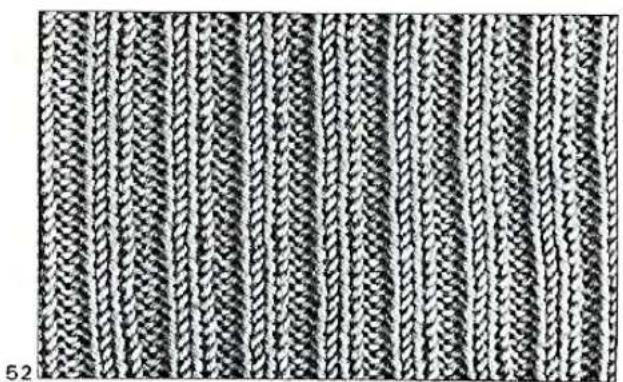
2 × 2 rib is 2 knit and 2 purl rib.
In one row, 2 knit stitches alternate with 2 purl stitches and vertically form knit stitch over knit stitch and purl stitch over purl stitch.
In the following example, medium thickness wool is used.
CASTING-ON FOR 2 × 2 RIB
- Setting of carriage
Carriage (KH)
Change knob. : N
Tension dial : 0
Holding cam lever : (L) I, (R) I
Pattern selector button : PLAIN
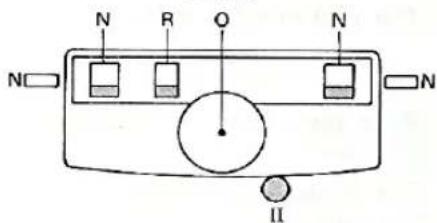
Carriage (KR)
Slide lever : II
Tension dial : 0
Cam lever : (L) N, (R) N
Tucking lever : R
Holding cam lever : (L) N, (R) N
- Needle arrangement
a. Set the half pitch lever on "P", and racking indicator on No 5.
b. By using 2/2 needle pusher, arrange the plain needles and purl needles in position B of each bed. (see Fig. 55.)
Note : Both end needles must be plain needles.
c. Set the half pitch lever on "H".
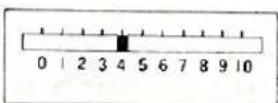
d. Set the racking indicator on No 4.
(see Fig. 56.)

natural_image
Close-up of a woven textile with repeating knitted strands (no text or symbols)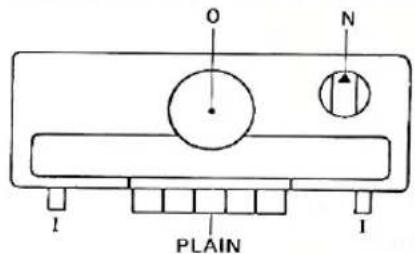
54
61

56
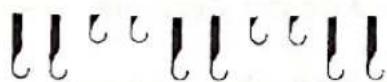
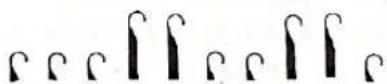
57
e. Raise a purl needle in the left side to position B.
f. Move the connected carriage a few times over all arranged needles to set them in a line.
Then, place the carriage at right end of the bed.
- First row knitting
a. Thread the yarn into the yarn feeder.
b. Move the connected carriage from right to left. (The yarn will hang on plain and purl needles.)
- Hang on the cast-on comb
* This is in the same way as 1 × 1 rib.
a. 'Hold the cast-on comb with the face having the protrusions facing you and the comb on top.
b. Put the cast-on comb between the knitter and the ribber from underneath and insert the comb between the yarn hanging on the needles. And pass the wire.
c. Hook the loose end of the yarn around the yarn clip.
- Hang on the weights
Hang the weights as per Standard weights chart on page 11 on the cast-on comb to keep balance.
- Perfect selvedge
a. Set the carriages as shown in the Fig. 61.
b. Move the connected carriage from left to right.
(Only the plain needles knit.)
c. Move the connected carriage from right to left.
(The purl needles knit.)
d. Move the connected carriage from left to right.
(The plain needles knit.)
58
59
60
61
63
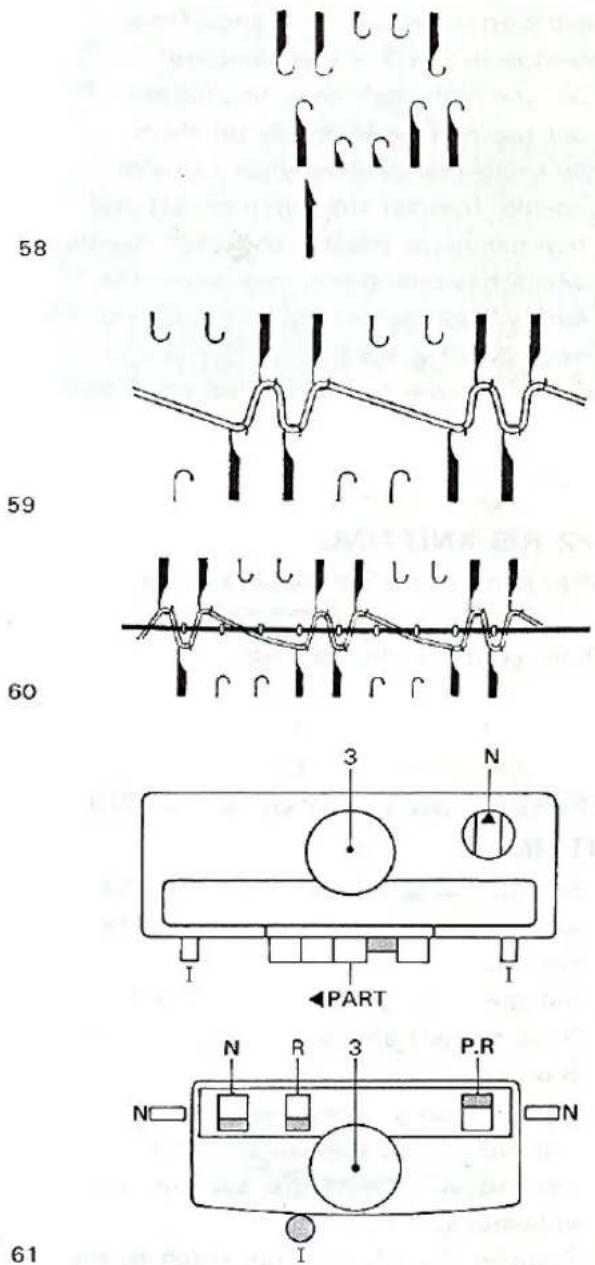
62
- Needle arrangement to change from selvedge of the 2 × 2 rib knitting.
a. Set the half pitch lever to position "P".
b. Set the racking indicator on No 5.
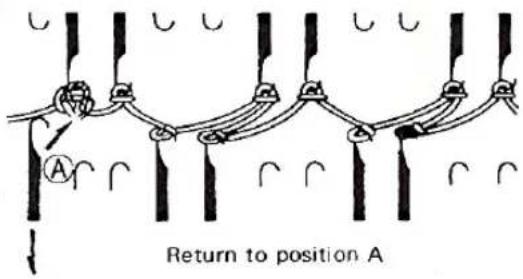
c. By using the Double eyelet transfer needle, transfer the stitch of left end purl needle to the left end plain needle which has one stitch, and return the empty purl needle to position "A" of KR bed. (See Fig. 63.)
* How to transfer……see on page 35.
2 × 2 RIB KNITTING
* After knitting the selvedge, set the carriages as shown in the Fig. 64 Then, continue the knitting.
64
DIFFERENT METHOD OF 2 × 2 RIB KNITTING
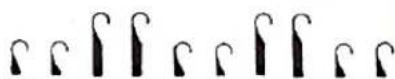
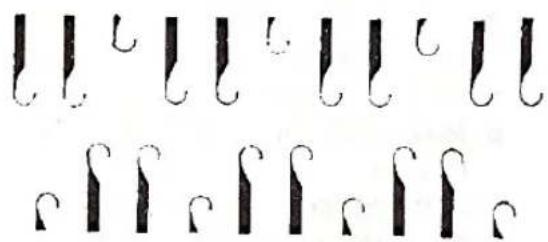
a. Set the half pitch lever to "H", and arrange the needles as shown in the Fig. 66
b. Set the racking indicator on No 4.
Raise the left end purl needle to position B of KR bed.
c. From the step "first row knitting" to "selvedge" are the same as original method. After selvedge, set the racking indicator on No 5.
d. Transfer the left end purl stitch to the plain needle, and return the empty needle to A position of KR bed.
e. The knitting is the same as original method.

66
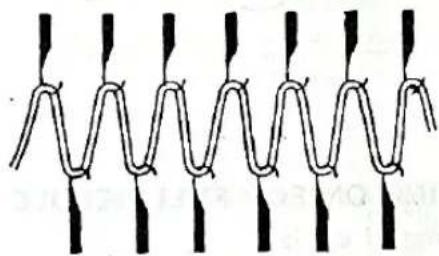
How to knit full needle rib
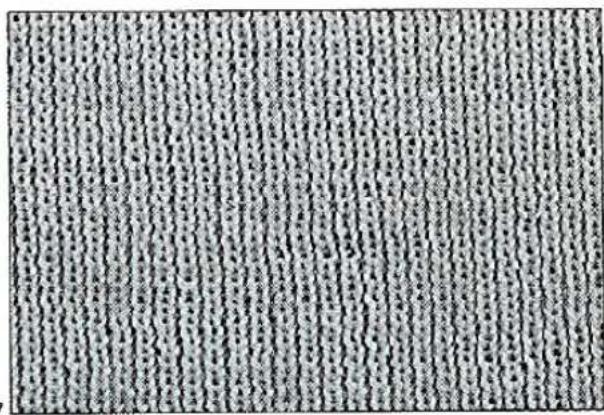
Knitting method of full needle rib is the same as for 1×1 rib. Difference is the needle arrangement only. In 1×1 rib, every other needles are used but in full needle rib, all needles are used. Fine wool (ex. 2ply) is suitable for this rib knitting.
CASTING-ON FOR FULL NEEDLE RIB
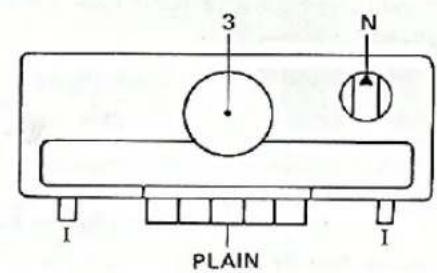
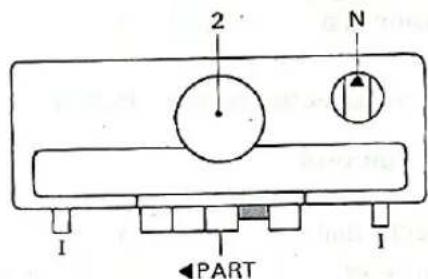
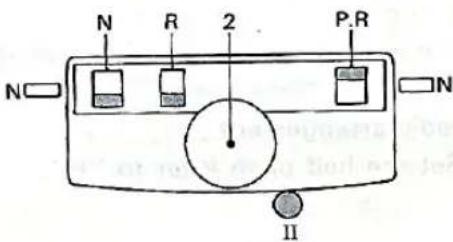
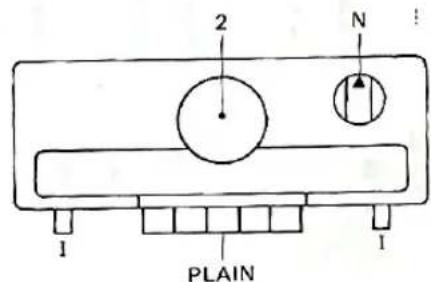
1. Setting of carriage
Carriage (KH)
Change knob : N
Tension dial : 0
Holding cam lever : (L) I, (R) I
Pattern selector button : PLAIN
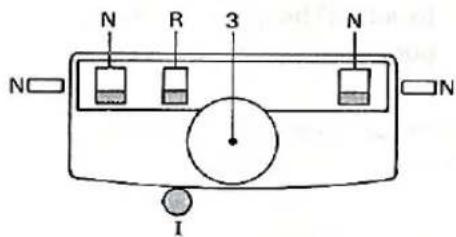
Carriage (KR)
Slide lever : II.
Tension dial : 0
Cam lever : (L) N, (R) N
Tucking lever : R
Holding cam lever : (L) N, (R) N
2. Needle arrangement
a. Set the half pitch lever to "H".
67
natural_image
Close-up of a textured fabric surface with vertical striations and no visible text or symbols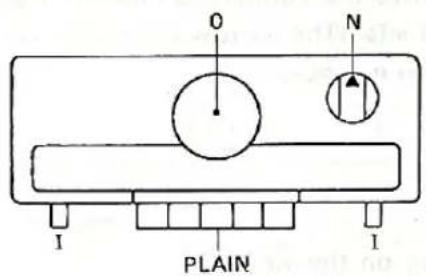
68
69
b. Arrange the plain and purl needles in position B of each bed.
Note: Both end needles must be plain needles.
c. Move the connected carriage a few times over all arranged needles to set them in a line. Then, place the carriage at right end of the bed.
- First row knitting
a. Thread the yarn into the yarn feeder.
b. Move the connected carriage from right to left. (The yarn will hang on plain and purl needles.)
-
Hang on the cast-on comb This is the same as 1×1 rib.
-
Hang on the weights
Hang the weights as per Standard weights chart on page 11 on the cast-on comb to keep balance.
- Perfect selvedge
a. Set the carriages as shown in the Fig. 72.
b. Move the connected carriage from left to right. (Only the plain needles knit.)
c. Move the connected carriage from right to left.
(The purl needles knit the stitches.)
d. Move the connected carriage from left to right. (The plain needles knit.)
FULL NEEDLE RIB KNITTING
* After knitting the selvedge, set the carriages as shown in the Fig. 73. Then, contique the knitting.
70
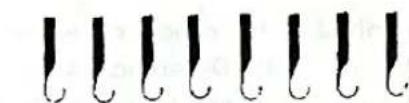
natural_image
Seven identical black hook symbols arranged horizontally (no text or labels)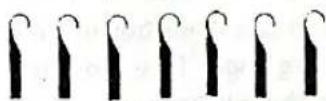
natural_image
Pure electrical circuit lines without any symbols71
72
How to knit 5 × 5 rib
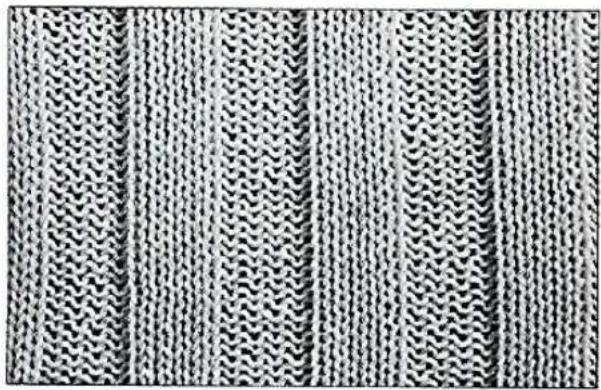
5 × 5 rib is called 5 knit 5 purl rib. In one row, there are 5 knit stitches alternating with 5 purl stitches, and vertically, from knit stitch over knit stitch and purl stitch over purl stitch.
The following example is knitted with medium thickness wool.
natural_image
Close-up of a woven fabric texture with repeating diamond patterns (no text or symbols)CASTING-ON FOR 5 × 5 RIB
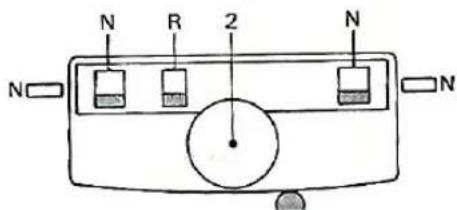
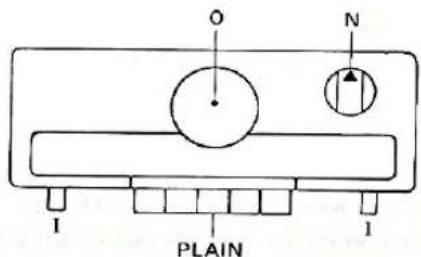
- Setting of carriage
Carriage (KH)
Change knob : N
Tension dial : 0
Holding cam lever : (L) I, (R) I
Pattern selector button : PLAIN
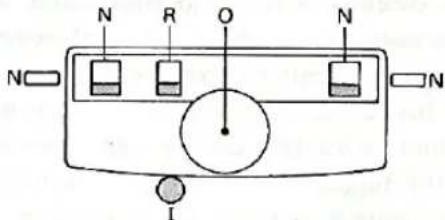
Carriage (KR)
Slide lever : I
Tension dial : 0
Cam lever : (L) N, (R) N
Tucking lever : R
Holding cam lever : (L) N, (R) N
-
"Needle arrangement", "First row knitting", "Hang on the cast-on comb" and "Hang on the weights" are the same as full needle rib.
-
Perfect selvedge
a. Set the carriages as shown in the Fig. 76.
b. Move the connected carriage from right to left.
(Only the plain needles knit.)
c. Move the connected carriage from left to right.
(The purl,needles knit.)
d. Move the connected carriage from right to left.
(The plain needles knit.)
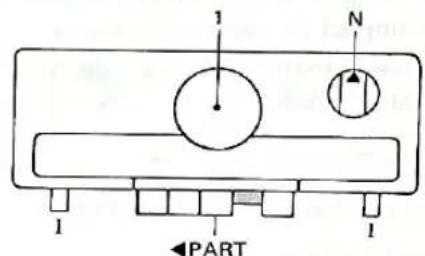
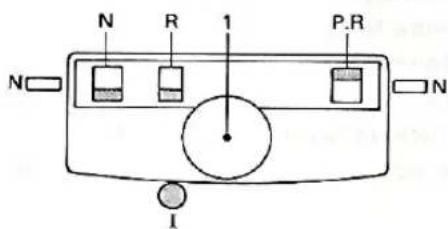
How to knit circular knitting
22
5 × 5 RIB KNITTING
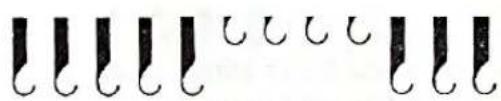
- After knitting the selvedge, by using the Double eyelet transfer needle, transfer the stitches to corresponded needles, and return the empty needles to position A of each bed. (see Fig. 77.)
- Set the carriages as shown in the Fig. 78. Then, continue the knitting.
How to knit circular knitting.
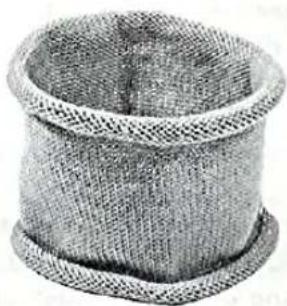
Circular knitting is made up of only plain knit stitches, and is a jointless tube. Size of tube depends on the number of needles.
Before you start to knit the garment, make the test piece to check the tension guage. If there is slacken on the side, please adjust by the tension dial on the KR carriage.
The example is knitted with medium thickness wool.
77
natural_image
Pure electrical circuit lines without any symbols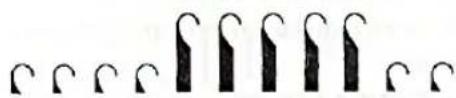
natural_image
Close-up of a woven bamboo or mesh material with no visible text or symbols79
CASTING-ON FOR CIRCULAR KNITTING
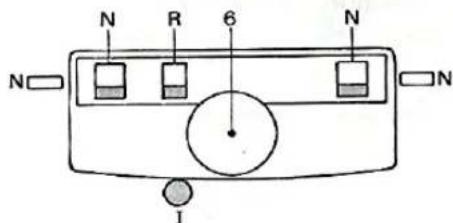
- Setting of carriage
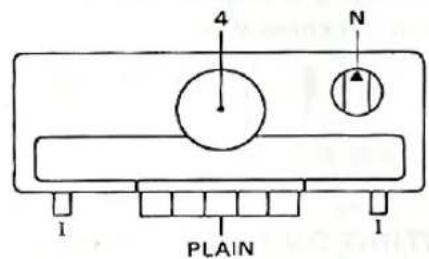
Carriage (KH)
Change knob : N
Tension dial : 6
Holding cam lever : (L) I, (R) I
Pattern selector button : PLAIN
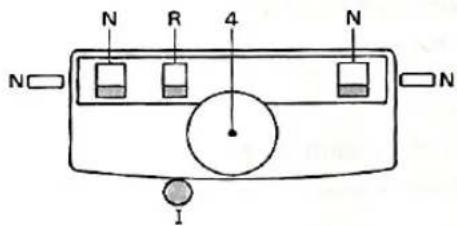
Carriage (KR)
Slide lever : 1
Tension dial : 6
Cam lever : (L) N, (R) N
Tucking lever : R
Holding cam lever : (L) N, (R) N
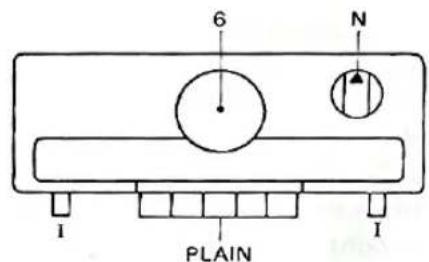
80
- Needle arrangement
a. Set the half pitch lever to "H".
b. Arrange the plain and purl needles in position B of each bed. (see Fig. 82.)
Note: The number of needles between plain and purl needle must be same.
c. Move the connected carriage a few times over all arranged needles to set them in a line. Then, place the carriage at right end of the bed.
81
- First row knitting
a. Thread the Cast-on thread provided in the accessories of KH into the yarn feeder.
b. Move the connected carriage from right to left. (The cast-on thread will hang on plain and purl needles.)
- Hang on the cast-on comb
*This is the same way as 1×1 rib.
- Hang on the weights
Hang the weights as per Standard weights chart on page 11 on the cast-on comb to keep balance. - Remove the cast-on thread from the yarn feeder, and rethread the knitting yarn into the feeder.
CIRCULAR RIB KNITTING
* Set the carriages as shown in the Fig. 83. Then, continue the knitting.
83
natural_image
Abstract pattern of black curved shapes arranged in two rows (no text or symbols)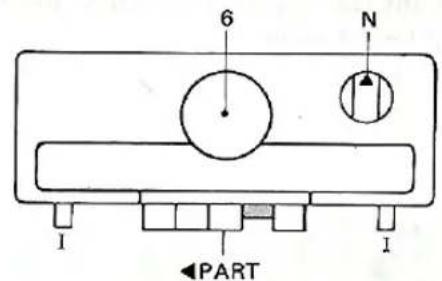
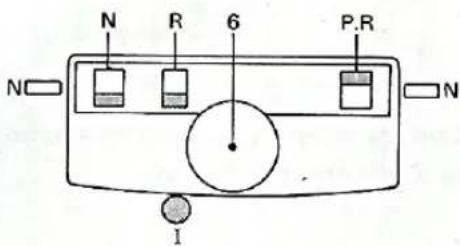

How to knit "U" style knitting
24
This garment is made of all plain knitting stitches. The knitter side and the ribber side are connected at only one side. This knitting is used for work of more than 200 stitches width. In the following, the garment is knitted with closed right side and open left side.
natural_image
Microscopic view of layered material structure with repeating patterns (no text or symbols)CASTING-ON FOR "U" STYLE KNITTING
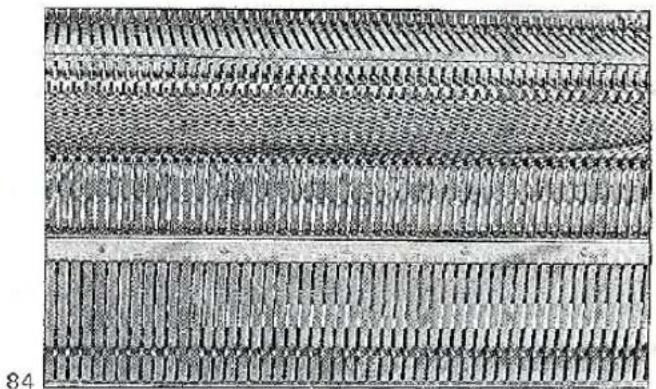
*This is the same as for circular knitting. The connected carriages is on the left side of the bed after casting-on.
84
"U" STYLE KNITTING
- Set the carriages as shown in the Fig. 85, and knit 2 rows.
85
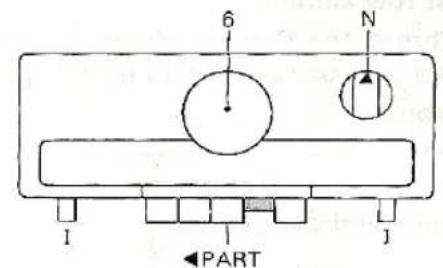
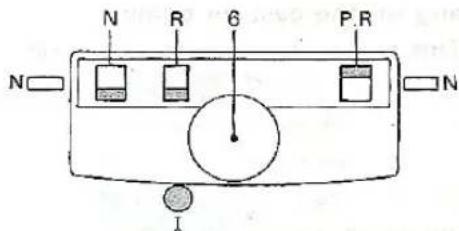
- Then, reset the carriages as shown in the Fig. 86, and knit 2 rows.
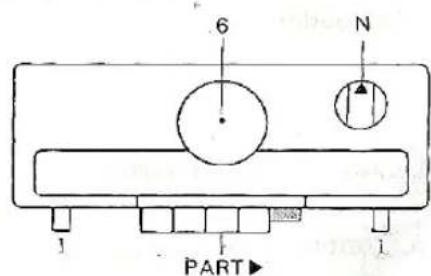
- Repeat step (1) to (2), then you can make "U" style knitting.
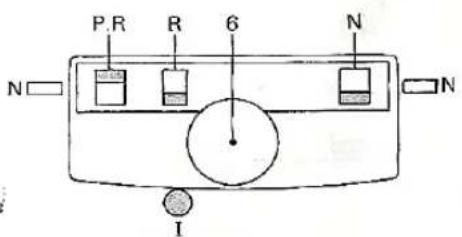
86
How to knit English rib How to knit fisherman's rib
ENGLISH RIB
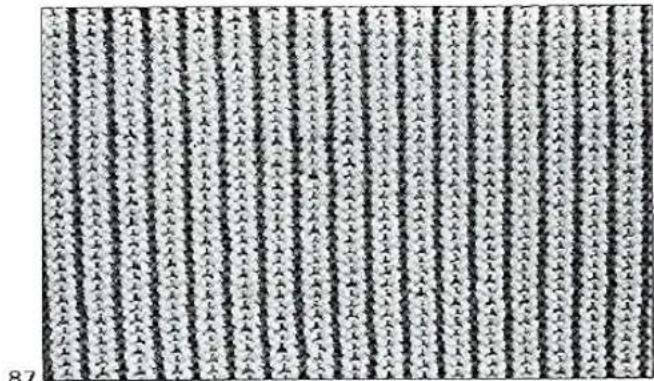
English rib is a variety of 1×1 rib, and knitter side is plain stitch but ribber side is tuck stitch.
The example is knitted with medium thickness wool.
CASTING-ON FOR ENGLISH RIB
*This is the same as for 1×1 rib.
natural_image
Pattern of repeating triangular and diamond shapes in grayscale, no text or symbols presentENGLISH RIB KNITTING
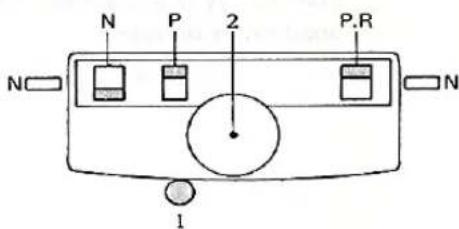
* Set the carriages as shown in the Fig. 88, and continue the knitting.
Note: Hang the Wire-loop type weight hanger and small weight on the edge of the knitting work to avoid stitch dropping.
How to use ......see on page 11.
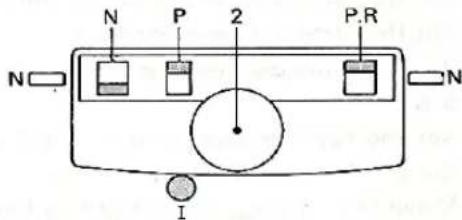
FISHERMAN'S RIB
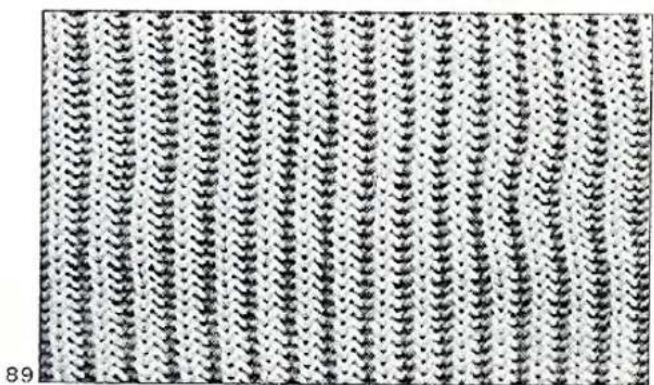
Fisherman's rib is made of tucking stitches on both sides of garment.
The example is knitted with medium thickness wool.
CASTING-ON FOR FISHERMAN'S RIB
*This is the same as for 1×1 rib.
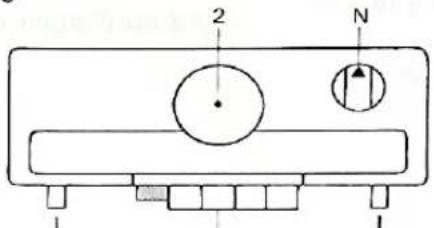
FISHERMAN'S RIB KNITTING
* Set the carriages as shown in the Fig. 90, and continue the knitting.
Note: Put the Needle presser brushes to the KH carriage.
90
TUCK
88
natural_image
Pattern of repeating black and white diamond-like shapes on a dotted background (no text or symbols)How to knit tucking pattern
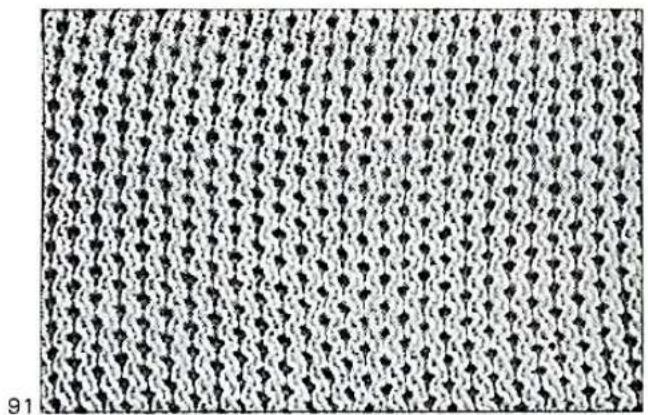
Tucking pattern is a variation of 1 × 1 rib or full needle rib. In the following description, tucking pattern of full needle rib is made. The example is knitted with fine wool (Ex. 2ply).
natural_image
Pattern of repeating diamond shapes on a textured background (no text or symbols)CASTING-ON FOR TUCKING PATTERN
* This is the same as for full needle rib.
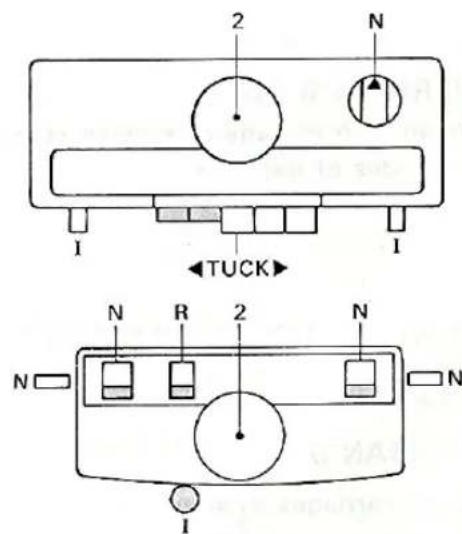
TUCKING PATTERN KNITTING
- Set the carriages as shown in the Fig92.
- Set the slide dial to position 1.
- Push the needle selector buttons No. 1, 3, 5 & 7.
-
Set the reverse lever to position A, and turn the set lever to select the needles.
-
Move the carriage from right to left.
-
Turn the set lever to select the same needles as the step 4.
-
Move the carriage from left to right.
-
Shift the reverse lever position from A to B, and turn the set lever.
-
Move the carriage from right to left.
-
Turn the set lever to select the same needles as the step 8.
-
Move the carriage from right to left.
-
Repeat the steps from 4 to 11 to proceed the knitting.
Note: If the end needles of KH bed is not brought by the carriage, bring to position D by hand.
Put the Needle presser brushes to the KH carriage
92
How to knit racking pattern of English rib
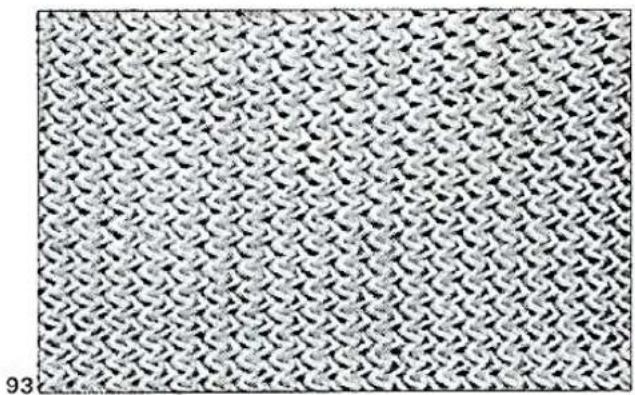
The example is knitted with medium thickness wool.
natural_image
Close-up of a woven fabric texture with repeating diamond patterns (no text or symbols)CASTING-ON FOR RACKING PATTERN OF ENGLISH RIB
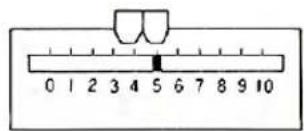
- Set the racking indicator on No. 5, and cursors on the indicator to No. 4 and No. 5.
- The other steps are the same as for 1×1 rib.
- After knitting the selvedge, set the half pitch lever on "H".
RACKING PATTERN KNITTING
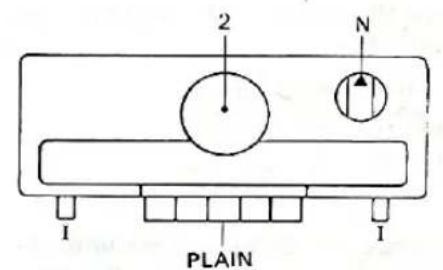
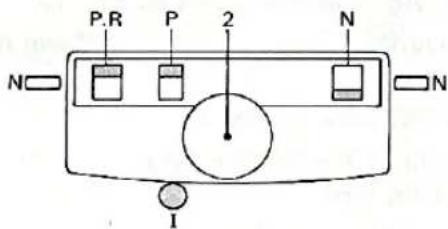
- Set the carriage as shown in the Fig. 95.
- Move the connected carriage from right to left. (The plain needles knit and purl needles have two loops each on their hooks.)
- Set the racking indicator on No. 4.
- Knit two rows.
- Set the racking indicator on No. 5.
- Move the connected carriage from left to right. (One row)
- repeat step (2) to (6).
94
95
How to knit racking pattern (I)
The example is knitted with medium thickness wool.
CASTING-ON FOR RACKING PATTERN (I)
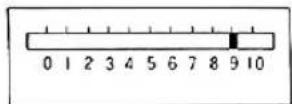
* Set the racking indicator on No. 0. The other steps are the same as for full needle rib.
RACKING PATTERN (I) KNITTING
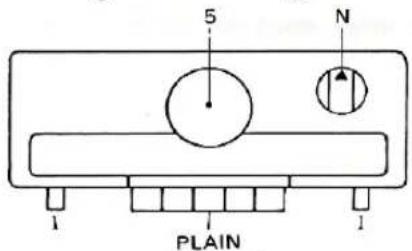
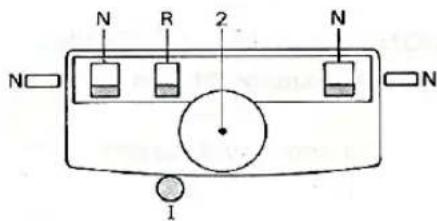
- After knitting the selvedge, using the Double eyelet transfer needle, transfer the part (A) stitches to opposite plain needles, and return the empty needles to position A of KR bed. How to use……see on page 35.
- Set the carriages as shown in the Fig. 98.
- Move the connected carriage from right to left. (The plain and purl needles knit.)
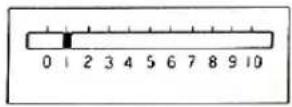
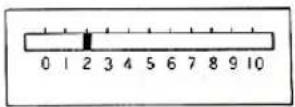
- Set the racking indicator on No. 1.
- Move the connected carriage from left to right.
- Set the racking indicator on No. 2.
- Continue the same manner until the racking indicator indicates No. 10.
- Move the connected carriage from right to left.
- Set the racking indicator on No. 9.
- Continue the same manner until the racking indicator indicates No. O.
- The pattern knitted from step (3) to (10) is one cycle.
Note: Don't turn the racking grip handle when the needles are raised over the gate pegs.
96
natural_image
Close-up of a woven textile with repeating geometric patterns (no text or symbols)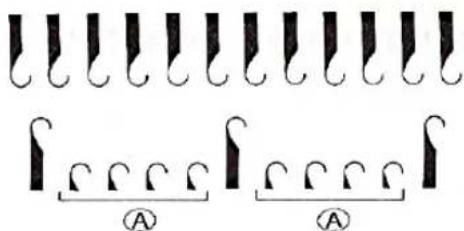
97
98
99
00
101
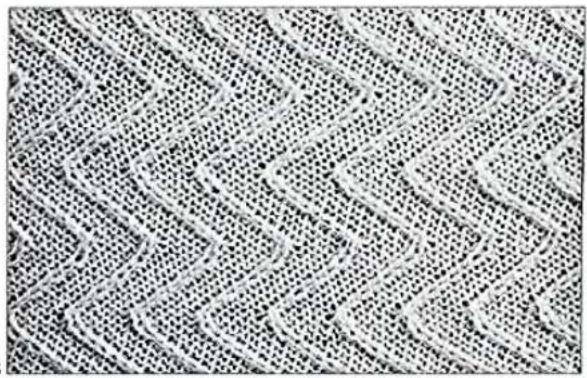
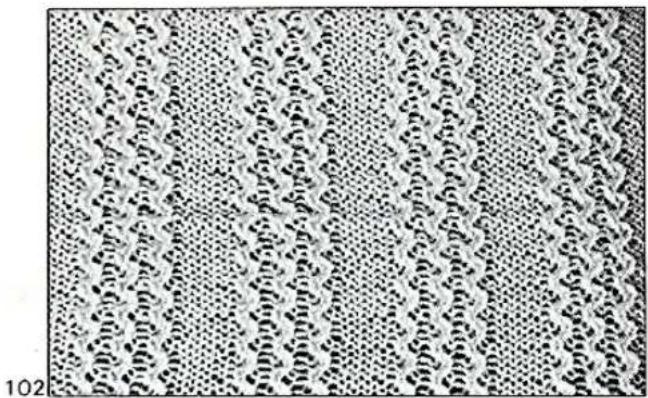
How to knit racking pattern (II)
The example is knitted with fine (ex. 2ply) wool.
natural_image
Patterned fabric with repeating zigzag textures and no visible text or symbolsCASTING-ON FOR RACKING PATTERN (II)
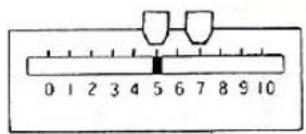
*This is the same as for full needle rib, and set the cursors to No. 5. and No. 7.
103
RACKING PATTERN (II) KNITTING
-
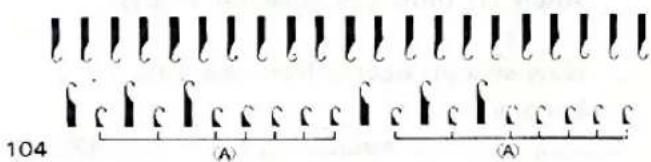
After knitting the selvedge, using the Double eyelet transfer needle, transfer the part (A) stitches to opposite plain needles, and return the empty needles to position A of KR bed.
-
Set the carriages as shown in the Fig. 105.
-
Move the connected carriage from right to left.
-
Move the connected carriage from left to right.
-
Set the racking indicator on No. 7.
-
Move the connected carriage from right to left.
-
Move the connected carriage from left to right.
-
Set the racking indicator on No. 5.
-
Repeat the step (3) to (8).
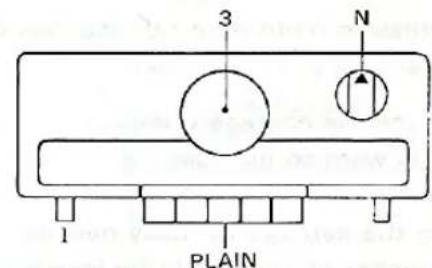
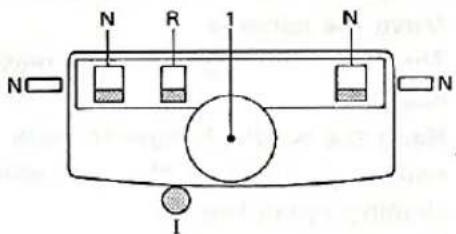
105
Increasing the stitches
- Increasing one stitch on one side of knitting width.
SIMPLE METHOD
a. Place the carriage on the side which you want to increase.
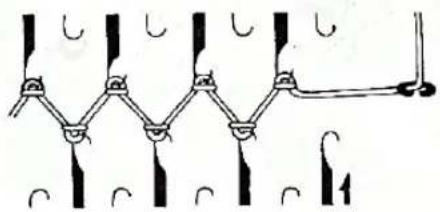
b. Raise the end needle to the working position B. (see Fig. 106.)
c. The empty needle will pick up the yarn as it knits the next row.
106
natural_image
Pure electrical circuit lines without any symbolsFULL FASHIONED METHOD
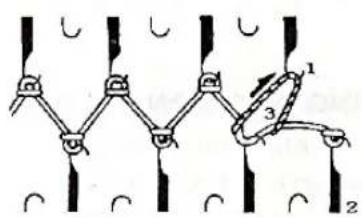
a. Use the transfer tool, move the first stitch (1) onto the adjacent empty/needle (2).
Now second needle from the end becomes empty.
b. Pick up either neighbouring lower loop (3), and hook on the empty needle (1).
- Increasing more than two stitches on either side of the garment.
a. Place the carriage opposite to the side you want to increase.
b. bring into action on the side opposite to the carriage as many needles as the number of stitches to be increased.
c. Move the carriage.
d. The yarn will hang on the increased needles on both sides.
e. Hang the weight hanger for side tension and small weight on the yarn which is shaping zigzag line.
f. Continue the knitting.
107
Decreasing the stitches
- Decreasing one stitch on either end.
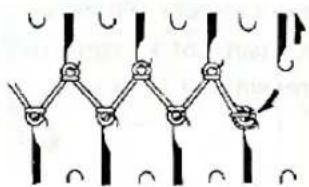
SIMPLE METHOD
* By using the single transfer tool, transfer the end stitch to the second needle, and take the empty needle out of action.
108
natural_image
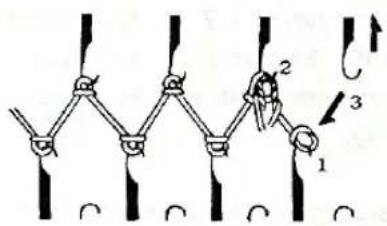
Pure mechanical linkage diagram without any text, numbers, or symbolsSECOND METHOD
a. Use two-needles transfer tool.
Transfer the end stitch to the second needle and the second needle to the third needle.
b. Take the empty needle out of action.
109
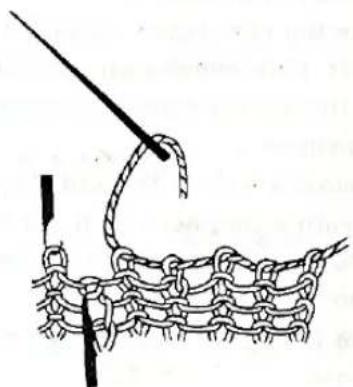
- Decreasing more than two stitches.
a. Place the carriage opposite to the side you want to decrease.
b. Use the tapestry needle.
Transfer the stitches which you want to decrease to the stem of the tapestry needle and pass through loops of stitches to be decreased.
c. Take the empty needles out of action.
110
natural_image
Diagram of a knotted fabric with a string and chain, no text or symbols presentPartial knitting of ribbing
Partial knitting is used for shaping of garment, making darts, shaping of a heel, vertical and horizontal buttonholes, neck opening, pockets etc. There are two cases, one is decreasing of knitting part, another one is increasing of knitting part.
PARTIAL KNITTING OF 1 × 1 RIB
* The example is partial knitting of 1 × 1 rib, however, 2 × 2 rib, full needle rib, 5 × 5 rib, English rib, Fisherman's rib and Tucking pattern rib are the same manner as 1 × 1 rib.
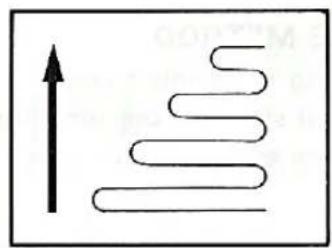
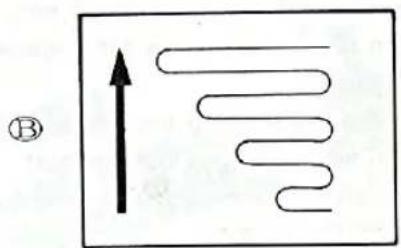
- Decreasing knitting part.
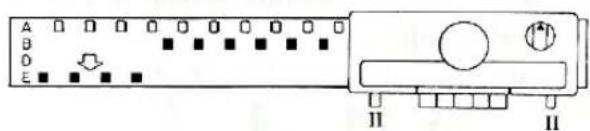
a. Set the both carriages as shown in the Fig. 112
b. Bring the nonknitting needles of KH and KR beds to position E.
c. Move the connected carriage from right to left. (The needles on position B knit, and the yarn is across on the needles on position E.)
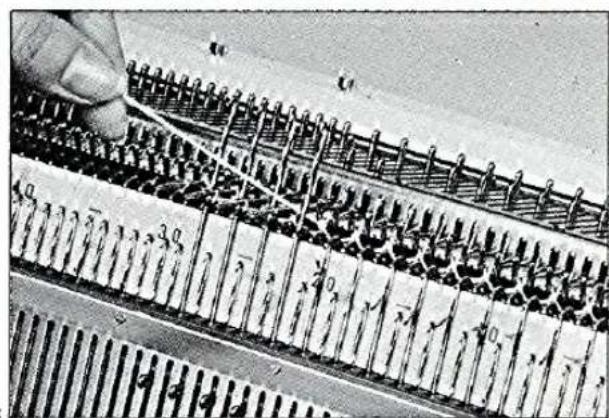
d. To avoid a hole in the knitting, hook the yarn laying across on the needles on position E to the next needle of KR to the knitting. (see Fig. 113.)
e. Move the connected carriage from left to right.
f. Repeat step (b) to (e) according to the shape of the garment.
* After partial knitting, if you want to knit all needles, simply set H.C.Ls. of both carriages to normal position. And move the carriage.

A
natural_image
Simple line drawing of a wavy line with an upward arrow, no text or symbols presentDecreasing knitting part
111
112
113
natural_image
Close-up of a hand using a tool to interact with a grid of electronic components (no visible text or symbols)- Increasing knitting part
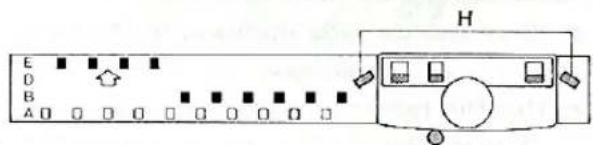
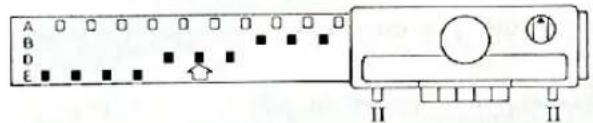
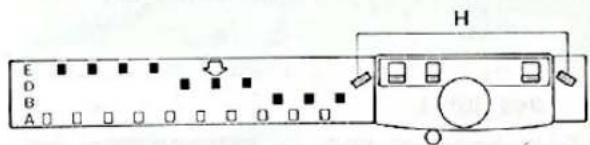
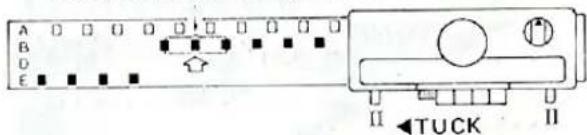
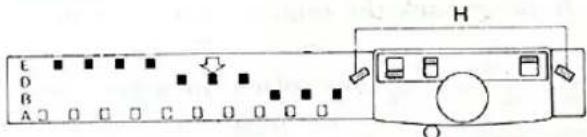
a. Set the both carriages as shown in the Fig. 114.
* For 1 × 1 rib, 2 × 2 rib and full needle rib, bring back the required needles you want to knit to position D of each bed. (see Fig. 114.)
* For English rib, Fisherman's rib and Tucking pattern rib, bring back the required needles you want to knit to position D, and using the transfer tool, place the stitch behaind the latch into the hook. Then, return these needles to position B. (see Fig. 115.)
b. Move the connected carriage from right to left.
(The needles on position B and D knit, and the yarn is across on the needles on position E.)
c. To avoid a hole in the knitting, hook the yarn laying across on the needles on position E to the next needle to the knitting.
d. Move the connected carriage from left to right.
e. Repeat step (a) to (d) according to the shape of garment.
PARTIAL KNITTING OF RACKING PATTERN
* In the racking pattern, it is impossible to bring both needles to position E, so, please knit partial knitting of racking pattern according to the following method.
The example is racking pattern of English rib.
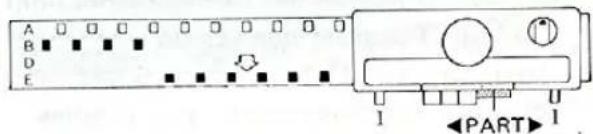
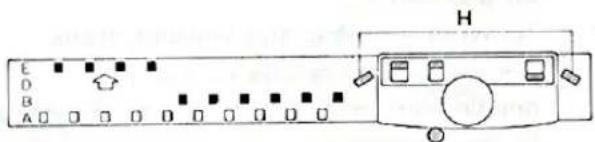
- Decreasing knitting part.
a. Set the carriages as shown in the Fig. 116
b. Bring the nonknitting needles of KR bed to position E.
c. Bring the knitting needles of KH bed to position E.
natural_image
Simple diagram showing a straight arrow pointing upward and a wavy line with curved ends inside a rectangle (no text or symbols)Increasing knitting part
114
Return the-stitch into the hook
115
116
d. Move the connected carriage from right to left. (The plain needles on Position E and purl needles on position B knit, and the yarn is across on the purl needles on position E.)
e. To avoid a hole in the knitting, hook the yarn laying across on the purl needles on position E to the next needle to the knitting,
f. Set the racking indicator on next number.
g. Bring the knitting needles of KH bed to position E.
h. Move the connected carriage from left to right.
i. Repeat step (b) to (e).
j. Set the racking indicator on next number.
k. Bring the knitting needles of KH bed to position E.
I. Move the connected carriage from left to right.
m. Repeat step (b) to (1) according to the shape of garment.
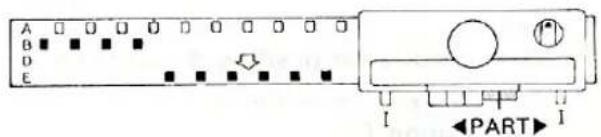
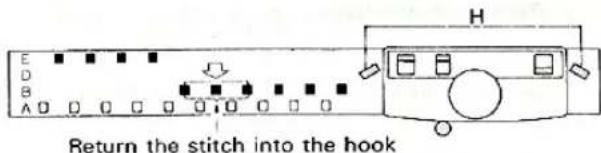
- Increasing knitting part.
a. Set the carriages as shown in the Fig. 117. b. Bring back the required needles you want to knit to position D, and using the transfer tool, place the stitch behaind the latch into the hook. Then, return these needles to position B.
c. Bring the knitting needles of KH bed to position E.
d. Move the connected carriage from right to left. (The plain needles on position E and purl needles on position B knit, and the yarn is across on the purl needles on position E.)
e. To avoid a hole in the knitting, hook the yarn laying across on the purl needles on position E to the next needle to the knitting.
f. Set the racking indicator on next number.
117
g. Bring the knitting needles of KH bed to position E.
h. Move the connected carriage from left to right.
i. Repeat step (b) to (e).
j. Set the racking indicator on next number.
k. Bring the knitting needles of KH bed to position E.
I. Move the connected carriage from left to right.
m. Repeat step (b) to (l) according to the shape of garment.
How to transfer the stitch from the purl needle to plain needle or from plain needle to purl needle.
HOW TO TRANSFER THE STITCHES
- How to transfer from purl needle to plain needle.
a. Raise the plain needle from position A to B, and open the latch.
b. By using the transfer tool, transfer the stitch on the purl needle to the empty plain needle.
- How to transfer from plain needle to purl needle.
a. By using the transfer tool, transfer the stitch on every other plain needle to the corresponding purl needle.
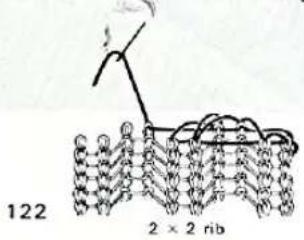
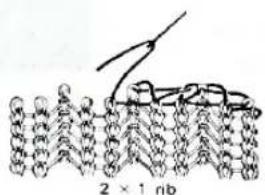
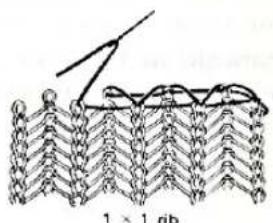
BINDING OFF AND FISHING EDGE OF RIB KNITTING
* This method is used for binding up the stitches of the last row by using the yarn of rib knitting. Binding up is the same as selvedge.
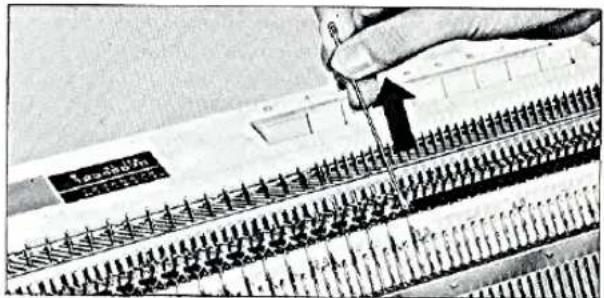
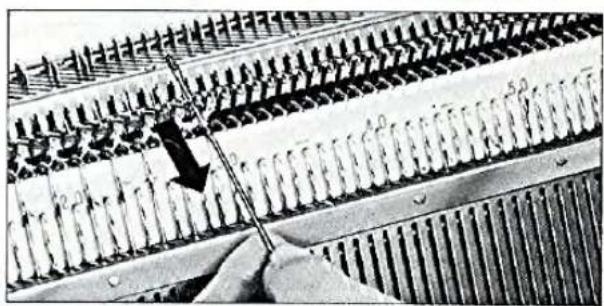
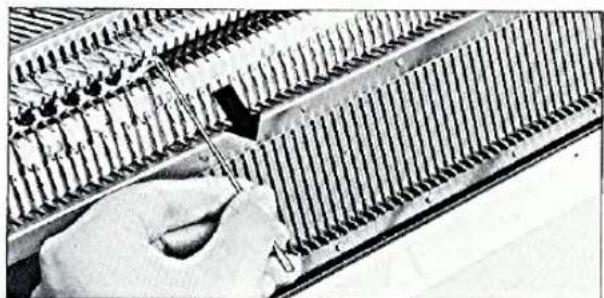
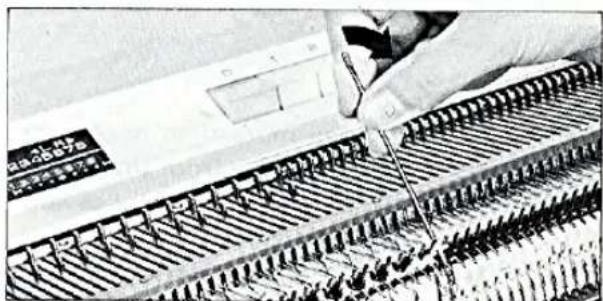
When you finish rib knitting, knit one or three rows of circular knitting, then bind the last row by using the tapestry needle as shown in the figures.
The length of the yarn for binding is 3 times the width of knitting.
118
natural_image
Close-up of a mechanical assembly with parallel rods and a black arrow indicating a specific component (no visible text or symbols)119
natural_image
Close-up of a hand using a tool to adjust or install a metal abacus (no visible text or symbols)120
natural_image
Close-up of a hand using a power tool to test circuitry on a grid of resistors (no visible text or symbols)121
123
124
How to pick up dropped stitch Unravelling the rows
36
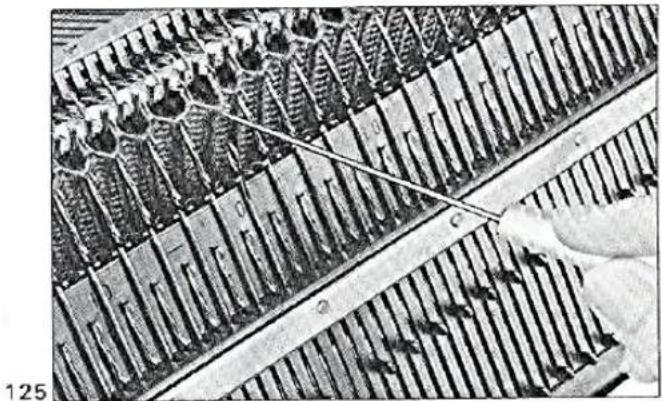
* First, take off the weights and prevent dropping of multiple rows.
- In case one stitch is dropped.
a. With the single transfer tool or work hook, pick up the stitch and the unknitted yarn and put them on the empty needle.
- In case multiple rows are dropped.
a. Open the gate by pushing down both bracket levers, and catch the lowest loop of the dropped stitches with latch tool.
b. With the latch tool, make the stitches, and hang the final stitch on the empty needle.
natural_image
Close-up of an abacus with beads arranged in rows, showing a hand holding a string (no visible text or symbols)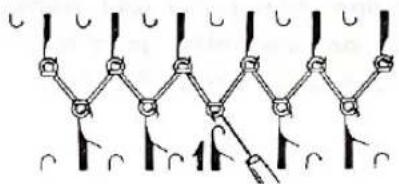
chemical
Chemical structure diagram showing a chain of carbon atoms connected by bonds, with numbered positions and directional arrows indicating interactions.126
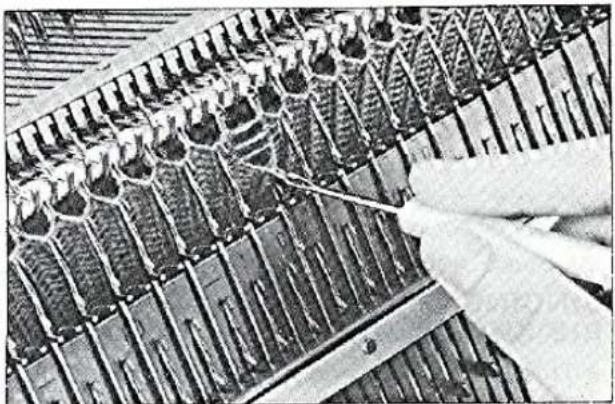
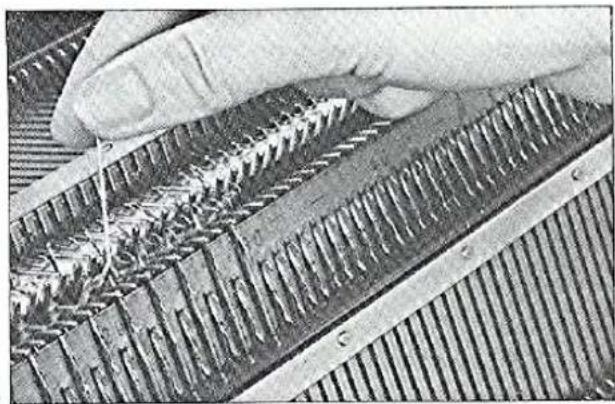
Unravelling the rows
* If you have knitted more than necessary, do not remove the work from the knitter and ribber. Simply unravel one or several rows by doing the following. Pull the yarn slightly, drawing it out of the stitches.
The stitches of the previous row will slip into the hook of the needles automatically as the yarn is raised in an upward movement towards the needle bed.
127
natural_image
Close-up of a gloved hand using a tool to adjust or install a grid of microstructures (no visible text or symbols)128
natural_image
Close-up of a hand using a tool to cut or wire through a grid-patterned circuit board (no visible text or symbols)If the carriage should jam…… How to use the knitter as a single bed with the ribber attached
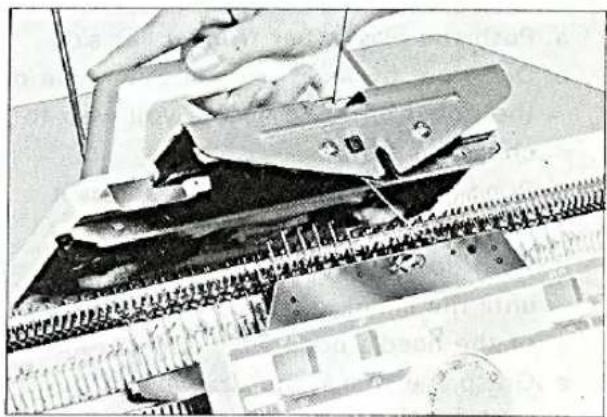
IF THE CARRIAGE SHOULD JAM
- Disconnect the carriage See on the page 10. Lift the front of the KH Carriage and move to the side where the row commenced.
- Remove the front foot from the front rail of KR needle bed. And place the KR carriage at the same side of KH carriage. (Fig. 130)
- Connect both carriages.
- Work the corrections if required.
- Continue the knitting.
natural_image
Close-up of hands using a tool to cut or install electronic components on a circuit board (no visible text or symbols)129
natural_image
Close-up of a hand operating a precision optical instrument with ruler in background (no visible text or symbols)130
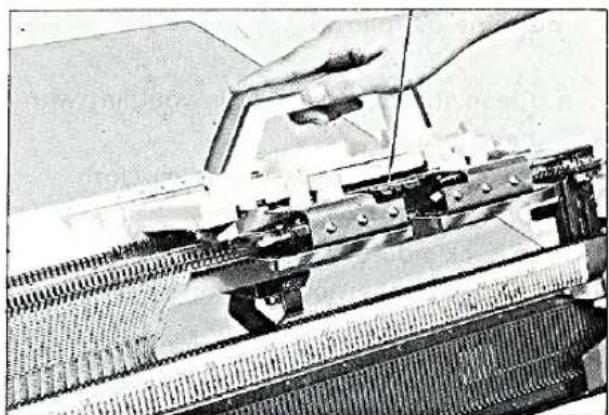
HOW TO USE THE KNITTER AS A SINGLE BED
a. Disconnect the carriage.
b. Push down both bracket levers of the ribber and the ribber will come down one step.
c. Take off the connecting arm from the KH carriage, and convert it to the sinker plate assembly of knitting machine.
d. The knitter can be used as a single bed.
natural_image
Close-up of a hand operating a mechanical device with a tool, no visible text or symbols131
How to replace the purl needle Maintenance
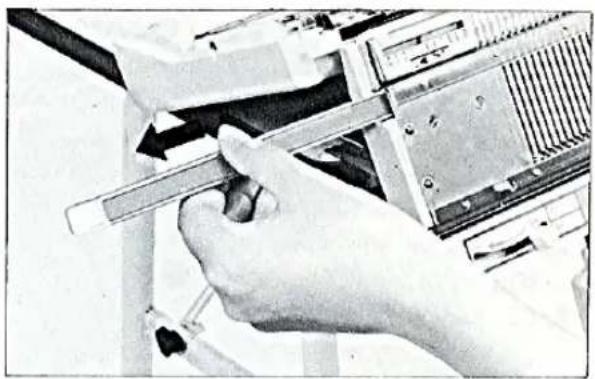
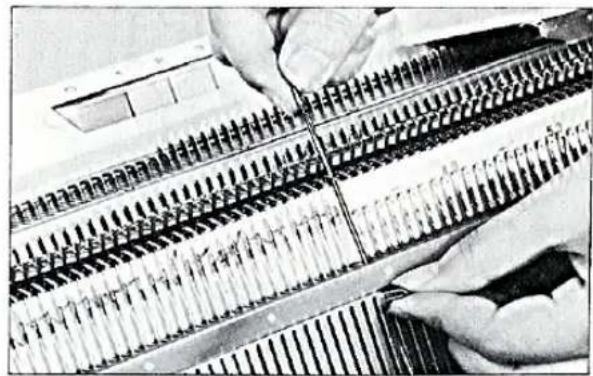
How to replace the purl needle.
a. Push the plastic bar from either side. b. Draw out by hand from another side of the ribber until the needle you wish to change is free.
c. Bring forward the needle as far as it will go.
d. Push down the hook of the needles until the shank of the needle rises free of the needle bed.
e. Grasp the shank and draw it out backwards.
f. Replace new needle with latch opened.
g. Push in the bar, making sure that the flat face is down.
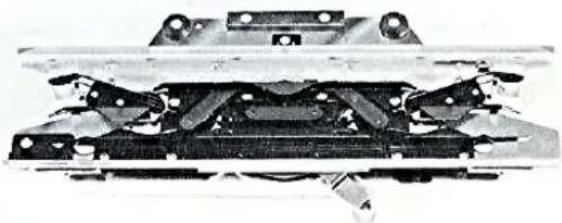
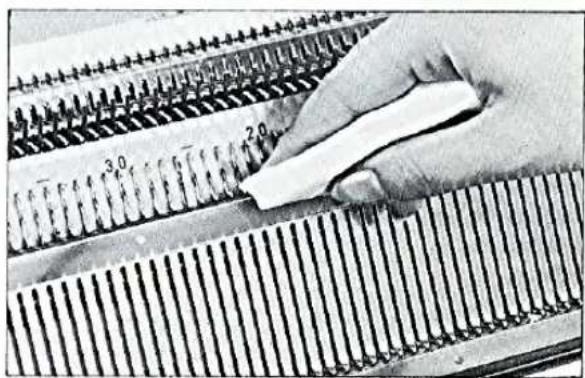
* Each time you finish work, service your machine as follows:
a. Clean the machine of all wool lint with hand brush.
b. Polish each part with soft oil cloth.
c. Oiling the following parts.
* Back side of the carriage. * Rails of the needle bed. * Needle butts.
d. Wipe off stained oil. e. Keep your machine in a dry place.
132
natural_image
Close-up of hands using a tool to adjust or install electronic components on a computer motherboard (no visible text or symbols)133
natural_image
Close-up of hands assembling a multi-pin electronic component with pins (no visible text or symbols)134
natural_image
Cross-sectional view of a mechanical assembly with no visible text or symbols135
natural_image
Close-up of a hand using a tool to press or write on a striped metal strip (no visible text or symbols)Index
INDEX
Name of parts 1
Accessories 2
Setting up your ribber to the knitter 3
Joining the carriage 5
Important points to remember before you start knitting 8
Tension dial, Slide lever 8
Needle position, Half pitch lever, Racking grip handle 9
Bracket lever 10
Disconnecting the carriage 10
How to use the accessories
How to knit 1 × 1 Rib....12
How to knit 2 × 2 Rib ....16
How to knit Full needle Rib 19
How to knit 5 × 5 Rib....21
How to knit Circular knitting 22
How to knit "U" style knitting 24
How to knit English Rib 25
How to knit Fisherman's Rib 25
How to knit Tucking pattern 26
How to knit Racking pattern of English Rib 27
How to knit Racking pattern 28
Increasing the stitches 30
Decreasing the stitches....31
Partial knitting of ribbing 32
How to transfer the stitches ....35
Binding off and finishing edge 35
How to pick up dropped stitch and unravelling the rows....36
If the carriage should jam....37
Using the knitter as a single bed with ribber attached 37
How to replace the purl needle ....38
Maintenance 38
Special instructions for attaching the KR-710 to the KH-588 knitting machine
40
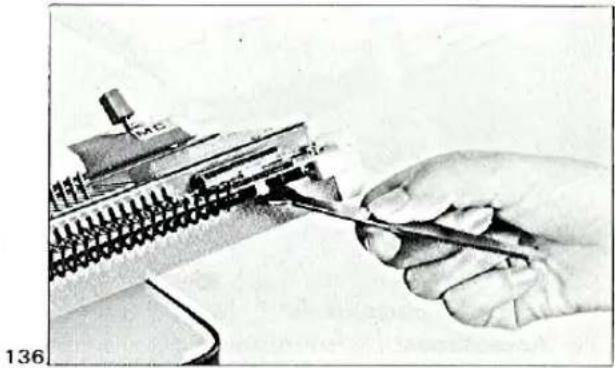
- Remove the extension rail holders on either side of the needle bed of KH-588. Then, attach the ribber to the knitting machine (see on pages 3 and 4). The thumb screws are not used for fixing the ribber.
natural_image
Close-up of a hand using a screwdriver to adjust a mechanical component (no visible text or symbols)- Take the 2 pcs. each of the extension rail holders for KR and set screws out of the accessories box. And put them onto the bracket stopper on either side of the ribber and fasten them by set screws temporary. Insert the extension rail into the holder.
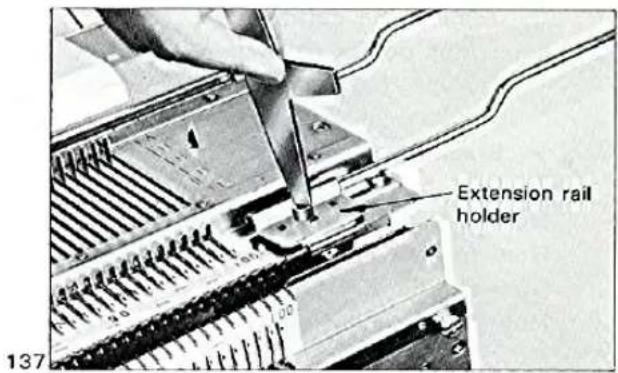
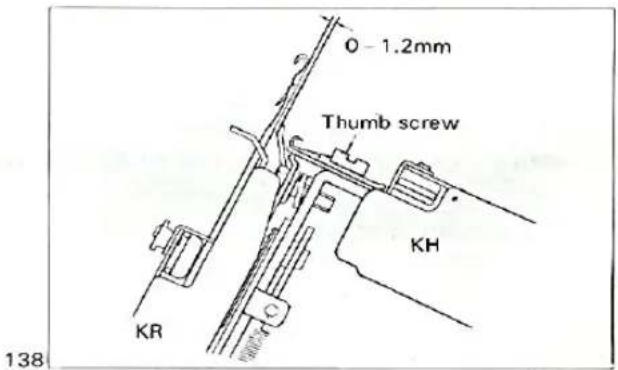
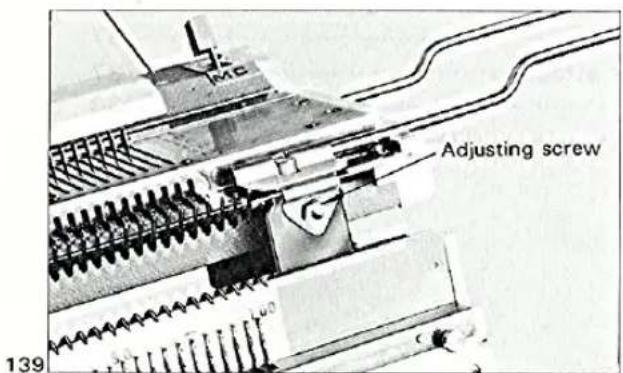
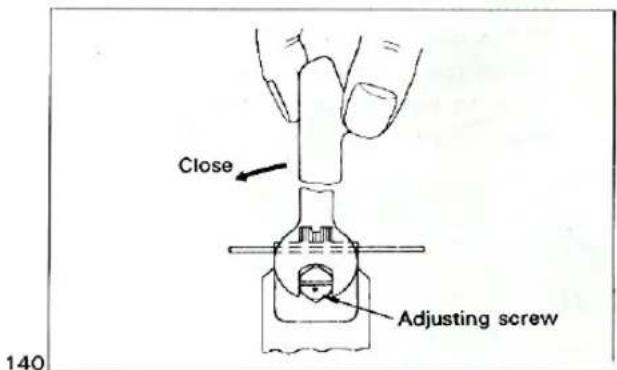
- You are requested to adjust the distance from the knitter to the ribber before starting the knitting. Turning the adjusting screw to the left by the spanner, adjust the distance. By turning the adjusting screw to the left one revolution (360°), the ribber will go inside (to close) by about 1 mm. The correct distance is about 0\~1.2 mm. For your reference, the thickness of the claw type weight hanger is 0.6 mm. After adjusting, tighten both set screws.
- Instruction manual for ribbing attachment Model KR-710
- SPECIAL INSTRUCTIONS FOR KR-120 RIBBING ATTACHMENT
- Name of parts
- Accessories
- Setting up your ribber to the knitter
- Here are a few important points to remember before you start knitting
- TENSION DIAL
- SLIDE LEVER
- NEEDLE POSITION
- HALF PITCH LEVER
- RACKING GRIP HANDLE
- BRACKET LEVER
- DISCONNECTING THE CARRIAGE
- TAKING OFF THE CONNECTING ARM
- TAKING OFF THE KR CARRIAGE
- How to use the accessories
- How to Knit 1×1 rib
- CASTING-ON FOR 1 × 1 RIB
- First row knitting
- × 1 RIB KNITTING
- How to knit 2 × 2 rib
- CASTING-ON FOR 2 × 2 RIB
- × 2 RIB KNITTING
- DIFFERENT METHOD OF 2 × 2 RIB KNITTING
- How to knit full needle rib
- CASTING-ON FOR FULL NEEDLE RIB
- Setting of carriage
- Needle arrangement
- FULL NEEDLE RIB KNITTING
- How to knit 5 × 5 rib
- CASTING-ON FOR 5 × 5 RIB
- How to knit circular knitting
- × 5 RIB KNITTING
- How to knit circular knitting.
- CASTING-ON FOR CIRCULAR KNITTING
- CIRCULAR RIB KNITTING
- How to knit "U" style knitting
- CASTING-ON FOR "U" STYLE KNITTING
- "U" STYLE KNITTING
- How to knit English rib How to knit fisherman's rib
- ENGLISH RIB
- CASTING-ON FOR ENGLISH RIB
- ENGLISH RIB KNITTING
- FISHERMAN'S RIB
- CASTING-ON FOR FISHERMAN'S RIB
- FISHERMAN'S RIB KNITTING
- How to knit tucking pattern
- CASTING-ON FOR TUCKING PATTERN
- TUCKING PATTERN KNITTING
- How to knit racking pattern of English rib
- CASTING-ON FOR RACKING PATTERN OF ENGLISH RIB
- RACKING PATTERN KNITTING
- How to knit racking pattern (I)
- CASTING-ON FOR RACKING PATTERN (I)
- RACKING PATTERN (I) KNITTING
- How to knit racking pattern (II)
- CASTING-ON FOR RACKING PATTERN (II)
- RACKING PATTERN (II) KNITTING
- Increasing the stitches
- SIMPLE METHOD
- FULL FASHIONED METHOD
- Decreasing the stitches
- SECOND METHOD
- Partial knitting of ribbing
- PARTIAL KNITTING OF 1 × 1 RIB
- PARTIAL KNITTING OF RACKING PATTERN
- How to transfer the stitch from the purl needle to plain needle or from plain needle to purl needle.
- HOW TO TRANSFER THE STITCHES
- BINDING OFF AND FISHING EDGE OF RIB KNITTING
- How to pick up dropped stitch Unravelling the rows
- Unravelling the rows
- If the carriage should jam…… How to use the knitter as a single bed with the ribber attached
- IF THE CARRIAGE SHOULD JAM
- HOW TO USE THE KNITTER AS A SINGLE BED
- How to replace the purl needle Maintenance
- Index
- Special instructions for attaching the KR-710 to the KH-588 knitting machine
Marke : BROTHER
Modell : KR710
Kategorie : Nähmaschine