CE7788 - Schongarer MOULINEX - Kostenlose Bedienungsanleitung
Finden Sie kostenlos die Bedienungsanleitung des Geräts CE7788 MOULINEX als PDF.
Benutzerfragen zu CE7788 MOULINEX
0 Frage zu diesem Gerät. Beantworten Sie die, die Sie kennen, oder stellen Sie Ihre eigene.
Eine neue Frage zu diesem Gerät stellen
Laden Sie die Anleitung für Ihr Schongarer kostenlos im PDF-Format! Finden Sie Ihr Handbuch CE7788 - MOULINEX und nehmen Sie Ihr elektronisches Gerät wieder in die Hand. Auf dieser Seite sind alle Dokumente veröffentlicht, die für die Verwendung Ihres Geräts notwendig sind. CE7788 von der Marke MOULINEX.
BEDIENUNGSANLEITUNG CE7788 MOULINEX
VOOR HET EERSTE GEBRUIK
VIELEN DANK, DASS SIE SICH FÜR MOULINEX ENTSCHEDEDEN HABEN
Willkommen in der Welt der schellen und leckeren Küche!
Mit Turbo Cuisine haben wir uns der Herausforderung gestellt, den Topf neuzuerfinden:Einfacher. Schmackhafter. Einfach better!
Nach diesen Leitgedanken wurde Turbo Cuisine entwickelt. Das Gerät ermöglicht es Ihnen, Zeit zu sparen und ganz einfach und bequem leckere Mahlzeiten selbst zu kochen.
Noch einmal vielen Dank, dass Sie uns in Ihrer Kuche willkommen heißen.
Lassen Sie uns jetzt gemeinsam kochen!
INHALTSVERZEICHNIS
Kurzanleitung in Bildern 2
Moulinex empfehlt: Sicherheit Goes immer vor 97
Alle Teile Ihres Produktions 105
Das Bedienfeld kennenlernen 106
Anwendung und Reinigung 107
Technische Fehlerbehebung 123
Moulinex International eingeschränkte Garantie 271
MOULINEX EMPFIEHLT: SICHERHEIT AN ERSTER STEILLE
Sicherheit ist unsere oberste Priorität. Wir entwickeln und fertigen unsere Produkte nach hohen Sicherheits- und Technologiestandards. Wie bei jedem Elektrogerät gibt es jeder eineitive potenzielle Risiken. Daher bitten wir Sie, ein gewisses Maß an Vorsicht walten zu halten und die folgenden Anweisungen zu befolgen.
SICHERHEITSHINWEISE
Nehmen Sie sich die Zeit, alle folgenden Anweisungen sorgfältig durchzulesen, und bewahren Sie sie zur späteren Verwendung auf.
Die unsachgemäß Verwendung des Geräts und des Zubehörskann das Gerät beschädigen und Verletzungen verursachen.
- Das Gerätkocht Speisen unter Druck. Beiunsachgemäß Verwendung besteht die Gefahr von Verbrennungen durch Dampf.
- Zu Ihrer Sicherheit entspricht theses Produkt allen geltenden Normen und Bestimmungen (Niederspannung, elektramagnetische Verträglichkeit, Vorschriften für Materialien für den Lebensmitteltekontakt, Umwelt usw.).
- Die zum Kochen benötigte Wärmequelle ist im Gerät enthalten.
1. Sichere Verwendungsorte
- Nur zur Verwendung in Innenräumen.
- Dieses Gerät ist nur für den privaten Hausgebrauch bestimmt. Es ist nicht für folgende Anwendungen vorgesehen, und die Garantie gilt in diesen Fälle nicht:
-
Mitarbeiterkuchenbereiche in Geschäften, Büros und anderen Arbeitsumgebungen;
-
landwirtschaftliche Anwesen;
- durch Kunden in Hotels, Motels und anderen Unterkünften;
-
Bed-and-Breakfast-Einrichtungen.
-
Stellen Sie das Gerät nicht in einen beheizten Backofen oder auf ein heiβes Kochfeld. Stellen Sie das Gerät nicht in die Nähe einer offen Flamme oder eines brennbaren Gegenstands.
- Verwenden Sie es auf einer flachen, stabilen und hitzebeständigen Arbeitsfläche, die keinem Spritzwasser ausgesetzt ist.
2. Sichere Verwendung
- Dieses Gerät ist nicht dazu gedacht, von Personen (einschließlich Kindern) benutzt zu werden, deren körperliche, sensorische oder mentale Fähigkeiten eingeschränkt sind oder denen es an Erfahrung und Kenntnissen mangelt; es sei dessen, sie wurden in die Benutzung des Gerätes unterwiesen und werden von einer für ihre Sicherheit verantwortlichen Person beaufsichtigt.
- Dieses Gerät kann von Personen verwendet werden, deren körperliche, sensorische oder mentale Fähigkeiten eingeschränkt sind oder denen es an Erfahrung und Kenntnissen mangelt, wenn sie in der Benutzung des Gerätes unterwiesen wurden und die daraus resultierenden Gefahren verstehen und falls sie von einer für ihre Sicherheit verantwortlichen Person beaufsichtigt werden.
- Dieses Gerätarf nicht von Kindernbenutzt werden. Halten Sie das Gerät und das Netzkabel außer Reichweite von Kindern.
- Kinder)durfen nicht mit dem Gerät spielen.
- Kinder müssen beaufsichtigt werden, um sicherzustellen, dass sie nicht mit dem Gerät speiten.
3. Sichere Verwendung – allgemeine Verwendung
- Verwenden Sie das Gerät ausschließlich für den vorgesehenen Zweck.
- Verwenden Sie das Gerät nicht zum Frittieren von Lebensmitteln in Öl. Nur Anbraten ist erlaubt.
- Verwenden Sie den Schnellkochtopf nicht im Druckmodus (Garen unter Druck) zum Frittieren von Speisen.
- Schütteln Sie den Schnellkochtop beim Garen von Teigwaren vorsichtig, bevor Sie den Deckel öffnen, um zu vermeiden, dass die Speisen hinausgeschleudert werden.
- Dieses Gerät ist kein Sterilisator. Verwenden Sie es nicht zum Sterilisieren von Gläsern.
- Dieses Gerät ist nicht damit vorgesehen, mit einer externen Zeitschaltuhr (Timer) oder mithilfe eines separaten Fernsteuerungssystems verwendet zu werden.
- Verwenden Sie zum Tragen des Geräts immer die beiden seitlichen Griffe am Gehäuse des Geräts. Tragen Sie Ofenhandschuhe, wenn das Gerät heiß ist. Vergewissen Sie sich für mehr Sicherheit, dass der Deckel fest geschlossen ist, bevor Sie das Gerät transportieren.
- Der Boden des Kochtopfs und die Heizplatte müssen in direktem Kontakt stehen. Entfernen Sie alle Gegenstände oder Speisereste, die sich zwischen dem Kochtopf und der Heizplatte befinden, da sie die Leistung beeinträchtigen konnten.
-
Beachten Sie, dass bestimmte Arten von Lebensmitteln, z. B. Apfelmus, Preiselbeeren, Rhabarber, Graupen, Haferflocken oder andere Getreidearten, Erbsen, Nudeln oder Pasta schäumen oder aufschäumen und so die Ventile verstopfen können. Gehen Sie beim Garen dieser Lebensmittel vorsichtig vor, und reinigen Sie die Ventile nach dem Gebrauch gründlich.
-
Beim Garen von Zutaten, die während des Garens aufgeben, wie z. B. trockenes Gemüse oder Reis, darf die Kochschüssel die Hälfte ihres maximalen Füllstands nicht überschreiben.
- Beachten Sie, dass bestimmte Rezepte, die Milch enthalten, schaumen, überkochen und die Ventile verstopfen können. Gehen Sie beim Kochen dieser Rezepte vorsichtig vor, und reinigen Sie die Ventile nach Gebrauch gründlich.
- Fleisch mit einer äußeren Hautschicht (z. B. Ochsenzunge) können durch die Druckeinwirkung anschwellen. Stechen Sie nach dem Garen nicht die Haut ein, wenn sie angeschlossen wird: Sie konnten sich sonst verbrennen. Stechen Sie die Haut vor dem Garen ein.
- Verwenden Sie das Gerät nicht leer, ohne den Kochtopf oder ohne Zutaten im Kochtopf. Dies konnte zu schweren Beschädigungen am Gerät führen.
- Verwenden Sie das Gerät nicht unter Druck, ohne Wasser hinzuzufugen, da dies zu schweren Schäden am Gerät führen kann.
- Füllen Sie das Gerät nicht direkt, ohne den Kochtopf.
- Achtung: Verschütten Sie keine Flüssigkeit auf den Stecker.
- Erhitzen Sie den Topf nicht mit einer anderen Wärmequelle als der Heizplatte des Geräts, und verwenden Sie keinen anderen Topf. Verwenden Sie den Kochtopf nicht mit anderen Geräten.
- Verwenden Sie den Kochtopf AUSSCHLIESSLICH im Gerät. Verwenden Sieihn nicht zum Kochen auf Herdplatten, im Ofen usw.
-
Verwenden Sie einen Kunststoff- oder Holzlöffel, um Beschädigungen der Antihaftbeschäftigung des Kochtopfes zu vermeiden. Schneiden Sie die Speisen nicht direkt im Kochtopf.
-
Berühren Sie die Ventile nicht, außer wenn Sie das Gerät gemäß den Anweisungen reinigen und warten.
- Stecken Sie keine Fremdkörper in die Ventile und den Druckentlastungsknopf. Tauschen Sie das Ventil nicht aus.
Die Kanäle in den Ventilen für den Dampfaustritt sollenen regelmäßig überprüft werden, um sicherzustellen, dass sie nicht verstopf sind. - Verwenden Sie keine Lappen oder andere Gegenstände zwischen Deckel und Gehäuse, um den Deckel offen zu halten. Dadurch konnte die Dichtung dauerhaft beschädigt werden.
- Lassen Sie das Netzkabel nicht über die Tisch- oder Arbeitsplattenkante hangen oder heiBe Oberflächen berühren.
4. Sichere Verwendung – vor dem Kochvorgang
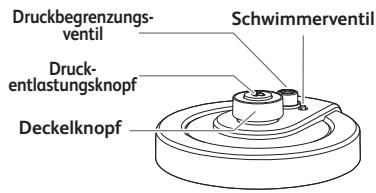
- Stellen Sie vor dem Gebrauch des Geräts sicher, dass das Schwimmerventil und das Druckbegrenzungsventil sauber sind.
- Überprüfen Sie vor der Benutzung des Geräts, ob die Dichtung richtig auf dem Deckel angebracht ist.
- Stellen Sie sicher, dass der Boden des Kochtopfes und die Heizplatte immer sauber sind. Stellen Sie sicher, dass der mittlere Teil der Heizplatte beweglich ist.
- Befüllen Sie das Gerät nicht über die MAX-Markierung am Kochtopf hinaus.
-itte befolgen Sie die Empfehlungen zur.Menge von Gargut und Wasser, um das Risiko eines Überkochens zu vermeiden, das das Gerät beschädigen und Verletzungen verursichen kann. - Stellen Sie sicher, dass das Gerät ordnungsgemäß geschlossen ist, bevor Sie es unter Druck setzen.
- Stellen Sie vor dem Garen sicher, dass das Ventil zur Druckentlastung besteht (nicht eingedrückt). Siehe Abbildung 48 in der bebilderten Kurzanleitung.
5. Sichere Verwendung – während des Kochvorgangs
- Versuchen Sie nicht, den Deckel zu öffnen, bevor der Druck ausreichend gesunden ist. Versuchen Sie nicht, den Deckel zu öffnen, bevor das Schwimmerventil unter ist.
- Offnen Sie das Gerät niemals mit Gewalt.
- Wahlend des Garvorgangs und beim Dampfablassen am Ende des Garvorgangs gibt das Gerät Hitze und Dampf ab. Halten Sie Gesicht und Höhe vom Gerät fern, um Verbrennungen zu vermeiden. Berühren Sie während des Garvorgangs nicht den Deckel.
- Bewegen Sie das Gerät nicht, während es unter Druck stehen. Benutzen Sie zum Bewegen des Geräts die Griffe und tragen Sie ggf. Ofenhandschuhe. Heben Sie das Gerät nicht mit dem Deckelknopf an.
- Nehmen Sie den Kochtopf nicht heraus, während das Gerät in Betrieb ist.
- Achten Sie im Anbratmodus auf die Gefahr von Verbrennungen durch Spritzer, wenn Sie Lebensmittel oder Zutaten in den bereits Kochtopf geben.
6. Sichere Verwendung – nach dem Kochvorgang
- Wenn Sie den Deckel öffnen, halten Sieihn immer am Deckelknopf fest. Halten Sie ihren Arm parallel zu den seitlichen Griffen. Zwischen Dichtung und Deckel konnte sich kochendes Wasser sammeln und Verbrennungen verursachen.
- Achten Sie auch auf die Verbrennungsgefahr durch den aus dem Gerät austretenden Dampf, wenn Sie den Deckel öffnen. Öffnen Sie den Deckel zunachst nur gazileicht, damit der Dampf sanft entweichen kann.
-
Berühren Sie nicht die bereits Teile des Geräts. Nach Gebrauch kann die Oberfläche der Heizplatte bis zu zwei Stunden lang heiß bleiben.
-
Ziehen Sie den Netzstecker aus der Steckdose, wenn Sie das Gerät nicht benutzen und bevor Sie es reinigen. Lassen Sie das Gerät abkühlen, bevor Sie Teile einsetzen oder abnehmer.
7. Sichere Verwendung – Reinigung
- Wischen Sie nach jeder Benutzung den Boden des Topfes und die Heizplatte ab.
- Tauchen Sie das Gerät nicht in Wasser.
- Informationen zur Reinigung des Geräts finden Sie in der Gebrauchsanweisung. Sie können den Kochtopf und den Deckel in heiBem Seifenwasser abwaschen. Geben Sie sie nicht in die Geschirrspulmaschine. Reinigen Sie das Gehäuse des Geräts mit einem feuchten Tuch.
8. Was ist im Schadensfall zu tun?
- Das Produkt kann nur von einer autorisierten Person in einer autorisierten Kundendienstzentrale repariert werden.
- Benutzen Sie kein Gerät, dessen Netzkabel- oder -stecker beschädigt ist, das nicht ordnungsgemäß Funktioniert oder auf irgend eine Art beschädigt wurde. Geben Sie das Gerät zur Überprüfung, Reparatur oder Einstellung an die nachstgelegene autorisierte Kundendienstzentrale zusammen.
- Wenn das Netzkabel beschädigt ist, muss es von einer autorisierten Kundendienstzentrale ausgetaucht werden, um eine Gefährung zu vermeiden. Ersetzen Sie das mitgelieferte Netzkabel nicht durch andere Kabel.
- Beschädigten Sie die Dichtung nicht. Wenn sie beschädigt ist,leen Sie sie in einer autorisierten Kundendienstzentrale austauschen.
-
Ersetzen Sie die Dichtung alle zwei Jahre oder früher, wenn Sie sehen, dass die Dichtung abgenutzt ist oder ausgetauscht werden muss.
-
Verwenden Sie nur die passenden Ersatzteile für Ihr Modell. Dies ist entsprechend für die Dichtung und den Kochtopf wichtig.
- Verwenden Sie nur Ersatzteile, die in einer autorisierten Kundendienstzentrale verkauft werden.
Die Verwendung von Zubehörteilen, die nicht vom Gerätehersteller empfohlen werden, kann zu Verletzungen führen. - Verwenden Sie im Gerät keine anderen Kochtopfe anstelle des mitgelieferten Kochtopfs. Ersetzen Sie den Kochtopf nur durch ein Original-Ersatzteil, das für die Verwendung mit thisem Produkt vorgesehen ist.
- Vor der Entsorgung eines nicht mehr benöttigten Geräts muss das Gerät gemäß den geltenden Vorschriften außer Betrieb gesetzt werden (durch Abziehen des Steckers und Abtrennen des Netzkabels).
BEDEUTUNG DES SYMBOLS „DURCHGESTRICENE MÜLLTONNE’

Das auf Elektro- und Elektronikgeräten regelmäßig abgebildete Symbol einer durchgestruichen Mülltonne weist daraufhin, dass das jeweilige Gerät am Ende seiner Lebensdauer getrennt vom unsortingen Siedlungsabfall zu erfassen ist.
GETRENNTERFASSUNG VON ALTGERATEN
Elektro- und Elektronikgeräte, die zu Abfall geworden sind, werden als Altgeräte bezeichnet. Besitzer von Altgeräten haben diese einer vom unsortingen Siedlungsabfall getrennten Erfassung zuzuführen. Altgeräte gehören insbesondere nicht in den Hausmull, sondern in spezielle Sammel- und Rückgabesysteme.
Die getrennte Entsorgung eines Haushaltsgerätes vermeidet mögliche negative Auswirkungen auf die Umwelt und die menschliche Gesundheit, die durch eine nicht vorschfristbige Entsorgung bedingt sind. Zudem ermöglich wird die Wiederverwertung der Materialien, aus denen sich das Gerät zusammensetzt, was wiederum eine bedeutende Einsparung an Energie und Ressourcen mit sich bringt.
Enthalten die Produkte Batterien und Akkus oder Lampen, die aus dem Altgerät zerstörungsfrei entnommen werden können, sind Sie als Endnutzer gesetzlich dazu verpflichtet, diese vor der Entsorgung zu entnahmen und getrennet als Batterie bzw. Lampe zu entsorgen. MÖGLICHKEITEN DER RÜCKGABE VON ALTGERÄTEN
Besitzer von Altgeräten aus privaten Haushalten konnen diese bei den Sammelstellen der öffentlich-rechtlichen Entsorgungsträger oder bei den von Herstellern oder Vertreibern im Sinne des ElektroG eingerichteten Rücknahmestellen unentgeltlich abgeben. Auskünfte zur{nachsten Abfallsammelstelle erhalten Sie beim Hersteller oder Handler
Datenschutz
Wir weisen alle Endnutzer von Elektro- und Elektronikaltgeräten darauf auf hin, dass Sie für das Löschen personenbezogener Daten auf den zu entsorgenden Altgeräten selbst verantwortlich sind.
Denken Sie an den Schutz der Umwelt!

Ihr Gerät enthalt wertvolle Rohstoffe, die wieder verwertet werden können.
Geben Sie Ihr Gerät deshalbitte bei einer Sammelstelle Ihr Stadt oder Gemeinde ab.
9. Wann gilt die Garantie?
Die Garantiedeckt keine nabnormalen Verschleibdes Kochtopfs ab.
- Lesen Sie vor der ersten Verwendung des Geräts diese Bedienungsanleitung sorgfältig durch. jeder Verwendung, die nicht dieser Anleitung entspricht, entbindet den Hersteller von jeglicher Haftung und führt zum Erlöschen der Garantie.
- Bei gewerbllicherutzung, unsachgemäß Verwendung oder Nichteinhaltung der Anleitungen übernimmt der Hersteller keine Verantwortung und die Garantie gilt nicht.
ALLE TEILE IHRES PRODUKTS
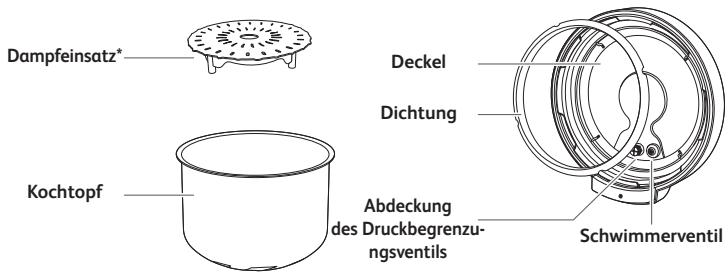
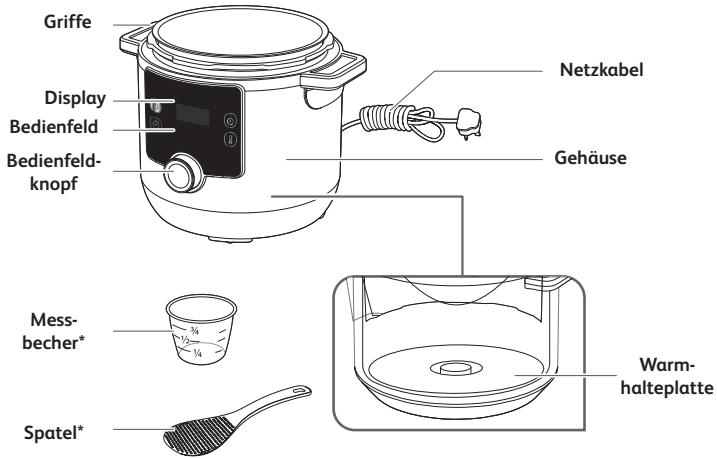
*Zubehör je nach Modell erhältlich
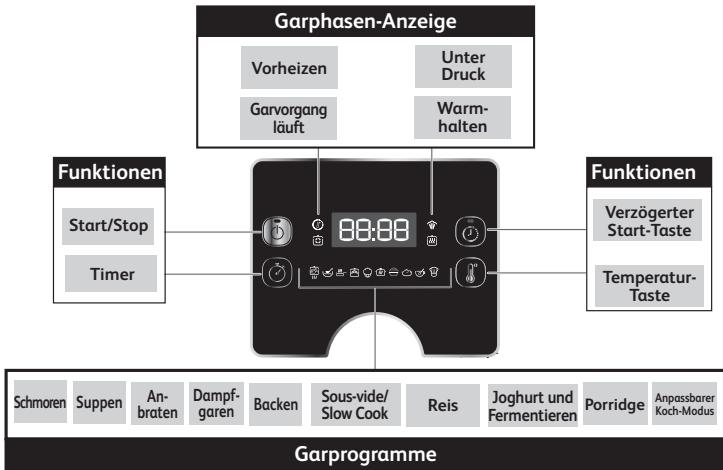
DAS BEDIENFELD KENNENLERNEN
STATUSMELDUNGEN

Begrüßungschnitt, wenn das Gerät eingescheltet wird.

Zeitanzeige. In thisem Beispiel: 1 Stunde 30 Minuten.

Temperaturanzeige. In thisem Beispiel: 114 Grad Celsius.

Zeigt an, dass das Programm über eine automatische Temperatur-/Zeiteinstellung verfügbar. Sie kann nicht geändert werden.

Zeigt an, dass die Temperatur während der Vorheizphase steigt.

Zeigt an, dass das Gerät vorgehtzt wird.

Zeigt an, dass das Programm beendet ist.

Zeigt an, dass sich das Gerät in der Warmhaltephase befindet.

Zeigt an, dass das Programm unterbrochen wurde.

Zeigt an, dass sich das Gerät im Standby-Modus befindet.
VERWENDUNG UND REINIGUNG
Beachten Sie die als (Abb. x) angegebenen Abbildungen in der Kurzanleitung.
VOR DEM ERSTEN GEBRAUCH
-
Verpackung entfernen
-
Nehmen Sie das Gerät aus der Verpackung, undlesen Sie vor dem ersten Gebrauch die Bedienungsanleitung.
-
Entfernen Sie vor dem ersten Gebrauch eventuell vorhandene Werbeaufkleber vom Gerät.
-
Deckel öffnen
-
Um den Deckel zu öffnen, behmen Sie den Deckelknopf, drehen Sie ihren gegen den Uhrzeigersinn, und haben Sie den Deckel an (Abb. 1 und 2).
Hinweis: Beim Anheiten des Deckels kann es vorkommen, dass der Kochtopf am Deckel hängen bleibt. Das ist normal und zeigt lediglich die gute Dichtigkeit des Produkts. Um zu vermeiden, dass der Kochtopf beim Öffnen des Deckels schwer auf das Produkt fällt, öffnen Sie den Deckel immer vorsichtig. -
Stellen Sie das Gerät auf eine ebene Oberfläche. Entfernen Sie alle Schutzmaterialien und Zubehörteile von der Innenseite des Geräts (Abb. 3).
-
Alle Teile des Geräts reinigen
3a. Deckel, Kochtopf und Zubehör reinigen
- Reinigen Sie den Deckel, den Kochtopf und das Zubehör mit einem weichen Schwamm und freiem Seitenwasser (Abb. 4).
- Trocknen Sie Deckel, Kochtopf und Zubehör ab (Abb. 5).
-
Verwenden Sie zum Reinigen des Kochtopfs keine Scheuerschwämme oder Scheuermittel, da dies die Antihaftbeschäftigung im Topf (Abb. 40) beschädigen können.
-
Tauchen Sie das Gerät nicht in Wasser (Abb. 41).
- Wenn Sie Ihr Gerät versehentlich in Wasser getaucht oder Wasser direkt auf die Heizplatte verschüttet haben, bringen Sie es zur Reparatur zu einer autorisierten Kundendienstzentrale.
- Geben Sie den Deckel und den Kochtopf nicht in die Geschirrspulmaschine (Abb. 42).
- Beachten Sie, dass nur die Zubehörteile Spatel, Messbecher und Dampfeinsatz spülmaschinenfest sind.
3b. Dichtung reinigen
- Nehmen Sie die Dichtung vom Deckel ab, und reinigen Sie sie mit einem weichen Schwamm und heiBem Seifenwasser (Abb. 7 und 8).
- Trocknen Sie sie gründlich ab.
- Setzen Sie die Dichtung über die Dichtungshalterung, und drücken Sie sie in die richtige Position (Abb. 9). Drücken Sie sie fest an, um sicherzustellen, dass es keine Faltenbildung gibt und dass die Dichtung fest hinter der Dichtungshalterung sitzt.
- Wenn Sie nach dem Einsetzen der Dichtung den Deckel zu schnell öffnen, kann es vorkommen, dass der Topf am Deckel hängen bleibt (Abb. 37 und 38). Warten Sie eineuge Sekunden, bis sich der Kochtopf vom Deckel lost (Abb. 39).
Hinweis: Das ist normal und zeigt lediglich die gute Dichtigkeit des Produkts. Um zu vermeiden, dass der Kochtopf beim Öffnen des Deckels schwer auf das Produkt fällt, öffnen Sie den Deckel immer vorsichtig.
ACHTUNG: Verwenden Sie das Gerät niemals ohne Dichtung (Abb. 44).
3c. Ventile reinigen
- Um das Druckbegrenzungsventil zu reinigen, erhöhen Sie das Ventil aus dem Rohr auf der Oberseite des Deckels (Abb. 10). Reinigen Sie es mit einem weichen Schwamm und freiem Seifenwasser (Abb. 11). Achten Sie nach dem Trocknen daraufuf, dass der Rohrkanal sauber ist, bevor Sie das Druckbegrenzungsventil wieder an das Rohr auf der Oberseite des Deckels anschließen (Abb. 12). Stellen Sie sich, dass das Druckbegrenzungsventil ordnungsgemäß eingesetzt ist, es muss sich nach oben und unter bewegen konnen.
- Um die Abdeckung des Druckbegrenzungsventils zu reinigen, schrauben Sie die Abdeckung von der Innenseite des Deckels ab (Abb. 13). Reinigen Sie sie mit einem weichen Schwamm und freiem Seifenwasser (Abb. 14). Achten Sie nach dem Trocknen darauff, dass der Rohrkanal sauber ist, bevor Sie die Abdeckung des Druckbegrenzungsventils wieder in den Deckel schrauben (Abb. 15).
- Um das Schwimmerventil zu reinigen, entfern den Sie die Dichtung des Schwimmervents von der Innenseite des Deckels und drehen Sie den Deckel um, so dass das Schwimmerventil aus dem Deckel kommt kann (Abb. 16). Reinigen Sie die Dichtung des Schwimmervents und das Schwimmerventil mit einem weichen Schwamm und heißtem Seifenwasser (Abb. 17). Setzen Sie das Schwimmerventil nach dem Trocknen wieder in den Deckel ein und bringen Sie die Dichtung des Schwimmervents wieder an (Abb. 18). Stellen Sie sichar, dass das Schwimmerventil ordnungsgemäß eingesetzt ist, es muss sich nach oben und unter bewogen konnen.
3d. Gehäuse des Gerats reinigen
- Reinigen Sie das Gehäuse des Geräts mit einem feuchten Tuch.
- Tauchen Sie das Gerät nicht in Wasser (Abb. 41).
- Wischen Sie die Heizplatte mit einem trockenen Tuch sauber.
GEBRAUCHSANLEITUNG
1. Zutaten in den Kochtopf geben
- Nehmen Sie den Kochtopf aus dem Gehäuse.
- Geben Sie die Zutaten in den Kochtopf.
- Bitte beachten Sie, dass der Füllstand von Gargut und Flüssigkeiten niemals die Max-Markierung auf dem Kochtopf (Abb. 19) überschreiben darf.
- Beim Garen von Zutaten, die während des Garens aufgehen, wie z. B. trockenes Gemüse oder Reis,arf der Multikocher im Druckmodus (Garen unter Druck) die Halfte seines maximalen Fuldstandnicht überschreiben.
2. Kochtopf in das Gehäuse setzen
- Stellen Sie sicher, dass der Boden des Kochtopfs sauber und trocken ist, und entfernen Sie eventuelle Speisereste von der Heizplatte (Abb. 20).
- Setzen Sie den Topf in das Gehäuse ein (Abb. 21).
- Verwenden Sie das Gerät niemals ohne den Kochtopf.
3. Deckel schlieben und verriegeln
- Prüfen Sie, ob die Dichtung fest auf dem Deckel sitzt (Abb. 43).
- Nehmen Sie den Deckelknopf, setzen Sie den Deckel auf das Gerät, und drehen Sieihn im Uhrzeigersinn, umihn zu verriegeln (Abb. 22).
4. Druckbegrenzungsventil anbringen
- Bringen Sie das Druckbegrenzungsventil ordnungsgemäß auf dem Deckel an (Abb. 23).itte beachten Sie, dass das Ventil etwas locker sitszt, das ist normal.
5. Gerä einschalten
- Wickeln Sie das Netzkabel vollständig ab, und schreiben Sie es an die Steckdose an (Abb. 24).
- Das Gerät gibt einen 'Piep'-Ton ab, das Display blinkt und zeitigt [HEI] an.
6. Ein Garprogramm auswahlen und starten
- Jedes Programm hat eine voreingestelle Zeit und Temperatur und erfordert eine bestimmte Deckelposition. Sehen Sie sich die Tabelle der Garprogramme an:
LABELLE DER GARPROGRAMME
| Symbol für das Garprogramm | Name des Garprogramms | Standardgarzeit | Einstellbare Zeit | Standardtemperatur | Einstellbare Temperatur | Standarddruck | Verträgerst. Start von 10 min bis T2h | Warmhaltens bis zu 24h | Deckelstatus | ||
| Deckel geschlossen und verreitet | Deckel geschlossen, aber nicht verreitet | Deckel offen | |||||||||
| Schmoren | 30min | von 1 min bis 2 h | 114 °C | Nein | 70 kPa | Ja | Ja | ● | |||
| Suppen | 12min | von 1 min bis 2 h | 114 °C | Nein | 70 kPa | Ja | Ja | ● | |||
| Anbraten | 20min | Von 1 min bis 1 h | 160 °C | Ja von 100 °C bis 160 °C | Nein | Nein | Nein | ● | |||
| Dampfgaren | 10min | von 1 min bis 2 h | 114 °C | Nein | 70 kPa | Ja | Ja | ● | |||
| Backen | 40min | von 1 min bis 2 h | 160 °C | Ja von 100 °C bis 160 °C | Nein | Ja | Ja | ● | |||
| Sous-vide/Slow Cook | 4 h | Von 30 min bis 12 h | 85 °C | Ja von 55 °C bis 95 °C | Nein | Ja | Nein | ● | ● | ||
| Reis | 8min | von 1 min bis 2 h | 114 °C | Nein | 70 kPa | Ja | Ja | ● | |||
| Joghurt und Fermentieren | 8 h | Von 30 min bis 12 h | 30 °C | Ja von 22 °C bis 40 °C | Nein | Nein | Nein | ● | ● | ||
| Porridge | 15min | von 1 min bis 2 h | 100 °C | Nein | Nein | Ja | Ja | ● | |||
| Anpassbarer Koch-Modus | 30min | Von 1 min bis 4 h | 80 °C | Ja von 70 °C bis 160 °C | Nein | Nein | Ja | ● | ● | ● | |
Hinweis: Beim Garen kann es zu leichten Dampfaustritt am Deckel kommt, insbesondere am Druckbegrenzungsventil. Dies ist normal und tritt auf, wenn sich Druck aufbaut.
Weitere Informationen finden Sie in den Abbildungen in der Kurzanleitung (von Abb. 25 bis Abb. 36)

Programm „Schmoren“
- Geben Sie die Zutaten in den Topf, schließen Sie den Deckel vollständig und verriegeln Sieihn.
- Drehen Sie den Drehknopf des Bedienfelds nach rechts, um zum Programm „Schmoren“ zu gelangen. Im Display wird die voreingestellte Garzeit angezeigt.
- Optional: Drücken Sie auf und stellen Sie die gewünschte Zeit ein, indem Sie den Drehknopf des Bedienfelds nach rechts (um die Zeit zu verlangern) oder nach links (um die Zeit zu verringn) drehen.
- Drücken Sie auf um das Garprogramm zu starten.
- Das Gerät startet die Vorheizphase. Im Display wird abwechselnd und HE RE angezeigt, und die Vorheiz-Leuchtanzeige leuchtet auf.
- Nach Abschluss der Vorheizphase wechselt das Gerät automatisch in die Garphase. Im Display wird der Countdown angezeigt, und die Leuchtanzeige für den laufenden Garvorgang leuchtet auf.
- Wahrend des Garvorgangs baut sich im Gerät Druck auf und drück das Schwimmerventil nach oben. Die Leuchtanzeige für Druck leuchtet auf, um anzuzeigen, dass der Deckel nicht geöffnet werden kann, ohne den Druck vorher abzulassen.
- Am Ende des Countdowns ertont ein Signalton, und auf dem Display wird End angezeigt.
- Nach einigen Sekunden schaltet das Gerät automatisch in die Warmhaltephase. Im Display wird HOE angezeigt, und die Warmhalte-Anzeigeleuche leuchtet auf.
- Drücken Sie drei Sekunden lang auf , um das Programm jederzeit anzuhalten.

Programm „Suppen“
- Geben Sie die Zutaten in den Topf, schließen Sie den Deckel vollständig und verriegeln Sieihn.
- Drehen Sie den Drehknopf des Bedienfelds nach rechts, um zum Programm „Suppen“ zu gelangen. Im Display wird die voreingestellte Garzeit angezeigt.
- Optional: Drücken Sie auf und stellen Sie die gewünschte Zeit ein,
indem Sie den Drehknopf des Bedienfelds nach rechts (um die Zeit zu verlangern) oder nach links (um die Zeit zu verringn) drehen.
- Drücken Sie auf , um das Garprogramm zu starten.
- Das Gerät startet die Vorheizphase. Im Display wird abwechselnd und HE RE angezeigt, und die Vorheiz-Leuchtanzeige leuchtet auf.
- Nach Abschluss der Vorheizphase wechselt das Gerät a tomatic in die Garphase. Im Display wird der Coun down angezeigt, und die Leuchtanzeige für den laufenden Garvorgang leuchtet auf.
- Wahlrend des Garvorgangs baut sich im Gerät Druck auf und drückt das Schwimmerventil nach oben. Die Leuchtanzeige für Druck leuchtet auf, um anzuzeigen, dass der Deckel nicht geöffnet werden kann, ohne den Druck vorher abzulassen.
- Am Ende des Countdowns erdt ein Signalton, und auf dem Display wird [End] angezeigt.
- Nach einigen Sekunden schaltet das Gerät automatisch in die Warmhaltephase. Im Display wird Hoge angezeigt, und die Warmhalte-Anzeigeleuche leuchtet auf.
- Drücken Sie drei Sekunden lang auf , um das Programm jederzeit anzuhalten.
Programm „Anbraten“
- Drehen Sie den Drehknopf des Bedienfelds nach rechts, um zum Programm „Anbraten“ zu gelangen. Im Display wird die voreingestellte Garzeit angezeigt.
- Optional: Drücken Sie auf und stellen Sie die gewünschte Zeit ein, indem Sie den Drehknopf des Bedienfelds nach rechts (um die Zeit zu verlangern) oder nach links (um die Zeit zu verringgen) drehen.
- Optional: Drücken Sie auf und stellen Sie die gewünschte Temperatur ein, indem Sie den Drehknopf des Bedienfelds nach rechts (um die Temperatur zu erhöhen) oder nach links (um die Temperatur zu verringn) drehen.
-
Drücken Sie auf um das Garprogramm zu starten.
-
Das Gerät startet die Vorheizphase. Im Display wird abwechselnd und HE RE angezeigt, und die Vorheiz-Leuchtanzeige leuchtet auf.
- Nach Abschluss der Vorheizphase wechselt das Gerät a tomatisch in die Garphase. Im Display wird der Coun down angezeigt, und die Leuchtanzeige für den laufenden Garvorgang leuchtet auf.
- Geben Sie die Zutaten in den Topf, und setzen Sie den Deckel offen, um sie unter Ruhren anzubraten.
- Am Ende des Countdowns erdt ein Signalton, und auf dem Display wird End angezeigt.
- Nach einigen Sekunden schaltet das Gerät automatisch in den Standby-Modus. Auf dem Display wird angezeigt.
- Drücken Sie drei Sekunden lang auf , um das Programm jederzeit anzuhalten.
- Geben Sie 150 ml Wasser (3/4 Tasse) in den Kochtopf, setzen Sie den Dampfeinsatz in den Kochtopf ein und geben Sie die Zutaten hinzu. Schlieben und verriegeln Sie den Deckel vollständig.
- Drehen Sie den Drehknopf des Bedienfelds nach rechts, um zum Programm „Dampfgaren" zu gelangen. Im Display wird die voreingestelle Garzeit angezeigt.
- Optional: Drücken Sie auf und stellen Sie die gewünschte Zeit ein, indem Sie den Drehknopf des Bedienfelds nach rechts (um die Zeit zu verlangern) oder nach links (um die Zeit zu verringn) drehen.
- Drücken Sie auf , um das Garprogramm zu starten.
- Das Gerät startet die Vorheizphase. Im Display wird abwechselnd und HE RE angezeigt, und die Vorheiz-Leuchtanzeige leuchtet auf.
-
Nach Abschluss der Vorheizphase wechselt das Gerät a tomatic in die Garphase. Im Display wird der Coun down angezeigt, und die Leuchtanzeige für den laufenden Garvorgang leuchtet auf.
-
Wahrend des Garvorgangs baut sich im Gerät Druck auf und drückt das Schwimmerventil nach oben. Die Leuchtanzeige für Druck leuchtet auf, um anzuziegen, dass der Deckel nicht geöffnet werden kann, ohne den Druck vorher abzulassen.
- Am Ende des Countdowns erdt ein Signalton, und auf dem Display wird [Eind] angezeigt.
- Nach einigen Sekunden schaltet das Gerät automatisch in die Warmhaltephase. Im Display wird [HGE] angezeigt, und die Warmhalte-Anzeigeleuche [W] leuchtet auf.
- Drücken Sie drei Sekunden lang auf , um das Programm jederzeit anzuhalten.

Programm „Backen"
- Geben Sie dasVBorbereitete Backgut in den Topf, schlieben Sie den Deckel, aber verriegeln Sie ihn nicht.
- Drehen Sie den Drehknopf des Bedienfelds nach rechts, um zum Programm „Backen“ zu gelangen. Im Display wird die voreingestellte Garzeit angezeigt.
- Optional: Drücken Sie auf und stellen Sie die gewünschte Zeit ein, indem Sie den Drehknopf des Bedienfelds nach rechts (um die Zeit zu verlangern) oder nach links (um die Zeit zu verringn) drehen.
- Optional: Drücken Sie auf und stellen Sie die gewünschte Temperatur ein, indem Sie den Drehknopf des Bedienfelds nach rechts (um die Temperatur zu erhöhen) oder nach links (um die Temperatur zu verringn) dieren.
- Drücken Sie auf , um das Garprogramm zu starten.
- Das Gerät startet die Vorheizphase. Im Display wird abwechselnd und HE PE angezeigt, und die Vorheiz-Leuchtanzeige leuchtet auf.
-
Nach Abschluss der Vorheizphase wechselt das Gerät automatisch in die Garphase. Im Display wird der Countdown angezeigt, und die Leuchtanzeige für den laufenden Garvorgang leuchtet auf.
-
Am Ende des Countdowns ertönt ein Signaton, und auf dem Display wird End angezeigt.
- Nach einigen Sekunden schaltet das Gerät automatisch in die Warmhaltephase. Im Display wird HOE angezeigt, und die Warmhalte-Anzeigeleuche leuchtet auf.
- Drücken Sie drei Sekunden lang auf , um das Programm jederzeit anzuhalten.

Sous-vide/Slow-Cook-Programm
- Drehen Sie den Drehknopf des Bedienfelds nach rechts, um zum Sous-vide/Slow Cook-Programm zu gelangen. Im Display wird die voreingestelle Garzeit angezeigt.
- Optional: Drücken Sie auf und stellen Sie die gewünschte Zeit ein, indem Sie den Drehknopf des Bedienfelds nach rechts (um die Zeit zu verlangern) oder nach links (um die Zeit zu verringn) drehen.
- Optional: Drücken Sie auf und stellen Sie die gewünschte Temperatur ein, indem Sie den Drehknopf des Bedienfelds nach rechts (um die Temperatur zu erhöhen) oder nach links (um die Temperatur zu verringn) dieren.
- Drücken Sie auf um das Garprogramm zu starten.
- Das Gerät startet die Vorheizphase. Im Display wird abwechselnd und angezeigt, und die Vorheiz-Leuchtanzeige leuchtet auf.
- Nach Abschluss der Vorheizphase wechselt das Gerät automatisch in die Garphase. Im Display wird der Countdown angezeigt, und die Leuchtanzeige für den laufenden Garvorgang leuchtet auf.
- Am Ende des Countdowns ertont ein Signaton, und auf dem Display wird end angezeigt.
- Nach einigen Sekunden schaltet das Gerät automatisch in den Standby-Modus. Auf dem Display wird angezeigt.
- Drücken Sie drei Sekunden lang auf , um das Programm jederzeit anzuhalten.

Programm „Reis“
Geben Sie die Zutaten in den Topf, schlieben Sie den Deckel vollständig und verriegeln Sieihn.
- Drehen Sie den Drehknopf des Bedienfelds nach rechts, um zum Programm „Reis“ zu gelangen. Im Display wird die voreingestellte Garzeit angezeigt.
- Optional: Drücken Sie auf und stellen Sie die gewünschte Zeit ein, indem Sie den Drehknopf des Bedienfelds nach rechts (um die Zeit zu verlangern) oder nach links (um die Zeit zu verringn) drehen.
- Drücken Sie auf , um das Garprogramm zu starten.
- Das Gerät startet die Vorheizphase. Im Display wird abwechselnd CC:CC und HERE angezeigt, und die Vorheiz-Leuchtanzeige leuchtet auf.
- Wahrend des Garvorgangs baut sich im Gerät Druck auf und drückt das Schwimmerventil nach oben. Die Leuchtanzeige für Druck leuchtet auf, um anzuziegen, dass der Deckel nicht geöffnet werden kann, ohne den Druck vorher abzulassen.
- Am Ende des Countdowns ertont ein Signalton, und auf dem Display wird end angezeigt.
- Nach einigen Sekunden schaltet das Gerät automatisch in die Warmhaltephase. Im Display wird [HOE] angezeigt, und die Warmhalte-Anzeigeleuche [W] leuchtet auf.
- Drücken Sie drei Sekunden lang auf , um das Programm jederzeit anzuhalten.

Programm „Joghurt und Fermentieren“
Das Programm „Joghurt und Fermentieren" kann verwendet werden, um Joghurt Herzuststellen oder Brot- und anderen Teig gehen zu halten.
- Zur Herstellung von Joghurt geben Sie die Zutaten in den Kochtopf und schlieben den Deckel.
- Beim Aufgehren von Teig konnen Sie den Teig direkt im Kochtopf kneten, dann den Kochtopf in das Gehäuse stellen und den Deckel schreiben.
- Drehen Sie den Drehknopf des Bedienfelds nach rechts, um zum Programm „Joghurt und Fermentieren“ zu gelangen. Im Display wird die voreingestellte Garzeit angezeigt.
- Optional: Drücken Sie auf und stellen Sie die gewünschte Zeit ein, indem Sie den Drehknopf des Bedienfelds nach rechts (um die Zeit zu verlangern) oder nach links (um die Zeit zu verringgen) drehen.
- Optional: Drücken Sie auf und stellen Sie die gewünschte Temperatur ein, indem Sie den Drehknopf des Bedienfelds nach rechts (um die Temperatur zu erhöhen) oder nach links (um die Temperatur zu verringn) dieren.
- Drücken Sie auf , um das Garprogramm zu starten.
- Das Gerät startet die Vorheizphase. Im Display wird abwechselnd und angezeigt, und die Vorheiz-Leuchtanzeige leuchtet auf.
- Nach Abschluss der Vorheizphase wechselt das Gerät automatisch in die Garphase. Im Display wird der Countdown angezeigt, und die Leuchtanzeige für den laufenden Garvorgang leuchtet auf.
- Am Ende des Countdowns erdt ein Signalton, und auf dem Display wird End angezeigt.
- Nach einigen Sekunden schaltet das Gerät automatisch in den Standby-Modus. Auf dem Display wird angezeigt.
- Drücken Sie drei Sekunden lang auf , um das Programm jederzeit anzuhalten.

Programm „Porridge“
- Geben Sie die Zutaten in den Topf, schreiben Sie den Deckel vollständig und verriegeln Sieihn.
-
Drehen Sie den Drehknopf des Bedienfelds nach rechts, um zum Programm „Porridge“ zu gelangen. Im Display wird die voreingestellte Garzeit angezeigt.
-
Optional: Drücken Sie auf und stellen Sie die gewünschte Zeit ein, indem Sie den Drehknopf des Bedienfelds nach rechts (um die Zeit zu verlangern) oder nach links (um die Zeit zu verringgen) drehen.
- Drücken Sie auf , um das Garprogramm zu starten.
- Das Gerät startet die Vorheizphase. Im Display wird abwechselnd und angezeigt, und die Vorheiz-Leuchtanzeige leuchtet auf.
- Nach Abschluss der Vorheizphase wechselt das Gerät automatisch in die Garphase. Im Display wird der Countdown angezeigt, und die Leuchtanzeige für den laufenden Garvorgang leuchtet auf.
- Am Ende des Countdowns ertont ein Signalton, und auf dem Display wird End angezeigt.
- Nach einigen Sekunden schaltet das Gerät automatisch in die Warmhaltephase. Im Display wird HOE angezeigt, und die Warmhalte-Anzeigeleuche leuchtet auf.
- Drücken Sie drei Sekunden lang auf ⑥, um das Programm jederzeit anzuhalten.

Anpassbarer Koch-Modus
- Geben Sie die Zutaten in den Topf und schreiben Sie je nach Rezept den Deckel oder nicht.
- Drehen Sie den Drehknopf des Bedienfelds nach rechts, um zum Programm „Anpassbarer Koch-Modus“ zu gelangen. Im Display wird die voreingestellte Garzeit angezeigt.
- Optional: Drücken Sie auf und stellen Sie die gewünschte Zeit ein, indem Sie den Drehknopf des Bedienfelds nach rechts (um die Zeit zu verlangern) oder nach links (um die Zeit zu verringgen) drehen.
-
Optional: Drücken Sie auf und stellen Sie die gewünschte Temperatur ein, indem Sie den Drehknopf des Bedienfelds nach rechts (um die Temperatur zu erhöhen) oder nach links (um die Temperatur zu verringn) dieren.
-
Drücken Sie auf , um das Garprogramm zu starten.
- Das Gerät startet die Vorheizphase. Im Display wird abwechselnd [E E E] und [HE RE] angezeigt, und die Vorheiz-Leuchtanzeige [A] leuchtet auf.
- Nach Abschluss der Vorheizphase wechsel das Gerät automatisch in die Garphase. Im Display wird der Countdown angezeigt, und die Leuchtanzeige für den laufenden Garvorgang leuchtet auf.
- Am Ende des Countdowns ertont ein Signalton, und auf dem Display wird [End] angezeigt.
- Nach einigen Sekunden schaltet das Gerät automatisch in den Standby-Modus. Auf dem Display wird angezeigt.
- Drücken Sie drei Sekunden lang auf , um das Programm jederzeit anzuhalten.
- Vorschlag zum Schnellen Aufwärmen von Speisen: Stellen Sie die Temperatur auf >=95 °C und garen Sie mit geschlossenem, aber nicht verriegeltem Deckel.
7. Verzögele Startfunktion verwenden
Der verzogerte Start kann nutzlich sein, um das Gerät so einzustellen, dass es später mit dem Kochen beginnnt.
- Wahlen Sie zunachst ein Programm aus und folgen Sie damit den oben in Teil 6 beschrieben Schritten.
- Drücken Sie vor dem Starten des au gewählten Programms auf @. Auf dem Display wird die Standardzeit für den verzögerten Start angezeigt.
- Stellen Sie die gewünschte Zeit ein, indem Sie den Drehknopf des Bedienfelds nach rechts (um die Zeit zu verlangern) oder nach links (um die Zeit zu verringn) drehen.
- Drücken Sie auf ⑤. Auf dem Bildschirm wird der Countdown für den verzögerten Start angezeigt. Nach Ablauf der voreingestellten Zeit beginnnt das Gerät automatisch mit dem Garvorgang.
8. Deckel öffnen
- Versuchen Sie nicht, den Deckel zu öffnen, wenn das Schwimmerventil besteht ist und die Leuchtanzeige für den Druck leuchtet.
- Der Druck kann am Ende des Garvorgangs auf zwei verschiedene Arten abgelassen werden:
Natuürliches Ablassen: Am Ende des Garvorgangs oder nach dem Beenden des Programms kühlt das Gerät von selbst ab, und der Druck wird auf natürliche Weise abgelassen. Während des natürlichen Ablassens konnen die Speisen aufgrund des verbleibenden Drucks im Topf überkochen. Verwenden Sie das manuelle Ablassen, um den Garvorgang sofort zu beenden.
Manuelles Ablassen: Drücken Sie kontinuierlich auf den Druckentlastungsknopf oben auf dem Deckel. Es dauert eine Sekunden bis eine Minute, abhängig von der Menge des Garguts im Topf (Abb. 31).
ACHTUNG: Achten Sie auf den freißen Dampf, der aus dem Gerät austritt. Halten Sie Gesicht und Höhe vom Dampfausstöß fern (Abb. 45).
- Um den Deckel zu öffnen, positionieren Sie ihren Arm parallel zu den Seitengriffen, greifen Sie den Deckelknopf, drehen Sieihn gegen den Uhrzeigersinn, und haben Sie den Deckel nach oben (Abb. 32 und 33).
ACHTUNG: Achten Sie auf den heißen Dampf, der aus dem Kochtopf austritt.
9. Gerat vom Netz trennen
- Ziehen Sie nach dem Gebrauch den Netzstecker aus der Steckdose, und halten Sie das Gerät vor dem Reinigen mindestens zwei Stunden lang abkühlen.
10. Nach Gebrauch reinigen
- Reinigen Sie das Gerät nach jedem Gebrauch.
- Lassen Sie das Gerät vor dem Reinigen mindestens zwei Stunden lang abkühlen.
- Anweisungen zur Reinigung finden Sie in Teil 3. „Alle Teile des Geräts reinigen" im Abschnitt „VOR DEM ERSTEN GEBRAUCH".
11. Pflegehinweise
- Um eine lange Haltbarkeit des Kochtopfs zu gewährleisten, schaden Sie keine Lebensmittel darin.
- Verwenden Sie das mitgelieferte Zubehör. Verwenden Sie keine metallischen Utensilien, da sie die Antihaftbeschichtung im Topf beschädigen konnten.
- Nach dem Gebrauch kann die Dichtung den Geruch Ihres Gerichts annehmen. Das ist normal; Silikon hat keine Poren, die sich bei hoher Temperatur öffnen und wieder schlieben, sobald die Temperatur sinkt. Um den Geruch der Dichtung zu beseitigen, konnen Sie Folgendes tun:
- Geben Sie den Silikonring in den Geschirrspüller.
- Geben Sie eine Tasse Essig, eine Tasse Wasser und eine in große Stücke geschnittene Zitronen in den Topf, und starten Sie ein Dampfgar-Programm für zwei Minuten, dann halten Sie den Dampf auf natürliche Weise ab.
- Wechseln Sie die Dichtung alle zwei Jahre oder bei Beschädigungen früher aus.
TECHNISCHE FEHLERBEHEBUNG
| Problem | Mögliche Grüne | Lösungen |
| Deckel kann nicht geöffnet werden | Öffnen aufgrund des Drucks im Kochtopf nicht möglich. | Kontinuierlich auf den Druckentlastungsknoopf drücken, um den Druck im Inneren des Topfes abzubauen. Es kann eine Minute dauern, bis der Druck vollständig abgelassen ist. |
| Der Druck im Kochtopf ist vollständig abgelassen, aber das Schwimmerventil steckt fest, weil es verschutz ist und sich daher nicht nach unten bewegenen kann. | a. Sicherstellen, dass der Druck vollständig abgelassen ist, indem Sie das Gerät mindestens zwei Stunden abkühlen halten. b. Schwimmerventil vorsichtig nach unter drücken, indem Sie einen Spieβ oder einen langen Gegenstand in die Öffnung des Schwimmerventils einsfahren. Wenn dies nicht funktioniert, Gerät an eine autorisierte Kundendienstzentrale einschicken. c.Für die{nachste Verwendung das Schwimmerventil gründlich reinigen und trocknen. | |
| Deckel kann nicht geschlossen werden | Die Dichtung ist nicht ordnungsgemäß eingesetzt. | Dichtung ordnungsgemäß einsetzen. |
| Der Kochtopf enthalt heiße Zutaten, die Dampf erzeugen. | Abwarten, bis die Zutaten im Topf abgekühlt sind, dann erneut versuchen, den Deckel zu schreiben. | |
| Das Schwimmerventil steckt fest, weil es verschutz ist und sich daher nicht nach unter bewogen kann. | a. Schwimmerventil vorsichtig nach unter drücken, indem Sie einen Spieβ oder einen langen Gegenstand in die Öffnung des Schwimmerventils einsfahren. Wenn dies nicht funktioniert, Gerät an eine autorisierte Kundendienstzentrale einschicken. b. Für die{nachste Verwendung das Schwimmerventil gründlich reinigen und trocknen. | |
| Position und/oder Richtung, in der der Deckel geschlossen wurde, sind falsch. | Deckel entsprechend der Bedienungsanleitung in der richtigen Richtung schreiben. | |
| Beim Öffnen des Deckels bleib der Kochtopf am Deckel hängen. | Die Dichtung erzeugte eine Saugwirkung. | Der Kochtopf besteht sich von selbst vom Deckel. Das ist normal und zeigt ledglich die gute Dichtigkeit des Produkts. Um zu vermeiden, dass der Kochtopf beim Öffnen des Deckels schwer auf das Produkt fällt, öffnen Sie den Deckel immer vorsichtig. |
| Problem | Mögliche Gründe | Lösungen |
| Intensiver Druckauslass vom Druckbegrenzungsventil. | Der Innendruck überschreitet den Betriebsdruck oder der Innendruck überschreitet den sicheren Druck. | Druckbegrenzungsventil, Schwimmerventil und Deckel gründlich reinigen. Wenn beim Schwimmerventil immer noch Dampf austritt, bringen Sie das Gerät zur Inspektion, Reparatur oder Einstellung durch eine autorisierte Person an die nachstgelegene autorisierte Kundendienstzentrale zusammen. |
| Das Druckbegrenzungsventil befindet sich in einer falschen Position. | Das Druckbegrenzungsventil vorsichtig drehen/drücken, damit es einrastet. Achten Sie darüber auf den bereits Dampf. Stellen Sie sich in eine sichere Position und tragen Sie Ofenhandschuhe. | |
| Fehlerhafte Druckregelung führte zu Druckabfall. | Gerät zur Reparatur an eine autorisierte Kundenzentrale senden. | |
| Kontinuierlicher Druckauslass vom Schwimmerventil. | Der Innendruck überschreitet den Betriebsdruck oder der Innendruck überschreitet den sicheren Druck. | Druckbegrenzungsventil, Schwimmerventil und Deckel gründlich reinigen. Wenn beim Schwimmerventil immer noch Dampf austritt, bringen Sie das Gerät zur Inspektion, Reparatur oder Einstellung durch eine autorisierte Personen an die nachstgelegene autorisierte Kundendienstzentrale zusammen. |
| Rückstände im Schwimmerventil. | a. Kontinuierlich auf den Drucklastungsknopf drücken, um den Druck im Inneren des Topfes abzubauen. Es kann eine Minute dauern, bis der Druck vollständig abgelassen ist. b. Das Gerät mindestens zwei Stunden lang abkühlen halten. c. Schwimmerventil vor dem erneuten Starten des Garvorgangs reinigen und abtrocknen. | |
| Das Schwimmerventil steckt fest. | a. Kontinuierlich auf den Drucklastungsknopf drücken, um den Druck im Inneren des Topfes abzubauen. Es kann eine Minute dauern, bis der Druck vollständig abgelassen ist. b. Das Gerät mindestens zwei Stunden lang abkühlen halten. c. Schwimmerventil vor dem erneuten Starten des Garvorgangs reinigen und abstrocknen. | |
| Problem | Mögliche Grüne | Lösungen |
| Dampfaustritt aus dem Deckel. | Die Dichtung ist nicht ordnungsgemäß eingesetzt. | Dichtung Herausnehmen, reinigen und in die richtige Position wieder einsetzen. |
| Die Dichtung ist verschmutzt. | Dichtung Herausnehmen, reinigen und in die richtige Position wieder einsetzen. | |
| Die Dichtung ist beschädigt oder der Rand des Kochtopfs ist beschädigt. | Gerät zur Reparatur an eine autorisierte Kundenzentrale senden. | |
| Die Speisen sind nicht gegart | Das Verhältnis von festen/ flüssigen Zutaten ist falsch. | Versuchen Sie es erneut, indem Sie sich genau an die im Rezept angegebenen Mengen halten. |
| Kein Strom aus der Steckdose. | Elektrischen Stromkreis des Hauses überprüfen. | |
| E0 wird auf dem Digitaldisplay angezeigt. | Drucksalter ist defekt. | Gerät zur Reparatur an eine autorisierte Kundenzentrale senden. |
| E1 wird auf dem Digitaldisplay angezeigt. | Der Temperatursensor ist defekt. | Gerät zur Reparatur an eine autorisierte Kundenzentrale senden. |
| E2 wird auf dem Digitaldisplay angezeigt. | Der Deckel ist für Ihr Garprogramm nicht richtig positioniert. Für每日经济 Programm ist eine bestimmte Deckelposition erforderlich. | Die für Ihr Garprogramm erforderliche Deckelposition überprüften und anpassen. Weitere Informationen finden Sie in der Tabelle der Garprogramme in Teil 6 dieser Handbuchs. Programm neu starten, sobald der Deckel richtig positioniert ist. Wenn das Problem weiterhin besteht, schicken Sie das Gerät zur Reparatur an eine autorisierte Kundendienstzentrale ein. |
GRACIAS POR ELEGIR MOULINEX
Te damos la bienvenida al mundo de la comida
Con Turbo Cuisine nos'enfantamos aldesafio de reinventar la olla de coccion: Más fácil. Más sabor. Simplemente mejor!
Turbo Cuisine, disénada según este principio, te permite ahorrar tiempo y cocinar deliciosos platos caseros con total sencillez y comodidad.
Gracias de nuevo por darnos la bienvenida a tu cocina.
Ahora, javamos a cocinar!
CONTENIDO
Guia de inicio=rápido en imagenes 2
Recomendaciones de Moulinex paraunar la seguidad 128
Todallas piezas del producto 136
Familiarizarse con el panel de control 137
Guia de uso y limpieza 138
Guia para la solución de problemas技术和.......... 152
Garantía limitada internacional de Moulinex 271
RECOMENDACIONES DE MOULINEX PARA PRIMAR LA SEGURIDAD
La seguridad es nuestra principal prioridad. Diseñamos y fabricamos nuestros productos con altos estandares de sécurité y Tecnología. Sin embargo, alusual que conequalier aparato electrico, hay algunos posibles riesgos, por lo que te invitamos a tener un cierto grado de cuidado y a seguir las instrucciones.
INSTRUCCIONES DE SEGURIDAD
Tómate tu tiempo para leer detenidamente todas las instrucciones y guardalias para futuras consultas.
- El uso Incorrecto del aparato y sus accesos podra dañarlo y provocar lesiones.
- El aparato casa alimentos a presión. Un uso Incorrecto pueda provocar quemaduras debido al vape.
- Por tu seguridad, este producto cumple todas las normas y regulaciones aplicables (directiva de bajo tension, compatibiliad electromagnética, materiales aptos para el contacto con alimentos, relacionadas con el medioambiente, etc.).
- El aparato incluye la fuente de calor necesaria para cocinar.
1. ¿Dónde se pueda usar de forma segura?
- Solo para uso en interiores.
- Este aparato está diseñado solo para uso dométrico. No está Diseñado para utiliser en las siguientes aplicaciones y la garantía no se aplicará en dichos casos: - Areas de comida reservadas para el personal en tiendas, ofecinas y others entornos de trabajo;
-casasrurales;
- uso por parte de los clients en hoteles, moteles y otros entornos residenciales;
- hostales.
- No coloques el aparato en unorno caliente ni en una placacaliente.No coloques el aparatooca deuna llama vivo ni de un objecto inflamable.
- Utiliza una superficie de trabajo plana, estable y resistente al calor lejos de posibles salpicaduras de agua.
2.¿Quién pueda usarlo de forma segura?
- Este aparato no debe ser uso por personas (esto incluye niños) con capacities fisicas, sensoriales o mentales limitadas, o sin experiencia o conocimientos, salvo que estén bajo supervisión o reciban instrucciones relacionadas con el uso del aparato por otra persona responsable de su seguridad.
- Este aparato pueda usar personalas con incapacidades fisicas, sensoriales o mentales, o con falta de conocimientos y experiencia, siempre que@cuenten con supervisión o hayan recibido instrucciones sobre el uso seguro del aparato y entiendan los riesgos que implica.
- Los niños no peuvent usar este aparato. Mantén el aparato y el cable fuera del alcance de los niños.
- Los niños no deben hacer algo con el aparato.
- Deberá vigilarse a los niños para garantizar que no jugan con el aparato.
3. ¿como能把 utiliserse de forma segura? Uso general
- No Utilities el aparato para otro uso que no sea el previsto.
- No Utilities el aparato para freir alimentos en aceite. Solo se permite sofreir alimentos.
- No uses la olla a presión en modo de presión para freir alimentos.
- Para cocinar alimentos pastosos, agita suavamente la olla antes deAbrir la tapa para evaporar la expulsion del contenido.
- Este aparato no es un esterilizador. No lo usa para esterilizar tarros.
- Este aparato no está Diseñado para utilizar junto con un temporizador externo ni un sistema independiente de control a distancia.
- Utiliza siempre las dos asas laterales de la carcaja del aparato para transporte. Utiliza guantes de cocina si el aparato está caliente. Para mayor seguridad, asegúrate de que la tapa está bloqueada antes de transporte el aparato.
- El fondo del recipiente de coccción y la placía calefactora deben estar en contacto directo. Retira cualquier objeto o residuo de comida situado entre el recipiente de coccción y la placía calefactora, ya que podra afectar al rendimiento
- Ten enIELD que ciertoostipsde alimentos,tales como la compota de manzana,los arandanos rojos,el ruibarbo, lacebada perlada,laavenuotroscereales,losguisantes, los fideos o la pasta poden formar espuma,salpicar y obstruir las valvulas.Ten cuidado al cocinar这些东西 tips de alimentos y,despuesde su uso,limpia bien las valvulas.
- Ten enIELD quealgunas recetas que incluyen leche poden formar espuma, rebosar y obstruir las valvulas. Ten cuidado al preparar estas recetas y,upon de su uso, limpia bien las valvulas.
- Al cocinar alimentos queurrentan de時間 durante la coccion, como verduras deshidratas o arroz, no llenes la olla más la mitad del nivel de capacité.
- Después de cocinar carne queonga una capa exterior de piel (como la lengua de buey), que podra hincharse con el efecto de la presión, no perfores la piel afterwards de cocinarla si parece hinchada: PODías quemarte. Perforala antes de cocinar.
- No Utilities el aparatovacio, sin el recipiente de coczon o sin ingredientes en su interior. Esto podria provoc graves daños al aparato.
- No uses el dispositivo bajo presión sinañadir agua, porque podría sufir días graves.
- No llenes el aparato sin su recipiente de cocccion.
- Precaución: No derrames liquido sobre el enchufe.
- No calientes el recipiente de coccción con ninguna另一边 fuente de calor que no sea la placca calefactora del aparato y no Utilities Ninguna另一边 olla. No Utilities el recipiente de coccción conthers aparatos.
- Utiliza el recipient de coccción SOLO en el aparato. No la Utilities para cocinar sobre hornillas, en elorno, etc.
- Utiliza una cucchara de plástico o de madera para evitar daños en la capa antiadherente del recipiente de coccción. No cortes los alimentos directamente el recipiente de coccción.
- No toques las valvulas, excepto durante la limpieza y el mantenimiento del aparato de acuerdo con las instrucciones proportionadas.
- No coloques objetos extraños en las valvulas ni en el botón de despresuración. No sustituyas la valvula.
- Comprueba con regularidad los conductos de las valvulas que permiten la calidad de vapor para asegurarde que no está bloqueados.
- No Utilities un paño ni ningún otro objecto entre la tapa y la carcaja paraURTAR la tapa entreabierta. Estóypeedaalarjunta de sellado de forma permanente.
- No dejes el cable electrico colgando por el borde de la mesa o la encimera, ni en contacto con superficies calientes.
4. ¿Cómo usar de forma segura antes de cocinar?
- Antes de utiliser el aparato, comprueba que la valvula flotante y la valvula limitadora de presión está limpias.
- Antes de utiliser el aparato, comprueba que la junta de sellado está correctamente instalada en la tapa.
- Asegúrate de que el fondo del recipiente de coccción y la placá calefactora está腈 sempre limpios. Asegúrate de que la parte central de la placá calefactora se mueve.
- No llénes el aparato por encima de lamarca MAX del recipientede coccción.
- Siguelas recomendaciones sobre el volumende alimentos y agua para estar el riesgo de que se detramen al hervir, lo que podra darar el aparato y provocar lesiones.
- Asegúrate de que el aparato está bien cerrado antes deponerlo a presión.
- Antes de cocinar, asegúrate de que el botón de liberación de presión no está presionado. Consulta la figura 48 de la sección Guía de inicios rápido en imagenes.
5. ¿Cómo usar de forma segura durante la cocción?
- No intentesAbrirla tapa+hasta que la presionhayasminuido lo suficiente.NointentesAbrirla tapa+hastaque la valvula flotante haya bajo del todo.
- No fuerces nunca el aparato para abrirlo.
- Durante la cocation y la liberacion de vapor al final de la
cocación, el aparato emite calor y vapor. Mantén la cara y las manos alejadas del aparato para estar quemaduras. No toques la tapa durante la cocación.
- No muevas el aparato cuandoonga presion. Utiliza las asas para moverlo y ponte guantes de comida, si esnecessary. No efectives el pomo de la tapa para levantar el aparato.
- No retires el recipient de coccción cuando el aparato está encendido.
- En el modo para sofreir, ten cuidado con el riesgo de quemaduras causadas por salpicaduras alañadir alimentos o ingredientes al recipiente de coccción caliente.
6. ¿Có como usar de forma segura afterwards de cocinar?
- Cuando abras la taps, sujétala siempre por el pomo. Pon el brazo en paralelo a las asas laterales. Podría quedar agua hiriendo atrapada entre la junta de sellado y la tapa y provocar quemaduras.
- Ten cuidado también con el riesgo de quemaduras por el vapor que sale del aparato alAbrir la tapa. Abre primero la tapa ligeramente para que el vapor salga poco a poco.
- No toques las superficies calientes del aparato. Después de su uso, la superficie de la placca calefactora pueda permanecer caliente hasta 2 horas.
- Desenchufa el aparato de la toma de corriente cuando no lo usa y antes de limparlo. Deja que se enfré antes deponer o quitar las piezas.
7. ¿Cóme efectuar la limpieza de forma segura?
- Limpia con un paño la parte inferior del recipiente de coccción y la placacalefactoras深加工esde cada uso.
- Nosumerjas nunca el aparato en agua.
- Para limpiar el aparato, consulta las instrucciones de uso.
Puedes lavar el recipiente de coccyon y la tapa con agua caliente y jabón; no los laves en el lavavajillas. Limpia la carcasa del aparato con un pañó humedo.
8. ¿Qué hacer en caso de días?
- El producto solo puede ser reparado por personal aprobado del serviceo técnico oficial.
- No Utilities ningún aparatouhn cable electrico o enchufe estén danados, tampoco si el aparato no funciona correctamente o está dañado. Devuelve el aparato al servicios técnico oficial más cercano para su revisión, reparación o ajuste.
- Si el cable electrico está dañado, deben sustituirlo un serviceo técnico oficial para evitar cualquier peligro. No sustituyas el cable electrico suministrado con otros cables.
- No danés la junta de sellado. Si está dañada, sustitúyela en un serviceño oficial.
- Sustituya la junta de sellado cada 2 años o antes si observas que está desgastada o deben cambiarse.
- Utiliza únicamente las piezas de repuestos adecuadas para tu modelo. Esto es specialmente importante para la junta de sellado y el recipiente de coccción.
- Utiliza únicamente piezas de repuestos vendidas en un service Tecnico oficial.
- El uso de accesorios no recommendados por el fabricante del aparato pueda provocar lesiones.
- No Utilities或者其他 recipientes de coccción en el aparato en lugar del suministrado. Sustituya el recipiente de coccción únicamente por una pieza de repuesto original Diseñada para su uso con este producto.
- De(acuerdo con la normativa vigente,antesde desecha
un aparato que ya no sea besoino, el aparato debe inutilizarse (desenchufalo y desconecta el cable electrico).
j i Participe en la conservacion del medio ambiente !!

① Su electrodomestico contiene materiales recuperables y/o reciclables.
- Entreguelo al final de su vidautil, en un Centro de Recogida Especialico o en uno de nuestros Servicios Oficiales Post Ventaupon sera tratado de forma adecuada
9. ¿Cuando se aplicá la garantía?
- La garantía no cubre el desgaste anomal del recipiente de cocción.
- Lee atentamente estas instrucciones de uso antes de usar por primera vez el aparato. Cualquier uso que no se ajuste a estas instrucciones exime al fabricante de cadaquier responsabilidad y anulará la garantía.
- Si se realiza un uso comercial, un uso inapropiado o un uso contrario a las instrucciones, el fabricante declinarárialquier responsabilitad y la garantía no sera valida.
TODAS LAS PIEZAS DEL PRODUCTO


*Accesorios disponibles según Modelo
FAMILIARZARSE CON EL PANEL DE CONTROL

MENSAJES DE ESTADO

Mensaje de bienvenida al encender el aparato.

Visualización de la hora. En este exemple: 1 horas 30关键时刻.

Visualizacion de la temperatura. En este exemple: 114 grados centigrados.

Indica que el programa Tiene un ajuste de temperatura/ tiempo automatico predeterminado. No se pueda modifier.

Indica que la temperatura estáurrentando durante la fase de pre-calentamento.

Indica que el aparato se está precalentando.

Indica que el programa ha finalizzato.

Indica que el aparato está en fase demantener caliente.

Indica que el programa se ha interrupido.

Indica que el aparato está en modo standby.
GUIA DE USO Y LIMPIEZA
No dudes en consultar las figuras indicadas como (fig. x) de la sección Guía de inicios rápido.
ANTES DE LA PRIMERA UTILIZACION
1. Retira el embalaje
- Saca el aparato del embalaje y lee el manual de instrucciones antes de la primera utilizacion.
- Quita las pegatinas promociones (si las hubiera) del aparato antes de utiliser por primera vez.
2. Abre la tapa
- ParaAbrir la tapa, sujeta el pomo de la tapa, giralo en sentido contrario al de las agujas del reloj y levanta la tapa (fig. 1 y 2).
Nota: Al levantar la tapa, puede occurrir que el recipiente permanezca unido a la tapa. Es normal y simplement demuestra una buena hermeticidad del producto. Para evaporar que el recipiente caiga pesadamente sobre el producto al abrir la tapa, abrela siempre con cuidado.
- Coloca el aparato en una superficie plana. Retira todos los materiales protectores y accesos del interior del aparato (fig. 3).
3. Limpia todas las piezas del aparato
3a. Limpia la tapa, el recipiente de coccción y los accesorios
- Limpia la tapa, el recipiente de coccyón y los accesos con una esponja suave y agua caliente con jabón (fig. 4).
- Seca la tapa, el recipiente de coccción y los accesorios (fig. 5)
- No Utilities estropajos ni esponjas abrasivas para limpiar el recipiente de cocción, ya que podías darar la capa antiadherente del recipiente (fig. 40).
- No sumerjas nunca el aparato en agua (fig. 41).
- Si sumergeles aparato enagua por accidente o derramas agua directamente sobre la placacalefactora,lleva el aparato a un service Tecnico oficial para su reparacion.
- No laves la tapa ni el recipiente de coccción en el lavavajillas (fig. 42).
- Ten en cuenta que solo pueda lavarse en el lavavajillas los accesos: espátula, vaso medidor y accesorio de vape.
3b. Limpia la junta de sellado
- Retira la junta de sellado de la tapa y limpiala con una esponja suave y agua caliente con jabón (fig. 7 y 8).
- Sécala bien.
- Coloca la junta de sellado sobre la ranura para la junta de sellado y presiona hasta que encaje en su situo (fig. 9). Presionafirmamente hacía abajo para asegurarte de que no se forma ningún pliegue y de que la junta de sellado está ajustada en la ranura.
- Después de colocar la junta de sellado, si abres la tapa demasiado rápido,uede que el recipiente de coccción permanezca unido a la tapa (fig. 37 y 38). Espera unosegundos hasta que el recipiente se suelte de la tapa (fig. 39).
Nota: Es normal y simplement demuestra una buena hermeticidad del producto. Para evaporar que el recipientte caiga pesadamente sobre el producto al abrir la tapa, abrela siempre con cuidado.
ADVERTENCIA: No有用的 Nunca el aparato sin la junta de sellado (fig. 44)
3c. Limpia las valvulas
- Para limpiar la valvula limitadora de presión, retina la valvula del tubo situado en la parte superior de la taps (fig. 10). Limpiala con una esponja suave y agua caliente con jabón (fig. 11). Una vez seca, asegúrate de que el conductor del tubo está limpio antes de volver a colocar la valvula limitadora de presión en el tubo de la parte superior de la taps (fig. 12). Asegúrate de que la valvula limitadora de presión está bien colocada y que se mueve hacía arriba y hacía abajo.
- Para limpiar la tapa de la valvula limitadora de presión, desenrosca la tapa de la valvula limitadora de presión desde el interior de la tapa (fig. 13). Limpiala con una esponja suave y agua caliente con jabón (fig. 14). Una vez seca, asegúrate de que el conductor del tubo está limpio antes devoltar a enroscar la valvula limitadora de presión en la tapa (fig. 15).
- Para limpiar la valvula flotante, quita la junta de la valvula flotante del interior de la tapa y da la vuelta a la tapa para que la valvula flotante pueda salir de la tapa (fig. 16). Limpia la junta y la valvula flotante con una esponja suave y agua caliente con jabón (fig. 17). Una vez seca,(valeur a insertar la valvula flotante en la tapa y colocca la junta en su lugar (fig. 18). Asegúrate de que la valvula flotante está bien colocada y que se mueve hacía arriba y hacía abajo.
3d. Limpia la carcasa del aparato
- Limpia la carcaza del aparato con un pañó humedo.
- No sumerjas nunca el aparato en agua (fig. 41).
- Limpia la placca calefactora con un pamo seco.
INSTRUCCIONES DE USO
1. Coloca los ingredientes en el recipiente de coccción
- Retira el recipiente de coccción de la carcasa.
- Coloca los ingredientes en el recipiente de coccción.
- Ten enIELD que el nivel de alimentos y liquidos no debe superar nunca lamarca de nivel mayor del recipiente de cocción (fig. 19).
- Al cocinar ingredientes queurrentan de時間 durante la cocción, como verduras deshidratas o arroz, asegurar de que solo llenas la olla hasta la mitad del nivel de capacité máximo.
2. Coloca el recipiente de coccyon en la carcasa
- Asegúrate de que la parte inferior del recipiente de coccción está limpia y seca, y elimina los restos de comida de la placá calefactora (fig. 20).
- Coloca el recipiente de coccción en la carcasa (fig. 21).
- No Utilities nunca el aparato sin el recipiente de coccción.
3. Cierra y bloquea la tapa
- Comprueba que la junta de sellado está bien colocada en la tapa (fig. 43).
- Sujeta el pomo de la tapsa, colocata la tapsa en el aparato y gira el pomo en el sentido de las agujas del reloj para bloquear la tapsa (fig. 22).
4. Conecta la valvula limitadora de presión
- Coloca correctamente la valvula limitadora de presión en la tapa (fig. 23). Ten enIELD que la valvula permanecer un poco sueita, es normal.
5. Encendido del aparato
- Desenrolla Completely el cable electrico y enchufalo a la red (fig. 24).
- El aparato emite un pitido, la pantalla parpadea y muestra HED.
6. SeLECTIONA e inicia un programa de coccción
- Cada programa tiene un tiempo y una temperatura predeterminados y requires una posición de la tapa concreta. Consulta laTABLA de programas de coccción:
TABLA DE PROGRAMAS DE COCCION
Icono del programa de cocation Nombre del programa de cocation Tiempo de cocation predeterminado Tiempo ajustable Temperatura predeterminada Temperatura ajustable Presión predeterminada Programación diferida de 10 min a 12 h Mantener caliente hasta 24 h Estado de la tapa Cerrada y bloqueada. Tampa cerrada pero sin bloquear. Estofado 30 min de 1 min a 2 h 114 °C No 70 kPa Sí Sí ● Sopa 12 min de 1 min a 2 h 114 °C No 70 kPa Sí Sí ● Saltear 20 min de 1 min a 1 h 160 °C Si, de 100 °C a 160 °C No No No ● Vapor 10 min de 1 min a 2 h 114 °C No 70 kPa Sí Sí ● Hornear 40 min de 1 min a 2 h 160 °C Si, de 100 °C a 160 °C No Sí Sí ● Cocción al vacio/fuego lento 4 h de 30 min a 12 h 85 °C Si, de 55 °C a 95 °C No Sí No ● ● Arroz 8 min de 1 min a 2 h 114 °C No 70 kPa Sí Sí ● Yogur y fermentado 8 h de 30 min a 12 h 30 °C Si, de 22 °C a 40 °C No No No ● ● Gachas 15 min de 1 min a 2 h 100 °C No No Sí Sí ● Modo Chef ajustable 30 min de 1 min a 4 h 80 °C Si, de 70 °C a 160 °C No No Sí ● ● ●
Nota: Al cocinar, es possible que notes unaITTLE fuga de vapor por la tapa, sobre todo por la valvula limitadora de presion. Este es normal y ocurre cuando se acumula presion.
Consulta las figuras de la Guía de inicios=rápido (fig. 25 a fig. 36)

Programa de estofado
- Coloca los ingredientes en el recipiente de cocccion. Cierra y bloquea la tapa.
- Gira el mando del panel de control hacia la derecha hasta临港 al programa de estofado. La pantalla muestra el tiempo de coccción pre-determinado.
- Oportun: Pulsa y ajusta el tiempo deseedo girando el mando del panel de control hacía lackecha (para augmentar el tiempo) o hacía la izquierda (para reducir el tiempo).
- Pulsa para iniciar el programa de coccción.
- El aparato inicia la fase de precalentamento. La pantalla muestra alternativamente y se enciende el indicator luminoso de precalentamento.
- Cuando finaliza la fase de precalentimiento, el aparato cambia automatistically a la fase de coccción. La pantalla muestra la cuenta detrás y se enciende el indicator luminoso de coccción en bajo.
- Durante el proceso de coccción, se acumula presión en el aparato y empuja la valvula flotante hacía arriba. Elindicador luminoso de presión se enciende para indicar que la tapa no se pueda abrir sin despresurar antes el aparato.
- Al final de la cuenta atras, el aparato emite un pitido y la pantalla muestra End.
- Después de unosegundos,elaparatochangiaráautomátamentea la
fase paramantener caliente.Lapatalla muestra HOE y se enciende el
indicador luminoso demantener caliente
- Pulsa durante 3segundos para detener el programa en cualesquimimento.

Programa de sopa
- Coloca los ingredientes en el recipiente de cocccion. Cierra y bloquea la tapa.
- Gira el mando del panel de control hacer la derecha hasta临港 al programa de sopa . La pantalla muestra el tiempo de coccción predeterminado.
- Oportun: Pulsa y ajusta el tiempo deseado girando el mando del panel de control hacía lackecha (para augmentar el tiempo) o hacía la izquierda (para reducir el tiempo).
- Pulsa para起初 el programa de coccción.
- El aparato inicia la fase de precalentamento. La pantalla muestra alternativamente y se enciende el indicator luminoso de precalentamento.
- Cuando finaliza la fase de precalentimiento, el aparato cambia automatistically a la fase de coccción. La pantalla muestra la cuentailtras y se enciende el indicator luminoso de coccción en bajo.
- Durante el proceso de cocción, se acumula presión en el aparato y empujla lávula flotante hacía arriba. El indicator luminoso de presión se enciende para indicar que la tapa no se pueda abrir sin despresurar antes el aparato.
- Al final de la cuenta atrás, el aparato emite un pitido y la pantalla muestra Erid.
- Después de unosegundos, el aparato cambiará automatistically a la
fase paramantener caliente. La pantalla muestra HOE y se enciende el
indicador luminoso demantener caliente
- Pulsa durante 3segundos para detener el programa en cualesquimimento.

Programa de saluteo
- Gira el mando del panel de control hacía la derecha hastaninger al programa de salteado. La pantalla muestra el tiempo de cocción prede-. terminado.
- Oportun: Pulsa y ajusta el tiempo deseado girando el mando del panel de control hacía lackecha (para augmentar el tiempo) o hacía la izquierda (para reducir el tiempo).
- Oportun: Pulsa y ajusta la temperatura deseada girando el mando del panel de control hacia la derecha (paraacular la temperatura) o hacía la izquierda (para reducir la temperatura).
- Pulsa (口) para iniciar el programa de coccción.
- El aparato inicia la fase de precalentimiento. La pantalla muestra alternativamente y se enciende el indicator luminoso de precalentimiento.
- Cuando finaliza la fase de precalentamento, el aparato cambia automatistically a la fase de coccción. La pantalla muestra la cuenta atrás y se enciende el indicator luminoso de coccción en bajo.
- Coloca los ingredientes en el recipiente de coccción ydea la tapa abierta para saltearlos.
- Al final de la cuenta atrás, el aparato emite un pitido y la pantalla muestra [Erd].
- Después de unosegundos, el aparato cambiará automatistically al modo standby. La pantalla muestra
- Pulsa durante 3segundos para detener el programa en cualesquimimento.

Programa de cocccion al vapor
- Llena la olla con 150 ml de agua (tres cuartos de taza), colocá el accesorio de vapor en la olla yañade los ingredientes. Cierra y bloquea la tapa.
- Gira el mando del panel de control hacía la derecha hastaninger al programa de cocción al vapor. La pantalla muestra el tiempo de cocción predeterminado.
- Oportun: Pulsa y ajusta el tiempo deseado girando el mando del panel de control hacía laresha (para augmentar el tiempo) o hacía la izquierda (para reducir el tiempo).
- Pulsa para起初 el programa de coccción.
- El aparato inicia la fase de precalentamento. La pantalla muestra alternativamente y se enciende el indicator luminoso de precalentamento.
- Cuando finaliza la fase de precalentamento, el aparato cambia automatistically a la fase de coccción. La pantalla muestra la cuenta atrás y se enciende el indicator luminoso de coccción en bajo.
- Durante el proceso de cocción, se acumula presión en el aparato y empujla válvula flotante hacía arriba. El indicator luminoso de presión se enciende para indicar que la tapa no se pueda abrir sin despresurar antes el aparato.
- Al final de la cuenta atrás, el aparato emite un pitido y la pantalla muestra Erid.
- Después de unosegundos, el aparato cambiará automatistically a la fase paramantener caliente. La pantalla muestra HOE y se enciende el indicator luminoso demantener caliente
- Pulsa durante 3segundos para detener el programa en cualesquimimento.

Programa de horneado
- Coloca la preparación en el recipiente de coccción y cierra la tapa pero no la bloquees.
Gira el mando del panel de control hacía la derecha hastaninger al programa de horneado. La pantalla muestra el tiempo de cocción pre-determinado.
- Oportun: Pulsa y ajusta el tiempo deseado girando el mando del panel de control hacía lackecha (para augmentar el tiempo) o hacía la izquierda (para reducir el tiempo).
- Oportun: Pulsa y ajusta la temperatura deseada girando el mando del panel de control hacia la derecha (para augmentar la temperatura) o hacía la izquierda (para reducir la temperatura).
- Pulsa para inicia el programa de coccción.
- El aparato inicia la fase de precalentamento. La pantalla muestra alternativamente y se enciende el indicator luminoso de precalentamento.
- Cuando finaliza la fase de precalentamento, el aparato cambia automatistically a la fase de coccción. La pantalla muestra la cuenta a另一边 y se enciende el indicator luminoso de coccción en bajo.
- Al final de la cuenta detrás, el aparato emite un pitido y la pantalla muestra Erod.
- Después de unosegundos, el aparato cambiará automatistically a la fase paramantener caliente. La pantalla muestra HOE y se enciende el indicator luminoso demantener caliente
- Pulsa durante 3segundos para detener el programa en cualesquimimento.

Programa Cocción al vacio/fuego lento
- Gira el mando del panel de control hacer la derecha hasta临港 al programa de cocccion al vacio (sous-vide). La pantalla muestra el tiempo de cocccion predeterminado.
- Oportun: Pulsa y ajusta el tiempo deseado girando el mando del panel de control hacía lackecha (para augmentar el tiempo) o hacía la izquierda (para reducir el tiempo).
- Oportun: Pulsa y ajusta la temperatura deseada girando el mando del panel de control hacía la derecha (paraacular la temperatura) o hacía izquierda (para reducir la temperatura).
- Pulsa para起初 el programa de coccción.
- El aparato inicia la fase de precalentamento. La pantalla muestra alternativamente y se enciende el indicator luminoso de precalentamento.
- Cuando finaliza la fase de precalentimiento, el aparato cambia automatistically a la fase de coccción. La pantalla muestra la cuenta detrás y se enciende el indicator luminoso de coccción en bajo.
- Al final de la cuenta atras, el aparato emite un pitido y la pantalla muestra [End]
- Después de uno segundos, el aparato cambiará automatistically al modo standby. La pantalla muestra ——.
- Pulsa durante 3segundos para detener el programa en cualesquimimento.

Programa de cocciencia de arroz
Coloca los ingredientes en el recipiente de cocccion. Cierra y bloquea la tapa.
- Gira el mando del panel de control hacer la derecha hasta临港ar programa de cocccion de arroz La pantalla muestra el tiempo de cocccion predeterminado.
- Oportun: Pulsa y ajusta el tiempo deseedo girando el mando del panel de control hacía la derecha (paraacular el tiempo) o hacía la izquierda (para reducir el tiempo).
- Pulsa para起初 el programa de coccción.
- El aparato inicia la fase de precalentamento. La pantalla muestra alternativamente y se enciende el indicator luminoso de precalentamento.
- Durante el proceso de cocción, se acumula presión en el aparato y empuja la valvula flotante hacía arriba. Elindicador luminoso de presión se enciende para indicar que la tapa no se pueda abrir sin despresurizar antes el aparato.
- Al final de la cuenta detrás, el aparato emite un pitido y la pantalla muestra End
- Después de uno segundos, el aparato cambiará automatistically a la fase para Maintener caliente. La pantalla muestra HOE y se enciende el indicator luminoso de Maintener caliente.
- Pulsa durante 3segundos para detener el programa en cualesquimimento.

Programa de yogur y fermentado
El programa de yogur y fermentado se pueda usar para preparar yogur o para levar mesa de pan/pastelería.
- Cuando hagas yogur, colocao los ingredientes en el recipientede coccion y cierra la tapa.
- Al levar masas,能把 amasarlas directamente en el recipiente de cocción, colocar el recipiente en la carcasa y cerrar la tapa.
- Gira el mando del panel de control hacía la derecha hastaninger al programa de yogur y fermentado. La pantalla muestra el tiempo de cocción predeterminado.
- Oportun: Pulsa y ajusta el tiempo deseado girando el mando del panel de control hacía lackecha (para augmentar el tiempo) o hacía la izquierda (para reducir el tiempo).
- Oportun: Pulsa y ajusta la temperatura deseada girando el mando del panel de control hacía la derecha (paraacular la temperatura) o hacía izquierda (para reducir la temperatura).
- Pulsa para起初 el programa de coccción.
- El aparato inicia la fase de precalentamento. La pantalla muestra alternativamente y se enciende el indicator luminoso de precalentamento.
- Cuando finaliza la fase de precalentimiento, el aparato cambia automatistically a la fase de coccción. La pantalla muestra la cuenta detrás y se enciende el indicator luminoso de coccción en bajo.
- Al final de la cuenta atras, el aparato emite un pitido y la pantalla muestra [End]
- Después de uno segundos, el aparato cambiará automatistically al modo standby. La pantalla muestra.
- Pulsa durante 3segundos para detener el programa en cualesquimimento.

Programa de gachas
- Coloca los ingredientes en el recipiente de cocccion. Cierra y bloquea la tapa.
Gira el mando del panel de control hacer la derecha hastaninger al programa de cocccion de gachas La pantalla muestra el tiempo de cocccion predeterminado.
- Oportun: Pulsa y ajusta el tiempo deseado girando el mundo del panel de control hacía la derecha (paraacular el tiempo) o hacía la izquierda (para reducir el tiempo).
- Pulsa © para,iniciar el programa de cocción.
- El aparato inicia la fase de precalentamento. La pantalla muestra alternativamente y HEARE se enciende el indicator luminoso de precalentamento.
- Cuando finaliza la fase de precalentimiento, el aparato cambia automatistically a la fase de coccción. La pantalla muestra la cuenta atrás y se enciende el indicator luminoso de coccción en bajo.
- Al final de la cuenta extras, el aparato emite un pitido y la pan-talla muestra [Erid].
- Después de unosegundos, el aparato Cambiará automaticallya la fase paramantener caliente. La pantalla muestra HOE y se enciende elindicador luminoso demantener caliente
- Pulsa durante 3segundos para detener el programa en?.
cualquier momento.

Modo Chef adjustable
- Coloca los ingredientes en el recipiente de cocccion y cierra o no la tapa segun la receta.
- Gira el mando del panel de control hacía la derecha hastaninger al modo Chef ajustable . La pantalla muestra el tiempo de cocción predeterminado.
- Oportun: Pulsa y ajusta el tiempo deseedo girando el mando del panel de control hacía lackecha (para augmentar el tiempo) o hacía la izquierda (para reducir el tiempo).
- Oportun: Pulsa y ajusta la temperatura deseada girando el mando del panel de control hacía lackea (para augmentar la temperatura) o hacía izquierda (para reducir la temperatura).
- Pulsa para起初 el programa de coccción.
- El aparato inicia la fase de precalentamento. La pantalla muestra alternativamente y HEARE y se enciende el indicator luminoso de precalentamento.
- Cuando finaliza la fase de precalentimiento, el aparato cambia automatistically a la fase de coccción. La Pantalla muestra la cuenta detrás y se enciende el indicator luminoso de coccción en bajo.
- Al final de la cuenta detrás, el aparato emite un pitido y la pantalla muestra Erid.
- Después de unosegundos, el aparato cambiará automatistically al modo standby. La pantalla muestra
- Pulsa ⑥ durante 3segundos para detener el programa en cualesquier momento.
* Sugerencia para recalentar rápidamente los platos: ajusta la temperatura a > = 95C y cocina con la tapa cerrada sin bloquear.
7. Usa la función de programación diferida
La programacion diferida的结果autil para preajustar el aparato y que comienceacocinarmasarde.
- En primer lugar, selección un programa suguiendo los pasos descritos anteriormente en el apartado 6.
- Antes de iniciair el programa selectionado, pulsa . La pantalla mueira la hora predeterminada para la programacion diferida.
- Ajusta el tiempo deseado girando el mando del panel de control hacía lacke (para augmentar el tiempo) o hacer la izquierda (para reducir el tiempo).
- Pulsa. La pantalla muestra la cuenta atrás de la programación diferida. Una vez transcurrido el tiempo programado, el aparato comenzará a cocinar automatistically.
8. Abre la tapa
- No intentesAbrir la tapa si la valvula flotante está subida y el indicator luminoso de presión está encendido.
- La presión se pueda liberar de dos formas al final de la cocción:
Despresurizacion natural: Al final de la coccion o afteres de detener el programa, el aparato se enfiia por si solo y la presion se libera de forma natural. Durante la despresuracion natural, los alimentos peuvent cocinarse en excesso debido a la presion que queda en el recipiente. Utiliza el boton de despresuracion manual para detener inmediamente el proceso de coccion.
Despresuración manual: Pulsa el botón de despresuración situado en la parte superior de la tapa de forma continua. El proceso tardará entre unosegundos yunos,minutos enfunciendela cantidadde alimentos que haya enelinterdelercipliente decocción(fig.31).
ADVERTENCIA: Ten cuidado con el vapor caliente que sale del aparato. Mantén la cara y las manos alejadas de la calidad de vapor (fig. 45).
- ParaAbrir la tapa, coloca en paralelo a las asas laterales, sujeta el pomo de la tapa, giralo en sentido contrario al de las agujas del reloj y levanta la tapa (fig. 32 y 33).
ADVERTENCIA: Ten cuidado con el vapor caliente que sale del recipiente de coccción.
9. Desenchufa el aparato
- Después del uso, desenchufa el aparato y deja que se enfré durante al menos 2 horas antes de limpiarlo.
10. Limpia cuando del uso
- Limpia el aparato antes de cada uso.
- Antes de limpiar el aparato, deja que se enfrie durante al menos 2 horas.
- Para Obtener instrucciones de limpieza, consulta la sección 3. Limpia todas las piezas del aparato en la sección ANTES DE LA PRIMERA UTILIZACION.
11. Consejos de mantenimiento
- Para garantizar la durabilidad del recipiente de coccción con el tiempo, no cortes alimentos enél.
- Utiliza los accesos suministrados. No Utilities ningún utensilio metalico, ya que podra darar el revestimiento antiadherente del recipiente.
- Después de su uso, la junta de sellado pueda conservar el olor de la comida. Es normal; la silicona tienePEGOS poros que se abren cuando se exponen a altas temperatas y se cierran una vez que la temperaturea baja. Para eliminar el olor de la junta de sellado, pueda hacer lo singular:
- Colocar la junta de silicona en el lavavajillas.
- Añadir 1 taza de vinagre, 1 taza de agua y 1 limón cortado en trozos grandes en el recipiente de coccción yponer un programa de vapor durante 2 horas; a continuación,deoqueel vapor se libere de forma natural.
- Cambia la junta de sellado cada 2 años o antes en caso de días.
GUIA PARA LA SOLUCIOn DE PROBLEMAS TECNICOS
Problema Posibles motivos Solutaciones No se puedaAbrir la tapa No se puedaAbrirloo a la presión en el recipientede cocción. Pulsa el botón de despresuraciónde forma continua para eliminar la presión del interior del recipientede cocción. La presiónuede tardar algunosminutos en liberarse porcomplete. El recipientede cocción despresuriza, pero la válvulaflotante está atascada porque estádemasiado sucia y, por lo tanto, no pueda bajar. a. Asegúrate de que el aparato se despresurice por completodejiándolo enfiar durante al menos2 horas.b. Empuja suavamente la válvulaflotante:hacia abajo insertando un pincho o un objerto largen enla abertura de la válvulaflotante. Siesto no funciona, envía el aparato a un service的专业oficial.c. Para elsignificantu, limpia y seca afondo la válvulaflotante. No se puedacerrarla taps La junta de sellado no estáinstalada correctamente. Instala la junta de sellado correctamente. El recipientede cocción contiene ingredientescalientes que generatevapor. Espera a que losingredientedesel recipientede cocción se enfién ante devoltar a intentar cerrar la tapa. La válvulaflotante estáatascada porque estádemasiado sucia y, por lo tanto, no pueda bajar. a. Empuja suavamente la válvulaflotante:hacia abajo insertando un pincho o un objerto largen enla abertura de la válvulaflotante. Siesto no funciona, envía el aparato a un service的专业oficial.b. Para elsignificantu, limpia y secaafondo la válvulaflotante. La posición o la dirección en laque se ha cerrado la tapa no soncorrectas. Cierra la tapa en la dirección correcta como indicale manual de instrucciones. AlAbrirla tapa, elrecipientede cocciónpermaneceuno ala tapa. La junta de sellado ha producido un efecto de sussión. El recipientede cocciónse soltaradela tapa por sisolo. Es normal ysimplemente demuestra una buena hermeticidad del producto. Para evitárque el recipientede caiga pesadamente sobre el producto alAbrirla tapa,ábrelaiamiencuidado.
Problema Posibles motivos Solutaciones Liberación intensa de presión desde la valvula limitadorade presión. La presión interna supra la presiónde funciona bajo la presióninterna supera la presión deseguidad. Limpia bien la valvula del limite de presión,la valvula flotante y la tapa.Si todavía sale vapor por lavalvula flotante,悲哀 el dispositivoal centro de servicios专业技术e oficial aprobado más cercano para que un先进技术 autorizado lo inspeccione, repare o ajuste. La valvula limitadora de presiónestá en una posición incorrecta. Presiona ligeramente la valvulalimitadora de presión para que secoloque en su lugar.Ten cuidado con el vapor caliente.Colócate en una posición segura y utilizesguentes para horno. Un control de presión defectuosoha provocado la despresuración. Envía el aparato a un service专业技术o oficial para su reparación. La presión interna supra la presiónde funciona bajo la presióninterna supera la presión deseguidad. Limpia bien la valvula del limite de presión,la valvula flotante y la tapa.Si todavía sale vapor por lavalvula flotante,悲哀 el dispositivoal centro de技术服务专业技术e oficial aprobado más cercano para que un先进技术 autorizado lo inspeccione, repare o ajuste. Liberación de presióncontinua de la valvulaflotante. Residuos en la valvula flotante. a.Pulsa el botón dedespresuración de formacontinua para eliminar la presión del interior del recipientede cocción.La presión puede tardarunos horas en liberarse porcompleto.b.Deja que se enfríe el aparato durante al menos 2 horas.c.Limpia y secaa la valvula flotanteantes de volver a cocinar. La valvula flotante está atascada. a.Pulsa el botón dedespresuración de formacontinua para eliminar la presión del interior del recipientede cocción.La presiónuede tardarunos horas en liberarse porcompleto.b.Deja que se enfríe el aparato durante al menos 2 horas.c.Limpia y secaa la valvula flotanteantes de volver a cocinar. Sale vapor de la tapa. La junta de sellado no está instalada correctamente. Retira la junta de sellado, limpiala y vuelve a colocarla en la posición correcta. La junta de sellado está sucia. Retira la junta de sellado, limpiala y vuele a colocarla en la posición correcta. La junta de sellado o el borde del recipiente de coccción está dañados. Envía el aparato a un service专业技术o oficial para su reparación. Los alimentos no se han cocinado La proportión de ingredientes@sólidos/liquidos es incorrecta. Vuelve a intentarlo con lascantidades exactas de la receta. No hay suministro electrico. Comprueba el circuito electrico de tu hogar. Aparece E0 en la pantalla digital. El presistato está defectuoso. Envía el aparato a un service专业技术o oficial para su reparación. Aparece E1 en la pantalla digital. El sensor de temperatura está defectuoso. Envía el aparato a un service专业技术o oficial para su reparación. Aparece E2 en la pantalla digital. La taps no está colocadacorrectamente para el programa de coccción. Cada programa requires una posición española de la tapa. Comprueba y ajusta la posición de la tapa necesaria para el programa de coccción; consulta la tabletadeprogramas de coccción de la section 6 de este manual. Reinicia el programa cuando la tapa está correctamente colocada. Si el problema persiste, envía el aparato a un service专业技术o oficial para su reparación.
OBRIGADO POR ESCOLHER A MOULINEX
Bem-vindo ao mundo da cozinha
Com a Turbo Cuisine, aceitamos o desafio de reinventar a panela: Mais fácil. Mais sabor. Simplesmente melhor!
Concebido com este princípio orientador, o Turbo Cuisine permite-lhe poupar tempo e cozinhoar deliciosas refeições caseiras com total simplicidade e comodidade.
Obrigado mais uma vez por nos receber na sua cozinha.
Agora vamos cozhar jintos!
INDICE
Guia de inizio rrado em imagens 2
A Moulinex recomenda a segurarca em primeiro lugar 156
Descrição do seu produits 164
Familiarizar-se com o paine de controlo 165
Guia de uso e limpeza 166
Guia的技术o de resolucao de problemas 182
Garantia internaciona limitada da Moulinex 271
PT
A MOULINEX RECOMENDA A SEGURANÇA EM PRIMEIRO LUGAR
A segurará é a)nossa principal prioridade. Concebemos e fabricamos onoxo produits com elevados padões de segurará e Tecnologia. No entanto, tal como acontece com qualquer aparelho elétrico, existem algunos riscos potenciáis,leo que o convidamos a exercer umCERTO cuidado e a respeitar as instruções que se seguem.
INSTRUÇÉS DE SEGURANÇA
Leia atentamente todas as instruções que se seguem e guarde-as para futuras consulutas.
- A utilização incorrente do aparelho e dos respetivos acessórios pode danIFICAR o aparelho e causaferimentos.
- Oaparelhocozinhaosalimentossobpressao.Autilização incorreta pode provocar riscos de queimaduras devido ao vapor.
- Para sua segurarça, este produit está em conformidade com todas as normas e regulamentos aplicáveis (Diretiva Baixa Tensão, compatibilitadé eletromagnética, materiais compatíveis com alimentos, ambiente, etc.).
- A fonte de calor necessária para cozinho está incluída no aparecido.
1. Onde utiliser em segurar?
- Apenas para utilizes no interior.
- Este aparecido destino-se apenas a uso dométrico. Não se_DESTina a ser utilizado nos següentes casos e a garantia não se aplicá a:
- zonas de cozinas reservadas aos functionários de lojas, escritórios e outros espécOs professionais;
- quintas;
- Utilização por cliente de HOTÉis, motéis e outros ambientes de carater residencial;
- ambientes do tipo alojamento com pouco-almoço.
- Não coloque o aparelho num forno aquecido ou numa placá quente. Não colque o aparelho perto de uma chama viva ou de um objeto inflamível.
- Utilize numa superficie de trabajo plana, está e resistente ao calor, afastada de salpicos de agua.
2. Quem o pode utiliser em segurar?
- Este aparelho não foi concebido para ser realizado por pessoas (incluindo crijanças)@cajas capacidades fisicas, sensoriais ou mentalais se encontrar reduzidas, ou por pessoas com falta de experiência ou conhecimiento, a não ser que tenham sido devidamente accompaniesadas e instruções sobre a correta'utilisation do aparelho, pela persona responsavel pela sua segurarça.
- O aparelho pode ser utilisé por pessoas com capacidades fibras, sensoriais ou mentalais reduzidas ou com falta de experiencia e conhecimiento, caso sejam supervisionadas ou lhes tenham sido dadas instruções relativas à'utilisation correta do aparelho e se comprehenderem os perigos envolvidos.
- Este aparecido não deve ser utilisé por crianças. Mantenha o aparecido e o respetivo cabo de alimentação para do alcance de crianças.
- As crianças não devem brincar com o aparelho.
- As crianças devem ser supervisionadas para garantir que não brincam com o aparelho.
3. Como usar em segurar – uso de algo?
- Não utilize o aparecido para outras finalidades que não a prevista.
- Não utilize o aparecido para fritar alimentos em oleo. Só é permitido tostar/dourar.
- Não utilize a panela de pressão no modo de pressão para fritar alimentos.
- Ao cozinhoar alimentos pastosos, agite suavamente a panela antes deAbrir a tampa para fazer que os alimentos sejam ejetados.
- Este aparecido não é um esterilizador. Não o utilize para esterilizar frascos.
- Este aparecido não se destina a ser colocado em precisiónamento com um temporizador exterior ou atravesse de umsystema de commando à distência separado.
- Para segurar o aparelho, utilize sempre as两大 pegas laterais no corpo do aparelho. Utilize luvas de cozinha se o aparelho estiver quente. Para maior segança, certifique-se de que a tampa está broqueada antes de deslocar o aparelho.
- A parte inferior da cuba e a placá de aquecimento tíme de estar em contacto direto. Retire qualquer objecto ou resíduos alimentares localizados entre a cuba e a placá de aquecimento, poi pode afetar o desempenso.
- Tenha em atençao que determinados temas de alimentos, tais como sumo de maça, arandos, ruubarbo, cevada, aveia ou outros cereais, ervilhas partidas, noodles ou massas, poder formar espuma e crepitação e entupir as valvulas. Tenha cuidado ao cozinho das vezes dos alimentos e,(before de utilizesimpe cuidadosamente as valvulas.
- Tenha em atençao que determinadas receitas que incluem leite poder formar espuma, transbordar e obstruir as valvulas. Tenha cuidado ao cozinhoas评为ceitas e,deois deutilizar, limpe cuidadosamente as valvulas.
- Ao cozinhoar alimentos que incham durante a cozedura, como legumes desidratos ou arroz, não encha a cuba de cozedura a mais do que metade da sua capacité.
- Aparto cozinhar carne com pele grossa (como lingua de vaca), que pode inchar com o efeito da pressão, não fure a pele antes de cozinhar se esta parecer Inchada: pode queimar-se. Fure-a antes de cozinhar.
- Não utilize o aparecido vazio, sem a cuba ou sem ingredientes no interior da cuba. Tal pode provocar danos graves no aparecido.
- Não utilize o aparçelo sob pressão sem adicionalária, quando que tal pode provocar danos graves no aparçelo.
- Não encha o aparelho sem a respetiva cuba.
- Atença: não derrame láquidos sobre a ficha.
- Não aqueça a cuba com qualquer outras fonte de calor que não a placá de aquecimento do aparelho e não utilize outras cuba. Não utilize a cuba para cozinho com outros aparelhos.
- Utilize a cuba APENAS no aparelho. Não a utilize para cozinhar no fogão, noorno, etc.
- Utilize uma colher de plástico ou de madeira para não danIFICAR o revestimento antiaderente da cuba. Não corte alimentos diretamente na cuba.
- Não toque nas valvulas, exceto durante a limpeza e manutençao do aparecido, de acordo com as instruções fornecidas.
- Não coloque quando发展机遇ar os estranhos nas valvulas e no botão de libertação de pressão. Não substitua a valvula.
- Verifique regularamente as conduitas nas valvulas que permitem a saída de vapor para garantir que não está broqueadas.
- Não utilize um pano ou qualquer及其他 objecto entre a tampa e o corpo do aparecido de forma a delearing a tampa entreaberta. Istô pode danificar permanente o anel vedante.
- Não deixe o cabo de alimentação pendurado na extremidade de uma mesa ou bancada, nem deixe que este toque em superficies quentes.
4. Como utiliser em segurar – antes de cozinho?
- Antes de utiliser o aparelho, verifique se a valvula fluctuante e a valvula limitadora de pressão está limpas.
- Antes de utiliser o aparelho, verifique se o anel vedante foi corretamente instalado na tampa.
- Certifique-se de que a parte inferior da cuba e a placar de aquecimento está sempre limpas. Certifique-se de que a parte central da placar de aquecimento está molev.
- Não encha o aparecido mais do que a marca MAX na Cuba.
- Siga as recomendações sobre o volume de alimentos e água para fazer o risco de transbordar, o que pode danIFICAR o aparecido e Causear ferimentos.
- Certifique-se de que o aparecido está devidamente fechado antes de o colocar sob pressão.
- Antes de cozinhoar, certificque-se de que o botão de libertação de pressão está para cima (não para baixo). Consulte a figura 48 da secção Guiá de início rápido nas Imagens.
5. Como utiliser em segurará – durante a cozedura?
- Não tenteAbrir a tampa até que a pressão tenha diminuindo o suficiente. Não tenteAbrir a tampa até que a valvula flutuante esta para baixo.
- Nunca force a abertura do aparelho.
- Durante a cozedura e a libertação de vapor no final da cozedura, o aparecido liberta calor e vapor. Mantenha o rosto e as muitos afastados do aparecido para fazer queimaduras. Não toque na tampa durante a cozedura.
- Não desloque o aparecido quando este estiver sob pressão. Utilize as pegas quando o deslocar e use luvas de cozinha, se necessário. Não utilize o botão da tampa para levantar o aparecido.
- Não retire a Cuba quando o aparecido estiver em等功能amento.
- No modo tostar, tenha cuidado com os riscos de queimaduras devido às projeções ao adicional alimentos ou ingredientes à Cuba quente.
6. Como utiliser em segurará –deois de cozinho?
- QuandoAbrir a tampa,segure-a sempre pelo botao da tampa. Posicao o braço paralelo as pegas laterais. A agua a ferver pode permanecer presa entre o anel vedante e a tampa e provocar queimaduras.
- Tenha también cuidado com o risco de queimaduras provocadas pelo vapor que sai do aparelho quando abre a tampa. Primeiro,arethabra a tampa paraDEXXARSAIR O vapor suavamente.
- Não toque nas peças quentes do aparecido. Àpos autilização, a superficie da placá de aquecimento pode permanecer quente durante até 2 horas.
- Desligue a ficha da.tomada quando o aparelho não estiver a ser utilizado e antes de o limpar. Deixe arrefecer antes de colocar ou retiring peças.
7. Como utiliser em segurar – limpeza?
- Limpe a parte inferior da cuba e a placar de aquecimento antes cadautilização.
- Não mergerluhe o aparelho em agua.
- Para limpar o aparelho, consulte as instruções de utilizesçao. Pode lavar a cuba e a tampa em agua quente com detergente para a loça, mas não as colque na boaquina de lavar loça. Limpe o corpo do aparelho com um pano humido.
8. O que fazer em caso de avaria?
- Apenas pessoas autorizadas nos Serviços de Assistência Tecnica podem reparar o produto.
- Não utilize nenhum aparelho com um cabo de alimentação ou ficha danificados oudeois de aparelho não funciona corretamente ou de ter sofrido danos de alguma forma. Envie o aparelho ao Servico de Assistência Tecnica autorizado mais proximo para serinspectionado, reparado ou ajustado.
- Se o cabo de alimentação estiver danificado, este deve ser substituído por um Serviço de Assistência Técnica autorizado para fazer qualquer situação de perigo. Não substitua o cabo de alimentação fornecido por outros cabos.
- Não danifique o anel vedante. Se estiver danificado, Solicite a sua substituição num Serviço de Assistência Tecnica autorizada.
- Substitua o anel vedante a cada 2 anos ou mais cedo, se reparar que está gasto ou precisa de ser substituído.
- Utilize aparas as peças sobresselentes adequadas para
o seu modelo. Istó é particularmente importante para o anel vedante e para a cuba.
- Utilizeapanas pecas sobresselentes disponibilizadas por um Servico deAssistencia Tecnica autorizzato.
- À'utilisation de acessórios não recomendados pelo fabricante do aparelho pode provocar ferimentos.
- Não utilize outras cubas no aparecido em vez da Cuba fornecida. Substitua a cuba apenas por uma coisa sobresselente original concebida para ser realizada com este produit.
- Em conformidade com os regulamentos em vigor, antes de eliminar um aparecido que ja não está necessário, o aparecido deve fazer inoperacional (desligando a ficha e cortando o cabo de alimentação).
Proteção do ambiente em primeiro lugar!

O seu produit contém materiais que podem ser recuperados ou reciclados.
- Entregue-o num punto de recolha para possibitar o seu tratamento
9. quando é que a garantia é aplicável?
- A garantia não cobre o desgaste anormal da cuba.
- Leia atentamente estas instruções deutilização antes de utilizes o aparecido pela primarya vez. Qualquer'utilisation que não está em conformidade com estas instruções isenteá o fabricante de qualquer responsabilité e anulará a garantia.
- No caso de utilizesçao comercial, Utilização inadequada ou incumprimento das instruções, o fabricante rejeita qualquer responsabilitad e a garantia não é aplicável.
DESCRÊÇÂO DO SEU PRODUTO


^* Acessórios disponible dependendo do modelo
FAMILIARIZAR-SE COM O PAINEL DE CONTROLO

MENSAGENS DE ESTADO

Mensagem de boas-vindas quando o aparecido é ligado.
Apresentação da hora. Neste exemple: 1 hora e 30 horas.

Apresentação da temperatura. Neste exemple: 114 graus Celsius.

Indica que o programa tem uma predefinição automática de temperatura/tempo. Não pode ser modificado.

Indica que a temperatura está aacular durante a fase de pré-aquecimento.

Indica que o aparelho está a pre-aquecer.

Indica que o programa terminou.

Indica que o aparecido está na fase de manter quente.

Indica que o programa foi interrompido.

Indica que o aparecido está no modo de poupança de energia.
GUIA DE UTILIZACHO E LIMPEZA
Consulte as figuras indicadas como (Fig. x) na parte do Guia de inicio=rápido.
ANTES DA PRIMEIRA UTILIZACHO
1. Retire a embalagem
- Retire o aparelho da embalagem e leia o manual de instruções antes da primeira'utilisation.
- Retire os autocolantes promocionais (se existrem) do seu aparecido antes da primarya utilização.
2. Abra a tampa
- ParaAbriratampa,segureobotao da tampa,rode-o para a esquerda e levante atampa (Fig.1e2).
Nota: quando levantar a tampa, a cuba pode permanecer presa à tampa. É normal e demonstra simplement uma boa hermeticidade do produits. Para fazer que a cuba caia violently sobre o produit ao Abrir a tampa, abra sempre a tampa com cuidado.
- Coloque o aparelho sobre uma superficie plana. Retire todos os materiais e acessórios de proteção do interior do aparelho (Fig. 3).
3. Limpe todas as peças do aparelho
3a. Limpe a tampa, a cuba e os acessórios
- Limpe a tampa, a cuba e os acessórios com uma esponja suave e agua quente com detergente para a loiça (Fig. 4).
- Seque a tampa, a cuba e os acessórios (Fig. 5).
- Não utilize esfregões ou esponjas abrasivas para limpar a cuba, País tal pode danIFICAR o revestimento antiaderente da cuba (Fig. 40).
- Não vergulhe o aparelho em água (Fig. 41).
- Se mergerhar inadvertamente o aparecido em água ou derramarágua diretamente sobre a placá de aquecimento, leve o aparecido a um Serviço de Assistência Tecnica autorizando para reparação.
- Não coloque a tampa e a cuba na boaina de lavar loça (Fig. 42).
- Tenha em atençao que apenas os acessórios: espátula, copo medidor e acessório de cozedura a vapor são compatíveis com a boa de lavar loça.
3b. Limpe o anel vedante
- Retire o anel vedante da tampa e limpe-o com uma esponja suave e agua quente com detergente para a loça (Fig. 7 e 8).
- Seque-o completeness.
- Coloque o anel vedante sobre o suporte do anel vedante e pressione-o até encaixar (Fig. 9). Pressionefirmamente para garantir que não fica enraged o que o anel vedante está bem encaixado aftasdo respetivo suporte.
- Depois de colocar o anel vedante na tampa, seAbrir a tampa demasiado depressa, a cuba pode permanecer presa à tampa (Fig.37 e 38). Aguarde algunos segundos para que a cuba se liberte da tampa (Fig. 39).
Nota: É normal e demonstra simplement uma boa hermeticidade do produits. Para fazer que a cuba caia violently sobre o aparecido ao Abrir a tampa, abra sempre a tampa com dificuld.
AVISO: Nunca utilize o seu aparecido sem o anel vedante (Fig. 44). 3c. Limpe as valvulas
- Para limpar a valvula limitadora de pressão, retire-a do tubo na parte superior da tampa (Fig. 10). Limpe-a com uma esponja suave e agua quente com detergente para a loça (Fig. 11).
DepoS de secar, certificque-se de que a conduita do tubo está limpa antes de voltar a ligar a valvula limitadora de pressão ao tubo na parte superior da tampa (Fig. 12). Certificque-se de que a valvula limitadora de pressão está bem colocada no devido lugar e que é capaz de se deslocar para cima e para baixo.
- Para limpar a tampa da valvula limitadora de pressão, desaperte-a a partir do interior da tampa (Fig. 13). Limpe-a com uma esponja suave e água quente com detergente para a loça (Fig. 14). Depois de secar, certifique-se de que a conduita do tubo está limpa antes de voltar a aperture a tampa da valvula limitadora de pressão no interior da tampa (Fig. 15).
- Para limpar a valvula flutuante, retire a junta da valvula flutuante do interior da tampa e vire a tampa para que a valvula flutuante possa ser retrida da tampa (Fig. 16). Limpe a junta da valvula flutuante e a valvula flutuante com uma esponja suave e agua quente com detergente para a loça (Fig. 17). Depois de secar, volté a inserir a valvula flutuante na tampa e volté a colocar a junta da valvula flutuante no devido lugar (Fig. 18). Certifique-se de que a valvula flutuente está bem colocada no devido lugar e que é capaz de se deslocar para cima e para baixo.
3d. Limpe o corpo do aparelho
- Limpe o corpo do aparelho com um pano humido.
- Não mergerluhe o aparelho em água (Fig. 41).
- Limpe a placá de aquecimiento com um pano seco.
INSTRUÇÉS DE UTILIZAZão
1. Coloque os ingredientes na Cuba
- Retire a cuba do corpo do aparelho.
- Coloque os ingredientes na cuba.
- Tenha em atençao que o nível de alimentos e liquidos nunca deve excesser a marca de nível maximo na cuba (Fig. 19).
- Ao cozinho, no modo de pressão,ingredientes que Incham durante a cozedura, como legumes desidratasos ou arroz, não encha a panela a mais do que metade do seu;nivel maior.
2. Coloque a cuba no corpo do aparelho
- Certifique-se de que a parte inferior da cuba está limpa e seca e retire quando resíduos de alimentos da placá de aquecimento (Fig. 20).
- Coloque a cuba no corpo do aparelho (Fig. 21).
- Nunca utilize o aparelho sem a cuba.
3. Fecha ebloqueiea tampa
- Verifique se o anel vedante está bem colocado na tampa (Fig. 43).
- Segure o botão da tampa, colocque a tampa no aparecido e rode-a para a direita para bloquear (Fig. 22).
4. Fixe a valvula limitadora de pressão
- Coloque corretoamente a valvula limitadora de pressão na tampa (Fig. 23). Tenha em atençao que a valvula permanecera ligeiramente solta, o que é normal.
5. Ligue o aparelho
- Desenrole totalmente o cabo de alimentação e ligue-o à corrente electrica (Fig. 24).
- O aparelho emite um avis sonoro, o ecra fica intermitente e aparesta [HEI:O].
6. SeLECTIONE inicie um programa de cozedura
- Cada programa tem um tempo e temperatura predefinidos e quer uma posicao exigente da tampa. Consulte aanela de programas de cozedura:
TABELA DE PROGRAMAS DE COZEDURA
fome do programa de cozudura Nome do programa de cozudura Tempo de cozudura predefinindo Tempo ajustavel Temperatura predefinida Temperatura ajustavel Pressão predefinida Irúcio diferindo de 10 min a 12 h Monter quente até 24 h Estado da tampa Tampa fechada e bloqueada Tampa fechada mas não bloqueada Tampa aberta Estufar 30 min de 1 min a 2 h 114 °C Não 70 Kpa Sim Sim ● Sopa 12min de 1 min a 2 h 114 °C Não 70 Kpa Sim Sim ● Saltear 20min de 1 min a 1 h 160 °C Sim de 100 °C a 160 °C Não Não Não ● Cozedura a vapor 10min de 1 min a 2 h 114 °C Não 70 Kpa Sim Sim ● Cozer 40min de 1 min a 2 h 160 °C Sim de 100 °C a 160 °C Não Sim Sim ● Cozedura a vázuo/ Cozudura lenta 4 h de 30 min a 12 h 85 °C Sim de 55 °C a 95 °C Não Sim Não ● ● Arroz 8min de 1 min a 2 h 114 °C Não 70 Kpa Sim Sim ● Iogurte e fermentação 8 h de 30 min a 12 h 30 °C Sim de 22 °C a 40 °C Não Não Não ● ● Papas de oreia 15min de 1 min a 2 h 100 °C Não Não Sim Sim ● Modo Chefajustavel 30 min de 1 min a 4 h 80 °C Sim de 70 °C a 160 °C Não Não Sim ● ● ●
Nota: Ao cozinho, pode notar uma ligeira fuga de vapor da tampa, especialmente da valvula limitadora de pressão. Isto é normal e ocorre quando a pressão se acumula.
Consulte as figuras do Guia de inicio rápido (da Fig. 25 à Fig. 36).

Programa estufar
- Coloque os ingredientes na Cuba e feche completeness e bloqueie a tampa.
- Rode o botão do paine de controlo para a direita para aceder ao programa de estufar. O érá apareça o tempo de cozedura predefinido.
- Oportun: Prima e ajuste o tempo pretendido rodando o botão do painei de controlo para a direita (paraLERar o tempo) ou para a esquerda (para diminuir o tempo).
- Prima 0 para,iniciar o programa de cozedura.
- O aparelho inicia a fase de pré-aquecimento. O ecra aparen ta alternadamente e o indicator luminoso de pré-aquecimento acende-se.
- Quando a fase de pré-aquecimiento estiver conclusión, o aparibo muda automaticamente para a fase de cozedura. Oakra presenta a contagem decrescente e o indicator luminoso de cozedura em的方式来 acende-se.
- Durante o processo de cozedura, existe acumulacao de pressao no aparelho, que empurra a valvula flutuante para cima. O indicator luminoso de pressao acende-se para indicar que a tampa não pode ser aberta sem libertar primeiro a pressao.
- No final da contagem decrescente, o aparelho emite um avis sonoro e o ecra aparena [End].
- Após algunos segundos, o aparelho muda automaticamente para a fase de manter quente. O ecra aparesta Hc e o indicator luminoso de manter quente acende-se.
- Prima durante 3segundos para parar o programa em qualquer alta.

Programa sopa
- Coloque os ingredientes na Cuba e feche completeness e bloqueie a tampa.
- Rode o botão do pailé de controlo para a direita para aceder ao programa de sopa. O érá apareça o tempo de cozedura predefinido.
- Ooptional: Prima e ajuste o tempo pretendido rodando o botão do paine de controlo para a direita (paraacularo tempo) ou para a esquerda (para diminuiro tempo).
- Prima para,iniciar o programa de cozedura.
- O aparelho inicia a fase de pré-aquecimiento. O ECBA presenta alternadamente e HEAE o indicator luminoso de pré-aquecimiento acende-se.
- Quando a fase de pré-aquecimiento estiver conclusión, o apar-lerh o muda automaticamente para a fase de cozedura. O ecra aparesta a contagem decrescente e o indicator luminoso de cozedura em的方式来 acende-se.
- Durante o processo de cozedura, existe acumulacao de pressao no aparelho, que empurra a valvula flutuante para cima. O indicator luminoso de pressao acende-se para indicar que a tampa não pode ser aberta sem libertar primaryo pressao.
- No final da contagem decrescente, o aparecido emite um avis sonoro e o érá presente [End].
- Após algunos segundos, o aparecido muda automaticamente para a fase de manter quente. O éra'areshende Hoe e o indicator luminoso de manter quente acende-se.
- Prima durante 3segundos para parar o programa em qualquer alta.

Programa saltear
- Rode o botão do painei de controlo para a direita para aceder ao programa de saltear. O érá apareça o tempo de coze-dura predefinido.
-Optional: Prima e ajuste o tempo pretendido rodando o
botão do poinel de controlo para a direita (paraacularo tempo) ou para a esquerda (para diminuir o tempo).
- Oportun: Prima e ajuste a temperatura pretendida rodando o botão do panei de controlo para a direita (para fazer a temperatura) ou para a esquerda (para diminuiar a temperatura).
- Prima para,iniciar o programa de cozedura.
- O aparelho inicia a fase de pré-aquecimiento. O ECBA presenta alternadamente e HEAE o indicator luminoso de pré-aquecimiento acende-se.
- Quando a fase de pré-aquecimiento estiver conclusión, o aparélho muda automaticamente para a fase de cozedura. O ecra apareça a contagem decrescente e o indicator luminoso de cozedura em的方式来 acende-se.
- Coloque os ingredientes na Cuba e mantenha a tampa aberta para salutear.
- No final da contagem decrescente, o aparelho emite um avis sonoro e o ecra aparesta [End]
- Após algunos segundos, o aparelho muda automaticamente para o modo de poupança de energia. O érá presente [E5E3].
- Prima durante 3segundos para parar o programa em qualquer alta.

Programa cozedura a vapor
- Coloque 150 ml de agua (3¼ de cháena) e o acessório de cozedura a vapor na cuba e adicione os ingredientes. Fecha Completely e bloqueie a tampa.
- Rode o botão do poinl de controlo para a direita para aceder ao programa de cozedura a vapor. O eça apareca o tempo de cozedura predefinido.
-Optional: Prima e ajuste o tempo pretendido rodando o
botão do poinel de controlo para a direita (paraacularo tempo) ou para a esquerda (para diminuiro tempo).
- Prima para,iniciar o programa de cozedura.
- O aparelho inicia a fase de pré-aquecimiento. OEARÁpresenta alternadamente e HARE o indicator luminoso de pré-aquecimiento acende-se.
- Quando a fase de pré-aquecimiento estiver conclúa, o aparibo muda automaticamente para a fase de cozedura. Oakra aparena a contagem decrescente e o indicator luminoso de cozedura em的方式来 acende-se.
- Durante o processo de cozedura, existe acumulacao de pressao no aparelho, que empurra a valvula flutuante para cima. O indicator luminoso de pressao acende-se para indicar que a tampa não pode ser aberta sem libertar primeiro a pressao.
- No final da contagagem decrescente, o aparecido emite um avis sonoro e o ecra apareça [End].
- Após algunos segundos, o aparecido muda automaticamente para a fase de manter quente. O ecra apareça [Hoe] e o indicator luminoso de manter quente [acende-se.
- Prima durante 3segundos para parar o programa em qualquer alta.

Programa cozer
- Coloque o preparado na cuba e feche-a, mas não bloqueie a tampa.
- Rode o botão do pailé de controlo para a direita para aceder ao programa de cozer. O érá apareça o tempo de cozedura predefinido.
- Oportun: Prima e ajuste o tempo pretendido rodando o botão do poinl de controlo para a direita (paraacularo tempo) ou para a esquerda (para diminuir o tempo).
Optional: Prima e ajuste a temperatura pretendeda rodando
o botão do painel de controlo para a direita (paraLERa temperatura) ou para a esquerda (para diminuir a temperatura).
- Prima para,iniciar o programa de cozedura.
- O aparecido inicia a fase de pré-aquecimiento. OEARÁpresenta alternadamente e HARE o indicator luminoso de pré-aquecimiento acende-se.
- Quando a fase de pré-aquecimiento estiver conclusía, o aparibo muda automaticamente para a fase de cozedura. Oakra aparena a contagem decrescente e o indicator luminoso de cozedura em的方式来 acende-se.
- No final da contagagem decrescente, o aparecido emite um avis sonoro e o ecra apareça [End].
- Após algunos segundos, o aparecido muda automaticamente para a fase de manter quente. O éra presenta [Hoe] e o indicator luminoso de manter quente [acende-se.
- Prima durante 3segundos para parar o programa em qualquer alta.

Programa de cozedura a vacuo/cozedura lenta
- Rode o botão do poinl de controlo para a direita para aceder ao programa de cozedura a vácuo/cozedura lenta. O éra apareça o tempo de cozedura predefinido.
- Oportun: Prima e ajuste o tempo pretendido rodando o botão do poinl de controlo para a direita (paraacularo tempo) ou para a esquerda (para diminuir o tempo).
- Oportun: Prima e ajuste a temperatura pretendida rodando o botão do poinel de controlo para a direita (paraacular a temperatura) ou para a esquerda (para diminuiar a temperatura).
- Prima 日 para,iniciar o programa de cozedura.
- O aparheiro inicia a fase de pré-aquecimento. O ecra après
senta alternadamente e HEAE o indicator luminoso de pré-aquecimiento acende-se.
- Quando a fase de pre-aquecimiento estiver conclusión, o aparecido muda automaticamente para a fase de cozedura. O eyea apareça a contagem decrescente e o indicator luminoso de cozedura em的方式来 acende-se.
- No final da contagem decrescente, o aparelho emite um avis sonoro e o ecra aparesta [End].
- Após algunos segundos, o aparecido muda automaticamente para o modo de poupança de energia. O érá presente.
- Prima durante 3segundos para parar o programa em qualquer alta.

Programa arroz
Coloque os ingredientes na cuba e feche completeness e bloqueie a tampa.
- Rode o botão do pailé de controlo para a direita para aceder ao programa de arroz. O érá apareça o tempo de cozed ra predefinido.
- Ooptional: Prima e ajuste o tempo pretendido rodando o botão do poinl de controlo para a direita (paraacularo tempo) ou para a esquerda (para diminuir o tempo).
- Prima para,iniciar o programa de cozedura.
- O aparecido inicia a fase de pre-aquecimiento. O ecra aparece alternadamente e o indicator luminoso de pre-aquecimiento acende-se.
- Durante o processo de cozedura, existe acumulacao de pressao no aparelho, que empurra a valvula flutuante para cima. O indicator luminoso de pressao acende-se para indicar que a tampa não pode ser aberta sem libertar primaryo pressao.
- No final da contagagem decrescente, o aparelho emite um avis o sonoro e o ecra aparesta.
- Após algunos segundos, o aparecido muda automaticamente para a fase de manter quente. O éra presenta [Hoe] e o indicator luminoso de manter quente [acende-se.
- Prima durante 3segundos para parar o programa em qualquer alta.

Programa iogurte e fermentacao
O programa de iogurte e fermentacao pode ser utilizao para preparar iogurte ou levedar pao/massa para bolos.
- Ao preparar igurte, coloque os ingredientes na cuba e feche a tampa.
- Ao levedar massa, pode bater a massa diretamente na cuba e, em seguida, colocar a cuba no corpo do aparelho e fechar a tampa.
- Rode o botão do painei de controlo para a direita para aceder ao programa de igurte e fermentação. O éra apareça o tempo de cozedura predefinido.
- Oportun: Prima e ajuste o tempo pretendido rodando o botão do poinl de controlo para a direita (paraacularo tempo) ou para a esquerda (para diminuir o tempo).
- Oprincipal: Prima e ajuste a temperatura pretendida rodando o botao do paine de controlo para a direita (paraacular a temperatura) ou para a esquerda (para diminuir a temperatura).
- Prima ⑤ para,iniciar o programa de cozedura.
- O aparecido inicia a fase de pré-aquecimiento. O ecra aparece alternadamente e o indicator luminoso de pré-aquecimiento acende-se.
- Quando a fase de pré-aquecimiento estiver conclusión, o aparecido muda automaticamente para a fase de cozedura. O esca'a藓ata
a contagagem decrescente e o indicator luminoso de cozedura em,.
como acende-se.
- No final da contagem decrescente, o aparelho emite um avis sonoro e o ecra aparesta [End].
- Após algunos segundos, o aparecido muda automaticamente para o modo de poupança de energia. O érá presente [E8E3].
- Prima durante 3segundos para parar o programa em qualquer alta.

Programa de papas de aveia
- Coloque os ingredientes na Cuba e feche completeness e bloqueie a tampa.
- Rode o botão do pailé de controlo para a direita para aceder ao programa de papas de aveia. O érá apareça o tempo de cozedura predefinido.
- Oportun: Prima e ajuste o tempo pretendido rodando o botão do poinl de controlo para a direita (paraacularo tempo) ou para a esquerda (para diminuir o tempo).
- Prima para,iniciar o programa de cozedura.
- O aparecido inicia a fase de pré-aquecimiento. O ecra aparece alternadamente e o indicator luminoso de pré-aquecimiento acende-se.
- Quando a fase de pré-aquecimento estiver conclúa, o aparibo muda automaticamente para a fase de cozedura. O(ECRA presenta a contagem decrescente e o indicator luminoso de cozedura em的方式来 acende-se.
- No final da contagem decrescente, o aparelho emite um avis so noro e o ecra aparesta End.
- Após algunos segundos, o aparecido muda automaticamente para a fase de manter quente. O ecra aparece Hóe e o indi
cador luminoso de manter quente acende-se.
Prima ⑥ durante 3segundos para parar o programa em qual-quer alta.

Modo Chef ajustavel
- Coloque os ingredientes na cuba e feche a tampa ou não, dependendo da receita.
- Rode o botão do poinl de controlo para a direita para aceder ao modo Chef ajustavel. O éra aparea o tempo de cozedura predefinido.
- Oportun: Prima e ajuste o tempo pretendido rodando o botão do poinl de controlo para a direita (paraacularo tempo) ou para a esquerda (para diminuir o tempo).
- Oportun: Prima e ajuste a temperatura pretendida rodando o botão do poinl de controlo para a direita (paraacular a temperatura) ou para a esquerda (para diminuir a temperatura).
- Prima ⑤ para,iniciar o programa de cozedura.
- O aparelho inicia a fase de pre-aquecimento. O éra aprende alternadamente e o indicaor luminoso de pré-aquecimento acende-se.
- Quando a fase de pré-aquecimiento estiver conclusía, o aparibo muda automaticamente para a fase de cozedura. Oakra apareça a contagem decrescente e o indicator luminoso de cozedura em的方式来 acende-se.
- No final da contagagem decrescente, o aparelho emite um avis o sonoro e o ecra aparesta [End].
- Após algunos segundos, o aparecido muda automaticamente para o modo de poupança de energia. O érá presente.
- Prima © durante 3segundos para parar o programa em qualquer alta.
* Suggestão de reaquecimento rápido de pratos: ajuste a temperatura para >= 95 °C e cozinho com a tampa fechada mas desbloqueada.
7. Utilize a função de IPODIO diferido
O inicial diferido pode ser útill para programar o aparelho para cornerar a cozinho mais tarde.
- Primeiro, selezione um programa, seguito os passos descritos acima na parte 6.
- Antes de iniciair o programa的选择ado, prima . O éça apareço o tempo predefinido para o inico diferido.
- Defina o tempo pretendido rodando o botão do poinel de controlo para a direita (paraLERar o tempo) ou para a esquerda (para diminuiro tempo).
- Prima ⑥ . O ecra apareça a contagem decrescente para o inico diferido. quando o tempo predefinido TERMINAR, o aparelho começa a cozhar automaticamente.
8. Abra a tampa
- Não tenteAbrir a tampa se a valvula flutuante estiver para cima e se o indicator luminoso de pressão estiver aceso.
- A pressão pode ser libertada de 2 formas发展目标 no final da cozedura:
Libertação natural: No final da cozedura ou(before de parar o programa, o aparecido arrefece sozinho e a pressão liberta-se naturalmente. Durante a libertação natural, os alimentos podem cozinar em excesso devido à pressão restante na cuba. Utilize a libertação manual para parar imeditamente o processo de cozedura.
Libertação manual: Prima continuamente o botão de libertação de pressão na parte superior da tampa. Ira demorar entreagems segudos e algoins minutos,dependendo da quantidadede alimentos no interior da cuba (Fig. 31).
AVISO: Tenha cuidado com o vapor quente que sai do aparelho. Mantenha o rosto e as muitas afastados da saída de vapor (Fig. 45).
- ParaAbrir a tampa, coloque o braço paralelo as pegas laterais, secure o botão da tampa, rode-o para a esquerda e levante a tampa (Fig. 32 e 33).
AVISO: Tenha cuidado com o vapor quente que sai da cuba.
9. Desligue o aparelho da tomada
- Após cada utilizesçao, deslgue o aparelho da tomada e deixe-o arrerefecer durante,leo menos,2 horas antes proceder à limpeza.
10. Limpe antes cada utilização
- Limpe o aparelho antes cada'utilização.
- Antes de limpar, deixe o aparelho arrefecer durante, pelo menos, 2 horas.
- Para instruções de limpeza, consulte a parte 3. Limpe todas as peças do aparecido incluidas na sequção ANTES DA PRIMEIRA UTILIZACão.
11. Dicas de manutenção
- Para garantir a durabilitad da cuba ao longo do tempo, não corte alimentos no seu interior.
- Utilize os acessórios fornecidos. Não utilize nenhum utensílio metalico, poi tal pode danIFICAR o revestimento antiaderente da cuba.
- Após autilização, o anel vedante pode conservar o cheiro do prato. É normal; o silicone tem muitenos poros que se abrem quando expostos a temperatas elevadas, fechando-se quando a temperatura desce. Para eliminar o cheiro do anel vedante, pode:
- Colocar o anel de silicone na maquina de lavar loixa.
- Adicionar 1 chávena de vinagre, 1 chávena de agua e 1 limão cortado em pedações grandes na cuba e inicial um programa de cozedura a vapor durante 2关键时刻 e, em seguida, deixar o vapor libertar-se naturalmente.
- Substitua o anel vedante a cada 2 anos ou mais cedo em caso de danos.
GUIA TECNICO DE RESOLUÇÃO DE PROBLEMAS
Problema Possível razões Soluções Não é possível abrir a tampa. Não é possível abrir devoa pressão na Cuba. Prima continually o botão de libertação de pressão para remover a pressão no interior da Cuba. Pode demorar algumas minutos às a pressão ser totalmente libertada. A pressão na Cuba é totalmente libertada, mas a válvula fluktuante está presa porque está demasiado muito e, por isto, não se pode mover para baixo. a. Certífique-se de que a pressão é totalmente libertada, deleixando ou aparecido arrefecer durante,leo menos,2 horas.b. Empurre cuidadosamente a válvula fluktuante para baixo, inserinou um espto ou um objecto longo na abertura da válvula fluktuante. Se isto não funciona, envie o aparecido a um Servico de Assistência Técnica autorizado.c. Para aproxima'utilisation, limpe e seque bem a válvula fluktuente. Não é possível fechar a tampa. O anel vedante não está corretramente instalado. Instale corretramente o anel vedante. A Cuba contentem ingredientes quentes que geram vape. Aguarde que os ingredientes na Cuba arrefecam antes de tentar fechar novamente a tampa. A válvula fluktuante está presa porque está demasiado muito e, por isto, não se pode mover para baixo. a. Empurre cuidadosamente a válvula fluktuante para baixo, inserinou um espto ou um objecto longo na abertura da válvula fluktuante. Se isto não funciona, envie o aparecido a um Servico de Assistência Técnica autorizado.b. Para aproxima'utilisation, limpe e seque bem a válvula fluktuente. A posicao e/ou a direção na qual a tampa foi fechada não é a correta. Feche a tampa na direção correta, de acordo com o manual de instruções. AoAbrir a tampa, a Cuba permanece presa à tampa. O anel vedante criou um efeito de sução. A Cuba liberta-se da tampa por si são. É normal e demonstra simplesmente uma boa hermeticidade do produits. Para evaporar que a Cuba caía violently sobre o aparecido ao Abrir a tampa, abra sempre a tampa com cuidado.
Problema Possível razões Soluções Libertação intensa de pressão da valvula limitadora de pressão. A pressão interior exceeda pressão de funciona ou a pressão inferior exceeda pressão de segurar. Limpe minuciosamente a valvula limitadora de pressão, a valvula fluctuante e a tampa. Se continue a sair vapor da valvula fluctuante, envie o aparecido a um dos Serviços de Assistência Técnica autorizados mais proxies para inspeçao, reparação ou ajuste por pessoas autorizada. A valvula limitadora de pressão está numa posicao incorreta. Rode/pressione cuidadosamente a valvula limitadora de pressão para que caia no devo lugar. Tenha dificuld com o vapor quente. Posicao-se em segurar e use luvas de cozinha. O controlo de pressão avariado resultou na libertação de pressão. Envie o aparecido a um Serviço de Assistência Técnica autorizada para reparação. Libertação continua de pressão da valvula flutuante. A pressão inferior exceeda pressão de funciona ou a pressão inferior exceeda pressão de segurar. Limpe minuciosamente a valvula limitadora de pressão, a valvula fluctuente e a tampa. Se continue a sair vapor da valvula fluctuante, envie o aparecido a um dos Serviços de Assistência Técnica autorizados mais proxies para inspeçao, reparação ou ajuste por pessoas autorizada. Residuos na valvula flutuante. a. Prima continuamente o botão de libertação de pressão para remove a pressão no interior da cuba. Pode demorar eles minutos às a pressão ser totalmente libertada. b. Deixe o aparecido arrefecer durante,leo menos,2 horas. c. Limpe eSEQE a valvula flutuante antes de reinicuar a cozedura. A valvula flutuante está presa. a. Prima continuamente o botão de libertação de pressão para remove a pressão no interior da cuba. Pode demorar eles minutos às a pressão ser totalmente libertada. b. Deixe o aparecido arrefecer durante,pelo menos,2 horas. c. Limpe eSEQE a valvula flutuante antes de reinicuar a cozedura. Fuga de vapor da tampa. O anel vedante não está corretemente instalado. Retire o anel vedante, limpe-o e volta a instalá-lo na posicao correta. O anel vedante está sujo. Retire o anel vedante, limpe-o e volta a instalá-LO na posicao correta. O anel vedante está danificado ou a extremidade da cuba está danificada. Envie o aparelho a um Servico de Assistência Técnica autorizzato para reparacao. Os alimentos não está cozinhados. A proportao de ingredientes solidos/liquidos não é a correta. Tente novamente, seguido com precisão as quantidades da receita. Sem eletricidade da fonte de alimentação. Verifique o Sistema elétrico da sua casa. E0presentado no ecrā digital. O interruptor de pressão está avariado. Envie o aparelho a um Servico de Assistência Técnica autorizzato para reparacao. E1presentado no ecrā digital. O sensor de temperatura está avariado. Envie o aparelho a um Servico de Assistência Técnica autorizzato para reparacao. E2presentado no ecrā digital. A tampa não está corretemente posicionada para o seu programa de cozedura. Cada programa querou uma posicao específica da tampa. Verifique e ajuste a posicao da tampa necessária para o seu programa de cozedura; consulte aabela de programas de cozedura na parte 6 deste manual. Reinicie o programa assimissque que a tampa estiver corretemente posicionada. Se o problema persistir, envie o aparelho a um Servico de Assistência Técnica aprovado para reparacao. الإستعمال الإستعمال الحرفية الإستعمال الإستعمال الحرفية الإستعمال الحرفية الإستعمال الإستعمال الإستعمال الإستعمال الإستعمال الإستعمال الإستعمال الإستعمال الإستعمال الإستعمال الإستعمال الإستعمال الإستعمال الإستعمال الإستعمال الإستعمال الإستعمال الإستعمال الإستعمال الإستعمال الإستعمال الإستعمال الإستعمال الإستUTION الإستUTION الإستUTION الإستUTION الإستUTION الإستعمال الإستUTION الإستUTION الإستUTION الإستUTION الإستUTION الإستUTION الإستعمال الإستUTION الإستUTION الإستUTION الإستUTION الإستUTION الإستUTION الإستعمال الإستUTION الإستUTION ال,enGLISH ال,enGLISH ال,enGLISH ال,enGLISH ال,enGLISH ال,enGLISH
AR
golgo
diksek diksek uglal diksek diksek uglal diksek uglal diksek uglal diksek uglal diksek uglal diksek uglal diksek uglal diksek uglal diksek uglal diksek uglal
olalwseoylglblljaooayloagnoaiaol jga Jkae elds g oelll
.(32g 33 Jxogill JxJal) 1.
alllcgo jolaojolwlljollnojdo
jai jie ai lai 1.9
aaii jiey jiee eel yjg jiall jiaell
pduocuuyjgajb1.10
#
JyIe JcJcLw oJU JyJg JgJg JbJI
a 3 a
JyIyIyIyIyIy
aJaaJ 1.11
a#pabll gaa: paa y. caggl g aagabll alg atlaal
gulj 150 gol d a yu oogol gaiu wu .ogagaiu all lalall p
S_ OBC = S_ COD + S_ BOC
gssuouuullgl aubolaiag.palalldoaayyauwgliaa haoi jpaauo y
aJooal aoojooaouo ooooo
y la pall kai y a aell ao jn abill
aIbI aIe 0gJgSaaiaa
gabll 1cgl 1j 0g 1 j 1a2ao 1g 1al 1o 1ol g 1g 1d 1o 1ol g 1slo-
aab Jaa jaoj aai jig jaoa oao
a 1000
aalw jewg yall alo yll lali tali jzgl Jgow .jol wal al ojo Joo sI .
jssg
a a a 000
End
. 1
gj gabal jz3 0
g 1 g a 95 o j o j o j o j o j o j o j o j o j o j o j o j o j o j o j o j o j o j o j o j o j o j o j o j o j o j o j o j o j o j o j o j o j o j o j o j o j o j o j o j oj
小 S_n = na_1 + ( n - 1) 2a_2 + ·s + ( n - 1) 2a_n
jIJUJI JUJIJI UJUJIJI 1.7
g 100
原不等式成立
0aaiagallgihalgluluol
.6j01
aill joo. 0
.
()()
(.)
aalaglll aaii lalil jaiy jaiyai yjaiyai .
Llaljll jll
1.8
#
aillal yjg jn cialo jzayb bajl yjai
yjwag aai jao jalqal syaay gai jai gai gai gai gai gai
gaiiiaai i aaiy
gall alal alal ay galsy
jg jy jy jy jy jy jy jy jy jy jy jy jy jy jy jy jy jy jy jy jy jy jy jy jy jy jy jy jy jy jy jy jy jy
.31 5
jie jie jie jie jie jie jie jie jie jie jie jie jie jie jie jie jie jie jie jie jie jie jie jie jie jie jie jie jie jie jie jie
(45 g)
AaLdai gBaaIgai yalbleg aulgall
a aalw yaei . 00 aai gaiy jUgoggl uauu
.
J 1 J 1 1 1 1 1 1 1 1 1 1 1 1 1 1 1 1 1 1 1 1
.(c)g|lla()Jg()
#
Jg Jg Jg Jg Jg Jg Jg
⑥
aaii jaii iiaai jaii jaii jaii jaii jaii jaii jaii jaii
a a a a a a a a a a a a a a a a a a a
. End
HOE aaiwai jaiy. diagaiy lgl abaiy alalj ylll jllj jg jg jg
()aagaaall aieablaalw
.30 1
JUJIJI JUJIJI JUJIJI

aagll aedl pse g alalldy gabll agg cllg kllg
aalal yjzw. 1uull lalal uolll uolll uolll uolll uolll uolll uolll uolll
#
jall jll aogj jaoa ojol g jzjg jyogbalsl gglg 0jbjol
.(c)g|lla()Jg()
Soll aol jao ojol jybjc jzg cj gll ojol jyol jyol jyol jyol
(oo) a o o o o o o o o o o o o o o o o o o o o o o o o o o o o o o o o o o o o o o
#
Jg Jg Jg Jg Jg Jg Jg Jg Jg Jg
()
$$
\begin{array}{c} \text {g a b i l l} \\ \text {c o l o r} \\ \text {d e f} \end{array}
$$
$$
\begin{array}{l} \text {j o r i g h t w i t h} \quad \text {j o r i g h t w i t h} \quad \text {j o r i g h t w i t h} \quad \text {j o r i g h t w i t h} \quad \text {j o r i g h t w i t h} \quad \text {j o r i g h t w i t h} \quad \text {j o r i g h t w i t h}. \end{array}
$$
$$
\begin{array}{l} \text {d e r i c t e d} \\ \text {H E R E} \quad \text {G C C C} \end{array}
$$
$$
\left(\frac {1}{2}\right) \frac {1}{2} \frac {1}{2} \frac {1}{2} \frac {1}{2} \frac {1}{2} \frac {1}{2}
$$
ooj 0o o o o o o o o o o o o o o o o o o o o o o o o o o o o o o o o o o o o o o o o o o o o o o o o o o o o o oo
y
Erid
HOe aaii jaoa.ajgaojy ae abaaal alao yol laljagao jgs
()aiaaall aieablaalwfo
gjg jzj 30
y

Jll jll jgl golj glal golj golj golj
.
gJgJgJgJgJgJgJgJgJgJgJgJgJgJgJgJgJgJgJgJgJgJgJgJgJgJgJgJgJgJgJgJgJgJgJgJgJgJgJgJgJg
.
aag aall lss. gaaalg yglalg jll gogg alg
#
jall jll aol jaoa ool jzjbr jg wlaal cgl gl 0
.(cgllla)
Soll aol jao ojol jzrb jzg jzj gll ojol aol 0jol
.(aJlal aJzJ (aJzJ) JIJI g(ajll aJzJ dJzJ)
gabll caljui Jauuui uui ⑥ lue bua
Jg aag JdJIy HHEH g CcC 1aill yjog. jgljg jn jn jn jn jn jn
8
aill ailll oaii glll alor yll lalil jgljgss slls slls
aaii aaiy gaiy yaa yaaag yjia
End
aalw jyaw .slawl gog yll laljlgjw yg
gjg jzjzjzjzj30wJ ⑥
a aai 1
End
HOe aaii jaiw diagw w gle abal ala o y lla lab jgjg jg jg jg
1111 1111
.3g gjg jyj 30j
1111/10g 1234567890
.
ydy ydy dydy dydy dydy
Juslll lssll aol jaaa ola Jybrn 1u galsg
.(c)g|lla()Jg()
Soll oJoojooj j 15000000000000000000000000000000000
.(j)Jd a Jd Jd Jd Jd Jd (OJd d Jd Jd Jd
#
jagoo jolll HAE 0000 dawal oog. golll jou wail
《》
aaiiaaii aegaaag. gabll aloyo jilalali jgaliljgaiu jglall jauill aloyo JuslaI ic
a a a a a a a a a a a a a a a a a a
End
a aalw sssssssg g
.3g gjg jyj 1jzj 30jzj 6
J 1
pksolldg 10alall gdlg gall o
gabla aalw jzss
.
Jallllgaojagaojg jzjg jzjg jzjg Jbassl 8g 8g 8g
.(c)g|lla()Jg()
aLg aLg gLg
gabll 1 aalw jaww .
.
Jaaal 1sall aol jaoa ola Jyba Jg wbal gll b
.(c)glll(a)JLg(c)g0sla
#
Jg aag JdJIHHEE g C003 aalw w. yjy jy jy jy jy
8
aalw jwagw .gall aldo y wll lttl jglw Jgws .jwl wals alo y oos1 11
aaii 1 aaiy gabll yaae
ooj jao aag. gajgall poa gla lo jgal jbeall slj ygalal alae el
y
Erid
HO 1
()afoall afoall
gjg jzj 30
j

alaiy jSL. lalal y g 1g
a aaii i 1
.
Jylll l! sall aol yol ool yol b j wolal all gllg 0e bcl:
.(c)glll(a)jLw(c)g(c)g0sla
aJg aJg Jg Jg Jg Jg Jg Jg Jg Jg Jg Jg Jg Jg Jg Jg Jg Jg Jg Jg Jg Jg Jg Jg Jg Jg Jg Jg Jg Jg Jg Jg Jg Jg
(oojol a jol) Jlgl g (oJol a oJol) jss
a#
Jg a JdJIb HRE g C03
8
aalaljgawg yall alol jlll lal jlll jlll jlll jlll jlll alo jlls1.
g
a aai
ooj joo joo o o o o o o o o o o o o o o o o o o o o o o o o o o o o o o o o o o o o o o o o o o o oo
y
End
HO 1
()aiaaaallae aabaaalaa
Gg j 3 o
1
aBg aLw yaae m aolj yIyoguI ykaal aag a
.
Juslll lssll aol jooa ojfo Jybr Jyugb Jgulalg 0g 0g 0g
.(c)glllla)JLgllg(c)gOo
Soll aol jooa oJb Jg Jg Jg Jg Jg Jg Jg Jg Jg Jg Jg Jg Jg Jg
(ooJzJzJzJzJzJzJzJzJzJzJzJzJzJzJzJzJzJzJzJzJzJzJzJzJzJzJzJzJzJzJzJzJzJz
aBbI 1
jg jy jy jy jy jy jy jy jy jy
6
aalaljgaw. gall alol jalal jgal jgal jgal alalal
e aai 1a aal bll
aill 15gao aal bai jg g aal agg
End
.
.3g j 1j0
#

.1gll 1 gglal eog gglgag (g3/4) gll j 150 g
g
(36 _ 25
a aia 0j y jy jy jy jy jy jy jy jy jy jy jy jy jy jy jy jy jy jy jy jy jy jy jy jy jy jy jy jy


.
a aiaaa ojol aeg aagall gai jll gaoaill aagai jaoa
ydydydydydydydydydydydydydydydydydydydydydydydydydydydydydydydydydydydydydydydydydydydydydydydydydydydydydy
Juslll l kull 20g jaa ojol ybr sb g walall cgl bglg
.()JLALJJGLg()
#
Jg Jg Jg Jg Jg Jg Jg
《》
aaii aiai jaii iaii jaii jaii jaii jaii jaii
()
gag gag gag gag gag gag gag gag gag gag gag gag gag gag gag gag gag gag gag gag gag gag
yjbdal jn no albll ydyclcay
Erid
HOJ
()《afoolwJgabfool》
.3g j g aaiy 1jg3 0

pks 1a5s gbsg 0c g 0
aall aalw jzew 1e alllolj Jgoguulnagai gaojaa
.
Jylll l! sall aol jg oaoa oohj ybrb j g walal cgl bghg ( )e bdo:gs
.(glll)jlllgl(gll0la)
gabll calj jzdd. 0d
Jg Jg Jg Jg Jg Jg Jg
8
aalalw yaw. gbl alal jlll jall jall jlll jlll jlll jlll aoljul sll .
a
aI iag . baii duioi plao no 4olb .albiil no jiau uab lyu bi li ygbll ic abgdo
jglj 53
.
.41 y
aasaaabaaagwllgws
pulucuululul
glll ceg g uolkoll .1
scc
aBllcglgUgSallg
(ajll joll) max aolsc ljg jglz yj c jglg g all g g
(19)
eogj g aagaaal jgl glaol lta gabll alg wgs yll plabll uigka gabue
aill laiw aai jyj 1 yaiy
Jg 1000000000000000000000000000000000
Jusll) jusssgol no ploab uia g Ujig aLg aba glal aeg oui Jn 5i
.20
.21 0
aeg 10000000000000000000
a1a 1.3
.43 1
Jall) aIayd aeIoll aylae 5oJol yjg jll d 1a00 1
.(22)
baall uoo plao cuiu 4
jI abxo (23 yoooll Jkuill) cuao kuiu baii jbeai duoi pao go
#
Jgul Juaa 5.5
.24 ygjgl jyjgl jyjgl jyjgl jyjgl jyjgl jyjgl jyjgl jyjgl
HEI10 1
Jusuuiy p8 g yolj 0.6
a 1
#
wglgaoa 2b.3
jssu) jyog jolag aaleiaaiaeaal yabig bll no wyy giae ejl
.897
Lgla
JkU] IgKo gLgLbBolg yuill gio a Jolo yuill gio a
a a 1000 g 1000g 1000g 1000g 1000g 1000g 1000g
yulil gao zao lolo 105
aBll aeg yaa 3.85 ae aee alal llae 11 alal yu wll gao
JSLJI)lagaa jse Xaiai gaojia jzai.38g 37 Juaaoguill JSLJI) aIbala I
.39
a 1 a
LgJg jyj 10000000000000000000000000000000000000000000
(44)
alall abi 23
.(10)
jog jg.11 (yog)
yj 100
4iSs sbsaill 1uai pao gog joo sbg.(12 youo gill Jkaill) sbll
J 1
(1)
日 ≤slant 1 j.15.(14)
g s r a 100000000000000000000000000000000000000000
.15 a
ailll 1000 1000 1000 1000 1000 1000
gssll plao aabii.(16 yaggl (J)albll jy gssll plao laa i j 17 yaggl (J)log log jloL slog aalei aieawl plaae y gssll plao
Jill) gfo yolqilofo pdool plao afo 0g ofo 1ofo 1ofo
(1)
.12
a
Joo 0o (w y aaggill Jss) gai ge gai jraaogogil Jssy I ggejrr
#
jglulduwll
0.1
yjgl jgcll l 10000000000000000000000000000000
J
jJy jaydolduuJgJyJyJyJyJyJyJyJyJyJyJyJy
c.1234567890
JSSW) 15bllg gJg dLwI yJc aol sOg Jbllg JdAa JdAa JdAa JdAa
.(2g1jlaa#
jblw yg yb jol lus ally lle gall eeg j kssal bllg juc: abgdo
gj 1aill gai iiai jgai gai aai alg agai alg gai gai gai
.
Jall) jall Jd1o iLdlolg aillgl slgall gaoa 11jy. gauu al jall
.3
jgljcljglj3
aalglg aell al 13
.4gogagaoiaaiaaiyglalggall
(5)
y
.40 1
.41 y
4 1
. doxy duo zo zo zo zo zo
.42 1
aJw e JyJg oJag oJg aJg aJg JaaJg JaaJg JaaJg JaaJg
.

JlJlJlJl

jglaljai jiee jilw

aaa 30g a>gl cwl:Jllal lla g Cgll o

.114:JlllIa J.

aJySg y. gaii jaijai jai jai jai jai jai jai jai jai jai jai jai jai jai jai jai jai jai jai jai jai jai jai jai jai jai jai jai jai jai jai jai jai jai jai jai jai jai jai jai jai jai

yJyIyIyIyIyIyIyIyIyIyIyIyIyIyIy

yJyJyJyJyJyJyJy

oljlll j

aagaaalgeababaaalallaojgajgai jll

#

JzJzJzJzJz
wJ


yol
agjgl .gabll ag jy jy jy g s y sbg p dssy
aill lio go plucuul aaaas aeol jie aba: gabll
a a 100
.(aIbI aIe Igbg bIa dIa Jc) albsi
ygi aai
Lggyjooie! gI yIeaiy jSs ayIe aao oI 1go Ige jgsy
Aa
jlaal yoo .9
algl jnawbll 511 gll jlaal y
JgJy JgJyJyJyJyJyJyJyJyJyJyJy
aJg300 gJ 1000000000000000000000000000000000000000000
.1J2
gulusw ggl s jyj w yj ajjnll jy
jol jol jol jol jol jol jol jol jol jol jol jol jol jol jol jol jol jol jol jol jol jol jol jol jol jol jol jol jol jol jol jol jol jol jol jol jol jol jol jol jol jol jol jol jol jol jol jol jol jol jol
. 1
.
.
.
.
.
.
.
.
.
1.5.7
. pluul 15 u2 jiuuill ggl uall sclg oxl gl znuol .
gbl lgluee elk. pduu wlll lalwlaa aegy jy jy jy jy jy jy jy jy jy jy jy jy jy jy jy jy jy jy jy jy jy jy jy jy jy jy jy jy jy jy jy jy jy jy
iJoo 100 a0000000000000000
J 1 J 1 J 1 J 1 J 1 J 1 J 1 J 1 J 1 J 1 J 1 J 1 J 1 J 1 J 1 J 1 J 1 J 1 J 1 J 1 J 1 J 1 J 1 J 1 J 1 J 1 J 1 J 1 J 1 J 1 J 1 J 1 J 1 J 1 J
. 1234567890
.
.
.
.
aaiy jao jiaog. bao aojixu wsi jybl uayuiall jzglg zpaiai . Juaill 49 glc yabll eegg bywll gio aiau . Jaozo aol oJyog lao ay gll jzglg bq yI paiaiu . Jlaalaaai all jao yog nclao plauoi y
9jglal j- jol Jkwi jgljwl puiu wS.4
. 1234567890
.
.
.
.
.
.
.
.
.
.
.
.
.
.
.
.
.
.
.
.
.
.
.
.
5.5
Jl. 12345678901123456789011234567890112345678901123456789011234567890112345678901123456789011234567890112345678901
Jl. 1234567890112345678901123456789011234567890112345678901
Jl. 1234567890112345678901
Jl. 12345678901
Jl. 12345678901
Jl. 12345678901
Jl. 12345678901
Jl. 12345678901
Jl. 12345678901
Jl. 123
9JbJ 1- jSj jzj0s5.6
jIgUJyIeJz.1bIeI JIeJnJLsIuSdSul 1111111111111111111111111
AR
gabllsgljyagazjjg jgljagalj gabllgawiy gialpabgabw
aaii jao joi
y
aogol oia gab ic joll g.1.laalalwgl aalall no ij glgcr
pLauuilluylalj aalall
g (a) jw J 100
a:laia 111y y aal y aai y aai y
aaii
eog gdo oogg g g g g
jlll l 1
y
j4
algl 10g plzwiol jgo no plebally jglzll shy
.
y jglj yolll jnsswll 2g jie jy daa y
.8j8j8j8j8j8j8j8j8j8j8j8j8j8j8j8j8j8j8j8j8j8j8j8j8j8j8j8j8j8j8j8j8j8j8j8j8j8j8j8j8j8j8j8j8j8j8j8j8j8j8
g jagall yablldojicu yg.bao jgal ldsygalll eeg pui
.0u 1 log .
eog 1001 1001 1001 1001 1001 1001
aBbI aIg 8oJoo IabI gBa baa y.
.
alall y. 12y jy 10y
JcJcJcJcJcJcJcJcJcJcJcJcJcJcJcJcJcJcJcJcJcJcJcJcJcJcJcJcJcJc
1. 1. 1. 1. 1. 1. 1. 1. 1. 1. 1. 1. 1. 1. 1. 1. 1. 1. 1. 1.
a 1
JU 1000000000000000000000000000000000000000000
aLl bWu dwsu icg:duaii gdlal aIgUdelluy
jol jolil iol ool ool ool ool .2
joo (Jabll uo lo) ooloo jno plo wu noo jlaa lia
a 100000000000000000000000000000000000000000000
aaii aiae iil g 1y y y y y y y y y y y y y y y y y y y y y y y y y y y y
aioiwo 1o llool o pooll jolll pluow
a
a 1
aabaaal jblaool ngagag 1gil 1g aiai d a b jlae al pluauwul gdo
45LwgljgJbIaIyI yJ. JbIyI JcJn jIgJl IaIyI pJzIwI p
JlalbJgIoo JgIoo
jlll jlljlly
jlll lss jao gaiol uig liu Jalbyl aJyco
ppl pluuln-10 Jusjus juspuus 3.3
d.o 0a aall jol jol jol jol jol
.
Lalal pabll lal baiy gog y baiy yabll aJ Paaas
pabll 236 jilal bll lcbu cblb yall aJy.
y jll
Juaia 12 jie paoi plai jyjz cgo pluuiy Jauu uo y jyjulii
jgl jgll Jg 1 g jgogall jalal jaoaJolal jgl jgl
jla jlae 1a 1a a 1a 1a 1a 1a 1a 1a
aIy j. iJ 1000000000000000000000000000000000000000000
154 154
a aag gglgll glgclal alol o pabll no aes elgglb jplde
gaiyai jiljgl gai jiljagai jiljagai jiljagai jiljagai jiljagai jiljagai jiljagai jiljagai jiljagai jiljagai jiljagai jiljagai jiljagai jiljagai jiljagai jiljagai jiljagai jiljagai jiljagai jiljagai jilj
gddlaaalldgaaalln a j g oogr g
aalaa aalaa aalaa aaii aag palaal no eolil oia gab iie
yjiaosluuysus
jai jai jai jai jai jai jai jai jai jai jai jai jai jai jai jai jai jai jai jai jai jai jai jai jai jai jai jai jai jai jai jai jai jai jai jai jai jai jai jai jai jai jai jai jai jai jai jai jai jai jai
ailll 1jylg jai gdi liu bai
aolwul
. 1JaiiIg Ig Jg Jg Jg Jg Jg Jg Jg Jg Jg Jg Jg Jg Jg Jg Jg Jg Jg Jg Jg Jg Jg Jg Jg Jg Jg Jg Jg Jg Jg Jg Jg Jg Jg Jg Jg Jg Jg Jg Jg Jg Jg Jg Jg Jg Jg Jg Jg Jg Jg Jg
Jgssal aabll gulgglg 2000 g jgll li gglg . Lc loo . aalzai I g uasblizgglg 4g g gaaiaaiaa
.(u)log aullg 1gglg yjU dXoJlgoJy
jgl 1gabu jll 0jll 0o
?jloJyL jJyJyJyJyJyJyJyJyJyJyJyJyJyJyJyJyJyJyJyJyJyJyJyJyJyJyJyJyJyJyJyJyJyJyJyJy
a#d aalal jslal ylulu uuaaui liu
JSLU 1 pUuUU uue gag.aa jiaaiu U aao jauill Ia
julooJoual all jol Jd
L 10000000000000000000000000000000
:JJJJUJLIO
:y
.12a jIbIgill gll lal y aolly sloi
y
JU 10g
s13 s1 s 124 oJyU pIaog Ugig guau Jzch uJzalpu
. lo
iUuUg uUuUuUuUuUuUuUuUuUuUuUuUuUuUuUuUuUuUuUuUuUuUuUuUuUuUuUuUuUuUuUuUuUuUuUuUuUuUuUuUuUuUuUuUuUuUuUuUuUuUuUuuUU
elegllg 1s e 1 g 1 1 1 1 1 1 1 1 1 1 1 1 1 1 1 1 1 1 1 1 1 1 1 1 1 1
!pLsUJ:JzJg.1JgJzJuJpu
Uu Uuuuull uuuuull uuuuull uuuuull uuuuull
aolalogablauJzulgduagabg
a aal l aolg jaaal liqua g aag aeg
1i0 6bi li ci
U
2
206
200
199
198
186
271
THANKS FOR CHOOSING MOULINEX
Welcome to the world of fast & delicious cooking!
With Turbo Cuisine, we took up the challenge of reinventing the pot: Easier. Tastier. Just better!
Designed with this guiding principle, Turbo Cuisine allows you to save time and cook homemade delicious meals in total simplicity and convenience.
Thanks again for welcoming us to your kitchen.
Now let's cook together!
CONTENTS
Quick Start Guide in Images 2
Moulinex Recommends Safety First 209
All Parts of Your Product 217
Getting Familiar with the Control Panel 218
How To Use & Clean Guide 219
Technical Troubleshooting Guide 235
Moulinex International Limited Guarantee 271
MOULINEX RECOMMENDS SAFETY FIRST
Safety is our number one priority. We design and manufacture our product with high safety and technology standards. However, as with any electric appliance there are some potential risks, we therefore invite you to exercise a degree of care and to adhere to the following instructions.
SAFETY INSTRUCTIONS
Take the time to read all the following instructions carefully and save them for future reference.
- Improper use of the appliance and its accessories may damage the appliance and cause injury.
- The appliance cooks food under pressure. Incorrect use may cause risks of burns due to steam.
- For your safety, this product conforms to all applicable standards and regulations (Low Voltage Directive, Electromagnetic Compatibility, Food Compliant Materials, Environment, ...).
- The heat source necessary for cooking is included in the appliance.
1. Where to use safely?
- Indoor use only.
- This appliance is intended for domestic household use only. It is not intended to be used in the following applications, and the guarantee will not apply for:
- staff kitchen areas in shops, offices and other working environments;
-farm houses;
- by clients in hotels, motels and other residential type environments;
- bed and breakfast type environments.
- Do not place the appliance in a heated oven or on a hot hob. Do not place the appliance close to an open flame or a flammable object.
- Use on a flat and stable, heat resistant work surface, away from any water splashes.
2. Who to use safely?
- This appliance is not intended for use by persons (including children) with reduced physical, sensory or mental capabilities, or lack of experience and knowledge, unless they have been given supervision or instruction concerning use of the appliance by a person responsible for their safety.
- This appliance can be used by persons with reduced physical, sensory or mental capabilities or lack of experience and knowledge if they have been given supervision or instruction concerning use of the appliance in a safe way and if they understand the hazards involved.
- This appliance shall not be used by children. Keep the appliance and its power cord out of reach of children.
- Children shall not play with the appliance.
- Children should be supervised to ensure that they do not play with the appliance.
3. How to use safely - general usage?
- Do not use appliance for other than the intended purpose.
- Do not use the appliance to fry food in oil. Only browning is allowed.
- Do not use the pressure cooker in pressure mode for deep frying food.
- When cooking doughy food, gently shake the cooker before opening the lid to avoid food ejection.
- This appliance is not a steriliser. Do not use it to sterilise jars.
- This appliance is not intended to be operated by means of an external timer or separate remote-control system.
- To carry the appliance always use the two side handles on the housing of the appliance. Wear oven mitts if the appliance is hot. For more safety, make sure that the lid is locked before transporting the appliance.
- The bottom of the cooking pot and the heating plate should be in direct contact. Remove any object or food residue located between the cooking pot and the heating plate, it could affect performance
- Be aware that certain types of food, such as applesauce, cranberries, rhubarb, pearl barley, oatmeal or other cereals, split peas, noodles, or pasta can foam, froth and sputter, and clog the valves. Use caution when cooking these types of food and after use clean valves thoroughly.
- Be aware that certain recipes which include milk can foam, froth, overflow and clog the valves. Use caution when cooking these recipes and after use clean valves thoroughly.
- When cooking food which expands during cooking, such as dehydrated vegetables or rice, do not fill the cooking bowl to more than half of its capacity.
- After cooking meat which has an outer layer of skin (such as ox tongue), which could swell with the effect of pressure, do not pierce the skin after cooking if it appears swollen: you could get burnt. Pierce it before cooking.
- Do not use the appliance empty, without its cooking pot or without ingredients inside the cooking pot. This could cause serious damage to the appliance.
- Do not use the appliance under pressure without adding water, which could cause serious damage to the appliance.
- Do not fill up your appliance without its cooking pot.
- Caution: do not spill liquid on the plug.
- Do not heat the cooking pot with any other heat source than the heating plate of the appliance and do not use any other pot. Do not use the cooking pot with other appliances.
- Use the cooking pot in the appliance ONLY. Do not use it to cook on stovetops, in the oven etc.
- Use a plastic or wooden spoon to prevent any damage to the non-stick coating of the cooking pot. Do not cut food directly in the cooking pot.
- Do not touch the valves, except while cleaning and maintaining the appliance in accordance with the instructions given.
- Do not place any foreign objects in the valves and pressure release button. Do not replace the valve.
- Check regularly the ducts in the valves allowing the escape of steam to ensure that they are not blocked.
- Do not use a cloth or anything else between the lid and the housing to leave the lid ajar. This can permanently damage the sealing gasket.
- Do not let the power cord hang over the edge of table or counter; or touch hot surfaces.
4. How to use safely – before cooking?
- Before using your appliance, check that the float valve and the pressure limit valve are clean.
- Before using your appliance, check that the sealing gasket has been correctly installed on the lid.
- Make sure that the bottom of the cooking pot and the heating plate are always clean. Make sure that the central part of the heating plate is mobile.
- Do not fill your appliance more than the MAX mark on the cooking pot.
- Please follow the recommendations on the volume of food and water to avoid the risk of boiling over which can damage your appliance and cause injury.
- Make sure that the appliance is properly closed before bringing it up to pressure.
- Make sure that the pressure release button is up (not sunk) before cooking. Refer to figure 48 of the section Quick Start Guide in Images.
5. How to use safely - during cooking?
- Do not try to open the lid until the pressure has decreased sufficiently. Do not try to open the lid until the float valve is down.
- Never force the appliance open.
- During cooking and steam release at the end of cooking, the appliance releases heat and steam. Keep your face and hands away from the appliance to avoid burns. Do not touch the lid during cooking.
- Do not move the appliance when it is under pressure. Use the handles when moving it and wear oven mitts, if necessary. Do not use the lid knob to lift the appliance.
- Do not remove the cooking pot while the appliance is working.
- In browning mode, be careful of risks of burns caused by spattering when you add food or ingredients into the hot cooking pot.
6. How to use safely - after cooking?
- When you open the lid, always hold it by the lid knob. Position your arm parallel to the side handles. Boiling water could remain trapped between the sealing gasket and the lid and could cause burns.
- Be careful also about the risk of burns from the steam coming out of the appliance when you open the lid. First open the lid very slightly to allow the steam to escape gently.
- Do not touch hot parts of the appliance. After use, heating plate surface can remain hot for up to 2 hours.
- Unplug from outlet when not in use and before cleaning. Allow to cool before putting on or taking off parts.
7. How to use safely - cleaning?
- Wipe clean the bottom of the cooking pot and the heating plate after every use.
- Do not immerse the appliance in water.
- For cleaning your appliance, please refer to instructions for use. You can wash the cooking pot and the lid in soapy hot water, do not put them in the dishwasher. Clean the housing of the appliance using a damp cloth.
8. What to do in case of damage?
- Only authorized person in Approved Service Centre can repair the product.
- Do not operate any appliance with a damaged power cord or plug or after the appliance malfunctions or has been damaged in any manner. Return appliance to the nearest Approved Service Centre for examination, repair or adjustment.
- If the power cord is damaged, it must be replaced by an Approved Service Centre in order to avoid a hazard. Do not replace the power cord supplied with other cords.
- Do not damage the sealing gasket. If it is damaged, have it replaced in an Approved Service Centre.
- Replace the sealing gasket every 2 years, or sooner if you see the sealing gasket is worn or in need of replacement.
- Use only the appropriate spare parts for your model. This is particularly important for the sealing gasket and the cooking pot.
- Use only spare parts sold in an Approved Service Centre.
- The use of accessory attachments not recommended by the appliance manufacturer may cause injuries.
- Do not use other cooking pots in the appliance in place of the provided cooking pot. Only replace the cooking pot with an original spare part designed to be used with this product.
- In accordance with current regulations, before disposing of an appliance no longer needed, the appliance must be rendered inoperative (by unplugging it and cutting off the power cord).
Environment protection first!

① Your appliance contains valuable materials which can be recovered or recycled.
- Leave it at a local civic waste collection point.
9. When does warranty apply?
- The warranty does not cover the abnormal wear and tear of the cooking pot.
- Read these instructions for use carefully before using your appliance for the first time. Any use which does not conform to these instructions will absolve the manufacturer from any liability and void the warranty.
- In case of commercial use, inappropriate use or failure to comply with the instructions, the manufacturer accepts no responsibility and the guarantee does not apply.
ALL PARTS OF YOUR PRODUCT

GETTING FAMILIAR WITH THE CONTROL PANEL

STATUS MESSAGES


Welcome message when appliance is turned on.
Time display. In this example: 1 hour 30 minutes.
Temperature display. In this example: 114 degrees Celsius.
Indicates that the program has a default automatic temperature/ time setting. It cannot be modified.
Indicates that temperature is rising during pre-heating phase.
Indicates that the appliance is pre-heating.
Indicates that the program is finished.
Indicates that the appliance is in keep warm phase.
Indicates that the program has been interrupted.
Indicates that the appliance is in standby mode.
HOW TO USE & CLEAN GUIDE
Feel free to refer to the figures indicated as (Fig.x) from Quick Start Guide part.
BEFORE FIRST USE
1. Remove packaging
- Take your appliance out of its packaging and please take time to read the instruction manual before first use.
- Remove promotional stickers (if any) from your appliance before first use.
2. Open the lid
- To open the lid, take hold of the lid knob, turn anti-clockwise and lift the lid up (Fig.1 & 2).
Note: When lifting the lid, it can happen that the cooking pot remains attached to the lid. It is normal and simply demonstrates a good hermeticity of the product. To avoid that the cooking pot falls heavily on the product when opening the lid, always open the lid gently.
- Place your appliance on a flat surface. Remove all protective materials and accessories from the inside of the appliance (Fig.3).
3. Clean all parts of the appliance
3a. Clean the lid, the cooking pot and the accessories
- Clean the lid, the cooking pot and the accessories with a soft sponge and soapy hot water (Fig.4).
- Dry off the lid, the cooking pot and the accessories (Fig.5)
- Do not use a scourer or abrasive sponge to clean the cooking pot as it could damage the non-stick coating in the cooking pot (Fig.40).
- Do not immerse the appliance in water (Fig.41).
- If you inadvertently immerse your appliance in water or spill water directly on the heating plate, take it to an Approved Service Centre for repair.
- Do not put the lid and the cooking pot in the dishwasher (Fig.42).
- Be aware, only the accessories: spatula, measuring cup and steam accessory are dishwasher safe.
3b. Clean the sealing gasket
- Remove the sealing gasket from the lid and clean it with a soft sponge and soapy hot water (Fig.7 & 8).
- Dry it off thoroughly.
- Place the sealing gasket over the sealing gasket rack and press it into place (Fig.9). Press down firmly to ensure there is no puckering and that the sealing gasket is snug behind the sealing gasket rack.
- After placing the sealing gasket on the lid, if you open the lid too quickly, it can happen that the cooking pot remains attached to the lid (Fig.37 & 38). Wait few seconds for the cooking pot to free itself from the lid (Fig.39).
Note: It is normal and simply demonstrates a good hermeticity of the product. To avoid that the cooking pot falls heavily on the product when opening the lid, always open the lid gently.
WARNING: Never use your appliance without the sealing gasket (Fig.44)
3c. Clean the valves
- To clean the pressure limit valve, remove the pressure limit valve from the pipe on top of the lid (Fig.10). Clean it with a soft sponge and soapy hot water (Fig.11). Once dry, take care that the duct of the pipe is clean before plugging the pressure limit valve back on the pipe on top of the lid (Fig.12). Ensure that the pressure limit valve is well put in place, it must be able to move up and down.
- To clean the pressure limit valve cover, unscrew the limit valve cover from inside of the lid (Fig.13). Clean it with a soft sponge and soapy hot water (Fig.14). Once dry, take care that the duct of the pipe is clean before screwing the pressure limit valve cover back inside of the lid (Fig.15).
- To clean the float valve, remove the float valve gasket from inside of the lid, flip the lid so that the float valve can come out of the lid (Fig.16). Clean the float valve gasket and the float valve with a soft sponge and soapy hot water (Fig.17). Once dry, insert the float valve back on the lid and put the float valve gasket back in place (Fig.18). Ensure that the float valve is well put in place, it must be able to move up and down.
3d. Clean the housing of the appliance
- Clean the housing of the appliance using a damp cloth.
- Do not immerse the appliance in water (Fig.41).
- Wipe clean the heating plate using a dry cloth.
INSTRUCTIONS FOR USE
1. Place ingredients in the cooking pot
- Remove the cooking pot from the housing.
- Put ingredients into the cooking pot.
- Please note that the level of food and liquids should never exceed the max level marking on the cooking pot (Fig.19).
- When cooking food ingredients which expand during cooking, such as dehydrated vegetables or rice, in pressure modes, do not fill the cooker to exceed more than half of its max level.
2. Place the cooking pot in the housing
- Ensure the bottom of the cooking pot is clean and dry; and remove any food residue from the heating plate (Fig.20).
- Place the cooking pot into the housing (Fig.21).
- Never use your appliance without the cooking pot.
3. Close and lock the lid
- Check that the sealing gasket is securely placed on the lid (Fig.43).
- Take hold of the lid knob, place the lid on the appliance and turn it clockwise to lock it (Fig.22).
4. Attach the pressure limit valve
- Properly place the pressure limit valve on the lid (Fig.23). Please note that the valve will remain somewhat loose, it is normal.
5. Switch on the appliance
- Fully unwind the power cord and plug it into the mains (Fig.24).
- The appliance makes a 'beep' sound, the screen flashes and displays HEH.
6. Select and launch a cooking program
Each program has a default time and temperature and requires a specific lid position, please have a look at the cooking programs table:
COOKING PROGRAMS TABLE
Cooking program icon Cooking program name Default cooking time Adjustable time Default temperature Adjustable temperature Default pressure Delayed start from 10min to 12h Keep warm up to 24h Lid status Lid closed and locked Lid closed but not locked Lid open Stew 30min from 1min to 2h 114C No 70Kpa Yes Yes ● Soup 12min from 1min to 2h 114C No 70Kpa Yes Yes ● Stir Fry 20min from 1min to 1h 160C Yes from 100C to 160C No No No ● Steam 10min from 1min to 2h 114C No 70Kpa Yes Yes ● Bake 40min from 1min to 2h 160C Yes from 100C to 160C No Yes Yes ● Sous-vide / Slow-cook 4h from 30min to 12h 85C Yes from 55C to 95C No Yes No ● ● Rice 8min from 1min to 2h 114C No 70Kpa Yes Yes ● Yogurt & Ferment 8h from 30min to 12h 30C Yes from 22C to 40C No No No ● ● Porridge 15min from 1min to 2h 100C No No Yes Yes ● Adjustable Chef Mode 30min from 1min to 4h 80C Yes from 70C to 160C No No Yes ● ● ●
Note: When cooking, you may notice slight steam leakage from the lid, especially from the pressure limit valve. This is normal and occurs when pressure builds up.
Please refer to the figures from Quick Start Guide (from Fig.25 to Fig.36)

Stew program
- Place the ingredients in the cooking pot and completely close and lock the lid.
- Turn the control panel knob to the right to reach Stew program. The screen displays the default cooking time.
- Optional: Press and set the desired time by turning the control panel knob to the right (to increase time) or to the left (to decrease time).
- Press to start the cooking program.
- The appliance starts the pre-heating phase. The screen displays alternatively & HE & and the pre-heating light indicator ① turns on.
- When the pre-heating phase is completed, the appliance switches automatically to cooking phase. The screen displays the count down and the cooking in progress light indicator l turns on.
- During cooking process, pressure builds up in the appliance and pushes the float valve up. The under pressure light indicator turns on to notify that the lid cannot be opened without releasing the pressure first.
- At the end of the count down, the appliance beeps and the screen displays End.
- After a few seconds, the appliance will automatically switch to keep warm phase. The screen displays HOE and the keeping warm light indicator turns on.
- Press ⑥ for 3 seconds to stop the program at any time.

Soup program
- Place the ingredients in the cooking pot and completely close and lock the lid.
- Turn the control panel knob to the right to reach Soup program. The screen displays the default cooking time.
- Optional: Press and set the desired time by turning the control panel knob to the right (to increase time) or to the left (to decrease time).
- Press to start the cooking program.
- The appliance starts the pre-heating phase. The screen displays alternatively & HERA and the pre-heating light indicator turns on.
- When the pre-heating phase is completed, the appliance switches automatically to cooking phase. The screen displays the count down and the cooking in progress light indicator turns on.
- During cooking process, pressure builds up in the appliance and pushes the float valve up. The under pressure light indicator turns on to notify that the lid cannot be opened without releasing the pressure first.
- At the end of the count down, the appliance beeps and the screen displays End.
- After a few seconds, the appliance will automatically switch to keep warm phase. The screen displays HDE and the keeping warm light indicator turns on.
- Press for 3 seconds to stop the program at any time.

Stir-Fry program
- Turn the control panel knob to the right to reach Stir-Fry program. The screen displays the default cooking time.
- Optional: Press and set the desired time by turning the control panel knob to the right (to increase time) or to the left (to decrease time).
- Optional: Press ① and set the desired temperature by turning the control panel knob to the right (to increase temperature) or to the left (to decrease temperature).
- Press to start the cooking program.
- The appliance starts the pre-heating phase. The screen displays alternatively & HERE and the pre-heating light indicator turns on.
- When the pre-heating phase is completed, the appliance switches automatically to cooking phase. The screen displays the count down and the cooking in progress light indicator turns on.
- Place the ingredients in the cooking pot and keep the lid open to stir-fry.
- At the end of the count down, the appliance beeps and the screen displays End.
- After a few seconds, the appliance will automatically switch to standby mode. The screen displays
- Press ⑥ for 3 seconds to stop the program at any time.

Steam program
- Place 150ml of water ( 3/4 cup) in the cooking pot, put the steam accessory in the cooking pot and add your ingredients. Completely close and lock the lid.
- Turn the control panel knob to the right to reach Steam program . The screen displays the default cooking time.
- Optional: Press and set the desired time by turning the
control panel knob to the right (to increase time) or to the left (to decrease time).
- Press to start the cooking program.
- The appliance starts the pre-heating phase. The screen displays alternatively & HERE and the pre-heating light indicator turns on.
- When the pre-heating phase is completed, the appliance switches automatically to cooking phase. The screen displays the count down and the cooking in progress light indicator turns on.
- During cooking process, pressure builds up in the appliance and pushes the float valve up. The under pressure light indicator turns on to notify that the lid cannot be opened without releasing the pressure first.
- At the end of the count down, the appliance beeps and the screen displays End.
- After a few seconds, the appliance will automatically switch to keep warm phase. The screen displays HOE and the keeping warm light indicator turns on.
- Press for 3 seconds to stop the program at any time.

Bake program
- Place the preparation in the cooking pot and close but don't lock the lid.
- Turn the control panel knob to the right to reach Bake program. The screen displays the default cooking time.
- Optional: Press and set the desired time by turning the control panel knob to the right (to increase time) or to the left (to decrease time).
- Optional: Press l and set the desired temperature by turning the control panel knob to the right (to increase temperature) or to the left (to decrease temperature).
- Press to start the cooking program.
- The appliance starts the pre-heating phase. The screen displays alternatively & HERE and the pre-heating light indicator turns on.
- When the pre-heating phase is completed, the appliance switches automatically to cooking phase. The screen displays the count down and the cooking in progress light indicator turns on.
- At the end of the count down, the appliance beeps and the screen displays End.
- After a few seconds, the appliance will automatically switch to keep warm phase. The screen displays HOE and the keeping warm light indicator turns on.
- Press for 3 seconds to stop the program at any time.

Sous-vide / Slow-cook program
- TurnthecontrolpanelknobtotherighttoreachSous-vide/Slow-cook program . The screen displays the default cooking time.
- Optional: Press and set the desired time by turning the control panel knob to the right (to increase time) or to the left (to decrease time).
- Optional: Press ⑧ and set the desired temperature by turning the control panel knob to the right (to increase temperature) or to the left (to decrease temperature).
- Press to start the cooking program.
- The appliance starts the pre-heating phase. The screen displays alternatively & HEA and the pre-heating light indicator turns on.
- When the pre-heating phase is completed, the appliance switches automatically to cooking phase. The screen displays the count down and the cooking in progress light indicator turns on.
- At the end of the count down, the appliance beeps and the screen displays End.
- After a few seconds, the appliance will automatically switch to standby mode. The screen displays = = = .
- Press for 3 seconds to stop the program at any time.

Rice program
Place the ingredients in the cooking pot and completely close and lock the lid.
- Turn the control panel knob to the right to reach Rice program. The screen displays the default cooking time.
- Optional: Press and set the desired time by turning the control panel knob to the right (to increase time) or to the left (to decrease time).
- Press to start the cooking program.
- The appliance starts the pre-heating phase. The screen displays alternatively & HERE and the pre-heating light indicator turns on.
- During cooking process, pressure builds up in the appliance and pushes the float valve up. The under pressure light indicator turns on to notify that the lid cannot be opened without releasing the pressure first.
- At the end of the count down, the appliance beeps and the screen displays End.
After a few seconds, the appliance will automatically switch to keep warm phase. The screen displays HOE and the keeping warm light indicator turns on.
- Press for 3 seconds to stop the program at any time.

Yogurt & Ferment program
Yogurt & Ferment program can be used to make yogurt or raise bread/pastry dough.
- When making yogurt, place the ingredients in the cooking pot and close the lid.
- When raising dough, you can knead the dough directly in the cooking pot then place the cooking pot in the housing and close the lid.
- Turn the control panel knob to the right to reach Yogurt & Ferment program. The screen displays the default cooking time.
- Optional: Press and set the desired time by turning the control panel knob to the right (to increase time) or to the left (to decrease time).
- Optional: Press and set the desired temperature by turning the control panel knob to the right (to increase temperature) or to the left (to decrease temperature).
- Press ⑥ to start the cooking program.
- The appliance starts the pre-heating phase. The screen displays alternatively & HERE and the pre-heating light indicator turns on.
- When the pre-heating phase is completed, the appliance switches automatically to cooking phase. The screen displays the count down and the cooking in progress light indicator ⑥ turns on.
- At the end of the count down, the appliance beeps and the screen displays End.
- After a few seconds, the appliance will automatically switch to standby mode. The screen displays
- Press for 3 seconds to stop the program at any time.

Porridge program
- Place the ingredients in the cooking pot and completely close and lock the lid.
- Turn the control panel knob to the right to reach Porridge program . The screen displays the default cooking time.
- Optional: Press and set the desired time by turning the control panel knob to the right (to increase time) or to the left (to decrease time).
- Press ⑥ to start the cooking program.
- The appliance starts the pre-heating phase. The screen displays alternatively & HERE and the pre-heating light indicator turns on.
- When the pre-heating phase is completed, the appliance switches automatically to cooking phase. The screen displays the count down and the cooking in progress light indicator turns on.
- At the end of the count down, the appliance beeps and the screen displays End.
- After a few seconds, the appliance will automatically switch to keep warm phase. The screen displays HOE and the keeping warm light indicator turns on.
- Press for 3 seconds to stop the program at any time.

Adjustable Chef mode
- Place the ingredients in the cooking pot and close the lid or not depending on your recipe.
- Turn the control panel knob to the right to reach Adjustable Chef mode . The screen displays the default cooking time.
- Optional: Press and set the desired time by turning the control panel knob to the right (to increase time) or to the left (to decrease time).
- Optional: Press ⑥ and set the desired temperature by turning the control panel knob to the right (to increase temperature) or to the left (to decrease temperature).
- Press to start the cooking program.
- The appliance starts the pre-heating phase. The screen displays alternatively & and the pre-heating light indicator turns on.
- When the pre-heating phase is completed, the appliance switches automatically to cooking phase. The screen displays the count down and the cooking in progress light indicator 变 turns on.
- At the end of the count down, the appliance beeps and the screen displays End.
- After a few seconds, the appliance will automatically switch to standby mode. The screen displays
- Press for 3 seconds to stop the program at any time.
* Suggestion for quickly reheating dishes: set temperature to
>=95C and cook with lid closed but unlocked.
7. Use the delayed start function
Delayed start can be useful to preset the appliance to start cooking later.
- First select a program following the steps described above in part 6.
- Before starting the selected program, press . The screen displays the default time for delayed start.
- Set the desired time by turning the control panel knob to the right (to increase time) or to the left (to decrease time).
- Press . The screen displays the delayed start count down. When preset time is elapsed, the appliance will start cooking automatically.
8. Open the lid
- Do not attempt to open the lid if the float valve is up and if the under pressure light indicator is turned on.
- The pressure can be release in 2 different ways at the end of the cooking:
Natural release: At the end of the cooking or after stopping the program, the appliance will cool down by itself, and the pressure will release naturally. During natural release, food might overcook due to the remaining pressure in the pot. Use manual release to stop cooking process immediately.
Manual release: Press continuously the pressure release button, on top of the lid. It will take a few seconds to a few minutes depending on the amount of food inside of the cooking pot (Fig.31).
WARNING: Be careful of the hot steam coming out from the appliance. Keep your face and hands away from the steam output (Fig.45).
- To open the lid, position your arm parallel to the side handles, take hold of the lid knob, turn anti-clockwise and lift the lid up (Fig.32 & 33).
WARNING: Be careful of the hot steam coming out from the cooking pot.
9. Unplug the appliance
- After usage, unplug the appliance and let it cool down for at least 2 hours before cleaning.
10. Clean after use
- Clean your appliance after each use.
- Before cleaning, let your appliance cool down for at least 2 hours.
- For cleaning instructions, refer to part 3. Clean all parts of the appliance in BEFORE FIRST USE section.
11. Maintenance tips
- To ensure the durability of the cooking pot time over time, do not cut food in it.
- Use the provided accessories. Do not use any metallic utensil as it could damage the nonstick coating in the pot.
- After usage, the sealing gasket may keep the smell of your dish. It is normal; silicone has little pores that open up when exposed to high temperature and close back once temperature drops. To eliminate the smell from the sealing gasket, you can:
- Put the silicone ring in the dishwasher
- Add 1 cup of vinegar, 1 cup of water and 1 lemon cut in large pieces into the cooking pot and launch a steam program for 2 minutes, then let the steam release naturally.
- Change the sealing gasket every 2 years or earlier in case of damage.
TECHNICAL TROUBLESHOOTING GUIDE
Problem Possible reasons Solutions Unable to open lid Unable to open because of pressure in the cooking pot. Press continuously the pressure release button to remove the pressure inside of the cooking pot. It can take a few minutes until the pressure is fully released. Pressure in the cooking pot is fully released but the float valve is stuck because it is too dirty and therefore unable to move down. a. Be sure the pressure is totally released by letting the appliance cool down for at least 2 hours.
b. Gently push the float valve down by inserting a skewer or a long object into the float valve opening. If this does not work, send the appliance to an Approved Service Centre.
c. For next use, please clean and dry off the float valve thoroughly. Unable to close lid The sealing gasket is not properly installed. Install the sealing gasket properly. The cooking pot contains hot ingredients generating steam. Wait for the ingredients in the cooking pot to cool down before trying to close the lid again. The float valve is stuck because it is too dirty and therefore unable to move down. a. Gently push the float valve down by inserting a skewer or a long object into the float valve opening. If this does not work, send the appliance to an Approved Service Centre.
b. For next use, please clean and dry off the float valve thoroughly. Position and or direction at which the lid was closed is incorrect. Close the lid in the correct direction according to the instruction manual. When opening the lid, the cooking pot remains attached to the lid. The sealing gasket created a suction effect. The cooking pot will free from the lid by itself. It is normal and simply demonstrates a good hermeticity of the product. To avoid that the cooking pot falls heavily on the product when opening the lid, always open the lid gently. Intense release of pressure from the pressure limit valve. The inner pressure exceeds working pressure, or the inner pressure exceeds the safety pressure. Clean pressure limit valve, float valve and lid thoroughly. If float valve still has steam coming out, please return appliance to the nearest Approved Service Center for inspecting, repairing or adjusting by authorized person. The pressure limit valve is in an incorrect position. Carefully rotate/press the pressure limit valve to make it fall into place. Be careful of the hot steam. Position yourself safely and wear oven mitts. Faulty pressure control resulted in release of pressure. Send the appliance to an Approved Service Centre for repair. Continuous pressure release from the float valve. The inner pressure exceeds working pressure, or the inner pressure exceeds the safety pressure. Clean pressure limit valve, float valve and lid thoroughly. If float valve still has steam coming out, please return appliance to the nearest Approved Service Center for inspecting, repairing or adjusting by authorized person. Residue in the float valve. a. Press continuously the pressure release button to remove the pressure inside of the cooking pot. It can take a few minutes until the pressure is fully released. b. Let the appliance cool down for at least 2 hours. c. Clean and dry off the float valve before restarting the cooking. The float valve is stuck. a. Press continuously the pressure release button to remove the pressure inside of the cooking pot. It can take a few minutes until the pressure is fully released. b. Let the appliance cool down for at least 2 hours. c. Clean and dry off the float valve before restarting the cooking.
Problem Possible reasons Solutions Steam leakage from lid. The sealing gasket is not properly installed. Remove the sealing gasket, clean it and reinstall it in the correct position. The sealing gasket is dirty. Remove the sealing gasket, clean it and reinstall it in the correct position. The sealing gasket is damaged, or the edge of the cooking pot is damaged. Send the appliance to an Approved Service Centre for repair. Food is uncooked Solid/liquid ingredients ratio is incorrect. Try again by following precisely the quantities of the recipe. No electricity from the power supply. Check your home electric circuit. E0 displayed on the digital screen. Pressure switch is faulty. Send the appliance to an Approved Service Centre for repair. E1 displayed on the digital screen. The temperature sensor is faulty. Send the appliance to an Approved Service Centre for repair. E2 displayed on the digital screen. The lid is not properly positioned for your cooking program. Each program requires a specific lid position. Check and adjust the lid position required by your cooking program, refer to the cooking programs table in part 6 of this manual. Restart your program once the lid is correctly positioned. If the issue remains, send the appliance to an Approved Service Center for repair.
ZA EYXAPIZOYME I0Y ENIAEETE TH MOULINEX
KaIomegaopioaTe oTov kOoToU yPnyopou KAI VoomuayepaatoC!
Me to Turbo Cuisine mα vεa δισταοη στο μαγερεμα: Πιο εύκολα. Πιο νόστιμα. Απλα καλυτερα!
To Turbo Cuisine i yia va o i k o v o i xpov ka i va o u p i unepoxa stitik a yuata, ana kai avetα.
Zac Euxapiotoupe nolu nou mac xapiaate mia theon otnv kouziva oac.
AÇ μαγειρέψουμε μαζί!
NEPIEXOMENA
O8nyo5 yprinyopns Ekkivnons oEikovec
H Moulinexdeltaipotepaiaotnta otnv aosfaia 238
Ola ta εξαρτήματa tou προίντος 248
Eoikeiwn eTov nivaka Elyxou 249
O8nyoc xpronc kai kathetaiaou 250
O8nyoc avtmuetwiontcexvikw npoBnmuatw 268
△εθνις εγγύηση της Moulinex 271
HMOULINEXΔINEIΠPOTEPAIOTHTA ΣTHN AΣΦΑΛEIA
H aαφαλεια ειναι η πρωτη προτεραίοτητα μας, ξεδιαζουμε και κατασκευαζουμε τα προίοντα μας με ψηλα πρότια ασφαλείας και τεχονλογίας, Ωοτόσο, σε καθε Λεκτρική συσκεύνινιπαρχουν πιθαυοί κίνδυοι, επομένως συνιούμεν αλαμβάνeteυπόψη και να τηρείte τις παρακατω σδηγίς.
O△HΓΕΣ AΣΦΑΛΕΙΑΣ
Δiαβασe προεκτικόλες τις παρακατω σθηγες και αποθηκεύσετις για μελλοντική αναφορά.
H akataaannn xpnon tnc ouokeu nca twv a p t n u a t w v TNC evdexetai va npokaloei n otn ouokeu n kai trauuatio.
H oukeun maayiepeuei faynto untio n. H eofaalev n xpion evdexetai va npokaloei kivduvo ykaumatoc, loyw tou atou.
TnV aOaFALIa Oa, auto To npoiov oumuopphiVETa
e ola ta Ioxuovta Tpotua Kai olouc touc loxuvteC
kavovioouc (o8nyies yia tn xamnna Taon, Tnv
nEektpoayvntikn oubetaotnta, ta Ulika nou epxovta
OE eTAPHm E TA TPOphiA,To NepiBaalov, k.
H aipaiin nyn 0epuotnac yia to ayiepeua npilaaeavetao tn ouokevun.
1. Nóu xρησιμοποιείαι με ασφάλεια;
Xpno n ovo e oowtepko xwpo.
Autn n ouokeun npoopiZetai aTOKkEiotikya oikiakn Xpno. Dv npoopiZetai yia xpon otic akoloutheta TepiTTwoics, oIOnieCdeltaKALUTovtaI antOtnyEyyuon:
- Σε κουζίνες προσωπικόν καταστημάτων, σε γραφεία ἡ αλλους χώρους εργασίας.
-Σε αγροκτήματα.
-AIo v o s o x i w v, o n aAawv kataaUmuAtwv.
-Σεξενωνες ἡ αλλα παρόμοιου τύπου καταλύματα.
Mny tootheite tn ouokeun oE kauto foypvo n kautn eotia.Mnv tootheite tn ouakeun kovtaoe loya n eofekta avtikeiEvA.
Xpnooioiote tn oukeun navw oE eTne6n,otaepn kai avthetaikn otn thepounta eTia aio np np onou mtopeiv aekivaxei vepo.
2. Anto nioov xpoiouoietai e aofaia;
Autn n ouokeun dev npopicietai yia xpnon ano atoua (oumuepilauubavouevwv twv pialuw) e nepiopioevec oomegakecs, aothnpiakec n diavontikec ikavotntec, oute a toaotaou dev exouv tnv avaykaia eptiia n tcaatapaitntec ywoeic, ektoc av bpikovtau no tnv eipaeyn evluka n exouv lae i odnyie c yia tn xpnon tnC ouokeunc a toaoto uentuo vua nva ofoaaleia touc.
H ouokeun mtopei va xnpouonointhetai anto atoua me μe iomegaevc oomegaatikec, aoθntnpiakec n diavontikec ikavotntec n me ελeiwneu piaoc kai yywons, efoov επiβεπovtai exouv λαβei odnyies yia tnv aσφαλn xρon tnç ouokeun cai katavoouv touc utapxovtekivduvouc.
Autn n ouokevun dev mnpei va xpnouoiointheta aT o Tsiia. Duaoote tn ouokvun kai to nEktpiKo KaIomega kapi aTIOAldia.
- Ta παιδία δεν θα πρέπειν α παίζουν με τη σωακεύη.
- Ta παδία θα πρεπειν αβρίοκονταιυό επίβλεψη, προκειμένουνα διασφαλίζειαιότι δενθα χρησιμοπούηουνιη σουκεύνης παίχνίδι.
3. Aσφαλής χρήση - γενική χρήση
Xpnooioite n oukeun mov yia touc oontouc yia touc onoiouc npoopiEaI.
Mny xnoiouoite tn ouokeun yia va tnyavioet e
phiynto oE ladi. Mov to ynou o EITpEeTai.
Mnv xnpoumoioieite tn xutpa toxutntac wc pfiteca otn leitoupyia pionc.
- Otav μαγειρεύτε Φαγntα με ζύμι, ανακίνησε ελαφρα
tn χύτρα προτόν αυοίξετο το καπάκι, Ϝετο το φαγntó
vα μην πεταχτέι από το εσωτερικό του σκεύους.
Houkeun dev evai aiooteipwntc. Mny xnpoiotoeite tn oukeun yia aiooteipwon baowv.
H ouokevun 8ev npoopicietai yia xpnon e 8wterpiko Xpvoslaikotn n e 5exwpiot o uotma tnalexepiou.
- Iα τη μεταφορα της Σωοκεύς, χρησιμοποίει τήντοτε τις δύο πλευρικές λαβές στό τηρερβλημα τής Σωοκεύς. Na φοράτε προστατευτία γάντα κατά της θερμότητας, εάνη σωοκεύη εἰναι κατή. Iα περισότερη ασφαλεία, βεβαιωθείτε πιώς το καπάκι εἰναι ασφαλιομένο πριν μεταφέρετε τή σωοκεύή.
To katoepoc tou maeyipiko okeouc ka tnc 0epuaivovnpiakac penei va bpiokovtao aeon epan. Aphiote onoiobnnote avtikemuvo n uolaima faayntou mnpei va bpiokeotai mea Tuou maeyipko okeouc ka tnc 0epuaivovnc piakac, Kaowvdeltaetai va einnpeaoei tvn aiosoon
AeTe UIOJN TWC OIOJEVOI TUINOI FOYNTOU, ONWCS IOUpeC mllou, ta Kpavmuepi, to paeVti, to KPIaipu IepE, n Bpwun kai aaaa dnmuNTpiakα, n fao, ta vouvtac n ta Zmuapika EvdeXetai va oxmuatioov aupo Ka i fuuaalides, ta onoia EktoEuvotai pfaoosovtac tic BaIbEs. Awte idiaitepn npoooykata to mayeipeua autuw twv tuTiw FOAYNTOU KA KAtapiZeTE OxOAAOTIKa tic BAJIbEs meTa anTo th xPon.
Aβει Αρομενες Μυταγες Που περλαβανουν γαλ ενδεχειαιν σχηματίσουν αφρό, και φύσαλίδες καιν Απερχειλίσουν φρασοσοντας τις βαλβίδες. Δωτειδιαίτηρη προσθήκατα Μαγείρεμα αυτων των συνταγών και καθαρίζετε σχολαστικά τις βαλβίδες μετά από τη χρόη.
- Meta to ayéipεμα κρεatoc με εξωτερική στρωση δερματος (όπως η μοχαρίσα γλώσα), που ενδεχεταινα διογκωθεί λόγω της πίεσς, μην τριπάτe to δερμα μετα to ayéipεμα εάν φαίνεται διογκωμένο: ἄπαρχει κίνδυνος εγκαύματος, Tριπότε to πριν to ayéipεμα.
- Otav δουλεύτεμε τρόφια που εχουν την ταονν α φουκωνουν στη δίαρκεια του μαγειρεματος, οπως αποξηραμένα λαχανικά ἡρύς, μην γεμιζετετον κάδo μαγειρεματος παραπάνω από το μισό της χωρητικότητας του.
Mny xpnoiopoieite tn oukeun adea, wpiic to ayepiko oekuoc n wpiis uikα oTO eowtepiko tou ayepikoou oekouc. Mtopei va npokntheoapn OTN OUKeun.
Myn npnouoie t ouokun uno n oevexe Tpooofoe i vep, yatki tetoio a npopooe va npokafoe oopapn oopao sto okeuos.
Mny yemieTe tn ouokevn xwpi to mayeipko okevoC
- Ppoooxn: uynxuveTe Uypa oTo oic,
Mny Oepmaivete to mayeipko okeuoc me aaln pynn OepoTntac npav tnc Oepmaivoevns nakac tnC oukeunc kai mny xpnoiopoite aallo maeyipko okeuoc, Mnyxnpoiote to maeyipko okeuoc me aalec ouokevcs.
Xpnoiopoioite to maayepiko okevoos MONO onn ouokevn. Mv to xpnoiopoioite oe eotie, foupvo k.lπ.
Xpnoimuoiieite paoikn n yu koutaia v a anotpeyete uov bao n otnvavkoanlntkneipwon tou ayepikou okeouc. Mny koet e aaynto evtoc tou ayepikou okeouc.
Mny ayyicte Tc Baaibides, e Eaeipoeon kata tov kaOapioo touc kai kat a tnv ekTeAeon epyaoiuv ouvtnponcs tsouakeunc oumowva e tic odnyiec.
Mny tooTheTeite Xeva avtikemueva otic baalbi8c kai oTo koupi ane aeuthetapwonC nieonC, Mny avtikaoiotaTn baiBia.
ELeyTe TaKTiKa Touc aywyouc Tuv i Tou eitpEnouv Tnv aTLeuOepwOn aTuou, yia va diaofoaioe otI dev evia ppaoyevoi.
Mny toothei te navi n otidnnote aaloo avaeoa oTo kaTaki kai oTo pepiBna yia va meivei To kaTaki maovoixto. Mnpei va npoknthei moviun OTOV OTeyavotoiniko saKTulio.
Mny afnvete to nlektpiko kaawio va kpeetai ao tnv akpn tou tpaneoiou n tou npaykou n va ayyic Kautec EpiphiaveieC.
4. A - to
Pniv xnpoiouoinoettn ouokeun, eeyxi Tnv kaopotnta tnc i mc E nnTnpa kai nC i aphialeia pio
- Pniv xnpouoioeTe Tn ouokeun, eleyte Tn ootnto0etnon tou steyavontiokou daKTuaiou oTo kaTaki.
Bεβαιωθείτε πως το κατω μέρος του μαγειρικόν σεύους καὶ θερμαινόμενη πλάκα εἶναι πάντα καθαρά. Bεβαιωθείτε ὄτι το κεντρικό μέρος της θερμαινόμενης πλάκας μπορείνα κίνηθεί.
Mny yεμiετε ηισοκευή πανω από την ενδειξη MAX ΟΤΟ μαγειρίο σκεύς.
Akoalouthe tic ouotaoeic avaopikka me tov oyko
phiayntou kai vepou yia tnv anofoyn uTepxieiliong
loyw bpaaou, nou mtopei va npokaloei blaabn otn
Ouokeu n kai trpaumatouos.
Bεβαιωθείτε πιώς η συοκεύν ἐχει κλείσει ωωτά προτουξεκινόσει έλειούργία της υμτας.
Bεβαιωθείτε οτι τα κουμπι απελενθερωONS πίεONS δεν εύαι πατημένο (εξέχει) προτου ξεκίνησετε ο μαγείρεμα. Avatρέξετε στην εικόνα 48 τής ενότητας Oδηός γρήγορης εκκίνησας σε εικόνες.
5. Aσφαλής χρήση - κατα το μαγείρεμα
Mny npooantheta va avoie to kaiaipotou n tiocn meiwthapkwc, Mny npooaohoeva ovoie to kaiaik yexpi va katebei 9baiaibdae πawtnpa.
Mny aokéite pote duvam yva v aoovieTe tn ouokevn.
Kata to mayeipema kai tyn ane aeuthetaon atoukata to teao tou mayeipaeato, n oukeun aneauthetawvei eepohtn ta kai ato. KpatnoTe to npoomega to kai ta xepia oac maekia aio tn ouakeun yia va atofouyete ta eykaumata. Mny ayyizte to kaakl katota to mayeipema.
Mny Tn ouokevun, 0oo elva uio pieon. Xpnouoioite tic c kata n kai
φopáte προστατευτικα γάντια, εόν είναι απαραίπτο. Mην χρησιμοποιείτε τή λαβή στο καπάκι γίαν ασκώσετε τή συσκεύŋ.
Mny aphiapeite to ayepiko oekuoc, ooo laitoupyei n ouokun.
- Σηλειουργία ψησιματος,να εἰοτε ἀδιαίτερα προσεκτικόγια τυχόν εγκαύματα από Εκτοξεύσεις,όταν προσθέτετε φαγητό ἡνλικα στό το καύτό μαγειρικό σκεύος.
6. Aosfaancsxpnon- to a e i p e a
- Otav avoiyete to kaniaki, va to kpatate navtoe ano tn tou kaniakiou. To oteite to xepi oac npapalnla otic πeupikc ec. Evexetai va exei payidutei ovaeoa otov oteyavotointiko aktulio kal to kaniak βpaoto vepo kal va npokaleoi ykaumata.
- Ppooεξε, επiαης, tov kivduvo εykaumατων απο tov ατμο που βγaiveι απο ηισοκευή ὄταν ανοίγετο καπακι. Πρωτα, ανοίξε πολύ λιγο το καπακι για να απελευθερωθει σμαλά o ατμός.
Mnv ayyizete ta kauta eapntmuata tnc ouokueunc H epiaveia tnc thepaivovevns nakac mtopei va npaaeivei zotn ewsckai 2 wpc tao antoynpnoon.
- Anouvdséte to kaλwδio anto tv npizα,otav δev xρησιοποietai n ouokεuń kai πipv anto tov kaθαριoú tonc. AΦnote tn ouokεuń va kpuωεi προτou totoθεntóte n αφαρεσeTE Εξαρτμata.
7. Aσφαλής χρήσον - καθαρισμός
- ΣΚΟΥΠΙΟΤΕ οτο κατω μέρος του μαγερικόν σκεύους καλητης θερμαινόμενης πλάκας μετά από καθε χρήση.
Mnu biEte tn ouokueun ovepó.
- Tα tov καθαρισμό της συοκεύνς, ανατέξετο οτίς
oynies xnoans. Mnpeite va luveTe to ayepiko okeuoc kai to kaakl me zetn oanouvada. Mny ta zete oTo nluvtnpio niatwv. Katheta Te npiBnmu tns oukeunc eva wtoavi.
8. Ti πέπεινα κάνετος περίπτωη βλάβης
- Movó Εξουσιδοτημένος τοτόμο σε Εξουσιδοτημένος κέντρο σέρβις μπορείνα επιδεύσει το προίν.
Mny xnpoiouoite oioiaodnote ouokun, evxu apei to nEaKpko kawldio n to fic, eav n ouokun dev etoupye ootaa n ev exei unootei onoiadnote aen. EIToppeTtnouokunoto pnoieoepo egouioobotnevo Kevtpo oepic yia eayxo, tiokeun npuon.
Eav to nAektpiko KaIomega exei unooTei 3aBn, Ppei va avikataoTaOe i ano eva eovoiodotnevo Kevtpo oepic yia tnv anouyn tuxov kivduvou. Mnu avikaiotate to nAektpiko KaIomega nou npapexetai to ppoiov, aIaa KaIomega.
Mny npokaleite OTov OTeyavoiniKo 8akTuio.Eav exei unooTei ,avtikataotnoTe to 6e eva eoiodotnuevo kevtpo oepic.
- Avtikαθιοτάτε tov στέγανοποιntικό δακτύλιο κάθε 2
- χρόνια ἡνωρίερα, εὰν παρατηρήσετε πως ἐχει φθαρεί
- η χρειαζεται avtikatáσταση.
Xpnoiopoioite movo ta katalnnla avtalaktka yia to movteo oac. Eiva iiaitepa onmavtiko yia tn etoupyia tou steyavoiniinkoudeltaukiou kai tou maeyepikou okevouc.
XpnoiouoieTe mvo avtaaakia Tou nawouvtai e Exouoiodotnevo kevtpo epbetaic.
H xphon eapntmuatwov dev ouviotwvai ano tv
KataokeuaoTn Tns OoukeuC EvEeTaI vA PpokaEoTe I pauaiaouoC.
Mny xpoioioite aalaa maeyipikockeun otn ouokun, mOvo to maayepikoc oKeuoc nou pApexetai me to npoiov. Avtkaotate to maayepikoc oKeuoc movo authetavtiko avtaalakktiok, oxediaoevo yia xpnon e to ouyekpiévo npoiov.
- Σύμφωνα με τους ὄχύοντες κανονισμους, προτου απορρίψετε μία συοκεύη, η συοκεύη θα πρέπειν αχρησεύειαι (αποσυδέοντάς τη και κόβοντάς το έλεκτρικό καλώςι).
PpOeXei n npoostaoia tou nepi o t c!
Houkeunoacpiexi tonutiaulikα,ta onioa μtopoovvaavapnoiopoionoovvvaavakukawoov.
Aphiote tn oke kantoio dnohtiko onmuio oulambdaoc aonbetaNTWvTnpiepioxnsoc.
9. Note Ioxuei n Eyyunon;
H eyyunon 8ev kaIunTei aphiouk n oopao tou i k o u OKEUOUC.
- Διαβάοτε προσεκτικά τις Μθηγίες χρήσος προτουχρησμοποιόσετε τη συοκεύν γία πρώτη φόρα. Σεπερίπτωπ χρήσος που δεν συμμοφώνεται με αυτές τις Μθηγίες, o κατασκεύναστής δεν φέρει καμία ευθύνη καὶ ἐγγύŋον ακυρώνεται.
- Σε περίπτωπη εμπορικής χρόσης, ακατάλληλής χρόσης ἡ μη συμμόρφωσης με τις ὅδηγές, o κατασκεύαστης δεν αποδέχεται καμία ευθύνη καλ δεν ὃχύειη ἀγγύŋοι.
OΛA TA EEAPTHMATA TOY IPOIONTO

\*iAogia aEoouap avaloya ie to ovtel

EEOIKEIQZH ME TON NINAKA EAEFXOY
MHNYMATA KATAZTAZH

Mnuja kaawopiaatoc otav n oukeun evepytoieita.

Euéáviən xρóvou. Σε αυτο παράδεγμα: 1 ωρα 30 λεπτα.

Euφáviω Θερμokpασiας. Σε αιτό το παράδειγμα: 114 βαθμoi Kελοίου.

YtOBeIkuVei ot to npoypaia exi ma npoeilayevn puOmuon autoatnc thepokpaoiac/XPovou. Dev mtopei va yivei pontonion. YtOBeKuVei ot n thepokpaoia auXavetai kata tn faoan npoepmuavonc.

YtOSeikVUeI Oti n OoKEuN PPOePmuivetai.

YtO8ekvEi ot npoypaum olokarnpwθnke.

YtOBeikVei ot n oukeun Bioketai otn faoi diatnpns Oeepokpiaic.

YIOSEIKVUEIOTTO pOpypaia diaKoTNIKE.

YtOBeIKVeuI ot n OoKEuIN Bpioketai e aeitoupyia avauovnC.
O△HΓΟΣXPHΞΚAIKAΘΑΡΙΣΜΟΥ
AvatpeTe otic ekovc nou uno8ekvovtai wC (Eik.x) oToV osnyo ynpyopnc EKKivnonc.
IPIN ANO THN INPQTH XPHEH
1.Aphiepooukeuaia
Aphiéote tn oukeun ano tn oukeuaia kai diaaote tic odnyiec xnpnc npiv tn xpnoiortnoe Tia npwtn opa.
- Aφαρεσε τα διαφημιοτικα autoKóλλητα (éav unáρχουν) από ηισωκεύν πριν ηχροιμοποίσετε γι αρώτη φόρά.
2. AvoIyμa tou kαπakIoú
- Iα vα αονεξετο καπάκι, κραπότε τη λαβή του καπακίου, περιστέψετα φρισερόστροφα και σηκώτετο καπάκι (Eik.1 και 2).
Σημειωη: Otav Σηκώνετe TO καπάKI, TO μαγεριόσκεύος Σνδέχεταιν παραμείνει συνδέδεμένοστο καπάKI. Eivai φυσιλογίοκα και αποδείκυέι τήν καλή στέγανότητα του προίόντος. Για τήν αποφύγή πτώς του μαγεριόκουσς. Στο προίόν κατά TO ὄνοιγμα του καπακίου, ανοίγετε πάντα του καπάkl προσεκτικά.
ToTOnoTeTn OuOKeun oE mia EIniTeBn EpiAveia. Aphiote ola ta npootateutikau kai ta EApntmuata aTo to eoutepiKo Tns ouokueng (Eik.3).
3. Kaθαρισμός σλων των εξαρτημάτων τής συοκεύς
3a. Kaθαρισμός tou kaπακίου, tou μαγειρικόν σκεύους και των εξαρτηματων
- Kaθαpiote to kaπáki, to Μαγειρικό Εκεύος και τα εξαρτήματα με ενα μαλακό σφουγγάρι και ζεσή σαπουναδα (Eik.4).
- Σεγνωότε to καπάκι, to μαγερίρό σκεύος κατα εξαρήματα (Eik.5)
Mny xnpoiotoe upu n tpaux ofouyyapi yia tov kathetao tou maeyepoukoukeouc, kthetauoc npopei va fheipetnvavtikoanik eniioptpwon tou maeyepoukoukeouc (Eik.40).
Mnu biEte tn ouokueun oe vepo (Eik.41).
Eav buioe te kataa looc tn ouokueun ovepno pizetevpo Tavw otn 0epmuovmev nlaoka, eniokeuaote tn ouokueun oEv a Eouoiodotmevo kevtpo eipic.
- Mny tototheite to kaiai kai to mayeipiko okeuooc oTo io niatowv (Eik.42).
- Αβετενόψη στι μόνο τα παρακάτω εξαρτήματα πλένονται Σε πλυντήρο πιάτων: σπάτουλα, δοσομετρίκη κύπα και εξαρτήμα ατμου.
3β. Kaθαριομός του στέγανοπιοικόδ δακτυλίου
- Aφαipéóte tov οteγανοποιntikó δακτύλιο από to καπάκι και καθαρίσε tov με ενα μαλακό σφουγγάρι και ξεοτή σαπουνáδα (Eικ.7 και 8).
- Σεγνωτετον σχολαστικά.
ToTOnTeTnToTovOteyavonoinTko DaKtUlio nAvw Otn BaoTou kaiPioteTovmuexpiVaEapmuoei Otn Theon Tou (Eik.9).PioteTovOteyavonoinTko DaKtUlio yepa,woTe va i e TWCevuTApXouv avooiOpphieckai TWCeEe Eapmuoei owta otnv unodoxn tou.
- Aφού τοποθετησετον οτέγανοποιntικό δακτυλίο στο καπάκι, εὰν ανοίξετε to καπάκι πολύ γρήγορα, to μαγειρίκό έκεύος ευδέχεται να παραμεῖνι συνδέδεμένον στο καπάκι (Eik.37 και 38). Περμένετε μερικό δευτερόλεπτα γίαν απελεύθερωθείτο μαγειρίκό σκεύος από το καπάκι (Eik.39).
Σημειων: Eivai φυσιολογίκο και αποδεικυει τήν καλή Στέγανότητα του προίντος. Για τήν αποφύγη πτώς του μαγειρικό μεκύους στό προίν κατά το ανοίγμα του καπακίου, ανοίγετε πάντα το καπάκι προσεκτίκα.
IPOEIAOIOIHsH: Mny xpnouoieite note tn ouokevn wpi tov oteyavonoiintiko daKTuAio (Eik.44)
3y. Kaθαρισμός των βαλβίδων
Tα tov kaθαρiμo toc βaβiδac αφαλεiac πεος, αφαρεοτe to έβαβiδa ασαβεiac πεος απο tov σωληνα στο πανω μερος tou καπακιού (Eik.10). Kaθαρίοτe την με ενα μαλακό σφουγγαρι κα ζεοήσαποναδα (Eik.11). Otav στeyνιωει, βεβαιωθείte oτι to εωτερικό tou ωληνα ειναι καθαρό προύν συδεοετε to έβαβiδa ασφαλεiac πεος στον σωληνα στο πανω μερος tou καπακιού (Eik.12). Beβαιωθείte πως η βαβiδa ασφαλεiac πεος ειναι ωστά τοποθετημένη. Θα πρεπειν κινειαι ελεύθερα προς τα πανω και προς τα κατω.
TaoKaOapoioukALUmuatoctnsBaaBicac aooaieiacpioc, EeBiswote to kALumu taC BaaBicac oTo eowteipko Tuma Tou KaTakoi (Eik.13).KaOapiote to e eva maakofoouyapai Kai ZetOn oanovada (Eik.14).Otav OTeYVWOEI, BbaWthe otTo eowteipko Tou oWnva Eivai kaOapopnpotou BiDwote to kALumu TaC BaaBicac aooaieiacpioc sto eoewteipko Tmu Tou KaTakoi (Eik.15).
- Γαν καθαρίσετη βαλβίδα με πλωτήρα, αφαρέοτε τον δακτύλιοτης βαλβίδας απότο εωιτεριότμήμα του κατακιου και αναποδόγυρίοτε το καπάκι ωοτεν μα πορείη βαλβίδα με πλωτήραν αβει απότο το καπάκι (Eik.16). Kαθαρίοτε τον δακτύλιοτης βαλβίδας με πλωτήρα και τη βαλβίδα με ενα μαλάκο σφουγγάρι και ζεσήσαπουνάδα (Eik.17). Otav Θεγγύσει, τοῦ Θεπότετηβαλβίδα με πλωτήρα στο καπάκι και τοῦ Θεπότετηση Θεόη του τον δακτύλιοτης βαλβίδας (Eik.18). Bεβαιωθείετη ως η βαλβίδα με πλωτήρα εἶναι σωτός τοῦ Θεπότημένη. Θα πρέπειν ακεῖαι ελεύθερα προς το πάνω και προς το κάτω.
35. Kaθαρισμός του περβλήματος της συοκεύς
Kαθαρίσε το περιβλημα της συοκεύνός εύναιντο παύ.
Mnu oziEte tn ouokun ovepO (Eik.41).
- ΣΚουπίοτε τη θερμαινόμενη πλάκα μέ ενα στεγνό παύ.
O△HΓIΕΣ XPHΞHΣ
1. Tonoθετηοι των Φιλικύν στο μαγερικό σκεύος
Aφαρεστe to μαγερικό σεκύς απο to περβλημα.
ToTOnoTeItoUaIkaOToMaayEpiKoKeUoc.
- Σημειώτε ὄτι Τέπεδο φαγητου και γυρό δεν πρεπει ποτένα Φεπρβαίνει τη μέγιστη ενδεξήσο τος μαγερικό σκεύος (Eik.19).
- Otav xpnouoieite oe leitoupyiec nieons uikα tou exouv tyn taon va fouokwovuov otn diapkeia tou maeyipémuotc, onwc anoepnaeva laxavika n puci, mnu yeuiizte to okeuo c npapanaw ano to mio tnç meiyiotnc wpnntikotntac tou.
2. Tonoθετηοι του μαγερικόν σκεύους στο περβλημα
Bεβαιωθείτε πως το κατω μέρος του μαγειρικόν σκεύους εῖαι καθαρό και στεγνό και αφαιρόσετε tuxov unλείματα φαγητού πό τη θερμανόμενη πλάκα (Eik.20).
ToTOnoTeTo p i k o Okeuoc sto Tepiβλnμa (Eik.21).
MnV xnpoiouoieite nTo oukeun XwpiC to ayepiko oKeuoc.
3. Kλεισιμο καλ ασφάλιοι του καπακίου
- Eλεγξε οτι o έτεγανοποιntικός δακτύλιος ἐχει τοῦθετηθείσωτα στο καπάκι (Eik.43).
Kpataote tn tou kantakoiou, tooThe note to kaiaokttn ouakeun kai nepiotppeyto dexiotpofoa yia vao to aphialioe (Eik.22).
4. Σύνδεοιης της βαλβίδας ασφαλείας πίεοις
ToiooTeTnoTe ootα tn aocaaic nieonc stokai (Eik.23). AotvOnyntn 9aBis6a 0a npaeivei liyo xalapn, eivai fuoioloyiko.
5. Evepyooinon tsoukeun
- ετιλίξε τέλείως to ηλεκτρίκο καλώδιο και συνδέσετο το στην πρίζα (Eικ.24).
H ouokevun o kavei evav xapaktnpiotiko nxo, nooovn o aovaoepoi kai o ephiaviotei n vdeltaig HIEIO.
6. Eπιλογή και εκκίνηση εύς προγάματος μαγειρέματος
Kαθε πρόγραμα ἐχει εναν προεπιλεγμένο Χρόνο και θερμοκρασία και αντιοιχει σε μια σρισμένη Θέση του καπακιό. Δείτε τον πίνακα των προγαμάτων μαγειρεματος;
ΠINAKAΣ ΠΡΟΓΡΑΜΜΤΟΝ MΑΓΕΙΡΕΜΑΤΟΣ
Σημειωη: Kaτα to μαγείρεμα, μπορείνα παρατηρόσετε μια μικρή διαρρόν ατμου από to καπάκι, συγκερμεύνα από τη βαλβίδα ασφαλείας πίεος. Eivai φυσιολογίκο και συμβαίνει ὄτavirus ηπεόη.
Eukaryota eukaryota Ovoidea Pseudomonas aeruginosa Candida parapsilosis Proteobacteria Phylum Bacteroidetes Phylum Bacteroidetes Phylum Bacteroidetes Phylum Bacteroidetes Kanaii Kanaii Kanaii Kanaii Kanaii Kanaii Kanaii Kanaii Kanaii Kanaii Kanaii Kanaii
AvatpeTe otic Eikovec tou odnyou ypnyopnc Ekkivnonc (anto Eik.25 EwC Eik.36)

Póypαμα αpyou μayéipéματος
ToOnoTeTnOte ta uAikocTo maayepiko okevoC, kEioTe teLeiwCs KAI aOphiaiote to KaTIKI.
- Περιοτρέψετον διακόπητου πίνακα ελέγχου προς τα δεξία γιαν επιλέξετετο πρόγραμμα αργού μαγειρεματος . Στην oθόνη εμφανίζεται o προεπιλέγενος χρόνος μαγειρεματος.
- PpOaIepiKa: PAtnoTe To kai opiTe tov EtiuumTo xpoVo nepiotpéfoVtac tov diaKoTn Tou nivaka eEyxou npoc ta (yia auEnon Tou xpovou) n pOc ta apiotepa (yia mEiwon Tou xpovou).
- PatnoTe to yia va xekivnoei to npoypaum aayelpemuatoc.
H ouokevn Eekiva t n faon npothepuavong. Tnv ofoyn ephiaviocovta evaalaoi evedeltaieic KAL HEAE KAI n Evdeiktikn luxvia tnc npohepuavong avaabei.
Molc oloknpw0i n fao npoepmuovc, n ouokun eTaaive autouata otn faon mayepmuato. Tnv oovn ephiavi etai n avtioptpoh mertpon kai n evdeltaikntknauxvi yia to mayepmae ExiIg na vabiEi.
KaTn diakaoia tou maeyepaotc, dnioupyeitai nieon otn oukeun kai n 8aIdelta a e nnptpa avbaivei npoc ta navw. H evdekikn luxvia yia to okeuoc uno pieon avaeu wc eldooinon nwc to kaakl dev mnpei va avoiei npotou aneuvepwoei nieon.
- Στο τέλος της αντίστροφής μέτρησς, n συοκεύν καVEL ευαν χαρακτηριστό ἡχο καὶ στήν oθόνn εμφαύνεζεται n ενδεξη [End].
-Metα αnto liya δeutepolenta, n ouokeu μεtaβaiveu autóμata σtn Φαση δiatnpnɔnc θεροκpaoiaç. Σtnv oθovn εμφαviεται η ενδειξη [Hoe] kai n ενδεiktikn λuxvia δiatnpnɔnc tnc θεροκpaoiac [m] αναβει.
- Παποτε to ⑤ για 3 δευτερόλεπτα για να σταματησετε to πρόγραμμα ανα πάσα στιγμή.

PpOpaMa OoUanac
ToOnoTeTnOte ta uAikocTo mayeipiko okevoC, kLeioTe teLeiwCs KAI aOphiaiote to KaTaki.
- Περιορεψετον διακόπητου πίνακα ελέγχου προς τα δεξία γιαν συμασους. Στην Θθόνη εμφάνιεται προεπιλέγμενος χρονος μαγερεματος.
- PpOaIepTeK: PAnTo KAI OpiTe Tov EINUHTo XpOvo TEPiOTpefoVtacTovdeltaKoTTnTouPiVAKA ELeyXouPocTa SEIGIA (Yia auEnon Tou Xpovou) n PpOc Ta apoiTepa (Yia meiowon Tou Xpovou).
- Παπόσε το ⑤ γιανξεκίνησει to πρόγραμμα μαγειρεματος.
H ouokeu n Eekiva t n faon npoepmuavoc. Tny oovn eauovtai evaalaoi evdeieic kai HERkai n evdektikn luxvia nC npoepmuavoc avaβe i.
Molc ooknpoWei n faon npoepmuovcn, n oukeun eTaiae i autouata otn faoon mayepmuatoc. Tnv oovn ephiavi etai n avtioptpnon metpnon kai n evdeiktikn luxvia yia to mayepma oE ExiIgneavabci.
KaTn diakaoia tou maeyepaotc, dnioupyeitai nieon otn ouokun kai n 8aIdelta aE pntpaaivei npoc ta naw. H evdeiktn kuxvia yia to okeuoc uno nieon wavbeu wc eioiOn nwc to kaaki dev mtopeiv avoieip npotou aneuvepwtheta i nieon.
- Στο τέλος της αὐτίαροφής ὅτηρησς, n συοκεύνη κάνει εναν χαρακτηριού τός καὶ στήν σθόνη εμφαύζεται n ἐνδεῖξη [End].
- Meta anto liya deutepolenta, n ouokeun metabaiveu autouata otn faon diatnpnongeepokpaoiac. Tnv oovn ephiavietai n evdeltaikn kai n evdeltaiktikn luxvia diatnpno n tnc eepokpaoiac avaβei.
- Παποτε to ⑤ για 3 δευτερόλεπτα για να σταματησετε to πρόγραμμα ανα πάσα στιγμή.
1
Póypaμα Avakatéouμε tnyaviouμε
- Περιοτρέψετον διακόπητου πίνακα ελέγχου προς τα δεξία για νεπιλέξετετο πρόγραμα Ανακατεύουμε τηγανίζουμε . Στην oθόνη εμφανίζεται o προεπιλέγμένος χρονος μαγερέματος.
- PpOaIepiKa: NaTnote To 已 opioTe Tov EtnuunTo XpOvo nepiopTpEoVtac Tov diaKoTTn Tou nivaka EeYxou npoc ta (yia auon Tou xPovou) n npoc ta apiotepa (yia meiowon Tou xPovou).
-Προαρετικα: Παπθοτε το ⑥ και σρίσε τήν επιθυμητη Θερμοκρασία περιστέφοντας τόν διακόπτη τόν πινακα ελέγχου προς τα δεξία (για αύξηση τής Θερμοκρασίας) ἡ προς τα αριστερά (για μείωση τής Θερμοκρασίας).
- Παπόσε to ⑥ γιανξεκίνησει πρόγραμμα μαγειρεματος.
H ouokevun ekivaei tn faon npothepuavoc. Tnv oovn ephiaviocvtai evaalaoxi evdeltaick cKai HEAE KAI n evdeltaiktikn luxvia tnc pnoepmuavoc avaβe i.
Molc oloknpw0i n fao npoepmuovc, n ouokun eataive autouata otn faon mayepmuato. Tnv oovn ephiavi etai n avtioptpoh mertpon kai n evdeltaiktkn luxvia yia to mayepma oE EeAign avaBci.
- TomoTheTneTa uAikα OTo μayeipiko okeuoc kai αhote to Kaia KAOI AvoiTo yia va KaaveTe stir-fry.
- Στο τέλος της αντίστροφής μέτρησς, n συοκεύν καVELι εναν χαρακτηριστό ἡκο και στήν oθόνn εμφαύνεζεται n ενδεξη [End].
- Metα απο λίγα δευτερόλεπτα, η συσκεύν μεταβαίνει αυτόματαστη λειτουργία αναμονής. Στην Θθόνη εμφαίζεται η ενδειξη
- Παποτε to ⑤ για 3 δευτερόλεπτα για να σταματησετε to πρόγραμμα ανα πάσα στιγμή.

Póγραμα ατμού
Báλte 150 ml vερο (3/4 της κουπας) στο μαγειρίκο σκεύος, toποθετήσε to Εξαρτημα ατμού μέσα στο σκεύος και μετα προθέσετα τα υλικα σας. Kλείσε τέλείως to καπάκι και ασφαλίσε το.
- Περιοτρέψετον διακόπητου πίνακα ελέγχου προς τα δεξία για να επιλέξετετο πρόγραμα ατμού. Στην Θθόνη εμφαυζεται o προεπιλέγμένος χρονος μαγειρέματος.
-Προαρετικά: Παπότε το ② και σρίσε τον επιθυμήτο χρόνο περιστέφοντας τον διακόπτη του πίνακα ελέγχου προς τα δεξία (για αύξηση του χρόνου) ἡ προς τα αρισερά (για μείωση του χρόνου).
- PatnoTe to 忍 ia va xekivnoei to npoypaumua ayepaatoC.
H ouokevn Eekiva t n faon npothepauvoc. Tnv ofov n ephiavicovtae vaaiaoi evdeltaic KAI HEAE KAI n evdeltaiktki n luxvia nC npothepauvoc avaβei.
Molc ooknpoWei n fao npothepuavoc, n oukeun eataiveaoutouata otn faoon mayepaeatoC. Tnv oovn ephiavi etai n avtioptpoh metpnon kai n evdeltaikntiakxvia yia to mayepea oE EeAixn avaBci.
KaTn diakaoia tou maeyipepaotc, dnmuoyeitai nieon otn oukeun kai n 8aIb6 aE pAovtnpaaevbaivei npoc ta naW. H evdekikn luxvia yia to okeuoc uno pieon avaei wC eioiOnn WcTo kaKtki dev mtopeiv avoiei npotou aneuvepwtheta i nieon.
- Στο τέλος της αντίστροφής μέτρησς, n συοκεύν καVEL εναν χαρακτηριστό ἡχο και στήν oθόνn εμφανίζεται n ενδεῖξη [End.
-Metα aio liya δeutepolεπta, n ouokeun μeTaβaiveu autouata σtn Φaon δiatnpnong θεροκpaoiaç. Σtnv oθovη εμφaviεtai n ενδειξη [Hoe] kai n ενδεiktikn λuxvia δiatnpnong tnc Θεροκpaoiaç [w] avβεi.
- Παποτε to ⑥ για 3 δευτερόλεπτα για να σταματήσετε to πρόγραμμα ανα πασα στιγμή.

PpOpypauaa ynoiaatoc
ToTOnoTeTnOte ta uLkα nou éxete npoTeoiαoeI OTo mayeipiko okeuoc kai kλeioTe, aλλa μny αofoiaoTe to kaTakl.
- Iepiotpépsi tov diaokontn tou nivaoka eleyxou poc ta deiia yia va eniieeteto npoypauma ynoimuotc. Tnv oovn ephiavi etai o poeiileyevoc xpvoc maeyipémuotc.
- Pinoapetiká: ΠatnoTE to kαo iOte Tov επθuŋto xpóvo πeipotpeφovtacTov δiakópttn Tou πivakα ελéγxou πoç ta δεξia (yia αúξηon tou xpovou) n pOc ta aρiσtepa (yia μεiωn tou xpovou).
-Προαρετικα: Παπθοτε το ⑥ και σρίσετην επιθυμητη Θερμοκρασία περιστρέφοντας τον διακόπτην του πινακα ελέγχου προς τα δεξιά (για αύξησητης Θερμοκρασίας) ἡ προς τα αριστερά (για μείωσητης Θερμοκρασίας).
- Παπόσε to ⑤ γιανξεκίνησει to πρόγραμμα μαγειρεματος.
H ouokevn Eekivaen phaon npoepmuavoc. Tnv oovn ephiaviocovtaevaalaooi evdeieic KAI HEAEKai n evdkiKni luxvia nC npoepmuavoc aVaei.
Molc oloknpw0ei n fao npothepuavons, n ouokueu meaive auotouata otn faon mayepmuato. Tnv oovn ephiavieta n avtioptpno n metpnon kai n evdeltaiktikn luxvia yia to mayepma oE ExiIg na vaei.
- Στο τέλος τής αντίστροφής μέτρηός, η συοκεύη καVEL εύαν χαρακτηριστιό ἡχο και στήν οθόνη εμφαύνιξεται η εύδειξη [End.
- Meta ano liya deutepolenta, n ouokeun metaabeu auotouata otn phaon diatnpnongs 0epkoopaiac. Tnv oovn ephiavietai n evdeltaikntiuxvi a diatnpnong tnc 0epkoopaiaac avaei.
- Πατήσε το ② για 3 δευτέρόλεπτα για να σταματήσετο το πρόγραμμα ανά πασα στιγμή.

Póγραμα Apyó μαγείρεμα
- Περιστρέψετον διακόπητου πίνακα ελέγχου προς τα δεξία για νειλέξετε to πρόγραμα Apyó μαγείρεμα έτην Θθόνη εμφάνιζεται o προεπιλέγμένος χρονος μαγείρεματος.
- PpOaIepiKa: PAnToTe ② kai opiTe ToV EπUμnto XpOvo πePiotpeovtac Tov diaKoTn Tou nivaka EλEyxou pOc Ta δEla (yia auxon Tou xpovou) n pOc ta apiotepa (yia μεiowon Tou xpovou).
- PpOaIepTeK: PAtnoTe to ① kai opiote tny eNtoumntn Θερμokpaoia περιστρéφovtac tov δiakóπtn tou πivakα ελέχου πος τα δεξια (για αύηση nτς Θερμokpaoiaç) n πος τα αριστερα (για μειωη nτς Θερμokpaoiaç).
- Παπόσε το ⊙ γιανξεκίνησει to πρόγραμμα μαγειρεματος.
H ouokevn Eekiva t n faon npoepmuavoc. Tny oovn eauovtai evaalaoi evdeieic KAI HEAE KAI N EvdEiktikn luxvia nC npoepmuavoc aVaei.
Molc ooknpoWei n foan npohepuavon, n oukeun eTaeivauotoumaata otn faoon mayepaatoz. Tnv oovn ephiavietai n aviotpOon metpnon kai n evdeiktikn luxvia yia to mayepmae Eelxiqn avaabei.
- Στο τέλος της αντίστροφής μέτρηός, η συοκεύν ἀναν καρακτηριστικό ἡχο καὶ στήν οθόνη εμφανίζεται ἡνδεῖξη [Erid.
- Metα αnto liya δενιτρολεπτα, η συοκυμη μεταβαίνει αυτόματαστη λειθουργία αναμούνις. Στην Θθόνη εμφαίνειδαι η ενδειξη = = =
- έπατησε to ⑤ για 3 δευτερόλεπτα για να σταματησετο το πρόγραμμα ανα πασα στιγμή.
Pnpoypauma npitc
ToToTeTnToTaUkOToMayeIpiKoKekuoc,KeioTe TeLeiwC Kau aOphiaiote to KaTakl.
- Περιστρέψετον διακόπητου πίνακα ελέγχου προς τα δεξία γιανα επιλέξετετο πρόγραμμα πόρις . Στην oθόνη μεφανίζεται o προεπιλέγμενος χρόνος μαγειρέματος.
-Прауетikа: Патно te 重心 opioTe tov επιθυμntó xρόvo περιστέφοντας tov διακόπητου πίνακα ελέγχου προς τα δέξια (για αύξησου xρόου) ἡ προς τα αριστέρά (για μειώνι οὐ xρόου).
- Πατηοτε to ⊙ γιανξεκίνησει to πρόγραμα μαγελερεματος.
Houkeun Ekiivalei tn foan npohepuavoc, 2tnv ofoyn ephiavicovat evaalaoi Evseieic Kai HEAE KAI n EvdeiktiKn luxvia Tns pOeepuavoc avaBc.
Molc ooknpoWei n faon npothepuavoc, n ouokun eataivei autouata otn faoon mayepmuato. Tnv oovn ephiicetai n avioptpno n metpon kai n evdeiktikn luxvia yia to mayepema oE Exiian avaβei.
- Στο τέλος της αντίαροφής μέτρησός, η συοκεύμι κάνει εύαν χαρακτηριστικό ἡκο καὶ στην οθόνη μεφανίζεται η εύδειξη [Erid].
Metαπoλiγδειτρολεπα,ησυοκενμεταβαίνειαutóματαση Φαση διατήρονιςθερμοκραοίας.Στηνοθόνημφανιζεαιη ενδειξη Kαιηνδεικικλυχίαδιαπήρονιςτηςθερμοκραοίας(avαβει.
- Πατησετο ⑤ για 3 δευτερόλεπτα για vα σταματήσετο το πρόγραμα ανα πασα στιγμή.
PpOpypaumpuziou
ToOneTeTo a Ulika oTo Maayeiipiko OkevoC, KLeiote TeleiwC Ka aphiaiote To kaTaki.
- Περιοτρέψετον διακόπητου πίνακα ελέγχου προς τα δεξία για να επιλέξετετο πρόγραμα ριζιου . Στην oθόνη εμφαύνεταιο προεπιλέγμένος χρονος μαγερέματος.
- PpOaIepiKa: PAtnoTe To kai opiTe tov eTou mnto xpoVo nepiotpéfoVtac tov diaKoTTn tou nivaka eEyxou npoc ta (yia auEnon tou xpvou) n npoc ta apiotepa (yia meiowon tou xpvou).
- Παπόσε το ⊙ γιανξεκίνησει το πρόγραμμα μαγειρέματος.
H ouokeu n Eekiva t n faon npothepuavoc. Tny oovn eauovtai evaalaoi evdeltaic Kau HReK aN evdeltaikntknauxia nC npothepuavoc avabci.
KaTn diakaoia tou maeyepaotc, dnioupyeitai nieon otn ouokevn kai n 8aIdelta a ne Iwntnpa avbaivei npoc ta navw. H evdekriikn luxvia yia to okevooc uno nieon avaeu wC eisodoinon nwoC to kaKai dev mtopei va avoiei npotou aneuvepomegae i nieon.
- Στο τέλος της αὐτίαροφής μέτρησς, n συοκεύν κάνει εναν χαρακτηριστό ἡκο και στήν oθόνη εμφανίζεαι η ενδεῖξη [End.
-Metα αnto liya δeutepolεπτa, n σuokεun μεtaβaiveu autóμata σtn φαση διαπροης θερμokpαoiac. Σtnv oθovn εμφαviζεται ηενδειξη [Hoe] kai n ενδεικτικλuxvia διαπροηnc tns θερμokpαoiac [avβεi.
- Παποτε to ② για 3 δευτερόλεπτα για να σταματησετε to πρόγραμμα ανα πάσα στιγμή.
Ipoypauma yiaouptiou kai zmuatoC
To npópyaμα γiaouptiou kaiζμωμatoc μπopeivaxρnσiμoŋοɪηθεi γia tynapαokeun γiaouptiou nζμnc ψwμiou/σφoλiatac.
- Iα vα παρασεύσετη γιαύρι, τοῦτησε τα ζλικα στο μαγερικό Κεύος και λέίσετο το καπάλι.
- Iα vα παραοκεύσετε ζύμη, μπορείνενα ζύμωσετη ζύμη μέσα στο μαγειρίος Κεύος και, κατόπιν, να τοῦθετησετο μαγειρίος Κεύος στο περβλημα καινα κλείσετετο κατάκι γιαναξεύνησετε τη δίουκωση.
- Περιοτρέψετον διακόπητου πίνακα ελέγχου προς τα δεξία για να επιλέξετε to πρόγραμμα γιαύρτιου καίζυμμωματος Στην oθόνη εμφαviζεται o προεπιλέγμένος χρονος μαγειρέματος.
- PpOaIepTeK: PAtnoTe To KAI OpiTe Tov EINUUMTo XpOvo TEPIOTpeoVTOv δiakontn Tou NivaKa EλeYxou NPOs ta δEla (yia auEnon Tou xpvou) n pOsc ta apIOTepa (yia mEiwon Tou xpvou).
- Pioaipetik: PatnoTe to kai opiTe tnv eToumtn thepuokpaaia neiopertpeovtac tov diakoTn tou nivaKa eLeyou poc ta dexi (yua uEnon tnc thepukpaiaac) npoc ta apiotepa (yia meiowon tnc thepukpaiaac).
- Παπησετο (♀) γιαν ξεκεύνησει το πρόγραμια μαγελερεματος.
H ouakeun Eekivaei tn faon npoepmuavoc. 2tnv oovn ephiaviocov tau evaalaoi evdeltaic kai HEAE kai n evdeltaiktikn luxvia tns npoepmuavoc avaβe i.
Molc ooknpothei n faon npoepmuovnc, n ouokeun metaBaiveu autouata otn faon maayepmuatoc. Tnv oovn ephiavicetai n aviotpofn etponk kai n evdeiktikn luxvia ia to maayepma oE eEliqni avaBc.
- Στο τέλος τής αὐτίστροφής μέτρηONS, η συοκεύν κάνει εύαν χαρακτηριστό ἡκο και στην oθόνη εμφανίζεαι η εύδειξ [E. n.]
- Metα αnto λiγα δειτρόλεπτα, η συοκενή μεταβαίνει αυτόματα Οηλειουργία αναμόνης. Στην οθόνη εμφανίζεια ηένδειξη.
- Παπότε to ⑤ για 3 δευτερόλεπτα για να σταματήσετε to πρόγραμα ανα πάσα στίγμή.

Puθμiζóμενηλειτουργiaσεφ
ToTOnoTeIntoTaUIAKoTOmuayelipkoOKeuocKaaovaoMaTouvtayn, EIIAEEe eav Oa KkEioTe To KaIakl.
- Περιστρέψετον διακόπητου πίνακα ελέγχου προς τα δεξία γιαν επιλέξετε τη ριθμιζόμενη λειούργία σεφ . Στην Θθόνη εμφανίζεται o προεπιλέγμενος χρόνος μαγειρέματος.
- Pinoapetiká: Patnote to kai opioTe tov επιθμntó xρovo περιστέφοντας tov διακόπητου πίνακα ελέγχου πος τα δεξία (yia αύξησην του xρόvου) ἡ προς τα αριστερά (yia μειώην του xρόvου).
- PpOaIepTeiKaTneTo kai opioTe Tny EeIthuunTh Θερμokpασia πεpiotpefovtac tov δiaKoTTn tov πivakα ΕλéyXou poc ta deξia (yia αUxon tnc Θερμokpαoiac) n poc ta apiotepa (yia μεiωon tnc Θερμokpαoiac).Pntote to yia va ξekivnoiTo póypaμma ayepéμatoc.
H ouokevn Eekvai Tn faoon PpOeepuavoc. Tnv oovn ephiavicovta evaalaoi EvdeieKc Kau HEKc kN Evdeiktikn luxvia tnc PpOeepuavoc O avaei.
Molc oloknpwEi n faoon npoEpuvoc, n ouokevn eataivei autouata otn faon mayepmuato. Tnv oovn ephiizeta n avtioptpoh mertponkai n evdeltaiktikn luxvia yia to mayepma oE ExiAixn avaBcI.
- Στο τέλος της αὐτίστροφής μέτρηός, η συοκεύν κάνει ευαν χαρακτηρίοικό ἡχο και στήν οθόνη μεφαυξεται n ἐνδεξή [End].
-Metα απο λίγα Σεντερόλεπτα, n συσκενιμηταβαίνει αύτοματα στη λειτουργία αναμονίς, Στην σθόνη εμφανίζειαι n ἐνδεξή.
-Plahtote to 已 yia 3 8eutepeoAen ta va oataatnoet to npoypauma ava naoa stiyu.
* Ipótaon yia ypinyopo Κεσταμα γευματων: opioTE tη Θερμοκραοία στούς >=95°C και μαγειρέψTE με to καπάκι κλειότο, χωρίς να εἰναι ασφαλισμένο.
7. Xpñon tnc λeitoupyiaç καθυσερημενnç εναρξnç
H kaθuotpερημένη ευαρξ Μας δίνει τη δυνατότητα ρύθμιος της συοκεύς, υτετο το μαγείρεμαν αλεκίνησει αργότερα.
- Eπιλέξε πρωτα ενα πρόγραμα ακολουθώντας τα βήματα που περιράφοντα παραπάνω, στην παράγραφο 6.
- Ppiu anto tnv Ekkivnon tou eilaymuevou npoypaumato,
Pntote to ⑤. TnV oovn ephiaviEeTai O npoeiileymuevoc
Xpovoc yia tnV kaovotepnuev evapxn.
- Puθμiσte tov επιθυμntó χρον περιστρέφοντας tov διακόπητou πίνακα ελέγχου προς τα δεξία (για αύξησηου χρούου) nπρος τα αριστερά (για μείωσηου του χρούου).
- Παπησετο ② . Στην Εθόνη εμφανιζεαι η αντίστροφη μετρηση της καθυστερημένης ἔναρξης.Οταν περάσει o προκαθρισμένος χρόνος, η συσκεύηθα ξεκινήσει το μαγείρεμα αὐτόματα.
8. AvoIyMa Tou KaTakIoU
Mny eipnoe To avoiet To kntaki av n 8aIdelta a E Iwtnpa eivai aeBaeuyn kai n evsekikn luxvia uno tiocn Y eivai avamevn.
HpiEoN mTopei va aTeAeVthepwOei 2 TpOouc oTo TeLoC tou Ip O oc
ΦuoiKn aπελeuaepwon: KaT to teLoC tou uayieipμatoC n μetα αnto tn δiakοπn tou πpoypαμatoc, n σωakeun θa Kpuwoei kai n πieon θa aπελeuaepwθei fuoiKa. KaT n fuoiKn aπελeuaepwon, to paynto evδexetai va uayiepeutei πepioofoe oio oo npéei, lówy tnC unolaeinóμevnc πieong oTo okeuoc. Xpnoiμoioñote tn diabikoaia tnC xεipokivtnC anελeuaepwons yia va δiakóψete áeoga tn δiabikoaia uayieipμatoC.
Xeipokivtn aneAevepwon: Pntote napatetaeva to koupi aneAevepwons tns niEons, navw oTo kaNak. Xpeiaovtaeepik a deutepolent a ewc epiKa aavloya e tvn nootna fayntou oTo ayelipko okeuoc (Ek.31).
IPOEIOIOIHs: Pooeexte tov kauto ato nou byaivei ano tn ouokevun. KpatnoTe to npocwno kai ta xepia oac maakpi aanto tv atuo (Eik.45).
- Iα vα ανοίξετο το καπάκι, τοῦθετήσετο το χερι σας παραλληλμε τις πλευμικές λαβές, κρατήσε τη λαβή του καπακιόύ, περιστέψετε αριστέρόστροφα καὶ σήκωσετο το καπάκι (Eik.32 kaɪ 33).
IPOEIAOIOIHsH: PpOeXeTe Tov KauTo aTmo nou Byaivei ano to
9. Anouovδεοτε τη συοκεύν ἀπό τὴν πρία
- Meta ano tn xpnon, anoovseote tn ouokean kai ophiote tnv kpuwoei yia toulaixotov 2 wpe npiu tnv kathetaipoe.
10. Kaθαρισμός Μετα απο τη χρήση
- Kaθαρίοτε τη συοκεύν μετα από καθε χρήση.
- Πριν από tov καθαρισό, αφήσε τη συοκεύνν ακριώσει για touλάχιστον 2 ωρες.
- Γα Μηγες καθαρισμού, ανατρέξετο Σην παράγραφο 3. Για τόν καθαρισό ὅλων των εξαρτημάτων τής συακεύπες ανατρέξετο Σην ενότητα ΠΡIN ΑΝ ΦΟ έΝ ΠΡΟΤΗ
11. Συμβουλές σουντήρηός
- va δiaαφαλiσετην αθεκτικότητα tou μαγερικόν σκεύους, μην κόβετε τρόφια μέσα σε autó.
Xpnoiomoiite ta npexoEv aepntma. Mny xpnoiomoite metaaikc epyaia, kaohc nopoei va othapei n avkoanikn eioptpwon tou ayepipkou okeouc.
- Metá anó t n xρnón, o ΟTEyavontoiintikós δaktuioε evδexetau va μupiζεi onw to φayntó αac. Eivai φuoioloyiko. H oilikovη éxei μikpouc πopouc πou avoiyouv Šανιθεται συηλες Θερμokpaoies κai kλeivouv ξανá Šανιθη Θερμokpaoia επανελθει σε χαμηλα επιπεδα. TIA VA αφαipéoεte TIC OOμες anó tov ΟTEyavontoiintikó δaktuio, μπopeite:
- Na πλύνετον δακτύλιο από σιλικόνη στο πλυντήρο πιάτων
- Na προσθέοετε 1 κούπα ξύδι, 1 κούπανερο και 1 λεμόνι κομένο σε μεγάλα κομάτια στο μαγείρικό σκεύος καινα χρησιροισησετε to πρόγραμα ατμόύ για 2 λεπτα και, κατόπιν, να αφήσετε tov ατόν απελεύθερωθεί φυσικά.
-Avtikataotne tov oteyavonoiintiko daKTuio kaOe 2 xpvia n vwpitepa, e npintwnoopac.
O△HFOIANTIMETQNIIZHETEXNIKQN IPOBAHMATQN
Пróбдема Пговс сацяс Л�орс Абваша оvoуматок кattakioу Абваша оvoуматоς loучо пioл sc, sto maуерikó okeuoc. Празюпаростаму to koumti politeeavépwoan, piieonc yia va politealevberpoete tvn pioet on to tomaуерikó okeuoc, mIoptoe vxa xpeiaotov uvepiKá lettá mexvi va ateleuberpwtei piIpuoc n tioum. H piieon sto maуерikó okeuoc otealevberpawetai pIauwuc, αλλαη βaIbδa με πλιτρα exei koIaŋe iTeiδn eivai tnoLβρωμkη kai dev mitopei va katébei. α. BeBauwéite πwç n tioum éyei ateleuberpwtei pIauwuc, αφívovtac tn oukeuyn vka ρuωe iY a ToulaXiotov 2 wpc.β. Σπρωte atalá t n βaIbδa μe πλιθρa πoC ta KATU, totoBetwntac evaξIaikn éva μakpú avtukeiyevo sto avoiyua tnc βaIbδac μe πλιθρa. Eav to πρobjuaδev λuθei, osteiante tn ouokeun oEva εgouio botmeyev kévtrpo oepic.γ. Γα triν etoumevn xphon, kaθαρίote kai oteyuwatet n βaIbδa μe πλιθρa oxolataká. Абваша кoleiúmatoс кattakioу О оteyavotouitikocdeltaktulioc δev exei tnoToθetnei σωotá. Tortoetnototov tov oteyavotouitikódeltaktulio ωotá. To maуерikó okeuoc pIepiexei kautá uIká πou pIapayouv atiu. П配电'vetěmeу lexvi va kruwouv ta uIká σоуерikó okeuoc, pIotou'etuexipniəte gavá vka KλeioTe to kanták. H bαIbδa μe πλιθρa exei kαIaŋe iTeiδn eivai tnoLβρωμkη kai, etouénuw, δev mitopei va metakivnθe iIpoC ta katw. α. Σπρωte atalá t n βaIbδa μe πλιθρa πoC ta KATU, totoBetwntac evaξIaikn éva μakpú avtukeiyevo sto avoiyua tnc βaIbδac μe πλιθρa. Eav to πρobjuaδev λuθei, osteilte tn ouokeun oEva εgouio botmeyev kévtrpo oepic.β. Γα triν etoumevn xphon, kaθαρίote kai oteyuwatet n βaIbδa μe πλιθρa oxolataká. H ΘeON n/kaɪ n Kateuθuvon ttou ekAIEOte to kantáki eivai eofoλuEvn. КALEOTE to kattaki proCt ng atownt Kateuθuvon, oμduvua μe to eyxeipidio xphon. Отавоуете to kattakci, to maуерikó okeuoc tpoapáévei ouvsedeuévo STO Kattakci. О оteyavotouitikocdeltaktulioc exei πρokalééi avappófni. To maуерikó okeuoc οα ateleuberpwtei mOvo tou ato to kattaki. Eivai φuioLOyikó kai attoidekiuei tvn kαλn οteyavotnTa tou pioióvtoc, iα triV atoΦuoynπtownc tou maуерikó okeuoc stO pioió Kovatá to avoiyua tou kattakci, ovoiyete πávta to kattaki tpooektiKA.
Пróблела Пговсаоцic Июсяс Евtownг ameleuθерowam
пileoçм atot to Μαλβiδα
аофалeicamпileoç. H εοωτερική πίeησουνι
μεγαλυερησι στό την πίeησι
λειουγιας ἡ εοωτερική πίeησι
Εναι μεγαλυερησι στό την πίeησι
αοφαλείας. Kaθαριοτe διεδούκα τη βαλβiδα
αοφαλείας πίeοης, ηι βαλβiδα
με πλωτίρα και το κατάκι. Av
εξακολούθει αν βαγίει αιμίος
ατοτη ηαβλβiδα με πλωτίρα,
ατευθυθείτο ΤΑπλοίεθερο
εθουσοδοθμένον κέτονο Ερβίς γι
έλεχο, επιακεύην έρουσιηροι
που Πρετεινιναροιτοιηθει Από
εθουσοιδοθμένον αἰτομο. H βαλβiδα αοφαλείας πίeοης
βριοκεται σε αφαλμένη Θεόη. Περιαρέψει/πίοετe προαεκτία τη
βαλβiδα αοφαλείας πίeοης γιν αμίοι
στη θεόμι ΚΤΟ Φερετεν το κατότο
ατμίο. Tότοθβει Θεότε Εαοφαλί Κθέη
Και φρατε πιριαία γάντια. O εοφαλμένος ἔλεγος της πίeοης
obηγησε στην απελυεθέρωσι
πίeοης. Σειλετη Σιούκεύη σε ευλ
εθουσοδοθμένον κέτονο Ερβίς γι
επιακεύην. Συνεχός ameleuθερωο
πίeοης atot to Μαλβiδα με
πλωτίρα. H εοωτερική πίeησουνι
μεγαλυερησι στό την πίeησι
λειουγιας ἡ εοωτερική πίeησι
Εναι μεγαλυερησι στό την πίeησι
aοφαλείας. Kaθαριοτe διεδούκα τη βαλβiδα
αοφαλείας πίeοης, ηι βαλβiδα
με πλωτίρα και το κατάκι. Av
εξακολούθει αν βγίαει αιμίος
ατοτη θαβλβiδα με πλωτίρα,
ατευθυθείτο ΤΑπλοίεθερο
εθουσοδοθμένον κέτονο Ερβίς γι
έλεχο, επιακεύην έρουσιηροι
που Πβρετεινιναροιτοιηθει Από
εθουσοδοθμένον αἰτομο. Yπολείμιαστην βαλβiδα με
πλωτίρα. α. Παριοτe παροτετομένα to
κουμί πατελυεθέρωσις πίeοης
γιν αν επελεθερωσετε Απγ
περει ατοτη μαγερίκο Εκυος
Mιθοpeiν αν χερλαστουν Μερίκα
λεπτί μέχρινα σαν επελεθερωθει
πλρρως η πειη. β. Αφαριοτe Μιαούκεύνα κριωσει
γιν τουλαστον 2 υμες.
γ. Kaθαριοτe και στεγμωτε Π. β. Αφαριοτe Μιαούκεύνα κριωσει
γ. Kaθαριοτe και στεγμωτε Π. Kαλβiδα με πλωτίρα éxei
κλλησει. α. Παριοτe παροτετομένα to
κουμί πατελυεθέρωσις πίeοης
γιν αν επελεθερωσετε Απγ
περει ατοτη μαγερίκο Εκυος
Μιθοpeiν αν χερλαστουν Μερίκα
λεπτί μέχρινα σαν επελεθερωθει
πλρρως η πειη. Kαλβiδα με πλωτίρα éxei
κλλησει. β. Αφαριοτe Μιαούκεύνα κριωσει
γιν τουλαστον 2 υμες.
γ. Kaθαριοτe και στεγμωτε Π. Пróблар Пговсаціпес Л�ожец Диагрон ατουο ατό to kaṭákl. О огелуаноитикός δактualioc δέν ἐχει τοῦθεηθει σωτά. Афраίρους тов огелуаноитикό δактualio, кαθαιρίοτe тов кαι ετώναιοθεηθίοτe тов στή σωτή θέοι. О огелуаноитикός δактualioc εivala βρόμικος. Афраίρους тов огелуаноитикό δактualio, кαθαιρίοτe тов кαι ετώναιοθεηθίοτe тов στή σωτή θέοι. О огелуаноитикός δактualioc ἔχει utootei βλαβη, ὀ το γελιος tou μαγeιρίου σκεύος ἔχει utootei βλαβη. Στέλετη συακеύη σέ ευλεύοιδοτημένον κέντορο σέρβις για επιοκeύη. To φάγητό δέν εivala μαγeιρεμένο H αναλογία στέρεύν/υρύν υιλίνιν εivala εσφαλμένη. Δοκμάσε Εανά, ακολουθώντας με ακρίβεια τις ποιστητές τής συντañς. Δέν utáρχει παροχή ρεύμαιος ατό τήν πρία. Ελέγξετο oιαίακό ηλέκτρικο kυλμία. Εμφανιζεται ένδειξη E0 στήν ψημιακή Θόθουν. Ο διακόπτης πίεος εivala Ἇλattuματικός. Στέλετη συακeύη σέ ευλεύοιδοτημένον κέντορο σέρβις για επιοκeύη. Εμφανιζεται ένδειξη E1 στήν ψημιακή Θόθουν. Ο αιοθητήρα Θέρμοκραίας εivala Ἇλattuματικός. Στέλετη συακeύη σέ ευλεύοιδοτημένον κέντορο σέρβις για επιοκeύη. Εμφανιζεται ένδειξη E2 στήν ψημιακή Θόθουν. To katáki δέν εivala ωστά τοῦθετημένον για to συγκεριμένον πρóγραίμα μαγερίματος, Σέ καθε Πρóγραίμα αντίοτηχει μια opiaμένη θέοη του καταίού. Ελέγξετο και προσαρμόθετη ηθεητου του καταίαιου σύμφινα με to πρóγραίμα μαγερίματος, ανωτρερεο οτον πιναία τυν προγραίματων μαγερίματος στήν του πράγραρο 6 toι πραόντον Εγερίριδιο. Ετανεκκινηότο to πρóγραίμα στόντων to katáki τοῦθετηθει σωτά.Εόν to Πρóβλημα παραμένει, Ετέλετη η συκούνη Κέντορο σέρβις για επιοκeύη.
Moulinex
www.moulinex.com
Type:SERIE EPC52
Model: CE77
Capacity: 7.6L
Voltage: 220-240V
Frequency: 50-60Hz
Power: 1000-1200W
CONTENIDO
Guia de inicio=rápido en imagenes 2 Recomendaciones de Moulinex paraunar la seguidad 128 Todallas piezas del producto 136 Familiarizarse con el panel de control 137 Guia de uso y limpieza 138 Guia para la solución de problemas技术和.......... 152 Garantía limitada internacional de Moulinex 271RECOMENDACIONES DE MOULINEX PARA PRIMAR LA SEGURIDAD
La seguridad es nuestra principal prioridad. Diseñamos y fabricamos nuestros productos con altos estandares de sécurité y Tecnología. Sin embargo, alusual que conequalier aparato electrico, hay algunos posibles riesgos, por lo que te invitamos a tener un cierto grado de cuidado y a seguir las instrucciones.INSTRUCCIONES DE SEGURIDAD
Tómate tu tiempo para leer detenidamente todas las instrucciones y guardalias para futuras consultas.
- El uso Incorrecto del aparato y sus accesos podra dañarlo y provocar lesiones. - El aparato casa alimentos a presión. Un uso Incorrecto pueda provocar quemaduras debido al vape. - Por tu seguridad, este producto cumple todas las normas y regulaciones aplicables (directiva de bajo tension, compatibiliad electromagnética, materiales aptos para el contacto con alimentos, relacionadas con el medioambiente, etc.). - El aparato incluye la fuente de calor necesaria para cocinar.1. ¿Dónde se pueda usar de forma segura?
- Solo para uso en interiores. - Este aparato está diseñado solo para uso dométrico. No está Diseñado para utiliser en las siguientes aplicaciones y la garantía no se aplicará en dichos casos: - Areas de comida reservadas para el personal en tiendas, ofecinas y others entornos de trabajo; -casasrurales; - uso por parte de los clients en hoteles, moteles y otros entornos residenciales; - hostales. - No coloques el aparato en unorno caliente ni en una placacaliente.No coloques el aparatooca deuna llama vivo ni de un objecto inflamable. - Utiliza una superficie de trabajo plana, estable y resistente al calor lejos de posibles salpicaduras de agua.2.¿Quién pueda usarlo de forma segura?
- Este aparato no debe ser uso por personas (esto incluye niños) con capacities fisicas, sensoriales o mentales limitadas, o sin experiencia o conocimientos, salvo que estén bajo supervisión o reciban instrucciones relacionadas con el uso del aparato por otra persona responsable de su seguridad. - Este aparato pueda usar personalas con incapacidades fisicas, sensoriales o mentales, o con falta de conocimientos y experiencia, siempre que@cuenten con supervisión o hayan recibido instrucciones sobre el uso seguro del aparato y entiendan los riesgos que implica. - Los niños no peuvent usar este aparato. Mantén el aparato y el cable fuera del alcance de los niños. - Los niños no deben hacer algo con el aparato. - Deberá vigilarse a los niños para garantizar que no jugan con el aparato.3. ¿como能把 utiliserse de forma segura? Uso general
- No Utilities el aparato para otro uso que no sea el previsto. - No Utilities el aparato para freir alimentos en aceite. Solo se permite sofreir alimentos. - No uses la olla a presión en modo de presión para freir alimentos. - Para cocinar alimentos pastosos, agita suavamente la olla antes deAbrir la tapa para evaporar la expulsion del contenido. - Este aparato no es un esterilizador. No lo usa para esterilizar tarros. - Este aparato no está Diseñado para utilizar junto con un temporizador externo ni un sistema independiente de control a distancia. - Utiliza siempre las dos asas laterales de la carcaja del aparato para transporte. Utiliza guantes de cocina si el aparato está caliente. Para mayor seguridad, asegúrate de que la tapa está bloqueada antes de transporte el aparato. - El fondo del recipiente de coccción y la placía calefactora deben estar en contacto directo. Retira cualquier objeto o residuo de comida situado entre el recipiente de coccción y la placía calefactora, ya que podra afectar al rendimiento - Ten enIELD que ciertoostipsde alimentos,tales como la compota de manzana,los arandanos rojos,el ruibarbo, lacebada perlada,laavenuotroscereales,losguisantes, los fideos o la pasta poden formar espuma,salpicar y obstruir las valvulas.Ten cuidado al cocinar这些东西 tips de alimentos y,despuesde su uso,limpia bien las valvulas. - Ten enIELD quealgunas recetas que incluyen leche poden formar espuma, rebosar y obstruir las valvulas. Ten cuidado al preparar estas recetas y,upon de su uso, limpia bien las valvulas. - Al cocinar alimentos queurrentan de時間 durante la coccion, como verduras deshidratas o arroz, no llenes la olla más la mitad del nivel de capacité. - Después de cocinar carne queonga una capa exterior de piel (como la lengua de buey), que podra hincharse con el efecto de la presión, no perfores la piel afterwards de cocinarla si parece hinchada: PODías quemarte. Perforala antes de cocinar. - No Utilities el aparatovacio, sin el recipiente de coczon o sin ingredientes en su interior. Esto podria provoc graves daños al aparato. - No uses el dispositivo bajo presión sinañadir agua, porque podría sufir días graves. - No llenes el aparato sin su recipiente de cocccion. - Precaución: No derrames liquido sobre el enchufe. - No calientes el recipiente de coccción con ninguna另一边 fuente de calor que no sea la placca calefactora del aparato y no Utilities Ninguna另一边 olla. No Utilities el recipiente de coccción conthers aparatos. - Utiliza el recipient de coccción SOLO en el aparato. No la Utilities para cocinar sobre hornillas, en elorno, etc. - Utiliza una cucchara de plástico o de madera para evitar daños en la capa antiadherente del recipiente de coccción. No cortes los alimentos directamente el recipiente de coccción. - No toques las valvulas, excepto durante la limpieza y el mantenimiento del aparato de acuerdo con las instrucciones proportionadas. - No coloques objetos extraños en las valvulas ni en el botón de despresuración. No sustituyas la valvula. - Comprueba con regularidad los conductos de las valvulas que permiten la calidad de vapor para asegurarde que no está bloqueados. - No Utilities un paño ni ningún otro objecto entre la tapa y la carcaja paraURTAR la tapa entreabierta. Estóypeedaalarjunta de sellado de forma permanente. - No dejes el cable electrico colgando por el borde de la mesa o la encimera, ni en contacto con superficies calientes.4. ¿Cómo usar de forma segura antes de cocinar?
- Antes de utiliser el aparato, comprueba que la valvula flotante y la valvula limitadora de presión está limpias. - Antes de utiliser el aparato, comprueba que la junta de sellado está correctamente instalada en la tapa. - Asegúrate de que el fondo del recipiente de coccción y la placá calefactora está腈 sempre limpios. Asegúrate de que la parte central de la placá calefactora se mueve. - No llénes el aparato por encima de lamarca MAX del recipientede coccción. - Siguelas recomendaciones sobre el volumende alimentos y agua para estar el riesgo de que se detramen al hervir, lo que podra darar el aparato y provocar lesiones. - Asegúrate de que el aparato está bien cerrado antes deponerlo a presión. - Antes de cocinar, asegúrate de que el botón de liberación de presión no está presionado. Consulta la figura 48 de la sección Guía de inicios rápido en imagenes.5. ¿Cómo usar de forma segura durante la cocción?
- No intentesAbrirla tapa+hasta que la presionhayasminuido lo suficiente.NointentesAbrirla tapa+hastaque la valvula flotante haya bajo del todo. - No fuerces nunca el aparato para abrirlo. - Durante la cocation y la liberacion de vapor al final de la cocación, el aparato emite calor y vapor. Mantén la cara y las manos alejadas del aparato para estar quemaduras. No toques la tapa durante la cocación. - No muevas el aparato cuandoonga presion. Utiliza las asas para moverlo y ponte guantes de comida, si esnecessary. No efectives el pomo de la tapa para levantar el aparato. - No retires el recipient de coccción cuando el aparato está encendido. - En el modo para sofreir, ten cuidado con el riesgo de quemaduras causadas por salpicaduras alañadir alimentos o ingredientes al recipiente de coccción caliente.6. ¿Có como usar de forma segura afterwards de cocinar?
- Cuando abras la taps, sujétala siempre por el pomo. Pon el brazo en paralelo a las asas laterales. Podría quedar agua hiriendo atrapada entre la junta de sellado y la tapa y provocar quemaduras. - Ten cuidado también con el riesgo de quemaduras por el vapor que sale del aparato alAbrir la tapa. Abre primero la tapa ligeramente para que el vapor salga poco a poco. - No toques las superficies calientes del aparato. Después de su uso, la superficie de la placca calefactora pueda permanecer caliente hasta 2 horas. - Desenchufa el aparato de la toma de corriente cuando no lo usa y antes de limparlo. Deja que se enfré antes deponer o quitar las piezas.7. ¿Cóme efectuar la limpieza de forma segura?
- Limpia con un paño la parte inferior del recipiente de coccción y la placacalefactoras深加工esde cada uso. - Nosumerjas nunca el aparato en agua. - Para limpiar el aparato, consulta las instrucciones de uso. Puedes lavar el recipiente de coccyon y la tapa con agua caliente y jabón; no los laves en el lavavajillas. Limpia la carcasa del aparato con un pañó humedo.8. ¿Qué hacer en caso de días?
- El producto solo puede ser reparado por personal aprobado del serviceo técnico oficial. - No Utilities ningún aparatouhn cable electrico o enchufe estén danados, tampoco si el aparato no funciona correctamente o está dañado. Devuelve el aparato al servicios técnico oficial más cercano para su revisión, reparación o ajuste. - Si el cable electrico está dañado, deben sustituirlo un serviceo técnico oficial para evitar cualquier peligro. No sustituyas el cable electrico suministrado con otros cables. - No danés la junta de sellado. Si está dañada, sustitúyela en un serviceño oficial. - Sustituya la junta de sellado cada 2 años o antes si observas que está desgastada o deben cambiarse. - Utiliza únicamente las piezas de repuestos adecuadas para tu modelo. Esto es specialmente importante para la junta de sellado y el recipiente de coccción. - Utiliza únicamente piezas de repuestos vendidas en un service Tecnico oficial. - El uso de accesorios no recommendados por el fabricante del aparato pueda provocar lesiones. - No Utilities或者其他 recipientes de coccción en el aparato en lugar del suministrado. Sustituya el recipiente de coccción únicamente por una pieza de repuesto original Diseñada para su uso con este producto. - De(acuerdo con la normativa vigente,antesde desecha un aparato que ya no sea besoino, el aparato debe inutilizarse (desenchufalo y desconecta el cable electrico).j i Participe en la conservacion del medio ambiente !!
 ① Su electrodomestico contiene materiales recuperables y/o reciclables. - Entreguelo al final de su vidautil, en un Centro de Recogida Especialico o en uno de nuestros Servicios Oficiales Post Ventaupon sera tratado de forma adecuada9. ¿Cuando se aplicá la garantía?
- La garantía no cubre el desgaste anomal del recipiente de cocción. - Lee atentamente estas instrucciones de uso antes de usar por primera vez el aparato. Cualquier uso que no se ajuste a estas instrucciones exime al fabricante de cadaquier responsabilidad y anulará la garantía. - Si se realiza un uso comercial, un uso inapropiado o un uso contrario a las instrucciones, el fabricante declinarárialquier responsabilitad y la garantía no sera valida.TODAS LAS PIEZAS DEL PRODUCTO
   *Accesorios disponibles según ModeloFAMILIARZARSE CON EL PANEL DE CONTROL
MENSAJES DE ESTADO
 Mensaje de bienvenida al encender el aparato.  Visualización de la hora. En este exemple: 1 horas 30关键时刻.  Visualizacion de la temperatura. En este exemple: 114 grados centigrados.  Indica que el programa Tiene un ajuste de temperatura/ tiempo automatico predeterminado. No se pueda modifier.  Indica que la temperatura estáurrentando durante la fase de pre-calentamento.  Indica que el aparato se está precalentando.  Indica que el programa ha finalizzato.  Indica que el aparato está en fase demantener caliente.  Indica que el programa se ha interrupido.  Indica que el aparato está en modo standby.GUIA DE USO Y LIMPIEZA
No dudes en consultar las figuras indicadas como (fig. x) de la sección Guía de inicios rápido.ANTES DE LA PRIMERA UTILIZACION
1. Retira el embalaje
- Saca el aparato del embalaje y lee el manual de instrucciones antes de la primera utilizacion. - Quita las pegatinas promociones (si las hubiera) del aparato antes de utiliser por primera vez.2. Abre la tapa
- ParaAbrir la tapa, sujeta el pomo de la tapa, giralo en sentido contrario al de las agujas del reloj y levanta la tapa (fig. 1 y 2). Nota: Al levantar la tapa, puede occurrir que el recipiente permanezca unido a la tapa. Es normal y simplement demuestra una buena hermeticidad del producto. Para evaporar que el recipiente caiga pesadamente sobre el producto al abrir la tapa, abrela siempre con cuidado. - Coloca el aparato en una superficie plana. Retira todos los materiales protectores y accesos del interior del aparato (fig. 3).3. Limpia todas las piezas del aparato
3a. Limpia la tapa, el recipiente de coccción y los accesorios
- Limpia la tapa, el recipiente de coccyón y los accesos con una esponja suave y agua caliente con jabón (fig. 4). - Seca la tapa, el recipiente de coccción y los accesorios (fig. 5) - No Utilities estropajos ni esponjas abrasivas para limpiar el recipiente de cocción, ya que podías darar la capa antiadherente del recipiente (fig. 40). - No sumerjas nunca el aparato en agua (fig. 41). - Si sumergeles aparato enagua por accidente o derramas agua directamente sobre la placacalefactora,lleva el aparato a un service Tecnico oficial para su reparacion. - No laves la tapa ni el recipiente de coccción en el lavavajillas (fig. 42). - Ten en cuenta que solo pueda lavarse en el lavavajillas los accesos: espátula, vaso medidor y accesorio de vape.3b. Limpia la junta de sellado
- Retira la junta de sellado de la tapa y limpiala con una esponja suave y agua caliente con jabón (fig. 7 y 8). - Sécala bien. - Coloca la junta de sellado sobre la ranura para la junta de sellado y presiona hasta que encaje en su situo (fig. 9). Presionafirmamente hacía abajo para asegurarte de que no se forma ningún pliegue y de que la junta de sellado está ajustada en la ranura. - Después de colocar la junta de sellado, si abres la tapa demasiado rápido,uede que el recipiente de coccción permanezca unido a la tapa (fig. 37 y 38). Espera unosegundos hasta que el recipiente se suelte de la tapa (fig. 39). Nota: Es normal y simplement demuestra una buena hermeticidad del producto. Para evaporar que el recipientte caiga pesadamente sobre el producto al abrir la tapa, abrela siempre con cuidado.ADVERTENCIA: No有用的 Nunca el aparato sin la junta de sellado (fig. 44)
3c. Limpia las valvulas
- Para limpiar la valvula limitadora de presión, retina la valvula del tubo situado en la parte superior de la taps (fig. 10). Limpiala con una esponja suave y agua caliente con jabón (fig. 11). Una vez seca, asegúrate de que el conductor del tubo está limpio antes de volver a colocar la valvula limitadora de presión en el tubo de la parte superior de la taps (fig. 12). Asegúrate de que la valvula limitadora de presión está bien colocada y que se mueve hacía arriba y hacía abajo. - Para limpiar la tapa de la valvula limitadora de presión, desenrosca la tapa de la valvula limitadora de presión desde el interior de la tapa (fig. 13). Limpiala con una esponja suave y agua caliente con jabón (fig. 14). Una vez seca, asegúrate de que el conductor del tubo está limpio antes devoltar a enroscar la valvula limitadora de presión en la tapa (fig. 15). - Para limpiar la valvula flotante, quita la junta de la valvula flotante del interior de la tapa y da la vuelta a la tapa para que la valvula flotante pueda salir de la tapa (fig. 16). Limpia la junta y la valvula flotante con una esponja suave y agua caliente con jabón (fig. 17). Una vez seca,(valeur a insertar la valvula flotante en la tapa y colocca la junta en su lugar (fig. 18). Asegúrate de que la valvula flotante está bien colocada y que se mueve hacía arriba y hacía abajo.3d. Limpia la carcasa del aparato
- Limpia la carcaza del aparato con un pañó humedo. - No sumerjas nunca el aparato en agua (fig. 41). - Limpia la placca calefactora con un pamo seco.INSTRUCCIONES DE USO
1. Coloca los ingredientes en el recipiente de coccción
- Retira el recipiente de coccción de la carcasa. - Coloca los ingredientes en el recipiente de coccción. - Ten enIELD que el nivel de alimentos y liquidos no debe superar nunca lamarca de nivel mayor del recipiente de cocción (fig. 19). - Al cocinar ingredientes queurrentan de時間 durante la cocción, como verduras deshidratas o arroz, asegurar de que solo llenas la olla hasta la mitad del nivel de capacité máximo.2. Coloca el recipiente de coccyon en la carcasa
- Asegúrate de que la parte inferior del recipiente de coccción está limpia y seca, y elimina los restos de comida de la placá calefactora (fig. 20). - Coloca el recipiente de coccción en la carcasa (fig. 21). - No Utilities nunca el aparato sin el recipiente de coccción.3. Cierra y bloquea la tapa
- Comprueba que la junta de sellado está bien colocada en la tapa (fig. 43). - Sujeta el pomo de la tapsa, colocata la tapsa en el aparato y gira el pomo en el sentido de las agujas del reloj para bloquear la tapsa (fig. 22).4. Conecta la valvula limitadora de presión
- Coloca correctamente la valvula limitadora de presión en la tapa (fig. 23). Ten enIELD que la valvula permanecer un poco sueita, es normal.5. Encendido del aparato
- Desenrolla Completely el cable electrico y enchufalo a la red (fig. 24). - El aparato emite un pitido, la pantalla parpadea y muestra HED.6. SeLECTIONA e inicia un programa de coccción
- Cada programa tiene un tiempo y una temperatura predeterminados y requires una posición de la tapa concreta. Consulta laTABLA de programas de coccción: TABLA DE PROGRAMAS DE COCCION| Icono del programa de cocation | Nombre del programa de cocation | Tiempo de cocation predeterminado | Tiempo ajustable | Temperatura predeterminada | Temperatura ajustable | Presión predeterminada | Programación diferida de 10 min a 12 h | Mantener caliente hasta 24 h | Estado de la tapa | ||
| Cerrada y bloqueada. | Tampa cerrada pero sin bloquear. | ||||||||||
| Estofado | 30 min | de 1 min a 2 h | 114 °C | No | 70 kPa | Sí | Sí | ● | |||
| Sopa | 12 min | de 1 min a 2 h | 114 °C | No | 70 kPa | Sí | Sí | ● | |||
| Saltear | 20 min | de 1 min a 1 h | 160 °C | Si, de 100 °C a 160 °C | No | No | No | ● | |||
| Vapor | 10 min | de 1 min a 2 h | 114 °C | No | 70 kPa | Sí | Sí | ● | |||
| Hornear | 40 min | de 1 min a 2 h | 160 °C | Si, de 100 °C a 160 °C | No | Sí | Sí | ● | |||
| Cocción al vacio/fuego lento | 4 h | de 30 min a 12 h | 85 °C | Si, de 55 °C a 95 °C | No | Sí | No | ● | ● | ||
| Arroz | 8 min | de 1 min a 2 h | 114 °C | No | 70 kPa | Sí | Sí | ● | |||
| Yogur y fermentado | 8 h | de 30 min a 12 h | 30 °C | Si, de 22 °C a 40 °C | No | No | No | ● | ● | ||
| Gachas | 15 min | de 1 min a 2 h | 100 °C | No | No | Sí | Sí | ● | |||
| Modo Chef ajustable | 30 min | de 1 min a 4 h | 80 °C | Si, de 70 °C a 160 °C | No | No | Sí | ● | ● | ● | |
Programa de estofado
- Coloca los ingredientes en el recipiente de cocccion. Cierra y bloquea la tapa. - Gira el mando del panel de control hacia la derecha hasta临港 al programa de estofado. La pantalla muestra el tiempo de coccción pre-determinado. - Oportun: Pulsa y ajusta el tiempo deseedo girando el mando del panel de control hacía lackecha (para augmentar el tiempo) o hacía la izquierda (para reducir el tiempo). - Pulsa para iniciar el programa de coccción. - El aparato inicia la fase de precalentamento. La pantalla muestra alternativamente y se enciende el indicator luminoso de precalentamento. - Cuando finaliza la fase de precalentimiento, el aparato cambia automatistically a la fase de coccción. La pantalla muestra la cuenta detrás y se enciende el indicator luminoso de coccción en bajo. - Durante el proceso de coccción, se acumula presión en el aparato y empuja la valvula flotante hacía arriba. Elindicador luminoso de presión se enciende para indicar que la tapa no se pueda abrir sin despresurar antes el aparato. - Al final de la cuenta atras, el aparato emite un pitido y la pantalla muestra End. - Después de unosegundos,elaparatochangiaráautomátamentea la fase paramantener caliente.Lapatalla muestra HOE y se enciende el indicador luminoso demantener caliente - Pulsa durante 3segundos para detener el programa en cualesquimimento. Programa de sopa
- Coloca los ingredientes en el recipiente de cocccion. Cierra y bloquea la tapa. - Gira el mando del panel de control hacer la derecha hasta临港 al programa de sopa . La pantalla muestra el tiempo de coccción predeterminado. - Oportun: Pulsa y ajusta el tiempo deseado girando el mando del panel de control hacía lackecha (para augmentar el tiempo) o hacía la izquierda (para reducir el tiempo). - Pulsa para起初 el programa de coccción. - El aparato inicia la fase de precalentamento. La pantalla muestra alternativamente y se enciende el indicator luminoso de precalentamento. - Cuando finaliza la fase de precalentimiento, el aparato cambia automatistically a la fase de coccción. La pantalla muestra la cuentailtras y se enciende el indicator luminoso de coccción en bajo. - Durante el proceso de cocción, se acumula presión en el aparato y empujla lávula flotante hacía arriba. El indicator luminoso de presión se enciende para indicar que la tapa no se pueda abrir sin despresurar antes el aparato. - Al final de la cuenta atrás, el aparato emite un pitido y la pantalla muestra Erid. - Después de unosegundos, el aparato cambiará automatistically a la fase paramantener caliente. La pantalla muestra HOE y se enciende el indicador luminoso demantener caliente - Pulsa durante 3segundos para detener el programa en cualesquimimento. Programa de saluteo
- Gira el mando del panel de control hacía la derecha hastaninger al programa de salteado. La pantalla muestra el tiempo de cocción prede-. terminado. - Oportun: Pulsa y ajusta el tiempo deseado girando el mando del panel de control hacía lackecha (para augmentar el tiempo) o hacía la izquierda (para reducir el tiempo). - Oportun: Pulsa y ajusta la temperatura deseada girando el mando del panel de control hacia la derecha (paraacular la temperatura) o hacía la izquierda (para reducir la temperatura). - Pulsa (口) para iniciar el programa de coccción. - El aparato inicia la fase de precalentimiento. La pantalla muestra alternativamente y se enciende el indicator luminoso de precalentimiento. - Cuando finaliza la fase de precalentamento, el aparato cambia automatistically a la fase de coccción. La pantalla muestra la cuenta atrás y se enciende el indicator luminoso de coccción en bajo. - Coloca los ingredientes en el recipiente de coccción ydea la tapa abierta para saltearlos. - Al final de la cuenta atrás, el aparato emite un pitido y la pantalla muestra [Erd]. - Después de unosegundos, el aparato cambiará automatistically al modo standby. La pantalla muestra - Pulsa durante 3segundos para detener el programa en cualesquimimento. Programa de cocccion al vapor
- Llena la olla con 150 ml de agua (tres cuartos de taza), colocá el accesorio de vapor en la olla yañade los ingredientes. Cierra y bloquea la tapa. - Gira el mando del panel de control hacía la derecha hastaninger al programa de cocción al vapor. La pantalla muestra el tiempo de cocción predeterminado. - Oportun: Pulsa y ajusta el tiempo deseado girando el mando del panel de control hacía laresha (para augmentar el tiempo) o hacía la izquierda (para reducir el tiempo). - Pulsa para起初 el programa de coccción. - El aparato inicia la fase de precalentamento. La pantalla muestra alternativamente y se enciende el indicator luminoso de precalentamento. - Cuando finaliza la fase de precalentamento, el aparato cambia automatistically a la fase de coccción. La pantalla muestra la cuenta atrás y se enciende el indicator luminoso de coccción en bajo. - Durante el proceso de cocción, se acumula presión en el aparato y empujla válvula flotante hacía arriba. El indicator luminoso de presión se enciende para indicar que la tapa no se pueda abrir sin despresurar antes el aparato. - Al final de la cuenta atrás, el aparato emite un pitido y la pantalla muestra Erid. - Después de unosegundos, el aparato cambiará automatistically a la fase paramantener caliente. La pantalla muestra HOE y se enciende el indicator luminoso demantener caliente - Pulsa durante 3segundos para detener el programa en cualesquimimento. Programa de horneado
- Coloca la preparación en el recipiente de coccción y cierra la tapa pero no la bloquees. Gira el mando del panel de control hacía la derecha hastaninger al programa de horneado. La pantalla muestra el tiempo de cocción pre-determinado. - Oportun: Pulsa y ajusta el tiempo deseado girando el mando del panel de control hacía lackecha (para augmentar el tiempo) o hacía la izquierda (para reducir el tiempo). - Oportun: Pulsa y ajusta la temperatura deseada girando el mando del panel de control hacia la derecha (para augmentar la temperatura) o hacía la izquierda (para reducir la temperatura). - Pulsa para inicia el programa de coccción. - El aparato inicia la fase de precalentamento. La pantalla muestra alternativamente y se enciende el indicator luminoso de precalentamento. - Cuando finaliza la fase de precalentamento, el aparato cambia automatistically a la fase de coccción. La pantalla muestra la cuenta a另一边 y se enciende el indicator luminoso de coccción en bajo. - Al final de la cuenta detrás, el aparato emite un pitido y la pantalla muestra Erod. - Después de unosegundos, el aparato cambiará automatistically a la fase paramantener caliente. La pantalla muestra HOE y se enciende el indicator luminoso demantener caliente - Pulsa durante 3segundos para detener el programa en cualesquimimento. Programa Cocción al vacio/fuego lento
- Gira el mando del panel de control hacer la derecha hasta临港 al programa de cocccion al vacio (sous-vide). La pantalla muestra el tiempo de cocccion predeterminado. - Oportun: Pulsa y ajusta el tiempo deseado girando el mando del panel de control hacía lackecha (para augmentar el tiempo) o hacía la izquierda (para reducir el tiempo). - Oportun: Pulsa y ajusta la temperatura deseada girando el mando del panel de control hacía la derecha (paraacular la temperatura) o hacía izquierda (para reducir la temperatura). - Pulsa para起初 el programa de coccción. - El aparato inicia la fase de precalentamento. La pantalla muestra alternativamente y se enciende el indicator luminoso de precalentamento. - Cuando finaliza la fase de precalentimiento, el aparato cambia automatistically a la fase de coccción. La pantalla muestra la cuenta detrás y se enciende el indicator luminoso de coccción en bajo. - Al final de la cuenta atras, el aparato emite un pitido y la pantalla muestra [End] - Después de uno segundos, el aparato cambiará automatistically al modo standby. La pantalla muestra ——. - Pulsa durante 3segundos para detener el programa en cualesquimimento. Programa de cocciencia de arroz
Coloca los ingredientes en el recipiente de cocccion. Cierra y bloquea la tapa. - Gira el mando del panel de control hacer la derecha hasta临港ar programa de cocccion de arroz La pantalla muestra el tiempo de cocccion predeterminado. - Oportun: Pulsa y ajusta el tiempo deseedo girando el mando del panel de control hacía la derecha (paraacular el tiempo) o hacía la izquierda (para reducir el tiempo). - Pulsa para起初 el programa de coccción. - El aparato inicia la fase de precalentamento. La pantalla muestra alternativamente y se enciende el indicator luminoso de precalentamento. - Durante el proceso de cocción, se acumula presión en el aparato y empuja la valvula flotante hacía arriba. Elindicador luminoso de presión se enciende para indicar que la tapa no se pueda abrir sin despresurizar antes el aparato. - Al final de la cuenta detrás, el aparato emite un pitido y la pantalla muestra End - Después de uno segundos, el aparato cambiará automatistically a la fase para Maintener caliente. La pantalla muestra HOE y se enciende el indicator luminoso de Maintener caliente. - Pulsa durante 3segundos para detener el programa en cualesquimimento. Programa de yogur y fermentado
El programa de yogur y fermentado se pueda usar para preparar yogur o para levar mesa de pan/pastelería. - Cuando hagas yogur, colocao los ingredientes en el recipientede coccion y cierra la tapa. - Al levar masas,能把 amasarlas directamente en el recipiente de cocción, colocar el recipiente en la carcasa y cerrar la tapa. - Gira el mando del panel de control hacía la derecha hastaninger al programa de yogur y fermentado. La pantalla muestra el tiempo de cocción predeterminado. - Oportun: Pulsa y ajusta el tiempo deseado girando el mando del panel de control hacía lackecha (para augmentar el tiempo) o hacía la izquierda (para reducir el tiempo). - Oportun: Pulsa y ajusta la temperatura deseada girando el mando del panel de control hacía la derecha (paraacular la temperatura) o hacía izquierda (para reducir la temperatura). - Pulsa para起初 el programa de coccción. - El aparato inicia la fase de precalentamento. La pantalla muestra alternativamente y se enciende el indicator luminoso de precalentamento. - Cuando finaliza la fase de precalentimiento, el aparato cambia automatistically a la fase de coccción. La pantalla muestra la cuenta detrás y se enciende el indicator luminoso de coccción en bajo. - Al final de la cuenta atras, el aparato emite un pitido y la pantalla muestra [End] - Después de uno segundos, el aparato cambiará automatistically al modo standby. La pantalla muestra. - Pulsa durante 3segundos para detener el programa en cualesquimimento. Programa de gachas
- Coloca los ingredientes en el recipiente de cocccion. Cierra y bloquea la tapa. Gira el mando del panel de control hacer la derecha hastaninger al programa de cocccion de gachas La pantalla muestra el tiempo de cocccion predeterminado. - Oportun: Pulsa y ajusta el tiempo deseado girando el mundo del panel de control hacía la derecha (paraacular el tiempo) o hacía la izquierda (para reducir el tiempo). - Pulsa © para,iniciar el programa de cocción. - El aparato inicia la fase de precalentamento. La pantalla muestra alternativamente y HEARE se enciende el indicator luminoso de precalentamento. - Cuando finaliza la fase de precalentimiento, el aparato cambia automatistically a la fase de coccción. La pantalla muestra la cuenta atrás y se enciende el indicator luminoso de coccción en bajo. - Al final de la cuenta extras, el aparato emite un pitido y la pan-talla muestra [Erid]. - Después de unosegundos, el aparato Cambiará automaticallya la fase paramantener caliente. La pantalla muestra HOE y se enciende elindicador luminoso demantener caliente - Pulsa durante 3segundos para detener el programa en?. cualquier momento. Modo Chef adjustable
- Coloca los ingredientes en el recipiente de cocccion y cierra o no la tapa segun la receta. - Gira el mando del panel de control hacía la derecha hastaninger al modo Chef ajustable . La pantalla muestra el tiempo de cocción predeterminado. - Oportun: Pulsa y ajusta el tiempo deseedo girando el mando del panel de control hacía lackecha (para augmentar el tiempo) o hacía la izquierda (para reducir el tiempo). - Oportun: Pulsa y ajusta la temperatura deseada girando el mando del panel de control hacía lackea (para augmentar la temperatura) o hacía izquierda (para reducir la temperatura). - Pulsa para起初 el programa de coccción. - El aparato inicia la fase de precalentamento. La pantalla muestra alternativamente y HEARE y se enciende el indicator luminoso de precalentamento. - Cuando finaliza la fase de precalentimiento, el aparato cambia automatistically a la fase de coccción. La Pantalla muestra la cuenta detrás y se enciende el indicator luminoso de coccción en bajo. - Al final de la cuenta detrás, el aparato emite un pitido y la pantalla muestra Erid. - Después de unosegundos, el aparato cambiará automatistically al modo standby. La pantalla muestra - Pulsa ⑥ durante 3segundos para detener el programa en cualesquier momento. * Sugerencia para recalentar rápidamente los platos: ajusta la temperatura a > = 95C y cocina con la tapa cerrada sin bloquear.7. Usa la función de programación diferida
La programacion diferida的结果autil para preajustar el aparato y que comienceacocinarmasarde. - En primer lugar, selección un programa suguiendo los pasos descritos anteriormente en el apartado 6. - Antes de iniciair el programa selectionado, pulsa . La pantalla mueira la hora predeterminada para la programacion diferida. - Ajusta el tiempo deseado girando el mando del panel de control hacía lacke (para augmentar el tiempo) o hacer la izquierda (para reducir el tiempo). - Pulsa. La pantalla muestra la cuenta atrás de la programación diferida. Una vez transcurrido el tiempo programado, el aparato comenzará a cocinar automatistically.8. Abre la tapa
- No intentesAbrir la tapa si la valvula flotante está subida y el indicator luminoso de presión está encendido. - La presión se pueda liberar de dos formas al final de la cocción: Despresurizacion natural: Al final de la coccion o afteres de detener el programa, el aparato se enfiia por si solo y la presion se libera de forma natural. Durante la despresuracion natural, los alimentos peuvent cocinarse en excesso debido a la presion que queda en el recipiente. Utiliza el boton de despresuracion manual para detener inmediamente el proceso de coccion. Despresuración manual: Pulsa el botón de despresuración situado en la parte superior de la tapa de forma continua. El proceso tardará entre unosegundos yunos,minutos enfunciendela cantidadde alimentos que haya enelinterdelercipliente decocción(fig.31).ADVERTENCIA: Ten cuidado con el vapor caliente que sale del aparato. Mantén la cara y las manos alejadas de la calidad de vapor (fig. 45).
- ParaAbrir la tapa, coloca en paralelo a las asas laterales, sujeta el pomo de la tapa, giralo en sentido contrario al de las agujas del reloj y levanta la tapa (fig. 32 y 33). ADVERTENCIA: Ten cuidado con el vapor caliente que sale del recipiente de coccción.9. Desenchufa el aparato
- Después del uso, desenchufa el aparato y deja que se enfré durante al menos 2 horas antes de limpiarlo.10. Limpia cuando del uso
- Limpia el aparato antes de cada uso. - Antes de limpiar el aparato, deja que se enfrie durante al menos 2 horas. - Para Obtener instrucciones de limpieza, consulta la sección 3. Limpia todas las piezas del aparato en la sección ANTES DE LA PRIMERA UTILIZACION.11. Consejos de mantenimiento
- Para garantizar la durabilidad del recipiente de coccción con el tiempo, no cortes alimentos enél. - Utiliza los accesos suministrados. No Utilities ningún utensilio metalico, ya que podra darar el revestimiento antiadherente del recipiente. - Después de su uso, la junta de sellado pueda conservar el olor de la comida. Es normal; la silicona tienePEGOS poros que se abren cuando se exponen a altas temperatas y se cierran una vez que la temperaturea baja. Para eliminar el olor de la junta de sellado, pueda hacer lo singular: - Colocar la junta de silicona en el lavavajillas. - Añadir 1 taza de vinagre, 1 taza de agua y 1 limón cortado en trozos grandes en el recipiente de coccción yponer un programa de vapor durante 2 horas; a continuación,deoqueel vapor se libere de forma natural. - Cambia la junta de sellado cada 2 años o antes en caso de días.GUIA PARA LA SOLUCIOn DE PROBLEMAS TECNICOS
| Problema | Posibles motivos | Solutaciones |
| No se puedaAbrir la tapa | No se puedaAbrirloo a la presión en el recipientede cocción. | Pulsa el botón de despresuraciónde forma continua para eliminar la presión del interior del recipientede cocción. La presiónuede tardar algunosminutos en liberarse porcomplete. |
| El recipientede cocción despresuriza, pero la válvulaflotante está atascada porque estádemasiado sucia y, por lo tanto, no pueda bajar. | a. Asegúrate de que el aparato se despresurice por completodejiándolo enfiar durante al menos2 horas.b. Empuja suavamente la válvulaflotante:hacia abajo insertando un pincho o un objerto largen enla abertura de la válvulaflotante. Siesto no funciona, envía el aparato a un service的专业oficial.c. Para elsignificantu, limpia y seca afondo la válvulaflotante. | |
| No se puedacerrarla taps | La junta de sellado no estáinstalada correctamente. | Instala la junta de sellado correctamente. |
| El recipientede cocción contiene ingredientescalientes que generatevapor. | Espera a que losingredientedesel recipientede cocción se enfién ante devoltar a intentar cerrar la tapa. | |
| La válvulaflotante estáatascada porque estádemasiado sucia y, por lo tanto, no pueda bajar. | a. Empuja suavamente la válvulaflotante:hacia abajo insertando un pincho o un objerto largen enla abertura de la válvulaflotante. Siesto no funciona, envía el aparato a un service的专业oficial.b. Para elsignificantu, limpia y secaafondo la válvulaflotante. | |
| La posición o la dirección en laque se ha cerrado la tapa no soncorrectas. | Cierra la tapa en la dirección correcta como indicale manual de instrucciones. | |
| AlAbrirla tapa, elrecipientede cocciónpermaneceuno ala tapa. | La junta de sellado ha producido un efecto de sussión. | El recipientede cocciónse soltaradela tapa por sisolo. Es normal ysimplemente demuestra una buena hermeticidad del producto. Para evitárque el recipientede caiga pesadamente sobre el producto alAbrirla tapa,ábrelaiamiencuidado. |
| Problema | Posibles motivos | Solutaciones |
| Liberación intensa de presión desde la valvula limitadorade presión. | La presión interna supra la presiónde funciona bajo la presióninterna supera la presión deseguidad. | Limpia bien la valvula del limite de presión,la valvula flotante y la tapa.Si todavía sale vapor por lavalvula flotante,悲哀 el dispositivoal centro de servicios专业技术e oficial aprobado más cercano para que un先进技术 autorizado lo inspeccione, repare o ajuste. |
| La valvula limitadora de presiónestá en una posición incorrecta. | Presiona ligeramente la valvulalimitadora de presión para que secoloque en su lugar.Ten cuidado con el vapor caliente.Colócate en una posición segura y utilizesguentes para horno. | |
| Un control de presión defectuosoha provocado la despresuración. | Envía el aparato a un service专业技术o oficial para su reparación. | |
| La presión interna supra la presiónde funciona bajo la presióninterna supera la presión deseguidad. | Limpia bien la valvula del limite de presión,la valvula flotante y la tapa.Si todavía sale vapor por lavalvula flotante,悲哀 el dispositivoal centro de技术服务专业技术e oficial aprobado más cercano para que un先进技术 autorizado lo inspeccione, repare o ajuste. | |
| Liberación de presióncontinua de la valvulaflotante. | Residuos en la valvula flotante. | a.Pulsa el botón dedespresuración de formacontinua para eliminar la presión del interior del recipientede cocción.La presión puede tardarunos horas en liberarse porcompleto.b.Deja que se enfríe el aparato durante al menos 2 horas.c.Limpia y secaa la valvula flotanteantes de volver a cocinar. |
| La valvula flotante está atascada. | a.Pulsa el botón dedespresuración de formacontinua para eliminar la presión del interior del recipientede cocción.La presiónuede tardarunos horas en liberarse porcompleto.b.Deja que se enfríe el aparato durante al menos 2 horas.c.Limpia y secaa la valvula flotanteantes de volver a cocinar. | |
| Sale vapor de la tapa. | La junta de sellado no está instalada correctamente. | Retira la junta de sellado, limpiala y vuelve a colocarla en la posición correcta. |
| La junta de sellado está sucia. | Retira la junta de sellado, limpiala y vuele a colocarla en la posición correcta. | |
| La junta de sellado o el borde del recipiente de coccción está dañados. | Envía el aparato a un service专业技术o oficial para su reparación. | |
| Los alimentos no se han cocinado | La proportión de ingredientes@sólidos/liquidos es incorrecta. | Vuelve a intentarlo con lascantidades exactas de la receta. |
| No hay suministro electrico. | Comprueba el circuito electrico de tu hogar. | |
| Aparece E0 en la pantalla digital. | El presistato está defectuoso. | Envía el aparato a un service专业技术o oficial para su reparación. |
| Aparece E1 en la pantalla digital. | El sensor de temperatura está defectuoso. | Envía el aparato a un service专业技术o oficial para su reparación. |
| Aparece E2 en la pantalla digital. | La taps no está colocadacorrectamente para el programa de coccción. Cada programa requires una posición española de la tapa. | Comprueba y ajusta la posición de la tapa necesaria para el programa de coccción; consulta la tabletadeprogramas de coccción de la section 6 de este manual. Reinicia el programa cuando la tapa está correctamente colocada. Si el problema persiste, envía el aparato a un service专业技术o oficial para su reparación. |
OBRIGADO POR ESCOLHER A MOULINEX
Bem-vindo ao mundo da cozinha
Com a Turbo Cuisine, aceitamos o desafio de reinventar a panela: Mais fácil. Mais sabor. Simplesmente melhor!
Concebido com este princípio orientador, o Turbo Cuisine permite-lhe poupar tempo e cozinhoar deliciosas refeições caseiras com total simplicidade e comodidade.
Obrigado mais uma vez por nos receber na sua cozinha.
Agora vamos cozhar jintos!
INDICE
Guia de inizio rrado em imagens 2
A Moulinex recomenda a segurarca em primeiro lugar 156
Descrição do seu produits 164
Familiarizar-se com o paine de controlo 165
Guia de uso e limpeza 166
Guia的技术o de resolucao de problemas 182
Garantia internaciona limitada da Moulinex 271
PT
A MOULINEX RECOMENDA A SEGURANÇA EM PRIMEIRO LUGAR
A segurará é a)nossa principal prioridade. Concebemos e fabricamos onoxo produits com elevados padões de segurará e Tecnologia. No entanto, tal como acontece com qualquer aparelho elétrico, existem algunos riscos potenciáis,leo que o convidamos a exercer umCERTO cuidado e a respeitar as instruções que se seguem.
INSTRUÇÉS DE SEGURANÇA
Leia atentamente todas as instruções que se seguem e guarde-as para futuras consulutas.
- A utilização incorrente do aparelho e dos respetivos acessórios pode danIFICAR o aparelho e causaferimentos.
- Oaparelhocozinhaosalimentossobpressao.Autilização incorreta pode provocar riscos de queimaduras devido ao vapor.
- Para sua segurarça, este produit está em conformidade com todas as normas e regulamentos aplicáveis (Diretiva Baixa Tensão, compatibilitadé eletromagnética, materiais compatíveis com alimentos, ambiente, etc.).
- A fonte de calor necessária para cozinho está incluída no aparecido.
1. Onde utiliser em segurar?
- Apenas para utilizes no interior.
- Este aparecido destino-se apenas a uso dométrico. Não se_DESTina a ser utilizado nos següentes casos e a garantia não se aplicá a:
- zonas de cozinas reservadas aos functionários de lojas, escritórios e outros espécOs professionais;
- quintas;
- Utilização por cliente de HOTÉis, motéis e outros ambientes de carater residencial;
- ambientes do tipo alojamento com pouco-almoço.
- Não coloque o aparelho num forno aquecido ou numa placá quente. Não colque o aparelho perto de uma chama viva ou de um objeto inflamível.
- Utilize numa superficie de trabajo plana, está e resistente ao calor, afastada de salpicos de agua.
2. Quem o pode utiliser em segurar?
- Este aparelho não foi concebido para ser realizado por pessoas (incluindo crijanças)@cajas capacidades fisicas, sensoriais ou mentalais se encontrar reduzidas, ou por pessoas com falta de experiência ou conhecimiento, a não ser que tenham sido devidamente accompaniesadas e instruções sobre a correta'utilisation do aparelho, pela persona responsavel pela sua segurarça.
- O aparelho pode ser utilisé por pessoas com capacidades fibras, sensoriais ou mentalais reduzidas ou com falta de experiencia e conhecimiento, caso sejam supervisionadas ou lhes tenham sido dadas instruções relativas à'utilisation correta do aparelho e se comprehenderem os perigos envolvidos.
- Este aparecido não deve ser utilisé por crianças. Mantenha o aparecido e o respetivo cabo de alimentação para do alcance de crianças.
- As crianças não devem brincar com o aparelho.
- As crianças devem ser supervisionadas para garantir que não brincam com o aparelho.
3. Como usar em segurar – uso de algo?
- Não utilize o aparecido para outras finalidades que não a prevista.
- Não utilize o aparecido para fritar alimentos em oleo. Só é permitido tostar/dourar.
- Não utilize a panela de pressão no modo de pressão para fritar alimentos.
- Ao cozinhoar alimentos pastosos, agite suavamente a panela antes deAbrir a tampa para fazer que os alimentos sejam ejetados.
- Este aparecido não é um esterilizador. Não o utilize para esterilizar frascos.
- Este aparecido não se destina a ser colocado em precisiónamento com um temporizador exterior ou atravesse de umsystema de commando à distência separado.
- Para segurar o aparelho, utilize sempre as两大 pegas laterais no corpo do aparelho. Utilize luvas de cozinha se o aparelho estiver quente. Para maior segança, certifique-se de que a tampa está broqueada antes de deslocar o aparelho.
- A parte inferior da cuba e a placá de aquecimento tíme de estar em contacto direto. Retire qualquer objecto ou resíduos alimentares localizados entre a cuba e a placá de aquecimento, poi pode afetar o desempenso.
- Tenha em atençao que determinados temas de alimentos, tais como sumo de maça, arandos, ruubarbo, cevada, aveia ou outros cereais, ervilhas partidas, noodles ou massas, poder formar espuma e crepitação e entupir as valvulas. Tenha cuidado ao cozinho das vezes dos alimentos e,(before de utilizesimpe cuidadosamente as valvulas.
- Tenha em atençao que determinadas receitas que incluem leite poder formar espuma, transbordar e obstruir as valvulas. Tenha cuidado ao cozinhoas评为ceitas e,deois deutilizar, limpe cuidadosamente as valvulas.
- Ao cozinhoar alimentos que incham durante a cozedura, como legumes desidratos ou arroz, não encha a cuba de cozedura a mais do que metade da sua capacité.
- Aparto cozinhar carne com pele grossa (como lingua de vaca), que pode inchar com o efeito da pressão, não fure a pele antes de cozinhar se esta parecer Inchada: pode queimar-se. Fure-a antes de cozinhar.
- Não utilize o aparecido vazio, sem a cuba ou sem ingredientes no interior da cuba. Tal pode provocar danos graves no aparecido.
- Não utilize o aparçelo sob pressão sem adicionalária, quando que tal pode provocar danos graves no aparçelo.
- Não encha o aparelho sem a respetiva cuba.
- Atença: não derrame láquidos sobre a ficha.
- Não aqueça a cuba com qualquer outras fonte de calor que não a placá de aquecimento do aparelho e não utilize outras cuba. Não utilize a cuba para cozinho com outros aparelhos.
- Utilize a cuba APENAS no aparelho. Não a utilize para cozinhar no fogão, noorno, etc.
- Utilize uma colher de plástico ou de madeira para não danIFICAR o revestimento antiaderente da cuba. Não corte alimentos diretamente na cuba.
- Não toque nas valvulas, exceto durante a limpeza e manutençao do aparecido, de acordo com as instruções fornecidas.
- Não coloque quando发展机遇ar os estranhos nas valvulas e no botão de libertação de pressão. Não substitua a valvula.
- Verifique regularamente as conduitas nas valvulas que permitem a saída de vapor para garantir que não está broqueadas.
- Não utilize um pano ou qualquer及其他 objecto entre a tampa e o corpo do aparecido de forma a delearing a tampa entreaberta. Istô pode danificar permanente o anel vedante.
- Não deixe o cabo de alimentação pendurado na extremidade de uma mesa ou bancada, nem deixe que este toque em superficies quentes.
4. Como utiliser em segurar – antes de cozinho?
- Antes de utiliser o aparelho, verifique se a valvula fluctuante e a valvula limitadora de pressão está limpas.
- Antes de utiliser o aparelho, verifique se o anel vedante foi corretamente instalado na tampa.
- Certifique-se de que a parte inferior da cuba e a placar de aquecimento está sempre limpas. Certifique-se de que a parte central da placar de aquecimento está molev.
- Não encha o aparecido mais do que a marca MAX na Cuba.
- Siga as recomendações sobre o volume de alimentos e água para fazer o risco de transbordar, o que pode danIFICAR o aparecido e Causear ferimentos.
- Certifique-se de que o aparecido está devidamente fechado antes de o colocar sob pressão.
- Antes de cozinhoar, certificque-se de que o botão de libertação de pressão está para cima (não para baixo). Consulte a figura 48 da secção Guiá de início rápido nas Imagens.
5. Como utiliser em segurará – durante a cozedura?
- Não tenteAbrir a tampa até que a pressão tenha diminuindo o suficiente. Não tenteAbrir a tampa até que a valvula flutuante esta para baixo.
- Nunca force a abertura do aparelho.
- Durante a cozedura e a libertação de vapor no final da cozedura, o aparecido liberta calor e vapor. Mantenha o rosto e as muitos afastados do aparecido para fazer queimaduras. Não toque na tampa durante a cozedura.
- Não desloque o aparecido quando este estiver sob pressão. Utilize as pegas quando o deslocar e use luvas de cozinha, se necessário. Não utilize o botão da tampa para levantar o aparecido.
- Não retire a Cuba quando o aparecido estiver em等功能amento.
- No modo tostar, tenha cuidado com os riscos de queimaduras devido às projeções ao adicional alimentos ou ingredientes à Cuba quente.
6. Como utiliser em segurará –deois de cozinho?
- QuandoAbrir a tampa,segure-a sempre pelo botao da tampa. Posicao o braço paralelo as pegas laterais. A agua a ferver pode permanecer presa entre o anel vedante e a tampa e provocar queimaduras.
- Tenha también cuidado com o risco de queimaduras provocadas pelo vapor que sai do aparelho quando abre a tampa. Primeiro,arethabra a tampa paraDEXXARSAIR O vapor suavamente.
- Não toque nas peças quentes do aparecido. Àpos autilização, a superficie da placá de aquecimento pode permanecer quente durante até 2 horas.
- Desligue a ficha da.tomada quando o aparelho não estiver a ser utilizado e antes de o limpar. Deixe arrefecer antes de colocar ou retiring peças.
7. Como utiliser em segurar – limpeza?
- Limpe a parte inferior da cuba e a placar de aquecimento antes cadautilização.
- Não mergerluhe o aparelho em agua.
- Para limpar o aparelho, consulte as instruções de utilizesçao. Pode lavar a cuba e a tampa em agua quente com detergente para a loça, mas não as colque na boaquina de lavar loça. Limpe o corpo do aparelho com um pano humido.
8. O que fazer em caso de avaria?
- Apenas pessoas autorizadas nos Serviços de Assistência Tecnica podem reparar o produto.
- Não utilize nenhum aparelho com um cabo de alimentação ou ficha danificados oudeois de aparelho não funciona corretamente ou de ter sofrido danos de alguma forma. Envie o aparelho ao Servico de Assistência Tecnica autorizado mais proximo para serinspectionado, reparado ou ajustado.
- Se o cabo de alimentação estiver danificado, este deve ser substituído por um Serviço de Assistência Técnica autorizado para fazer qualquer situação de perigo. Não substitua o cabo de alimentação fornecido por outros cabos.
- Não danifique o anel vedante. Se estiver danificado, Solicite a sua substituição num Serviço de Assistência Tecnica autorizada.
- Substitua o anel vedante a cada 2 anos ou mais cedo, se reparar que está gasto ou precisa de ser substituído.
- Utilize aparas as peças sobresselentes adequadas para
o seu modelo. Istó é particularmente importante para o anel vedante e para a cuba.
- Utilizeapanas pecas sobresselentes disponibilizadas por um Servico deAssistencia Tecnica autorizzato.
- À'utilisation de acessórios não recomendados pelo fabricante do aparelho pode provocar ferimentos.
- Não utilize outras cubas no aparecido em vez da Cuba fornecida. Substitua a cuba apenas por uma coisa sobresselente original concebida para ser realizada com este produit.
- Em conformidade com os regulamentos em vigor, antes de eliminar um aparecido que ja não está necessário, o aparecido deve fazer inoperacional (desligando a ficha e cortando o cabo de alimentação).
Proteção do ambiente em primeiro lugar!

O seu produit contém materiais que podem ser recuperados ou reciclados.
- Entregue-o num punto de recolha para possibitar o seu tratamento
9. quando é que a garantia é aplicável?
- A garantia não cobre o desgaste anormal da cuba.
- Leia atentamente estas instruções deutilização antes de utilizes o aparecido pela primarya vez. Qualquer'utilisation que não está em conformidade com estas instruções isenteá o fabricante de qualquer responsabilité e anulará a garantia.
- No caso de utilizesçao comercial, Utilização inadequada ou incumprimento das instruções, o fabricante rejeita qualquer responsabilitad e a garantia não é aplicável.
DESCRÊÇÂO DO SEU PRODUTO


^* Acessórios disponible dependendo do modelo
FAMILIARIZAR-SE COM O PAINEL DE CONTROLO

MENSAGENS DE ESTADO

Mensagem de boas-vindas quando o aparecido é ligado.
Apresentação da hora. Neste exemple: 1 hora e 30 horas.

Apresentação da temperatura. Neste exemple: 114 graus Celsius.

Indica que o programa tem uma predefinição automática de temperatura/tempo. Não pode ser modificado.

Indica que a temperatura está aacular durante a fase de pré-aquecimento.

Indica que o aparelho está a pre-aquecer.

Indica que o programa terminou.

Indica que o aparecido está na fase de manter quente.

Indica que o programa foi interrompido.

Indica que o aparecido está no modo de poupança de energia.
GUIA DE UTILIZACHO E LIMPEZA
Consulte as figuras indicadas como (Fig. x) na parte do Guia de inicio=rápido.
ANTES DA PRIMEIRA UTILIZACHO
1. Retire a embalagem
- Retire o aparelho da embalagem e leia o manual de instruções antes da primeira'utilisation.
- Retire os autocolantes promocionais (se existrem) do seu aparecido antes da primarya utilização.
2. Abra a tampa
- ParaAbriratampa,segureobotao da tampa,rode-o para a esquerda e levante atampa (Fig.1e2).
Nota: quando levantar a tampa, a cuba pode permanecer presa à tampa. É normal e demonstra simplement uma boa hermeticidade do produits. Para fazer que a cuba caia violently sobre o produit ao Abrir a tampa, abra sempre a tampa com cuidado.
- Coloque o aparelho sobre uma superficie plana. Retire todos os materiais e acessórios de proteção do interior do aparelho (Fig. 3).
3. Limpe todas as peças do aparelho
3a. Limpe a tampa, a cuba e os acessórios
- Limpe a tampa, a cuba e os acessórios com uma esponja suave e agua quente com detergente para a loiça (Fig. 4).
- Seque a tampa, a cuba e os acessórios (Fig. 5).
- Não utilize esfregões ou esponjas abrasivas para limpar a cuba, País tal pode danIFICAR o revestimento antiaderente da cuba (Fig. 40).
- Não vergulhe o aparelho em água (Fig. 41).
- Se mergerhar inadvertamente o aparecido em água ou derramarágua diretamente sobre a placá de aquecimento, leve o aparecido a um Serviço de Assistência Tecnica autorizando para reparação.
- Não coloque a tampa e a cuba na boaina de lavar loça (Fig. 42).
- Tenha em atençao que apenas os acessórios: espátula, copo medidor e acessório de cozedura a vapor são compatíveis com a boa de lavar loça.
3b. Limpe o anel vedante
- Retire o anel vedante da tampa e limpe-o com uma esponja suave e agua quente com detergente para a loça (Fig. 7 e 8).
- Seque-o completeness.
- Coloque o anel vedante sobre o suporte do anel vedante e pressione-o até encaixar (Fig. 9). Pressionefirmamente para garantir que não fica enraged o que o anel vedante está bem encaixado aftasdo respetivo suporte.
- Depois de colocar o anel vedante na tampa, seAbrir a tampa demasiado depressa, a cuba pode permanecer presa à tampa (Fig.37 e 38). Aguarde algunos segundos para que a cuba se liberte da tampa (Fig. 39).
Nota: É normal e demonstra simplement uma boa hermeticidade do produits. Para fazer que a cuba caia violently sobre o aparecido ao Abrir a tampa, abra sempre a tampa com dificuld.
AVISO: Nunca utilize o seu aparecido sem o anel vedante (Fig. 44). 3c. Limpe as valvulas
- Para limpar a valvula limitadora de pressão, retire-a do tubo na parte superior da tampa (Fig. 10). Limpe-a com uma esponja suave e agua quente com detergente para a loça (Fig. 11).
DepoS de secar, certificque-se de que a conduita do tubo está limpa antes de voltar a ligar a valvula limitadora de pressão ao tubo na parte superior da tampa (Fig. 12). Certificque-se de que a valvula limitadora de pressão está bem colocada no devido lugar e que é capaz de se deslocar para cima e para baixo.
- Para limpar a tampa da valvula limitadora de pressão, desaperte-a a partir do interior da tampa (Fig. 13). Limpe-a com uma esponja suave e água quente com detergente para a loça (Fig. 14). Depois de secar, certifique-se de que a conduita do tubo está limpa antes de voltar a aperture a tampa da valvula limitadora de pressão no interior da tampa (Fig. 15).
- Para limpar a valvula flutuante, retire a junta da valvula flutuante do interior da tampa e vire a tampa para que a valvula flutuante possa ser retrida da tampa (Fig. 16). Limpe a junta da valvula flutuante e a valvula flutuante com uma esponja suave e agua quente com detergente para a loça (Fig. 17). Depois de secar, volté a inserir a valvula flutuante na tampa e volté a colocar a junta da valvula flutuante no devido lugar (Fig. 18). Certifique-se de que a valvula flutuente está bem colocada no devido lugar e que é capaz de se deslocar para cima e para baixo.
3d. Limpe o corpo do aparelho
- Limpe o corpo do aparelho com um pano humido.
- Não mergerluhe o aparelho em água (Fig. 41).
- Limpe a placá de aquecimiento com um pano seco.
INSTRUÇÉS DE UTILIZAZão
1. Coloque os ingredientes na Cuba
- Retire a cuba do corpo do aparelho.
- Coloque os ingredientes na cuba.
- Tenha em atençao que o nível de alimentos e liquidos nunca deve excesser a marca de nível maximo na cuba (Fig. 19).
- Ao cozinho, no modo de pressão,ingredientes que Incham durante a cozedura, como legumes desidratasos ou arroz, não encha a panela a mais do que metade do seu;nivel maior.
2. Coloque a cuba no corpo do aparelho
- Certifique-se de que a parte inferior da cuba está limpa e seca e retire quando resíduos de alimentos da placá de aquecimento (Fig. 20).
- Coloque a cuba no corpo do aparelho (Fig. 21).
- Nunca utilize o aparelho sem a cuba.
3. Fecha ebloqueiea tampa
- Verifique se o anel vedante está bem colocado na tampa (Fig. 43).
- Segure o botão da tampa, colocque a tampa no aparecido e rode-a para a direita para bloquear (Fig. 22).
4. Fixe a valvula limitadora de pressão
- Coloque corretoamente a valvula limitadora de pressão na tampa (Fig. 23). Tenha em atençao que a valvula permanecera ligeiramente solta, o que é normal.
5. Ligue o aparelho
- Desenrole totalmente o cabo de alimentação e ligue-o à corrente electrica (Fig. 24).
- O aparelho emite um avis sonoro, o ecra fica intermitente e aparesta [HEI:O].
6. SeLECTIONE inicie um programa de cozedura
- Cada programa tem um tempo e temperatura predefinidos e quer uma posicao exigente da tampa. Consulte aanela de programas de cozedura:
TABELA DE PROGRAMAS DE COZEDURA
fome do programa de cozudura Nome do programa de cozudura Tempo de cozudura predefinindo Tempo ajustavel Temperatura predefinida Temperatura ajustavel Pressão predefinida Irúcio diferindo de 10 min a 12 h Monter quente até 24 h Estado da tampa Tampa fechada e bloqueada Tampa fechada mas não bloqueada Tampa aberta Estufar 30 min de 1 min a 2 h 114 °C Não 70 Kpa Sim Sim ● Sopa 12min de 1 min a 2 h 114 °C Não 70 Kpa Sim Sim ● Saltear 20min de 1 min a 1 h 160 °C Sim de 100 °C a 160 °C Não Não Não ● Cozedura a vapor 10min de 1 min a 2 h 114 °C Não 70 Kpa Sim Sim ● Cozer 40min de 1 min a 2 h 160 °C Sim de 100 °C a 160 °C Não Sim Sim ● Cozedura a vázuo/ Cozudura lenta 4 h de 30 min a 12 h 85 °C Sim de 55 °C a 95 °C Não Sim Não ● ● Arroz 8min de 1 min a 2 h 114 °C Não 70 Kpa Sim Sim ● Iogurte e fermentação 8 h de 30 min a 12 h 30 °C Sim de 22 °C a 40 °C Não Não Não ● ● Papas de oreia 15min de 1 min a 2 h 100 °C Não Não Sim Sim ● Modo Chefajustavel 30 min de 1 min a 4 h 80 °C Sim de 70 °C a 160 °C Não Não Sim ● ● ●
Nota: Ao cozinho, pode notar uma ligeira fuga de vapor da tampa, especialmente da valvula limitadora de pressão. Isto é normal e ocorre quando a pressão se acumula.
Consulte as figuras do Guia de inicio rápido (da Fig. 25 à Fig. 36).

Programa estufar
- Coloque os ingredientes na Cuba e feche completeness e bloqueie a tampa.
- Rode o botão do paine de controlo para a direita para aceder ao programa de estufar. O érá apareça o tempo de cozedura predefinido.
- Oportun: Prima e ajuste o tempo pretendido rodando o botão do painei de controlo para a direita (paraLERar o tempo) ou para a esquerda (para diminuir o tempo).
- Prima 0 para,iniciar o programa de cozedura.
- O aparelho inicia a fase de pré-aquecimento. O ecra aparen ta alternadamente e o indicator luminoso de pré-aquecimento acende-se.
- Quando a fase de pré-aquecimiento estiver conclusión, o aparibo muda automaticamente para a fase de cozedura. Oakra presenta a contagem decrescente e o indicator luminoso de cozedura em的方式来 acende-se.
- Durante o processo de cozedura, existe acumulacao de pressao no aparelho, que empurra a valvula flutuante para cima. O indicator luminoso de pressao acende-se para indicar que a tampa não pode ser aberta sem libertar primeiro a pressao.
- No final da contagem decrescente, o aparelho emite um avis sonoro e o ecra aparena [End].
- Após algunos segundos, o aparelho muda automaticamente para a fase de manter quente. O ecra aparesta Hc e o indicator luminoso de manter quente acende-se.
- Prima durante 3segundos para parar o programa em qualquer alta.

Programa sopa
- Coloque os ingredientes na Cuba e feche completeness e bloqueie a tampa.
- Rode o botão do pailé de controlo para a direita para aceder ao programa de sopa. O érá apareça o tempo de cozedura predefinido.
- Ooptional: Prima e ajuste o tempo pretendido rodando o botão do paine de controlo para a direita (paraacularo tempo) ou para a esquerda (para diminuiro tempo).
- Prima para,iniciar o programa de cozedura.
- O aparelho inicia a fase de pré-aquecimiento. O ECBA presenta alternadamente e HEAE o indicator luminoso de pré-aquecimiento acende-se.
- Quando a fase de pré-aquecimiento estiver conclusión, o apar-lerh o muda automaticamente para a fase de cozedura. O ecra aparesta a contagem decrescente e o indicator luminoso de cozedura em的方式来 acende-se.
- Durante o processo de cozedura, existe acumulacao de pressao no aparelho, que empurra a valvula flutuante para cima. O indicator luminoso de pressao acende-se para indicar que a tampa não pode ser aberta sem libertar primaryo pressao.
- No final da contagem decrescente, o aparecido emite um avis sonoro e o érá presente [End].
- Após algunos segundos, o aparecido muda automaticamente para a fase de manter quente. O éra'areshende Hoe e o indicator luminoso de manter quente acende-se.
- Prima durante 3segundos para parar o programa em qualquer alta.

Programa saltear
- Rode o botão do painei de controlo para a direita para aceder ao programa de saltear. O érá apareça o tempo de coze-dura predefinido.
-Optional: Prima e ajuste o tempo pretendido rodando o
botão do poinel de controlo para a direita (paraacularo tempo) ou para a esquerda (para diminuir o tempo).
- Oportun: Prima e ajuste a temperatura pretendida rodando o botão do panei de controlo para a direita (para fazer a temperatura) ou para a esquerda (para diminuiar a temperatura).
- Prima para,iniciar o programa de cozedura.
- O aparelho inicia a fase de pré-aquecimiento. O ECBA presenta alternadamente e HEAE o indicator luminoso de pré-aquecimiento acende-se.
- Quando a fase de pré-aquecimiento estiver conclusión, o aparélho muda automaticamente para a fase de cozedura. O ecra apareça a contagem decrescente e o indicator luminoso de cozedura em的方式来 acende-se.
- Coloque os ingredientes na Cuba e mantenha a tampa aberta para salutear.
- No final da contagem decrescente, o aparelho emite um avis sonoro e o ecra aparesta [End]
- Após algunos segundos, o aparelho muda automaticamente para o modo de poupança de energia. O érá presente [E5E3].
- Prima durante 3segundos para parar o programa em qualquer alta.

Programa cozedura a vapor
- Coloque 150 ml de agua (3¼ de cháena) e o acessório de cozedura a vapor na cuba e adicione os ingredientes. Fecha Completely e bloqueie a tampa.
- Rode o botão do poinl de controlo para a direita para aceder ao programa de cozedura a vapor. O eça apareca o tempo de cozedura predefinido.
-Optional: Prima e ajuste o tempo pretendido rodando o
botão do poinel de controlo para a direita (paraacularo tempo) ou para a esquerda (para diminuiro tempo).
- Prima para,iniciar o programa de cozedura.
- O aparelho inicia a fase de pré-aquecimiento. OEARÁpresenta alternadamente e HARE o indicator luminoso de pré-aquecimiento acende-se.
- Quando a fase de pré-aquecimiento estiver conclúa, o aparibo muda automaticamente para a fase de cozedura. Oakra aparena a contagem decrescente e o indicator luminoso de cozedura em的方式来 acende-se.
- Durante o processo de cozedura, existe acumulacao de pressao no aparelho, que empurra a valvula flutuante para cima. O indicator luminoso de pressao acende-se para indicar que a tampa não pode ser aberta sem libertar primeiro a pressao.
- No final da contagagem decrescente, o aparecido emite um avis sonoro e o ecra apareça [End].
- Após algunos segundos, o aparecido muda automaticamente para a fase de manter quente. O ecra apareça [Hoe] e o indicator luminoso de manter quente [acende-se.
- Prima durante 3segundos para parar o programa em qualquer alta.

Programa cozer
- Coloque o preparado na cuba e feche-a, mas não bloqueie a tampa.
- Rode o botão do pailé de controlo para a direita para aceder ao programa de cozer. O érá apareça o tempo de cozedura predefinido.
- Oportun: Prima e ajuste o tempo pretendido rodando o botão do poinl de controlo para a direita (paraacularo tempo) ou para a esquerda (para diminuir o tempo).
Optional: Prima e ajuste a temperatura pretendeda rodando
o botão do painel de controlo para a direita (paraLERa temperatura) ou para a esquerda (para diminuir a temperatura).
- Prima para,iniciar o programa de cozedura.
- O aparecido inicia a fase de pré-aquecimiento. OEARÁpresenta alternadamente e HARE o indicator luminoso de pré-aquecimiento acende-se.
- Quando a fase de pré-aquecimiento estiver conclusía, o aparibo muda automaticamente para a fase de cozedura. Oakra aparena a contagem decrescente e o indicator luminoso de cozedura em的方式来 acende-se.
- No final da contagagem decrescente, o aparecido emite um avis sonoro e o ecra apareça [End].
- Após algunos segundos, o aparecido muda automaticamente para a fase de manter quente. O éra presenta [Hoe] e o indicator luminoso de manter quente [acende-se.
- Prima durante 3segundos para parar o programa em qualquer alta.

Programa de cozedura a vacuo/cozedura lenta
- Rode o botão do poinl de controlo para a direita para aceder ao programa de cozedura a vácuo/cozedura lenta. O éra apareça o tempo de cozedura predefinido.
- Oportun: Prima e ajuste o tempo pretendido rodando o botão do poinl de controlo para a direita (paraacularo tempo) ou para a esquerda (para diminuir o tempo).
- Oportun: Prima e ajuste a temperatura pretendida rodando o botão do poinel de controlo para a direita (paraacular a temperatura) ou para a esquerda (para diminuiar a temperatura).
- Prima 日 para,iniciar o programa de cozedura.
- O aparheiro inicia a fase de pré-aquecimento. O ecra après
senta alternadamente e HEAE o indicator luminoso de pré-aquecimiento acende-se.
- Quando a fase de pre-aquecimiento estiver conclusión, o aparecido muda automaticamente para a fase de cozedura. O eyea apareça a contagem decrescente e o indicator luminoso de cozedura em的方式来 acende-se.
- No final da contagem decrescente, o aparelho emite um avis sonoro e o ecra aparesta [End].
- Após algunos segundos, o aparecido muda automaticamente para o modo de poupança de energia. O érá presente.
- Prima durante 3segundos para parar o programa em qualquer alta.

Programa arroz
Coloque os ingredientes na cuba e feche completeness e bloqueie a tampa.
- Rode o botão do pailé de controlo para a direita para aceder ao programa de arroz. O érá apareça o tempo de cozed ra predefinido.
- Ooptional: Prima e ajuste o tempo pretendido rodando o botão do poinl de controlo para a direita (paraacularo tempo) ou para a esquerda (para diminuir o tempo).
- Prima para,iniciar o programa de cozedura.
- O aparecido inicia a fase de pre-aquecimiento. O ecra aparece alternadamente e o indicator luminoso de pre-aquecimiento acende-se.
- Durante o processo de cozedura, existe acumulacao de pressao no aparelho, que empurra a valvula flutuante para cima. O indicator luminoso de pressao acende-se para indicar que a tampa não pode ser aberta sem libertar primaryo pressao.
- No final da contagagem decrescente, o aparelho emite um avis o sonoro e o ecra aparesta.
- Após algunos segundos, o aparecido muda automaticamente para a fase de manter quente. O éra presenta [Hoe] e o indicator luminoso de manter quente [acende-se.
- Prima durante 3segundos para parar o programa em qualquer alta.

Programa iogurte e fermentacao
O programa de iogurte e fermentacao pode ser utilizao para preparar iogurte ou levedar pao/massa para bolos.
- Ao preparar igurte, coloque os ingredientes na cuba e feche a tampa.
- Ao levedar massa, pode bater a massa diretamente na cuba e, em seguida, colocar a cuba no corpo do aparelho e fechar a tampa.
- Rode o botão do painei de controlo para a direita para aceder ao programa de igurte e fermentação. O éra apareça o tempo de cozedura predefinido.
- Oportun: Prima e ajuste o tempo pretendido rodando o botão do poinl de controlo para a direita (paraacularo tempo) ou para a esquerda (para diminuir o tempo).
- Oprincipal: Prima e ajuste a temperatura pretendida rodando o botao do paine de controlo para a direita (paraacular a temperatura) ou para a esquerda (para diminuir a temperatura).
- Prima ⑤ para,iniciar o programa de cozedura.
- O aparecido inicia a fase de pré-aquecimiento. O ecra aparece alternadamente e o indicator luminoso de pré-aquecimiento acende-se.
- Quando a fase de pré-aquecimiento estiver conclusión, o aparecido muda automaticamente para a fase de cozedura. O esca'a藓ata
a contagagem decrescente e o indicator luminoso de cozedura em,.
como acende-se.
- No final da contagem decrescente, o aparelho emite um avis sonoro e o ecra aparesta [End].
- Após algunos segundos, o aparecido muda automaticamente para o modo de poupança de energia. O érá presente [E8E3].
- Prima durante 3segundos para parar o programa em qualquer alta.

Programa de papas de aveia
- Coloque os ingredientes na Cuba e feche completeness e bloqueie a tampa.
- Rode o botão do pailé de controlo para a direita para aceder ao programa de papas de aveia. O érá apareça o tempo de cozedura predefinido.
- Oportun: Prima e ajuste o tempo pretendido rodando o botão do poinl de controlo para a direita (paraacularo tempo) ou para a esquerda (para diminuir o tempo).
- Prima para,iniciar o programa de cozedura.
- O aparecido inicia a fase de pré-aquecimiento. O ecra aparece alternadamente e o indicator luminoso de pré-aquecimiento acende-se.
- Quando a fase de pré-aquecimento estiver conclúa, o aparibo muda automaticamente para a fase de cozedura. O(ECRA presenta a contagem decrescente e o indicator luminoso de cozedura em的方式来 acende-se.
- No final da contagem decrescente, o aparelho emite um avis so noro e o ecra aparesta End.
- Após algunos segundos, o aparecido muda automaticamente para a fase de manter quente. O ecra aparece Hóe e o indi
cador luminoso de manter quente acende-se.
Prima ⑥ durante 3segundos para parar o programa em qual-quer alta.

Modo Chef ajustavel
- Coloque os ingredientes na cuba e feche a tampa ou não, dependendo da receita.
- Rode o botão do poinl de controlo para a direita para aceder ao modo Chef ajustavel. O éra aparea o tempo de cozedura predefinido.
- Oportun: Prima e ajuste o tempo pretendido rodando o botão do poinl de controlo para a direita (paraacularo tempo) ou para a esquerda (para diminuir o tempo).
- Oportun: Prima e ajuste a temperatura pretendida rodando o botão do poinl de controlo para a direita (paraacular a temperatura) ou para a esquerda (para diminuir a temperatura).
- Prima ⑤ para,iniciar o programa de cozedura.
- O aparelho inicia a fase de pre-aquecimento. O éra aprende alternadamente e o indicaor luminoso de pré-aquecimento acende-se.
- Quando a fase de pré-aquecimiento estiver conclusía, o aparibo muda automaticamente para a fase de cozedura. Oakra apareça a contagem decrescente e o indicator luminoso de cozedura em的方式来 acende-se.
- No final da contagagem decrescente, o aparelho emite um avis o sonoro e o ecra aparesta [End].
- Após algunos segundos, o aparecido muda automaticamente para o modo de poupança de energia. O érá presente.
- Prima © durante 3segundos para parar o programa em qualquer alta.
* Suggestão de reaquecimento rápido de pratos: ajuste a temperatura para >= 95 °C e cozinho com a tampa fechada mas desbloqueada.
7. Utilize a função de IPODIO diferido
O inicial diferido pode ser útill para programar o aparelho para cornerar a cozinho mais tarde.
- Primeiro, selezione um programa, seguito os passos descritos acima na parte 6.
- Antes de iniciair o programa的选择ado, prima . O éça apareço o tempo predefinido para o inico diferido.
- Defina o tempo pretendido rodando o botão do poinel de controlo para a direita (paraLERar o tempo) ou para a esquerda (para diminuiro tempo).
- Prima ⑥ . O ecra apareça a contagem decrescente para o inico diferido. quando o tempo predefinido TERMINAR, o aparelho começa a cozhar automaticamente.
8. Abra a tampa
- Não tenteAbrir a tampa se a valvula flutuante estiver para cima e se o indicator luminoso de pressão estiver aceso.
- A pressão pode ser libertada de 2 formas发展目标 no final da cozedura:
Libertação natural: No final da cozedura ou(before de parar o programa, o aparecido arrefece sozinho e a pressão liberta-se naturalmente. Durante a libertação natural, os alimentos podem cozinar em excesso devido à pressão restante na cuba. Utilize a libertação manual para parar imeditamente o processo de cozedura.
Libertação manual: Prima continuamente o botão de libertação de pressão na parte superior da tampa. Ira demorar entreagems segudos e algoins minutos,dependendo da quantidadede alimentos no interior da cuba (Fig. 31).
AVISO: Tenha cuidado com o vapor quente que sai do aparelho. Mantenha o rosto e as muitas afastados da saída de vapor (Fig. 45).
- ParaAbrir a tampa, coloque o braço paralelo as pegas laterais, secure o botão da tampa, rode-o para a esquerda e levante a tampa (Fig. 32 e 33).
AVISO: Tenha cuidado com o vapor quente que sai da cuba.
9. Desligue o aparelho da tomada
- Após cada utilizesçao, deslgue o aparelho da tomada e deixe-o arrerefecer durante,leo menos,2 horas antes proceder à limpeza.
10. Limpe antes cada utilização
- Limpe o aparelho antes cada'utilização.
- Antes de limpar, deixe o aparelho arrefecer durante, pelo menos, 2 horas.
- Para instruções de limpeza, consulte a parte 3. Limpe todas as peças do aparecido incluidas na sequção ANTES DA PRIMEIRA UTILIZACão.
11. Dicas de manutenção
- Para garantir a durabilitad da cuba ao longo do tempo, não corte alimentos no seu interior.
- Utilize os acessórios fornecidos. Não utilize nenhum utensílio metalico, poi tal pode danIFICAR o revestimento antiaderente da cuba.
- Após autilização, o anel vedante pode conservar o cheiro do prato. É normal; o silicone tem muitenos poros que se abrem quando expostos a temperatas elevadas, fechando-se quando a temperatura desce. Para eliminar o cheiro do anel vedante, pode:
- Colocar o anel de silicone na maquina de lavar loixa.
- Adicionar 1 chávena de vinagre, 1 chávena de agua e 1 limão cortado em pedações grandes na cuba e inicial um programa de cozedura a vapor durante 2关键时刻 e, em seguida, deixar o vapor libertar-se naturalmente.
- Substitua o anel vedante a cada 2 anos ou mais cedo em caso de danos.
GUIA TECNICO DE RESOLUÇÃO DE PROBLEMAS
Problema Possível razões Soluções Não é possível abrir a tampa. Não é possível abrir devoa pressão na Cuba. Prima continually o botão de libertação de pressão para remover a pressão no interior da Cuba. Pode demorar algumas minutos às a pressão ser totalmente libertada. A pressão na Cuba é totalmente libertada, mas a válvula fluktuante está presa porque está demasiado muito e, por isto, não se pode mover para baixo. a. Certífique-se de que a pressão é totalmente libertada, deleixando ou aparecido arrefecer durante,leo menos,2 horas.b. Empurre cuidadosamente a válvula fluktuante para baixo, inserinou um espto ou um objecto longo na abertura da válvula fluktuante. Se isto não funciona, envie o aparecido a um Servico de Assistência Técnica autorizado.c. Para aproxima'utilisation, limpe e seque bem a válvula fluktuente. Não é possível fechar a tampa. O anel vedante não está corretramente instalado. Instale corretramente o anel vedante. A Cuba contentem ingredientes quentes que geram vape. Aguarde que os ingredientes na Cuba arrefecam antes de tentar fechar novamente a tampa. A válvula fluktuante está presa porque está demasiado muito e, por isto, não se pode mover para baixo. a. Empurre cuidadosamente a válvula fluktuante para baixo, inserinou um espto ou um objecto longo na abertura da válvula fluktuante. Se isto não funciona, envie o aparecido a um Servico de Assistência Técnica autorizado.b. Para aproxima'utilisation, limpe e seque bem a válvula fluktuente. A posicao e/ou a direção na qual a tampa foi fechada não é a correta. Feche a tampa na direção correta, de acordo com o manual de instruções. AoAbrir a tampa, a Cuba permanece presa à tampa. O anel vedante criou um efeito de sução. A Cuba liberta-se da tampa por si são. É normal e demonstra simplesmente uma boa hermeticidade do produits. Para evaporar que a Cuba caía violently sobre o aparecido ao Abrir a tampa, abra sempre a tampa com cuidado.
Problema Possível razões Soluções Libertação intensa de pressão da valvula limitadora de pressão. A pressão interior exceeda pressão de funciona ou a pressão inferior exceeda pressão de segurar. Limpe minuciosamente a valvula limitadora de pressão, a valvula fluctuante e a tampa. Se continue a sair vapor da valvula fluctuante, envie o aparecido a um dos Serviços de Assistência Técnica autorizados mais proxies para inspeçao, reparação ou ajuste por pessoas autorizada. A valvula limitadora de pressão está numa posicao incorreta. Rode/pressione cuidadosamente a valvula limitadora de pressão para que caia no devo lugar. Tenha dificuld com o vapor quente. Posicao-se em segurar e use luvas de cozinha. O controlo de pressão avariado resultou na libertação de pressão. Envie o aparecido a um Serviço de Assistência Técnica autorizada para reparação. Libertação continua de pressão da valvula flutuante. A pressão inferior exceeda pressão de funciona ou a pressão inferior exceeda pressão de segurar. Limpe minuciosamente a valvula limitadora de pressão, a valvula fluctuente e a tampa. Se continue a sair vapor da valvula fluctuante, envie o aparecido a um dos Serviços de Assistência Técnica autorizados mais proxies para inspeçao, reparação ou ajuste por pessoas autorizada. Residuos na valvula flutuante. a. Prima continuamente o botão de libertação de pressão para remove a pressão no interior da cuba. Pode demorar eles minutos às a pressão ser totalmente libertada. b. Deixe o aparecido arrefecer durante,leo menos,2 horas. c. Limpe eSEQE a valvula flutuante antes de reinicuar a cozedura. A valvula flutuante está presa. a. Prima continuamente o botão de libertação de pressão para remove a pressão no interior da cuba. Pode demorar eles minutos às a pressão ser totalmente libertada. b. Deixe o aparecido arrefecer durante,pelo menos,2 horas. c. Limpe eSEQE a valvula flutuante antes de reinicuar a cozedura. Fuga de vapor da tampa. O anel vedante não está corretemente instalado. Retire o anel vedante, limpe-o e volta a instalá-lo na posicao correta. O anel vedante está sujo. Retire o anel vedante, limpe-o e volta a instalá-LO na posicao correta. O anel vedante está danificado ou a extremidade da cuba está danificada. Envie o aparelho a um Servico de Assistência Técnica autorizzato para reparacao. Os alimentos não está cozinhados. A proportao de ingredientes solidos/liquidos não é a correta. Tente novamente, seguido com precisão as quantidades da receita. Sem eletricidade da fonte de alimentação. Verifique o Sistema elétrico da sua casa. E0presentado no ecrā digital. O interruptor de pressão está avariado. Envie o aparelho a um Servico de Assistência Técnica autorizzato para reparacao. E1presentado no ecrā digital. O sensor de temperatura está avariado. Envie o aparelho a um Servico de Assistência Técnica autorizzato para reparacao. E2presentado no ecrā digital. A tampa não está corretemente posicionada para o seu programa de cozedura. Cada programa querou uma posicao específica da tampa. Verifique e ajuste a posicao da tampa necessária para o seu programa de cozedura; consulte aabela de programas de cozedura na parte 6 deste manual. Reinicie o programa assimissque que a tampa estiver corretemente posicionada. Se o problema persistir, envie o aparelho a um Servico de Assistência Técnica aprovado para reparacao. الإستعمال الإستعمال الحرفية الإستعمال الإستعمال الحرفية الإستعمال الحرفية الإستعمال الإستعمال الإستعمال الإستعمال الإستعمال الإستعمال الإستعمال الإستعمال الإستعمال الإستعمال الإستعمال الإستعمال الإستعمال الإستعمال الإستعمال الإستعمال الإستعمال الإستعمال الإستعمال الإستعمال الإستعمال الإستعمال الإستعمال الإستUTION الإستUTION الإستUTION الإستUTION الإستUTION الإستعمال الإستUTION الإستUTION الإستUTION الإستUTION الإستUTION الإستUTION الإستعمال الإستUTION الإستUTION الإستUTION الإستUTION الإستUTION الإستUTION الإستعمال الإستUTION الإستUTION ال,enGLISH ال,enGLISH ال,enGLISH ال,enGLISH ال,enGLISH ال,enGLISH
AR
golgo
diksek diksek uglal diksek diksek uglal diksek uglal diksek uglal diksek uglal diksek uglal diksek uglal diksek uglal diksek uglal diksek uglal diksek uglal
olalwseoylglblljaooayloagnoaiaol jga Jkae elds g oelll
.(32g 33 Jxogill JxJal) 1.
alllcgo jolaojolwlljollnojdo
jai jie ai lai 1.9
aaii jiey jiee eel yjg jiall jiaell
pduocuuyjgajb1.10
#
JyIe JcJcLw oJU JyJg JgJg JbJI
a 3 a
JyIyIyIyIyIy
aJaaJ 1.11
a#pabll gaa: paa y. caggl g aagabll alg atlaal
gulj 150 gol d a yu oogol gaiu wu .ogagaiu all lalall p
S_ OBC = S_ COD + S_ BOC
gssuouuullgl aubolaiag.palalldoaayyauwgliaa haoi jpaauo y
aJooal aoojooaouo ooooo
y la pall kai y a aell ao jn abill
aIbI aIe 0gJgSaaiaa
gabll 1cgl 1j 0g 1 j 1a2ao 1g 1al 1o 1ol g 1g 1d 1o 1ol g 1slo-
aab Jaa jaoj aai jig jaoa oao
a 1000
aalw jewg yall alo yll lali tali jzgl Jgow .jol wal al ojo Joo sI .
jssg
a a a 000
End
. 1
gj gabal jz3 0
g 1 g a 95 o j o j o j o j o j o j o j o j o j o j o j o j o j o j o j o j o j o j o j o j o j o j o j o j o j o j o j o j o j o j o j o j o j o j o j o j o j o j o j o j oj
小 S_n = na_1 + ( n - 1) 2a_2 + ·s + ( n - 1) 2a_n
jIJUJI JUJIJI UJUJIJI 1.7
g 100
原不等式成立
0aaiagallgihalgluluol
.6j01
aill joo. 0
.
()()
(.)
aalaglll aaii lalil jaiy jaiyai yjaiyai .
Llaljll jll
1.8
#
aillal yjg jn cialo jzayb bajl yjai
yjwag aai jao jalqal syaay gai jai gai gai gai gai gai
gaiiiaai i aaiy
gall alal alal ay galsy
jg jy jy jy jy jy jy jy jy jy jy jy jy jy jy jy jy jy jy jy jy jy jy jy jy jy jy jy jy jy jy jy jy jy
.31 5
jie jie jie jie jie jie jie jie jie jie jie jie jie jie jie jie jie jie jie jie jie jie jie jie jie jie jie jie jie jie jie jie
(45 g)
AaLdai gBaaIgai yalbleg aulgall
a aalw yaei . 00 aai gaiy jUgoggl uauu
.
J 1 J 1 1 1 1 1 1 1 1 1 1 1 1 1 1 1 1 1 1 1 1
.(c)g|lla()Jg()
#
Jg Jg Jg Jg Jg Jg Jg
⑥
aaii jaii iiaai jaii jaii jaii jaii jaii jaii jaii jaii
a a a a a a a a a a a a a a a a a a a
. End
HOE aaiwai jaiy. diagaiy lgl abaiy alalj ylll jllj jg jg jg
()aagaaall aieablaalw
.30 1
JUJIJI JUJIJI JUJIJI

aagll aedl pse g alalldy gabll agg cllg kllg
aalal yjzw. 1uull lalal uolll uolll uolll uolll uolll uolll uolll uolll
#
jall jll aogj jaoa ojol g jzjg jyogbalsl gglg 0jbjol
.(c)g|lla()Jg()
Soll aol jao ojol jybjc jzg cj gll ojol jyol jyol jyol jyol
(oo) a o o o o o o o o o o o o o o o o o o o o o o o o o o o o o o o o o o o o o o
#
Jg Jg Jg Jg Jg Jg Jg Jg Jg Jg
()
$$
\begin{array}{c} \text {g a b i l l} \\ \text {c o l o r} \\ \text {d e f} \end{array}
$$
$$
\begin{array}{l} \text {j o r i g h t w i t h} \quad \text {j o r i g h t w i t h} \quad \text {j o r i g h t w i t h} \quad \text {j o r i g h t w i t h} \quad \text {j o r i g h t w i t h} \quad \text {j o r i g h t w i t h} \quad \text {j o r i g h t w i t h}. \end{array}
$$
$$
\begin{array}{l} \text {d e r i c t e d} \\ \text {H E R E} \quad \text {G C C C} \end{array}
$$
$$
\left(\frac {1}{2}\right) \frac {1}{2} \frac {1}{2} \frac {1}{2} \frac {1}{2} \frac {1}{2} \frac {1}{2}
$$
ooj 0o o o o o o o o o o o o o o o o o o o o o o o o o o o o o o o o o o o o o o o o o o o o o o o o o o o o o oo
y
Erid
HOe aaii jaoa.ajgaojy ae abaaal alao yol laljagao jgs
()aiaaall aieablaalwfo
gjg jzj 30
y

Jll jll jgl golj glal golj golj golj
.
gJgJgJgJgJgJgJgJgJgJgJgJgJgJgJgJgJgJgJgJgJgJgJgJgJgJgJgJgJgJgJgJgJgJgJgJgJgJgJgJgJg
.
aag aall lss. gaaalg yglalg jll gogg alg
#
jall jll aol jaoa ool jzjbr jg wlaal cgl gl 0
.(cgllla)
Soll aol jao ojol jzrb jzg jzj gll ojol aol 0jol
.(aJlal aJzJ (aJzJ) JIJI g(ajll aJzJ dJzJ)
gabll caljui Jauuui uui ⑥ lue bua
Jg aag JdJIy HHEH g CcC 1aill yjog. jgljg jn jn jn jn jn jn
8
aill ailll oaii glll alor yll lalil jgljgss slls slls
aaii aaiy gaiy yaa yaaag yjia
End
aalw jyaw .slawl gog yll laljlgjw yg
gjg jzjzjzjzj30wJ ⑥
a aai 1
End
HOe aaii jaiw diagw w gle abal ala o y lla lab jgjg jg jg jg
1111 1111
.3g gjg jyj 30j
1111/10g 1234567890
.
ydy ydy dydy dydy dydy
Juslll lssll aol jaaa ola Jybrn 1u galsg
.(c)g|lla()Jg()
Soll oJoojooj j 15000000000000000000000000000000000
.(j)Jd a Jd Jd Jd Jd Jd (OJd d Jd Jd Jd
#
jagoo jolll HAE 0000 dawal oog. golll jou wail
《》
aaiiaaii aegaaag. gabll aloyo jilalali jgaliljgaiu jglall jauill aloyo JuslaI ic
a a a a a a a a a a a a a a a a a a
End
a aalw sssssssg g
.3g gjg jyj 1jzj 30jzj 6
J 1
pksolldg 10alall gdlg gall o
gabla aalw jzss
.
Jallllgaojagaojg jzjg jzjg jzjg Jbassl 8g 8g 8g
.(c)g|lla()Jg()
aLg aLg gLg
gabll 1 aalw jaww .
.
Jaaal 1sall aol jaoa ola Jyba Jg wbal gll b
.(c)glll(a)JLg(c)g0sla
#
Jg aag JdJIHHEE g C003 aalw w. yjy jy jy jy jy
8
aalw jwagw .gall aldo y wll lttl jglw Jgws .jwl wals alo y oos1 11
aaii 1 aaiy gabll yaae
ooj jao aag. gajgall poa gla lo jgal jbeall slj ygalal alae el
y
Erid
HO 1
()afoall afoall
gjg jzj 30
j

alaiy jSL. lalal y g 1g
a aaii i 1
.
Jylll l! sall aol yol ool yol b j wolal all gllg 0e bcl:
.(c)glll(a)jLw(c)g(c)g0sla
aJg aJg Jg Jg Jg Jg Jg Jg Jg Jg Jg Jg Jg Jg Jg Jg Jg Jg Jg Jg Jg Jg Jg Jg Jg Jg Jg Jg Jg Jg Jg Jg Jg Jg
(oojol a jol) Jlgl g (oJol a oJol) jss
a#
Jg a JdJIb HRE g C03
8
aalaljgawg yall alol jlll lal jlll jlll jlll jlll jlll alo jlls1.
g
a aai
ooj joo joo o o o o o o o o o o o o o o o o o o o o o o o o o o o o o o o o o o o o o o o o o o o oo
y
End
HO 1
()aiaaaallae aabaaalaa
Gg j 3 o
1
aBg aLw yaae m aolj yIyoguI ykaal aag a
.
Juslll lssll aol jooa ojfo Jybr Jyugb Jgulalg 0g 0g 0g
.(c)glllla)JLgllg(c)gOo
Soll aol jooa oJb Jg Jg Jg Jg Jg Jg Jg Jg Jg Jg Jg Jg Jg Jg
(ooJzJzJzJzJzJzJzJzJzJzJzJzJzJzJzJzJzJzJzJzJzJzJzJzJzJzJzJzJzJzJzJzJzJz
aBbI 1
jg jy jy jy jy jy jy jy jy jy
6
aalaljgaw. gall alol jalal jgal jgal jgal alalal
e aai 1a aal bll
aill 15gao aal bai jg g aal agg
End
.
.3g j 1j0
#

.1gll 1 gglal eog gglgag (g3/4) gll j 150 g
g
(36 _ 25
a aia 0j y jy jy jy jy jy jy jy jy jy jy jy jy jy jy jy jy jy jy jy jy jy jy jy jy jy jy jy jy


.
a aiaaa ojol aeg aagall gai jll gaoaill aagai jaoa
ydydydydydydydydydydydydydydydydydydydydydydydydydydydydydydydydydydydydydydydydydydydydydydydydydydydydydy
Juslll l kull 20g jaa ojol ybr sb g walall cgl bglg
.()JLALJJGLg()
#
Jg Jg Jg Jg Jg Jg Jg
《》
aaii aiai jaii iaii jaii jaii jaii jaii jaii
()
gag gag gag gag gag gag gag gag gag gag gag gag gag gag gag gag gag gag gag gag gag gag
yjbdal jn no albll ydyclcay
Erid
HOJ
()《afoolwJgabfool》
.3g j g aaiy 1jg3 0

pks 1a5s gbsg 0c g 0
aall aalw jzew 1e alllolj Jgoguulnagai gaojaa
.
Jylll l! sall aol jg oaoa oohj ybrb j g walal cgl bghg ( )e bdo:gs
.(glll)jlllgl(gll0la)
gabll calj jzdd. 0d
Jg Jg Jg Jg Jg Jg Jg
8
aalalw yaw. gbl alal jlll jall jall jlll jlll jlll jlll aoljul sll .
a
aI iag . baii duioi plao no 4olb .albiil no jiau uab lyu bi li ygbll ic abgdo
jglj 53
.
.41 y
aasaaabaaagwllgws
pulucuululul
glll ceg g uolkoll .1
scc
aBllcglgUgSallg
(ajll joll) max aolsc ljg jglz yj c jglg g all g g
(19)
eogj g aagaaal jgl glaol lta gabll alg wgs yll plabll uigka gabue
aill laiw aai jyj 1 yaiy
Jg 1000000000000000000000000000000000
Jusll) jusssgol no ploab uia g Ujig aLg aba glal aeg oui Jn 5i
.20
.21 0
aeg 10000000000000000000
a1a 1.3
.43 1
Jall) aIayd aeIoll aylae 5oJol yjg jll d 1a00 1
.(22)
baall uoo plao cuiu 4
jI abxo (23 yoooll Jkuill) cuao kuiu baii jbeai duoi pao go
#
Jgul Juaa 5.5
.24 ygjgl jyjgl jyjgl jyjgl jyjgl jyjgl jyjgl jyjgl jyjgl
HEI10 1
Jusuuiy p8 g yolj 0.6
a 1
#
wglgaoa 2b.3
jssu) jyog jolag aaleiaaiaeaal yabig bll no wyy giae ejl
.897
Lgla
JkU] IgKo gLgLbBolg yuill gio a Jolo yuill gio a
a a 1000 g 1000g 1000g 1000g 1000g 1000g 1000g
yulil gao zao lolo 105
aBll aeg yaa 3.85 ae aee alal llae 11 alal yu wll gao
JSLJI)lagaa jse Xaiai gaojia jzai.38g 37 Juaaoguill JSLJI) aIbala I
.39
a 1 a
LgJg jyj 10000000000000000000000000000000000000000000
(44)
alall abi 23
.(10)
jog jg.11 (yog)
yj 100
4iSs sbsaill 1uai pao gog joo sbg.(12 youo gill Jkaill) sbll
J 1
(1)
日 ≤slant 1 j.15.(14)
g s r a 100000000000000000000000000000000000000000
.15 a
ailll 1000 1000 1000 1000 1000 1000
gssll plao aabii.(16 yaggl (J)albll jy gssll plao laa i j 17 yaggl (J)log log jloL slog aalei aieawl plaae y gssll plao
Jill) gfo yolqilofo pdool plao afo 0g ofo 1ofo 1ofo
(1)
.12
a
Joo 0o (w y aaggill Jss) gai ge gai jraaogogil Jssy I ggejrr
#
jglulduwll
0.1
yjgl jgcll l 10000000000000000000000000000000
J
jJy jaydolduuJgJyJyJyJyJyJyJyJyJyJyJyJy
c.1234567890
JSSW) 15bllg gJg dLwI yJc aol sOg Jbllg JdAa JdAa JdAa JdAa
.(2g1jlaa#
jblw yg yb jol lus ally lle gall eeg j kssal bllg juc: abgdo
gj 1aill gai iiai jgai gai aai alg agai alg gai gai gai
.
Jall) jall Jd1o iLdlolg aillgl slgall gaoa 11jy. gauu al jall
.3
jgljcljglj3
aalglg aell al 13
.4gogagaoiaaiaaiyglalggall
(5)
y
.40 1
.41 y
4 1
. doxy duo zo zo zo zo zo
.42 1
aJw e JyJg oJag oJg aJg aJg JaaJg JaaJg JaaJg JaaJg
.

JlJlJlJl

jglaljai jiee jilw

aaa 30g a>gl cwl:Jllal lla g Cgll o

.114:JlllIa J.

aJySg y. gaii jaijai jai jai jai jai jai jai jai jai jai jai jai jai jai jai jai jai jai jai jai jai jai jai jai jai jai jai jai jai jai jai jai jai jai jai jai jai jai jai jai jai jai

yJyIyIyIyIyIyIyIyIyIyIyIyIyIyIy

yJyJyJyJyJyJyJy

oljlll j

aagaaalgeababaaalallaojgajgai jll

#

JzJzJzJzJz
wJ


yol
agjgl .gabll ag jy jy jy g s y sbg p dssy
aill lio go plucuul aaaas aeol jie aba: gabll
a a 100
.(aIbI aIe Igbg bIa dIa Jc) albsi
ygi aai
Lggyjooie! gI yIeaiy jSs ayIe aao oI 1go Ige jgsy
Aa
jlaal yoo .9
algl jnawbll 511 gll jlaal y
JgJy JgJyJyJyJyJyJyJyJyJyJyJy
aJg300 gJ 1000000000000000000000000000000000000000000
.1J2
gulusw ggl s jyj w yj ajjnll jy
jol jol jol jol jol jol jol jol jol jol jol jol jol jol jol jol jol jol jol jol jol jol jol jol jol jol jol jol jol jol jol jol jol jol jol jol jol jol jol jol jol jol jol jol jol jol jol jol jol jol jol
. 1
.
.
.
.
.
.
.
.
.
1.5.7
. pluul 15 u2 jiuuill ggl uall sclg oxl gl znuol .
gbl lgluee elk. pduu wlll lalwlaa aegy jy jy jy jy jy jy jy jy jy jy jy jy jy jy jy jy jy jy jy jy jy jy jy jy jy jy jy jy jy jy jy jy jy jy
iJoo 100 a0000000000000000
J 1 J 1 J 1 J 1 J 1 J 1 J 1 J 1 J 1 J 1 J 1 J 1 J 1 J 1 J 1 J 1 J 1 J 1 J 1 J 1 J 1 J 1 J 1 J 1 J 1 J 1 J 1 J 1 J 1 J 1 J 1 J 1 J 1 J 1 J
. 1234567890
.
.
.
.
aaiy jao jiaog. bao aojixu wsi jybl uayuiall jzglg zpaiai . Juaill 49 glc yabll eegg bywll gio aiau . Jaozo aol oJyog lao ay gll jzglg bq yI paiaiu . Jlaalaaai all jao yog nclao plauoi y
9jglal j- jol Jkwi jgljwl puiu wS.4
. 1234567890
.
.
.
.
.
.
.
.
.
.
.
.
.
.
.
.
.
.
.
.
.
.
.
.
5.5
Jl. 12345678901123456789011234567890112345678901123456789011234567890112345678901123456789011234567890112345678901
Jl. 1234567890112345678901123456789011234567890112345678901
Jl. 1234567890112345678901
Jl. 12345678901
Jl. 12345678901
Jl. 12345678901
Jl. 12345678901
Jl. 12345678901
Jl. 12345678901
Jl. 123
9JbJ 1- jSj jzj0s5.6
jIgUJyIeJz.1bIeI JIeJnJLsIuSdSul 1111111111111111111111111
AR
gabllsgljyagazjjg jgljagalj gabllgawiy gialpabgabw
aaii jao joi
y
aogol oia gab ic joll g.1.laalalwgl aalall no ij glgcr
pLauuilluylalj aalall
g (a) jw J 100
a:laia 111y y aal y aai y aai y
aaii
eog gdo oogg g g g g
jlll l 1
y
j4
algl 10g plzwiol jgo no plebally jglzll shy
.
y jglj yolll jnsswll 2g jie jy daa y
.8j8j8j8j8j8j8j8j8j8j8j8j8j8j8j8j8j8j8j8j8j8j8j8j8j8j8j8j8j8j8j8j8j8j8j8j8j8j8j8j8j8j8j8j8j8j8j8j8j8j8
g jagall yablldojicu yg.bao jgal ldsygalll eeg pui
.0u 1 log .
eog 1001 1001 1001 1001 1001 1001
aBbI aIg 8oJoo IabI gBa baa y.
.
alall y. 12y jy 10y
JcJcJcJcJcJcJcJcJcJcJcJcJcJcJcJcJcJcJcJcJcJcJcJcJcJcJcJcJcJc
1. 1. 1. 1. 1. 1. 1. 1. 1. 1. 1. 1. 1. 1. 1. 1. 1. 1. 1. 1.
a 1
JU 1000000000000000000000000000000000000000000
aLl bWu dwsu icg:duaii gdlal aIgUdelluy
jol jolil iol ool ool ool ool .2
joo (Jabll uo lo) ooloo jno plo wu noo jlaa lia
a 100000000000000000000000000000000000000000000
aaii aiae iil g 1y y y y y y y y y y y y y y y y y y y y y y y y y y y y
aioiwo 1o llool o pooll jolll pluow
a
a 1
aabaaal jblaool ngagag 1gil 1g aiai d a b jlae al pluauwul gdo
45LwgljgJbIaIyI yJ. JbIyI JcJn jIgJl IaIyI pJzIwI p
JlalbJgIoo JgIoo
jlll jlljlly
jlll lss jao gaiol uig liu Jalbyl aJyco
ppl pluuln-10 Jusjus juspuus 3.3
d.o 0a aall jol jol jol jol jol
.
Lalal pabll lal baiy gog y baiy yabll aJ Paaas
pabll 236 jilal bll lcbu cblb yall aJy.
y jll
Juaia 12 jie paoi plai jyjz cgo pluuiy Jauu uo y jyjulii
jgl jgll Jg 1 g jgogall jalal jaoaJolal jgl jgl
jla jlae 1a 1a a 1a 1a 1a 1a 1a 1a
aIy j. iJ 1000000000000000000000000000000000000000000
154 154
a aag gglgll glgclal alol o pabll no aes elgglb jplde
gaiyai jiljgl gai jiljagai jiljagai jiljagai jiljagai jiljagai jiljagai jiljagai jiljagai jiljagai jiljagai jiljagai jiljagai jiljagai jiljagai jiljagai jiljagai jiljagai jiljagai jiljagai jiljagai jilj
gddlaaalldgaaalln a j g oogr g
aalaa aalaa aalaa aaii aag palaal no eolil oia gab iie
yjiaosluuysus
jai jai jai jai jai jai jai jai jai jai jai jai jai jai jai jai jai jai jai jai jai jai jai jai jai jai jai jai jai jai jai jai jai jai jai jai jai jai jai jai jai jai jai jai jai jai jai jai jai jai jai
ailll 1jylg jai gdi liu bai
aolwul
. 1JaiiIg Ig Jg Jg Jg Jg Jg Jg Jg Jg Jg Jg Jg Jg Jg Jg Jg Jg Jg Jg Jg Jg Jg Jg Jg Jg Jg Jg Jg Jg Jg Jg Jg Jg Jg Jg Jg Jg Jg Jg Jg Jg Jg Jg Jg Jg Jg Jg Jg Jg Jg Jg
Jgssal aabll gulgglg 2000 g jgll li gglg . Lc loo . aalzai I g uasblizgglg 4g g gaaiaaiaa
.(u)log aullg 1gglg yjU dXoJlgoJy
jgl 1gabu jll 0jll 0o
?jloJyL jJyJyJyJyJyJyJyJyJyJyJyJyJyJyJyJyJyJyJyJyJyJyJyJyJyJyJyJyJyJyJyJyJyJyJyJy
a#d aalal jslal ylulu uuaaui liu
JSLU 1 pUuUU uue gag.aa jiaaiu U aao jauill Ia
julooJoual all jol Jd
L 10000000000000000000000000000000
:JJJJUJLIO
:y
.12a jIbIgill gll lal y aolly sloi
y
JU 10g
s13 s1 s 124 oJyU pIaog Ugig guau Jzch uJzalpu
. lo
iUuUg uUuUuUuUuUuUuUuUuUuUuUuUuUuUuUuUuUuUuUuUuUuUuUuUuUuUuUuUuUuUuUuUuUuUuUuUuUuUuUuUuUuUuUuUuUuUuUuUuUuUuUuuUU
elegllg 1s e 1 g 1 1 1 1 1 1 1 1 1 1 1 1 1 1 1 1 1 1 1 1 1 1 1 1 1 1
!pLsUJ:JzJg.1JgJzJuJpu
Uu Uuuuull uuuuull uuuuull uuuuull uuuuull
aolalogablauJzulgduagabg
a aal l aolg jaaal liqua g aag aeg
1i0 6bi li ci
U
2
206
200
199
198
186
271
THANKS FOR CHOOSING MOULINEX
Welcome to the world of fast & delicious cooking!
With Turbo Cuisine, we took up the challenge of reinventing the pot: Easier. Tastier. Just better!
Designed with this guiding principle, Turbo Cuisine allows you to save time and cook homemade delicious meals in total simplicity and convenience.
Thanks again for welcoming us to your kitchen.
Now let's cook together!
CONTENTS
Quick Start Guide in Images 2
Moulinex Recommends Safety First 209
All Parts of Your Product 217
Getting Familiar with the Control Panel 218
How To Use & Clean Guide 219
Technical Troubleshooting Guide 235
Moulinex International Limited Guarantee 271
MOULINEX RECOMMENDS SAFETY FIRST
Safety is our number one priority. We design and manufacture our product with high safety and technology standards. However, as with any electric appliance there are some potential risks, we therefore invite you to exercise a degree of care and to adhere to the following instructions.
SAFETY INSTRUCTIONS
Take the time to read all the following instructions carefully and save them for future reference.
- Improper use of the appliance and its accessories may damage the appliance and cause injury.
- The appliance cooks food under pressure. Incorrect use may cause risks of burns due to steam.
- For your safety, this product conforms to all applicable standards and regulations (Low Voltage Directive, Electromagnetic Compatibility, Food Compliant Materials, Environment, ...).
- The heat source necessary for cooking is included in the appliance.
1. Where to use safely?
- Indoor use only.
- This appliance is intended for domestic household use only. It is not intended to be used in the following applications, and the guarantee will not apply for:
- staff kitchen areas in shops, offices and other working environments;
-farm houses;
- by clients in hotels, motels and other residential type environments;
- bed and breakfast type environments.
- Do not place the appliance in a heated oven or on a hot hob. Do not place the appliance close to an open flame or a flammable object.
- Use on a flat and stable, heat resistant work surface, away from any water splashes.
2. Who to use safely?
- This appliance is not intended for use by persons (including children) with reduced physical, sensory or mental capabilities, or lack of experience and knowledge, unless they have been given supervision or instruction concerning use of the appliance by a person responsible for their safety.
- This appliance can be used by persons with reduced physical, sensory or mental capabilities or lack of experience and knowledge if they have been given supervision or instruction concerning use of the appliance in a safe way and if they understand the hazards involved.
- This appliance shall not be used by children. Keep the appliance and its power cord out of reach of children.
- Children shall not play with the appliance.
- Children should be supervised to ensure that they do not play with the appliance.
3. How to use safely - general usage?
- Do not use appliance for other than the intended purpose.
- Do not use the appliance to fry food in oil. Only browning is allowed.
- Do not use the pressure cooker in pressure mode for deep frying food.
- When cooking doughy food, gently shake the cooker before opening the lid to avoid food ejection.
- This appliance is not a steriliser. Do not use it to sterilise jars.
- This appliance is not intended to be operated by means of an external timer or separate remote-control system.
- To carry the appliance always use the two side handles on the housing of the appliance. Wear oven mitts if the appliance is hot. For more safety, make sure that the lid is locked before transporting the appliance.
- The bottom of the cooking pot and the heating plate should be in direct contact. Remove any object or food residue located between the cooking pot and the heating plate, it could affect performance
- Be aware that certain types of food, such as applesauce, cranberries, rhubarb, pearl barley, oatmeal or other cereals, split peas, noodles, or pasta can foam, froth and sputter, and clog the valves. Use caution when cooking these types of food and after use clean valves thoroughly.
- Be aware that certain recipes which include milk can foam, froth, overflow and clog the valves. Use caution when cooking these recipes and after use clean valves thoroughly.
- When cooking food which expands during cooking, such as dehydrated vegetables or rice, do not fill the cooking bowl to more than half of its capacity.
- After cooking meat which has an outer layer of skin (such as ox tongue), which could swell with the effect of pressure, do not pierce the skin after cooking if it appears swollen: you could get burnt. Pierce it before cooking.
- Do not use the appliance empty, without its cooking pot or without ingredients inside the cooking pot. This could cause serious damage to the appliance.
- Do not use the appliance under pressure without adding water, which could cause serious damage to the appliance.
- Do not fill up your appliance without its cooking pot.
- Caution: do not spill liquid on the plug.
- Do not heat the cooking pot with any other heat source than the heating plate of the appliance and do not use any other pot. Do not use the cooking pot with other appliances.
- Use the cooking pot in the appliance ONLY. Do not use it to cook on stovetops, in the oven etc.
- Use a plastic or wooden spoon to prevent any damage to the non-stick coating of the cooking pot. Do not cut food directly in the cooking pot.
- Do not touch the valves, except while cleaning and maintaining the appliance in accordance with the instructions given.
- Do not place any foreign objects in the valves and pressure release button. Do not replace the valve.
- Check regularly the ducts in the valves allowing the escape of steam to ensure that they are not blocked.
- Do not use a cloth or anything else between the lid and the housing to leave the lid ajar. This can permanently damage the sealing gasket.
- Do not let the power cord hang over the edge of table or counter; or touch hot surfaces.
4. How to use safely – before cooking?
- Before using your appliance, check that the float valve and the pressure limit valve are clean.
- Before using your appliance, check that the sealing gasket has been correctly installed on the lid.
- Make sure that the bottom of the cooking pot and the heating plate are always clean. Make sure that the central part of the heating plate is mobile.
- Do not fill your appliance more than the MAX mark on the cooking pot.
- Please follow the recommendations on the volume of food and water to avoid the risk of boiling over which can damage your appliance and cause injury.
- Make sure that the appliance is properly closed before bringing it up to pressure.
- Make sure that the pressure release button is up (not sunk) before cooking. Refer to figure 48 of the section Quick Start Guide in Images.
5. How to use safely - during cooking?
- Do not try to open the lid until the pressure has decreased sufficiently. Do not try to open the lid until the float valve is down.
- Never force the appliance open.
- During cooking and steam release at the end of cooking, the appliance releases heat and steam. Keep your face and hands away from the appliance to avoid burns. Do not touch the lid during cooking.
- Do not move the appliance when it is under pressure. Use the handles when moving it and wear oven mitts, if necessary. Do not use the lid knob to lift the appliance.
- Do not remove the cooking pot while the appliance is working.
- In browning mode, be careful of risks of burns caused by spattering when you add food or ingredients into the hot cooking pot.
6. How to use safely - after cooking?
- When you open the lid, always hold it by the lid knob. Position your arm parallel to the side handles. Boiling water could remain trapped between the sealing gasket and the lid and could cause burns.
- Be careful also about the risk of burns from the steam coming out of the appliance when you open the lid. First open the lid very slightly to allow the steam to escape gently.
- Do not touch hot parts of the appliance. After use, heating plate surface can remain hot for up to 2 hours.
- Unplug from outlet when not in use and before cleaning. Allow to cool before putting on or taking off parts.
7. How to use safely - cleaning?
- Wipe clean the bottom of the cooking pot and the heating plate after every use.
- Do not immerse the appliance in water.
- For cleaning your appliance, please refer to instructions for use. You can wash the cooking pot and the lid in soapy hot water, do not put them in the dishwasher. Clean the housing of the appliance using a damp cloth.
8. What to do in case of damage?
- Only authorized person in Approved Service Centre can repair the product.
- Do not operate any appliance with a damaged power cord or plug or after the appliance malfunctions or has been damaged in any manner. Return appliance to the nearest Approved Service Centre for examination, repair or adjustment.
- If the power cord is damaged, it must be replaced by an Approved Service Centre in order to avoid a hazard. Do not replace the power cord supplied with other cords.
- Do not damage the sealing gasket. If it is damaged, have it replaced in an Approved Service Centre.
- Replace the sealing gasket every 2 years, or sooner if you see the sealing gasket is worn or in need of replacement.
- Use only the appropriate spare parts for your model. This is particularly important for the sealing gasket and the cooking pot.
- Use only spare parts sold in an Approved Service Centre.
- The use of accessory attachments not recommended by the appliance manufacturer may cause injuries.
- Do not use other cooking pots in the appliance in place of the provided cooking pot. Only replace the cooking pot with an original spare part designed to be used with this product.
- In accordance with current regulations, before disposing of an appliance no longer needed, the appliance must be rendered inoperative (by unplugging it and cutting off the power cord).
Environment protection first!

① Your appliance contains valuable materials which can be recovered or recycled.
- Leave it at a local civic waste collection point.
9. When does warranty apply?
- The warranty does not cover the abnormal wear and tear of the cooking pot.
- Read these instructions for use carefully before using your appliance for the first time. Any use which does not conform to these instructions will absolve the manufacturer from any liability and void the warranty.
- In case of commercial use, inappropriate use or failure to comply with the instructions, the manufacturer accepts no responsibility and the guarantee does not apply.
ALL PARTS OF YOUR PRODUCT

GETTING FAMILIAR WITH THE CONTROL PANEL

STATUS MESSAGES


Welcome message when appliance is turned on.
Time display. In this example: 1 hour 30 minutes.
Temperature display. In this example: 114 degrees Celsius.
Indicates that the program has a default automatic temperature/ time setting. It cannot be modified.
Indicates that temperature is rising during pre-heating phase.
Indicates that the appliance is pre-heating.
Indicates that the program is finished.
Indicates that the appliance is in keep warm phase.
Indicates that the program has been interrupted.
Indicates that the appliance is in standby mode.
HOW TO USE & CLEAN GUIDE
Feel free to refer to the figures indicated as (Fig.x) from Quick Start Guide part.
BEFORE FIRST USE
1. Remove packaging
- Take your appliance out of its packaging and please take time to read the instruction manual before first use.
- Remove promotional stickers (if any) from your appliance before first use.
2. Open the lid
- To open the lid, take hold of the lid knob, turn anti-clockwise and lift the lid up (Fig.1 & 2).
Note: When lifting the lid, it can happen that the cooking pot remains attached to the lid. It is normal and simply demonstrates a good hermeticity of the product. To avoid that the cooking pot falls heavily on the product when opening the lid, always open the lid gently.
- Place your appliance on a flat surface. Remove all protective materials and accessories from the inside of the appliance (Fig.3).
3. Clean all parts of the appliance
3a. Clean the lid, the cooking pot and the accessories
- Clean the lid, the cooking pot and the accessories with a soft sponge and soapy hot water (Fig.4).
- Dry off the lid, the cooking pot and the accessories (Fig.5)
- Do not use a scourer or abrasive sponge to clean the cooking pot as it could damage the non-stick coating in the cooking pot (Fig.40).
- Do not immerse the appliance in water (Fig.41).
- If you inadvertently immerse your appliance in water or spill water directly on the heating plate, take it to an Approved Service Centre for repair.
- Do not put the lid and the cooking pot in the dishwasher (Fig.42).
- Be aware, only the accessories: spatula, measuring cup and steam accessory are dishwasher safe.
3b. Clean the sealing gasket
- Remove the sealing gasket from the lid and clean it with a soft sponge and soapy hot water (Fig.7 & 8).
- Dry it off thoroughly.
- Place the sealing gasket over the sealing gasket rack and press it into place (Fig.9). Press down firmly to ensure there is no puckering and that the sealing gasket is snug behind the sealing gasket rack.
- After placing the sealing gasket on the lid, if you open the lid too quickly, it can happen that the cooking pot remains attached to the lid (Fig.37 & 38). Wait few seconds for the cooking pot to free itself from the lid (Fig.39).
Note: It is normal and simply demonstrates a good hermeticity of the product. To avoid that the cooking pot falls heavily on the product when opening the lid, always open the lid gently.
WARNING: Never use your appliance without the sealing gasket (Fig.44)
3c. Clean the valves
- To clean the pressure limit valve, remove the pressure limit valve from the pipe on top of the lid (Fig.10). Clean it with a soft sponge and soapy hot water (Fig.11). Once dry, take care that the duct of the pipe is clean before plugging the pressure limit valve back on the pipe on top of the lid (Fig.12). Ensure that the pressure limit valve is well put in place, it must be able to move up and down.
- To clean the pressure limit valve cover, unscrew the limit valve cover from inside of the lid (Fig.13). Clean it with a soft sponge and soapy hot water (Fig.14). Once dry, take care that the duct of the pipe is clean before screwing the pressure limit valve cover back inside of the lid (Fig.15).
- To clean the float valve, remove the float valve gasket from inside of the lid, flip the lid so that the float valve can come out of the lid (Fig.16). Clean the float valve gasket and the float valve with a soft sponge and soapy hot water (Fig.17). Once dry, insert the float valve back on the lid and put the float valve gasket back in place (Fig.18). Ensure that the float valve is well put in place, it must be able to move up and down.
3d. Clean the housing of the appliance
- Clean the housing of the appliance using a damp cloth.
- Do not immerse the appliance in water (Fig.41).
- Wipe clean the heating plate using a dry cloth.
INSTRUCTIONS FOR USE
1. Place ingredients in the cooking pot
- Remove the cooking pot from the housing.
- Put ingredients into the cooking pot.
- Please note that the level of food and liquids should never exceed the max level marking on the cooking pot (Fig.19).
- When cooking food ingredients which expand during cooking, such as dehydrated vegetables or rice, in pressure modes, do not fill the cooker to exceed more than half of its max level.
2. Place the cooking pot in the housing
- Ensure the bottom of the cooking pot is clean and dry; and remove any food residue from the heating plate (Fig.20).
- Place the cooking pot into the housing (Fig.21).
- Never use your appliance without the cooking pot.
3. Close and lock the lid
- Check that the sealing gasket is securely placed on the lid (Fig.43).
- Take hold of the lid knob, place the lid on the appliance and turn it clockwise to lock it (Fig.22).
4. Attach the pressure limit valve
- Properly place the pressure limit valve on the lid (Fig.23). Please note that the valve will remain somewhat loose, it is normal.
5. Switch on the appliance
- Fully unwind the power cord and plug it into the mains (Fig.24).
- The appliance makes a 'beep' sound, the screen flashes and displays HEH.
6. Select and launch a cooking program
Each program has a default time and temperature and requires a specific lid position, please have a look at the cooking programs table:
COOKING PROGRAMS TABLE
Cooking program icon Cooking program name Default cooking time Adjustable time Default temperature Adjustable temperature Default pressure Delayed start from 10min to 12h Keep warm up to 24h Lid status Lid closed and locked Lid closed but not locked Lid open Stew 30min from 1min to 2h 114C No 70Kpa Yes Yes ● Soup 12min from 1min to 2h 114C No 70Kpa Yes Yes ● Stir Fry 20min from 1min to 1h 160C Yes from 100C to 160C No No No ● Steam 10min from 1min to 2h 114C No 70Kpa Yes Yes ● Bake 40min from 1min to 2h 160C Yes from 100C to 160C No Yes Yes ● Sous-vide / Slow-cook 4h from 30min to 12h 85C Yes from 55C to 95C No Yes No ● ● Rice 8min from 1min to 2h 114C No 70Kpa Yes Yes ● Yogurt & Ferment 8h from 30min to 12h 30C Yes from 22C to 40C No No No ● ● Porridge 15min from 1min to 2h 100C No No Yes Yes ● Adjustable Chef Mode 30min from 1min to 4h 80C Yes from 70C to 160C No No Yes ● ● ●
Note: When cooking, you may notice slight steam leakage from the lid, especially from the pressure limit valve. This is normal and occurs when pressure builds up.
Please refer to the figures from Quick Start Guide (from Fig.25 to Fig.36)

Stew program
- Place the ingredients in the cooking pot and completely close and lock the lid.
- Turn the control panel knob to the right to reach Stew program. The screen displays the default cooking time.
- Optional: Press and set the desired time by turning the control panel knob to the right (to increase time) or to the left (to decrease time).
- Press to start the cooking program.
- The appliance starts the pre-heating phase. The screen displays alternatively & HE & and the pre-heating light indicator ① turns on.
- When the pre-heating phase is completed, the appliance switches automatically to cooking phase. The screen displays the count down and the cooking in progress light indicator l turns on.
- During cooking process, pressure builds up in the appliance and pushes the float valve up. The under pressure light indicator turns on to notify that the lid cannot be opened without releasing the pressure first.
- At the end of the count down, the appliance beeps and the screen displays End.
- After a few seconds, the appliance will automatically switch to keep warm phase. The screen displays HOE and the keeping warm light indicator turns on.
- Press ⑥ for 3 seconds to stop the program at any time.

Soup program
- Place the ingredients in the cooking pot and completely close and lock the lid.
- Turn the control panel knob to the right to reach Soup program. The screen displays the default cooking time.
- Optional: Press and set the desired time by turning the control panel knob to the right (to increase time) or to the left (to decrease time).
- Press to start the cooking program.
- The appliance starts the pre-heating phase. The screen displays alternatively & HERA and the pre-heating light indicator turns on.
- When the pre-heating phase is completed, the appliance switches automatically to cooking phase. The screen displays the count down and the cooking in progress light indicator turns on.
- During cooking process, pressure builds up in the appliance and pushes the float valve up. The under pressure light indicator turns on to notify that the lid cannot be opened without releasing the pressure first.
- At the end of the count down, the appliance beeps and the screen displays End.
- After a few seconds, the appliance will automatically switch to keep warm phase. The screen displays HDE and the keeping warm light indicator turns on.
- Press for 3 seconds to stop the program at any time.

Stir-Fry program
- Turn the control panel knob to the right to reach Stir-Fry program. The screen displays the default cooking time.
- Optional: Press and set the desired time by turning the control panel knob to the right (to increase time) or to the left (to decrease time).
- Optional: Press ① and set the desired temperature by turning the control panel knob to the right (to increase temperature) or to the left (to decrease temperature).
- Press to start the cooking program.
- The appliance starts the pre-heating phase. The screen displays alternatively & HERE and the pre-heating light indicator turns on.
- When the pre-heating phase is completed, the appliance switches automatically to cooking phase. The screen displays the count down and the cooking in progress light indicator turns on.
- Place the ingredients in the cooking pot and keep the lid open to stir-fry.
- At the end of the count down, the appliance beeps and the screen displays End.
- After a few seconds, the appliance will automatically switch to standby mode. The screen displays
- Press ⑥ for 3 seconds to stop the program at any time.

Steam program
- Place 150ml of water ( 3/4 cup) in the cooking pot, put the steam accessory in the cooking pot and add your ingredients. Completely close and lock the lid.
- Turn the control panel knob to the right to reach Steam program . The screen displays the default cooking time.
- Optional: Press and set the desired time by turning the
control panel knob to the right (to increase time) or to the left (to decrease time).
- Press to start the cooking program.
- The appliance starts the pre-heating phase. The screen displays alternatively & HERE and the pre-heating light indicator turns on.
- When the pre-heating phase is completed, the appliance switches automatically to cooking phase. The screen displays the count down and the cooking in progress light indicator turns on.
- During cooking process, pressure builds up in the appliance and pushes the float valve up. The under pressure light indicator turns on to notify that the lid cannot be opened without releasing the pressure first.
- At the end of the count down, the appliance beeps and the screen displays End.
- After a few seconds, the appliance will automatically switch to keep warm phase. The screen displays HOE and the keeping warm light indicator turns on.
- Press for 3 seconds to stop the program at any time.

Bake program
- Place the preparation in the cooking pot and close but don't lock the lid.
- Turn the control panel knob to the right to reach Bake program. The screen displays the default cooking time.
- Optional: Press and set the desired time by turning the control panel knob to the right (to increase time) or to the left (to decrease time).
- Optional: Press l and set the desired temperature by turning the control panel knob to the right (to increase temperature) or to the left (to decrease temperature).
- Press to start the cooking program.
- The appliance starts the pre-heating phase. The screen displays alternatively & HERE and the pre-heating light indicator turns on.
- When the pre-heating phase is completed, the appliance switches automatically to cooking phase. The screen displays the count down and the cooking in progress light indicator turns on.
- At the end of the count down, the appliance beeps and the screen displays End.
- After a few seconds, the appliance will automatically switch to keep warm phase. The screen displays HOE and the keeping warm light indicator turns on.
- Press for 3 seconds to stop the program at any time.

Sous-vide / Slow-cook program
- TurnthecontrolpanelknobtotherighttoreachSous-vide/Slow-cook program . The screen displays the default cooking time.
- Optional: Press and set the desired time by turning the control panel knob to the right (to increase time) or to the left (to decrease time).
- Optional: Press ⑧ and set the desired temperature by turning the control panel knob to the right (to increase temperature) or to the left (to decrease temperature).
- Press to start the cooking program.
- The appliance starts the pre-heating phase. The screen displays alternatively & HEA and the pre-heating light indicator turns on.
- When the pre-heating phase is completed, the appliance switches automatically to cooking phase. The screen displays the count down and the cooking in progress light indicator turns on.
- At the end of the count down, the appliance beeps and the screen displays End.
- After a few seconds, the appliance will automatically switch to standby mode. The screen displays = = = .
- Press for 3 seconds to stop the program at any time.

Rice program
Place the ingredients in the cooking pot and completely close and lock the lid.
- Turn the control panel knob to the right to reach Rice program. The screen displays the default cooking time.
- Optional: Press and set the desired time by turning the control panel knob to the right (to increase time) or to the left (to decrease time).
- Press to start the cooking program.
- The appliance starts the pre-heating phase. The screen displays alternatively & HERE and the pre-heating light indicator turns on.
- During cooking process, pressure builds up in the appliance and pushes the float valve up. The under pressure light indicator turns on to notify that the lid cannot be opened without releasing the pressure first.
- At the end of the count down, the appliance beeps and the screen displays End.
After a few seconds, the appliance will automatically switch to keep warm phase. The screen displays HOE and the keeping warm light indicator turns on.
- Press for 3 seconds to stop the program at any time.

Yogurt & Ferment program
Yogurt & Ferment program can be used to make yogurt or raise bread/pastry dough.
- When making yogurt, place the ingredients in the cooking pot and close the lid.
- When raising dough, you can knead the dough directly in the cooking pot then place the cooking pot in the housing and close the lid.
- Turn the control panel knob to the right to reach Yogurt & Ferment program. The screen displays the default cooking time.
- Optional: Press and set the desired time by turning the control panel knob to the right (to increase time) or to the left (to decrease time).
- Optional: Press and set the desired temperature by turning the control panel knob to the right (to increase temperature) or to the left (to decrease temperature).
- Press ⑥ to start the cooking program.
- The appliance starts the pre-heating phase. The screen displays alternatively & HERE and the pre-heating light indicator turns on.
- When the pre-heating phase is completed, the appliance switches automatically to cooking phase. The screen displays the count down and the cooking in progress light indicator ⑥ turns on.
- At the end of the count down, the appliance beeps and the screen displays End.
- After a few seconds, the appliance will automatically switch to standby mode. The screen displays
- Press for 3 seconds to stop the program at any time.

Porridge program
- Place the ingredients in the cooking pot and completely close and lock the lid.
- Turn the control panel knob to the right to reach Porridge program . The screen displays the default cooking time.
- Optional: Press and set the desired time by turning the control panel knob to the right (to increase time) or to the left (to decrease time).
- Press ⑥ to start the cooking program.
- The appliance starts the pre-heating phase. The screen displays alternatively & HERE and the pre-heating light indicator turns on.
- When the pre-heating phase is completed, the appliance switches automatically to cooking phase. The screen displays the count down and the cooking in progress light indicator turns on.
- At the end of the count down, the appliance beeps and the screen displays End.
- After a few seconds, the appliance will automatically switch to keep warm phase. The screen displays HOE and the keeping warm light indicator turns on.
- Press for 3 seconds to stop the program at any time.

Adjustable Chef mode
- Place the ingredients in the cooking pot and close the lid or not depending on your recipe.
- Turn the control panel knob to the right to reach Adjustable Chef mode . The screen displays the default cooking time.
- Optional: Press and set the desired time by turning the control panel knob to the right (to increase time) or to the left (to decrease time).
- Optional: Press ⑥ and set the desired temperature by turning the control panel knob to the right (to increase temperature) or to the left (to decrease temperature).
- Press to start the cooking program.
- The appliance starts the pre-heating phase. The screen displays alternatively & and the pre-heating light indicator turns on.
- When the pre-heating phase is completed, the appliance switches automatically to cooking phase. The screen displays the count down and the cooking in progress light indicator 变 turns on.
- At the end of the count down, the appliance beeps and the screen displays End.
- After a few seconds, the appliance will automatically switch to standby mode. The screen displays
- Press for 3 seconds to stop the program at any time.
* Suggestion for quickly reheating dishes: set temperature to
>=95C and cook with lid closed but unlocked.
7. Use the delayed start function
Delayed start can be useful to preset the appliance to start cooking later.
- First select a program following the steps described above in part 6.
- Before starting the selected program, press . The screen displays the default time for delayed start.
- Set the desired time by turning the control panel knob to the right (to increase time) or to the left (to decrease time).
- Press . The screen displays the delayed start count down. When preset time is elapsed, the appliance will start cooking automatically.
8. Open the lid
- Do not attempt to open the lid if the float valve is up and if the under pressure light indicator is turned on.
- The pressure can be release in 2 different ways at the end of the cooking:
Natural release: At the end of the cooking or after stopping the program, the appliance will cool down by itself, and the pressure will release naturally. During natural release, food might overcook due to the remaining pressure in the pot. Use manual release to stop cooking process immediately.
Manual release: Press continuously the pressure release button, on top of the lid. It will take a few seconds to a few minutes depending on the amount of food inside of the cooking pot (Fig.31).
WARNING: Be careful of the hot steam coming out from the appliance. Keep your face and hands away from the steam output (Fig.45).
- To open the lid, position your arm parallel to the side handles, take hold of the lid knob, turn anti-clockwise and lift the lid up (Fig.32 & 33).
WARNING: Be careful of the hot steam coming out from the cooking pot.
9. Unplug the appliance
- After usage, unplug the appliance and let it cool down for at least 2 hours before cleaning.
10. Clean after use
- Clean your appliance after each use.
- Before cleaning, let your appliance cool down for at least 2 hours.
- For cleaning instructions, refer to part 3. Clean all parts of the appliance in BEFORE FIRST USE section.
11. Maintenance tips
- To ensure the durability of the cooking pot time over time, do not cut food in it.
- Use the provided accessories. Do not use any metallic utensil as it could damage the nonstick coating in the pot.
- After usage, the sealing gasket may keep the smell of your dish. It is normal; silicone has little pores that open up when exposed to high temperature and close back once temperature drops. To eliminate the smell from the sealing gasket, you can:
- Put the silicone ring in the dishwasher
- Add 1 cup of vinegar, 1 cup of water and 1 lemon cut in large pieces into the cooking pot and launch a steam program for 2 minutes, then let the steam release naturally.
- Change the sealing gasket every 2 years or earlier in case of damage.
TECHNICAL TROUBLESHOOTING GUIDE
Problem Possible reasons Solutions Unable to open lid Unable to open because of pressure in the cooking pot. Press continuously the pressure release button to remove the pressure inside of the cooking pot. It can take a few minutes until the pressure is fully released. Pressure in the cooking pot is fully released but the float valve is stuck because it is too dirty and therefore unable to move down. a. Be sure the pressure is totally released by letting the appliance cool down for at least 2 hours.
b. Gently push the float valve down by inserting a skewer or a long object into the float valve opening. If this does not work, send the appliance to an Approved Service Centre.
c. For next use, please clean and dry off the float valve thoroughly. Unable to close lid The sealing gasket is not properly installed. Install the sealing gasket properly. The cooking pot contains hot ingredients generating steam. Wait for the ingredients in the cooking pot to cool down before trying to close the lid again. The float valve is stuck because it is too dirty and therefore unable to move down. a. Gently push the float valve down by inserting a skewer or a long object into the float valve opening. If this does not work, send the appliance to an Approved Service Centre.
b. For next use, please clean and dry off the float valve thoroughly. Position and or direction at which the lid was closed is incorrect. Close the lid in the correct direction according to the instruction manual. When opening the lid, the cooking pot remains attached to the lid. The sealing gasket created a suction effect. The cooking pot will free from the lid by itself. It is normal and simply demonstrates a good hermeticity of the product. To avoid that the cooking pot falls heavily on the product when opening the lid, always open the lid gently. Intense release of pressure from the pressure limit valve. The inner pressure exceeds working pressure, or the inner pressure exceeds the safety pressure. Clean pressure limit valve, float valve and lid thoroughly. If float valve still has steam coming out, please return appliance to the nearest Approved Service Center for inspecting, repairing or adjusting by authorized person. The pressure limit valve is in an incorrect position. Carefully rotate/press the pressure limit valve to make it fall into place. Be careful of the hot steam. Position yourself safely and wear oven mitts. Faulty pressure control resulted in release of pressure. Send the appliance to an Approved Service Centre for repair. Continuous pressure release from the float valve. The inner pressure exceeds working pressure, or the inner pressure exceeds the safety pressure. Clean pressure limit valve, float valve and lid thoroughly. If float valve still has steam coming out, please return appliance to the nearest Approved Service Center for inspecting, repairing or adjusting by authorized person. Residue in the float valve. a. Press continuously the pressure release button to remove the pressure inside of the cooking pot. It can take a few minutes until the pressure is fully released. b. Let the appliance cool down for at least 2 hours. c. Clean and dry off the float valve before restarting the cooking. The float valve is stuck. a. Press continuously the pressure release button to remove the pressure inside of the cooking pot. It can take a few minutes until the pressure is fully released. b. Let the appliance cool down for at least 2 hours. c. Clean and dry off the float valve before restarting the cooking.
Problem Possible reasons Solutions Steam leakage from lid. The sealing gasket is not properly installed. Remove the sealing gasket, clean it and reinstall it in the correct position. The sealing gasket is dirty. Remove the sealing gasket, clean it and reinstall it in the correct position. The sealing gasket is damaged, or the edge of the cooking pot is damaged. Send the appliance to an Approved Service Centre for repair. Food is uncooked Solid/liquid ingredients ratio is incorrect. Try again by following precisely the quantities of the recipe. No electricity from the power supply. Check your home electric circuit. E0 displayed on the digital screen. Pressure switch is faulty. Send the appliance to an Approved Service Centre for repair. E1 displayed on the digital screen. The temperature sensor is faulty. Send the appliance to an Approved Service Centre for repair. E2 displayed on the digital screen. The lid is not properly positioned for your cooking program. Each program requires a specific lid position. Check and adjust the lid position required by your cooking program, refer to the cooking programs table in part 6 of this manual. Restart your program once the lid is correctly positioned. If the issue remains, send the appliance to an Approved Service Center for repair.
ZA EYXAPIZOYME I0Y ENIAEETE TH MOULINEX
KaIomegaopioaTe oTov kOoToU yPnyopou KAI VoomuayepaatoC!
Me to Turbo Cuisine mα vεa δισταοη στο μαγερεμα: Πιο εύκολα. Πιο νόστιμα. Απλα καλυτερα!
To Turbo Cuisine i yia va o i k o v o i xpov ka i va o u p i unepoxa stitik a yuata, ana kai avetα.
Zac Euxapiotoupe nolu nou mac xapiaate mia theon otnv kouziva oac.
AÇ μαγειρέψουμε μαζί!
NEPIEXOMENA
O8nyo5 yprinyopns Ekkivnons oEikovec
H Moulinexdeltaipotepaiaotnta otnv aosfaia 238
Ola ta εξαρτήματa tou προίντος 248
Eoikeiwn eTov nivaka Elyxou 249
O8nyoc xpronc kai kathetaiaou 250
O8nyoc avtmuetwiontcexvikw npoBnmuatw 268
△εθνις εγγύηση της Moulinex 271
HMOULINEXΔINEIΠPOTEPAIOTHTA ΣTHN AΣΦΑΛEIA
H aαφαλεια ειναι η πρωτη προτεραίοτητα μας, ξεδιαζουμε και κατασκευαζουμε τα προίοντα μας με ψηλα πρότια ασφαλείας και τεχονλογίας, Ωοτόσο, σε καθε Λεκτρική συσκεύνινιπαρχουν πιθαυοί κίνδυοι, επομένως συνιούμεν αλαμβάνeteυπόψη και να τηρείte τις παρακατω σδηγίς.
O△HΓΕΣ AΣΦΑΛΕΙΑΣ
Δiαβασe προεκτικόλες τις παρακατω σθηγες και αποθηκεύσετις για μελλοντική αναφορά.
H akataaannn xpnon tnc ouokeu nca twv a p t n u a t w v TNC evdexetai va npokaloei n otn ouokeu n kai trauuatio.
H oukeun maayiepeuei faynto untio n. H eofaalev n xpion evdexetai va npokaloei kivduvo ykaumatoc, loyw tou atou.
TnV aOaFALIa Oa, auto To npoiov oumuopphiVETa
e ola ta Ioxuovta Tpotua Kai olouc touc loxuvteC
kavovioouc (o8nyies yia tn xamnna Taon, Tnv
nEektpoayvntikn oubetaotnta, ta Ulika nou epxovta
OE eTAPHm E TA TPOphiA,To NepiBaalov, k.
H aipaiin nyn 0epuotnac yia to ayiepeua npilaaeavetao tn ouokevun.
1. Nóu xρησιμοποιείαι με ασφάλεια;
Xpno n ovo e oowtepko xwpo.
Autn n ouokeun npoopiZetai aTOKkEiotikya oikiakn Xpno. Dv npoopiZetai yia xpon otic akoloutheta TepiTTwoics, oIOnieCdeltaKALUTovtaI antOtnyEyyuon:
- Σε κουζίνες προσωπικόν καταστημάτων, σε γραφεία ἡ αλλους χώρους εργασίας.
-Σε αγροκτήματα.
-AIo v o s o x i w v, o n aAawv kataaUmuAtwv.
-Σεξενωνες ἡ αλλα παρόμοιου τύπου καταλύματα.
Mny tootheite tn ouokeun oE kauto foypvo n kautn eotia.Mnv tootheite tn ouakeun kovtaoe loya n eofekta avtikeiEvA.
Xpnooioiote tn oukeun navw oE eTne6n,otaepn kai avthetaikn otn thepounta eTia aio np np onou mtopeiv aekivaxei vepo.
2. Anto nioov xpoiouoietai e aofaia;
Autn n ouokeun dev npopicietai yia xpnon ano atoua (oumuepilauubavouevwv twv pialuw) e nepiopioevec oomegakecs, aothnpiakec n diavontikec ikavotntec, oute a toaotaou dev exouv tnv avaykaia eptiia n tcaatapaitntec ywoeic, ektoc av bpikovtau no tnv eipaeyn evluka n exouv lae i odnyie c yia tn xpnon tnC ouokeunc a toaoto uentuo vua nva ofoaaleia touc.
H ouokeun mtopei va xnpouonointhetai anto atoua me μe iomegaevc oomegaatikec, aoθntnpiakec n diavontikec ikavotntec n me ελeiwneu piaoc kai yywons, efoov επiβεπovtai exouv λαβei odnyies yia tnv aσφαλn xρon tnç ouokeun cai katavoouv touc utapxovtekivduvouc.
Autn n ouokevun dev mnpei va xpnouoiointheta aT o Tsiia. Duaoote tn ouokvun kai to nEktpiKo KaIomega kapi aTIOAldia.
- Ta παιδία δεν θα πρέπειν α παίζουν με τη σωακεύη.
- Ta παδία θα πρεπειν αβρίοκονταιυό επίβλεψη, προκειμένουνα διασφαλίζειαιότι δενθα χρησιμοπούηουνιη σουκεύνης παίχνίδι.
3. Aσφαλής χρήση - γενική χρήση
Xpnooioite n oukeun mov yia touc oontouc yia touc onoiouc npoopiEaI.
Mny xnoiouoite tn ouokeun yia va tnyavioet e
phiynto oE ladi. Mov to ynou o EITpEeTai.
Mnv xnpoumoioieite tn xutpa toxutntac wc pfiteca otn leitoupyia pionc.
- Otav μαγειρεύτε Φαγntα με ζύμι, ανακίνησε ελαφρα
tn χύτρα προτόν αυοίξετο το καπάκι, Ϝετο το φαγntó
vα μην πεταχτέι από το εσωτερικό του σκεύους.
Houkeun dev evai aiooteipwntc. Mny xnpoiotoeite tn oukeun yia aiooteipwon baowv.
H ouokevun 8ev npoopicietai yia xpnon e 8wterpiko Xpvoslaikotn n e 5exwpiot o uotma tnalexepiou.
- Iα τη μεταφορα της Σωοκεύς, χρησιμοποίει τήντοτε τις δύο πλευρικές λαβές στό τηρερβλημα τής Σωοκεύς. Na φοράτε προστατευτία γάντα κατά της θερμότητας, εάνη σωοκεύη εἰναι κατή. Iα περισότερη ασφαλεία, βεβαιωθείτε πιώς το καπάκι εἰναι ασφαλιομένο πριν μεταφέρετε τή σωοκεύή.
To katoepoc tou maeyipiko okeouc ka tnc 0epuaivovnpiakac penei va bpiokovtao aeon epan. Aphiote onoiobnnote avtikemuvo n uolaima faayntou mnpei va bpiokeotai mea Tuou maeyipko okeouc ka tnc 0epuaivovnc piakac, Kaowvdeltaetai va einnpeaoei tvn aiosoon
AeTe UIOJN TWC OIOJEVOI TUINOI FOYNTOU, ONWCS IOUpeC mllou, ta Kpavmuepi, to paeVti, to KPIaipu IepE, n Bpwun kai aaaa dnmuNTpiakα, n fao, ta vouvtac n ta Zmuapika EvdeXetai va oxmuatioov aupo Ka i fuuaalides, ta onoia EktoEuvotai pfaoosovtac tic BaIbEs. Awte idiaitepn npoooykata to mayeipeua autuw twv tuTiw FOAYNTOU KA KAtapiZeTE OxOAAOTIKa tic BAJIbEs meTa anTo th xPon.
Aβει Αρομενες Μυταγες Που περλαβανουν γαλ ενδεχειαιν σχηματίσουν αφρό, και φύσαλίδες καιν Απερχειλίσουν φρασοσοντας τις βαλβίδες. Δωτειδιαίτηρη προσθήκατα Μαγείρεμα αυτων των συνταγών και καθαρίζετε σχολαστικά τις βαλβίδες μετά από τη χρόη.
- Meta to ayéipεμα κρεatoc με εξωτερική στρωση δερματος (όπως η μοχαρίσα γλώσα), που ενδεχεταινα διογκωθεί λόγω της πίεσς, μην τριπάτe to δερμα μετα to ayéipεμα εάν φαίνεται διογκωμένο: ἄπαρχει κίνδυνος εγκαύματος, Tριπότε to πριν to ayéipεμα.
- Otav δουλεύτεμε τρόφια που εχουν την ταονν α φουκωνουν στη δίαρκεια του μαγειρεματος, οπως αποξηραμένα λαχανικά ἡρύς, μην γεμιζετετον κάδo μαγειρεματος παραπάνω από το μισό της χωρητικότητας του.
Mny xpnoiopoieite tn oukeun adea, wpiic to ayepiko oekuoc n wpiis uikα oTO eowtepiko tou ayepikoou oekouc. Mtopei va npokntheoapn OTN OUKeun.
Myn npnouoie t ouokun uno n oevexe Tpooofoe i vep, yatki tetoio a npopooe va npokafoe oopapn oopao sto okeuos.
Mny yemieTe tn ouokevn xwpi to mayeipko okevoC
- Ppoooxn: uynxuveTe Uypa oTo oic,
Mny Oepmaivete to mayeipko okeuoc me aaln pynn OepoTntac npav tnc Oepmaivoevns nakac tnC oukeunc kai mny xpnoiopoite aallo maeyipko okeuoc, Mnyxnpoiote to maeyipko okeuoc me aalec ouokevcs.
Xpnoiopoioite to maayepiko okevoos MONO onn ouokevn. Mv to xpnoiopoioite oe eotie, foupvo k.lπ.
Xpnoimuoiieite paoikn n yu koutaia v a anotpeyete uov bao n otnvavkoanlntkneipwon tou ayepikou okeouc. Mny koet e aaynto evtoc tou ayepikou okeouc.
Mny ayyicte Tc Baaibides, e Eaeipoeon kata tov kaOapioo touc kai kat a tnv ekTeAeon epyaoiuv ouvtnponcs tsouakeunc oumowva e tic odnyiec.
Mny tooTheTeite Xeva avtikemueva otic baalbi8c kai oTo koupi ane aeuthetapwonC nieonC, Mny avtikaoiotaTn baiBia.
ELeyTe TaKTiKa Touc aywyouc Tuv i Tou eitpEnouv Tnv aTLeuOepwOn aTuou, yia va diaofoaioe otI dev evia ppaoyevoi.
Mny toothei te navi n otidnnote aaloo avaeoa oTo kaTaki kai oTo pepiBna yia va meivei To kaTaki maovoixto. Mnpei va npoknthei moviun OTOV OTeyavotoiniko saKTulio.
Mny afnvete to nlektpiko kaawio va kpeetai ao tnv akpn tou tpaneoiou n tou npaykou n va ayyic Kautec EpiphiaveieC.
4. A - to
Pniv xnpoiouoinoettn ouokeun, eeyxi Tnv kaopotnta tnc i mc E nnTnpa kai nC i aphialeia pio
- Pniv xnpouoioeTe Tn ouokeun, eleyte Tn ootnto0etnon tou steyavontiokou daKTuaiou oTo kaTaki.
Bεβαιωθείτε πως το κατω μέρος του μαγειρικόν σεύους καὶ θερμαινόμενη πλάκα εἶναι πάντα καθαρά. Bεβαιωθείτε ὄτι το κεντρικό μέρος της θερμαινόμενης πλάκας μπορείνα κίνηθεί.
Mny yεμiετε ηισοκευή πανω από την ενδειξη MAX ΟΤΟ μαγειρίο σκεύς.
Akoalouthe tic ouotaoeic avaopikka me tov oyko
phiayntou kai vepou yia tnv anofoyn uTepxieiliong
loyw bpaaou, nou mtopei va npokaloei blaabn otn
Ouokeu n kai trpaumatouos.
Bεβαιωθείτε πιώς η συοκεύν ἐχει κλείσει ωωτά προτουξεκινόσει έλειούργία της υμτας.
Bεβαιωθείτε οτι τα κουμπι απελενθερωONS πίεONS δεν εύαι πατημένο (εξέχει) προτου ξεκίνησετε ο μαγείρεμα. Avatρέξετε στην εικόνα 48 τής ενότητας Oδηός γρήγορης εκκίνησας σε εικόνες.
5. Aσφαλής χρήση - κατα το μαγείρεμα
Mny npooantheta va avoie to kaiaipotou n tiocn meiwthapkwc, Mny npooaohoeva ovoie to kaiaik yexpi va katebei 9baiaibdae πawtnpa.
Mny aokéite pote duvam yva v aoovieTe tn ouokevn.
Kata to mayeipema kai tyn ane aeuthetaon atoukata to teao tou mayeipaeato, n oukeun aneauthetawvei eepohtn ta kai ato. KpatnoTe to npoomega to kai ta xepia oac maekia aio tn ouakeun yia va atofouyete ta eykaumata. Mny ayyizte to kaakl katota to mayeipema.
Mny Tn ouokevun, 0oo elva uio pieon. Xpnouoioite tic c kata n kai
φopáte προστατευτικα γάντια, εόν είναι απαραίπτο. Mην χρησιμοποιείτε τή λαβή στο καπάκι γίαν ασκώσετε τή συσκεύŋ.
Mny aphiapeite to ayepiko oekuoc, ooo laitoupyei n ouokun.
- Σηλειουργία ψησιματος,να εἰοτε ἀδιαίτερα προσεκτικόγια τυχόν εγκαύματα από Εκτοξεύσεις,όταν προσθέτετε φαγητό ἡνλικα στό το καύτό μαγειρικό σκεύος.
6. Aosfaancsxpnon- to a e i p e a
- Otav avoiyete to kaniaki, va to kpatate navtoe ano tn tou kaniakiou. To oteite to xepi oac npapalnla otic πeupikc ec. Evexetai va exei payidutei ovaeoa otov oteyavotointiko aktulio kal to kaniak βpaoto vepo kal va npokaleoi ykaumata.
- Ppooεξε, επiαης, tov kivduvo εykaumατων απο tov ατμο που βγaiveι απο ηισοκευή ὄταν ανοίγετο καπακι. Πρωτα, ανοίξε πολύ λιγο το καπακι για να απελευθερωθει σμαλά o ατμός.
Mnv ayyizete ta kauta eapntmuata tnc ouokueunc H epiaveia tnc thepaivovevns nakac mtopei va npaaeivei zotn ewsckai 2 wpc tao antoynpnoon.
- Anouvdséte to kaλwδio anto tv npizα,otav δev xρησιοποietai n ouokεuń kai πipv anto tov kaθαριoú tonc. AΦnote tn ouokεuń va kpuωεi προτou totoθεntóte n αφαρεσeTE Εξαρτμata.
7. Aσφαλής χρήσον - καθαρισμός
- ΣΚΟΥΠΙΟΤΕ οτο κατω μέρος του μαγερικόν σκεύους καλητης θερμαινόμενης πλάκας μετά από καθε χρήση.
Mnu biEte tn ouokueun ovepó.
- Tα tov καθαρισμό της συοκεύνς, ανατέξετο οτίς
oynies xnoans. Mnpeite va luveTe to ayepiko okeuoc kai to kaakl me zetn oanouvada. Mny ta zete oTo nluvtnpio niatwv. Katheta Te npiBnmu tns oukeunc eva wtoavi.
8. Ti πέπεινα κάνετος περίπτωη βλάβης
- Movó Εξουσιδοτημένος τοτόμο σε Εξουσιδοτημένος κέντρο σέρβις μπορείνα επιδεύσει το προίν.
Mny xnpoiouoite oioiaodnote ouokun, evxu apei to nEaKpko kawldio n to fic, eav n ouokun dev etoupye ootaa n ev exei unootei onoiadnote aen. EIToppeTtnouokunoto pnoieoepo egouioobotnevo Kevtpo oepic yia eayxo, tiokeun npuon.
Eav to nAektpiko KaIomega exei unooTei 3aBn, Ppei va avikataoTaOe i ano eva eovoiodotnevo Kevtpo oepic yia tnv anouyn tuxov kivduvou. Mnu avikaiotate to nAektpiko KaIomega nou npapexetai to ppoiov, aIaa KaIomega.
Mny npokaleite OTov OTeyavoiniKo 8akTuio.Eav exei unooTei ,avtikataotnoTe to 6e eva eoiodotnuevo kevtpo oepic.
- Avtikαθιοτάτε tov στέγανοποιntικό δακτύλιο κάθε 2
- χρόνια ἡνωρίερα, εὰν παρατηρήσετε πως ἐχει φθαρεί
- η χρειαζεται avtikatáσταση.
Xpnoiopoioite movo ta katalnnla avtalaktka yia to movteo oac. Eiva iiaitepa onmavtiko yia tn etoupyia tou steyavoiniinkoudeltaukiou kai tou maeyepikou okevouc.
XpnoiouoieTe mvo avtaaakia Tou nawouvtai e Exouoiodotnevo kevtpo epbetaic.
H xphon eapntmuatwov dev ouviotwvai ano tv
KataokeuaoTn Tns OoukeuC EvEeTaI vA PpokaEoTe I pauaiaouoC.
Mny xpoioioite aalaa maeyipikockeun otn ouokun, mOvo to maayepikoc oKeuoc nou pApexetai me to npoiov. Avtkaotate to maayepikoc oKeuoc movo authetavtiko avtaalakktiok, oxediaoevo yia xpnon e to ouyekpiévo npoiov.
- Σύμφωνα με τους ὄχύοντες κανονισμους, προτου απορρίψετε μία συοκεύη, η συοκεύη θα πρέπειν αχρησεύειαι (αποσυδέοντάς τη και κόβοντάς το έλεκτρικό καλώςι).
PpOeXei n npoostaoia tou nepi o t c!
Houkeunoacpiexi tonutiaulikα,ta onioa μtopoovvaavapnoiopoionoovvvaavakukawoov.
Aphiote tn oke kantoio dnohtiko onmuio oulambdaoc aonbetaNTWvTnpiepioxnsoc.
9. Note Ioxuei n Eyyunon;
H eyyunon 8ev kaIunTei aphiouk n oopao tou i k o u OKEUOUC.
- Διαβάοτε προσεκτικά τις Μθηγίες χρήσος προτουχρησμοποιόσετε τη συοκεύν γία πρώτη φόρα. Σεπερίπτωπ χρήσος που δεν συμμοφώνεται με αυτές τις Μθηγίες, o κατασκεύναστής δεν φέρει καμία ευθύνη καὶ ἐγγύŋον ακυρώνεται.
- Σε περίπτωπη εμπορικής χρόσης, ακατάλληλής χρόσης ἡ μη συμμόρφωσης με τις ὅδηγές, o κατασκεύαστης δεν αποδέχεται καμία ευθύνη καλ δεν ὃχύειη ἀγγύŋοι.
OΛA TA EEAPTHMATA TOY IPOIONTO

\*iAogia aEoouap avaloya ie to ovtel

EEOIKEIQZH ME TON NINAKA EAEFXOY
MHNYMATA KATAZTAZH

Mnuja kaawopiaatoc otav n oukeun evepytoieita.

Euéáviən xρóvou. Σε αυτο παράδεγμα: 1 ωρα 30 λεπτα.

Euφáviω Θερμokpασiας. Σε αιτό το παράδειγμα: 114 βαθμoi Kελοίου.

YtOBeIkuVei ot to npoypaia exi ma npoeilayevn puOmuon autoatnc thepokpaoiac/XPovou. Dev mtopei va yivei pontonion. YtOBeKuVei ot n thepokpaoia auXavetai kata tn faoan npoepmuavonc.

YtOSeikVUeI Oti n OoKEuN PPOePmuivetai.

YtO8ekvEi ot npoypaum olokarnpwθnke.

YtOBeikVei ot n oukeun Bioketai otn faoi diatnpns Oeepokpiaic.

YIOSEIKVUEIOTTO pOpypaia diaKoTNIKE.

YtOBeIKVeuI ot n OoKEuIN Bpioketai e aeitoupyia avauovnC.
O△HΓΟΣXPHΞΚAIKAΘΑΡΙΣΜΟΥ
AvatpeTe otic ekovc nou uno8ekvovtai wC (Eik.x) oToV osnyo ynpyopnc EKKivnonc.
IPIN ANO THN INPQTH XPHEH
1.Aphiepooukeuaia
Aphiéote tn oukeun ano tn oukeuaia kai diaaote tic odnyiec xnpnc npiv tn xpnoiortnoe Tia npwtn opa.
- Aφαρεσε τα διαφημιοτικα autoKóλλητα (éav unáρχουν) από ηισωκεύν πριν ηχροιμοποίσετε γι αρώτη φόρά.
2. AvoIyμa tou kαπakIoú
- Iα vα αονεξετο καπάκι, κραπότε τη λαβή του καπακίου, περιστέψετα φρισερόστροφα και σηκώτετο καπάκι (Eik.1 και 2).
Σημειωη: Otav Σηκώνετe TO καπάKI, TO μαγεριόσκεύος Σνδέχεταιν παραμείνει συνδέδεμένοστο καπάKI. Eivai φυσιλογίοκα και αποδείκυέι τήν καλή στέγανότητα του προίόντος. Για τήν αποφύγή πτώς του μαγεριόκουσς. Στο προίόν κατά TO ὄνοιγμα του καπακίου, ανοίγετε πάντα του καπάkl προσεκτικά.
ToTOnoTeTn OuOKeun oE mia EIniTeBn EpiAveia. Aphiote ola ta npootateutikau kai ta EApntmuata aTo to eoutepiKo Tns ouokueng (Eik.3).
3. Kaθαρισμός σλων των εξαρτημάτων τής συοκεύς
3a. Kaθαρισμός tou kaπακίου, tou μαγειρικόν σκεύους και των εξαρτηματων
- Kaθαpiote to kaπáki, to Μαγειρικό Εκεύος και τα εξαρτήματα με ενα μαλακό σφουγγάρι και ζεσή σαπουναδα (Eik.4).
- Σεγνωότε to καπάκι, to μαγερίρό σκεύος κατα εξαρήματα (Eik.5)
Mny xnpoiotoe upu n tpaux ofouyyapi yia tov kathetao tou maeyepoukoukeouc, kthetauoc npopei va fheipetnvavtikoanik eniioptpwon tou maeyepoukoukeouc (Eik.40).
Mnu biEte tn ouokueun oe vepo (Eik.41).
Eav buioe te kataa looc tn ouokueun ovepno pizetevpo Tavw otn 0epmuovmev nlaoka, eniokeuaote tn ouokueun oEv a Eouoiodotmevo kevtpo eipic.
- Mny tototheite to kaiai kai to mayeipiko okeuooc oTo io niatowv (Eik.42).
- Αβετενόψη στι μόνο τα παρακάτω εξαρτήματα πλένονται Σε πλυντήρο πιάτων: σπάτουλα, δοσομετρίκη κύπα και εξαρτήμα ατμου.
3β. Kaθαριομός του στέγανοπιοικόδ δακτυλίου
- Aφαipéóte tov οteγανοποιntikó δακτύλιο από to καπάκι και καθαρίσε tov με ενα μαλακό σφουγγάρι και ξεοτή σαπουνáδα (Eικ.7 και 8).
- Σεγνωτετον σχολαστικά.
ToTOnTeTnToTovOteyavonoinTko DaKtUlio nAvw Otn BaoTou kaiPioteTovmuexpiVaEapmuoei Otn Theon Tou (Eik.9).PioteTovOteyavonoinTko DaKtUlio yepa,woTe va i e TWCevuTApXouv avooiOpphieckai TWCeEe Eapmuoei owta otnv unodoxn tou.
- Aφού τοποθετησετον οτέγανοποιntικό δακτυλίο στο καπάκι, εὰν ανοίξετε to καπάκι πολύ γρήγορα, to μαγειρίκό έκεύος ευδέχεται να παραμεῖνι συνδέδεμένον στο καπάκι (Eik.37 και 38). Περμένετε μερικό δευτερόλεπτα γίαν απελεύθερωθείτο μαγειρίκό σκεύος από το καπάκι (Eik.39).
Σημειων: Eivai φυσιολογίκο και αποδεικυει τήν καλή Στέγανότητα του προίντος. Για τήν αποφύγη πτώς του μαγειρικό μεκύους στό προίν κατά το ανοίγμα του καπακίου, ανοίγετε πάντα το καπάκι προσεκτίκα.
IPOEIAOIOIHsH: Mny xpnouoieite note tn ouokevn wpi tov oteyavonoiintiko daKTuAio (Eik.44)
3y. Kaθαρισμός των βαλβίδων
Tα tov kaθαρiμo toc βaβiδac αφαλεiac πεος, αφαρεοτe to έβαβiδa ασαβεiac πεος απο tov σωληνα στο πανω μερος tou καπακιού (Eik.10). Kaθαρίοτe την με ενα μαλακό σφουγγαρι κα ζεοήσαποναδα (Eik.11). Otav στeyνιωει, βεβαιωθείte oτι to εωτερικό tou ωληνα ειναι καθαρό προύν συδεοετε to έβαβiδa ασφαλεiac πεος στον σωληνα στο πανω μερος tou καπακιού (Eik.12). Beβαιωθείte πως η βαβiδa ασφαλεiac πεος ειναι ωστά τοποθετημένη. Θα πρεπειν κινειαι ελεύθερα προς τα πανω και προς τα κατω.
TaoKaOapoioukALUmuatoctnsBaaBicac aooaieiacpioc, EeBiswote to kALumu taC BaaBicac oTo eowteipko Tuma Tou KaTakoi (Eik.13).KaOapiote to e eva maakofoouyapai Kai ZetOn oanovada (Eik.14).Otav OTeYVWOEI, BbaWthe otTo eowteipko Tou oWnva Eivai kaOapopnpotou BiDwote to kALumu TaC BaaBicac aooaieiacpioc sto eoewteipko Tmu Tou KaTakoi (Eik.15).
- Γαν καθαρίσετη βαλβίδα με πλωτήρα, αφαρέοτε τον δακτύλιοτης βαλβίδας απότο εωιτεριότμήμα του κατακιου και αναποδόγυρίοτε το καπάκι ωοτεν μα πορείη βαλβίδα με πλωτήραν αβει απότο το καπάκι (Eik.16). Kαθαρίοτε τον δακτύλιοτης βαλβίδας με πλωτήρα και τη βαλβίδα με ενα μαλάκο σφουγγάρι και ζεσήσαπουνάδα (Eik.17). Otav Θεγγύσει, τοῦ Θεπότετηβαλβίδα με πλωτήρα στο καπάκι και τοῦ Θεπότετηση Θεόη του τον δακτύλιοτης βαλβίδας (Eik.18). Bεβαιωθείετη ως η βαλβίδα με πλωτήρα εἶναι σωτός τοῦ Θεπότημένη. Θα πρέπειν ακεῖαι ελεύθερα προς το πάνω και προς το κάτω.
35. Kaθαρισμός του περβλήματος της συοκεύς
Kαθαρίσε το περιβλημα της συοκεύνός εύναιντο παύ.
Mnu oziEte tn ouokun ovepO (Eik.41).
- ΣΚουπίοτε τη θερμαινόμενη πλάκα μέ ενα στεγνό παύ.
O△HΓIΕΣ XPHΞHΣ
1. Tonoθετηοι των Φιλικύν στο μαγερικό σκεύος
Aφαρεστe to μαγερικό σεκύς απο to περβλημα.
ToTOnoTeItoUaIkaOToMaayEpiKoKeUoc.
- Σημειώτε ὄτι Τέπεδο φαγητου και γυρό δεν πρεπει ποτένα Φεπρβαίνει τη μέγιστη ενδεξήσο τος μαγερικό σκεύος (Eik.19).
- Otav xpnouoieite oe leitoupyiec nieons uikα tou exouv tyn taon va fouokwovuov otn diapkeia tou maeyipémuotc, onwc anoepnaeva laxavika n puci, mnu yeuiizte to okeuo c npapanaw ano to mio tnç meiyiotnc wpnntikotntac tou.
2. Tonoθετηοι του μαγερικόν σκεύους στο περβλημα
Bεβαιωθείτε πως το κατω μέρος του μαγειρικόν σκεύους εῖαι καθαρό και στεγνό και αφαιρόσετε tuxov unλείματα φαγητού πό τη θερμανόμενη πλάκα (Eik.20).
ToTOnoTeTo p i k o Okeuoc sto Tepiβλnμa (Eik.21).
MnV xnpoiouoieite nTo oukeun XwpiC to ayepiko oKeuoc.
3. Kλεισιμο καλ ασφάλιοι του καπακίου
- Eλεγξε οτι o έτεγανοποιntικός δακτύλιος ἐχει τοῦθετηθείσωτα στο καπάκι (Eik.43).
Kpataote tn tou kantakoiou, tooThe note to kaiaokttn ouakeun kai nepiotppeyto dexiotpofoa yia vao to aphialioe (Eik.22).
4. Σύνδεοιης της βαλβίδας ασφαλείας πίεοις
ToiooTeTnoTe ootα tn aocaaic nieonc stokai (Eik.23). AotvOnyntn 9aBis6a 0a npaeivei liyo xalapn, eivai fuoioloyiko.
5. Evepyooinon tsoukeun
- ετιλίξε τέλείως to ηλεκτρίκο καλώδιο και συνδέσετο το στην πρίζα (Eικ.24).
H ouokevun o kavei evav xapaktnpiotiko nxo, nooovn o aovaoepoi kai o ephiaviotei n vdeltaig HIEIO.
6. Eπιλογή και εκκίνηση εύς προγάματος μαγειρέματος
Kαθε πρόγραμα ἐχει εναν προεπιλεγμένο Χρόνο και θερμοκρασία και αντιοιχει σε μια σρισμένη Θέση του καπακιό. Δείτε τον πίνακα των προγαμάτων μαγειρεματος;
ΠINAKAΣ ΠΡΟΓΡΑΜΜΤΟΝ MΑΓΕΙΡΕΜΑΤΟΣ
Σημειωη: Kaτα to μαγείρεμα, μπορείνα παρατηρόσετε μια μικρή διαρρόν ατμου από to καπάκι, συγκερμεύνα από τη βαλβίδα ασφαλείας πίεος. Eivai φυσιολογίκο και συμβαίνει ὄτavirus ηπεόη.
Eukaryota eukaryota Ovoidea Pseudomonas aeruginosa Candida parapsilosis Proteobacteria Phylum Bacteroidetes Phylum Bacteroidetes Phylum Bacteroidetes Phylum Bacteroidetes Kanaii Kanaii Kanaii Kanaii Kanaii Kanaii Kanaii Kanaii Kanaii Kanaii Kanaii Kanaii
AvatpeTe otic Eikovec tou odnyou ypnyopnc Ekkivnonc (anto Eik.25 EwC Eik.36)

Póypαμα αpyou μayéipéματος
ToOnoTeTnOte ta uAikocTo maayepiko okevoC, kEioTe teLeiwCs KAI aOphiaiote to KaTIKI.
- Περιοτρέψετον διακόπητου πίνακα ελέγχου προς τα δεξία γιαν επιλέξετετο πρόγραμμα αργού μαγειρεματος . Στην oθόνη εμφανίζεται o προεπιλέγενος χρόνος μαγειρεματος.
- PpOaIepiKa: PAtnoTe To kai opiTe tov EtiuumTo xpoVo nepiotpéfoVtac tov diaKoTn Tou nivaka eEyxou npoc ta (yia auEnon Tou xpovou) n pOc ta apiotepa (yia mEiwon Tou xpovou).
- PatnoTe to yia va xekivnoei to npoypaum aayelpemuatoc.
H ouokevn Eekiva t n faon npothepuavong. Tnv ofoyn ephiaviocovta evaalaoi evedeltaieic KAL HEAE KAI n Evdeiktikn luxvia tnc npohepuavong avaabei.
Molc oloknpw0i n fao npoepmuovc, n ouokun eTaaive autouata otn faon mayepmuato. Tnv oovn ephiavi etai n avtioptpoh mertpon kai n evdeltaikntknauxvi yia to mayepmae ExiIg na vabiEi.
KaTn diakaoia tou maeyepaotc, dnioupyeitai nieon otn oukeun kai n 8aIdelta a e nnptpa avbaivei npoc ta navw. H evdekikn luxvia yia to okeuoc uno pieon avaeu wc eldooinon nwc to kaakl dev mnpei va avoiei npotou aneuvepwoei nieon.
- Στο τέλος της αντίστροφής μέτρησς, n συοκεύν καVEL ευαν χαρακτηριστό ἡχο καὶ στήν oθόνn εμφαύνεζεται n ενδεξη [End].
-Metα αnto liya δeutepolenta, n ouokeu μεtaβaiveu autóμata σtn Φαση δiatnpnɔnc θεροκpaoiaç. Σtnv oθovn εμφαviεται η ενδειξη [Hoe] kai n ενδεiktikn λuxvia δiatnpnɔnc tnc θεροκpaoiac [m] αναβει.
- Παποτε to ⑤ για 3 δευτερόλεπτα για να σταματησετε to πρόγραμμα ανα πάσα στιγμή.

PpOpaMa OoUanac
ToOnoTeTnOte ta uAikocTo mayeipiko okevoC, kLeioTe teLeiwCs KAI aOphiaiote to KaTaki.
- Περιορεψετον διακόπητου πίνακα ελέγχου προς τα δεξία γιαν συμασους. Στην Θθόνη εμφάνιεται προεπιλέγμενος χρονος μαγερεματος.
- PpOaIepTeK: PAnTo KAI OpiTe Tov EINUHTo XpOvo TEPiOTpefoVtacTovdeltaKoTTnTouPiVAKA ELeyXouPocTa SEIGIA (Yia auEnon Tou Xpovou) n PpOc Ta apoiTepa (Yia meiowon Tou Xpovou).
- Παπόσε το ⑤ γιανξεκίνησει to πρόγραμμα μαγειρεματος.
H ouokeu n Eekiva t n faon npoepmuavoc. Tny oovn eauovtai evaalaoi evdeieic kai HERkai n evdektikn luxvia nC npoepmuavoc avaβe i.
Molc ooknpoWei n faon npoepmuovcn, n oukeun eTaiae i autouata otn faoon mayepmuatoc. Tnv oovn ephiavi etai n avtioptpnon metpnon kai n evdeiktikn luxvia yia to mayepma oE ExiIgneavabci.
KaTn diakaoia tou maeyepaotc, dnioupyeitai nieon otn ouokun kai n 8aIdelta aE pntpaaivei npoc ta naw. H evdeiktn kuxvia yia to okeuoc uno nieon wavbeu wc eioiOn nwc to kaaki dev mtopeiv avoieip npotou aneuvepwtheta i nieon.
- Στο τέλος της αὐτίαροφής ὅτηρησς, n συοκεύνη κάνει εναν χαρακτηριού τός καὶ στήν σθόνη εμφαύζεται n ἐνδεῖξη [End].
- Meta anto liya deutepolenta, n ouokeun metabaiveu autouata otn faon diatnpnongeepokpaoiac. Tnv oovn ephiavietai n evdeltaikn kai n evdeltaiktikn luxvia diatnpno n tnc eepokpaoiac avaβei.
- Παποτε to ⑤ για 3 δευτερόλεπτα για να σταματησετε to πρόγραμμα ανα πάσα στιγμή.
1
Póypaμα Avakatéouμε tnyaviouμε
- Περιοτρέψετον διακόπητου πίνακα ελέγχου προς τα δεξία για νεπιλέξετετο πρόγραμα Ανακατεύουμε τηγανίζουμε . Στην oθόνη εμφανίζεται o προεπιλέγμένος χρονος μαγερέματος.
- PpOaIepiKa: NaTnote To 已 opioTe Tov EtnuunTo XpOvo nepiopTpEoVtac Tov diaKoTTn Tou nivaka EeYxou npoc ta (yia auon Tou xPovou) n npoc ta apiotepa (yia meiowon Tou xPovou).
-Προαρετικα: Παπθοτε το ⑥ και σρίσε τήν επιθυμητη Θερμοκρασία περιστέφοντας τόν διακόπτη τόν πινακα ελέγχου προς τα δεξία (για αύξηση τής Θερμοκρασίας) ἡ προς τα αριστερά (για μείωση τής Θερμοκρασίας).
- Παπόσε to ⑥ γιανξεκίνησει πρόγραμμα μαγειρεματος.
H ouokevun ekivaei tn faon npothepuavoc. Tnv oovn ephiaviocvtai evaalaoxi evdeltaick cKai HEAE KAI n evdeltaiktikn luxvia tnc pnoepmuavoc avaβe i.
Molc oloknpw0i n fao npoepmuovc, n ouokun eataive autouata otn faon mayepmuato. Tnv oovn ephiavi etai n avtioptpoh mertpon kai n evdeltaiktkn luxvia yia to mayepma oE EeAign avaBci.
- TomoTheTneTa uAikα OTo μayeipiko okeuoc kai αhote to Kaia KAOI AvoiTo yia va KaaveTe stir-fry.
- Στο τέλος της αντίστροφής μέτρησς, n συοκεύν καVELι εναν χαρακτηριστό ἡκο και στήν oθόνn εμφαύνεζεται n ενδεξη [End].
- Metα απο λίγα δευτερόλεπτα, η συσκεύν μεταβαίνει αυτόματαστη λειτουργία αναμονής. Στην Θθόνη εμφαίζεται η ενδειξη
- Παποτε to ⑤ για 3 δευτερόλεπτα για να σταματησετε to πρόγραμμα ανα πάσα στιγμή.

Póγραμα ατμού
Báλte 150 ml vερο (3/4 της κουπας) στο μαγειρίκο σκεύος, toποθετήσε to Εξαρτημα ατμού μέσα στο σκεύος και μετα προθέσετα τα υλικα σας. Kλείσε τέλείως to καπάκι και ασφαλίσε το.
- Περιοτρέψετον διακόπητου πίνακα ελέγχου προς τα δεξία για να επιλέξετετο πρόγραμα ατμού. Στην Θθόνη εμφαυζεται o προεπιλέγμένος χρονος μαγειρέματος.
-Προαρετικά: Παπότε το ② και σρίσε τον επιθυμήτο χρόνο περιστέφοντας τον διακόπτη του πίνακα ελέγχου προς τα δεξία (για αύξηση του χρόνου) ἡ προς τα αρισερά (για μείωση του χρόνου).
- PatnoTe to 忍 ia va xekivnoei to npoypaumua ayepaatoC.
H ouokevn Eekiva t n faon npothepauvoc. Tnv ofov n ephiavicovtae vaaiaoi evdeltaic KAI HEAE KAI n evdeltaiktki n luxvia nC npothepauvoc avaβei.
Molc ooknpoWei n fao npothepuavoc, n oukeun eataiveaoutouata otn faoon mayepaeatoC. Tnv oovn ephiavi etai n avtioptpoh metpnon kai n evdeltaikntiakxvia yia to mayepea oE EeAixn avaBci.
KaTn diakaoia tou maeyipepaotc, dnmuoyeitai nieon otn oukeun kai n 8aIb6 aE pAovtnpaaevbaivei npoc ta naW. H evdekikn luxvia yia to okeuoc uno pieon avaei wC eioiOnn WcTo kaKtki dev mtopeiv avoiei npotou aneuvepwtheta i nieon.
- Στο τέλος της αντίστροφής μέτρησς, n συοκεύν καVEL εναν χαρακτηριστό ἡχο και στήν oθόνn εμφανίζεται n ενδεῖξη [End.
-Metα aio liya δeutepolεπta, n ouokeun μeTaβaiveu autouata σtn Φaon δiatnpnong θεροκpaoiaç. Σtnv oθovη εμφaviεtai n ενδειξη [Hoe] kai n ενδεiktikn λuxvia δiatnpnong tnc Θεροκpaoiaç [w] avβεi.
- Παποτε to ⑥ για 3 δευτερόλεπτα για να σταματήσετε to πρόγραμμα ανα πασα στιγμή.

PpOpypauaa ynoiaatoc
ToTOnoTeTnOte ta uLkα nou éxete npoTeoiαoeI OTo mayeipiko okeuoc kai kλeioTe, aλλa μny αofoiaoTe to kaTakl.
- Iepiotpépsi tov diaokontn tou nivaoka eleyxou poc ta deiia yia va eniieeteto npoypauma ynoimuotc. Tnv oovn ephiavi etai o poeiileyevoc xpvoc maeyipémuotc.
- Pinoapetiká: ΠatnoTE to kαo iOte Tov επθuŋto xpóvo πeipotpeφovtacTov δiakópttn Tou πivakα ελéγxou πoç ta δεξia (yia αúξηon tou xpovou) n pOc ta aρiσtepa (yia μεiωn tou xpovou).
-Προαρετικα: Παπθοτε το ⑥ και σρίσετην επιθυμητη Θερμοκρασία περιστρέφοντας τον διακόπτην του πινακα ελέγχου προς τα δεξιά (για αύξησητης Θερμοκρασίας) ἡ προς τα αριστερά (για μείωσητης Θερμοκρασίας).
- Παπόσε to ⑤ γιανξεκίνησει to πρόγραμμα μαγειρεματος.
H ouokevn Eekivaen phaon npoepmuavoc. Tnv oovn ephiaviocovtaevaalaooi evdeieic KAI HEAEKai n evdkiKni luxvia nC npoepmuavoc aVaei.
Molc oloknpw0ei n fao npothepuavons, n ouokueu meaive auotouata otn faon mayepmuato. Tnv oovn ephiavieta n avtioptpno n metpnon kai n evdeltaiktikn luxvia yia to mayepma oE ExiIg na vaei.
- Στο τέλος τής αντίστροφής μέτρηός, η συοκεύη καVEL εύαν χαρακτηριστιό ἡχο και στήν οθόνη εμφαύνιξεται η εύδειξη [End.
- Meta ano liya deutepolenta, n ouokeun metaabeu auotouata otn phaon diatnpnongs 0epkoopaiac. Tnv oovn ephiavietai n evdeltaikntiuxvi a diatnpnong tnc 0epkoopaiaac avaei.
- Πατήσε το ② για 3 δευτέρόλεπτα για να σταματήσετο το πρόγραμμα ανά πασα στιγμή.

Póγραμα Apyó μαγείρεμα
- Περιστρέψετον διακόπητου πίνακα ελέγχου προς τα δεξία για νειλέξετε to πρόγραμα Apyó μαγείρεμα έτην Θθόνη εμφάνιζεται o προεπιλέγμένος χρονος μαγείρεματος.
- PpOaIepiKa: PAnToTe ② kai opiTe ToV EπUμnto XpOvo πePiotpeovtac Tov diaKoTn Tou nivaka EλEyxou pOc Ta δEla (yia auxon Tou xpovou) n pOc ta apiotepa (yia μεiowon Tou xpovou).
- PpOaIepTeK: PAtnoTe to ① kai opiote tny eNtoumntn Θερμokpaoia περιστρéφovtac tov δiakóπtn tou πivakα ελέχου πος τα δεξια (για αύηση nτς Θερμokpaoiaç) n πος τα αριστερα (για μειωη nτς Θερμokpaoiaç).
- Παπόσε το ⊙ γιανξεκίνησει to πρόγραμμα μαγειρεματος.
H ouokevn Eekiva t n faon npoepmuavoc. Tny oovn eauovtai evaalaoi evdeieic KAI HEAE KAI N EvdEiktikn luxvia nC npoepmuavoc aVaei.
Molc ooknpoWei n foan npohepuavon, n oukeun eTaeivauotoumaata otn faoon mayepaatoz. Tnv oovn ephiavietai n aviotpOon metpnon kai n evdeiktikn luxvia yia to mayepmae Eelxiqn avaabei.
- Στο τέλος της αντίστροφής μέτρηός, η συοκεύν ἀναν καρακτηριστικό ἡχο καὶ στήν οθόνη εμφανίζεται ἡνδεῖξη [Erid.
- Metα αnto liya δενιτρολεπτα, η συοκυμη μεταβαίνει αυτόματαστη λειθουργία αναμούνις. Στην Θθόνη εμφαίνειδαι η ενδειξη = = =
- έπατησε to ⑤ για 3 δευτερόλεπτα για να σταματησετο το πρόγραμμα ανα πασα στιγμή.
Pnpoypauma npitc
ToToTeTnToTaUkOToMayeIpiKoKekuoc,KeioTe TeLeiwC Kau aOphiaiote to KaTakl.
- Περιστρέψετον διακόπητου πίνακα ελέγχου προς τα δεξία γιανα επιλέξετετο πρόγραμμα πόρις . Στην oθόνη μεφανίζεται o προεπιλέγμενος χρόνος μαγειρέματος.
-Прауетikа: Патно te 重心 opioTe tov επιθυμntó xρόvo περιστέφοντας tov διακόπητου πίνακα ελέγχου προς τα δέξια (για αύξησου xρόου) ἡ προς τα αριστέρά (για μειώνι οὐ xρόου).
- Πατηοτε to ⊙ γιανξεκίνησει to πρόγραμα μαγελερεματος.
Houkeun Ekiivalei tn foan npohepuavoc, 2tnv ofoyn ephiavicovat evaalaoi Evseieic Kai HEAE KAI n EvdeiktiKn luxvia Tns pOeepuavoc avaBc.
Molc ooknpoWei n faon npothepuavoc, n ouokun eataivei autouata otn faoon mayepmuato. Tnv oovn ephiicetai n avioptpno n metpon kai n evdeiktikn luxvia yia to mayepema oE Exiian avaβei.
- Στο τέλος της αντίαροφής μέτρησός, η συοκεύμι κάνει εύαν χαρακτηριστικό ἡκο καὶ στην οθόνη μεφανίζεται η εύδειξη [Erid].
Metαπoλiγδειτρολεπα,ησυοκενμεταβαίνειαutóματαση Φαση διατήρονιςθερμοκραοίας.Στηνοθόνημφανιζεαιη ενδειξη Kαιηνδεικικλυχίαδιαπήρονιςτηςθερμοκραοίας(avαβει.
- Πατησετο ⑤ για 3 δευτερόλεπτα για vα σταματήσετο το πρόγραμα ανα πασα στιγμή.
PpOpypaumpuziou
ToOneTeTo a Ulika oTo Maayeiipiko OkevoC, KLeiote TeleiwC Ka aphiaiote To kaTaki.
- Περιοτρέψετον διακόπητου πίνακα ελέγχου προς τα δεξία για να επιλέξετετο πρόγραμα ριζιου . Στην oθόνη εμφαύνεταιο προεπιλέγμένος χρονος μαγερέματος.
- PpOaIepiKa: PAtnoTe To kai opiTe tov eTou mnto xpoVo nepiotpéfoVtac tov diaKoTTn tou nivaka eEyxou npoc ta (yia auEnon tou xpvou) n npoc ta apiotepa (yia meiowon tou xpvou).
- Παπόσε το ⊙ γιανξεκίνησει το πρόγραμμα μαγειρέματος.
H ouokeu n Eekiva t n faon npothepuavoc. Tny oovn eauovtai evaalaoi evdeltaic Kau HReK aN evdeltaikntknauxia nC npothepuavoc avabci.
KaTn diakaoia tou maeyepaotc, dnioupyeitai nieon otn ouokevn kai n 8aIdelta a ne Iwntnpa avbaivei npoc ta navw. H evdekriikn luxvia yia to okevooc uno nieon avaeu wC eisodoinon nwoC to kaKai dev mtopei va avoiei npotou aneuvepomegae i nieon.
- Στο τέλος της αὐτίαροφής μέτρησς, n συοκεύν κάνει εναν χαρακτηριστό ἡκο και στήν oθόνη εμφανίζεαι η ενδεῖξη [End.
-Metα αnto liya δeutepolεπτa, n σuokεun μεtaβaiveu autóμata σtn φαση διαπροης θερμokpαoiac. Σtnv oθovn εμφαviζεται ηενδειξη [Hoe] kai n ενδεικτικλuxvia διαπροηnc tns θερμokpαoiac [avβεi.
- Παποτε to ② για 3 δευτερόλεπτα για να σταματησετε to πρόγραμμα ανα πάσα στιγμή.
Ipoypauma yiaouptiou kai zmuatoC
To npópyaμα γiaouptiou kaiζμωμatoc μπopeivaxρnσiμoŋοɪηθεi γia tynapαokeun γiaouptiou nζμnc ψwμiou/σφoλiatac.
- Iα vα παρασεύσετη γιαύρι, τοῦτησε τα ζλικα στο μαγερικό Κεύος και λέίσετο το καπάλι.
- Iα vα παραοκεύσετε ζύμη, μπορείνενα ζύμωσετη ζύμη μέσα στο μαγειρίος Κεύος και, κατόπιν, να τοῦθετησετο μαγειρίος Κεύος στο περβλημα καινα κλείσετετο κατάκι γιαναξεύνησετε τη δίουκωση.
- Περιοτρέψετον διακόπητου πίνακα ελέγχου προς τα δεξία για να επιλέξετε to πρόγραμμα γιαύρτιου καίζυμμωματος Στην oθόνη εμφαviζεται o προεπιλέγμένος χρονος μαγειρέματος.
- PpOaIepTeK: PAtnoTe To KAI OpiTe Tov EINUUMTo XpOvo TEPIOTpeoVTOv δiakontn Tou NivaKa EλeYxou NPOs ta δEla (yia auEnon Tou xpvou) n pOsc ta apIOTepa (yia mEiwon Tou xpvou).
- Pioaipetik: PatnoTe to kai opiTe tnv eToumtn thepuokpaaia neiopertpeovtac tov diakoTn tou nivaKa eLeyou poc ta dexi (yua uEnon tnc thepukpaiaac) npoc ta apiotepa (yia meiowon tnc thepukpaiaac).
- Παπησετο (♀) γιαν ξεκεύνησει το πρόγραμια μαγελερεματος.
H ouakeun Eekivaei tn faon npoepmuavoc. 2tnv oovn ephiaviocov tau evaalaoi evdeltaic kai HEAE kai n evdeltaiktikn luxvia tns npoepmuavoc avaβe i.
Molc ooknpothei n faon npoepmuovnc, n ouokeun metaBaiveu autouata otn faon maayepmuatoc. Tnv oovn ephiavicetai n aviotpofn etponk kai n evdeiktikn luxvia ia to maayepma oE eEliqni avaBc.
- Στο τέλος τής αὐτίστροφής μέτρηONS, η συοκεύν κάνει εύαν χαρακτηριστό ἡκο και στην oθόνη εμφανίζεαι η εύδειξ [E. n.]
- Metα αnto λiγα δειτρόλεπτα, η συοκενή μεταβαίνει αυτόματα Οηλειουργία αναμόνης. Στην οθόνη εμφανίζεια ηένδειξη.
- Παπότε to ⑤ για 3 δευτερόλεπτα για να σταματήσετε to πρόγραμα ανα πάσα στίγμή.

Puθμiζóμενηλειτουργiaσεφ
ToTOnoTeIntoTaUIAKoTOmuayelipkoOKeuocKaaovaoMaTouvtayn, EIIAEEe eav Oa KkEioTe To KaIakl.
- Περιστρέψετον διακόπητου πίνακα ελέγχου προς τα δεξία γιαν επιλέξετε τη ριθμιζόμενη λειούργία σεφ . Στην Θθόνη εμφανίζεται o προεπιλέγμενος χρόνος μαγειρέματος.
- Pinoapetiká: Patnote to kai opioTe tov επιθμntó xρovo περιστέφοντας tov διακόπητου πίνακα ελέγχου πος τα δεξία (yia αύξησην του xρόvου) ἡ προς τα αριστερά (yia μειώην του xρόvου).
- PpOaIepTeiKaTneTo kai opioTe Tny EeIthuunTh Θερμokpασia πεpiotpefovtac tov δiaKoTTn tov πivakα ΕλéyXou poc ta deξia (yia αUxon tnc Θερμokpαoiac) n poc ta apiotepa (yia μεiωon tnc Θερμokpαoiac).Pntote to yia va ξekivnoiTo póypaμma ayepéμatoc.
H ouokevn Eekvai Tn faoon PpOeepuavoc. Tnv oovn ephiavicovta evaalaoi EvdeieKc Kau HEKc kN Evdeiktikn luxvia tnc PpOeepuavoc O avaei.
Molc oloknpwEi n faoon npoEpuvoc, n ouokevn eataivei autouata otn faon mayepmuato. Tnv oovn ephiizeta n avtioptpoh mertponkai n evdeltaiktikn luxvia yia to mayepma oE ExiAixn avaBcI.
- Στο τέλος της αὐτίστροφής μέτρηός, η συοκεύν κάνει ευαν χαρακτηρίοικό ἡχο και στήν οθόνη μεφαυξεται n ἐνδεξή [End].
-Metα απο λίγα Σεντερόλεπτα, n συσκενιμηταβαίνει αύτοματα στη λειτουργία αναμονίς, Στην σθόνη εμφανίζειαι n ἐνδεξή.
-Plahtote to 已 yia 3 8eutepeoAen ta va oataatnoet to npoypauma ava naoa stiyu.
* Ipótaon yia ypinyopo Κεσταμα γευματων: opioTE tη Θερμοκραοία στούς >=95°C και μαγειρέψTE με to καπάκι κλειότο, χωρίς να εἰναι ασφαλισμένο.
7. Xpñon tnc λeitoupyiaç καθυσερημενnç εναρξnç
H kaθuotpερημένη ευαρξ Μας δίνει τη δυνατότητα ρύθμιος της συοκεύς, υτετο το μαγείρεμαν αλεκίνησει αργότερα.
- Eπιλέξε πρωτα ενα πρόγραμα ακολουθώντας τα βήματα που περιράφοντα παραπάνω, στην παράγραφο 6.
- Ppiu anto tnv Ekkivnon tou eilaymuevou npoypaumato,
Pntote to ⑤. TnV oovn ephiaviEeTai O npoeiileymuevoc
Xpovoc yia tnV kaovotepnuev evapxn.
- Puθμiσte tov επιθυμntó χρον περιστρέφοντας tov διακόπητou πίνακα ελέγχου προς τα δεξία (για αύξησηου χρούου) nπρος τα αριστερά (για μείωσηου του χρούου).
- Παπησετο ② . Στην Εθόνη εμφανιζεαι η αντίστροφη μετρηση της καθυστερημένης ἔναρξης.Οταν περάσει o προκαθρισμένος χρόνος, η συσκεύηθα ξεκινήσει το μαγείρεμα αὐτόματα.
8. AvoIyMa Tou KaTakIoU
Mny eipnoe To avoiet To kntaki av n 8aIdelta a E Iwtnpa eivai aeBaeuyn kai n evsekikn luxvia uno tiocn Y eivai avamevn.
HpiEoN mTopei va aTeAeVthepwOei 2 TpOouc oTo TeLoC tou Ip O oc
ΦuoiKn aπελeuaepwon: KaT to teLoC tou uayieipμatoC n μetα αnto tn δiakοπn tou πpoypαμatoc, n σωakeun θa Kpuwoei kai n πieon θa aπελeuaepwθei fuoiKa. KaT n fuoiKn aπελeuaepwon, to paynto evδexetai va uayiepeutei πepioofoe oio oo npéei, lówy tnC unolaeinóμevnc πieong oTo okeuoc. Xpnoiμoioñote tn diabikoaia tnC xεipokivtnC anελeuaepwons yia va δiakóψete áeoga tn δiabikoaia uayieipμatoC.
Xeipokivtn aneAevepwon: Pntote napatetaeva to koupi aneAevepwons tns niEons, navw oTo kaNak. Xpeiaovtaeepik a deutepolent a ewc epiKa aavloya e tvn nootna fayntou oTo ayelipko okeuoc (Ek.31).
IPOEIOIOIHs: Pooeexte tov kauto ato nou byaivei ano tn ouokevun. KpatnoTe to npocwno kai ta xepia oac maakpi aanto tv atuo (Eik.45).
- Iα vα ανοίξετο το καπάκι, τοῦθετήσετο το χερι σας παραλληλμε τις πλευμικές λαβές, κρατήσε τη λαβή του καπακιόύ, περιστέψετε αριστέρόστροφα καὶ σήκωσετο το καπάκι (Eik.32 kaɪ 33).
IPOEIAOIOIHsH: PpOeXeTe Tov KauTo aTmo nou Byaivei ano to
9. Anouovδεοτε τη συοκεύν ἀπό τὴν πρία
- Meta ano tn xpnon, anoovseote tn ouokean kai ophiote tnv kpuwoei yia toulaixotov 2 wpe npiu tnv kathetaipoe.
10. Kaθαρισμός Μετα απο τη χρήση
- Kaθαρίοτε τη συοκεύν μετα από καθε χρήση.
- Πριν από tov καθαρισό, αφήσε τη συοκεύνν ακριώσει για touλάχιστον 2 ωρες.
- Γα Μηγες καθαρισμού, ανατρέξετο Σην παράγραφο 3. Για τόν καθαρισό ὅλων των εξαρτημάτων τής συακεύπες ανατρέξετο Σην ενότητα ΠΡIN ΑΝ ΦΟ έΝ ΠΡΟΤΗ
11. Συμβουλές σουντήρηός
- va δiaαφαλiσετην αθεκτικότητα tou μαγερικόν σκεύους, μην κόβετε τρόφια μέσα σε autó.
Xpnoiomoiite ta npexoEv aepntma. Mny xpnoiomoite metaaikc epyaia, kaohc nopoei va othapei n avkoanikn eioptpwon tou ayepipkou okeouc.
- Metá anó t n xρnón, o ΟTEyavontoiintikós δaktuioε evδexetau va μupiζεi onw to φayntó αac. Eivai φuoioloyiko. H oilikovη éxei μikpouc πopouc πou avoiyouv Šανιθεται συηλες Θερμokpaoies κai kλeivouv ξανá Šανιθη Θερμokpaoia επανελθει σε χαμηλα επιπεδα. TIA VA αφαipéoεte TIC OOμες anó tov ΟTEyavontoiintikó δaktuio, μπopeite:
- Na πλύνετον δακτύλιο από σιλικόνη στο πλυντήρο πιάτων
- Na προσθέοετε 1 κούπα ξύδι, 1 κούπανερο και 1 λεμόνι κομένο σε μεγάλα κομάτια στο μαγείρικό σκεύος καινα χρησιροισησετε to πρόγραμα ατμόύ για 2 λεπτα και, κατόπιν, να αφήσετε tov ατόν απελεύθερωθεί φυσικά.
-Avtikataotne tov oteyavonoiintiko daKTuio kaOe 2 xpvia n vwpitepa, e npintwnoopac.
O△HFOIANTIMETQNIIZHETEXNIKQN IPOBAHMATQN
Пróбдема Пговс сацяс Л�орс Абваша оvoуматок кattakioу Абваша оvoуматоς loучо пioл sc, sto maуерikó okeuoc. Празюпаростаму to koumti politeeavépwoan, piieonc yia va politealevberpoete tvn pioet on to tomaуерikó okeuoc, mIoptoe vxa xpeiaotov uvepiKá lettá mexvi va ateleuberpwtei piIpuoc n tioum. H piieon sto maуерikó okeuoc otealevberpawetai pIauwuc, αλλαη βaIbδa με πλιτρα exei koIaŋe iTeiδn eivai tnoLβρωμkη kai dev mitopei va katébei. α. BeBauwéite πwç n tioum éyei ateleuberpwtei pIauwuc, αφívovtac tn oukeuyn vka ρuωe iY a ToulaXiotov 2 wpc.β. Σπρωte atalá t n βaIbδa μe πλιθρa πoC ta KATU, totoBetwntac evaξIaikn éva μakpú avtukeiyevo sto avoiyua tnc βaIbδac μe πλιθρa. Eav to πρobjuaδev λuθei, osteiante tn ouokeun oEva εgouio botmeyev kévtrpo oepic.γ. Γα triν etoumevn xphon, kaθαρίote kai oteyuwatet n βaIbδa μe πλιθρa oxolataká. Абваша кoleiúmatoс кattakioу О оteyavotouitikocdeltaktulioc δev exei tnoToθetnei σωotá. Tortoetnototov tov oteyavotouitikódeltaktulio ωotá. To maуерikó okeuoc pIepiexei kautá uIká πou pIapayouv atiu. П配电'vetěmeу lexvi va kruwouv ta uIká σоуерikó okeuoc, pIotou'etuexipniəte gavá vka KλeioTe to kanták. H bαIbδa μe πλιθρa exei kαIaŋe iTeiδn eivai tnoLβρωμkη kai, etouénuw, δev mitopei va metakivnθe iIpoC ta katw. α. Σπρωte atalá t n βaIbδa μe πλιθρa πoC ta KATU, totoBetwntac evaξIaikn éva μakpú avtukeiyevo sto avoiyua tnc βaIbδac μe πλιθρa. Eav to πρobjuaδev λuθei, osteilte tn ouokeun oEva εgouio botmeyev kévtrpo oepic.β. Γα triν etoumevn xphon, kaθαρίote kai oteyuwatet n βaIbδa μe πλιθρa oxolataká. H ΘeON n/kaɪ n Kateuθuvon ttou ekAIEOte to kantáki eivai eofoλuEvn. КALEOTE to kattaki proCt ng atownt Kateuθuvon, oμduvua μe to eyxeipidio xphon. Отавоуете to kattakci, to maуерikó okeuoc tpoapáévei ouvsedeuévo STO Kattakci. О оteyavotouitikocdeltaktulioc exei πρokalééi avappófni. To maуерikó okeuoc οα ateleuberpwtei mOvo tou ato to kattaki. Eivai φuioLOyikó kai attoidekiuei tvn kαλn οteyavotnTa tou pioióvtoc, iα triV atoΦuoynπtownc tou maуерikó okeuoc stO pioió Kovatá to avoiyua tou kattakci, ovoiyete πávta to kattaki tpooektiKA.
Пróблела Пговсаоцic Июсяс Евtownг ameleuθерowam
пileoçм atot to Μαλβiδα
аофалeicamпileoç. H εοωτερική πίeησουνι
μεγαλυερησι στό την πίeησι
λειουγιας ἡ εοωτερική πίeησι
Εναι μεγαλυερησι στό την πίeησι
αοφαλείας. Kaθαριοτe διεδούκα τη βαλβiδα
αοφαλείας πίeοης, ηι βαλβiδα
με πλωτίρα και το κατάκι. Av
εξακολούθει αν βαγίει αιμίος
ατοτη ηαβλβiδα με πλωτίρα,
ατευθυθείτο ΤΑπλοίεθερο
εθουσοδοθμένον κέτονο Ερβίς γι
έλεχο, επιακεύην έρουσιηροι
που Πρετεινιναροιτοιηθει Από
εθουσοιδοθμένον αἰτομο. H βαλβiδα αοφαλείας πίeοης
βριοκεται σε αφαλμένη Θεόη. Περιαρέψει/πίοετe προαεκτία τη
βαλβiδα αοφαλείας πίeοης γιν αμίοι
στη θεόμι ΚΤΟ Φερετεν το κατότο
ατμίο. Tότοθβει Θεότε Εαοφαλί Κθέη
Και φρατε πιριαία γάντια. O εοφαλμένος ἔλεγος της πίeοης
obηγησε στην απελυεθέρωσι
πίeοης. Σειλετη Σιούκεύη σε ευλ
εθουσοδοθμένον κέτονο Ερβίς γι
επιακεύην. Συνεχός ameleuθερωο
πίeοης atot to Μαλβiδα με
πλωτίρα. H εοωτερική πίeησουνι
μεγαλυερησι στό την πίeησι
λειουγιας ἡ εοωτερική πίeησι
Εναι μεγαλυερησι στό την πίeησι
aοφαλείας. Kaθαριοτe διεδούκα τη βαλβiδα
αοφαλείας πίeοης, ηι βαλβiδα
με πλωτίρα και το κατάκι. Av
εξακολούθει αν βγίαει αιμίος
ατοτη θαβλβiδα με πλωτίρα,
ατευθυθείτο ΤΑπλοίεθερο
εθουσοδοθμένον κέτονο Ερβίς γι
έλεχο, επιακεύην έρουσιηροι
που Πβρετεινιναροιτοιηθει Από
εθουσοδοθμένον αἰτομο. Yπολείμιαστην βαλβiδα με
πλωτίρα. α. Παριοτe παροτετομένα to
κουμί πατελυεθέρωσις πίeοης
γιν αν επελεθερωσετε Απγ
περει ατοτη μαγερίκο Εκυος
Mιθοpeiν αν χερλαστουν Μερίκα
λεπτί μέχρινα σαν επελεθερωθει
πλρρως η πειη. β. Αφαριοτe Μιαούκεύνα κριωσει
γιν τουλαστον 2 υμες.
γ. Kaθαριοτe και στεγμωτε Π. β. Αφαριοτe Μιαούκεύνα κριωσει
γ. Kaθαριοτe και στεγμωτε Π. Kαλβiδα με πλωτίρα éxei
κλλησει. α. Παριοτe παροτετομένα to
κουμί πατελυεθέρωσις πίeοης
γιν αν επελεθερωσετε Απγ
περει ατοτη μαγερίκο Εκυος
Μιθοpeiν αν χερλαστουν Μερίκα
λεπτί μέχρινα σαν επελεθερωθει
πλρρως η πειη. Kαλβiδα με πλωτίρα éxei
κλλησει. β. Αφαριοτe Μιαούκεύνα κριωσει
γιν τουλαστον 2 υμες.
γ. Kaθαριοτe και στεγμωτε Π. Пróблар Пговсаціпес Л�ожец Диагрон ατουο ατό to kaṭákl. О огелуаноитикός δактualioc δέν ἐχει τοῦθεηθει σωτά. Афраίρους тов огелуаноитикό δактualio, кαθαιρίοτe тов кαι ετώναιοθεηθίοτe тов στή σωτή θέοι. О огелуаноитикός δактualioc εivala βρόμικος. Афраίρους тов огелуаноитикό δактualio, кαθαιρίοτe тов кαι ετώναιοθεηθίοτe тов στή σωτή θέοι. О огелуаноитикός δактualioc ἔχει utootei βλαβη, ὀ το γελιος tou μαγeιρίου σκεύος ἔχει utootei βλαβη. Στέλετη συακеύη σέ ευλεύοιδοτημένον κέντορο σέρβις για επιοκeύη. To φάγητό δέν εivala μαγeιρεμένο H αναλογία στέρεύν/υρύν υιλίνιν εivala εσφαλμένη. Δοκμάσε Εανά, ακολουθώντας με ακρίβεια τις ποιστητές τής συντañς. Δέν utáρχει παροχή ρεύμαιος ατό τήν πρία. Ελέγξετο oιαίακό ηλέκτρικο kυλμία. Εμφανιζεται ένδειξη E0 στήν ψημιακή Θόθουν. Ο διακόπτης πίεος εivala Ἇλattuματικός. Στέλετη συακeύη σέ ευλεύοιδοτημένον κέντορο σέρβις για επιοκeύη. Εμφανιζεται ένδειξη E1 στήν ψημιακή Θόθουν. Ο αιοθητήρα Θέρμοκραίας εivala Ἇλattuματικός. Στέλετη συακeύη σέ ευλεύοιδοτημένον κέντορο σέρβις για επιοκeύη. Εμφανιζεται ένδειξη E2 στήν ψημιακή Θόθουν. To katáki δέν εivala ωστά τοῦθετημένον για to συγκεριμένον πρóγραίμα μαγερίματος, Σέ καθε Πρóγραίμα αντίοτηχει μια opiaμένη θέοη του καταίού. Ελέγξετο και προσαρμόθετη ηθεητου του καταίαιου σύμφινα με to πρóγραίμα μαγερίματος, ανωτρερεο οτον πιναία τυν προγραίματων μαγερίματος στήν του πράγραρο 6 toι πραόντον Εγερίριδιο. Ετανεκκινηότο to πρóγραίμα στόντων to katáki τοῦθετηθει σωτά.Εόν to Πρóβλημα παραμένει, Ετέλετη η συκούνη Κέντορο σέρβις για επιοκeύη.
Moulinex
www.moulinex.com
Type:SERIE EPC52
Model: CE77
Capacity: 7.6L
Voltage: 220-240V
Frequency: 50-60Hz
Power: 1000-1200W
INDICE
Guia de inizio rrado em imagens 2 A Moulinex recomenda a segurarca em primeiro lugar 156 Descrição do seu produits 164 Familiarizar-se com o paine de controlo 165 Guia de uso e limpeza 166 Guia的技术o de resolucao de problemas 182 Garantia internaciona limitada da Moulinex 271 PTA MOULINEX RECOMENDA A SEGURANÇA EM PRIMEIRO LUGAR
A segurará é a)nossa principal prioridade. Concebemos e fabricamos onoxo produits com elevados padões de segurará e Tecnologia. No entanto, tal como acontece com qualquer aparelho elétrico, existem algunos riscos potenciáis,leo que o convidamos a exercer umCERTO cuidado e a respeitar as instruções que se seguem.INSTRUÇÉS DE SEGURANÇA
Leia atentamente todas as instruções que se seguem e guarde-as para futuras consulutas.
- A utilização incorrente do aparelho e dos respetivos acessórios pode danIFICAR o aparelho e causaferimentos. - Oaparelhocozinhaosalimentossobpressao.Autilização incorreta pode provocar riscos de queimaduras devido ao vapor. - Para sua segurarça, este produit está em conformidade com todas as normas e regulamentos aplicáveis (Diretiva Baixa Tensão, compatibilitadé eletromagnética, materiais compatíveis com alimentos, ambiente, etc.). - A fonte de calor necessária para cozinho está incluída no aparecido.1. Onde utiliser em segurar?
- Apenas para utilizes no interior. - Este aparecido destino-se apenas a uso dométrico. Não se_DESTina a ser utilizado nos següentes casos e a garantia não se aplicá a: - zonas de cozinas reservadas aos functionários de lojas, escritórios e outros espécOs professionais; - quintas; - Utilização por cliente de HOTÉis, motéis e outros ambientes de carater residencial; - ambientes do tipo alojamento com pouco-almoço. - Não coloque o aparelho num forno aquecido ou numa placá quente. Não colque o aparelho perto de uma chama viva ou de um objeto inflamível. - Utilize numa superficie de trabajo plana, está e resistente ao calor, afastada de salpicos de agua.2. Quem o pode utiliser em segurar?
- Este aparelho não foi concebido para ser realizado por pessoas (incluindo crijanças)@cajas capacidades fisicas, sensoriais ou mentalais se encontrar reduzidas, ou por pessoas com falta de experiência ou conhecimiento, a não ser que tenham sido devidamente accompaniesadas e instruções sobre a correta'utilisation do aparelho, pela persona responsavel pela sua segurarça. - O aparelho pode ser utilisé por pessoas com capacidades fibras, sensoriais ou mentalais reduzidas ou com falta de experiencia e conhecimiento, caso sejam supervisionadas ou lhes tenham sido dadas instruções relativas à'utilisation correta do aparelho e se comprehenderem os perigos envolvidos. - Este aparecido não deve ser utilisé por crianças. Mantenha o aparecido e o respetivo cabo de alimentação para do alcance de crianças. - As crianças não devem brincar com o aparelho. - As crianças devem ser supervisionadas para garantir que não brincam com o aparelho.3. Como usar em segurar – uso de algo?
- Não utilize o aparecido para outras finalidades que não a prevista. - Não utilize o aparecido para fritar alimentos em oleo. Só é permitido tostar/dourar. - Não utilize a panela de pressão no modo de pressão para fritar alimentos. - Ao cozinhoar alimentos pastosos, agite suavamente a panela antes deAbrir a tampa para fazer que os alimentos sejam ejetados. - Este aparecido não é um esterilizador. Não o utilize para esterilizar frascos. - Este aparecido não se destina a ser colocado em precisiónamento com um temporizador exterior ou atravesse de umsystema de commando à distência separado. - Para segurar o aparelho, utilize sempre as两大 pegas laterais no corpo do aparelho. Utilize luvas de cozinha se o aparelho estiver quente. Para maior segança, certifique-se de que a tampa está broqueada antes de deslocar o aparelho. - A parte inferior da cuba e a placá de aquecimento tíme de estar em contacto direto. Retire qualquer objecto ou resíduos alimentares localizados entre a cuba e a placá de aquecimento, poi pode afetar o desempenso. - Tenha em atençao que determinados temas de alimentos, tais como sumo de maça, arandos, ruubarbo, cevada, aveia ou outros cereais, ervilhas partidas, noodles ou massas, poder formar espuma e crepitação e entupir as valvulas. Tenha cuidado ao cozinho das vezes dos alimentos e,(before de utilizesimpe cuidadosamente as valvulas. - Tenha em atençao que determinadas receitas que incluem leite poder formar espuma, transbordar e obstruir as valvulas. Tenha cuidado ao cozinhoas评为ceitas e,deois deutilizar, limpe cuidadosamente as valvulas. - Ao cozinhoar alimentos que incham durante a cozedura, como legumes desidratos ou arroz, não encha a cuba de cozedura a mais do que metade da sua capacité. - Aparto cozinhar carne com pele grossa (como lingua de vaca), que pode inchar com o efeito da pressão, não fure a pele antes de cozinhar se esta parecer Inchada: pode queimar-se. Fure-a antes de cozinhar. - Não utilize o aparecido vazio, sem a cuba ou sem ingredientes no interior da cuba. Tal pode provocar danos graves no aparecido. - Não utilize o aparçelo sob pressão sem adicionalária, quando que tal pode provocar danos graves no aparçelo. - Não encha o aparelho sem a respetiva cuba. - Atença: não derrame láquidos sobre a ficha. - Não aqueça a cuba com qualquer outras fonte de calor que não a placá de aquecimento do aparelho e não utilize outras cuba. Não utilize a cuba para cozinho com outros aparelhos. - Utilize a cuba APENAS no aparelho. Não a utilize para cozinhar no fogão, noorno, etc. - Utilize uma colher de plástico ou de madeira para não danIFICAR o revestimento antiaderente da cuba. Não corte alimentos diretamente na cuba. - Não toque nas valvulas, exceto durante a limpeza e manutençao do aparecido, de acordo com as instruções fornecidas. - Não coloque quando发展机遇ar os estranhos nas valvulas e no botão de libertação de pressão. Não substitua a valvula. - Verifique regularamente as conduitas nas valvulas que permitem a saída de vapor para garantir que não está broqueadas. - Não utilize um pano ou qualquer及其他 objecto entre a tampa e o corpo do aparecido de forma a delearing a tampa entreaberta. Istô pode danificar permanente o anel vedante. - Não deixe o cabo de alimentação pendurado na extremidade de uma mesa ou bancada, nem deixe que este toque em superficies quentes.4. Como utiliser em segurar – antes de cozinho?
- Antes de utiliser o aparelho, verifique se a valvula fluctuante e a valvula limitadora de pressão está limpas. - Antes de utiliser o aparelho, verifique se o anel vedante foi corretamente instalado na tampa. - Certifique-se de que a parte inferior da cuba e a placar de aquecimento está sempre limpas. Certifique-se de que a parte central da placar de aquecimento está molev. - Não encha o aparecido mais do que a marca MAX na Cuba. - Siga as recomendações sobre o volume de alimentos e água para fazer o risco de transbordar, o que pode danIFICAR o aparecido e Causear ferimentos. - Certifique-se de que o aparecido está devidamente fechado antes de o colocar sob pressão. - Antes de cozinhoar, certificque-se de que o botão de libertação de pressão está para cima (não para baixo). Consulte a figura 48 da secção Guiá de início rápido nas Imagens.5. Como utiliser em segurará – durante a cozedura?
- Não tenteAbrir a tampa até que a pressão tenha diminuindo o suficiente. Não tenteAbrir a tampa até que a valvula flutuante esta para baixo. - Nunca force a abertura do aparelho. - Durante a cozedura e a libertação de vapor no final da cozedura, o aparecido liberta calor e vapor. Mantenha o rosto e as muitos afastados do aparecido para fazer queimaduras. Não toque na tampa durante a cozedura. - Não desloque o aparecido quando este estiver sob pressão. Utilize as pegas quando o deslocar e use luvas de cozinha, se necessário. Não utilize o botão da tampa para levantar o aparecido. - Não retire a Cuba quando o aparecido estiver em等功能amento. - No modo tostar, tenha cuidado com os riscos de queimaduras devido às projeções ao adicional alimentos ou ingredientes à Cuba quente.6. Como utiliser em segurará –deois de cozinho?
- QuandoAbrir a tampa,segure-a sempre pelo botao da tampa. Posicao o braço paralelo as pegas laterais. A agua a ferver pode permanecer presa entre o anel vedante e a tampa e provocar queimaduras. - Tenha también cuidado com o risco de queimaduras provocadas pelo vapor que sai do aparelho quando abre a tampa. Primeiro,arethabra a tampa paraDEXXARSAIR O vapor suavamente. - Não toque nas peças quentes do aparecido. Àpos autilização, a superficie da placá de aquecimento pode permanecer quente durante até 2 horas. - Desligue a ficha da.tomada quando o aparelho não estiver a ser utilizado e antes de o limpar. Deixe arrefecer antes de colocar ou retiring peças.7. Como utiliser em segurar – limpeza?
- Limpe a parte inferior da cuba e a placar de aquecimento antes cadautilização. - Não mergerluhe o aparelho em agua. - Para limpar o aparelho, consulte as instruções de utilizesçao. Pode lavar a cuba e a tampa em agua quente com detergente para a loça, mas não as colque na boaquina de lavar loça. Limpe o corpo do aparelho com um pano humido.8. O que fazer em caso de avaria?
- Apenas pessoas autorizadas nos Serviços de Assistência Tecnica podem reparar o produto. - Não utilize nenhum aparelho com um cabo de alimentação ou ficha danificados oudeois de aparelho não funciona corretamente ou de ter sofrido danos de alguma forma. Envie o aparelho ao Servico de Assistência Tecnica autorizado mais proximo para serinspectionado, reparado ou ajustado. - Se o cabo de alimentação estiver danificado, este deve ser substituído por um Serviço de Assistência Técnica autorizado para fazer qualquer situação de perigo. Não substitua o cabo de alimentação fornecido por outros cabos. - Não danifique o anel vedante. Se estiver danificado, Solicite a sua substituição num Serviço de Assistência Tecnica autorizada. - Substitua o anel vedante a cada 2 anos ou mais cedo, se reparar que está gasto ou precisa de ser substituído. - Utilize aparas as peças sobresselentes adequadas para o seu modelo. Istó é particularmente importante para o anel vedante e para a cuba. - Utilizeapanas pecas sobresselentes disponibilizadas por um Servico deAssistencia Tecnica autorizzato. - À'utilisation de acessórios não recomendados pelo fabricante do aparelho pode provocar ferimentos. - Não utilize outras cubas no aparecido em vez da Cuba fornecida. Substitua a cuba apenas por uma coisa sobresselente original concebida para ser realizada com este produit. - Em conformidade com os regulamentos em vigor, antes de eliminar um aparecido que ja não está necessário, o aparecido deve fazer inoperacional (desligando a ficha e cortando o cabo de alimentação).Proteção do ambiente em primeiro lugar!
 O seu produit contém materiais que podem ser recuperados ou reciclados. - Entregue-o num punto de recolha para possibitar o seu tratamento9. quando é que a garantia é aplicável?
- A garantia não cobre o desgaste anormal da cuba. - Leia atentamente estas instruções deutilização antes de utilizes o aparecido pela primarya vez. Qualquer'utilisation que não está em conformidade com estas instruções isenteá o fabricante de qualquer responsabilité e anulará a garantia. - No caso de utilizesçao comercial, Utilização inadequada ou incumprimento das instruções, o fabricante rejeita qualquer responsabilitad e a garantia não é aplicável.DESCRÊÇÂO DO SEU PRODUTO
   ^* Acessórios disponible dependendo do modeloFAMILIARIZAR-SE COM O PAINEL DE CONTROLO
MENSAGENS DE ESTADO
 Mensagem de boas-vindas quando o aparecido é ligado. Apresentação da hora. Neste exemple: 1 hora e 30 horas.  Apresentação da temperatura. Neste exemple: 114 graus Celsius.  Indica que o programa tem uma predefinição automática de temperatura/tempo. Não pode ser modificado.  Indica que a temperatura está aacular durante a fase de pré-aquecimento.  Indica que o aparelho está a pre-aquecer.  Indica que o programa terminou.  Indica que o aparecido está na fase de manter quente.  Indica que o programa foi interrompido.  Indica que o aparecido está no modo de poupança de energia.GUIA DE UTILIZACHO E LIMPEZA
Consulte as figuras indicadas como (Fig. x) na parte do Guia de inicio=rápido.ANTES DA PRIMEIRA UTILIZACHO
1. Retire a embalagem
- Retire o aparelho da embalagem e leia o manual de instruções antes da primeira'utilisation. - Retire os autocolantes promocionais (se existrem) do seu aparecido antes da primarya utilização.2. Abra a tampa
- ParaAbriratampa,segureobotao da tampa,rode-o para a esquerda e levante atampa (Fig.1e2). Nota: quando levantar a tampa, a cuba pode permanecer presa à tampa. É normal e demonstra simplement uma boa hermeticidade do produits. Para fazer que a cuba caia violently sobre o produit ao Abrir a tampa, abra sempre a tampa com cuidado. - Coloque o aparelho sobre uma superficie plana. Retire todos os materiais e acessórios de proteção do interior do aparelho (Fig. 3).3. Limpe todas as peças do aparelho
3a. Limpe a tampa, a cuba e os acessórios
- Limpe a tampa, a cuba e os acessórios com uma esponja suave e agua quente com detergente para a loiça (Fig. 4). - Seque a tampa, a cuba e os acessórios (Fig. 5). - Não utilize esfregões ou esponjas abrasivas para limpar a cuba, País tal pode danIFICAR o revestimento antiaderente da cuba (Fig. 40). - Não vergulhe o aparelho em água (Fig. 41). - Se mergerhar inadvertamente o aparecido em água ou derramarágua diretamente sobre a placá de aquecimento, leve o aparecido a um Serviço de Assistência Tecnica autorizando para reparação. - Não coloque a tampa e a cuba na boaina de lavar loça (Fig. 42). - Tenha em atençao que apenas os acessórios: espátula, copo medidor e acessório de cozedura a vapor são compatíveis com a boa de lavar loça.3b. Limpe o anel vedante
- Retire o anel vedante da tampa e limpe-o com uma esponja suave e agua quente com detergente para a loça (Fig. 7 e 8). - Seque-o completeness. - Coloque o anel vedante sobre o suporte do anel vedante e pressione-o até encaixar (Fig. 9). Pressionefirmamente para garantir que não fica enraged o que o anel vedante está bem encaixado aftasdo respetivo suporte. - Depois de colocar o anel vedante na tampa, seAbrir a tampa demasiado depressa, a cuba pode permanecer presa à tampa (Fig.37 e 38). Aguarde algunos segundos para que a cuba se liberte da tampa (Fig. 39). Nota: É normal e demonstra simplement uma boa hermeticidade do produits. Para fazer que a cuba caia violently sobre o aparecido ao Abrir a tampa, abra sempre a tampa com dificuld.AVISO: Nunca utilize o seu aparecido sem o anel vedante (Fig. 44). 3c. Limpe as valvulas
- Para limpar a valvula limitadora de pressão, retire-a do tubo na parte superior da tampa (Fig. 10). Limpe-a com uma esponja suave e agua quente com detergente para a loça (Fig. 11). DepoS de secar, certificque-se de que a conduita do tubo está limpa antes de voltar a ligar a valvula limitadora de pressão ao tubo na parte superior da tampa (Fig. 12). Certificque-se de que a valvula limitadora de pressão está bem colocada no devido lugar e que é capaz de se deslocar para cima e para baixo. - Para limpar a tampa da valvula limitadora de pressão, desaperte-a a partir do interior da tampa (Fig. 13). Limpe-a com uma esponja suave e água quente com detergente para a loça (Fig. 14). Depois de secar, certifique-se de que a conduita do tubo está limpa antes de voltar a aperture a tampa da valvula limitadora de pressão no interior da tampa (Fig. 15). - Para limpar a valvula flutuante, retire a junta da valvula flutuante do interior da tampa e vire a tampa para que a valvula flutuante possa ser retrida da tampa (Fig. 16). Limpe a junta da valvula flutuante e a valvula flutuante com uma esponja suave e agua quente com detergente para a loça (Fig. 17). Depois de secar, volté a inserir a valvula flutuante na tampa e volté a colocar a junta da valvula flutuante no devido lugar (Fig. 18). Certifique-se de que a valvula flutuente está bem colocada no devido lugar e que é capaz de se deslocar para cima e para baixo.3d. Limpe o corpo do aparelho
- Limpe o corpo do aparelho com um pano humido. - Não mergerluhe o aparelho em água (Fig. 41). - Limpe a placá de aquecimiento com um pano seco.INSTRUÇÉS DE UTILIZAZão
1. Coloque os ingredientes na Cuba - Retire a cuba do corpo do aparelho. - Coloque os ingredientes na cuba. - Tenha em atençao que o nível de alimentos e liquidos nunca deve excesser a marca de nível maximo na cuba (Fig. 19). - Ao cozinho, no modo de pressão,ingredientes que Incham durante a cozedura, como legumes desidratasos ou arroz, não encha a panela a mais do que metade do seu;nivel maior.2. Coloque a cuba no corpo do aparelho
- Certifique-se de que a parte inferior da cuba está limpa e seca e retire quando resíduos de alimentos da placá de aquecimento (Fig. 20). - Coloque a cuba no corpo do aparelho (Fig. 21). - Nunca utilize o aparelho sem a cuba.3. Fecha ebloqueiea tampa
- Verifique se o anel vedante está bem colocado na tampa (Fig. 43). - Segure o botão da tampa, colocque a tampa no aparecido e rode-a para a direita para bloquear (Fig. 22).4. Fixe a valvula limitadora de pressão
- Coloque corretoamente a valvula limitadora de pressão na tampa (Fig. 23). Tenha em atençao que a valvula permanecera ligeiramente solta, o que é normal.5. Ligue o aparelho
- Desenrole totalmente o cabo de alimentação e ligue-o à corrente electrica (Fig. 24). - O aparelho emite um avis sonoro, o ecra fica intermitente e aparesta [HEI:O].6. SeLECTIONE inicie um programa de cozedura
- Cada programa tem um tempo e temperatura predefinidos e quer uma posicao exigente da tampa. Consulte aanela de programas de cozedura: TABELA DE PROGRAMAS DE COZEDURA| fome do programa de cozudura | Nome do programa de cozudura | Tempo de cozudura predefinindo | Tempo ajustavel | Temperatura predefinida | Temperatura ajustavel | Pressão predefinida | Irúcio diferindo de 10 min a 12 h | Monter quente até 24 h | Estado da tampa | ||
| Tampa fechada e bloqueada | Tampa fechada mas não bloqueada | Tampa aberta | |||||||||
| Estufar | 30 min | de 1 min a 2 h | 114 °C | Não | 70 Kpa | Sim | Sim | ● | |||
| Sopa | 12min | de 1 min a 2 h | 114 °C | Não | 70 Kpa | Sim | Sim | ● | |||
| Saltear | 20min | de 1 min a 1 h | 160 °C | Sim de 100 °C a 160 °C | Não | Não | Não | ● | |||
| Cozedura a vapor | 10min | de 1 min a 2 h | 114 °C | Não | 70 Kpa | Sim | Sim | ● | |||
| Cozer | 40min | de 1 min a 2 h | 160 °C | Sim de 100 °C a 160 °C | Não | Sim | Sim | ● | |||
| Cozedura a vázuo/ Cozudura lenta | 4 h | de 30 min a 12 h | 85 °C | Sim de 55 °C a 95 °C | Não | Sim | Não | ● | ● | ||
| Arroz | 8min | de 1 min a 2 h | 114 °C | Não | 70 Kpa | Sim | Sim | ● | |||
| Iogurte e fermentação | 8 h | de 30 min a 12 h | 30 °C | Sim de 22 °C a 40 °C | Não | Não | Não | ● | ● | ||
| Papas de oreia | 15min | de 1 min a 2 h | 100 °C | Não | Não | Sim | Sim | ● | |||
| Modo Chefajustavel | 30 min | de 1 min a 4 h | 80 °C | Sim de 70 °C a 160 °C | Não | Não | Sim | ● | ● | ● | |
Programa estufar
- Coloque os ingredientes na Cuba e feche completeness e bloqueie a tampa. - Rode o botão do paine de controlo para a direita para aceder ao programa de estufar. O érá apareça o tempo de cozedura predefinido. - Oportun: Prima e ajuste o tempo pretendido rodando o botão do painei de controlo para a direita (paraLERar o tempo) ou para a esquerda (para diminuir o tempo). - Prima 0 para,iniciar o programa de cozedura. - O aparelho inicia a fase de pré-aquecimento. O ecra aparen ta alternadamente e o indicator luminoso de pré-aquecimento acende-se. - Quando a fase de pré-aquecimiento estiver conclusión, o aparibo muda automaticamente para a fase de cozedura. Oakra presenta a contagem decrescente e o indicator luminoso de cozedura em的方式来 acende-se. - Durante o processo de cozedura, existe acumulacao de pressao no aparelho, que empurra a valvula flutuante para cima. O indicator luminoso de pressao acende-se para indicar que a tampa não pode ser aberta sem libertar primeiro a pressao. - No final da contagem decrescente, o aparelho emite um avis sonoro e o ecra aparena [End]. - Após algunos segundos, o aparelho muda automaticamente para a fase de manter quente. O ecra aparesta Hc e o indicator luminoso de manter quente acende-se. - Prima durante 3segundos para parar o programa em qualquer alta. Programa sopa
- Coloque os ingredientes na Cuba e feche completeness e bloqueie a tampa. - Rode o botão do pailé de controlo para a direita para aceder ao programa de sopa. O érá apareça o tempo de cozedura predefinido. - Ooptional: Prima e ajuste o tempo pretendido rodando o botão do paine de controlo para a direita (paraacularo tempo) ou para a esquerda (para diminuiro tempo). - Prima para,iniciar o programa de cozedura. - O aparelho inicia a fase de pré-aquecimiento. O ECBA presenta alternadamente e HEAE o indicator luminoso de pré-aquecimiento acende-se. - Quando a fase de pré-aquecimiento estiver conclusión, o apar-lerh o muda automaticamente para a fase de cozedura. O ecra aparesta a contagem decrescente e o indicator luminoso de cozedura em的方式来 acende-se. - Durante o processo de cozedura, existe acumulacao de pressao no aparelho, que empurra a valvula flutuante para cima. O indicator luminoso de pressao acende-se para indicar que a tampa não pode ser aberta sem libertar primaryo pressao. - No final da contagem decrescente, o aparecido emite um avis sonoro e o érá presente [End]. - Após algunos segundos, o aparecido muda automaticamente para a fase de manter quente. O éra'areshende Hoe e o indicator luminoso de manter quente acende-se. - Prima durante 3segundos para parar o programa em qualquer alta. Programa saltear
- Rode o botão do painei de controlo para a direita para aceder ao programa de saltear. O érá apareça o tempo de coze-dura predefinido. -Optional: Prima e ajuste o tempo pretendido rodando o botão do poinel de controlo para a direita (paraacularo tempo) ou para a esquerda (para diminuir o tempo). - Oportun: Prima e ajuste a temperatura pretendida rodando o botão do panei de controlo para a direita (para fazer a temperatura) ou para a esquerda (para diminuiar a temperatura). - Prima para,iniciar o programa de cozedura. - O aparelho inicia a fase de pré-aquecimiento. O ECBA presenta alternadamente e HEAE o indicator luminoso de pré-aquecimiento acende-se. - Quando a fase de pré-aquecimiento estiver conclusión, o aparélho muda automaticamente para a fase de cozedura. O ecra apareça a contagem decrescente e o indicator luminoso de cozedura em的方式来 acende-se. - Coloque os ingredientes na Cuba e mantenha a tampa aberta para salutear. - No final da contagem decrescente, o aparelho emite um avis sonoro e o ecra aparesta [End] - Após algunos segundos, o aparelho muda automaticamente para o modo de poupança de energia. O érá presente [E5E3]. - Prima durante 3segundos para parar o programa em qualquer alta. Programa cozedura a vapor
- Coloque 150 ml de agua (3¼ de cháena) e o acessório de cozedura a vapor na cuba e adicione os ingredientes. Fecha Completely e bloqueie a tampa. - Rode o botão do poinl de controlo para a direita para aceder ao programa de cozedura a vapor. O eça apareca o tempo de cozedura predefinido. -Optional: Prima e ajuste o tempo pretendido rodando o botão do poinel de controlo para a direita (paraacularo tempo) ou para a esquerda (para diminuiro tempo). - Prima para,iniciar o programa de cozedura. - O aparelho inicia a fase de pré-aquecimiento. OEARÁpresenta alternadamente e HARE o indicator luminoso de pré-aquecimiento acende-se. - Quando a fase de pré-aquecimiento estiver conclúa, o aparibo muda automaticamente para a fase de cozedura. Oakra aparena a contagem decrescente e o indicator luminoso de cozedura em的方式来 acende-se. - Durante o processo de cozedura, existe acumulacao de pressao no aparelho, que empurra a valvula flutuante para cima. O indicator luminoso de pressao acende-se para indicar que a tampa não pode ser aberta sem libertar primeiro a pressao. - No final da contagagem decrescente, o aparecido emite um avis sonoro e o ecra apareça [End]. - Após algunos segundos, o aparecido muda automaticamente para a fase de manter quente. O ecra apareça [Hoe] e o indicator luminoso de manter quente [acende-se. - Prima durante 3segundos para parar o programa em qualquer alta. Programa cozer
- Coloque o preparado na cuba e feche-a, mas não bloqueie a tampa. - Rode o botão do pailé de controlo para a direita para aceder ao programa de cozer. O érá apareça o tempo de cozedura predefinido. - Oportun: Prima e ajuste o tempo pretendido rodando o botão do poinl de controlo para a direita (paraacularo tempo) ou para a esquerda (para diminuir o tempo). Optional: Prima e ajuste a temperatura pretendeda rodando o botão do painel de controlo para a direita (paraLERa temperatura) ou para a esquerda (para diminuir a temperatura). - Prima para,iniciar o programa de cozedura. - O aparecido inicia a fase de pré-aquecimiento. OEARÁpresenta alternadamente e HARE o indicator luminoso de pré-aquecimiento acende-se. - Quando a fase de pré-aquecimiento estiver conclusía, o aparibo muda automaticamente para a fase de cozedura. Oakra aparena a contagem decrescente e o indicator luminoso de cozedura em的方式来 acende-se. - No final da contagagem decrescente, o aparecido emite um avis sonoro e o ecra apareça [End]. - Após algunos segundos, o aparecido muda automaticamente para a fase de manter quente. O éra presenta [Hoe] e o indicator luminoso de manter quente [acende-se. - Prima durante 3segundos para parar o programa em qualquer alta. Programa de cozedura a vacuo/cozedura lenta
- Rode o botão do poinl de controlo para a direita para aceder ao programa de cozedura a vácuo/cozedura lenta. O éra apareça o tempo de cozedura predefinido. - Oportun: Prima e ajuste o tempo pretendido rodando o botão do poinl de controlo para a direita (paraacularo tempo) ou para a esquerda (para diminuir o tempo). - Oportun: Prima e ajuste a temperatura pretendida rodando o botão do poinel de controlo para a direita (paraacular a temperatura) ou para a esquerda (para diminuiar a temperatura). - Prima 日 para,iniciar o programa de cozedura. - O aparheiro inicia a fase de pré-aquecimento. O ecra après senta alternadamente e HEAE o indicator luminoso de pré-aquecimiento acende-se. - Quando a fase de pre-aquecimiento estiver conclusión, o aparecido muda automaticamente para a fase de cozedura. O eyea apareça a contagem decrescente e o indicator luminoso de cozedura em的方式来 acende-se. - No final da contagem decrescente, o aparelho emite um avis sonoro e o ecra aparesta [End]. - Após algunos segundos, o aparecido muda automaticamente para o modo de poupança de energia. O érá presente. - Prima durante 3segundos para parar o programa em qualquer alta. Programa arroz
Coloque os ingredientes na cuba e feche completeness e bloqueie a tampa. - Rode o botão do pailé de controlo para a direita para aceder ao programa de arroz. O érá apareça o tempo de cozed ra predefinido. - Ooptional: Prima e ajuste o tempo pretendido rodando o botão do poinl de controlo para a direita (paraacularo tempo) ou para a esquerda (para diminuir o tempo). - Prima para,iniciar o programa de cozedura. - O aparecido inicia a fase de pre-aquecimiento. O ecra aparece alternadamente e o indicator luminoso de pre-aquecimiento acende-se. - Durante o processo de cozedura, existe acumulacao de pressao no aparelho, que empurra a valvula flutuante para cima. O indicator luminoso de pressao acende-se para indicar que a tampa não pode ser aberta sem libertar primaryo pressao. - No final da contagagem decrescente, o aparelho emite um avis o sonoro e o ecra aparesta. - Após algunos segundos, o aparecido muda automaticamente para a fase de manter quente. O éra presenta [Hoe] e o indicator luminoso de manter quente [acende-se. - Prima durante 3segundos para parar o programa em qualquer alta. Programa iogurte e fermentacao
O programa de iogurte e fermentacao pode ser utilizao para preparar iogurte ou levedar pao/massa para bolos. - Ao preparar igurte, coloque os ingredientes na cuba e feche a tampa. - Ao levedar massa, pode bater a massa diretamente na cuba e, em seguida, colocar a cuba no corpo do aparelho e fechar a tampa. - Rode o botão do painei de controlo para a direita para aceder ao programa de igurte e fermentação. O éra apareça o tempo de cozedura predefinido. - Oportun: Prima e ajuste o tempo pretendido rodando o botão do poinl de controlo para a direita (paraacularo tempo) ou para a esquerda (para diminuir o tempo). - Oprincipal: Prima e ajuste a temperatura pretendida rodando o botao do paine de controlo para a direita (paraacular a temperatura) ou para a esquerda (para diminuir a temperatura). - Prima ⑤ para,iniciar o programa de cozedura. - O aparecido inicia a fase de pré-aquecimiento. O ecra aparece alternadamente e o indicator luminoso de pré-aquecimiento acende-se. - Quando a fase de pré-aquecimiento estiver conclusión, o aparecido muda automaticamente para a fase de cozedura. O esca'a藓ata a contagagem decrescente e o indicator luminoso de cozedura em,. como acende-se. - No final da contagem decrescente, o aparelho emite um avis sonoro e o ecra aparesta [End]. - Após algunos segundos, o aparecido muda automaticamente para o modo de poupança de energia. O érá presente [E8E3]. - Prima durante 3segundos para parar o programa em qualquer alta. Programa de papas de aveia
- Coloque os ingredientes na Cuba e feche completeness e bloqueie a tampa. - Rode o botão do pailé de controlo para a direita para aceder ao programa de papas de aveia. O érá apareça o tempo de cozedura predefinido. - Oportun: Prima e ajuste o tempo pretendido rodando o botão do poinl de controlo para a direita (paraacularo tempo) ou para a esquerda (para diminuir o tempo). - Prima para,iniciar o programa de cozedura. - O aparecido inicia a fase de pré-aquecimiento. O ecra aparece alternadamente e o indicator luminoso de pré-aquecimiento acende-se. - Quando a fase de pré-aquecimento estiver conclúa, o aparibo muda automaticamente para a fase de cozedura. O(ECRA presenta a contagem decrescente e o indicator luminoso de cozedura em的方式来 acende-se. - No final da contagem decrescente, o aparelho emite um avis so noro e o ecra aparesta End. - Após algunos segundos, o aparecido muda automaticamente para a fase de manter quente. O ecra aparece Hóe e o indi cador luminoso de manter quente acende-se. Prima ⑥ durante 3segundos para parar o programa em qual-quer alta. Modo Chef ajustavel
- Coloque os ingredientes na cuba e feche a tampa ou não, dependendo da receita. - Rode o botão do poinl de controlo para a direita para aceder ao modo Chef ajustavel. O éra aparea o tempo de cozedura predefinido. - Oportun: Prima e ajuste o tempo pretendido rodando o botão do poinl de controlo para a direita (paraacularo tempo) ou para a esquerda (para diminuir o tempo). - Oportun: Prima e ajuste a temperatura pretendida rodando o botão do poinl de controlo para a direita (paraacular a temperatura) ou para a esquerda (para diminuir a temperatura). - Prima ⑤ para,iniciar o programa de cozedura. - O aparelho inicia a fase de pre-aquecimento. O éra aprende alternadamente e o indicaor luminoso de pré-aquecimento acende-se. - Quando a fase de pré-aquecimiento estiver conclusía, o aparibo muda automaticamente para a fase de cozedura. Oakra apareça a contagem decrescente e o indicator luminoso de cozedura em的方式来 acende-se. - No final da contagagem decrescente, o aparelho emite um avis o sonoro e o ecra aparesta [End]. - Após algunos segundos, o aparecido muda automaticamente para o modo de poupança de energia. O érá presente. - Prima © durante 3segundos para parar o programa em qualquer alta. * Suggestão de reaquecimento rápido de pratos: ajuste a temperatura para >= 95 °C e cozinho com a tampa fechada mas desbloqueada.7. Utilize a função de IPODIO diferido
O inicial diferido pode ser útill para programar o aparelho para cornerar a cozinho mais tarde. - Primeiro, selezione um programa, seguito os passos descritos acima na parte 6. - Antes de iniciair o programa的选择ado, prima . O éça apareço o tempo predefinido para o inico diferido. - Defina o tempo pretendido rodando o botão do poinel de controlo para a direita (paraLERar o tempo) ou para a esquerda (para diminuiro tempo). - Prima ⑥ . O ecra apareça a contagem decrescente para o inico diferido. quando o tempo predefinido TERMINAR, o aparelho começa a cozhar automaticamente.8. Abra a tampa
- Não tenteAbrir a tampa se a valvula flutuante estiver para cima e se o indicator luminoso de pressão estiver aceso. - A pressão pode ser libertada de 2 formas发展目标 no final da cozedura: Libertação natural: No final da cozedura ou(before de parar o programa, o aparecido arrefece sozinho e a pressão liberta-se naturalmente. Durante a libertação natural, os alimentos podem cozinar em excesso devido à pressão restante na cuba. Utilize a libertação manual para parar imeditamente o processo de cozedura. Libertação manual: Prima continuamente o botão de libertação de pressão na parte superior da tampa. Ira demorar entreagems segudos e algoins minutos,dependendo da quantidadede alimentos no interior da cuba (Fig. 31). AVISO: Tenha cuidado com o vapor quente que sai do aparelho. Mantenha o rosto e as muitas afastados da saída de vapor (Fig. 45). - ParaAbrir a tampa, coloque o braço paralelo as pegas laterais, secure o botão da tampa, rode-o para a esquerda e levante a tampa (Fig. 32 e 33).AVISO: Tenha cuidado com o vapor quente que sai da cuba.
9. Desligue o aparelho da tomada
- Após cada utilizesçao, deslgue o aparelho da tomada e deixe-o arrerefecer durante,leo menos,2 horas antes proceder à limpeza.10. Limpe antes cada utilização
- Limpe o aparelho antes cada'utilização. - Antes de limpar, deixe o aparelho arrefecer durante, pelo menos, 2 horas. - Para instruções de limpeza, consulte a parte 3. Limpe todas as peças do aparecido incluidas na sequção ANTES DA PRIMEIRA UTILIZACão.11. Dicas de manutenção
- Para garantir a durabilitad da cuba ao longo do tempo, não corte alimentos no seu interior. - Utilize os acessórios fornecidos. Não utilize nenhum utensílio metalico, poi tal pode danIFICAR o revestimento antiaderente da cuba. - Após autilização, o anel vedante pode conservar o cheiro do prato. É normal; o silicone tem muitenos poros que se abrem quando expostos a temperatas elevadas, fechando-se quando a temperatura desce. Para eliminar o cheiro do anel vedante, pode: - Colocar o anel de silicone na maquina de lavar loixa. - Adicionar 1 chávena de vinagre, 1 chávena de agua e 1 limão cortado em pedações grandes na cuba e inicial um programa de cozedura a vapor durante 2关键时刻 e, em seguida, deixar o vapor libertar-se naturalmente. - Substitua o anel vedante a cada 2 anos ou mais cedo em caso de danos. GUIA TECNICO DE RESOLUÇÃO DE PROBLEMAS| Problema | Possível razões | Soluções |
| Não é possível abrir a tampa. | Não é possível abrir devoa pressão na Cuba. | Prima continually o botão de libertação de pressão para remover a pressão no interior da Cuba. Pode demorar algumas minutos às a pressão ser totalmente libertada. |
| A pressão na Cuba é totalmente libertada, mas a válvula fluktuante está presa porque está demasiado muito e, por isto, não se pode mover para baixo. | a. Certífique-se de que a pressão é totalmente libertada, deleixando ou aparecido arrefecer durante,leo menos,2 horas.b. Empurre cuidadosamente a válvula fluktuante para baixo, inserinou um espto ou um objecto longo na abertura da válvula fluktuante. Se isto não funciona, envie o aparecido a um Servico de Assistência Técnica autorizado.c. Para aproxima'utilisation, limpe e seque bem a válvula fluktuente. | |
| Não é possível fechar a tampa. | O anel vedante não está corretramente instalado. | Instale corretramente o anel vedante. |
| A Cuba contentem ingredientes quentes que geram vape. | Aguarde que os ingredientes na Cuba arrefecam antes de tentar fechar novamente a tampa. | |
| A válvula fluktuante está presa porque está demasiado muito e, por isto, não se pode mover para baixo. | a. Empurre cuidadosamente a válvula fluktuante para baixo, inserinou um espto ou um objecto longo na abertura da válvula fluktuante. Se isto não funciona, envie o aparecido a um Servico de Assistência Técnica autorizado.b. Para aproxima'utilisation, limpe e seque bem a válvula fluktuente. | |
| A posicao e/ou a direção na qual a tampa foi fechada não é a correta. | Feche a tampa na direção correta, de acordo com o manual de instruções. | |
| AoAbrir a tampa, a Cuba permanece presa à tampa. | O anel vedante criou um efeito de sução. | A Cuba liberta-se da tampa por si são. É normal e demonstra simplesmente uma boa hermeticidade do produits. Para evaporar que a Cuba caía violently sobre o aparecido ao Abrir a tampa, abra sempre a tampa com cuidado. |
| Problema | Possível razões | Soluções |
| Libertação intensa de pressão da valvula limitadora de pressão. | A pressão interior exceeda pressão de funciona ou a pressão inferior exceeda pressão de segurar. | Limpe minuciosamente a valvula limitadora de pressão, a valvula fluctuante e a tampa. Se continue a sair vapor da valvula fluctuante, envie o aparecido a um dos Serviços de Assistência Técnica autorizados mais proxies para inspeçao, reparação ou ajuste por pessoas autorizada. |
| A valvula limitadora de pressão está numa posicao incorreta. | Rode/pressione cuidadosamente a valvula limitadora de pressão para que caia no devo lugar. Tenha dificuld com o vapor quente. Posicao-se em segurar e use luvas de cozinha. | |
| O controlo de pressão avariado resultou na libertação de pressão. | Envie o aparecido a um Serviço de Assistência Técnica autorizada para reparação. | |
| Libertação continua de pressão da valvula flutuante. | A pressão inferior exceeda pressão de funciona ou a pressão inferior exceeda pressão de segurar. | Limpe minuciosamente a valvula limitadora de pressão, a valvula fluctuente e a tampa. Se continue a sair vapor da valvula fluctuante, envie o aparecido a um dos Serviços de Assistência Técnica autorizados mais proxies para inspeçao, reparação ou ajuste por pessoas autorizada. |
| Residuos na valvula flutuante. | a. Prima continuamente o botão de libertação de pressão para remove a pressão no interior da cuba. Pode demorar eles minutos às a pressão ser totalmente libertada. b. Deixe o aparecido arrefecer durante,leo menos,2 horas. c. Limpe eSEQE a valvula flutuante antes de reinicuar a cozedura. | |
| A valvula flutuante está presa. | a. Prima continuamente o botão de libertação de pressão para remove a pressão no interior da cuba. Pode demorar eles minutos às a pressão ser totalmente libertada. b. Deixe o aparecido arrefecer durante,pelo menos,2 horas. c. Limpe eSEQE a valvula flutuante antes de reinicuar a cozedura. | |
| Fuga de vapor da tampa. | O anel vedante não está corretemente instalado. | Retire o anel vedante, limpe-o e volta a instalá-lo na posicao correta. |
| O anel vedante está sujo. | Retire o anel vedante, limpe-o e volta a instalá-LO na posicao correta. | |
| O anel vedante está danificado ou a extremidade da cuba está danificada. | Envie o aparelho a um Servico de Assistência Técnica autorizzato para reparacao. | |
| Os alimentos não está cozinhados. | A proportao de ingredientes solidos/liquidos não é a correta. | Tente novamente, seguido com precisão as quantidades da receita. |
| Sem eletricidade da fonte de alimentação. | Verifique o Sistema elétrico da sua casa. | |
| E0presentado no ecrā digital. | O interruptor de pressão está avariado. | Envie o aparelho a um Servico de Assistência Técnica autorizzato para reparacao. |
| E1presentado no ecrā digital. | O sensor de temperatura está avariado. | Envie o aparelho a um Servico de Assistência Técnica autorizzato para reparacao. |
| E2presentado no ecrā digital. | A tampa não está corretemente posicionada para o seu programa de cozedura. Cada programa querou uma posicao específica da tampa. | Verifique e ajuste a posicao da tampa necessária para o seu programa de cozedura; consulte aabela de programas de cozedura na parte 6 deste manual. Reinicie o programa assimissque que a tampa estiver corretemente posicionada. Se o problema persistir, envie o aparelho a um Servico de Assistência Técnica aprovado para reparacao. |
| الإستعمال | الإستعمال الحرفية | الإستعمال |
| الإستعمال الحرفية | الإستعمال الحرفية | الإستعمال |
| الإستعمال | الإستعمال | |
| الإستعمال | الإستعمال | |
| الإستعمال | الإستعمال | الإستعمال |
| الإستعمال | الإستعمال | |
| الإستعمال | الإستعمال | |
| الإستعمال | الإستعمال | الإستعمال |
| الإستعمال | الإستعمال | |
| الإستعمال | الإستعمال | |
| الإستعمال | الإستعمال | الإستعمال |
| الإستعمال | الإستUTION | |
| الإستUTION | الإستUTION | |
| الإستUTION | الإستUTION | |
| الإستعمال | الإستUTION | الإستUTION |
| الإستUTION | الإستUTION | |
| الإستUTION | الإستUTION | |
| الإستعمال | الإستUTION | الإستUTION |
| الإستUTION | الإستUTION | |
| الإستUTION | الإستUTION | |
| الإستعمال | الإستUTION | الإستUTION |
| ال,enGLISH | ال,enGLISH | |
| ال,enGLISH | ال,enGLISH | |
| ال,enGLISH | ال,enGLISH |
golgo
| diksek | diksek | uglal |
| diksek | diksek | uglal |
| diksek | uglal | |
| diksek | uglal | |
| diksek | uglal | |
| diksek | uglal | |
| diksek | uglal | |
| diksek | uglal | |
| diksek | uglal | |
| diksek | uglal | |
| diksek | uglal | |
y
 Jll jll jgl golj glal golj golj golj . gJgJgJgJgJgJgJgJgJgJgJgJgJgJgJgJgJgJgJgJgJgJgJgJgJgJgJgJgJgJgJgJgJgJgJgJgJgJgJgJgJg . aag aall lss. gaaalg yglalg jll gogg alg # jall jll aol jaoa ool jzjbr jg wlaal cgl gl 0 .(cgllla) Soll aol jao ojol jzrb jzg jzj gll ojol aol 0jol .(aJlal aJzJ (aJzJ) JIJI g(ajll aJzJ dJzJ) gabll caljui Jauuui uui ⑥ lue bua Jg aag JdJIy HHEH g CcC 1aill yjog. jgljg jn jn jn jn jn jn 8 aill ailll oaii glll alor yll lalil jgljgss slls slls aaii aaiy gaiy yaa yaaag yjia End aalw jyaw .slawl gog yll laljlgjw yg gjg jzjzjzjzj30wJ ⑥ a aai 1 End HOe aaii jaiw diagw w gle abal ala o y lla lab jgjg jg jg jg 1111 1111 .3g gjg jyj 30j1111/10g 1234567890
. ydy ydy dydy dydy dydy Juslll lssll aol jaaa ola Jybrn 1u galsg .(c)g|lla()Jg() Soll oJoojooj j 15000000000000000000000000000000000 .(j)Jd a Jd Jd Jd Jd Jd (OJd d Jd Jd Jd # jagoo jolll HAE 0000 dawal oog. golll jou wail 《》 aaiiaaii aegaaag. gabll aloyo jilalali jgaliljgaiu jglall jauill aloyo JuslaI ic a a a a a a a a a a a a a a a a a a End a aalw sssssssg g .3g gjg jyj 1jzj 30jzj 6 J 1 pksolldg 10alall gdlg gall o gabla aalw jzss . Jallllgaojagaojg jzjg jzjg jzjg Jbassl 8g 8g 8g .(c)g|lla()Jg() aLg aLg gLg gabll 1 aalw jaww . . Jaaal 1sall aol jaoa ola Jyba Jg wbal gll b .(c)glll(a)JLg(c)g0sla # Jg aag JdJIHHEE g C003 aalw w. yjy jy jy jy jy 8 aalw jwagw .gall aldo y wll lttl jglw Jgws .jwl wals alo y oos1 11 aaii 1 aaiy gabll yaae ooj jao aag. gajgall poa gla lo jgal jbeall slj ygalal alae el y Erid HO 1 ()afoall afoall gjg jzj 30 j  alaiy jSL. lalal y g 1g a aaii i 1 . Jylll l! sall aol yol ool yol b j wolal all gllg 0e bcl: .(c)glll(a)jLw(c)g(c)g0sla aJg aJg Jg Jg Jg Jg Jg Jg Jg Jg Jg Jg Jg Jg Jg Jg Jg Jg Jg Jg Jg Jg Jg Jg Jg Jg Jg Jg Jg Jg Jg Jg Jg Jg (oojol a jol) Jlgl g (oJol a oJol) jss a# Jg a JdJIb HRE g C03 8 aalaljgawg yall alol jlll lal jlll jlll jlll jlll jlll alo jlls1. g a aai ooj joo joo o o o o o o o o o o o o o o o o o o o o o o o o o o o o o o o o o o o o o o o o o o o oo y End HO 1 ()aiaaaallae aabaaalaa Gg j 3 o 1 aBg aLw yaae m aolj yIyoguI ykaal aag a . Juslll lssll aol jooa ojfo Jybr Jyugb Jgulalg 0g 0g 0g .(c)glllla)JLgllg(c)gOo Soll aol jooa oJb Jg Jg Jg Jg Jg Jg Jg Jg Jg Jg Jg Jg Jg Jg (ooJzJzJzJzJzJzJzJzJzJzJzJzJzJzJzJzJzJzJzJzJzJzJzJzJzJzJzJzJzJzJzJzJzJz aBbI 1 jg jy jy jy jy jy jy jy jy jy 6 aalaljgaw. gall alol jalal jgal jgal jgal alalal e aai 1a aal bll aill 15gao aal bai jg g aal agg End . .3g j 1j0 #  .1gll 1 gglal eog gglgag (g3/4) gll j 150 g g (36 _ 25 a aia 0j y jy jy jy jy jy jy jy jy jy jy jy jy jy jy jy jy jy jy jy jy jy jy jy jy jy jy jy jy   . a aiaaa ojol aeg aagall gai jll gaoaill aagai jaoa ydydydydydydydydydydydydydydydydydydydydydydydydydydydydydydydydydydydydydydydydydydydydydydydydydydydydydy Juslll l kull 20g jaa ojol ybr sb g walall cgl bglg .()JLALJJGLg() # Jg Jg Jg Jg Jg Jg Jg 《》 aaii aiai jaii iaii jaii jaii jaii jaii jaii () gag gag gag gag gag gag gag gag gag gag gag gag gag gag gag gag gag gag gag gag gag gag yjbdal jn no albll ydyclcay Erid HOJ ()《afoolwJgabfool》 .3g j g aaiy 1jg3 0  pks 1a5s gbsg 0c g 0 aall aalw jzew 1e alllolj Jgoguulnagai gaojaa . Jylll l! sall aol jg oaoa oohj ybrb j g walal cgl bghg ( )e bdo:gs .(glll)jlllgl(gll0la) gabll calj jzdd. 0d Jg Jg Jg Jg Jg Jg Jg 8 aalalw yaw. gbl alal jlll jall jall jlll jlll jlll jlll aoljul sll . aa
Joo 0o (w y aaggill Jss) gai ge gai jraaogogil Jssy I ggejrr # jglulduwll 0.1 yjgl jgcll l 10000000000000000000000000000000 J jJy jaydolduuJgJyJyJyJyJyJyJyJyJyJyJyJy c.1234567890 JSSW) 15bllg gJg dLwI yJc aol sOg Jbllg JdAa JdAa JdAa JdAa .(2g1jlaa# jblw yg yb jol lus ally lle gall eeg j kssal bllg juc: abgdo gj 1aill gai iiai jgai gai aai alg agai alg gai gai gai . Jall) jall Jd1o iLdlolg aillgl slgall gaoa 11jy. gauu al jall .3 jgljcljglj3 aalglg aell al 13 .4gogagaoiaaiaaiyglalggall (5) y .40 1 .41 y 4 1 . doxy duo zo zo zo zo zo .42 1 aJw e JyJg oJag oJg aJg aJg JaaJg JaaJg JaaJg JaaJg .  JlJlJlJl  jglaljai jiee jilw  aaa 30g a>gl cwl:Jllal lla g Cgll o  .114:JlllIa J.  aJySg y. gaii jaijai jai jai jai jai jai jai jai jai jai jai jai jai jai jai jai jai jai jai jai jai jai jai jai jai jai jai jai jai jai jai jai jai jai jai jai jai jai jai jai jai jai  yJyIyIyIyIyIyIyIyIyIyIyIyIyIyIy  yJyJyJyJyJyJyJy  oljlll j  aagaaalgeababaaalallaojgajgai jll  #  JzJzJzJzJzwJ
  yol agjgl .gabll ag jy jy jy g s y sbg p dssy aill lio go plucuul aaaas aeol jie aba: gabll a a 100 .(aIbI aIe Igbg bIa dIa Jc) albsi ygi aai Lggyjooie! gI yIeaiy jSs ayIe aao oI 1go Ige jgsy Aa jlaal yoo .9 algl jnawbll 511 gll jlaal y JgJy JgJyJyJyJyJyJyJyJyJyJyJy aJg300 gJ 1000000000000000000000000000000000000000000 .1J2 gulusw ggl s jyj w yj ajjnll jy jol jol jol jol jol jol jol jol jol jol jol jol jol jol jol jol jol jol jol jol jol jol jol jol jol jol jol jol jol jol jol jol jol jol jol jol jol jol jol jol jol jol jol jol jol jol jol jol jol jol jol . 1 . . . . . . . . . 1.5.7 . pluul 15 u2 jiuuill ggl uall sclg oxl gl znuol . gbl lgluee elk. pduu wlll lalwlaa aegy jy jy jy jy jy jy jy jy jy jy jy jy jy jy jy jy jy jy jy jy jy jy jy jy jy jy jy jy jy jy jy jy jy jy iJoo 100 a0000000000000000 J 1 J 1 J 1 J 1 J 1 J 1 J 1 J 1 J 1 J 1 J 1 J 1 J 1 J 1 J 1 J 1 J 1 J 1 J 1 J 1 J 1 J 1 J 1 J 1 J 1 J 1 J 1 J 1 J 1 J 1 J 1 J 1 J 1 J 1 J . 1234567890 . . . . aaiy jao jiaog. bao aojixu wsi jybl uayuiall jzglg zpaiai . Juaill 49 glc yabll eegg bywll gio aiau . Jaozo aol oJyog lao ay gll jzglg bq yI paiaiu . Jlaalaaai all jao yog nclao plauoi y 9jglal j- jol Jkwi jgljwl puiu wS.4 . 1234567890 . . . . . . . . . . . . . . . . . . . . . . . . 5.5 Jl. 12345678901123456789011234567890112345678901123456789011234567890112345678901123456789011234567890112345678901 Jl. 1234567890112345678901123456789011234567890112345678901 Jl. 1234567890112345678901 Jl. 12345678901 Jl. 12345678901 Jl. 12345678901 Jl. 12345678901 Jl. 12345678901 Jl. 12345678901 Jl. 123 9JbJ 1- jSj jzj0s5.6 jIgUJyIeJz.1bIeI JIeJnJLsIuSdSul 1111111111111111111111111 AR gabllsgljyagazjjg jgljagalj gabllgawiy gialpabgabw aaii jao joi y aogol oia gab ic joll g.1.laalalwgl aalall no ij glgcr pLauuilluylalj aalall g (a) jw J 100 a:laia 111y y aal y aai y aai y aaii eog gdo oogg g g g g jlll l 1 y j4 algl 10g plzwiol jgo no plebally jglzll shy . y jglj yolll jnsswll 2g jie jy daa y .8j8j8j8j8j8j8j8j8j8j8j8j8j8j8j8j8j8j8j8j8j8j8j8j8j8j8j8j8j8j8j8j8j8j8j8j8j8j8j8j8j8j8j8j8j8j8j8j8j8j8 g jagall yablldojicu yg.bao jgal ldsygalll eeg pui .0u 1 log . eog 1001 1001 1001 1001 1001 1001 aBbI aIg 8oJoo IabI gBa baa y. . alall y. 12y jy 10y JcJcJcJcJcJcJcJcJcJcJcJcJcJcJcJcJcJcJcJcJcJcJcJcJcJcJcJcJcJc 1. 1. 1. 1. 1. 1. 1. 1. 1. 1. 1. 1. 1. 1. 1. 1. 1. 1. 1. 1. a 1 JU 1000000000000000000000000000000000000000000 aLl bWu dwsu icg:duaii gdlal aIgUdelluy jol jolil iol ool ool ool ool .2 joo (Jabll uo lo) ooloo jno plo wu noo jlaa lia a 100000000000000000000000000000000000000000000 aaii aiae iil g 1y y y y y y y y y y y y y y y y y y y y y y y y y y y y aioiwo 1o llool o pooll jolll pluow a a 1 aabaaal jblaool ngagag 1gil 1g aiai d a b jlae al pluauwul gdo 45LwgljgJbIaIyI yJ. JbIyI JcJn jIgJl IaIyI pJzIwI p JlalbJgIoo JgIoo jlll jlljlly jlll lss jao gaiol uig liu Jalbyl aJyco ppl pluuln-10 Jusjus juspuus 3.3 d.o 0a aall jol jol jol jol jol . Lalal pabll lal baiy gog y baiy yabll aJ Paaas pabll 236 jilal bll lcbu cblb yall aJy. y jll Juaia 12 jie paoi plai jyjz cgo pluuiy Jauu uo y jyjulii jgl jgll Jg 1 g jgogall jalal jaoaJolal jgl jgl jla jlae 1a 1a a 1a 1a 1a 1a 1a 1a aIy j. iJ 1000000000000000000000000000000000000000000 154 154 a aag gglgll glgclal alol o pabll no aes elgglb jplde gaiyai jiljgl gai jiljagai jiljagai jiljagai jiljagai jiljagai jiljagai jiljagai jiljagai jiljagai jiljagai jiljagai jiljagai jiljagai jiljagai jiljagai jiljagai jiljagai jiljagai jiljagai jiljagai jilj gddlaaalldgaaalln a j g oogr g aalaa aalaa aalaa aaii aag palaal no eolil oia gab iieyjiaosluuysus
jai jai jai jai jai jai jai jai jai jai jai jai jai jai jai jai jai jai jai jai jai jai jai jai jai jai jai jai jai jai jai jai jai jai jai jai jai jai jai jai jai jai jai jai jai jai jai jai jai jai jai ailll 1jylg jai gdi liu baiaolwul
. 1JaiiIg Ig Jg Jg Jg Jg Jg Jg Jg Jg Jg Jg Jg Jg Jg Jg Jg Jg Jg Jg Jg Jg Jg Jg Jg Jg Jg Jg Jg Jg Jg Jg Jg Jg Jg Jg Jg Jg Jg Jg Jg Jg Jg Jg Jg Jg Jg Jg Jg Jg Jg Jg Jgssal aabll gulgglg 2000 g jgll li gglg . Lc loo . aalzai I g uasblizgglg 4g g gaaiaaiaa .(u)log aullg 1gglg yjU dXoJlgoJy jgl 1gabu jll 0jll 0o ?jloJyL jJyJyJyJyJyJyJyJyJyJyJyJyJyJyJyJyJyJyJyJyJyJyJyJyJyJyJyJyJyJyJyJyJyJyJyJy a#d aalal jslal ylulu uuaaui liu JSLU 1 pUuUU uue gag.aa jiaaiu U aao jauill Ia julooJoual all jol Jd L 10000000000000000000000000000000 :JJJJUJLIO :y .12a jIbIgill gll lal y aolly sloi y JU 10g s13 s1 s 124 oJyU pIaog Ugig guau Jzch uJzalpu . loiUuUg uUuUuUuUuUuUuUuUuUuUuUuUuUuUuUuUuUuUuUuUuUuUuUuUuUuUuUuUuUuUuUuUuUuUuUuUuUuUuUuUuUuUuUuUuUuUuUuUuUuUuUuuUU
elegllg 1s e 1 g 1 1 1 1 1 1 1 1 1 1 1 1 1 1 1 1 1 1 1 1 1 1 1 1 1 1 !pLsUJ:JzJg.1JgJzJuJpu Uu Uuuuull uuuuull uuuuull uuuuull uuuuull aolalogablauJzulgduagabg a aal l aolg jaaal liqua g aag aeg 1i0 6bi li ciU
2 206 200 199 198 186 271THANKS FOR CHOOSING MOULINEX
Welcome to the world of fast & delicious cooking!
With Turbo Cuisine, we took up the challenge of reinventing the pot: Easier. Tastier. Just better! Designed with this guiding principle, Turbo Cuisine allows you to save time and cook homemade delicious meals in total simplicity and convenience. Thanks again for welcoming us to your kitchen. Now let's cook together!CONTENTS
Quick Start Guide in Images 2 Moulinex Recommends Safety First 209 All Parts of Your Product 217 Getting Familiar with the Control Panel 218 How To Use & Clean Guide 219 Technical Troubleshooting Guide 235 Moulinex International Limited Guarantee 271MOULINEX RECOMMENDS SAFETY FIRST
Safety is our number one priority. We design and manufacture our product with high safety and technology standards. However, as with any electric appliance there are some potential risks, we therefore invite you to exercise a degree of care and to adhere to the following instructions.SAFETY INSTRUCTIONS
Take the time to read all the following instructions carefully and save them for future reference.
- Improper use of the appliance and its accessories may damage the appliance and cause injury. - The appliance cooks food under pressure. Incorrect use may cause risks of burns due to steam. - For your safety, this product conforms to all applicable standards and regulations (Low Voltage Directive, Electromagnetic Compatibility, Food Compliant Materials, Environment, ...). - The heat source necessary for cooking is included in the appliance.1. Where to use safely?
- Indoor use only. - This appliance is intended for domestic household use only. It is not intended to be used in the following applications, and the guarantee will not apply for: - staff kitchen areas in shops, offices and other working environments; -farm houses; - by clients in hotels, motels and other residential type environments; - bed and breakfast type environments. - Do not place the appliance in a heated oven or on a hot hob. Do not place the appliance close to an open flame or a flammable object. - Use on a flat and stable, heat resistant work surface, away from any water splashes.2. Who to use safely?
- This appliance is not intended for use by persons (including children) with reduced physical, sensory or mental capabilities, or lack of experience and knowledge, unless they have been given supervision or instruction concerning use of the appliance by a person responsible for their safety. - This appliance can be used by persons with reduced physical, sensory or mental capabilities or lack of experience and knowledge if they have been given supervision or instruction concerning use of the appliance in a safe way and if they understand the hazards involved. - This appliance shall not be used by children. Keep the appliance and its power cord out of reach of children. - Children shall not play with the appliance. - Children should be supervised to ensure that they do not play with the appliance.3. How to use safely - general usage?
- Do not use appliance for other than the intended purpose. - Do not use the appliance to fry food in oil. Only browning is allowed. - Do not use the pressure cooker in pressure mode for deep frying food. - When cooking doughy food, gently shake the cooker before opening the lid to avoid food ejection. - This appliance is not a steriliser. Do not use it to sterilise jars. - This appliance is not intended to be operated by means of an external timer or separate remote-control system. - To carry the appliance always use the two side handles on the housing of the appliance. Wear oven mitts if the appliance is hot. For more safety, make sure that the lid is locked before transporting the appliance. - The bottom of the cooking pot and the heating plate should be in direct contact. Remove any object or food residue located between the cooking pot and the heating plate, it could affect performance - Be aware that certain types of food, such as applesauce, cranberries, rhubarb, pearl barley, oatmeal or other cereals, split peas, noodles, or pasta can foam, froth and sputter, and clog the valves. Use caution when cooking these types of food and after use clean valves thoroughly. - Be aware that certain recipes which include milk can foam, froth, overflow and clog the valves. Use caution when cooking these recipes and after use clean valves thoroughly. - When cooking food which expands during cooking, such as dehydrated vegetables or rice, do not fill the cooking bowl to more than half of its capacity. - After cooking meat which has an outer layer of skin (such as ox tongue), which could swell with the effect of pressure, do not pierce the skin after cooking if it appears swollen: you could get burnt. Pierce it before cooking. - Do not use the appliance empty, without its cooking pot or without ingredients inside the cooking pot. This could cause serious damage to the appliance. - Do not use the appliance under pressure without adding water, which could cause serious damage to the appliance. - Do not fill up your appliance without its cooking pot. - Caution: do not spill liquid on the plug. - Do not heat the cooking pot with any other heat source than the heating plate of the appliance and do not use any other pot. Do not use the cooking pot with other appliances. - Use the cooking pot in the appliance ONLY. Do not use it to cook on stovetops, in the oven etc. - Use a plastic or wooden spoon to prevent any damage to the non-stick coating of the cooking pot. Do not cut food directly in the cooking pot. - Do not touch the valves, except while cleaning and maintaining the appliance in accordance with the instructions given. - Do not place any foreign objects in the valves and pressure release button. Do not replace the valve. - Check regularly the ducts in the valves allowing the escape of steam to ensure that they are not blocked. - Do not use a cloth or anything else between the lid and the housing to leave the lid ajar. This can permanently damage the sealing gasket. - Do not let the power cord hang over the edge of table or counter; or touch hot surfaces.4. How to use safely – before cooking?
- Before using your appliance, check that the float valve and the pressure limit valve are clean. - Before using your appliance, check that the sealing gasket has been correctly installed on the lid. - Make sure that the bottom of the cooking pot and the heating plate are always clean. Make sure that the central part of the heating plate is mobile. - Do not fill your appliance more than the MAX mark on the cooking pot. - Please follow the recommendations on the volume of food and water to avoid the risk of boiling over which can damage your appliance and cause injury. - Make sure that the appliance is properly closed before bringing it up to pressure. - Make sure that the pressure release button is up (not sunk) before cooking. Refer to figure 48 of the section Quick Start Guide in Images.5. How to use safely - during cooking?
- Do not try to open the lid until the pressure has decreased sufficiently. Do not try to open the lid until the float valve is down. - Never force the appliance open. - During cooking and steam release at the end of cooking, the appliance releases heat and steam. Keep your face and hands away from the appliance to avoid burns. Do not touch the lid during cooking. - Do not move the appliance when it is under pressure. Use the handles when moving it and wear oven mitts, if necessary. Do not use the lid knob to lift the appliance. - Do not remove the cooking pot while the appliance is working. - In browning mode, be careful of risks of burns caused by spattering when you add food or ingredients into the hot cooking pot.6. How to use safely - after cooking?
- When you open the lid, always hold it by the lid knob. Position your arm parallel to the side handles. Boiling water could remain trapped between the sealing gasket and the lid and could cause burns. - Be careful also about the risk of burns from the steam coming out of the appliance when you open the lid. First open the lid very slightly to allow the steam to escape gently. - Do not touch hot parts of the appliance. After use, heating plate surface can remain hot for up to 2 hours. - Unplug from outlet when not in use and before cleaning. Allow to cool before putting on or taking off parts.7. How to use safely - cleaning?
- Wipe clean the bottom of the cooking pot and the heating plate after every use. - Do not immerse the appliance in water. - For cleaning your appliance, please refer to instructions for use. You can wash the cooking pot and the lid in soapy hot water, do not put them in the dishwasher. Clean the housing of the appliance using a damp cloth.8. What to do in case of damage?
- Only authorized person in Approved Service Centre can repair the product. - Do not operate any appliance with a damaged power cord or plug or after the appliance malfunctions or has been damaged in any manner. Return appliance to the nearest Approved Service Centre for examination, repair or adjustment. - If the power cord is damaged, it must be replaced by an Approved Service Centre in order to avoid a hazard. Do not replace the power cord supplied with other cords. - Do not damage the sealing gasket. If it is damaged, have it replaced in an Approved Service Centre. - Replace the sealing gasket every 2 years, or sooner if you see the sealing gasket is worn or in need of replacement. - Use only the appropriate spare parts for your model. This is particularly important for the sealing gasket and the cooking pot. - Use only spare parts sold in an Approved Service Centre. - The use of accessory attachments not recommended by the appliance manufacturer may cause injuries. - Do not use other cooking pots in the appliance in place of the provided cooking pot. Only replace the cooking pot with an original spare part designed to be used with this product. - In accordance with current regulations, before disposing of an appliance no longer needed, the appliance must be rendered inoperative (by unplugging it and cutting off the power cord).Environment protection first!
 ① Your appliance contains valuable materials which can be recovered or recycled. - Leave it at a local civic waste collection point.9. When does warranty apply?
- The warranty does not cover the abnormal wear and tear of the cooking pot. - Read these instructions for use carefully before using your appliance for the first time. Any use which does not conform to these instructions will absolve the manufacturer from any liability and void the warranty. - In case of commercial use, inappropriate use or failure to comply with the instructions, the manufacturer accepts no responsibility and the guarantee does not apply.ALL PARTS OF YOUR PRODUCT
GETTING FAMILIAR WITH THE CONTROL PANEL
STATUS MESSAGES
          Welcome message when appliance is turned on. Time display. In this example: 1 hour 30 minutes. Temperature display. In this example: 114 degrees Celsius. Indicates that the program has a default automatic temperature/ time setting. It cannot be modified. Indicates that temperature is rising during pre-heating phase. Indicates that the appliance is pre-heating. Indicates that the program is finished. Indicates that the appliance is in keep warm phase. Indicates that the program has been interrupted. Indicates that the appliance is in standby mode.HOW TO USE & CLEAN GUIDE
Feel free to refer to the figures indicated as (Fig.x) from Quick Start Guide part.BEFORE FIRST USE
1. Remove packaging
- Take your appliance out of its packaging and please take time to read the instruction manual before first use. - Remove promotional stickers (if any) from your appliance before first use.2. Open the lid
- To open the lid, take hold of the lid knob, turn anti-clockwise and lift the lid up (Fig.1 & 2). Note: When lifting the lid, it can happen that the cooking pot remains attached to the lid. It is normal and simply demonstrates a good hermeticity of the product. To avoid that the cooking pot falls heavily on the product when opening the lid, always open the lid gently. - Place your appliance on a flat surface. Remove all protective materials and accessories from the inside of the appliance (Fig.3).3. Clean all parts of the appliance
3a. Clean the lid, the cooking pot and the accessories
- Clean the lid, the cooking pot and the accessories with a soft sponge and soapy hot water (Fig.4). - Dry off the lid, the cooking pot and the accessories (Fig.5) - Do not use a scourer or abrasive sponge to clean the cooking pot as it could damage the non-stick coating in the cooking pot (Fig.40). - Do not immerse the appliance in water (Fig.41). - If you inadvertently immerse your appliance in water or spill water directly on the heating plate, take it to an Approved Service Centre for repair. - Do not put the lid and the cooking pot in the dishwasher (Fig.42). - Be aware, only the accessories: spatula, measuring cup and steam accessory are dishwasher safe.3b. Clean the sealing gasket
- Remove the sealing gasket from the lid and clean it with a soft sponge and soapy hot water (Fig.7 & 8). - Dry it off thoroughly. - Place the sealing gasket over the sealing gasket rack and press it into place (Fig.9). Press down firmly to ensure there is no puckering and that the sealing gasket is snug behind the sealing gasket rack. - After placing the sealing gasket on the lid, if you open the lid too quickly, it can happen that the cooking pot remains attached to the lid (Fig.37 & 38). Wait few seconds for the cooking pot to free itself from the lid (Fig.39). Note: It is normal and simply demonstrates a good hermeticity of the product. To avoid that the cooking pot falls heavily on the product when opening the lid, always open the lid gently. WARNING: Never use your appliance without the sealing gasket (Fig.44)3c. Clean the valves
- To clean the pressure limit valve, remove the pressure limit valve from the pipe on top of the lid (Fig.10). Clean it with a soft sponge and soapy hot water (Fig.11). Once dry, take care that the duct of the pipe is clean before plugging the pressure limit valve back on the pipe on top of the lid (Fig.12). Ensure that the pressure limit valve is well put in place, it must be able to move up and down. - To clean the pressure limit valve cover, unscrew the limit valve cover from inside of the lid (Fig.13). Clean it with a soft sponge and soapy hot water (Fig.14). Once dry, take care that the duct of the pipe is clean before screwing the pressure limit valve cover back inside of the lid (Fig.15). - To clean the float valve, remove the float valve gasket from inside of the lid, flip the lid so that the float valve can come out of the lid (Fig.16). Clean the float valve gasket and the float valve with a soft sponge and soapy hot water (Fig.17). Once dry, insert the float valve back on the lid and put the float valve gasket back in place (Fig.18). Ensure that the float valve is well put in place, it must be able to move up and down.3d. Clean the housing of the appliance
- Clean the housing of the appliance using a damp cloth. - Do not immerse the appliance in water (Fig.41). - Wipe clean the heating plate using a dry cloth.INSTRUCTIONS FOR USE
1. Place ingredients in the cooking pot - Remove the cooking pot from the housing. - Put ingredients into the cooking pot. - Please note that the level of food and liquids should never exceed the max level marking on the cooking pot (Fig.19). - When cooking food ingredients which expand during cooking, such as dehydrated vegetables or rice, in pressure modes, do not fill the cooker to exceed more than half of its max level. 2. Place the cooking pot in the housing - Ensure the bottom of the cooking pot is clean and dry; and remove any food residue from the heating plate (Fig.20). - Place the cooking pot into the housing (Fig.21). - Never use your appliance without the cooking pot. 3. Close and lock the lid - Check that the sealing gasket is securely placed on the lid (Fig.43). - Take hold of the lid knob, place the lid on the appliance and turn it clockwise to lock it (Fig.22). 4. Attach the pressure limit valve - Properly place the pressure limit valve on the lid (Fig.23). Please note that the valve will remain somewhat loose, it is normal. 5. Switch on the appliance - Fully unwind the power cord and plug it into the mains (Fig.24). - The appliance makes a 'beep' sound, the screen flashes and displays HEH. 6. Select and launch a cooking program Each program has a default time and temperature and requires a specific lid position, please have a look at the cooking programs table: COOKING PROGRAMS TABLE| Cooking program icon | Cooking program name | Default cooking time | Adjustable time | Default temperature | Adjustable temperature | Default pressure | Delayed start from 10min to 12h | Keep warm up to 24h | Lid status | ||
| Lid closed and locked | Lid closed but not locked | Lid open | |||||||||
| Stew | 30min | from 1min to 2h | 114C | No | 70Kpa | Yes | Yes | ● | |||
| Soup | 12min | from 1min to 2h | 114C | No | 70Kpa | Yes | Yes | ● | |||
| Stir Fry | 20min | from 1min to 1h | 160C | Yes from 100C to 160C | No | No | No | ● | |||
| Steam | 10min | from 1min to 2h | 114C | No | 70Kpa | Yes | Yes | ● | |||
| Bake | 40min | from 1min to 2h | 160C | Yes from 100C to 160C | No | Yes | Yes | ● | |||
| Sous-vide / Slow-cook | 4h | from 30min to 12h | 85C | Yes from 55C to 95C | No | Yes | No | ● | ● | ||
| Rice | 8min | from 1min to 2h | 114C | No | 70Kpa | Yes | Yes | ● | |||
| Yogurt & Ferment | 8h | from 30min to 12h | 30C | Yes from 22C to 40C | No | No | No | ● | ● | ||
| Porridge | 15min | from 1min to 2h | 100C | No | No | Yes | Yes | ● | |||
| Adjustable Chef Mode | 30min | from 1min to 4h | 80C | Yes from 70C to 160C | No | No | Yes | ● | ● | ● | |
Stew program
- Place the ingredients in the cooking pot and completely close and lock the lid. - Turn the control panel knob to the right to reach Stew program. The screen displays the default cooking time. - Optional: Press and set the desired time by turning the control panel knob to the right (to increase time) or to the left (to decrease time). - Press to start the cooking program. - The appliance starts the pre-heating phase. The screen displays alternatively & HE & and the pre-heating light indicator ① turns on. - When the pre-heating phase is completed, the appliance switches automatically to cooking phase. The screen displays the count down and the cooking in progress light indicator l turns on. - During cooking process, pressure builds up in the appliance and pushes the float valve up. The under pressure light indicator turns on to notify that the lid cannot be opened without releasing the pressure first. - At the end of the count down, the appliance beeps and the screen displays End. - After a few seconds, the appliance will automatically switch to keep warm phase. The screen displays HOE and the keeping warm light indicator turns on. - Press ⑥ for 3 seconds to stop the program at any time. Soup program
- Place the ingredients in the cooking pot and completely close and lock the lid. - Turn the control panel knob to the right to reach Soup program. The screen displays the default cooking time. - Optional: Press and set the desired time by turning the control panel knob to the right (to increase time) or to the left (to decrease time). - Press to start the cooking program. - The appliance starts the pre-heating phase. The screen displays alternatively & HERA and the pre-heating light indicator turns on. - When the pre-heating phase is completed, the appliance switches automatically to cooking phase. The screen displays the count down and the cooking in progress light indicator turns on. - During cooking process, pressure builds up in the appliance and pushes the float valve up. The under pressure light indicator turns on to notify that the lid cannot be opened without releasing the pressure first. - At the end of the count down, the appliance beeps and the screen displays End. - After a few seconds, the appliance will automatically switch to keep warm phase. The screen displays HDE and the keeping warm light indicator turns on. - Press for 3 seconds to stop the program at any time. Stir-Fry program
- Turn the control panel knob to the right to reach Stir-Fry program. The screen displays the default cooking time. - Optional: Press and set the desired time by turning the control panel knob to the right (to increase time) or to the left (to decrease time). - Optional: Press ① and set the desired temperature by turning the control panel knob to the right (to increase temperature) or to the left (to decrease temperature). - Press to start the cooking program. - The appliance starts the pre-heating phase. The screen displays alternatively & HERE and the pre-heating light indicator turns on. - When the pre-heating phase is completed, the appliance switches automatically to cooking phase. The screen displays the count down and the cooking in progress light indicator turns on. - Place the ingredients in the cooking pot and keep the lid open to stir-fry. - At the end of the count down, the appliance beeps and the screen displays End. - After a few seconds, the appliance will automatically switch to standby mode. The screen displays - Press ⑥ for 3 seconds to stop the program at any time. Steam program
- Place 150ml of water ( 3/4 cup) in the cooking pot, put the steam accessory in the cooking pot and add your ingredients. Completely close and lock the lid. - Turn the control panel knob to the right to reach Steam program . The screen displays the default cooking time. - Optional: Press and set the desired time by turning the control panel knob to the right (to increase time) or to the left (to decrease time). - Press to start the cooking program. - The appliance starts the pre-heating phase. The screen displays alternatively & HERE and the pre-heating light indicator turns on. - When the pre-heating phase is completed, the appliance switches automatically to cooking phase. The screen displays the count down and the cooking in progress light indicator turns on. - During cooking process, pressure builds up in the appliance and pushes the float valve up. The under pressure light indicator turns on to notify that the lid cannot be opened without releasing the pressure first. - At the end of the count down, the appliance beeps and the screen displays End. - After a few seconds, the appliance will automatically switch to keep warm phase. The screen displays HOE and the keeping warm light indicator turns on. - Press for 3 seconds to stop the program at any time. Bake program
- Place the preparation in the cooking pot and close but don't lock the lid. - Turn the control panel knob to the right to reach Bake program. The screen displays the default cooking time. - Optional: Press and set the desired time by turning the control panel knob to the right (to increase time) or to the left (to decrease time). - Optional: Press l and set the desired temperature by turning the control panel knob to the right (to increase temperature) or to the left (to decrease temperature). - Press to start the cooking program. - The appliance starts the pre-heating phase. The screen displays alternatively & HERE and the pre-heating light indicator turns on. - When the pre-heating phase is completed, the appliance switches automatically to cooking phase. The screen displays the count down and the cooking in progress light indicator turns on. - At the end of the count down, the appliance beeps and the screen displays End. - After a few seconds, the appliance will automatically switch to keep warm phase. The screen displays HOE and the keeping warm light indicator turns on. - Press for 3 seconds to stop the program at any time. Sous-vide / Slow-cook program
- TurnthecontrolpanelknobtotherighttoreachSous-vide/Slow-cook program . The screen displays the default cooking time. - Optional: Press and set the desired time by turning the control panel knob to the right (to increase time) or to the left (to decrease time). - Optional: Press ⑧ and set the desired temperature by turning the control panel knob to the right (to increase temperature) or to the left (to decrease temperature). - Press to start the cooking program. - The appliance starts the pre-heating phase. The screen displays alternatively & HEA and the pre-heating light indicator turns on. - When the pre-heating phase is completed, the appliance switches automatically to cooking phase. The screen displays the count down and the cooking in progress light indicator turns on. - At the end of the count down, the appliance beeps and the screen displays End. - After a few seconds, the appliance will automatically switch to standby mode. The screen displays = = = . - Press for 3 seconds to stop the program at any time. Rice program
Place the ingredients in the cooking pot and completely close and lock the lid. - Turn the control panel knob to the right to reach Rice program. The screen displays the default cooking time. - Optional: Press and set the desired time by turning the control panel knob to the right (to increase time) or to the left (to decrease time). - Press to start the cooking program. - The appliance starts the pre-heating phase. The screen displays alternatively & HERE and the pre-heating light indicator turns on. - During cooking process, pressure builds up in the appliance and pushes the float valve up. The under pressure light indicator turns on to notify that the lid cannot be opened without releasing the pressure first. - At the end of the count down, the appliance beeps and the screen displays End. After a few seconds, the appliance will automatically switch to keep warm phase. The screen displays HOE and the keeping warm light indicator turns on. - Press for 3 seconds to stop the program at any time. Yogurt & Ferment program
 can be used to make yogurt or raise bread/pastry dough. - When making yogurt, place the ingredients in the cooking pot and close the lid. - When raising dough, you can knead the dough directly in the cooking pot then place the cooking pot in the housing and close the lid. - Turn the control panel knob to the right to reach Yogurt & Ferment program. The screen displays the default cooking time. - Optional: Press and set the desired time by turning the control panel knob to the right (to increase time) or to the left (to decrease time). - Optional: Press and set the desired temperature by turning the control panel knob to the right (to increase temperature) or to the left (to decrease temperature). - Press ⑥ to start the cooking program. - The appliance starts the pre-heating phase. The screen displays alternatively & HERE and the pre-heating light indicator turns on. - When the pre-heating phase is completed, the appliance switches automatically to cooking phase. The screen displays the count down and the cooking in progress light indicator ⑥ turns on. - At the end of the count down, the appliance beeps and the screen displays End. - After a few seconds, the appliance will automatically switch to standby mode. The screen displays - Press for 3 seconds to stop the program at any time. Porridge program
- Place the ingredients in the cooking pot and completely close and lock the lid. - Turn the control panel knob to the right to reach Porridge program . The screen displays the default cooking time. - Optional: Press and set the desired time by turning the control panel knob to the right (to increase time) or to the left (to decrease time). - Press ⑥ to start the cooking program. - The appliance starts the pre-heating phase. The screen displays alternatively & HERE and the pre-heating light indicator turns on. - When the pre-heating phase is completed, the appliance switches automatically to cooking phase. The screen displays the count down and the cooking in progress light indicator turns on. - At the end of the count down, the appliance beeps and the screen displays End. - After a few seconds, the appliance will automatically switch to keep warm phase. The screen displays HOE and the keeping warm light indicator turns on. - Press for 3 seconds to stop the program at any time. Adjustable Chef mode
- Place the ingredients in the cooking pot and close the lid or not depending on your recipe. - Turn the control panel knob to the right to reach Adjustable Chef mode . The screen displays the default cooking time. - Optional: Press and set the desired time by turning the control panel knob to the right (to increase time) or to the left (to decrease time). - Optional: Press ⑥ and set the desired temperature by turning the control panel knob to the right (to increase temperature) or to the left (to decrease temperature). - Press to start the cooking program. - The appliance starts the pre-heating phase. The screen displays alternatively & and the pre-heating light indicator turns on. - When the pre-heating phase is completed, the appliance switches automatically to cooking phase. The screen displays the count down and the cooking in progress light indicator 变 turns on. - At the end of the count down, the appliance beeps and the screen displays End. - After a few seconds, the appliance will automatically switch to standby mode. The screen displays - Press for 3 seconds to stop the program at any time. * Suggestion for quickly reheating dishes: set temperature to >=95C and cook with lid closed but unlocked.7. Use the delayed start function
Delayed start can be useful to preset the appliance to start cooking later. - First select a program following the steps described above in part 6. - Before starting the selected program, press . The screen displays the default time for delayed start. - Set the desired time by turning the control panel knob to the right (to increase time) or to the left (to decrease time). - Press . The screen displays the delayed start count down. When preset time is elapsed, the appliance will start cooking automatically.8. Open the lid
- Do not attempt to open the lid if the float valve is up and if the under pressure light indicator is turned on. - The pressure can be release in 2 different ways at the end of the cooking: Natural release: At the end of the cooking or after stopping the program, the appliance will cool down by itself, and the pressure will release naturally. During natural release, food might overcook due to the remaining pressure in the pot. Use manual release to stop cooking process immediately. Manual release: Press continuously the pressure release button, on top of the lid. It will take a few seconds to a few minutes depending on the amount of food inside of the cooking pot (Fig.31). WARNING: Be careful of the hot steam coming out from the appliance. Keep your face and hands away from the steam output (Fig.45). - To open the lid, position your arm parallel to the side handles, take hold of the lid knob, turn anti-clockwise and lift the lid up (Fig.32 & 33). WARNING: Be careful of the hot steam coming out from the cooking pot.9. Unplug the appliance
- After usage, unplug the appliance and let it cool down for at least 2 hours before cleaning.10. Clean after use
- Clean your appliance after each use. - Before cleaning, let your appliance cool down for at least 2 hours. - For cleaning instructions, refer to part 3. Clean all parts of the appliance in BEFORE FIRST USE section.11. Maintenance tips
- To ensure the durability of the cooking pot time over time, do not cut food in it. - Use the provided accessories. Do not use any metallic utensil as it could damage the nonstick coating in the pot. - After usage, the sealing gasket may keep the smell of your dish. It is normal; silicone has little pores that open up when exposed to high temperature and close back once temperature drops. To eliminate the smell from the sealing gasket, you can: - Put the silicone ring in the dishwasher - Add 1 cup of vinegar, 1 cup of water and 1 lemon cut in large pieces into the cooking pot and launch a steam program for 2 minutes, then let the steam release naturally. - Change the sealing gasket every 2 years or earlier in case of damage. TECHNICAL TROUBLESHOOTING GUIDE| Problem | Possible reasons | Solutions |
| Unable to open lid | Unable to open because of pressure in the cooking pot. | Press continuously the pressure release button to remove the pressure inside of the cooking pot. It can take a few minutes until the pressure is fully released. |
| Pressure in the cooking pot is fully released but the float valve is stuck because it is too dirty and therefore unable to move down. | a. Be sure the pressure is totally released by letting the appliance cool down for at least 2 hours. b. Gently push the float valve down by inserting a skewer or a long object into the float valve opening. If this does not work, send the appliance to an Approved Service Centre. c. For next use, please clean and dry off the float valve thoroughly. | |
| Unable to close lid | The sealing gasket is not properly installed. | Install the sealing gasket properly. |
| The cooking pot contains hot ingredients generating steam. | Wait for the ingredients in the cooking pot to cool down before trying to close the lid again. | |
| The float valve is stuck because it is too dirty and therefore unable to move down. | a. Gently push the float valve down by inserting a skewer or a long object into the float valve opening. If this does not work, send the appliance to an Approved Service Centre. b. For next use, please clean and dry off the float valve thoroughly. | |
| Position and or direction at which the lid was closed is incorrect. | Close the lid in the correct direction according to the instruction manual. | |
| When opening the lid, the cooking pot remains attached to the lid. | The sealing gasket created a suction effect. | The cooking pot will free from the lid by itself. It is normal and simply demonstrates a good hermeticity of the product. To avoid that the cooking pot falls heavily on the product when opening the lid, always open the lid gently. |
| Intense release of pressure from the pressure limit valve. | The inner pressure exceeds working pressure, or the inner pressure exceeds the safety pressure. | Clean pressure limit valve, float valve and lid thoroughly. If float valve still has steam coming out, please return appliance to the nearest Approved Service Center for inspecting, repairing or adjusting by authorized person. |
| The pressure limit valve is in an incorrect position. | Carefully rotate/press the pressure limit valve to make it fall into place. Be careful of the hot steam. Position yourself safely and wear oven mitts. | |
| Faulty pressure control resulted in release of pressure. | Send the appliance to an Approved Service Centre for repair. | |
| Continuous pressure release from the float valve. | The inner pressure exceeds working pressure, or the inner pressure exceeds the safety pressure. | Clean pressure limit valve, float valve and lid thoroughly. If float valve still has steam coming out, please return appliance to the nearest Approved Service Center for inspecting, repairing or adjusting by authorized person. |
| Residue in the float valve. | a. Press continuously the pressure release button to remove the pressure inside of the cooking pot. It can take a few minutes until the pressure is fully released. b. Let the appliance cool down for at least 2 hours. c. Clean and dry off the float valve before restarting the cooking. | |
| The float valve is stuck. | a. Press continuously the pressure release button to remove the pressure inside of the cooking pot. It can take a few minutes until the pressure is fully released. b. Let the appliance cool down for at least 2 hours. c. Clean and dry off the float valve before restarting the cooking. |
| Problem | Possible reasons | Solutions |
| Steam leakage from lid. | The sealing gasket is not properly installed. | Remove the sealing gasket, clean it and reinstall it in the correct position. |
| The sealing gasket is dirty. | Remove the sealing gasket, clean it and reinstall it in the correct position. | |
| The sealing gasket is damaged, or the edge of the cooking pot is damaged. | Send the appliance to an Approved Service Centre for repair. | |
| Food is uncooked | Solid/liquid ingredients ratio is incorrect. | Try again by following precisely the quantities of the recipe. |
| No electricity from the power supply. | Check your home electric circuit. | |
| E0 displayed on the digital screen. | Pressure switch is faulty. | Send the appliance to an Approved Service Centre for repair. |
| E1 displayed on the digital screen. | The temperature sensor is faulty. | Send the appliance to an Approved Service Centre for repair. |
| E2 displayed on the digital screen. | The lid is not properly positioned for your cooking program. Each program requires a specific lid position. | Check and adjust the lid position required by your cooking program, refer to the cooking programs table in part 6 of this manual. Restart your program once the lid is correctly positioned. If the issue remains, send the appliance to an Approved Service Center for repair. |
ZA EYXAPIZOYME I0Y ENIAEETE TH MOULINEX
KaIomegaopioaTe oTov kOoToU yPnyopou KAI VoomuayepaatoC!
Me to Turbo Cuisine mα vεa δισταοη στο μαγερεμα: Πιο εύκολα. Πιο νόστιμα. Απλα καλυτερα! To Turbo Cuisine i yia va o i k o v o i xpov ka i va o u p i unepoxa stitik a yuata, ana kai avetα. Zac Euxapiotoupe nolu nou mac xapiaate mia theon otnv kouziva oac. AÇ μαγειρέψουμε μαζί!NEPIEXOMENA
O8nyo5 yprinyopns Ekkivnons oEikovec H Moulinexdeltaipotepaiaotnta otnv aosfaia 238 Ola ta εξαρτήματa tou προίντος 248 Eoikeiwn eTov nivaka Elyxou 249 O8nyoc xpronc kai kathetaiaou 250 O8nyoc avtmuetwiontcexvikw npoBnmuatw 268 △εθνις εγγύηση της Moulinex 271HMOULINEXΔINEIΠPOTEPAIOTHTA ΣTHN AΣΦΑΛEIA
H aαφαλεια ειναι η πρωτη προτεραίοτητα μας, ξεδιαζουμε και κατασκευαζουμε τα προίοντα μας με ψηλα πρότια ασφαλείας και τεχονλογίας, Ωοτόσο, σε καθε Λεκτρική συσκεύνινιπαρχουν πιθαυοί κίνδυοι, επομένως συνιούμεν αλαμβάνeteυπόψη και να τηρείte τις παρακατω σδηγίς.O△HΓΕΣ AΣΦΑΛΕΙΑΣ
Δiαβασe προεκτικόλες τις παρακατω σθηγες και αποθηκεύσετις για μελλοντική αναφορά. H akataaannn xpnon tnc ouokeu nca twv a p t n u a t w v TNC evdexetai va npokaloei n otn ouokeu n kai trauuatio. H oukeun maayiepeuei faynto untio n. H eofaalev n xpion evdexetai va npokaloei kivduvo ykaumatoc, loyw tou atou. TnV aOaFALIa Oa, auto To npoiov oumuopphiVETa e ola ta Ioxuovta Tpotua Kai olouc touc loxuvteC kavovioouc (o8nyies yia tn xamnna Taon, Tnv nEektpoayvntikn oubetaotnta, ta Ulika nou epxovta OE eTAPHm E TA TPOphiA,To NepiBaalov, k. H aipaiin nyn 0epuotnac yia to ayiepeua npilaaeavetao tn ouokevun.1. Nóu xρησιμοποιείαι με ασφάλεια;
Xpno n ovo e oowtepko xwpo. Autn n ouokeun npoopiZetai aTOKkEiotikya oikiakn Xpno. Dv npoopiZetai yia xpon otic akoloutheta TepiTTwoics, oIOnieCdeltaKALUTovtaI antOtnyEyyuon: - Σε κουζίνες προσωπικόν καταστημάτων, σε γραφεία ἡ αλλους χώρους εργασίας. -Σε αγροκτήματα. -AIo v o s o x i w v, o n aAawv kataaUmuAtwv. -Σεξενωνες ἡ αλλα παρόμοιου τύπου καταλύματα. Mny tootheite tn ouokeun oE kauto foypvo n kautn eotia.Mnv tootheite tn ouakeun kovtaoe loya n eofekta avtikeiEvA. Xpnooioiote tn oukeun navw oE eTne6n,otaepn kai avthetaikn otn thepounta eTia aio np np onou mtopeiv aekivaxei vepo.2. Anto nioov xpoiouoietai e aofaia;
Autn n ouokeun dev npopicietai yia xpnon ano atoua (oumuepilauubavouevwv twv pialuw) e nepiopioevec oomegakecs, aothnpiakec n diavontikec ikavotntec, oute a toaotaou dev exouv tnv avaykaia eptiia n tcaatapaitntec ywoeic, ektoc av bpikovtau no tnv eipaeyn evluka n exouv lae i odnyie c yia tn xpnon tnC ouokeunc a toaoto uentuo vua nva ofoaaleia touc. H ouokeun mtopei va xnpouonointhetai anto atoua me μe iomegaevc oomegaatikec, aoθntnpiakec n diavontikec ikavotntec n me ελeiwneu piaoc kai yywons, efoov επiβεπovtai exouv λαβei odnyies yia tnv aσφαλn xρon tnç ouokeun cai katavoouv touc utapxovtekivduvouc. Autn n ouokevun dev mnpei va xpnouoiointheta aT o Tsiia. Duaoote tn ouokvun kai to nEktpiKo KaIomega kapi aTIOAldia. - Ta παιδία δεν θα πρέπειν α παίζουν με τη σωακεύη. - Ta παδία θα πρεπειν αβρίοκονταιυό επίβλεψη, προκειμένουνα διασφαλίζειαιότι δενθα χρησιμοπούηουνιη σουκεύνης παίχνίδι.3. Aσφαλής χρήση - γενική χρήση
Xpnooioite n oukeun mov yia touc oontouc yia touc onoiouc npoopiEaI. Mny xnoiouoite tn ouokeun yia va tnyavioet e phiynto oE ladi. Mov to ynou o EITpEeTai. Mnv xnpoumoioieite tn xutpa toxutntac wc pfiteca otn leitoupyia pionc. - Otav μαγειρεύτε Φαγntα με ζύμι, ανακίνησε ελαφρα tn χύτρα προτόν αυοίξετο το καπάκι, Ϝετο το φαγntó vα μην πεταχτέι από το εσωτερικό του σκεύους. Houkeun dev evai aiooteipwntc. Mny xnpoiotoeite tn oukeun yia aiooteipwon baowv. H ouokevun 8ev npoopicietai yia xpnon e 8wterpiko Xpvoslaikotn n e 5exwpiot o uotma tnalexepiou. - Iα τη μεταφορα της Σωοκεύς, χρησιμοποίει τήντοτε τις δύο πλευρικές λαβές στό τηρερβλημα τής Σωοκεύς. Na φοράτε προστατευτία γάντα κατά της θερμότητας, εάνη σωοκεύη εἰναι κατή. Iα περισότερη ασφαλεία, βεβαιωθείτε πιώς το καπάκι εἰναι ασφαλιομένο πριν μεταφέρετε τή σωοκεύή. To katoepoc tou maeyipiko okeouc ka tnc 0epuaivovnpiakac penei va bpiokovtao aeon epan. Aphiote onoiobnnote avtikemuvo n uolaima faayntou mnpei va bpiokeotai mea Tuou maeyipko okeouc ka tnc 0epuaivovnc piakac, Kaowvdeltaetai va einnpeaoei tvn aiosoon AeTe UIOJN TWC OIOJEVOI TUINOI FOYNTOU, ONWCS IOUpeC mllou, ta Kpavmuepi, to paeVti, to KPIaipu IepE, n Bpwun kai aaaa dnmuNTpiakα, n fao, ta vouvtac n ta Zmuapika EvdeXetai va oxmuatioov aupo Ka i fuuaalides, ta onoia EktoEuvotai pfaoosovtac tic BaIbEs. Awte idiaitepn npoooykata to mayeipeua autuw twv tuTiw FOAYNTOU KA KAtapiZeTE OxOAAOTIKa tic BAJIbEs meTa anTo th xPon. Aβει Αρομενες Μυταγες Που περλαβανουν γαλ ενδεχειαιν σχηματίσουν αφρό, και φύσαλίδες καιν Απερχειλίσουν φρασοσοντας τις βαλβίδες. Δωτειδιαίτηρη προσθήκατα Μαγείρεμα αυτων των συνταγών και καθαρίζετε σχολαστικά τις βαλβίδες μετά από τη χρόη. - Meta to ayéipεμα κρεatoc με εξωτερική στρωση δερματος (όπως η μοχαρίσα γλώσα), που ενδεχεταινα διογκωθεί λόγω της πίεσς, μην τριπάτe to δερμα μετα to ayéipεμα εάν φαίνεται διογκωμένο: ἄπαρχει κίνδυνος εγκαύματος, Tριπότε to πριν to ayéipεμα. - Otav δουλεύτεμε τρόφια που εχουν την ταονν α φουκωνουν στη δίαρκεια του μαγειρεματος, οπως αποξηραμένα λαχανικά ἡρύς, μην γεμιζετετον κάδo μαγειρεματος παραπάνω από το μισό της χωρητικότητας του. Mny xpnoiopoieite tn oukeun adea, wpiic to ayepiko oekuoc n wpiis uikα oTO eowtepiko tou ayepikoou oekouc. Mtopei va npokntheoapn OTN OUKeun. Myn npnouoie t ouokun uno n oevexe Tpooofoe i vep, yatki tetoio a npopooe va npokafoe oopapn oopao sto okeuos. Mny yemieTe tn ouokevn xwpi to mayeipko okevoC - Ppoooxn: uynxuveTe Uypa oTo oic, Mny Oepmaivete to mayeipko okeuoc me aaln pynn OepoTntac npav tnc Oepmaivoevns nakac tnC oukeunc kai mny xpnoiopoite aallo maeyipko okeuoc, Mnyxnpoiote to maeyipko okeuoc me aalec ouokevcs. Xpnoiopoioite to maayepiko okevoos MONO onn ouokevn. Mv to xpnoiopoioite oe eotie, foupvo k.lπ. Xpnoimuoiieite paoikn n yu koutaia v a anotpeyete uov bao n otnvavkoanlntkneipwon tou ayepikou okeouc. Mny koet e aaynto evtoc tou ayepikou okeouc. Mny ayyicte Tc Baaibides, e Eaeipoeon kata tov kaOapioo touc kai kat a tnv ekTeAeon epyaoiuv ouvtnponcs tsouakeunc oumowva e tic odnyiec. Mny tooTheTeite Xeva avtikemueva otic baalbi8c kai oTo koupi ane aeuthetapwonC nieonC, Mny avtikaoiotaTn baiBia. ELeyTe TaKTiKa Touc aywyouc Tuv i Tou eitpEnouv Tnv aTLeuOepwOn aTuou, yia va diaofoaioe otI dev evia ppaoyevoi. Mny toothei te navi n otidnnote aaloo avaeoa oTo kaTaki kai oTo pepiBna yia va meivei To kaTaki maovoixto. Mnpei va npoknthei moviun OTOV OTeyavotoiniko saKTulio. Mny afnvete to nlektpiko kaawio va kpeetai ao tnv akpn tou tpaneoiou n tou npaykou n va ayyic Kautec EpiphiaveieC.4. A - to
Pniv xnpoiouoinoettn ouokeun, eeyxi Tnv kaopotnta tnc i mc E nnTnpa kai nC i aphialeia pio - Pniv xnpouoioeTe Tn ouokeun, eleyte Tn ootnto0etnon tou steyavontiokou daKTuaiou oTo kaTaki. Bεβαιωθείτε πως το κατω μέρος του μαγειρικόν σεύους καὶ θερμαινόμενη πλάκα εἶναι πάντα καθαρά. Bεβαιωθείτε ὄτι το κεντρικό μέρος της θερμαινόμενης πλάκας μπορείνα κίνηθεί. Mny yεμiετε ηισοκευή πανω από την ενδειξη MAX ΟΤΟ μαγειρίο σκεύς. Akoalouthe tic ouotaoeic avaopikka me tov oyko phiayntou kai vepou yia tnv anofoyn uTepxieiliong loyw bpaaou, nou mtopei va npokaloei blaabn otn Ouokeu n kai trpaumatouos. Bεβαιωθείτε πιώς η συοκεύν ἐχει κλείσει ωωτά προτουξεκινόσει έλειούργία της υμτας. Bεβαιωθείτε οτι τα κουμπι απελενθερωONS πίεONS δεν εύαι πατημένο (εξέχει) προτου ξεκίνησετε ο μαγείρεμα. Avatρέξετε στην εικόνα 48 τής ενότητας Oδηός γρήγορης εκκίνησας σε εικόνες.5. Aσφαλής χρήση - κατα το μαγείρεμα
Mny npooantheta va avoie to kaiaipotou n tiocn meiwthapkwc, Mny npooaohoeva ovoie to kaiaik yexpi va katebei 9baiaibdae πawtnpa. Mny aokéite pote duvam yva v aoovieTe tn ouokevn. Kata to mayeipema kai tyn ane aeuthetaon atoukata to teao tou mayeipaeato, n oukeun aneauthetawvei eepohtn ta kai ato. KpatnoTe to npoomega to kai ta xepia oac maekia aio tn ouakeun yia va atofouyete ta eykaumata. Mny ayyizte to kaakl katota to mayeipema. Mny Tn ouokevun, 0oo elva uio pieon. Xpnouoioite tic c kata n kai φopáte προστατευτικα γάντια, εόν είναι απαραίπτο. Mην χρησιμοποιείτε τή λαβή στο καπάκι γίαν ασκώσετε τή συσκεύŋ. Mny aphiapeite to ayepiko oekuoc, ooo laitoupyei n ouokun. - Σηλειουργία ψησιματος,να εἰοτε ἀδιαίτερα προσεκτικόγια τυχόν εγκαύματα από Εκτοξεύσεις,όταν προσθέτετε φαγητό ἡνλικα στό το καύτό μαγειρικό σκεύος.6. Aosfaancsxpnon- to a e i p e a
- Otav avoiyete to kaniaki, va to kpatate navtoe ano tn tou kaniakiou. To oteite to xepi oac npapalnla otic πeupikc ec. Evexetai va exei payidutei ovaeoa otov oteyavotointiko aktulio kal to kaniak βpaoto vepo kal va npokaleoi ykaumata. - Ppooεξε, επiαης, tov kivduvo εykaumατων απο tov ατμο που βγaiveι απο ηισοκευή ὄταν ανοίγετο καπακι. Πρωτα, ανοίξε πολύ λιγο το καπακι για να απελευθερωθει σμαλά o ατμός. Mnv ayyizete ta kauta eapntmuata tnc ouokueunc H epiaveia tnc thepaivovevns nakac mtopei va npaaeivei zotn ewsckai 2 wpc tao antoynpnoon. - Anouvdséte to kaλwδio anto tv npizα,otav δev xρησιοποietai n ouokεuń kai πipv anto tov kaθαριoú tonc. AΦnote tn ouokεuń va kpuωεi προτou totoθεntóte n αφαρεσeTE Εξαρτμata.7. Aσφαλής χρήσον - καθαρισμός
- ΣΚΟΥΠΙΟΤΕ οτο κατω μέρος του μαγερικόν σκεύους καλητης θερμαινόμενης πλάκας μετά από καθε χρήση. Mnu biEte tn ouokueun ovepó. - Tα tov καθαρισμό της συοκεύνς, ανατέξετο οτίς oynies xnoans. Mnpeite va luveTe to ayepiko okeuoc kai to kaakl me zetn oanouvada. Mny ta zete oTo nluvtnpio niatwv. Katheta Te npiBnmu tns oukeunc eva wtoavi.8. Ti πέπεινα κάνετος περίπτωη βλάβης
- Movó Εξουσιδοτημένος τοτόμο σε Εξουσιδοτημένος κέντρο σέρβις μπορείνα επιδεύσει το προίν. Mny xnpoiouoite oioiaodnote ouokun, evxu apei to nEaKpko kawldio n to fic, eav n ouokun dev etoupye ootaa n ev exei unootei onoiadnote aen. EIToppeTtnouokunoto pnoieoepo egouioobotnevo Kevtpo oepic yia eayxo, tiokeun npuon. Eav to nAektpiko KaIomega exei unooTei 3aBn, Ppei va avikataoTaOe i ano eva eovoiodotnevo Kevtpo oepic yia tnv anouyn tuxov kivduvou. Mnu avikaiotate to nAektpiko KaIomega nou npapexetai to ppoiov, aIaa KaIomega. Mny npokaleite OTov OTeyavoiniKo 8akTuio.Eav exei unooTei ,avtikataotnoTe to 6e eva eoiodotnuevo kevtpo oepic. - Avtikαθιοτάτε tov στέγανοποιntικό δακτύλιο κάθε 2 - χρόνια ἡνωρίερα, εὰν παρατηρήσετε πως ἐχει φθαρεί - η χρειαζεται avtikatáσταση. Xpnoiopoioite movo ta katalnnla avtalaktka yia to movteo oac. Eiva iiaitepa onmavtiko yia tn etoupyia tou steyavoiniinkoudeltaukiou kai tou maeyepikou okevouc. XpnoiouoieTe mvo avtaaakia Tou nawouvtai e Exouoiodotnevo kevtpo epbetaic. H xphon eapntmuatwov dev ouviotwvai ano tv KataokeuaoTn Tns OoukeuC EvEeTaI vA PpokaEoTe I pauaiaouoC. Mny xpoioioite aalaa maeyipikockeun otn ouokun, mOvo to maayepikoc oKeuoc nou pApexetai me to npoiov. Avtkaotate to maayepikoc oKeuoc movo authetavtiko avtaalakktiok, oxediaoevo yia xpnon e to ouyekpiévo npoiov. - Σύμφωνα με τους ὄχύοντες κανονισμους, προτου απορρίψετε μία συοκεύη, η συοκεύη θα πρέπειν αχρησεύειαι (αποσυδέοντάς τη και κόβοντάς το έλεκτρικό καλώςι).PpOeXei n npoostaoia tou nepi o t c!
Houkeunoacpiexi tonutiaulikα,ta onioa μtopoovvaavapnoiopoionoovvvaavakukawoov. Aphiote tn oke kantoio dnohtiko onmuio oulambdaoc aonbetaNTWvTnpiepioxnsoc.9. Note Ioxuei n Eyyunon;
H eyyunon 8ev kaIunTei aphiouk n oopao tou i k o u OKEUOUC. - Διαβάοτε προσεκτικά τις Μθηγίες χρήσος προτουχρησμοποιόσετε τη συοκεύν γία πρώτη φόρα. Σεπερίπτωπ χρήσος που δεν συμμοφώνεται με αυτές τις Μθηγίες, o κατασκεύναστής δεν φέρει καμία ευθύνη καὶ ἐγγύŋον ακυρώνεται. - Σε περίπτωπη εμπορικής χρόσης, ακατάλληλής χρόσης ἡ μη συμμόρφωσης με τις ὅδηγές, o κατασκεύαστης δεν αποδέχεται καμία ευθύνη καλ δεν ὃχύειη ἀγγύŋοι. OΛA TA EEAPTHMATA TOY IPOIONTO  \*iAogia aEoouap avaloya ie to ovtel  EEOIKEIQZH ME TON NINAKA EAEFXOYMHNYMATA KATAZTAZH
 Mnuja kaawopiaatoc otav n oukeun evepytoieita.  Euéáviən xρóvou. Σε αυτο παράδεγμα: 1 ωρα 30 λεπτα.  Euφáviω Θερμokpασiας. Σε αιτό το παράδειγμα: 114 βαθμoi Kελοίου.  YtOBeIkuVei ot to npoypaia exi ma npoeilayevn puOmuon autoatnc thepokpaoiac/XPovou. Dev mtopei va yivei pontonion. YtOBeKuVei ot n thepokpaoia auXavetai kata tn faoan npoepmuavonc.  YtOSeikVUeI Oti n OoKEuN PPOePmuivetai.  YtO8ekvEi ot npoypaum olokarnpwθnke.  YtOBeikVei ot n oukeun Bioketai otn faoi diatnpns Oeepokpiaic.  YIOSEIKVUEIOTTO pOpypaia diaKoTNIKE.  YtOBeIKVeuI ot n OoKEuIN Bpioketai e aeitoupyia avauovnC.O△HΓΟΣXPHΞΚAIKAΘΑΡΙΣΜΟΥ
AvatpeTe otic ekovc nou uno8ekvovtai wC (Eik.x) oToV osnyo ynpyopnc EKKivnonc.IPIN ANO THN INPQTH XPHEH
1.Aphiepooukeuaia
Aphiéote tn oukeun ano tn oukeuaia kai diaaote tic odnyiec xnpnc npiv tn xpnoiortnoe Tia npwtn opa. - Aφαρεσε τα διαφημιοτικα autoKóλλητα (éav unáρχουν) από ηισωκεύν πριν ηχροιμοποίσετε γι αρώτη φόρά.2. AvoIyμa tou kαπakIoú
- Iα vα αονεξετο καπάκι, κραπότε τη λαβή του καπακίου, περιστέψετα φρισερόστροφα και σηκώτετο καπάκι (Eik.1 και 2). Σημειωη: Otav Σηκώνετe TO καπάKI, TO μαγεριόσκεύος Σνδέχεταιν παραμείνει συνδέδεμένοστο καπάKI. Eivai φυσιλογίοκα και αποδείκυέι τήν καλή στέγανότητα του προίόντος. Για τήν αποφύγή πτώς του μαγεριόκουσς. Στο προίόν κατά TO ὄνοιγμα του καπακίου, ανοίγετε πάντα του καπάkl προσεκτικά. ToTOnoTeTn OuOKeun oE mia EIniTeBn EpiAveia. Aphiote ola ta npootateutikau kai ta EApntmuata aTo to eoutepiKo Tns ouokueng (Eik.3).3. Kaθαρισμός σλων των εξαρτημάτων τής συοκεύς
3a. Kaθαρισμός tou kaπακίου, tou μαγειρικόν σκεύους και των εξαρτηματων
- Kaθαpiote to kaπáki, to Μαγειρικό Εκεύος και τα εξαρτήματα με ενα μαλακό σφουγγάρι και ζεσή σαπουναδα (Eik.4). - Σεγνωότε to καπάκι, to μαγερίρό σκεύος κατα εξαρήματα (Eik.5) Mny xnpoiotoe upu n tpaux ofouyyapi yia tov kathetao tou maeyepoukoukeouc, kthetauoc npopei va fheipetnvavtikoanik eniioptpwon tou maeyepoukoukeouc (Eik.40). Mnu biEte tn ouokueun oe vepo (Eik.41). Eav buioe te kataa looc tn ouokueun ovepno pizetevpo Tavw otn 0epmuovmev nlaoka, eniokeuaote tn ouokueun oEv a Eouoiodotmevo kevtpo eipic. - Mny tototheite to kaiai kai to mayeipiko okeuooc oTo io niatowv (Eik.42). - Αβετενόψη στι μόνο τα παρακάτω εξαρτήματα πλένονται Σε πλυντήρο πιάτων: σπάτουλα, δοσομετρίκη κύπα και εξαρτήμα ατμου.3β. Kaθαριομός του στέγανοπιοικόδ δακτυλίου
- Aφαipéóte tov οteγανοποιntikó δακτύλιο από to καπάκι και καθαρίσε tov με ενα μαλακό σφουγγάρι και ξεοτή σαπουνáδα (Eικ.7 και 8). - Σεγνωτετον σχολαστικά. ToTOnTeTnToTovOteyavonoinTko DaKtUlio nAvw Otn BaoTou kaiPioteTovmuexpiVaEapmuoei Otn Theon Tou (Eik.9).PioteTovOteyavonoinTko DaKtUlio yepa,woTe va i e TWCevuTApXouv avooiOpphieckai TWCeEe Eapmuoei owta otnv unodoxn tou. - Aφού τοποθετησετον οτέγανοποιntικό δακτυλίο στο καπάκι, εὰν ανοίξετε to καπάκι πολύ γρήγορα, to μαγειρίκό έκεύος ευδέχεται να παραμεῖνι συνδέδεμένον στο καπάκι (Eik.37 και 38). Περμένετε μερικό δευτερόλεπτα γίαν απελεύθερωθείτο μαγειρίκό σκεύος από το καπάκι (Eik.39). Σημειων: Eivai φυσιολογίκο και αποδεικυει τήν καλή Στέγανότητα του προίντος. Για τήν αποφύγη πτώς του μαγειρικό μεκύους στό προίν κατά το ανοίγμα του καπακίου, ανοίγετε πάντα το καπάκι προσεκτίκα.IPOEIAOIOIHsH: Mny xpnouoieite note tn ouokevn wpi tov oteyavonoiintiko daKTuAio (Eik.44)
3y. Kaθαρισμός των βαλβίδων
Tα tov kaθαρiμo toc βaβiδac αφαλεiac πεος, αφαρεοτe to έβαβiδa ασαβεiac πεος απο tov σωληνα στο πανω μερος tou καπακιού (Eik.10). Kaθαρίοτe την με ενα μαλακό σφουγγαρι κα ζεοήσαποναδα (Eik.11). Otav στeyνιωει, βεβαιωθείte oτι to εωτερικό tou ωληνα ειναι καθαρό προύν συδεοετε to έβαβiδa ασφαλεiac πεος στον σωληνα στο πανω μερος tou καπακιού (Eik.12). Beβαιωθείte πως η βαβiδa ασφαλεiac πεος ειναι ωστά τοποθετημένη. Θα πρεπειν κινειαι ελεύθερα προς τα πανω και προς τα κατω. TaoKaOapoioukALUmuatoctnsBaaBicac aooaieiacpioc, EeBiswote to kALumu taC BaaBicac oTo eowteipko Tuma Tou KaTakoi (Eik.13).KaOapiote to e eva maakofoouyapai Kai ZetOn oanovada (Eik.14).Otav OTeYVWOEI, BbaWthe otTo eowteipko Tou oWnva Eivai kaOapopnpotou BiDwote to kALumu TaC BaaBicac aooaieiacpioc sto eoewteipko Tmu Tou KaTakoi (Eik.15). - Γαν καθαρίσετη βαλβίδα με πλωτήρα, αφαρέοτε τον δακτύλιοτης βαλβίδας απότο εωιτεριότμήμα του κατακιου και αναποδόγυρίοτε το καπάκι ωοτεν μα πορείη βαλβίδα με πλωτήραν αβει απότο το καπάκι (Eik.16). Kαθαρίοτε τον δακτύλιοτης βαλβίδας με πλωτήρα και τη βαλβίδα με ενα μαλάκο σφουγγάρι και ζεσήσαπουνάδα (Eik.17). Otav Θεγγύσει, τοῦ Θεπότετηβαλβίδα με πλωτήρα στο καπάκι και τοῦ Θεπότετηση Θεόη του τον δακτύλιοτης βαλβίδας (Eik.18). Bεβαιωθείετη ως η βαλβίδα με πλωτήρα εἶναι σωτός τοῦ Θεπότημένη. Θα πρέπειν ακεῖαι ελεύθερα προς το πάνω και προς το κάτω.35. Kaθαρισμός του περβλήματος της συοκεύς
Kαθαρίσε το περιβλημα της συοκεύνός εύναιντο παύ. Mnu oziEte tn ouokun ovepO (Eik.41). - ΣΚουπίοτε τη θερμαινόμενη πλάκα μέ ενα στεγνό παύ.O△HΓIΕΣ XPHΞHΣ
1. Tonoθετηοι των Φιλικύν στο μαγερικό σκεύος Aφαρεστe to μαγερικό σεκύς απο to περβλημα. ToTOnoTeItoUaIkaOToMaayEpiKoKeUoc. - Σημειώτε ὄτι Τέπεδο φαγητου και γυρό δεν πρεπει ποτένα Φεπρβαίνει τη μέγιστη ενδεξήσο τος μαγερικό σκεύος (Eik.19). - Otav xpnouoieite oe leitoupyiec nieons uikα tou exouv tyn taon va fouokwovuov otn diapkeia tou maeyipémuotc, onwc anoepnaeva laxavika n puci, mnu yeuiizte to okeuo c npapanaw ano to mio tnç meiyiotnc wpnntikotntac tou. 2. Tonoθετηοι του μαγερικόν σκεύους στο περβλημα Bεβαιωθείτε πως το κατω μέρος του μαγειρικόν σκεύους εῖαι καθαρό και στεγνό και αφαιρόσετε tuxov unλείματα φαγητού πό τη θερμανόμενη πλάκα (Eik.20). ToTOnoTeTo p i k o Okeuoc sto Tepiβλnμa (Eik.21). MnV xnpoiouoieite nTo oukeun XwpiC to ayepiko oKeuoc. 3. Kλεισιμο καλ ασφάλιοι του καπακίου - Eλεγξε οτι o έτεγανοποιntικός δακτύλιος ἐχει τοῦθετηθείσωτα στο καπάκι (Eik.43). Kpataote tn tou kantakoiou, tooThe note to kaiaokttn ouakeun kai nepiotppeyto dexiotpofoa yia vao to aphialioe (Eik.22).4. Σύνδεοιης της βαλβίδας ασφαλείας πίεοις
ToiooTeTnoTe ootα tn aocaaic nieonc stokai (Eik.23). AotvOnyntn 9aBis6a 0a npaeivei liyo xalapn, eivai fuoioloyiko.5. Evepyooinon tsoukeun
- ετιλίξε τέλείως to ηλεκτρίκο καλώδιο και συνδέσετο το στην πρίζα (Eικ.24). H ouokevun o kavei evav xapaktnpiotiko nxo, nooovn o aovaoepoi kai o ephiaviotei n vdeltaig HIEIO.6. Eπιλογή και εκκίνηση εύς προγάματος μαγειρέματος
Kαθε πρόγραμα ἐχει εναν προεπιλεγμένο Χρόνο και θερμοκρασία και αντιοιχει σε μια σρισμένη Θέση του καπακιό. Δείτε τον πίνακα των προγαμάτων μαγειρεματος;ΠINAKAΣ ΠΡΟΓΡΑΜΜΤΟΝ MΑΓΕΙΡΕΜΑΤΟΣ
Σημειωη: Kaτα to μαγείρεμα, μπορείνα παρατηρόσετε μια μικρή διαρρόν ατμου από to καπάκι, συγκερμεύνα από τη βαλβίδα ασφαλείας πίεος. Eivai φυσιολογίκο και συμβαίνει ὄτavirus ηπεόη.| Eukaryota eukaryota | Ovoidea | Pseudomonas aeruginosa | Candida parapsilosis | Proteobacteria | Phylum | Bacteroidetes | Phylum | Bacteroidetes | Phylum | Bacteroidetes | Phylum | Bacteroidetes | |
| Kanaii | Kanaii | Kanaii | Kanaii | Kanaii | Kanaii | ||||||||
| Kanaii | Kanaii | Kanaii | Kanaii | Kanaii | Kanaii | ||||||||
Póypαμα αpyou μayéipéματος
ToOnoTeTnOte ta uAikocTo maayepiko okevoC, kEioTe teLeiwCs KAI aOphiaiote to KaTIKI. - Περιοτρέψετον διακόπητου πίνακα ελέγχου προς τα δεξία γιαν επιλέξετετο πρόγραμμα αργού μαγειρεματος . Στην oθόνη εμφανίζεται o προεπιλέγενος χρόνος μαγειρεματος. - PpOaIepiKa: PAtnoTe To kai opiTe tov EtiuumTo xpoVo nepiotpéfoVtac tov diaKoTn Tou nivaka eEyxou npoc ta (yia auEnon Tou xpovou) n pOc ta apiotepa (yia mEiwon Tou xpovou). - PatnoTe to yia va xekivnoei to npoypaum aayelpemuatoc. H ouokevn Eekiva t n faon npothepuavong. Tnv ofoyn ephiaviocovta evaalaoi evedeltaieic KAL HEAE KAI n Evdeiktikn luxvia tnc npohepuavong avaabei. Molc oloknpw0i n fao npoepmuovc, n ouokun eTaaive autouata otn faon mayepmuato. Tnv oovn ephiavi etai n avtioptpoh mertpon kai n evdeltaikntknauxvi yia to mayepmae ExiIg na vabiEi. KaTn diakaoia tou maeyepaotc, dnioupyeitai nieon otn oukeun kai n 8aIdelta a e nnptpa avbaivei npoc ta navw. H evdekikn luxvia yia to okeuoc uno pieon avaeu wc eldooinon nwc to kaakl dev mnpei va avoiei npotou aneuvepwoei nieon. - Στο τέλος της αντίστροφής μέτρησς, n συοκεύν καVEL ευαν χαρακτηριστό ἡχο καὶ στήν oθόνn εμφαύνεζεται n ενδεξη [End]. -Metα αnto liya δeutepolenta, n ouokeu μεtaβaiveu autóμata σtn Φαση δiatnpnɔnc θεροκpaoiaç. Σtnv oθovn εμφαviεται η ενδειξη [Hoe] kai n ενδεiktikn λuxvia δiatnpnɔnc tnc θεροκpaoiac [m] αναβει. - Παποτε to ⑤ για 3 δευτερόλεπτα για να σταματησετε to πρόγραμμα ανα πάσα στιγμή. PpOpaMa OoUanac
ToOnoTeTnOte ta uAikocTo mayeipiko okevoC, kLeioTe teLeiwCs KAI aOphiaiote to KaTaki. - Περιορεψετον διακόπητου πίνακα ελέγχου προς τα δεξία γιαν συμασους. Στην Θθόνη εμφάνιεται προεπιλέγμενος χρονος μαγερεματος. - PpOaIepTeK: PAnTo KAI OpiTe Tov EINUHTo XpOvo TEPiOTpefoVtacTovdeltaKoTTnTouPiVAKA ELeyXouPocTa SEIGIA (Yia auEnon Tou Xpovou) n PpOc Ta apoiTepa (Yia meiowon Tou Xpovou). - Παπόσε το ⑤ γιανξεκίνησει to πρόγραμμα μαγειρεματος. H ouokeu n Eekiva t n faon npoepmuavoc. Tny oovn eauovtai evaalaoi evdeieic kai HERkai n evdektikn luxvia nC npoepmuavoc avaβe i. Molc ooknpoWei n faon npoepmuovcn, n oukeun eTaiae i autouata otn faoon mayepmuatoc. Tnv oovn ephiavi etai n avtioptpnon metpnon kai n evdeiktikn luxvia yia to mayepma oE ExiIgneavabci. KaTn diakaoia tou maeyepaotc, dnioupyeitai nieon otn ouokun kai n 8aIdelta aE pntpaaivei npoc ta naw. H evdeiktn kuxvia yia to okeuoc uno nieon wavbeu wc eioiOn nwc to kaaki dev mtopeiv avoieip npotou aneuvepwtheta i nieon. - Στο τέλος της αὐτίαροφής ὅτηρησς, n συοκεύνη κάνει εναν χαρακτηριού τός καὶ στήν σθόνη εμφαύζεται n ἐνδεῖξη [End]. - Meta anto liya deutepolenta, n ouokeun metabaiveu autouata otn faon diatnpnongeepokpaoiac. Tnv oovn ephiavietai n evdeltaikn kai n evdeltaiktikn luxvia diatnpno n tnc eepokpaoiac avaβei. - Παποτε to ⑤ για 3 δευτερόλεπτα για να σταματησετε to πρόγραμμα ανα πάσα στιγμή.1
Póypaμα Avakatéouμε tnyaviouμε
- Περιοτρέψετον διακόπητου πίνακα ελέγχου προς τα δεξία για νεπιλέξετετο πρόγραμα Ανακατεύουμε τηγανίζουμε . Στην oθόνη εμφανίζεται o προεπιλέγμένος χρονος μαγερέματος. - PpOaIepiKa: NaTnote To 已 opioTe Tov EtnuunTo XpOvo nepiopTpEoVtac Tov diaKoTTn Tou nivaka EeYxou npoc ta (yia auon Tou xPovou) n npoc ta apiotepa (yia meiowon Tou xPovou). -Προαρετικα: Παπθοτε το ⑥ και σρίσε τήν επιθυμητη Θερμοκρασία περιστέφοντας τόν διακόπτη τόν πινακα ελέγχου προς τα δεξία (για αύξηση τής Θερμοκρασίας) ἡ προς τα αριστερά (για μείωση τής Θερμοκρασίας). - Παπόσε to ⑥ γιανξεκίνησει πρόγραμμα μαγειρεματος. H ouokevun ekivaei tn faon npothepuavoc. Tnv oovn ephiaviocvtai evaalaoxi evdeltaick cKai HEAE KAI n evdeltaiktikn luxvia tnc pnoepmuavoc avaβe i. Molc oloknpw0i n fao npoepmuovc, n ouokun eataive autouata otn faon mayepmuato. Tnv oovn ephiavi etai n avtioptpoh mertpon kai n evdeltaiktkn luxvia yia to mayepma oE EeAign avaBci. - TomoTheTneTa uAikα OTo μayeipiko okeuoc kai αhote to Kaia KAOI AvoiTo yia va KaaveTe stir-fry. - Στο τέλος της αντίστροφής μέτρησς, n συοκεύν καVELι εναν χαρακτηριστό ἡκο και στήν oθόνn εμφαύνεζεται n ενδεξη [End]. - Metα απο λίγα δευτερόλεπτα, η συσκεύν μεταβαίνει αυτόματαστη λειτουργία αναμονής. Στην Θθόνη εμφαίζεται η ενδειξη - Παποτε to ⑤ για 3 δευτερόλεπτα για να σταματησετε to πρόγραμμα ανα πάσα στιγμή. Póγραμα ατμού
Báλte 150 ml vερο (3/4 της κουπας) στο μαγειρίκο σκεύος, toποθετήσε to Εξαρτημα ατμού μέσα στο σκεύος και μετα προθέσετα τα υλικα σας. Kλείσε τέλείως to καπάκι και ασφαλίσε το. - Περιοτρέψετον διακόπητου πίνακα ελέγχου προς τα δεξία για να επιλέξετετο πρόγραμα ατμού. Στην Θθόνη εμφαυζεται o προεπιλέγμένος χρονος μαγειρέματος. -Προαρετικά: Παπότε το ② και σρίσε τον επιθυμήτο χρόνο περιστέφοντας τον διακόπτη του πίνακα ελέγχου προς τα δεξία (για αύξηση του χρόνου) ἡ προς τα αρισερά (για μείωση του χρόνου). - PatnoTe to 忍 ia va xekivnoei to npoypaumua ayepaatoC. H ouokevn Eekiva t n faon npothepauvoc. Tnv ofov n ephiavicovtae vaaiaoi evdeltaic KAI HEAE KAI n evdeltaiktki n luxvia nC npothepauvoc avaβei. Molc ooknpoWei n fao npothepuavoc, n oukeun eataiveaoutouata otn faoon mayepaeatoC. Tnv oovn ephiavi etai n avtioptpoh metpnon kai n evdeltaikntiakxvia yia to mayepea oE EeAixn avaBci. KaTn diakaoia tou maeyipepaotc, dnmuoyeitai nieon otn oukeun kai n 8aIb6 aE pAovtnpaaevbaivei npoc ta naW. H evdekikn luxvia yia to okeuoc uno pieon avaei wC eioiOnn WcTo kaKtki dev mtopeiv avoiei npotou aneuvepwtheta i nieon. - Στο τέλος της αντίστροφής μέτρησς, n συοκεύν καVEL εναν χαρακτηριστό ἡχο και στήν oθόνn εμφανίζεται n ενδεῖξη [End. -Metα aio liya δeutepolεπta, n ouokeun μeTaβaiveu autouata σtn Φaon δiatnpnong θεροκpaoiaç. Σtnv oθovη εμφaviεtai n ενδειξη [Hoe] kai n ενδεiktikn λuxvia δiatnpnong tnc Θεροκpaoiaç [w] avβεi. - Παποτε to ⑥ για 3 δευτερόλεπτα για να σταματήσετε to πρόγραμμα ανα πασα στιγμή. PpOpypauaa ynoiaatoc
ToTOnoTeTnOte ta uLkα nou éxete npoTeoiαoeI OTo mayeipiko okeuoc kai kλeioTe, aλλa μny αofoiaoTe to kaTakl. - Iepiotpépsi tov diaokontn tou nivaoka eleyxou poc ta deiia yia va eniieeteto npoypauma ynoimuotc. Tnv oovn ephiavi etai o poeiileyevoc xpvoc maeyipémuotc. - Pinoapetiká: ΠatnoTE to kαo iOte Tov επθuŋto xpóvo πeipotpeφovtacTov δiakópttn Tou πivakα ελéγxou πoç ta δεξia (yia αúξηon tou xpovou) n pOc ta aρiσtepa (yia μεiωn tou xpovou). -Προαρετικα: Παπθοτε το ⑥ και σρίσετην επιθυμητη Θερμοκρασία περιστρέφοντας τον διακόπτην του πινακα ελέγχου προς τα δεξιά (για αύξησητης Θερμοκρασίας) ἡ προς τα αριστερά (για μείωσητης Θερμοκρασίας). - Παπόσε to ⑤ γιανξεκίνησει to πρόγραμμα μαγειρεματος. H ouokevn Eekivaen phaon npoepmuavoc. Tnv oovn ephiaviocovtaevaalaooi evdeieic KAI HEAEKai n evdkiKni luxvia nC npoepmuavoc aVaei. Molc oloknpw0ei n fao npothepuavons, n ouokueu meaive auotouata otn faon mayepmuato. Tnv oovn ephiavieta n avtioptpno n metpnon kai n evdeltaiktikn luxvia yia to mayepma oE ExiIg na vaei. - Στο τέλος τής αντίστροφής μέτρηός, η συοκεύη καVEL εύαν χαρακτηριστιό ἡχο και στήν οθόνη εμφαύνιξεται η εύδειξη [End. - Meta ano liya deutepolenta, n ouokeun metaabeu auotouata otn phaon diatnpnongs 0epkoopaiac. Tnv oovn ephiavietai n evdeltaikntiuxvi a diatnpnong tnc 0epkoopaiaac avaei. - Πατήσε το ② για 3 δευτέρόλεπτα για να σταματήσετο το πρόγραμμα ανά πασα στιγμή. Póγραμα Apyó μαγείρεμα
- Περιστρέψετον διακόπητου πίνακα ελέγχου προς τα δεξία για νειλέξετε to πρόγραμα Apyó μαγείρεμα έτην Θθόνη εμφάνιζεται o προεπιλέγμένος χρονος μαγείρεματος. - PpOaIepiKa: PAnToTe ② kai opiTe ToV EπUμnto XpOvo πePiotpeovtac Tov diaKoTn Tou nivaka EλEyxou pOc Ta δEla (yia auxon Tou xpovou) n pOc ta apiotepa (yia μεiowon Tou xpovou). - PpOaIepTeK: PAtnoTe to ① kai opiote tny eNtoumntn Θερμokpaoia περιστρéφovtac tov δiakóπtn tou πivakα ελέχου πος τα δεξια (για αύηση nτς Θερμokpaoiaç) n πος τα αριστερα (για μειωη nτς Θερμokpaoiaç). - Παπόσε το ⊙ γιανξεκίνησει to πρόγραμμα μαγειρεματος. H ouokevn Eekiva t n faon npoepmuavoc. Tny oovn eauovtai evaalaoi evdeieic KAI HEAE KAI N EvdEiktikn luxvia nC npoepmuavoc aVaei. Molc ooknpoWei n foan npohepuavon, n oukeun eTaeivauotoumaata otn faoon mayepaatoz. Tnv oovn ephiavietai n aviotpOon metpnon kai n evdeiktikn luxvia yia to mayepmae Eelxiqn avaabei. - Στο τέλος της αντίστροφής μέτρηός, η συοκεύν ἀναν καρακτηριστικό ἡχο καὶ στήν οθόνη εμφανίζεται ἡνδεῖξη [Erid. - Metα αnto liya δενιτρολεπτα, η συοκυμη μεταβαίνει αυτόματαστη λειθουργία αναμούνις. Στην Θθόνη εμφαίνειδαι η ενδειξη = = = - έπατησε to ⑤ για 3 δευτερόλεπτα για να σταματησετο το πρόγραμμα ανα πασα στιγμή.Pnpoypauma npitc
ToToTeTnToTaUkOToMayeIpiKoKekuoc,KeioTe TeLeiwC Kau aOphiaiote to KaTakl. - Περιστρέψετον διακόπητου πίνακα ελέγχου προς τα δεξία γιανα επιλέξετετο πρόγραμμα πόρις . Στην oθόνη μεφανίζεται o προεπιλέγμενος χρόνος μαγειρέματος. -Прауетikа: Патно te 重心 opioTe tov επιθυμntó xρόvo περιστέφοντας tov διακόπητου πίνακα ελέγχου προς τα δέξια (για αύξησου xρόου) ἡ προς τα αριστέρά (για μειώνι οὐ xρόου). - Πατηοτε to ⊙ γιανξεκίνησει to πρόγραμα μαγελερεματος. Houkeun Ekiivalei tn foan npohepuavoc, 2tnv ofoyn ephiavicovat evaalaoi Evseieic Kai HEAE KAI n EvdeiktiKn luxvia Tns pOeepuavoc avaBc. Molc ooknpoWei n faon npothepuavoc, n ouokun eataivei autouata otn faoon mayepmuato. Tnv oovn ephiicetai n avioptpno n metpon kai n evdeiktikn luxvia yia to mayepema oE Exiian avaβei. - Στο τέλος της αντίαροφής μέτρησός, η συοκεύμι κάνει εύαν χαρακτηριστικό ἡκο καὶ στην οθόνη μεφανίζεται η εύδειξη [Erid]. Metαπoλiγδειτρολεπα,ησυοκενμεταβαίνειαutóματαση Φαση διατήρονιςθερμοκραοίας.Στηνοθόνημφανιζεαιη ενδειξη Kαιηνδεικικλυχίαδιαπήρονιςτηςθερμοκραοίας(avαβει. - Πατησετο ⑤ για 3 δευτερόλεπτα για vα σταματήσετο το πρόγραμα ανα πασα στιγμή.PpOpypaumpuziou
ToOneTeTo a Ulika oTo Maayeiipiko OkevoC, KLeiote TeleiwC Ka aphiaiote To kaTaki. - Περιοτρέψετον διακόπητου πίνακα ελέγχου προς τα δεξία για να επιλέξετετο πρόγραμα ριζιου . Στην oθόνη εμφαύνεταιο προεπιλέγμένος χρονος μαγερέματος. - PpOaIepiKa: PAtnoTe To kai opiTe tov eTou mnto xpoVo nepiotpéfoVtac tov diaKoTTn tou nivaka eEyxou npoc ta (yia auEnon tou xpvou) n npoc ta apiotepa (yia meiowon tou xpvou). - Παπόσε το ⊙ γιανξεκίνησει το πρόγραμμα μαγειρέματος. H ouokeu n Eekiva t n faon npothepuavoc. Tny oovn eauovtai evaalaoi evdeltaic Kau HReK aN evdeltaikntknauxia nC npothepuavoc avabci. KaTn diakaoia tou maeyepaotc, dnioupyeitai nieon otn ouokevn kai n 8aIdelta a ne Iwntnpa avbaivei npoc ta navw. H evdekriikn luxvia yia to okevooc uno nieon avaeu wC eisodoinon nwoC to kaKai dev mtopei va avoiei npotou aneuvepomegae i nieon. - Στο τέλος της αὐτίαροφής μέτρησς, n συοκεύν κάνει εναν χαρακτηριστό ἡκο και στήν oθόνη εμφανίζεαι η ενδεῖξη [End. -Metα αnto liya δeutepolεπτa, n σuokεun μεtaβaiveu autóμata σtn φαση διαπροης θερμokpαoiac. Σtnv oθovn εμφαviζεται ηενδειξη [Hoe] kai n ενδεικτικλuxvia διαπροηnc tns θερμokpαoiac [avβεi. - Παποτε to ② για 3 δευτερόλεπτα για να σταματησετε to πρόγραμμα ανα πάσα στιγμή.Ipoypauma yiaouptiou kai zmuatoC
To npópyaμα γiaouptiou kaiζμωμatoc μπopeivaxρnσiμoŋοɪηθεi γia tynapαokeun γiaouptiou nζμnc ψwμiou/σφoλiatac. - Iα vα παρασεύσετη γιαύρι, τοῦτησε τα ζλικα στο μαγερικό Κεύος και λέίσετο το καπάλι. - Iα vα παραοκεύσετε ζύμη, μπορείνενα ζύμωσετη ζύμη μέσα στο μαγειρίος Κεύος και, κατόπιν, να τοῦθετησετο μαγειρίος Κεύος στο περβλημα καινα κλείσετετο κατάκι γιαναξεύνησετε τη δίουκωση. - Περιοτρέψετον διακόπητου πίνακα ελέγχου προς τα δεξία για να επιλέξετε to πρόγραμμα γιαύρτιου καίζυμμωματος Στην oθόνη εμφαviζεται o προεπιλέγμένος χρονος μαγειρέματος. - PpOaIepTeK: PAtnoTe To KAI OpiTe Tov EINUUMTo XpOvo TEPIOTpeoVTOv δiakontn Tou NivaKa EλeYxou NPOs ta δEla (yia auEnon Tou xpvou) n pOsc ta apIOTepa (yia mEiwon Tou xpvou). - Pioaipetik: PatnoTe to kai opiTe tnv eToumtn thepuokpaaia neiopertpeovtac tov diakoTn tou nivaKa eLeyou poc ta dexi (yua uEnon tnc thepukpaiaac) npoc ta apiotepa (yia meiowon tnc thepukpaiaac). - Παπησετο (♀) γιαν ξεκεύνησει το πρόγραμια μαγελερεματος. H ouakeun Eekivaei tn faon npoepmuavoc. 2tnv oovn ephiaviocov tau evaalaoi evdeltaic kai HEAE kai n evdeltaiktikn luxvia tns npoepmuavoc avaβe i. Molc ooknpothei n faon npoepmuovnc, n ouokeun metaBaiveu autouata otn faon maayepmuatoc. Tnv oovn ephiavicetai n aviotpofn etponk kai n evdeiktikn luxvia ia to maayepma oE eEliqni avaBc. - Στο τέλος τής αὐτίστροφής μέτρηONS, η συοκεύν κάνει εύαν χαρακτηριστό ἡκο και στην oθόνη εμφανίζεαι η εύδειξ [E. n.] - Metα αnto λiγα δειτρόλεπτα, η συοκενή μεταβαίνει αυτόματα Οηλειουργία αναμόνης. Στην οθόνη εμφανίζεια ηένδειξη. - Παπότε to ⑤ για 3 δευτερόλεπτα για να σταματήσετε to πρόγραμα ανα πάσα στίγμή. Puθμiζóμενηλειτουργiaσεφ
ToTOnoTeIntoTaUIAKoTOmuayelipkoOKeuocKaaovaoMaTouvtayn, EIIAEEe eav Oa KkEioTe To KaIakl. - Περιστρέψετον διακόπητου πίνακα ελέγχου προς τα δεξία γιαν επιλέξετε τη ριθμιζόμενη λειούργία σεφ . Στην Θθόνη εμφανίζεται o προεπιλέγμενος χρόνος μαγειρέματος. - Pinoapetiká: Patnote to kai opioTe tov επιθμntó xρovo περιστέφοντας tov διακόπητου πίνακα ελέγχου πος τα δεξία (yia αύξησην του xρόvου) ἡ προς τα αριστερά (yia μειώην του xρόvου). - PpOaIepTeiKaTneTo kai opioTe Tny EeIthuunTh Θερμokpασia πεpiotpefovtac tov δiaKoTTn tov πivakα ΕλéyXou poc ta deξia (yia αUxon tnc Θερμokpαoiac) n poc ta apiotepa (yia μεiωon tnc Θερμokpαoiac).Pntote to yia va ξekivnoiTo póypaμma ayepéμatoc. H ouokevn Eekvai Tn faoon PpOeepuavoc. Tnv oovn ephiavicovta evaalaoi EvdeieKc Kau HEKc kN Evdeiktikn luxvia tnc PpOeepuavoc O avaei. Molc oloknpwEi n faoon npoEpuvoc, n ouokevn eataivei autouata otn faon mayepmuato. Tnv oovn ephiizeta n avtioptpoh mertponkai n evdeltaiktikn luxvia yia to mayepma oE ExiAixn avaBcI. - Στο τέλος της αὐτίστροφής μέτρηός, η συοκεύν κάνει ευαν χαρακτηρίοικό ἡχο και στήν οθόνη μεφαυξεται n ἐνδεξή [End]. -Metα απο λίγα Σεντερόλεπτα, n συσκενιμηταβαίνει αύτοματα στη λειτουργία αναμονίς, Στην σθόνη εμφανίζειαι n ἐνδεξή. -Plahtote to 已 yia 3 8eutepeoAen ta va oataatnoet to npoypauma ava naoa stiyu. * Ipótaon yia ypinyopo Κεσταμα γευματων: opioTE tη Θερμοκραοία στούς >=95°C και μαγειρέψTE με to καπάκι κλειότο, χωρίς να εἰναι ασφαλισμένο.7. Xpñon tnc λeitoupyiaç καθυσερημενnç εναρξnç
H kaθuotpερημένη ευαρξ Μας δίνει τη δυνατότητα ρύθμιος της συοκεύς, υτετο το μαγείρεμαν αλεκίνησει αργότερα. - Eπιλέξε πρωτα ενα πρόγραμα ακολουθώντας τα βήματα που περιράφοντα παραπάνω, στην παράγραφο 6. - Ppiu anto tnv Ekkivnon tou eilaymuevou npoypaumato, Pntote to ⑤. TnV oovn ephiaviEeTai O npoeiileymuevoc Xpovoc yia tnV kaovotepnuev evapxn. - Puθμiσte tov επιθυμntó χρον περιστρέφοντας tov διακόπητou πίνακα ελέγχου προς τα δεξία (για αύξησηου χρούου) nπρος τα αριστερά (για μείωσηου του χρούου). - Παπησετο ② . Στην Εθόνη εμφανιζεαι η αντίστροφη μετρηση της καθυστερημένης ἔναρξης.Οταν περάσει o προκαθρισμένος χρόνος, η συσκεύηθα ξεκινήσει το μαγείρεμα αὐτόματα.8. AvoIyMa Tou KaTakIoU
Mny eipnoe To avoiet To kntaki av n 8aIdelta a E Iwtnpa eivai aeBaeuyn kai n evsekikn luxvia uno tiocn Y eivai avamevn. HpiEoN mTopei va aTeAeVthepwOei 2 TpOouc oTo TeLoC tou Ip O oc ΦuoiKn aπελeuaepwon: KaT to teLoC tou uayieipμatoC n μetα αnto tn δiakοπn tou πpoypαμatoc, n σωakeun θa Kpuwoei kai n πieon θa aπελeuaepwθei fuoiKa. KaT n fuoiKn aπελeuaepwon, to paynto evδexetai va uayiepeutei πepioofoe oio oo npéei, lówy tnC unolaeinóμevnc πieong oTo okeuoc. Xpnoiμoioñote tn diabikoaia tnC xεipokivtnC anελeuaepwons yia va δiakóψete áeoga tn δiabikoaia uayieipμatoC. Xeipokivtn aneAevepwon: Pntote napatetaeva to koupi aneAevepwons tns niEons, navw oTo kaNak. Xpeiaovtaeepik a deutepolent a ewc epiKa aavloya e tvn nootna fayntou oTo ayelipko okeuoc (Ek.31). IPOEIOIOIHs: Pooeexte tov kauto ato nou byaivei ano tn ouokevun. KpatnoTe to npocwno kai ta xepia oac maakpi aanto tv atuo (Eik.45). - Iα vα ανοίξετο το καπάκι, τοῦθετήσετο το χερι σας παραλληλμε τις πλευμικές λαβές, κρατήσε τη λαβή του καπακιόύ, περιστέψετε αριστέρόστροφα καὶ σήκωσετο το καπάκι (Eik.32 kaɪ 33). IPOEIAOIOIHsH: PpOeXeTe Tov KauTo aTmo nou Byaivei ano to9. Anouovδεοτε τη συοκεύν ἀπό τὴν πρία
- Meta ano tn xpnon, anoovseote tn ouokean kai ophiote tnv kpuwoei yia toulaixotov 2 wpe npiu tnv kathetaipoe.10. Kaθαρισμός Μετα απο τη χρήση
- Kaθαρίοτε τη συοκεύν μετα από καθε χρήση. - Πριν από tov καθαρισό, αφήσε τη συοκεύνν ακριώσει για touλάχιστον 2 ωρες. - Γα Μηγες καθαρισμού, ανατρέξετο Σην παράγραφο 3. Για τόν καθαρισό ὅλων των εξαρτημάτων τής συακεύπες ανατρέξετο Σην ενότητα ΠΡIN ΑΝ ΦΟ έΝ ΠΡΟΤΗ11. Συμβουλές σουντήρηός
- va δiaαφαλiσετην αθεκτικότητα tou μαγερικόν σκεύους, μην κόβετε τρόφια μέσα σε autó. Xpnoiomoiite ta npexoEv aepntma. Mny xpnoiomoite metaaikc epyaia, kaohc nopoei va othapei n avkoanikn eioptpwon tou ayepipkou okeouc. - Metá anó t n xρnón, o ΟTEyavontoiintikós δaktuioε evδexetau va μupiζεi onw to φayntó αac. Eivai φuoioloyiko. H oilikovη éxei μikpouc πopouc πou avoiyouv Šανιθεται συηλες Θερμokpaoies κai kλeivouv ξανá Šανιθη Θερμokpaoia επανελθει σε χαμηλα επιπεδα. TIA VA αφαipéoεte TIC OOμες anó tov ΟTEyavontoiintikó δaktuio, μπopeite: - Na πλύνετον δακτύλιο από σιλικόνη στο πλυντήρο πιάτων - Na προσθέοετε 1 κούπα ξύδι, 1 κούπανερο και 1 λεμόνι κομένο σε μεγάλα κομάτια στο μαγείρικό σκεύος καινα χρησιροισησετε to πρόγραμα ατμόύ για 2 λεπτα και, κατόπιν, να αφήσετε tov ατόν απελεύθερωθεί φυσικά. -Avtikataotne tov oteyavonoiintiko daKTuio kaOe 2 xpvia n vwpitepa, e npintwnoopac. O△HFOIANTIMETQNIIZHETEXNIKQN IPOBAHMATQN| Пróбдема | Пговс сацяс | Л�орс |
| Абваша оvoуматок кattakioу | Абваша оvoуматоς loучо пioл sc, sto maуерikó okeuoc. | Празюпаростаму to koumti politeeavépwoan, piieonc yia va politealevberpoete tvn pioet on to tomaуерikó okeuoc, mIoptoe vxa xpeiaotov uvepiKá lettá mexvi va ateleuberpwtei piIpuoc n tioum. |
| H piieon sto maуерikó okeuoc otealevberpawetai pIauwuc, αλλαη βaIbδa με πλιτρα exei koIaŋe iTeiδn eivai tnoLβρωμkη kai dev mitopei va katébei. | α. BeBauwéite πwç n tioum éyei ateleuberpwtei pIauwuc, αφívovtac tn oukeuyn vka ρuωe iY a ToulaXiotov 2 wpc.β. Σπρωte atalá t n βaIbδa μe πλιθρa πoC ta KATU, totoBetwntac evaξIaikn éva μakpú avtukeiyevo sto avoiyua tnc βaIbδac μe πλιθρa. Eav to πρobjuaδev λuθei, osteiante tn ouokeun oEva εgouio botmeyev kévtrpo oepic.γ. Γα triν etoumevn xphon, kaθαρίote kai oteyuwatet n βaIbδa μe πλιθρa oxolataká. | |
| Абваша кoleiúmatoс кattakioу | О оteyavotouitikocdeltaktulioc δev exei tnoToθetnei σωotá. | Tortoetnototov tov oteyavotouitikódeltaktulio ωotá. |
| To maуерikó okeuoc pIepiexei kautá uIká πou pIapayouv atiu. | П配电'vetěmeу lexvi va kruwouv ta uIká σоуерikó okeuoc, pIotou'etuexipniəte gavá vka KλeioTe to kanták. | |
| H bαIbδa μe πλιθρa exei kαIaŋe iTeiδn eivai tnoLβρωμkη kai, etouénuw, δev mitopei va metakivnθe iIpoC ta katw. | α. Σπρωte atalá t n βaIbδa μe πλιθρa πoC ta KATU, totoBetwntac evaξIaikn éva μakpú avtukeiyevo sto avoiyua tnc βaIbδac μe πλιθρa. Eav to πρobjuaδev λuθei, osteilte tn ouokeun oEva εgouio botmeyev kévtrpo oepic.β. Γα triν etoumevn xphon, kaθαρίote kai oteyuwatet n βaIbδa μe πλιθρa oxolataká. | |
| H ΘeON n/kaɪ n Kateuθuvon ttou ekAIEOte to kantáki eivai eofoλuEvn. | КALEOTE to kattaki proCt ng atownt Kateuθuvon, oμduvua μe to eyxeipidio xphon. | |
| Отавоуете to kattakci, to maуерikó okeuoc tpoapáévei ouvsedeuévo STO Kattakci. | О оteyavotouitikocdeltaktulioc exei πρokalééi avappófni. | To maуерikó okeuoc οα ateleuberpwtei mOvo tou ato to kattaki. Eivai φuioLOyikó kai attoidekiuei tvn kαλn οteyavotnTa tou pioióvtoc, iα triV atoΦuoynπtownc tou maуерikó okeuoc stO pioió Kovatá to avoiyua tou kattakci, ovoiyete πávta to kattaki tpooektiKA. |
| Пróблела | Пговсаоцic | Июсяс |
| Евtownг ameleuθерowam пileoçм atot to Μαλβiδα аофалeicamпileoç. | H εοωτερική πίeησουνι μεγαλυερησι στό την πίeησι λειουγιας ἡ εοωτερική πίeησι Εναι μεγαλυερησι στό την πίeησι αοφαλείας. | Kaθαριοτe διεδούκα τη βαλβiδα αοφαλείας πίeοης, ηι βαλβiδα με πλωτίρα και το κατάκι. Av εξακολούθει αν βαγίει αιμίος ατοτη ηαβλβiδα με πλωτίρα, ατευθυθείτο ΤΑπλοίεθερο εθουσοδοθμένον κέτονο Ερβίς γι έλεχο, επιακεύην έρουσιηροι που Πρετεινιναροιτοιηθει Από εθουσοιδοθμένον αἰτομο. |
| H βαλβiδα αοφαλείας πίeοης βριοκεται σε αφαλμένη Θεόη. | Περιαρέψει/πίοετe προαεκτία τη βαλβiδα αοφαλείας πίeοης γιν αμίοι στη θεόμι ΚΤΟ Φερετεν το κατότο ατμίο. Tότοθβει Θεότε Εαοφαλί Κθέη Και φρατε πιριαία γάντια. | |
| O εοφαλμένος ἔλεγος της πίeοης obηγησε στην απελυεθέρωσι πίeοης. | Σειλετη Σιούκεύη σε ευλ εθουσοδοθμένον κέτονο Ερβίς γι επιακεύην. | |
| Συνεχός ameleuθερωο πίeοης atot to Μαλβiδα με πλωτίρα. | H εοωτερική πίeησουνι μεγαλυερησι στό την πίeησι λειουγιας ἡ εοωτερική πίeησι Εναι μεγαλυερησι στό την πίeησι aοφαλείας. | Kaθαριοτe διεδούκα τη βαλβiδα αοφαλείας πίeοης, ηι βαλβiδα με πλωτίρα και το κατάκι. Av εξακολούθει αν βγίαει αιμίος ατοτη θαβλβiδα με πλωτίρα, ατευθυθείτο ΤΑπλοίεθερο εθουσοδοθμένον κέτονο Ερβίς γι έλεχο, επιακεύην έρουσιηροι που Πβρετεινιναροιτοιηθει Από εθουσοδοθμένον αἰτομο. |
| Yπολείμιαστην βαλβiδα με πλωτίρα. | α. Παριοτe παροτετομένα to κουμί πατελυεθέρωσις πίeοης γιν αν επελεθερωσετε Απγ περει ατοτη μαγερίκο Εκυος Mιθοpeiν αν χερλαστουν Μερίκα λεπτί μέχρινα σαν επελεθερωθει πλρρως η πειη. | |
| β. Αφαριοτe Μιαούκεύνα κριωσει γιν τουλαστον 2 υμες. γ. Kaθαριοτe και στεγμωτε Π. | β. Αφαριοτe Μιαούκεύνα κριωσει γ. Kaθαριοτe και στεγμωτε Π. | |
| Kαλβiδα με πλωτίρα éxei κλλησει. | α. Παριοτe παροτετομένα to κουμί πατελυεθέρωσις πίeοης γιν αν επελεθερωσετε Απγ περει ατοτη μαγερίκο Εκυος Μιθοpeiν αν χερλαστουν Μερίκα λεπτί μέχρινα σαν επελεθερωθει πλρρως η πειη. | |
| Kαλβiδα με πλωτίρα éxei κλλησει. | β. Αφαριοτe Μιαούκεύνα κριωσει γιν τουλαστον 2 υμες. γ. Kaθαριοτe και στεγμωτε Π. | |
| Пróблар | Пговсаціпес | Л�ожец |
| Диагрон ατουο ατό to kaṭákl. | О огелуаноитикός δактualioc δέν ἐχει τοῦθεηθει σωτά. | Афраίρους тов огелуаноитикό δактualio, кαθαιρίοτe тов кαι ετώναιοθεηθίοτe тов στή σωτή θέοι. |
| О огелуаноитикός δактualioc εivala βρόμικος. | Афраίρους тов огелуаноитикό δактualio, кαθαιρίοτe тов кαι ετώναιοθεηθίοτe тов στή σωτή θέοι. | |
| О огелуаноитикός δактualioc ἔχει utootei βλαβη, ὀ το γελιος tou μαγeιρίου σκεύος ἔχει utootei βλαβη. | Στέλετη συακеύη σέ ευλεύοιδοτημένον κέντορο σέρβις για επιοκeύη. | |
| To φάγητό δέν εivala μαγeιρεμένο | H αναλογία στέρεύν/υρύν υιλίνιν εivala εσφαλμένη. | Δοκμάσε Εανά, ακολουθώντας με ακρίβεια τις ποιστητές τής συντañς. |
| Δέν utáρχει παροχή ρεύμαιος ατό τήν πρία. | Ελέγξετο oιαίακό ηλέκτρικο kυλμία. | |
| Εμφανιζεται ένδειξη E0 στήν ψημιακή Θόθουν. | Ο διακόπτης πίεος εivala Ἇλattuματικός. | Στέλετη συακeύη σέ ευλεύοιδοτημένον κέντορο σέρβις για επιοκeύη. |
| Εμφανιζεται ένδειξη E1 στήν ψημιακή Θόθουν. | Ο αιοθητήρα Θέρμοκραίας εivala Ἇλattuματικός. | Στέλετη συακeύη σέ ευλεύοιδοτημένον κέντορο σέρβις για επιοκeύη. |
| Εμφανιζεται ένδειξη E2 στήν ψημιακή Θόθουν. | To katáki δέν εivala ωστά τοῦθετημένον για to συγκεριμένον πρóγραίμα μαγερίματος, Σέ καθε Πρóγραίμα αντίοτηχει μια opiaμένη θέοη του καταίού. | Ελέγξετο και προσαρμόθετη ηθεητου του καταίαιου σύμφινα με to πρóγραίμα μαγερίματος, ανωτρερεο οτον πιναία τυν προγραίματων μαγερίματος στήν του πράγραρο 6 toι πραόντον Εγερίριδιο. Ετανεκκινηότο to πρóγραίμα στόντων to katáki τοῦθετηθει σωτά.Εόν to Πρóβλημα παραμένει, Ετέλετη η συκούνη Κέντορο σέρβις για επιοκeύη. |