PLP 180 SOLDERING GUN - Schweißgerät PARKSIDE - Kostenlose Bedienungsanleitung
Finden Sie kostenlos die Bedienungsanleitung des Geräts PLP 180 SOLDERING GUN PARKSIDE als PDF.

| Produkttyp | Lötkolben |
| Marke | PARKSIDE |
| Modell | PLP 180 |
| Gewicht | 1050 g |
| Nennspannung | 230 V |
| Frequenz | 50 Hz |
| Nennleistung | 180 W |
| Isolationsklasse | II |
| Maximale Lötspitzentemperatur | 600 °C |
| Aufheizzeit | 5 Sekunden (max. 12 s Dauerbetrieb, min. 48 s Ruhe) |
| Beleuchtungslampe | 6 V / 3 W |
| Verwendungszweck | Intervallweichlöten von Drähten und Verbindungen von 1 bis 3 mm |
| Hauptbestandteile | Lötspitze, Befestigungsschrauben, Kontrollleuchte, Drucktaster, Griff, Netzkabel |
| Wartung und Reinigung | Lötspitze mit feuchtem Schwamm reinigen; Lötspitze durch Lösen der Schrauben wechseln |
| Sicherheitshinweise | Nicht im Dauerbetrieb verwenden; Gerät vor jedem Gebrauch prüfen; Schutzausrüstung tragen |
| Ersatzteile und Reparierbarkeit | Ersatzlötspitzen erhältlich; Reparatur durch einen Fachmann |
| Garantie | 36 Monate ab Kaufdatum |
| Allgemeine Informationen | Entspricht den EU-Richtlinien (98/37 EG, 73/23 EWG, 89/336 EWG) |
Häufig gestellte Fragen - PLP 180 SOLDERING GUN PARKSIDE
Benutzerfragen zu PLP 180 SOLDERING GUN PARKSIDE
0 Frage zu diesem Gerät. Beantworten Sie die, die Sie kennen, oder stellen Sie Ihre eigene.
Eine neue Frage zu diesem Gerät stellen
Laden Sie die Anleitung für Ihr Schweißgerät kostenlos im PDF-Format! Finden Sie Ihr Handbuch PLP 180 SOLDERING GUN - PARKSIDE und nehmen Sie Ihr elektronisches Gerät wieder in die Hand. Auf dieser Seite sind alle Dokumente veröffentlicht, die für die Verwendung Ihres Geräts notwendig sind. PLP 180 SOLDERING GUN von der Marke PARKSIDE.
BEDIENUNGSANLEITUNG PLP 180 SOLDERING GUN PARKSIDE
PARKSIDE


PLP 180
C∈ 2003
PARKSIDE
PARKSIDE
PLP 180 SOLDERING GUN
Dear Customer! We are delighted that you have decided to purchase our high quality PLP 180 soldering gun. Please make sure you familiarise yourself fully with the way the equipment works before you use it for the first time and that you understand how to handle electrical power tools correctly. Please read carefully through the following operating instructions i and the following safety advice A . Use the equipment only as described and for the indicated purposes. By doing this you will be able to work in complete safety and produce better results.
We hope you enjoy using your soldering gun.
PROPER USE
Soft-soldering in intermittent use on wires and soldered joints of 1 - 3mm in size. Any other use or modification of the device is deemed to be improper use and could give rise to considerable dangers.
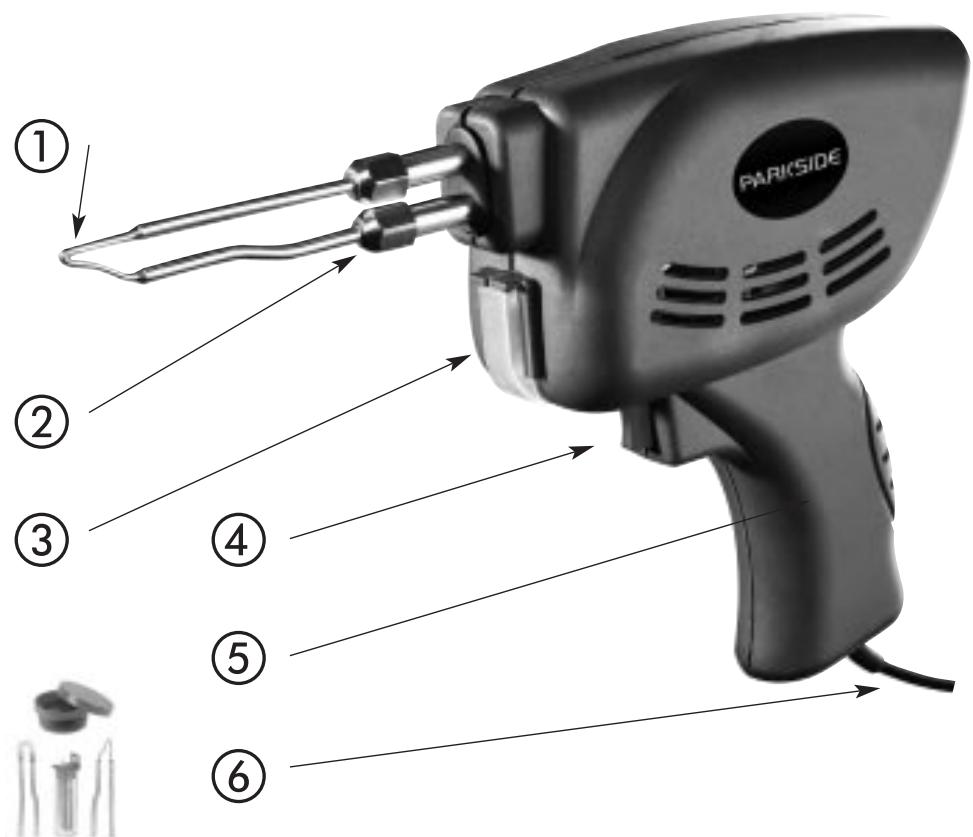
FEATURES OF THE PLP 180
① Soldering tip
② Fixing screw
③ Operation indicator / Illumination of the soldering area
④ Push-button switch (device switch)
⑤ Device handle
⑥ Device plug/cable
TECHNICAL DATA
Nominal voltage: 230 V
Frequency: 50 Hz
Rated consumption: 180 W
Insulation class: II
Weight: 1050 g
max. soldering
tip temperature: 600^
Ready for soldering after: 5 sec
ON max. 12 sec. / OFF min. 48 sec.
Bulb: 6 V / 3 W
IMPORTANT SAFETY ADVICE
Before using your soldering gun for the first time please read the section "Working safely".
Before every use check that the soldering gun is in proper operating condition; does the power supply match the requirements, is the solder about to run out or is it broken?
The size of the soldering tip must be suitable for the size of the soldered joint.
The soldering tip must be free of contaminants. A small wet sponge is ideal for cleaning it
Make sure that the joint surfaces to be soldered are bright, clean metal. There must be no dirt and oxide coating present. If necessary clean the soldering site with alcohol.
The strength of the soldering site must be greater than the solder.
Use the general solder/ tin solder sparingly. Remember - a site that has been soldered before cannot be made free of solder residue.
This soldering gun is intended for home use only.
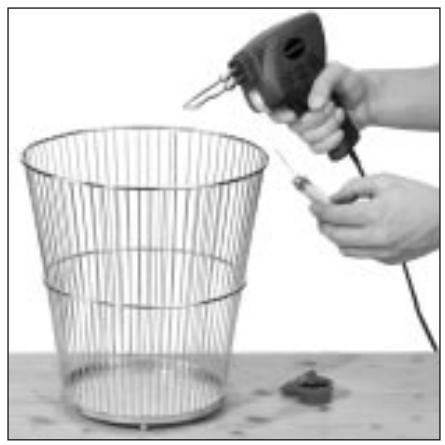
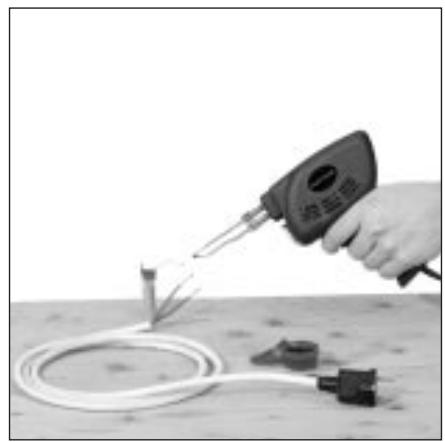
OPERATING INSTRUCTIONS
- Prior to use, draw the soldering tip through the soldering paste which is also supplied.
- Direct the soldering tip ① towards the soldering point.
- Actuate the push-button switch ④. The operation indicator ③ lights up
- In order to heat up the soldering tip, keep the switch pressed down for max 12 sec. before starting the soldering work until the necessary soldering heat has been reached - then let go of the push-button switch.
Never operate the soldering gun for continuous peroids!
The duration of the power supply controls the soldering heat (longer power supply = higher soldering heat). During the soldering process, never keep the push-button switch pressed down for too long. Determine the necessary duration of the power supply in practice by checking the soldering heat.
Press the ON/OFF switch ④ for a maximum of 12 seconds – then do not operate the gun for at least 48 seconds.
As soon as you let go of the push-button switch, the soldering heat is reduced automatically. If the switch is actuated again, the heat increases rapidly. Constant soldering heat guarantees an optimum soldering quality, melting of the soldering tip due to excessive temperatures is avoided and the service life of the device is extended.
Prior to use, draw the soldering tip through the soldering paste which is also supplied.
Because the operating temperature is reached quickly, the device functions in a very energy-saving manner. The special shape of the soldering-gun tip makes partial heating possible. Thus, the device is particularly operator-friendly and accelerates the heating process in the case of tin soldering.
MAINTENANCE OF THE DEVICE
Soldering tips and the soldering gun housing are connected together using screws and nuts so that the soldering tips can be quickly and easily changed.
Because the tip melts and wears after lengthy use, it is necessary to replace it at regular intervals.
CHANGING THE SOLDERING TIP
Unscrew and remove the two fixing screws connecting the tip and the housing. Replace the old tip with a new one and re-insert and tighten the screws. The device is then ready for operation once again.
SAFE OPERATION
- Check the mains voltage.
Please make sure that the available mains voltage corresponds to that shown on the rating plate on the equipment.
- Switch equipment on before placing into contact with workpiece.
Always turn on the equipment before placing it into contact with the workpiece.
- Keep your working area tidy.
Untidiness at your working area may lead to accidents.
- Take surrounding influences into consideration.
Do not subject power tools to rain. Do not use power tools in a moist or wet environment. Ensure good lighting. Do not use power tools close to inflammable liquids or gases.
- Protect yourself against an electric shock.
Avoid physical contact with earthed parts such as tubes, radiators, stoves, refrigerators.
- Keep out of reach of children.
Keep other people away from your working area.
- Store your tools in a safe place.
Tools not being used should be stored in a dry, high and closed place, out of the reach of children.
- Do not overload your power tools.
Your work is safer and better if carried out within the indicated capacity ranges.
- Use the correct power tool.
Do not use machines of insufficient capacity for heavy-duty work. Do not use tools for other purposes than those for which they are intended, for example do not use a manual circular saw for cutting tree trunks and timber.
- Wear appropriate workwear.
Do not wear wide clothes or jewellery since they might be caught by mobile parts. When working in the open, rubber gloves and non-skid footwear is recommended. Wear a hair net if you have long hair.
- Wear eye protection, protective mask and ear defenders.
For work which produces splinters, swarf or dust or when working overhead always wear eye protection, with an appropriate protective mask. When working in noisy conditions, wear ear defenders.
- Connect the dust suction device.
If devices for the connection of dust suction equipment and collectors are available, ensure that these are connected and properly used.
- Use cable only for such purposes for which it is intended.
Never carry the power tool by the cable. Do not use cable to disconnect the tool from the mains supply. Protect the cable against heat, oil and sharp edges.
- Secure the work piece.
Use a fastening device or a vice to secure the work. This guarantees a safer hold than with a single hand and allows you to operate the power tool with both hands.
- Avoid abnormal posture.
Get a firm stand and hold your balance at any time.
- Service your tools carefully.
Keep your tools clean and sharp to be able to perform better and safer work. Observe the service instructions and the note regarding change of tools. Check the cable of the tool regularly and in case of damage, ask for professional repair. Check extension cables regularly and replace them if damaged. Keep handles dry and free of oil and grease.
- Disconnect the mains plug.
When power tool is not used, before maintenance and when changing tools, such as saw blade, drill, hob.
- Always remove tool keys.
Before switching on device, ensure that the keys and adjustment tools are removed.
- Avoid unintended start.
Do not carry any tools connected to the mains supply with your finger on the switch. Ensure that the switch is off when plugging instrument into socket.
- Extensions in the open.
Only use authorized and respectively marked extensions for use in the open.
- Be attentive.
Pay attention to what you are doing. Act sensibly. Do not use the power tool if you are not fully concentrating.
- Check the power tool for any possible damages.
Before further use of the power tool, the protection devices or any lightly damaged parts must be carefully examined. Check whether the mobile parts function correctly and do no jam or if any parts are damaged. All parts must be mounted correctly and meet all conditions to guarantee perfect operation of power tool. Any damaged protection devices and parts must be repaired professionally by a recognized expert workshop or exchanged, unless otherwise stipulated in the operation manual. Damaged switches must be replaced at an after-sales workshop. Never use power tools whose switches cannot be operated.
- Make others aware of how to handle the equipment.
If you lend or hand over tools to another person make sure you explain how to handle the equipment. Always pass on this safety advice and the instructions for use.
- Take care when working from ladders and scaffolds.
Special care must to be taken when working from ladders or scaffolds. Make sure they are correctly assembled and secured against slipping.
- Attention!
Only use such accessories and auxiliaries that are listed in the operating instructions. Use of replacement tools other than those stipulated in the operating instructions or other accessories may entail the risk of injury for operator.
- Have your power tool repaired by a professional electrician.
This power tool complies with the relevant safety regulations. Repair work may only be carried out by a professional electrician by using original spare parts; otherwise this may entail in accidents for the operator.
WARRANTY
This piece of equipment is covered by a 36-month warranty as of the date of purchase. The equipment was produced with the greatest of care and underwent thorough testing before delivery. In the unlikely event of detecting a functional defect, please return the equipment in its original packaging with the proof of purchase (if available) to the closest service address.
Damage caused due to improper handling as well as regular wear of the parts are not covered by this warranty.
Beaver Electronic Services · The Lodge, Premier Business Park
Long Street, Walsall · West Midlands, WS2 9DY
Tel.: 01922/725554 Fax: 01922/725417
WARRANTY
This piece of equipment is covered by a 36-month warranty as of the date of purchase. The equipment was produced with the greatest of care and underwent thorough testing before delivery. In the unlikely event of detecting a functional defect, please return the equipment in its original packaging with the proof of purchase (if available) to the closest service address.
Damage caused due to improper handling as well as regular wear of the parts are not covered by this warranty.
Irish Web Specialists
1 Verbena Avenue · Dublin 13
Tel.: 01/8320492 Fax: 01/8396829
DECLARATION OF CONFORMITY (C)
We, Kompernaß Handelsgesellschaft mbH, Burgstr. 21, D-44867 Bochum, Germany, declare that this product complies with the following EU directives:
Machinery Directive (98/37 EC), Low Voltage Directive (73/23 EEC, 93/68 EEC), Electromagnetic Compatibility (89/336 EEC, 93/68 EEC) in accordance with the applicable standards, and confirm this with the CE mark.
Type/machine description: PARKSIDE PLP 180 SOLDERING GUN
Bochum, 31.01.2003

Hans Komperna
- Managing Director -