VidiProof - Camcorder BRAUN - Kostenlose Bedienungsanleitung
Finden Sie kostenlos die Bedienungsanleitung des Geräts VidiProof BRAUN als PDF.

| Produkttyp | Camcorder |
| Marke | Braun |
| Modell | VidiProof |
| Abmessungen (ca.) | 10 × 5 × 5 cm |
| Gewicht (ca.) | 200 g |
| Stromversorgung | Li-Ion Akku, 3.7 V |
| Videoauflösung | Full HD 1080p (1920 × 1080) |
| Fotoauflösung | 5 Megapixel (interpoliert) |
| Digitalzoom | 10-fach |
| Bildstabilisator | Elektronisch |
| Speichermedium | SD/SDHC-Karte (max. 32 GB) |
| Anschlüsse | USB 2.0, HDMI (Mini), AV |
| Display | 2,7" LCD (ca. 230.000 Pixel) |
| Funktionen | Videoaufnahme, Fotografie, Zeitraffer, Nachtmodus |
| Reinigung & Pflege | Linse mit Mikrofasertuch reinigen; Gerät trocken und staubfrei lagern |
| Sicherheitshinweise | Nicht in Wasser eintauchen; Akku nicht kurzschließen; Gerät vor extremen Temperaturen schützen |
| Ersatzteile & Reparierbarkeit | Ersatzakku, Ladegerät, USB-Kabel erhältlich; Reparatur nur durch Fachpersonal |
| Garantie | 2 Jahre (bei ordnungsgemäßer Nutzung) |
Häufig gestellte Fragen - VidiProof BRAUN
Benutzerfragen zu VidiProof BRAUN
0 Frage zu diesem Gerät. Beantworten Sie die, die Sie kennen, oder stellen Sie Ihre eigene.
Eine neue Frage zu diesem Gerät stellen
Laden Sie die Anleitung für Ihr Camcorder kostenlos im PDF-Format! Finden Sie Ihr Handbuch VidiProof - BRAUN und nehmen Sie Ihr elektronisches Gerät wieder in die Hand. Auf dieser Seite sind alle Dokumente veröffentlicht, die für die Verwendung Ihres Geräts notwendig sind. VidiProof von der Marke BRAUN.
BEDIENUNGSANLEITUNG VidiProof BRAUN
VIDIPROOF Manual
IMPORTANT
- Don't open the battery door under water.
- Close the battery door properly for best water sealing.
- Rinse by clean water after use and keep it dry for storage.
After used this camcorder under water, the voice recording quality will be affected as there still has water inside the mic and speaker compartment.
The sound will be resumed to normal once water dry out.
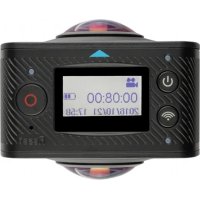
1. Key features of your camcorder
Full HD digital video commander = 1820x1500 up to 30fps
HOTY HCM high deviation markets compa
2.17 from quick LTPS min* LCD display
SKI for Micro SD Memory cord, support up to 16GB SD card capacity
Dine-Heinz, A. H. 2017, XP-4 and MAC 10.4 of the
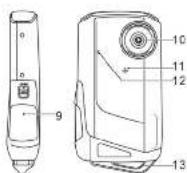
2. Functional parts
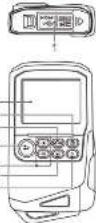
| Item | Part | Function |
| 1 | USB Interface. For transforming images and video links to connection via USB cable. Card slot, inserting more SD card for digital files, charging. HDMI socket. Use a pixel HDMI socket for HDTV connections. LCD zoom: LCD shows images, video camera, camera Settings and Menu Menu Button. Press to bit PICTURE VIDEO recording app icons. Mode Button. Press this button to select mode. PICTURE taking or VIDEO recording. Motion Button. Press this button to take off PICTURE; In Start or Stop recording VIM/Video loop. In other channels (Off) in menu mode. Zoom Button. Zoom in a CUT slot during recording mode. Volume ramp button. Getting the volume in video playback mode. Up/Down button. In MENU mode, push the key up/down from UP/DOWN addition. Playback button. In photo mode, press this button to enter the Playback PICTURE mode. In video mode, cross this button to enter the Playback VIDEO mode. Power Button. 1. Pressing and breaking the power button is turn back off the unit. 2. Pressing the button to lock some display. Battery 3x 2x AA inline bar is present. Lands, Offsets and Video & Picture Taking. Speaker. Speaker. Top video playback | |
| 1 | Speaker | Audio format |
| 1 | Macgruppe | For video format |
| 1 | Strip Track | For hang hand step |
3. Explanation of the status icons
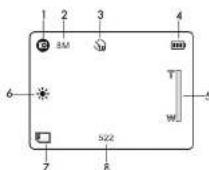
| Item | Function | Description |
| 1 | Recording mode | Photograph mode. Video mode. |
| 2 | Serial and resolution | Photo-34, 5V, 9V Video Full HD, 1600P30, 72CP10, WVGAP60 WVGAP30, VGA, GVGA |
| 3 | Solder | On/Off |
| 4 | Battery indicator | Battery is full Uply battery |
| 5 | Zoom indicator | Show zoom range |
| 6 | White beam icon | White beam selection. |
| 7 | SD card indicator | The SD card is inserted and will be used as storage for PHOTO and VIDEO |
| 8 | Counter indicator | Show available time for recording VIDEO Show active recording VIDEO clock Show picture installed in PHOTO mode |
4. Details for camera setting
PHOTO selling
| Audio mode, pressing the MENU button and set to PHOTO. Then pressing the OK button to set to photo edit mode. | ||
| Audio | Super First: First(Duty) Normal | 111113 quantity setting |
| Size | 3M slot convolution | 204x 1936 pixels |
| 5M slot convolution | 2592 x 1944 pixels | |
| 8M slot convolution | 3200 x 2400 pixels | |
| Set-time | On | Set-time selected, 10 sec delay |
| Off | Turn to the set-time slide | |
| VIDEO setting | ||
| in video mode, opening the MENU button and set to VIDEO, then opening the OK button to set to video edit mode. | ||
| Audio | Super First: First(Duty) Normal | VIDEO quantity setting |
| Resolution | Full HD | 1000x1000 up to 30fps |
| 100/3P0 | 1440x3000 up to 30fps | |
| 230/3P0 | 1200x200, up to 40fps | |
| WCA/3P0 | 840x400, up to 90fps | |
| WCA/3P0 | 840x400, up to 90fps | |
| VCA | 840x400, up to 90fps | |
| WCA | 300x400, up to 90fps | |
| Setup | ||
| in photoVideo mode, pressing the MENU button and set to SETUP by pressing the own button, then pressing the OK button to enter camera bank setup options. | ||
| TV type | NHD | American and American TV format |
| PAL | European TV format | |
| Oil | Auto Power Oil oil | |
| Auto power on | 1 min | Auto power off 1 min |
| 3 min | Auto power off 3 min | |
| 5 min | Auto power off 5 min | |
| Time setup | Year / Month / Day / Hour / Time | Getting the time on the image or video clos |
| Clutch view | 3rd / 1st/2nd / Off | Selected picture review time after photo locking. |
| Volume | 06 - 64 | Reading the volume. |
| Default setting | Yes / No | Reception the default settings |
| Format | Year / No | Format the G3 card |
| Language | English / Dutch / Irish / Italian / Caribbean / Netherlands / Park, Greece / CHS / CHT / Russian | Selected display language |
| Beep Sound | Off / High / Low | Setting the beer sound volume. |
| 5 image | On / Off | Setting the opening screen on or off. |
| Business | Div / Off | Setting the opening station or off. |
| File number | Board / Business | |
| Blide Show | 10th / 5th / 9th / Off | Setting the image slice time. |
| Paste | (Off) | Set for European electricity frequency. |
| Frequency | 40Hz | Set for American electricity frequency. |
| FW Vision | 40Hz | Set for The microwave action. |
| EffectIn photovoltaics mode, preaching the VENUBLATION and correct EFFECT by pressing the down button, then pressing OK to enter tilted options. | ||
| Starch | A last timestamped hourly:SportHeight landscape | Choose an opening Picture control |
| ISO | Aust / 200 / 400 | Second-day select |
| Morning | Center / Average / Spot | Interfering setting |
| Act | Autumnatic shift balance | |
| Serary | While balance selected for Sunday day | |
| Coarse | While balance selected for Monday day | |
| White Balance | Fluor count | While balance selected for two seconds/second light |
| intermediate | While balance selected for longer times/minute lighting | |
| Links | Necessary / Normal / Off / Square | Clicks setting |
| Shower case | Standard / Hard / Soft | Showercase setting |
| Fly Setting | C1 = 9.8, + 0.7, + 1.0, + 1.8, + 1.7, + 2.0 | Level of exposure |
Note: The current will remain in the last selling season if a forced CHF and CNV began
5. Using the camera
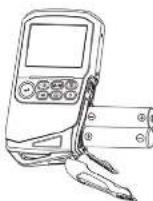
5.1 Battery installation
-
Heavens and spent the battery can
-
Intel supplied 2c Alkodna bilanica nio Pabuclary compartment
Align battery terminals with metal connectors made compartment.
- Close the salary scar
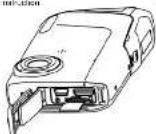
5.2 Inserting a memory card (not included)
You must install More 3D Care (not supplied) to record and store your VIDEO and PICTURES.
Follow the instruction for inserting a Micro SD Memory card:
-
Turn OFF the corner.
-
The Mean SD can then be Mean SD can not clearly present in the unit of value
Notes: Do not force the card into the slot; forcing may damage camera and the Micro SD memory
Note: The Micro 50 memory card must be installed before (after photography.
San Fe following situation
5.3 Formatting the SD memory card
If your 3D card or new, or it was used with other camera or device, you need to I PRINT the card and simply save before. If your current also, we would have worked in your 2nd floor.
- In photo/video mode, press the MENU button and select SETUP, then press OK to enter
amore basic setup options.
- Select FORMAT by pressing the LP (☑) button and press the UK button.
[Unreadable]
Note: D was (www.ironaline Mmp-ED root protein, vol. no 3)
make sure you save your valuable records before lenimating the memories.
Remember, all your records will be erased during formatting!
5.4 Setting the resolution
VIDEO recording mode
- Press the MENU button in video mode. Select VIDEO and press the OK button to enter
•
- Select RESOLUTION by pressing the UP ( [●] ) button, then press the OK button to enter each line counter.
The following table is in English:
E A HD (2020-1960) 1/87/201640-1680, 70/201790-750, INV4380 (848-650)
WVGAP30 (840 x 490), VGA (640 x 490), C/VGA(320 x 240)
then press the OK button to confirm sellng.
PICTURE taking most
- Press the MENU button in photo mode. See: PHOTO and press the OK button to enter
sp. 108,250
- Selective SIZE by pressing the UP (■) button, press the OK button to enter resolution selection
(一)本次股东大会的召集和召开程序
- Selective Section by: pre-ning PE QFT [17] DOAKI [2] EUNDA
1.2 (3.4) × 1.5(1) 3.8 (3.9) × 2.4(1) 7.0 (3.6) × 2.4(1)
- 2017年1月1日,公司与上海浦东发展银行股份有限公司签订了《最高额保证合同》,
5.5 Taking video or pictures
-
Tum on your corner.
-
Press the MODE button to select FICTURES: 📄 or VIDEO recording mode
-
Use the LCD screen as a screen under composing the scene.
Note: 1. Keep forward earnings products from the company
- Max video file size is 4GE. The unit will stop recording automatics.
5.6 Zoom IN and OUT
Your credit can account up to 4 x
Pressing the UP (☐) / DOWN (☐) buttons for selecting desired scene view
Note the 2008 bar in which we have the closing range.
| Resculator Digital zoom | |
| CVGA 30fps 4X | |
| VGA 50fps 4X | |
| WVGA 50fps 4X | |
| WVGA 60fps 4X | |
| 750P 30fps 4X | |
| 100P 30fps 2X | |
| FullHD Optoe | Without Digital Zoom |
5.7 Playback PICTURES and VIDEO clips
- In PHOTO / VIDEO mode, Press the PLAYBACK button (▶) to enter PICTURES / VIDEO
PASIKIN
-
Frucing the UP ( ☐ ) / DOAN ( ☐ ) button to select created FIGTURE / VIDEO.
-
Pressing the CK button to confirm selected VIDEO or see full size PICTURE.
-
When seeing stolen clips, press the £10 billion in start playing the series and press again in
polar.
- When playing the video, once the UP ( ) : CCWN ( ) but error for hot forward or
TEM 412 VIDES.
5.8 Delete photographs and video clips
- In PHC1D / VIDEO mode, press the PLAYBACK button (▶) in order PICTURES / VIDEO
Flapcock truss.
Select the photo or video to delete
-
Press the MENU button to enter the delete mode.
-
Pressing the UIP; ☐) : DC/AN; [buttons for select delete current image(YB)) or delete
At the request and please for OK to issue to confirm
6. Connecting the HD DV camcorder
6.1 Connect to TV
When you wish to view on High Definition (HD) TV, please use supplied HDMI cable and contact.

Get your HOTV to corresponding HDMI INPUT (review TV Manual if required) and use barriers
Buttons in the same way as you use camera during FLATBACK mode.
—by anising the line and the 91% of the right.
6.2 Connect to Personal computer
You may not correct your HD controller to PC for viewing PICTURES and VIDEOS on the
edit your videos or images and send them to friends over the internet or even post your own
VEELOS n° YouTube! M. Inno al people may close them?
Upload to YouTube
Please install MEDIAMPRESSION. This software enables upload to YouTube. This will take you
directly to YouTube Website for easy download of videos.
Installing Directx and Arcsolt MediaImpression
-
Please then provide CD into computer's CD-ROM and/or screen (atamps to print)
-
Her HRS scale is proved to improve its performance in core
-
Cucu Mio Comunitary, Reputable Data and spirelimous
-
Clos to open and watch high nutrition video placed back.
You may also install QuickTime (not bundled on supplied CDI or other suitable programs for best.
when playback
The text in the table is very similar, but the text is not. The text in the table is a reference to the text.
- Specification
| Image Sensor: 5.0 Megaprot COVID sensor | |
| Resolution | VDD.O |
| External memory card | Supported up to 10GB SD memory card (card is required to use video 8 pictures, cards in above SD cards are recommended) |
| File format | VIDEO: MCV / PICTURE: JPEG |
| Staff line | 10 second option |
| PCI Interface | USB 2.0 port |
| Power source | 3x AA intake bar channels |
| TV set | High Digital: VIDEO: HDMIShorted TV/INSD or PALI together: HDMI |
- PC system min requirement
| Operating System | Windows 7.2 V1: XPMax 10.4.4 or show |
| CPU | Period III: 10Hz (minimum)Period 4 / 3.0Gz or above processor (recommended) |
| RAM | At least 269MB (minimum), 1GB (recommended) |
| Intersat | USB available port |
| Diskay Cure | mV dia GeForce 7600 or ATIX 1500 or above |
- Troubleshooting
| Problem | Cause | Solution |
| Constant, Low ON the comparator | 1. Lower battery power2. Battery not started properly | 1. Pushes with near 2x AA showing batteries2. Check that battery or mostly align when included |
| VIDEO or PICTURES carried out several times and taking them. | 1. Micro SD card has been taken instead2. The Micro SD card has not been formatted properly3. Memory is full. Display seconds 50 MHz (1:1) | 1. Isell Mille SD card2. Formed the Micro SD card in SETUP mode of the computer. Please order to check 6.5.3. Download the picture and video from the computer to the computer to create storage interface |
| Computer does not recognize your computer when connected. You cannot find removable disk | Construction failure. | Make sure all quick connections are counted. Record the computer if necessary. |
| I'm battery like it very often. | imposed or read, start up, directly | Hipsesh with near 2x AA minimum batteries |
| Blurry images | 1. The HD camera is not, but the density during reception2. I have a high HD TV currently daily. | 1. Hold the HD DV common stereo when taking pictures, wait to hear the brain sound2. Check the area with each dry cash |

For EU only