PAM7.2 - Empfänger APART - Kostenlose Bedienungsanleitung
Finden Sie kostenlos die Bedienungsanleitung des Geräts PAM7.2 APART als PDF.

| Produkttyp | Empfänger |
| Marke | APART |
| Modell | PAM7.2 |
| Kanäle | 7.2 (7 Lautsprecher, 2 Subwoofer) |
| Ausgangsleistung pro Kanal | 100 W (8 Ohm, 20 Hz – 20 kHz, 0,05 % THD) |
| Frequenzgang | 20 Hz – 20 kHz (±0,5 dB) |
| Klirrfaktor (THD) | < 0,05 % |
| Signal-Rausch-Abstand | > 100 dB |
| Eingänge | 4× HDMI, 3× optisch, 2× koaxial, 1× analog (Cinch) |
| Ausgänge | 2× Subwoofer-Preout, 6× Lautsprecher-Terminals |
| Audioformate | Dolby Atmos, DTS:X, PCM, Dolby TrueHD |
| Video-Passthrough | 4K @ 60 Hz, HDR10, Dolby Vision, 3D |
| Netzwerk | WLAN (802.11ac), Bluetooth 5.0, Ethernet |
| Streaming-Dienste | AirPlay 2, Spotify Connect, Chromecast, Tidal |
| USB-Anschluss | 1× USB-A (für Audio-Wiedergabe und Firmware-Update) |
| FM-Tuner | Ja, RDS |
| Abmessungen (B×H×T) | 430 × 165 × 340 mm |
| Gewicht | 12,5 kg |
| Stromversorgung | 230 V AC, 50 Hz |
| Leistungsaufnahme (Betrieb) | 500 W |
| Standby-Leistung | < 0,5 W |
| Fernbedienung | Ja, inklusive |
| Display | OLED, 2 Zoll |
| Gehäusefarbe | Schwarz |
| Garantie | 2 Jahre |
Häufig gestellte Fragen - PAM7.2 APART
Benutzerfragen zu PAM7.2 APART
0 Frage zu diesem Gerät. Beantworten Sie die, die Sie kennen, oder stellen Sie Ihre eigene.
Eine neue Frage zu diesem Gerät stellen
Laden Sie die Anleitung für Ihr Empfänger kostenlos im PDF-Format! Finden Sie Ihr Handbuch PAM7.2 - APART und nehmen Sie Ihr elektronisches Gerät wieder in die Hand. Auf dieser Seite sind alle Dokumente veröffentlicht, die für die Verwendung Ihres Geräts notwendig sind. PAM7.2 von der Marke APART.
BEDIENUNGSANLEITUNG PAM7.2 APART
OWNERS MANUAL
PRE-AMPUFEER MIXER
STEEREO
PROFESSIONAL
PA-M-7.2
PAM-7.2 General Specifications :
Stereo output
Power
Dimensions & Weight
230 Vac, 8VA
70×140×325mm, 1.4 kg
1 mv, 600 ohm, balanced
Each microphone can be
placing the corresponding
Jumper JPI or JP2 internally
Music stereo inputs
Mio inputs
High
MID
low
S/N RATIO
Tone control
Freq. Response
THD
10000 Hz
1500 Hz
ZH 08
90 DE ± 12 DE
20-25.000 Hz 0.01%
OWNERS MANUAL
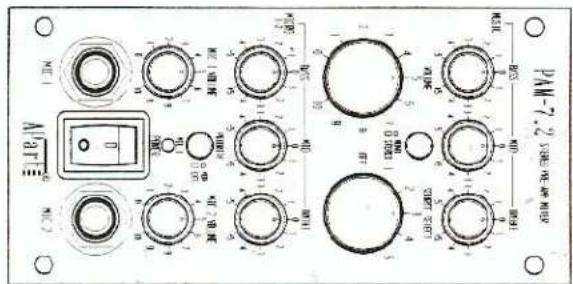
PAM-7.2 features & controls
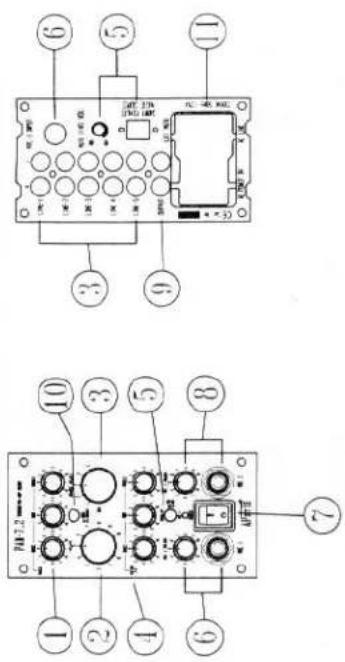
1. Tone control for music inputs 1-5
With these controls, you can adjust the timbre of your music input; LOW for "bass" tones, MID for mid tones(eg voice).HIGH for "treble" tones.
2. Master Volume control
This knob controls the volume of both the music sources AND the mix of the microphones.
3. Source select for music inputs 1-5
With this selector, you can choose one of the stereo music inputs which are connected on the rear Cinch RCA connectors.
4. Tone control for microphone inputs 1 + 2
With these controls, you can adjust the clearness or intelligibility of you microphones. However, a standard low-cut filter is built in to avoid "pop" sounds when a person speaks too close to the microphone. 5. Priority MIC 1 VOX/EXT switch With this function, you can choose between 3 possibilities ; a. mixing the microphones with the music The VOX/EXT switch must be cut and there may be not a short circuit on the Screw Terminal
The VOX/EXT switch must be out, and there may be not a short-circuit on the Screw Terminal
on the rear. Now, you can make a mix by adjusting the volume controls of music, mic 1 and mic 2 b. mixing the microphone 1 with 'talk-over' function on the music; auto-mixing
The VOX./EXT switch must be pushed in, and then the Screw Terminal on the rear is out of
function. Now, as soon as you speak through mic 1, then the level of the music will be attenuated or muted. When you stop speaking, the music will come back automatically. The level of this attenuation of the music can be adjusted by the mic 1 level on the front and the VOX trimmer on the rear. Mic 2 can also be mixed in this program, but without ‘talk-over’ function. c. priority of microphone 1 over the music
The VOX/EXT switch must be out. If you apply a short-circuit on the Screw Terminal on the rear, then the music will be muted. The rear VOX trimmer has no effect on this. Of course, the front volume control of mic 1 has to be set to the appropriate level. This function is often used in applications with 'call' or 'emergency calls'. Please note that the Screw Terminal may only be shorted by a contact, DO NOT apply any DC or AC voltages to this connector. 6. Volume control for microphone input 1
With this control, you can adjust the volume of your microphone input 1. This can be connected by the jack connector on the front or rear panel. 7. Power switch
Switch to "ON" position to turn power on, and to "OFF" to turn power off.
8. Volume control for microphone input 2
With this control, you can adjust the volume of your microphone input 2. This can be connected by the jack connector on the front panel. 9. Stereo cinch output
Output of the pre-amplifier mixer, to be connected to a power amplifier input. This output is a high quality drive output with mute circuit to avoid DC peaks when switching the unit ON and OFF. 10. Stereo-Mono switch
When this switch pushed in, then the Left and Right channels of the stereo music inputs shall be mixed to one Mono signal. This is often used when this unit is connected with Monoblock amplifiers MB-150 in multi-zone applications.
11. AC outlet(unswitched)/AC input
Use AC cord connect to the AC input to a AC socket.
Use the AC outlet to power other modules (with the MB-AC link cable) or to other associated equipment. AC voltage is always present as long as the amplifier is connected to the AC voltage source.
Precautions
WARNINGS
- All operating instructions should be read before using this equipment.
-
To reduce risk of electric shock, do not remove cover or back. There are no user serviceable parts inside. Refer servicing to a qualified service technician.
-
Do not expose this unit to direct sunlight or a heat source such as a radiator, stove or other heat producing appliance.
-
This unit should be cleaned with a damp cloth only. Avoid solvents or other cleaning detergents.
-
When moving this equipment, it should be placed in its original carton and packing or a suitable road case. This will reduce the risk of damage in transit.
If 'Hum' or 'Buzz' occurs when connecting different inputs, then this is often caused by 'ground or earth loops'. Inside, you can disconnect JP3 to break this ground loop. Please contact a qualified technician.
Block diagram
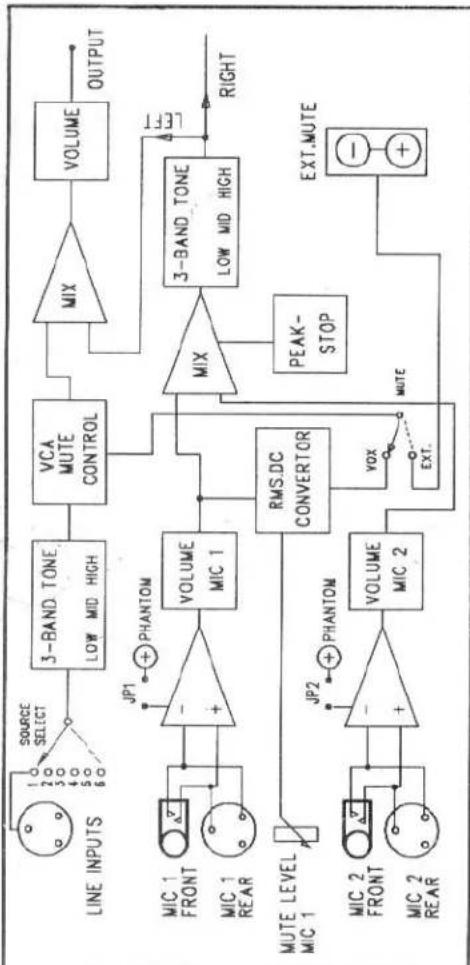
flowchart
graph TD
    A["SOURCE SELECT"] --> B["3-BAND TONE LOW MID HIGH"]
    B --> C["VCA MUTE CONTROL"]
    C --> D["MIX"]
    D --> E["VOLUME OUTPUT"]
    F["MIC 1 FRONT"] --> G["+"]
    H["MIC 1 REAR"] --> G
    I["MUTE LEVEL MIC 1"] --> J["+"]
    K["MIC 2 FRONT"] --> L["+"]
    M["MIC 2 REAR"] --> L
    G --> N["VOLUME MIC 1"]
    L --> O["VOLUME MIC 2"]
    N --> P["RMS.DC CONVERTOR"]
    O --> P
    P --> Q["VOX EXT."]
    Q --> R["PEAK-STOP MUTE"]
    R --> S["3-BAND TONE LOW MID HIGH"]
    S --> T["OUTPUT"]
    U["LEFT"] --> S
    V["EXT.MUTE"] --> S