BEDIENUNGSANLEITUNG BDX2000KE TOSHIBA
TOSHIBA
Blu-ray Disc Player BDX2000KE
OWNER'S MANUAL







Owner's Record
The model number and serial number are on the back of this unit. Record these numbers in the spaces below. Refer to these numbers whenever you communicate with your Toshiba dealer about this unit.
Model number: Serial number :
© 2009 Toshiba Corporation

INTRODUCTION
Safety Instructions
WARNING: TO REDUCE THE RISK OF FIRE OR ELECTRIC SHOCK, DO NOT EXPOSE THIS APPARATUS TO RAIN OR MOISTURE.

CAUTION RISK OF ELECTRIC SHOCK DO NOT OPEN

CAUTION:
TO REDUCE THE RISK OF ELECTRIC SHOCK, DO NOT REMOVE COVER (OR BACK). NO USER SERVICEABLE PARTS INSIDE. REFER SERVICING TO QUALIFIED SERVICE PERSONNEL.
The important note is located on the rear or bottom of the cabinet.

The lightning flash with arrowhead symbol, within an equilateral triangle, is intended to alert the user to the presence of uninsulated "dangerous voltage" within the product's enclosure that may be of sufficient magnitude to constitute a risk of electric shock to persons.

The exclamation point within an equilateral triangle is intended to alert the user to the presence of important operating and maintenance (servicing) instructions in the literature accompanying the appliance.

The symbol for CLASS II (Double Insulation)
Caution
- Do not attempt to open the cabinet. There are no parts inside you can service. Refer all servicing to qualified service personnel.
- Slots and openings in the cabinet at the sides and underneath are provided for ventilation. To ensure reliable operation and to protect the unit from overheating, these openings must not be blocked or covered.
Avoid installation in enclosed spaces such as bookcases unless suitable ventilation is provided.
- Keep the unit away from radiators and other heat sources.
- Avoid use near strong magnetic fields.
- Do not push objects of any kind into the unit through the cabinet slots or openings as they could touch electrically live parts or short circuit parts resulting in a fire or electric shock.
- To prevent fire or shock hazard, do not expose this apparatus to dripping or splashing, no objects filled with liquids, such as vases, should be placed on the apparatus.
- Do not stand the unit vertically. Use the unit in a horizontal (flat) position only.
- This product is in Stand-by mode when turned off while the mains cable is connected.
- Do not place a flaming object such as a burning candle on the apparatus.
- Before moving the unit, be sure to remove any media and unplug the mains cable from the AC outlet.
- Disconnect the mains plug to shut off the unit, if you suspect a fault has developed, or if it will not be used for an extended period.
- The mains plug shall remain readily operable and accessible.
- Read both instruction manuals to ensure correct and safe installation and interconnection of the unit in multimedia systems.
- Keep a distance of 20 cm around the ventilation openings of the apparatus.
-
Do not overload wall outlets; extension cords, or integral convenience receptacles as this can result in a risk of fire or electric shock.
-
Do not use a cracked, deformed, or repaired disc. These discs are easily broken and may cause serious personal injury and apparatus malfunction.
- If the apparatus should smoke or smell, immediately disconnect the power cord from the wall outlet. Wait until the smoke or smell stops, then ask your dealer for a check and repair. Neglecting to do so may cause fire.
- While it is thundering, do not touch the connecting cables or the apparatus.
Laser Safety
This unit employs a laser. Only a qualified service person should remove the cover or attempt to service this device, due to possible eye injury.
CAUTION:
USE OF CONTROLS OR ADJUSTMENTS OR PERFORMANCE OF PROCEDURES OTHER THAN THOSE SPECIFIED HEREIN MAY RESULT IN HAZARDOUS RADIATION EXPOSURE.
CAUTION:
CLASS 2 LASER RADIATION WHEN OPEN
DO NOT STARE INTO THE BEAM
LOCATION:
• INSIDE, NEAR MECHANISM
| CAUTION | - CASER RADIATION WHEN OPEN,DO NOT STARE INTO BEAM, (FDA 21CFR/Class 2) |
| ATTENTION | - CLASS 2 LASER RADIATION WHEN OPENDO NOT STARE INTO THE BEAM (IEC60825-1/Class 2)-RAYONNEMENT LASER DE CLASSE 2 EN CAS D'OLUVERTURENE PAS REGARDER DANS LE FASSEAU |
| 注意 | - ここを聞くとクラス 2のレーザー放射が出るビーム後の動きは届ないこと |
Avoid the Hazards of Electrical Shock and Fire
- Do not handle the mains cable with wet hands.
- Do not pull on the mains cable to disconnect Grasp it by the plug.
- If, by accident, water is spilled on the unit cable immediately and take the unit to an authorised service centre for servicing.
Moisture Condensation Warning
Moisture condensation may occur inside the unit when it is moved from a cold place to a warm place, after heating a cold room, or under conditions of high humidity. Do not use the unit for at least 2 hours to allow the inside to dry.
INTRODUCTION
Connection to Power
Before Switching on make sure that the voltage of your electricity supply is the same as that indicated on the rating plate.
Power Supply
The power supply is connected and the unit is live when the mains cable is plugged into a 220 - 240 V\~, 50 Hz AC outlet. To operate the unit, press [ON/STANDBY ⏻].
WARNING: LIVE PARTS INSIDE. DO NOT REMOVE ANY SCREWS.
Installation Location
For safety and optimum performance of this unit:
• Install the unit in a horizontal and stable position.
- Keep the unit away from electronic equipment such as an amplifier, TV, etc. to prevent warping, damage, fire and malfunction.
- Do not place anything directly on top of the unit.
- Shield the unit from direct sunlight and keep away from sources
nd stable position.
ic equipment such as an
top of the unit.
nt and keep away from sources
of intense heat. Avoid dusty or humid locations. Avoid locations with insufficient ventilation for suitable heat dissipation. Do not block the ventilation holes on the sides of the unit. Avoid locations subject to strong vibration or strong magnetic fields.
- Do not locate near water.
Do not place the unit on the furniture that is capable of being tilted by a child and an adult leaning, pulling, standing or climbing on it. A falling unit can cause serious injury or even death.

"This product is marked with "CE" and complies therefore with the applicable harmonised European standards listed under the Low Voltage Directive 2006/95/EC and the EMC Directive 2004/108/EC."
Responsible for CE-marking is
TOSHIBA INFORMATION SYSTEMS (U.K.) LTD, Toshiba Court, Weybridge Business Park, Addlestone Road, Weybridge, Surrey, KT15 2UL, United Kingdom
Other Precautions
About Recycle
A NOTE ABOUT RECYCLING
This product's packaging materials are recyclable and can be reused. Please dispose of any materials in accordance with your local recycling regulations.
This product consists of materials which can be recycled and reused if disassembled by a specialised company.
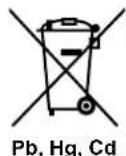
The use of the symbol indicates that this product may not be treated as household waste. By ensuring this product is
disposed of correctly, you will help prevent potential negative consequences for the environment and human health, which could otherwise be caused by inappropriate waste handling of this product. For more detailed information about recycling of this product, please contact your local city office, your household waste disposal service or the shop where you purchased the product.

The crossed out wheeled dust bin symbol indicates that batteries and/or accumulators must be collected and disposed of separately from household waste. If the battery or accumulator contains more than the specified values of lead (Pb), mercury (Hg), and/or cadmium (Cd) defined in the Battery Directive (2006/66/EC), then the chemical symbols for lead (Pb), mercury (Hg) and/or cadmium (Cd) will appear below the crossed out wheeled dust bin symbol. By participating in separate collection of batteries, you will help to assure the
proper disposal of products and batteries and thus help to prevent potential negative consequences for the environment and human health. For more detailed information about the collection and recycling programmes available in your country, please contact your local city office or the shop where you purchased the product.
Make your contribution to the environment!!!
- Exhausted batteries do not belong in the du
- You can dispose of them at a collection poi
exhausted batteries or special waste
- Contact your council for details.

INTRODUCTION
About Copyright
Unauthorised copying, broadcasting, public performance and lending of discs are prohibited. This product incorporates copyright protection technology that is protected by U.S. patents and other intellectual property rights. Use of this copyright protection technology must be authorised by Macrovision, and is intended for home and other limited viewing uses only unless otherwise authorised by Macrovision. Reverse engineering or disassembly is prohibited.
About Maintenance
Cleaning the Unit
Use a soft cloth slightly moistened with a mild detergent solution. Do not use solutions containing alcohol, spirits, ammonia or abrasive.
Cleaning Discs
If a disc becomes dirty, clean it with a cleaning cloth. Wipe the disc from the centre out. Do not wipe in a circular motion. Do not use solvents such as benzine, thinner, commercially available cleaners, detergent, abrasive cleaning agents or antistatic spray intended for analogue records.
Disc Handling
Handle the discs so that fingerprints and dust do not adhere to the disc surfaces.
Always store the disc in its protective case when it is not in use.
Servicing
If the unit becomes inoperative, do not try to correct the problem by yourself. There are no user serviceable parts inside. Turn the unit off, unplug the mains cable, and consult your dealer or an authorised service centre.
Cleaning the Disc Lens
If the unit does not perform correctly even though you have referred to "Troubleshooting" and the relevant sections in the Owner's Manual, the laser optical pickup unit may be dirty. Consult your dealer or an authorised service centre for inspection and cleaning of the laser optical pickup unit.
IR Signal Check
- If the remote control is not wo a digital camera (including a cellular phone with built-in camera) to see if it is sending out an infrared signal.
With a digital camera
(including built-in cell phone cameras):

Point a digital camera towards the remote control. Push any button on the remote control and look through the digital camera. If the infrared light appears through the camera, the remote control is working.
Because of problems and errors that can occur during the creation of DVD and CD software and/or the manufacture of DVD and CD discs, Toshiba cannot assure that this Blu-ray Disc Player will successfully play every disc or every feature of every disc bearing the DVD logo and/or every CD bearing the CD logo. As one of the creators of DVD technology, Toshiba DVD players are manufactured using the highest standards of quality, and as a result, such incompatibilities are rare.
About Remote Control
Installing the Batteries in the Remote Control
Install 2 R6 (1.5V) batteries matching the polarity indicated inside battery compartment of the remote control.

Make sure to match + and - on the batteries to the marks indicated in the battery compartment.
3)
Caution
Incorrect use of batteries can result in hazards such as leakage and bursting. Please observe the following:
- Do not mix new and old batteries together
- Do not use different kinds of batteries to Although they may look similar, different batteries may have different voltages.
- Make sure that the + and - ends of each b match the indications in the battery compartment.
- Remove batteries from battery compartment are not going to be used for a month or more.
- When disposing of used batteries, please comply with governmental regulations or environmental public rules that apply in your country or area. (Refer to page 3.)
- Do not recharge, short-circuit, heat, burn disassemble batteries.
Using a Remote Control
Keep in mind the following when using the remote control:
- Make sure that there are no remote control and the infrared sensor window on the unit.
i rRge pm opteer lyq py œur a atni a sne may become sunlight or fluorescent light is shining on the infrared sensor window of the unit.
- Remote control for different each other. Avoid using remote control for other device located close to the unit.
- Replace the batteries when yo operating range of the remote control.
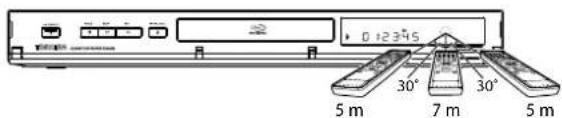
• The maximum operable ranges follows.
Line of sight: approx. 7 m
- Either side of the centre: approx. 5 m within 30°
- Above: approx. 5 m within 15°
- Below: approx. 3 m within 30°
INTRODUCTION
Supplied Accessories
- Remote control with R6 (1.5V) batDewryex'2 manual
- Composite audio / video cables - Quick start guide
Content
INTRODUCTION
Safety Instructions 2
Caution....2
Laser Safety....2
Avoid the Hazards of Electrical Shock and Fire ......2
Moisture Condensation Warning ....2
Connection to Power....3
Installation Location....3
EU Conformity Statement ....3
Other Precautions ....3
About Recycle....3
About Copyright....4
About Maintenance....4
About Remote Control....4
Supplied Accessories 5
Trademark Information......6
Features 7
Functional Overview 8
Front Panel....8
Rear Panel 8
Remote Control....8
Front Panel Display....9
Symbols Used in this Manual....9
CONNECTIONS
Connection to the TV.... 10
Connection to an Audio System.... 12
Network Connection with LAN 12
Finding the Video Channel on Your TV 12
PLAYBACK
Information on Playback.... 13
playable Media....13
Unplayable Media....14
Colour Systems....14
Region Codes....14
Structure of Media Contents.... 14
On-Screen Display.... 14
Preparing to Play Back.... 16
How to Insert a Disc.... 16
How to Insert an SD Card 16
Selecting the Media.... 16
Basic playback 16
Playing Back (BD, DVD or a Disc with
AVCHD files) 16
Playing Back (Audio CD or a Media with DivX®/
MP3/Windows Media™ Audio/JPEG Files)....17
Reading an SD Card....18
Kodak Picture CD....18
Special Playback 19
About DivX® and DivX® VOD....19
Playing Back a DivX ® with DivX ® External
Subtitle 19
Fast Forward / Fast Reverse....20
Slow Motion Playback....20
Step by Step Playback....20
Repeat Playback 20
A-B Repeat....21
Programme Playback 21
Random Playback 22
Rapid Playback....22
Useful Function....22
Noise Reduction 22
Virtual Surround....23
PIP (BONUSVIEW) Setting....23
Camera Angle....23
Enjoying BD-Live Discs with Online Content......23
Search....24
Switching Subtitles 25
Switching Audio Soundtrack....25
Setting the BD Audio Mode 26
FUNCTION SETUP
How to Navigate through the Setup Menus....27
List of Setup Menus....27
TV Aspect 32
HDMI Audio Out 33
Digital Out 34
Parental....35
HDMI CEC (REGZA - LINK) 35
One Touch Play....35
Standby 35
System Information....35
Network Connection ....36
Connection Test 36
Enable(Easy)....36
Enable(Custom)....36
Disable 38
Software Update 39
Current Version....39
Disc Update....39
Initialise....39
OTHERS
Language Code List....40
Troubleshooting....41
Specifications 42


INTRODUCTION




HDMI, the HDMI logo and High-Definition Multimedia Interface are trademarks or registered trademarks of HDMI Licensing LLC.
Manufactured under license from Dolby Laboratories. Dolby and the double-D symbol are trademarks of Dolby Laboratories.
Manufactured under license under U.S. Patent #'s: 5,451,942; 5,956,674; 5,974,380; 5,978,762; 6,226,616; 6,487,535; 7,392,195; 7,272,567; 7,333,929; 7,212,872 & other U.S. and worldwide patents issued & pending. DTS is a registered trademark and the DTS logos, Symbol, DTS-HD and DTS-HD Master Audio | Essential are trademarks of DTS, Inc. ©1996-2008 DTS, Inc. All Rights Reserved.
"x.v.Color" and "x.v.Color" logo are trademarks of Sony Corporation.

TM

"AVCHD" and the "AVCHD" logo are trademarks of Panasonic Corporation and Sony Corporation.

"BONUSVIEW" is trademark of Blu-ray Disc Association.

"BD-LIVE" logo is trademark of Blu-ray Disc Association.

Java and all other Java trademarks and logos are trademarks or registered trademarks of Sun Microsystems, Inc. in the United States and/or other countries.

DivX ® , DivX Certified ® , and associated logos are trademarks of DivX, Inc. and are used under license.
Windows Media and the Windows logo are trademarks or registered trademarks of Microsoft Corporation in the United States and/or other countries.
"Blu-ray Disc" and are trademarks.
DVD is a trademark of DVD Format/Logo Licensing Corporation.

is trademark of Eastman Kodak Company.
MPEG Layer-3 audio coding technology licensed from Fraunhofer IIS and Thomson.
THIS PRODUCT IS LICENSED UNDER THE MPEG-4 VISUAL PATENT PORTFOLIO LICENSE FOR THE PERSONAL AND NON-COMMERCIAL USE OF A CONSUMER FOR (i) ENCODING VIDEO IN COMPLIANCE WITH THE MPEG-4 VISUAL STANDARD ("MPEG-4 VIDEO") AND/OR (ii) DECODING MPEG-4 VIDEO THAT WAS ENCODED BY A CONSUMER ENGAGED IN A PERSONAL AND NON-COMMERCIAL ACTIVITY AND/OR WAS OBTAINED FROM A VIDEO PROVIDER LICENSED BY MPEG LA TO PROVIDE MPEG-4 VIDEO. NO LICENSE IS GRANTED OR SHALL BE IMPLIED FOR ANY OTHER USE. ADDITIONAL INFORMATION INCLUDING THAT RELATING TO PROMOTIONAL, INTERNAL AND COMMERCIAL USES AND LICENSING MAY BE OBTAINED FROM MPEG LA, L. L. C. SEE HTTP://WWW.MPEGLA.COM
EN
INTRODUCTION
Features
BD-Java
With some BDs which support Java applications, you can enjoy the interactive functions such as games or interactive menus.
BD-Live
BD-Live (BD-ROM version 2 Profile 2.0) that allows interactive functions to be used when this unit is connected to the Internet in addition to the BONUSVIEW function. The various functions differ depending on the disc.
Full High-Definition Video Playback
Watch movies in the highest picture quality available for your HDTV. This unit offers full high-definition video playback up to 1080p resolution for an amazing viewing experience. A highly detailed picture and increased sharpness delivers a more true-to-life picture.
DVD Upconversion for Enhanced Picture Quality
Your current DVD will look even better than before thanks to video upconversion. Upconversion will increase the resolution of standard definition DVD to high definition up to 1080p over an HDMI connection. The picture will be less jagged and more realistic for a near high-definition experience.
Enjoy Your Content on Different Kinds of Media
Full backwards compatibility with BD, DVD, CD and SD card ensures that you can continue to enjoy your current audio-video collection. Additionally, you can enjoy AVCHD/DivX®/MP3/WMA/JPEG files.
Experience Rich Multi-Channel Surround Sound
Multi-channel surround sound, which recognises real-to-life sound and makes you feel like you are really there.
PIP (BONUSVIEW)
Some BD-video have the PIP function which enables you to display the secondary video in the primary video. You can call up the secondary video by pressing [PIP] whenever the scene contains the secondary video.
Some BD-videos have pop-up menu which is a navigation menu that can be called up and be operated on the TV screen without interrupting the playback. You can call up the pop-up menu by pressing [POP MENU / MENU]. Contents in the pop-up menu vary depending on the disc.
Rapid Playback
Playback in slightly faster speed while keeping the sound output.
Rapid playback is available only on discs recorded in the Dolby Digital format.
Playback of Content from an SD Card
You can play back AVCHD/MP3/WMA/JPEG stored in an SD card.
You can store picture-in-picture commentary, subtitles or other extras for BD-ROM ver. 2 (Profile 2.0 / Profile 1.1) files in an SD card and play them back with the BD-video.
Playing Back AVCHD Files
This unit supports playback of AVCHD format files (new format for high definition video camcorders) recorded on disc/SD card. Your high definition personal archive is playable in HD quality.
x.v.Color
This unit supports playback of video contents on discs recorded with "x.v.Color" technology. To watch this video content with the "x.v.Color", a TV or other display device supporting both video image reproduction using the "x.v.Color" standard and capable of manually switching it's colour setting is required. Please refer to the owner's manual of your display device for further information.
Easy and Simple Connection to Your HDTV via HDMI
You can connect this unit to your HDTV with one single HDMI (High-Definition Multimedia Interface) cable. It is recommended to use a High Speed HDMI Cable for optimal compatibility. The high definition video output signal will be transferred to your HDTV without conversion to analogue signals, so you will get excellent picture and sound quality, completely free from noise.
HDMI Deep Colour
Deep Colour reduces the posterisation effect of the playback image. Refer to "HDMI Deep Color" in "FUNCTION SETUP" on page 28.
HDMI CEC (Consumer Electronics Control) (REGZA - LINK)
This unit supports HDMI CEC, which allows integrated system control over HDMI and is part of the HDMI standard. This function may not work properly on some devices.
HDMI 1080p24 Output (BD Only)
This unit is equipped with a feature which can provide the smooth movement in the playback of film originated material with the frame rate of 24 frames per second with progressive scan. (Available only when the TV is connected by an HDMI cable and compatible with 1080p24 frame input.) Refer to "HDMI Video Resolution" in "FUNCTION SETUP" on page 28.
HDCP Compatible
To play back the digital video images of a BD / DVD via an HDMI connection, it is necessary that both the unit and the TV (or an AV amplifier) support a copyright protection system called HDCP (high-bandwidth digital content protection system). HDCP is copy protection technology that comprises data encryption and authentication of the connected AV device. This unit supports HDCP. Please read the operating instructions of your TV (or AV amplifier) for more information.
INTRODUCTION
Functional Overview
Front Panel

(*) The unit can also be turned on by pressing these buttons.
- Press to turn on the turn the unit into the standby mode. (To completely turn off the unit, you must unplug the mains cable.)
- ON/STANDBY ⏻ indicator
- PAUSE II button
- STOP ■ button
- PLAY▶ button*
-
OPEN/CLOSE ▲ button*
-
Disc tray
- Display
- Infrared sensor window
- SD card slot
Rear Panel
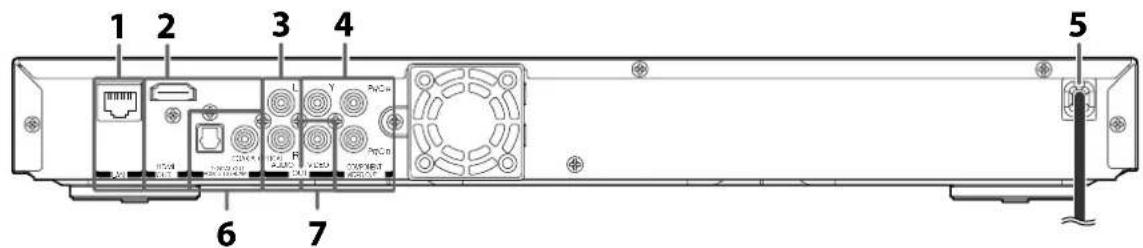
- LAN terminal
- HDMI OUT jack
- AUDIO OUT jacks
- COMPONENT VIDEO OUT jacks
-
Mains cable
-
DIGITAL OUT (OPTICAL / COAXIAL) jacks
- VIDEO OUT jack
Caution
- Do not touch the inner pins of the jacks on the rear panel. Electrostatic discharge may cause permanent damage to the unit.
Remote Control

8
(*) The unit can also be turned on by pressing these buttons.
1. HDMI button
2. OPEN/CLOSE ▲ button*
3. Number buttons
4. SEARCH button
5. Red / Green / Yellow / Blue buttons
6. TOP MENU button
7. ▲/▼/◄/► buttons
8. SETUP button
9. REV ◀ button
10. SKIP ◀◀ button
11. PLAY▶ button*
12. MODE button
13. REPEAT button
14. PIP button
15. ON/STANDBY ⏻ button
- Press to turn on the unit, or to turn the unit into the standby mode. (To completely turn off the unit, you must unplug the mains cable.)
- ANGLE button
- AUDIO button
- SUBTITLE button
- DISPLAY button
- CLEAR button
- POP MENU / MENU button
- ENTER button
- RETURN button
- FWD▶ button
- SKIP ▶▶| button
- STOP ■ button
- PAUSE II button
- A-B button
EN
INTRODUCTION
Front Panel Display

* Brightness of the display can be adjusted. Refer to "Panel Display" in "FUNCTION SETUP" on page 30.
- Displays repeat icon. (Appears during repeat playback.)
- Displays media icon (disc mode or SD card mode).
- Displays playback status icon. Refer to the table below.
- Displays various kinds of information such as title number, elapsed playing time, repeat type, menu type, etc.
| Playback status icon Mode |
| Playback is in progress |
| Stop mode |
| Pause mode |
| Fast forward mode |
| Fast reverse mode |
| Slow motion mode |
Example of Display Message

Title is being played back.
Indicating the current title number and the elapsed time.

Current chapter is in chapter repeat mode.

Loading a disc.

Dolby Digital audio is being played back.

DTS audio is being played back.
Symbols Used in this Manual
To specify for which media type each function is, we put the following symbols at the beginning of each item to operate.
Symbol
description

Description refers to BD-video and BD-RE (ver.2.1) / BD-R (ver.1.1/1.2/1.3) recorded in BDMV format

Description refers to DVD-video

Description refers to audio CD / DTS-CD

Description refers to DVD-RW/-R and SD card with AVCHD files

Description refers to BD-RE/-R, DVD-RW/-R and CD-RW/-R with DivX ® files

Description refers to BD-RE/-R, DVD-RW/-R, CD-RW/-R and SD card with MP3 files

Description refers to BD-RE/-R, DVD-RW/-R, CD-RW/-R and SD card with Windows Media™ Audio files

Description refers to BD-RE/-R, DVD-RW/-R, CD-RW/-R and SD card with JPEG files
If you do not find any of the symbols listed above under the function heading, the operation is applicable to all media.

EN
CONNECTIONS
- When you change the connections, all devices should be turned off.
- Refer also to the manual of the devices to be connected.
Connection to the TV
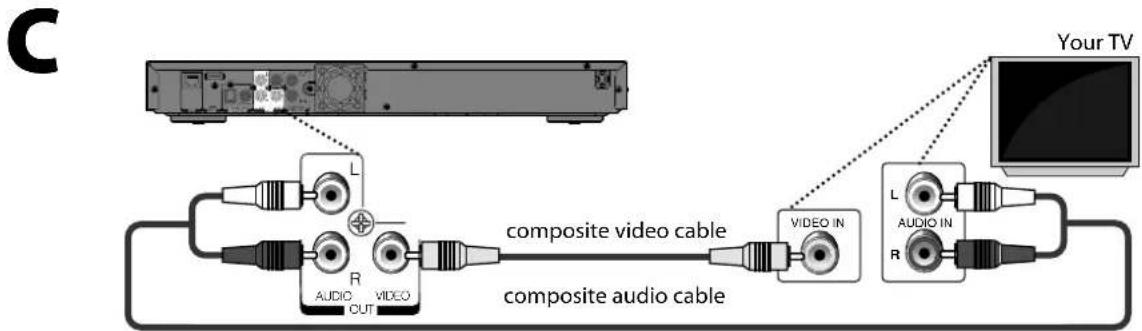
1 Choose the appropriate connection, then proceed to the corresponding instruction (A, B or C) on the next page.
Best (Supports up to 1080i / 1080p, 1080p24 resolution.)
![graph LR A["Video Audio"] -->|HDMI cable| B["HDMI IN"] B --> C["High Definition TV"] C --> D["Go To"] D --> E["A"]](/content/2026/05/1018651/images/3afc202cae9e8f9dd0ea48e0d55907b9585072480a829f353c287246879920ee.jpg)
No analogue audio connection required.
HDMI cable NOT INCLUDED
High Speed HDMI Cable (also known as HDMI category 2 cable) is recommended for optimal compatibility.
Better (Supports up to 1080i resolution.)
![graph LR A["Video"] --> B["component video cable"] C["Audio"] --> D["composite audio cable"] B --> E["COMPONENT VIDEO IN Y"] D --> F["COMPONENT VIDEO IN L"] D --> G["PB/Cb"] D --> H["PB/CR"] D --> I["AUDIO IN R"] E --> J["Your TV"] F --> J G --> J H --> J I --> J J --> K["Go To"] K --> L["B"]](/content/2026/05/1018651/images/41a7ee433a10c5a13a21aaeecff5bbd514e796fa489926a3f01ed28468961bb1.jpg)
Component video cable NOT INCLUDED
Composite audio cable included
Basic (Supports only 480i/576i resolution.)
![graph LR A["Video"] --> B["composite video cable"] C["Audio"] --> D["composite audio cable"] B --> E["VIDEO IN"] D --> F["VIDEO IN L"] D --> G["AUDIO IN R"] E --> H["Your TV Standard Definition TV"] F --> H G --> H H --> I["Go To"] I --> J["C"]](/content/2026/05/1018651/images/8d6a2eb6dd81f9a3287fb3b1f3a735c0775970a6cdcd8ff6272982dbec83e7ed.jpg)
- Connect this unit directly to the TV. If the composite audio / video cables are distorted due to the copy right protection system.
Composite audio / video cables included
10 EN

E5RJ2ED_EN.book Page 11 Thursday, October 29, 2009 3:30 PM
CONNECTIONS
2 Connect the cables by following the descriptions below.
HDMI Video / Audio Connection

Note
- Do not tilt the connector when inserting it into the HDMI jack, and makes a connector are matched.
- When using non-HDCP compatible TV, the image may not be displayed prop
Component Video + Standard Audio Connection
![graph TD A["Component video cable"] --> B["Composite audio cable"] B --> C["Output"] subgraph Component L1["L"] Y["Y"] PR/CR PB/CR PB/CB R["AUDIO OUT"] PB/C2 end subgraph Composite Y1["COMPONENT VIDEO IN Y"] PR/CR PB/CR PB/CB end subgraph Composite L2["L"] R["AUDIO IN"] R["R"] end B -->|dotted| D["C…](/content/2026/05/1018651/images/4a9eabff9e1c9c2558c0f631d14a67725036bbc006eb8f4922037a33adcd3a5c.jpg)
Standard Video + Standard Audio Connection

EN
11

CONNECTIONS
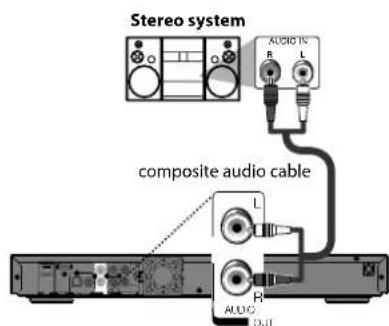
Connection to an Audio System
2-Channel Analogue Audio Connection
Digital Audio Connection HDMI Audio Connection
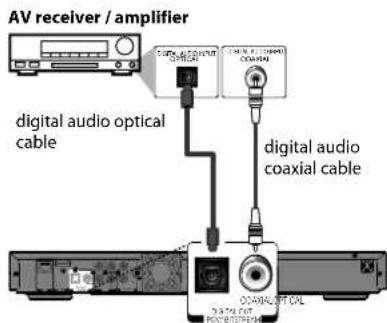
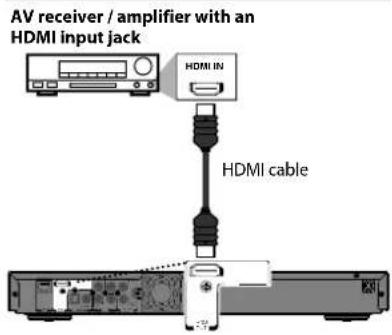
• Refer to page 34 for digital audio setting. • Refer to pa
Digital audio optical / coaxial cable and HDMI cable NOT INCLUDED
Composite audio cable included
Network Connection with LAN
- You can use a disc which offers connecting the unit to the Internet.
(For BD-Live information, please refer to page 23.)
![graph TD A["Networking equipment (modem, etc.)"] --> B["LAN"] B --> C["LAN cable"] C --> D["LAN cable"] D --> E["LAN"] E --> F["Hub or broadband router"] G["Internet"] -.-> A H["Server"] --> I["Central device"]](/content/2026/05/1018651/images/54ffcf8aa96acf27cb2da8fc07ba53fb138db4c8517d87f92e45ed6d736b0294.jpg)
Networking equipment, hub or broadband router and cables NOT INCLUDED
Caution
- Do not insert any cable other than LAN terminal to avoid damaging the unit.
Note
• After connecting a LAN cable, set up necessary network settings.
- If your network equipment (modem, etc.) does not
have broadband router functions, connect a broadband router.
- If your network equipment (modem, etc.) has broadband router functions but there is no vacant port, use a hub.
- For a broadband router, use a router which supports 10BASE-T/100BASE-TX.
- Do not connect your PC directly to the LAN terminal of this unit.
- For the network setup, refer to "Network Connection" on pages 36-38.
Finding the Video Channel on Your TV
After you have completed all the connections, you must find the correct video channel (external input channel) on your TV.
1 After you have made all the necessary connections, turn on the unit and your TV.
2 Press the button on the TV's remote control that accesses the external input channel repeatedly until you see the opening screen. It may be labelled "→(for TOSHIBA TV)", "SOURCE", "AV" or "INPUT" (refer to your TV's user manual).

Note
• If the TV is connected by an HDMI cable, p a few minutes for the opening screen to display.
12 EN
PLAYBACK
Before you start playing back a disc, read the following information.
This unit is compatible to play back the following discs / files. To play back a disc / file, make sure that it meets the requirements for region codes and colour systems as described below. You can play back discs that have the following logos.
Other disc types are not guaranteed to play back.
playable discs Logos
| Blu-ray Disc- BD-video (single / dual layer)- BD-RE ver. 2.1 (single / dual layer)(Recorded in BDMV format)- BD-R ver. 1.1 / 1.2 / 1.3 (single / dual layer)(Recorded in BDMV format) (Unclosed discs may not be played back.) |  |
| DVD-video | DVDVIDEO |
| DVD-RW | DVDRW |
| DVD-R | DVDR |
| CD-DA (audio CD) | COMPACTDISCGDIGITAL AUDIO |
| CD-RW | COMPACTDISCGDIGITAL AUDIO(ReWritable)COMPACTDISC(ReWritable) |
| CD-R | COMPACTDISCGDIGITAL AUDIO(ReWritable)COMPACTDISC |
| Kodak Picture CD | KodakPicture CDCOMPATIBLE |
| DTS-CD | - |
| Playable files Media |
| AVCHD | DVD-RW/-R, SD Memory Card (including SDHC), miniSD Card, microSD Card |
| DivX® | BD-RE/-R, DVD-RW/-R, CD-RW/-R |
| MP3 | BD-RE/-R, DVD-RW/-R, CD-RW/-R, SD Memory Card (including SDHC), miniSD Card, microSD Card |
| Windows MediaTM Audio |
| JPEG |
EN
- ABOUT DIVX V1 ® digital video format created by DivX, Inc. This is an official DivX Certified device that plays DivX video. Visit www.divx.com for more information and software tools to convert your files into DivX video.
- ABOUT DIVX VIDEO-ON-DEMAND: device must be registered in order to play DivX Video-on-Demand (VOD) content. To generate the registration code, locate the DivX VOD section in the device setup menu. Go to vod.divx.com with this code to complete the registration process and learn more about DivX VOD.
- Officia® Certified product; Plays all versions of DivX® video (including DivX® 6/DivX® HD) with standard playback of DivX® media files.
- Discs contain in figst with the DivX® GMC (Global Motion Compensation) playback feature, which is DivX® supplemental function, cannot be played back on this unit.
It is recommended that files to be played back in this unit are recorded under the following specifications:
DivX®
Official DivX Certified® product
- Playable co DivX® 8.x, DivX® 4.x V I f i g l e s :
DivX ® 5.x, DivX ® 6.x
• Maximum size of a video: 1920
- Sampling fr1e6qkuHezn-cy48okfHz
audio
• Audio type : MPEG1 audio layer (MP3), MPEG1 audio layer 2, Dolby Digital
- Sampling frequency : 32 kHz,
- Constant bit rate : 112 kbps - 320 kbps (MP3),
48 kbps - 192 kbps
(Windows Media™ Audio)
JPEG
• Upper limit : 2,560 x 1,90
sampling is 4:4:4)
5,120 x 3,840 dots (sub
sampling is up to 4:2:2)
- Lower limit : 32 x 32 dots
- File size of 12 mm Bge maximum
| Readable cards | Playerable files / data |
| SD Memory Card (8 MB - 2 GB) | AVCHD, MP3, Windows MediaTM Audio, JPEG, picture-in-picture commentary, subtitles or other extras for BD-ROM ver. 2 (Profile 2.0 / Profile 1.1) |
| SDHC Memory Card (4 GB - 8 GB) |
| miniSD Card (8 MB - 2 GB) |
| microSD Card (8 MB - 2 GB) |
playable files Media
| AVCHD | DVD-RW/-R, SD Memory Card (including SDHC), miniSD Card, microSD Card |
| DivX® | BD-RE/-R, DVD-RW/-R, CD-RW/-R |
| MP3 | BD-RE/-R, DVD-RW/-R, CD-RW/-R, SD Memory Card (including SDHC), miniSD Card, microSD Card |
| Windows MediaTM Audio |
| JPEG |
PLAYBACK
Note for SD cards
- This unit supports SD Memory FAT16 file system, and SDHC Memory Card with FAT32 file system.
- This unit does not support NTF
- This unit may not read the SD computer. If that is the case, please reformat the SD cards in this unit and try again.
- This unit does not support min Memory Card.
- For miniSD Card and microSD C necessary.

- Portions of this unit are protected law and are provided under license by ARIS / SOLANA / 4C.
- Please keep the SD cards in the not using them.
- Do not try to open or modify the
- Do not touch the terminal surface any metals.
- Do not attach additional labels
- Do not remove the label of the
- This unit recognises up to 8 cha the SD card. Characters after 8th will not be displayed.
Region Codes
C a T d w i t h E A T 1 2 / This unit has been designed to play back BD-video with region "B" and DVD-video with region "2" or "ALL". You cannot play
back BD-video or DVD-video that are labelled for other regions. Look for the symbols on the right on your BD-video or SVD video. If these regions, SVD video do not appear on your BD-video or DVD-video, you cannot play back the disc in this unit. The letter or number inside the globe refers to region of the world. A BD-video or DVD-video labelled for a specific region can only play back on the unit with the same region code.
BD-video

DVD-video


ed under copyright Structure of Media Contents
The contents of BD / DVD / AVCHD are generally divided into titles. Titles may be further subdivided into chapters.

The following discs will not be played back in this unit.
- CD-ROM • CD-I (compact disc-interactive)
• DVD-RAM • VSD (video single disc)
• DVD-audio • Video CD
·HD DVD ·SVCD
• Unfinalised disc
• BD - RE (ver.1.0)
• BD - RE (ver.2.1) (Recorded in BDAV
- SD card cont® filien.s DivX
• BD / DVD hybrid disc (played back
• BD that contains AVCHD files
- BD-R (ver.1.1 / 1.2 / 1.3) (Recorde
• DVD-RW/-R recorded in non compa format.
- Super Audio CD - Only the sound of heard. The sound on the high-density Super Audio CD layer cannot be heard.
- Playability of dual discs are not
- This unit cannot play back the d Windows Media™ Digital Rights Management (DRM).
Audio CD is divided into tracks.

Data discs or SD cards containing DivX® / MP3 / WMA / JPEG are divided into folders, and the folders are subdivided into files.

guaranteed.
sOn-ScreenDisplay protected by
You can check information about the current disc by pressing [DISPLAY].
To call the on-screen display menu, press [DISPLAY] during playback. Every time you press [DISPLAY], the information changes. Depending on the media, available information varies.
Colour Systems
BD and DVD are recorded in different colour systems throughout the world. The most common colour system, used primarily in the U.K. and other EU countries, is PAL. This unit uses the PAL system. However, it is also possible to play back BD and DVD using other colour systems, such as NTSC.
BD VIDEO AVCHD
OFF → Title / Chapter information
→ Title information (elapsed time)
→ Title information (remaining time)
→ Decoding format information → OFF
PLAYBACK
DVD VIDEO
OFF → Chapter information (elapsed time)
→ Chapter information (remaining time)
→ Title information (elapsed time)
→ Title information (remaining time)
→ Decoding format information → OFF
CD
OFF (Track information(elapsed time))
→ Track information (remaining time)
→ Disc information* (elapsed time)
→ Disc information* (remaining time)
→ OFF (Track information(elapsed time))
(* not available during programme / random playback)
DivX
OFF → File information (elapsed time)
→ File information (remaining time)
→ File name information → OFF
MP3
OFF (File information (elapsed time))
→ File name information
→ OFF (File information (elapsed time))
WMA
OFF (File information (elapsed time))
→ File name information
→ Tag information (title name)
→ Tag information (artist name)
→ OFF (File information (elapsed time))
JPEG
OFF → File information → File name information → OFF
</p>
<p><img src="/content/2026/05/1018651/images/b63127e2077464cf6779a8aeced9e062dafc14538aabed2d53ef1c5812d39870.jpg" alt="TT 1 1/10 1 2 3 4 5" loading="lazy" decoding="async"></p>
<p><Chapter information (DVD)></p>
<p><img src="/content/2026/05/1018651/images/9cb957150a9a7c660141f8fe76f8c5d7e1e8fc9219c60b550f5d19deaf9f7ee4.jpg" alt="1 / 10:00:01:02 2 6" loading="lazy" decoding="async"></p>
<ol>
<li>Current title number </li>
<li>Current chapter number / Total number of chapters </li>
<li>Current repeat setting (Only when repeat setting is active) <br />
(C: Chapter repeat, T: Title repeat, AB: A-B repeat) </li>
<li>Indicates that the multi camera angle images are available on the scene </li>
<li>Current playback status </li>
<li>Elapsed time (or Remaining time) of the current chapter <br />
<Title information (BD / DVD / AVCHD)></li>
</ol>
<p><img src="/content/2026/05/1018651/images/83f8af6734a6765bc57a4a93c916692f429da72ff572e63d1798eac842e3b89c.jpg" alt="TT 3/5 0:01:02 1 2" loading="lazy" decoding="async"></p>
<ol>
<li>Current title number / Total number of titles </li>
<li>Elapsed time (or Remaining time) of the current title</li>
</ol>
<p><Track (File) information (CD / DivX® / MP3 / WMA / JPEG)></p>
<p><img src="/content/2026/05/1018651/images/9ec5773cfdeade0c313ce8609cb79c35ac5f4e2c1da4d606c28511ba1c4b8658.jpg" alt="TR 1 2 SD1 740:00:51 3 4" loading="lazy" decoding="async"></p>
<ol>
<li>Current track (file) number / Total number of track (file) </li>
<li>Elapsed time (or Remaining time) of the current track / file (except for JPEG files) </li>
<li>Indication of SD card playback </li>
<li>Current repeat setting
(Only when repeat setting is active)
(T: Track repeat, G: Group repeat,
A: All repeat, AB: A-B repeat)</li>
</ol>
<p><Disc information (CD)></p>
<p><img src="/content/2026/05/1018651/images/922cb40fcd183a2ceae720b546224e8be5c42da5cce88cdfe0873416c99ccd3a.jpg" alt="ALL 1 / 14 0 : 00: 51 1 2" loading="lazy" decoding="async"></p>
<ol>
<li>Current track number / Total number of tracks </li>
<li>Elapsed time (or Remaining time) of the current disc</li>
</ol>
<p><File name information (MP3 / WMA)></p>
<p><img src="/content/2026/05/1018651/images/b419fedbafc01004cc21cf01e1497bcd39f43ac95ab0bc8a4952d69aacc26caa.jpg" alt="File_name_001 1" loading="lazy" decoding="async"></p>
<ol>
<li>Media icon and file name</li>
</ol>
<p><img src="/content/2026/05/1018651/images/451d7e5a61d42b0705f8ecb9ea8c6db7cb312d113291aef62d25a05cf139de47.jpg" alt="TOSHIBA BDX2000KE - JPEG - 7" loading="lazy" decoding="async"></p>
<p>: DivX® files : MP3 files</p>
<p><img src="/content/2026/05/1018651/images/2c83b3a188c64b458b3cf63df20cacfd6160914e6228acb59bef4159b9d12775.jpg" alt="TOSHIBA BDX2000KE - JPEG - 8" loading="lazy" decoding="async"></p>
<p><img src="/content/2026/05/1018651/images/e78a25d0091a74775bcafca7859a330eac1876b0e6f2937549fe2388e19045d1.jpg" alt="TOSHIBA BDX2000KE - JPEG - 9" loading="lazy" decoding="async"></p>
<p>: WMA files : JPEG files</p>
<p><img src="/content/2026/05/1018651/images/a0e49b658584d35e798ad7a0090207294348e78bae3cbd90df29baffb33c3c59.jpg" alt="TOSHIBA BDX2000KE - JPEG - 10" loading="lazy" decoding="async"></p>
<p><Tag information (WMA)></p>
<p>Title name information</p>
<p><img src="/content/2026/05/1018651/images/27901eb7872ed38be431f9d3bac0e52e462c280b3f8dc7221d4fcbc4ec1424b5.jpg" alt="TITLE 1" loading="lazy" decoding="async"></p>
<p>Artist name information</p>
<p><img src="/content/2026/05/1018651/images/d2a806ee5c735e9a625430e16536ea376f480514767d9b20c706fd71b2e6698d.jpg" alt="ARTIST NAME 2" loading="lazy" decoding="async"></p>
<ol>
<li>Title name based on tag information of current Windows Media™ Audio file </li>
<li>Artist name based on tag information of current Windows Media™ Audio file</li>
</ol>
<p><Decoding format information></p>
<p><img src="/content/2026/05/1018651/images/df909d37ab71fa1523d05a9f2010472620f1fb3a496d22df509651a1405ec8ed.jpg" alt="Dolby Digital 1" loading="lazy" decoding="async"></p>
<ol>
<li>Decoding format</li>
</ol>
<p><img src="/content/2026/05/1018651/images/ee5a11191744fa935697dc5c0c54baf14ead7d3003f90f73e39ea3ff952aa475.jpg" alt="TOSHIBA BDX2000KE - JPEG - 14" loading="lazy" decoding="async"></p>
<p>EN</p>
<p>15</p>
<p><img src="/content/2026/05/1018651/images/7101c86ff3b6ef40203f2aca7341d480a4672da1717b077c88c51f755168045e.jpg" alt="TOSHIBA BDX2000KE - JPEG - 15" loading="lazy" decoding="async"></p>
<p><img src="/content/2026/05/1018651/images/7cb6206d34c01cdbef81d3b914aa999bbc1e59817cd5b0bce6e8c9c7a0955e3e.jpg" alt="TOSHIBA BDX2000KE - JPEG - 16" loading="lazy" decoding="async"></p>
<p><img src="/content/2026/05/1018651/images/075f45c0fb4016cb1e696050cfcb1ff3c766c5e33f154b49edac4cbc4d67ad79.jpg" alt="TOSHIBA BDX2000KE - JPEG - 17" loading="lazy" decoding="async"></p>
<p><img src="/content/2026/05/1018651/images/df358da6c739f5316ba14207b9548e73f9cecc46c6b6ce0abbf2ebe08a7e9445.jpg" alt="Pure geometric diagram with intersecting lines and circles, no text or symbols present" loading="lazy" decoding="async"></p>
<h2 id="playback-5">PLAYBACK</h2>
<h2 id="preparing-to-play-back">Preparing to Play Back</h2>
<h2 id="how-to-insert-a-disc">How to Insert a Disc</h2>
<p>1 Press [OPEN/CLOSE ▲] to open the disc tray. <br />
2 Place the disc on the disc tray with its label side facing up.</p>
<p><img src="/content/2026/05/1018651/images/5027413560f45368410a22b4cb7eeb4462d5ee5a3ab1e7ff0afdffc2815fb5fc.jpg" alt="Illustration of a hand using a circular tool to press or install a mechanical component (no text or symbols visible)" loading="lazy" decoding="async"></p>
<p>Align the disc to the disc tray guide.</p>
<p>- Make sure the disc is compatible (Refer to page 13 for the list of compatible discs.)</p>
<p>3 Press [OPEN/CLOSE ▲] to close the disc tray.</p>
<p>Please allow time for the disc to load.</p>
<p>To eject the disc:</p>
<p>Press [OPEN/CLOSE ▲].</p>
<h2 id="how-to-insert-an-sd-card">How to Insert an SD Card</h2>
<p>1 Gently push in the SD card, with its label side facing up, into the SD card slot until it clicks.</p>
<p><img src="/content/2026/05/1018651/images/3b5c9712a59ea893ad41551e7907574cd5044abf599e51d47d374263b218ffa5.jpg" alt="0 12345 SD card" loading="lazy" decoding="async"></p>
<h2 id="to-remove-the-sd-card">To remove the SD card:</h2>
<p>In stop mode, gently push in the SD card, then pull it out slowly.</p>
<h2 id="selecting-the-media">Selecting the Media</h2>
<p>When an SD card is inserted, the correct media should be selected in advance. You can switch the media by following the steps below. "Media Select" is available only when an SD card is inserted.</p>
<p>1 In stop mode, press [SETUP]. <br />
2 Use [▲ / ▼] to select 📋, then press [ENTER]. <br />
3 Use [▲ / ▼] to select "Media Select". <br />
4 Press [ENTER] repeatedly to select the desired media. <br />
5 Press [SETUP] to exit.</p>
<p>Even if you turn the unit to the standby mode in "SD Card" mode, it will be in "Disc" mode the next time you turn it on.</p>
<h2 id="16-en">16 EN</h2>
<h2 id="basic-playback">Basic playback</h2>
<p>Playing Back</p>
<p>(BD, DVD or a Disc with AVCHD files)</p>
<p><img src="/content/2026/05/1018651/images/cac129190f8d5ff2f59feb28040fec3c686a30098cc30e3ec85dbe2a3ac5d8fc.jpg" alt="TOSHIBA BDX2000KE - Basic playback - 1" loading="lazy" decoding="async"></p>
<p>BD
VIDEO</p>
<p>[NO TEXT]</p>
<p>DVD VIDEO</p>
<p>AVCHD</p>
<p>1 Insert a disc.</p>
<p>2 Playback may start automatically.</p>
<p>If not, press [PLAY▶].</p>
<p>- Some discs may show a title or a disc me In such case, refer to "Using the Title / Disc / Pop-up Menu" on page 17.</p>
<p>To pause playback:</p>
<p>Press [PAUSEIII].</p>
<p>To return to the normal playback:</p>
<p>w pth [PLAY] unit.</p>
<p>To stop playback:</p>
<p>Press [STOP ■].</p>
<p>Playback will be in Resume-On-Stop mode.</p>
<h2 id="resume-on-stop-mode">Resume-On-Stop mode</h2>
<p>If a playback is in Resume-On-Stop mode, when you press [PLAY▶] next time, the playback will start from the point where it has been stopped.</p>
<h2 id="note-4">Note</h2>
<ul>
<li>Resume playback may not be available for supports Java applications (BD-Java). <br />
• In "Disc" mode, the resume information w when;</li>
</ul>
<p>- [STOP ■] is pressed while in the Resume-On-Stop mode.</p>
<p>-the parental level is changed. <br />
-the disc tray is opened.</p>
<p>- In "SD Card" mode, the resume cleared when;</p>
<ul>
<li>[STOP ■] is pressed while in the Resume-On-Stop mode. <br />
-the SD card is removed. <br />
-the unit is turned into the standby mode.</li>
</ul>
<h2 id="note-5">Note</h2>
<ul>
<li>m a y a p p e a r a t when the operation is prohibited by the disc or this unit. </li>
<li>During the playback of 2-layered disc, pic stop for a moment. This happens when the 1st layer switches to the 2nd layer. This is not a malfunction. <br />
• The operation may vary when you play back video and DVD-video with disc menu. Refer to the manual accompanying the disc for details. </li>
<li>Set "Still Mode" setting to "Field" in "Vid pictures in the pause mode are blurred. Refer to "Still Mode" on page 28.</li>
</ul>
<h2 id="playback-6">PLAYBACK</h2>
<h2 id="using-the-title-disc-pop-up-menu">Using the Title / Disc / Pop-up Menu</h2>
<p><img src="/content/2026/05/1018651/images/526a2ddf0921e980194531e3a5b3490971858c6a5c4721e84d6b7b7fd4b2bb7b.jpg" alt="TOSHIBA BDX2000KE - Using the Title / Disc / Pop-up Menu - 1" loading="lazy" decoding="async"></p>
<p>BD
VIDEO</p>
<p><img src="/content/2026/05/1018651/images/1d64a089e6b5df7e1af5041171acaf77e11c57b73c8bc8346b826e485c61220d.jpg" alt="TOSHIBA BDX2000KE - Using the Title / Disc / Pop-up Menu - 2" loading="lazy" decoding="async"></p>
<p>DVD VIDEO</p>
<p>AVCHD</p>
<p>Many of BD-video and DVD-video discs contain title menu (BD-video / DVD-video / AVCHD), disc menu (DVD-video) or pop-up menu (BD-video) which guides you through the available functions in the disc. The contents of the menus may differ depending on the discs.</p>
<h2 id="title-menu-bd-video-dvd-video-avchd">Title menu (BD-video / DVD-video / AVCHD)</h2>
<p>1 Press [TOP MENU]. <br />
2 Use [▲ / ▼ / ◀ / ▶] to select an item, then press [ENTER]. <br />
3 Press [TOP MENU] to exit.</p>
<p>Disc menu (DVD-video)</p>
<p>1 Press [POP MENU / MENU]. <br />
2 Use [▲ / ▼ / ◀ / ▶] to select an item, then press [ENTER]. <br />
3 Press [POP MENU / MENU] to exit.</p>
<p>Pop-up menu (BD-video)</p>
<p>- This is a special feature available. When you press [POP MENU / MENU], a menu pops out on the TV screen during the playback.</p>
<p>1 During the playback of BD-video, press [POP MENU / MENU]. <br />
2 Use [▲ / ▼ / ◀ / ▶] to select an item, then press [ENTER]. <br />
3 Press [POP MENU / MENU] to exit.</p>
<h2 id="note-6">Note</h2>
<ul>
<li>Contents of menus and correspo operations may vary among discs. Refer to the manual accompanying the disc for details. </li>
<li>Title menu is also available for files.</li>
</ul>
<p>Playing Back (Audio CD or a Media with DivX®/MP3/Windows Media™ Audio/JPEG Files)</p>
<p><img src="/content/2026/05/1018651/images/26279cdd2d58e7388e3e077297e80324e94d07c2666f7e3ff301a44c64c2e2ab.jpg" alt="TOSHIBA BDX2000KE - Note - 1" loading="lazy" decoding="async"></p>
<p>CD</p>
<p>DivX</p>
<p>MP3</p>
<p>WMA</p>
<p>JPEG</p>
<p>1 Insert an audio CD or a media with DivX <sup>®</sup> (not available for SD card), MP3, WMA or JPEG files.</p>
<p>• Media filter screen will appear <br />
- For audio CD and a disc contai skip to step 3.</p>
<p>2 Select the type of the file you want to play back in the media filter screen. Then press [ENTER] to display the file list.</p>
<p>3 Use [▲ / ▼] to select a desired track, folder or file, then press [ENTER].</p>
<p>Use [◀/▶] to go in and out of folders. (only for DivX® / MP3 / WMA / JPEG files).</p>
<p>- If you press [ENTER] on the desired track / file, playback will start.</p>
<p>e.g.) JPEG</p>
<p><img src="/content/2026/05/1018651/images/134faa93f9c2a063de8b59f822b48aa31bd3843ea8715653ff729cc84c7352b9.jpg" alt="1 2 3 4 5 6 TR -- / 20 File List JPEG_DISC Folder_1 Folder_2 Folder_3 JPEG_A JPEG_B JPEG_C JPEG_D 2 / 3 Page Up Page Down Media Mode" loading="lazy" decoding="async"></p>
<p>7</p>
<ol>
<li>Audio CD</li>
</ol>
<p>I eTracRinformation BD-videos.</p>
<p>DivX® / MP3 / WMA / JPEG</p>
<p>File information</p>
<ol>
<li>Audio CD</li>
</ol>
<p>"CD-DA" will be displayed</p>
<p>DivX® / MP3 / WMA / JPEG</p>
<p>Current Disc, SD card, or folder name will be displayed</p>
<ol>
<li>Audio CD</li>
</ol>
<p>List of the track number and time</p>
<p>DivX® / MP3 / WMA / JPEG</p>
<p>List of the folder or file names in the current disc or folder menu</p>
<ol>
<li>Operation guide <br />
Press [Red] to go to the previous page <br />
S D Press [Green] to go to the next page
Press [Yellow] to call up the subtitle list
Press [Blue] to select "Media Mode" </li>
<li>Current page / Total page number </li>
<li>Playback status </li>
<li>Media icon</li>
</ol>
<p><img src="/content/2026/05/1018651/images/2dcd2cc81a210022fcf810ada53f5f362683f83b13a22a8db4ec47c7c764fdd5.jpg" alt="TOSHIBA BDX2000KE - Note - 3" loading="lazy" decoding="async"></p>
<p>: Folder: audio CD track</p>
<p><img src="/content/2026/05/1018651/images/ea1c5ce3599481e9e2cc2a79be2475eca55864d7d153e2692571488dcdb6e971.jpg" alt="TOSHIBA BDX2000KE - Note - 4" loading="lazy" decoding="async"></p>
<p><img src="/content/2026/05/1018651/images/e2420e236b53f612b54858b7fb0d3c92779408826558639497f41e180a0f507b.jpg" alt="TOSHIBA BDX2000KE - Note - 5" loading="lazy" decoding="async"></p>
<p>: DivX® files</p>
<p><img src="/content/2026/05/1018651/images/76f68e73667eac10836f70d4aed4da0f8d2ee79a657e89a7f9ecfccb52b0234c.jpg" alt="TOSHIBA BDX2000KE - Note - 6" loading="lazy" decoding="async"></p>
<p><img src="/content/2026/05/1018651/images/9b6c2062ff213fc21149a508da45c4b65819a84e1b9922ac31faed7830810f93.jpg" alt="TOSHIBA BDX2000KE - Note - 7" loading="lazy" decoding="async"></p>
<p>: WMA files: JPEG files
n ly one type</p>
<p><img src="/content/2026/05/1018651/images/59a21b93b68cc56ba0551cb9ddb8c1a115b59f06d53cac93d33233c8b955c21d.jpg" alt="TOSHIBA BDX2000KE - Note - 8" loading="lazy" decoding="async"></p>
<p>To stop playback:</p>
<p>Press [STOP ■].</p>
<p><img src="/content/2026/05/1018651/images/2d6ddd600f4cf58396eabfb31e3f89e0f9c3c7e0dd7eaeaee2866aa5cd54998b.jpg" alt="TOSHIBA BDX2000KE - Note - 9" loading="lazy" decoding="async"></p>
<p>EN</p>
<p>17</p>
<p><img src="/content/2026/05/1018651/images/818b0120f72035998ee4ea1141093b614e7b026c5ba65bd22a5d91bfb1a579de.jpg" alt="TOSHIBA BDX2000KE - Note - 10" loading="lazy" decoding="async"></p>
<p><img src="/content/2026/05/1018651/images/9d9c570f931ef90177f29231eb42ee20c3b9201291bd59e0775f3813d227a0f3.jpg" alt="TOSHIBA BDX2000KE - Note - 11" loading="lazy" decoding="async"></p>
<p><img src="/content/2026/05/1018651/images/09e2a4983b98206106d6773c0b99afd634a1a3d4607d94970f58a738557a6c2f.jpg" alt="TOSHIBA BDX2000KE - Note - 12" loading="lazy" decoding="async"></p>
<p><img src="/content/2026/05/1018651/images/bcef50ba71dde9668c0177dfaf2bb3f12f64d8fab4ee2226ecbcbe8b3057b48c.jpg" alt="TOSHIBA BDX2000KE - Note - 13" loading="lazy" decoding="async"></p>
<h2 id="playback-7">PLAYBACK</h2>
<h2 id="note-7">Note</h2>
<ul>
<li>Unrecognisable characters will basterisks. </li>
<li>Some unplayable folders or files the recording status. <br />
• High-resolution JPEG files take </li>
<li>Progressive JPEG files (JPEG file format) cannot be played back in this unit. <br />
• The system can recognise up to for CD, 999 folders / 9,999 files for BD, DVD and SD card. <br />
• The 9th and deeper hierarchies for CD. The 10th and deeper hierarchies cannot be displayed for DVD and SD card. </li>
<li>For the SD card playback, refer Card" on page 18. </li>
<li>Extensions other than listed bel recognised.</li>
</ul>
<p>-DivX.avi/.AVI/.divx/.DivX</p>
<p>-MP3:.mp3</p>
<p>- W M A : . w m a</p>
<p>-JPEG:.jpg / jpeg*</p>
<p>* The extension "jpeg" is not available for SD card.</p>
<ul>
<li>If a disc contains AVCHD files, t files which are in the same disc is not available. </li>
<li>With regard to the multi-border recorded sections cannot be recognised. </li>
<li>With regard to the multi-border additionally recorded sections may not be recognised.</li>
</ul>
<p>4 Use [▲ /▼] to select a desired folder or file, then press [ENTER].</p>
<p>Use[◄/►] to go in and out of folders.</p>
<p>m a fy yboeu l p's te'd [ENTER] on the desired file, playback will start.</p>
<p>longer to be displayed</p>
<p>sCautiond in progressive</p>
<p>Do not remove the SD card or turn the un
standby mode while the contents of the card are in
playback. It may result in malfunction or loss of the
card's data
cannot be displayed</p>
<h2 id="note-8">Note</h2>
<p>to "Reading Select Screen will disappear under conditions listed below:</p>
<p>- when the screen saver is activated.</p>
<p>- when [RETURN] is pressed.</p>
<p>-when the setup menu is called up.</p>
<p>- If "Media Select" screen disappears before the selection, refer to "Selecting the Media" on page 16.</p>
<p>- Do not delete the folders or files in the S your computer. This onit may not read the SD cards formatted on a computer.</p>
<p>B Dr - B Ef/o Rd e a dodri tfi o a n l a m e i n c l u d e s o n e o f t h unrecognisable characters, the folder or file name D M A D not be displayed correctly.</p>
<p>-Unrecognisable [ˌhɪˈaɪnər] ; 〔e: 〔¥ :</p>
<h2 id="reading-an-sd-card">Reading an SD Card</h2>
<h2 id="avchd-mp3-wma-jpeg">AVCHD MP3 WMA JPEG</h2>
<p>With SD card, you can enjoy the following functions in addition to playing back AVCHD / MP3 / WMA / JPEG files stored in the card.</p>
<ul>
<li>Special additional content (For more information about the special additional contents, refer to the instruction book that came with the disc.) </li>
<li>BD - Live function (BD - RO (For more information about BD-Live, refer to page 23.)</li>
</ul>
<p>1 Insert an SD card (refer to page 16 on how to insert a disc).</p>
<p>If no disc is in operation, "Media Select" screen will appear on the TV screen.</p>
<p>2 Use [▲ / ▼] to select "SD Card", then press [ENTER].</p>
<p>- When the SD card contains only to step 4.</p>
<p>3 Select the type of the file you want to play back. Then press [ENTER] to display the file list.</p>
<p>- For AVCHD files, the playback select "Video". (The file list is not available for AVCHD files.)</p>
<p><img src="/content/2026/05/1018651/images/6cd1e26a6aa6ca6494dd0f8435b1bc1697e0d3c469cdc65b3e810787445aa4ff.jpg" alt="Please select the media to play back. Video Audio Picture" loading="lazy" decoding="async"></p>
<h2 id="kodak-picture-cd">Kodak Picture CD</h2>
<h2 id="jpeg-3">JPEG</h2>
<p>This unit can also run JPEG files stored on Kodak Picture CD. You can enjoy picture images on the TV set by playing back the Kodak Picture CD. This unit conforms to ver.7.0 of a n.t. s for BD-ROM Profile 1 ver. D. Kodak Picture CD. For details of Kodak Picture CD, contact a shop that provides developing service of Kodak Inc.</p>
<p>1 Insert a Kodak Picture CD. Kodak Picture M CD menu will appear automatically on the TV screen.</p>
<p>on</p>
<p><img src="/content/2026/05/1018651/images/db910c0ca4a7aac5059d146d48ac5b00f69334a3857858d4e4b782d277c6a978.jpg" alt="1 TR -- / 16 4 Thumbnail Pictures 2 / 3 Page Prev Page Next" loading="lazy" decoding="async"></p>
<ol>
<li>File information </li>
<li>Current page / Total page number </li>
<li>Operation guide</li>
</ol>
<p>Press [Yellow] to go to the previous page</p>
<p>w i Press [Blue] to go to the next page you</p>
<ol>
<li>Playback status</li>
</ol>
<h2 id="18-en">18 EN</h2>
<h2 id="playback-8">PLAYBACK</h2>
<h2 id="2-use-to-select-a-desired-file-to-be-played-back-then-press-play-or-enter">2 Use [▲ /▼ / ◀/▶] to select a desired file to be played back, then press [PLAY▶] or [ENTER].</h2>
<p>• An image will be played back and go to the next one in turn.</p>
<p>To stop playback: Press [STOP ■].</p>
<p>To return to the first item: Press [TOP MENU].</p>
<p>To return to the file played back last: Press [POP MENU / MENU].</p>
<h2 id="tips-for-jpeg-kodak-picture-cd-playback">Tips for JPEG / Kodak Picture CD Playback</h2>
<ul>
<li>Every press on [ANGLE] will turn the image clockwise by 90 degrees when an image is displayed. </li>
<li>To change the visual effect for playback image, press [MODE] once, then use [◀/▶] or [ENTER] to switch between "Cut In/Out" and "Fade In/Out". </li>
<li>During JPEG / Kodak Picture CD [MODE] twice to change the size of the playback image, then use [◀/▶] or [ENTER] to switch between "Normal" (100%) and "Small" (95%). The size change may have no effect on some files (e.g. files with a small picture size).</li>
</ul>
<h2 id="note-9">Note</h2>
<ul>
<li>A file with an extension of ".avi" as a DivX® file. All files with ".avi" extension are recognised as MPEG4. </li>
<li>For CD-RW/-R, maximum of 255 g files may be recognised. </li>
<li>For BD-RE/-R and DVD-RW/-R, ma group (folder) or 9,999 files may be recognised. <br />
• The 10th and deeper hierarchies displayed. </li>
<li>Unrecognisable characters will be</li>
<li>When playing back the files reco rates, the images can be interrupted in some occasions. </li>
<li>Although log <sub>log</sub> has been obtained for this unit, it may not be able to play back some data, depending on the characteristics, bit rates, or audio </li>
<li>If a large -s file is selected, please allow time for the file to start the playback (over 20 seconds sometimes). <br />
p1 af y D a file written on a CD-RW/-R cannot be played back, rewrite them on a BD-RE/-R or DVD-RW/-R, and try playing it back again. </li>
<li>For more information please visit DivX http://www.divx.com.</li>
</ul>
<h2 id="playing-back-a-divx-with-divx-external-subtitle">Playing Back a DivX® with DivX® External Subtitle</h2>
<h2 id="divx-3">DivX</h2>
<p>Subtitles created by the user can be displayed during DivX® playback.</p>
<p>1 Follow steps 1 to 3 in "Playing Back (Audio CD or a Media with DivX®/MP3/Windows Media™ Audio/JPEG Files)" on page 17. <br />
2 Select a file you want to play back, then press [Yellow].</p>
<p>Subtitle list will appear.</p>
<h2 id="special-playback">Special Playback</h2>
<h2 id="about-divx-and-divx-vod">About DivX® and DivX® VOD</h2>
<h2 id="divx-4">DivX</h2>
<p>Hint for the purchased or rented official DivX® Certified product</p>
<p>- When you purchase <sup>®</sup> file through the DivX official site of DivX <sup>®</sup> video which is called DivX <sup>®</sup> Video On-Demand (VOD) services, a registration code is required every time you get the new file from the DivX <sup>®</sup> VOD services. Refer to "DivX <sup>®</sup> VOD" in "FUNCTION SETUP" on page 30.</p>
<h2 id="possible-errors">Possible Errors</h2>
<p>"This rental has ○ views left. Do you want to use one of your ○ views now?"</p>
<p>Some DivX® VOD files are restricted with the limited playable times. You cannot play them back beyond the limit.</p>
<p>"This player is not authorized to play this video."</p>
<p>You cannot play back the DivX® VOD files obtained with different registration codes on this unit.</p>
<p>"This rental is expired."</p>
<p>You cannot play back the DivX® VOD files with the expired rental period.</p>
<p>"This player does not support this video format."</p>
<p>You cannot play back the DivX® files whose image size exceeds 1920 x 1080.</p>
<p>"This player does not support this audio format."</p>
<p>For DivX <sup>®</sup> files with audio format other than MPEG1 audio layer 3 (MP3), MPEG1 audio layer 2 and Dolby Digital, audio will not be output and only the video will be output.</p>
<p><img src="/content/2026/05/1018651/images/dc0fbc237a20bc2d9f569108b7ecd5cff32429db990f7bd39b588086e33a33b2.jpg" alt="T R - / 9 Subtitle List DivX_File [Off] [ASS] [SMI] [SRT] [SSA] [SUB] [TXT] File List" loading="lazy" decoding="async"></p>
<ul>
<li>"DivX Subtitle" appears next to DivX® subtitle is available for the selected file. </li>
<li>If you press [PLAY▶] or [ENTER] instead of [Yellow], playback without subtitle will start.</li>
</ul>
<p>3 Select the desired subtitle file, then press [PLAY▶] or [ENTER].</p>
<p>Playback of the DivX <sup>®</sup> file with DivX <sup>®</sup> subtitle will start.</p>
<p>INTRODUCTION CONNECTION</p>
<p>replace
rded in h</p>
<p>K FUNCTION SETUP OTHERS</p>
<p><img src="/content/2026/05/1018651/images/d964adbd71d66e9e5f66318458b2a408e3796a1982654f02804161700ef7a8c8.jpg" alt="TOSHIBA BDX2000KE - Possible Errors - 2" loading="lazy" decoding="async"></p>
<h2 id="playback-9">PLAYBACK</h2>
<h2 id="note-10">Note</h2>
<p>• To utilise this function, the following must meet. <br />
-Playback file and the subtitle same name. <br />
-Playback file and the subtitle same folder. <br />
- Only the subtitle files with the follow are supported; .smi (.SMI), .srt (.SRT), .sub (.SUB), .ass (.ASS), .ssa (.SSA), .txt (.TXT). (.sub (.SUB) and .txt (.TXT) may not be recognised.) <br />
- The subtitles that exceeds the DivX® file will not be displayed.</p>
<h2 id="step-by-step-playback">Step by Step Playback</h2>
<p><img src="/content/2026/05/1018651/images/b6fd54b4ec5bf371343e298a8737c02d1555c57305e60b74f23552a21acb91d4.jpg" alt="TOSHIBA BDX2000KE - Step by Step Playback - 1" loading="lazy" decoding="async"></p>
<p><img src="/content/2026/05/1018651/images/947c92bd48dd2698fecb0539375d8408ba12763086d17eb9a07f0f9e283df32a.jpg" alt="TOSHIBA BDX2000KE - Step by Step Playback - 2" loading="lazy" decoding="async"></p>
<p>a .must have the</p>
<p>7 In pause mode, press [PAUSE III] repeatedly.
e Every time you press [RAUSE II], playback will advance one step at a time.</p>
<p>2 Press [PLAY▶] to return to normal playback.</p>
<h2 id="note-11">Note</h2>
<p>playback time of the only step by step forward is available. <br />
- Set "Still Mode" setting to "Field" in "Vid pictures in step by step playback mode are blurred. Refer to "Still Mode" on page 28.</p>
<h2 id="fast-forward-fast-reverse">Fast Forward / Fast Reverse</h2>
<p><img src="/content/2026/05/1018651/images/3162aa7fdb30c08ed097d78421e2a729b74f67be8de6c5e0b0357982b2ed3c42.jpg" alt="TOSHIBA BDX2000KE - Fast Forward / Fast Reverse - 1" loading="lazy" decoding="async"></p>
<p>BD
Video</p>
<p><img src="/content/2026/05/1018651/images/b7490ab0f75d5b6b7a98f8095d90b39f6e7d72059dee464bdecf725b94f3027e.jpg" alt="TOSHIBA BDX2000KE - Fast Forward / Fast Reverse - 2" loading="lazy" decoding="async"></p>
<p>DVD
VIDEO</p>
<p><img src="/content/2026/05/1018651/images/cf59cadb77d42ddf6de3d4958cd8c4decd394d3aef0d8ff8f5e0c5e025e77dc9.jpg" alt="TOSHIBA BDX2000KE - Fast Forward / Fast Reverse - 3" loading="lazy" decoding="async"></p>
<p>CD</p>
<p>AVO</p>
<p>HD</p>
<p>DivX</p>
<p>MP3</p>
<h2 id="wma-2">WMA</h2>
<p>1 During playback, press [FWD▶▶] repeatedly for fast forward.</p>
<p>During playback, press [REV ◀◀] repeatedly for fast reverse.</p>
<p>Every time you press [FWD▶▶] or [REV◀◀], the playback speed will change.</p>
<p>2 Press [PLAY▶] to return to normal playback.</p>
<h2 id="note-12">Note</h2>
<ul>
<li>For BD, DVD and AVCHD, speed different levels. </li>
<li>For audio C, MP3 and Windows Media™ Audio, speed changes in 3 different levels. </li>
<li>For audio CD, fast forward / fast reverse search between different tracks are not available during programme and random playback. </li>
<li>For D <sup>®</sup> jMP8 and Windows Media™ Audio, fast forward / fast reverse search between different files are not available. </li>
<li>For some filesj fast forward/fast reverse may not function.</li>
</ul>
<h2 id="slow-motion-playback">Slow Motion Playback</h2>
<p><img src="/content/2026/05/1018651/images/dbef662a2307d724634e9259f21dcdff78dda617905757c74e98c57dbf0f8925.jpg" alt="TOSHIBA BDX2000KE - Slow Motion Playback - 1" loading="lazy" decoding="async"></p>
<p>BD</p>
<p>VIDEO</p>
<p><img src="/content/2026/05/1018651/images/f2e2bd61146f488ee8c1b0d63492d725c8e610e78399316670e43ed8cf69d2c6.jpg" alt="TOSHIBA BDX2000KE - Slow Motion Playback - 2" loading="lazy" decoding="async"></p>
<p>DVD</p>
<p>VIDEO</p>
<p>AVCHD</p>
<p>DivX</p>
<p>1 During playback, press [PAUSE III], then press [FWD ▶▶].</p>
<p>Every time you press [FWD▶▶], playback speed will change.</p>
<p>2 Press [PLAY▶] to return to normal playback.</p>
<h2 id="note-13">Note</h2>
<p>• Slow motion speed changes in 3 <br />
- Only slow forward is available <br />
- Set "Still Mode" setting to "File pictures in the slow motion playback mode are blurred. Refer to "Still Mode" on page 28. <br />
- For some filesj slow forward may not function.</p>
<h2 id="repeat-playback">Repeat Playback</h2>
<p>Available repeat functions vary depending the discs.</p>
<p>1 During playback, press [REPEAT] repeatedly to select the desired repeat mode.</p>
<table><tr><td colspan="2">Repeat mode Available media</td></tr><tr><td>Chapter repeat</td><td rowspan="2"></td></tr><tr><td>The current chapter will be played back repeatedly.</td></tr><tr><td>Title repeat</td><td rowspan="2"></td></tr><tr><td>The current title will be played back repeatedly in 5</td></tr><tr><td>Track repeat</td><td rowspan="2"></td></tr><tr><td>The current track will be played back repeatedly.</td></tr><tr><td>Group repeat</td><td rowspan="2"></td></tr><tr><td>The current folder will be played back repeatedly.</td></tr><tr><td>All repeat</td><td rowspan="2"></td></tr><tr><td>All tracks or files in the media will be played back repeatedly.</td></tr></table>
<table><tr><td colspan="2">Repeat mode Available media</td></tr><tr><td>Chapter repeat</td><td rowspan="2"></td></tr><tr><td>The current chapter will be played back repeatedly.</td></tr><tr><td>Title repeat</td><td rowspan="2"></td></tr><tr><td>The current title will be played back repeatedly in 5</td></tr><tr><td>Track repeat</td><td rowspan="2"></td></tr><tr><td>The current track will be played back repeatedly.</td></tr><tr><td>Group repeat</td><td rowspan="2"></td></tr><tr><td>The current folder will be played back repeatedly.</td></tr><tr><td>All repeat</td><td rowspan="2"></td></tr><tr><td>All tracks or files in the media will be played back repeatedly.</td></tr></table>
<h2 id="note-14">Note</h2>
<p>• The repeat setting will be cancelled when playback. <br />
• The chapter, title, track or group repeat cleared when moving to another chapter, title, track/file or folder. <br />
- Repeat playback does not function during d play/acrent levels. <br />
- Chapter and title repeat are not available with some "scenes." Video" menu if</p>
<p>- When the repeat setting is set for a MP3 (folder (file), the repeat setting will be cancelled if you select other MP3 or WMA folder (file) to play back.</p>
<h2 id="playback-10">PLAYBACK</h2>
<h2 id="a-b-repeat">A-B Repeat</h2>
<p><img src="/content/2026/05/1018651/images/4600cd34ca0e3e7f8efff9d5928d8f9d6478719c9d1d47d147c9e1c7570db094.jpg" alt="TOSHIBA BDX2000KE - A-B Repeat - 1" loading="lazy" decoding="async"></p>
<p>BD
VIDEO</p>
<p><img src="/content/2026/05/1018651/images/2b50c1dc37ee28b8f78de28ebec297e5558eca36abc821c64a98a3ca90e24221.jpg" alt="TOSHIBA BDX2000KE - A-B Repeat - 2" loading="lazy" decoding="async"></p>
<p>DVD
VIDEO</p>
<p><img src="/content/2026/05/1018651/images/099f14de0527dcf978606775316d46165f6d01a6f12b224074cfb7f3cf09b7e0.jpg" alt="TOSHIBA BDX2000KE - A-B Repeat - 3" loading="lazy" decoding="async"></p>
<p>CD</p>
<p>AVCHD</p>
<p>DivX</p>
<p>You can play back the specific part (between point A and point B) repeatedly.</p>
<p>1 During playback, press [A-B] at the desired starting point A.</p>
<p>2 During playback, press [A-B] at the desired ending point B.</p>
<p>As soon as you set the point B, the part between point A and point B will start playback repeatedly.</p>
<p>• To cancel the A-B repeat, press</p>
<h2 id="note-15">Note</h2>
<ul>
<li>Point B should be set within the point A. <br />
• A - B repeat is not available with <br />
• To cancel the A point which was <br />
• A - B repeat does not function du </li>
<li>For some filesj A-Repeat playback may not function.</li>
</ul>
<h2 id="programme-playback">Programme Playback</h2>
<p><img src="/content/2026/05/1018651/images/c86f11b2e9011135c1f63039cec288201aa807d013383fb62871cf8b21f38b2e.jpg" alt="TOSHIBA BDX2000KE - Programme Playback - 1" loading="lazy" decoding="async"></p>
<p>CD</p>
<p>MP3</p>
<p>WMA</p>
<p>JPEG</p>
<p>You can play back the disc/card in your desired order.</p>
<p>1 In stop mode, press [MODE]. <br />
2 Use [▲ /▼] to select a track / folder / file, then press [ENTER].</p>
<p>e.g.) audio CD <br />
<img src="/content/2026/05/1018651/images/9bab4dccd3bfc185bd470cf326b0e60541adb6be6c8e551129e5596c9d34130f.jpg" alt="1 2 3 4 5 6 TR --/16 Program CD-DA Total 0 : 26 : 24 8 0:36 9 1:14 10 0:45 11 0:50 12 0:53 13 0:20 14 0:54 2 / 3 2 1:14 4 0:50 9 1:14 11 0:50 12 0:53 14 0:54 8 0:36 7 Page Up Page Down Page Prev Page Next 8" loading="lazy" decoding="async"></p>
<ol>
<li>Audio CD</li>
</ol>
<p>Track information</p>
<p>DivX® / MP3 / WMA / JPEG</p>
<p>File information</p>
<ol>
<li>Audio CD</li>
</ol>
<p>"CD-DA" will be displayed</p>
<p>DivX® / MP3 / WMA / JPEG</p>
<p>Current disc, SD card, or folder name will be displayed</p>
<ol>
<li>Track / Folder / File list</li>
</ol>
<p>Track / Folder / File list in the original order</p>
<ol>
<li>Programmed list</li>
</ol>
<p>Track / File list in the programmed order</p>
<ol>
<li>Cumulative playback time of all tracks in the programmed list (audio CD only)</li>
</ol>
<h2 id="en">EN</h2>
<ol>
<li>Playback status </li>
<li>Current page / Total page number </li>
<li>Operation guide</li>
</ol>
<p>Press [Red] to go to the previous page in the track / folder / file list</p>
<p>Press [Green] to go to the next page in the track / folder / file list</p>
<p>Press [Yellow] to go to the previous page in the programmed list</p>
<p>Press [Blue] to go to the next page in the programmed list</p>
<p>• For D <sup></sup> j MP3, WMA or JPEG files, use [▲ /▼] to</p>
<p>[A-B]e-gctin.folder, then press [ENTER] first, and then use [▲ /▼] to select a file, then press [ENTER].</p>
<ul>
<li>Press [CLEAR] to erase the last file of the programme. <br />
s a i m e [▲ t / ▼] to select "All Clear" at the bottom of the list to erase all the tracks / files in the programme. <br />
set Use [▲/▼] to go back/ forward between the hierarchy of folders play back.</li>
</ul>
<p>3 Press [PLAY▶] to start programme playback.</p>
<p>• The programme playback will start.</p>
<p>To exit from the programme playback mode:</p>
<p>- Press [RETURN] in stop mode.</p>
<h2 id="note-16">Note</h2>
<ul>
<li>During programme playback, press [STOP ■] once to set the resume point, and then press [PLAY ▶] to resume programme playback from where [STOP ■] was pressed (audio CD) or from beginning of the file where [STOP ■] was pressed (MP3 / WMA / JPEG). </li>
<li>During programme playback, press [STOP ■] twice to display the programme screen. To go back to the normal programme playback, press [RETURN] to exit from the programme screen, then press [PLAY▶]. <br />
• Up to 99 tracks / files can be entered </li>
<li>To repeat the current track / file in the press [REPEAT] repeatedly until "Track" appears during playback. To repeat the entire programme, press [REPEAT] repeatedly until</li>
</ul>
<p>All" appears during playback.</p>
<ul>
<li>Playback from a desired track / file and r, playback are not available during programme playback. </li>
<li>Pre [MODE] to switch to the random playback mode. <br />
• The programme will be cleared when;
-the unit is turned into the standby mode. <br />
-the media is switched. </li>
<li>the disc / card is removed (as for "Disc" m opening the disc tray will clear the programme info).</li>
</ul>
<h2 id="playback-11">PLAYBACK</h2>
<h2 id="random-playback">Random Playback</h2>
<p><img src="/content/2026/05/1018651/images/c4b47d2006e231d0c3fe30dbc4a13e719311b4abdaad0a3bb1edb153bad02393.jpg" alt="TOSHIBA BDX2000KE - Random Playback - 1" loading="lazy" decoding="async"></p>
<p>CD</p>
<p>MP3</p>
<p>WMA</p>
<p>JPEG</p>
<p>This function shuffles the playback order of tracks / files.</p>
<h2 id="1-in-stop-mode-press-mode-twice">1 In stop mode, press [MODE] twice.</h2>
<p>e.g.) audio CD <br />
<img src="/content/2026/05/1018651/images/090cdb3251566db5f93e5c6ca1cc88571ac233bb7525e3422d4be8a4f0898e09.jpg" alt="1 TR - / 16 Random CD-DA Total 1 : 13 : 29 1 0:36 2 1:14 3 0:45 4 0:50 5 0:53 6 0:20 7 0:54 1 / 3 Page Down" loading="lazy" decoding="async"></p>
<h2 id="1-audio-cd">1. Audio CD</h2>
<p>Track information</p>
<p>MP3 / WMA / JPEG</p>
<p>File information</p>
<h2 id="2-audio-cd">2. Audio CD</h2>
<p>"CD-DA" will be displayed</p>
<p>MP3 / WMA / JPEG</p>
<p>Current disc, SD card, or folder name will be displayed</p>
<h2 id="3-track-file-list">3. Track / File list</h2>
<p>Track / File list in the original order will be displayed</p>
<h2 id="4-operation-guide">4. Operation guide</h2>
<p>Press [Red] to go to the previous page in the track/file list</p>
<p>Press [Green] to go to the next page in the track / file list</p>
<h2 id="5-total-playback-time-of-all-tracks-audio-cd-only">5. Total playback time of all tracks (audio CD only)</h2>
<h2 id="6-playback-status">6. Playback status</h2>
<h2 id="2-press-play-to-start-random-playback">2 Press [PLAY▶] to start random playback.</h2>
<p>To exit from the random playback mode:</p>
<p>- Press [MODE] in stop mode.</p>
<h2 id="note-17">Note</h2>
<p>- During the random playback, press [STOP ■] once to set the resume point, and then press [PLAY ▶] to resume random playback from where [STOP ■] was pressed (audio CD) or from beginning of the file where [STOP ■] was pressed (MP3 / WMA / JPEG).</p>
<p>• To repeat the current track / selection, press [REPEAT] repeatedly until</p>
<p><img src="/content/2026/05/1018651/images/343c7091a355f14171ef8a478d3bfbaa6830e69febeca52c3dea05a1d13ce902.jpg" alt="TOSHIBA BDX2000KE - Note - 1" loading="lazy" decoding="async"></p>
<p>1</p>
<p>r</p>
<p>[Table]</p>
<p>a</p>
<p>C</p>
<p>F</p>
<p>entire random selection press [REPEAT] repeatedly until "appears during playback.</p>
<ul>
<li>Playback from a desired track / file during random playback. </li>
<li>In stop mode, press [RETURN] to switch to the programme playback mode. </li>
<li>For a disc containing mixed MP3 and Windows Media™ Audio files, random playback of those files will be performed.</li>
</ul>
<h2 id="rapid-playback-2">Rapid Playback</h2>
<p><img src="/content/2026/05/1018651/images/ecaefdecbec46ac2aaeb3c61bf0d740da70657c82d3c68345661a22b4e9a3150.jpg" alt="TOSHIBA BDX2000KE - Rapid Playback - 1" loading="lazy" decoding="async"></p>
<p>BD</p>
<p>©</p>
<p>DVD</p>
<p>AVCHD</p>
<p>This function plays back approximately at 1.3 times the normal playback while keeping the sound output. This function is available only on discs recorded in the Dolby Digital format.</p>
<h2 id="1-during-playback-press-mode-repeatedly-until-appears">1 During playback, press [MODE] repeatedly until appears.</h2>
<h2 id="2-press-enter-or-to-change-the-setting">2 Press [ENTER] or [◀/▶] to change the setting.</h2>
<p>"Off": Plays back in normal speed.</p>
<p>“♪♪”: Plays back approximately at 1.3 times of normal playback.</p>
<h2 id="3-press-play-to-return-to-normal-playback">3 Press [PLAY▶] to return to normal playback.</h2>
<h2 id="note-18">Note</h2>
<p>• Picture adjustment and audio language setting cannot be changed during this function. <br />
•Virtual surround does not work during thi <br />
- This function may not work at some point <br />
- During this function, 2ch LPCM will be out HDMI OUT jack and DIGITAL OUT jack.</p>
<h2 id="useful-function">Useful Function</h2>
<h2 id="noise-reduction">Noise Reduction</h2>
<p><img src="/content/2026/05/1018651/images/f1fc282710632ca956afce2188f132373a0b97cd858bca22f88af1f1e2a26abe.jpg" alt="TOSHIBA BDX2000KE - Noise Reduction - 1" loading="lazy" decoding="async"></p>
<p>DVD</p>
<p>DivX</p>
<p>Reduces the noise of the playback picture.</p>
<h2 id="1-during-playback-press-mode-repeatedly-until-appears-2">1 During playback, press [MODE] repeatedly until appears.</h2>
<h2 id="2-use-to-change-the-setting">2 Use [◀/▶] to change the setting.</h2>
<p>"Off": Shows the original picture as recorded. <br />
"1": Executes 3D noise reduction which detects and deletes the noise by comparing each picture frames. <br />
"2": Executes MPEG noise reduction which reduces the block noise and mosquito noise on the subtitles on the movie. <br />
"3": Executes both MPEG noise reduction and 3D noise reduction.</p>
<h2 id="3-press-return-to-exit">3 Press [RETURN] to exit.</h2>
<p>e in the random
Note</p>
<p>p · The setting will remain the same even if turned to the standby mode. <br />
- You cannot adjust the setting during rapi</p>
<p>/ file is not available</p>
<h2 id="22-en">22 EN</h2>
<h2 id="playback-12">PLAYBACK</h2>
<h2 id="virtual-surround">Virtual Surround</h2>
<p><img src="/content/2026/05/1018651/images/ad9f33dc14980a32774853e20615207a5c50fcfabb4180ccaed446bdd0912e0a.jpg" alt="TOSHIBA BDX2000KE - Virtual Surround - 1" loading="lazy" decoding="async"></p>
<p>BD
Vipro</p>
<p><img src="/content/2026/05/1018651/images/96434d8812de612a67144dd45db1abed6627ab860957c2d038b4ba5c519bb183.jpg" alt="TOSHIBA BDX2000KE - Virtual Surround - 2" loading="lazy" decoding="async"></p>
<p>DVD
VIDEO</p>
<p><img src="/content/2026/05/1018651/images/60ea8dc28c811ee5502cd9a50ee028a1722fd0ba612f11030af60346cde709e7.jpg" alt="TOSHIBA BDX2000KE - Virtual Surround - 3" loading="lazy" decoding="async"></p>
<p>CD</p>
<p>AVCHD</p>
<p>DivX</p>
<p>MP3</p>
<h2 id="wma-3">WMA</h2>
<p>You can enjoy stereophonic virtual space through your existing 2-channel stereo system.</p>
<p>1 During playback, press [MODE] repeatedly until appears.</p>
<p>2 Use [▲ / ▼] to change the setting.</p>
<p>"Off": No surround effect</p>
<p>"1": Natural surround effect</p>
<p>"2": Stronger surround effect</p>
<p>3 Press [RETURN] to exit.</p>
<h2 id="note-19">Note</h2>
<ul>
<li>Set the virtual surround setting to "Off" or lower the volume if the sound is distorted. </li>
<li>Virtual surround does not function during rapid playback. </li>
<li>For virtual surround, audio signal will always be 2-channel LPCM.</li>
</ul>
<h2 id="pip-bonusview-setting">PIP (BONUSVIEW) Setting</h2>
<p><img src="/content/2026/05/1018651/images/e1644549166d99a378d018ef63dd2a0e570c908cf3bab7910071a17a5d8f4c23.jpg" alt="TOSHIBA BDX2000KE - PIP (BONUSVIEW) Setting - 1" loading="lazy" decoding="async"></p>
<p>BD
Video</p>
<p>Some BD-videos have the PIP function which enables you to display the secondary video in the primary video. You can call up the secondary video by pressing [PIP] whenever the scene contains the secondary video.</p>
<p><img src="/content/2026/05/1018651/images/f82505841652f0601f61d154196b0fe53cd2b3beb8748d20827f24d89136fa7c.jpg" alt="primary video secondary video" loading="lazy" decoding="async"></p>
<p>1 During playback, press [PIP]. <br />
2 Use [▲ / ▼] to select the secondary video you want.</p>
<p><img src="/content/2026/05/1018651/images/08c7e64df27df29ce8c62bd4070e7a391c5dde16ca0cc73f3d329feb087cde7c.jpg" alt="TOSHIBA BDX2000KE - PIP (BONUSVIEW) Setting - 3" loading="lazy" decoding="async"></p>
<p>3/32</p>
<p>[Non-Text]</p>
<p>3 Press [RETURN] or [PIP] to remove the PIP information.</p>
<h2 id="note-20">Note</h2>
<p>- The secondary audio will not be secondary audio is set to "Off" or when "BD Audio Mode" is set to "HD Audio Output". Refer to "Switching Audio Soundtrack" on page 25 and "Setting the BD Audio Mode" on page 26.</p>
<h2 id="camera-angle">Camera Angle</h2>
<p><img src="/content/2026/05/1018651/images/0baecb822b62d86f85315e449c4d9826f867f544871d36ec3a7d748ce67da079.jpg" alt="TOSHIBA BDX2000KE - Camera Angle - 1" loading="lazy" decoding="async"></p>
<p>BD</p>
<p>©</p>
<p>OVD</p>
<p>Some BD-videos and DVD-videos contain scenes which have been shot simultaneously from various angles. You can change the camera angle when appears on the TV screen.</p>
<p>1 During playback, press [ANGLE]. <br />
2 Use [▲ / ▼] to select your desired angle.</p>
<p><img src="/content/2026/05/1018651/images/3ba525e954a4765ebdd2c3764c1af76b8184599c37fff46af6456fbde1018a14.jpg" alt="TOSHIBA BDX2000KE - Camera Angle - 2" loading="lazy" decoding="async"></p>
<p>1/3</p>
<p>[Non-Text]</p>
<p>3 Press [RETURN] to exit.</p>
<h2 id="note-21">Note</h2>
<p>- If "Angle Icon" setting is "Off" in will not appear. Refer to page 30.</p>
<p>hers'</p>
<h2 id="enjoying-bd-live-discs-with-online-content">Enjoying BD-Live Discs with Online Content</h2>
<p><img src="/content/2026/05/1018651/images/c968d5f1e6d504c0a154ce727e7e9db544e0ceada6d460298bf67b8e6cd7c299.jpg" alt="TOSHIBA BDX2000KE - Enjoying BD-Live Discs with Online Content - 1" loading="lazy" decoding="async"></p>
<p>BD
VIDEO</p>
<p>You can enjoy the BD-Live functions which enable you to use the interactive functions when the unit is connected to the Internet. (For the Network connection, refer to page 36.)</p>
<p>Examples for BD-Live interactive functions:</p>
<ul>
<li>Download the additional contents such as trailer, subtitles and BD-Java, etc. </li>
<li>While downloading, special video back.</li>
</ul>
<p>Service and functions differ depending on the disc. Follow the instructions given by the disc when using the BD-Live function.</p>
<p>+</p>
<p>中</p>
<h2 id="note-22">Note</h2>
<ul>
<li>You must connect the unit to the Internet necessary settings in order to use the BD-Live function. </li>
<li>For certain discs, setting for "BD-Live Set need to be changed. </li>
<li>Depending on your connection environment take time to connect to the Internet or the Internet may not be connected. </li>
<li>When BD-Live functions are used and the connected to the Internet, you may be charged for this communication. </li>
<li>While connecting to BD-Live, sometimes in awhile before the next page is downloaded or refreshed. </li>
<li>You must insert an SD card when using the function. (SD card of 1GB is recommended.) </li>
<li>Do not remove the SD card when using the function.</li>
</ul>
<h2 id="note-for-aacs-online">Note for AACS Online</h2>
<p>• The player or disc IDs may be sent to the <br />
provider when playing back a disc with BD-Live <br />
function. <br />
• If you save your viewing history on these using these IDs, you will be introduced to other similar movies. <br />
- You can save game score histories.</p>
<p>EN</p>
<p>23</p>
<p><img src="/content/2026/05/1018651/images/4c8f31c0551efd8d17ddc98b61f70d06d65cd903f3f9c9cfe8fb8d6486681674.jpg" alt="TOSHIBA BDX2000KE - Note for AACS Online - 1" loading="lazy" decoding="async"></p>
<p><img src="/content/2026/05/1018651/images/76fb2fef3475f7c19906074a9fa399bde358a14fb63b3cb0f7d897269169712b.jpg" alt="TOSHIBA BDX2000KE - Note for AACS Online - 2" loading="lazy" decoding="async"></p>
<p><img src="/content/2026/05/1018651/images/a45be5a1fb07d4ee7ef2d18c5404c1495bf970221dc4ab724649aeb9f13d44a2.jpg" alt="TOSHIBA BDX2000KE - Note for AACS Online - 3" loading="lazy" decoding="async"></p>
<p><img src="/content/2026/05/1018651/images/3bb88c836f2950e72743da4bd6dcc5a22c65785d3aea9a2d04fa7b62792ee738.jpg" alt="Pure electrical circuit lines without any symbols" loading="lazy" decoding="async"></p>
<h2 id="playback-13">PLAYBACK</h2>
<h2 id="search">Search</h2>
<p>Using [SKIP |◀◀ /▶▶]</p>
<p>1 During playback, press [SKIP▶▶] to move to the next track / title / chapter / file. Press it repeatedly to skip to subsequent tracks. Press [SKIP ◀◀◀] once to go back to the beginning of the current track. Press it repeatedly to go to the previous tracks.</p>
<p>- For JPEG files, press [SKIP ◀◀◀] to go back to the previous file.</p>
<h2 id="note-23">Note</h2>
<ul>
<li>If title contains no chapters, [SKIP |◀◀ /▶▶] changes the title. </li>
<li>For JPEG files, [◀/▶] is also available.</li>
</ul>
<h2 id="using-search">Using [SEARCH]</h2>
<p>By using [SEARCH], you can select the following search modes.</p>
<p><img src="/content/2026/05/1018651/images/282eded8737439bb21f086cbd76866f2d84cb802e54d476b1e285f9073495dca.jpg" alt="Search mode Available media ▶ / TT Chapter / Title search BD VIDEO DVD VIDEO AVCHD TR Track search CD DivX* MP3 WMA JPEG Time search BD VIDEO DVD VIDEO CD AVCHD DivX*" loading="lazy" decoding="async"></p>
<p>1 During playback, press [SEARCH] repeatedly until your desired search mode appears. <br />
2 Enter the desired chapter, title, track, file number or time to search for using [Number buttons].</p>
<p>• Chapter, title, track or time search will start.</p>
<p>- Press [CLEAR] to erase an incorrect input.</p>
<h2 id="note-24">Note</h2>
<ul>
<li>During programme and random playback, search functions are not available except the search using [SKIP |◀◀ /▶▶]. </li>
<li>Time search is available only in the same track, file or title. </li>
<li>For BD and AVCHD, chapter and time search are available only during playback. </li>
<li>For some filesj time search may not function.</li>
</ul>
<h2 id="using-number-buttons-direct-search">Using [Number buttons] (Direct Search)</h2>
<h2 id="title-search">Title Search</h2>
<p>In stop mode, enter the title number you want to search using [Number buttons].</p>
<p>Playback of the title will start in a few seconds.</p>
<h2 id="chapter-search">Chapter Search</h2>
<p>During playback of a title, enter the chapter number you want to search using [Number buttons].</p>
<p>Playback of the chapter will start in a few seconds.</p>
<h2 id="track-file-search">Track / File Search</h2>
<p>Enter the track / file number you want to search using [Number buttons].</p>
<p>Playback of the track / file will start in a few seconds.</p>
<h2 id="note-25">Note</h2>
<p>- As for the BD-video, how it performs will determined by the disc, and may not perform as described here.</p>
<h2 id="playback-14">PLAYBACK</h2>
<p>You can select the format of audio and video as you prefer depending on the contents of the disc you are playing back.</p>
<h2 id="switching-subtitles">Switching Subtitles</h2>
<p>Some BD, DVD and AVCHD materials may have subtitles in 1 or more languages. For commercially available discs, the supported languages can be found on the disc case. Follow the steps below to switch the subtitle languages during playback.</p>
<h2 id="bd-video">BD VIDEO</h2>
<p>1 During playback, press [SUBTITLE]. <br />
2 Use [▲ / ▼] to select the desired item to set, then press [ENTER].</p>
<p>"Primary Subtitle": Sets the subtitle for the "Primary": Sets the audio for the primary primary video. "Secondary": Sets the audio for the seco</p>
<p>"Secondary Subtitle": Sets the subtitle for 3 Use [▲ / ▼] to select your desired audio stream secondary video. channel.</p>
<p>"Subtitle Style": Sets style of the subtitle.. For "Secondary", use [◀/▶] to switch between Use [▲/▼] to select your desired subtitle or current audio setting and "Off".</p>
<p>3 Use [▲ / ▼] to select your desired subtitle or style.</p>
<p>- Use [◀/▶] to switch between current subtitle setting and "Off".</p>
<p>4 Press [SUBTITLE] to exit.</p>
<h2 id="dvd-video-avchd-divx">DVD Video AVCHD DivX®</h2>
<p>1 During playback, press [SUBTITLE]. <br />
2 Use [▲ /▼] to select your desired subtitle.</p>
<h2 id="1-4">1 /4</h2>
<p>- Use [◀/▶] to switch between current subtitle setting and "Off".</p>
<p>3 Press [SUBTITLE] to exit.</p>
<h2 id="note-26">Note</h2>
<ul>
<li>Some discs will only allow you subtitles from the disc menu or pop-up menu. Press [TOP MENU] or [POP MENU / MENU] to display the disc menu or pop-up menu. </li>
<li>If 4-digit-language code appears in the subtitle menu, refer to "Language Code List" on page 40. </li>
<li>If the disc has no subtitle language or subtitle style, "Not Available" will be displayed on the TV screen. </li>
<li>During playback of the secondary video, the primary subtitle setting is not available except when there is no subtitle for the secondary video. </li>
<li>If you select a language that has a 3-letter-language code, the code will be displayed every time you change the subtitle language setting. If you select any other languages, “---” will be displayed instead. (Refer to page 40.) </li>
<li>For D® external subtitle, refer to "Playing Back a DivX® with DivX® External Subtitle" on page 19.</li>
</ul>
<h2 id="switching-audio-soundtrack">Switching Audio Soundtrack</h2>
<p>Some BD, DVD, audio CD and AVCHD materials contain multiple audio streams. Those are often in different audio languages or audio formats. For BD, available audio varies depending on "BD Audio Mode" setting. Refer to page 29 for more information.</p>
<h2 id="bd-video-2">BD VIDEO</h2>
<p>1 During playback, press [AUDIO]. <br />
2 Use [▲ / ▼] to select the desired item to set, then press [ENTER].</p>
<p>he "Primary": Sets the audio for the primary "Secondary": Sets the audio for the seco</p>
<p>3 Use [▲ / ▼] to select your desired audio stream channel.</p>
<p>- For "Secondary", use [◀/▶] to switch between current audio setting and "Off".</p>
<p>4 Press [AUDIO] to exit.</p>
<h2 id="dvd-video-cd-avchd-divx">DVD VIDEO CD AVCHD DivX</h2>
<p>1 During playback, press [AUDIO]. <br />
2 Use [▲ / ▼] to select your desired audio stream channel.</p>
<p>e.g.) DVD-video</p>
<h2 id="1-eng-dolby-d-321ch-48k-3">1 ENG Dolby D 3/2.1ch 48k / 3</h2>
<p>- For audio CD, you can select fo</p>
<p>"Stereo": Both right and left channels are active (stereo).</p>
<p>"L-ch": Only left channel is active. <br />
"R-ch": Only right channel is active.</p>
<p>3 Press [AUDIO] to exit.</p>
<p>to .φha n g p s t C (5.1 music disc), "DTS" will b (Selecting audio streams or channels is not available.)</p>
<h2 id="playback-15">PLAYBACK</h2>
<h2 id="note-27">Note</h2>
<p>• The secondary audio will not be</p>
<p>secondary video is not displayed or when "BD Audio Mode" is set to "HD Audio Output". (For some BDs, secondary audio will be output even when secondary video is off.)</p>
<p>• The sound mode cannot be chan playback of discs not recorded in multiple audio.</p>
<p>- Some discs allow changing the setting on the disc menu. (Operation varies depending on the discs. Refer to the manual accompanying the disc.)</p>
<p>- [AUDIO] may not work on some discs with multiple audio streams or channels (e.g. DVDs that allow changing audio setting on the disc menu).</p>
<p>- If you select a language that code, the code will be displayed every time you change the audio language setting. If you select any other languages, “---” will be displayed instead. (Refer to page 40.)</p>
<p>• Audio Language selection cannot rapid playback. (Refer to page 22.)</p>
<p>- If 4-digit-language code appears refer to page 40.</p>
<p>- If the disc has no audio language be displayed on the TV screen.</p>
<h2 id="setting-the-bd-audio-mode">Setting the BD Audio Mode</h2>
<p><img src="/content/2026/05/1018651/images/c8e7aa9a1110ac0d693848514da6f6bf0ef5889d4ae14c37f8bfc9ae11b49684.jpg" alt="TOSHIBA BDX2000KE - Setting the BD Audio Mode - 1" loading="lazy" decoding="async"></p>
<p>ut when the</p>
<p>There are 2 options for "BD Audio Mode" setting; either by setting the output to the secondary and interactive audio accompanied by the primary audio or by setting only the primary audio. (Refer to pages 33-34 for more information)</p>
<p>1 In stop mode, press [MODE] repeatedly until</p>
<p>appears.</p>
<p>2 Use [▲ / ▼] to change the setting.</p>
<p>"Mix Audio Output":</p>
<p>a. 3 - Letter - language
If it is available, BD-video's secondary and interactive audio will be output with the primary audio.</p>
<p>- The secondary audio is the audio for the video (Director's commentary, etc.) and the interactive audio is the audio for the interactive application (Button click sounds etc.).</p>
<p>in the audio menu, "HD Audio Output":</p>
<p>e Only the primary audio will be output. Set this mode in order to output, Dolby Digital Plus, Dolby TrueHD, or DTS-HD audio of BD through HDMI connection.</p>
<p>3 Press [RETURN] to exit.</p>
<h2 id="note-28">Note</h2>
<p>- You can also set "BD Audio Mode" from the menu. Refer to page 29.</p>
<p>- Refer to "Audio signals output from HDMI on page 33 and "Audio signals output from DIGITAL OUT (OPTICAL / COAXIAL) jack" on page 34 for how BD Audio will be output.</p>
<p>- In "Mix Audio Output" mode, if there is no and interactive audio, the audio will be output as "HD Audio Output" mode.</p>
<h2 id="function-setup-2">FUNCTION SETUP</h2>
<p>In the setup menu screen, you can access various kinds of menus, and customise them as you prefer. To call up the setup menu screen, press [SETUP]. Then follow the instructions below to navigate through the screen.</p>
<p>< Setup menu screen ></p>
<p><img src="/content/2026/05/1018651/images/3dd6fc84fbb8d4403ea91861ef960047a3bb6fe047da6590cc1c28894ac18dfb.jpg" alt="Quick Media Select Disc HDMI Audio Out HDMI Multi(Normal) HDMI Video Resolution Auto Component Output 480V/576i Player Menu English" loading="lazy" decoding="async"></p>
<h2 id="1-quick-menu">1. Quick menu</h2>
<p>Contains only the frequently used menus.</p>
<h2 id="2-custom-menu">2. Custom menu</h2>
<p>Contains all the available setup menus.</p>
<h2 id="3-initialise-menu">3. Initialise menu</h2>
<p>Contains the menus that relates to the initialisation of the unit or the SD card.</p>
<h2 id="4-menu-window">4. Menu window</h2>
<p>Displays the available items for the selected menu.</p>
<h2 id="how-to-navigate-through-the-setup-menus">How to Navigate through the Setup Menus</h2>
<ul>
<li>Use [▲ / ▼] to move the highlight up and down. </li>
<li>Press [ENTER] to access the options of an item, to switch settings, or to confirm the selection. </li>
<li>Use [◀/▶] to switch settings in some menus. </li>
<li>Press [RETURN] to go back to the previous screen. </li>
<li>Press [SETUP] to exit.</li>
</ul>
<h2 id="list-of-setup-menus">List of Setup Menus</h2>
<p>Items with (*) can be accessed from "Quick" menu also.</p>
<p>The items highlighted in grey are the default setting.</p>
<table><tr><td>Category</td><td colspan="4">Menus / Options Description</td><td></td></tr><tr><td rowspan="8">Custom</td><td rowspan="2">Language Audio Original Chinese</td><td></td><td colspan="2">Turkish</td><td rowspan="2">Sets the audio language for BD-video, DVD-video or AVCHD file playback. “Original”: Activates the disc's original language. “Other”: If you select "Other", enter 4-digit-code for the desired language (refer to page 40).</td></tr><tr><td>EnglishGermanFrenchItalianSpanishDutchSwedishRussian</td><td>JapaneseKoreanDanishFinnishNorwegianIcelandicHungarianRomanian</td><td>GreekIrishPortuguesePolishCzechSlovakBulgarianOther</td></tr><tr><td rowspan="2">Subtitle</td><td>Off Chinese</td><td></td><td>Turkish</td><td rowspan="2">Sets the subtitle language for BD-video, DVD-video or AVCHD file playback. “Other”: If you select "Other", enter 4-digit-code for the desired language (refer to page 40).</td></tr><tr><td>EnglishGermanFrenchItalianSpanishDutchSwedishRussian</td><td>JapaneseKoreanDanishFinnishNorwegianIcelandicHungarianRomanian</td><td>GreekIrishPortuguesePolishCzechSlovakBulgarianOther</td></tr><tr><td rowspan="2">Disc Menu</td><td colspan="2">English Japanese</td><td>Greek</td><td rowspan="2">Sets the language for disc menu. “Other”: If you select "Other", enter 4-digit-code for the desired language (refer to page 40).</td></tr><tr><td>GermanFrenchItalianSpanishDutchSwedishRussianChinese</td><td>KoreanDanishFinnishNorwegianIcelandicHungarianRomanianTurkish</td><td>IrishPortuguesePolishCzechSlovakBulgarianOther</td></tr><tr><td rowspan="2" colspan="5">Player Menu* Auto (XXX) Polski Sets the language for player menu. (on-screen display menu) “Auto”: Activates the Get & Set Menu Language function (refer to page 35). “Auto” is available only when “HDMI CEC” is set to “On”. Inside the parentheses next to “Auto” will be currently selected language.</td></tr><tr></tr></table>
<p>EN</p>
<h2 id="function-setup-3">FUNCTION SETUP</h2>
<table><tr><td>Category</td><td colspan="2">Menus / Options Description</td><td></td></tr><tr><td rowspan="7">Custom</td><td>Language DivX Subtitle English PortugueseDivX®</td><td>German PolishFrench ItalianSpanish Dutch Swedish Russian1 Russian2</td><td>Sets the language for DivX® subtitle. If the DivX® subtitle file contains more than one subtitle language, you can toggle those by pressing [SUBTITLE] repeatedly.</td></tr><tr><td>Video TV Aspect· Refer to p for more information.</td><td>16:9 Wide Sets the aspect ratio of the p4:3P8n&Scan4:3 Letter Box16:9 Squeeze</td><td>playback image to fit your TV.</td></tr><tr><td>HDMI Video Resolution*· This fe at u available only when the display device is connected by an HDMI cable.· Refer to p for more information.</td><td>Auto Sets the resolution of the video signal480p/576p720p1080i1080p1080p24a g e 3 2</td><td>nal being output from the HDMI OUT jack.</td></tr><tr><td>HDMI Deep Color· This fe at u available only when the display device is connected by an HDMI cable, and when it supports Deep Colour feature.</td><td>Auto Reduces the posterisation effect of Off is</td><td rowspan="2">the playback picture."Auto":Reduces the posterisation effect by automatically outputting up to 12 bit colour whenever the unit recognises the connected display device supports Deep Colour feature."Off":Outputs the standard 8 bit colour.</td></tr><tr><td>Component Output*</td><td>480i/576i Sets the resolution for the component output picture.</td></tr><tr><td>Progressive Mode</td><td>Auto "Auto":Video</td><td>The progressive mode will detect 24-frame film material (movies) and automatically select appropriate progressive mode."Video":Suited for playing back video material discs (TV shows or animation).</td></tr><tr><td>Still Mode</td><td>Auto Adjusts picture resolution and quality in still mode.FieldFrame</td><td>"Auto":Automatically selects the best resolution setting ("Frame" or "Field") based on the data characteristics of the pictures."Field":Stabilises the pictures, although the picture quality may become coarse due to the limited amount of data. Select "Field" when the pictures are still unstable even if "Auto" is selected."Frame":Displays relatively motionless pictures in higher resolution. "Frame" improves the picture quality, although it may unstabilise the pictures due to alternate output of 2-field data.A n individual picture on th "Frame", which consists of two separate images called "Field". Some pictures may be blurred at the auto setting in "Still Mode" setting due to their data characteristics.</td></tr></table>
<h2 id="function-setup-4">FUNCTION SETUP</h2>
<table><tr><td>Category</td><td colspan="4">Menus / Options Description</td><td></td></tr><tr><td rowspan="24">Audio</td><td>BD Audio Mode[IMAGE]</td><td colspan="3">Mix Audio OutputHD Audio Output</td><td>For BD, selects whether to output the secondary andinteractive audio with primary audio if it is available oronly the primary audio. Refer to “Setting the BD AudioMode” on page 26.“Mix Audio Output”:The audio for the secondary video and the interactiveapplication will be output together with the audio forthe primary video.“HD Audio Output”:Outputs only the primary audio. Set this mode in orderto output Dolby Digital, Dolby Digital Plus, DolbyTrueHD, DTS or DTS-HD audio of BD through HDMIconnection.</td></tr><tr><td rowspan="23">HDMI Audio Out*· This fe at uavailable onlywhen the displaydevice isconnected by anHDMI cable.· R e f e r t o pfor moreinformation.</td><td>HDMI Multi(Normas)</td><td colspan="2"></td><td rowspan="17">Outputs the multi-channelaudio signals from HDMIOUT jack with bitstream orLPCM.</td></tr><tr><td rowspan="22">HDMI Multi(LPCM)a g e 3 3</td><td rowspan="6">SpeakerSize</td><td>Front Large Sets theSpeakerconfiguration to suite thesize/number of yourspeakers.Press [ENTER] to changethe setting.</td></tr><tr><td>Center Small</td></tr><tr><td>Subwoofer On</td></tr><tr><td>Surround Large</td></tr><tr><td>Surround BackSmall</td></tr><tr><td>Default</td></tr><tr><td rowspan="10">ChannelLevel</td><td>Test Tone Off Outputs the test tone fromeach speaker.Use [◀/▶] to switchoptions, then press[ENTER] to confirm.· Test tone willautomatically.· To stop the te press [RETURN].“Manual”:Allows you to manuallyselect the speaker to test.Use [▲/▼] to select thespeaker.Use [◀/▶] to adjust thevolume.“Auto”:Automatically tests allspeakers.Use [◀/▶] to adjust thevolume.</td></tr><tr><td>Front Lch-12 to0dB(Default0dB)</td></tr><tr><td>Center</td></tr><tr><td>Subwoofer</td></tr><tr><td>Front Rch</td></tr><tr><td>SurroundRch</td></tr><tr><td>SurroundBack Rch</td></tr><tr><td>SurroundBack Lch</td></tr><tr><td>SurroundLch</td></tr><tr><td>Default</td></tr><tr><td rowspan="6">DelayTime</td><td>DistanceFeetMeters</td><td>Sets the desired measuresystem. This measure system will be used for“Delay Time” setting.Use [◀/▶] to change thesetting.</td></tr><tr><td>Front0 to 18m(Default3.6m)</td><td rowspan="5">Sets the distance from thelistening point to thespeaker to get the idealdelay time.Use [◀/▶] to change thesetting.</td></tr><tr><td>Center</td></tr><tr><td>Surround0 to 18m(Default3.0m)</td></tr><tr><td>SurroundBack</td></tr><tr><td>Default</td></tr></table>
<p>EN</p>
<p>29</p>
<h2 id="function-setup-5">FUNCTION SETUP</h2>
<table><tr><td colspan="5">Category Menus / Options Description</td><td colspan="2"></td></tr><tr><td rowspan="14">Custom</td><td rowspan="3">Audio Audio</td><td>Mute</td><td>• Refer "Digital Out" setting on page 34 for setting options.</td><td>Digital Qub</td><td>Bitstream "Bitstream": LPCM</td><td>Sets the audio format output from DIGITAL OUT jack.</td></tr><tr><td>Down Sampling</td><td colspan="3">On Sets the digital audio output when p Off</td><td rowspan="2">laying back BD or DVD recorded in LPCM. "On": LPCM signals are converted to 48 kHz for output. Set to "On" when using digital connections to an AV amplifier that is not compatible with sampling frequencies of 96 kHz. "Off": For BD and DVD recorded in LPCM without copyright protection, 2-channel audio signals up to 192 kHz are output as LPCM signals with no conversion.</td></tr><tr><td>DRC</td><td colspan="3">Auto Sets whether to compress the range of sound volume On Off</td></tr><tr><td rowspan="3">Parental• Refer page 35 for more information.</td><td rowspan="3">Password input field to</td><td>BD Rating Level</td><td colspan="3">All Sets the rating level for the disc playback.</td></tr><tr><td>DVD Rating Level</td><td colspan="3">All Sets the rating level for the disc playback.</td></tr><tr><td>Password Change</td><td>Password input field</td><td colspan="2">Sets the new password for "Parental" setting.</td></tr><tr><td rowspan="8">Others</td><td>Angle Icon</td><td colspan="4">On Sets whether to display the angle icon on the TV when Off</td></tr><tr><td>Auto Power Off</td><td colspan="4">On Sets whether to turn off the unit (to the standby mode) Off</td></tr><tr><td>Panel Display</td><td colspan="4">Auto Sets the brightness of the front panel display Bright Dimmer</td></tr><tr><td rowspan="3">DivX® VOD DivX®</td><td>Registration Code</td><td colspan="2">Your registration code is: ○○○○○○○○○○ To learn more visit www.divx.com/vod</td><td>This menu item provides you with the DivX® VOD registration code. The DivX® registration code is required when downloading the DivX® VOD files from the Internet. To learn more about DivX® VOD, visit www.divx.com/vod.</td></tr><tr><td>Deactivation Code</td><td colspan="2">Your deactivation code is: ○○○○○○○○ To learn more visit www.divx.com/vod</td><td>This menu item provides you with the DivX® VOD deactivation code. The DivX® deactivation code is required when re-downloading the DivX® VOD files from the Internet after deactivating. To learn more about DivX® VOD, visit www.divx.com/vod.</td></tr><tr><td>Deactivation</td><td colspan="2">No Yes</td><td>This menu deactivates the DivX® VOD files and provides you with new registration code and deactivation code in order to download the DivX® VOD files from the Internet.</td></tr><tr><td>HDMI CEC• This feature available only when the display device is connected with an HDMI cable, and when it supports HDMI CEC feature.• Refer to page for more information.</td><td colspan="3">On Sets whether to utilise the HDMI CEC Off is</td><td>function.</td></tr><tr><td>Media Select*</td><td colspan="3">Disc SD Card</td><td>Select the media to play back.</td></tr></table>
<h2 id="function-setup-6">FUNCTION SETUP</h2>
<table><tr><td></td><td colspan="5">Category Menus / Options Description</td><td></td></tr><tr><td rowspan="20">Custom</td><td rowspan="20">Others Network</td><td rowspan="18">Connection• Refer to p 38 for more information.</td><td colspan="3">Connection Test a g e s 3 6 -</td><td>Performs the network connection test. After you change the IP Address or DNS Setting, always perform this test.</td></tr><tr><td>Enable (Easy)</td><td colspan="2"></td><td>If you select "Enable(Easy)", Connection test will automatically start.</td></tr><tr><td rowspan="15">Enable (Custom)</td><td>IP Address Setting</td><td>Auto (DHCP) Sets Manual</td><td>Sets the IP Address.In most cases, you can connect to the Internet without making any changes to the default setting.</td></tr><tr><td colspan="2">IP Address Input field Allows</td><td rowspan="13">you to set "IP Address", "Subnet Mask" and "Default Gateway" manually.A v a i l a b l e o n l y when "Manu Address Setting".</td></tr><tr><td>Subnet Mask</td><td></td></tr><tr><td>Default Gateway</td><td></td></tr><tr><td>DNS Setting</td><td>Auto (DHCP) Sets the DNS Setting.Manual</td></tr><tr><td>Primary DNS</td><td rowspan="2">Input field Allows you to set "Primary DNS" and "Secondary DNS" manually.A v a i l a b l e o n l y when "Manu Setting".</td></tr><tr><td>Secondary DNS</td></tr><tr><td>Proxy Setting</td><td>Do Not Use Sets the proxy server.Use</td></tr><tr><td>Proxy Address</td><td rowspan="2">Input field Allows you to set "Proxy Address" and "Proxy Port" manually.Available only when "Use" is selected in "Proxy Setting".</td></tr><tr><td>Proxy Port</td></tr><tr><td>Connection Speed</td><td>Auto Sets the connection speed.10BASE Half10BASE Full100BASE Half100BASE Full</td></tr><tr><td rowspan="3">BD-Live Setting</td><td>Allow You can restrict Internet access when BD-Live functions are used.</td></tr><tr><td>Limited Allow</td></tr><tr><td>Prohibit</td></tr><tr><td colspan="2">MAC Address</td><td>You can check the MAC Address.</td></tr><tr><td colspan="3">Disable</td><td>Deactivates the network connection.</td></tr><tr><td rowspan="2">Software Update• Refer to p for more information.</td><td colspan="3">Current Vegsier B 9</td><td>Indicates the current firmware version.</td></tr><tr><td>Disc Update</td><td colspan="2">No Yes</td><td>Allows you to update this unit's firmware using a disc.</td></tr><tr><td rowspan="5">Initialize</td><td>Setup</td><td>NoYes</td><td rowspan="5" colspan="3">• Refer to page 39 for</td><td>Resets all the settings, except for "Parental" and "Network Connection" to the factory default.</td></tr><tr><td>Format SD Card</td><td>NoYes</td><td>Re-formats SD card.</td></tr><tr><td>Erase Saved BD-ROM Data (Player)</td><td>NoYes</td><td>Re-formats local storage (Player) used for BD-Java.more information.</td></tr><tr><td>Erase Saved BD-ROM Data (SD Card)</td><td>NoYes</td><td>Re-formats local storage (SD card) used for BD-Java.</td></tr><tr><td>Network Settings</td><td>NoYes</td><td>Initialises network settings.</td></tr></table>
<p>INTRODUCTION</p>
<p>CONNECTIONS</p>
<p>PLAYBACK</p>
<p>FUNCTION SETUP</p>
<p>OTHERS</p>
<h2 id="function-setup-7">FUNCTION SETUP</h2>
<h2 id="tv-aspect">TV Aspect</h2>
<p>[SETUP] → "Custom" → "Video" → "TV Aspect"</p>
<p>Use this feature to adjust the aspect ratio of the video source which is different from your TV's ratio to fit your TV monitor without distorting the picture. Descriptions of each setting are as follows:</p>
<table><tr><td>Video source</td><td colspan="2">Your TV Option Description</td><td></td></tr><tr><td rowspan="3">16:9</td><td rowspan="2">4:3</td><td>4:3 Letter Box To enjoy <img src="/content/2026/05/1018651/images/0093f82e0a141c88204ad3f9a0bcb28c811cab6c72693643c41692913835df10.jpg" alt="TOSHIBA BDX2000KE - TV Aspect - 1" loading="lazy" decoding="async"></td><td>joy 16:9 picture on 4:3 monitor:16:9 picture is scaled down until both sides of the picture fits the 4:3 TV.</td></tr><tr><td>4:3 Pan & Scan To enjoy <img src="/content/2026/05/1018651/images/085aeeceb02fda59d366c5550644e5baaaa89a7f31d0c4ef17b581247c7b9acc.jpg" alt="TOSHIBA BDX2000KE - TV Aspect - 2" loading="lazy" decoding="async"></td><td>joy 16:9 picture on 4:3 monitor:Both sides of the picture are trimmed to fit the 4:3 TV without distorting the aspect ratio of the picture.</td></tr><tr><td rowspan="2">16:9</td><td>16:9 Wide To enjoy 1 <img src="/content/2026/05/1018651/images/fe9f8c73a7aeb8689d1e5acddd201a71a7ec6947f15c48b5648759ce9f35340b.jpg" alt="TOSHIBA BDX2000KE - TV Aspect - 3" loading="lazy" decoding="async"></td><td>6:9 picture on 16:9 monitor:Select this setting when you want to enjoy 16:9 picture on the 16:9 TV.</td></tr><tr><td>4:3</td><td>16:9 Squeeze To enjoy <img src="/content/2026/05/1018651/images/3d1e59f566fb42c594bbe4960c9d2292fdf2dfce59e74324b7786514e9e27e39.jpg" alt="TOSHIBA BDX2000KE - TV Aspect - 4" loading="lazy" decoding="async"></td><td>Joy 4:3 picture on 16:9 monitor:Use this setting to display 4:3 picture on the 16:9 TV without distorting the aspect ratio of the picture.</td></tr></table>
<h2 id="note-for-hdmi-video-resolution-and-component-output">Note for "HDMI Video Resolution" and "Component Output"</h2>
<p>• The selected resolution must also be supported by your display device. <br />
- Even if you set "HDMI Video Resolution" setting to "Auto", when this unit is connected to a DVI compatible display devices with an HDMI-DVI cable, 480p/576p signal will be output. <br />
• Video and audio signals may be distorted temporarily when switching to / from the HDMI output mode. <br />
- You cannot change the video resolution during playback of BDs or AVCHD files. To change the resolution, stop playback. <br />
- In order to get natural and high quality film reproduction of 24-frame film material, use an HDMI cable (High Speed HDMI Cable is recommended) and select "Auto" if the connected TV is compatible with 1080p24 frame input. <br />
- For AV C H D P fiDsj and for discs with the contents which are not compatible with 1080p24 frame, 1080p60 frame will be output even if the connected TV is compatible with 1080p24 frame input and you set "HDMI Video Resolution" setting to "Auto" or "1080p24". <br />
- Pressing [PLAY▶] on the front panel for 5 seconds changes the setting back to its default. <br />
- When you change the resolution, the TV monitor temporarily goes blank and then comes back again. This is not a malfunction. <br />
- If you have selected the resolution not supported by your TV by mistake and the picture gets disturbed or goes blank and does not come back, press and hold [PLAY▶] on the front panel for 5 seconds to change the setting back to its default. <br />
- When HDMI cable is connected, only "480i/576i" and the resolution selected in "HDMI Video Resolution" will be available for "Component Output". <br />
- If the video resolution for the component output and HDMI video resolution do not match, the video resolution for the component output will be switched to "480i/576i". <br />
- If you play back copy-protected DVD-video, 480p/576p signal will be output from COMPONENT VIDEO OUT jacks, even when "Component Output" setting is set to "720p" or "1080i". <br />
- With some copy-protected BD-video, the video image may only be output from HDMI OUT jack. <br />
• Refer also to your TV's manual.</p>
<h2 id="function-setup-8">FUNCTION SETUP</h2>
<p>HDMI Audio Out </p>
<table><tr><td>[SETUP] → "Quick" → "HDMI Audio Out"</td></tr></table>
<table><tr><td>Device to be connected</td><td>“HDMI Audio Out” setting</td><td>Output HDMI audio signal</td></tr><tr><td>Device compatible with Dolby Digital, Dolby Digital Plus, Dolby TrueHD, DTS or DTS-HD decoding</td><td colspan="2">HDMI Multi(Normal) Dolby Digital, Dolby Digital Plus, Dolby TrueHD, DTS, or DTS-HD bitstream are output from HDMI OUT jack. Make the speaker settings on the connected AV amplifier, etc.</td></tr><tr><td>Device compatible with 3 or more channels of audio inputs (not Dolby Digital, Dolby Digital Plus, Dolby TrueHD, DTS or DTS-HD compatible)</td><td colspan="2">HDMI Multi(LPCM) Multi-channel audio signals are output from HDMI OUT jack. Make the speaker settings with the speaker setting items appear after you select “HDMI Multi(LPCM)”. Refer to page 29.</td></tr><tr><td>HDMI connection to a TV and digital audio connection (optical / coaxial) to an AV amplifier</td><td colspan="2">Audio Mute HDMI audio will be mute, and Dolby Digital / DTS bitstream or LPCM will be output from DIGITAL OUT jack depending on “Digital Out” setting. Refer to page 34.</td></tr></table>
<p>Audio signals output from HDMI OUT jack </p>
<table><tr><td rowspan="3">Media</td><td rowspan="3">Recording format</td><td colspan="4">“HDMI Audio Out” setting</td></tr><tr><td colspan="2">HDMI Multi(Normal)</td><td colspan="2">HDMI Multi(LPCM)</td></tr><tr><td>When “BD Audio Mode” is set to “HD Audio Output”</td><td>When “BD Audio Mode” is set to “Mix Audio Output”</td><td>When “BD Audio Mode” is set to “HD Audio Output”</td><td>When “BD Audio Mode” is set to “Mix Audio Output”</td></tr><tr><td rowspan="6">BD-video</td><td>Dolby Digital</td><td>Dolby Digital</td><td>Dolby Digital</td><td>Multi LPCM</td><td>Multi LPCM</td></tr><tr><td>Dolby Digital Plus</td><td>Dolby Digital Plus</td><td> Dolby Digital<sup>*2</sup> </td><td> Multi LPCM<sup>*1</sup> </td><td> Multi LPCM<sup>*2</sup> </td></tr><tr><td>Dolby TrueHD</td><td>Dolby TrueHD</td><td> Dolby Digital<sup>*4</sup> </td><td> Multi LPCM<sup>*3</sup> </td><td> Multi LPCM<sup>*4</sup> </td></tr><tr><td>DTS</td><td>DTS</td><td>DTS</td><td> Multi LPCM<sup>*6</sup> </td><td> Multi LPCM<sup>*6</sup> </td></tr><tr><td>DTS-HD</td><td>DTS-HD</td><td> DTS<sup>*5</sup> </td><td> Multi LPCM<sup>*1,*6</sup> </td><td> Multi LPCM<sup>*5,*6</sup> </td></tr><tr><td>LPCM</td><td>Multi LPCM</td><td>Multi LPCM</td><td>Multi LPCM</td><td>Multi LPCM</td></tr><tr><td rowspan="4">DVD-video</td><td>Dolby Digital</td><td colspan="2">Dolby Digital</td><td colspan="2">Multi LPCM</td></tr><tr><td>DTS</td><td colspan="2">DTS</td><td colspan="2">Multi LPCM</td></tr><tr><td>LPCM</td><td colspan="2">2ch LPCM</td><td colspan="2">2ch LPCM</td></tr><tr><td>MPEG</td><td colspan="2">MPEG</td><td colspan="2">Multi LPCM</td></tr><tr><td rowspan="2">AVCHD</td><td>Dolby Digital</td><td colspan="2">Dolby Digital</td><td colspan="2">Multi LPCM</td></tr><tr><td>LPCM</td><td colspan="2">2ch LPCM</td><td colspan="2">Multi LPCM</td></tr><tr><td rowspan="2">DivX®</td><td>Dolby Digital</td><td colspan="2">Dolby Digital</td><td colspan="2">Multi LPCM</td></tr><tr><td>MP3 / MP2</td><td colspan="2">2ch LPCM</td><td colspan="2">2ch LPCM</td></tr><tr><td colspan="2">audio CD / MP3 / Windows MediaTM Audio</td><td colspan="2">2ch LPCM</td><td colspan="2">2ch LPCM</td></tr><tr><td colspan="2">DTS-CD</td><td colspan="2">DTS</td><td colspan="2">Multi LPCM</td></tr></table>
<p>*1) Full decoded.</p>
<p>*2) Only the independent substream is decoded.</p>
<p>*3) Dolby TrueHD stream is decoded.</p>
<p>*4) Only the Dolby Digital substream is decoded.</p>
<p>*5) Only the core substream is decoded.</p>
<p>*6) When audio source is Multi-channel, decoded as 7.1ch. However, number of the output audio channel will depend on the number of the connected speakers.</p>
<p>- If the connected device is not compatible with the HDMI BITSTREAM, audio will be output as multi LPCM or 2-channel down-mixed LPCM depending on the capability of the connected device even if you select "HDMI Multi(Normal)" in "HDMI Audio Out" setting.</p>
<p>- When playing back a BD-video which only contains the primary audio, the a "HD Audio Output" even if the "BD Audio Mode" is set to "Mix Audio Output".</p>
<h2 id="note-29">Note</h2>
<p>• The audio signals from HDMI OUT jack (including the sampling frequency, t maybe limited by the device that is connected. <br />
- Among the devices that support HDMI, some do not support audio output (e.g. projectors). In connections with device such as this unit, audio signals are not output from HDMI OUT jack. <br />
• Video and audio signals may be distorted temporarily when switching to /</p>
<h2 id="function-setup-9">FUNCTION SETUP</h2>
<h2 id="digital-out">Digital Out</h2>
<p>[SETUP] → "Quick" → "HDMI Audio Out" → "Audio Mute" → "Digital Out"</p>
<p>When "Audio Mute" is selected in "HDMI Audio Out" setting, HDMI audio signal will be mute and the audio signals output from DIGITAL OUT jack changes depending on "Digital Out" setting.</p>
<p>Audio signals output from DIGITAL OUT (OPTICAL / COAXIAL) jack </p>
<table><tr><td rowspan="3" colspan="2">Media Recording format</td><td colspan="4">“Digital Out” setting</td></tr><tr><td colspan="2">Bitstream LPCM</td><td colspan="2"></td></tr><tr><td>When “BD Audio Mode” is set to “HD Audio Output”</td><td>When “BD Audio Mode” is set to “Mix Audio Output”</td><td>When “BD Audio Mode” is set to “HD Audio Output”</td><td>When “BD Audio Mode” is set to “Mix Audio Output”</td></tr><tr><td rowspan="6">BD-video</td><td>Dolby Digital</td><td>Dolby Digital</td><td>Dolby Digital</td><td>2ch Downmix LPCM</td><td>2ch Downmix LPCM</td></tr><tr><td>Dolby Digital Plus</td><td>Dolby Digital</td><td>Dolby Digital</td><td>2ch Downmix LPCM</td><td>2ch Downmix LPCM</td></tr><tr><td>Dolby TrueHD</td><td>Dolby Digital</td><td>Dolby Digital</td><td>2ch Downmix LPCM</td><td>2ch Downmix LPCM</td></tr><tr><td>DTS</td><td>DTS</td><td>DTS</td><td>2ch Downmix LPCM</td><td>2ch Downmix LPCM</td></tr><tr><td>DTS-HD</td><td>DTS</td><td>DTS</td><td>2ch Downmix LPCM</td><td>2ch Downmix LPCM</td></tr><tr><td>LPCM</td><td>2ch Downmix LPCM</td><td>2ch Downmix LPCM</td><td>2ch Downmix LPCM</td><td>2ch Downmix LPCM</td></tr><tr><td rowspan="4">DVD-video</td><td colspan="5">Dolby Digital Dolby Digital 2ch Downmix LPCM</td></tr><tr><td>DTS</td><td colspan="2">DTS</td><td colspan="2">2ch Downmix LPCM</td></tr><tr><td>LPCM</td><td colspan="2">2ch LPCM</td><td colspan="2">2ch LPCM</td></tr><tr><td>MPEG</td><td colspan="2">MPEG</td><td colspan="2">Multi LPCM</td></tr><tr><td rowspan="2">AVCHD</td><td colspan="5">Dolby Digital Dolby Digital 2ch Downmix LPCM</td></tr><tr><td>LPCM</td><td colspan="2">2ch Downmix LPCM</td><td colspan="2">2ch Downmix LPCM</td></tr><tr><td rowspan="2">DivX®</td><td colspan="5">Dolby Digital Dolby Digital 2ch Downmix LPCM</td></tr><tr><td>MP3 / MP2</td><td colspan="2">2ch LPCM</td><td colspan="2">2ch LPCM</td></tr><tr><td colspan="2">audio CD / MP3 / Windows MediaTM Audio</td><td colspan="2">2ch LPCM</td><td colspan="2">2ch LPCM</td></tr><tr><td colspan="2">DTS-CD</td><td colspan="2">DTS</td><td colspan="2">2ch Downmix LPCM</td></tr></table>
<ul>
<li>When playing back a BD-video which only contains the primary audio, the audio output will be the same case as the "HD Audio Output" even if the "BD Audio Mode" is set to "Mix Audio Output".</li>
</ul>
<h2 id="note-30">Note</h2>
<p>- In order to output LPCM signal from DIGITAL OUT jack while outputting the HDMI audio signal, set "HDMI Audio Out" setting to "HDMI Multi(LPCM)".</p>
<h2 id="function-setup-10">FUNCTION SETUP</h2>
<h2 id="parental">Parental</h2>
<p>[SETUP] → "Custom" → "Parental"</p>
<p>Some BD-videos or DVD-videos feature a parental lock level.</p>
<p>Playback will stop if the ratings exceed the levels you set, it will require you to enter a password before the disc will play back. This feature prevents your children from viewing inappropriate material.</p>
<h2 id="1-with-selected-press-enter">1. With "selected press [ENTER].</h2>
<p>Password input field appears.</p>
<ol>
<li>If a password has not been set, follow A).
If a password has already been set, follow B).
If you want to change the password, follow B) and C).
If you forget the password, follow D).</li>
</ol>
<p>A) Enter 4 digit password using [Number buttons]. "4737" cannot be used.</p>
<p>B) Enter 4 digit password</p>
<p>C) Select "Password Change", then press [ENTER]. Enter the new password.</p>
<p>D) Enter "4737". Current password and "Parental" settings are now cleared. Enter a new password.</p>
<ol>
<li>
<p>Select the desired item to set the rating level for, then press [ENTER].</p>
</li>
<li>
<p>Select the desired rating level, then press [ENTER].</p>
</li>
</ol>
<p><BD rating level> </p>
<table><tr><td>All</td><td>Sets no limit.</td></tr><tr><td>Age Setting</td><td>Allows you to enter the age to limit, and prohibits the playback of a disc whose rating level exceeds the age setting entered here.Enter the age as a 3 - dig (e.g., For age 15, enter [0], [1], [5].)</td></tr></table>
<p><DVD rating level> </p>
<table><tr><td>All</td><td>Parental control is inactive; all discs can be played back.</td></tr><tr><td>8</td><td>DVD software of any grades (adult / general / children) can be played back.</td></tr><tr><td>7</td><td>[NC-17] No one under 17 admitted.</td></tr><tr><td>6</td><td>[R] Restricted; under 17 requires accompanying parent or adult guardian.</td></tr><tr><td>5</td><td>[PGR] Parental Guidance Recommended.</td></tr><tr><td>4</td><td>[PG13] Unsuitable for children under 13.</td></tr><tr><td>3</td><td>[PG] Parental Guidance suggested.</td></tr><tr><td>2</td><td>[G] General audience.</td></tr><tr><td>1</td><td>Suitable for children.</td></tr></table>
<h2 id="to-cancel-parental-lock-temporarily">To Cancel Parental Lock Temporarily</h2>
<p>Some discs allow you to cancel the parental lock temporarily. With those discs, the message below will appear when you try to play them back.
"Enter current password."
Follow the instruction which appears on the TV screen to cancel the parental lock.</p>
<h2 id="hdmi-cec-regza-link">HDMI CEC (REGZA - LINK)</h2>
<p>[SETUP] → "Custom" → "Others" → "HDMI CEC"</p>
<p>You can control all HDMI CEC compatible components connected via an HDMI cable by simple button operations of the remote control of this unit. In order to enable the function, you need to set "HDMI CEC" to "On".</p>
<h2 id="one-touch-play">One Touch Play</h2>
<p>When the operations with following buttons of the remote control of this unit are performed, the TV will automatically be turned on and switched to the appropriate input channel.</p>
<h2 id="buttons-for-one-touch-play">Buttons for one touch play:</h2>
<p>- [PLAY▶]</p>
<p>- [TOP MENU], or [POP MENU / MENU] (when a disc is inserted in the unit)</p>
<h2 id="standby">Standby</h2>
<p>When you press and hold [ON/STANDBY ⏻] for 2 seconds, it turns off the power of the TV first and then turns off the power of this unit.</p>
<p>When the connected HDMI CEC compatible display device is turned off, this unit may also turn off together.</p>
<h2 id="system-information">System Information</h2>
<h2 id="get-set-menu-language">Get & Set Menu Language</h2>
<p>The unit recognises the OSD language set for the TV and automatically sets the same language as the player menu language (OSD menu language) for this unit.</p>
<p>- This feature is available only when selected in "Player Menu" in the setup menu. (Refer to page 27.)</p>
<h2 id="receiving-operational-signal-from-tvs-remote-control">Receiving Operational Signal from TV's Remote Control</h2>
<p>You can operate this unit with TV's remote control. Check your TV owner's manual for details.</p>
<p>- This function may not work properly depen connected TV.</p>
<p>• The available operation may differ depend remote control you use.</p>
<p>- Other components must be compatible within order to use this function.</p>
<h2 id="function-setup-11">FUNCTION SETUP</h2>
<h2 id="network-connection">Network Connection</h2>
<p>Set up the network connection settings in order to use the BD-Live function with a BD-Live disc.</p>
<h2 id="connection-test">Connection Test</h2>
<table><tr><td>[SETUP] → "Custom" → "Others" → "Network Connection" → "Connection Test"</td></tr></table>
<p>After you made IP address/DNS settings or when a LAN cable is connected, always perform the connection test to check if the connection is correctly made.</p>
<p>1 In stop mode, press [SETUP].</p>
<p>2 Use [▲ / ▼] to select 🎨, then press [ENTER].</p>
<p>3 Use [▲ / ▼] to select "Others", then press [ENTER].</p>
<p>4 Use [▲ / ▼] to select "Network Connection", then press [ENTER].</p>
<p>5 Use [▲ / ▼] to select "Connection Test", then press [ENTER].</p>
<p>Connection test will start automatically and the test result will appear right after the connection test finishes.</p>
<p>- "Testing..." : The test is in prog</p>
<p>- "Pass" : Connection test is succe</p>
<p>completed.</p>
<p>- "Fail" : Connection test failed.</p>
<p>Check the connection settings.</p>
<p>Press [ENTER] to go to the list of network status confirmation screen.</p>
<p><img src="/content/2026/05/1018651/images/0474db30c1b545aff2e157d895aadc1000d38887ea996105b21c55534dbab354.jpg" alt="Others Connection Test IP Address xxx.xxx.xxx.xxx Subnet Mask xxx.xxx.xxx.xxx Default Gateway xxx.xxx.xxx.xxx Primary DNS xxx.xxx.xxx.xxx Secondary DNS xxx.xxx.xxx.xxx then press 'ENTER'." loading="lazy" decoding="async"></p>
<p>6 Press [ENTER] to go back to the previous screen, or press [SETUP] to exit.</p>
<h2 id="note-31">Note</h2>
<p>- If the connection test passes, you BD-Live functions using the Internet without making any extra settings.</p>
<p>- If the connection test fails, you the MAC address settings of your router. You can check the MAC address of this unit on "Enable(Custom)" screen.</p>
<p>- "Connection Test" is not available v selected in "Network Connection".</p>
<h2 id="enableeasy">Enable(Easy)</h2>
<table><tr><td>[SETUP] → "Custom" → "Others" → "Network Connection" → "Enable (Easy)"</td></tr></table>
<p>Network settings are set to the following settings initially. (In most cases, you can connect to the Internet without making any changes to the default settings.)</p>
<p>- IP Address Setting Auto(DHCP)</p>
<p>- DNS Setting Auto(DHCP)</p>
<p>- Proxy Setting Do Not Use</p>
<p>- Connection Speed Auto</p>
<p>- BD-Live Setting Allow</p>
<p>If you want to set the network settings back to the default settings as above (except "BD-Live Setting"), follow the procedure below.</p>
<p>1 Follow steps 1 to 4 in "Connection Test" on page 36.</p>
<p>2 Use [▲ / ▼] to select "Enable(Easy)", then press [ENTER].</p>
<p>• The unit will start the connection test at and the test result will appear right after the test finishes.</p>
<p>After the connection test finishes, press to network status confirmation screen.</p>
<p>3 Press [ENTER] to activate the network settings and set the network connection automatically. Press [SETUP] to exit.</p>
<h2 id="note-32">Note</h2>
<p>- The setting of "BD-Live Setting" will not to the default, even if you follow the procedure.</p>
<h2 id="enablecustom">Enable(Custom)</h2>
<table><tr><td>[SETUP] → "Custom" → "Others" → "Network Connection" → "Enable (Custom)"</td></tr></table>
<p>In following cases, select "Enable(Custom)" to set each setting as necessary.</p>
<p>- When connection test failed with the setti "Enable(Easy)".</p>
<p>- When instructed by your Internet service p make specific settings in accordance with your network environment.</p>
<h2 id="ip-address-setting-dns-setting">IP Address Setting / DNS Setting</h2>
<p>you can enjoy the</p>
<p>1 Follow steps 1 to 4 in "Connection Test" on page 36.</p>
<p>may need to change</p>
<p>2 Use [▲ / ▼] to select "Enable(Custom)", then press [ENTER].</p>
<p>When "Disable" is to select "IP Address Setting", then press [ENTER] repeatedly to select the desired setting.</p>
<table><tr><td>"Auto(DHCP)"</td><td>: If your router has DHCP server function, select "Auto(DHCP)".</td></tr><tr><td>"Manual"</td><td>: If your router does not have DHCP server function, select "Manual".</td></tr></table>
<h2 id="function-setup-12">FUNCTION SETUP</h2>
<h2 id="if-you-select-manual-follow-the-following-instruction-to-set-the-ip-address-and-dns">If you select "Manual", follow the following instruction to set the IP address and DNS.</h2>
<p>1) Use [▲ /▼] to select "IP Address", "Subnet Mask" or "Default Gateway", then press [ENTER]. IP address setting screen will appear. Enter IP address, subnet mask and default gateway with cursor buttons and number buttons.</p>
<p><img src="/content/2026/05/1018651/images/e9758cf11500df9a7a52be9d8b7db528aebae73fc8fdd15eb9335cc9b7cb0aa6.jpg" alt="Others IP Address Setting IP Address XXX . XXX . XXX . XXX Subnet Mask XXX . XXX . XXX . XXX Default Gateway XXX . XXX . XXX . XXX then pross 'ENTER'." loading="lazy" decoding="async"></p>
<p>- Enter the IP address number specifications of your router.
- If the IP address number is IP address number of other devices (e.g. PC connected via LAN cable) and assign a different number from those of other devices.</p>
<p>2) After you enter all correctly, press [ENTER].
• Confirmation message will appear. Select "Yes" to complete the settings.
3) Use [▲ /▼] to select "Primary DNS" or "Secondary DNS", then press [ENTER]. DNS setting screen will appear. Enter primary DNS and secondary DNS with cursor buttons and number buttons.</p>
<p>- Enter the numbers instructed by provider.</p>
<p>- If the number is unknown, check other devices (e.g. PC connected via LAN cable) and assign the same number.</p>
<p>4) After you enter all correctly, press [ENTER].
• Confirmation message will appear. Select "Yes" to complete the settings.</p>
<h2 id="4-press-return-to-go-back-to-the-previous-screen-or-press-setup-to-exit">4 Press [RETURN] to go back to the previous screen, or press [SETUP] to exit.</h2>
<h2 id="note-33">Note</h2>
<ul>
<li>The range of input number is be</li>
<li>If you enter a number larger than will automatically be 255. </li>
<li>The manually entered number with you change the setting to "Auto(DHCP)". </li>
<li>When you enter a wrong number, cancel. (The number will be back to "0".) </li>
<li>When IP address setting is set setting of DNS setting will automatically be "Manual" and when IP address setting is set to "Auto(DHCP)", you can set either "Auto(DHCP)" or "Manual" for DNS setting.</li>
</ul>
<p>- If you want to enter 1 or 2 digit number in one cell, press [▶] to move on to the next cell.</p>
<p>- If the entered IP address or the default gateway or primary DNS number is same as the default setting, IP address setting will be set to "Auto(DHCP)". (The manually entered number will be saved.)</p>
<h2 id="proxy-setting">Proxy Setting</h2>
<p>1 Follow steps 1 to 4 in "Connection Test" on page 36. <br />
2 Use [▲ / ▼] to select "Enable(Custom)", then press [ENTER]. <br />
3 Use [▲ /▼] to select "Proxy Setting", then press [ENTER] repeatedly to select the desired setting.</p>
<p>- For default settings, select "Do
- If you need to change the proxy by your Internet service provider to set the designated proxy address and port, select "Use".</p>
<h2 id="if-you-select-use-follow-the-following-instructions-to-set-the-proxy-address-and-proxy-port">If you select "Use", follow the following instructions to set the proxy address and proxy port.</h2>
<p>1) Use [▲/▼] to select "Proxy Address", then press [ENTER]. Proxy address setting screen will appear. e Enter proxy adddesst h e</p>
<p>• The keyboard screen will app</p>
<p>n, check the [▲/▼/◄/►]: Move the highlight.</p>
<p>[Number buttons]: Enter number.
[ENTER]: Enter the highlighted num
[Red]: Clear the entered number or word.
[Green]: Clear all the entered numbers or words.
[Yellow]: Switch between abc ?ABC
[Blue]: Set the entered number or</p>
<p>2) After you enter proxy address correctly, press [Blue]. <br />
- Confirmation message will appear. Select "Yes" y to complete the settings. <br />
3) Use [▲/▼] to select "Proxy Port", then press [ENTER]. Proxy port setting screen will appear. Enter proxy port number with number buttons. <br />
4) After you enter proxy port correctly, press [ENTER].</p>
<h2 id="4-press-return-to-go-back-to-the-previous-screen-or-press-setup-to-exit-2">4 Press [RETURN] to go back to the previous screen, or press [SETUP] to exit.</h2>
<h2 id="note-34">Note</h2>
<p>• The range of input number for the port nut wbetween@ and6532.5If you enter a number larger in than 65,536,hitavilbu regarded as 65535.) <br />
- For proxy port, the selected ports may be I and not be valued to use depending on your network environment.</p>
<p>[CLEAR] to</p>
<p>(五) 2014年1月1日 星期一、2014年1月1日</p>
<p>number in one cell, <br />
(四) 本次股东大会的召集和召开程序<br />
default gateway or</p>
<p>to "Manual", the</p>
<p><img src="/content/2026/05/1018651/images/b6f5058570ecdcd17119fd25a92c122431495303a535925e528da360fc9dcb9d.jpg" alt="TOSHIBA BDX2000KE - Note - 1" loading="lazy" decoding="async"></p>
<p><img src="/content/2026/05/1018651/images/9ff8fe8722abb51651c3ebb3f8bddb3f90b094a68d4b0b6698730c2a207ce767.jpg" alt="Pure electrical circuit lines without any symbols" loading="lazy" decoding="async"></p>
<p><img src="/content/2026/05/1018651/images/f265dcc6182a1304e517fcaa38b0cacb5f670ebfe5e2a91594ef86d8d56db288.jpg" alt="TOSHIBA BDX2000KE - Note - 3" loading="lazy" decoding="async"></p>
<p><img src="/content/2026/05/1018651/images/94390309ae1c2a697921e28f6a3022196fb8f61ffd59a6be7090499b1a5530cc.jpg" alt="Pure electrical circuit lines without any symbols" loading="lazy" decoding="async"></p>
<h2 id="function-setup-13">FUNCTION SETUP</h2>
<h2 id="connection-speed">Connection Speed</h2>
<p>You can set connection speed as your preference. (The default setting is "Auto".)</p>
<p>1 Follow steps 1 to 4 in "Connection Test" on page 36. <br />
2 Use [▲ / ▼] to select "Enable(Custom)", then press [ENTER]. <br />
3 Use [▲ / ▼] to select "Connection Speed", then press [ENTER]. <br />
4 Use [▲ / ▼] to select the desired setting, then press [ENTER].</p>
<p>"Auto":</p>
<p>Set the appropriate connection speed automatically, in accordance with your network environment.</p>
<p>"10BASE Half": Set the connect "10BASE Half".</p>
<p>"10BASE Full": Set the connect "10BASE Full".</p>
<p>"100BASE Half": Set the connec 5
"100BASE Half".</p>
<p>"100BASE Full": Set the connect "100BASE Full".</p>
<h2 id="bd-live-setting">BD-Live Setting</h2>
<p>You can limit the Internet access from the BD-Live functions. (The default setting is "Allow".)</p>
<p>1 Follow steps 1 to 4 in "Connection Test" on page 36. <br />
2 Use [▲ / ▼] to select "Enable(Custom)", then press [ENTER]. <br />
3 Use [▲ / ▼] to select "BD-Live Setting", then press [ENTER]. <br />
4 Use [▲ / ▼] to select the desired setting, then press [ENTER].</p>
<p>"Allow":</p>
<p>Internet access is permitted from all BD-Live contents. "Limited Allow":</p>
<p>Internet access is permitted only for BD-Live contents which have content owner certificates. Internet access without the certificates are prohibited.</p>
<p>"Prohibite":peed to</p>
<p>Internet access is prohibited from all BD-Live contents.</p>
<p>5 Press [RETURN] to go back to the previous screen, or press [SETUP] to exit.</p>
<p>ion'speed to</p>
<h2 id="5-press-return-to-go-back-to-the-previous-screen-or-press-setup-to-exit">5 Press [RETURN] to go back to the previous screen, or press [SETUP] to exit.</h2>
<h2 id="note-35">Note</h2>
<ul>
<li>Choose a connection speed in accordance with your network environment. <br />
• The network connection may be on the device, when the settings are changed.</li>
</ul>
<h2 id="disable">Disable</h2>
<p>Deactivate all the network connection and settings.</p>
<p>1 Follow steps 1 to 4 in "Connection Test" on page 36. <br />
2 Use [▲ / ▼] to select "Disable", then press [ENTER].d depending <br />
3 Press [RETURN] to go back to the previous screen, or press [SETUP] to exit.</p>
<h2 id="note-36">Note</h2>
<p>- The network connection can be reactivate setting the network connection to "Enable(Easy)" or "Enable(Custom)".</p>
<h2 id="function-setup-14">FUNCTION SETUP</h2>
<h2 id="software-update">Software Update</h2>
<h2 id="current-version">Current Version</h2>
<p>You can confirm the current software version.</p>
<p>1 Follow steps 1 to 3 in "Connection Test" on page 36. <br />
2 Use [▲ /▼] to select "Software Update", then press [ENTER]. <br />
3 Use [▲ /▼] to select "Current Version", then press [ENTER]. <br />
4 Press [ENTER] or [RETURN] to exit.</p>
<h2 id="note-37">Note</h2>
<p>- Please visit http://www.toshiba-o the latest firmware version.</p>
<h2 id="disc-update">Disc Update</h2>
<p>You can upgrade the software by using disc.</p>
<p>1 Follow steps 1 to 3 in "Connection Test" on page 36. <br />
2 Use [▲ /▼] to select "Software Update", then press [ENTER]. <br />
3 Use [▲ / ▼] to select "Disc Update", then press [ENTER]. <br />
4 Use [▲ / ▼] to select "Yes", then press [ENTER].</p>
<p>5 Disc tray will open automatically.</p>
<p>- Insert the disc for software update and then press [OPEN/CLOSE▲].</p>
<p>6 After completing loading disc, confirmation message will appear. Select "Yes" and press [ENTER] to start upgrading.</p>
<p>- It may take awhile to complete wait until "100%" appears on the front panel display.)</p>
<p>7 After the disc upgrade finishes, this unit will restart and eject the disc.</p>
<h2 id="initialise">Initialise</h2>
<p>Initialise the setting or SD card.</p>
<p>1 In stop mode, press [SETUP].</p>
<p>2 Use [▲ / ▼] to select ☑, then press [ENTER].</p>
<p>3 Use [▲ / ▼] to select a desired option, then press [ENTER].</p>
<p>- Confirmation message will appe</p>
<p>"Setup":</p>
<p>Resets the setup menu to the default.</p>
<p>The setting for "Parental", "Network Connection" and "Media Select" will not be reset.</p>
<p>n"Forneat SDCard"0 wn n load</p>
<p>(Available only when an SD card is inserted.): Initialises the SD card.</p>
<p>"Erase Saved BD-ROM Data (Player)":</p>
<p>Clears the data saved for the BD-ROM contents, such as BD-ROM game scores, from this player.</p>
<p>"Erase Saved BD-ROM Data (SD Card)"</p>
<p>(Available only when an SD card is inserted.): Clears the supplemental data for the BD-ROM playback, such as subtitle data, from the SD card.</p>
<p>"Network Settings":</p>
<p>Resets the Network Settings menu to the default.</p>
<p>4 Select "Yes", then press [ENTER].</p>
<p>- Press [ENTER] again to complete the settings.</p>
<p>5 Press [SETUP] to exit.</p>
<p>date and then press</p>
<h2 id="caution-8">Caution</h2>
<p>- Do not remove the SD card while executing SD Card" or "Erase Saved BD-ROM Data (SD Card)". It damages the card.</p>
<p>the updating. (Please</p>
<h2 id="note-38">Note</h2>
<ul>
<li>You can check the current firmware version in "Current Version" in "Software Update" menu. </li>
<li>Please do not unplug the mains cable while executing "Disc Update". </li>
<li>All settings will remain the same even if you update the firmware version.</li>
</ul>
<h2 id="others-2">OTHERS</h2>
<p>Language Code List </p>
<table><tr><td colspan="2">Language Code</td><td colspan="2">Language Code</td><td colspan="2">Language Code</td><td colspan="2">Language Code</td></tr><tr><td colspan="2">A-B</td><td>French [FRE]</td><td>5264</td><td>Macedonian</td><td>5957</td><td>Siswat 6565</td><td></td></tr><tr><td colspan="2">Abkhazian 4748</td><td>Frisian</td><td>5271</td><td>Malagasy</td><td>5953</td><td>Slovak [SLO]</td><td>6557</td></tr><tr><td colspan="2">Afar 4747</td><td>Galician</td><td>5358</td><td>Malay</td><td>5965</td><td>Slovenian 6558</td><td></td></tr><tr><td colspan="2">Afrikaans 4752</td><td>Georgian</td><td>5747</td><td>Malayalam</td><td>5958</td><td>Somali</td><td>6561</td></tr><tr><td colspan="2">Albanian 6563</td><td>German [GER]</td><td>5051</td><td>Maltese 5966</td><td></td><td>Spanish [SPA]</td><td>5165</td></tr><tr><td colspan="2">Amharic 4759</td><td>Greek [GRE]</td><td>5158</td><td>Maori 5955</td><td></td><td>Sundanese</td><td>6567</td></tr><tr><td colspan="2">Arabic 4764</td><td>Greenlandic</td><td>5758</td><td>Marathi 5964</td><td></td><td>Swahili</td><td>6569</td></tr><tr><td colspan="2">Armenian 5471</td><td>Guarani</td><td>5360</td><td>Moldavian 5961</td><td></td><td>Swedish [SWE]</td><td>6568</td></tr><tr><td colspan="2">Assamese 4765</td><td>Gujarati</td><td>5367</td><td>Mongolian</td><td>5960</td><td colspan="2">T</td></tr><tr><td colspan="2">Aymara 4771</td><td>Hausa</td><td>5447</td><td>Nauru</td><td>6047</td><td>Tagalog</td><td>6658</td></tr><tr><td colspan="2">Azerbaijani 4772</td><td>Hebrew</td><td>5569</td><td>Nepali 6051</td><td></td><td>Tajik</td><td>6653</td></tr><tr><td colspan="2">Bashkir 4847</td><td>Hindi</td><td>5455</td><td>Norwegian [NOR]</td><td>6061</td><td>Tamil</td><td>6647</td></tr><tr><td colspan="2">Basque 5167</td><td>Hungarian [HUN]</td><td>5467</td><td colspan="2">O-R</td><td>Tatar</td><td>6666</td></tr><tr><td colspan="2">Bengali;Bangla 4860</td><td colspan="2">I-K</td><td colspan="2">Occitan 6149</td><td>Telugu</td><td>6651</td></tr><tr><td colspan="2">Bhutani 5072</td><td>Icelandic [ICE]</td><td>5565</td><td>Oriya</td><td>6164</td><td>Thai</td><td>6654</td></tr><tr><td colspan="2">Bihari 4854</td><td>Indonesian</td><td>5560</td><td colspan="2">Oromo (Afan) 6159</td><td>Tibetan</td><td>4861</td></tr><tr><td colspan="2">Bislama 4855</td><td>Interlingua</td><td>5547</td><td>Panjabi</td><td>6247</td><td>Tigrinya</td><td>6655</td></tr><tr><td colspan="2">Breton 4864</td><td>Interlingue</td><td>5551</td><td>Pashto;Pushto</td><td>6265</td><td>Tonga 6661</td><td></td></tr><tr><td>Bulgarian [BUL]</td><td>4853</td><td>Inupiak</td><td>5557</td><td>Persian 5247</td><td></td><td>Tsonga</td><td>6665</td></tr><tr><td>Burmese</td><td>5971</td><td>Irish [IRI]</td><td>5347</td><td>Polish [POL]</td><td>6258</td><td>Turkish [TUR]</td><td>6664</td></tr><tr><td>Byelorussian</td><td>4851</td><td>Italian [ITA] 5566</td><td></td><td>Portuguese [POR]</td><td>6266</td><td>Turkmen 6657</td><td></td></tr><tr><td colspan="2">C-E</td><td>Japanese [JPN]</td><td>5647</td><td>Quechua</td><td>6367</td><td>Twi</td><td>6669</td></tr><tr><td>Cambodian</td><td>5759</td><td>Javanese</td><td>5669</td><td rowspan="2">Rhaeto-Romance</td><td rowspan="2">6459</td><td colspan="2">U-Z</td></tr><tr><td>Catalan</td><td>4947</td><td>Kannada</td><td>5760</td><td>Ukrainian</td><td>6757</td></tr><tr><td>Chinese [CHI]</td><td>7254</td><td>Kashmiri</td><td>5765</td><td rowspan="2">Romanian [RUM]</td><td rowspan="2">6461</td><td>Urdu</td><td>6764</td></tr><tr><td>Corsican</td><td>4961</td><td>Kazakh</td><td>5757</td><td>Uzbek</td><td>6772</td></tr><tr><td>Croatian</td><td>5464</td><td>Kinyarwanda</td><td>6469</td><td>Russian [RUS]</td><td>6467</td><td>Vietnamese</td><td>6855</td></tr><tr><td>Czech [CZE]</td><td>4965</td><td>Kirghiz</td><td>5771</td><td colspan="2">S</td><td>Volapuk</td><td>6861</td></tr><tr><td>Danish [DAN]</td><td>5047</td><td>Kirundi 6460</td><td></td><td>Samoan</td><td>6559</td><td>Welsh</td><td>4971</td></tr><tr><td>Dutch [DUT]</td><td>6058</td><td>Korean [KOR]</td><td>5761</td><td>Sangho 6553</td><td></td><td>Wolof</td><td>6961</td></tr><tr><td>English [ENG]</td><td>5160</td><td>Kurdish</td><td>5767</td><td>Sanskrit</td><td>6547</td><td>Xhosa</td><td>7054</td></tr><tr><td>Esperanto</td><td>5161</td><td colspan="2">L-N</td><td>Scots Gaelic</td><td>5350</td><td>Yiddish</td><td>5655</td></tr><tr><td>Estonian</td><td>5166</td><td>Laothian</td><td>5861</td><td>Serbian</td><td>6564</td><td>Yoruba</td><td>7161</td></tr><tr><td colspan="2">F-H</td><td>Latin</td><td>5847</td><td>Serbo-Croatian</td><td>6554</td><td>Zulu</td><td>7267</td></tr><tr><td colspan="2">Faroese 5261</td><td>Latvian; Lettish</td><td>5868</td><td>Sesotho</td><td>6566</td><td></td><td></td></tr><tr><td>Fiji</td><td>5256</td><td>Lingala 5860</td><td></td><td>Setswana</td><td>6660</td><td></td><td></td></tr><tr><td>Finnish [FIN]</td><td>5255</td><td>Lithuanian</td><td>5866</td><td>Shona</td><td>6560</td><td></td><td></td></tr><tr><td></td><td></td><td></td><td></td><td>Sindhi</td><td>6550</td><td></td><td></td></tr><tr><td></td><td></td><td></td><td></td><td>Singhalese</td><td>6555</td><td></td><td></td></tr></table>
<h2 id="note-39">Note</h2>
<p>- If you choose a language that has a 3-letter-language code (written in bracket), the code will be displayed every time you change the audio or subtitle language setting on page 25. If you choose any other languages, “---” will be displayed instead.</p>
<h2 id="others-3">OTHERS</h2>
<h2 id="troubleshooting">Troubleshooting</h2>
<p>If the unit does not perform properly when operated as instructed in this manual, check the unit, consulting the following checklist.</p>
<p>Problem Solution </p>
<table><tr><td colspan="2">No power - Check if the mains cable is properly connected.- Un plug the mains cable once, and</td><td>wait fo</td></tr><tr><td colspan="2">No sound or picture - Check if the connected TV is turned on.- Check if the connections are made securely and correctly.- Check whether the connected TV or other output a video signal unless the other device supports HDCP.)- Check whether the output format of this unit (HDMI FORMAT) matches the supported input format of other connected device.</td><td>CONNECTIONS</td></tr><tr><td colspan="2">Distorted picture - Sometimes a small amount of picture distortion may appear.This is not a malfunction.- Connect this unit directly to the TV. If the composite audio / video cables are connected to a VCR, pictures may be distorted due to the copy right protection system.</td><td>PLAYBACK</td></tr><tr><td>Completely distorted picture or black / white picture with BD / DVD</td><td>- Make sure the disc is compatible</td><td>with th i</td></tr><tr><td colspan="2">No sound or distorted sound - Adjust the volume.- Check if speakers are connected correctly.- Check the HDMI connections.- Check the settings in "Audio" menu.</td><td>FUNCTION SETUP</td></tr><tr><td>Picture freezes momentarily during playback</td><td colspan="2">- Check the disc for fingerprints / scratches and clean with a soft cloth wiping from centre to edge.- Clean the disc.</td></tr><tr><td colspan="3">Disc cannot be played back - Clean the disc.- Ensure the disc label is facing up.- Check if the disc is defective by trying another disc.- Cancel the ratings control or change the control level.- In set a correct disc that can be played back on this uni</td></tr><tr><td>SD card cannot be read</td><td colspan="2">- The format of the card does not match that accepted by this unit or the card is not compatible.</td></tr><tr><td>No return to start-up screen when disc is removed</td><td colspan="2">- Reset this unit by turning it off, then on</td></tr><tr><td>The unit does not respond to the remote control</td><td colspan="2">- Aim the remote control directly at infrar- Reduce the distance to infrared sensor w- Replace the batteries in the remote contr- Re-insert the batteries with their polarit</td></tr><tr><td>Buttons do not work or the unit stops responding</td><td colspan="2">- To completely reset the unit, press and hold [ON/STANDBY Ⓞ] on the front panel for 10 seconds to shut down the unit or unplug the mains cable from the AC outlet for 5-10 seconds.</td></tr><tr><td>The unit does not respond to some operating commands during playback</td><td colspan="2">- Operations may not be permitted by the d Refer to the instructions of the disc.</td></tr><tr><td>The unit cannot read BD / DVD/ CD</td><td colspan="2">- Dew condensation may form inside the un hours until its inside gets dry.- You are attempting to play back a disc ot page 13.- Wipe the dirt off the disc or replace the</td></tr><tr><td>Angle does not switch</td><td colspan="2">- The angle cannot be switched for BD / DVD which do not contain multiple angles. In some cases multiple angles are only recorded for specific scenes.</td></tr><tr><td>Playback does not start when the title is selected</td><td colspan="2">- Check the settings in "Parental" menu.</td></tr><tr><td>The password for rating level has been forgotten</td><td colspan="2">- Enter the default password "4737", then y</td></tr></table>
<p>EN</p>
<p>41</p>
<p><img src="/content/2026/05/1018651/images/82c5955d60a83d161b9340ef2bb00f2f6d81c41d8cd72fb33c0fcc824b09a214.jpg" alt="TOSHIBA BDX2000KE - Troubleshooting - 1" loading="lazy" decoding="async"></p>
<p>INTRODUCTION</p>
<h2 id="others-4">OTHERS</h2>
<p>Problem Solution </p>
<table><tr><td>Cannot connect to the network</td><td>- Check if the LAN cable connection is properly made.- Turn on the modem or broadband router.- Check the network setting.- Check if the broadband router and/or modem is correctly connected.- Check "BD-Live Setting".</td></tr><tr><td>Cannot connect to the network while my PC is connected to the network</td><td>- Check the content of your Internet service contract to see if your Internet service provider prevents multiple terminals connecting at the same time.</td></tr><tr><td>Cannot use the BD-Live function</td><td>- Use an SD card with enough space.</td></tr><tr><td>The playback of BD-video or download of data does not perform properly</td><td>- Check if an SD card is correctly inserted. Do not remove the card during playback as some BD-videos require an SD card for playback.</td></tr></table>
<h2 id="note-40">Note</h2>
<ul>
<li>Some functions are not available in specific modes, but this is not a malfunction. Read the description in this manual for details on correct operations. </li>
<li>Some functions are prohibited on some discs.</li>
</ul>
<p>Specifications </p>
<table><tr><td colspan="2">General</td></tr><tr><td colspan="2">Signal system NTSC/PAL colour</td></tr><tr><td colspan="2">Power requirements 220-240 V AC, 50 Hz</td></tr><tr><td colspan="2">Power consumption 22 W (standby: 0.5 W)</td></tr><tr><td colspan="2">Dimensions (width x height x depth) 435 x 56 x 218 mm</td></tr><tr><td colspan="2">Weight 2.3 kg</td></tr><tr><td colspan="2">Operating temperature 5°C to 35°C</td></tr><tr><td>Operating humidity</td><td>Less than 80 % (no condensation)</td></tr></table>
<p>Terminals </p>
<table><tr><td rowspan="12">Rear</td><td colspan="3">Video output</td></tr><tr><td>RCA jack x 1</td><td>1 Vp-p (75Ω)</td><td></td></tr><tr><td colspan="3">Component video output</td></tr><tr><td>RCA jack x 3</td><td>Y: 1 Vp-p (75Ω)</td><td> P<sub>B</sub>/C<sub>B</sub> : 700 mVp-p (75Ω) P<sub>R</sub>/C<sub>R</sub> : 700 mVp-p (75Ω)</td></tr><tr><td colspan="3">HDMI output</td></tr><tr><td>HDMI jack x 1</td><td colspan="2">Video: 480p/576p, 720p, 1080i, 1080p, 1080p24 / Audio</td></tr><tr><td colspan="3">Audio output (Analogue)</td></tr><tr><td>RCA jack x 2</td><td colspan="2">L/R: 2 Vrms (output impedance: more than 1kΩ)</td></tr><tr><td colspan="3">Audio output (Digital)</td></tr><tr><td>RCA jack x 1</td><td colspan="2">500 mVp-p (75Ω)</td></tr><tr><td>Optical jack x 1</td><td colspan="2">Digital connector</td></tr><tr><td>LAN terminal</td><td colspan="2">10BASE-T/100BASE-TX</td></tr></table>
<h2 id="note-41">Note</h2>
<p>• The specifications and design of this unit are subject to change without no</p>
<h2 id="others-5">OTHERS</h2>
<h2 id="license-information-on-the-software-used-in-this-product">License Information on the Software Used in This Product</h2>
<p>This document is statement purpose only. Not concerned with operation of this product.</p>
<p>The software pre-installed in this product consists of multiple, independent software components. Each software component is copyrighted by a third party.</p>
<p>This product uses software components that are distributed as freeware under a third-party end-user license agreement or copyright notice (hereinafter referred to as a "EULA").</p>
<p>TOSHIBA provides a warranty for this product you have purchased under conditions set forth by TOSHIBA. However, some of the software components distributed under an EULA are made available for use by the user on the assumption that they are not copyrighted or warranted by a third party. These software components are licensed to the user free of charge and therefore not covered by any warranty within the scope of the applicable laws. These software components are not subject to any copyrights or other third-party rights and are provided in "as is" condition without any warranty, whether express or implied. "Warranty" here includes, but not limited to, an implied warranty for marketability or fitness for specific uses. All risks associated with the quality or performance of these software components are assumed by the user. TOSHIBA shall not be liable whatsoever for any cost of repair or correction or other incidental expense incurred in connection with a defect found in any of these software components. Unless specified under the applicable laws or in a written agreement, a party who changes or redistributes the software with consent from the copyright holders or based on the aforementioned licenses shall not be held liable whatsoever for any loss arising from the use of or inability to use such software components. The same applies even when the copyright holders or relevant third parties have been informed of the possibility of such loss. "Loss" here includes normal, special, incidental and indirect loss (including, but not limited to, the loss of data or its accuracy; loss incurred by the user or any third party; and Interface incompatibility with other software). Please read each EULA for details on the use conditions and items that must be observed regarding these software components.</p>
<p>The table below lists the software components pre-installed in this product, which are subject to EULAs. The user should read the applicable EULAs carefully before using these software components. The EULAs are exhibited in their original text (English) as exactly written by the respective parties.</p>
<table><tr><td colspan="2">Program name EULA</td></tr><tr><td>e2fsprogs</td><td>Exhibit A</td></tr><tr><td>linux</td><td>Exhibit A</td></tr><tr><td>module-init-tools</td><td>Exhibit A</td></tr><tr><td>mount</td><td>Exhibit A</td></tr><tr><td>netkit</td><td>Exhibit A</td></tr><tr><td>nettools</td><td>Exhibit A</td></tr><tr><td>sash</td><td>Exhibit A</td></tr><tr><td>util-linux</td><td>Exhibit A</td></tr></table>
<table><tr><td colspan="2">Program name EULA</td></tr><tr><td>directfb</td><td>Exhibit B</td></tr><tr><td>glibc</td><td>Exhibit B</td></tr><tr><td>Free Type</td><td>Exhibit C</td></tr><tr><td>LibJPEG</td><td>Exhibit C</td></tr><tr><td>Open SSL</td><td>Exhibit C</td></tr></table>
<p>- Reverse engineering, disassembling, decompiling, dismantling, or otherwise attempting to analyze or modify the software included in this product is prohibited.</p>
<h2 id="exhibit-a">Exhibit A</h2>
<h2 id="gpl">GPL</h2>
<h2 id="gnu-general-public-license">GNU GENERAL PUBLIC LICENSE</h2>
<p>Version 2, June 1991</p>
<p>Copyright (C) 1989, 1991 Free Software Foundation, Inc.</p>
<p>51 Franklin Street, Fifth Floor, Boston, MA 02110-1301 USA</p>
<p>Everyone is permitted to copy and distribute verbatim copies of this license document, but changing it is not allowed.</p>
<h2 id="preamble">Preamble</h2>
<p>The licenses for most software are designed to take away your freedom to share and change it. By contrast, the GNU General Public License is intended to guarantee your freedom to share and change free software to make sure the software is free for all its users. This General Public License applies to most of the Free Software Foundation's software and to any other program whose authors commit to using it. (Some other Free Software Foundation software is covered by the GNU Lesser General Public License Instead.) You can apply it to your programs, too.</p>
<p>When we speak of free software, we are referring to freedom, not price. Our General Public Licenses are designed to make sure that you have the freedom to distribute copies of free software (and charge for this service if you wish), that you receive source code or can get it if you want it, that you can change the software or use pieces of it in new free programs; and that you know you can do these things.</p>
<p>To protect your rights, we need to make restrictions that forbid anyone to deny you these rights or to ask you to surrender the rights. These restrictions translate to certain responsibilities for you if you distribute copies of the software, or if you modify it.</p>
<p>For example, if you distribute copies of such a program, whether gratis or for a fee, you must give the recipients all the rights that you have. You must make sure that they, too, receive or can get the source code. And you must show them these terms so they know their rights.</p>
<p>We protect your rights with two steps: (1) copyright the software, and (2) offer you this license which gives you legal permission to copy, distribute and/or modify the software.</p>
<p>Also, for each author's protection and ours, we want to make certain that everyone understands that there is no warranty for this free software. If the software is modified by someone else and passed on, we want its recipients to know that what they have is not the original, so that any problems introduced by others will not reflect on the original authors' reputations.</p>
<p>Finally, any free program is threatened constantly by software patents. We wish to avoid the danger that redistributors of a free program will individually obtain patent licenses, in effect making the program proprietary. To prevent this, we have made it clear that any patent must be licensed for everyone's free use or not licensed at all.</p>
<p>The precise terms and conditions for copying, distribution and modification follow.</p>
<h2 id="gnu-general-public-license-2">GNU GENERAL PUBLIC LICENSE</h2>
<p>TERMS AND CONDITIONS FOR COPYING, DISTRIBUTION AND MODIFICATION</p>
<ol>
<li>This License applies to any program or other work which contains a notice placed by the copyright holder saying it may be distributed under the terms of this General Public License. The "Program", below, refers to any such program or work, and a "work based on the Program" means either the Program or any derivative work under copyright law: that is to say, a work containing the Program or a portion of it, either verbatim or with modifications and/or translated into another language. (Hereinafter, translation is included without limitation in the term "modification"). Each licensee is addressed as "you".</li>
</ol>
<p>Activities other than copying, distribution and modification are not covered by this License; they are outside its scope. The act of the Program is not restricted, and the output from the Program is covered only if its contents be a work based on the Program (Independent of having been made by running the Program). Whether that is true depends on what the Program does.</p>
<ol>
<li>You may copy and distribute verbatim copies of the Program's source code as you receive it, in any medium, provided that you conspicuously and appropriately publish on each copy an appropriate copyright notice and disclaimer of warranty; keep intact all the notices that refer to this License and to the absence of any warranty; and give any other recipients of the Program a copy of this License along with the Program.</li>
</ol>
<p>You may charge a fee for the physical act of transferring a copy, and you may at your option offer warranty protection in exchange for a fee.</p>
<ol>
<li>You may modify your copy or copies of the Program or any portion of it, thus forming a work based on the Program, and copy and distribute such modifications or work under the terms of Section 1 above, provided that you also meet all of these conditions:</li>
</ol>
<p>a) You must cause the modified files to carry prominent notices stating that you changed the files and the date of any change.</p>
<p>b) You must cause any work that you distribute or publish, that in whole or in part contains or is derived from the Program or any part thereof, to be licensed as a whole at no charge to all third parties under the terms of this License.</p>
<p>c) if the modified program normally reads commands interactively when run, you must cause it, when started running for such interactive use in the most ordinary way, to print or display an announcement including an appropriate copyright notice and a notice that there is no warranty (or else, saying that you provide a warranty) and that users may redistribute the program under these conditions, and telling the user how to view a copy of this License. (Exception: if the Program itself is interactive but does not normally print such an announcement, your work based on the Program is not required to print an announcement.)</p>
<p>These requirements apply to the modified work as a whole. If Identifiable sections of that work are not derived from the Program, and can be reasonably considered independent and separate works in themselves, then this License, and its terms, do not apply to those sections when you distribute them as separate works. But when you distribute the same sections as part of a whole which is a work based on the Program, the distribution of the whole must be on the terms of this License, whose permissions for other licensees extend to the entire whole, and thus to each and every part regardless of who wrote it.</p>
<p>Thus, it is not the intent of this section to claim rights or contest your rights to work written entirely by you; rather, the intent is to exercise the right to control the distribution of derivative or collective works based on the Program.</p>
<p>In addition, mere aggregation of another work not based on the Program with the Program (or with a work based on the Program) on a volume of a storage or distribution medium does not bring the other work under the scope of this License.</p>
<p><img src="/content/2026/05/1018651/images/86cf5f3ccf7c7c33330f5550a56e89e8196b25f8842b742b5dbae05b8f70320a.jpg" alt="TOSHIBA BDX2000KE - GNU GENERAL PUBLIC LICENSE - 1" loading="lazy" decoding="async"></p>
<h2 id="others-6">OTHERS</h2>
<ol>
<li>You may copy and distribute the Program (or a work based on it, under Section 2) in object code or executable form under the terms of Sections 1 and 2 above provided that you also do one of the following:</li>
</ol>
<p>a) Accompany it with the complete corresponding machine-readable source code, which must be distributed under the terms of Sections 1 and 2 above on a medium customarily used for software interchange; or, <br />
b) Accompany it with a written offer, valid for at least three years, to give any third party, for a charge no more than your cost of physically performing source distribution, a complete machine-readable copy of the corresponding source code, to be distributed under the terms of Sections 1 and 2 above on a medium customarily used for software interchange; or, <br />
c) Accompany it with the information you received as to the offer to distribute corresponding source code. (This alternative is allowed only for noncommercial distribution and only if you received the program in object code or executable form with such an offer, in accord with Subsection b above.)</p>
<p>The source code for a work means the preferred form of the work for making modifications to it. For an executable work, complete source code means all the source code for all modules it contains, plus any associated interface definition files, plus the scripts used to control compilation and installation of the executable. However, as a special exception, the source code distributed need not include anything that is normally distributed (in either source or binary form) with the major components (compiler, kernel, and so on) of the operating system on which the executable runs, unless that component itself accompanies the executable.</p>
<p>If distribution of executable or object code is made by offering access to copy from a designated place, then offering equivalent access to copy the source code from the same place counts as distribution of the source code, even though third parties are not compelled to copy the source along with the object code.</p>
<ol>
<li>You may not copy, modify, sublicense, or distribute the Program except as expressly provided under this License. Any attempt otherwise to copy, modify, sublicense or distribute the Program is void, and will automatically terminate your rights under this License. However, parties who have received copies, or rights, from you under this License will not have their licenses terminated so long as such parties remain in full compliance. </li>
<li>You are not required to accept this License, since you have not signed it. However, nothing else grants you permission to modify or distribute the Program or its derivative works. These actions are prohibited by law if you do not accept this License. Therefore, by modifying or distributing the Program (or any work based on the Program), you indicate your acceptance of this License to do so, and all its terms and conditions for copying, distributing or modifying the Program or works based on it. </li>
<li>Each time you redistribute the Program (or any work based on the Program), the recipient automatically receives a license from the original licensor to copy, distribute or modify the Program subject to these terms and conditions. You may not impose any further restrictions on the recipients' exercise of the rights granted herein. You are not responsible for enforcing compliance by third parties to this License. </li>
<li>If, as a consequence of a court judgment or allegation of patent infringement or for any other reason (not limited to patent issues), conditions are imposed on you (whether by court order, agreement or otherwise) that contradict the conditions of this License, they do not excuse you from the conditions of this License. If you cannot distribute so as to satisfy simultaneously your obligations under this License and any other pertinent obligations, then as a consequence you may not distribute the Program at all. For example, if a patent license would not permit royalty-free redistribution of the Program by all those who receive copies directly or indirectly through you, then the only way you could satisfy both it and this License would be to refrain entirely from distribution of the Program.</li>
</ol>
<p>If any portion of this section is held invalid or unenforceable under any particular circumstance, the balance of the section is intended to apply and the section as a whole is intended to apply in other circumstances.</p>
<p>It is not the purpose of this section to induce you to infinge any patents or other property right claims or to contest validity of any such claims; this section has the sole purpose of protecting the integrity of the free software distribution system, which is implemented by public license practices. Many people have made generous contributions to the wide range of software distributed through that system in reliance on consistent application of that system; it is up to the author/donor to decide if he or she is willing to distribute software through any other system and a licensee cannot impose that choice.</p>
<p>This section is intended to make thoroughly clear what is believed to be a consequence of the rest of this License.</p>
<ol>
<li>If the distribution and/or use of the Program is restricted in certain countries either by patents or by copyrighted interfaces, the original copyright holder who places the Program under this License may add an explicit geographical distribution limitation excluding those countries, so that distribution is permitted only in or among countries not thus excluded. In such case, this License incorporates the limitation as if written in the body of this License. </li>
<li>The Free Software Foundation may publish revised and/or new versions of the General Public License from time to time. Such new versions will be similar in spirit to the present version, but may differ in detail to address new problems or concerns.</li>
</ol>
<p>Each version is given a distinguishing version number. If the Program specifies a version number of this License which applies to it and 'any later version', you have the option of following the terms and conditions either of that version or of any later version published by the Free Software Foundation. If the Program does not specify a version number of this License, you may choose any version ever published by the Free Software Foundation.</p>
<ol>
<li>If you wish to incorporate parts of the Program into other free programs whose distribution conditions are different, write to the author to ask for permission. For software which is copyrighted by the Free Software Foundation, write to the Free Software Foundation; we sometimes make exceptions for this. Our decision will be guided by the two goals of preserving the free status of all derivatives of our free software and of promoting the sharing and reuse of software generally.</li>
</ol>
<h2 id="no-warranty">NO WARRANTY</h2>
<ol>
<li>BECAUSE THE PROGRAM IS LICENSED FREE OF CHARGE, THERE IS NO WARRANTY FOR THE PROGRAM, TO THE EXTENT PERMITTED BY APPLICABLE LAW, EXCEPT WHEN OTHERWISE STATED IN WRITING THE COPYRIGHT HOLDERS AND/OR OTHER PARTIES PROVIDE THE PROGRAM "AS IS" WITHOUT WARRANTY OF ANY KIND, EITHER EXPRESSED OR IMPLIED, INCLUDING, BUT NOT LIMITED TO, THE IMPLIED WARRANTIES OF MERCHANTABILITY AND FITNESS FOR A PARTICULAR PURPOSE. THE ENTIRE RISK AS TO THE QUALITY AND PERFORMANCE OF THE PROGRAM IS WITH YOU. SHOULD THE PROGRAM PROVE DEFECTIVE, YOU ASSUME THE COST OF ALL NECESSARY SERVICING, REPAIR OR CORRECTION. </li>
<li>IN NO EVENT UNLESS REQUIRED BY APPLICABLE LAW OR AGREED TO IN WRITING WILL ANY COPYRIGHT HOLDER, OR ANY OTHER PARTY WHO MAY MODIFY AND/OR REDISTRIBUTE THE PROGRAM AS PERMITTED ABOVE, BE LIABLE TO YOU FOR DAMAGES, INCLUDING ANY GENERAL, SPECIAL, INCIDENTAL OR CONSEQUENTIAL DAMAGES ARISING OUT OF THE USE OR INABILITY TO USE THE PROGRAM (INCLUDING BUT NOT LIMITED TO LOSS OF DATA OR DATA BEING RENDERED INACCURATE OR LOSSES SUSTAINED BY YOU OR THIRD PARTIES OR A FAILURE OF THE PROGRAM TO OPERATE WITH ANY OTHER PROGRAMS), EVEN IF SUCH HOLDER OR OTHER PARTY HAS BEEN ADVISED OF THE POSSIBILITY OF SUCH DAMAGES.</li>
</ol>
<h2 id="end-of-terms-and-conditions">END OF TERMS AND CONDITIONS</h2>
<h2 id="how-to-apply-these-terms-to-your-new-programs">How to Apply These Terms to Your New Programs</h2>
<p>If you develop a new program, and you want it to be of the greatest possible use to the public, the best way to achieve this is to make it free software which everyone can redistribute and change under these terms. <br />
To do so, attach the following notices to the program. It is safest to attach them to the start of each source file to most effectively convey the exclusion of warranty; and each file should have at least the "copyright" line and a pointer to where the full notice is found.</p>
<p><one line to give the program's name and a brief idea of what it does.></p>
<p>Copyright (C) <year> <name of author></p>
<p>This program is free software; you can redistribute it and/or modify it under the terms of the GNU General Public License as published by the Free Software Foundation; either version 2 of the License, or (at your option) any later version.</p>
<p>This program is distributed in the hope that it will be useful, but WITHOUT ANY WARRANTY; without even the implied warranty of MERCHANTABILITY or FITNESS FOR A PARTICULAR PURPOSE. See the GNU General Public License for more details. <br />
You should have received a copy of the GNU General Public License along with this program; if not, write to the Free Software Foundation, Inc., 51 Franklin Street, Fifth Floor, Boston, MA 02110-1301 USA.</p>
<p>Also add information on how to contact you by electronic and paper mail.</p>
<p>If the program is interactive, make it output a short notice like this when it starts in an interactive mode:</p>
<p>Gnomovision version 69. Copyright (C) year name of author <br />
Gnomovision comes with ABSOLUTELY NO WARRANTY; for details type 'show w'. <br />
This is free software, and you are welcome to redistribute it under certain conditions: type 'show c' for details.</p>
<p>The hypothetical commands 'show w' and 'show c' should show the appropriate parts of the General Public License. Of course, the commands you use may be called something other than 'show w' and 'show c'; they could even be mouse-clicks or menu items—whatever suits your program.</p>
<p>You should also get your employer (if you work as a programmer) or your school, if any, to sign a "copyright disclaimer" for the program, if necessary. Here is a sample; alter the names:</p>
<p>Yoyodyne, Inc., hereby disclaims all copyright interest in the program 'Gnomovision' (which makes passes at compilers) written by James Hacker.</p>
<p><signature of Ty Conn>. 1 April 1989 <br />
Ty Coon, President of Vice</p>
<p>This General Public License does not permit incorporating your program into proprietary programs. If your program is a subroutine library, you may consider it more useful to permit linking proprietary applications with the library. If this is what you want to do, use the GNU Lesser General Public License instead of this License.</p>
<h2 id="exhibit-b">Exhibit B</h2>
<h2 id="lgpl">LGPL</h2>
<h2 id="gnu-lesser-general-public-license">GNU LESSER GENERAL PUBLIC LICENSE</h2>
<h2 id="version-21-february-1999">Version 2.1, February 1999</h2>
<p>Copyright (C) 1991, 1999 Free Software Foundation, Inc. <br />
51 Franklin Street, Fifth Floor, Boston, MA 02110-1301 USA <br />
Everyone is permitted to copy and distribute verbatim copies of this license document, but changing it is not allowed.</p>
<p>[This is the first released version of the Lesser GPL. It also counts as the successor of the GNU Library Public License, version 2, hence the version number 2.1.]</p>
<h2 id="preamble-2">Preamble</h2>
<p>The licenses for most software are designed to take away your freedom to share and change it. By contrast, the GNU General Public Licenses are intended to guarantee your freedom to share and change free software--to make sure the software is free for all its users. <br />
This license, the Lesser General Public License, applies to some specially designated software packages—typically libraries—of the Free Software Foundation and other authors who decide to use it. You can use it too, but we suggest you first think carefully about whether this license or the ordinary General Public License is the better strategy to use in any particular case, based on the explanations below. <br />
When we speak of free software, we are referring to freedom of use, not price. Our General Public Licenses are designed to make sure that you have the freedom to distribute copies of free software (and charge for this service if you wish); that you receive source code or can get it if you want it; that you can change the software and use pieces of it in new free programs; and that you are informed that you can do these things. <br />
To protect your rights, we need to make restrictions that forbid distributors to deny you these rights or to ask you to surrender these rights. These restrictions translate to certain responsibilities for you if you distribute copies of the library or if you modify it. <br />
For example, if you distribute copies of the library, whether gratis or for a fee, you must give the recipients all the rights that we gave you. You must make sure that they, too, receive or can get the source code. If you link other code with the library, you must provide complete object files to the recipients, so that they can relink them with the library after making changes to the library and recompiling it. And you must show them these terms so they know their rights. <br />
We protect your rights with a two-step method: (1) we copyright the library, and (2) we offer you this license, which gives you legal permission to copy, distribute and/or modify the library. <br />
To protect each distributor, we want to make it very clear that there is no warranty for the free library. Also, if the library is modified by someone else and passed on, the recipients should know that what they have is not the original version, so that the original author's reputation will not be affected by problems that might be introduced by others. <br />
Finally, software patents pose a constant threat to the existence of any free program. We wish to make sure that a company cannot effectively restrict the users of a free program by obtaining a restrictive license from a patent holder. Therefore, we insist that any patent license obtained for a version of the library must be consistent with the full freedom of use specified in this license. <br />
Most GNU software, including some libraries, is covered by the ordinary GNU General Public License. This license, the GNU Lesser General Public License, applies to certain designated libraries, and is quite different from the ordinary General Public License. We use this license for certain libraries in order to permit linking those libraries into non-free programs.</p>
<h2 id="others-7">OTHERS</h2>
<p>When a program is linked with a library, whether statically or using a shared library, the combination of the two is legally speaking a combined work, a derivative of the original library. The ordinary General Public License therefore permits such linking only if the entire combination fits its criteria of freedom. The Lesser General Public License permits more lax criteria for linking other code with the library.</p>
<p>We call this license the "Lesser" General Public License because it does Less to protect the user's freedom than the ordinary General Public License. It also provides other free software developers Less of an advantage over competing non-free programs. These disadvantages are the reason we use the ordinary General Public License for many libraries. However, the Lesser license provides advantages in certain special circumstances.</p>
<p>For example, on rare occasions, there may be a special need to encourage the widest possible use of a certain library, so that it becomes a de facto standard. To achieve this, non-free programs must be allowed to use the library. A more frequent case is that a free library does the same job as widely used non-free libraries. In this case, there is little to gain by limiting the free library to free software only, so we use the Lesser General Public License.</p>
<p>In other cases, permission to use a particular library in non-free programs enables a greater number of people to use a large body of free software. For example, permission to use the GNU C Library In non-free programs enables many more people to use the whole GNU operating system, as well as its variant, the GNU/Linux operating system.</p>
<p>Although the Lesser General Public License is Less protective of the users' freedom, it does ensure that the user of a program that is linked with the Library has the freedom and the wherewithal to run that program using a modified version of the Library.</p>
<p>The precise terms and conditions for copying, distribution and modification follow. Pay close attention to the difference between a "work based on the library" and a "work that uses the library". The former contains code derived from the library, whereas the latter must be combined with the library in order to run.</p>
<h2 id="gnu-lesser-general-public-license-2">GNU LESSER GENERAL PUBLIC LICENSE</h2>
<h2 id="terms-and-conditions-for-copying-distribution-and-modification">TERMS AND CONDITIONS FOR COPYING, DISTRIBUTION AND MODIFICATION</h2>
<ol>
<li>This License Agreement applies to any software library or other program which contains a notice placed by the copyright holder or other authorized party saying it may be distributed under the terms of this Lesser General Public License (also called "this License"). Each licensee is addressed as "you".</li>
</ol>
<p>A "library" means a collection of software functions and/or data prepared so as to be conveniently linked with application programs (which use some of those functions and data) to form executables.</p>
<p>The "Library", below, refers to any such software library or work which has been distributed under these terms. A "work based on the Library" means either the Library or any derivative work under copyright law: that is to say, a work containing the Library or a portion of it, either verbatim or with modifications and/or translated straightforwardly into another language. (Hereinafter, translation is included without limitation in the term 'modification').</p>
<p>"Source code" for a work means the preferred form of the work for making modifications to it. For a library, complete source code means all the source code for all modules it contains, plus any associated interface definition files, plus the scripts used to control compilation and installation of the library.</p>
<p>Activities other than copying, distribution and modification are not covered by this License; they are outside its scope. The act of running a program using the Library is not restricted, and output from such a program is covered only if its contents constitute a work based on the Library (Independent of the use of the Library in a tool for writing it). Whether that is true depends on what the Library does and what the program that uses the Library does.</p>
<ol>
<li>You may copy and distribute verbatim copies of the Library's complete source code as you receive it, in any medium, provided that you conspicuously and appropriately publish on each copy an appropriate copyright notice and disclaimer of warranty; keep intact all the notices that refer to this License and to the absence of any warranty; and distribute a copy of this License along with the Library.</li>
</ol>
<p>You may charge a fee for the physical act of transferring a copy, and you may at your option offer warranty protection in exchange for a fee.</p>
<ol>
<li>You may modify your copy or copies of the Library or any portion of it, thus forming a work based on the Library, and copy and distribute such modifications or work under the terms of Section 1 above, provided that you also meet all of these conditions:</li>
</ol>
<p>a) The modified work must itself be a software library.</p>
<p>b) You must cause the files modified to carry prominent notices stating that you changed the files and the date of any change.</p>
<p>c) You must cause the whole of the work to be licensed at no charge to all third parties under the terms of this License.</p>
<p>d) If a facility in the modified Library refers to a function or a table of data to be supplied by an application program that uses the facility, other than as an argument passed when the facility is invoked, then you must make a good faith effort to ensure that, in the event an application does not supply such function or table, the facility still operates, and performs whatever part of its purpose remains meaningful.</p>
<p>(For example, a function in a library to compute square roots has a purpose that is entirely well-defined independent of the application. Therefore, Subsection 2d requires that any application-supplied function or table used by this function must be optional: if the application does not supply it, the square root function must still compute square roots.)</p>
<p>These requirements apply to the modified work as a whole. If identifiable sections of that work are not derived from the Library, and can be reasonably considered independent and separate works in themselves, then this License, and its terms, do not apply to those sections when you distribute them as separate works. But when you distribute the same sections as part of a whole which is a work based on the Library, the distribution of the whole must be on the terms of this License, whose permissions for other licensees extend to the entire whole, and thus to each and every part regardless of who wrote it.</p>
<p>Thus, it is not the intent of this section to claim rights or contest your rights to work written entirely by you; rather, the intent is to exercise the right to control the distribution of derivative or collective works based on the Library.</p>
<p>In addition, mere aggregation of another work not based on the Library with the Library (or with a work based on the Library) on a volume of a storage or distribution medium does not bring the other work under the scope of this License.</p>
<ol>
<li>You may opt to apply the terms of the ordinary GNU General Public License instead of this License to a given copy of the Library. To do this, you must alter all the notices that refer to this License, so that they refer to the ordinary GNU General Public License, version 2, instead of to this License. (If a newer version than version 2 of the ordinary GNU General Public License has appeared, then you can specify that version Instead if you wish.) Do not make any other change in these notices.</li>
</ol>
<p>Once this change is made in a given copy, it is irreversible for that copy, so the ordinary GNU General Public License applies to all subsequent copies and derivative works made from that copy.</p>
<p>This option is useful when you wish to copy part of the code of the Library into a program that is not a library.</p>
<ol>
<li>You may copy and distribute the Library (or a portion or derivative of it, under Section 2) in object code or executable form under the terms of Sections 1 and 2 above provided that you accompany it with the complete corresponding machine-readable source code, which must be distributed under the terms of Sections 1 and 2 above on a medium customarily used for software interchange.</li>
</ol>
<p>If distribution of object code is made by offering access to copy from a designated place, then offering equivalent access to copy the source code from the same place satisfies the requirement to distribute the source code, even though third parties are not compelled to copy the source along with the object code.</p>
<ol>
<li>A program that contains no derivative of any portion of the Library, but is designed to work with the Library by being compiled or linked with it, is called a "work that uses the Library". Such a work, in isolation, is not a derivative work of the Library, and therefore falls outside the scope of this License.</li>
</ol>
<p>However, linking a "work that uses the Library" with the Library creates an executable that is a derivative of the Library (because it contains portions of the Library), rather than a "work that uses the library". The executable is therefore covered by this License. Section 6 states terms for distribution of such executables.</p>
<p>When a "work that uses the Library" uses material from a header file that is part of the Library, the object code for the work may be a derivative work of the Library even though the source code is not. Whether this is true is especially significant if the work can be linked without the Library, or if the work is itself a library. The threshold for this to be true is not precisely defined by law.</p>
<p>If such an object file uses only numerical parameters, data structure layouts and accessors, and small macros and small inline functions (ten lines or less in length), then the use of the object file is unrestricted, regardless of whether it is legally a derivative work. (Executables containing this object code plus portions of the Library will still fall under Section 6.)</p>
<p>Otherwise, if the work is a derivative of the Library, you may distribute the object code for the work under the terms of Section 6. Any executables containing that work also fall under Section 6, whether or not they are linked directly with the Library itself.</p>
<ol>
<li>As an exception to the Sections above, you may also combine or link a "work that uses the Library" with the Library to produce a work containing portions of the Library, and distribute that work under terms of your choice, provided that the terms permit modification of the work for the customer's own use and reverse engineering for debugging such modifications.</li>
</ol>
<p>You must give prominent notice with each copy of the work that the Library is used in it and that the Library and its use are covered by this License. You must supply a copy of this License. If the work during execution displays copyright notices, you must include the copyright notice for the Library among them, as well as a reference directing the user to the copy of this License. Also, you must do one of these things:</p>
<p>a) Accompany the work with the complete corresponding machine-readable source code for the Library including whatever changes were used in the work (which must be distributed under Sections 1 and 2 above); and, if the work is an executable linked with the Library, with the complete machine-readable "work that uses the Library", as object code and/or source code, so that the user can modify the Library and then relink to produce a modified executable containing the modified Library. It is understood that the user who changes the contents of definitions files in the Library will not necessarily be able to recompile the application to use the modified definitions.)</p>
<p>b) Use a suitable shared library mechanism for linking with the Library. A suitable mechanism is one that (1) uses at run time a copy of the library already present on the user's computer system, rather than copying library functions into the executable, and (2) will operate properly with a modified version of the library, if the user installs one, as long as the modified version is interface-compatible with the version that the work was made with.</p>
<p>c) Accompany the work with a written offer, valid for at least three years, to give the same user the materials specified in Subsection 6a, above, for a charge no more than the cost of performing this distribution.</p>
<p>d) If distribution of the work is made by offering access to copy from a designated place, offer equivalent access to copy the above specified materials from the same place.</p>
<p>e) Verify that the user has already received a copy of these materials or that you have already sent this user a copy.</p>
<p>For an executable, the required form of the 'work that uses the Library' must include any data and utility programs needed for reproducing the executable from it. However, as a special exception, the materials to be distributed need not include anything that is normally distributed (in either source or binary form) with the major components (compiler, kernel, and so on) of the operating system on which the executable runs, unless that component itself accompanies the executable.</p>
<p>It may happen that this requirement contradicts the license restrictions of other proprietary libraries that do not normally accompany the operating system. Such a contradiction means you cannot use both them and the Library together in an executable that you distribute.</p>
<ol>
<li>You may place library facilities that are a work based on the Library side-by-side in a single library together with other library facilities not covered by this License, and distribute such a combined library, provided that the separate distribution of the work based on the Library and of the other library facilities is otherwise permitted, and provided that you do these two things:</li>
</ol>
<p>a) Accompany the combined library with a copy of the same work based on the Library, uncombined with any other library facilities. This must be distributed under the terms of the Sections above.</p>
<p>b) Give prominent notice with the combined library of the fact that part of it is a work based on the Library, and explaining where to find the accompanying uncombined form of the same work.</p>
<ol>
<li>
<p>You may not copy, modify, sublicense, link with, or distribute the Library except as expressly provided under this License. Any attempt otherwise to copy, modify, sublicense, link with, or distribute the Library is void, and will automatically terminate your rights under this License. However, parties who have received copies, or rights, from you under this License will not have their licenses terminated so long as such parties remain in full compliance.</p>
</li>
<li>
<p>You are not required to accept this License, since you have not signed it. However, nothing else grants you permission to modify or distribute the Library or its derivative works. These actions are prohibited by law if you do not accept this License. Therefore, by modifying or distributing the Library (or any work based on the Library), you indicate your acceptance of this License to do so, and all its terms and conditions for copying, distributing or modifying the Library or works based on it.</p>
</li>
<li>
<p>Each time you redistribute the Library (or any work based on the Library), the recipient automatically receives a license from the original licensor to copy, distribute, link with or modify the Library subject to these terms and conditions. You may not impose any further restrictions on the recipients' exercise of the rights granted herein. You are not responsible for enforcing compliance by third parties with this License.</p>
</li>
</ol>
<p><img src="/content/2026/05/1018651/images/726c68de188c8e9c3147a7aaad675474a38048354259fd3e09786e2f42046572.jpg" alt="TOSHIBA BDX2000KE - TERMS AND CONDITIONS FOR COPYING, DISTRIBUTION AND MODIFICATION - 1" loading="lazy" decoding="async"></p>
<p><img src="/content/2026/05/1018651/images/320fea0af92cde1604c8275300b1635fb599013f5cccbf916d529049f3fd0e78.jpg" alt="TOSHIBA BDX2000KE - TERMS AND CONDITIONS FOR COPYING, DISTRIBUTION AND MODIFICATION - 2" loading="lazy" decoding="async"></p>
<h2 id="others-8">OTHERS</h2>
<ol>
<li>If, as a consequence of a court judgment or allegation of patent infringement or for any other reason (not limited to patent issues), conditions are imposed on you (whether by court order, agreement or otherwise) that contradict the conditions of this License, they do not excuse you from the conditions of this License. If you cannot distribute so as to satisfy simultaneously your obligations under this License and any other pertinent obligations, then as a consequence you may not distribute the Library at all. For example, if a patent license would not permit royalty-free redistribution of the Library by all those who receive copies directly or indirectly through you, then the only way you could satisfy both it and this License would be to refrain entirely from distribution of the Library.</li>
</ol>
<p>If any portion of this section is held invalid or unenforceable under any particular circumstance, the balance of the section is intended to apply, and the section as a whole is intended to apply in other circumstances.</p>
<p>It is not the purpose of this section to induce you to infringe any patents or other property right claims or to contest validity of any such claims; this section has the sole purpose of protecting the integrity of the free software distribution system which is implemented by public license practices. Many people have made generous contributions to the wide range of software distributed through that system in reliance on consistent application of that system; it is up to the author/donor to decide if he or she is willing to distribute software through any other system and a licensee cannot impose that choice.</p>
<p>This section is intended to make thoroughly clear what is believed to be a consequence of the rest of this License.</p>
<ol>
<li>
<p>If the distribution and/or use of the Library is restricted in certain countries either by patents or by copyrighted interfaces, the original copyright holder who places the Library under this License may add an explicit geographical distribution limitation excluding those countries, so that distribution is permitted only in or among countries not thus excluded. In such case, this License incorporates the limitation as if written in the body of this License.</p>
</li>
<li>
<p>The Free Software Foundation may publish revised and/or new versions of the Lesser General Public License from time to time. Such new versions will be similar in spirit to the present version, but may differ in detail to address new problems or concerns.</p>
</li>
</ol>
<p>Each version is given a distinguishing version number. If the Library specifies a version number of this License which applies to it and "any later version", you have the option of following the terms and conditions either of that version or of any later version published by the Free Software Foundation. If the Library does not specify a license version number, you may choose any version ever published by the Free Software Foundation.</p>
<ol>
<li>If you wish to incorporate parts of the Library into other free programs whose distribution conditions are incompatible with these, write to the author to ask for permission. For software which is copyrighted by the Free Software Foundation, write to the Free Software Foundation; we sometimes make exceptions for this. Our decision will be guided by the two goals of preserving the free status of all derivatives of our free software and of promoting the sharing and reuse of software generally.</li>
</ol>
<h2 id="no-warranty-2">NO WARRANTY</h2>
<ol>
<li>
<p>BECAUSE THE LIBRARY IS LICENSED FREE OF CHARGE, THERE IS NO WARRANTY FOR THE LIBRARY, TO THE EXTENT PERMITTED BY APPLICABLE LAW, EXCEPT WHEN OTHERWISE STATED IN WRITING THE COPYRIGHT HOLDERS AND/OR OTHER PARTIES PROVIDE THE LIBRARY "AS IS" WITHOUT WARRANTY OF ANY KIND, EITHER EXPRESSED OR IMPLIED, INCLUDING, BUT NOT LIMITED TO, THE IMPLIED WARRANTIES OF MERCHANTABILITY AND FITNESS FOR A PARTICULAR PURPOSE. THE ENTIRE RISK AS TO THE QUALITY AND PERFORMANCE OF THE LIBRARY IS WITH YOU. SHOULD THE LIBRARY PROVE DEFECTIVE, YOU ASSUME THE COST OF ALL NECESSARY SERVICING, REPAIR OR CORRECTION.</p>
</li>
<li>
<p>IN NO EVENT UNLESS REQUIRED BY APPLICABLE LAW OR AGREED TO IN WRITING WILL ANY COPYRIGHT HOLDER, OR ANY OTHER PARTY WHO MAY MODIFY AND/OR REDISTRIBUTE THE LIBRARY AS PERMITTED ABOVE, BE LIABLE TO YOU FOR DAMAGES, INCLUDING ANY GENERAL, SPECIAL, INCIDENTAL OR CONSEQUENTIAL DAMAGES ARISING OUT OF THE USE OR INABILITY TO USE THE LIBRARY INCLUDING BUT NOT LIMITED TO LOSS OF DATA OR DATA BEING RENDERED INACCRATUR OR LOSSES SUSTAINED BY YOU OR THIRD PARTIES OR A FAILURE OF THE LIBRARY TO OPERATE WITH ANY OTHER SOFTWARE, EVEN IF SUCH HOLDER OR OTHER PARTY HAS BEEN ADVISED OF THE POSSIBILITY OF SUCH DAMAGES.</p>
</li>
</ol>
<h2 id="end-of-terms-and-conditions-how-to-apply-these-terms-to-your-new-libraries">END OF TERMS AND CONDITIONS How to Apply These Terms to Your New Libraries</h2>
<p>If you develop a new library, and you want it to be of the greatest possible use to the public, we recommend making it free software that everyone can redistribute and change. You can do so by permitting redistribution under these terms (or, alternatively, under the terms of the ordinary General Public License).</p>
<p>To apply these terms, attach the following notices to the library. It is safest to attach them to the start of each source file to most effectively convey the exclusion of warranty; and each file should have at least the 'copyright' line and a pointer to where the full notice is found.</p>
<p><one line to give the library's name and a brief idea of what it does.> Copyright (C) <year> <name of author></p>
<p>This library is free software; you can redistribute it and/or modify it under the terms of the GNU Lesser General Public License as published by the Free Software Foundation; either version 2.1 of the License, or (at your option) any later version.</p>
<p>This library is distributed in the hope that it will be useful, but WITHOUT ANY WARRANTY; without even the implied warranty of MERCHANTABILITY or FITNESS FOR A PARTICULAR PURPOSE. See the GNU Lesser General Public License for more details.</p>
<p>You should have received a copy of the GNU Lesser General Public License along with this library; if not, write to the Free Software Foundation, Inc., 51 Franklin Street, Fifth Floor, Boston, MA 02110-1301 USA.</p>
<p>Also add information on how to contact you by electronic and paper mail.</p>
<p>You should also get your employer (if you work as a programmer) or your school, if any, to sign a *copyright disclaimer* for the library, if necessary. Here is a sample; alter the names:</p>
<p>Yoyodyne, Inc., hereby disclaims all copyright interest in the library 'Frob' (a library for tweaking knobs) written by James Random Hacker.</p>
<p><signature of Ty Coon>, 1 April 1990
Ty Coon, President of Vice</p>
<p>That's all there is to it!</p>
<h2 id="exhibit-c-free-type">Exhibit C Free Type</h2>
<h2 id="the-freetype-project-license">The FreeType Project LICENSE</h2>
<p>2006-Jan-27</p>
<p>Copyright 1996-2002, 2006 by</p>
<p>David Turner, Robert Wilhelm, and Werner Lemberg</p>
<h2 id="introduction-10">Introduction</h2>
<p>The FreeType Project is distributed in several archive packages: some of them may contain, in addition to the FreeType font engine, various tools and contributions which rely on, or relate to, the FreeType Project.</p>
<p>This license applies to all files found in such packages, and which do not fall under their own explicit license. The license affects thus the Free Type font engine, the test programs, documentation and makefiles, at the very least.</p>
<p>This license was inspired by the BSD, Artistic, and IJG (Independent JPEG Group) licenses, which all encourage Inclusion and use of free software in commercial and freeware products alike. As a consequence, its main points are that:</p>
<p>- We don't promise that this software works. However, we report reports, (as is' distribution)</p>
<p>- You can use this software for whatever you want. In parts [royalty-free usage]</p>
<p>- You may not pretend that you wrote this software. If you must acknowledge somewhere in your documentation that you have used the FreeType code.
['credits']</p>
<p>We specifically permit and encourage the inclusion of this software, with or without modifications, in commercial products. We disclaim all warranties covering The FreeType Project and assume no liability related to The FreeType Project.</p>
<p>Finally, many people asked us for a preferred form for a credit/disclaimer to use in compliance with this license. We thus encourage you to use the following text:</p>
<p>•</p>
<p>Portions of this software are copyright© <year> The FreeType Project (www.freetype.org). All rights reserved.</p>
<p>Please replace <year> with the value from the FreeType version you actually use.</p>
<h2 id="legal-terms">Legal Terms</h2>
<h2 id="0-definitions">0. Definitions</h2>
<p>Throughout this license, the terms 'package', 'FreeType Project', and 'FreeType archive' refer to the set of files originally distributed by the authors (David Turner, Robert Wilhelm, and Werner Lemberg) as the 'FreeType Project', be they named as alpha, beta or final release.</p>
<p>'You' refers to the licensee, or person using the project, where 'using' is a generic term including compiling the project's source code as well as linking it to form a 'program' or 'executable'. This program is referred to as 'a program using the Free Type engine'.</p>
<p>This license applies to all files distributed in the original FreeType Project, including all source code, binaries and documentation, unless otherwise stated in the file in its original, unmodified form as distributed in the original archive. If you are unsure whether or not a particular file is covered by this license, you must contact us to verify this.</p>
<p>The FreeType Project is copyright (C) 1996-2000 by David Turner, Robert Wilhelm, and Werner Lemberg. All rights reserved except as specified below.</p>
<h2 id="1-no-warranty">1. No Warranty</h2>
<p>THE FREETYPE PROJECT IS PROVIDED 'AS IS' WITHOUT WARRANTY OF ANY KIND, EITHER EXPRESS OR IMPLIED, INCLUDING, BUT NOT LIMITED TO, WARRANTIES OF MERCHANTABILITY AND FITNESS FOR A PARTICULAR PURPOSE. IN NO EVENT WILL ANY OF THE AUTHORS OR COPYRIGHT HOLDERS BE LIABLE FOR ANY DAMAGES CAUSED BY THE USE OR THE INABILITY TO USE, OF THE FREETYPE PROJECT.</p>
<h2 id="2-redistribution">2. Redistribution</h2>
<p>This license grants a worldwide, royalty-free, perpetual and irrevocable right and license to use, execute, perform, compile, display, copy, create derivative works of, distribute and sublicense the FreeType Project (in both source and object code forms) and derivative works thereof for any purpose; and to authorize others to exercise some or all of the rights granted herein, subject to the following conditions:</p>
<p>- Redistribution of source code must retain this license file deletions or changes to the original files must be clearly indicated in accompanying documentation. The copyright notices of the unaltered, original files must be preserved in all copies of source files.</p>
<p>- Redistribution in binary form must provide a disclaimer that states that the software is based in part of the work of the FreeType Team, in the distribution documentation. We also encourage you to put an URL to the FreeType web page in your documentation, though this isn't mandatory.</p>
<p>These conditions apply to any software derived from or based on the FreeType Project, not just the unmodified files. If you use our work, you must acknowledge us. However, no fee need be paid to us.</p>
<h2 id="3-advertising">3. Advertising</h2>
<p>Neither the FreeType authors and contributors nor you shall use the name of the other for commercial, advertising, or promotional purposes without specific prior written permission.</p>
<p>We suggest, but do not require, that you use one or more of the following phrases to refer to this software in your documentation or advertising materials: 'FreeType Project', 'FreeType Engine', 'FreeType library', or 'FreeType Distribution'.</p>
<p>As you have not signed this license, you are not required to accept it. However, as the FreeType Project is copyrighted material, only this license, or another one contracted with the authors, grants you the right to use, distribute, and modify it. Therefore, by using, distributing, or modifying the FreeType Project, you indicate that you understand and accept all the terms of this license.</p>
<h2 id="others-9">OTHERS</h2>
<h2 id="4-contacts">4. Contacts</h2>
<p>There are two mailing lists related to FreeType:</p>
<ul>
<li>frectype@nongnu.org <br />
Discusses general use and applications of FreeType, as well as future and wanted additions to the library and distribution. If you are looking for support, start in this list if you haven't found anything to help you in the documentation. <br />
freetype-devel@nongnu.org <br />
Discusses bugs, as well as engine internals, design issues, specific licenses, porting, etc.</li>
</ul>
<p>Our home page can be found at</p>
<p>http://www.freetype.org</p>
<h2 id="libjpeg">LibJPEG</h2>
<p>In plain English:</p>
<ol>
<li>We don't promise that this software works. (But if you find any bugs, please let us know!) </li>
<li>You can use this software for whatever you want. You don't have to pay us. </li>
<li>You may not pretend that you wrote this software. If you use it in a program, you must acknowledge somewhere in your documentation that you've used the UG code.</li>
</ol>
<p>In legalese:</p>
<p>The authors make NO WARRANTY or representation, either express or implied, with respect to this software, its quality, accuracy, merchantability, or fitness for a particular purpose. This software is provided "AS IS", and you, its user, assume the entire risk as to its quality and accuracy.</p>
<p>This software is copyright (C) 1991-1998, Thomas G. Lane.</p>
<p>All Rights Reserved except as specified below.</p>
<p>Permission is hereby granted to use, copy, modify, and distribute this software (or portions thereof) for any purpose, without fee, subject to these conditions:</p>
<p>(1) If any part of the source code for this software is distributed, then this README file must be included, with this copyright and no-warranty notice unaltered; and any additions, deletions, or changes to the original files must be clearly indicated in accompanying documentation.</p>
<p>(2) If only executable code is distributed, then the accompanying documentation must state that "this software is based in part on the work of the independent JPEG Group".</p>
<p>(3) Permission for use of this software is granted only if the user accepts full responsibility for any undesirable consequences; the authors accept NO LIABILITY for damages of any kind.</p>
<p>These conditions apply to any software derived from or based on the UG code, not just to the unmodified library. If you use our work, you ought to acknowledge us.</p>
<p>Permission is NOT granted for the use of any UG author's name or company name in advertising or publicity relating to this software or products derived from it. This software may be referred to only as "the Independent JPEG Group's software".</p>
<p>We specifically permit and encourage the use of this software as the basis of commercial products, provided that all warranty or liability claims are assumed by the product vendor.</p>
<h2 id="open-ssl">Open SSL</h2>
<p>OpenSSL License</p>
<p>Copyright (c) 1998-2008 The OpenSSL Project. All rights reserved.</p>
<p>Redistribution and use in source and binary forms, with or without modification, are permitted provided that the following conditions are met:</p>
<ol>
<li>
<p>Redistributions of source code must retain the above copyright notice, this list of conditions and the following disclaimer.</p>
</li>
<li>
<p>Redistributions in binary form must reproduce the above copyright notice, this list of conditions and the following disclaimer in the documentation and/or other materials provided with the distribution.</p>
</li>
<li>
<p>All advertising materials mentioning features or use of this software must display the following acknowledgment:</p>
</li>
</ol>
<p>"This product includes software developed by the OpenSSL Project for use in the OpenSSL Toolkit. (http://www.openssl.org/)"</p>
<ol>
<li>
<p>The names "OpenSSL Toolkit" and "OpenSSL Project" must not be used to endorse or promote products derived from this software without prior written permission. For written permission, please contact openssl-core@openssl.org.</p>
</li>
<li>
<p>Products derived from this software may not be called 'OpenSSL' nor may 'OpenSSL' appear in their names without prior written permission of the OpenSSL Project.</p>
</li>
<li>
<p>Redistributions of any form whatsoever must retain the following acknowledgment:</p>
</li>
</ol>
<p>"This product includes software developed by the OpenSSL Project for use in the OpenSSL Toolkit (http://www.openssl.org/)"</p>
<p>THIS SOFTWARE IS PROVIDED BY THE OpenSSL PROJECT "AS IS" AND ANY EXPRESSED OR IMPLIED WARRANTIES, INCLUDING, BUT NOT LIMITED TO, THE IMPLIED WARRANTIES OF MERCHANTABILITY AND FITNESS FOR A PARTICULAR PURPOSE ARE DISCLAIMED. IN NO EVENT SHALL THE OpenSSL PROJECT OR ITS CONTRIBUTORS BE LIABLE FOR ANY DIRECT, INDIRECT, INCIDENTAL, SPECIAL, EXEMPLARY, OR CONSEQUENTIAL DAMAGES (INCLUDING, BUT NOT LIMITED TO, PROCUREMENT OF SUBSTITUTE GOODS OR SERVICES; LOSS OF USE, DATA, OR PROFITS; OR BUSINESS INTERRUPTION) HOWEVER CAUSED AND ON ANY THEORY OF LIABILITY, WHETHER IN CONTRACT, STRICT LIABILITY, OR TORT (INCLUDING NEGLIGENCE OR OTHERWISE) ARISING IN ANY WAY OUT OF THE USE OF THIS SOFTWARE, EVEN IF ADVISED OF THE POSSIBILITY OF SUCH DAMAGE.</p>
<p>This product includes cryptographic software written by Eric Young (eay@cryptsoft.com). This product includes software written by Tim Hudson (tjh@cryptsoft.com).</p>
<p>*</p>
<h2 id="original-ssleay-license">Original SSLeay License</h2>
<p>/* Copyright (C) 1995-1998 Eric Young (eay@cryptsoft.com) All rights reserved.</p>
<p>This package is an SSL implementation written by Eric Young (eay@cryptsoft.com). The implementation was written so as to conform with Netscapes SSL.</p>
<p>This library is free for commercial and non-commercial use as long as the following conditions are adhered to. The following conditions apply to all code found in this distribution, be it the RCA, RSA, Ihash, DES, etc., code; not just the SSL code. The SSL documentation included with this distribution is covered by the same copyright terms except that the holder is Tim Hudson (tjh@cryptsoft.com).</p>
<p>Copyright remains Eric Young's, and as such any Copyright notices in the code are not to be removed. If this package is used in a product, Eric Young should be given attribution as the author of the parts of the library used. This can be in the form of a textual message at program startup or in documentation (online or textual) provided with the package.</p>
<p>Redistribution and use in source and binary forms, with or without modification, are permitted provided that the following conditions are met:</p>
<ol>
<li>
<p>Redistributions of source code must retain the copyright notice, this list of conditions and the following disclaimer.</p>
</li>
<li>
<p>Redistributions in binary form must reproduce the above copyright notice, this list of conditions and the following disclaimer in the documentation and/or other materials provided with the distribution.</p>
</li>
<li>
<p>All advertising materials mentioning features or use of this software must display the following acknowledgement:</p>
</li>
</ol>
<p>'This product includes cryptographic software written by Eric Young (eay@cryptsoft.com)'
The word 'cryptographic' can be left out if the routines from the library being used are not cryptographic related -.
4. If you include any Windows specific code (or a derivative thereof) from the apps directory (application code) you must include an acknowledgement:</p>
<p>"This product includes software written by Tim Hudson (tjh@cryptsoft.com)"</p>
<p>THIS SOFTWARE IS PROVIDED BY ERIC YOUNG "AS IS" AND ANY EXPRESS OR IMPLIED WARRANTIES, INCLUDING, BUT NOT LIMITED TO, THE IMPLIED WARRANTIES OF MERCHANTABILITY AND FITNESS FOR A PARTICULAR PURPOSE ARE DISCLAIMED. IN NO EVENT SHALL THE AUTHOR OR CONTRIBUTORS BE LIABLE FOR ANY DIRECT, INDIRECT, INCIDENTAL, SPECIAL, EXEMPLARY, OR CONSEQUENTIAL DAMAGES (INCLUDING, BUT NOT LIMITED TO, PROCUREMENT OF SUBSTITUTE GOODS OR SERVICES; LOSS OF USE, DATA, OR PROFITS; OR BUSINESS INTERRUPTION) HOWEVER CAUSED AND ON ANY THEORY OF LIABILITY, WHETHER IN CONTRACT, STRICT LIABILITY, OR TORT (INCLUDING NEGLIGENCE OR OTHERWISE) ARISING IN ANY WAY OUT OF THE USE OF THIS SOFTWARE, EVEN IF ADVISED OF THE POSSIBILITY OF SUCH DAMAGE.</p>
<p>The licence and distribution terms for any publicly available version or derivative of this code cannot be changed. i.e. this code cannot simply be copied and put under another distribution licence [Including the GNU Public Licence.]</p>
<p>*1</p>
<p><img src="/content/2026/05/1018651/images/8010ffdc7c22620174889fb44f4e3c3816a8838e72cf3da93d9609cd7055ff4f.jpg" alt="TOSHIBA BDX2000KE - Original SSLeay License - 1" loading="lazy" decoding="async"></p>
<p><img src="/content/2026/05/1018651/images/298e6bcaf2a1a1121c16267deb1908b6f9ea01efba667a246de216b9cbe437f1.jpg" alt="TOSHIBA BDX2000KE - Original SSLeay License - 2" loading="lazy" decoding="async"></p>
<p><img src="/content/2026/05/1018651/images/02ca72d644163260c198ea68b1edcd99ff2a9118440029c13cf37474437edb83.jpg" alt="TOSHIBA BDX2000KE - Original SSLeay License - 3" loading="lazy" decoding="async"></p>
<p><img src="/content/2026/05/1018651/images/81f66114236a45bd5dc23f850bc414eba7821456cd10d3e42dc9f8c4fbe1f398.jpg" alt="TOSHIBA BDX2000KE - Original SSLeay License - 4" loading="lazy" decoding="async"></p>
<p><img src="/content/2026/05/1018651/images/40524c385eb6fb5f14a32692c06c076b8c42a248e4c2490a120a605cac27e038.jpg" alt="TOSHIBA BDX2000KE - Original SSLeay License - 5" loading="lazy" decoding="async"></p>
<p><img src="/content/2026/05/1018651/images/9ec58fce36f9def1ccdea0b4dc728b74405b088d2616fec16a52c84f1265391e.jpg" alt="TOSHIBA BDX2000KE - Original SSLeay License - 6" loading="lazy" decoding="async"></p>
<p><img src="/content/2026/05/1018651/images/9eba935ff390ca97a0d0cf7c32e4b43be92dc33fbc3bb1dd4e18541cfa2fdc8b.jpg" alt="TOSHIBA BDX2000KE - Original SSLeay License - 7" loading="lazy" decoding="async"></p>
<p><img src="/content/2026/05/1018651/images/463bba0a8b5e45ae8a71cfbbb378972616dd08dc4f7481ef4a43b555daf040c9.jpg" alt="TOSHIBA BDX2000KE - Original SSLeay License - 8" loading="lazy" decoding="async"></p>
<p>E5RJ2ED_EN.book Page 48 Thursday, October 29, 2009 3:30 PM</p>
<p><img src="/content/2026/05/1018651/images/776e6dc1e1d14a1c9bc05e46cb57dc8d73fc7cb724abfcdf49dfbd759b1fbd9d.jpg" alt="Pure geometric diagram with intersecting lines and circles, no text or symbols present" loading="lazy" decoding="async"></p>
<p><img src="/content/2026/05/1018651/images/492d57a7b45f2f79be6150fe4e0e8205784885c80a19ec020188e7dedc8a98ad.jpg" alt="TOSHIBA BDX2000KE - Original SSLeay License - 10" loading="lazy" decoding="async"></p>
<p><img src="/content/2026/05/1018651/images/9792a24cae26ad4177cb1a34abd93180fab39dccd9c8dd637664e63cb505eb2a.jpg" alt="TOSHIBA BDX2000KE - Original SSLeay License - 11" loading="lazy" decoding="async"></p>
<h2 id="toshiba-2">TOSHIBA</h2>
<p>1VMN28613 / E5RJ2ED ★★★★★</p>
<p><img src="/content/2026/05/1018651/images/04d93b7c03e965599f20eccdd07720c5f6cdf4babfe6520ca9f67a4a5c499121.jpg" alt="TOSHIBA BDX2000KE - TOSHIBA - 1" loading="lazy" decoding="async"></p>
<p><img src="/content/2026/05/1018651/images/fbe233137e80d73ac67b389650add258f3fc071f28b9ac00d8fafbb0f1acd3cb.jpg" alt="Pure geometric diagram with intersecting lines and circles, no text or symbols present" loading="lazy" decoding="async"></p>
<p>Printed in China</p>
<p><img src="/content/2026/05/1018651/images/a224c5f233e481fd54c15bbb8388d4eaa8d6e193add74ddac82d9ec0a7487a05.jpg" alt="TOSHIBA BDX2000KE - TOSHIBA - 3" loading="lazy" decoding="async"></p>
<p><img src="/content/2026/05/1018651/images/71fa83a356386fb7c62ffc088934e01296e21345b6474569a8f6de6f33702781.jpg" alt="Pure geometric diagram with intersecting lines and a circular pattern (no text or symbols)" loading="lazy" decoding="async"></p>
<h2 id="toshiba-3">TOSHIBA</h2>
<h2 id="blu-ray-disk-spieler-bdx2000ke">Blu-ray Disk-Spieler BDX2000KE</h2>
<p>BEDIENUNGSANLEITUNG</p>
<p><img src="/content/2026/05/1018651/images/eb0cef56cd3fd08f66eee2269348eb216baf8efa19de027f5683181c69723562.jpg" alt="TOSHIBA BDX2000KE - Blu-ray Disk-Spieler BDX2000KE - 1" loading="lazy" decoding="async"></p>
<p><img src="/content/2026/05/1018651/images/34c94c93ff468b1bf84c0d4f05ebefce634e93817483b8847f216e10efd1fd8c.jpg" alt="TOSHIBA BDX2000KE - Blu-ray Disk-Spieler BDX2000KE - 2" loading="lazy" decoding="async"></p>
<p><img src="/content/2026/05/1018651/images/9136183631ae9571da4c879f15ae2c4b07b8948b4f0ad42634b6fac6f923133e.jpg" alt="TOSHIBA BDX2000KE - Blu-ray Disk-Spieler BDX2000KE - 3" loading="lazy" decoding="async"></p>
<p><img src="/content/2026/05/1018651/images/ce5ab6320e7c7112a3c21fa576f5085f9c74cf05a730415ce662dee7388ec966.jpg" alt="TOSHIBA BDX2000KE - Blu-ray Disk-Spieler BDX2000KE - 4" loading="lazy" decoding="async"></p>
<p><img src="/content/2026/05/1018651/images/6ca25f439142d42106943e1f92b5ab7fa93ea49ac3e20ad7f2321cc62fdc1493.jpg" alt="TOSHIBA BDX2000KE - Blu-ray Disk-Spieler BDX2000KE - 5" loading="lazy" decoding="async"></p>
<p><img src="/content/2026/05/1018651/images/e802d250bd2d770f19539b83e4d5878612faa6148b2c902e611b871bae326961.jpg" alt="TOSHIBA BDX2000KE - Blu-ray Disk-Spieler BDX2000KE - 6" loading="lazy" decoding="async"></p>
<p><img src="/content/2026/05/1018651/images/fb900a847a6a912f80747b6ea44ce45e84842554c74f9de3e6575049547f89cd.jpg" alt="TOSHIBA BDX2000KE - Blu-ray Disk-Spieler BDX2000KE - 7" loading="lazy" decoding="async"></p>
<p><img src="/content/2026/05/1018651/images/fd86d51c3f114e0c2a1419fc8713ad35f17ad1956eef3bd818f422e5c449ed5d.jpg" alt="TOSUWA Sony Sony" loading="lazy" decoding="async"></p>
<h2 id="eigentümerdaten">Eigentümerdaten</h2>
<p>Die Modellnummer und die Seriennummer finden Sie auf der Rückseite dieses Geräts. Schreiben Sie diese Nummern in die nachstehenden freien Felder. Halten Sie diese Nummern bereit, wenn Sie sich bei Fragen zu diesem Gerät mit Ihrem Toshiba-Händler in Verbindung setzen.</p>
<p><img src="/content/2026/05/1018651/images/b0fc28c00f244eded6f7cb6c64b056a5c72e82189c08040a7e9fd6f31994c24e.jpg" alt="Modellnummer: Seriennummer:" loading="lazy" decoding="async"></p>
<p>© 2009 Toshiba Corporation</p>
<h2 id="einleitung">EINLEITUNG</h2>
<h2 id="sicherheitshinweise">Sicherheitshinweise</h2>
<p>WARNUNG: SETZEN SIE DIESES GERÄT AUF KEINEN FALL REGEN ODER NÄSSE AUS, DA ANDERENFALLS DIE GEFAHR VON BRANDAUSBRUCH UND ELEKTRISCHEM SCHLAG BESTEHT.</p>
<p><img src="/content/2026/05/1018651/images/57aa7e4e2020c204e05667d2d6dee6b02485d98e41d4877df6333d9b67d31a84.jpg" alt="TOSHIBA BDX2000KE - Sicherheitshinweise - 1" loading="lazy" decoding="async"></p>
<h2 id="caution-riskofelectricshock-donotopen">CAUTION RISKOFELECTRICSHOCK DONOTOPEN</h2>
<p><img src="/content/2026/05/1018651/images/b4938222e4964c86f2369ee8a190b447e2a30b4ddf908516747ca7983bbb8670.jpg" alt="TOSHIBA BDX2000KE - CAUTION RISKOFELECTRICSHOCK DONOTOPEN - 1" loading="lazy" decoding="async"></p>
<h2 id="achtung">ACHTUNG:</h2>
<p>ENTFERNEN SIE AUF KEINEN FALL IRGENDWELCHE GEHÄUSETEILE (ODER DIE HINTERE ABDECKUNG), DA ANDERENFALLS DIE GEAHRV ON ELEKTRISCHEM SCHLAG BESTEHT. IM GERÄTEINNEREN BEFINDEN SICH KEINE TEILE, DIE VOM BENUTZER GEWARTET WERDEN KÖNNEN. ÜBERLASSEN SIE WARTUNGSARBEITEN GRUNDSÄTZLICH DEM KUNDENDIENSTPERSONAL.</p>
<p>Die wichtigen Hinweise befinden sich auf der Gehäuserückseite oder -Unterseite.</p>
<p><img src="/content/2026/05/1018651/images/f272a1b5114a91911003436f332456bc77400ae3f8436192b43be637da6965c3.jpg" alt="TOSHIBA BDX2000KE - ACHTUNG: - 1" loading="lazy" decoding="async"></p>
<p>Das Blitzsymbol in einem gleichseitigen Dreieck warnt den Benutzer vor dem Vorhandensein einer nicht isolierten „gefährlichen Spannung“ im Geräteinneren, die ausreichend hoch ist, um eine Stromschlaggefahr für Personen darzustellen.</p>
<p><img src="/content/2026/05/1018651/images/29baea8bfd7cd0c858060dd9c82fa7a7489d17f6363c886e742f14bc6ff56289.jpg" alt="TOSHIBA BDX2000KE - ACHTUNG: - 2" loading="lazy" decoding="async"></p>
<p>Das Ausrufezeichen in einem gleichseitigen Dreieck macht den Benutzer auf wichtige Anweisungen zur Bedienung und Instandhaltung (Pflege) im Text der Bedienungsanleitung aufmerksam.</p>
<h2 id="warnhinweise">Warnhinweise</h2>
<ol>
<li>Versuchen Sie nicht, das Gehäuse zu öffnen. Im Geräteinneren befinden sich keine Teile, die Ihnen dienlich sein können. Überlassen Sie alle Wartungsarbeiten qualifiziertem Fachpersonal. </li>
<li>Schlitze und Öffnungen in den Gehäuseseiten und auf der Unterseite dienen der Belüftung. Um einen verlässlichen Betrieb zu gewährleisten und das Gerät vor dem Überhitzen zu schützen, dürfen diese Öffnungen nicht blockiert oder abgedeckt werden. Vermeiden Sie es, das Gerät an geschlossenen Standorten, wie z B. im Bücherregal, aufzustellen, es sei denn, es ist für ausreichend Belüftung gesorgt. </li>
<li>Halten Sie das Gerät von Radiatoren und anderen Hitzequellen fern. </li>
<li>Vermeiden Sie es, das Gerät in der Nähe von starken Magnetfeldern zu benutzen. </li>
<li>Führen Sie keine Gegenstände durch die Gehäuseschlitze oder die Öffnungen in das Gerät ein. Diese könnten spannungsführende Teile berühren oder einen Kurzschluss verursachen, was zu einem Feuer oder elektrischen Schlag führen kann. </li>
<li>Vermeiden Sie ein Feuer oder einen elektrischen Schlag, indem Sie darauf achten, dass das Gerät nicht mit Flüssigkeiten betropft oder bespritzt wird. Stellen Sie keine mit Flüssigkeiten gefüllten Gegenstände, wie Vasen, auf das Gerät. </li>
<li>Stellen Sie das Gerät nicht vertikal auf. Das Gerät darf nur horizontal (flache) Position genutzt werden. </li>
<li>Dieses Produkt befindet sich im Standby-Modus, wenn es ausgeschaltet wird, während das Netzkabel angeschlossen ist. </li>
<li>Stellen Sie keine flammenden Gegenstände, wie brennende Kerzen, auf dem Gerät ab. </li>
<li>Vergewissern Sie sich, bevor Sie das Gerät bewegen, dass Sie alle Medien entnommen und den Netzstecker aus der Steckdose gezogen haben. </li>
<li>Nehmen Sie das Gerät vom Stromnetz, um es auszuschalten, wenn Sie der Ansicht sind, dass ein Fehler aufgetreten ist, oder wenn Sie es über einen längeren Zeitraum nicht benutzen. </li>
<li>Das Netzkabel muss leicht zugänglich und bedienbar gelegt werden.</li>
</ol>
<p><img src="/content/2026/05/1018651/images/db7d67d1de00a5d390e2c5f52e2901a568c014a6c9f766392ad3dd8fae89c1b3.jpg" alt="TOSHIBA BDX2000KE - Warnhinweise - 1" loading="lazy" decoding="async"></p>
<p>Das Symbol für CLASS II (Doppelte Isolierung)</p>
<ol>
<li>Lesen Sie beide Bedienungsanleitungen, um sicherzustellen, dass das Gerät richtig und sicher installiert und korrekt mit den Multimediasystemen verbunden wurde. </li>
<li>Halten Sie einen Abstand von 20 cm um das Gerät herum zur Belüftung frei. </li>
<li>Achten Sie darauf, Wandsteckdosen, Verlängerungskabel oder Verteilerdosen nicht zu überlasten. Dies könnte zu einem Feuer oder elektrischen Schlag führen. </li>
<li>Benutzen Sie keine gebrochenen, verformten oder reparierten Disks. Diese Disks brechen leicht und können zu ernsthaften Verletzungen und Fehlfunktionen des Geräts führen. </li>
<li>Wenn Rauch oder Gerüche aus dem Gerät austreten, ziehen Sie sofort das Netzkabel aus der Steckdose. Warten Sie, bis der Rauch oder Geruch nicht mehr austritt, und kontaktieren Sie Ihren Händler für eine Überprüfung und Reparatur. Anderenfalls besteht Feuergefahr. </li>
<li>Berühren Sie die Verbindungskabel und das Gerät nicht, wenn es gewittert.</li>
</ol>
<h2 id="sicherheitshinweise-für-lasergeräte">Sicherheitshinweise für Lasergeräte</h2>
<p>Dieses Gerät funktioniert mit Laser. Nur qualifiziertes Servicepersonal sollte das Gehäuse öffnen bzw. versuchen, dieses Gerät zu reparieren. Anderenfalls kann es zu Verletzungen der Augen kommen.</p>
<h2 id="warnhinweise-2">WARNHINWEISE:</h2>
<p>HALTEN SIE SICH BEI DER BENUTZUNG DER STEUERUNGEN, DEM VORNEHMEN VON EINSTELLUNGEN BZW. DER AUSFÜHRUNG VON BEDIENVORGÄNGEN AN DIE HIER BESCHRIEBENEN ANWEISUNGEN. ANDERENFALLS KANN ES ZUR FREISETZUNHG GEFÄHRLICHER STRAHLUNG KOMMEN.</p>
<h2 id="warnhinweise-3">WARNHINWEISE:</h2>
<p>KLASSE 2 LASERSTRAHLUNG WENN GERÄT OFFEN NICHT IN DEN STRAHL BLICKEN</p>
<h2 id="position">POSITION:</h2>
<p>• IM GERÄTEINN
BEIM
BD-MECHANISMUS</p>
<table><tr><td>CAUTION</td><td>- LASER RADIATION WHEN OPEN,DO NOT STARE INTO BEAM. (FDA 21CFR/Class II)</td></tr><tr><td>ATTENTION</td><td>- CLASS 2 LASER RADIATION WHEN OPEN,DO NOT STARE INTO THE BEAM (IEC60825-1/Class 2) - RAYONNEMENT LASER DE CLASSE 2 EN CAS D'OLVERTURENE PAS REGARDER DANS LE FASCEAU</td></tr><tr><td>注意</td><td>- ここを聞くとクラス2のレーザー放射が出るビーム次のポピングはないこと</td></tr></table>
<h2 id="einleitung-2">EINLEITUNG</h2>
<h2 id="vermeiden-von-elektrischen-schlägen-und-feuer">Vermeiden von elektrischen Schlägen und Feuer</h2>
<ul>
<li>Berühren Sie das Netzkabel nicht</li>
<li>Greifen Sie nicht das Kabel, wenn ziehen. Ziehen Sie am Stecker. </li>
<li>Sollte versehentlich Wasser auf sofort den Netzstecker aus der Steckdose und bringen Sie das Gerät zur Reparatur zu einem Fachkundendienstcenter.</li>
</ul>
<h2 id="warnung-vor-kondensation-von-feuchtigkeit">Warnung vor Kondensation von Feuchtigkeit</h2>
<p>Es könnte sich Feuchtigkeit im Gerät niederschlagen, wenn dieses von einem kalten Ort an einen warmen Ort gebracht wird, oder nach dem Beheizen eines kalten Ortes sowie unter hohen Feuchtigkeitsbedingungen. Verwenden Sie das Gerät mindestens 2 Stunden lang nicht, damit das Geräteinnere trocknen kann.</p>
<h2 id="anschluss-an-das-stromnetz">Anschluss an das Stromnetz</h2>
<p>Vergewissern Sie sich vor dem Anschluss an ein Stromnetz, dass dessen elektrische Spannung der auf dem Geräteetikett angegebenen Spannung entspricht.</p>
<h2 id="stromversorgung">Stromversorgung</h2>
<p>Die Stromversorgung ist hergestellt bzw. das Gerät führt Spannung, wenn das Netzkabel an eine Wandsteckdose mit 220 - 240 V\~, 50 Hz angeschlossen wird.
Drücken Sie [ON/STANDBY ☐], um das Gerät in Betrieb zu nehmen.</p>
<p>ACHTUNG: STROMFÜHRENDE TEILE IM INNEREN.
KEINE SCHRAUBEN ENTFERNEN.</p>
<h2 id="aufstellungsort">Aufstellungsort</h2>
<p>Zur Sicherheit und zum optimalen Betrieb dieses Geräts:
• sit e I l e n s i e d a s d. Ger ä t i n w a a g e r e c h
• p i s t e o n i e r n H e n S i e d a s, G e r ä t i n c h t i n u r
elektronischen Geräten, wie einem Verstalker, Fernsengerät,
• usw. So verhinder, Sie Verwerfungen, Beschädigungen, Br ä nde
as und F ä rilffunktionen</p>
<ul>
<li>Stellen Sie keinerlei Gegenstände</li>
<li>Schützen Sie das Gerät vor direkte halten Sie es von starken Wärmequellen fern. Vermeiden Sie staubige oder feuchte Standorte. Vermeiden Sie Standorte mit unzureichender Belüftung, um eine ausreichende Wärmeabstrahlung zu gewährleisten. Verdecken Sie nicht die Belüftungslöcher an den Seiten des Gerätes. Vermeiden Sie Standorte, die starken Vibrationen oder Magnetfeldern ausgesetzt sind. </li>
<li>Stellen Sie das Gerät nicht in der Nähe von Wasser auf.</li>
</ul>
<p>Positionieren Sie das Gerät nicht auf Möbeln, die ein Kind umkippen kann, an die sich Erwachsene anlehnen können, die sie ziehen bzw. auf die sie sich stellen oder auf die sie hinaufklettern können. Ein Gerät, das herunterfällt, kann zu ernsthaften Verletzungen oder sogar zum Tode führen.</p>
<h2 id="eu-konformitätserklärung">EU-Konformitätserklärung</h2>
<p><img src="/content/2026/05/1018651/images/5555b862882e27f88fdd59e253610246f0e79d7c59eab8cf49c34dfa37c6e332.jpg" alt="TOSHIBA BDX2000KE - EU-Konformitätserklärung - 1" loading="lazy" decoding="async"></p>
<p>„Das Gerät ist mit dem Zeichen „CE“ versehen und entspricht somit den anwendbaren harmonisierten europäischen Normen der Niederspannungsrichtlinie 2006/95/EG und der EMV-Richtlinie 2004/108/EG.“</p>
<p>Verantwortlich für die CE-Markierung ist
TOSHIBA INFORMATION SYSTEMS (U.K.) LTD, Toshiba Court,
Weybridge Business Park, Addlestone Road, Weybridge, Surrey,
KT15 2UL, Vereinigtes Königreich</p>
<h2 id="andere-vorsichtshinweise">Andere Vorsichtshinweise</h2>
<h2 id="über-das-recycling">Über das Recycling</h2>
<h2 id="recycling-hinweis">RECYCLING-HINWEIS</h2>
<p>Die Verpackungsmaterialien für dieses Produkts können dem Recycling zugeführt und wiederverwendet werden. Bitte entsorgen Sie alle Materialien entsprechend der örtlichen Recycling-Vorschriften.</p>
<p>Dieses Produkt besteht aus Materialien, die für Recycling geeignet sind, sofern das Gerät von einem darauf spezialisierten Unternehmen zerlegt wird.</p>
<h2 id="die-folgenden-informationen-gelten-nur-für-die-eu-mitgliedsstaaten">Die folgenden Informationen gelten nur für die EU-Mitgliedsstaaten:</h2>
<p>Dieses Symbol zeigt an, dass dieses Produkt nicht in den Hausmüll gegeben werden darf. Indem Sie sicherstellen, dass dieses Produkt auf korrekte Art und Weise entsorgt wird, helfen</p>
<p>Sie mit, potenziell negative Auswirkungen auf die Umwelt und die menschliche Gesundheit zu vermeiden, die durch das nicht verantwortungsbewusste Entsorgen dieses Geräts verursacht werden könnten.</p>
<p>Ausführlichere Informationen zum Recycling dieses Produkts erhalten Sie bei Ihrer Gemeinde, Ihrem Entsorgungsdienst oder dem Händler, bei dem Sie das Gerät erworben haben.</p>
<p><img src="/content/2026/05/1018651/images/54ee4720f5a5c0c58b8191c7bb1276db1824476c031fcc3c65d66511b2406da9.jpg" alt="TOSHIBA BDX2000KE - Die folgenden Informationen gelten nur für die EU-Mitgliedsstaaten: - 1" loading="lazy" decoding="async"></p>
<h2 id="folgende-informationen-gelten-ausschließlich-für-mitglieder-der-eu-staaten">Folgende Informationen gelten ausschließlich für Mitglieder der EU-Staaten:</h2>
<h2 id="verordnung-über-die-rücknahme-und-entsorgung-gebrauchter-batterien-und-akkumulatoren">Verordnung über die Rücknahme und Entsorgung gebrauchter Batterien und Akkumulatoren</h2>
<p>Das Symbol der durchgestrichenen Mülltonne besagt, dass Batterien und Akkumulatoren gesondert und keinesfalls über den Hausmüll zu entsorgen sind. Wenn die Batterie oder der Akkumulator den vorgegebenen Wert an Blei (Pb), Quecksilber (Hg) und/oder Kadmium (Cd) laut Batterieverordnung (2006/66/EC) überschreitet, erscheinen die chemischen Symbole für Blei (Pb), Quecksilber (Hg) und/oder Kadmium (Cd) unter dem Symbol der durchgestrichenen Mülltonne. Durch Ihre Teilnahme an der gesonderten Batteriesammlung tragen Sie zur</p>
<p>Gewährleistung der ordnungsgemäßen
Entsorgung von Batterien bei und verhindern auf
diese Weise, mögliche negative Konsequenzen
für die Umwelt und menschliche Gesundheit. Für
weitere ausführliche Informationen bezüglich
der Altbatteriesammlung und</p>
<p>Wiederverwertung in Ihrem Land, wenden Sie sich an die Stadtverwaltung oder dem Händler, bei dem Sie das Produkt bezogen haben.</p>
<p><img src="/content/2026/05/1018651/images/74f269b0983f9d3990b3afd9f907937cc52d1bf36b4f91cace9280631e7c6760.jpg" alt="TOSHIBA BDX2000KE - Verordnung über die Rücknahme und Entsorgung gebrauchter Batterien und Akkumulatoren - 1" loading="lazy" decoding="async"><br />
Pb, Hg, Cd</p>
<h2 id="tragen-sie-zum-umweltschutz-bei">Tragen Sie zum Umweltschutz bei!!!</h2>
<ul>
<li>Verbrauchte Batterien gehören nicht in den Hausmüll. </li>
<li>Sie können Sie zu einer Sammelstelle für Altbatterien bringen oder in den Sondermüll geben. </li>
<li>Ausführliche Informationen erhalten Sie in Gemeindebüro.</li>
</ul>
<p>DE</p>
<p>3</p>
<h2 id="einleitung-3">EINLEITUNG</h2>
<h2 id="hinweis-zum-urheberrecht">Hinweis zum Urheberrecht</h2>
<p>Nicht autorisiertes Kopieren, Ausstrahlen, öffentliches Vorführen und Ausleihen der Disks ist verboten. Dieses Gerät enthält eine Kopierschutztechnologie, für die in den USA mehrere Patente angemeldet wurden. Außerdem sind sie teilweise geistiges Eigentum der Macrovision Corporation und anderer Rechtspersonen. Die Verwendung dieser Copyright-Schutztechnologie muss von der Macrovision Corporation genehmigt werden und gilt nur für den Heim- und andere Anwendungsbereiche für kleine Gruppen, es sei denn, die Macrovision Corporation hat für andere Anwendungen ausdrücklich ihr Einverständnis gegeben. Es ist verboten, den verwendeten Code zu analysieren oder in seine Einzelteile zu zerlegen</p>
<h2 id="zur-wartung">Zur Wartung</h2>
<h2 id="reinigen-des-geräts">Reinigen des Geräts</h2>
<p>Verwenden Sie ein weiches Tuch, das Sie leicht mit einer milden Reinigungslösung angefeuchtet haben. Verwenden Sie keine Lösungen, die Alkohol, Spiritus, Ammoniak oder Scheuermittel enthalten.</p>
<h2 id="reinigung-von-disks">Reinigung von Disks</h2>
<p>Sollte eine Disk verschmutzen, reinigen Sie sie mit einem Reinigungstuch. Wischen Sie dabei von der Mitte nach außen. Führen Sie beim Wischen keine Kreisbewegungen aus. Verwenden Sie keine Lösungsmittel wie Benzin, Verdünner, handelsübliche Reinigungsmittel, Reinigungsmittel, kratzende Reinigungsmittel oder Antistatik-Sprays für Schallplatten.</p>
<h2 id="handhabung-von-disks">Handhabung von Disks</h2>
<p>Hinterlassen Sie keine Fingerabdrücke oder Staub auf der Oberfläche von Disks.
Bewahren Sie die Disks immer in ihrer Hülle auf, wenn sie nicht verwendet werden.</p>
<h2 id="im-reparaturfall">Im Reparaturfall</h2>
<p>Sollte sich das Gerät nicht mehr bedienen lassen, versuchen Sie bitte auf keinen Fall, es selbst zu warten. Im Geräteinneren befinden sich keine Teile, die vom Benutzer gewartet werden können. Schalten Sie das Gerät aus, ziehen Sie den Netzstecker aus der Steckdose und kontaktieren Sie Ihren Händler oder ein autorisiertes Servicecenter.</p>
<h2 id="reinigen-der-diskleseeinheit">Reinigen der Diskleseeinheit</h2>
<p>Wenn das Gerät nicht ordnungsgemäß funktioniert, obwohl Sie im Kapitel „Problemlösungen“ und den relevanten Abschnitten in der Bedienungsanleitung nachgelesen haben, ist es möglich, dass die optische Laserleseeinheit verschmutzt ist.
Setzen Sie sich mit Ihrem Händler oder einem autorisierten Servicecenter in Verbindung, um die optische Laserleseeinheit reinigen zu lassen.</p>
<h2 id="ir-signalprüfung">IR-Signalprüfung</h2>
<p>• Falls die Fernbedienung nicht können Sie mit einer digitalen Kamera (oder auch einem Mobiltelefon mit eingebauter Kamera) prüfen, ob sie ein Infrarot-Signal aussendet.</p>
<h2 id="mit-einer-digitalkamera">Mit einer Digitalkamera</h2>
<h2 id="oder-mobiltelefon-mit-eingebauter-kamera">(oder Mobiltelefon mit eingebauter Kamera):</h2>
<p><img src="/content/2026/05/1018651/images/129cea9398afb3a04e0a667a1c124eb62e1c456d004289667d2d08b0e27859f1.jpg" alt="TOSHIBA BDX2000KE - (oder Mobiltelefon mit eingebauter Kamera): - 1" loading="lazy" decoding="async"></p>
<p>Richten Sie die digitale Kamera auf die Fernbedienung. Drücken Sie eine beliebige Taste auf der Fernbedienung und schauen Sie in den Sucher/auf den Monitor der Digitalkamera. Falls das Infrarotlicht über die Kamera sichtbar ist, funktioniert die Fernbedienung.</p>
<p>Aufgrund von Problemen und Fehlern, die während der Entwicklung einer DVD oder CD-Software und/oder der Herstellung von DVDs und CDs möglicherweise auftreten, kann Toshiba nicht garantieren, dass dieser Blu-ray Player jede Disk bzw. jede Funktion einer jeden Disk mit DVD-Logo und/oder einer jeden CD mit CD-Logo ordnungsgemäß abspielen wird. Toshiba ist einer der Hersteller der DVD-Technologie mit den höchsten Qualitätsstandards. Eine Inkompatibilität tritt daher äußerst selten auf.</p>
<h2 id="zur-fernbedienung">Zur Fernbedienung</h2>
<h2 id="die-batterien-in-die-fernbedienung-einsetzen">Die Batterien in die Fernbedienung einsetzen</h2>
<p>Setzen Sie 2 R6 Batterien (1,5 V) gemäß der im Inneren des Batteriefachs ausgewiesenen Polarität ein.</p>
<p><img src="/content/2026/05/1018651/images/7f56f3c0b61319b411ce571793a42a82894b48cf03c597a0ba96d3e302d549e8.jpg" alt="TOSHIBA BDX2000KE - Die Batterien in die Fernbedienung einsetzen - 1" loading="lazy" decoding="async"></p>
<p>2)1)3)2)1) <br />
<img src="/content/2026/05/1018651/images/c170ce230bba74bb9d233ecb9088094acd68a34e3f6567caefd2f5ec26f10718.jpg" alt="TOSHIBA BDX2000KE - Die Batterien in die Fernbedienung einsetzen - 2" loading="lazy" decoding="async"></p>
<p><img src="/content/2026/05/1018651/images/ce70905071ca4ff5a76825745d0afe14ac6359af4a8588e934f0d18da01d14bc.jpg" alt="TOSHIBA BDX2000KE - Die Batterien in die Fernbedienung einsetzen - 3" loading="lazy" decoding="async"></p>
<p>3)</p>
<p>Achten Sie darauf, die Markierungen + und - jeder Batterie auf die Polaritätsmarkierungen im Inneren des Batteriefachs auszurichten.</p>
<h2 id="warnhinweise-4">Warnhinweise</h2>
<h2 id="eine-unsachgemäße-handhabung-von-batterien-kann-ein-auslaufen-von-elektrolyt-und-ein-platzen-der-batterien-zur-folge-haben-bitte-beachten-sie-daher-die-folgenden-hinweise">Eine unsachgemäße Handhabung von Batterien kann ein Auslaufen von Elektrolyt und ein Platzen der Batterien zur Folge haben. Bitte beachten Sie daher die folgenden Hinweise:</h2>
<ul>
<li>Verwenden Sie nicht gleichzeitig eine neu gebrauchte Batterie. </li>
<li>Legen Sie keine Batterien unterschiedlich gemeinsam ein. Trotz gleicher Größe können verschiedene Batterien eine unterschiedliche Spannung besitzen. </li>
<li>Achten Sie darauf, den Plus- und Minuspo Batterie auf die Polaritätsmarkierungen + und - im Inneren des Batteriefachs auszurichten. </li>
<li>Entfernen Sie die Batterien, wenn die Feri während eines Monats oder länger nicht verwendet werden wird. </li>
<li>Bitte befolgen Sie beim Entsorgen verbraut
Batterien die einschlägigen
Umweltschutzbestimmungen. (Siehe seite 3.) </li>
<li>Versuchen Sie auf keinen Fall, Trocken|zel aufzuladen oder zu zerlegen, schließen Sie sie nicht kurz, und werfen Sie sie nicht in ein Feuer.</li>
</ul>
<h2 id="verwendung-der-fernbedienung">Verwendung der Fernbedienung</h2>
<p>Bitte beachten Sie folgenden Hinweise beim Gebrauch der Fernbedienung:</p>
<ul>
<li>Sorgen Sie dafür, dass sich ke dem Fernbedienungsgeber und dem Sensor an der Frontplatte des Gerates befinden. </li>
<li>Falls der Fernbedienungssigna Sonneneinstrahlung oder dem Licht einer Fluoreszenzlampe ausgesetzt ist, kann die Übermittlung der Infrarotsignale dadurch beeinträchtigt werden, so dass keine Fernbedienung des Gerätes möglich ist. <br />
• Die Fernbedienungen verschiede gegenseitig beeinflussen. Vermeiden Sie den gleichzeitigen Gebrauch der Fernbedienung eines anderen Gerätes, das in der Nähe dieses Gerätes aufgestellt ist. </li>
<li>Wenn die Reichweite der Fernk abnimmt, müssen die Batterien ausgewechselt werden. </li>
<li>Reichweite der Fernbedienung -Abstand direkt vor dem Gerät: ca.7m max.</li>
</ul>
<p>- Diagonaler Winkel: 30° max. innerhalb eines Abstands von ca. 5 m</p>
<p>-Abstand oberhalb d15°smaGiemeralbeines</p>
<p>Abstands von ca. 5 m</p>
<p>-Abstand unterhalb 2Densax. Greenhalteins:</p>
<p>Abstands von ca. 3 m</p>
<p><img src="/content/2026/05/1018651/images/ff539378897eaf83113667969c889bfdcca7b77976939b89816009766b9ec056.jpg" alt="0 12345 30° 7 m 30° 5 m 5 m" loading="lazy" decoding="async"></p>
<p>DE</p>
<h2 id="einleitung-4">EINLEITUNG</h2>
<h2 id="mitgeliefertes-zubehör">Mitgeliefertes Zubehör</h2>
<p>• Fernbedienung mit zwei (2) R6 (1; BeVD) i eBnautr n g siaennl eitung <br />
• Composite Audio-/Videokabel <br />
• Schnelle Einstiegshilfe</p>
<h2 id="inhalt">Inhalt</h2>
<h2 id="einleitung-5">EINLEITUNG</h2>
<p>Sicherheitshinweise....2</p>
<p>Warnhinweise....2</p>
<p>Sicherheitshinweise für Lasergeräte 2</p>
<p>Vermeiden von elektrischen Schlägen und Feuer .....3</p>
<p>Warnung vor Kondensation von Feuchtigkeit ....3</p>
<p>Anschluss an das Stromnetz ....3</p>
<p>Aufstellungsort....3</p>
<p>EU-Konformitätserklärung....3</p>
<p>Andere Vorsichtshinweise....3</p>
<p>Über das Recycling ....3</p>
<p>Hinweis zum Urheberrecht....4</p>
<p>Zur Wartung....4</p>
<p>Zur Fernbedienung 4</p>
<p>Mitgeliefertes Zubehör 5</p>
<p>Informationen zu Marken......6</p>
<p>Merkmale....7</p>
<p>Funktioneller Überblick....8</p>
<p>Frontplatte....8</p>
<p>Rückwand....8</p>
<p>Fernbedienung 8</p>
<p>Displayanzeigen 9</p>
<p>In dieser Anleitung verwendete Symbole......9</p>
<h2 id="anschlüsse">ANSCHLÜSSE</h2>
<p>Anschluss an ein Fernsehgerät.... 10</p>
<p>Anschluss an eine Hi-Fi-Anlage....12</p>
<p>Netzwerkverbindung mit einem LAN....12</p>
<p>Einstellen des Videokanals auf Ihrem Fernsehgerät..... 12</p>
<h2 id="wiedergabe">WIEDERGABE</h2>
<p>Informationen zur Wiedergabe.... 13</p>
<p>Abspielbare Medien....13</p>
<p>Nicht abspielbare Medien.... 14</p>
<p>Farbsysteme....14</p>
<p>Regionalcodes....14</p>
<p>Struktur von Medieninhalten.... 14</p>
<p>Bildschirmanzeigen....14</p>
<p>Vorbereitung der Wiedergabe ....16</p>
<p>Einlegen einer Disk 16</p>
<p>Einsetzen einer SD-Karte 16</p>
<p>Auswählen des Mediums 16</p>
<p>Grundlegende Wiedergabeverfahren 16</p>
<p>Wiedergabe (BD, DVD oder Disk mit</p>
<p>AVCHD-Dateien)....16</p>
<p>Wiedergabe (Audio-CD oder Medium mit</p>
<p>DivX <sup>®</sup> -/MP3-/Windows Media <sup>™</sup> Audio-/</p>
<p>JPEG -Dateien)....17</p>
<p>Verwendung einer SD-Karte.... 18</p>
<p>Kodak Picture CD....18</p>
<p>Weiterführende Wiedergabefunktionen....19</p>
<p>Über DivX® und DivX® VOD....19</p>
<p>Wiedergabe von DivX® mit DivX® Externen</p>
<p>Untertiteln....19</p>
<p>Suchlauf vorwärts / rückwärts....20</p>
<p>Wiedergabe in Zeitlupe....20</p>
<p>Einzelbild-Weiterschaltung....20</p>
<p>Wiedergabewiederholung 20</p>
<p>A-B-Wiederholung....21</p>
<p>Programmwiedergabe....21</p>
<p>Zufallswiedergabe....22</p>
<p>Schnelle Wiedergabe....22</p>
<p>Nützliche Funktion 22</p>
<p>Rauschminderung 22</p>
<p>Virtual Surround....23</p>
<p>Einstellung PIP (BONUSVIEW)......23</p>
<p>Kamerawinkel....23</p>
<p>Abspielen von BD-Live-Disks mit Onlineinhalten.....23</p>
<p>Suche....24</p>
<p>Umschalten der Untertitelsprache ....25</p>
<p>Umschalten der Tonspur....25</p>
<p>Einstellen des BD-Audiomodus....26</p>
<h2 id="funktionseinrichtung">FUNKTIONSEINRICHTUNG</h2>
<p>Navigieren durch die Einrichtungsmenüs ....27</p>
<p>Liste der Einrichtungsmenüs 27</p>
<p>Bildformat....32</p>
<p>HDMI-Audioausgabe....33</p>
<p>Digitalausgang....34</p>
<p>Sicherung....35</p>
<p>HDMI CEC (REGZA - LINK)....35</p>
<p>One-Touch-Wiedergabe....35</p>
<p>Bereitschaftszustand 35</p>
<p>Systeminformationen....35</p>
<p>Netzwerkverbindung 36</p>
<p>Verbindung prüfen....36</p>
<p>Aktivieren(Standard)......36</p>
<p>Aktivieren(Benutzerdef.) 36</p>
<p>Deaktivieren....39</p>
<p>Software-Update....39</p>
<p>Aktuelle Version 39</p>
<p>Disk-Update 39</p>
<p>Initialisieren....39</p>
<h2 id="sonstiges">SONSTIGES</h2>
<p>Sprachcode-Liste....40</p>
<p>Problemlösungen ....41</p>
<p>Technische Daten 42</p>
<p>DE</p>
<h2 id="einleitung-6">EINLEITUNG</h2>
<h2 id="informationen-zu-marken">Informationen zu Marken</h2>
<p><img src="/content/2026/05/1018651/images/b16f3fbc859e02325c2449a924f85d20e3b95ab354dd28c9972275d8b9b70907.jpg" alt="TOSHIBA BDX2000KE - Informationen zu Marken - 1" loading="lazy" decoding="async"></p>
<p><img src="/content/2026/05/1018651/images/a15b9e28b84623d6fef3f554191b1dd0ccf4131fcd8fdc29a5870aa1ab3e13fc.jpg" alt="TOSHIBA BDX2000KE - Informationen zu Marken - 2" loading="lazy" decoding="async"></p>
<p><img src="/content/2026/05/1018651/images/64d3adf7677d97e3647ce40906323ba67b5998457b48f4c0f9472396528c3154.jpg" alt="TOSHIBA BDX2000KE - Informationen zu Marken - 3" loading="lazy" decoding="async"></p>
<p><img src="/content/2026/05/1018651/images/33ffadf5ce8f73a291931e22279051be339c5efcb91e68b3711845f6c03b9ef1.jpg" alt="TOSHIBA BDX2000KE - Informationen zu Marken - 4" loading="lazy" decoding="async"></p>
<p>HDMI, das HDMI-Logo und High-Definition Multimedia Interface sind Handelsmarken oder eingetragene Warenzeichen der HDMI Licensing LLC.</p>
<p>Hergestellt unter Lizenz von Dolby Laboratories. Dolby und das Doppel-D-Symbol sind Warenzeichen von Dolby Laboratories.</p>
<p>Hergestellt unter Lizenz von US-Patent Nr.: 5,451,942; 5,956,674; 5,974,380; 5,978,762; 6,226,616; 6,487,535; 7,392,195; 7,272,567; 7,333,929; 7,212,872 & andere U.S.- und weltweite Patente wurden eingeräumt oder beantragt. DTS ist eine eingetragene Marke, und die DTS-Logos, Symbol DTS-HD und DTS-HD Master Audio | Essential sind Marken von DTS, Inc. ©1996-2008 DTS, Inc. Alle Rechte vorbehalten.</p>
<p>„x.v.Color“ und das „x.v.Color“-Logo sind Handelsmarken der Sony Corporation.</p>
<p><img src="/content/2026/05/1018651/images/67799bf466a617a69ed5ad626cd101b1b65044cd9b2d24bc5df96d599a049276.jpg" alt="TOSHIBA BDX2000KE - Informationen zu Marken - 5" loading="lazy" decoding="async"></p>
<p>TM</p>
<p><img src="/content/2026/05/1018651/images/9b8551ba0ca1719f1a4e20539de003b4a70814f6d716e15c25bae7a39329f1b6.jpg" alt="TOSHIBA BDX2000KE - Informationen zu Marken - 6" loading="lazy" decoding="async"></p>
<p><img src="/content/2026/05/1018651/images/89a560de2ec6aadaafc030d2f1970172c1b10ec74fd508c1eec54ec8f8deb834.jpg" alt="TOSHIBA BDX2000KE - Informationen zu Marken - 7" loading="lazy" decoding="async"></p>
<p>„AVCHD“ und das „AVCHD“-Logo sind Handelsmarken der Panasonic Corporation und Sony Corporation.</p>
<p>Bei „BONUSVIEW“ handelt es sich um eine Handelsmarke der Blu-ray Disc Association.</p>
<p><img src="/content/2026/05/1018651/images/fe02ca2b31e0c2117b15c7f3ef0f5d61ae31984225713d3693d829dc370116b3.jpg" alt="TOSHIBA BDX2000KE - Informationen zu Marken - 8" loading="lazy" decoding="async"></p>
<p>Bei „BD-LIVE“-Logo handelt es sich um eine Handelsmarke der Blu-ray Disc Association.</p>
<p><img src="/content/2026/05/1018651/images/08bb3f3eed894e0f92b83e959eaf3d07f486e22db2dba00f792e99d3dad6af5a.jpg" alt="TOSHIBA BDX2000KE - Informationen zu Marken - 9" loading="lazy" decoding="async"></p>
<p>Bei „Java“ und allen sonstigen Java-Marken und -Logos handelt es sich um Handelsmarken bzw. eingetragene Handelsmarken von Sun Microsystems, Inc. in den Vereinigten Staaten und/oder anderen Ländern.</p>
<p><img src="/content/2026/05/1018651/images/7537b28735b69f3a9781eec6d7fde19e02f0a8bfb9f6f3778818d8509d09a440.jpg" alt="TOSHIBA BDX2000KE - Informationen zu Marken - 10" loading="lazy" decoding="async"></p>
<p>DivX®, DivX -zertifiziert® und die zugehörigen Logos sind Marken von DivX, Inc. und werden unter Lizenz verwendet.</p>
<p>Windows Media und das Windows-Logo sind Handelsmarken oder eingetragene Handelsmarken von Microsoft Corporation in den Vereinigten Staaten und/oder anderen Ländern.</p>
<p>„Blu-ray Disc“ und Handelt es sich um Handelsmarken.</p>
<p>Bei Handelt es sich um eine Handelsmarke der DVD Format/Logo Licensing Corporation.</p>
<p><img src="/content/2026/05/1018651/images/268808fe5cef3437edbe42de0b47257219f6f6d85e5cf1fda190939ce69f59e3.jpg" alt="TOSHIBA BDX2000KE - Informationen zu Marken - 11" loading="lazy" decoding="async"></p>
<p>ist eine Handelsmarke der Eastman Kodak</p>
<p>Company.</p>
<p>MPEG Layer-3 audio coding technology licensed from Fraunhofer IIS and Thomson.</p>
<p>THIS PRODUCT IS LICENSED UNDER THE MPEG-4 VISUAL PATENT PORTFOLIO LICENSE FOR THE PERSONAL AND NON-COMMERCIAL USE OF A CONSUMER FOR (i) ENCODING VIDEO IN COMPLIANCE WITH THE MPEG-4 VISUAL STANDARD ("MPEG-4 VIDEO") AND/OR (ii) DECODING MPEG-4 VIDEO THAT WAS ENCODED BY A CONSUMER ENGAGED IN A PERSONAL AND NON-COMMERCIAL ACTIVITY AND/OR WAS OBTAINED FROM A VIDEO PROVIDER LICENSED BY MPEG LA TO PROVIDE MPEG-4 VIDEO. NO LICENSE IS GRANTED OR SHALL BE IMPLIED FOR ANY OTHER USE. ADDITIONAL INFORMATION INCLUDING THAT RELATING TO PROMOTIONAL, INTERNAL AND COMMERCIAL USES AND LICENSING MAY BE OBTAINED FROM MPEG LA, L. L. C. SEE HTTP://WWW.MPEGLA.COM</p>
<h2 id="einleitung-7">EINLEITUNG</h2>
<h2 id="merkmale">Merkmale</h2>
<h2 id="bd-java-2">BD-Java</h2>
<p>Mit einigen BD-Disks, die Java-Anwendungen unterstützen, können Sie interaktive Funktionen wie Spiele oder interaktive Menüs nutzen.</p>
<h2 id="bd-live-2">BD-Live</h2>
<p>BD-Live (BD-ROM Version 2, Profil 2.0) unterstützt zusätzlich zur BONUSVIEW-Funktion interaktive Funktionen, die genutzt werden können, wenn das Gerät mit dem Internet verbunden ist. Die verschiedenen Funktionen unterscheiden sich je nach Disk.</p>
<h2 id="vollständig-hochauflösende-videowiedergabe">Vollständig hochauflösende Videowiedergabe</h2>
<p>Sie können Spielfilme mit der höchsten Bildqualität betrachten, die für ein hochauflösendes Fernsehgerät HDTV zur Verfügung steht. Dank einer vollständig hochauflösenden Videowiedergabe bis zum Signalformat 1080p bietet dieses Gerät ein unübertroffenes Erlebnis beim Betrachten von Filmen. Der Detailreichtum und die erhöhte Schärfe liefern ein wirklichkeitsgetreues Bild.</p>
<h2 id="aufwärtskonvertierung-von-dvds-für-verbesserte-bildqualität">Aufwärtskonvertierung von DVDs für verbesserte Bildqualität</h2>
<p>Ihre derzeitigen DVDs werden dank Video-Aufwärtskonvertierung sogar noch besser aussehen als zuvor. Bei Verwendung eines HDMI-Anschlusses führt die Aufwärtskonvertierung zu einer Erhöhung der Auflösung von Standardauflösungs-DVDs auf ein hochauflösendes Signalformat von bis zu 1080p. Dies resultiert in einem ruckfreieren, realistischeren Wiedergabebild in annähernd hochauflösender Qualität.</p>
<h2 id="kompatibel-mit-verschiedenen-arten-von-datenträgern">Kompatibel mit verschiedenen Arten von Datenträgern</h2>
<p>Die vollständige Abwärtskompatibilität des Gerätes mit herkömmlichen BDs, DVDs, CDs und SD-karten ermöglicht Ihnen den fortgesetzten Genuss Ihrer bestehenden Sammlung von Audio- und Video-Datenträgern. Zusätzlich ist die Wiedergabe von AVCHD/DivX®/MP3/WMA/JPEG-Dateien möglich.</p>
<h2 id="voller-mehrkanaliger-surround-sound">Voller, mehrkanaliger Surround-Sound</h2>
<p>Der mehrkanalige Surround Sound bietet einen dynamischen, reichhaltigen Klang mit dem realistischem Ambiente einer Live- Darbietung.</p>
<h2 id="pip-bonusview-2">PIP (BONUSVIEW)</h2>
<p>Einige BD-Videoss verfügen über die PIP-Funktion, mithilfe derer Sie im Primärvideo ein zweites Video anzeigen können. Bei Wiedergabe einer Szene, die Sekundärvideo enthält, kann dieses durch Drücken von [PIP] aufgerufen werden.</p>
<h2 id="pop-up-menü">Pop-Up-Menü</h2>
<p>Bestimmte BD-Videoss verfügen über ein Pop-Up-Navigationsmenü, das ohne Unterbrechung der Wiedergabe auf den Fernsehschirm aufgerufen und bedient werden kann. Dieses Menü wird durch Drücken von [POP MENU / MENU] aufgerufen. Der Inhalt des Pop-Up-Menüs ist je nach Disk verschieden.</p>
<h2 id="schnelle-wiedergabe">Schnelle Wiedergabe</h2>
<p>Wiedergabe mit etwas erhöhter Geschwindigkeit, wobei weiterhin Sound ausgegeben wird.</p>
<p>Die schnelle Wiedergabe ist nur auf Disks im Format Dolby Digital verfügbar.</p>
<h2 id="wiedergabe-des-inhalts-einer-sd-karte">Wiedergabe des Inhalts einer SD-Karte</h2>
<p>Auf einer SD-karte gespeicherte AVCHD/MP3/WMA/JPEG-Dateien können mit diesem Gerät abgespielt werden. Sie können Bild-im-Bild-Kommentare, Untertitel oder andere Zusatzfunktionen für Dateien im BD-ROM Ver. 2 (Profil 2.0/Profil 1.1) Dateien auf einer SD-karte speichern und über BD-Videos wiedergeben.</p>
<h2 id="abspielen-von-avchd-dateien">Abspielen von AVCHD-Dateien</h2>
<p>Dieses Gerät unterstützt die Wiedergabe von AVCHD-Dateien, die auf Disk oder SD-Karte aufgezeichnet sind. (Es handelt sich hierbei um ein neues Format für HD-Video-Camcorder.) Ihr persönliches HD-Archiv kann nun in HD-Qualität wiedergegeben werden.</p>
<h2 id="xvcolor-2">x.v.Color</h2>
<p>Dieses Gerät unterstützt die Wiedergabe von Videoinhalten auf Disks, die mit „x.v.Color“-Technologie aufgezeichnet wurden. Um diese Videoinhalte mit „x.v.Color“-Farbraum anzuzeigen, benötigen Sie ein TV-Gerät oder ein anderes Anzeigegerät, dass sowohl eine Videowiedergabe nach „x.v.Color“-Standard als auch Funktionen zur manuellen Umschaltung der Farbeinstellung bietet. Weitere Informationen finden Sie in der Bedienungsanleitung zu Ihrem Anzeigegerät.</p>
<h2 id="einfacher-anschluss-an-ihren-hdtv-fernseher-über-eine-hdmi-schnittstelle">Einfacher Anschluss an Ihren HDTV-Fernseher über eine HDMI-Schnittstelle</h2>
<p>Sie können dieses Gerät mit einem einfachen HDMI (High-Definition Multimedia Interface)-Kabel an Ihr HD-Fernsehgerät anschließen. Für beste Kompatibilität zwischen Geräten empfiehlt sich der Gebrauch eines Hochgeschwindigkeits-HDMI-Kabels. Bei diesem Anschluss wird das hochauflösende digitale Videoausgangssignal ohne Umwandlung in ein analoges Signal direkt an das HDTV-Gerät übertragen, so dass eine hervorragende Bild- und Tonqualität ohne jegliches Rauschen erhalten wird.</p>
<h2 id="hdmi-deep-colour-2">HDMI Deep Colour</h2>
<p>Die Deep Colour-Funktion dient dazu, den Posterisierungseffekt des Wiedergabebilds zu reduzieren. Siehe „HDMI Deep Colour“ unter „FUNKTIONSEINRICHTUNG“ auf seite 28.</p>
<h2 id="hdmi-cec-consumer-electronics-control-regza-link-2">HDMI CEC (Consumer Electronics Control) (REGZA - LINK)</h2>
<p>Dieses Gerät unterstützt HDMI CEC, welches die integrierte Systemsteuerung über HDMI ermöglicht und eine Komponente des HDMI-Standards ist.</p>
<p>Auf einigen Geräten funktioniert dies möglicherweise nicht einwandfrei.</p>
<h2 id="hdmi-1080p24-bilder-nur-bd">HDMI 1080p/24 Bilder (nur BD)</h2>
<p>Dieses Gerät verfügt über eine Funktion, die bei der Wiedergabe eines Videosignals mit 1080 Linien und progressiver Abtastung für ruckfreie Bewegungen von Filmmaterial sorgt, das ursprünglich mit einer Bildfolgerate von 24 Bildern pro Sekunde aufgenommen wurde. (Diese Funktion steht nur zur Verfügung, wenn der Anschluss an das Fernsehgerät über ein HDMI-Kabel hergestellt wurde und ein 1080p-Signal mit 24 Bildern pro Sekunde zugeleitet wird.) Siehe „HDMI-Videoauflösung“ unter „FUNKTIONSEINRICHTUNG“ auf seite 28.</p>
<h2 id="hdcp-kompatibel">HDCP-kompatibel</h2>
<p>Um die digitalen Videobilder einer BD/DVD über eine HDMI-Verbindung wiederzugeben, müssen sowohl das Gerät als auch das Fernsehgerät (oder ein AV-Verstärker) ein als HDCP (High-Bandwidth Digital Content Protection System) bezeichnetes Urheberrechtsschutz-System unterstützen. HDCP ist ein Kopierschutzsystem, das Datenverschlüsselung und die Authentifizierung des angeschlossenen AV-Geräts umfasst. Dieses Gerät unterstützt HDCP. Weitere Informationen hierzu finden Sie in der Bedienungsanleitung Ihres Fernsehgerätes (bzw. AV-Verstärkers).</p>
<p><img src="/content/2026/05/1018651/images/89c1edbdc5c4ee23c784e46293085e58af9a3173455a654846df05229e157283.jpg" alt="TOSHIBA BDX2000KE - HDCP-kompatibel - 1" loading="lazy" decoding="async"></p>
<p>DE</p>
<p>7</p>
<p><img src="/content/2026/05/1018651/images/9ff92598f57542bf388b3591c3ce8422a404da988c829a4c05de08fc4ea3f385.jpg" alt="Pure electrical circuit lines without any symbols" loading="lazy" decoding="async"></p>
<p><img src="/content/2026/05/1018651/images/e5790fd00aef9277510c15fec4849eb55736966172ef4419251a0814ba10bf20.jpg" alt="TOSHIBA BDX2000KE - HDCP-kompatibel - 3" loading="lazy" decoding="async"></p>
<p><img src="/content/2026/05/1018651/images/d8d90b25dcadf3ad9ea57605f6ba4a56b841b1d856cebe81f371d333119f8ccf.jpg" alt="TOSHIBA BDX2000KE - HDCP-kompatibel - 4" loading="lazy" decoding="async"></p>
<h2 id="einleitung-8">EINLEITUNG</h2>
<h2 id="funktioneller-überblick">Funktioneller Überblick</h2>
<p>Frontplatte <br />
<img src="/content/2026/05/1018651/images/1f823bfe694c641574e37f6f04141a65d16f111917a21969aaca3a48b9c9cc58.jpg" alt="1 2 3 4 5* 7 8 96* TOSHIBA SUNWING FLOWER SCREEN 0:23:45 10" loading="lazy" decoding="async"></p>
<p>(*) Das Gerät kann auch durch drücken einer dieser Tasten eingeschaltet werden. <br />
1. Taste ON/STANDBY <br />
- Betätigen Sie diese Gerät einzuschalten beziehungsweise in den Standby-Modus zu versetzen. (Um das Gerät vollständig auszuschalten, müssen Sie das Netzkabel aus der Steckdose ziehen.) <br />
2. ON/STANDBY ⏻-Anzeige <br />
3. Taste PAUSE II d as <br />
4. Taste STOP <br />
5. Taste PLAY▶* <br />
6. Taste OPEN/CLOSE ▲* <br />
7. Disk-Fach <br />
8. Display <br />
9. IR-Sensor <br />
10. SD-Kartensteckplatz</p>
<p>Rückwand <br />
<img src="/content/2026/05/1018651/images/eb5b178503ca9303373abdf9947f0625e58409944965ee38b8ee7735cd46a8a6.jpg" alt="1 2 3 4 5 6 7" loading="lazy" decoding="async"></p>
<ol>
<li>LAN-Anschluss </li>
<li>HDMI OUT-Buchse </li>
<li>AUDIO OUT-Buchsen </li>
<li>COMPONENT VIDEO OUT-
Buchsen </li>
<li>Netzkabel </li>
<li>DIGITAL OUT (OPTICAL / COAXIAL)-Buchsen </li>
<li>VIDEO OUT-Buchse</li>
</ol>
<h2 id="warnhinweise-5">Warnhinweise</h2>
<p>- Vermeiden Sie eine Stifte im Inneren der Buchsen an der Rückwand. Elektrostatische Entladung kann einen nicht behebbaren Geräteschaden verursachen.</p>
<p>Berührung c</p>
<p>Fernbedienung <br />
<img src="/content/2026/05/1018651/images/30e9dd61cf4fe014e9c37d6fc20689da049c95a52211a0d8b04e9526aeac5000.jpg" alt="1 2* 3 4 5 6 7 8 9 10 11* 12 13 OPEN CLOSE HOURS PIP ON STANLEY 1 2 3 1 2 3 1 2 3 1 2 3 1 2 3 1 2 3 1 2 3 1 2 3 1 2 3 1 2 3 1 2 3 1 2 3 1 2 3 1 2 3 1 2 3 1 2 3 1 2 3 1 14 15 16 17 18 19 20 21 22 23 24 25 26 27 28 29 30 31 32 33 34 35 36 37 38 39 40 41 42 43 44 45 46 47 48 49 50 51 52 53 54 55 56 57…" loading="lazy" decoding="async"></p>
<p>8</p>
<p>(*) Das Gerät kann auch durch drücken einer dieser Tasten eingeschaltet werden.</p>
<ol>
<li>
<p>Taste HDMI</p>
</li>
<li>
<p>Taste OPEN/CLOSE ▲*</p>
</li>
<li>
<p>Nummerntasten</p>
</li>
<li>
<p>Taste SEARCH</p>
</li>
<li>
<p>Tasten Rot / Grün / Gelb / Blau</p>
</li>
<li>
<p>Taste TOP MENU</p>
</li>
<li>
<p>Tasten ▲ / ▼ / ◀ / ▶</p>
</li>
<li>
<p>Taste SETUP</p>
</li>
<li>
<p>Taste REV</p>
</li>
<li>
<p>Taste SKIP</p>
</li>
<li>
<p>Taste PLAY▶*</p>
</li>
<li>
<p>Taste MODE</p>
</li>
<li>
<p>Taste REPEAT</p>
</li>
<li>
<p>Taste PIP</p>
</li>
<li>
<p>Taste ON/STANDBY ⏻</p>
</li>
</ol>
<p>- Betätigen Sie diese Taste, um das Gerät einzuschalten
beziehungsweise in den Standby-Modus zu versetzen. (Um das Gerät vollständig auszuschalten, müssen Sie das Netzkabel aus der Steckdose ziehen.)</p>
<p>DE</p>
<h2 id="einleitung-9">EINLEITUNG</h2>
<p>Displayanzeigen <br />
<img src="/content/2026/05/1018651/images/86deb884a780ab4760a6d21dd18703e8f61d2db954022a65a79fb99894582d72.jpg" alt="1 2 3 4" loading="lazy" decoding="async"></p>
<p>* Die Helligkeit des Displays kann eingestellt werden. Siehe „Anzeige“ unter „FUNKTIONSEINRICHTUNG“ auf seite 30.</p>
<ol>
<li>Zur Anzeige des Wiederholungssymbols. (Erscheint während der wiederholten Wiedergabe.) </li>
<li>Zur Anzeige des Mediensymbols (Disk-Modus oder SD-Kartenmodus). </li>
<li>Hier erscheint ein Symbol, das den aktuellen Wiedergabezustand kennzeichnet. Siehe die nachstehende Tabelle. </li>
<li>Auf diesem Anzeigefeld erscheinen verschiedene Informationen, z. B. die Titelnummer, die verstrichene Spielzeit, die aktuelle Wiederholart, die Menüart, usw.</li>
</ol>
<table><tr><td>Symbol für Wiedergabestatus</td><td>Modus</td></tr><tr><td></td><td>Wiedergabe</td></tr><tr><td></td><td>Stopp</td></tr><tr><td></td><td>Pause</td></tr><tr><td></td><td>Suchlauf vorwärts</td></tr><tr><td></td><td>Suchlauf rückwärts</td></tr><tr><td></td><td>Zeitlupenmodus</td></tr></table>
<p>Beispiele von Displayanzeigen <br />
<img src="/content/2026/05/1018651/images/78be4d564ba4ace3bf9dc33e42555ec529ad243cc59ffaf013143974f4fc57b6.jpg" alt="TOSHIBA BDX2000KE - EINLEITUNG - 2" loading="lazy" decoding="async"></p>
<p>Ein Titel wird
wiedergegeben.
Die Nummer des
laufenden Titels und die
verstrichene Spielzeit
werden angezeigt.</p>
<p><img src="/content/2026/05/1018651/images/18ffcc1fbfc72bd49ea503c4502b854e0adbfc014d25b2e1379bba09e3214bae.jpg" alt="TOSHIBA BDX2000KE - EINLEITUNG - 3" loading="lazy" decoding="async"></p>
<p>Der Kapitel-
Wiederholmodus ist
aktiviert.</p>
<p><img src="/content/2026/05/1018651/images/6979d235fa59677d9b87ca9ab09e2e0705d9ed24e0f41283c9393bc19bbc9ffc.jpg" alt="TOSHIBA BDX2000KE - EINLEITUNG - 4" loading="lazy" decoding="async"></p>
<p>Die Disk wird momentan geladen.</p>
<p><img src="/content/2026/05/1018651/images/b8e0aef4d58168f58c584620599afd6d30c27d7a1b97d279c4a0bf0d81e63694.jpg" alt="TOSHIBA BDX2000KE - EINLEITUNG - 5" loading="lazy" decoding="async"></p>
<p>Dolby Digital-
Audiosignale werden
wiedergegeben.</p>
<p><img src="/content/2026/05/1018651/images/8897309ea09bc2fe8476b7c4bc5999c0a0ac73938afe73b814cb0255a8c539bb.jpg" alt="TOSHIBA BDX2000KE - EINLEITUNG - 6" loading="lazy" decoding="async"></p>
<p>DTS-Audio wird wiedergegeben.</p>
<h2 id="in-dieser-anleitung-verwendete-symbole">In dieser Anleitung verwendete Symbole</h2>
<p>Um die Funktionen den zugehörigen Medientypen zuzuordnen, setzen wir die folgenden Symbole vor die Erklärung jeder Funktion.</p>
<p>Symbol Beschreibung <br />
<img src="/content/2026/05/1018651/images/3a799b2ee11d0a20b859c0deca162454e4d3a9263193beef72c19c03fd3a23ea.jpg" alt="TOSHIBA BDX2000KE - In dieser Anleitung verwendete Symbole - 1" loading="lazy" decoding="async"></p>
<p>Beschreibung bezieht sich auf BD-Videos und BD-RE (Ver.2.1) / BD-R (Ver.1.1/1.2/1.3), aufgezeichnet im BDMV-Format</p>
<p><img src="/content/2026/05/1018651/images/960427967f8144fb900e72427ef16b9d05e8214ebc9d993bb9603e92ddd51f29.jpg" alt="TOSHIBA BDX2000KE - In dieser Anleitung verwendete Symbole - 2" loading="lazy" decoding="async"></p>
<p>Beschreibung bezieht sich auf DVD-Video</p>
<p><img src="/content/2026/05/1018651/images/e5649806df43abe9fe0e2b95d1aab18d502e2de4962526c9c9672c6ad6353cb9.jpg" alt="TOSHIBA BDX2000KE - In dieser Anleitung verwendete Symbole - 3" loading="lazy" decoding="async"></p>
<p>Beschreibung bezieht sich auf Audio-CD / DTS-CD</p>
<p><img src="/content/2026/05/1018651/images/abf9f071f771c45dda4210e465f32368487f56edc52a659574125ccb7db5556a.jpg" alt="TOSHIBA BDX2000KE - In dieser Anleitung verwendete Symbole - 4" loading="lazy" decoding="async"></p>
<p>Beschreibung bezieht sich auf DVD-RW/-R und SD-Karte mit AVCHD-Dateien</p>
<p><img src="/content/2026/05/1018651/images/372350c9d9b1e29bedf1737e9480629688d9779955d1b929d3fe6747df9d5245.jpg" alt="TOSHIBA BDX2000KE - In dieser Anleitung verwendete Symbole - 5" loading="lazy" decoding="async"></p>
<p>Beschreibung bezieht sich auf BD-RE/-R, DVD-RW/-R und CD-RW/-R mit DivX®-Dateien</p>
<p><img src="/content/2026/05/1018651/images/d8e58cfd41ed51810f67acda3afbd2b0f88a62f14cc48c543c8dfae927d332d2.jpg" alt="TOSHIBA BDX2000KE - In dieser Anleitung verwendete Symbole - 6" loading="lazy" decoding="async"></p>
<p>Beschreibung bezieht sich BD-RE/-R, DVD-RW/-R, CD-RW/-R und SD-Karte mit MP3-Dateien</p>
<p><img src="/content/2026/05/1018651/images/734f29a8b39d7144cf368db92398dd16194f3bb7cc681e045e7e33b1b635d34a.jpg" alt="TOSHIBA BDX2000KE - In dieser Anleitung verwendete Symbole - 7" loading="lazy" decoding="async"></p>
<p>Beschreibung bezieht sich BD-RE/-R, DVD-RW/-R, CD-RW/-R und SD-Karte mit Windows Media™ Audiodateien</p>
<p><img src="/content/2026/05/1018651/images/2caaeb7fd03b715d9181dd5fce9b6e5b5e595497fac540345fbc91c1420db6fa.jpg" alt="TOSHIBA BDX2000KE - In dieser Anleitung verwendete Symbole - 8" loading="lazy" decoding="async"></p>
<p>Beschreibung bezieht sich BD-RE/-R, DVD-RW/-R, CD-RW/-R und SD-Karte mit JPEG-Dateien</p>
<p>Wenn eine bestimmte Überschrift nicht mit einem der obigen Symbole versehen ist, gilt der betreffende Text für alle Datenträger.</p>
<h2 id="anschlüsse-2">ANSCHLÜSSE</h2>
<ul>
<li>Achten Sie stets darauf, alle Geräte auszuschalten, bevor Sie irgendwelche Anschlüsse herstellen oder ändern. </li>
<li>Siehe auch die Bedienungsanleitung der anzuschließenden Geräte.</li>
</ul>
<h2 id="anschluss-an-ein-fernsehgerät">Anschluss an ein Fernsehgerät</h2>
<p>1 Wählen Sie einen geeigneten Anschluss aus und fahren Sie mit den entsprechenden Anleitungen (A, B oder C) auf der nächsten Seite fort.</p>
<p>Am besten (Unterstützt Auflösungen bis zu 1080i/1080p, 1080p/24.)</p>
<p><img src="/content/2026/05/1018651/images/eabe32fe2ae5ea37170194f28435399a539acffb76e36d4791ec32c9ea1ea23f.jpg" alt="graph LR A["Video Audio"] --> B["HDMI-Kabel"] B --> C["HDMI IN"] C --> D["Ihr Fernsehgerät HD-Fernsehgerät"] D --> E["Weiter zu"] E --> F["A"]" loading="lazy" decoding="async"></p>
<p>Kein analoger Audioanschluss erforderlich.</p>
<p>HDMI-Kabel NICHT MITGELIEFERT</p>
<p>Für beste Kompatibilität zwischen den Geräten empfiehlt sich ein Hochgeschwindigkeits-HDMI-Kabel (auch als HDMI-Kabel der Kategorie 2 bezeichnet)</p>
<p>Besser (Unterstützt Auflösungen bis zu 1080i.) <br />
<img src="/content/2026/05/1018651/images/bafe16ac50d6c216da3d385431b0e239ccd518893204bc7244d237db9b26da03.jpg" alt="graph LR A["Video"] --> B["Komponentenvideo-Kabel"] C["Audio"] --> D["Composite-Audiokabel"] B --> E["COMPONENT VIDEO IN Y"] B --> F["Pb/Cb"] B --> G["PR/Cr"] D --> H["L AUDIO IN R"] E --> I["Ihr Fernsehgerät HD-Fernsehgerät"] F --> I G --> I H --> I I --> J["Weiter zu ..."] J --> K["B"]" loading="lazy" decoding="async"></p>
<p>Komponenten-Videokabel NICHT MITGELIEFERT</p>
<p>Komposite-Audiokabel mitgeliefert</p>
<p>Grundlegend (Unterstützt nur Auflösungen 480i/576i.) <br />
<img src="/content/2026/05/1018651/images/d535d8750128d518a36ec683dd27571367aacaa0d8f9102cded8ee76022c2c23.jpg" alt="graph LR A["Video"] --> B["Composite-Videokabel"] C["Audio"] --> D["Composite-Audiokabel"] B --> E["VIDEO IN"] D --> F["AUDIO IN"] E --> G["Ihr Fernsehgerät\nFernsehgerät mit Standard-auflösung"] F --> G G --> H["Weiter zu"]" loading="lazy" decoding="async"></p>
<p>- Schließen Sie dieses Gerät direkt an das Fernsehgerät an. Wenn das Gerät über Composite Audio-/Videokabel an einen Videorecorder angeschlossen ist, kann es durch das Kopierschutzsystem zu Bildverzerrungen kommen.</p>
<p>Composite Audio-/Videokabel mitgeliefert</p>
<p><img src="/content/2026/05/1018651/images/d8a1063885daeb722132ac4499dd9353dba7eded7c8dc552243d65d8eb5953c8.jpg" alt="E5RJ2LD_DE.book Page 11 Wednesday, October 28, 2009 6:22 PM ANSCHLÜSSE 2 Schließen Sie die Kabel entsprechend der untenstehenden Erläuterungen an. HDMI Video-/Audioanschluss A Ihr Fernsehgerät HDMI IN HDMI-Kabel HDMI OUT EINLEITUNG EHLÜSSE WIEDERGABE SONSTIGES HINWEIS • Verkanten Sie den Stecker nic…" loading="lazy" decoding="async"></p>
<p><img src="/content/2026/05/1018651/images/4addb2819ecba22391f9620a984de5e9b0d698de5db4a0712a22d9732f5d6f3d.jpg" alt="A Ihr Fernsengerat HDMI Kabel HDMI IN HDMI OUT" loading="lazy" decoding="async"></p>
<h2 id="hinweis">Hinweis</h2>
<ul>
<li>Verkanten Sie den Stecker nicht, wenn Sie ihn in die HDMI-Buchse Form von Stecker und Buchse übereinstimmen. </li>
<li>Wenn Sie ein nicht mit HDCP kompatibles Fernsehgerät benutzen, kann das Bild nicht richtig angezeigt werden.</li>
</ul>
<p><img src="/content/2026/05/1018651/images/066c2838f45b011fd222cc8558ec58f8c33e48d074aead5e18bb19160f6e7ada.jpg" alt="graph TD A["Video-Kabel"] --> B["Component video-Kabel"] B --> C["Composite-Audiokabel"] subgraph Video-Kabel L1["L"] Y["Y"] PR/CR PR/CR PR/CB PR/CB R["AUDIO OUT"] R["AUDIO IN"] end subgraph Audio-Kabel L2["L"] R["R"] end B -->|Composite video out| B B -->|Audio IN| B B -->|Audio IN| B" loading="lazy" decoding="async"></p>
<p>Standard-Video + Standard-Audioanschluss <br />
<img src="/content/2026/05/1018651/images/29a175452ae6ce1203ebd81bb334c48f7cdeb273f7971dbdb0ee53fc0d3e3553.jpg" alt="C Ihr Fernsehgerät Composite-Videokabel Composite-Audiokabel L R AUDIO VICO L AUDIO IN R" loading="lazy" decoding="async"></p>
<p>DE</p>
<p>11</p>
<p><img src="/content/2026/05/1018651/images/aab1c1a4313282c1715510ede7eea32f05e50d4e0466287609eb9fedd89d4d31.jpg" alt="DE 11" loading="lazy" decoding="async"></p>
<h2 id="anschlüsse-3">ANSCHLÜSSE</h2>
<h2 id="anschluss-an-eine-hi-fi-anlage">Anschluss an eine Hi-Fi-Anlage</h2>
<p>2-kanaliger analoger
Audioanschluss <br />
<img src="/content/2026/05/1018651/images/282cc5770937c996cefb30b65cbbfcdebbadea009c494dfe312c094db068cf89.jpg" alt="Hi-Fi-Anlage Audiok R L Composite-Audiokabel L R Audiok D.I.T" loading="lazy" decoding="async"></p>
<p>Digitaler Audioanschluss HDMI-Audioanschluss <br />
<img src="/content/2026/05/1018651/images/28170e46dab3acd411e9a07e5b76535df59bdad307f8646593b2071c030b3558.jpg" alt="AV-Receiver / Verstärker OPTISCHES Digitalaudio-Kabel OPTICALDIN VENT OPTICALDIN VENT COASTRAL koaxiales Digitalaudio- Kabel OPTICALDIN OUT OPTICALDIN OUT POWERITUREU" loading="lazy" decoding="async"></p>
<p><img src="/content/2026/05/1018651/images/326eac8644a0d2cfadd3b71d9fdf70842c085d5d617c8f508c0190eba596b24b.jpg" alt="AV-Receiver / Verstärker mit HDMI-Eingangsbuchse HDMI IN HDMI-Kabel" loading="lazy" decoding="async"></p>
<ul>
<li>Siehe Seite 34 für digisähe Seite 33 für HDMI-Audioeinstellungen.</li>
</ul>
<p>Digitale optische/koaxiale Audiokabel und HDMI-Kabel NICHT MITGELIEFERT</p>
<p>Das Komposite-Kabel wird mitgeliefert</p>
<h2 id="netzwerkverbindung-mit-einem-lan">Netzwerkverbindung mit einem LAN</h2>
<p>- Sie können eine Disk mit BD-Live indem Sie dieses Gerät an das Internet anschließen. (Einzelheiten zu BD-Live siehe seite 23.)</p>
<p><img src="/content/2026/05/1018651/images/2d7c53101f6d7f90ef8bc93ef8d252ad54f34d7cf6110002e677c964712e5e8c.jpg" alt="graph TD A["Netzwerkgerät (Modem, usw.)"] --> B["LAN"] B --> C["LAN-Kabel"] C --> D["LAN-Kabel"] D --> E["LAN"] E --> F["Hub oder Breitbandrouter"] G["Internet"] -.-> A H["Computer"] --> I["Server"]" loading="lazy" decoding="async"></p>
<p>Netzwerkgerät, Hub oder Broadbandrouter sowie Kabel NICHT MITGELIEFERT</p>
<h2 id="einstellen-des-videokanals-auf-ihrem-fernsehgerät">Einstellen des Videokanals auf Ihrem Fernsehgerät.</h2>
<p>Nachdem Sie alle Anschlüsse vorgenommen haben, müssen Sie den richtigen Videokanal (externer Eingangskanal) auf Ihrem Fernsehgerät einstellen.</p>
<p>1 Sind alle erforderlichen Verbindungen erfolgt, schalten Sie das Gerät und Ihr Fernsehgerät ein.</p>
<p>2 Drücken Sie die Taste zur Einstellung des externen Eingangskanals auf der Fernbedienung Ihres Fernsehgeräts wiederholt, bis Sie den Willkommensbildschirm sehen. Dieser zeigt zum Beispiel „(bei einem TOSHIBA TV)“, „SOURCE“, „AV“ oder „INPUT“ (siehe Bedienungsanleitung Ihres Fernsehgeräts).</p>
<h2 id="warnhinweise-6">Warnhinweise</h2>
<p>- Verbinden Sie ausschließlich ein LA LAN-Anschluss, um Schäden am Gerät zu verhindern.</p>
<h2 id="hinweis-2">Hinweis</h2>
<p>- Nach dem Anschluss mit einem LAN-Sie die erforderlichen Netzwerkeinstellungen vornehmen.</p>
<p>- Wenn Ihr Netzwerkgerät (Modem, us Breitbandrouterfunktionen bietet, schließen Sie einen Breitbandrouter an.</p>
<p>- Wenn Ihr Netzwerkgerät (Modem, us Routerfunktionen bietet, aber kein Port frei ist, verwenden Sie einen Hub.</p>
<p>- Benutzen Sie einen Breitbandrouter 100BASE-TX unterstützt.</p>
<p>• Schließen Sie Ihren PC nicht direkt
Anschluss dieses Geräts an.</p>
<p>- Hinweise zur Einrichtung des Netzwerks finden Sie unter „Netzwerkverbindung“ auf Seiten 36-38.</p>
<p><img src="/content/2026/05/1018651/images/a98a0089ed965c1f2c01994d34b8e1b78e94cbcd5f2899e2bd9c6c11b7152471.jpg" alt="TOSHIBA N-Kabel mit dem Kabel müssen W-1 keine BluvayDisc" loading="lazy" decoding="async"></p>
<h2 id="hinweis-3">Hinweis</h2>
<p>t. W urde r 10 B A S F T / e r d a s F e n s e h g e r a t m i t e i n e m H D M I - K angeschlossen, kann es einige Minuten dauern, bis der Willkommensbildschirm angezeigt wird.</p>
<h2 id="wiedergabe-2">WIEDERGABE</h2>
<h2 id="informationen-zur-wiedergabe">Informationen zur Wiedergabe</h2>
<p>Bitte lesen Sie die folgenden Informationen, bevor Sie mit der Wiedergabe einer Disk beginnen.</p>
<h2 id="abspielbare-medien">Abspielbare Medien</h2>
<p>Dieses Gerät ist zum Abspielen der nachstehend aufgeführten Disk- Typen und Dateiformate im Stande. Bitte vergewissern Sie sich vor dem Abspielen einer Disk oder Datei, dass diese den unten angegebenen Anforderungen hinsichtlich Regionalcode und Farbsystem entspricht. Disks, die mit einem der in der folgenden Tabelle abgebildeten Logos gekennzeichnet sind, können mit diesem Gerät abgespielt werden.
Bei anderen Disk-Typen ist keine Wiedergabe gewährleistet.</p>
<h2 id="abspielbare-disks-logo">Abspielbare Disks Logo</h2>
<h2 id="blu-ray-disk">Blu-ray Disk</h2>
<ul>
<li>BD-Videos (Einzelschicht/Doppelschicht) </li>
<li>BD-RE Ver. 2.1(Einzelschicht/Doppelschicht) <br />
(aufgezeichnet im BDMV-Format) </li>
<li>BD-R Ver. 1.1/ 1.2 / 1.3 (Einzelschicht/Doppelschicht) (Aufgezeichnet im BDMV-Format) (Nicht finalisierte Disks <br />
können gegebenenfalls nicht
wiedergegeben werden.)</li>
</ul>
<p><img src="/content/2026/05/1018651/images/46b4b08a521df7beeb1d7e18f81d6556cee49730aecca7766da652383e546dc7.jpg" alt="TOSHIBA BDX2000KE - Blu-ray Disk - 1" loading="lazy" decoding="async"></p>
<p>DVD-Video</p>
<p><img src="/content/2026/05/1018651/images/0096664cc7f97df09975b91d2c9c1bbad19d21cc5c4250bb2700d63f255543cf.jpg" alt="TOSHIBA BDX2000KE - Blu-ray Disk - 2" loading="lazy" decoding="async"></p>
<p>DVD-RW</p>
<p><img src="/content/2026/05/1018651/images/8817aaed7ffbcc54e161cadc8e7a22469b2cb06a225c3a7bafe6cef303c9673e.jpg" alt="TOSHIBA BDX2000KE - Blu-ray Disk - 3" loading="lazy" decoding="async"></p>
<p>DVD-R</p>
<p><img src="/content/2026/05/1018651/images/94596ee614a44b8db5b5ad38abc0383467c63527f7070f237598ce548257465c.jpg" alt="TOSHIBA BDX2000KE - Blu-ray Disk - 4" loading="lazy" decoding="async"></p>
<p>CD-DA (Audio-CD)</p>
<p><img src="/content/2026/05/1018651/images/2e329b4e91863ac2b5523c525da2bbf43332378e42def5867d5b88d6e9927db8.jpg" alt="TOSHIBA BDX2000KE - Blu-ray Disk - 5" loading="lazy" decoding="async"></p>
<p>CD-RW</p>
<p><img src="/content/2026/05/1018651/images/3a156a4ade963fe5b91acf7c17736243b747da5531fb0d998704fb6776e5b6aa.jpg" alt="TOSHIBA BDX2000KE - Blu-ray Disk - 6" loading="lazy" decoding="async"></p>
<p><img src="/content/2026/05/1018651/images/a98a2d6e5942aad9ae477aa586518db505b36a27ca3aa973066f268729c1160a.jpg" alt="TOSHIBA BDX2000KE - Blu-ray Disk - 7" loading="lazy" decoding="async"></p>
<p>CD-R</p>
<p><img src="/content/2026/05/1018651/images/e9593fc14ff8451578f52623d7ff74d6362e206805596157479ba5a2c3208479.jpg" alt="TOSHIBA BDX2000KE - Blu-ray Disk - 8" loading="lazy" decoding="async"></p>
<p><img src="/content/2026/05/1018651/images/6940bafa3570ed9a81a3248d0f008c18ea93a77783aefbd252bac150a8fc883d.jpg" alt="TOSHIBA BDX2000KE - Blu-ray Disk - 9" loading="lazy" decoding="async"></p>
<p>Kodak Picture CD</p>
<p><img src="/content/2026/05/1018651/images/ce1e8611ccca93e422edfb8967088c6f2da67e778e09b13df09b87341ec10aeb.jpg" alt="TOSHIBA BDX2000KE - Blu-ray Disk - 10" loading="lazy" decoding="async"></p>
<p>DTS-CD</p>
<p>Abspielbare Dateien Datenträger </p>
<table><tr><td>AVCHD</td><td>DVD-RW/-R, SD-Speicherkarte (einschließlich SDHC), miniSD-Karte, microSD-Karte</td></tr><tr><td>DivX®</td><td>BD-RE/-R, DVD-RW/-R, CD-RW/-R</td></tr><tr><td>MP3 BD-RE/-R, DVD-RW/-R, CD-RW/-R, Windows MediaTM Audio</td><td rowspan="2">SD-Speicherkarte (einschließlich SDHC), miniSD-Karte, micro SD-Karte</td></tr><tr><td>JPEG</td></tr></table>
<p>- ÜBER DIVX-VIDEO: DivX® ist ein digitales Videoformat, das von DivX, Inc. entwickelt wurde. Dies ist ein offiziell DivX-zertifiziertes Gerät, das DivX-Video abspielt. Besuchen Sie www.divx.com, um weitere Informationen und Software-Werkzeuge zu erhalten, mit denen Sie Ihre Dateien in DivX-Videos konvertieren können.</p>
<p>- Über DIVX VIDEO-ON-DEMAND: Die Gerät muss registriert sein, um Inhalt aus DivX Video-on-Demand (VOD) wiedergeben zu können. Um den Registriercode zu erstellen, müssen Sie den Abschnitt DivX VOD im Einstellungsmenü des Geräts suchen. Gehen Sie mit diesem Code zu vod.divx.com, um den Registriervorgang abzuschließen und mehr über DivX VOD zu erfahren.</p>
<p>- O f f i z i e l l e®-zerfüziertes Produkt; Wiedergabe aller DivX®-Videos (einschließlich DivX® 6/DivX® HD) sowie Standard-Wiedergabe von DivX® Media-Dateien.</p>
<p>- D i s k s , d P e Da Dei en mit dem Wiedergabemerkmal DivX <sup></sup> GMC (Global Motion Compensation) enthalten, wobei es sich um eine DivX <sup></sup> -Zusatzfunktion handelt, können nicht mit diesem Gerät abgespielt werden.</p>
<p>Es wird empfohlen, die zur Wiedergabe mit diesem Gerät vorgesehenen Dateien mit den nachstehend aufgeführten Spezifikationen aufzuzeichnen:</p>
<h2 id="divx-5">DivX®</h2>
<p>Offizielles DivX®-zertifiziertes Produkt</p>
<ul>
<li>A bspielbare DivX®3.xoDivX®4x, von AVI-Dateien DivX®5.x.DivX®6.x <br />
• M a x i m a l e G: r1 ♂ 20 e x e 11 0h 8e0s b e i 60 Videos Bildern/Sek.</li>
</ul>
<p>- Audiowiedergabefrequenz:16 k
- Audio-Typ :MPEG1-Audio</p>
<p>(MP3), MPEG1 Audio Layer 2, Dolby Digital</p>
<h2 id="mp3windows-media-audio-2">MP3/Windows Media™ Audio</h2>
<p>• A b t a s t f r e q u e n z : 3 2 kHz, 4 4 kHz</p>
<p>• Konstante Bitrate : 1 1 2 kbps
48 kbps - 192 kbps
(Windows Media™ Audio)</p>
<h2 id="jpeg-4">JPEG</h2>
<p>• Obergrenze : 2.560 x 1.900</p>
<p>(Sub Sampling 4:4:4)</p>
<p>5.120 x 3.840 Bildpunkte</p>
<p>(Sub Sampling bis zu 4:2:2)</p>
<p>- Untergrenze : 32 x 32 Bild</p>
<p>• Maximale Bild dateigröße: 12 M</p>
<p>Lesbare Speicherkarten Abspielbare Dateien / Daten </p>
<table><tr><td>SD-Speicherkarte (8 MB - 2 GB)</td><td>AVCHD, MP3, Windows</td></tr><tr><td>SDHC-Speicherkarte (4 GB - 8 GB)</td><td rowspan="3">MediaTM Audio, JPEG, Bild-im-Bild-Kommentare, Untertitel oder andere Zusatzfunktionen für BD-ROM Ver. 2 (Profil 2.0/Profil 1.1)</td></tr><tr><td>miniSD-Speicherkarte (8 MB - 2 GB)</td></tr><tr><td>microSD-Speicherkarte(8 MB - 2 GB)</td></tr></table>
<p>DE</p>
<p>13</p>
<p><img src="/content/2026/05/1018651/images/4143ff5bf7934120603dd1e4e3010a679cf7be2d4e7ec70df092ca7ede68c6c0.jpg" alt="TOSHIBA BDX2000KE - JPEG - 1" loading="lazy" decoding="async"></p>
<p><img src="/content/2026/05/1018651/images/1d66c6e7afbc04fa29eb250e653c0e95e1f893a2c37e75a34a61f1e087235304.jpg" alt="TOSHIBA BDX2000KE - JPEG - 2" loading="lazy" decoding="async"></p>
<p><img src="/content/2026/05/1018651/images/3b5cdec169744c4bc931c7f60a7b58e612e2f3807d4fecd005bd8bcb4a150f3e.jpg" alt="TOSHIBA BDX2000KE - JPEG - 3" loading="lazy" decoding="async"></p>
<p><img src="/content/2026/05/1018651/images/4143ff5bf7934120603dd1e4e3010a679cf7be2d4e7ec70df092ca7ede68c6c0.jpg" alt="TOSHIBA BDX2000KE - JPEG - 4" loading="lazy" decoding="async"></p>
<p><img src="/content/2026/05/1018651/images/3a609c63b091ec557f0caaf0568a54b986fed403b1da807cac733e116366771e.jpg" alt="TOSHIBA BDX2000KE - JPEG - 5" loading="lazy" decoding="async"></p>
<p><img src="/content/2026/05/1018651/images/d0f58fd181d52be9cc20601a556c5285f7f2c21b9fdd1899c91feb561c272f0e.jpg" alt="TOSHIBA BDX2000KE - JPEG - 6" loading="lazy" decoding="async"></p>
<p><img src="/content/2026/05/1018651/images/ceae57c7d8dcb6ff18c29e11d1052761d2e03fbea2cde7cdf391fded7b5b7e9c.jpg" alt="TOSHIBA BDX2000KE - JPEG - 7" loading="lazy" decoding="async"></p>
<p><img src="/content/2026/05/1018651/images/0feb60bdc7ab00eeb15ee88a6e8c97873adf5d6971151d49d4008a6089bdf866.jpg" alt="TOSHIBA BDX2000KE - JPEG - 8" loading="lazy" decoding="async"></p>
<p><img src="/content/2026/05/1018651/images/6399b5ed5e38d96e6ecb0c497e052d6afa449107569e3fb6fa18873efc2a97c7.jpg" alt="TOSHIBA BDX2000KE - JPEG - 9" loading="lazy" decoding="async"></p>
<p><img src="/content/2026/05/1018651/images/154ec14e83b504cdf60c14604baadf9a1c32f5fc3b917a931a5989043bd1cce8.jpg" alt="TOSHIBA BDX2000KE - JPEG - 10" loading="lazy" decoding="async"></p>
<p><img src="/content/2026/05/1018651/images/80fcee2892851934249b178e68d45b636ee387d89cce6c14a1e0f95baf71480f.jpg" alt="TOSHIBA BDX2000KE - JPEG - 11" loading="lazy" decoding="async"></p>
<h2 id="wiedergabe-3">WIEDERGABE</h2>
<h2 id="hinweise-zu-sd-karten">Hinweise zu SD-Karten</h2>
<ul>
<li>Dieses Gerät unterstützt SD-Sp Dateisystem FAT12 oder FAT16 formatiert sind, sowie SDHC-Speicherkarten, die mit dem Dateisystem FAT32 formatiert sind. <br />
• Das NTFS-Dateisystem wird von unterstützt. </li>
<li>SD-karten, die mit einem Comp können möglicherweise nicht von diesem Gerät gelesen werden. In einem solchen Fall müssen Sie die SD-karten mit diesem Gerät neu formatieren. <br />
• Dieses Gerät bietet keine Unte miniSDHC- und microSDHC-Speicherkarten. <br />
• Zum Gebrauch von miniSD- und jeweils der entsprechende Adapter erforderlich.</li>
</ul>
<p><img src="/content/2026/05/1018651/images/c0eae80c9c55a4c24a6e1d02a2f2235cd3f89a679d66a7837ec7afd509c36502.jpg" alt="TOSHIBA BDX2000KE - Hinweise zu SD-Karten - 1" loading="lazy" decoding="async"></p>
<p><img src="/content/2026/05/1018651/images/67cf4ec3f04098a066394db38788558b9abd12b7e27d0eb77d63bb4c6b7e007f.jpg" alt="D- nadapter miniSD-Karte microSD- Kartenadapter microSD -Karte" loading="lazy" decoding="async"></p>
<p>• Teile dieses Geräts sind urhebe werden unter Lizenz von ARIS / SOLANA / 4C geliefert. <br />
- Bitte bewahren Sie SD-karten b grundsätzlich in ihren Behältern auf. <br />
- Versuchen Sie auf keinen Fall, zu modifizieren. <br />
- Vermeiden Sie eine Berührung Fingern oder Metallgegenständen. <br />
- Bringen Sie keine zusätzlichen an der Karte an. <br />
• Das Originalletikett einer SD-ka <br />
- Dieses Gerät erkennt die erster Dateinamen auf einer SD-karte. Über das achte Zeichen hinausgehende Namensteile werden nicht angezeigt.</p>
<h2 id="regionalcodes">Regionalcodes</h2>
<p>i s h e r k a r t e d i n m i t d e m
Dieses Gerät ist für die Wiedergabe von
BD-Videos mit dem Regionalcode „B“ und
von DVD-Videos mit dem Regionalcode <br />
2" oder ALL" vorgesehen. BD-Videos d"fesem Gerat nicht oder DVD-Video, die für andere Regionen <br />
bestimmt sind können nicht
ter Formaient wurden, wiedergegeben werden. Suchen Sie auf der BD-Videos bzw. dem DVD-Video nach den rechts abgebildeten Symbolen. <br />
s Warrziese Regionalsymbole nicht auf Ihrer BD-Videos bzw. dem DVD-Video
meischeinerDkökrem Sie die Disk mit diesem Gerät nicht abspielen. Der Buchstabe bzw. die Ziffer innerhalb des Globussymbols kennzeichnet jeweils die Region der Welt, für die die betreffende Disk vorgesehen ist. Eine mit einer bestimmten Region gekennzeichnete BD-
r Veleoch bzw. DVD-Video kähn nur in und einem Gerät des selben Regionalcodes
wiedelgegeben werden.</p>
<p>BD-Videos</p>
<p><img src="/content/2026/05/1018651/images/07f675aea04034f2b83784f53c1b44d249f4e72613d75b22944afd07a049abfb.jpg" alt="TOSHIBA BDX2000KE - Regionalcodes - 1" loading="lazy" decoding="async"></p>
<p>DVD-Video</p>
<p><img src="/content/2026/05/1018651/images/3bae77ac8550ff84b6eacef091b7fc52426a5eceb09660292c1d1cd62fc7f336.jpg" alt="TOSHIBA BDX2000KE - Regionalcodes - 2" loading="lazy" decoding="async"></p>
<p><img src="/content/2026/05/1018651/images/acc1faef661144fb9e80cee19e58ecf5eb8b81d19c7ea9e59681e2c0cb6eba67.jpg" alt="TOSHIBA BDX2000KE - Regionalcodes - 3" loading="lazy" decoding="async"></p>
<h2 id="e-kartez-öffn-an-oder-struktur-von-medieninhalten">e Kartez öffn an oder Struktur von Medieninhalten</h2>
<p>d er Knraft von BDF/DVDH AVCMD ist generell in Titel unterteilt. Titel können ihrerseits in mehrere Kapitel E itikatten oder Aufkleber unterteilt sein.</p>
<h2 id="nicht-abspielbare-medien">Nicht abspielbare Medien</h2>
<p>Die nachstehend aufgeführten Disks können nicht mit diesem Gerät abgespielt werden.</p>
<p>- CD-ROM • CD-I (Compact Disk-Interactive)</p>
<p>• DVD-RAM • VSD (Video Single Disk)</p>
<p>• DVD - Audio • Video - CD</p>
<p>·HD DVD ·SVCD</p>
<p>• Nicht finalisierte Disk</p>
<p>• BD - RE (Ver. 1.0)</p>
<p>- BD - RE (Ver. 2.1) (aufgezeichnet im BDAV-I
- SD - karte m-DateDi.v X</p>
<p>• BD/DVD-Hybrid-Disk (Wiedergabe nur als BD-Video)</p>
<p>• BD mit AVCHD-Dateien</p>
<p>• BD - R (Ver. 1.1/ 1.2/ 1.3) (aufgezeic</p>
<p>- DVD-RW/-R, die in nicht-kompatib! Aufnahmeformaten aufgezeichnet wurden.</p>
<p>- Super Audio CD - Nur Audio der CD auf der hochdichten Super Audio CD-Schicht aufgezeichneten Audiodaten werden nicht wiedergegeben.</p>
<p>- Ein einwandfreies Abspielen von Gerät ist nicht gewährleistet.</p>
<p>- Dieses Gerät kann keine von Wind Rights Management (DRM) geschützten Disk-Inhalte wiedergeben.</p>
<p>Audio-CDs sind in Tracks (Musiktitel) unterteilt.</p>
<p><img src="/content/2026/05/1018651/images/d66dc06208222e32cefeecbfb55fdee24a4de7a33536e68e1e0ad2e9b7bee645.jpg" alt="darf nicht BD/PVD/AVCHD werden. Zeichre n Timon Kapitel 1 Kapitel 2 Kapitel 2 Kapitel 1 Kapitel 3" loading="lazy" decoding="async"></p>
<p><img src="/content/2026/05/1018651/images/0580d236f250edce5ceb0c39a4a11c43842f11482b24e8a14917f3ad7328dd34.jpg" alt="Audio-CD Track 1 Track 2 Track 3 Track 4 Track 5" loading="lazy" decoding="async"></p>
<p>Der Inhalt von Disks und SD-karten, die Daten des Formats DivX® / MP3 / WMA / JPEG ist in Ordner unterteilt, die einzelne Dateien enthalten.</p>
<p><img src="/content/2026/05/1018651/images/89f9200355d8c77d593a05fa3e6ebdb9c613c1f2574a205d83a0f347abcb7978.jpg" alt="DivX® / MP3 / WMA / JPEG Ordner (Gruppe) 1 Datei1 i m Datei2 V-Form Datei3 Datei4 Datei5 M a b c d e f g h i j k l m i n o u a + D i s k s m i t d i e s e m" loading="lazy" decoding="async"></p>
<h2 id="ows-media-digital-bildschirmanzeigen">ows Media™ Digital Bildschirmanzeigen</h2>
<p>Nach Drücken von [DISPLAY] werden verschiedene Informationen über die aktuelle Disk in den Bildschirm eingeblendet.</p>
<p>Um die Bildschirmanzeige aufzurufen, drücken Sie [DISPLAY] während der Wiedergabe einer Disk. Bei jeder Betätigung von [DISPLAY] wird der Reihe nach zwischen den einzelnen Anzeigen umgeschaltet. Die angezeigten Informationen richten sich nach dem jeweiligen Datenträger.</p>
<h2 id="farbsysteme">Farbsysteme</h2>
<p>BD- und DVD-Disks werden in verschiedenen Regionen der Welt mit verschiedenen Farbsystemen aufgezeichnet. Das gebräuchlichste Farbsystem, das vor allem in Großbritannien und der EU eingesetzt wird, ist PAL. Dieses Gerät benutzt das PAL-System. Es ist jedoch auch möglich, BD- und DVD-Disks wiederzugeben, die andere Farbsysteme wie z.B. NTSC verwenden.</p>
<h2 id="wiedergabe-4">WIEDERGABE</h2>
<p><img src="/content/2026/05/1018651/images/f0e1d531b237dee25ab5facb38ad642446116f81aef4fff8a2277f894baeb0f9.jpg" alt="TOSHIBA BDX2000KE - WIEDERGABE - 1" loading="lazy" decoding="async"></p>
<h2 id="bd-video-avchd-2">BD VIDEO AVCHD</h2>
<p>AUS → Titel- / Kapitelnformationen</p>
<p>→ Titelinformation (verstrichene Spielzeit) <br />
→ Titelinformation (Restspielzeit) <br />
→ Dekodierungsformat-Informationen → AUS</p>
<p><img src="/content/2026/05/1018651/images/6d29f8089039afc8bc5d32a8375f9c109ad04db48dc1492813b84e2277ba7c51.jpg" alt="TOSHIBA BDX2000KE - BD VIDEO AVCHD - 1" loading="lazy" decoding="async"></p>
<h2 id="dvd-video-2">DVD VIDEO</h2>
<p>AUS → Kapitel-Informationen (abgelaufene Zeit)</p>
<p>→ Kapitelnformation (Restspielzeit) <br />
→ Titelinformation (verstrichene Spielzeit) <br />
→ Titelinformation (Restspielzeit) <br />
→ Dekodierungsformat-Informationen → AUS</p>
<p><img src="/content/2026/05/1018651/images/2c65ff0c338433dfe55b87f7297a17c11a1f16f51c595038a1af12ac42b0c98e.jpg" alt="TOSHIBA BDX2000KE - DVD VIDEO - 1" loading="lazy" decoding="async"></p>
<h2 id="cd-2">CD</h2>
<p>AUS (Track-Information (verstrichene Spielzeit))</p>
<p>→ Track-Information (Restspielzeit) <br />
→ Disk-Information* (verstrichene Spielzeit) <br />
→ Disk-Information* (Restspielzeit) <br />
→ AUS (Track-Information (verstrichene Spielzeit))</p>
<p>(* bei Programm- und Zufallswiedergabe nicht verfügbar)</p>
<h2 id="divx-6">DivX</h2>
<p>AUS → Datei-Information (verstrichene Spielzeit)</p>
<p>→ Datei-Information (Restspielzeit) <br />
→ Dateinamen-informationen → AUS</p>
<h2 id="mp3-2">MP3</h2>
<p>AUS (Datei-Information (verstrichene Spielzeit))</p>
<p>→ Dateinamen-Informationen <br />
→ AUS (Datei-Information (verstrichene Spielzeit))</p>
<h2 id="wma-4">WMA</h2>
<p>AUS (Datei-Information (verstrichene Spielzeit))</p>
<p>→ Dateinamen-Informationen <br />
→ Etikett-Informationen (Titelbezeichnung) <br />
→ Etikett-Informationen (Künstlername) <br />
→ AUS (Datei-Information (verstrichene Spielzeit))</p>
<h2 id="jpeg-5">JPEG</h2>
<p>AUS → Datei-Informationen → Dateinamens-Informationen → AUS</p>
<p><Titel-/Kapitelinformationen (BD / AVCHD)></p>
<p><img src="/content/2026/05/1018651/images/49f7e5387f6fb929e37cccdda996931f10b79a9dad156c09c17c46a9b43eec12.jpg" alt="TT 1 1/10 1 2 GT 3 4 5" loading="lazy" decoding="async"></p>
<p><Kapitelinformationen (DVD)></p>
<p><img src="/content/2026/05/1018651/images/b7ed71a743ba6b60cd70956e14e3306f8b6d2d10e1e7a56413744c9260dfe80c.jpg" alt="1 / 10:00:01:02 2 6" loading="lazy" decoding="async"></p>
<ol>
<li>Aktuelle Titelnummer </li>
<li>Nummer des laufenden Kapitels/ Gesamtanzahl der Kapitel </li>
<li>Aktuelle Wiederholungseinstellung (nur wenn Wiederholungseinstellung aktiv ist)
(C: Wiederholung Kapitel, T: Wiederholung Titel, AB: A-B Wiederholung) </li>
<li>Zeigt, dass in der Szene Bilder aus mehreren Kamerawinkeln verfügbar sind </li>
<li>Aktueller Wiedergabestatus </li>
<li>Verstrichene Spielzeit (oder Restspielzeit) des laufenden Kapitels</li>
</ol>
<p><Titelinformation (BD/ DVD/ AVCHD)></p>
<p><img src="/content/2026/05/1018651/images/4babb629ef18441a5cbf6f0a917a11558965d36ca9a19245a12b270e9d4bd84c.jpg" alt="TT 3/50:01:02 1 2" loading="lazy" decoding="async"></p>
<ol>
<li>Nummer des laufenden Titels / Gesamtanzahl der Titel </li>
<li>Verstrichene Spielzeit (oder Restspielzeit) des laufenden Titels</li>
</ol>
<p><Track-(Datei-)Informationen (CD / DivX®/ MP3 / WMA / JPEG)></p>
<p><img src="/content/2026/05/1018651/images/262354cc6b98cee9e9fac89051be4d3b1f2ecb67433c543bc11dbbff9efb4086.jpg" alt="TR 1 2 3 4 SD1/40: 00: 51" loading="lazy" decoding="async"></p>
<ol>
<li>Nummer des aktuellen Tracks (Datei)/Gesamtanzahl der Tracks (Dateien) </li>
<li>Verstrichene Spielzeit (oder Restspielzeit) des laufenden Tracks / Datei (außer JPEG-Dateien) </li>
<li>Anzeige, dass SD-karte wiedergegeben wird </li>
<li>Aktueller Wiederholmodus
(nur bei aktivierter Wiederholfunktion)
(T: Wiederholung Track, G: Wiederholung Gruppe,
A: Wiederholung Alle, AB: A-B Wiederholung)</li>
</ol>
<p><Disk-Informationen (CD)></p>
<p><img src="/content/2026/05/1018651/images/4af57ff00f78a55633236a99c4b9837f4395a2e2f60762833df7ed1f21f52e90.jpg" alt="TOSHIBA BDX2000KE - JPEG - 5" loading="lazy" decoding="async"></p>
<ol>
<li>Aktuelle Tracknummer/Gesamtzahl der Tracks </li>
<li>Verstrichene Spielzeit (oder Restspielzeit) der laufenden Disk</li>
</ol>
<p>Dateinamens-Informationen (MP3/WMA)></p>
<p><img src="/content/2026/05/1018651/images/eef1876ca8ee3d4f2174568cffe25f121e1534a0e430509d5cdc8882f40093bc.jpg" alt="File_name_001 1" loading="lazy" decoding="async"></p>
<ol>
<li>Datenträger-Symbol und Dateiname</li>
</ol>
<p><img src="/content/2026/05/1018651/images/30ba2d804759d665c793b555a51f84301d1155642b77b211e19c9a7c82da3f60.jpg" alt="TOSHIBA BDX2000KE - JPEG - 7" loading="lazy" decoding="async"></p>
<p>: DivX®-Datei : MP3-Date</p>
<p><img src="/content/2026/05/1018651/images/620bfde27e3218f514e99a218d63e5ed67355b0500724ce8b843a6e6eacdcf10.jpg" alt="TOSHIBA BDX2000KE - JPEG - 8" loading="lazy" decoding="async"></p>
<p><img src="/content/2026/05/1018651/images/3df13486605bc51ff97fbb989955501d8894b396b2c7c29ed9b8821fbb73c7e7.jpg" alt="TOSHIBA BDX2000KE - JPEG - 9" loading="lazy" decoding="async"></p>
<p>: WMA-Datei : JPEG-Dat</p>
<p><img src="/content/2026/05/1018651/images/6b00787315c651b2f2202bf4a02fc44c2e4768c6a863f63a5af263c040cb0bcd.jpg" alt="TOSHIBA BDX2000KE - JPEG - 10" loading="lazy" decoding="async"></p>
<p><Etikett-Informationen (WMA)></p>
<p>Titelbezeichnung-Informationen</p>
<p><img src="/content/2026/05/1018651/images/c9d9deb36feffaaa82795bc068fdf96deb4db4476b7ca01a0969cb252384285e.jpg" alt="TITLEL 1" loading="lazy" decoding="async"></p>
<p>Künstlernamen-Informationen</p>
<p><img src="/content/2026/05/1018651/images/ced0f0e564ba33f6747c9b56e706645e8d646af787ee65e71aac3de0f3840dab.jpg" alt="INTERPRET 2" loading="lazy" decoding="async"></p>
<ol>
<li>Titelname auf der Basis von Etikett-Informationen der aktuellen Windows Media™ Audio-Datei </li>
<li>Interpret auf der Basis von Etikett-Informationen der aktuellen Windows Media™ Audio-Datei</li>
</ol>
<p><Dekodierungsformat-Informationen></p>
<p><img src="/content/2026/05/1018651/images/4e3559d6d44110e7e1bc55a268288d8d67724bd74fbe7a6f484b7d0a02214b6a.jpg" alt="Dolby Digital 1" loading="lazy" decoding="async"></p>
<ol>
<li>Dekodierungsformat</li>
</ol>
<p><img src="/content/2026/05/1018651/images/3f0f409b6358a0f482aec48cafaf828c2b392539fc21d2cac52dd4bcd8a1fcc8.jpg" alt="TOSHIBA BDX2000KE - JPEG - 14" loading="lazy" decoding="async"></p>
<p><img src="/content/2026/05/1018651/images/726d8ae0c5ae2de32f3835bd716927bb327dfcf5874bdf541a4dcaa5e94ff504.jpg" alt="TOSHIBA BDX2000KE - JPEG - 15" loading="lazy" decoding="async"></p>
<p>DE</p>
<p><img src="/content/2026/05/1018651/images/269de8cb58d80b4a155201f9008ce594ea19768658387c39660d18e06336bca9.jpg" alt="Pure geometric diagram with intersecting lines and circular shapes, no text or symbols present" loading="lazy" decoding="async"></p>
<h2 id="wiedergabe-5">WIEDERGABE</h2>
<h2 id="vorbereitung-der-wiedergabe">Vorbereitung der Wiedergabe</h2>
<h2 id="einlegen-einer-disk">Einlegen einer Disk</h2>
<p>1 Drücken Sie [OPEN/CLOSE ▲], um das Disk-Fach zu öffnen. <br />
2 Legen Sie eine Disk mit der Etikettseite nach oben weisend auf das Disk-Fach.</p>
<p><img src="/content/2026/05/1018651/images/8b7dda341ffd8454b5ca2792a7ae0cc3a6895411f03b7e73d1eed52f8c7aaf39.jpg" alt="Illustration of a hand using a circular tool to press or interact with a mechanical component (no text or symbols visible)" loading="lazy" decoding="async"></p>
<p>Richten Sie die Disk korrekt auf die Vertiefung im Disk-Fach aus.</p>
<p>- Vergewissern Sie sich, dass die kompatibel ist.
(Siehe seite 13 mit der Liste kompatibler Disks.)</p>
<p>3 Drücken Sie [OPEN/CLOSE ▲], um das Disk-Fach zu schließen.</p>
<p>Das Laden der Disk kann eine Weile dauern.</p>
<p>Auswerfen der Disk:</p>
<p>Drücken Sie [OPEN/CLOSE ▲].</p>
<h2 id="einsetzen-einer-sd-karte">Einsetzen einer SD-Karte</h2>
<p>1 Drücken Sie die SD-karte vorsichtig mit dem Etikett nach oben weisend in das Fach des SD-kartensteckplatzes, bis sie einrastet.</p>
<p><img src="/content/2026/05/1018651/images/4b2e1b829d9b8c5544bbe5d3401eb3ebcfc87cef0b77dce22c3eb580a9ef5148.jpg" alt="0 12345 SD-Karis" loading="lazy" decoding="async"></p>
<p>Entfernen der SD-karte:</p>
<p>Drücken Sie die SD-karte im Stoppmodus leicht nach innen und ziehen Sie sie dann langsam heraus.</p>
<h2 id="auswählen-des-mediums">Auswählen des Mediums</h2>
<p>Wird eine SD-Karte eingesetzt, sollte das korrekte Medium im Vorfeld ausgewählt werden. Sie können die Einstellung des Mediums wie nachfolgend beschrieben umschalten.
„Medienauswahl“ ist nur bei eingelegter SD-karte verfügbar.</p>
<p>1 Drücken Sie im Stoppmodus [SETUP]. <br />
2 Betätigen Sie [▲ / ▼] zur Wahl von 📋, und drücken Sie dann [ENTER]. <br />
3 Verwenden Sie [▲ / ▼], um „Medienauswahl“ zu wählen. <br />
4 Drücken Sie wiederholt [ENTER], um das gewünschte Medium auszuwählen. <br />
5 Drücken Sie [SETUP], um das Menü zu verlassen.</p>
<p>Das Gerät wird auch dann beim nächsten Einschalten im „Disc“-Modus starten, wenn Sie aus dem „SD-Karte“-Modus in den Standby-Modus umgeschaltet haben.</p>
<h2 id="grundlegende-wiedergabeverfahren">Grundlegende Wiedergabeverfahren</h2>
<p>Wiedergabe (BD, DVD oder Disk mit AVCHD-Dateien)</p>
<p><img src="/content/2026/05/1018651/images/ce209f82e1e00222f12126482a615d9cb136ac8a38581976391da94663f51b52.jpg" alt="TOSHIBA BDX2000KE - Grundlegende Wiedergabeverfahren - 1" loading="lazy" decoding="async"></p>
<p>BD
VIDEO</p>
<p>[NO TEXT]</p>
<p>DVD VIDEO</p>
<p>AVCHD</p>
<p>1 Legen Sie eine Disk ein.</p>
<p>2 Die Wiedergabe startet gegebenenfalls automatisch.</p>
<p>Sollte das nicht der Fall sein, drücken Sie [PLAY▶].</p>
<p>- Be i einigen Disks wird ein Titel- oder Di angezeigt.
Lesen Sie dazu „Benutzung von Titel-/Disk-/Pop-up-Menü“ auf seite 17.</p>
<p>Um die Wiedergabe zu pausieren:</p>
<p>D is Drücken Sie [PAUSEH]. Gerät
Um zur normalen Wiedergabe zurückzukehren:
Drücken Sie [PLAY▶].</p>
<p>Um die Wiedergabe zu stoppen:</p>
<p>Drücken Sie [STOP ■].</p>
<p>Die Wiedergabe befindet sich nun im Modus Fortsetzung-bei-Stopp.</p>
<h2 id="fortsetzung-bei-stopp-modus">Fortsetzung-bei-Stopp Modus</h2>
<p>Wenn Sie bei aktiviertem Fortsetzung-bei-Stopp Modus wieder [PLAY▶] betätigen, wird die Wiedergabe von dem Punkt an fortgesetzt, an dem sie gestoppt worden war.</p>
<h2 id="hinweis-4">Hinweis</h2>
<ul>
<li>Bei einer BD, die Java-Anwend Java), steht die Fortsetzungs-Wiedergabefunktion u. U. nicht zur Verfügung. </li>
<li>
<p>Im „Disc“ - Modus werden die Fortsetzungsinformationen gelöscht, wenn</p>
</li>
<li>
<p>[STOP ■] im Fortsetzung-bei-Stopp Modus gedrückt wird. <br />
-die Kindersicherung geändert wird.
-das Disk-Fach geöffnet wird. </p>
</li>
<li>Im „SD-Karte“-Modus werden die Fortsetzungsinformationen gelöscht, wenn </li>
<li>[STOP ■] im Fortsetzung-bei-Stopp Modus gedrückt wird. <br />
-die SD-karte entfernt wird. <br />
-das Gerät in den Standby-Modu <br />
ird.</li>
</ul>
<p>ngen unte</p>
<p>versetzt v</p>
<h2 id="hinweis-5">Hinweis</h2>
<ul>
<li>Wenn ein bestimmter Betriebsvorgang ent durch die Disk oder durch dieses Gerät gesperrt ist, erscheint das Symbol rechts oben auf dem Fernsehschirm. </li>
<li>Während der Wiedergabe einer Doppelschi kann es vorkommen, dass das Bild kurzzeitig stoppt. Dies tritt beim Umschalten von der 1. Schicht auf die 2. Schicht der Disk auf. Dabei handelt es sich nicht um eine Funktionsstörung. </li>
<li>Bei Wiedergabe von BD-Videos und DVD-Vi Disk-Menü kann dieser Vorgang variieren. Einzelheiten finden Sie ggf. in der Begleitliteratur der jeweiligen Disk. </li>
<li>Wenn das Bild im Pausenmodus verschwom stellen Sie den Eintrag „Standbildmodus“ im „Video“-Menü auf „Halbbild“. Siehe „Standbildmodus“ auf seite 28.</li>
</ul>
<p>16 DE</p>
<h2 id="wiedergabe-6">WIEDERGABE</h2>
<p>Benutzung von Titel-/Disk-/Pop-up-Menü</p>
<p><img src="/content/2026/05/1018651/images/1fb477b32ca13ff24cd02901eb69065a2ef719881c12af10005de2467a840c40.jpg" alt="TOSHIBA BDX2000KE - WIEDERGABE - 1" loading="lazy" decoding="async"></p>
<p>BD
VIDEO</p>
<p><img src="/content/2026/05/1018651/images/897d3b05187401b92d66c90d988c7036097f7adc019bb65fb2f7404e890b82c9.jpg" alt="TOSHIBA BDX2000KE - WIEDERGABE - 2" loading="lazy" decoding="async"></p>
<p>DVD
VIDEO</p>
<p>AVCHD</p>
<p>Viele BD-Videos und DVD-Video-Disks enthalten ein Titelmenü (BD-Videos / DVD-Video / AVCHD), Disk-Menü (DVD-Video) oder Pop-Up-Menü (BD-Videos), das Sie durch die verfügbaren Funktionen der Disk führt. Der Inhalt dieser Menüs kann je nach Disk variieren.</p>
<p>Titelmenü (BD-Videos / DVD-Video / AVCHD)</p>
<p>1 Drücken Sie [TOP MENU].</p>
<p>2 Betätigen Sie [▲ /▼ /◄/►] zur Wahl des gewünschten Eintrags, und drücken Sie dann [ENTER].</p>
<p>3Drücken Sie [TOP MENU], um das Menü zu verlassen.</p>
<p>Disk-Menü (DVD-Video)</p>
<p>1 Drücken Sie [POP MENU / MENU].</p>
<p>2 Betätigen Sie [▲ /▼ /◄/►] zur Wahl des gewünschten Eintrags, und drücken Sie dann [ENTER].</p>
<p>3Drücken Sie [POP MENU / MENU], um das Menü zu verlassen.</p>
<p>Pop-Up-Menü (BD-Videos)</p>
<p>- Dabei handelt es sich um eine bestimmten BD-Videos zur Verfügung steht. Nach Drücken von [POP MENU / MENÜ] erscheint während der Wiedergabe ein Menü auf dem Fernsehschirm.</p>
<p>1 Drücken Sie während der Wiedergabe des BD-Videos auf [POP MENU / MENU].</p>
<p>2 Betätigen Sie [▲ / ▼ / ◀ / ▶] zur Wahl des gewünschten Eintrags, und drücken Sie dann [ENTER].</p>
<p>3Drücken Sie [POP MENU / MENU], um das Menü zu verlassen.</p>
<h2 id="hinweis-6">Hinweis</h2>
<ul>
<li>Inhalt und Bedienung der Menüs verschieden. Einzelheiten finden Sie ggf. in der Begleitliteratur der jeweiligen Disk. </li>
<li>Ein Titelmenü steht auch für SD Dateien zur Verfügung.</li>
</ul>
<p>Wiedergabe (Audio-CD oder Medium mit DivX®-/MP3-/Windows Media™ Audio-/JPEG -Dateien)</p>
<p><img src="/content/2026/05/1018651/images/102fa39596adcf4b83cd9db21d7a6b5ec549ab0cccf69001ef2bfcaca209a158.jpg" alt="TOSHIBA BDX2000KE - Hinweis - 1" loading="lazy" decoding="async"></p>
<p>CD</p>
<p>DivX</p>
<p>MP3</p>
<p>WMA</p>
<p>JPEG</p>
<p>1 Legen/Setzen Sie eine Audio-CD bzw. eine medium mit DivX® (für SD-Karten nicht verfügbar), MP3, WMA oder JPEG-Dateien ein.</p>
<p>• Der Medienfilterbildschirm wir <br />
- Wenn die Audio-CD bzw. Disk n enthält, fahren Sie mit dem Schritt 3 fort.</p>
<p>2 Wählen Sie im Medienfilterbildschirm die Dateiart aus, die Sie wiedergeben möchten. Drücken Sie dann [ENTER], um die Dateiliste anzuzeigen.</p>
<p>3 Betätigen Sie [▲ / ▼] zur Wahl eines Tracks, Ordners oder einer Datei, und drücken Sie dann [ENTER]. Mithilfe von [◀ / ▶] können Sie Ordner öffnen und schließen. (nur für DivX® / MP3 / WMA / JPEG-Dateien).</p>
<p>- Sobald Sie nach Markierung der Datei [ENTER] drücken, startet die Wiedergabe.</p>
<p>z. B.) JPEG <br />
<img src="/content/2026/05/1018651/images/f977a9c38c2e9a5b0ba753d57276cbbf44062a76f08c242dbbb7af45882efc3e.jpg" alt="1 2 3 4 5 6 TR - / 20 Titelliste JPEG_DISC Folder_1 Folder_2 Folder_3 JPEG_A JPEG_B JPEG_C JPEG_D 2 / 3 Selte rauf Selte runter Medienmod." loading="lazy" decoding="async"></p>
<p>7</p>
<ol>
<li>Audio-CD</li>
</ol>
<p>onTrack-informationenn, die bei</p>
<p>DivX® / MP3 / WMA / JPEG</p>
<p>Dateiinformationen</p>
<ol>
<li>Audio-CD</li>
</ol>
<p>„CD-DA“ wird angezeigt</p>
<p>DivX® / MP3 / WMA / JPEG</p>
<p>Der Name der aktuellen Disk, SD-karte oder des aktuellen Ordners wird angezeigt</p>
<ol>
<li>Audio-CD</li>
</ol>
<p>Liste der Tracknummern und Spielzeiten</p>
<p>DivX® / MP3 / WMA / JPEG</p>
<p>Liste der Namen der Ordner oder Dateien auf der aktuellen Disk bzw. im aktuellen Ordner</p>
<ol>
<li>Benutzerführung</li>
</ol>
<p>s Drücken Sie [Rof], um zum vorigen Seite zu wechseln Drücken Sie [Grün], um zum nächsten Seite zu wechseln</p>
<p>k a r f e n m i t A V C H D -
Drücken Sie [Gelb], um die Untertitelliste aufzurufen
Drücken Sie [Blau], um „Medienmod.“ auszuwählen</p>
<ol>
<li>
<p>Aktuelle Seite / Gesamtanzahl der Seiten</p>
</li>
<li>
<p>Wiedergabestatus</p>
</li>
<li>
<p>Mediensymbol</p>
</li>
</ol>
<p><img src="/content/2026/05/1018651/images/42931dc57230a38efe17232a74cb58d200c82a7d1e8ca787db622810d9040eda.jpg" alt="TOSHIBA BDX2000KE - Hinweis - 3" loading="lazy" decoding="async"></p>
<p>: O r d n e r :</p>
<p><img src="/content/2026/05/1018651/images/6b0347619e325f7a8308974a5dc70e0dc99c5e6a8a36d604b6f7ae9293ce008f.jpg" alt="TOSHIBA BDX2000KE - Hinweis - 4" loading="lazy" decoding="async"></p>
<p>d i o - C D</p>
<p>Tracks</p>
<p><img src="/content/2026/05/1018651/images/739e6cc7c7f03ceaec50f2b5033a875ada52686b9ab07a240e67d2bef32d8dec.jpg" alt="TOSHIBA BDX2000KE - Hinweis - 5" loading="lazy" decoding="async"></p>
<p>: DivX®-Dateien</p>
<p><img src="/content/2026/05/1018651/images/730ee15dd6570e9976b35bce3b7ea134ed8eaddec261d70a67cd77ea51adc04e.jpg" alt="TOSHIBA BDX2000KE - Hinweis - 6" loading="lazy" decoding="async"></p>
<p>: MP3-Dateien</p>
<p><img src="/content/2026/05/1018651/images/6423a8e9dc68c6fd7df4400f4a2a2472d2a009d0f1c63dfc9ed51be984561663.jpg" alt="TOSHIBA BDX2000KE - Hinweis - 7" loading="lazy" decoding="async"></p>
<p>: W M A - D a t</p>
<p><img src="/content/2026/05/1018651/images/fef959bf5dd1448bba61bb8cc33e17394eabf99c70af7911ce4bd0f996e3b71d.jpg" alt="TOSHIBA BDX2000KE - Hinweis - 8" loading="lazy" decoding="async"></p>
<p>e n : J P E G</p>
<p>- Date i e</p>
<p>Um die Wiedetgabe Dustoppema
Drücken Sie [STOP ■].</p>
<p>DE</p>
<p>17</p>
<p><img src="/content/2026/05/1018651/images/9330fde0efba493294b9d1f94d68dc30ef8ff4be01ee9d90e237d78f221ff3e6.jpg" alt="TOSHIBA BDX2000KE - Hinweis - 9" loading="lazy" decoding="async"></p>
<p><img src="/content/2026/05/1018651/images/c4d11225503337344a9b5c10cef1c52f5ecf2372e5a9549499becfd8e872bc39.jpg" alt="TOSHIBA BDX2000KE - Hinweis - 10" loading="lazy" decoding="async"></p>
<p><img src="/content/2026/05/1018651/images/306edb06780fda643893329723f877b30417653fa50a0d7b34b8ba6e2782ef96.jpg" alt="TOSHIBA BDX2000KE - Hinweis - 11" loading="lazy" decoding="async"></p>
<p><img src="/content/2026/05/1018651/images/ae41259eaa3c92b88fd9a035483b9a82fe1da2002b608d3da901356586477f24.jpg" alt="TOSHIBA BDX2000KE - Hinweis - 12" loading="lazy" decoding="async"></p>
<h2 id="wiedergabe-7">WIEDERGABE</h2>
<h2 id="hinweis-7">Hinweis</h2>
<p>- Zeichen, die von diesem Gerät nic können, werden durch Sternzeichen (*) ersetzt.</p>
<p>• Die Liste enthält möglicherweise die aufgrund des Zustands ihrer Aufzeichnung nicht abgespielt werden können.</p>
<p>- Bei hochauflösenden JPEG-Dateien Sekunden verstreichen, bevor das Bild auf dem Fernsehschirm erscheint.</p>
<p>- Progressive JPEG-Dateien (d.h. im abgespeicherte JPEG-Dateien) können mit diesem Gerät nicht wiedergegeben werden.</p>
<p>• Das System kann bis zu 255 Ordner/99; Ordner/9.999 Dateien für BD, DVD und SD-karte erkennen.</p>
<p>• Die Verzeichnisebene 9 und tiefene von CDs können nicht angezeigt werden. Die Verzeichnisebene 10 und tiefere Verzeichnisebenen von DVDs und SD-karten können nicht angezeigt werden.</p>
<p>- Für Informationen zur Wiedergabe
„Verwendung einer SD-Karte“ auf seite 18.</p>
<p>- Dateitypen, die nachstehend nicht werden nicht erkannt.</p>
<p>-DivX.avi/.AVI/.divx/.DivX</p>
<p>-MP3:.mp3</p>
<p>- W M A : . w m a</p>
<p>-JPEG:.jpg/.jpeg*</p>
<p>* Der Dateityp „.jpeg“ steht für SD-Karten nicht zur Verfügung.</p>
<p>- Wenn eine Disk AVCHD-Dateien andere Dateien, die sich auf derselben Disk befinden, nicht wiedergegeben werden.</p>
<p>- Zusätzlich auf Multi-border BD-RE/-Rat Abschnitte können nicht erkannt werden.</p>
<p>Zusätzlich auf Multi-border DVD Abschnitte können nicht erkannt werden.</p>
<p>4 Betätigen Sie [▲ / ▼] zur Wahl eines Ordners
ich oder einer Datei, und drücken Sie dann [ENTER].
Mithilfe von [◀/▶] können Sie Ordner öffnen
und schließen.</p>
<p>- Sobald Sie nach Markierung der gewünsch [ENTER] drücken, startet die Wiedergabe der Datei. können mehrere</p>
<h2 id="warnhinweise-7">Warnhinweise</h2>
<p>- Entfernen Sie die SD-Karte nicht, oder sch
n Gerätnichtenden Standby-Modus, während der Inhalt
der Karte wiedergegeben wird. Dies kann eine
Funktionsstörung oder einen Verlust der auf der Karte
999 Dateien für CD 999
aufzeichneten Daten verursachen.</p>
<h2 id="hinweis-verzeichnisebenen">Hinweis Verzeichnisebenen</h2>
<p>- Der Bildschirm „Medienauswahl“ kann unter Umständen verschwinden, wenn
e- den Bildschaftenscheiner aktiviert ist,
- [RETURN] betätigt wird,</p>
<p>- t dausf genrichtus insmenü aufgerufen wird.
- Wenn der „Medienauswahl“- Bildschirm vers
bevor Sie eine Auswahl getroffen haben, siehe
„Auswählen des Mediums“ auf seite 16.</p>
<p>• Die auf einer SD-karte abgespeicherten Or Dateien dürfen nicht unter Einsatz eines Computers von der Karte gelöscht werden. SD-karten, die mit einem Computer formatiert wurden, können möglicherweise nicht von diesem Gerät gelesen werden.</p>
<p>- Enthält ein Ordner- oder Dateiname eines nicht leharen Zeichen, wird der Ordner- oder Dateiname möglicherweise nicht korrekt angezeigt.</p>
<p>R-WI ∈ R t a luefsgbeam e mZre ieqrhee\n |:¥</p>
<h2 id="verwendung-einer-sd-karte">Verwendung einer SD-Karte</h2>
<h2 id="avchd-mp3-wma-jpeg-2">AVCHD | MP3 | WMA | JPEG</h2>
<p>Mit SD-karten können Sie zusätzlich zur Wiedergabe der auf der Karte gespeicherten AVCHD/ MP3/ WMA/ JPEG-Dateien die folgenden Funktionen nutzen.</p>
<ul>
<li>Spezielle zusätzliche I (Weitere Informationen über den für eine Disk evtl. verfügbaren Zusatzinhalt finden Sie in der Begleitliteratur der betreffenden Disk.) </li>
<li>BD - Live Funktion (BD - R (Für weitere Informationen zu BD-Live siehe seite 23.)</li>
</ul>
<p>1 Setzen Sie eine SD-Karte ein (zum Thema Einlegen einer Disk siehe seite 16).</p>
<p>Wenn keine Disk in Betrieb ist, könnte „Medienauswahl“ auf dem Fernsehbildschirm erscheinen.</p>
<p>2 Betätigen Sie [▲ / ▼] zur Wahl von „SD-Karte“, und drücken Sie dann [ENTER].</p>
<p>- Enthält die SD-karte nur eine bitte zum Schritt 4.</p>
<p>3 Wählen Sie die Dateiart aus, die Sie wiedergeben möchten. Drücken Sie dann [ENTER], um die Dateiliste anzuzeigen.</p>
<p><img src="/content/2026/05/1018651/images/e772131d3c754aca6c94d3b972b0878f93b01096b1283de692e0180732c4faf7.jpg" alt="Bitte wählen Sie zur Wiedergabe. Video Audio Bild" loading="lazy" decoding="async"></p>
<p>• Die Wiedergabe von AVCHD-Dat nachdem Sie „Video“ gewählt haben. (Für AVCHD-Dateien steht keine Dateiliste zur Verfügung.)</p>
<h2 id="kodak-picture-cd-2">Kodak Picture CD</h2>
<h2 id="jpeg-6">JPEG</h2>
<p>Dieses Gerät kann auch JPEG-Dateien wiedergeben, die auf einer Kodak Picture CD gespeichert sind. Damit können Sie Photobilder auf dem Fernsehgerät anzeigen, wenn Sie eine Kodak Picture CD abspielen. Dieses Gerät entspricht Kodak Picture CD Ver.7.0. Wenn Sie Naheres über Kodak Picture CD wissen möchten, kontaktiereh Sie einen Kodak Inc. Entwicklungsservice. <br />
1 Legen Sie eine Kodak Picture CD ein. Auf M dem Fernsehbildschirm erscheint 0 ) . automatisch das Kodak Picture CD-Menü.</p>
<p><img src="/content/2026/05/1018651/images/188d02e62134a97404c4e44b98d2ce044a8413f2d44567b08462fd855a7ed9bd.jpg" alt="1 TR -- / 16 Bildvorschau Bilddatelen 2 / 3 Zurück Weiter 4 2 3" loading="lazy" decoding="async"></p>
<ol>
<li>Dateinformationen </li>
<li>Aktuelle Seite / Gesamtanzahl der Seiten </li>
<li>Benutzerführung <br />
e i DrückeneSig [Gelb]; um aufnovortigen Seite zu wechseln
Drücken Sie [Blau], um zum nächsten Seite zu wechseln</li>
<li>Wiedergabestatus</li>
</ol>
<h2 id="wiedergabe-8">WIEDERGABE</h2>
<h2 id="2-betätigen-sie-um-die-gewünschte-datei-zur-wiedergabe-auszuwählen-und-drücken-sie-dann-play-oder-enter">2 Betätigen Sie [▲ / ▼ / ◀/▶], um die gewünschte Datei zur Wiedergabe auszuwählen, und drücken Sie dann [PLAY▶] oder [ENTER].</h2>
<p>- Ein Bild der gewählten Datei und Sie können zum nächsten weitergehen.
Um die Wiedergabe zu stoppen:
Drücken Sie [STOP ■].
So gehen Sie zum ersten Eintrag zurück:
Drücken Sie [TOP MENU].
So kehren Sie zur zuletzt gespielten Datei zurück:
Drücken Sie [POP MENU / MENU].</p>
<h2 id="tipps-zur-wiedergabe-von-jpeg-kodak-picture-cd">Tipps zur Wiedergabe von JPEG/ Kodak Picture CD</h2>
<p>- Bei Anzeige eines Bilds wird dies von [ANGLE] um 90 Grad im Uhrzeigersinn gedreht.
- Um den Übergangseffekt beim Um den einzelnen Bildern zu ändern, drücken Sie [MODE] einmal und betätigen dann [◀/▶] oder [ENTER] zur Wahl eines der beiden Übergangseffekte, „Rein-/Rausschneiden“ oder „Einblenden/Ausblenden”.
- Um die Größes des Wiedergabebild Wiedergabe von JPEG/Kodak Picture CD zu ändern, drücken Sie [MODE] zweimal und anschließend [◀/▶] oder [ENTER], um zwischen „Normal“ (100 %) und „Klein“ (95 %) umzuschalten. Bei bestimmten Dateien (z. B. Dateien mit kleiner Bildgröße) kann es vorkommen, dass eine Änderung der Bildgröße ohne Wirkung bleibt.</p>
<h2 id="weiterführende-wiedergabefunktionen">Weiterführende Wiedergabefunktionen</h2>
<h2 id="über-divx-und-divx-vod">Über DivX® und DivX® VOD</h2>
<h2 id="divx-7">DivX</h2>
<p>Hinweise zum erworbenen oder gemieteten offiziell DivX®-zertifizierten Produkt</p>
<p>- Wenn Sie über die offiz <sup>1</sup> -Video, deneite so genannten DivX <sup>®</sup> -Video-On-Demand (VOD)-Dienst, eine DivX <sup>®</sup> -Datei leihen oder kaufen möchten, benötigen Sie jedes Mal einen Registrierungscode des DivX <sup>®</sup> VOD-Diensts. Siehe „DivX <sup>®</sup> VOD“ unter „FUNKTIONSEINRICHTUNG“ auf seite 30.</p>
<h2 id="mögliche-fehler">Mögliche Fehler</h2>
<p>„Dieser Film kann noch ○ angeschaut werden. Möchten Sie einen Ihrer ○ jetzt nutzen?“</p>
<p>Einige DivX® VOD-Dateien besitzen eingeschränkte Spielzeiten. Sie können Sie nicht über das Spielzeitlimit hinaus wiedergeben.</p>
<p>„Dieser Player ist nicht autorisiert, diese Disc wiederzugeben.“</p>
<p>DivX® VOD-Dateien, die unter verschiedenen Registrierungscodes erhalten wurden, können nicht mit diesem Gerät abgespielt werden.</p>
<p>„Die Leihperiode für diese Disc ist abgelaufen.“</p>
<p>DivX® VOD-Dateien, deren Mietzeitraum abgelaufen ist, können nicht wiedergegeben werden.</p>
<p>„Dieses Videoformat wird von diesem Gerät nicht unterstützt.“</p>
<p>Sie können keine DivX®-Dateien wiedergeben, die größer sind als 1,920 x 1,080.</p>
<p>„Audioformat wird von diesem Player nicht unterstützt.“</p>
<p>Bei DivX®-Dateien mit einem anderen Tonformat als MPEG1-Audio-Layer 3 (MP3), MPEG1-Audio-Layer 2 und Dolby Digital erfolgt keine Tonausgabe; es wird nur das Bild angezeigt.</p>
<h2 id="hinweis-8">Hinweis</h2>
<ul>
<li>D i v® Dateien besitzen die Erweiterung „avi“ und „DivX“. Alle Dateien mit der Erweiterung „avi“ werden als Dateien des Formats MPEG4 erkannt. <br />
• Auufwiedergedeben / - R können höc (Ordner) bzw. 999 Dateien erkannt werden. </li>
<li>Auf einer BD-RE/-R und DVD-RW/-R können höchstens 999 Gruppen (Ordner) bzw. 9.999 Dateien erkannt werden. <br />
• Die Verzeichnisebene 10 und t Verzeichnisebenen können nicht angezeigt werden. </li>
<li>Zeichen, die von diesem Gerät können, werden durch Sternzeichen (*) ersetzt. </li>
<li>Beim Abspielen von Dateien, Bitrate aufgezeichnet wurden, treten möglicherweise kurzzeitige Unterbrechungen im Bild auf. </li>
<li>Obwohl dieses Gerät-Logd verskehemistekan des vorkommen, das bestimmte Daten aufgrund ihrer Eigenschaften, der Bitrate, den Audioformatseinstellungen uzwichne abgespielt werden können. </li>
<li>Bei Wahl einer 0-Dateß kann lÄnigen Zeit (in manchen Fällen mehr als 20 Sekunden) verstreichen, bevor die Wiedergabe startet. </li>
<li>Falls Datejendes® Auf einer CDs-RW/-Rv X nicht wiedergeben werden können, kopieren Sie sie auf eine BD-RE/-R oder DVD-RW/-R und versuchen Sie, diese wiederzugeben. </li>
<li>Weitere Informati®findemSiezauf DivX http://www.divx.com.</li>
</ul>
<h2 id="wiedergabe-von-divx-mit-divx-externen-untertiteln">Wiedergabe von DivX® mit DivX® Externen Untertiteln</h2>
<h2 id="divx-8">DivX</h2>
<p>Während der DivX®-Wiedergabe können die Untertitel angezeigt werden, die Sie selbst erstellt haben.</p>
<p>1 Folgen Sie den Schritten 1 bis 3 in „Wiedergabe (Audio-CD oder Medium mit DivX®-MP3X/Windows Media™ Audio-/JPEG - Dateien)“ auf seite 17.</p>
<p>2 Wählen Sie eine Datei, die Sie wiedergeben möchten, und drücken Sie [Gelb].</p>
<p>Die Untertitelliste erscheint.</p>
<p><img src="/content/2026/05/1018651/images/c07ab5d150cacfb832c6af526b2644ed016ca3b90f50caab91cc4e2b56150366.jpg" alt="T R - / 9 Untertitelliste DivX_File [Aus] [ASS] [SM] [SRT] [SSA] [SUB] [TXT] Titelliste" loading="lazy" decoding="async"></p>
<ul>
<li>„DivX Untertitel“ wird dann angezeigt, wenn für die gewählte Datei DivX®-Untertitel zur Verfügung stehen. </li>
<li>Wenn Sie [PLAY▶] oder [ENTER] anstelle von [Gelb] drücken, beginnt die Wiedergabe ohne Untertitel.</li>
</ul>
<p>3 Wählen Sie die gewünschte Untertiteldatei aus und drücken Sie [PLAY ▶] oder [ENTER].</p>
<p>Die Wiedergabe der DivX®-Datei mit DivX®-Untertitel wird gestartet.</p>
<p>EINLEITUNG ANSCHL</p>
<p>e e e</p>
<p>cht erkan</p>
<p>mit einer</p>
<p>E SONSTIGES</p>
<p>FUNKTIONSEIN-
RICH TUNG</p>
<p>neben</p>
<h2 id="wiedergabe-9">WIEDERGABE</h2>
<h2 id="hinweis-9">Hinweis</h2>
<p>- Um von dieser Funktion Gebrauch müssen die folgenden Bedingungen erfüllt sein:</p>
<ul>
<li>Die Wiedergabedatei und die Unt den gleichen Dateinamen besitzen. </li>
<li>Die Wiedergabedatei und die Unt sich im gleichen Ordner befinden.</li>
</ul>
<p>- Dieses Gerät unterstützt nur Unt
einer der folgenden Erweiterungen: .smi (.SMI), .srt (.SRT), .sub (.SUB), .ass (.ASS), .ssa (.SSA), .txt (.TXT).
(Die Erweiterungen .sub (.SUB) oder .txt (.TXT)
werden möglicherweise nicht erkannt.)</p>
<p>- Untertitel, die die Sp-Datezeit der überschreiten, werden nicht angezeigt.</p>
<h2 id="einzelbild-weiterschaltung">Einzelbild-Weiterschaltung</h2>
<p><img src="/content/2026/05/1018651/images/437cf33512498b18fde83e698b7d0759fc82cd5e6128e71d5fcfdd1a28f44c96.jpg" alt="TOSHIBA BDX2000KE - Einzelbild-Weiterschaltung - 1" loading="lazy" decoding="async"></p>
<p>ertiteldatei.mussen</p>
<p>7 Betatigen Sie im Pausenmodus [PAUSEIII]. Bei jeder Betätigung von [PAUSEII] wird um ein Bild weitergeschaltet.</p>
<p>2 Drücken Sie [PLAY] um die Wiedergabe fortzusetzen.</p>
<h2 id="hinweis-10">Hinweis</h2>
<ul>
<li>Einzelbild-Weiterschaltung ist nur in Vorwärtsrichtu
dimglich. </li>
<li>Wenn das Bild während der Einzelbild-Weiterschaltung verschwommen ist, stellen Sie den Eintrag „Standbildmodus“ des Menüs „Video“ auf „Halbbild“ ein. Siehe „Standbildmodus“ auf seite 28.</li>
</ul>
<h2 id="suchlauf-vorwärts-rückwärts">Suchlauf vorwärts / rückwärts</h2>
<p><img src="/content/2026/05/1018651/images/588b394580124d11fcc53f93f22576c466b54b9dd4dbe00a19809869ce80a9ff.jpg" alt="TOSHIBA BDX2000KE - Suchlauf vorwärts / rückwärts - 1" loading="lazy" decoding="async"></p>
<p><img src="/content/2026/05/1018651/images/2ba984229a690e59877fe6ac4ca078a216dc56f6fc1ce86c6786d1bfaa93de31.jpg" alt="TOSHIBA BDX2000KE - Suchlauf vorwärts / rückwärts - 2" loading="lazy" decoding="async"></p>
<p><img src="/content/2026/05/1018651/images/38664df4147463dbe8407e21801e66621488087fddc27c147fe108561fef226f.jpg" alt="TOSHIBA BDX2000KE - Suchlauf vorwärts / rückwärts - 3" loading="lazy" decoding="async"></p>
<p><img src="/content/2026/05/1018651/images/e3736732742b016af2581b82b662c27f9e683ec642af42667bc1dc388da68ca1.jpg" alt="TOSHIBA BDX2000KE - Suchlauf vorwärts / rückwärts - 4" loading="lazy" decoding="async"></p>
<p><img src="/content/2026/05/1018651/images/60cf986562f160eecd7e53059635c16284dff9a9dc6ecdcdc87b245a0cd4a086.jpg" alt="TOSHIBA BDX2000KE - Suchlauf vorwärts / rückwärts - 5" loading="lazy" decoding="async"></p>
<p><img src="/content/2026/05/1018651/images/2b0d468167451f0e110d0af4280da9b5ce20f956bada5dacb55165ac590d368c.jpg" alt="TOSHIBA BDX2000KE - Suchlauf vorwärts / rückwärts - 6" loading="lazy" decoding="async"></p>
<h2 id="wma-5">WMA</h2>
<p>1Um einen Suchlauf in Vorwärtsrichtung auszuführen, betätigen Sie während der Wiedergabe [FWD▶▶].</p>
<p>Um einen Suchlauf in Rückwärtsrichtung auszuführen, betätigen Sie während der Wiedergabe [REV ◀◀].</p>
<p>Bei jeder Betätigung von [FWD▶▶] oder [REV◀◀] wechselt die Suchlaufgeschwindigkeit.</p>
<p>2 Drücken Sie [PLAY▶], um die Wiedergabe fortzusetzen.</p>
<h2 id="hinweis-11">Hinweis</h2>
<p>• Bei BD, DVD und AVCHD gibtes 5 <br />
- Bei Audio - C, MP3 und Windows Media™ Audio gibt es 3 Geschwindigkeitsstufen. <br />
- Bei Audio-CD ist die Schnellvorl Schnellrücklauf-Suche zwischen unterschiedlichen Tracks während der Programm- und Zufallswiedergabe nicht verfügbar. <br />
- B e i D <sup>®</sup> iMP3 und Windows Media™ Audio ist die Schnellvorlauf- und Schnellrücklauf-Suche zwischen unterschiedlichen Dateien nicht verfügbar. <br />
- Bei bestim m® DateiED funktioniert der Schnelldurchlauf vorwärts/rückwärts möglicherweise nicht.</p>
<h2 id="wiedergabe-in-zeitlupe">Wiedergabe in Zeitlupe</h2>
<p><img src="/content/2026/05/1018651/images/f4b37420b3dd0aa72d2276bf0b855b70a9f39bfcb56923d5131caa40a0a5a17c.jpg" alt="TOSHIBA BDX2000KE - Wiedergabe in Zeitlupe - 1" loading="lazy" decoding="async"></p>
<p>BD
VIDEO</p>
<p><img src="/content/2026/05/1018651/images/9ab5f68fde3dcb5e913da0e1131409f5229e8f174ea0d9b1c3aff5c73f36797a.jpg" alt="TOSHIBA BDX2000KE - Wiedergabe in Zeitlupe - 2" loading="lazy" decoding="async"></p>
<p>AVCHD</p>
<p>DivX</p>
<p>1 Drücken Sie während der Wiedergabe zunächst [PAUSE II] und dann [FWD ▶▶]. Bei jeder Betätigung von [FWD ▶▶] wechselt die Zeitlupengeschwindigkeit.</p>
<p>2 Drücken Sie [PLAY▶], um die Wiedergabe fortzusetzen.</p>
<h2 id="hinweis-12">Hinweis</h2>
<ul>
<li>Es gibt 3 Geschwindigkeitsstufen</li>
<li>Zeitlupenwiedergabe ist nur in V </li>
<li>Wenn das Bild während der Zeitlu verschwommen ist, stellen Sie den Eintrag „Standbildmodus“ im Menü „Video“ auf „Halbbild“. Siehe „Standbildmodus“ auf seite 28. </li>
<li>Bei bestim m <sup>®</sup> Dateid funktioniert der langsame Vorlauf möglicherweise nicht.</li>
</ul>
<h2 id="wiedergabewiederholung">Wiedergabewiederholung</h2>
<p>Die verfügbaren Wiederholungsfunktionen variieren je nach Disk.</p>
<p>1 Betätigen Sie während der Wiedergabe [REPEAT] zur Wahl des gewünschten Wiederholmodus.</p>
<table><tr><td colspan="2">Wiederholmodus Geeignete Datenträger</td></tr><tr><td>Kapitelwiederholung</td><td rowspan="2"></td></tr><tr><td>Das laufende Kapitel wird wiederholt wiedergegeben.</td></tr><tr><td>Titelwiederholung</td><td rowspan="2"></td></tr><tr><td>Der laufende Titel wird wiederholt wiedergegeben.Geschwindigkeitssstu</td></tr><tr><td>Trackwiederholung</td><td rowspan="2"></td></tr><tr><td>Der laufende Track wird wiederholt wiedergegeben.</td></tr><tr><td>Gruppenwiederholung</td><td rowspan="2"></td></tr><tr><td>Der aktuelle Ordner wird wiederholt wiedergegeben.</td></tr><tr><td>Wiederholung aller Tracks/Dateien</td><td rowspan="2"></td></tr><tr><td>Alle Tracks oder Dateien auf dem Datenträger werden wiederholt wiedergegeben.</td></tr></table>
<h2 id="hinweis-13">Hinweis</h2>
<ul>
<li>Wenn Sie die Wiedergabe stoppen, wird di Wiederholfunktion aufgehoben. </li>
<li>Wenn Sie auf ein anderes Kapitel, einen an einen anderen Track, eine andere Datei oder einen anderen Ordner umschalten, wird die Kapitel-, Titel-, Track / Datei- bzw. Gruppenwiederholung aufgehoben. </li>
<li>Währhepdzierten A-B-Wiederholung stehen die
o Wiederholmodi nicht zur Verfügung ich. <br />
J. Behwiedermatten Szenen stehen die Kapitel-
Titelwiederholung nicht zur Verfügung. </li>
<li>Eine für einen MP3 oder WMA-Ordner (Date) eingestellte Wiederholungsfunktion wird storniert, wenn Sie einen anderen MP3 oder WMA-Ordner (Datei) zur Wiedergabe auswählen.</li>
</ul>
<h2 id="wiedergabe-10">WIEDERGABE</h2>
<h2 id="a-b-wiederholung">A-B-Wiederholung</h2>
<p><img src="/content/2026/05/1018651/images/124a07b56c229a53435730bfa5a49d3c4103840bcea88f99bd3ddbbb98d89730.jpg" alt="TOSHIBA BDX2000KE - A-B-Wiederholung - 1" loading="lazy" decoding="async"></p>
<p>BD
VIDEO</p>
<p><img src="/content/2026/05/1018651/images/6b2130ee492e2d505d7b26b4d9fda51b03299481ecf53bf4d8a102ad902faf0a.jpg" alt="TOSHIBA BDX2000KE - A-B-Wiederholung - 2" loading="lazy" decoding="async"></p>
<p>DVD VIDEO</p>
<p><img src="/content/2026/05/1018651/images/03d1b337fcf64c631da2de630f4407e8c5a507de70154232067ffc4df1842292.jpg" alt="TOSHIBA BDX2000KE - A-B-Wiederholung - 3" loading="lazy" decoding="async"></p>
<p>CD</p>
<p>AVCHD</p>
<p>DivX</p>
<p>Diese Funktion ermöglicht es, einen bestimmten Abschnitt (zwischen Punkt A und Punkt B) wiederholt abzuspielen.</p>
<p>1 Drücken Sie während der Wiedergabe [A-B] an der Stelle, die als Anfangspunkt (A) festgelegt werden soll.</p>
<p>2Drücken Sie während der Wiedergabe [A-B] an der Stelle, die als Endpunkt (B) festgelegt werden soll.</p>
<p>Sobald Sie Punkt B festgelegt haben, startet die wiederholte Wiedergabe des Abschnitts zwischen Punkt A und B.</p>
<p>- Um die A-B-Wiederholung aufzu [A-B] erneut.</p>
<h2 id="hinweis-14">Hinweis</h2>
<p>- Punkt B muss innerhalb des gleich wie Punkt A festgelegt werden.</p>
<p>- Bei bestimmten Szenen steht die nicht zur Verfügung.</p>
<p>• Um den festgelegten Punkt[CLEAR].u</p>
<p>• Die A-B-Wiederholung funktionie Wiedergabe mit Wiederholung.</p>
<p>- Bei bestim m®-Daneid funktioniert die A-B-Wiederholung möglicherweise nicht.</p>
<h2 id="programmwiedergabe">Programmwiedergabe</h2>
<p><img src="/content/2026/05/1018651/images/b18a9ac7f84f5f02697af522ed04dadb342283d33faaa0646934d0f3edfc2b68.jpg" alt="TOSHIBA BDX2000KE - Programmwiedergabe - 1" loading="lazy" decoding="async"></p>
<p>CD</p>
<p>MP3</p>
<p>WMA</p>
<p>JPEG</p>
<p>Sie können eine Disk/Karte in einer von Ihnen gewünschten Reihenfolge abspielen.</p>
<p>1 Drücken Sie im Stoppmodus [MODE].</p>
<p>2 Betätigen Sie [▲ / ▼] zur Wahl des Tracks/ Ordners/ bzw. der Datei, und drücken Sie dann [ENTER].</p>
<p>z. B.) Audio-CD <br />
<img src="/content/2026/05/1018651/images/2dc606a329588005511e8581025fc6032c15a0bdcf1c1dbcbbc4837b0b385483.jpg" alt="1 2 3 4 5 6 TR --/16 Programm CD-DA Gesamt 0:26:24 8 0:36 9 1:14 10 0:45 11 0:50 12 0:53 13 0:20 14 0:54 2 / 3 2 1:14 4 0:50 9 1:14 11 0:50 12 0:53 14 0:54 8 0:36 Seite rauf Seite runter Zurück k Weiter" loading="lazy" decoding="async"></p>
<h2 id="1-audio-cd-2">1. Audio-CD</h2>
<p>Track-Informationen</p>
<p>DivX® / MP3 / WMA / JPEG</p>
<p>Dateinformationen</p>
<h2 id="2-audio-cd-2">2. Audio-CD</h2>
<p>„CD-DA“ wird angezeigt</p>
<p>DivX® / MP3 / WMA / JPEG</p>
<p>Der Name der aktuellen Disk, SD-karte oder des aktuellen Ordners wird angezeigt</p>
<h2 id="3-track-ordner-dateiliste">3. Track-/ Ordner-/ Dateiliste</h2>
<p>Track-/ Ordner-/ Dateiliste in ursprünglicher Reihenfolge</p>
<h2 id="4-programmierte-liste">4. Programmierte Liste</h2>
<p>Track-/Dateiliste in programmierter Reihenfolge</p>
<ol>
<li>Kumulative Wiedergabezeit aller Tracks in der programmierten Liste (nur Audio-CD)</li>
</ol>
<h2 id="6-wiedergabestatus">6. Wiedergabestatus</h2>
<ol>
<li>Aktuelle Seite / Gesamtanzahl der Seiten</li>
</ol>
<h2 id="8-benutzerführung">8. Benutzerführung</h2>
<p>Drücken Sie [Rot], um zur vorherigen Seite in der Track-/ Ordner-/ Dateiliste zu springen
Drücken Sie [Grün], um zur nächsten Seite in der Track-/ Ordner-/ Dateiliste zu springen
Drücken Sie [Gelb], um zur vorherigen Seite in der programmierten Liste zu springen
Drücken Sie [Blau], um zur nächsten Seite in der programmierten Liste zu springen</p>
<p>- Zur Auswahl eines O®,MPB,MMAn mit boden JPEG-Dateikrenutzern Sie [▲/▼], drücken danach [ENTER] und anschließend [▲/▼], um eine Datei auszuwählen. Drücken Sie dann [ENTER].</p>
<p>• Um die letzte Datei aus der P
en Titels oder Tracks
löschen, drücken Sie [CLEAR].</p>
<p>: B mW pe der Th a F u n g/ Dateien aus
löschen, betätigen Sie [▲ /▼] zur Wahl von „Alle</p>
<p>c l'ösch", am unteren RandslerListe.</p>
<p>- Betätigen Siea[◀ f▶] um zwischen den verschiedenen Ordnerebenen zu navigieren.</p>
<p>3Drücken Sie nach beendeter Programmierung [PLAY▶], um die Programmwiedergabe zu starten.</p>
<p>• Die Programmwiedergabe begin</p>
<p>So verlassen Sie den Programm-Wiedergabemodus:</p>
<p>- Drücken Sie im Stoppmodus auf</p>
<h2 id="hinweis-15">Hinweis</h2>
<p>- Drücken Sie während der Progr einmal [STOP ■], um den Startpunkt für die erneute Wiedergabe festzulegen. Drücken Sie anschließend [PLAY ▶], um die Programmwiedergabe von der Stelle aus fortzusetzen, an der [STOP ■] gedrückt wurde (Audio-CD), oder vom Beginn der Datei, in der [STOP ■] gedrückt wurde (MP3 / WMA / JPEG).</p>
<p>- Um das Programmfenster während der Programmwiedergabe aufzurufen, drücken Sie [STOP ■] zweimal. Um auf die Programmwiedergabe zurückzukehren, drücken Sie zunächst [RETURN], um das Programmfenster zu verlassen, und dann [PLAY ▶].</p>
<p>- Bis zu 99 Tracks / Dateien können einprog werden.</p>
<p>- Um den laufenden Programmschritt (Track/wiederholen, betätigen Sie [REPEAT] so oft, bis</p>
<p><img src="/content/2026/05/1018651/images/55d40866085bdc687f24fd7fb8c16b1ff91f50a0fa057e24b77e9e6efbd69edf.jpg" alt="TOSHIBA BDX2000KE - Hinweis - 1" loading="lazy" decoding="async"></p>
<p>∴ m = 3/11</p>
<p>r</p>
<p>The Ground Truth image displays a single, solid horizontal line. According to Rule 2 (UNDERSCORE & LINE RULES), this is a stylistic or background line, not a placeholder underscore. Therefore, the OCR result must ignore it and output nothing or only meaningful text. The provided OCR content is "____", which consists of four underscores. This is an incorrect interpretation of the line as a placeholder, violating the rule that stylistic lines must be ignored. The OCR has hallucinated underscores where none should exist based on the GT's visual context. Hence, the OCR result is inconsistent with the Ground Truth.</p>
<p>a</p>
<p>∴ m = 3/11</p>
<p>C</p>
<p>-</p>
<p>k</p>
<p>∴ m = 3/11</p>
<p>∴ m = 3/11</p>
<p>"</p>
<p>∴ m = 3/11</p>
<p>"</p>
<p>The Ground Truth image displays a single, solid horizontal line. According to Rule 2 (UNDERSCORE & LINE RULES), this is a stylistic or background line, not a placeholder underscore. Therefore, the OCR result must ignore it and output nothing or only meaningful text. The provided OCR content is "____", which consists of four underscores. This is an incorrect interpretation of the line as a placeholder, violating the rule that stylistic lines must be ignored. The OCR has hallucinated underscores where none should exist based on the GT's visual context. Hence, the OCR result is inconsistent with the Ground Truth.</p>
<p>∴ m = 3/11</p>
<p>∴ m = 3/11</p>
<p>∴ m = 3/11</p>
<p>a</p>
<p>[Non-Text]</p>
<p>1</p>
<p>[Non-Text]</p>
<p>Programm zu wiederholen, drücken Sie mehrmals [REPEAT], bis während der Wiedergabe „Alle“ erscheint.</p>
<ul>
<li>Während der Programmwiedergabe stehen Funktion für das Starten der Wiedergabe mit einem bestimmten Track bzw. einer bestimmten Datei und die Zufallswiedergabe nicht zur Verfügung. </li>
<li>Drücke [MODE], um in den Zufallswiedergabe-Modus zu schalten. </li>
<li>Das Programm wird gelöscht, wenn;</li>
<li>das Gerät in den Standby-Modus versetzt v</li>
<li>das Medium umgeschaltet wird.</li>
<li>die Disk/Karte entfernt wird (im „Disc“-Mo bewirkt schon das Öffnen des Disk-Fachs das Löschen der Programminformationen).</li>
</ul>
<p>(1) = 1/2( a - b/a + 1) + ... + b - 1/b + 1</p>
<p>DE</p>
<p>21</p>
<p><img src="/content/2026/05/1018651/images/064da61ddebf30eec38d4426f7c99a9efdd478c0500560c5aa05075b6ee64eca.jpg" alt="TOSHIBA BDX2000KE - Hinweis - 2" loading="lazy" decoding="async"></p>
<p><img src="/content/2026/05/1018651/images/0f12984597bcac8d76a726182e781fde29fee47cc3ffe57e5151df2db1088147.jpg" alt="TOSHIBA BDX2000KE - Hinweis - 3" loading="lazy" decoding="async"></p>
<p><img src="/content/2026/05/1018651/images/47697a1ec91a64e370ec760639c7e0e76684a775e3a45ece7793d5746fca045a.jpg" alt="TOSHIBA BDX2000KE - Hinweis - 4" loading="lazy" decoding="async"></p>
<p><img src="/content/2026/05/1018651/images/5755b387997ded01b1b9477fb73344c552617863cc44d5d76118286b22d1b040.jpg" alt="TOSHIBA BDX2000KE - Hinweis - 5" loading="lazy" decoding="async"></p>
<p><img src="/content/2026/05/1018651/images/caee0ab35545cf12a11e07c5d812c996ce6ab9a1c05b961ccd9e2734cc950061.jpg" alt="TOSHIBA BDX2000KE - Hinweis - 6" loading="lazy" decoding="async"></p>
<p><img src="/content/2026/05/1018651/images/35f851d94cc5c4b6fc74177af31db8f0ea786ea0a4bec153ccd7fb882529045d.jpg" alt="TOSHIBA BDX2000KE - Hinweis - 7" loading="lazy" decoding="async"></p>
<p><img src="/content/2026/05/1018651/images/04d71cb898d66cca06c3cafe87cb81c8cc8b894c45c43d3d920fcce4798a2626.jpg" alt="TOSHIBA BDX2000KE - Hinweis - 8" loading="lazy" decoding="async"></p>
<h2 id="wiedergabe-11">WIEDERGABE</h2>
<h2 id="zufallswiedergabe">Zufallswiedergabe</h2>
<p><img src="/content/2026/05/1018651/images/7d32588fcaadd0275d1f23771eea95c455c90d951386de0e87c3435acab59c0c.jpg" alt="TOSHIBA BDX2000KE - Zufallswiedergabe - 1" loading="lazy" decoding="async"></p>
<p>Diese Funktion ermöglicht eine Wiedergabe aller Tracks / Dateien in einer zufallsbestimmten Reihenfolge.</p>
<p>1 Drücken Sie im Stoppmodus [MODE] zweimal.</p>
<p>z. B.) Audio-CD <br />
<img src="/content/2026/05/1018651/images/fcde1e7fd6b74efdfda9f274248c58f562ad278308fa69222d6fa2237ce11534.jpg" alt="1 TR - / 16 Zufällig CD-DA Gesamt 1 : 13 : 29 1 0:36 2 1:14 3 0:45 4 0:50 5 0:53 6 0:20 7 0:54 1 / 3 Seite runter" loading="lazy" decoding="async"></p>
<h2 id="1-audio-cd-3">1. Audio-CD</h2>
<p>Track-Informationen</p>
<p>MP3 / WMA / JPEG</p>
<p>Dateinformationen</p>
<h2 id="2-audio-cd-3">2. Audio-CD</h2>
<p>„CD-DA“ wird angezeigt</p>
<p>MP3 / WMA / JPEG</p>
<p>Der Name der aktuellen Disk, SD-karte oder des aktuellen Ordners wird angezeigt</p>
<h2 id="3-track-dateiliste">3. Track-/Dateiliste</h2>
<p>Track-/Dateiliste wird in ursprünglicher Reihenfolge angezeigt</p>
<h2 id="4-benutzerführung">4. Benutzerführung</h2>
<p>Drücken Sie [Rot], um zur vorherigen Seite in der Track-/ Dateiliste zu springen
Drücken Sie [Grün], um zur nächsten Seite in der Track-/ Dateiliste zu springen</p>
<h2 id="5-gesamtspielzeit-aller-tracks-nur-audio-cd">5. Gesamtspielzeit aller Tracks (nur Audio-CD)</h2>
<h2 id="6-wiedergabestatus-2">6. Wiedergabestatus</h2>
<h2 id="2drücken-sie-play-um-die">2Drücken Sie [PLAY▶], um die</h2>
<p>Zufallswiedergabe zu starten.</p>
<p>So verlassen Sie den Zufallswiedergabe-Modus:</p>
<p>- Drücken Sie im Stoppmodus auf</p>
<h2 id="hinweis-16">Hinweis</h2>
<p>- Drücken Sie während der Zufal [STOP ■], um den Startpunkt für die erneute Wiedergabe festzulegen. Drücken Sie anschließend [PLAY▶], um die Zufallswiedergabe von der Stelle aus fortzusetzen, an der [STOP ■] gedrückt wurde (Audio-CD), oder vom Beginn der Datei, in der [STOP ■] gedrückt wurde (MP3 / WMA / JPEG).</p>
<p>- Um den aktuellen Track/ die D Zufallsauswahl zu wiederholen, drücken Sie mehrmals</p>
<p>[REPEAT], bis während der Wiedergabe „ erscheint. Um die gesamte Zufallsauswahl zu wiederholen, drücken Sie mehrmals [REPEAT], bis während der Wiedergabe „ erscheint.</p>
<p>• Die Wiedergabe ab einem gewü Datei ist während der Zufallswiedergabe nicht möglich.</p>
<p>- Drücken Sie im Stoppmodus [RE Programmwiedergabemodus umzuschalten.</p>
<p>- Bei einer Disk mit gemischten Media™ Audio-Dateien wird eine Zufallswiedergabe dieser Dateien ausgeführt.</p>
<h2 id="schnelle-wiedergabe-2">Schnelle Wiedergabe</h2>
<p><img src="/content/2026/05/1018651/images/b6bada86ea29d53baaa128fe6dda92af471090ddc88a31cdd522397db448143f.jpg" alt="TOSHIBA BDX2000KE - Schnelle Wiedergabe - 1" loading="lazy" decoding="async"></p>
<p>Diese Funktion bietet eine Wiedergabe mit ca. 1,3-facher Normalgeschwindigkeit, wobei der Sound nicht stumm geschaltet wird. Diese Funktion ist nur auf Disks im Format Dolby Digital verfügbar.</p>
<p>1 Drücken Sie während der Wiedergabe mehrmals [MODE] bis erscheint.</p>
<p>2 Drücken Sie [ENTER] oder [◀/▶], um zwischen den Einstellungen umzuschalten.</p>
<p>„Aus“: Wird in Normal geschwindigkeit wiedergegeben.</p>
<p>„♪♪“: Die Wiedergabe erfolgt in der 1,3-fachen Normalgeschwindigkeit.</p>
<p>3 Drücken Sie [PLAY▶], um die Wiedergabe fortzusetzen.</p>
<h2 id="hinweis-17">Hinweis</h2>
<p>• Die Bildeinstellung und die Audio-Sprache können während dieser Funktion nicht geändert werden. <br />
• Virtual Surround ist während dieser Funkt verfügbar. <br />
- Diese Funktion steht an einigen Punkten e evtl. nicht zur Verfügung. <br />
- Während dieser Funktion wird 2ch LPCM über den HDMI OUT-Ausgang und den DIGITAL OUT-Ausgang ausgegeben.</p>
<h2 id="nützliche-funktion">Nützliche Funktion</h2>
<h2 id="rauschminderung">Rauschminderung</h2>
<p><img src="/content/2026/05/1018651/images/cd38c7dae40c8183a2603d7f3045e73560a0512b6bd33962464a1f06a249ce19.jpg" alt="TOSHIBA BDX2000KE - Rauschminderung - 1" loading="lazy" decoding="async"></p>
<p>Diese Funktion dient zur Reduzierung von Rauschen im Wiedergabebild.</p>
<p>1 Drücken Sie während der Wiedergabe mehrmals [MODE] bis erscheint.</p>
<p>2[Mode] prücken Sie [◀/▶], um die Einstellung zu ändern.</p>
<p>w i e Aus" Da Originalbikd wirdangezeigt.</p>
<p>„1“ :3D-Rauschminderung wird angewandt, die Rauschen anhand eines Vergleichs zwischen Einzelbildern erkennt und beseitigt.</p>
<p>„2“ :MPEG-Rauschminderung wird angewandt, die Blockrauschen und Moskitorauschen in den i n d Untertiteln von Spielfilmen reduziert.</p>
<p>„3“ :Sowohl MPEG- als auch 3D-Rauschminderung werden angewandt.</p>
<p>3Drücken Sie [RETURN], um das Menü zu verlassen.</p>
<p>chten Track/ einer Hinweis</p>
<p>[TURN], Drehendstellung bleibt auch dann aktiviert Gerät in den Standby-Modus geschaltet wird.</p>
<p>MP3Sienkörmiend dwe Einstellung während der so Wiedergabe nicht anpassen.</p>
<h2 id="wiedergabe-12">WIEDERGABE</h2>
<h2 id="virtual-surround-2">Virtual Surround</h2>
<p><img src="/content/2026/05/1018651/images/b5f0eaf68f05c7df413d1e81b93d4993a368167d7fa8eb53c6379ace1090ce24.jpg" alt="TOSHIBA BDX2000KE - Virtual Surround - 1" loading="lazy" decoding="async"></p>
<p><img src="/content/2026/05/1018651/images/9815769054e0d8606d94fc5c526a356141487bbb5294616a59aabd47df439fa0.jpg" alt="TOSHIBA BDX2000KE - Virtual Surround - 2" loading="lazy" decoding="async"></p>
<p><img src="/content/2026/05/1018651/images/716bafd2f08fe0b69ee30a7eb3d3b45b0191d5e5e69706e08dcb9c0b13b63799.jpg" alt="TOSHIBA BDX2000KE - Virtual Surround - 3" loading="lazy" decoding="async"></p>
<p><img src="/content/2026/05/1018651/images/220eb18dac577929bb7230edeb448aae1371b93dd9745eaf3d94f0b384dab21f.jpg" alt="TOSHIBA BDX2000KE - Virtual Surround - 4" loading="lazy" decoding="async"></p>
<p><img src="/content/2026/05/1018651/images/6c21ba1f5b4b1c13391ee3c479d3cce3e1ef3389782039eedd04a83f4b44a212.jpg" alt="TOSHIBA BDX2000KE - Virtual Surround - 5" loading="lazy" decoding="async"></p>
<p><img src="/content/2026/05/1018651/images/b7113a7ec006f052fd08c29626aa55b4b25424003a98f968e5baed76c9426a3e.jpg" alt="TOSHIBA BDX2000KE - Virtual Surround - 6" loading="lazy" decoding="async"></p>
<h2 id="wma-6">WMA</h2>
<p>Sie können mit Ihrer vorhandenen 2-Kanal- Stereoanlage stereophonen Raumklang erleben.</p>
<p>1 Drücken Sie während der Wiedergabe mehrmals [MODE] bis erscheint.</p>
<p>2 Drücken Sie [▲ / ▼], um die Einstellung zu ändern.</p>
<p>„Aus“:Kein Surround-Effekt</p>
<p>„1“:Natürlicher Surround-Effekt</p>
<p>„2“:Stärkerer Surround-Effekt</p>
<p>3 Drücken Sie [RETURN], um das Menü zu verlassen.</p>
<h2 id="hinweis-18">Hinweis</h2>
<p>- Falls der Klang verzerr virtual surround auf „Aus“ ein, oder verringern Sie den Lautstärkepegel.</p>
<p>• Virtual Surround ist wä Wiedergabe nicht verfügbar.</p>
<p>- Bei Erzeugung eines vi handelt es sich beim Audioausgangssignal stets um ein 2-kanaliges LPCM-Signal.</p>
<h2 id="einstellung-pip-bonusview">Einstellung PIP (BONUSVIEW)</h2>
<p><img src="/content/2026/05/1018651/images/9c370c57f4a4fc4d5eefc8709347cc8fce8c2bc1c4d273e90f2f7d04f87b4db5.jpg" alt="TOSHIBA BDX2000KE - Einstellung PIP (BONUSVIEW) - 1" loading="lazy" decoding="async"></p>
<p>Einige BD-Videooss verfügen über die PIP-Funktion, mithilfe derer Sie im Primärvideo ein zweites Video anzeigen können. Bei Wiedergabe einer Szene, die Sekundärvideo enthält, kann dieses durch Drücken von [PIP] aufgerufen werden.</p>
<p><img src="/content/2026/05/1018651/images/16bb870f0929864f75d46a1b17975692d89251aa002ee2603eb13f7717d13c2d.jpg" alt="Primärvideo Sekundärvideo" loading="lazy" decoding="async"></p>
<p>1 Drücken Sie [PIP] während der Wiedergabe.</p>
<p>2 Betätigen Sie [▲ / ▼] zur Wahl des gewünschten Sekundärvideos.</p>
<p><img src="/content/2026/05/1018651/images/d59d13da1653f794644f452585870cccdaeffe00049c13878d1e8fa8c1c1f2a6.jpg" alt="TOSHIBA BDX2000KE - Einstellung PIP (BONUSVIEW) - 3" loading="lazy" decoding="async"></p>
<p><img src="/content/2026/05/1018651/images/150b73b1917fce63ea0a746da2b41c384119d7001497ea17dcee6474d2d53964.jpg" alt="TOSHIBA BDX2000KE - Einstellung PIP (BONUSVIEW) - 4" loading="lazy" decoding="async"></p>
<p>3 Drücken Sie [RETURN] oder [PIP], um die PIP-Informationen auszublenden.</p>
<h2 id="hinweis-19">Hinweis</h2>
<p>- Das Sekundäraudio wird nicht „Sekundär“ auf „Aus“ oder der Eintrag „BD-Audiomodus“ auf „HD-Audioausgabe“ eingestellt ist. Siehe „Umschalten der Tonspur“ auf seite 25 und „Einstellen des BD-Audiomodus“ auf seite 26.</p>
<h2 id="kamerawinkel">Kamerawinkel</h2>
<p><img src="/content/2026/05/1018651/images/97147744a237c2242026163ba87d7b98b56c68d6f271351d7160925d4d8adb91.jpg" alt="TOSHIBA BDX2000KE - Kamerawinkel - 1" loading="lazy" decoding="async"></p>
<p><img src="/content/2026/05/1018651/images/164074a123bc176db62b1e4fb221ed31eb28c6847e51dd0a8021174b3bc0b4fb.jpg" alt="TOSHIBA BDX2000KE - Kamerawinkel - 2" loading="lazy" decoding="async"></p>
<p>Manche BD-Videos und DVD-Videos enthalten Szenen, die aus verschiedenen Kamerawinkeln aufgenommen wurden. Das Symbol erscheint auf dem Fernsehschirm, um darauf hinzuweisen, dass der Kamerawinkel gewechselt werden kann.</p>
<p>1 Drücken Sie [ANGLE] während der Wiedergabe.</p>
<p>2 Betätigen Sie [▲ / ▼] zur Wahl des gewünschten Kamerawinkels.</p>
<p><img src="/content/2026/05/1018651/images/0205fd1b6abd8d83da5f8d04b10e0edbffe667e8dcec3b6137cb4bd013bbfce7.jpg" alt="TOSHIBA BDX2000KE - Kamerawinkel - 3" loading="lazy" decoding="async"></p>
<p><img src="/content/2026/05/1018651/images/3e7aa06d369cddacbe7e9a57cb4e98f3154794ee2fb944de8bcd40cdfe015e75.jpg" alt="TOSHIBA BDX2000KE - Kamerawinkel - 4" loading="lazy" decoding="async"></p>
<p>3 Drücken Sie [RETURN], um das Menü zu verlassen.</p>
<h2 id="hinweis-20">Hinweis</h2>
<p>- Wenn der Eintrag „Kamerawinkel“ auf „Aus“ eingestellt ist, erscheint das Symbol nicht auf dem Fernsehschirm. Siehe seite 30.
t ist, stellen Sie den Ei</p>
<h2 id="abspielen-von-bd-live-disks-mit-onlineinhalten">Abspielen von BD-Live-Disks mit Onlineinhalten</h2>
<p><img src="/content/2026/05/1018651/images/c79c7d3c857fa3cbff96a1f002e84ffdd6f70c30ae8d26f5ff43ab794e5491ff.jpg" alt="TOSHIBA BDX2000KE - Abspielen von BD-Live-Disks mit Onlineinhalten - 1" loading="lazy" decoding="async"></p>
<p>d der schnellen</p>
<p><img src="/content/2026/05/1018651/images/8d705fbc97746282c17aa17c922222d55f672c0aa1a20626d7cdfef6906f1352.jpg" alt="TOSHIBA BDX2000KE - Abspielen von BD-Live-Disks mit Onlineinhalten - 2" loading="lazy" decoding="async"></p>
<p>r fuellen Surround - Effekt
Sie können BD-Live-Funktionen verwenden, die Ihnen bei
Verbindung mit dem Internet die Nutzung interaktiver
Funktionen gestatten. (Für Hinweise zu
Netzwerkverbindungen siehe seite 36.)
Beispiele für interaktive BD-Live-Funktionen:</p>
<p>- Laden Sie zusätzliche Inhalte herunter, zur Filmtrailer, Untertitel oder BD-Java usw.</p>
<p>- Während des Downloads werden unter Umst spezielle Videodaten wiedergegeben.</p>
<p>Dienste und Funktionen unterscheiden sich je nach Disk. Folgen Sie den Anweisungen, die bei Verwendung der BD-Live-Funktionen einer Disk angezeigt werden.</p>
<h2 id="hinweis-21">Hinweis</h2>
<ul>
<li>Um die BD-Live-Funktion verwenden zu kör müssen Sie das Gerät mit dem Internet verbinden und die notwendigen Einstellungen vornehmen. </li>
<li>Bei bestimmten Disks muss die Einstellung Einstellungen" unter Umständen geändert werden. </li>
<li>Je nach Netzwerkumgebung kann es eine Ze dauern, bis die Verbindung zum Internet hergestellt werden kann. Unter Umständen ist eine Verbindung nicht möglich. </li>
<li>Wenn das Gerät mit dem Internet verbunde BD-Live-Funktionen eingesetzt werden, kann Ihnen dies Kosten verursachen. </li>
<li>Bei einer Verbindung mit BD-Live kann es Fällen eine Weile dauern, bis die nächste Seite heruntergeladen oder aktualisiert wurde. </li>
<li>Sie müssen eine SD-karten einsetzen, um c Funktion verwenden zu können. (Es werden SD-karte mit einer Kapazität von 1 GB empfohlen.) </li>
<li>Ziehen Sie die SD-karte bei Verwendung d'Funktion niemals ab.</li>
</ul>
<h2 id="hinweis-für-aacs-online">Hinweis für AACS-Online</h2>
<ul>
<li>Wenn Sie eine Disk mit BD-Live-Funktion wiedergeben, wird unter Umständen eine ID des Players oder der Disk an den Anbieter der Onlineinhalte übermittelt. </li>
<li>Wenn Sie Ihren Anzeigeverlauf mithilfe dieser IDs auf dem Server speichern, werden Ihnen weitere ähnliche Filme vorgestellt. </li>
<li>Sie können auch Spielstände als Verlauf sp</li>
</ul>
<h2 id="de">DE</h2>
<h2 id="23">23</h2>
<p><img src="/content/2026/05/1018651/images/b6aeb9e1c4d1c4888c85384beeb8c6adf167416c85785bdc2695eadbf5a9a2e5.jpg" alt="TOSHIBA BDX2000KE - 23 - 1" loading="lazy" decoding="async"></p>
<p><img src="/content/2026/05/1018651/images/1db3b7f91bbcb340d0dac4656b66beb89184033dd8810297e67b6bfcad887148.jpg" alt="Pure geometric diagram with intersecting lines and circles, no text or symbols present" loading="lazy" decoding="async"></p>
<p><img src="/content/2026/05/1018651/images/0d1c54933db7e151f8844ada3ce6cd5940718f4a9c6319a660743dea3bdf9e3f.jpg" alt="TOSHIBA BDX2000KE - 23 - 3" loading="lazy" decoding="async"></p>
<p><img src="/content/2026/05/1018651/images/77a42af243a3f74f226e811ebbf0545fd29e8a6552d1836a5fdec82c23fab2e1.jpg" alt="Pure geometric diagram with intersecting lines and circular shapes, no text or symbols present" loading="lazy" decoding="async"></p>
<h2 id="wiedergabe-13">WIEDERGABE</h2>
<h2 id="suche">Suche</h2>
<p>Verwendung von [SKIP |◀◀ /▶▶]</p>
<p>1 Drücken Sie während der Wiedergabe [SKIP ▶▶], um zum nächsten Track/ Titel/ Kapitel bzw. nächsten Datei weiterzuspringen. Um an nachfolgende Tracks zu springen, betätigen Sie die Taste so oft wie erforderlich. Drücken Sie [SKIP ◀◀◀] einmal, um an den Anfang des laufenden Tracks zurückzukehren. Um zu weiter zurückliegenden Tracks zu springen, betätigen Sie die Taste so oft wie erforderlich.</p>
<p>- Beim Abspielen von JPEG-Dateien [SKIP |◀◀], um zur vorigen Datei zurückzukehren.</p>
<h2 id="hinweis-22">Hinweis</h2>
<ul>
<li>Wenn der Titel keine Kapitel enthält, ändert [SKIP] ◀◀/▶▶] den Titel. Hinweis </li>
<li>Bei JPEG-Dateien steht auch [◀/▶] für die Sprungfunktion zur Verfügung.</li>
</ul>
<h2 id="verwendung-von-search">Verwendung von [SEARCH]</h2>
<p>Mit Hilfe von [SEARCH] können Sie die folgenden Suchmodi wählen.</p>
<table><tr><td colspan="4">Suchmodus Geeignete Datenträger</td></tr><tr><td>/ TTKapitel-/ Titelsuche</td><td></td><td></td><td></td></tr><tr><td rowspan="3">TR Tracksuche</td><td rowspan="3"></td><td></td><td></td></tr><tr><td>CD</td><td>DivX'</td></tr><tr><td>WMA</td><td>JPEG</td></tr><tr><td rowspan="2">Zeitsuche</td><td rowspan="2"></td><td></td><td></td></tr><tr><td>AVCHD</td><td>DivX'</td></tr></table>
<p>1Betätigen Sie während der Wiedergabe [SEARCH] so oft, bis der gewünschte Suchmodus angezeigt wird. <br />
2Betätigen Sie die [Nummerntasten] zur Eingabe der Nummer des zu suchenden Kapitels, Titels, Tracks/Datei oder der Zeitposition, die aufgesucht werden soll.</p>
<p>- Daraufhin startet die Kapitel-, Titel-, Track/Datei- oder Zeitpositionssuche.</p>
<p>- Um eine fehlerhafte Eingabe zu löschen, drücken Sie [CLEAR].</p>
<h2 id="hinweis-23">Hinweis</h2>
<ul>
<li>Während der Programm- und Zufallswiedergabe stehen keine Suchfunktionen außer der Sprungfunktion mit Hilfe von [SKIP|◀◀/▶▶] zur Verfügung. <br />
• Die Zeitpositionssuche kann nur innerhalb eines Tracks, einer Datei oder eines Titels ausgeführt werden. </li>
<li>Bei BDs und AVCHD sind Kapitel- und Spielzeitsuche nur während der Wiedergabe möglich. </li>
<li>Bei bestim m® DateiD funktioniert die Zeitpositionssuche möglicherweise nicht.</li>
</ul>
<h2 id="verwendung-von-nummerntasten-direktsuche">Verwendung von [Nummerntasten] (Direktsuche)</h2>
<h2 id="titelsuche">Titelsuche</h2>
<p>Geben Sie im Stoppmodus mit [Nummerntasten] die gesuchte Titelnummer ein.</p>
<p>Die Wiedergabe des Titels beginnt in einigen Sekunden.</p>
<h2 id="kapitelsuche">Kapitelsuche</h2>
<p>Geben Sie während der Wiedergabe eines Titels mit [Nummerntasten] die gesuchte Kapitelnummer ein.</p>
<p>Die Wiedergabe des Kapitels beginnt in einigen Sekunden.</p>
<h2 id="track-dateisuche">Track-/ Dateisuche</h2>
<p>Geben Sie die Track/-Dateinummer ein, die Sie betatigen Sie mithilfe von [Nummerntasten] suchen möchten.</p>
<p>Die Wiedergabe des Tracks/ der Datei beginnt nach wenigen Sekunden.</p>
<h2 id="hinweis-24">Hinweis</h2>
<p>• Die Wiedergabe eines BD - Videoss ist stark Disk abhängig. Gegebenenfalls funktioniert sie nicht, wie hier beschrieben.</p>
<h2 id="wiedergabe-14">WIEDERGABE</h2>
<p>Abhängig vom Inhalt der aktuellen Disk können Sie das bevorzugte Audio- und Videoformat wählen.</p>
<h2 id="umschalten-der-untertitelsprache">Umschalten der Untertitelsprache</h2>
<p>Einige BDs, DVDs und AVCHDs enthalten Untertitel in einer oder mehreren Sprachen. Bei handelsüblichen Disks sind die unterstützten Sprachen auf der Verpackung angegeben. Gehen Sie wie nachstehend beschrieben vor, um die Untertitelsprache während der Wiedergabe zu wechseln.</p>
<h2 id="bd-video-3">BD VIDEO</h2>
<p>1 Drücken Sie [SUBTITLE] während der Wiedergabe. <br />
2 Wählen Sie mit [▲ / ▼] den gewünschten einzustellenden Menüpunkt aus und drücken Sie dann auf [ENTER].</p>
<p>„Primäre Untertitel“: Dient zur Einstellung
Untertitelsprache für das
Primärvideo.</p>
<p>„Sekundäre Untertitel“: Dient zur Einstellung
Untertitelsprache für das
Sekundärvideo.</p>
<p>„Untertitelstil“: Dient zur Einstellung des Untertitelstils.</p>
<p>3 Betätigen Sie [▲ / ▼] zur Wahl der gewünschten Untertitelsprache bzw. des gewünschten Untertitelstils.</p>
<p>- Betätigen Sie [◀/▶], um zwischen der aktuellen Untertiteleinstellung und „Aus“ umzuschalten.</p>
<p>4Drücken Sie [SUBTITLE], um das Menü zu verlassen.</p>
<h2 id="dvd-video-avchd-divx-2">DVD VIDEO AVCHD DivX</h2>
<p>1 Drücken Sie [SUBTITLE] während der Wiedergabe. <br />
2 Betätigen Sie [▲ / ▼] zur Wahl der gewünschten Untertitel.</p>
<p><img src="/content/2026/05/1018651/images/792444ce01cb337bd6792f1d398e95cf38e1b7635c22c08c49b3bba0a9737e67.jpg" alt="TOSHIBA BDX2000KE - DVD VIDEO AVCHD DivX - 1" loading="lazy" decoding="async"></p>
<p>- Betätigen Sie [◀/▶], um zwischen der aktuellen Untertiteleinstellung und „Aus“ umzuschalten.</p>
<p>3 Drücken Sie [SUBTITLE], um das Menü zu verlassen.</p>
<h2 id="hinweis-25">Hinweis</h2>
<ul>
<li>Bei bestimmten Disks kann die im Disk-Menü oder Pop-Up-Menü gewechselt werden. In einem solchen Fall drücken Sie [TOP MENU] oder [POP MENU / MENU], um das Disk-Menü bzw. Pop-Up-Menü aufzurufen. </li>
<li>Wenn ein 4-stelliger Sprachen erscheint, siehe „Sprachcode-Liste“ auf seite 40. </li>
<li>Wenn die betreffende Disk kei Untertitelsprache oder des Untertitelstils bietet, erscheint die Meldung „Nicht Vorhanden“ auf dem Fernsehschirm. </li>
<li>Während der Wiedergabe des S die Untertiteleinstellung für das Primärvideo nur dann zur Verfügung, wenn keine Untertitel für das Sekundärvideo vorhanden sind. </li>
<li>Bei Wahl einer Untertitelsprache Buchstaben bestehenden Sprachencode wird dieser bei jeder Änderung der Einstellung der Untertitelsprache angezeigt. Bei Wahl einer anderen Sprache wird stattdessen „---“ angezeigt. (Siehe Seite 40.) </li>
<li>Für D®extXrne Untertitel siehe „Wiedergabe von DivX® mit DivX® Externen Untertiteln“ auf seite 19.</li>
</ul>
<h2 id="umschalten-der-tonspur">Umschalten der Tonspur</h2>
<p>Einige BDs, DVDs, Audio-CDs und AVCHDs enthalten mehrere Audio-Streams. Diese können verschiedene Tonspursprachen oder Audioformate aufweisen. Bei BD-Disks hängen die verfügbaren Audio-Streams vom Eintrag „BD-Audiomodus“ ab. Siehe seite 29 für weitere Informationen.</p>
<h2 id="bd-video-4">BD VIDEO</h2>
<p>1 Drücken Sie [AUDIO] während der Wiedergabe. <br />
2 Wählen Sie mit [▲ / ▼] den gewünschten einzustellenden Menüpunkt aus und drücken Sie dann auf [ENTER].</p>
<p>„Primär“: Dient zur Einstellung des Tons Primärvideo.</p>
<p>„Sekundär“ :Dient zur Einstellung des T Sekundärvideo.</p>
<p>3 Betätigen Sie [▲ / ▼] zur Wahl des gewünschten Audio-Stream-Kanals.</p>
<p>- Für „Sekundär“ betätigen Sie [◀/▶], um zwischen der aktuellen Audioeinstellung und „Aus“ umzuschalten.</p>
<p>4Drücken Sie [AUDIO], um das Menü zu verlassen.</p>
<h2 id="dvd-video-cd-avchd-divx-2">DVD VIDEO CD AVCHD DivX®</h2>
<p>1 Drücken Sie [AUDIO] während der Wiedergabe. <br />
2 Betätigen Sie [▲ / ▼] zur Wahl des gewünschten Audio-Stream-Kanals.</p>
<p>z. B.) DVD-Video</p>
<p><img src="/content/2026/05/1018651/images/8a8b73a282c9b66538973fe13f369c605d175179f66053d42d09629e81ae7259.jpg" alt="TOSHIBA BDX2000KE - DVD VIDEO CD AVCHD DivX® - 1" loading="lazy" decoding="async"></p>
<ul>
<li>Bei einer Audio-CD stehen die folgenden zur Auswahl. <br />
„Stereo“ : Sowohl der rechte als auch der linke Kanal</li>
</ul>
<p>Untertite \inobaktivc(\tereq).ur</p>
<p>„L-ch“ : Nur der linke Kanal ist aktiv. <br />
„R-ch“ : Nur der rechte Kanal ist aktiv.</p>
<p>3Drücken Sie [AUDIO], um das Menü zu de im Untertitelmenü verlassen.</p>
<p>A u l m w E a l l e e r i n e r D T S - C D (5.1 Musik - Disk) w angezeigt. (Eine Auswahl von Audiodatenströmen oder Tonspuren ist nicht möglich.)</p>
<p>mit einem aus 3</p>
<h2 id="de-2">DE</h2>
<h2 id="wiedergabe-15">WIEDERGABE</h2>
<h2 id="hinweis-26">Hinweis</h2>
<ul>
<li>Das Sekundäraudio wird nicht das Sekundärvideo momentan nicht angezeigt wird oder der Eintrag „BD-Audiomodus“ auf „HD-Audioausgabe“ eingestellt ist. (Bei bestimmten BDs wird das Sekundäraudio jedoch selbst bei ausgeschaltetem Sekundärvideo ausgegeben.) </li>
<li>Während der Wiedergabe einer mehreren Tonkanälen bespielt ist, kann der Audiomodus nicht umgeschaltet werden. </li>
<li>Bestimmte Disks gestatten eine Einstellung der Tonspursprache im Disk-Menü. (Das hierzu erforderliche Bedienungsverfahren ist je nach Disk unterschiedlich. Einzelheiten finden Sie in der Begleitliteratur der jeweiligen Disk.) </li>
<li>Bei bestimmten Disks, auf denen Streams oder Audiokanäle aufgezeichnet sind (z. B. DVDs, bei denen die Audioeinstellung im Disk-Menü geändert werden kann), ist [AUDIO] nicht funktionsfähig. </li>
<li>Bei Wahl einer Tonspursprache Buchstaben bestehenden Sprachencode wird dieser bei jeder Änderung der Einstellung der Tonspursprache angezeigt. Bei Wahl einer anderen Sprache wird stattdessen „---“ angezeigt. (Siehe seite 40.) </li>
<li>Während der schnellen Wieder Tonspursprache nicht gewählt werden. (Siehe seite 22.) </li>
<li>Wenn ein 4-stelliger Sprachen erscheint, siehe seite 40. </li>
<li>Wenn die betreffende Disk kei Tonspursprache bietet, erscheint die Meldung „Nicht Vorhanden“ auf dem Fernsehschirm.</li>
</ul>
<h2 id="einstellen-des-bd-audiomodus">Einstellen des BD-Audiomodus</h2>
<p>ausgegeben, wenn</p>
<p>BD
VIDEO</p>
<p>Der Eintrag „BD-Audiomodus“ umfasst zwei Einstellungen. Diese legen fest, ob Sekundär- und Interaktiv-Audio gemeinsam mit dem Primäraudio ausgegeben werden</p>
<p>oder ob nur das Primäraudio ausgegeben wird. (Für weitere Informationen Sie auf den Seiten 33-34.)</p>
<p>1 Drücken Sie im Stoppmodus mehrmals
Änderung der
[MODE], bis erscheint.</p>
<p>2 Drücken Sie [▲ / ▼], um die Einstellung zu ändern.</p>
<p>mehrere Audio-
„Audioausgabe: Mix“:</p>
<p>Falls auf BD-Video verfügbar, werden Sekundär- und Interaktiv- Audio gemeinsam mit dem Primäraudio ausgegeben.</p>
<p>mit Beilime Reekursäraudio handelt es sich um d Sekundärvideos (Kommentare des Regisseurs usw.), beim Interaktiv-Audio um den Ton für die interaktive Anwendung (Tastenklickgeräusche usw.).</p>
<p>„HD-Audioausgabe“:</p>
<p>a b Nur das Primä Audio wird ausgegeben. Wählen Sie diesen Modus aus, um Dolby Digital Plus, Dolby TrueHD oder DTS-HD-Audio der BD über den HDMI-Anschluss oder i m Audio - Menu auszugeben.</p>
<p>e3 Drücken Sie [RETURN], um das Menü zu verlassen.</p>
<h2 id="hinweis-27">Hinweis</h2>
<ul>
<li>Der Eintrag „BD-Audiomodus“ kann auch in Einrichtungsmenu eingestellt werden. Siehe seite 29. </li>
<li>Informationen zum Thema Ausgabe von BD finden Sie unter „Von HDMI OUT-Buchse ausgegebene Audiosignale“ auf seite 33 und „Von DIGITAL OUT (OPTICAL / COAXIAL)-Buchse ausgegebene Audiosignale“ auf seite 34. </li>
<li>Wenn bei Wahl der Einstellung „Audioausg kein Sekundär- und Interaktiv-Audio vorhanden ist, erfolgt die Audioausgabe im Modus „HD-Audioausgabe“.</li>
</ul>
<h2 id="funktionseinrichtung-2">FUNKTIONSEINRICHTUNG</h2>
<p>Im Einrichtungsmenübildschirm können Sie auf verschiedene Menüarten zugreifen und diese Ihren Anforderungen anpassen. Zum Aufrufen des Einrichtungsmenübildschirms drücken Sie [SETUP]. Folgen Sie dann den nachstehenden Anweisungen, um im Bildschirm zu navigieren.</p>
<p>< Einrichtungsmenübildschirm ></p>
<p><img src="/content/2026/05/1018651/images/ba1a39ffd21cb607f236821a28d3660cb52575eb2eb42e19d884a971ddec1da9.jpg" alt="Schnell Medienauswahl Disc HDMI-Audioausgabe HDMI Multi (Normal) HDMI-Videoauflösung Auto Component-Ausgang 480/576i Player Menü Deutsch" loading="lazy" decoding="async"></p>
<h2 id="1-schnell">1. Schnell</h2>
<p>Enthält nur die häufig genutzten Menüs.</p>
<h2 id="2-benutzerdefiniertes-menü">2. Benutzerdefiniertes Menü</h2>
<p>Enthält alle verfügbaren Einrichtungsmenüs.</p>
<h2 id="3-initialisierungsmenü">3. Initialisierungsmenü</h2>
<p>Enthält die Menüs, die mit der Initialisierung des Geräts oder der SD-karte im Zusammenhang stehen.</p>
<h2 id="4-menüfenster">4. Menüfenster</h2>
<p>Zeigt die für das gewünschte Menü zur Verfügung stehenden Menüpunkte an.</p>
<h2 id="navigieren-durch-die-einrichtungsmenüs">Navigieren durch die Einrichtungsmenüs</h2>
<ul>
<li>Betätigen Sie [▲ /▼], um den Cursor auf und ab zu bewegen. </li>
<li>Drücken Sie [ENTER], um auf die Optionen eines Menüpunkts zuzugreifen, die Einstellung zu ändern oder die Auswahl zu bestätigen. </li>
<li>Betätigen Sie [◀/▶], um in einigen Menüs die Einstellungen umzuschalten. </li>
<li>Drücken Sie [RETURN], um auf den vorigen Bildschirm zurückzukehren. </li>
<li>Drücken Sie [SETUP], um das Menü zu verlassen.</li>
</ul>
<h2 id="liste-der-einrichtungsmenüs">Liste der Einrichtungsmenüs</h2>
<p>Auf die mit einem Stern (*) versehenen Menüpunkte können Sie auch vom „Schnell“ aus zugreifen.</p>
<p>Die grau markierten Menüpunkte sind Standardeinstellungen.</p>
<table><tr><td colspan="5">Kategorie Menüs / Optionen Beschreibung</td><td></td></tr><tr><td rowspan="2">Sprache Audio Original Chinesisch</td><td></td><td></td><td colspan="2">Türkisch</td><td rowspan="2">Stellt bei Wiedergabe eines BD-Videos, DVD-Videos oder AVCHD-Datei die Audiosprache ein. „Original“:Aktiviert die Originalsprache der Disk. „Andere“:Wenn Sie „Andere“ auswählen, geben Sie den 4-stelligen Code für die gewünschte Sprache ein (siehe seite 40).</td></tr><tr><td>EnglischDeutschFranzösischItalienischSpanischHolländischSchwedischRussisch</td><td>JapanischKoreanischDänischFinnischNorwegischIsländischUngarischRumänisch</td><td colspan="2">GriechischIrischPortugiesischPolnischTschechischSlowakischBulgarischAndere</td></tr><tr><td rowspan="2">Untertitel</td><td colspan="2">Aus Chinesisch</td><td colspan="2">Türkisch</td><td rowspan="2">Stellt bei Wiedergabe eines BD-Videos, DVD-Videos oder AVCHD-Datei die Untertitelsprache ein. „Andere“:Wenn Sie „Andere“ auswählen, geben Sie den 4-stelligen Code für die gewünschte Sprache ein (siehe seite 40).</td></tr><tr><td>EnglischDeutschFranzösischItalienischSpanischHolländischSchwedischRussisch</td><td>JapanischKoreanischDänischFinnischNorwegischIsländischUngarischRumänisch</td><td colspan="2">GrizechischIrischPortugiesischPolnischTschechischSlowakischBulgarischAndere</td></tr><tr><td rowspan="2">Disc. Menü</td><td colspan="2">Englisch Japanisch</td><td colspan="2">Griechisch</td><td rowspan="2">Stellt die Sprache für das Disk-Menü ein. „Andere“:Wenn Sie „Andere“ auswählen, geben Sie den 4-stelligen Code für die gewünschte Sprache ein (siehe seite 40).</td></tr><tr><td>DeutschFranzösischItalienischSpanischHolländischSchwedischRussischChinesisch</td><td>KoreanischDänischFinnischNorwegischIsländischUngarischRumänischTürkisch</td><td colspan="2">IrischPortugiesischPolnischTschechischSlowakischBulgarischAndere</td></tr><tr><td>Player Menü*</td><td>Auto (XXX)EnglishDeutschFrançaisItalianoEspañolNederlandsSvenskaРусскийPortuguês</td><td>Polski</td><td colspan="2"></td><td>Stellt die Sprache für das Gerätemenü ein. (Bildschirmanzeige-Menü) „Auto“:Aktiviert die Funktion Menüsprache abfragen und einstellen (siehe seite 35).„Auto“ ist nur verfügbar, wenn „HDMI CEC“ auf „An“ eingestellt ist.Die aktuell ausgewählte Sprache wird neben „Auto“ in Klammern angezeigt.</td></tr></table>
<p>DE</p>
<h2 id="funktionseinrichtung-3">FUNKTIONSEINRICHTUNG</h2>
<table><tr><td colspan="4">Kategorie Menüs / Optionen Beschreibung</td><td></td></tr><tr><td rowspan="2">Sprache DivX</td><td rowspan="2">Untertitel EnglischDivX*</td><td></td><td rowspan="2">PortugiesischPolnisch</td><td rowspan="2">Zur Einstellung der Sprache von DivX®-Untertiteln.Wenn die DivX®-Untertiteldatei mehr als eine Untertitelsprache enthält, können Sie zwischen diesen umschalten, indem Sie wiederholt [SUBTITLE] drücken.</td></tr><tr><td>DeutschFranzösischItalienischSpanischHolländischSchwedischRussisch1Russisch2</td></tr><tr><td rowspan="6">Video Bildformat</td><td>• Sie h e s e i t weitere Informationen.</td><td colspan="3">16:9 Breit Stellt das Seitenverhältnis des wiedergegebenen4:3 Pan & Skan4:3 Letter Box16:9 Squeeze</td></tr><tr><td>HDMI-Videoauflösung*• Diese Fun nur zur Verfügung, wenn das Anzeigegerät mit einem HDMI-Kabel angeschlossen wurde.• Sie h e s e i t weitere Informationen.</td><td colspan="2">Auto Zur Einstellung des Videosignals, das 480p/576p720p1080i1080p1080p24e 3 2 für</td><td>Bilds so ein, dass es dem Ihres Fernsehgeräts entspricht.</td></tr><tr><td>HDMI Deep Colour• Diese Fun nur zur Verfügung, wenn das Anzeigegerät über ein HDMI-Kabel angeschlossen ist und die Funktion Deep Colour unterstützt.</td><td colspan="2">Auto Diese Funktion dient zur Reduzierung des Aus on steht</td><td>über die HDMIOUT-Buchse ausgegeben wird.</td></tr><tr><td>Component-Ausgang*</td><td colspan="2">480i/576i Zur Einstellung der Auflösung die Bildanzeige über 480p/576p720p1080i</td><td>Posterisierungseffekts im Wiedergabebild.„Auto“:Reduziert den Posterisierungseffekt durch die automatische Ausgabe als bis zu 12-Bit-Farbe, sobald das Gerät erkennt, dass das angeschlossene Anzeigegerät die Funktion Deep Colour unterstützt.„Aus“:Gibt 8-Bit-Farben (Standard) aus.</td></tr><tr><td>Vollbildmodus</td><td colspan="2">Auto „Auto“:Video</td><td>Das Gerät erkennt Filmmaterial mit einer Bildfolgerate von 24-Bildern pro Sekunde (Spielfilme) und wählt den geeigneten Progressiv-Modus automatisch.„Video“:Diese Einstellung eignet sich zur Wiedergabe von Disks mit Videomaterial (Fernsehprogramme oder Animation).</td></tr><tr><td>Standbildmodus</td><td colspan="2">Auto Dieser Eintrag dient zur Einstellung der HalbbildVollbild</td><td>Bildauflösung und Bildqualität im Standbildmodus.„Auto“:Die beste Einstellung der Auflösung („Vollbild“ oder „Halbbild“) wird auf der Grundlage der Dateneigenschaften des Bildmaterials automatisch gewählt.„Halbbild“:Bei Wahl dieser Einstellung wird das Bild stabilisiert, kann jedoch aufgrund der begrenzten Datenmenge körnig wirken. Wählen Sie die Einstellung „Halbbild“, wenn das Bild bei Wahl von „Auto“ unstabil ist.„Vollbild“:Bei Wahl dieser Einstellung werden verhältnismäßig bewegungsarme Bilder mit höherer Auflösung angezeigt. „Vollbild“ verbessert die Bildqualität, obwohl es dadurch zu Instabilitäten aufgrund abwechselnder Ausgabe von 2-Feld-Daten kommen kann.• D a s a u f d e m F e r n s e h s chirm erscheinende Einzelbild nennt man „Vollbild“. Es besteht aus zwei separaten Bildern, die als „Halbbild“ bezeichnet werden. Bei bestimmten Bildern kann es aufgrund ihrer Dateneigenschaften bei Wahl der Einstellung Auto im Eintrag „Standbildmodus“ vorkommen, dass sie verschwommen angezeigt werden.</td></tr></table>
<h2 id="funktionseinrichtung-4">FUNKTIONSEINRICHTUNG</h2>
<table><tr><td>Kategorie</td><td colspan="5">Menüs / Optionen Beschreibung</td><td></td></tr><tr><td rowspan="24">Audio</td><td>BD-Audiomodus[IMAGE]</td><td colspan="4">Audioausgabe: MixHD-Audioausgabe</td><td>Bei einer BD wird mit diesem Eintrag festgelegt, ob Sekundär- und Interaktiv-Audio, falls verfügbar, gemeinsam mit dem Primäraudio ausgegeben werden oder nur das Primäraudio ausgegeben wird. Siehe „Einstellen des BD-Audiomodus“ auf seite 26.„Audioausgabe:Mix“:Der Ton des Sekundärvideos und die interaktive Anwendung werden gemeinsam mit dem Ton des Primärvideos ausgegeben.„HD-Audioausgabe“:Nur das Primäraudio wird ausgegeben. Wählen Sie diesen Modus, um den Dolby Digital, Dolby Digital Plus, Dolby TrueHD, DTS oder DTS-HD-Audio der BD über den HDMI-Anschluss auszugeben.</td></tr><tr><td rowspan="23">HDMI-Audioausgabe*• Diese Fun steht nur zur Verfügung, wenn das Anzelgegerät mit einem HDMI-Kabel angeschlossen wurde.• Sie h e seit weitere Informationen.</td><td>HDMI Multi (Normal)ktion</td><td colspan="3"></td><td>Zur Ausgabe der mehrkanaligen Audiosignale mit Bitstream oder LPCM über die HDMI OUT-Buchse.</td></tr><tr><td rowspan="22">HDMI Multi (LPCM)e 33 für</td><td rowspan="6">Lautsprecher Grösse</td><td>Vorne Gross</td><td>Zur Ausgabe der mehrkanaligen Audiosignale mit Bitstream oder LPCM über die HDMI OUT-Buchse.</td><td rowspan="7">Stellt das Audioformat der Ausgabe über die HDMI OUT-Buchse ein.Wenn Sie die Einstellungen „Lautsprecher Grösse“ und „Verzögerung“ für einen Lautsprecher ändern, werden die Einstellungen der anderen Lautsprecher automatisch angepasst. Für die Einstellung „Verzögerung“ darf der Unterschied zwischen den Werten von „Vorne“, „Surround“ und „Surround hinten“ 4,5 m (15Fuß) und von „Vorne“ und „Mitte“ 1,5 m (5 Fuß) nicht übersteigen.Für die Einstes „Verzögerung“ darf der Wert von „Mitte“, „Surround“ und „Surround hinten“ den Wert von „Vorne“ nicht übersteigen.</td></tr><tr><td>Mitte Klein</td><td></td></tr><tr><td>Sub Woofer</td><td>An</td></tr><tr><td>Surround</td><td>Gross</td></tr><tr><td>Surround hinten</td><td>Klein</td></tr><tr><td>Standard</td><td></td></tr><tr><td rowspan="10">Pegel-Einstellung</td><td></td><td>Testton Aus Zur Ausgabe des Testtons aus jedem Lautsprecher. Betätigen Sie [◀/▶] zur Wahl einer Option, und drücken Sie dann zur Bestätigung [ENTER].• Der Testton w automatisch ausgegeben. Zum Stoppen des Testtons drücken Sie [RETURN].„Manuell“:Ermöglicht Ihnen die manuelle Auswahl des zu testenden Lautsprechers. Betätigen Sie [▲/▼], um den Lautsprecher auszuwählen. Betätigen Sie [◀/▶], um die Lautstärke anzupassen.„Auto“:Zum automatischen Testen aller Lautsprecher. Betätigen Sie [◀/▶], um die Lautstärke anzupassen.</td></tr><tr><td>Vorne L</td><td rowspan="8">-12 bis 0 dB(Standard 0 dB)</td><td rowspan="9">Zur Einstellung des Lautstärkeniveaus für jeden Lautsprecher, um die optimale Audiobalance zu erzielen. Drücken Sie [◀/▶], um die Einstellung zu ändern.</td></tr><tr><td>Mitte</td></tr><tr><td>Sub Woofer</td></tr><tr><td>Vorne R</td></tr><tr><td>Surround R</td></tr><tr><td>Surround hinten R</td></tr><tr><td>Surround hinten L</td></tr><tr><td>Surround L</td></tr><tr><td>Standard</td><td></td></tr><tr><td rowspan="6">Verzögerung</td><td>Entfernung</td><td>FeetMeter</td><td>Zur Einstellung der gewünschten Einheit (Meter oder Fuß) zur Abstandsmessung. Diese Einheit wird bei der Einstellung des Abstands jedes Lautsprechers im Eintrag „Verzögerung“ verwendet. Drücken Sie [◀/▶], um die Einstellung zu ändern.</td></tr><tr><td>Vorne</td><td rowspan="2">0 bis 18 m(Standard 3,6 m)</td><td rowspan="5">Zur Einstellung der Entfernung von der Hörposition zum Lautsprecher, um so die ideale Verzögerung zu erhalten. Drücken Sie [◀/▶], um die Einstellung zu ändern.</td></tr><tr><td>Mitte</td></tr><tr><td>Surround</td><td rowspan="2">0 bis 18 m(Standard 3,0 m)</td></tr><tr><td>Surround hinten</td></tr><tr><td>Standard</td><td></td></tr></table>
<p>DE</p>
<p>29</p>
<h2 id="funktionseinrichtung-5">FUNKTIONSEINRICHTUNG</h2>
<table><tr><td colspan="5">Kategorie Menüs / Optionen Beschreibung</td><td colspan="2"></td></tr><tr><td rowspan="3">Audio Stumm-</td><td>schaltung• S i e h eEinstellung von„Digitalausgang“ aufseite 34 fürEinstellungsoptionen.</td><td>Digital-aus-gang</td><td>BitstreamLPCM</td><td>„Bitstream“:Bei der Wiedergabe von inDolby Digital, Dolby DigitalPlus, Dolby TrueHD, DTS oderDTS-HD aufgenommenenDisks, wird der entsprechendeCore Stream (Dolby Digitaloder DTS) ausgegeben.„LPCM“:Ein LPCM-Signal wird von derDIGITAL OUT-Buchse ausgegeben.</td><td colspan="2">Zur Einstellung desAudioformat-Ausgangsvon der DIGITAL OUT-Buchse.</td></tr><tr><td colspan="3">Down Sampling An Ermöglicht die Einstellung der DigitalaudioAus</td><td colspan="3">-Ausgabebei der Wiedergabe von in LPCM aufgezeichnetenBD-oder DVD-Disks.„An“:Das LPCM-Signal wird zur Ausgabe auf eineAbtastfrequenz von 48 kHz heruntergetaktet.Wählen Sie die Einstellung „An“, wenn ein Digitalanschlussan einen AV-Verstärker hergestellt wurde, der nicht miteiner Abtastfrequenz von 96 kHz kompatibel ist.„Aus“:Bei BDs und DVDs ohne Kopierschutz, die mit LPCMTon bespielt sind, wird ein 2-kanaliges Audiosignal miteiner Abtastfrequenz von bis zu 192 kHz ohneHerunteraktung als LPCM-Signal ausgegeben.</td></tr><tr><td>DRC</td><td colspan="2">Auto Mit diesem Eintrag wird festgelegtAnAus</td><td colspan="3">ob derLautstärkebereich komprimiert wird (Regelung desDynamikumfangs), wenn Audiosignale des FormatsDolby Digital, Dolby Digital Plus oder Dolby TrueHdwiedergegeben werden.</td></tr><tr><td rowspan="3">Sicherung• S i e h e seite 35 fürweitereInformati-onen.</td><td rowspan="3">Passwort-Eingabefeld</td><td>BD-Einstufung</td><td>Alle Zur Einstellung der KindAlterseinstellung</td><td colspan="3">dersicherungsstufe für dieseDisk-Wiedergabe.</td></tr><tr><td>DVD-Einstufung</td><td>Alle Zur Einstellung der Kindbis1</td><td colspan="3">dersicherungsstufe für dieseDisk-Wiedergabe.</td></tr><tr><td>Passwort ändern</td><td>Passwort-Eingabefeld Zum</td><td colspan="3">Festlegen des neuen Passworts für „Sicherung“.</td></tr><tr><td rowspan="8">Andere Kamerawinkel</td><td colspan="3">AnAus</td><td colspan="3">Zur Einstellung der Anzeige des Winkelsymbols auf demFernsehbildschirm, wenn eine Szene wiedergegeben wird,die aus verschiedenen Winkeln angezeigt werden kann.</td></tr><tr><td>Abschaltung</td><td colspan="5">An Hier legen Sie fest, ob das Gerät automischausgeschaltet wird (in den Standby-Modus), wenn es30 Minuten lang nicht bedient wurde.</td></tr><tr><td>Anzeige</td><td colspan="2">Auto Dieser Eintrag dient zur EinstellungHellDunkel</td><td colspan="3">der Helligkeit desDisplays an der Frontplatte des Gerätes.Wurde „Auto“ ausgewählt, verdunkelt sich dieFrontkonsolenanzeige automatisch während der Wiedergabe.</td></tr><tr><td rowspan="3">DivX® VODDivX®</td><td>Registrie-rungscode</td><td>Ihr Registrier-Code ist:○○○○○○○○○○Um mehr über DivX zuerfahren, besuchen Siebitte www.divx.com/vod</td><td colspan="3">Dieses Menüelement vermittelt Ihnen den DivX® VOD-Registrierungscode. Der DivX®-Registrierungscode isterforderlich, um DivX® VOD-Dateien aus dem Internetherunterladen zu können. Weitere Informationen zuDivX® VOD finden Sie auf www.divx.com/vod.</td></tr><tr><td>Deaktivie-rungscode</td><td>Ihr Deaktivierungscode lautet:○○○○○○○○Um mehr über DivX zuerfahren, besuchen Siebitte www.divx.com/vod</td><td colspan="3">Dieses Menüelement vermittelt Ihnen den DivX® VOD-Deaktivierungscode. Der DivX®-Deaktivierungscode isterforderlich, um DivX® VOD-Dateien nach derDeaktivierung erneut aus dem Internet herunterladenzu können. Weitere Informationen zu DivX® VODfinden Sie auf www.divx.com/vod.</td></tr><tr><td>Deaktivierung</td><td>Nein Dieses Menü deaktiviertJa</td><td colspan="3">die DivX® VOD-Dateien undvermittelt Ihnen einen neuen Registrierungs- undDeaktivierungscode, um die DivX® VOD-Dateien ausdem Internet herunterladen zu können.</td></tr><tr><td>HDMI CEC• Diese Fun nur zur Verfügung,wenn dasAnzeigegerät überein HDMI-Kabelangeschlossen istund die FunktionHDMI CECunterstützt.• Siehe seit 35 fürweitere Informationen.</td><td colspan="2">An Legt fest, ob die HDMI CEC-FunktionAust on steht</td><td colspan="3">verwendetwerden kann.</td></tr><tr><td>Medienauswahl*</td><td colspan="2">DiscSD-Karte</td><td colspan="3">Wählen Sie das wiederzugebende Medium.</td></tr></table>
<h2 id="funktionseinrichtung-6">FUNKTIONSEINRICHTUNG</h2>
<table><tr><td></td><td colspan="5">Kategorie Menüs / Optionen Beschreibung</td><td></td></tr><tr><td rowspan="18">Benutz.def</td><td rowspan="18">Andere</td><td rowspan="16">Netzwerkverbindung• Für weiter Informationen siehe seiten 36-38.</td><td colspan="3">Verbindungprüfen</td><td>Zur Durchführung des Netzwerkverbindungstests.Führen Sie diesen Test immer dann durch, wenn Sie die IP-Adresse oder die DNS-Einstellungen ändern.</td></tr><tr><td>Aktivieren(Standard)</td><td colspan="2"></td><td>Wenn Sie „Aktivieren(Standard)" wählen, wird der Verbindungstest automatisch gestartet.</td></tr><tr><td rowspan="13">Aktivieren(Benutzer-def.)</td><td>IP-Adresse einrichten</td><td>Auto(DHCP) ZurManuell</td><td>Einstellung der IP-Adresse.In den meisten Fällen können Sie eine Verbindung mit dem Internet herstellen, ohne Änderungen an den Voreinstellungen vornehmen zu müssen.</td></tr><tr><td>IP-Adresse</td><td rowspan="3">Eingabefeld Zur</td><td rowspan="3">manuellen Einstellung von „IP-Adresse“,„Subnetzmaske" und „Standard-Gateway“.• Nur verfügba r, wenn Sie in die Option „Manuell" ausgewählt haben.</td></tr><tr><td>Subnetz-maske</td></tr><tr><td>Standard-Gateway</td></tr><tr><td>DNS-Ein-stellungen</td><td>Auto(DHCP) ZurManuell</td><td>Einstellung der DNS-Einstellungen.In den meisten Fällen können Sie eine Verbindung mit dem Internet herstellen, ohne Änderungen an den Voreinstellungen vornehmen zu müssen.</td></tr><tr><td>PrimäreDNS</td><td rowspan="2">Eingabefeld Zur</td><td rowspan="2">manuellen Einstellung von „Primäre DNS" und„Sekundäre DNS“.• Nur verfügba r, wenn Sie in Option „Manuell" ausgewählt haben.</td></tr><tr><td>SekundäreDNS</td></tr><tr><td>Proxy-Ein-stellungen</td><td>Nicht verwendenVerwenden</td><td>Zur Einstellung des Proxy-Servers.In den meisten Fällen können Sie eine Verbindung zum Internet herstellen, ohne einen Proxy-Server zu verwenden.</td></tr><tr><td>Proxy-Adresse</td><td rowspan="2">Eingabefeld Zur</td><td rowspan="2">manuellen Einstellung von „Proxy-Adresse" und„Proxy-Port“.• Nur verfügba r, wenn Sie in Option „Verwenden" ausgewählt haben.</td></tr><tr><td>Proxy-Port</td></tr><tr><td>Verbin-dungsgeschwindigk.</td><td>Auto Zur Einstellung der Verbindungsgeschwindigkeit.10BASE Halb10BASE Voll100BASE Halb100BASE Voll</td><td>In den meisten Fällen können Sie eine Verbindung mit dem Internet herstellen, ohne Änderungen an den Voreinstellungen vornehmen zu müssen.</td></tr><tr><td>BD-Live-Einstellungen</td><td>Erlauben Sie können den Internetzugang beschränken, wennEingeschränkterlaubenNicht erlauben</td><td>BD-Live-Funktionen verwendet werden.</td></tr><tr><td colspan="3">MAC-Adresse Sie können die MAC-Adresse überprüfen.</td></tr><tr><td colspan="3">Deaktivie-ren</td><td>Deaktiviert die Netzwerkverbindung.</td></tr><tr><td rowspan="2">Software-Update• Sie heseit weitere Informationen.</td><td colspan="3">Aktuelle Version für</td><td>Zeigt die aktuelle Firmwareversion an.</td></tr><tr><td>Disk-Update</td><td>NeinJa</td><td></td><td>Ermöglicht es, die Firmware dieses Geräts mit einer Disk zu aktualisieren.</td></tr><tr><td rowspan="5">Initialisier</td><td>Einstellungen</td><td>NeinJa</td><td rowspan="5" colspan="3">Für weitere Informa39.</td><td>Setzt alle Einstellungen mit Ausnahme von „Sicherung“ und „Netzwerkverbindung“ in die Werkseinstellungen zurück.</td></tr><tr><td>SD-Karte formatieren</td><td>NeinJa</td><td>Die SD-Karte wird neu formatiert.</td></tr><tr><td>Gespeichert e BD-ROM-Daten löschen (Player)</td><td>NeinJa</td><td>Zur Neuformatierung des lokalen Speichers (Player), der für BD-Java verwendet wird.tionen siehe Seite</td></tr><tr><td>Gespeichert e BD-ROM-Daten löschen (SD-Karte)</td><td>NeinJa</td><td>Zur Neuformatierung des lokalen Speichers (SD-karte), der für BD-Java verwendet wird.</td></tr><tr><td>Netzwerkeinstellungen</td><td>NeinJa</td><td>Initialisiert die Netzwerkeinstellungen.</td></tr></table>
<p>EINLEITUNG</p>
<p>ANSCHLÜSSE</p>
<p>WIEDERGABE</p>
<p>FUNKTIONSEIN-
RICHTUNG</p>
<p>SONSTIGES</p>
<p>DE</p>
<p>31</p>
<h2 id="funktionseinrichtung-7">FUNKTIONSEINRICHTUNG</h2>
<h2 id="bildformat">Bildformat</h2>
<p>[SETUP] → „Benutz.def“ → „Video“ → „Bildformat“</p>
<p>Nutzen Sie diese Funktion, um das Seitenverhältnis der Videoquelle anzupassen, wenn es sich von dem Ihres Fernsehgeräts unterscheidet, so dass das Bild ohne Verzerrungen auf Ihrem Fernsehbildschirm angezeigt wird. Nachfolgend die Beschreibung der einzelnen Einstellungen:</p>
<table><tr><td>Videoquelle</td><td>Ihr Fernsehgerät</td><td colspan="2">Option Beschreibung</td></tr><tr><td rowspan="3">16:9</td><td rowspan="2">4:3</td><td>4:3 Letter Box Für ein <img src="/content/2026/05/1018651/images/9807790d71206e8e6d9510a14f38ce94aa51dae2f145cb11a7b504c0f7dfb686.jpg" alt="TOSHIBA BDX2000KE - Bildformat - 1" loading="lazy" decoding="async"></td><td>16:9-Bild auf einem 4:3-Bildschirm:Das 16:9-Bild wird im Maßstab verkleinert, bis beide Seiten dem Verhältnis eines 4:3-Fernsehbildschirms entsprechen.</td></tr><tr><td>4:3 Pan & Scan Für ein <img src="/content/2026/05/1018651/images/4526d6070ce33d31ee25c8a0ca4a60bdeccb49be3899fed1de12957bb2c215e4.jpg" alt="TOSHIBA BDX2000KE - Bildformat - 2" loading="lazy" decoding="async"></td><td>16:9-Bild auf einem 4:3-Bildschirm:Beide Seiten des Bilds werden abgeschnitten, damit es ohne Verzerrung des Seitenverhältnisses des Bilds auf einem 4:3-Fernsehbildschirm dargestellt werden kann.</td></tr><tr><td rowspan="2">16:9</td><td colspan="2">16:9 Breit Für ein 16:9-Bild auf einem 16:9-Bildschirm:Wählen Sie diese Einstellung, um ein 16:9-Bild auf einem 16:9-Fernsehbildschirm anzuzeigen.</td></tr><tr><td>4:3</td><td>16:9 Squeeze Für ein <img src="/content/2026/05/1018651/images/c70c5bebf2556147be13ed4591ec2172d5bbecb33bf44cf07d385bea3ae5be76.jpg" alt="TOSHIBA BDX2000KE - Bildformat - 3" loading="lazy" decoding="async"></td><td>4:3-Bild auf einem 16:9-Bildschirm:Nutzen Sie diese Einstellung, um ein 4:3-Bild auf einem 16:9-Fernsehbildschirm ohne Verzerrung des Seitenverhältnisses des Bilds anzuzeigen.</td></tr></table>
<h2 id="hinweis-für-hdmi-videoauflösung-und-component-ausgang">Hinweis für „HDMI-Videoauflösung“ und „Component-Ausgang“</h2>
<p>• Die gewählte Auflösung muss auch von Ihrem Anzeigegerät unterstützt werden. <br />
- Selbst wenn Sie bei Anschluss dieses Geräts an ein DVI-kompatibles Anzeigegerät mit HDMI-DVI-Kabel für „HDMI-Videoauflösung“ die Option „Auto“ wählen, wird ein 480p/576p-Signal ausgegeben werden. <br />
- Beim Umschalten in den bzw. aus dem HDMI-Ausgangsmodus können Video- und Audiosignal kurzzeitig verzerrt wirken. <br />
- Während der Wiedergabe von BDs oder AVCHD-Dateien können Sie die Videoauflösung nicht ändern. Stoppen Sie die Wiedergabe, um die Auflösung zu ändern. <br />
- Für eine natürlich wirkende, hochwertige Wiedergabe von Filmmaterial mit einer Bildfolgerate von 24 Bildern pro Sekunde stellen Sie den Anschluss über ein HDMI-Kabel her (der Gebrauch eines Hochgeschwindigkeits-HDMI-Kabels wird empfohlen), und wählen dann „Auto“, sofern das angeschlossene Fernsehgerät mit einem Eingangssignal des Formats 1080p/24 Bilder kompatibel ist. <br />
- Beim Abspielen von®-Datein-Höw. Disbisi de Hen Inhalt nicht mit 1080p/24 Bilder, 1080p/60 Bilder ausgegeben wird, selbst wenn ein mit 1080p/24 Bilder kompatibles Fernsehgerät angeschlossen wurde, stellen Sie unter „HDMI-Videoauflösung“ die Option „Auto“ oder „1080p24“ ein. <br />
- Durch das Drücken von [PLAY▶] auf der Frontkonsole für 5 Sekunden werden die Standardeinstellungen wieder hergestellt. <br />
- Wenn Sie die Auflösung ändern, wird der Fernsehbildschirm vorübergehend schwarz, bevor er wieder ein Bild anzeigt. Dabei handelt es sich nicht um eine Funktionsstörung. <br />
- Wenn Sie versehentlich eine Auflösung gewählt haben, die von Ihrem Fernsehgerät nicht unterstützt wird, und das Bild verzerrt oder gar nicht angezeigt wird und sich nicht zurücksetzen lässt, drücken und halten Sie [PLAY ▶] auf der Frontkonsole für 5 Sekunden, um die Standardeinstellungen wieder herzustellen. <br />
- Wenn Sie den Anschluss per HDMI-Kabel durchgeführt haben, steht für „Component-Ausgang“ nur „480i/576i“ und die unter „HDMI-Videoauflösung“ eingestellte Auflösung zur Verfügung <br />
- Stimmt die Videoauflösung des Komponentenausgangs nicht mit der Videoauflösung von HDMI überein, wird die Videoauflösung für den Komponentenausgang auf „480i/576i“ umgeschaltet. <br />
- Beim Abspielen einer mit Kopierschutz versehenen DVD-Video wird über die COMPONENT VIDEO OUT-Buchsen ein 480p/576p-Signal ausgegeben, selbst wenn für die Einstellung „Component-Ausgang“ die Option „720p“ oder „1080i“ gewählt wurde. <br />
• Das Videosignal einiger kopiergeschützter BD-Videos wird ggfs. nur über die HDMI OUT-Buchse ausgegeben. <br />
• Lesen Sie auch in der Bedienungsanleitung Ihres Fernsehgeräts nach.</p>
<h2 id="funktionseinrichtung-8">FUNKTIONSEINRICHTUNG</h2>
<p>HDMI-Audioausgabe </p>
<table><tr><td>[SETUP] → „Schnell" → „HDMI-Audioausgabe"</td></tr></table>
<table><tr><td>Angeschlossenes Gerät</td><td>Einstellung von „HDMI-Audioausgabe“</td><td>Ausgegebenes HDMI-Audiosignal</td></tr><tr><td>Mit Dolby Digital, Dolby Digital Plus, Dolby TrueHD, DTS oder DTS-HD- Decoding kompatibles Gerät</td><td colspan="2">HDMI Multi(Normal) Dolby Digital, Dolby Digital Plus, Dolby TrueHD, DTS, oder DTS-HD-Bitstream werden über die HDMI OUT-Buchse ausgegeben. Nehmen Sie die geeigneten Lautsprechereinstellungen am angeschlossenen AV-Verstärker usw. vor.</td></tr><tr><td>Mit 3 oder mehr Kanälen Audioeingang kompatibles Gerät (nicht mit Dolby Digital, Dolby Digital Plus, Dolby TrueHD, DTS oder DTS-HD kompatibel)</td><td colspan="2">HDMI Multi(LPCM) Mehrkanalige Audiosignale werden von der HDMI OUT-Buchse ausgegeben. Nehmen Sie die geeigneten Lautsprechereinstellungen in den entsprechenden Einträgen des Menüs vor, das nach Wahl von „HDMI Multi(LPCM)“ auf dem Bildschirm erscheint. Siehe seite 29.</td></tr><tr><td>HDMI-Anschluss an ein Fernsehgerät und digitaler Audioanschluss (optisch/koaxial) an einen AV-Verstärker</td><td colspan="2">Stummschaltung HDMI-Audio wird stumm geschaltet und Dolby Digital/ DTS-Bitstream oder LPCM wird über die DIGITAL OUT-Buchse ausgegeben, je nach „Digitalausgang“-Einstellung. Siehe seite 34.</td></tr></table>
<p>Von HDMI OUT-Buchse ausgegebene Audiosignale </p>
<table><tr><td rowspan="3" colspan="2">Datenträger Aufnahmeformat</td><td colspan="4">Einstellung von „HDMI-Audioausgabe“</td></tr><tr><td colspan="2">HDMI Multi(Normal)</td><td colspan="2">HDMI Multi(LPCM)</td></tr><tr><td>Der für „BD-Audiomodus“ die Einstellung „HD-Audioausgabe“ gewählt wurde</td><td>Der für „BD-Audiomodus“ die Einstellung „Audioausgabe: Mix“ gewählt wurde</td><td>Der für „BD-Audiomodus“ die Einstellung „HD-Audioausgabe“ gewählt wurde</td><td>Der für „BD-Audiomodus“ die Einstellung „Audioausgabe: Mix“ gewählt wurde</td></tr><tr><td rowspan="6">BD-Videos</td><td>Dolby Digital</td><td>Dolby Digital</td><td>Dolby Digital</td><td>Multi LPCM</td><td>Multi LPCM</td></tr><tr><td>Dolby Digital Plus</td><td>Dolby Digital Plus</td><td>Dolby Digital*2</td><td>Multi LPCM*1</td><td>Multi LPCM*2</td></tr><tr><td>Dolby TrueHD</td><td>Dolby TrueHD</td><td>Dolby Digital*4</td><td>Multi LPCM*3</td><td>Multi LPCM*4</td></tr><tr><td>DTS</td><td>DTS</td><td>DTS</td><td>Multi LPCM*6</td><td>Multi LPCM*6</td></tr><tr><td>DTS-HD</td><td>DTS-HD</td><td>DTS*5</td><td>Multi LPCM*1,*6</td><td>Multi LPCM*5,*6</td></tr><tr><td>LPCM</td><td>Multi LPCM</td><td>Multi LPCM</td><td>Multi LPCM</td><td>Multi LPCM</td></tr><tr><td rowspan="4">DVD-Video</td><td>Dolby Digital</td><td colspan="2">Dolby Digital</td><td colspan="2">Multi LPCM</td></tr><tr><td>DTS</td><td colspan="2">DTS</td><td colspan="2">Multi LPCM</td></tr><tr><td>LPCM</td><td colspan="2">2ch LPCM</td><td colspan="2">2ch LPCM</td></tr><tr><td>MPEG</td><td colspan="2">MPEG</td><td colspan="2">Multi LPCM</td></tr><tr><td rowspan="2">AVCHD</td><td>Dolby Digital</td><td colspan="2">Dolby Digital</td><td colspan="2">Multi LPCM</td></tr><tr><td>LPCM</td><td colspan="2">2ch LPCM</td><td colspan="2">Multi LPCM</td></tr><tr><td rowspan="2">DivX®</td><td>Dolby Digital</td><td colspan="2">Dolby Digital</td><td colspan="2">Multi LPCM</td></tr><tr><td>MP3 / MP2</td><td colspan="2">2ch LPCM</td><td colspan="2">2ch LPCM</td></tr><tr><td colspan="2">Audio-CD/ MP3/Windows MediaTM Audio</td><td colspan="2">2ch LPCM</td><td colspan="2">2ch LPCM</td></tr><tr><td colspan="2">DTS-CD</td><td colspan="2">DTS</td><td colspan="2">Multi LPCM</td></tr></table>
<p>*1) Vollständig dekodiert. <br />
*2) Nur der unabhängige Substream wird dekodiert. <br />
*3) Der Dolby TrueHD-Stream wird dekodiert. <br />
*4) Nur der Dolby Digital-Substream wird dekodiert. <br />
*5) Nur der Core-Substream wird dekodiert. <br />
*6) Wenn die Audioquelle mehrkanalig ist, wird dies als 7.1-Kanal dekodiert. Allerdings hängt die Anzahl der ausgegebenen Audiokanäle von der Zahl der angeschlossenen Lautsprecher ab. <br />
- Wenn das angeschlossene Gerät nicht mit dem HDMI-Bitstream kompatibel ist, wird je nach den Leistungsmerkmalen des angeschlossenen Gerätes selbst dann ein mehrkanaliges LPCM- oder ein auf 2 Kanäle heruntergemischtes LPCM-Signal ausgegeben, wenn Sie „HDMI Multi(Normal)“ als Einstellung des Eintrags „HDMI-Audioausgabe“ gewählt haben. <br />
- Bei der Wiedergabe eines BD-Videos, das nur das Primäraudio enthält, ist die Audioausgabe mit „HD-Audioausgabe“ identisch, selbst wenn „BD-Audiomodus“ auf „Audioausgabe: Mix“ eingestellt ist.</p>
<h2 id="hinweis-28">Hinweis</h2>
<ul>
<li>Die von der HDMI OUT-Buchse ausgegebenen Audiodaten (einschließlich Abtastfrequenz, Anzahl der Kanäle und Bitlänge), werden möglicherweise durch das jeweils angeschlossene Gerät beschränkt. </li>
<li>Bestimmte Geräte mit HDMI-Schnittstelle unterstützen keine Audioausgabe (z. B. Projektoren). Bei Anschluss an ein derartiges Gerät erfolgt keine Ausgabe von Audiosignalen von der HDMI OUT-Buchse dieses Gerätes. </li>
<li>Beim Umschalten auf den bzw. aus dem HDMI-Ausgabemodus treten möglicherweise kurzzeitige Verzerrungen in den Video- und Audiosignale auf.</li>
</ul>
<p>DE</p>
<p>33</p>
<h2 id="funktionseinrichtung-9">FUNKTIONSEINRICHTUNG</h2>
<h2 id="digitalausgang">Digitalausgang</h2>
<p>[SETUP] → „Schnell“ → „HDMI-Audioausgabe“ → „Stummschaltung“ → „Digitalausgang“</p>
<p>Wenn der Eintrag „HDMI-Audioausgabe“ auf „Stummschaltung“ eingestellt ist, wird das HDMI-Audiosignal stummgeschaltet, und das von der DIGITAL OUT-Buchse ausgegebene Audiosignal richtet sich nach der Einstellung des Eintrags „Digitalausgang“.</p>
<p>Von DIGITAL OUT (OPTICAL / COAXIAL)-Buchse ausgegebene Audiosignale </p>
<table><tr><td rowspan="3" colspan="2">Datenträger Aufnahmeformat</td><td colspan="4">Einstellung von „Digitalausgang“</td></tr><tr><td colspan="2">Bitstream LPCM</td><td colspan="2"></td></tr><tr><td>Der für „BD-Audiomodus“ die Einstellung „HD-Audioausgabe“ gewählt wurde</td><td>Der für „BD-Audiomodus“ die Einstellung „Audioausgabe: Mix“ gewählt wurde</td><td>Der für „BD-Audiomodus“ die Einstellung „HD-Audioausgabe“ gewählt wurde</td><td>Der für „BD-Audiomodus“ die Einstellung „Audioausgabe: Mix“ gewählt wurde</td></tr><tr><td rowspan="6">BD-Videos</td><td>Dolby Digital Dolby Digital Dolby Digital</td><td></td><td></td><td>Auf 2ch heruntergemischtes LPCM-Signal</td><td>Auf 2ch heruntergemischtes LPCM-Signal</td></tr><tr><td>Dolby Digital Plus Dolby Digital Dolby Digital</td><td></td><td></td><td>Auf 2ch heruntergemischtes LPCM-Signal</td><td>Auf 2ch heruntergemischtes LPCM-Signal</td></tr><tr><td>Dolby TrueHD</td><td>Dolby Digital Dolby Digital</td><td></td><td>Auf 2ch heruntergemischtes LPCM-Signal</td><td>Auf 2ch heruntergemischtes LPCM-Signal</td></tr><tr><td>DTS</td><td>DTS</td><td>DTS</td><td>Auf 2ch heruntergemischtes LPCM-Signal</td><td>Auf 2ch heruntergemischtes LPCM-Signal</td></tr><tr><td>DTS-HD</td><td>DTS</td><td>DTS</td><td>Auf 2ch heruntergemischtes LPCM-Signal</td><td>Auf 2ch heruntergemischtes LPCM-Signal</td></tr><tr><td>LPCM</td><td>Auf 2ch heruntergemischtes LPCM-Signal</td><td>Auf 2ch heruntergemischtes LPCM-Signal</td><td>Auf 2ch heruntergemischtes LPCM-Signal</td><td>Auf 2ch heruntergemischtes LPCM-Signal</td></tr><tr><td rowspan="4">DVD-Video</td><td>Dolby Digital Dolby Digital</td><td colspan="4">Auf 2ch heruntergemischtes LPCM-Signal</td></tr><tr><td>DTS</td><td colspan="2">DTS</td><td colspan="2">Auf 2ch heruntergemischtes LPCM-Signal</td></tr><tr><td>LPCM</td><td colspan="2">2ch LPCM</td><td colspan="2">2ch LPCM</td></tr><tr><td>MPEG</td><td colspan="2">MPEG</td><td colspan="2">Multi LPCM</td></tr><tr><td rowspan="2">AVCHD</td><td>Dolby Digital Dolby Digital</td><td colspan="4">Auf 2ch heruntergemischtes LPCM-Signal</td></tr><tr><td>LPCM</td><td colspan="2">Auf 2ch heruntergemischtes LPCM-Signal</td><td colspan="2">Auf 2ch heruntergemischtes LPCM-Signal</td></tr><tr><td rowspan="2">DivX®</td><td>Dolby Digital Dolby Digital</td><td colspan="4">Auf 2ch heruntergemischtes LPCM-Signal</td></tr><tr><td>MP3 / MP2</td><td colspan="2">2ch LPCM</td><td colspan="2">2ch LPCM</td></tr><tr><td colspan="2">Audio-CD/ MP3/Windows MediaTM Audio</td><td colspan="2">2ch LPCM</td><td colspan="2">2ch LPCM</td></tr><tr><td colspan="2">DTS-CD</td><td colspan="2">DTS</td><td colspan="2">Auf 2ch heruntergemischtes LPCM-Signal</td></tr></table>
<ul>
<li>Bei der Wiedergabe eines BD-Videos, das nur das Primäraudio enthält, ist die Audioausgabe mit „HD-Audioausgabe“ identisch, selbst wenn „BD-Audiomodus“ auf „Audioausgabe: Mix“ eingestellt ist.</li>
</ul>
<h2 id="hinweis-29">Hinweis</h2>
<p>- Um während der Ausgabe eines HDMI-Audiosignals gleichzeitig ein LPCM-Signal über die DIGITAL OUT-Buchse auszugeben, stellen Sie den Eintrag „HDMI-Audioausgabe“ auf „HDMI Multi(LPCM)“.</p>
<h2 id="funktionseinrichtung-10">FUNKTIONSEINRICHTUNG</h2>
<h2 id="sicherung">Sicherung</h2>
<p>[SETUP] → „Benutz.def“ → „Sicherung“</p>
<p>Einige BD-Videos oder DVD-Videos sind mit Kindersicherungsstufen versehen.</p>
<p>Wenn das Programm den von Ihnen eingegebenen Wert überschreitet, wird die Wiedergabe gestoppt und erst nach Eingabe eines Passworts fortgesetzt. Mithilfe dieser Funktion verhindern Sie, dass Ihre Kinder ungeeignetes Videomaterial ansehen.</p>
<ol>
<li>
<p>Wählen Sie „aus und drücken Sie [ENTER]. Das Passwort-Eingabefeld wird eingeblendet.</p>
</li>
<li>
<p>Wurde kein Passwort festgelegt, folgen Sie A). Wurde bereits ein Passwort festgelegt, folgen Sie B). Wenn Sie das Passwort ändern möchten, folgen Sie B) und C).</p>
</li>
</ol>
<p>Wenn Sie Ihr Passwort vergessen haben, folgen Sie D).</p>
<p>A) Geben Sie mithilfe der [Nummerntasten] ein 4-stelliges Passwort ein.
• „ 4737“ kann nicht verwendet</p>
<p>B) Geben Sie ein 4-stelliges Passwort ein</p>
<p>C) Wählen Sie „Passwort ändern“ und drücken Sie dann [ENTER]. Geben Sie das neue Passwort ein.</p>
<p>D) Geben Sie „4737“ ein. Das aktuelle Passwort und die „Sicherung“-Einstellungen wurden gelöscht. Geben Sie ein neues Passwort ein.</p>
<ol>
<li>
<p>Wählen Sie den gewünschten Punkt zur Einstellung der Kindersicherungsstufe und drücken Sie anschließend [ENTER].</p>
</li>
<li>
<p>Wählen Sie die gewünschte Kindersicherungsstufe und drücken Sie anschließend [ENTER].</p>
</li>
</ol>
<p><BD-Kindersicherungsstufe> </p>
<table><tr><td colspan="2">Alle Keine Beschränkungen festgelegt.</td></tr><tr><td>Alterseinstellung</td><td>Ermöglicht Ihnen die Eingabe einer Altersbegrenzung und verhindert die Wiedergabe von Disks, deren Altersangabe die hier eingegebene Altersbegrenzung übersteigt.Geben Sie das Alterals B. Für das Alter 15 lautet die Eingabe [0], [1], [5].)</td></tr></table>
<p><DVD-Kindersicherungsstufe> </p>
<table><tr><td colspan="2">Alle Kindersicherung deaktiviert, alle Disks können wiedergegeben werden.</td></tr><tr><td>8</td><td>DVDs aller Sicherungsstufen (Erwachsene/Allgemein/Kinder) können abgespielt werden.</td></tr><tr><td>7</td><td>[NC-17] Keine Wiedergabe durch Jugendliche unter 17 Jahren.</td></tr><tr><td>6</td><td>[R] Die Wiedergabe ist eingeschränkt; ein Erwachsener muss anwesend sein, damit Jugendliche unter 17 Jahren die Disk ansehen können.</td></tr><tr><td>5</td><td>[PGR] Anwesenheit eines Erwachsenen während der Wiedergabe wird empfohlen.</td></tr><tr><td>4</td><td>[PG13] Für Kinder unter 13 Jahren ungeeignetes Material.</td></tr><tr><td>3</td><td>[PG] Anwesenheit eines Erwachsenen während der Wiedergabe wird nahegelegt.</td></tr><tr><td>2</td><td>[G] Allgemeines Publikum.</td></tr><tr><td>1</td><td>Für Kinder geeignetes Material.</td></tr></table>
<h2 id="zeitweise-stornierung-der-kindersicherung">Zeitweise Stornierung der Kindersicherung</h2>
<p>Einige Disks ermöglichen es Ihnen, die Kindersicherung zeitweise zu stornieren. Beim Versuch, eine solche Disk wiederzugeben, erscheint die folgende Nachricht. „Eingabe des Passwortes.“</p>
<p>Folgen Sie den Anweisungen auf dem Fernsehbildschirm, um die Kindersicherung zu stornieren.</p>
<h2 id="hdmi-cec-regza-link-2">HDMI CEC (REGZA - LINK)</h2>
<p>[SETUP] → „Benutz.def“ → „Andere“ → „HDMI CEC“</p>
<p>Sie können alle HDMI CEC-kompatiblen Komponenten, die über ein HDMI-Kabel angeschlossen wurden, durch einfache Tastenbedienvorgänge mithilfe der Fernbedienung dieses Geräts steuern. Um diese Funktion zu aktivieren, müssen Sie für „HDMI CEC“ die Option „An“ wählen.</p>
<h2 id="one-touch-wiedergabe">One-Touch-Wiedergabe</h2>
<p>Wenn die Bedienung mit den folgenden Tasten der Fernbedienung dieses Geräts erfolgt, wird das Fernsehgerät automatisch eingeschaltet und auf den entsprechenden Eingangskanal eingestellt.</p>
<p>Tasten für die One-Touch-Wiedergabe:</p>
<p>- [PLAY▶]</p>
<p>- [TOP MENU] oder [POP MENU / MENU] (wenn eine Disk in das Gerät eingelegt wurde)</p>
<h2 id="bereitschaftszustand">Bereitschaftszustand</h2>
<p>Wenn Sie [ON/STANDBY ⏻] 2 Sekunden lang gedrückt halten, wird zuerst das Fernsehgerät und dann auch dieses Gerät ausgeschaltet.</p>
<p>Wenn das angeschlossene HDMI CEC-kompatible Anzeigegerät ausgeschaltet wird, schaltet sich dieses Gerät gleichzeitig mit aus.</p>
<h2 id="systeminformationen">Systeminformationen</h2>
<h2 id="mensprache-abfragen-und-einstellen">Mensprache abfragen und einstellen</h2>
<p>Das Gerät erkennt die für das Fernsehgerät eingestellte Menüsprache und stellt dieselbe Sprache als Menüsprache dieses Geräts ein (Sprache des Bildschirmmenüs).</p>
<p>- Diese Funktion ist nur verfügbar, wenn „Auto (XXX)“ in „Player Menü“ im Setup-Menü gewählt ist. (Siehe seite 27.)</p>
<h2 id="empfang-von-bediensignalen-der-fernbedienung-des-fernsehgeräts">Empfang von Bediensignalen der Fernbedienung des Fernsehgeräts</h2>
<p>Sie können dieses Gerät mit der Fernbedienung des Fernsehgeräts bedienen. Einzelheiten finden Sie in der Bedienungsanleitung Ihres Fernsehgeräts.</p>
<p>- Je nach angeschlossenem Fernsehgerät fun diese Funktion möglicherweise nicht.</p>
<p>• Die verfügbaren Funktionen können je nach Ihnen verwendeten Fernseh-Fernbedienung variieren.</p>
<p>- Andere Komponenten müssen mit HDMI CEC kompatibel sein, damit Sie diese Funktion nutzen können.</p>
<p>DE</p>
<h2 id="funktionseinrichtung-11">FUNKTIONSEINRICHTUNG</h2>
<h2 id="netzwerkverbindung">Netzwerkverbindung</h2>
<p>Stellen Sie die Netzwerkeinstellungen ein, um die BD-Live-Funktion mit einer BD-Live-Disk verwenden zu können.</p>
<h2 id="verbindung-prüfen">Verbindung prüfen</h2>
<table><tr><td>[SETUP] → „Benutz.def“ → „Andere“ → „Netzwerkverbindung“ → „Verbindung prüfen“</td></tr></table>
<p>Nachdem Sie die IP-Adresse und die DNS-Parameter eingestellt oder ein LAN-Kabel angeschlossen haben, führen Sie stets einen Verbindungstest durch, um zu kontrollieren, ob die Verbindung korrekt hergestellt wurde.</p>
<h2 id="1-drücken-sie-im-stoppmodus-setup">1 Drücken Sie im Stoppmodus [SETUP].</h2>
<p>2 Betätigen Sie [▲ / ▼] zur Wahl von 🌿, und drücken Sie dann [ENTER]. <br />
3 Betätigen Sie [▲ / ▼] zur Wahl von „Andere“, und drücken Sie dann [ENTER]. <br />
4 Betätigen Sie [▲ / ▼] zur Wahl von „Netzwerkverbindung“, und drücken Sie dann [ENTER]. <br />
5 Betätigen Sie [▲ /▼] zur Wahl von „Verbindung prüfen“, und drücken Sie dann [ENTER].</p>
<p>Der Verbindungstest startet automatisch, und das Ergebnis erscheint unmittelbar nach seinem Abschluss.</p>
<p>• „Wird geprüft...“ : Test läuft. <br />
• „Eingerichtet“ : Verbindungst erfolgreich abgeschlossen. <br />
• „Fehlgeschlagen“ : Verbindung</p>
<p>Überprüfen Sie die
Verbindungseinstellungen.</p>
<p>Betätigen Sie [ENTER], und die Liste auf dem Netzwerkstatus- Kontrollbildschirm anzuzeigen.</p>
<p><img src="/content/2026/05/1018651/images/5df07c330fc84cba4fefbcda9897dfcca900120b3778603b5070ef81defba477.jpg" alt="Andere Verbindung prüfen IP-Adresse xxx.xxx.xxx.xxx Subnetzmaske xxx.xxx.xxx.xxx Standard-Gateway xxx.xxx.xxx.xxx Primäre DNS xxx.xxx.xxx.xxx Sekundäre DNS xxx.xxx.xxx.xxx 'Enter drücken." loading="lazy" decoding="async"></p>
<h2 id="6mit-enter-können-sie-zum-vorherigen-bildschirm-zurückkehren-alternativ-betätigen-sie-setup-um-den-vorgang-zu-beenden">6Mit [ENTER] können Sie zum vorherigen Bildschirm zurückkehren. Alternativ betätigen Sie [SETUP], um den Vorgang zu beenden.</h2>
<h2 id="hinweis-30">Hinweis</h2>
<ul>
<li>Wird der Verbindungstest erfol so können Sie die BD-Live-Funktionen über das Internet nutzen, ohne zusätzliche Einstellungen vornehmen zu müssen. </li>
<li>Schlägt der Verbindungstestfe unter Umständen die MAC-Adresseinstellungen auf Ihrem Router ändern. Sie können die MAC-Adresse dieses Gerät im „Aktivieren(Benutzerdef.)“-Bildschirm prüfen. </li>
<li>„Verbindung prüfen“ ist nicht „Deaktivieren“ in „Netzwerkverbindung“ gewählt ist.</li>
</ul>
<h2 id="aktivierenstandard">Aktivieren(Standard)</h2>
<table><tr><td>[SETUP] → „Benutz.def" → „Andere“ → „Netzwerkverbindung“ → „Aktivieren(Standard)”</td></tr></table>
<p>Die Voreinstellungen für das Netzwerk sind nachfolgend aufgeführt.</p>
<p>(In den meisten Fällen können Sie eine Verbindung mit dem Internet herstellen, ohne Änderungen an den Voreinstellungen vornehmen zu müssen.)</p>
<ul>
<li>IP-Adresse einrichten Auto(DHCP) </li>
<li>DNS-Einstellungen Auto(DHCP) </li>
<li>Proxy-Einstellungen Nicht verwenden </li>
<li>Verbindungsgeschwindigk. Auto </li>
<li>BD-Live-Einstellungen Erlauben</li>
</ul>
<p>Wenn Sie die Netzwerkeinstellungen wieder oben gezeigten Voreinstellungen zurücksetzen wollen (Ausnahme: „BD-Live-Einstellungen“), gehen Sie wie folgt vor.</p>
<h2 id="1-folgen-sie-den-schritten-1-bis-4-unter-verbindung-prüfen-auf-seite-36">1 Folgen Sie den Schritten 1 bis 4 unter „Verbindung prüfen“ auf seite 36.</h2>
<h2 id="2-betätigen-sie-zur-wahl-von-aktivierenstandard-und-drücken-sie-dann-enter">2 Betätigen Sie [▲ / ▼] zur Wahl von „Aktivieren(Standard)“, und drücken Sie dann [ENTER].</h2>
<p>- Das Gerät startet den Verbindungstest au und das Ergebnis erscheint unmittelbar nach seinem Abschluss.</p>
<p>. Wehrädtegen Sie nach Abschluss des Tests [E] dem Netzwerkstatus-Kontrollbildschirm anzuzeigen.
est fehlgeschlagen.</p>
<h2 id="3betätigen-sie-enter-um-die-netzwerkeinstellungen-zu-aktivieren-und-die-netzwerkverbindung-automatisch-festzulegen-drücken-sie-setup-um-das-menü-zu-verlassen">3Betätigen Sie [ENTER], um die Netzwerkeinstellungen zu aktivieren und die Netzwerkverbindung automatisch festzulegen. Drücken Sie [SETUP], um das Menü zu verlassen.</h2>
<h2 id="hinweis-31">Hinweis</h2>
<p>• Die Einstellung des Parameters „BD-Live-Einstellungen“ wird auch bei Ausführung dieses Vorgangs nicht auf den Vorgabewert zurückgesetzt.</p>
<h2 id="aktivierenbenutzerdef">Aktivieren(Benutzerdef.)</h2>
<table><tr><td>[SETUP] → „Benutz.def“ → „Andere“ → „Netzwerkverbindung“ → „Aktivieren (Benutzerdef.)“</td></tr></table>
<p>In den folgenden Fällen wählen Sie</p>
<p>„Aktivieren(Benutzerdef.)“, um die jeweiligen Einstellungen vorzunehmen.</p>
<p>- Wenn der Verbindungstest mit der Einstell „Aktivieren(Standard)" scheitert.</p>
<p>Wenn Sie von Ihrem Internetanbieter aufge
greich ab deschlossen,
werden, bestimmte Einstellungen gemäß Ihrer
Netzwerkumgebung vorzunehmen.</p>
<h2 id="ip-adresse-einrichten-dns-einstellungen">IP-Adresse einrichten /DNS-Einstellungen</h2>
<h2 id="1-folgen-sie-den-schritten-1-bis-4-unter-verbindung-prüfen-auf-seite-36-2">1 Folgen Sie den Schritten 1 bis 4 unter „Verbindung prüfen“ auf seite 36.</h2>
<p>2 Betätigen Sie [▲, h▼] zur Wahl von „Aktivieren(Benutzerdef.)“, und drücken Sie dann [ENTER].</p>
<h2 id="funktionseinrichtung-12">FUNKTIONSEINRICHTUNG</h2>
<h2 id="3-wählen-sie-mit-die-option-ip-adresse-einrichten-und-drücken-sie-dann-wiederholt-auf-enter-um-die-gewünschte-einstellung-zu-erreichen">3 Wählen Sie mit [▲ / ▼] die Option „IP-Adresse einrichten“ und drücken Sie dann wiederholt auf [ENTER], um die gewünschte Einstellung zu erreichen.</h2>
<p>„Auto(DHCP)“: Wenn Ihr Router eine DHCP-Serverfunktion bereitstellt, wählen Sie „Auto(DHCP)“.</p>
<p>„Manuell“: Wenn Ihr Router keine DHCP-Serverfunktion bereitstellt, wählen Sie „Manuell“.</p>
<h2 id="nach-der-auswahl-von-manuell-gehen-sie-wie-folgt-vor-um-die-ip-adresse-und-dns-festzulegen">Nach der Auswahl von „Manuell“ gehen Sie wie folgt vor, um die IP-Adresse und DNS festzulegen.</h2>
<p>1) Betätigen Sie [▲ / ▼] zur Wahl von „IP-Adresse“, „Subnetzmaske“ oder „Standard-Gateway“, und drücken Sie dann [ENTER]. Der Bildschirm zur Eingabe der IP-Adresse wird aufgerufen. Geben Sie die IP-Adresse, Subnetzmaske und das Default-Gateway mit den Cursor- und den Nummerntasten ein.</p>
<p><img src="/content/2026/05/1018651/images/f8ed59dd9fcc5ff61b223ee7574aad47fc6d16fb6748b78212e1e2484065a2bf.jpg" alt="Andere IP-Adresse einrichten IP-Adresse XXX. XXX.XX.XX.XX Subnetzmaske XXX. XXX. XXX. XXX Standard-Gateway XXX. XXX. XXX. XXX 'Enter' drücken." loading="lazy" decoding="async"></p>
<p>• Geben Sie die IP-Adresse ents Spezifikationen zu Ihrem Router ein. <br />
- Ist Ihnen die IP-Adresse nicht Sie die IP-Adresse anderer Geräte (z. B. eines mit LAN-Kabel angeschlossenen Geräts) und weisen eine Adresse der anderen Geräte zu.</p>
<p>2) Nachdem Sie alle Daten korrekt eingegeben haben, betätigen Sie [ENTER].</p>
<p>- Eine Bestätigungsmeldung
Wählen Sie „Ja“, um die Einstellung
abzuschließen.</p>
<p>3) Wählen Sie mit [▲ / ▼] die Option „Primäre DNS“ oder „Sekundäre DNS“ aus, und drücken Sie dann [ENTER]. Der Bildschirm zur Eingabe der DNS-Einstellungen wird aufgerufen. Geben Sie die primären und sekundären DNS-Werte mit den Cursor- und den Nummerntasten ein.</p>
<ul>
<li>Geben Sie die Adresswerte so Ihrem Internet Provider erhalten haben. </li>
<li>Sind die Adressen unbekannt, kontrollieren Sie die entsprechenden Angaben auf anderen Geräten (z. B. eines via LAN-Kabel angeschlossen PCs) und weisen Sie dieselbe Adresse wie dort zu.</li>
</ul>
<p>4) Nachdem Sie alle Daten korrekt eingegeben haben, betätigen Sie [ENTER].</p>
<p>- Eine Bestätigungsmeldung wird angezeigt. Wählen Sie „Ja“, um die Einstellung abzuschließen.</p>
<h2 id="4mit-return-können-sie-zum-vorherigen-bildschirm-zurückkehren-alternativ-betätigen-sie-setup-um-den-vorgang-zu-beenden">4Mit [RETURN] können Sie zum vorherigen Bildschirm zurückkehren. Alternativ betätigen Sie [SETUP], um den Vorgang zu beenden.</h2>
<h2 id="hinweis-32">Hinweis</h2>
<p>• Der Eingabebereich aller Zahlen 255. <br />
- Wenn Sie einen Wert eingeben, ist, wird dieser automatisch auf 255 heruntergesetzt. <br />
- Der manuell eingegebenen Wert gespeichert, wenn Sie die Einstellung zu „Auto(DHCP)“ ändern. <br />
- Wenn Sie einen falschen Wert ei drücken Sie [CLEAR], um die Eingabe zu verwerfen. (In diesem Fall ist der Wert auf „0“ zurückgesetzt.) <br />
- Wenn Sie ein- oder zweistellige eingeben wollen, betätigen Sie [▶], um zur nächsten Zeile fortzuschreiten. <br />
- Wenn die eingegebene IP-Adress Gateway oder die Adresse des primären DNS-Servers der Voreinstellung entsprechen, wird die IP-Adresseinstellung auf „Auto(DHCP)“ umgestellt. (Der manuell eingegebene Wert wird trotzdem gespeichert.) <br />
- Wenn die IP-Adresse auf „Manue wird der DNS-Einstellung automatisch auf „Manuell“ gesetzt; ist als IP-Adresseinstellung „Auto(DHCP)“ festgelegt, dann können Sie für die DNS-Einstellung wahlweise „Auto(DHCP)“ oder „Manuell“ auswählen.</p>
<h2 id="proxy-einstellungen">Proxy-Einstellungen</h2>
<h2 id="1-führen-sie-die-schritte-1-bis-4-des-abschnitts-verbindung-prüfen-auf-seite-36-durch">1 Führen Sie die Schritte 1 bis 4 des Abschnitts „Verbindung prüfen“ auf seite 36 durch.</h2>
<p>2 Betätigen Sie [▲/▼] zur Wahl von „Aktivieren(Benutzerdef.)“, und drücken Sie ist dann [ENTER]. prüfen</p>
<h2 id="3-wählen-sie-mit-die-option-proxy-einstellungen-und-drücken-sie-dann-wiederholt-auf-enter-um-die-gewünschte-einstellung-zu-erreichen">3 Wählen Sie mit [▲ / ▼] die Option „Proxy-Einstellungen“ und drücken Sie dann wiederholt auf [ENTER], um die gewünschte Einstellung zu erreichen.</h2>
<p>d. U <sup>a</sup> ngez <sup>e</sup> z <sup>e</sup> igt. treinstellungen zu verwenden, w „Nicht verwenden“. <br />
- Wenn Sie auf Aufforderung Ihres Internet Proxy-Einstellung ändern müssen, um die angegebene Proxy-Adresse und den Port festzulegen, wählen Sie „Verwenden“.</p>
<h2 id="nach-der-auswahl-von-verwenden-gehen-sie-wie-folgt-vor-um-proxy-adresse-und-proxy-port-festzulegen">Nach der Auswahl von „Verwenden“ gehen Sie wie folgt vor, um Proxy-Adresse und Proxy-Port festzulegen.</h2>
<p>e i 19 Betätigen Sie [▲▼] zu! Wahl von „Proxy-Adresse“, und drücken Sie dann [ENTER]. Der Bildschirm zur Eingabe der Proxy-Adresseneinstellung wird aufgerufen. Geben Sie die Proxy-Adresse ein.</p>
<p><img src="/content/2026/05/1018651/images/135f84defb37eb58902e87ffc9be24704095d02c3c27b2e3cfd8f9ca710e9dbb.jpg" alt="TOSHIBA BDX2000KE - Nach der Auswahl von „Verwenden“ gehen Sie wie folgt vor, um Proxy-Adresse und Proxy-Port festzulegen. - 1" loading="lazy" decoding="async"></p>
<p>EINELTUNG ANSCHEUSE</p>
<p>gegeben
Zahlen in</p>
<p>FUNCTIONSEIN-RICHUNG SO</p>
<p>tgel</p>
<p>NSICES</p>
<p><img src="/content/2026/05/1018651/images/a90bc2d9cef5e3ee41b566b3812adc8741c4b69570a308d7401bcd314aa13089.jpg" alt="TOSHIBA BDX2000KE - Nach der Auswahl von „Verwenden“ gehen Sie wie folgt vor, um Proxy-Adresse und Proxy-Port festzulegen. - 2" loading="lazy" decoding="async"></p>
<h2 id="funktionseinrichtung-13">FUNKTIONSEINRICHTUNG</h2>
<p>• Der Tastaturbildschirm erscheint 10BASEHalb"</p>
<p>[▲ / ▼ / ◀ / ▶ ] : Bewegt dem Cursor.</p>
<p>[Nummerntasten]: Erlaubt die Zahleneingabe</p>
<p>[ENTER] : Erlaubt die Eingabe der markierten Zahl/Wort.</p>
<p>[Rot] : Löscht die eingegebene Zahl/Wort.</p>
<p>[Grün]: Löscht alle eingegebenen</p>
<p>[Gelb]: Umschalten zwischen abc?</p>
<p>[Blau]: Legt die eingegebene Zahl</p>
<p>„10BASE Halb“ : Setzt die</p>
<p>Verbindungsgeschwindigkeit auf „10BASE Halb“.</p>
<p>„10BASE Voll“ : Setzt die</p>
<p>Zahlen/Wörter.</p>
<p>: Setzt die</p>
<p>Verbindungsgeschwindigkeit auf „10BASE Voll“.</p>
<p>bzw100BASEHalb"setzt die</p>
<p>Verbindungsgeschwindigkeit auf „100BASE Halb“.</p>
<p>2) Nachdem Sie die Proxy-Adresse korrekt eingegeben haben, betätigen Sie [Blau].</p>
<p>- Eine Bestätigungsmeldung
Wählen Sie „Ja“, um die Einstellung
abzuschließen.</p>
<p>3) Betätigen Sie [▲ / ▼] zur Wahl von „Proxy-Port“, und drücken Sie dann [ENTER]. Der Bildschirm zur Eingabe der Proxy-Porteinstellung wird aufgerufen. Geben Sie die Proxy-Portnummer mit den Nummenrtasten ein.</p>
<p>4) Nachdem Sie die Proxy-Port korrekt eingegeben haben, betätigen Sie [ENTER].</p>
<h2 id="4mit-return-können-sie-zum-vorherigen-bildschirm-zurückkehren-alternativ-betätigen-sie-setup-um-den-vorgang-zu-beenden-2">4Mit [RETURN] können Sie zum vorherigen Bildschirm zurückkehren. Alternativ betätigen Sie [SETUP], um den Vorgang zu beenden.</h2>
<h2 id="hinweis-33">Hinweis</h2>
<p>- Der Eingabebereich der Portnu 0 und 65535. (Wenn Sie einen Wert eingeben, die größer als 65535 ist, wird dieser auf 65535 heruntergesetzt.)</p>
<p>- Je nach Einstellungen in Ihrer sind die ausgewählten Proxy-Ports unter Umständen gesperrt und können nicht verwendet werden.</p>
<h2 id="verbindungsgeschwindigk">Verbindungsgeschwindigk.</h2>
<p>Sie können die Verbindungsgeschwindigkeit nach Belieben festlegen. (Die werkseitige Voreinstellung ist „Auto“.)</p>
<h2 id="1führen-sie-die-schritte-1-bis-4-des-abschnitts-verbindung-prüfen-auf-seite-36-durch">1Führen Sie die Schritte 1 bis 4 des Abschnitts „Verbindung prüfen“ auf seite 36 durch.</h2>
<p>2 Betätigen Sie [▲ / ▼] zur Wahl von „Aktivieren(Benutzerdef.)“, und drücken Sie dann [ENTER].</p>
<p>3 Betätigen Sie [▲ / ▼] zur Wahl von „Verbindungsgeschwindigk.“, und drücken Sie dann [ENTER].</p>
<p>4 Nehmen Sie mit [▲ / ▼] die gewünschte Einstellung vor und drücken Sie dann auf [ENTER].</p>
<p>„Auto“:</p>
<p>Legt die geeignete Verbindungsgeschwindigkeit automatisch entsprechend Ihrer Netzwerkumgebung fest.</p>
<h2 id="5mit-return-können-sie-zum-vorherigen-bildschirm-zurückkehren-alternativ-betätigen-sie-setup-um-den-vorgang-zu-beenden">5Mit [RETURN] können Sie zum vorherigen Bildschirm zurückkehren. Alternativ betätigen Sie [SETUP], um den Vorgang zu beenden.</h2>
<h2 id="hinweis-34">Hinweis</h2>
<p>- Wählen Sie eine Ihrer Netzwerkumgebung entsprechende Verbindungsgeschwindigkeit.</p>
<p>- Wenn die Einstellungen geändert werden, Netzwerkverbindung je nach Gerät eventuell deaktiviert.</p>
<h2 id="bd-live-einstellungen">BD-Live-Einstellungen</h2>
<p>Sie können den Internetzugriff bei BD-Live-Funktionen beschränkten. Die werkseitige Voreinstellung ist „Erlauben“.</p>
<h2 id="1führen-sie-die-schritte-1-bis-4-des-abschnitts-netzwerkumgepung-verbindung-prufen-auf-seite-36-durch">1Führen Sie die Schritte 1 bis 4 des Abschnitts Netzwerkumgepung „Verbindung prufen“ auf seite 36 durch.</h2>
<p>2 Betätigen Sie [▲ / ▼] zur Wahl von „Aktivieren(Benutzerdef.)“, und drücken Sie dann [ENTER].</p>
<p>3 Betätigen Sie [▲ / ▼] zur Wahl von „BD-Live-Einstellungen“, und drücken Sie dann [ENTER].</p>
<p>4 Nehmen Sie mit [▲ / ▼] die gewünschte Einstellung vor und drücken Sie dann auf [ENTER].</p>
<p>„Erlauben“:</p>
<p>Der Internetzugriff ist für alle BD-Live-Inhalte zulässig. „Eingeschränkt erlauben“:</p>
<p>Der Internetzugriff ist nur für BD-Live-Inhalte mit Inhaltsbesitzerzertifikaten zulässig. Ein Internetzugriff ohne Zertifikate ist untersagt.</p>
<p>„Nicht erlauben“:</p>
<p>Der Internetzugriff ist für alle BD-Live-Inhalte untersagt.</p>
<h2 id="5mit-return-können-sie-zum-vorherigen-bildschirm-zurückkehren-alternativ-betätigen-sie-setup-um-den-vorgang-zu-beenden-2">5Mit [RETURN] können Sie zum vorherigen Bildschirm zurückkehren. Alternativ betätigen Sie [SETUP], um den Vorgang zu beenden.</h2>
<h2 id="funktionseinrichtung-14">FUNKTIONSEINRICHTUNG</h2>
<h2 id="deaktivieren">Deaktivieren</h2>
<p>Deaktivieren Sie alle Netzwerkverbindungen und -einstellungen.</p>
<p>1Führen Sie die Schritte 1 bis 4 des Abschnitts „Verbindung prüfen“ auf seite 36 durch.</p>
<p>2 Betätigen Sie [▲ / ▼] zur Wahl von „Deaktivieren“, und drücken Sie dann [ENTER].</p>
<p>3Mit [RETURN] können Sie zum vorherigen Bildschirm zurückkehren. Alternativ betätigen Sie [SETUP], um den Vorgang zu beenden.</p>
<h2 id="hinweis-35">Hinweis</h2>
<p>- Die Netzwerkverbindung kann indem Sie die Netzwerkverbindung auf „Aktivieren(Standard)“ oder „Aktivieren(Benutzerdef.)“ setzen.</p>
<h2 id="software-update-2">Software-Update</h2>
<h2 id="aktuelle-version">Aktuelle Version</h2>
<p>Sie können die aktuelle Softwareversion bestätigen.</p>
<p>1Führen Sie die Schritte 1 bis 3 des Abschnitts „Verbindung prüfen“ auf seite 36 durch.</p>
<p>2 Betätigen Sie [▲ / ▼] zur Wahl von „Software-Update“, und drücken Sie dann [ENTER].</p>
<p>3 Betätigen Sie [▲ / ▼] zur Wahl von „Aktuelle Version“, und drücken Sie dann [ENTER].</p>
<p>4Drücken Sie [ENTER] oder [RETURN], um diese Anzeige auszublenden.</p>
<h2 id="hinweis-36">Hinweis</h2>
<p>- Besuchen Sie http://www.toshiba-om.net, neueste Firmwareversion herunterzuladen.</p>
<h2 id="disk-update">Disk-Update</h2>
<p>Sie können die Software mit einer Disk aktualisieren.</p>
<p>1Führen Sie die Schritte 1 bis 3 des Abschnitts „Verbindung prüfen“ auf seite 36 durch.</p>
<p>2 Betätigen Sie [▲ /▼] zur Wahl von „Software-Update“, und drücken Sie dann [ENTER].</p>
<p>3 Betätigen Sie [▲ / ▼] zur Wahl von „Disk-Update“, und drücken Sie dann [ENTER].</p>
<p>4 Betätigen Sie [▲ / ▼] zur Wahl von „Ja“, und drücken Sie dann [ENTER].</p>
<p>5Das Disk-Fach öffnet sich automatisch.</p>
<p>- Legen Sie die Disk für das drücken Sie [OPEN/CLOSE ▲].</p>
<p>6Nach dem Laden der Disk erscheint eine Bestätigungsmeldung. Wählen Sie „Ja“ und drücken Sie [ENTER], um den Upgrade-Prozess zu starten.</p>
<p>- Es kann einen Moment dauern, abgeschlossen ist. (Bitte warten Sie, bis „100%“ in der Frontkonsolenanzeige erscheint.)</p>
<h2 id="7-nach-abschluss-des-disk-upgrades-startet-das-gerät-erneut-und-wirft-die-disk-aus">7 Nach Abschluss des Disk-Upgrades startet das Gerät erneut und wirft die Disk aus.</h2>
<h2 id="hinweis-37">Hinweis</h2>
<ul>
<li>Sie können die aktuelle Firmware-Version „Aktuelle Version“ im Menü „Software-Update“ überprüfen. </li>
<li>Ziehen Sie bitte nicht den Netzstecker aus Steckdose, während das „Disk-Update“ ausgeführt wird. </li>
<li>Eine Aktualisierung der Firmware version h Änderungen an den Geräteeinstellungen zur Folge.</li>
</ul>
<h2 id="initialisieren">Initialisieren</h2>
<p>aktiviert werden,
Dieses Untermenü ermöglicht eine Initialisierung des
Einrichtungsmenüs oder einer SD-karte.</p>
<h2 id="1-drücken-sie-im-stoppmodus-setup-2">1 Drücken Sie im Stoppmodus [SETUP].</h2>
<p>2 Betätigen Sie [▲ / ▼] zur Wahl von ☎, und drücken Sie dann [ENTER].</p>
<p>3 Betätigen Sie [▲ / ▼] zur Wahl der gewünschten Option, und drücken Sie dann [ENTER].</p>
<p>• Eine Bestätigungsmeldung wird</p>
<p>„Einstellungen“:</p>
<p>Alle Standardeinstellungen des Einrichtungsmenüs werden wiederhergestellt.</p>
<p>Die Einstellungen für „Sicherung“,</p>
<p>„Netzwerkverbindung“ und „Medienauswahl“ werden nicht zurückgesetzt.</p>
<p>„SD-Karte formatieren“</p>
<p>(Nur bei eingelegter SD-karte verfügbar.): Die SD-karte wird initialisiert.</p>
<p>„Gedpeicherte BD-ROM-Daten löschen (Player)“:</p>
<p>Löscht die für BD-ROM-Inhalte gespeicherten Daten, wie Spielergebnisse, von diesem Gerät.</p>
<p>„Gespeicherte BD-ROM-Daten löschen (SD-Karte)“ (Nur bei eingelegter SD-karte verfügbar.):</p>
<p>Löscht die Zusatzdaten für die BD-ROM-Wiedergabe, wie Untertiteldaten, von der SD-karte.</p>
<p>„Netzwerkeinstellungen“:</p>
<p>Setzt das Netzwerkeinstellungsmenü auf die Vorgabewerte zurück.</p>
<p>4 Wählen Sie „Ja“ und drücken Sie dann [ENTER].</p>
<p>- Drücken Sie [ENTER] noch einmal, um die Einstellungen abzuschließen.</p>
<h2 id="5-drücken-sie-setup-um-das-menü-zu-w-a-verlaspenate-ein-und">5 Drücken Sie [SETUP], um das Menü zu w a verlaspenate ein und</h2>
<h2 id="warnhinweise-8">Warnhinweise</h2>
<p>- Entfernen Sie die SD-karte nicht, während formatieren" oder „Gespeicherte BD-ROM-Daten löschen (SD-Karte)" ausgeführt wird. Andernfalls kann die Karte beschädigt werden.</p>
<p>bis die Aktualisierung</p>
<h2 id="de-3">DE</h2>
<h2 id="sonstiges-2">SONSTIGES</h2>
<p>Sprachcode-Liste </p>
<table><tr><td>SpracheCod</td><td></td><td>SpracheCode</td><td></td><td>SpracheCode</td><td></td><td>SpracheCod</td><td></td></tr><tr><td colspan="2">A-B</td><td>Grönländisch</td><td>5758</td><td>Madagassisch</td><td>5953</td><td>Slowakisch [SLO]</td><td>6557</td></tr><tr><td colspan="2">Abkhasisch 4748</td><td>Guarani</td><td>5360</td><td>Mazedonisch</td><td>5957</td><td>Slowenisch 6558</td><td></td></tr><tr><td colspan="2">Afar 4747</td><td>Gujarati</td><td>5367</td><td>Malay</td><td>5965</td><td>Somalisch</td><td>6561</td></tr><tr><td colspan="2">Afrikaans 4752</td><td>Hausa</td><td>5447</td><td>Malayalam 5958</td><td></td><td>Spanisch [SPA]</td><td>5165</td></tr><tr><td colspan="2">Albanisch 6563</td><td>Hebräisch</td><td>5569</td><td>Maltesisch</td><td>5966</td><td>Sundanesisch</td><td>6567</td></tr><tr><td colspan="2">Amharic 4759</td><td>Hindi</td><td>5455</td><td>Maori 5955</td><td></td><td>Suaheli</td><td>6569</td></tr><tr><td colspan="2">Arabisch 4764</td><td>Holländisch [DUT]</td><td>6058</td><td>Marathi 5964</td><td></td><td>Schwedisch [SWE]</td><td>6568</td></tr><tr><td colspan="2">Armenisch 5471</td><td colspan="2">I-K</td><td>Moldavisch</td><td>5961</td><td colspan="2">T</td></tr><tr><td colspan="2">Assamesisch 4765</td><td>Isländisch [ICE]</td><td>5565</td><td>Mongolisch</td><td>5960</td><td>Tagalog</td><td>6658</td></tr><tr><td colspan="2">Aymara 4771</td><td>Indonesisch</td><td>5560</td><td>Nauru</td><td>6047</td><td>Tajik</td><td>6653</td></tr><tr><td colspan="2">Azerbaijanisch 4772</td><td>Interlingua</td><td>5547</td><td>Nepalisch 6051</td><td></td><td>Tamil</td><td>6647</td></tr><tr><td colspan="2">Bashkir 4847</td><td>Interlingue</td><td>5551</td><td>Norwegisch [NOR]</td><td>6061</td><td>Tatarisch</td><td>6666</td></tr><tr><td colspan="2">Baskisch 5167</td><td>Inupiak</td><td>5557</td><td colspan="2">O-R</td><td>Telugu</td><td>6651</td></tr><tr><td colspan="2">Bengalisch 4860</td><td>Irisch [IRI]</td><td>5347</td><td>Okzitanisch 6149</td><td></td><td>Thai</td><td>6654</td></tr><tr><td colspan="2">Bhutani 5072</td><td>Italienisch [ITA]</td><td>5566</td><td>Oriya</td><td>6164</td><td>Tibetanisch 4861</td><td></td></tr><tr><td colspan="2">Bihari 4854</td><td>Japanisch [JPN]</td><td>5647</td><td>Oromo (Afan)</td><td>6159</td><td>Tigrinya</td><td>6655</td></tr><tr><td colspan="2">Bislama 4855</td><td>Javanesisch</td><td>5669</td><td>Panjabi</td><td>6247</td><td>Tonga</td><td>6661</td></tr><tr><td colspan="2">Bretonisch 4864</td><td>Jiddisch</td><td>5655</td><td>Pashto; Pushto</td><td>6265</td><td>Tschechisch [CZE]</td><td>4965</td></tr><tr><td>Bulgarisch [BUL]</td><td>4853</td><td>Kambodschanisch</td><td>5759</td><td>Persisch</td><td>5247</td><td>Tsonga</td><td>6665</td></tr><tr><td colspan="2">Burmesisch 5971</td><td>Kannadisch 5760</td><td></td><td>Polnisch [POL]</td><td>6258</td><td>Türkisch [TUR]</td><td>6664</td></tr><tr><td>Byelorussisch</td><td>4851</td><td>Kashmiri 5765</td><td></td><td>Portugiesisch [POR]</td><td>6266</td><td>Turkmenisch</td><td>6657</td></tr><tr><td colspan="2">C-E</td><td>Kasachisch</td><td>5757</td><td>Rätoromanisch</td><td>6459</td><td>Twi</td><td>6669</td></tr><tr><td>Chinesisch [CHI]</td><td>7254</td><td>Katalanisch</td><td>4947</td><td>Rumänisch[RUM]</td><td>6461</td><td colspan="2">U-Z</td></tr><tr><td colspan="2">Dänisch [DAN] 5047</td><td>Ketschua</td><td>6367</td><td>Russisch [RUS]</td><td>6467</td><td>Ukrainisch</td><td>6757</td></tr><tr><td>Deutsch [GER]</td><td>5051</td><td>Kinyarwanda</td><td>6469</td><td colspan="2">S</td><td>Ungarisch [HUN]</td><td>5467</td></tr><tr><td colspan="2">Englisch [ENG] 5160</td><td>Kirghiz</td><td>5771</td><td>Samoisch</td><td>6559</td><td>Urdu</td><td>6764</td></tr><tr><td>Esperanto</td><td>5161</td><td>Kirundi 6460</td><td></td><td>Sangho 6553</td><td></td><td>Uzbekisch</td><td>6772</td></tr><tr><td colspan="2">Estländisch 5166</td><td>Koreanisch [KOR]</td><td>5761</td><td>Sanskrit</td><td>6547</td><td>Vietnamesisch</td><td>6855</td></tr><tr><td colspan="2">F-H</td><td>Korsisch</td><td>4961</td><td>Schottisch/Gälisch</td><td>5350</td><td>Volapük</td><td>6861</td></tr><tr><td colspan="2">Faröisch 5261</td><td>Kroatisch 5464</td><td></td><td>Serbisch</td><td>6564</td><td>Walisisch 4971</td><td></td></tr><tr><td>Fiji</td><td>5256</td><td>Kurdisch 5767</td><td></td><td>Serbokroatisch</td><td>6554</td><td>Wolof</td><td>6961</td></tr><tr><td>Finnisch [FIN]</td><td>5255</td><td colspan="2">L-N</td><td>Sesotho</td><td>6566</td><td>Xhosa</td><td>7054</td></tr><tr><td>Französisch [FRE]</td><td>5264</td><td>Laotisch 5861</td><td></td><td>Setswana</td><td>6660</td><td>Yoruba 7161</td><td></td></tr><tr><td>Friesisch</td><td>5271</td><td>Latein</td><td>5847</td><td>Shona</td><td>6560</td><td>Zulu</td><td>7267</td></tr><tr><td colspan="2">Galizisch 5358</td><td>Latvian; Lettisch</td><td>5868</td><td>Sindhi</td><td>6550</td><td></td><td></td></tr><tr><td>Georgisch</td><td>5747</td><td>Lingala 5860</td><td></td><td>Singalesisch</td><td>6555</td><td></td><td></td></tr><tr><td>Griechisch [GRE]</td><td>5158</td><td>Litauisch</td><td>5866</td><td>Siswati</td><td>6565</td><td></td><td></td></tr></table>
<h2 id="hinweis-38">Hinweis</h2>
<p>- Bei Wahl einer Sprache mit einem aus 3 Buchstaben bestehenden Sprachencode (in Klammern geschrieben) wird dieser bei jeder Änderung der Einstellung der Audio- oder Untertitelsprache auf seite 25 angezeigt. Bei Wahl einer anderen Sprache wird stattdessen „---“ angezeigt.</p>
<h2 id="sonstiges-3">SONSTIGES</h2>
<h2 id="problemlösungen">Problemlösungen</h2>
<p>Falls das Gerät nicht wie in dieser Bedienungsanleitung beschrieben funktioniert, überprüfen Sie es bitte unter Zuhilfenahme der nachstehenden Tabelle.</p>
<table><tr><td>Störung Abhilfema</td><td>nahme</td></tr><tr><td>Das Gerät lässt sich nicht einschalten</td><td>- Prüfen Sie nach, dass das Netzkabe ericht- Trennen Sie den Netzstecker von de Netz und schließen Sie ihn dann erneut an.</td></tr><tr><td rowspan="2" colspan="2">Kein Ton oder Bild - Prüfen Sie nach, dass das angeschlossene Fernsehgerät eingeschaltet ist.</td></tr><tr><td>- Prüfen Sie nach, dass alle Anschlüss eric zum Anschlag in die Buchsen geschoben sind.- Überprüfen Sie, ob das angeschlossene Fe unterstützt. (Dieses Gerät gibt nur dann ein Videosignal aus, wenn das angeschlossene Gerät HDCP unterstützt.)- Prüfen Sie, ob das Ausgabe format unterschieden Eingangsformat des angeschlossenen Geräts entspricht.</td></tr><tr><td>Das Bild ist verzerrt</td><td>- In bestimmten Fällen können geringfügige Verzerrungen im Wiedergabebild auftreten.Dabei handelt es sich nicht um eine Funktionsstörung.- Schließen Sie dieses Gerät direkt an das Composite Audio-/Videokabel an einen Videorecorder angeschlossen ist, kann es durch das Kopierschutzsystem zu Bildverzerrungen kommen.</td></tr><tr><td>Das Bild ist völlig verzerrt oder der Fernsehschirm ganzflächig schwarz bzw. bei BD / DVD-Wiedergabe weiß</td><td>- Vergewissern Sie sich, dass die Disk mit FUNKTIONSEIMRECHTUNG</td></tr><tr><td>Kein Ton, oder der Klang ist verzerrt</td><td>- Stellen Sie einen geeigneten Lautsstärkep- Prüfen Sie nach, dass die Lautsprecherichtig ange- Prüfen Sie den HDMI-Anschluss.- Überprüfen Sie die Einstellungen d-GCGB]</td></tr><tr><td>Während der Wiedergabe friert das Bild kurzzeitig ein</td><td>- Überprüfen Sie die Disk auf Finger einem weichen Tuch, wobei sie es vom Mittelloch in einer geraden Bewegung zum Außenrand führen.- Reinigen Sie die Disk.</td></tr><tr><td>Eine Disk kann nicht abgespielt werden</td><td>- Reinigen Sie die Disk.- Prüfen Sie nach, dass die Disk mit nach obe wurde.- Überprüfen Sie, ob die Disk defekt ist, u- Heben Sie die Kindersicherung auf, oder - Legen Sie eine mit diesem Gerät abspielb</td></tr><tr><td>SD-Karten kann nicht gelesen werden</td><td>- Das Format der Karte stimmt nicht mit de überein, oder die Karte ist nicht mit diesem Gerät kompatibel.</td></tr><tr><td>Beim Entfernen einer Disk wird nicht auf den Startbildschirm zurückgekehrt</td><td>- Schalten Sie das Gerät einmal aus und da</td></tr><tr><td>Das Gerät kann nicht mit der Fernbedienung gesteuert werden</td><td>- Richten Sie den Fernbedienungsgeber dire Sensor an der Frontplatte.- Verwenden Sie die Fernbdienung in einem Fernbedienungssignal-Sensor.- Wechseln Sie die Batterien der Fernbedie- Legen Sie die Batterien entsprechend den Pol-Inneren des Batteriefachs ein.</td></tr><tr><td>Tasten funktionieren nicht, oder das Gerät spricht nicht mehr an</td><td>- Um das Gerät vollständig zurückzusetzen, halten Sie [ON/STANDBY ☐] für 10 Sekunden gedrückt, um das Gerät so auszuschalten, oder ziehen Sie den Netzstecker für 5-10 Sekunden aus der Steckdose.</td></tr><tr><td>Während der Wiedergabe spricht das Gerät nicht auf bestimmte Befehle an</td><td>- Bestimmte Funktionen werden möglicher wie Einzelheiten finden Sie in den Anweisungen zur jeweiligen Disk.</td></tr><tr><td>Das Gerät kann eine BD / DVD / CD nicht lesen</td><td>- Im Geräteinneren kann sich Feuchtigkeit einige Stunden lang nicht, damit sein Inneres trocknen kann.- Sie versuchen, eine Disk wiederzugeben, aufgelisteten Logos aufweist.- Reinigen Sie die Disk, falls sie verschmut</td></tr></table>
<p>EINLEITUNG ANSCHLÜSSE WIEDERGABE <br />
dieses Geräts (HD <br />
a n d a s <br />
FUNKTIONSEIN
RCHTUNG
t</p>
<p>DE</p>
<p>41</p>
<p><img src="/content/2026/05/1018651/images/b929afc859192053551576fd44439b67b08e6d11781a94b6a3871d5b6675c960.jpg" alt="TOSHIBA BDX2000KE - Problemlösungen - 1" loading="lazy" decoding="async"></p>
<p><img src="/content/2026/05/1018651/images/05be2c41ede6aba0c9f946bd9d1b13568b3d5440c44f4fac91d6fa2fbba7e7ae.jpg" alt="TOSHIBA BDX2000KE - Problemlösungen - 2" loading="lazy" decoding="async"></p>
<p><img src="/content/2026/05/1018651/images/f82e078121b1d9a174de83a5e1519307d5c0140587d082fcc11e4a30e91b4487.jpg" alt="TOSHIBA BDX2000KE - Problemlösungen - 3" loading="lazy" decoding="async"></p>
<p><img src="/content/2026/05/1018651/images/eaaa99c27f57b6b1c77e5cb9fb4aa8f038fa8c2c15edfe0a2428a1a88dab3ad1.jpg" alt="TOSHIBA BDX2000KE - Problemlösungen - 4" loading="lazy" decoding="async"></p>
<p><img src="/content/2026/05/1018651/images/38f5009267d5305cfd34507dd0a9d95695b6f4dec7499eef0d32f90feb9e779c.jpg" alt="TOSHIBA BDX2000KE - Problemlösungen - 5" loading="lazy" decoding="async"></p>
<p><img src="/content/2026/05/1018651/images/e1694f99551ccafd69081173dc255fb39e96886804645097f52024b6d9c16ab7.jpg" alt="TOSHIBA BDX2000KE - Problemlösungen - 6" loading="lazy" decoding="async"></p>
<h2 id="sonstiges-4">SONSTIGES</h2>
<p>Störung Abhilfema </p>
<table><tr><td>Der Kamerawinkel kann nicht umgeschaltet werden</td><td>-Bei einer BD / DVD, die nicht mit steht diese Funktion nicht zur Verfügung. In manchen Fällen sind nur bestimmte Szenen einer Disk mit mehreren Kamerawinkeln aufgenommen worden.</td><td>mehreren K</td></tr><tr><td>Nach Wahl eines Titels startet die Wiedergabe nicht</td><td>-Überprüfen Sie die Einstellungen</td><td>des Men</td></tr><tr><td>Sie haben das Passwort für die Kindersicherung vergessen</td><td>-Geben Sie das Standard-Passwort „4737“ e</td><td></td></tr><tr><td>Verbindung zum Netzwerk kann nicht hergestellt werden</td><td>-Kontrollieren Sie, ob das LAN-Kabel korre-Schalten Sie Modem oder Breitbandrouter-Prüfen Sie die Netzwerkeinstellungen.-Kontrollieren Sie, ob Breitbandrouter und sind.-Prüfen „BD-Live-Einstellungen“.</td><td></td></tr><tr><td>Ich kann keine Verbindung zum Netzwerk herstellen, solange mein PC mit dem Netzwerk verbunden ist</td><td>-Prüfen Sie Ihren Internetversorgungsvert gleichzeitige Anbindung mehrerer Stationen unterbindet.</td><td></td></tr><tr><td>Die BD-Live-Funktion kann nicht benutzt werden</td><td>-Benutzen Sie eine SD-Karte mit ausreiche</td><td></td></tr><tr><td>Die Wiedergabe von BD-Videos oder der Download von Daten funktionieren nicht einwandfrei</td><td>-Kontrollieren Sie, ob eine SD-Karte korre Karte bei laufender Wiedergabe nicht ab, da einige BD-Videos das Vorhandensein einer SD-Karte während der Wiedergabe verlangen.</td><td></td></tr></table>
<h2 id="hinweis-39">Hinweis</h2>
<ul>
<li>In bestimmten Modi stehen nicht alle Funktionen zur Verfügung, doch handelt es sich dabei nicht um eine Funktionsstörung. Bitte lesen Sie den betreffenden Abschnitt dieser Bedienungsanleitung, um das richtige Bedienungsverfahren zu ermitteln. </li>
<li>Bestimmte Funktionen können von der Disk aus gesperrt sein.</li>
</ul>
<h2 id="technische-daten">Technische Daten</h2>
<p>Allgemein </p>
<table><tr><td>Signalsystem NTSC-/PAL-Farbe</td></tr><tr><td>Spannungsversorgung 220-240 V AC, 50 Hz</td></tr><tr><td>Leistungsaufnahme 22 W (Standby: 0,5 W)</td></tr><tr><td>Abmessungen (Breite x Höhe x Tiefe) 435 x 56 x 218 mm</td></tr><tr><td>Gewicht 2,3 kg</td></tr><tr><td>Betriebstemperatur 5°C bis 35°C</td></tr><tr><td>Betriebsluftfeuchtigkeit Weniger als 80 % (keine Kondensation)</td></tr></table>
<p>Anschlüsse </p>
<table><tr><td rowspan="7">Rückwand</td><td colspan="3">VideoausgangRCA-Buchse x 1 1 Vp-p (75Ω)</td></tr><tr><td>Komponenten-VideoausgangRCA-Buchse x 3 Y: 1 Vp-p (75Ω)</td><td>P</td><td> <sub>B/C<sub>B</sub></sub> : 700 mVp-p (75Ω) <sub>PR/C<sub>R</sub></sub> : 700 mVp-p (75Ω)</td></tr><tr><td>HDMI-AusgangHDMI-Buchse x 1</td><td colspan="2">Video: 480p/576p, 720p, 1080i, 1080p, 1080p24 / Audio</td></tr><tr><td colspan="3">Audioausgang (analog)RCA-Buchse x 2 L/R: 2 Vrms (Ausgangsimpedanz: mehr als 1kΩ)</td></tr><tr><td>Audioausgang (digital)RCA-Buchse x 1</td><td colspan="2">500 mVp-p (75Ω)</td></tr><tr><td>Optische Buchse x 1</td><td colspan="2">Digitaler Anschluss</td></tr><tr><td>LAN-Anschluss</td><td colspan="2">10BASE-T/100BASE-TX</td></tr></table>
<h2 id="hinweis-40">Hinweis</h2>
<p>- Änderungen der technischen Daten und äußeren Aufmachung des Geräts bleiben jederzeit vorbehalten.</p>
<p><img src="/content/2026/05/1018651/images/9196779815549f90c8f622d8379026cc1710d1851733c3378beeee22cac5607a.jpg" alt="TOSHIBA BDX2000KE - Hinweis - 1" loading="lazy" decoding="async"></p>
<p><img src="/content/2026/05/1018651/images/880c5e5be3003d7d2426ecc9023578c7628b19db1fe459dfd69b6b156caf1770.jpg" alt="TOSHIBA BDX2000KE - Hinweis - 2" loading="lazy" decoding="async"></p>
<h2 id="sonstiges-5">SONSTIGES</h2>
<h2 id="license-information-on-the-software-used-in-this-product-2">License Information on the Software Used in This Product</h2>
<p>This document is statement purpose only. Not concerned with operation of this product.</p>
<p>The software pre-installed in this product consists of multiple, independent software components. Each software component is copyrighted by a third party.</p>
<p>This product uses software components that are distributed as freeware under a third-party end-user license agreement or copyright notice (hereinafter referred to as a "EULA").</p>
<p>TOSHIBA provides a warranty for this product you have purchased under conditions set forth by TOSHIBA. However, some of the software components distributed under an EULA are made available for use by the user on the assumption that they are not copyrighted or warranted by a third party. These software components are licensed to the user free of charge and therefore not covered by any warranty within the scope of the applicable laws. These software components are not subject to any copyrights or other third-party rights and are provided in "as is" condition without any warranty, whether express or implied. "Warranty" here includes, but not limited to, an implied warranty for marketability or fitness for specific uses. All risks associated with the quality or performance of these software components are assumed by the user. TOSHIBA shall not be liable whatsoever for any cost of repair or correction or other incidental expense incurred in connection with a defect found in any of these software components. Unless specified under the applicable laws or in a written agreement, a party who changes or redistributes the software with consent from the copyright holders or based on the aforementioned licenses shall not be held liable whatsoever for any loss arising from the use of or inability to use such software components. The same applies even when the copyright holders or relevant third parties have been informed of the possibility of such loss. "Loss" here includes normal, special, incidental and indirect loss (including, but not limited to, the loss of data or its accuracy; loss incurred by the user or any third party; and interface incompatibility with other software). Please read each EULA for details on the use conditions and items that must be observed regarding these software components.</p>
<p>The table below lists the software components pre-installed in this product, which are subject to EULAs. The user should read the applicable EULAs carefully before using these software components. The EULAs are exhibited in their original text (English) as exactly written by the respective parties.</p>
<table><tr><td colspan="2">Program name EULA</td></tr><tr><td>e2fsprogs</td><td>Exhibit A</td></tr><tr><td>linux</td><td>Exhibit A</td></tr><tr><td>module-init-tools</td><td>Exhibit A</td></tr><tr><td>mount</td><td>Exhibit A</td></tr><tr><td>netkit</td><td>Exhibit A</td></tr><tr><td>nettools</td><td>Exhibit A</td></tr><tr><td>sash</td><td>Exhibit A</td></tr><tr><td>util-linux</td><td>Exhibit A</td></tr></table>
<table><tr><td colspan="2">Program name EULA</td></tr><tr><td>directfb</td><td>Exhibit B</td></tr><tr><td>glibc</td><td>Exhibit B</td></tr><tr><td>Free Type</td><td>Exhibit C</td></tr><tr><td>LibJPEG</td><td>Exhibit C</td></tr><tr><td>Open SSL</td><td>Exhibit C</td></tr></table>
<p>- Reverse engineering, disassembling, decompiling, dismantling, or otherwise attempting to analyze or modify the software included in this product is prohibited.</p>
<h2 id="exhibit-a-2">Exhibit A</h2>
<h2 id="gpl-2">GPL</h2>
<p>GNU GENERAL PUBLIC LICENSE</p>
<p>Version 2, June 1991</p>
<p>Copyright (C) 1989, 1991 Free Software Foundation, Inc.,</p>
<p>51 Franklin Street, Fifth Floor, Boston, MA 02110-1301 USA</p>
<p>Everyone is permitted to copy and distribute verbatim copies of this license document, but changing it is not allowed.</p>
<h2 id="preamble-3">Preamble</h2>
<p>The licenses for most software are designed to take away your freedom to share and change it. By contrast, the GNU General Public License is intended to guarantee your freedom to share and change free software—to make sure the software is free for all its users. This General Public License applies to most of the Free Software Foundation's software and to any other program whose authors commit to using it. (Some other Free Software Foundation software is covered by the GNU Lesser General Public License Instead.) You can apply it to your programs, too.</p>
<p>When we speak of free software, we are referring to freedom, not price. Our General Public Licenses are designed to make sure that you have the freedom to distribute copies of free software (and charge for this service if you wish), that you receive source code or can get it if you want it, that you can change the software or use pieces of it in new free programs; and that you know you can do these things.</p>
<p>To protect your rights, we need to make restrictions that forbid anyone to deny you these rights or to ask you to surrender the rights. These restrictions translate to certain responsibilities for you if you distribute copies of the software, or if you modify it.</p>
<p>For example, if you distribute copies of such a program, whether gratis or for a fee, you must give the recipients all the rights that you have. You must make sure that they, too, receive or can get the source code. And you must show them these terms so they know their rights.</p>
<p>We protect your rights with two steps: (1) copyright the software, and (2) offer you this license which gives you legal permission to copy, distribute and/or modify the software.</p>
<p>Also, for each author's protection and ours, we want to make certain that everyone understands that there is no warranty for this free software. If the software is modified by someone else and passed on, we want its recipients to know that what they have is not the original, so that any problems introduced by others will not reflect on the original authors' reputations.</p>
<p>Finally, any free program is threatened constantly by software patents. We wish to avoid the danger that redistributors of a free program will individually obtain patent licenses, in effect making the program proprietary. To prevent this, we have made it clear that any patent must be licensed for everyone's free use or not licensed at all.</p>
<p>The precise terms and conditions for copying, distribution and modification follow.</p>
<p>GNU GENERAL PUBLIC LICENSE</p>
<p>TERMS AND CONDITIONS FOR COPYING, DISTRIBUTION AND MODIFICATION</p>
<ol>
<li>This License applies to any program or other work which contains a notice placed by the copyright holder saying it may be distributed under the terms of this General Public License. The "Program", below, refers to any such program or work, and a "work based on the Program" means either the Program or any derivative work under copyright law: that is to say, a work containing the Program or a portion of it, either verbatim or with modifications and/or translated into another language. (Hereinafter, translation is included without limitation in the term "modification"). Each licensee is addressed as "you".</li>
</ol>
<p>Activities other than copying, distribution and modification are not covered by this License; they are outside its scope. The act of running the Program is not restricted, and the output from the Program is covered only if its contents constitute a work based on the Program (independent of having been made by running the Program). Whether that is true depends on what the Program does.</p>
<ol>
<li>You may copy and distribute verbatim copies of the Program's source code as you receive it, in any medium, provided that you conspicuously and appropriately publish on each copy an appropriate copyright notice and disclaimer of warranty; keep intact all the notices that refer to this License and to the absence of any warranty; and give any other recipients of the Program a copy of this License along with the Program.</li>
</ol>
<p>You may charge a fee for the physical act of transferring a copy, and you may at your option offer warranty protection in exchange for a fee.</p>
<ol>
<li>You may modify your copy or copies of the Program or any portion of it, thus forming a work based on the Program, and copy and distribute such modifications or work under the terms of Section 1 above, provided that you also meet all of these conditions:</li>
</ol>
<p>a) You must cause the modified files to carry prominent notices stating that you changed the files and the date of any change.</p>
<p>b) You must cause any work that you distribute or publish, that in whole or in part contains or is derived from the Program or any part thereof, to be licensed as a whole at no charge to all third parties under the terms of this License.</p>
<p>c) If the modified program normally reads commands interactively when run, you must cause it, when started running for such interactive use in the most ordinary way, to print or display an announcement including an appropriate copyright notice and a notice that there is no warranty (or else, saying that you provide a warranty) and that users may redistribute the program under these conditions, and telling the user how to view a copy of this License. (Exception: If the Program itself is interactive but does not normally print such an announcement, your work based on the Program is not required to print an announcement.)</p>
<p>These requirements apply to the modified work as a whole. If Identifiable sections of that work are not derived from the Program, and can be reasonably considered independent and separate works in themselves, then this License, and its terms, do not apply to those sections when you distribute them as separate works. But when you distribute the same sections as part of a whole which is a work based on the Program, the distribution of the whole must be on the terms of this License, whose permissions for other licensees extend to the entire whole, and thus to each and every part regardless of who wrote it.</p>
<p>Thus, it is not the intent of this section to claim rights or contest your rights to work written entirely by you; rather, the intent is to exercise the right to control the distribution of derivative or collective works based on the Program.</p>
<p>In addition, mere aggregation of another work not based on the Program with the Program (or with a work based on the Program) on a volume of a storage or distribution medium does not bring the other work under the scope of this License.</p>
<p><img src="/content/2026/05/1018651/images/daa1d62cd1afa1ea71f82977300913270b98ae96cb9663530d5e2f24977b1564.jpg" alt="TOSHIBA BDX2000KE - Preamble - 1" loading="lazy" decoding="async"></p>
<p>DE</p>
<p>43</p>
<h2 id="sonstiges-6">SONSTIGES</h2>
<ol>
<li>You may copy and distribute the Program (or a work based on it, under Section 2) in object code or executable form under the terms of Sections 1 and 2 above provided that you also do one of the following:</li>
</ol>
<p>a) Accompany it with the complete corresponding machine-readable source code, which must be distributed under the terms of Sections 1 and 2 above on a medium customarily used for software interchange; or, <br />
b) Accompany it with a written offer, valid for at least three years, to give any third party, for a charge no more than your cost of physically performing source distribution, a complete machine-readable copy of the corresponding source code, to be distributed under the terms of Sections 1 and 2 above on a medium customarily used for software interchange; or, <br />
c) Accompany it with the information you received as to the offer to distribute corresponding source code. (This alternative is allowed only for noncommercial distribution and only if you received the program in object code or executable form with such an offer, in accord with Subsection b above.)</p>
<p>The source code for a work means the preferred form of the work for making modifications to it. For an executable work, complete source code means all the source code for all modules it contains, plus any associated interface definition files, plus the scripts used to control compilation and installation of the executable. However, as a special exception, the source code distributed need not include anything that is normally distributed (in either source or binary form) with the major components (compiler, kernel, and so on) of the operating system on which the executable runs, unless that component itself accompanies the executable.</p>
<p>If distribution of executable or object code is made by offering access to copy from a designated place, then offering equivalent access to copy the source code from the same place counts as distribution of the source code, even though third parties are not compelled to copy the source along with the object code.</p>
<ol>
<li>You may not copy, modify, sublicense, or distribute the Program except as expressly provided under this License. Any attempt otherwise to copy, modify, sublicense or distribute the Program is void, and will automatically terminate your rights under this License. However, parties who have received copies, or rights, from you under this License will not have their licenses terminated so long as such parties remain in full compliance. </li>
<li>You are not required to accept this License, since you have not signed it. However, nothing else grants you permission to modify or distribute the Program or its derivative works. These actions are prohibited by law if you do not accept this License. Therefore, by modifying or distributing the Program (or any work based on the Program), you indicate your acceptance of this License to do so, and all its terms and conditions for copying, distributing or modifying the Program or works based on it. </li>
<li>Each time you redistribute the Program (or any work based on the Program), the recipient automatically receives a license from the original licensor to copy, distribute or modify the Program subject to these terms and conditions. You may not impose any further restrictions on the recipients' exercise of the rights granted herein. You are not responsible for enforcing compliance by third parties to this License. </li>
<li>If, as a consequence of a court judgment or allegation of patent infringement or for any other reason (not limited to patent issues), conditions are imposed on you (whether by court order, agreement or otherwise) that contradict the conditions of this License, they do not excuse you from the conditions of this License. If you cannot distribute so as to satisfy simultaneously your obligations under this License and any other pertinent obligations, then as a consequence you may not distribute the Program at all. For example, if a patent license would not permit royalty-free redistribution of the Program by all those who receive copies directly or indirectly through you, then the only way you could satisfy both it and this License would be to refrain entirely from distribution of the Program.</li>
</ol>
<p>If any portion of this section is held invalid or unenforceable under any particular circumstance, the balance of the section is intended to apply and the section as a whole is intended to apply in other circumstances.</p>
<p>It is not the purpose of this section to induce you to infringe any patents or other property right claims or to contest validity of any such claims; this section has the sole purpose of protecting the integrity of the free software distribution system, which is implemented by public license practices. Many people have made generous contributions to the wide range of software distributed through that system in reliance on consistent application of that system it is up to the author/donor to decide if he or she is willing to distribute software through any other system and a licensee cannot impose that choice.</p>
<p>This section is intended to make thoroughly clear what is believed to be a consequence of the rest of this License.</p>
<ol>
<li>If the distribution and/or use of the Program is restricted in certain countries either by patents or by copyrighted interfaces, the original copyright holder who places the Program under this License may add an explicit geographical distribution limitation excluding those countries, so that distribution is permitted only in or among countries not thus excluded. In such case, this License Incorporates the limitation as if written in the body of this License. </li>
<li>The Free Software Foundation may publish revised and/or new versions of the General Public License from time to time. Such new versions will be similar in spirit to the present version, but may differ in detail to address new problems or concerns.</li>
</ol>
<p>Each version is given a distinguishing version number. If the Program specifies a version number of this License which applies to it and "any later version", you have the option of following the terms and conditions either of that version or of any later version published by the Free Software Foundation. If the Program does not specify a version number of this License, you may choose any version ever published by the Free Software Foundation.</p>
<ol>
<li>If you wish to Incorporate parts of the Program into other free programs whose distribution conditions are different, write to the author to ask for permission. For software which is copyrighted by the Free Software Foundation, write to the Free Software Foundation; we sometimes make exceptions for this. Our decision will be guided by the two goals of preserving the free status of all derivatives of our free software and of promoting the sharing and reuse of software generally.</li>
</ol>
<h2 id="no-warranty-3">NO WARRANTY</h2>
<ol>
<li>BECAUSE THE PROGRAM IS LICENSED FREE OF CHARGE, THERE IS NO WARRANTY FOR THE PROGRAM, TO THE EXTENT PERMITTED BY APPLICABLE LAW, EXCEPT WHEN OTHERWISE STATED IN WRITING THE COPYRIGHT HOLDERS AND/OR OTHER PARTIES PROVIDE THE PROGRAM "AS IS" WITHOUT WARRANTY OF ANY KIND, EITHER EXPRESSED OR IMPLIED, INCLUDING, BUT NOT LIMITED TO, THE IMPLIED WARRANTIES OF MERCHANTABILITY AND FITNESS FOR A PARTICULAR PURPOSE, THE ENTIRE RISK AS TO THE QUALITY AND PERFORMANCE OF THE PROGRAM IS WITH YOU. SHOULD THE PROGRAM PROVE DEFECTIVE, YOU ASSUME THE COST OF ALL NECESSARY SERVICING, REPAIR OR CORRECTION. </li>
<li>IN NO EVENT UNLESS REQUIRED BY APPLICABLE LAW OR AGREED TO IN WRITING WILL ANY COPYRIGHT HOLDER, OR ANY OTHER PARTY WHO MAY MODIFY AND/OR REDISTRIBUTE THE PROGRAM AS PERMITTED ABOVE. BE LIABLE TO YOU FOR DAMAGES, INCLUDING ANY GENERAL, SPECIAL, INCIDENTAL OR CONSEQUENTIAL DAMAGES ARISING OUT OF THE USE OR INABILITY TO USE THE PROGRAM (INCLUDING BUT NOT LIMITED TO LOSS OF DATA OR DATA BEING RENDERED INACCURATE OR LOSSES SUSTAINED BY YOU OR THIRD PARTIES OR A FAILURE OF THE PROGRAM TO OPERATE WITH ANY OTHER PROGRAMS), EVEN IF SUCH HOLDER OR OTHER PARTY HAS BEEN ADVISED OF THE POSSIBILITY OF SUCH DAMAGES.</li>
</ol>
<p>END OF TERMS AND CONDITIONS</p>
<p>How to Apply These Terms to Your New Programs</p>
<p>If you develop a new program, and you want it to be of the greatest possible use to the public, the best way to achieve this is to make it free software which everyone can redistribute and change under these terms.</p>
<p>To do so, attach the following notices to the program. It is safest to attach them to the start of each source file to most effectively convey the exclusion of warranty; and each file should have at least the "copyright" line and a pointer to where the full notice is found.</p>
<p><one line to give the program's name and a brief idea of what it does.></p>
<p>Copyright (C) <year> <name of author></p>
<p>This program is free software; you can redistribute it and/or modify it under the terms of the GNU General Public License as published by the Free Software Foundation; either version 2 of the License, or (at your option) any later version. <br />
This program is distributed in the hope that it will be useful, but WITHOUT ANY WARRANTY; without even the Implied warranty of MERCHANTABILITY or FITNESS FOR A PARTICULAR PURPOSE. See the GNU General Public License for more details. <br />
You should have received a copy of the GNU General Public License along with this program; if not, write to the Free Software Foundation, Inc., 51 Franklin Street, Fifth Floor, Boston, MA 02110-1301 USA.</p>
<p>Also add information on how to contact you by electronic and paper mail.</p>
<p>If the program is interactive, make it output a short notice like this when it starts in an interactive mode:</p>
<p>Gnomovision version 69, Copyright (C) year name of author <br />
Gnomovision comes with ABSOLUTELY NO WARRANTY; for details type 'show w'. <br />
This is free software, and you are welcome to redistribute it under certain conditions; type 'show c' for details.</p>
<p>The hypothetical commands 'show w' and 'show c' should show the appropriate parts of the General Public License. Of course, the commands you use may be called something other than 'show w' and 'show c'; they could even be mouse-clicks or menu items—whatever suits your program.</p>
<p>You should also get your employer (if you work as a programmer) or your school, if any, to sign a 'copyright disclaimer' for the program, if necessary. Here is a sample; alter the names:</p>
<p>Yoyodyne, Inc., hereby disclaims all copyright Interest in the program 'Gnomovision' (which makes passes at compilers) written by James Hacker.</p>
<p><signature of Ty Coon>, 1 April 1989 <br />
Ty Conn, President of Vice</p>
<p>This General Public License does not permit incorporating your program into proprietary programs. If your program is a subroutine library, you may consider it more useful to permit linking proprietary applications with the library. If this is what you want to do, use the GNU Lesser General Public License Instead of this License.</p>
<h2 id="exhibit-b-2">Exhibit B</h2>
<h2 id="lgpl-2">LGPL</h2>
<h2 id="gnu-lesser-general-public-license-3">GNU LESSER GENERAL PUBLIC LICENSE</h2>
<p>Version 2.1, February 1999</p>
<p>Copyright (C) 1991, 1999 Free Software Foundation, Inc. <br />
51 Franklin Street, Fifth Floor, Boston, MA 02110-1301 USA <br />
Everyone is permitted to copy and distribute verbatim copies of this license document, but changing it is not allowed.</p>
<p>[This is the first released version of the Lesser GPL. It also counts as the successor of the GNU Library Public License, version 2, hence the version number 2.1.]</p>
<h2 id="preamble-4">Preamble</h2>
<p>The licenses for most software are designed to take away your freedom to share and change it. By contrast, the GNU General Public Licenses are intended to guarantee your freedom to share and change free software--to make sure the software is free for all its users. <br />
This license, the Lesser General Public License, applies to some specially designated software packages—typically libraries—of the Free Software Foundation and other authors who decide to use it. You can use it too, but we suggest you first think carefully about whether this license or the ordinary General Public License is the better strategy to use in any particular case, based on the explanations below. <br />
When we speak of free software, we are referring to freedom of use, not price. Our General Public Licenses are designed to make sure that you have the freedom to distribute copies of free software (and charge for this service if you wish); that you receive source code or can get it if you want it; that you can change the software and use pieces of it in new free programs; and that you are informed that you can do these things. <br />
To protect your rights, we need to make restrictions that forbid distributors to deny you these rights or to ask you to surrender these rights. These restrictions translate to certain responsibilities for you if you distribute copies of the library or if you modify it. <br />
For example, if you distribute copies of the library, whether gratis or for a fee, you must give the recipients all the rights that we gave you. You must make sure that they, too, receive or can get the source code. If you link other code with the library, you must provide complete object files to the recipients, so that they can relink them with the library after making changes to the library and recompiling it. And you must show them these terms so they know their rights. <br />
We protect your rights with a two-step method: (1) we copyright the library, and (2) we offer you this license, which gives you legal permission to copy, distribute and/or modify the library. <br />
To protect each distributor, we want to make it very clear that there is no warranty for the free library. Also, if the library is modified by someone else and passed on, the recipients should know that what they have is not the original version, so that the original author's reputation will not be affected by problems that might be introduced by others. <br />
Finally, software patents pose a constant threat to the existence of any free program. We wish to make sure that a company cannot effectively restrict the users of a free program by obtaining a restrictive license from a patent holder. Therefore, we insist that any patent license obtained for a version of the library must be consistent with the full freedom of use specified in this license. <br />
Most GNU software, including some libraries, is covered by the ordinary GNU General Public License. This license, the GNU Lesser General Public License, applies to certain designated libraries, and is quite different from the ordinary General Public License. We use this license for certain libraries in order to permit linking those libraries into non-free programs.</p>
<h2 id="sonstiges-7">SONSTIGES</h2>
<p>When a program is linked with a library, whether statically or using a shared library, the combination of the two is legally speaking a combined work, a derivative of the original library. The ordinary General Public License therefore permits such linking only if the entire combination fits its criteria of freedom. The Lesser General Public License permits more lax criteria for linking other code with the library.</p>
<p>We call this license the "Lesser" General Public License because it does Less to protect the user's freedom than the ordinary General Public License. It also provides other free software developers Less of an advantage over competing non-free programs. These disadvantages are the reason we use the ordinary General Public License for many libraries. However, the Lesser license provides advantages in certain special circumstances.</p>
<p>For example, on rare occasions, there may be a special need to encourage the widest possible use of a certain library, so that it becomes a de-facto standard. To achieve this, non-free programs must be allowed to use the library. A more frequent case is that a free library does the same job as widely used non-free libraries. In this case, there is little to gain by limiting the free library to free software only, so we use the Lesser General Public License.</p>
<p>In other cases, permission to use a particular library in non-free programs enables a greater number of people to use a large body of free software. For example, permission to use the GNU C Library in non-free programs enables many more people to use the whole GNU operating system, as well as its variant, the GNU/Linux operating system.</p>
<p>Although the Lesser General Public License is Less protective of the users' freedom, it does ensure that the user of a program that is linked with the Library has the freedom and the wherewithal to run that program using a modified version of the Library.</p>
<p>The precise terms and conditions for copying, distribution and modification follow. Pay close attention to the difference between a "work based on the library" and a "work that uses the library". The former contains code derived from the library, whereas the latter must be combined with the library in order to run.</p>
<h2 id="gnu-lesser-general-public-license-4">GNU LESSER GENERAL PUBLIC LICENSE</h2>
<h2 id="terms-and-conditions-for-copying-distribution-and-modification-2">TERMS AND CONDITIONS FOR COPYING, DISTRIBUTION AND MODIFICATION</h2>
<ol>
<li>This License Agreement applies to any software library or other program which contains a notice placed by the copyright holder or other authorized party saying it may be distributed under the terms of this Lesser General Public License (also called "this License"). Each licensee is addressed as "you".</li>
</ol>
<p>A "library" means a collection of software functions and/or data prepared so as to be conveniently linked with application programs (which use some of those functions and data) to form executables.</p>
<p>The "Library", below, refers to any such software library or work which has been distributed under these terms. A "work based on the Library" means either the Library or any derivative work under copyright law that is to say, a work containing the Library or a portion of it, either verbatim or with modifications and/or translated straightforwardly into another language. (Hereinafter, translation is included without limitation in the term "modification".)</p>
<p>"Source code" for a work means the preferred form of the work for making modifications to it. For a library, complete source code means all the source code for all modules it contains, plus any associated interface definition files, plus the scripts used to control compilation and installation of the library.</p>
<p>Activities other than copying, distribution and modification are not covered by this License; they are outside its scope. The act of running a program using the Library is not restricted, and output from such a program is covered only if its contents constitute a work based on the Library independent of the use of the Library in a tool for writing it). Whether that is true depends on what the Library does and what the program that uses the Library does.</p>
<ol>
<li>You may copy and distribute verbatim copies of the Library's complete source code as you receive it, in any medium, provided that you conspicuously and appropriately publish on each copy an appropriate copyright notice and disclaimer of warranty; keep intact all the notices that refer to this License and to the absence of any warranty; and distribute a copy of this License along with the Library.</li>
</ol>
<p>You may charge a fee for the physical act of transferring a copy, and you may at your option offer warranty protection in exchange for a fee.</p>
<ol>
<li>You may modify your copy or copies of the Library or any portion of it, thus forming a work based on the Library, and copy and distribute such modifications or work under the terms of Section 1 above, provided that you also meet all of these conditions:</li>
</ol>
<p>a) The modified work must itself be a software library.</p>
<p>b) You must cause the files modified to carry prominent notices stating that you changed the files and the date of any change.</p>
<p>c) You must cause the whole of the work to be licensed at no charge to all third parties under the terms of this License.</p>
<p>d) If a facility in the modified Library refers to a function or a table of data to be supplied by an application program that uses the facility, other than as an argument passed when the facility is invoked, then you must make a good faith effort to ensure that, in the event an application does not supply such function or table, the facility still operates, and performs whatever part of its purpose remains meaningful.</p>
<p>(For example, a function in a library to compute square roots has a purpose that is entirely well-defined independent of the application. Therefore, Subsection 2d requires that any application-supplied function or table used by this function must be optional: if the application does not supply it, the square root function must still compute square roots.)</p>
<p>These requirements apply to the modified work as a whole. If identifiable sections of that work are not derived from the Library, and can be reasonably considered independent and separate works in themselves, then this License, and its terms, do not apply to those sections when you distribute them as separate works. But when you distribute the same sections as part of a whole which is a work based on the Library, the distribution of the whole must be on the terms of this License, whose permissions for other licensees extend to the entire whole, and thus to each and every part regardless of who wrote it.</p>
<p>Thus, it is not the intent of this section to claim rights or contest your rights to work written entirely by you; rather, the intent is to exercise the right to control the distribution of derivative or collective works based on the Library.</p>
<p>In addition, more aggregation of another work not based on the Library with the Library (or with a work based on the Library) on a volume of a storage or distribution medium does not bring the other work under the scope of this License.</p>
<ol>
<li>You may opt to apply the terms of the ordinary GNU General Public License instead of this License to a given copy of the Library. To do this, you must alter all the notices that refer to this License, so that they refer to the ordinary GNU General Public License, version 2, instead of to this License. (If a newer version than version 2 of the ordinary GNU General Public License has appeared, then you can specify that version instead if you wish.) Do not make any other change in these notices.</li>
</ol>
<p>Once this change is made in a given copy, it is irreversible for that copy, so the ordinary GNU General Public License applies to all subsequent copies and derivative works made from that copy.</p>
<p>This option is useful when you wish to copy part of the code of the Library into a program that is not a library.</p>
<ol>
<li>You may copy and distribute the Library (or a portion or derivative of it, under Section 2) in object code or executable form under the terms of Sections 1 and 2 above provided that you accompany it with the complete corresponding machine-readable source code, which must be distributed under the terms of Sections 1 and 2 above on a medium customarily used for software interchange.</li>
</ol>
<p>If distribution of object code is made by offering access to copy from a designated place, then offering equivalent access to copy the source code from the same place satisfies the requirement to distribute the source code, even though third parties are not compelled to copy the source along with the object code.</p>
<ol>
<li>A program that contains no derivative of any portion of the Library, but is designed to work with the Library by being compiled or linked with it, is called a "work that uses the Library". Such a work, In Isolation, is not a derivative work of the Library, and therefore falls outside the scope of this License.</li>
</ol>
<p>However, linking a 'work that uses the Library' with the Library creates an executable that is a derivative of the Library (because it contains portions of the Library), rather than a 'work that uses the library'. The executable is therefore covered by this License. Section 6 states terms for distribution of such executables.</p>
<p>When a "work that uses the Library" uses material from a header file that is part of the Library, the object code for the work may be a derivative work of the Library even though the source code is not. Whether this is true is especially significant if the work can be linked without the Library, or if the work is itself a library. The threshold for this to be true is not precisely defined by law.</p>
<p>If such an object file uses only numerical parameters, data structure layouts and accessors, and small macros and small inline functions (ten lines or less in length), then the use of the object file is unrestricted, regardless of whether it is legally a derivative work. (Executables containing this object code plus portions of the Library will still fall under Section 6.)</p>
<p>Otherwise, if the work is a derivative of the Library, you may distribute the object code for the work under the terms of Section 6. Any executables containing that work also fall under Section 6, whether or not they are linked directly with the Library itself.</p>
<ol>
<li>As an exception to the Sections above, you may also combine or link a "work that uses the Library" with the Library to produce a work containing portions of the Library, and distribute that work under terms of your choice, provided that the terms permit modification of the work for the customer's own use and reverse engineering for debugging such modifications.</li>
</ol>
<p>You must give prominent notice with each copy of the work that the Library is used in it and that the Library and its use are covered by this License. You must supply a copy of this License. If the work during execution displays copyright notices, you must include the copyright notice for the Library among them, as well as a reference directing the user to the copy of this License. Also, you must do one of these things:</p>
<p>a) Accompany the work with the complete corresponding machine-readable source code for the Library Including whatever changes were used in the work (which must be distributed under Sections 1 and 2 above); and, if the work is an executable linked with the Library, with the complete machine-readable "work that uses the Library", as object code and/or source code, so that the user can modify the Library and then relink to produce a modified executable containing the modified Library. (It is understood that the user who changes the contents of definitions files in the Library will not necessarily be able to recompile the application to use the modified definitions.)</p>
<p>b) Use a suitable shared library mechanism for linking with the Library. A suitable mechanism is one that (1) uses at run time a copy of the library already present on the user's computer system, rather than copying library functions into the executable, and (2) will operate properly with a modified version of the library, if the user installs one, as long as the modified version is Interface-compatible with the version that the work was made with.</p>
<p>c) Accompany the work with a written offer, valid for at least three years, to give the same user the materials specified in Subsection 6a, above, for a charge no more than the cost of performing this distribution.</p>
<p>d) If distribution of the work is made by offering access to copy from a designated place, offer equivalent access to copy the above specified materials from the same place.</p>
<p>e) Verify that the user has already received a copy of these materials or that you have already sent this user a copy.</p>
<p>For an executable, the required form of the "work that uses the Library" must include any data and utility programs needed for reproducing the executable from it. However, as a special exception, the materials to be distributed need not include anything that is normally distributed (in either source or binary form) with the major components (compiler, kernel, and so on) of the operating system on which the executable runs, unless that component itself accompanies the executable.</p>
<p>It may happen that this requirement contradicts the license restrictions of other proprietary libraries that do not normally accompany the operating system. Such a contradiction means you cannot use both them and the Library together in an executable that you distribute.</p>
<ol>
<li>You may place library facilities that are a work based on the Library side-by-side in a single library together with other library facilities not covered by this License, and distribute such a combined library, provided that the separate distribution of the work based on the Library and of the other library facilities is otherwise permitted, and provided that you do these two things:</li>
</ol>
<p>a) Accompany the combined library with a copy of the same work based on the Library, uncombined with any other library facilities. This must be distributed under the terms of the Sections above.</p>
<p>b) Give prominent notice with the combined library of the fact that part of it is a work based on the Library, and explaining where to find the accompanying uncombined form of the same work.</p>
<ol>
<li>
<p>You may not copy, modify, sublicense, link with, or distribute the Library except as expressly provided under this License. Any attempt otherwise to copy, modify, sublicense, link with, or distribute the Library is void, and will automatically terminate your rights under this License. However, parties who have received copies, or rights, from you under this License will not have their licenses terminated so long as such parties remain in full compliance.</p>
</li>
<li>
<p>You are not required to accept this License, since you have not signed it. However, nothing else grants you permission to modify or distribute the Library or its derivative works. These actions are prohibited by law if you do not accept this License. Therefore, by modifying or distributing the Library (or any work based on the Library), you indicate your acceptance of this License to do so, and all its terms and conditions for copying, distributing or modifying the Library or works based on it.</p>
</li>
<li>
<p>Each time you redistribute the Library (or any work based on the Library), the recipient automatically receives a license from the original licensor to copy, distribute, link with or modify the Library subject to these terms and conditions. You may not impose any further restrictions on the recipients' exercise of the rights granted herein. You are not responsible for enforcing compliance by third parties with this License.</p>
</li>
</ol>
<p><img src="/content/2026/05/1018651/images/0ef9f9aaf031096aa0fc5b76fa0c3a7f3ee30a9b6e9a4be798c46232b49bbe60.jpg" alt="TOSHIBA BDX2000KE - TERMS AND CONDITIONS FOR COPYING, DISTRIBUTION AND MODIFICATION - 1" loading="lazy" decoding="async"></p>
<p><img src="/content/2026/05/1018651/images/acb1dc2ab3eb5f9d63bb4db8ebf5fb65e5c6c05a0344ff0f1f884433e11f22df.jpg" alt="TOSHIBA BDX2000KE - TERMS AND CONDITIONS FOR COPYING, DISTRIBUTION AND MODIFICATION - 2" loading="lazy" decoding="async"></p>
<h2 id="sonstiges-8">SONSTIGES</h2>
<ol>
<li>If, as a consequence of a court judgment or allegation of patent infringement or for any other reason (not limited to patent issues), conditions are imposed on you (whether by court order, agreement or otherwise) that contradict the conditions of this License, they do not excuse you from the conditions of this License. If you cannot distribute so as to satisfy simultaneously your obligations under this License and any other pertinent obligations, then as a consequence you may not distribute the Library at all. For example, if a patent license would not permit royalty-free redistribution of the Library by all those who receive copies directly or indirectly through you, then the only way you could satisfy both it and this License would be to refrain entirely from distribution of the Library.</li>
</ol>
<p>If any portion of this section is held invalid or unenforceable under any particular circumstance, the balance of the section is intended to apply, and the section as a whole is intended to apply in other circumstances.</p>
<p>It is not the purpose of this section to induce you to infringe any patents or other property right claims or to contest validity of any such claims; this section has the sole purpose of protecting the integrity of the free software distribution system which is implemented by public license practices. Many people have made generous contributions to the wide range of software distributed through that system in reliance on consistent application of that system; it is up to the author/donor to decide if he or she is willing to distribute software through any other system and a licensee cannot impose that choice.</p>
<p>This section is intended to make thoroughly clear what is believed to be a consequence of the rest of this License.</p>
<ol>
<li>
<p>If the distribution and/or use of the Library is restricted in certain countries either by patents or by copyrighted Interfaces, the original copyright holder who places the Library under this License may add an explicit geographical distribution limitation excluding those countries, so that distribution is permitted only in or among countries not thus excluded. In such case, this License incorporates the limitation as if written in the body of this License.</p>
</li>
<li>
<p>The Free Software Foundation may publish revised and/or new versions of the Lesser General Public License from time to time. Such new versions will be similar in spirit to the present version, but may differ in detail to address new problems or concerns.</p>
</li>
</ol>
<p>Each version is given a distinguishing version number. If the Library specifies a version number of this License which applies to it and 'any later version', you have the option of following the terms and conditions either of that version or of any later version published by the Free Software Foundation. If the Library does not specify a license version number, you may choose any version ever published by the Free Software Foundation.</p>
<ol>
<li>If you wish to incorporate parts of the Library into other free programs whose distribution conditions are incompatible with these, write to the author to ask for permission. For software which is copyrighted by the Free Software Foundation, write to the Free Software Foundation; we sometimes make exceptions for this. Our decision will be guided by the two goals of preserving the free status of all derivatives of our free software and of promoting the sharing and reuse of software generally.</li>
</ol>
<h2 id="no-warranty-4">NO WARRANTY</h2>
<ol>
<li>
<p>BECAUSE THE LIBRARY IS LICENSED FREE OF CHARGE, THERE IS NO WARRANTY FOR THE LIBRARY, TO THE EXTENT PERMITTED BY APPLICABLE LAW, EXCEPT WHEN OTHERWISE STATED IN WRITING THE COPYRIGHT HOLDERS AND/OR OTHER PARTIES PROVIDE THE LIBRARY "AS 1" WITHOUT WARRANTY OF ANY KIND, EITHER EXPRESSED OR IMPLIED, INCLUDING, BUT NOT LIMITED TO, THE IMPLIED WARRANTIES OF MERCHANTABILITY AND FITNESS FOR A PARTICULAR PURPOSE, THE ENTIRE RISK AS TO THE QUALITY AND PERFORMANCE OF THE LIBRARY IS WITH YOU. SHOULD THE LIBRARY PROVE DEFECTIVE, YOU ASSUME THE COST OF ALL NECESSARY SERVICING, REPAIR OR CORRECTION.</p>
</li>
<li>
<p>IN NO EVENT UNLESS REQUIRED BY APPLICABLE LAW OR AGREED TO IN WRITING WILL ANY COPYRIGHT HOLDER, OR ANY OTHER PARTY WHO MAY MODIFY AND/OR REDISTRIBUTE THE LIBRARY AS PERMITTED ABOVE, BE LIABLE TO YOU FOR DAMAGES, INCLUDING ANY GENERAL, SPECIAL, INCIDENTAL OR CONSEQUENTIAL DAMAGES ARISING OUT OF THE USE OR INABILITY TO USE THE LIBRARY (INCLUDING BUT NOT LIMITED TO LOSS OF DATA OR DATA BEING RENDERED INACCURATE OR LOSSES SUSTAINED BY YOU OR THIRD PARTIES OR A FAILURE OF THE LIBRARY TO OPERATE WITH ANY OTHER SOFTWARE), EVEN IF SUCH HOLDER OR OTHER PARTY HAS BEEN ADVISED OF THE POSSIBILITY OF SUCH DAMAGES.</p>
</li>
</ol>
<h2 id="end-of-terms-and-conditions-how-to-apply-these-terms-to-your-new-libraries-2">END OF TERMS AND CONDITIONS How to Apply These Terms to Your New Libraries</h2>
<p>If you develop a new library, and you want it to be of the greatest possible use to the public, we recommend making it free software that everyone can redistribute and change. You can do so by permitting redistribution under these terms (or, alternatively, under the terms of the ordinary General Public License).</p>
<p>To apply these terms, attach the following notices to the library, it is safest to attach them to the start of each source file to most effectively convey the exclusion of warranty; and each file should have at least the "copyright" line and a pointer to where the full notice is found.</p>
<p><one line to give the library's name and a brief idea of what it does.> Copyright (C) <year> <name of author></p>
<p>This library is free software; you can redistribute it and/or modify it under the terms of the GNU Lesser General Public License as published by the Free Software Foundation; either version 2.1 of the License, or (at your option) any later version.</p>
<p>This library is distributed in the hope that it will be useful, but WITHOUT ANY WARRANTY; without even the implied warranty of MERCHANTABILITY or FITNESS FOR A PARTICULAR PURPOSE. See the GNU Lesser General Public License for more details.</p>
<p>You should have received a copy of the GNU Lesser General Public License along with this library; if not, write to the Free Software Foundation, Inc., 51 Franklin Street, Fifth Floor, Boston, MA 02110-1301 USA.</p>
<p>Also add information on how to contact you by electronic and paper mail.</p>
<p>You should also get your employer (if you work as a programmer) or your school, if any, to sign a "copyright disclaimer" for the library, if necessary. Here is a sample; alter the names:</p>
<p>Yoyodyne, Inc., hereby disclaims all copyright interest in the library 'Frob' (a library for tweaking knobs) written by James Random Hacker.</p>
<p><signature of Ty Coon>, 1 April 1990
Ty Coon, President of Vice</p>
<p>That's all there is to it!</p>
<h2 id="exhibit-c-free-type-2">Exhibit C Free Type</h2>
<h2 id="the-freetype-project-license-2">The FreeType Project LICENSE</h2>
<p>2006-Jan-27</p>
<p>Copyright 1996-2002, 2006 by</p>
<p>David Turner, Robert Wilhelm, and Werner Lemberg</p>
<h2 id="introduction-11">Introduction</h2>
<p>The FreeType Project is distributed in several archive packages: some of them may contain, in addition to the FreeType font engine, various tools and contributions which rely on, or relate to, the FreeType Project.</p>
<p>This license applies to all files found in such packages, and which do not fall under their own explicit license. The license affects thus the FreeType font engine, the test programs, documentation and makefiles, at the very least.</p>
<p>This license was inspired by the BSD, Artistic, and IUG (Independent JPEG Group) licenses, which all encourage inclusion and use of free software in commercial and freeware products alike. As a consequence, its main points are that:</p>
<p>- We don't promise that this software works. However, we report reports. ('as is' distribution)</p>
<p>• You can use this software for whatever you want, In parts ('royalty-free' usage)</p>
<p>- You may not pretend that you wrote this software. If you must acknowledge somewhere in your documentation that you have used the FreeType code.
[credits]</p>
<p>We specifically permit and encourage the inclusion of this software, with or without modifications, in commercial products. We disclaim all warranties covering The FreeType Project and assume no liability related to The FreeType Project.</p>
<p>Finally, many people asked us for a preferred form for a credit/disclaimer to use in compliance with this license. We thus encourage you to use the following text:</p>
<p>“</p>
<p>Portions of this software are copyright©<year> The FreeType Project (www.freetype.org). All rights reserved.</p>
<p>Please replace <year> with the value from the FreeType version you actually use.</p>
<h2 id="legal-terms-2">Legal Terms</h2>
<h2 id="0-definitions-2">0. Definitions</h2>
<p>Throughout this license, the terms 'package', 'FreeType Project', and 'FreeType archive' refer to the set of files originally distributed by the authors (David Turner, Robert Wilhelm, and Werner Lemberg) as the 'FreeType Project', be they named as alpha, beta or final release.</p>
<p>'You' refers to the licensee, or person using the project, where 'using' is a generic term including compiling the project's source code as well as linking it to form a 'program' or 'executable'. This program is referred to as 'a program using the FreeType engine'.</p>
<p>This license applies to all files distributed in the original FreeType Project, Including all source code, binaries and documentation, unless otherwise stated in the file in its original, unmodified form as distributed in the original archive. If you are unsure whether or not a particular file is covered by this license, you must contact us to verify this.</p>
<p>The FreeType Project is copyright (C) 1996-2000 by David Turner, Robert Wilhelm, and Werner Lemberg. All rights reserved except as specified below.</p>
<h2 id="1-no-warranty-2">1. No Warranty</h2>
<p>THE FREETYPE PROJECT IS PROVIDED 'ASIS' WITHOUT WARRANTY OF ANY KIND, EITHER EXPRESS OR IMPLIED, INCLUDING, BUT NOT LIMITED TO, WARRANTIES OF MERCHANTABILITY AND FITNESS FOR A PARTICULAR PURPOSE. IN NO EVENT WILL ANY OF THE AUTHORS OR COPYRIGHT HOLDERS BE LIABLE FOR ANY DAMAGES CAUSED BY THE USE OR THE INABILITY TO USE, OF THE FREETYPE PROJECT.</p>
<h2 id="2-redistribution-2">2. Redistribution</h2>
<p>This license grants a worldwide, royalty-free, perpetual and irrevocable right and license to use, execute, perform, compile, display, copy, create derivative works of, distribute and sublicense the FreeType Project (in both source and object code forms) and derivative works thereof for any purpose; and to authorize others to exercise some or all of the rights granted herein, subject to the following conditions:</p>
<p>• Redistribution of source code must retain this license file deletions or changes to the original files must be clearly indicated in accompanying documentation. The copyright notices of the unaltered, original files must be preserved in all copies of source files.</p>
<p>- Redistribution in binary form must provide a disclaimer that states that the software is based in part of the work of the FreeType Team, in the distribution documentation. We also encourage you to put an URL to the FreeType web page in your documentation, though this isn't mandatory.</p>
<p>These conditions apply to any software derived from or based on the FreeType Project, not just the unmodified files. If you use our work, you must acknowledge us. However, no fee need be paid to us.</p>
<h2 id="3-advertising-2">3. Advertising</h2>
<p>Neither the FreeType authors and contributors nor you shall use the name of the other for commercial, advertising, or promotional purposes without specific prior written permission.</p>
<p>We suggest, but do not require, that you use one or more of the following phrases to refer to this software in your documentation or advertising materials: 'FreeType Project', 'FreeType Engine', 'FreeType library', or 'FreeType Distribution'.</p>
<p>As you have not signed this license, you are not required to accept it. However, as the FreeType Project is copyrighted material, only this license, or another one contracted with the authors, grants you the right to use, distribute, and modify it. Therefore, by using, distributing, or modifying the FreeType Project, you indicate that you understand and accept all the terms of this license.</p>
<h2 id="sonstiges-9">SONSTIGES</h2>
<h2 id="4-contacts-2">4. Contacts</h2>
<p>There are two mailing lists related to FreeType:</p>
<ul>
<li>freetype@nongnu.org
Discusses general use and applications of FreeType, as well as future and wanted additions to the library and distribution. If you are looking for support, start in this list if you haven't found anything to help you in the documentation. </li>
<li>freetype-devel@nongnu.org
Discusses bugs, as well as engine internals, design issues, specific licenses, porting, etc.</li>
</ul>
<p>Our home page can be found at</p>
<p>http://www.frectype.org</p>
<h2 id="libjpeg-2">LibJPEG</h2>
<p>In plain English:</p>
<ol>
<li>We don't promise that this software works. (But if you find any bugs, please let us know) </li>
<li>You can use this software for whatever you want. You don't have to pay us. </li>
<li>You may not pretend that you wrote this software. If you use it in a program, you must acknowledge somewhere in your documentation that you've used the UG code.</li>
</ol>
<p>In legalese:</p>
<p>The authors make NO WARRANTY or representation, either express or implied, with respect to this software, its quality, accuracy, merchantability, or fitness for a particular purpose. This software is provided "AS IS", and you, its user, assume the entire risk as to its quality and accuracy.</p>
<p>This software is copyright (C) 1991-1998, Thomas G. Lane.</p>
<p>All Rights Reserved except as specified below.</p>
<p>Permission is hereby granted to use, copy, modify, and distribute this software (or portions thereof) for any purpose, without fee, subject to these conditions:</p>
<p>(1) If any part of the source code for this software is distributed, then this README file must be included, with this copyright and no-warranty notice unaltered; and any additions, deletions, or changes to the original files must be clearly indicated in accompanying documentation.</p>
<p>(2) If only executable code is distributed, then the accompanying documentation must state that "this software is based in part on the work of the Independent JPEG Group".</p>
<p>(3) Permission for use of this software is granted only if the user accepts full responsibility for any undesirable consequences; the authors accept NO LIABILITY for damages of any kind.</p>
<p>These conditions apply to any software derived from or based on the I2G code, not just to the unmodified library. If you use our work, you ought to acknowledge us.</p>
<p>Permission is NOT granted for the use of any LIG author's name or company name in advertising or publicity relating to this software or products derived from it. This software may be referred to only as "the Independent JPEG Group's software".</p>
<p>We specifically permit and encourage the use of this software as the basis of commercial products, provided that all warranty or liability claims are assumed by the product vendor.</p>
<h2 id="open-ssl-2">Open SSL</h2>
<p>OpenSSL License</p>
<p>Copyright (c) 1998-2008 The OpenSSL Project. All rights reserved.</p>
<p>Redistribution and use in source and binary forms, with or without modification, are permitted provided that the following conditions are met:</p>
<ol>
<li>
<p>Redistributions of source code must retain the above copyright notice, this list of conditions and the following disclaimer.</p>
</li>
<li>
<p>Redistributions in binary form must reproduce the above copyright notice, this list of conditions and the following disclaimer in the documentation and/or other materials provided with the distribution.</p>
</li>
<li>
<p>All advertising materials mentioning features or use of this software must display the following acknowledgment:
"This product includes software developed by the OpenSSL Project for use in the OpenSSL Toolkit. (http://www.openssl.org/)"</p>
</li>
<li>
<p>The names "OpenSSL Toolkit" and "OpenSSL Project" must not be used to endorse or promote products derived from this software without prior written permission. For written permission, please contact openssl-core@openssl.org.</p>
</li>
<li>
<p>Products derived from this software may not be called "OpenSSL" nor may "OpenSSL" appear in their names without prior written permission of the OpenSSL Project.</p>
</li>
<li>
<p>Redistributions of any form whatsoever must retain the following acknowledgment: "This product includes software developed by the OpenSSL Project for use in the OpenSSL Toolkit (http://www.openssl.org/)"</p>
</li>
</ol>
<p>THIS SOFTWARE IS PROVIDED BY THE OpenSSL PROJECT "AS IS" AND ANY EXPRESSED OR IMPLIED WARRANTIES, INCLUDING, BUT NOT LIMITED TO, THE IMPLIED WARRANTIES OF MERCHANTABILITY AND FITNESS FOR A PARTICULAR PURPOSE ARE DISCLAIMED. IN NO EVENT SHALL THE OpenSSL PROJECT OR ITS CONTRIBUTORS BE LIABLE FOR ANY DIRECT, INDIRECT, INCIDENTAL, SPECIAL, EXEMPLARY, OR CONSEQUENTIAL DAMAGES (INCLUDING, BUT NOT LIMITED TO, PROCUREMENT OF SUBSTITUTE GOODS OR SERVICES; LOSS OF USE, DATA, OR PROFITS; OR BUSINESS INTERRUPTION) HOWEVER CAUSED AND ON ANY THEORY OF LIABILITY, WHETHER IN CONTRACT, STRICT LIABILITY, OR TORT (INCLUDING NEGLIGENCE OR OTHERWISE) ARISING IN ANY WAY OUT OF THE USE OF THIS SOFTWARE, EVEN IF ADVISED OF THE POSSIBILITY OF SUCH DAMAGE.</p>
<p>This product includes cryptographic software written by Eric Young (cay@cryptsoft.com). This product includes software written by Tim Hudson (tjh@cryptsoft.com).</p>
<p>y</p>
<h2 id="original-ssleay-license-2">Original SSLeay License</h2>
<p>/* Copyright (C) 1995-1998 Eric Young (eay@cryptsoft.com) All rights reserved.</p>
<p>This package is an SSL implementation written by Eric Young (eay@cryptsoft.com). The implementation was written so as to conform with Netscapes SSL.</p>
<p>This library is free for commercial and non-commercial use as long as the following conditions are adhered to. The following conditions apply to all code found in this distribution, be it the RCA, RSA, ihash, DES, etc., code; not just the SSL code. The SSL documentation included with this distribution is covered by the same copyright terms except that the holder is Tim Hudson (tjh@cryptsoft.com).</p>
<p>Copyright remains Eric Young's, and as such any Copyright notices in the code are not to be removed. If this package is used in a product, Eric Young should be given attribution as the author of the parts of the library used. This can be in the form of a textual message at program startup or in documentation (online or textual) provided with the package.</p>
<p>Redistribution and use in source and binary forms, with or without modification, are permitted provided that the following conditions are met:</p>
<ol>
<li>Redistributions of source code must retain the copyright notice, this list of conditions and the following disclaimer.</li>
<li>Redistributions in binary form must reproduce the above copyright notice, this list of conditions and</li>
</ol>
<p>the following disclaimer in the documentation and/or other materials provided with the distribution.
3. All advertising materials mentioning features or use of this software must display the following
acknowledgement:</p>
<p>"This product includes cryptographic software written by Eric Young (cay@cryptsoft.com)" The word 'cryptographic' can be left out if the routines from the library being used are not cryptographic related -). If you include any Windows specific code (or a derivative thereof) from the apps directory (application code) you must include an acknowledgement:</p>
<p>*This product includes software written by Tim Hudson (tjh@cryptsoft.com)*</p>
<p>THIS SOFTWARE IS PROVIDED BY ERIC YOUNG "AS IS" AND ANY EXPRESS OR IMPLIED WARRANTIES, INCLUDING, BUT NOT LIMITED TO, THE IMPLIED WARRANTIES OF MERCHANTABILITY AND FITNESS FOR A PARTICULAR PURPOSE ARE DISCLAIMED. IN NO EVENT SHALL THE AUTHOR OR CONTRIBUTORS BE LIABLE FOR ANY DIRECT, INDIRECT, INCIDENTAL, SPECIAL, EXEMPLARY, OR CONSEQUENTIAL DAMAGES (INCLUDING, BUT NOT LIMITED TO, PROCUREMENT OF SUBSTITUTE GOODS OR SERVICES; LOSS OF USE, DATA, OR PROFITS; OR BUSINESS INTERRUPTION); HOWEVER CAUSED AND ON ANY THEORY OF LIABILITY, WHETHER IN CONTRACT, STRICT LIABILITY, OR TORT (INCLUDING NEGLIGENCE OR OTHERWISE ARISING IN ANY WAY OUT OF THE USE OF THIS SOFTWARE, EVEN IF ADVISED OF THE POSSIBILITY OF SUCH DAMAGE.</p>
<p>The licence and distribution terms for any publicly available version or derivative of this code cannot be changed. i.e. this code cannot simply be copied and put under another distribution licence [including the GNU Public Licence.]</p>
<p>x</p>
<p><img src="/content/2026/05/1018651/images/55e171ad0fbc8854cd68f975be9622b51bd6cdcd479526bb684f410785427ab1.jpg" alt="TOSHIBA BDX2000KE - Original SSLeay License - 1" loading="lazy" decoding="async"></p>
<p>DE</p>
<p>47</p>
<p><img src="/content/2026/05/1018651/images/5b9b597e452e2c1ea051e2f353c81f8514e687c3aab3bfc30acc1c90ce7b205c.jpg" alt="Pure electrical circuit lines without any symbols" loading="lazy" decoding="async"></p>
<p><img src="/content/2026/05/1018651/images/be3985c062cca1cce8533225102e8735917f3968e8d45ca9d2494f8c8a6056cd.jpg" alt="TOSHIBA BDX2000KE - Original SSLeay License - 3" loading="lazy" decoding="async"></p>
<p><img src="/content/2026/05/1018651/images/ee053d92d6bffd0ee6449e568291eeee6bbcf2b7463f997f0f56237ddaf8f06a.jpg" alt="TOSHIBA BDX2000KE - Original SSLeay License - 4" loading="lazy" decoding="async"></p>
<p><img src="/content/2026/05/1018651/images/1e56a7819582d23a103832377a593b7d8fd3bbf2e59b362ca13fc64fe15d7e93.jpg" alt="TOSHIBA BDX2000KE - Original SSLeay License - 5" loading="lazy" decoding="async"></p>
<p><img src="/content/2026/05/1018651/images/b08f143264ca9d7a713ad36a26465d2c5bc37eebd2e7276bfa7833c437148ab6.jpg" alt="TOSHIBA BDX2000KE - Original SSLeay License - 6" loading="lazy" decoding="async"></p>
<p>E5RJ2ED_DE.book Page 48 Wednesday, October 28, 2009 6:22 PM</p>
<p><img src="/content/2026/05/1018651/images/01457cdbe82d299ace40385576f8be1285944d9483b907814f5b3bde029eb1fd.jpg" alt="Pure geometric diagram with intersecting lines and circles, no text or symbols present" loading="lazy" decoding="async"></p>
<p><img src="/content/2026/05/1018651/images/cf1d5452284e765d1aa7b2b9921b409c313a7e8cbfe0fad2f5fc20062baf5c8d.jpg" alt="TOSHIBA BDX2000KE - Original SSLeay License - 8" loading="lazy" decoding="async"></p>
<p><img src="/content/2026/05/1018651/images/e67ab6d187e03bf04b4bef663711836fb422edb0714eb0c7099c87a8a0db3348.jpg" alt="TOSHIBA BDX2000KE - Original SSLeay License - 9" loading="lazy" decoding="async"></p>
<h2 id="toshiba-4">TOSHIBA</h2>
<p>1VMN28614 / E5RJ2ED ★★★★★</p>
<p><img src="/content/2026/05/1018651/images/76f2a010af7bfdb2ed76e585156e2ea08944c691424b3b30a6f7937b08fae3b9.jpg" alt="TOSHIBA BDX2000KE - TOSHIBA - 1" loading="lazy" decoding="async"></p>
<p>"1VMN28614"</p>
<p><img src="/content/2026/05/1018651/images/0b6ee4a9a39f88d43994ae9bede4c6b160144b04a2f8cac23ba5390a0dcb54e8.jpg" alt="Pure geometric diagram with intersecting lines and circles, no text or symbols present" loading="lazy" decoding="async"></p>
<p>Gedruckt in China</p>
<p><img src="/content/2026/05/1018651/images/f246735a9737d223e42c7c10152d02148a2a1a57e78a4b561782bc12f56f22fb.jpg" alt="TOSHIBA BDX2000KE - TOSHIBA - 3" loading="lazy" decoding="async"></p>
<p><img src="/content/2026/05/1018651/images/037329a3640f3446773f8a2799669a84613501e2c203d2910cda24af76fd2744.jpg" alt="Pure geometric lines and symbols without any text, numbers, or labels" loading="lazy" decoding="async"></p> </div><!-- /modetexte-inner -->
</div><!-- /modetexte -->
<div class="related-notices-section" id="related-notices-section">
<div class="related-notices-header">
<h3>
<i class="fa fa-book" style="margin-right:10px;color:#2780e3;"></i>
Andere Handbücher TOSHIBA </h3>
<p>
Entdecken Sie weitere Handbücher der Marke TOSHIBA </p>
</div>
<div class="related-notices-grid">
<a href="https://www.notice-facile.com/de/handbuch/1252317/toshiba+bdx3200ke"
class="related-notice-card"
title="Bedienungsanleitung BDX3200KE TOSHIBA"
data-ga-event="related_notice_click"
data-ga-location="related_notices"
data-ga-label="BDX3200KE">
<div class="related-notice-img">
<img src="/assets/img/1252317.jpg" alt="BDX3200KE TOSHIBA" class="notice-main-img" width="220" height="280" loading="lazy" onerror="this.onerror=function(){this.onerror=null;this.outerHTML='<div class=\'notice-logo-placeholder\'><span>TOSHIBA</span></div>';};this.src='/assets/marques/41.png';this.classList.remove('notice-main-img');this.classList.add('notice-logo-img');this.style.objectFit='contain';"> </div>
<div class="related-notice-content">
<div class="related-notice-category">Blu-ray player</div>
<h4 class="related-notice-title">BDX3200KE</h4>
<div class="related-notice-brand">
<i class="fa fa-tag"></i>TOSHIBA </div>
</div>
<div class="related-notice-cta">
Handbuch anzeigen <i class="fa fa-arrow-right" style="margin-left:5px;"></i>
</div>
</a>
<a href="https://www.notice-facile.com/de/handbuch/1020877/toshiba+bdx4400ke"
class="related-notice-card"
title="Bedienungsanleitung BDX4400KE TOSHIBA"
data-ga-event="related_notice_click"
data-ga-location="related_notices"
data-ga-label="BDX4400KE">
<div class="related-notice-img">
<img src="/assets/img/1020877.jpg" alt="BDX4400KE TOSHIBA" class="notice-main-img" width="220" height="280" loading="lazy" onerror="this.onerror=function(){this.onerror=null;this.outerHTML='<div class=\'notice-logo-placeholder\'><span>TOSHIBA</span></div>';};this.src='/assets/marques/41.png';this.classList.remove('notice-main-img');this.classList.add('notice-logo-img');this.style.objectFit='contain';"> </div>
<div class="related-notice-content">
<div class="related-notice-category">Blu-ray player</div>
<h4 class="related-notice-title">BDX4400KE</h4>
<div class="related-notice-brand">
<i class="fa fa-tag"></i>TOSHIBA </div>
</div>
<div class="related-notice-cta">
Handbuch anzeigen <i class="fa fa-arrow-right" style="margin-left:5px;"></i>
</div>
</a>
<a href="https://www.notice-facile.com/de/handbuch/1020876/toshiba+bdx4350ke"
class="related-notice-card"
title="Bedienungsanleitung BDX4350KE TOSHIBA"
data-ga-event="related_notice_click"
data-ga-location="related_notices"
data-ga-label="BDX4350KE">
<div class="related-notice-img">
<img src="/assets/img/1020876.jpg" alt="BDX4350KE TOSHIBA" class="notice-main-img" width="220" height="280" loading="lazy" onerror="this.onerror=function(){this.onerror=null;this.outerHTML='<div class=\'notice-logo-placeholder\'><span>TOSHIBA</span></div>';};this.src='/assets/marques/41.png';this.classList.remove('notice-main-img');this.classList.add('notice-logo-img');this.style.objectFit='contain';"> </div>
<div class="related-notice-content">
<div class="related-notice-category">Blu-ray player</div>
<h4 class="related-notice-title">BDX4350KE</h4>
<div class="related-notice-brand">
<i class="fa fa-tag"></i>TOSHIBA </div>
</div>
<div class="related-notice-cta">
Handbuch anzeigen <i class="fa fa-arrow-right" style="margin-left:5px;"></i>
</div>
</a>
<a href="https://www.notice-facile.com/de/handbuch/1020875/toshiba+bdx3400se"
class="related-notice-card"
title="Bedienungsanleitung BDX3400SE TOSHIBA"
data-ga-event="related_notice_click"
data-ga-location="related_notices"
data-ga-label="BDX3400SE">
<div class="related-notice-img">
<img src="/assets/img/1020875.jpg" alt="BDX3400SE TOSHIBA" class="notice-main-img" width="220" height="280" loading="lazy" onerror="this.onerror=function(){this.onerror=null;this.outerHTML='<div class=\'notice-logo-placeholder\'><span>TOSHIBA</span></div>';};this.src='/assets/marques/41.png';this.classList.remove('notice-main-img');this.classList.add('notice-logo-img');this.style.objectFit='contain';"> </div>
<div class="related-notice-content">
<div class="related-notice-category">Blu-ray player</div>
<h4 class="related-notice-title">BDX3400SE</h4>
<div class="related-notice-brand">
<i class="fa fa-tag"></i>TOSHIBA </div>
</div>
<div class="related-notice-cta">
Handbuch anzeigen <i class="fa fa-arrow-right" style="margin-left:5px;"></i>
</div>
</a>
<a href="https://www.notice-facile.com/de/handbuch/1020874/toshiba+bdx2400ke"
class="related-notice-card"
title="Bedienungsanleitung BDX2400KE TOSHIBA"
data-ga-event="related_notice_click"
data-ga-location="related_notices"
data-ga-label="BDX2400KE">
<div class="related-notice-img">
<img src="/assets/img/1020874.jpg" alt="BDX2400KE TOSHIBA" class="notice-main-img" width="220" height="280" loading="lazy" onerror="this.onerror=function(){this.onerror=null;this.outerHTML='<div class=\'notice-logo-placeholder\'><span>TOSHIBA</span></div>';};this.src='/assets/marques/41.png';this.classList.remove('notice-main-img');this.classList.add('notice-logo-img');this.style.objectFit='contain';"> </div>
<div class="related-notice-content">
<div class="related-notice-category">Blu-ray player</div>
<h4 class="related-notice-title">BDX2400KE</h4>
<div class="related-notice-brand">
<i class="fa fa-tag"></i>TOSHIBA </div>
</div>
<div class="related-notice-cta">
Handbuch anzeigen <i class="fa fa-arrow-right" style="margin-left:5px;"></i>
</div>
</a>
</div>
</div>
<script>
const CHAT_CONTEXT = {
marque: "TOSHIBA",
categorie: "blu-ray player",
reference: "BDX2000KE",
id_notice: 1018651,
pdf_url: "\/file\/2026\/05\/m_835d751628f94.pdf",
locale: "de",
// Libelles ecrits par viewer.js pendant la conversation. Sans eux ils
// restaient en francais sur toutes les versions traduites.
t: {"assistant_recherche":"Assistent sucht","recherche_en_cours":"Suche läuft","assistant_repond":"Assistent antwortet","erreur_reseau":"Netzwerkfehler. Bitte gleich erneut versuchen","erreur_survenue":"Ein Fehler ist aufgetreten","photo_envoi":"Foto wird gesendet","photo_prete":"Foto bereit","photo_lourde":"Foto zu groß (max. 8 MB)","echec":"Fehlgeschlagen"}};
</script>
<style>
#nf-back-to-top {
position: fixed;
right: 20px;
bottom: 20px;
width: 46px;
height: 46px;
border-radius: 50%;
background: #115192;
color: #fff;
border: none;
box-shadow: 0 4px 14px rgba(17,81,146,.35);
cursor: pointer;
display: flex;
align-items: center;
justify-content: center;
opacity: 0;
visibility: hidden;
transform: translateY(12px);
transition: opacity .25s ease, transform .25s ease, visibility .25s, background .15s;
z-index: 2147483646;
padding: 0;
}
#nf-back-to-top.is-visible {
opacity: 1;
visibility: visible;
transform: translateY(0);
}
#nf-back-to-top:hover { background: #0d3f73; }
#nf-back-to-top svg { width: 22px; height: 22px; display: block; }
@media (max-width: 575px) {
#nf-back-to-top { right: 14px; bottom: 70px; width: 42px; height: 42px; }
}
</style>
<button id="nf-back-to-top" type="button" aria-label="Zurück nach oben auf der Seite" title="Nach oben">
<svg xmlns="http://www.w3.org/2000/svg" viewBox="0 0 24 24" fill="none"
stroke="currentColor" stroke-width="2.5" stroke-linecap="round" stroke-linejoin="round"
aria-hidden="true">
<path d="M12 19V5"></path>
<path d="M5 12l7-7 7 7"></path>
</svg>
</button>
<script>
(function () {
var btn = document.getElementById('nf-back-to-top');
if (!btn) return;
var threshold = 300; // px scrollés avant d'afficher le bouton
var ticking = false;
function update() {
var y = window.pageYOffset || document.documentElement.scrollTop;
btn.classList.toggle('is-visible', y > threshold);
ticking = false;
}
window.addEventListener('scroll', function () {
if (!ticking) {
window.requestAnimationFrame(update);
ticking = true;
}
}, { passive: true });
btn.addEventListener('click', function () {
window.scrollTo({ top: 0, behavior: 'smooth' });
if (typeof window.nfTrack === 'function') {
window.nfTrack('back_to_top_click', { location: 'floating_button' });
}
});
update();
})();
</script>
<script>
(function () {
var btn = document.getElementById('ctaDownloadPdfBtn');
if (!btn) return;
var nid = 1018651;
/* Ce jeton ne sert qu'au bouton de téléchargement, mais lancé au chargement
il occupait 1 323 ms du chemin critique mesuré par Lighthouse, sans que
rien d'affiché n'en dépende. Il part donc au premier temps mort du
navigateur, et immédiatement si le visiteur approche du bouton avant. */
var demande = false;
function demanderJeton() {
if (demande) { return; }
demande = true;
fetch('/dl-token.php?n=' + nid, { credentials: 'same-origin' })
.then(function (r) { return r.ok ? r.json() : null; })
.then(function (d) {
if (d && d.ok && d.token) {
btn.href = '/dl.php?n=' + nid + '&token=' + encodeURIComponent(d.token);
}
// Si d.captcha=true ou erreur : href reste /dl.php?n=NID (captcha géré par dl.php)
})
.catch(function () { /* fallback silencieux */ });
}
['pointerenter', 'touchstart', 'focus'].forEach(function (e) {
btn.addEventListener(e, demanderJeton, { once: true, passive: true });
});
function auCalme() {
if (window.requestIdleCallback) {
requestIdleCallback(demanderJeton, { timeout: 3000 });
} else {
setTimeout(demanderJeton, 1200);
}
}
if (document.readyState === 'complete') { auCalme(); }
else { window.addEventListener('load', auCalme, { once: true }); }
})();
</script>
</div>
<div class="col-lg-4" id="assistant-col">
<div class="ai-sidebar">
<div class="toc-container" id="toc-container" aria-label="Inhaltsverzeichnis">
<div class="toc-header">
<div class="toc-title">
<strong>Inhaltsverzeichnis</strong>
<span class="toc-sub">
Klicken Sie auf einen Titel, um darauf zuzugreifen </span>
</div>
<button type="button" class="toc-toggle" id="toc-toggle" aria-expanded="true"
data-label-show="Inhaltsverzeichnis anzeigen"
data-label-hide="Ausblenden">
Inhaltsverzeichnis anzeigen </button>
</div>
<div class="toc-search-wrap" style="padding:8px 12px 4px;">
<input type="text" id="toc-search" class="form-control form-control-sm"
placeholder="Im Inhaltsverzeichnis suchen..."
autocomplete="off"
style="width:100%;padding:6px 10px;border:1px solid #ddd;border-radius:6px;font-size:13px;">
</div>
<ul class="toc-list" id="toc-list">
<li class="toc-row">
<a class="toc-item toc-item-anchor"
href="#toshiba"
data-ga-event="toc_item_click"
data-ga-location="toc"
data-ga-label="TOSHIBA"
style="text-decoration:none;display:flex;align-items:center;justify-content:space-between;width:100%;">
<span class="toc-item-title">TOSHIBA</span>
</a>
</li>
<li class="toc-row">
<a class="toc-item toc-item-anchor"
href="#blu-ray-disc-player-bdx2000ke"
data-ga-event="toc_item_click"
data-ga-location="toc"
data-ga-label="BLU-RAY DISC PLAYER BDX2000KE"
style="text-decoration:none;display:flex;align-items:center;justify-content:space-between;width:100%;">
<span class="toc-item-title">BLU-RAY DISC PLAYER BDX2000KE</span>
</a>
</li>
<li class="toc-row">
<a class="toc-item toc-item-anchor"
href="#owners-record"
data-ga-event="toc_item_click"
data-ga-location="toc"
data-ga-label="OWNER'S RECORD"
style="text-decoration:none;display:flex;align-items:center;justify-content:space-between;width:100%;">
<span class="toc-item-title">OWNER'S RECORD</span>
</a>
</li>
<li class="toc-row">
<a class="toc-item toc-item-anchor"
href="#introduction"
data-ga-event="toc_item_click"
data-ga-location="toc"
data-ga-label="INTRODUCTION"
style="text-decoration:none;display:flex;align-items:center;justify-content:space-between;width:100%;">
<span class="toc-item-title">INTRODUCTION</span>
</a>
</li>
<li class="toc-row">
<a class="toc-item toc-item-anchor"
href="#safety-instructions"
data-ga-event="toc_item_click"
data-ga-location="toc"
data-ga-label="SAFETY INSTRUCTIONS"
style="text-decoration:none;display:flex;align-items:center;justify-content:space-between;width:100%;">
<span class="toc-item-title">SAFETY INSTRUCTIONS</span>
</a>
</li>
<li class="toc-row">
<a class="toc-item toc-item-anchor"
href="#caution-risk-of-electric-shock-do-not-open"
data-ga-event="toc_item_click"
data-ga-location="toc"
data-ga-label="CAUTION RISK OF ELECTRIC SHOCK DO NOT OPEN"
style="text-decoration:none;display:flex;align-items:center;justify-content:space-between;width:100%;">
<span class="toc-item-title">CAUTION RISK OF ELECTRIC SHOCK DO NOT OPEN</span>
</a>
</li>
<li class="toc-row">
<a class="toc-item toc-item-anchor"
href="#caution"
data-ga-event="toc_item_click"
data-ga-location="toc"
data-ga-label="CAUTION"
style="text-decoration:none;display:flex;align-items:center;justify-content:space-between;width:100%;">
<span class="toc-item-title">CAUTION</span>
</a>
</li>
<li class="toc-row">
<a class="toc-item toc-item-anchor"
href="#laser-safety"
data-ga-event="toc_item_click"
data-ga-location="toc"
data-ga-label="LASER SAFETY"
style="text-decoration:none;display:flex;align-items:center;justify-content:space-between;width:100%;">
<span class="toc-item-title">LASER SAFETY</span>
</a>
</li>
<li class="toc-row">
<a class="toc-item toc-item-anchor"
href="#location"
data-ga-event="toc_item_click"
data-ga-location="toc"
data-ga-label="LOCATION"
style="text-decoration:none;display:flex;align-items:center;justify-content:space-between;width:100%;">
<span class="toc-item-title">LOCATION</span>
</a>
</li>
<li class="toc-row">
<a class="toc-item toc-item-anchor"
href="#avoid-the-hazards-of-electrical-shock-and-fire"
data-ga-event="toc_item_click"
data-ga-location="toc"
data-ga-label="AVOID THE HAZARDS OF ELECTRICAL SHOCK AND FIRE"
style="text-decoration:none;display:flex;align-items:center;justify-content:space-between;width:100%;">
<span class="toc-item-title">AVOID THE HAZARDS OF ELECTRICAL SHOCK AND FIRE</span>
</a>
</li>
<li class="toc-row">
<a class="toc-item toc-item-anchor"
href="#moisture-condensation-warning"
data-ga-event="toc_item_click"
data-ga-location="toc"
data-ga-label="MOISTURE CONDENSATION WARNING"
style="text-decoration:none;display:flex;align-items:center;justify-content:space-between;width:100%;">
<span class="toc-item-title">MOISTURE CONDENSATION WARNING</span>
</a>
</li>
<li class="toc-row">
<a class="toc-item toc-item-anchor"
href="#connection-to-power"
data-ga-event="toc_item_click"
data-ga-location="toc"
data-ga-label="CONNECTION TO POWER"
style="text-decoration:none;display:flex;align-items:center;justify-content:space-between;width:100%;">
<span class="toc-item-title">CONNECTION TO POWER</span>
</a>
</li>
<li class="toc-row">
<a class="toc-item toc-item-anchor"
href="#power-supply"
data-ga-event="toc_item_click"
data-ga-location="toc"
data-ga-label="POWER SUPPLY"
style="text-decoration:none;display:flex;align-items:center;justify-content:space-between;width:100%;">
<span class="toc-item-title">POWER SUPPLY</span>
</a>
</li>
<li class="toc-row">
<a class="toc-item toc-item-anchor"
href="#warning-live-parts-inside-do-not-remove-any-screws"
data-ga-event="toc_item_click"
data-ga-location="toc"
data-ga-label="WARNING: LIVE PARTS INSIDE. DO NOT REMOVE ANY SCREWS"
style="text-decoration:none;display:flex;align-items:center;justify-content:space-between;width:100%;">
<span class="toc-item-title">WARNING: LIVE PARTS INSIDE. DO NOT REMOVE ANY SCREWS</span>
</a>
</li>
<li class="toc-row">
<a class="toc-item toc-item-anchor"
href="#installation-location"
data-ga-event="toc_item_click"
data-ga-location="toc"
data-ga-label="INSTALLATION LOCATION"
style="text-decoration:none;display:flex;align-items:center;justify-content:space-between;width:100%;">
<span class="toc-item-title">INSTALLATION LOCATION</span>
</a>
</li>
<li class="toc-row">
<a class="toc-item toc-item-anchor"
href="#eu-conformity-statement"
data-ga-event="toc_item_click"
data-ga-location="toc"
data-ga-label="EU CONFORMITY STATEMENT"
style="text-decoration:none;display:flex;align-items:center;justify-content:space-between;width:100%;">
<span class="toc-item-title">EU CONFORMITY STATEMENT</span>
</a>
</li>
<li class="toc-row">
<a class="toc-item toc-item-anchor"
href="#other-precautions"
data-ga-event="toc_item_click"
data-ga-location="toc"
data-ga-label="OTHER PRECAUTIONS"
style="text-decoration:none;display:flex;align-items:center;justify-content:space-between;width:100%;">
<span class="toc-item-title">OTHER PRECAUTIONS</span>
</a>
</li>
<li class="toc-row">
<a class="toc-item toc-item-anchor"
href="#about-recycle"
data-ga-event="toc_item_click"
data-ga-location="toc"
data-ga-label="ABOUT RECYCLE"
style="text-decoration:none;display:flex;align-items:center;justify-content:space-between;width:100%;">
<span class="toc-item-title">ABOUT RECYCLE</span>
</a>
</li>
<li class="toc-row">
<a class="toc-item toc-item-anchor"
href="#a-note-about-recycling"
data-ga-event="toc_item_click"
data-ga-location="toc"
data-ga-label="A NOTE ABOUT RECYCLING"
style="text-decoration:none;display:flex;align-items:center;justify-content:space-between;width:100%;">
<span class="toc-item-title">A NOTE ABOUT RECYCLING</span>
</a>
</li>
<li class="toc-row">
<a class="toc-item toc-item-anchor"
href="#following-information-is-only-for-eu-member-states"
data-ga-event="toc_item_click"
data-ga-location="toc"
data-ga-label="FOLLOWING INFORMATION IS ONLY FOR EU-MEMBER STATES"
style="text-decoration:none;display:flex;align-items:center;justify-content:space-between;width:100%;">
<span class="toc-item-title">FOLLOWING INFORMATION IS ONLY FOR EU-MEMBER STATES</span>
</a>
</li>
<li class="toc-row">
<a class="toc-item toc-item-anchor"
href="#following-information-is-only-valid-eu-member-states-disposal-of-batteries-andor-accumulators"
data-ga-event="toc_item_click"
data-ga-location="toc"
data-ga-label="FOLLOWING INFORMATION IS ONLY VALID EU-MEMBER STATES: DISPOSAL OF BATTERIES AND/OR ACCUMULATORS"
style="text-decoration:none;display:flex;align-items:center;justify-content:space-between;width:100%;">
<span class="toc-item-title">FOLLOWING INFORMATION IS ONLY VALID EU-MEMBER STATES: DISPOSAL OF BATTERIES AND/OR ACCUMULATORS</span>
</a>
</li>
<li class="toc-row">
<a class="toc-item toc-item-anchor"
href="#make-your-contribution-to-the-environment"
data-ga-event="toc_item_click"
data-ga-location="toc"
data-ga-label="MAKE YOUR CONTRIBUTION TO THE ENVIRONMENT"
style="text-decoration:none;display:flex;align-items:center;justify-content:space-between;width:100%;">
<span class="toc-item-title">MAKE YOUR CONTRIBUTION TO THE ENVIRONMENT</span>
</a>
</li>
<li class="toc-row">
<a class="toc-item toc-item-anchor"
href="#about-copyright"
data-ga-event="toc_item_click"
data-ga-location="toc"
data-ga-label="ABOUT COPYRIGHT"
style="text-decoration:none;display:flex;align-items:center;justify-content:space-between;width:100%;">
<span class="toc-item-title">ABOUT COPYRIGHT</span>
</a>
</li>
<li class="toc-row">
<a class="toc-item toc-item-anchor"
href="#about-maintenance"
data-ga-event="toc_item_click"
data-ga-location="toc"
data-ga-label="ABOUT MAINTENANCE"
style="text-decoration:none;display:flex;align-items:center;justify-content:space-between;width:100%;">
<span class="toc-item-title">ABOUT MAINTENANCE</span>
</a>
</li>
<li class="toc-row">
<a class="toc-item toc-item-anchor"
href="#cleaning-the-unit"
data-ga-event="toc_item_click"
data-ga-location="toc"
data-ga-label="CLEANING THE UNIT"
style="text-decoration:none;display:flex;align-items:center;justify-content:space-between;width:100%;">
<span class="toc-item-title">CLEANING THE UNIT</span>
</a>
</li>
<li class="toc-row">
<a class="toc-item toc-item-anchor"
href="#cleaning-discs"
data-ga-event="toc_item_click"
data-ga-location="toc"
data-ga-label="CLEANING DISCS"
style="text-decoration:none;display:flex;align-items:center;justify-content:space-between;width:100%;">
<span class="toc-item-title">CLEANING DISCS</span>
</a>
</li>
<li class="toc-row">
<a class="toc-item toc-item-anchor"
href="#disc-handling"
data-ga-event="toc_item_click"
data-ga-location="toc"
data-ga-label="DISC HANDLING"
style="text-decoration:none;display:flex;align-items:center;justify-content:space-between;width:100%;">
<span class="toc-item-title">DISC HANDLING</span>
</a>
</li>
<li class="toc-row">
<a class="toc-item toc-item-anchor"
href="#servicing"
data-ga-event="toc_item_click"
data-ga-location="toc"
data-ga-label="SERVICING"
style="text-decoration:none;display:flex;align-items:center;justify-content:space-between;width:100%;">
<span class="toc-item-title">SERVICING</span>
</a>
</li>
<li class="toc-row">
<a class="toc-item toc-item-anchor"
href="#cleaning-the-disc-lens"
data-ga-event="toc_item_click"
data-ga-location="toc"
data-ga-label="CLEANING THE DISC LENS"
style="text-decoration:none;display:flex;align-items:center;justify-content:space-between;width:100%;">
<span class="toc-item-title">CLEANING THE DISC LENS</span>
</a>
</li>
<li class="toc-row">
<a class="toc-item toc-item-anchor"
href="#ir-signal-check"
data-ga-event="toc_item_click"
data-ga-location="toc"
data-ga-label="IR SIGNAL CHECK"
style="text-decoration:none;display:flex;align-items:center;justify-content:space-between;width:100%;">
<span class="toc-item-title">IR SIGNAL CHECK</span>
</a>
</li>
<li class="toc-row">
<a class="toc-item toc-item-anchor"
href="#with-a-digital-camera"
data-ga-event="toc_item_click"
data-ga-location="toc"
data-ga-label="WITH A DIGITAL CAMERA"
style="text-decoration:none;display:flex;align-items:center;justify-content:space-between;width:100%;">
<span class="toc-item-title">WITH A DIGITAL CAMERA</span>
</a>
</li>
<li class="toc-row">
<a class="toc-item toc-item-anchor"
href="#including-built-in-cell-phone-cameras"
data-ga-event="toc_item_click"
data-ga-location="toc"
data-ga-label="(INCLUDING BUILT-IN CELL PHONE CAMERAS)"
style="text-decoration:none;display:flex;align-items:center;justify-content:space-between;width:100%;">
<span class="toc-item-title">(INCLUDING BUILT-IN CELL PHONE CAMERAS)</span>
</a>
</li>
<li class="toc-row">
<a class="toc-item toc-item-anchor"
href="#about-remote-control"
data-ga-event="toc_item_click"
data-ga-location="toc"
data-ga-label="ABOUT REMOTE CONTROL"
style="text-decoration:none;display:flex;align-items:center;justify-content:space-between;width:100%;">
<span class="toc-item-title">ABOUT REMOTE CONTROL</span>
</a>
</li>
<li class="toc-row">
<a class="toc-item toc-item-anchor"
href="#installing-the-batteries-in-the-remote-control"
data-ga-event="toc_item_click"
data-ga-location="toc"
data-ga-label="INSTALLING THE BATTERIES IN THE REMOTE CONTROL"
style="text-decoration:none;display:flex;align-items:center;justify-content:space-between;width:100%;">
<span class="toc-item-title">INSTALLING THE BATTERIES IN THE REMOTE CONTROL</span>
</a>
</li>
<li class="toc-row">
<a class="toc-item toc-item-anchor"
href="#incorrect-use-of-batteries-can-result-in-hazards-such-as-leakage-and-bursting-please-observe-the-following"
data-ga-event="toc_item_click"
data-ga-location="toc"
data-ga-label="INCORRECT USE OF BATTERIES CAN RESULT IN HAZARDS SUCH AS LEAKAGE AND BURSTING. PLEASE OBSERVE THE FOLLOWING"
style="text-decoration:none;display:flex;align-items:center;justify-content:space-between;width:100%;">
<span class="toc-item-title">INCORRECT USE OF BATTERIES CAN RESULT IN HAZARDS SUCH AS LEAKAGE AND BURSTING. PLEASE OBSERVE THE FOLLOWING</span>
</a>
</li>
<li class="toc-row">
<a class="toc-item toc-item-anchor"
href="#using-a-remote-control"
data-ga-event="toc_item_click"
data-ga-location="toc"
data-ga-label="USING A REMOTE CONTROL"
style="text-decoration:none;display:flex;align-items:center;justify-content:space-between;width:100%;">
<span class="toc-item-title">USING A REMOTE CONTROL</span>
</a>
</li>
<li class="toc-row">
<a class="toc-item toc-item-anchor"
href="#supplied-accessories"
data-ga-event="toc_item_click"
data-ga-location="toc"
data-ga-label="SUPPLIED ACCESSORIES"
style="text-decoration:none;display:flex;align-items:center;justify-content:space-between;width:100%;">
<span class="toc-item-title">SUPPLIED ACCESSORIES</span>
</a>
</li>
<li class="toc-row">
<a class="toc-item toc-item-anchor"
href="#content"
data-ga-event="toc_item_click"
data-ga-location="toc"
data-ga-label="CONTENT"
style="text-decoration:none;display:flex;align-items:center;justify-content:space-between;width:100%;">
<span class="toc-item-title">CONTENT</span>
</a>
</li>
<li class="toc-row">
<a class="toc-item toc-item-anchor"
href="#connections"
data-ga-event="toc_item_click"
data-ga-location="toc"
data-ga-label="CONNECTIONS"
style="text-decoration:none;display:flex;align-items:center;justify-content:space-between;width:100%;">
<span class="toc-item-title">CONNECTIONS</span>
</a>
</li>
<li class="toc-row">
<a class="toc-item toc-item-anchor"
href="#playback"
data-ga-event="toc_item_click"
data-ga-location="toc"
data-ga-label="PLAYBACK"
style="text-decoration:none;display:flex;align-items:center;justify-content:space-between;width:100%;">
<span class="toc-item-title">PLAYBACK</span>
</a>
</li>
<li class="toc-row">
<a class="toc-item toc-item-anchor"
href="#function-setup"
data-ga-event="toc_item_click"
data-ga-location="toc"
data-ga-label="FUNCTION SETUP"
style="text-decoration:none;display:flex;align-items:center;justify-content:space-between;width:100%;">
<span class="toc-item-title">FUNCTION SETUP</span>
</a>
</li>
<li class="toc-row">
<a class="toc-item toc-item-anchor"
href="#others"
data-ga-event="toc_item_click"
data-ga-location="toc"
data-ga-label="OTHERS"
style="text-decoration:none;display:flex;align-items:center;justify-content:space-between;width:100%;">
<span class="toc-item-title">OTHERS</span>
</a>
</li>
<li class="toc-row">
<a class="toc-item toc-item-anchor"
href="#trademark-information"
data-ga-event="toc_item_click"
data-ga-location="toc"
data-ga-label="TRADEMARK INFORMATION"
style="text-decoration:none;display:flex;align-items:center;justify-content:space-between;width:100%;">
<span class="toc-item-title">TRADEMARK INFORMATION</span>
</a>
</li>
<li class="toc-row">
<a class="toc-item toc-item-anchor"
href="#features"
data-ga-event="toc_item_click"
data-ga-location="toc"
data-ga-label="FEATURES"
style="text-decoration:none;display:flex;align-items:center;justify-content:space-between;width:100%;">
<span class="toc-item-title">FEATURES</span>
</a>
</li>
<li class="toc-row">
<a class="toc-item toc-item-anchor"
href="#bd-java"
data-ga-event="toc_item_click"
data-ga-location="toc"
data-ga-label="BD-JAVA"
style="text-decoration:none;display:flex;align-items:center;justify-content:space-between;width:100%;">
<span class="toc-item-title">BD-JAVA</span>
</a>
</li>
<li class="toc-row">
<a class="toc-item toc-item-anchor"
href="#bd-live"
data-ga-event="toc_item_click"
data-ga-location="toc"
data-ga-label="BD-LIVE"
style="text-decoration:none;display:flex;align-items:center;justify-content:space-between;width:100%;">
<span class="toc-item-title">BD-LIVE</span>
</a>
</li>
<li class="toc-row">
<a class="toc-item toc-item-anchor"
href="#full-high-definition-video-playback"
data-ga-event="toc_item_click"
data-ga-location="toc"
data-ga-label="FULL HIGH-DEFINITION VIDEO PLAYBACK"
style="text-decoration:none;display:flex;align-items:center;justify-content:space-between;width:100%;">
<span class="toc-item-title">FULL HIGH-DEFINITION VIDEO PLAYBACK</span>
</a>
</li>
<li class="toc-row">
<a class="toc-item toc-item-anchor"
href="#dvd-upconversion-for-enhanced-picture-quality"
data-ga-event="toc_item_click"
data-ga-location="toc"
data-ga-label="DVD UPCONVERSION FOR ENHANCED PICTURE QUALITY"
style="text-decoration:none;display:flex;align-items:center;justify-content:space-between;width:100%;">
<span class="toc-item-title">DVD UPCONVERSION FOR ENHANCED PICTURE QUALITY</span>
</a>
</li>
<li class="toc-row">
<a class="toc-item toc-item-anchor"
href="#enjoy-your-content-on-different-kinds-of-media"
data-ga-event="toc_item_click"
data-ga-location="toc"
data-ga-label="ENJOY YOUR CONTENT ON DIFFERENT KINDS OF MEDIA"
style="text-decoration:none;display:flex;align-items:center;justify-content:space-between;width:100%;">
<span class="toc-item-title">ENJOY YOUR CONTENT ON DIFFERENT KINDS OF MEDIA</span>
</a>
</li>
<li class="toc-row">
<a class="toc-item toc-item-anchor"
href="#experience-rich-multi-channel-surround-sound"
data-ga-event="toc_item_click"
data-ga-location="toc"
data-ga-label="EXPERIENCE RICH MULTI-CHANNEL SURROUND SOUND"
style="text-decoration:none;display:flex;align-items:center;justify-content:space-between;width:100%;">
<span class="toc-item-title">EXPERIENCE RICH MULTI-CHANNEL SURROUND SOUND</span>
</a>
</li>
<li class="toc-row">
<a class="toc-item toc-item-anchor"
href="#pip-bonusview"
data-ga-event="toc_item_click"
data-ga-location="toc"
data-ga-label="PIP (BONUSVIEW)"
style="text-decoration:none;display:flex;align-items:center;justify-content:space-between;width:100%;">
<span class="toc-item-title">PIP (BONUSVIEW)</span>
</a>
</li>
<li class="toc-row">
<a class="toc-item toc-item-anchor"
href="#pop-up-menu"
data-ga-event="toc_item_click"
data-ga-location="toc"
data-ga-label="POP-UP MENU"
style="text-decoration:none;display:flex;align-items:center;justify-content:space-between;width:100%;">
<span class="toc-item-title">POP-UP MENU</span>
</a>
</li>
<li class="toc-row">
<a class="toc-item toc-item-anchor"
href="#rapid-playback"
data-ga-event="toc_item_click"
data-ga-location="toc"
data-ga-label="RAPID PLAYBACK"
style="text-decoration:none;display:flex;align-items:center;justify-content:space-between;width:100%;">
<span class="toc-item-title">RAPID PLAYBACK</span>
</a>
</li>
<li class="toc-row">
<a class="toc-item toc-item-anchor"
href="#playback-of-content-from-an-sd-card"
data-ga-event="toc_item_click"
data-ga-location="toc"
data-ga-label="PLAYBACK OF CONTENT FROM AN SD CARD"
style="text-decoration:none;display:flex;align-items:center;justify-content:space-between;width:100%;">
<span class="toc-item-title">PLAYBACK OF CONTENT FROM AN SD CARD</span>
</a>
</li>
<li class="toc-row">
<a class="toc-item toc-item-anchor"
href="#playing-back-avchd-files"
data-ga-event="toc_item_click"
data-ga-location="toc"
data-ga-label="PLAYING BACK AVCHD FILES"
style="text-decoration:none;display:flex;align-items:center;justify-content:space-between;width:100%;">
<span class="toc-item-title">PLAYING BACK AVCHD FILES</span>
</a>
</li>
<li class="toc-row">
<a class="toc-item toc-item-anchor"
href="#xvcolor"
data-ga-event="toc_item_click"
data-ga-location="toc"
data-ga-label="X.V.COLOR"
style="text-decoration:none;display:flex;align-items:center;justify-content:space-between;width:100%;">
<span class="toc-item-title">X.V.COLOR</span>
</a>
</li>
<li class="toc-row">
<a class="toc-item toc-item-anchor"
href="#easy-and-simple-connection-to-your-hdtv-via-hdmi"
data-ga-event="toc_item_click"
data-ga-location="toc"
data-ga-label="EASY AND SIMPLE CONNECTION TO YOUR HDTV VIA HDMI"
style="text-decoration:none;display:flex;align-items:center;justify-content:space-between;width:100%;">
<span class="toc-item-title">EASY AND SIMPLE CONNECTION TO YOUR HDTV VIA HDMI</span>
</a>
</li>
<li class="toc-row">
<a class="toc-item toc-item-anchor"
href="#hdmi-deep-colour"
data-ga-event="toc_item_click"
data-ga-location="toc"
data-ga-label="HDMI DEEP COLOUR"
style="text-decoration:none;display:flex;align-items:center;justify-content:space-between;width:100%;">
<span class="toc-item-title">HDMI DEEP COLOUR</span>
</a>
</li>
<li class="toc-row">
<a class="toc-item toc-item-anchor"
href="#hdmi-cec-consumer-electronics-control-regza-link"
data-ga-event="toc_item_click"
data-ga-location="toc"
data-ga-label="HDMI CEC (CONSUMER ELECTRONICS CONTROL) (REGZA - LINK)"
style="text-decoration:none;display:flex;align-items:center;justify-content:space-between;width:100%;">
<span class="toc-item-title">HDMI CEC (CONSUMER ELECTRONICS CONTROL) (REGZA - LINK)</span>
</a>
</li>
<li class="toc-row">
<a class="toc-item toc-item-anchor"
href="#hdmi-1080p24-output-bd-only"
data-ga-event="toc_item_click"
data-ga-location="toc"
data-ga-label="HDMI 1080P24 OUTPUT (BD ONLY)"
style="text-decoration:none;display:flex;align-items:center;justify-content:space-between;width:100%;">
<span class="toc-item-title">HDMI 1080P24 OUTPUT (BD ONLY)</span>
</a>
</li>
<li class="toc-row">
<a class="toc-item toc-item-anchor"
href="#hdcp-compatible"
data-ga-event="toc_item_click"
data-ga-location="toc"
data-ga-label="HDCP COMPATIBLE"
style="text-decoration:none;display:flex;align-items:center;justify-content:space-between;width:100%;">
<span class="toc-item-title">HDCP COMPATIBLE</span>
</a>
</li>
<li class="toc-row">
<a class="toc-item toc-item-anchor"
href="#functional-overview"
data-ga-event="toc_item_click"
data-ga-location="toc"
data-ga-label="FUNCTIONAL OVERVIEW"
style="text-decoration:none;display:flex;align-items:center;justify-content:space-between;width:100%;">
<span class="toc-item-title">FUNCTIONAL OVERVIEW</span>
</a>
</li>
<li class="toc-row">
<a class="toc-item toc-item-anchor"
href="#1-onstandby-button"
data-ga-event="toc_item_click"
data-ga-location="toc"
data-ga-label="ON/STANDBY ⏻ BUTTON"
style="text-decoration:none;display:flex;align-items:center;justify-content:space-between;width:100%;">
<span class="toc-item-title">ON/STANDBY ⏻ BUTTON</span>
</a>
</li>
<li class="toc-row">
<a class="toc-item toc-item-anchor"
href="#symbols-used-in-this-manual"
data-ga-event="toc_item_click"
data-ga-location="toc"
data-ga-label="SYMBOLS USED IN THIS MANUAL"
style="text-decoration:none;display:flex;align-items:center;justify-content:space-between;width:100%;">
<span class="toc-item-title">SYMBOLS USED IN THIS MANUAL</span>
</a>
</li>
<li class="toc-row">
<a class="toc-item toc-item-anchor"
href="#symbol"
data-ga-event="toc_item_click"
data-ga-location="toc"
data-ga-label="SYMBOL"
style="text-decoration:none;display:flex;align-items:center;justify-content:space-between;width:100%;">
<span class="toc-item-title">SYMBOL</span>
</a>
</li>
<li class="toc-row">
<a class="toc-item toc-item-anchor"
href="#description"
data-ga-event="toc_item_click"
data-ga-location="toc"
data-ga-label="DESCRIPTION"
style="text-decoration:none;display:flex;align-items:center;justify-content:space-between;width:100%;">
<span class="toc-item-title">DESCRIPTION</span>
</a>
</li>
<li class="toc-row">
<a class="toc-item toc-item-anchor"
href="#connection-to-the-tv"
data-ga-event="toc_item_click"
data-ga-location="toc"
data-ga-label="CONNECTION TO THE TV"
style="text-decoration:none;display:flex;align-items:center;justify-content:space-between;width:100%;">
<span class="toc-item-title">CONNECTION TO THE TV</span>
</a>
</li>
<li class="toc-row">
<a class="toc-item toc-item-anchor"
href="#2-connect-the-cables-by-following-the-descriptions-below"
data-ga-event="toc_item_click"
data-ga-location="toc"
data-ga-label="2 CONNECT THE CABLES BY FOLLOWING THE DESCRIPTIONS BELOW"
style="text-decoration:none;display:flex;align-items:center;justify-content:space-between;width:100%;">
<span class="toc-item-title">2 CONNECT THE CABLES BY FOLLOWING THE DESCRIPTIONS BELOW</span>
</a>
</li>
<li class="toc-row">
<a class="toc-item toc-item-anchor"
href="#note"
data-ga-event="toc_item_click"
data-ga-location="toc"
data-ga-label="NOTE"
style="text-decoration:none;display:flex;align-items:center;justify-content:space-between;width:100%;">
<span class="toc-item-title">NOTE</span>
</a>
</li>
<li class="toc-row">
<a class="toc-item toc-item-anchor"
href="#connection-to-an-audio-system"
data-ga-event="toc_item_click"
data-ga-location="toc"
data-ga-label="CONNECTION TO AN AUDIO SYSTEM"
style="text-decoration:none;display:flex;align-items:center;justify-content:space-between;width:100%;">
<span class="toc-item-title">CONNECTION TO AN AUDIO SYSTEM</span>
</a>
</li>
<li class="toc-row">
<a class="toc-item toc-item-anchor"
href="#network-connection-with-lan"
data-ga-event="toc_item_click"
data-ga-location="toc"
data-ga-label="NETWORK CONNECTION WITH LAN"
style="text-decoration:none;display:flex;align-items:center;justify-content:space-between;width:100%;">
<span class="toc-item-title">NETWORK CONNECTION WITH LAN</span>
</a>
</li>
<li class="toc-row">
<a class="toc-item toc-item-anchor"
href="#finding-the-video-channel-on-your-tv"
data-ga-event="toc_item_click"
data-ga-location="toc"
data-ga-label="FINDING THE VIDEO CHANNEL ON YOUR TV"
style="text-decoration:none;display:flex;align-items:center;justify-content:space-between;width:100%;">
<span class="toc-item-title">FINDING THE VIDEO CHANNEL ON YOUR TV</span>
</a>
</li>
<li class="toc-row">
<a class="toc-item toc-item-anchor"
href="#12-en"
data-ga-event="toc_item_click"
data-ga-location="toc"
data-ga-label="12 EN"
style="text-decoration:none;display:flex;align-items:center;justify-content:space-between;width:100%;">
<span class="toc-item-title">12 EN</span>
</a>
</li>
<li class="toc-row">
<a class="toc-item toc-item-anchor"
href="#information-on-playback"
data-ga-event="toc_item_click"
data-ga-location="toc"
data-ga-label="INFORMATION ON PLAYBACK"
style="text-decoration:none;display:flex;align-items:center;justify-content:space-between;width:100%;">
<span class="toc-item-title">INFORMATION ON PLAYBACK</span>
</a>
</li>
<li class="toc-row">
<a class="toc-item toc-item-anchor"
href="#playable-media"
data-ga-event="toc_item_click"
data-ga-location="toc"
data-ga-label="PLAYABLE MEDIA"
style="text-decoration:none;display:flex;align-items:center;justify-content:space-between;width:100%;">
<span class="toc-item-title">PLAYABLE MEDIA</span>
</a>
</li>
<li class="toc-row">
<a class="toc-item toc-item-anchor"
href="#it-is-recommended-that-files-to-be-played-back-in-this-unit-are-recorded-under-the-following-specifications"
data-ga-event="toc_item_click"
data-ga-location="toc"
data-ga-label="IT IS RECOMMENDED THAT FILES TO BE PLAYED BACK IN THIS UNIT ARE RECORDED UNDER THE FOLLOWING SPECIFICATIONS"
style="text-decoration:none;display:flex;align-items:center;justify-content:space-between;width:100%;">
<span class="toc-item-title">IT IS RECOMMENDED THAT FILES TO BE PLAYED BACK IN THIS UNIT ARE RECORDED UNDER THE FOLLOWING SPECIFICATIONS</span>
</a>
</li>
<li class="toc-row">
<a class="toc-item toc-item-anchor"
href="#divx"
data-ga-event="toc_item_click"
data-ga-location="toc"
data-ga-label="DIVX®"
style="text-decoration:none;display:flex;align-items:center;justify-content:space-between;width:100%;">
<span class="toc-item-title">DIVX®</span>
</a>
</li>
<li class="toc-row">
<a class="toc-item toc-item-anchor"
href="#mp3windows-media-audio"
data-ga-event="toc_item_click"
data-ga-location="toc"
data-ga-label="MP3/WINDOWS MEDIA™ AUDIO"
style="text-decoration:none;display:flex;align-items:center;justify-content:space-between;width:100%;">
<span class="toc-item-title">MP3/WINDOWS MEDIA™ AUDIO</span>
</a>
</li>
<li class="toc-row">
<a class="toc-item toc-item-anchor"
href="#jpeg"
data-ga-event="toc_item_click"
data-ga-location="toc"
data-ga-label="JPEG"
style="text-decoration:none;display:flex;align-items:center;justify-content:space-between;width:100%;">
<span class="toc-item-title">JPEG</span>
</a>
</li>
<li class="toc-row">
<a class="toc-item toc-item-anchor"
href="#note-for-sd-cards"
data-ga-event="toc_item_click"
data-ga-location="toc"
data-ga-label="NOTE FOR SD CARDS"
style="text-decoration:none;display:flex;align-items:center;justify-content:space-between;width:100%;">
<span class="toc-item-title">NOTE FOR SD CARDS</span>
</a>
</li>
<li class="toc-row">
<a class="toc-item toc-item-anchor"
href="#region-codes"
data-ga-event="toc_item_click"
data-ga-location="toc"
data-ga-label="REGION CODES"
style="text-decoration:none;display:flex;align-items:center;justify-content:space-between;width:100%;">
<span class="toc-item-title">REGION CODES</span>
</a>
</li>
<li class="toc-row">
<a class="toc-item toc-item-anchor"
href="#ed-under-copyright-structure-of-media-contents"
data-ga-event="toc_item_click"
data-ga-location="toc"
data-ga-label="ED UNDER COPYRIGHT STRUCTURE OF MEDIA CONTENTS"
style="text-decoration:none;display:flex;align-items:center;justify-content:space-between;width:100%;">
<span class="toc-item-title">ED UNDER COPYRIGHT STRUCTURE OF MEDIA CONTENTS</span>
</a>
</li>
<li class="toc-row">
<a class="toc-item toc-item-anchor"
href="#unplayable-media"
data-ga-event="toc_item_click"
data-ga-location="toc"
data-ga-label="UNPLAYABLE MEDIA"
style="text-decoration:none;display:flex;align-items:center;justify-content:space-between;width:100%;">
<span class="toc-item-title">UNPLAYABLE MEDIA</span>
</a>
</li>
<li class="toc-row">
<a class="toc-item toc-item-anchor"
href="#colour-systems"
data-ga-event="toc_item_click"
data-ga-location="toc"
data-ga-label="COLOUR SYSTEMS"
style="text-decoration:none;display:flex;align-items:center;justify-content:space-between;width:100%;">
<span class="toc-item-title">COLOUR SYSTEMS</span>
</a>
</li>
<li class="toc-row">
<a class="toc-item toc-item-anchor"
href="#bd-video-avchd"
data-ga-event="toc_item_click"
data-ga-location="toc"
data-ga-label="BD VIDEO AVCHD"
style="text-decoration:none;display:flex;align-items:center;justify-content:space-between;width:100%;">
<span class="toc-item-title">BD VIDEO AVCHD</span>
</a>
</li>
<li class="toc-row">
<a class="toc-item toc-item-anchor"
href="#dvd-video"
data-ga-event="toc_item_click"
data-ga-location="toc"
data-ga-label="DVD VIDEO"
style="text-decoration:none;display:flex;align-items:center;justify-content:space-between;width:100%;">
<span class="toc-item-title">DVD VIDEO</span>
</a>
</li>
<li class="toc-row">
<a class="toc-item toc-item-anchor"
href="#cd"
data-ga-event="toc_item_click"
data-ga-location="toc"
data-ga-label="CD"
style="text-decoration:none;display:flex;align-items:center;justify-content:space-between;width:100%;">
<span class="toc-item-title">CD</span>
</a>
</li>
<li class="toc-row">
<a class="toc-item toc-item-anchor"
href="#divx-2"
data-ga-event="toc_item_click"
data-ga-location="toc"
data-ga-label="DIVX"
style="text-decoration:none;display:flex;align-items:center;justify-content:space-between;width:100%;">
<span class="toc-item-title">DIVX</span>
</a>
</li>
<li class="toc-row">
<a class="toc-item toc-item-anchor"
href="#mp3"
data-ga-event="toc_item_click"
data-ga-location="toc"
data-ga-label="MP3"
style="text-decoration:none;display:flex;align-items:center;justify-content:space-between;width:100%;">
<span class="toc-item-title">MP3</span>
</a>
</li>
<li class="toc-row">
<a class="toc-item toc-item-anchor"
href="#wma"
data-ga-event="toc_item_click"
data-ga-location="toc"
data-ga-label="WMA"
style="text-decoration:none;display:flex;align-items:center;justify-content:space-between;width:100%;">
<span class="toc-item-title">WMA</span>
</a>
</li>
<li class="toc-row">
<a class="toc-item toc-item-anchor"
href="#preparing-to-play-back"
data-ga-event="toc_item_click"
data-ga-location="toc"
data-ga-label="PREPARING TO PLAY BACK"
style="text-decoration:none;display:flex;align-items:center;justify-content:space-between;width:100%;">
<span class="toc-item-title">PREPARING TO PLAY BACK</span>
</a>
</li>
<li class="toc-row">
<a class="toc-item toc-item-anchor"
href="#how-to-insert-a-disc"
data-ga-event="toc_item_click"
data-ga-location="toc"
data-ga-label="HOW TO INSERT A DISC"
style="text-decoration:none;display:flex;align-items:center;justify-content:space-between;width:100%;">
<span class="toc-item-title">HOW TO INSERT A DISC</span>
</a>
</li>
<li class="toc-row">
<a class="toc-item toc-item-anchor"
href="#how-to-insert-an-sd-card"
data-ga-event="toc_item_click"
data-ga-location="toc"
data-ga-label="HOW TO INSERT AN SD CARD"
style="text-decoration:none;display:flex;align-items:center;justify-content:space-between;width:100%;">
<span class="toc-item-title">HOW TO INSERT AN SD CARD</span>
</a>
</li>
<li class="toc-row">
<a class="toc-item toc-item-anchor"
href="#to-remove-the-sd-card"
data-ga-event="toc_item_click"
data-ga-location="toc"
data-ga-label="TO REMOVE THE SD CARD"
style="text-decoration:none;display:flex;align-items:center;justify-content:space-between;width:100%;">
<span class="toc-item-title">TO REMOVE THE SD CARD</span>
</a>
</li>
<li class="toc-row">
<a class="toc-item toc-item-anchor"
href="#selecting-the-media"
data-ga-event="toc_item_click"
data-ga-location="toc"
data-ga-label="SELECTING THE MEDIA"
style="text-decoration:none;display:flex;align-items:center;justify-content:space-between;width:100%;">
<span class="toc-item-title">SELECTING THE MEDIA</span>
</a>
</li>
<li class="toc-row">
<a class="toc-item toc-item-anchor"
href="#16-en"
data-ga-event="toc_item_click"
data-ga-location="toc"
data-ga-label="16 EN"
style="text-decoration:none;display:flex;align-items:center;justify-content:space-between;width:100%;">
<span class="toc-item-title">16 EN</span>
</a>
</li>
<li class="toc-row">
<a class="toc-item toc-item-anchor"
href="#basic-playback"
data-ga-event="toc_item_click"
data-ga-location="toc"
data-ga-label="BASIC PLAYBACK"
style="text-decoration:none;display:flex;align-items:center;justify-content:space-between;width:100%;">
<span class="toc-item-title">BASIC PLAYBACK</span>
</a>
</li>
<li class="toc-row">
<a class="toc-item toc-item-anchor"
href="#resume-on-stop-mode"
data-ga-event="toc_item_click"
data-ga-location="toc"
data-ga-label="RESUME-ON-STOP MODE"
style="text-decoration:none;display:flex;align-items:center;justify-content:space-between;width:100%;">
<span class="toc-item-title">RESUME-ON-STOP MODE</span>
</a>
</li>
<li class="toc-row">
<a class="toc-item toc-item-anchor"
href="#using-the-title-disc-pop-up-menu"
data-ga-event="toc_item_click"
data-ga-location="toc"
data-ga-label="USING THE TITLE / DISC / POP-UP MENU"
style="text-decoration:none;display:flex;align-items:center;justify-content:space-between;width:100%;">
<span class="toc-item-title">USING THE TITLE / DISC / POP-UP MENU</span>
</a>
</li>
<li class="toc-row">
<a class="toc-item toc-item-anchor"
href="#title-menu-bd-video-dvd-video-avchd"
data-ga-event="toc_item_click"
data-ga-location="toc"
data-ga-label="TITLE MENU (BD-VIDEO / DVD-VIDEO / AVCHD)"
style="text-decoration:none;display:flex;align-items:center;justify-content:space-between;width:100%;">
<span class="toc-item-title">TITLE MENU (BD-VIDEO / DVD-VIDEO / AVCHD)</span>
</a>
</li>
<li class="toc-row">
<a class="toc-item toc-item-anchor"
href="#reading-an-sd-card"
data-ga-event="toc_item_click"
data-ga-location="toc"
data-ga-label="READING AN SD CARD"
style="text-decoration:none;display:flex;align-items:center;justify-content:space-between;width:100%;">
<span class="toc-item-title">READING AN SD CARD</span>
</a>
</li>
<li class="toc-row">
<a class="toc-item toc-item-anchor"
href="#avchd-mp3-wma-jpeg"
data-ga-event="toc_item_click"
data-ga-location="toc"
data-ga-label="AVCHD MP3 WMA JPEG"
style="text-decoration:none;display:flex;align-items:center;justify-content:space-between;width:100%;">
<span class="toc-item-title">AVCHD MP3 WMA JPEG</span>
</a>
</li>
<li class="toc-row">
<a class="toc-item toc-item-anchor"
href="#kodak-picture-cd"
data-ga-event="toc_item_click"
data-ga-location="toc"
data-ga-label="KODAK PICTURE CD"
style="text-decoration:none;display:flex;align-items:center;justify-content:space-between;width:100%;">
<span class="toc-item-title">KODAK PICTURE CD</span>
</a>
</li>
<li class="toc-row">
<a class="toc-item toc-item-anchor"
href="#18-en"
data-ga-event="toc_item_click"
data-ga-location="toc"
data-ga-label="18 EN"
style="text-decoration:none;display:flex;align-items:center;justify-content:space-between;width:100%;">
<span class="toc-item-title">18 EN</span>
</a>
</li>
<li class="toc-row">
<a class="toc-item toc-item-anchor"
href="#2-use-to-select-a-desired-file-to-be-played-back-then-press-play-or-enter"
data-ga-event="toc_item_click"
data-ga-location="toc"
data-ga-label="2 USE [▲ /▼ / ◀/▶] TO SELECT A DESIRED FILE TO BE PLAYED BACK, THEN PRESS [PLAY▶] OR [ENTER]"
style="text-decoration:none;display:flex;align-items:center;justify-content:space-between;width:100%;">
<span class="toc-item-title">2 USE [▲ /▼ / ◀/▶] TO SELECT A DESIRED FILE TO BE PLAYED BACK, THEN PRESS [PLAY▶] OR [ENTER]</span>
</a>
</li>
<li class="toc-row">
<a class="toc-item toc-item-anchor"
href="#tips-for-jpeg-kodak-picture-cd-playback"
data-ga-event="toc_item_click"
data-ga-location="toc"
data-ga-label="TIPS FOR JPEG / KODAK PICTURE CD PLAYBACK"
style="text-decoration:none;display:flex;align-items:center;justify-content:space-between;width:100%;">
<span class="toc-item-title">TIPS FOR JPEG / KODAK PICTURE CD PLAYBACK</span>
</a>
</li>
<li class="toc-row">
<a class="toc-item toc-item-anchor"
href="#playing-back-a-divx-with-divx-external-subtitle"
data-ga-event="toc_item_click"
data-ga-location="toc"
data-ga-label="PLAYING BACK A DIVX® WITH DIVX® EXTERNAL SUBTITLE"
style="text-decoration:none;display:flex;align-items:center;justify-content:space-between;width:100%;">
<span class="toc-item-title">PLAYING BACK A DIVX® WITH DIVX® EXTERNAL SUBTITLE</span>
</a>
</li>
<li class="toc-row">
<a class="toc-item toc-item-anchor"
href="#special-playback"
data-ga-event="toc_item_click"
data-ga-location="toc"
data-ga-label="SPECIAL PLAYBACK"
style="text-decoration:none;display:flex;align-items:center;justify-content:space-between;width:100%;">
<span class="toc-item-title">SPECIAL PLAYBACK</span>
</a>
</li>
<li class="toc-row">
<a class="toc-item toc-item-anchor"
href="#about-divx-and-divx-vod"
data-ga-event="toc_item_click"
data-ga-location="toc"
data-ga-label="ABOUT DIVX® AND DIVX® VOD"
style="text-decoration:none;display:flex;align-items:center;justify-content:space-between;width:100%;">
<span class="toc-item-title">ABOUT DIVX® AND DIVX® VOD</span>
</a>
</li>
<li class="toc-row">
<a class="toc-item toc-item-anchor"
href="#possible-errors"
data-ga-event="toc_item_click"
data-ga-location="toc"
data-ga-label="POSSIBLE ERRORS"
style="text-decoration:none;display:flex;align-items:center;justify-content:space-between;width:100%;">
<span class="toc-item-title">POSSIBLE ERRORS</span>
</a>
</li>
<li class="toc-row">
<a class="toc-item toc-item-anchor"
href="#step-by-step-playback"
data-ga-event="toc_item_click"
data-ga-location="toc"
data-ga-label="STEP BY STEP PLAYBACK"
style="text-decoration:none;display:flex;align-items:center;justify-content:space-between;width:100%;">
<span class="toc-item-title">STEP BY STEP PLAYBACK</span>
</a>
</li>
<li class="toc-row">
<a class="toc-item toc-item-anchor"
href="#fast-forward-fast-reverse"
data-ga-event="toc_item_click"
data-ga-location="toc"
data-ga-label="FAST FORWARD / FAST REVERSE"
style="text-decoration:none;display:flex;align-items:center;justify-content:space-between;width:100%;">
<span class="toc-item-title">FAST FORWARD / FAST REVERSE</span>
</a>
</li>
<li class="toc-row">
<a class="toc-item toc-item-anchor"
href="#slow-motion-playback"
data-ga-event="toc_item_click"
data-ga-location="toc"
data-ga-label="SLOW MOTION PLAYBACK"
style="text-decoration:none;display:flex;align-items:center;justify-content:space-between;width:100%;">
<span class="toc-item-title">SLOW MOTION PLAYBACK</span>
</a>
</li>
<li class="toc-row">
<a class="toc-item toc-item-anchor"
href="#repeat-playback"
data-ga-event="toc_item_click"
data-ga-location="toc"
data-ga-label="REPEAT PLAYBACK"
style="text-decoration:none;display:flex;align-items:center;justify-content:space-between;width:100%;">
<span class="toc-item-title">REPEAT PLAYBACK</span>
</a>
</li>
<li class="toc-row">
<a class="toc-item toc-item-anchor"
href="#a-b-repeat"
data-ga-event="toc_item_click"
data-ga-location="toc"
data-ga-label="A-B REPEAT"
style="text-decoration:none;display:flex;align-items:center;justify-content:space-between;width:100%;">
<span class="toc-item-title">A-B REPEAT</span>
</a>
</li>
<li class="toc-row">
<a class="toc-item toc-item-anchor"
href="#programme-playback"
data-ga-event="toc_item_click"
data-ga-location="toc"
data-ga-label="PROGRAMME PLAYBACK"
style="text-decoration:none;display:flex;align-items:center;justify-content:space-between;width:100%;">
<span class="toc-item-title">PROGRAMME PLAYBACK</span>
</a>
</li>
<li class="toc-row">
<a class="toc-item toc-item-anchor"
href="#en"
data-ga-event="toc_item_click"
data-ga-location="toc"
data-ga-label="EN"
style="text-decoration:none;display:flex;align-items:center;justify-content:space-between;width:100%;">
<span class="toc-item-title">EN</span>
</a>
</li>
<li class="toc-row">
<a class="toc-item toc-item-anchor"
href="#random-playback"
data-ga-event="toc_item_click"
data-ga-location="toc"
data-ga-label="RANDOM PLAYBACK"
style="text-decoration:none;display:flex;align-items:center;justify-content:space-between;width:100%;">
<span class="toc-item-title">RANDOM PLAYBACK</span>
</a>
</li>
<li class="toc-row">
<a class="toc-item toc-item-anchor"
href="#1-in-stop-mode-press-mode-twice"
data-ga-event="toc_item_click"
data-ga-location="toc"
data-ga-label="1 IN STOP MODE, PRESS [MODE] TWICE"
style="text-decoration:none;display:flex;align-items:center;justify-content:space-between;width:100%;">
<span class="toc-item-title">1 IN STOP MODE, PRESS [MODE] TWICE</span>
</a>
</li>
<li class="toc-row">
<a class="toc-item toc-item-anchor"
href="#1-audio-cd"
data-ga-event="toc_item_click"
data-ga-location="toc"
data-ga-label="AUDIO CD"
style="text-decoration:none;display:flex;align-items:center;justify-content:space-between;width:100%;">
<span class="toc-item-title">AUDIO CD</span>
</a>
</li>
<li class="toc-row">
<a class="toc-item toc-item-anchor"
href="#3-track-file-list"
data-ga-event="toc_item_click"
data-ga-location="toc"
data-ga-label="TRACK / FILE LIST"
style="text-decoration:none;display:flex;align-items:center;justify-content:space-between;width:100%;">
<span class="toc-item-title">TRACK / FILE LIST</span>
</a>
</li>
<li class="toc-row">
<a class="toc-item toc-item-anchor"
href="#4-operation-guide"
data-ga-event="toc_item_click"
data-ga-location="toc"
data-ga-label="OPERATION GUIDE"
style="text-decoration:none;display:flex;align-items:center;justify-content:space-between;width:100%;">
<span class="toc-item-title">OPERATION GUIDE</span>
</a>
</li>
<li class="toc-row">
<a class="toc-item toc-item-anchor"
href="#5-total-playback-time-of-all-tracks-audio-cd-only"
data-ga-event="toc_item_click"
data-ga-location="toc"
data-ga-label="TOTAL PLAYBACK TIME OF ALL TRACKS (AUDIO CD ONLY)"
style="text-decoration:none;display:flex;align-items:center;justify-content:space-between;width:100%;">
<span class="toc-item-title">TOTAL PLAYBACK TIME OF ALL TRACKS (AUDIO CD ONLY)</span>
</a>
</li>
<li class="toc-row">
<a class="toc-item toc-item-anchor"
href="#6-playback-status"
data-ga-event="toc_item_click"
data-ga-location="toc"
data-ga-label="PLAYBACK STATUS"
style="text-decoration:none;display:flex;align-items:center;justify-content:space-between;width:100%;">
<span class="toc-item-title">PLAYBACK STATUS</span>
</a>
</li>
<li class="toc-row">
<a class="toc-item toc-item-anchor"
href="#2-press-play-to-start-random-playback"
data-ga-event="toc_item_click"
data-ga-location="toc"
data-ga-label="2 PRESS [PLAY▶] TO START RANDOM PLAYBACK"
style="text-decoration:none;display:flex;align-items:center;justify-content:space-between;width:100%;">
<span class="toc-item-title">2 PRESS [PLAY▶] TO START RANDOM PLAYBACK</span>
</a>
</li>
<li class="toc-row">
<a class="toc-item toc-item-anchor"
href="#1-during-playback-press-mode-repeatedly-until-appears"
data-ga-event="toc_item_click"
data-ga-location="toc"
data-ga-label="1 DURING PLAYBACK, PRESS [MODE] REPEATEDLY UNTIL APPEARS"
style="text-decoration:none;display:flex;align-items:center;justify-content:space-between;width:100%;">
<span class="toc-item-title">1 DURING PLAYBACK, PRESS [MODE] REPEATEDLY UNTIL APPEARS</span>
</a>
</li>
<li class="toc-row">
<a class="toc-item toc-item-anchor"
href="#2-press-enter-or-to-change-the-setting"
data-ga-event="toc_item_click"
data-ga-location="toc"
data-ga-label="2 PRESS [ENTER] OR [◀/▶] TO CHANGE THE SETTING"
style="text-decoration:none;display:flex;align-items:center;justify-content:space-between;width:100%;">
<span class="toc-item-title">2 PRESS [ENTER] OR [◀/▶] TO CHANGE THE SETTING</span>
</a>
</li>
<li class="toc-row">
<a class="toc-item toc-item-anchor"
href="#3-press-play-to-return-to-normal-playback"
data-ga-event="toc_item_click"
data-ga-location="toc"
data-ga-label="3 PRESS [PLAY▶] TO RETURN TO NORMAL PLAYBACK"
style="text-decoration:none;display:flex;align-items:center;justify-content:space-between;width:100%;">
<span class="toc-item-title">3 PRESS [PLAY▶] TO RETURN TO NORMAL PLAYBACK</span>
</a>
</li>
<li class="toc-row">
<a class="toc-item toc-item-anchor"
href="#useful-function"
data-ga-event="toc_item_click"
data-ga-location="toc"
data-ga-label="USEFUL FUNCTION"
style="text-decoration:none;display:flex;align-items:center;justify-content:space-between;width:100%;">
<span class="toc-item-title">USEFUL FUNCTION</span>
</a>
</li>
<li class="toc-row">
<a class="toc-item toc-item-anchor"
href="#noise-reduction"
data-ga-event="toc_item_click"
data-ga-location="toc"
data-ga-label="NOISE REDUCTION"
style="text-decoration:none;display:flex;align-items:center;justify-content:space-between;width:100%;">
<span class="toc-item-title">NOISE REDUCTION</span>
</a>
</li>
<li class="toc-row">
<a class="toc-item toc-item-anchor"
href="#2-use-to-change-the-setting"
data-ga-event="toc_item_click"
data-ga-location="toc"
data-ga-label="2 USE [◀/▶] TO CHANGE THE SETTING"
style="text-decoration:none;display:flex;align-items:center;justify-content:space-between;width:100%;">
<span class="toc-item-title">2 USE [◀/▶] TO CHANGE THE SETTING</span>
</a>
</li>
<li class="toc-row">
<a class="toc-item toc-item-anchor"
href="#3-press-return-to-exit"
data-ga-event="toc_item_click"
data-ga-location="toc"
data-ga-label="3 PRESS [RETURN] TO EXIT"
style="text-decoration:none;display:flex;align-items:center;justify-content:space-between;width:100%;">
<span class="toc-item-title">3 PRESS [RETURN] TO EXIT</span>
</a>
</li>
<li class="toc-row">
<a class="toc-item toc-item-anchor"
href="#22-en"
data-ga-event="toc_item_click"
data-ga-location="toc"
data-ga-label="22 EN"
style="text-decoration:none;display:flex;align-items:center;justify-content:space-between;width:100%;">
<span class="toc-item-title">22 EN</span>
</a>
</li>
<li class="toc-row">
<a class="toc-item toc-item-anchor"
href="#virtual-surround"
data-ga-event="toc_item_click"
data-ga-location="toc"
data-ga-label="VIRTUAL SURROUND"
style="text-decoration:none;display:flex;align-items:center;justify-content:space-between;width:100%;">
<span class="toc-item-title">VIRTUAL SURROUND</span>
</a>
</li>
<li class="toc-row">
<a class="toc-item toc-item-anchor"
href="#pip-bonusview-setting"
data-ga-event="toc_item_click"
data-ga-location="toc"
data-ga-label="PIP (BONUSVIEW) SETTING"
style="text-decoration:none;display:flex;align-items:center;justify-content:space-between;width:100%;">
<span class="toc-item-title">PIP (BONUSVIEW) SETTING</span>
</a>
</li>
<li class="toc-row">
<a class="toc-item toc-item-anchor"
href="#camera-angle"
data-ga-event="toc_item_click"
data-ga-location="toc"
data-ga-label="CAMERA ANGLE"
style="text-decoration:none;display:flex;align-items:center;justify-content:space-between;width:100%;">
<span class="toc-item-title">CAMERA ANGLE</span>
</a>
</li>
<li class="toc-row">
<a class="toc-item toc-item-anchor"
href="#enjoying-bd-live-discs-with-online-content"
data-ga-event="toc_item_click"
data-ga-location="toc"
data-ga-label="ENJOYING BD-LIVE DISCS WITH ONLINE CONTENT"
style="text-decoration:none;display:flex;align-items:center;justify-content:space-between;width:100%;">
<span class="toc-item-title">ENJOYING BD-LIVE DISCS WITH ONLINE CONTENT</span>
</a>
</li>
<li class="toc-row">
<a class="toc-item toc-item-anchor"
href="#note-for-aacs-online"
data-ga-event="toc_item_click"
data-ga-location="toc"
data-ga-label="NOTE FOR AACS ONLINE"
style="text-decoration:none;display:flex;align-items:center;justify-content:space-between;width:100%;">
<span class="toc-item-title">NOTE FOR AACS ONLINE</span>
</a>
</li>
<li class="toc-row">
<a class="toc-item toc-item-anchor"
href="#search"
data-ga-event="toc_item_click"
data-ga-location="toc"
data-ga-label="SEARCH"
style="text-decoration:none;display:flex;align-items:center;justify-content:space-between;width:100%;">
<span class="toc-item-title">SEARCH</span>
</a>
</li>
<li class="toc-row">
<a class="toc-item toc-item-anchor"
href="#using-search"
data-ga-event="toc_item_click"
data-ga-location="toc"
data-ga-label="USING [SEARCH]"
style="text-decoration:none;display:flex;align-items:center;justify-content:space-between;width:100%;">
<span class="toc-item-title">USING [SEARCH]</span>
</a>
</li>
<li class="toc-row">
<a class="toc-item toc-item-anchor"
href="#using-number-buttons-direct-search"
data-ga-event="toc_item_click"
data-ga-location="toc"
data-ga-label="USING [NUMBER BUTTONS] (DIRECT SEARCH)"
style="text-decoration:none;display:flex;align-items:center;justify-content:space-between;width:100%;">
<span class="toc-item-title">USING [NUMBER BUTTONS] (DIRECT SEARCH)</span>
</a>
</li>
<li class="toc-row">
<a class="toc-item toc-item-anchor"
href="#title-search"
data-ga-event="toc_item_click"
data-ga-location="toc"
data-ga-label="TITLE SEARCH"
style="text-decoration:none;display:flex;align-items:center;justify-content:space-between;width:100%;">
<span class="toc-item-title">TITLE SEARCH</span>
</a>
</li>
<li class="toc-row">
<a class="toc-item toc-item-anchor"
href="#chapter-search"
data-ga-event="toc_item_click"
data-ga-location="toc"
data-ga-label="CHAPTER SEARCH"
style="text-decoration:none;display:flex;align-items:center;justify-content:space-between;width:100%;">
<span class="toc-item-title">CHAPTER SEARCH</span>
</a>
</li>
<li class="toc-row">
<a class="toc-item toc-item-anchor"
href="#track-file-search"
data-ga-event="toc_item_click"
data-ga-location="toc"
data-ga-label="TRACK / FILE SEARCH"
style="text-decoration:none;display:flex;align-items:center;justify-content:space-between;width:100%;">
<span class="toc-item-title">TRACK / FILE SEARCH</span>
</a>
</li>
<li class="toc-row">
<a class="toc-item toc-item-anchor"
href="#switching-subtitles"
data-ga-event="toc_item_click"
data-ga-location="toc"
data-ga-label="SWITCHING SUBTITLES"
style="text-decoration:none;display:flex;align-items:center;justify-content:space-between;width:100%;">
<span class="toc-item-title">SWITCHING SUBTITLES</span>
</a>
</li>
<li class="toc-row">
<a class="toc-item toc-item-anchor"
href="#bd-video"
data-ga-event="toc_item_click"
data-ga-location="toc"
data-ga-label="BD VIDEO"
style="text-decoration:none;display:flex;align-items:center;justify-content:space-between;width:100%;">
<span class="toc-item-title">BD VIDEO</span>
</a>
</li>
<li class="toc-row">
<a class="toc-item toc-item-anchor"
href="#dvd-video-avchd-divx"
data-ga-event="toc_item_click"
data-ga-location="toc"
data-ga-label="DVD VIDEO AVCHD DIVX®"
style="text-decoration:none;display:flex;align-items:center;justify-content:space-between;width:100%;">
<span class="toc-item-title">DVD VIDEO AVCHD DIVX®</span>
</a>
</li>
<li class="toc-row">
<a class="toc-item toc-item-anchor"
href="#1-4"
data-ga-event="toc_item_click"
data-ga-location="toc"
data-ga-label="1 /4"
style="text-decoration:none;display:flex;align-items:center;justify-content:space-between;width:100%;">
<span class="toc-item-title">1 /4</span>
</a>
</li>
<li class="toc-row">
<a class="toc-item toc-item-anchor"
href="#switching-audio-soundtrack"
data-ga-event="toc_item_click"
data-ga-location="toc"
data-ga-label="SWITCHING AUDIO SOUNDTRACK"
style="text-decoration:none;display:flex;align-items:center;justify-content:space-between;width:100%;">
<span class="toc-item-title">SWITCHING AUDIO SOUNDTRACK</span>
</a>
</li>
<li class="toc-row">
<a class="toc-item toc-item-anchor"
href="#dvd-video-cd-avchd-divx"
data-ga-event="toc_item_click"
data-ga-location="toc"
data-ga-label="DVD VIDEO CD AVCHD DIVX"
style="text-decoration:none;display:flex;align-items:center;justify-content:space-between;width:100%;">
<span class="toc-item-title">DVD VIDEO CD AVCHD DIVX</span>
</a>
</li>
<li class="toc-row">
<a class="toc-item toc-item-anchor"
href="#1-eng-dolby-d-321ch-48k-3"
data-ga-event="toc_item_click"
data-ga-location="toc"
data-ga-label="1 ENG DOLBY D 3/2.1CH 48K / 3"
style="text-decoration:none;display:flex;align-items:center;justify-content:space-between;width:100%;">
<span class="toc-item-title">1 ENG DOLBY D 3/2.1CH 48K / 3</span>
</a>
</li>
<li class="toc-row">
<a class="toc-item toc-item-anchor"
href="#setting-the-bd-audio-mode"
data-ga-event="toc_item_click"
data-ga-location="toc"
data-ga-label="SETTING THE BD AUDIO MODE"
style="text-decoration:none;display:flex;align-items:center;justify-content:space-between;width:100%;">
<span class="toc-item-title">SETTING THE BD AUDIO MODE</span>
</a>
</li>
<li class="toc-row">
<a class="toc-item toc-item-anchor"
href="#1-quick-menu"
data-ga-event="toc_item_click"
data-ga-location="toc"
data-ga-label="QUICK MENU"
style="text-decoration:none;display:flex;align-items:center;justify-content:space-between;width:100%;">
<span class="toc-item-title">QUICK MENU</span>
</a>
</li>
<li class="toc-row">
<a class="toc-item toc-item-anchor"
href="#2-custom-menu"
data-ga-event="toc_item_click"
data-ga-location="toc"
data-ga-label="CUSTOM MENU"
style="text-decoration:none;display:flex;align-items:center;justify-content:space-between;width:100%;">
<span class="toc-item-title">CUSTOM MENU</span>
</a>
</li>
<li class="toc-row">
<a class="toc-item toc-item-anchor"
href="#3-initialise-menu"
data-ga-event="toc_item_click"
data-ga-location="toc"
data-ga-label="INITIALISE MENU"
style="text-decoration:none;display:flex;align-items:center;justify-content:space-between;width:100%;">
<span class="toc-item-title">INITIALISE MENU</span>
</a>
</li>
<li class="toc-row">
<a class="toc-item toc-item-anchor"
href="#4-menu-window"
data-ga-event="toc_item_click"
data-ga-location="toc"
data-ga-label="MENU WINDOW"
style="text-decoration:none;display:flex;align-items:center;justify-content:space-between;width:100%;">
<span class="toc-item-title">MENU WINDOW</span>
</a>
</li>
<li class="toc-row">
<a class="toc-item toc-item-anchor"
href="#how-to-navigate-through-the-setup-menus"
data-ga-event="toc_item_click"
data-ga-location="toc"
data-ga-label="HOW TO NAVIGATE THROUGH THE SETUP MENUS"
style="text-decoration:none;display:flex;align-items:center;justify-content:space-between;width:100%;">
<span class="toc-item-title">HOW TO NAVIGATE THROUGH THE SETUP MENUS</span>
</a>
</li>
<li class="toc-row">
<a class="toc-item toc-item-anchor"
href="#list-of-setup-menus"
data-ga-event="toc_item_click"
data-ga-location="toc"
data-ga-label="LIST OF SETUP MENUS"
style="text-decoration:none;display:flex;align-items:center;justify-content:space-between;width:100%;">
<span class="toc-item-title">LIST OF SETUP MENUS</span>
</a>
</li>
<li class="toc-row">
<a class="toc-item toc-item-anchor"
href="#tv-aspect"
data-ga-event="toc_item_click"
data-ga-location="toc"
data-ga-label="TV ASPECT"
style="text-decoration:none;display:flex;align-items:center;justify-content:space-between;width:100%;">
<span class="toc-item-title">TV ASPECT</span>
</a>
</li>
<li class="toc-row">
<a class="toc-item toc-item-anchor"
href="#note-for-hdmi-video-resolution-and-component-output"
data-ga-event="toc_item_click"
data-ga-location="toc"
data-ga-label="NOTE FOR "HDMI VIDEO RESOLUTION" AND "COMPONENT OUTPUT"
style="text-decoration:none;display:flex;align-items:center;justify-content:space-between;width:100%;">
<span class="toc-item-title">NOTE FOR "HDMI VIDEO RESOLUTION" AND "COMPONENT OUTPUT</span>
</a>
</li>
<li class="toc-row">
<a class="toc-item toc-item-anchor"
href="#digital-out"
data-ga-event="toc_item_click"
data-ga-location="toc"
data-ga-label="DIGITAL OUT"
style="text-decoration:none;display:flex;align-items:center;justify-content:space-between;width:100%;">
<span class="toc-item-title">DIGITAL OUT</span>
</a>
</li>
<li class="toc-row">
<a class="toc-item toc-item-anchor"
href="#parental"
data-ga-event="toc_item_click"
data-ga-location="toc"
data-ga-label="PARENTAL"
style="text-decoration:none;display:flex;align-items:center;justify-content:space-between;width:100%;">
<span class="toc-item-title">PARENTAL</span>
</a>
</li>
<li class="toc-row">
<a class="toc-item toc-item-anchor"
href="#1-with-selected-press-enter"
data-ga-event="toc_item_click"
data-ga-location="toc"
data-ga-label="WITH "SELECTED PRESS [ENTER]"
style="text-decoration:none;display:flex;align-items:center;justify-content:space-between;width:100%;">
<span class="toc-item-title">WITH "SELECTED PRESS [ENTER]</span>
</a>
</li>
<li class="toc-row">
<a class="toc-item toc-item-anchor"
href="#to-cancel-parental-lock-temporarily"
data-ga-event="toc_item_click"
data-ga-location="toc"
data-ga-label="TO CANCEL PARENTAL LOCK TEMPORARILY"
style="text-decoration:none;display:flex;align-items:center;justify-content:space-between;width:100%;">
<span class="toc-item-title">TO CANCEL PARENTAL LOCK TEMPORARILY</span>
</a>
</li>
<li class="toc-row">
<a class="toc-item toc-item-anchor"
href="#hdmi-cec-regza-link"
data-ga-event="toc_item_click"
data-ga-location="toc"
data-ga-label="HDMI CEC (REGZA - LINK)"
style="text-decoration:none;display:flex;align-items:center;justify-content:space-between;width:100%;">
<span class="toc-item-title">HDMI CEC (REGZA - LINK)</span>
</a>
</li>
<li class="toc-row">
<a class="toc-item toc-item-anchor"
href="#one-touch-play"
data-ga-event="toc_item_click"
data-ga-location="toc"
data-ga-label="ONE TOUCH PLAY"
style="text-decoration:none;display:flex;align-items:center;justify-content:space-between;width:100%;">
<span class="toc-item-title">ONE TOUCH PLAY</span>
</a>
</li>
<li class="toc-row">
<a class="toc-item toc-item-anchor"
href="#buttons-for-one-touch-play"
data-ga-event="toc_item_click"
data-ga-location="toc"
data-ga-label="BUTTONS FOR ONE TOUCH PLAY"
style="text-decoration:none;display:flex;align-items:center;justify-content:space-between;width:100%;">
<span class="toc-item-title">BUTTONS FOR ONE TOUCH PLAY</span>
</a>
</li>
<li class="toc-row">
<a class="toc-item toc-item-anchor"
href="#standby"
data-ga-event="toc_item_click"
data-ga-location="toc"
data-ga-label="STANDBY"
style="text-decoration:none;display:flex;align-items:center;justify-content:space-between;width:100%;">
<span class="toc-item-title">STANDBY</span>
</a>
</li>
<li class="toc-row">
<a class="toc-item toc-item-anchor"
href="#system-information"
data-ga-event="toc_item_click"
data-ga-location="toc"
data-ga-label="SYSTEM INFORMATION"
style="text-decoration:none;display:flex;align-items:center;justify-content:space-between;width:100%;">
<span class="toc-item-title">SYSTEM INFORMATION</span>
</a>
</li>
<li class="toc-row">
<a class="toc-item toc-item-anchor"
href="#get-set-menu-language"
data-ga-event="toc_item_click"
data-ga-location="toc"
data-ga-label="GET & SET MENU LANGUAGE"
style="text-decoration:none;display:flex;align-items:center;justify-content:space-between;width:100%;">
<span class="toc-item-title">GET & SET MENU LANGUAGE</span>
</a>
</li>
<li class="toc-row">
<a class="toc-item toc-item-anchor"
href="#receiving-operational-signal-from-tvs-remote-control"
data-ga-event="toc_item_click"
data-ga-location="toc"
data-ga-label="RECEIVING OPERATIONAL SIGNAL FROM TV'S REMOTE CONTROL"
style="text-decoration:none;display:flex;align-items:center;justify-content:space-between;width:100%;">
<span class="toc-item-title">RECEIVING OPERATIONAL SIGNAL FROM TV'S REMOTE CONTROL</span>
</a>
</li>
<li class="toc-row">
<a class="toc-item toc-item-anchor"
href="#network-connection"
data-ga-event="toc_item_click"
data-ga-location="toc"
data-ga-label="NETWORK CONNECTION"
style="text-decoration:none;display:flex;align-items:center;justify-content:space-between;width:100%;">
<span class="toc-item-title">NETWORK CONNECTION</span>
</a>
</li>
<li class="toc-row">
<a class="toc-item toc-item-anchor"
href="#connection-test"
data-ga-event="toc_item_click"
data-ga-location="toc"
data-ga-label="CONNECTION TEST"
style="text-decoration:none;display:flex;align-items:center;justify-content:space-between;width:100%;">
<span class="toc-item-title">CONNECTION TEST</span>
</a>
</li>
<li class="toc-row">
<a class="toc-item toc-item-anchor"
href="#enableeasy"
data-ga-event="toc_item_click"
data-ga-location="toc"
data-ga-label="ENABLE(EASY)"
style="text-decoration:none;display:flex;align-items:center;justify-content:space-between;width:100%;">
<span class="toc-item-title">ENABLE(EASY)</span>
</a>
</li>
<li class="toc-row">
<a class="toc-item toc-item-anchor"
href="#enablecustom"
data-ga-event="toc_item_click"
data-ga-location="toc"
data-ga-label="ENABLE(CUSTOM)"
style="text-decoration:none;display:flex;align-items:center;justify-content:space-between;width:100%;">
<span class="toc-item-title">ENABLE(CUSTOM)</span>
</a>
</li>
<li class="toc-row">
<a class="toc-item toc-item-anchor"
href="#ip-address-setting-dns-setting"
data-ga-event="toc_item_click"
data-ga-location="toc"
data-ga-label="IP ADDRESS SETTING / DNS SETTING"
style="text-decoration:none;display:flex;align-items:center;justify-content:space-between;width:100%;">
<span class="toc-item-title">IP ADDRESS SETTING / DNS SETTING</span>
</a>
</li>
<li class="toc-row">
<a class="toc-item toc-item-anchor"
href="#if-you-select-manual-follow-the-following-instruction-to-set-the-ip-address-and-dns"
data-ga-event="toc_item_click"
data-ga-location="toc"
data-ga-label="IF YOU SELECT "MANUAL", FOLLOW THE FOLLOWING INSTRUCTION TO SET THE IP ADDRESS AND DNS"
style="text-decoration:none;display:flex;align-items:center;justify-content:space-between;width:100%;">
<span class="toc-item-title">IF YOU SELECT "MANUAL", FOLLOW THE FOLLOWING INSTRUCTION TO SET THE IP ADDRESS AND DNS</span>
</a>
</li>
<li class="toc-row">
<a class="toc-item toc-item-anchor"
href="#4-press-return-to-go-back-to-the-previous-screen-or-press-setup-to-exit"
data-ga-event="toc_item_click"
data-ga-location="toc"
data-ga-label="4 PRESS [RETURN] TO GO BACK TO THE PREVIOUS SCREEN, OR PRESS [SETUP] TO EXIT"
style="text-decoration:none;display:flex;align-items:center;justify-content:space-between;width:100%;">
<span class="toc-item-title">4 PRESS [RETURN] TO GO BACK TO THE PREVIOUS SCREEN, OR PRESS [SETUP] TO EXIT</span>
</a>
</li>
<li class="toc-row">
<a class="toc-item toc-item-anchor"
href="#proxy-setting"
data-ga-event="toc_item_click"
data-ga-location="toc"
data-ga-label="PROXY SETTING"
style="text-decoration:none;display:flex;align-items:center;justify-content:space-between;width:100%;">
<span class="toc-item-title">PROXY SETTING</span>
</a>
</li>
<li class="toc-row">
<a class="toc-item toc-item-anchor"
href="#if-you-select-use-follow-the-following-instructions-to-set-the-proxy-address-and-proxy-port"
data-ga-event="toc_item_click"
data-ga-location="toc"
data-ga-label="IF YOU SELECT "USE", FOLLOW THE FOLLOWING INSTRUCTIONS TO SET THE PROXY ADDRESS AND PROXY PORT"
style="text-decoration:none;display:flex;align-items:center;justify-content:space-between;width:100%;">
<span class="toc-item-title">IF YOU SELECT "USE", FOLLOW THE FOLLOWING INSTRUCTIONS TO SET THE PROXY ADDRESS AND PROXY PORT</span>
</a>
</li>
<li class="toc-row">
<a class="toc-item toc-item-anchor"
href="#connection-speed"
data-ga-event="toc_item_click"
data-ga-location="toc"
data-ga-label="CONNECTION SPEED"
style="text-decoration:none;display:flex;align-items:center;justify-content:space-between;width:100%;">
<span class="toc-item-title">CONNECTION SPEED</span>
</a>
</li>
<li class="toc-row">
<a class="toc-item toc-item-anchor"
href="#bd-live-setting"
data-ga-event="toc_item_click"
data-ga-location="toc"
data-ga-label="BD-LIVE SETTING"
style="text-decoration:none;display:flex;align-items:center;justify-content:space-between;width:100%;">
<span class="toc-item-title">BD-LIVE SETTING</span>
</a>
</li>
<li class="toc-row">
<a class="toc-item toc-item-anchor"
href="#5-press-return-to-go-back-to-the-previous-screen-or-press-setup-to-exit"
data-ga-event="toc_item_click"
data-ga-location="toc"
data-ga-label="5 PRESS [RETURN] TO GO BACK TO THE PREVIOUS SCREEN, OR PRESS [SETUP] TO EXIT"
style="text-decoration:none;display:flex;align-items:center;justify-content:space-between;width:100%;">
<span class="toc-item-title">5 PRESS [RETURN] TO GO BACK TO THE PREVIOUS SCREEN, OR PRESS [SETUP] TO EXIT</span>
</a>
</li>
<li class="toc-row">
<a class="toc-item toc-item-anchor"
href="#disable"
data-ga-event="toc_item_click"
data-ga-location="toc"
data-ga-label="DISABLE"
style="text-decoration:none;display:flex;align-items:center;justify-content:space-between;width:100%;">
<span class="toc-item-title">DISABLE</span>
</a>
</li>
<li class="toc-row">
<a class="toc-item toc-item-anchor"
href="#software-update"
data-ga-event="toc_item_click"
data-ga-location="toc"
data-ga-label="SOFTWARE UPDATE"
style="text-decoration:none;display:flex;align-items:center;justify-content:space-between;width:100%;">
<span class="toc-item-title">SOFTWARE UPDATE</span>
</a>
</li>
<li class="toc-row">
<a class="toc-item toc-item-anchor"
href="#current-version"
data-ga-event="toc_item_click"
data-ga-location="toc"
data-ga-label="CURRENT VERSION"
style="text-decoration:none;display:flex;align-items:center;justify-content:space-between;width:100%;">
<span class="toc-item-title">CURRENT VERSION</span>
</a>
</li>
<li class="toc-row">
<a class="toc-item toc-item-anchor"
href="#disc-update"
data-ga-event="toc_item_click"
data-ga-location="toc"
data-ga-label="DISC UPDATE"
style="text-decoration:none;display:flex;align-items:center;justify-content:space-between;width:100%;">
<span class="toc-item-title">DISC UPDATE</span>
</a>
</li>
<li class="toc-row">
<a class="toc-item toc-item-anchor"
href="#initialise"
data-ga-event="toc_item_click"
data-ga-location="toc"
data-ga-label="INITIALISE"
style="text-decoration:none;display:flex;align-items:center;justify-content:space-between;width:100%;">
<span class="toc-item-title">INITIALISE</span>
</a>
</li>
<li class="toc-row">
<a class="toc-item toc-item-anchor"
href="#troubleshooting"
data-ga-event="toc_item_click"
data-ga-location="toc"
data-ga-label="TROUBLESHOOTING"
style="text-decoration:none;display:flex;align-items:center;justify-content:space-between;width:100%;">
<span class="toc-item-title">TROUBLESHOOTING</span>
</a>
</li>
<li class="toc-row">
<a class="toc-item toc-item-anchor"
href="#license-information-on-the-software-used-in-this-product"
data-ga-event="toc_item_click"
data-ga-location="toc"
data-ga-label="LICENSE INFORMATION ON THE SOFTWARE USED IN THIS PRODUCT"
style="text-decoration:none;display:flex;align-items:center;justify-content:space-between;width:100%;">
<span class="toc-item-title">LICENSE INFORMATION ON THE SOFTWARE USED IN THIS PRODUCT</span>
</a>
</li>
<li class="toc-row">
<a class="toc-item toc-item-anchor"
href="#exhibit-a"
data-ga-event="toc_item_click"
data-ga-location="toc"
data-ga-label="EXHIBIT A"
style="text-decoration:none;display:flex;align-items:center;justify-content:space-between;width:100%;">
<span class="toc-item-title">EXHIBIT A</span>
</a>
</li>
<li class="toc-row">
<a class="toc-item toc-item-anchor"
href="#gpl"
data-ga-event="toc_item_click"
data-ga-location="toc"
data-ga-label="GPL"
style="text-decoration:none;display:flex;align-items:center;justify-content:space-between;width:100%;">
<span class="toc-item-title">GPL</span>
</a>
</li>
<li class="toc-row">
<a class="toc-item toc-item-anchor"
href="#gnu-general-public-license"
data-ga-event="toc_item_click"
data-ga-location="toc"
data-ga-label="GNU GENERAL PUBLIC LICENSE"
style="text-decoration:none;display:flex;align-items:center;justify-content:space-between;width:100%;">
<span class="toc-item-title">GNU GENERAL PUBLIC LICENSE</span>
</a>
</li>
<li class="toc-row">
<a class="toc-item toc-item-anchor"
href="#preamble"
data-ga-event="toc_item_click"
data-ga-location="toc"
data-ga-label="PREAMBLE"
style="text-decoration:none;display:flex;align-items:center;justify-content:space-between;width:100%;">
<span class="toc-item-title">PREAMBLE</span>
</a>
</li>
<li class="toc-row">
<a class="toc-item toc-item-anchor"
href="#no-warranty"
data-ga-event="toc_item_click"
data-ga-location="toc"
data-ga-label="NO WARRANTY"
style="text-decoration:none;display:flex;align-items:center;justify-content:space-between;width:100%;">
<span class="toc-item-title">NO WARRANTY</span>
</a>
</li>
<li class="toc-row">
<a class="toc-item toc-item-anchor"
href="#end-of-terms-and-conditions"
data-ga-event="toc_item_click"
data-ga-location="toc"
data-ga-label="END OF TERMS AND CONDITIONS"
style="text-decoration:none;display:flex;align-items:center;justify-content:space-between;width:100%;">
<span class="toc-item-title">END OF TERMS AND CONDITIONS</span>
</a>
</li>
<li class="toc-row">
<a class="toc-item toc-item-anchor"
href="#how-to-apply-these-terms-to-your-new-programs"
data-ga-event="toc_item_click"
data-ga-location="toc"
data-ga-label="HOW TO APPLY THESE TERMS TO YOUR NEW PROGRAMS"
style="text-decoration:none;display:flex;align-items:center;justify-content:space-between;width:100%;">
<span class="toc-item-title">HOW TO APPLY THESE TERMS TO YOUR NEW PROGRAMS</span>
</a>
</li>
<li class="toc-row">
<a class="toc-item toc-item-anchor"
href="#exhibit-b"
data-ga-event="toc_item_click"
data-ga-location="toc"
data-ga-label="EXHIBIT B"
style="text-decoration:none;display:flex;align-items:center;justify-content:space-between;width:100%;">
<span class="toc-item-title">EXHIBIT B</span>
</a>
</li>
<li class="toc-row">
<a class="toc-item toc-item-anchor"
href="#lgpl"
data-ga-event="toc_item_click"
data-ga-location="toc"
data-ga-label="LGPL"
style="text-decoration:none;display:flex;align-items:center;justify-content:space-between;width:100%;">
<span class="toc-item-title">LGPL</span>
</a>
</li>
<li class="toc-row">
<a class="toc-item toc-item-anchor"
href="#gnu-lesser-general-public-license"
data-ga-event="toc_item_click"
data-ga-location="toc"
data-ga-label="GNU LESSER GENERAL PUBLIC LICENSE"
style="text-decoration:none;display:flex;align-items:center;justify-content:space-between;width:100%;">
<span class="toc-item-title">GNU LESSER GENERAL PUBLIC LICENSE</span>
</a>
</li>
<li class="toc-row">
<a class="toc-item toc-item-anchor"
href="#version-21-february-1999"
data-ga-event="toc_item_click"
data-ga-location="toc"
data-ga-label="VERSION 2.1, FEBRUARY 1999"
style="text-decoration:none;display:flex;align-items:center;justify-content:space-between;width:100%;">
<span class="toc-item-title">VERSION 2.1, FEBRUARY 1999</span>
</a>
</li>
<li class="toc-row">
<a class="toc-item toc-item-anchor"
href="#terms-and-conditions-for-copying-distribution-and-modification"
data-ga-event="toc_item_click"
data-ga-location="toc"
data-ga-label="TERMS AND CONDITIONS FOR COPYING, DISTRIBUTION AND MODIFICATION"
style="text-decoration:none;display:flex;align-items:center;justify-content:space-between;width:100%;">
<span class="toc-item-title">TERMS AND CONDITIONS FOR COPYING, DISTRIBUTION AND MODIFICATION</span>
</a>
</li>
<li class="toc-row">
<a class="toc-item toc-item-anchor"
href="#end-of-terms-and-conditions-how-to-apply-these-terms-to-your-new-libraries"
data-ga-event="toc_item_click"
data-ga-location="toc"
data-ga-label="END OF TERMS AND CONDITIONS HOW TO APPLY THESE TERMS TO YOUR NEW LIBRARIES"
style="text-decoration:none;display:flex;align-items:center;justify-content:space-between;width:100%;">
<span class="toc-item-title">END OF TERMS AND CONDITIONS HOW TO APPLY THESE TERMS TO YOUR NEW LIBRARIES</span>
</a>
</li>
<li class="toc-row">
<a class="toc-item toc-item-anchor"
href="#exhibit-c-free-type"
data-ga-event="toc_item_click"
data-ga-location="toc"
data-ga-label="EXHIBIT C FREE TYPE"
style="text-decoration:none;display:flex;align-items:center;justify-content:space-between;width:100%;">
<span class="toc-item-title">EXHIBIT C FREE TYPE</span>
</a>
</li>
<li class="toc-row">
<a class="toc-item toc-item-anchor"
href="#the-freetype-project-license"
data-ga-event="toc_item_click"
data-ga-location="toc"
data-ga-label="THE FREETYPE PROJECT LICENSE"
style="text-decoration:none;display:flex;align-items:center;justify-content:space-between;width:100%;">
<span class="toc-item-title">THE FREETYPE PROJECT LICENSE</span>
</a>
</li>
<li class="toc-row">
<a class="toc-item toc-item-anchor"
href="#legal-terms"
data-ga-event="toc_item_click"
data-ga-location="toc"
data-ga-label="LEGAL TERMS"
style="text-decoration:none;display:flex;align-items:center;justify-content:space-between;width:100%;">
<span class="toc-item-title">LEGAL TERMS</span>
</a>
</li>
<li class="toc-row">
<a class="toc-item toc-item-anchor"
href="#0-definitions"
data-ga-event="toc_item_click"
data-ga-location="toc"
data-ga-label="DEFINITIONS"
style="text-decoration:none;display:flex;align-items:center;justify-content:space-between;width:100%;">
<span class="toc-item-title">DEFINITIONS</span>
</a>
</li>
<li class="toc-row">
<a class="toc-item toc-item-anchor"
href="#2-redistribution"
data-ga-event="toc_item_click"
data-ga-location="toc"
data-ga-label="REDISTRIBUTION"
style="text-decoration:none;display:flex;align-items:center;justify-content:space-between;width:100%;">
<span class="toc-item-title">REDISTRIBUTION</span>
</a>
</li>
<li class="toc-row">
<a class="toc-item toc-item-anchor"
href="#3-advertising"
data-ga-event="toc_item_click"
data-ga-location="toc"
data-ga-label="ADVERTISING"
style="text-decoration:none;display:flex;align-items:center;justify-content:space-between;width:100%;">
<span class="toc-item-title">ADVERTISING</span>
</a>
</li>
<li class="toc-row">
<a class="toc-item toc-item-anchor"
href="#4-contacts"
data-ga-event="toc_item_click"
data-ga-location="toc"
data-ga-label="CONTACTS"
style="text-decoration:none;display:flex;align-items:center;justify-content:space-between;width:100%;">
<span class="toc-item-title">CONTACTS</span>
</a>
</li>
<li class="toc-row">
<a class="toc-item toc-item-anchor"
href="#libjpeg"
data-ga-event="toc_item_click"
data-ga-location="toc"
data-ga-label="LIBJPEG"
style="text-decoration:none;display:flex;align-items:center;justify-content:space-between;width:100%;">
<span class="toc-item-title">LIBJPEG</span>
</a>
</li>
<li class="toc-row">
<a class="toc-item toc-item-anchor"
href="#open-ssl"
data-ga-event="toc_item_click"
data-ga-location="toc"
data-ga-label="OPEN SSL"
style="text-decoration:none;display:flex;align-items:center;justify-content:space-between;width:100%;">
<span class="toc-item-title">OPEN SSL</span>
</a>
</li>
<li class="toc-row">
<a class="toc-item toc-item-anchor"
href="#original-ssleay-license"
data-ga-event="toc_item_click"
data-ga-location="toc"
data-ga-label="ORIGINAL SSLEAY LICENSE"
style="text-decoration:none;display:flex;align-items:center;justify-content:space-between;width:100%;">
<span class="toc-item-title">ORIGINAL SSLEAY LICENSE</span>
</a>
</li>
<li class="toc-row">
<a class="toc-item toc-item-anchor"
href="#blu-ray-disk-spieler-bdx2000ke"
data-ga-event="toc_item_click"
data-ga-location="toc"
data-ga-label="BLU-RAY DISK-SPIELER BDX2000KE"
style="text-decoration:none;display:flex;align-items:center;justify-content:space-between;width:100%;">
<span class="toc-item-title">BLU-RAY DISK-SPIELER BDX2000KE</span>
</a>
</li>
<li class="toc-row">
<a class="toc-item toc-item-anchor"
href="#eigentümerdaten"
data-ga-event="toc_item_click"
data-ga-location="toc"
data-ga-label="EIGENTÜMERDATEN"
style="text-decoration:none;display:flex;align-items:center;justify-content:space-between;width:100%;">
<span class="toc-item-title">EIGENTÜMERDATEN</span>
</a>
</li>
<li class="toc-row">
<a class="toc-item toc-item-anchor"
href="#einleitung"
data-ga-event="toc_item_click"
data-ga-location="toc"
data-ga-label="EINLEITUNG"
style="text-decoration:none;display:flex;align-items:center;justify-content:space-between;width:100%;">
<span class="toc-item-title">EINLEITUNG</span>
</a>
</li>
<li class="toc-row">
<a class="toc-item toc-item-anchor"
href="#sicherheitshinweise"
data-ga-event="toc_item_click"
data-ga-location="toc"
data-ga-label="SICHERHEITSHINWEISE"
style="text-decoration:none;display:flex;align-items:center;justify-content:space-between;width:100%;">
<span class="toc-item-title">SICHERHEITSHINWEISE</span>
</a>
</li>
<li class="toc-row">
<a class="toc-item toc-item-anchor"
href="#caution-riskofelectricshock-donotopen"
data-ga-event="toc_item_click"
data-ga-location="toc"
data-ga-label="CAUTION RISKOFELECTRICSHOCK DONOTOPEN"
style="text-decoration:none;display:flex;align-items:center;justify-content:space-between;width:100%;">
<span class="toc-item-title">CAUTION RISKOFELECTRICSHOCK DONOTOPEN</span>
</a>
</li>
<li class="toc-row">
<a class="toc-item toc-item-anchor"
href="#achtung"
data-ga-event="toc_item_click"
data-ga-location="toc"
data-ga-label="ACHTUNG"
style="text-decoration:none;display:flex;align-items:center;justify-content:space-between;width:100%;">
<span class="toc-item-title">ACHTUNG</span>
</a>
</li>
<li class="toc-row">
<a class="toc-item toc-item-anchor"
href="#warnhinweise"
data-ga-event="toc_item_click"
data-ga-location="toc"
data-ga-label="WARNHINWEISE"
style="text-decoration:none;display:flex;align-items:center;justify-content:space-between;width:100%;">
<span class="toc-item-title">WARNHINWEISE</span>
</a>
</li>
<li class="toc-row">
<a class="toc-item toc-item-anchor"
href="#sicherheitshinweise-für-lasergeräte"
data-ga-event="toc_item_click"
data-ga-location="toc"
data-ga-label="SICHERHEITSHINWEISE FÜR LASERGERÄTE"
style="text-decoration:none;display:flex;align-items:center;justify-content:space-between;width:100%;">
<span class="toc-item-title">SICHERHEITSHINWEISE FÜR LASERGERÄTE</span>
</a>
</li>
<li class="toc-row">
<a class="toc-item toc-item-anchor"
href="#position"
data-ga-event="toc_item_click"
data-ga-location="toc"
data-ga-label="POSITION"
style="text-decoration:none;display:flex;align-items:center;justify-content:space-between;width:100%;">
<span class="toc-item-title">POSITION</span>
</a>
</li>
<li class="toc-row">
<a class="toc-item toc-item-anchor"
href="#vermeiden-von-elektrischen-schlägen-und-feuer"
data-ga-event="toc_item_click"
data-ga-location="toc"
data-ga-label="VERMEIDEN VON ELEKTRISCHEN SCHLÄGEN UND FEUER"
style="text-decoration:none;display:flex;align-items:center;justify-content:space-between;width:100%;">
<span class="toc-item-title">VERMEIDEN VON ELEKTRISCHEN SCHLÄGEN UND FEUER</span>
</a>
</li>
<li class="toc-row">
<a class="toc-item toc-item-anchor"
href="#warnung-vor-kondensation-von-feuchtigkeit"
data-ga-event="toc_item_click"
data-ga-location="toc"
data-ga-label="WARNUNG VOR KONDENSATION VON FEUCHTIGKEIT"
style="text-decoration:none;display:flex;align-items:center;justify-content:space-between;width:100%;">
<span class="toc-item-title">WARNUNG VOR KONDENSATION VON FEUCHTIGKEIT</span>
</a>
</li>
<li class="toc-row">
<a class="toc-item toc-item-anchor"
href="#anschluss-an-das-stromnetz"
data-ga-event="toc_item_click"
data-ga-location="toc"
data-ga-label="ANSCHLUSS AN DAS STROMNETZ"
style="text-decoration:none;display:flex;align-items:center;justify-content:space-between;width:100%;">
<span class="toc-item-title">ANSCHLUSS AN DAS STROMNETZ</span>
</a>
</li>
<li class="toc-row">
<a class="toc-item toc-item-anchor"
href="#stromversorgung"
data-ga-event="toc_item_click"
data-ga-location="toc"
data-ga-label="STROMVERSORGUNG"
style="text-decoration:none;display:flex;align-items:center;justify-content:space-between;width:100%;">
<span class="toc-item-title">STROMVERSORGUNG</span>
</a>
</li>
<li class="toc-row">
<a class="toc-item toc-item-anchor"
href="#aufstellungsort"
data-ga-event="toc_item_click"
data-ga-location="toc"
data-ga-label="AUFSTELLUNGSORT"
style="text-decoration:none;display:flex;align-items:center;justify-content:space-between;width:100%;">
<span class="toc-item-title">AUFSTELLUNGSORT</span>
</a>
</li>
<li class="toc-row">
<a class="toc-item toc-item-anchor"
href="#eu-konformitätserklärung"
data-ga-event="toc_item_click"
data-ga-location="toc"
data-ga-label="EU-KONFORMITÄTSERKLÄRUNG"
style="text-decoration:none;display:flex;align-items:center;justify-content:space-between;width:100%;">
<span class="toc-item-title">EU-KONFORMITÄTSERKLÄRUNG</span>
</a>
</li>
<li class="toc-row">
<a class="toc-item toc-item-anchor"
href="#andere-vorsichtshinweise"
data-ga-event="toc_item_click"
data-ga-location="toc"
data-ga-label="ANDERE VORSICHTSHINWEISE"
style="text-decoration:none;display:flex;align-items:center;justify-content:space-between;width:100%;">
<span class="toc-item-title">ANDERE VORSICHTSHINWEISE</span>
</a>
</li>
<li class="toc-row">
<a class="toc-item toc-item-anchor"
href="#über-das-recycling"
data-ga-event="toc_item_click"
data-ga-location="toc"
data-ga-label="ÜBER DAS RECYCLING"
style="text-decoration:none;display:flex;align-items:center;justify-content:space-between;width:100%;">
<span class="toc-item-title">ÜBER DAS RECYCLING</span>
</a>
</li>
<li class="toc-row">
<a class="toc-item toc-item-anchor"
href="#recycling-hinweis"
data-ga-event="toc_item_click"
data-ga-location="toc"
data-ga-label="RECYCLING-HINWEIS"
style="text-decoration:none;display:flex;align-items:center;justify-content:space-between;width:100%;">
<span class="toc-item-title">RECYCLING-HINWEIS</span>
</a>
</li>
<li class="toc-row">
<a class="toc-item toc-item-anchor"
href="#die-folgenden-informationen-gelten-nur-für-die-eu-mitgliedsstaaten"
data-ga-event="toc_item_click"
data-ga-location="toc"
data-ga-label="DIE FOLGENDEN INFORMATIONEN GELTEN NUR FÜR DIE EU-MITGLIEDSSTAATEN"
style="text-decoration:none;display:flex;align-items:center;justify-content:space-between;width:100%;">
<span class="toc-item-title">DIE FOLGENDEN INFORMATIONEN GELTEN NUR FÜR DIE EU-MITGLIEDSSTAATEN</span>
</a>
</li>
<li class="toc-row">
<a class="toc-item toc-item-anchor"
href="#folgende-informationen-gelten-ausschließlich-für-mitglieder-der-eu-staaten"
data-ga-event="toc_item_click"
data-ga-location="toc"
data-ga-label="FOLGENDE INFORMATIONEN GELTEN AUSSCHLIESSLICH FÜR MITGLIEDER DER EU-STAATEN"
style="text-decoration:none;display:flex;align-items:center;justify-content:space-between;width:100%;">
<span class="toc-item-title">FOLGENDE INFORMATIONEN GELTEN AUSSCHLIESSLICH FÜR MITGLIEDER DER EU-STAATEN</span>
</a>
</li>
<li class="toc-row">
<a class="toc-item toc-item-anchor"
href="#verordnung-über-die-rücknahme-und-entsorgung-gebrauchter-batterien-und-akkumulatoren"
data-ga-event="toc_item_click"
data-ga-location="toc"
data-ga-label="VERORDNUNG ÜBER DIE RÜCKNAHME UND ENTSORGUNG GEBRAUCHTER BATTERIEN UND AKKUMULATOREN"
style="text-decoration:none;display:flex;align-items:center;justify-content:space-between;width:100%;">
<span class="toc-item-title">VERORDNUNG ÜBER DIE RÜCKNAHME UND ENTSORGUNG GEBRAUCHTER BATTERIEN UND AKKUMULATOREN</span>
</a>
</li>
<li class="toc-row">
<a class="toc-item toc-item-anchor"
href="#tragen-sie-zum-umweltschutz-bei"
data-ga-event="toc_item_click"
data-ga-location="toc"
data-ga-label="TRAGEN SIE ZUM UMWELTSCHUTZ BEI"
style="text-decoration:none;display:flex;align-items:center;justify-content:space-between;width:100%;">
<span class="toc-item-title">TRAGEN SIE ZUM UMWELTSCHUTZ BEI</span>
</a>
</li>
<li class="toc-row">
<a class="toc-item toc-item-anchor"
href="#hinweis-zum-urheberrecht"
data-ga-event="toc_item_click"
data-ga-location="toc"
data-ga-label="HINWEIS ZUM URHEBERRECHT"
style="text-decoration:none;display:flex;align-items:center;justify-content:space-between;width:100%;">
<span class="toc-item-title">HINWEIS ZUM URHEBERRECHT</span>
</a>
</li>
<li class="toc-row">
<a class="toc-item toc-item-anchor"
href="#zur-wartung"
data-ga-event="toc_item_click"
data-ga-location="toc"
data-ga-label="ZUR WARTUNG"
style="text-decoration:none;display:flex;align-items:center;justify-content:space-between;width:100%;">
<span class="toc-item-title">ZUR WARTUNG</span>
</a>
</li>
<li class="toc-row">
<a class="toc-item toc-item-anchor"
href="#reinigen-des-geräts"
data-ga-event="toc_item_click"
data-ga-location="toc"
data-ga-label="REINIGEN DES GERÄTS"
style="text-decoration:none;display:flex;align-items:center;justify-content:space-between;width:100%;">
<span class="toc-item-title">REINIGEN DES GERÄTS</span>
</a>
</li>
<li class="toc-row">
<a class="toc-item toc-item-anchor"
href="#reinigung-von-disks"
data-ga-event="toc_item_click"
data-ga-location="toc"
data-ga-label="REINIGUNG VON DISKS"
style="text-decoration:none;display:flex;align-items:center;justify-content:space-between;width:100%;">
<span class="toc-item-title">REINIGUNG VON DISKS</span>
</a>
</li>
<li class="toc-row">
<a class="toc-item toc-item-anchor"
href="#handhabung-von-disks"
data-ga-event="toc_item_click"
data-ga-location="toc"
data-ga-label="HANDHABUNG VON DISKS"
style="text-decoration:none;display:flex;align-items:center;justify-content:space-between;width:100%;">
<span class="toc-item-title">HANDHABUNG VON DISKS</span>
</a>
</li>
<li class="toc-row">
<a class="toc-item toc-item-anchor"
href="#im-reparaturfall"
data-ga-event="toc_item_click"
data-ga-location="toc"
data-ga-label="IM REPARATURFALL"
style="text-decoration:none;display:flex;align-items:center;justify-content:space-between;width:100%;">
<span class="toc-item-title">IM REPARATURFALL</span>
</a>
</li>
<li class="toc-row">
<a class="toc-item toc-item-anchor"
href="#reinigen-der-diskleseeinheit"
data-ga-event="toc_item_click"
data-ga-location="toc"
data-ga-label="REINIGEN DER DISKLESEEINHEIT"
style="text-decoration:none;display:flex;align-items:center;justify-content:space-between;width:100%;">
<span class="toc-item-title">REINIGEN DER DISKLESEEINHEIT</span>
</a>
</li>
<li class="toc-row">
<a class="toc-item toc-item-anchor"
href="#ir-signalprüfung"
data-ga-event="toc_item_click"
data-ga-location="toc"
data-ga-label="IR-SIGNALPRÜFUNG"
style="text-decoration:none;display:flex;align-items:center;justify-content:space-between;width:100%;">
<span class="toc-item-title">IR-SIGNALPRÜFUNG</span>
</a>
</li>
<li class="toc-row">
<a class="toc-item toc-item-anchor"
href="#mit-einer-digitalkamera"
data-ga-event="toc_item_click"
data-ga-location="toc"
data-ga-label="MIT EINER DIGITALKAMERA"
style="text-decoration:none;display:flex;align-items:center;justify-content:space-between;width:100%;">
<span class="toc-item-title">MIT EINER DIGITALKAMERA</span>
</a>
</li>
<li class="toc-row">
<a class="toc-item toc-item-anchor"
href="#oder-mobiltelefon-mit-eingebauter-kamera"
data-ga-event="toc_item_click"
data-ga-location="toc"
data-ga-label="(ODER MOBILTELEFON MIT EINGEBAUTER KAMERA)"
style="text-decoration:none;display:flex;align-items:center;justify-content:space-between;width:100%;">
<span class="toc-item-title">(ODER MOBILTELEFON MIT EINGEBAUTER KAMERA)</span>
</a>
</li>
<li class="toc-row">
<a class="toc-item toc-item-anchor"
href="#zur-fernbedienung"
data-ga-event="toc_item_click"
data-ga-location="toc"
data-ga-label="ZUR FERNBEDIENUNG"
style="text-decoration:none;display:flex;align-items:center;justify-content:space-between;width:100%;">
<span class="toc-item-title">ZUR FERNBEDIENUNG</span>
</a>
</li>
<li class="toc-row">
<a class="toc-item toc-item-anchor"
href="#die-batterien-in-die-fernbedienung-einsetzen"
data-ga-event="toc_item_click"
data-ga-location="toc"
data-ga-label="DIE BATTERIEN IN DIE FERNBEDIENUNG EINSETZEN"
style="text-decoration:none;display:flex;align-items:center;justify-content:space-between;width:100%;">
<span class="toc-item-title">DIE BATTERIEN IN DIE FERNBEDIENUNG EINSETZEN</span>
</a>
</li>
<li class="toc-row">
<a class="toc-item toc-item-anchor"
href="#eine-unsachgemäße-handhabung-von-batterien-kann-ein-auslaufen-von-elektrolyt-und-ein-platzen-der-batterien-zur-folge-haben-bitte-beachten-sie-daher-die-folgenden-hinweise"
data-ga-event="toc_item_click"
data-ga-location="toc"
data-ga-label="EINE UNSACHGEMÄSSE HANDHABUNG VON BATTERIEN KANN EIN AUSLAUFEN VON ELEKTROLYT UND EIN PLATZEN DER BATTERIEN ZUR FOLGE HABEN. BITTE BEACHTEN SIE DAHER DIE FOLGENDEN HINWEISE"
style="text-decoration:none;display:flex;align-items:center;justify-content:space-between;width:100%;">
<span class="toc-item-title">EINE UNSACHGEMÄSSE HANDHABUNG VON BATTERIEN KANN EIN AUSLAUFEN VON ELEKTROLYT UND EIN PLATZEN DER BATTERIEN ZUR FOLGE HABEN. BITTE BEACHTEN SIE DAHER DIE FOLGENDEN HINWEISE</span>
</a>
</li>
<li class="toc-row">
<a class="toc-item toc-item-anchor"
href="#verwendung-der-fernbedienung"
data-ga-event="toc_item_click"
data-ga-location="toc"
data-ga-label="VERWENDUNG DER FERNBEDIENUNG"
style="text-decoration:none;display:flex;align-items:center;justify-content:space-between;width:100%;">
<span class="toc-item-title">VERWENDUNG DER FERNBEDIENUNG</span>
</a>
</li>
<li class="toc-row">
<a class="toc-item toc-item-anchor"
href="#mitgeliefertes-zubehör"
data-ga-event="toc_item_click"
data-ga-location="toc"
data-ga-label="MITGELIEFERTES ZUBEHÖR"
style="text-decoration:none;display:flex;align-items:center;justify-content:space-between;width:100%;">
<span class="toc-item-title">MITGELIEFERTES ZUBEHÖR</span>
</a>
</li>
<li class="toc-row">
<a class="toc-item toc-item-anchor"
href="#inhalt"
data-ga-event="toc_item_click"
data-ga-location="toc"
data-ga-label="INHALT"
style="text-decoration:none;display:flex;align-items:center;justify-content:space-between;width:100%;">
<span class="toc-item-title">INHALT</span>
</a>
</li>
<li class="toc-row">
<a class="toc-item toc-item-anchor"
href="#anschlüsse"
data-ga-event="toc_item_click"
data-ga-location="toc"
data-ga-label="ANSCHLÜSSE"
style="text-decoration:none;display:flex;align-items:center;justify-content:space-between;width:100%;">
<span class="toc-item-title">ANSCHLÜSSE</span>
</a>
</li>
<li class="toc-row">
<a class="toc-item toc-item-anchor"
href="#wiedergabe"
data-ga-event="toc_item_click"
data-ga-location="toc"
data-ga-label="WIEDERGABE"
style="text-decoration:none;display:flex;align-items:center;justify-content:space-between;width:100%;">
<span class="toc-item-title">WIEDERGABE</span>
</a>
</li>
<li class="toc-row">
<a class="toc-item toc-item-anchor"
href="#funktionseinrichtung"
data-ga-event="toc_item_click"
data-ga-location="toc"
data-ga-label="FUNKTIONSEINRICHTUNG"
style="text-decoration:none;display:flex;align-items:center;justify-content:space-between;width:100%;">
<span class="toc-item-title">FUNKTIONSEINRICHTUNG</span>
</a>
</li>
<li class="toc-row">
<a class="toc-item toc-item-anchor"
href="#sonstiges"
data-ga-event="toc_item_click"
data-ga-location="toc"
data-ga-label="SONSTIGES"
style="text-decoration:none;display:flex;align-items:center;justify-content:space-between;width:100%;">
<span class="toc-item-title">SONSTIGES</span>
</a>
</li>
<li class="toc-row">
<a class="toc-item toc-item-anchor"
href="#informationen-zu-marken"
data-ga-event="toc_item_click"
data-ga-location="toc"
data-ga-label="INFORMATIONEN ZU MARKEN"
style="text-decoration:none;display:flex;align-items:center;justify-content:space-between;width:100%;">
<span class="toc-item-title">INFORMATIONEN ZU MARKEN</span>
</a>
</li>
<li class="toc-row">
<a class="toc-item toc-item-anchor"
href="#merkmale"
data-ga-event="toc_item_click"
data-ga-location="toc"
data-ga-label="MERKMALE"
style="text-decoration:none;display:flex;align-items:center;justify-content:space-between;width:100%;">
<span class="toc-item-title">MERKMALE</span>
</a>
</li>
<li class="toc-row">
<a class="toc-item toc-item-anchor"
href="#vollständig-hochauflösende-videowiedergabe"
data-ga-event="toc_item_click"
data-ga-location="toc"
data-ga-label="VOLLSTÄNDIG HOCHAUFLÖSENDE VIDEOWIEDERGABE"
style="text-decoration:none;display:flex;align-items:center;justify-content:space-between;width:100%;">
<span class="toc-item-title">VOLLSTÄNDIG HOCHAUFLÖSENDE VIDEOWIEDERGABE</span>
</a>
</li>
<li class="toc-row">
<a class="toc-item toc-item-anchor"
href="#aufwärtskonvertierung-von-dvds-für-verbesserte-bildqualität"
data-ga-event="toc_item_click"
data-ga-location="toc"
data-ga-label="AUFWÄRTSKONVERTIERUNG VON DVDS FÜR VERBESSERTE BILDQUALITÄT"
style="text-decoration:none;display:flex;align-items:center;justify-content:space-between;width:100%;">
<span class="toc-item-title">AUFWÄRTSKONVERTIERUNG VON DVDS FÜR VERBESSERTE BILDQUALITÄT</span>
</a>
</li>
<li class="toc-row">
<a class="toc-item toc-item-anchor"
href="#kompatibel-mit-verschiedenen-arten-von-datenträgern"
data-ga-event="toc_item_click"
data-ga-location="toc"
data-ga-label="KOMPATIBEL MIT VERSCHIEDENEN ARTEN VON DATENTRÄGERN"
style="text-decoration:none;display:flex;align-items:center;justify-content:space-between;width:100%;">
<span class="toc-item-title">KOMPATIBEL MIT VERSCHIEDENEN ARTEN VON DATENTRÄGERN</span>
</a>
</li>
<li class="toc-row">
<a class="toc-item toc-item-anchor"
href="#voller-mehrkanaliger-surround-sound"
data-ga-event="toc_item_click"
data-ga-location="toc"
data-ga-label="VOLLER, MEHRKANALIGER SURROUND-SOUND"
style="text-decoration:none;display:flex;align-items:center;justify-content:space-between;width:100%;">
<span class="toc-item-title">VOLLER, MEHRKANALIGER SURROUND-SOUND</span>
</a>
</li>
<li class="toc-row">
<a class="toc-item toc-item-anchor"
href="#pop-up-menü"
data-ga-event="toc_item_click"
data-ga-location="toc"
data-ga-label="POP-UP-MENÜ"
style="text-decoration:none;display:flex;align-items:center;justify-content:space-between;width:100%;">
<span class="toc-item-title">POP-UP-MENÜ</span>
</a>
</li>
<li class="toc-row">
<a class="toc-item toc-item-anchor"
href="#schnelle-wiedergabe"
data-ga-event="toc_item_click"
data-ga-location="toc"
data-ga-label="SCHNELLE WIEDERGABE"
style="text-decoration:none;display:flex;align-items:center;justify-content:space-between;width:100%;">
<span class="toc-item-title">SCHNELLE WIEDERGABE</span>
</a>
</li>
<li class="toc-row">
<a class="toc-item toc-item-anchor"
href="#wiedergabe-des-inhalts-einer-sd-karte"
data-ga-event="toc_item_click"
data-ga-location="toc"
data-ga-label="WIEDERGABE DES INHALTS EINER SD-KARTE"
style="text-decoration:none;display:flex;align-items:center;justify-content:space-between;width:100%;">
<span class="toc-item-title">WIEDERGABE DES INHALTS EINER SD-KARTE</span>
</a>
</li>
<li class="toc-row">
<a class="toc-item toc-item-anchor"
href="#abspielen-von-avchd-dateien"
data-ga-event="toc_item_click"
data-ga-location="toc"
data-ga-label="ABSPIELEN VON AVCHD-DATEIEN"
style="text-decoration:none;display:flex;align-items:center;justify-content:space-between;width:100%;">
<span class="toc-item-title">ABSPIELEN VON AVCHD-DATEIEN</span>
</a>
</li>
<li class="toc-row">
<a class="toc-item toc-item-anchor"
href="#einfacher-anschluss-an-ihren-hdtv-fernseher-über-eine-hdmi-schnittstelle"
data-ga-event="toc_item_click"
data-ga-location="toc"
data-ga-label="EINFACHER ANSCHLUSS AN IHREN HDTV-FERNSEHER ÜBER EINE HDMI-SCHNITTSTELLE"
style="text-decoration:none;display:flex;align-items:center;justify-content:space-between;width:100%;">
<span class="toc-item-title">EINFACHER ANSCHLUSS AN IHREN HDTV-FERNSEHER ÜBER EINE HDMI-SCHNITTSTELLE</span>
</a>
</li>
<li class="toc-row">
<a class="toc-item toc-item-anchor"
href="#hdmi-1080p24-bilder-nur-bd"
data-ga-event="toc_item_click"
data-ga-location="toc"
data-ga-label="HDMI 1080P/24 BILDER (NUR BD)"
style="text-decoration:none;display:flex;align-items:center;justify-content:space-between;width:100%;">
<span class="toc-item-title">HDMI 1080P/24 BILDER (NUR BD)</span>
</a>
</li>
<li class="toc-row">
<a class="toc-item toc-item-anchor"
href="#hdcp-kompatibel"
data-ga-event="toc_item_click"
data-ga-location="toc"
data-ga-label="HDCP-KOMPATIBEL"
style="text-decoration:none;display:flex;align-items:center;justify-content:space-between;width:100%;">
<span class="toc-item-title">HDCP-KOMPATIBEL</span>
</a>
</li>
<li class="toc-row">
<a class="toc-item toc-item-anchor"
href="#funktioneller-überblick"
data-ga-event="toc_item_click"
data-ga-location="toc"
data-ga-label="FUNKTIONELLER ÜBERBLICK"
style="text-decoration:none;display:flex;align-items:center;justify-content:space-between;width:100%;">
<span class="toc-item-title">FUNKTIONELLER ÜBERBLICK</span>
</a>
</li>
<li class="toc-row">
<a class="toc-item toc-item-anchor"
href="#in-dieser-anleitung-verwendete-symbole"
data-ga-event="toc_item_click"
data-ga-location="toc"
data-ga-label="IN DIESER ANLEITUNG VERWENDETE SYMBOLE"
style="text-decoration:none;display:flex;align-items:center;justify-content:space-between;width:100%;">
<span class="toc-item-title">IN DIESER ANLEITUNG VERWENDETE SYMBOLE</span>
</a>
</li>
<li class="toc-row">
<a class="toc-item toc-item-anchor"
href="#anschluss-an-ein-fernsehgerät"
data-ga-event="toc_item_click"
data-ga-location="toc"
data-ga-label="ANSCHLUSS AN EIN FERNSEHGERÄT"
style="text-decoration:none;display:flex;align-items:center;justify-content:space-between;width:100%;">
<span class="toc-item-title">ANSCHLUSS AN EIN FERNSEHGERÄT</span>
</a>
</li>
<li class="toc-row">
<a class="toc-item toc-item-anchor"
href="#hinweis"
data-ga-event="toc_item_click"
data-ga-location="toc"
data-ga-label="HINWEIS"
style="text-decoration:none;display:flex;align-items:center;justify-content:space-between;width:100%;">
<span class="toc-item-title">HINWEIS</span>
</a>
</li>
<li class="toc-row">
<a class="toc-item toc-item-anchor"
href="#anschluss-an-eine-hi-fi-anlage"
data-ga-event="toc_item_click"
data-ga-location="toc"
data-ga-label="ANSCHLUSS AN EINE HI-FI-ANLAGE"
style="text-decoration:none;display:flex;align-items:center;justify-content:space-between;width:100%;">
<span class="toc-item-title">ANSCHLUSS AN EINE HI-FI-ANLAGE</span>
</a>
</li>
<li class="toc-row">
<a class="toc-item toc-item-anchor"
href="#netzwerkverbindung-mit-einem-lan"
data-ga-event="toc_item_click"
data-ga-location="toc"
data-ga-label="NETZWERKVERBINDUNG MIT EINEM LAN"
style="text-decoration:none;display:flex;align-items:center;justify-content:space-between;width:100%;">
<span class="toc-item-title">NETZWERKVERBINDUNG MIT EINEM LAN</span>
</a>
</li>
<li class="toc-row">
<a class="toc-item toc-item-anchor"
href="#einstellen-des-videokanals-auf-ihrem-fernsehgerät"
data-ga-event="toc_item_click"
data-ga-location="toc"
data-ga-label="EINSTELLEN DES VIDEOKANALS AUF IHREM FERNSEHGERÄT"
style="text-decoration:none;display:flex;align-items:center;justify-content:space-between;width:100%;">
<span class="toc-item-title">EINSTELLEN DES VIDEOKANALS AUF IHREM FERNSEHGERÄT</span>
</a>
</li>
<li class="toc-row">
<a class="toc-item toc-item-anchor"
href="#informationen-zur-wiedergabe"
data-ga-event="toc_item_click"
data-ga-location="toc"
data-ga-label="INFORMATIONEN ZUR WIEDERGABE"
style="text-decoration:none;display:flex;align-items:center;justify-content:space-between;width:100%;">
<span class="toc-item-title">INFORMATIONEN ZUR WIEDERGABE</span>
</a>
</li>
<li class="toc-row">
<a class="toc-item toc-item-anchor"
href="#abspielbare-medien"
data-ga-event="toc_item_click"
data-ga-location="toc"
data-ga-label="ABSPIELBARE MEDIEN"
style="text-decoration:none;display:flex;align-items:center;justify-content:space-between;width:100%;">
<span class="toc-item-title">ABSPIELBARE MEDIEN</span>
</a>
</li>
<li class="toc-row">
<a class="toc-item toc-item-anchor"
href="#abspielbare-disks-logo"
data-ga-event="toc_item_click"
data-ga-location="toc"
data-ga-label="ABSPIELBARE DISKS LOGO"
style="text-decoration:none;display:flex;align-items:center;justify-content:space-between;width:100%;">
<span class="toc-item-title">ABSPIELBARE DISKS LOGO</span>
</a>
</li>
<li class="toc-row">
<a class="toc-item toc-item-anchor"
href="#blu-ray-disk"
data-ga-event="toc_item_click"
data-ga-location="toc"
data-ga-label="BLU-RAY DISK"
style="text-decoration:none;display:flex;align-items:center;justify-content:space-between;width:100%;">
<span class="toc-item-title">BLU-RAY DISK</span>
</a>
</li>
<li class="toc-row">
<a class="toc-item toc-item-anchor"
href="#hinweise-zu-sd-karten"
data-ga-event="toc_item_click"
data-ga-location="toc"
data-ga-label="HINWEISE ZU SD-KARTEN"
style="text-decoration:none;display:flex;align-items:center;justify-content:space-between;width:100%;">
<span class="toc-item-title">HINWEISE ZU SD-KARTEN</span>
</a>
</li>
<li class="toc-row">
<a class="toc-item toc-item-anchor"
href="#regionalcodes"
data-ga-event="toc_item_click"
data-ga-location="toc"
data-ga-label="REGIONALCODES"
style="text-decoration:none;display:flex;align-items:center;justify-content:space-between;width:100%;">
<span class="toc-item-title">REGIONALCODES</span>
</a>
</li>
<li class="toc-row">
<a class="toc-item toc-item-anchor"
href="#e-kartez-öffn-an-oder-struktur-von-medieninhalten"
data-ga-event="toc_item_click"
data-ga-location="toc"
data-ga-label="E KARTEZ ÖFFN AN ODER STRUKTUR VON MEDIENINHALTEN"
style="text-decoration:none;display:flex;align-items:center;justify-content:space-between;width:100%;">
<span class="toc-item-title">E KARTEZ ÖFFN AN ODER STRUKTUR VON MEDIENINHALTEN</span>
</a>
</li>
<li class="toc-row">
<a class="toc-item toc-item-anchor"
href="#nicht-abspielbare-medien"
data-ga-event="toc_item_click"
data-ga-location="toc"
data-ga-label="NICHT ABSPIELBARE MEDIEN"
style="text-decoration:none;display:flex;align-items:center;justify-content:space-between;width:100%;">
<span class="toc-item-title">NICHT ABSPIELBARE MEDIEN</span>
</a>
</li>
<li class="toc-row">
<a class="toc-item toc-item-anchor"
href="#ows-media-digital-bildschirmanzeigen"
data-ga-event="toc_item_click"
data-ga-location="toc"
data-ga-label="OWS MEDIA™ DIGITAL BILDSCHIRMANZEIGEN"
style="text-decoration:none;display:flex;align-items:center;justify-content:space-between;width:100%;">
<span class="toc-item-title">OWS MEDIA™ DIGITAL BILDSCHIRMANZEIGEN</span>
</a>
</li>
<li class="toc-row">
<a class="toc-item toc-item-anchor"
href="#farbsysteme"
data-ga-event="toc_item_click"
data-ga-location="toc"
data-ga-label="FARBSYSTEME"
style="text-decoration:none;display:flex;align-items:center;justify-content:space-between;width:100%;">
<span class="toc-item-title">FARBSYSTEME</span>
</a>
</li>
<li class="toc-row">
<a class="toc-item toc-item-anchor"
href="#vorbereitung-der-wiedergabe"
data-ga-event="toc_item_click"
data-ga-location="toc"
data-ga-label="VORBEREITUNG DER WIEDERGABE"
style="text-decoration:none;display:flex;align-items:center;justify-content:space-between;width:100%;">
<span class="toc-item-title">VORBEREITUNG DER WIEDERGABE</span>
</a>
</li>
<li class="toc-row">
<a class="toc-item toc-item-anchor"
href="#einlegen-einer-disk"
data-ga-event="toc_item_click"
data-ga-location="toc"
data-ga-label="EINLEGEN EINER DISK"
style="text-decoration:none;display:flex;align-items:center;justify-content:space-between;width:100%;">
<span class="toc-item-title">EINLEGEN EINER DISK</span>
</a>
</li>
<li class="toc-row">
<a class="toc-item toc-item-anchor"
href="#einsetzen-einer-sd-karte"
data-ga-event="toc_item_click"
data-ga-location="toc"
data-ga-label="EINSETZEN EINER SD-KARTE"
style="text-decoration:none;display:flex;align-items:center;justify-content:space-between;width:100%;">
<span class="toc-item-title">EINSETZEN EINER SD-KARTE</span>
</a>
</li>
<li class="toc-row">
<a class="toc-item toc-item-anchor"
href="#auswählen-des-mediums"
data-ga-event="toc_item_click"
data-ga-location="toc"
data-ga-label="AUSWÄHLEN DES MEDIUMS"
style="text-decoration:none;display:flex;align-items:center;justify-content:space-between;width:100%;">
<span class="toc-item-title">AUSWÄHLEN DES MEDIUMS</span>
</a>
</li>
<li class="toc-row">
<a class="toc-item toc-item-anchor"
href="#grundlegende-wiedergabeverfahren"
data-ga-event="toc_item_click"
data-ga-location="toc"
data-ga-label="GRUNDLEGENDE WIEDERGABEVERFAHREN"
style="text-decoration:none;display:flex;align-items:center;justify-content:space-between;width:100%;">
<span class="toc-item-title">GRUNDLEGENDE WIEDERGABEVERFAHREN</span>
</a>
</li>
<li class="toc-row">
<a class="toc-item toc-item-anchor"
href="#fortsetzung-bei-stopp-modus"
data-ga-event="toc_item_click"
data-ga-location="toc"
data-ga-label="FORTSETZUNG-BEI-STOPP MODUS"
style="text-decoration:none;display:flex;align-items:center;justify-content:space-between;width:100%;">
<span class="toc-item-title">FORTSETZUNG-BEI-STOPP MODUS</span>
</a>
</li>
<li class="toc-row">
<a class="toc-item toc-item-anchor"
href="#hinweis-verzeichnisebenen"
data-ga-event="toc_item_click"
data-ga-location="toc"
data-ga-label="HINWEIS VERZEICHNISEBENEN"
style="text-decoration:none;display:flex;align-items:center;justify-content:space-between;width:100%;">
<span class="toc-item-title">HINWEIS VERZEICHNISEBENEN</span>
</a>
</li>
<li class="toc-row">
<a class="toc-item toc-item-anchor"
href="#verwendung-einer-sd-karte"
data-ga-event="toc_item_click"
data-ga-location="toc"
data-ga-label="VERWENDUNG EINER SD-KARTE"
style="text-decoration:none;display:flex;align-items:center;justify-content:space-between;width:100%;">
<span class="toc-item-title">VERWENDUNG EINER SD-KARTE</span>
</a>
</li>
<li class="toc-row">
<a class="toc-item toc-item-anchor"
href="#avchd-mp3-wma-jpeg-2"
data-ga-event="toc_item_click"
data-ga-location="toc"
data-ga-label="AVCHD | MP3 | WMA | JPEG"
style="text-decoration:none;display:flex;align-items:center;justify-content:space-between;width:100%;">
<span class="toc-item-title">AVCHD | MP3 | WMA | JPEG</span>
</a>
</li>
<li class="toc-row">
<a class="toc-item toc-item-anchor"
href="#2-betätigen-sie-um-die-gewünschte-datei-zur-wiedergabe-auszuwählen-und-drücken-sie-dann-play-oder-enter"
data-ga-event="toc_item_click"
data-ga-location="toc"
data-ga-label="2 BETÄTIGEN SIE [▲ / ▼ / ◀/▶], UM DIE GEWÜNSCHTE DATEI ZUR WIEDERGABE AUSZUWÄHLEN, UND DRÜCKEN SIE DANN [PLAY▶] ODER [ENTER]"
style="text-decoration:none;display:flex;align-items:center;justify-content:space-between;width:100%;">
<span class="toc-item-title">2 BETÄTIGEN SIE [▲ / ▼ / ◀/▶], UM DIE GEWÜNSCHTE DATEI ZUR WIEDERGABE AUSZUWÄHLEN, UND DRÜCKEN SIE DANN [PLAY▶] ODER [ENTER]</span>
</a>
</li>
<li class="toc-row">
<a class="toc-item toc-item-anchor"
href="#tipps-zur-wiedergabe-von-jpeg-kodak-picture-cd"
data-ga-event="toc_item_click"
data-ga-location="toc"
data-ga-label="TIPPS ZUR WIEDERGABE VON JPEG/ KODAK PICTURE CD"
style="text-decoration:none;display:flex;align-items:center;justify-content:space-between;width:100%;">
<span class="toc-item-title">TIPPS ZUR WIEDERGABE VON JPEG/ KODAK PICTURE CD</span>
</a>
</li>
<li class="toc-row">
<a class="toc-item toc-item-anchor"
href="#weiterführende-wiedergabefunktionen"
data-ga-event="toc_item_click"
data-ga-location="toc"
data-ga-label="WEITERFÜHRENDE WIEDERGABEFUNKTIONEN"
style="text-decoration:none;display:flex;align-items:center;justify-content:space-between;width:100%;">
<span class="toc-item-title">WEITERFÜHRENDE WIEDERGABEFUNKTIONEN</span>
</a>
</li>
<li class="toc-row">
<a class="toc-item toc-item-anchor"
href="#über-divx-und-divx-vod"
data-ga-event="toc_item_click"
data-ga-location="toc"
data-ga-label="ÜBER DIVX® UND DIVX® VOD"
style="text-decoration:none;display:flex;align-items:center;justify-content:space-between;width:100%;">
<span class="toc-item-title">ÜBER DIVX® UND DIVX® VOD</span>
</a>
</li>
<li class="toc-row">
<a class="toc-item toc-item-anchor"
href="#mögliche-fehler"
data-ga-event="toc_item_click"
data-ga-location="toc"
data-ga-label="MÖGLICHE FEHLER"
style="text-decoration:none;display:flex;align-items:center;justify-content:space-between;width:100%;">
<span class="toc-item-title">MÖGLICHE FEHLER</span>
</a>
</li>
<li class="toc-row">
<a class="toc-item toc-item-anchor"
href="#wiedergabe-von-divx-mit-divx-externen-untertiteln"
data-ga-event="toc_item_click"
data-ga-location="toc"
data-ga-label="WIEDERGABE VON DIVX® MIT DIVX® EXTERNEN UNTERTITELN"
style="text-decoration:none;display:flex;align-items:center;justify-content:space-between;width:100%;">
<span class="toc-item-title">WIEDERGABE VON DIVX® MIT DIVX® EXTERNEN UNTERTITELN</span>
</a>
</li>
<li class="toc-row">
<a class="toc-item toc-item-anchor"
href="#einzelbild-weiterschaltung"
data-ga-event="toc_item_click"
data-ga-location="toc"
data-ga-label="EINZELBILD-WEITERSCHALTUNG"
style="text-decoration:none;display:flex;align-items:center;justify-content:space-between;width:100%;">
<span class="toc-item-title">EINZELBILD-WEITERSCHALTUNG</span>
</a>
</li>
<li class="toc-row">
<a class="toc-item toc-item-anchor"
href="#suchlauf-vorwärts-rückwärts"
data-ga-event="toc_item_click"
data-ga-location="toc"
data-ga-label="SUCHLAUF VORWÄRTS / RÜCKWÄRTS"
style="text-decoration:none;display:flex;align-items:center;justify-content:space-between;width:100%;">
<span class="toc-item-title">SUCHLAUF VORWÄRTS / RÜCKWÄRTS</span>
</a>
</li>
<li class="toc-row">
<a class="toc-item toc-item-anchor"
href="#wiedergabe-in-zeitlupe"
data-ga-event="toc_item_click"
data-ga-location="toc"
data-ga-label="WIEDERGABE IN ZEITLUPE"
style="text-decoration:none;display:flex;align-items:center;justify-content:space-between;width:100%;">
<span class="toc-item-title">WIEDERGABE IN ZEITLUPE</span>
</a>
</li>
<li class="toc-row">
<a class="toc-item toc-item-anchor"
href="#wiedergabewiederholung"
data-ga-event="toc_item_click"
data-ga-location="toc"
data-ga-label="WIEDERGABEWIEDERHOLUNG"
style="text-decoration:none;display:flex;align-items:center;justify-content:space-between;width:100%;">
<span class="toc-item-title">WIEDERGABEWIEDERHOLUNG</span>
</a>
</li>
<li class="toc-row">
<a class="toc-item toc-item-anchor"
href="#a-b-wiederholung"
data-ga-event="toc_item_click"
data-ga-location="toc"
data-ga-label="A-B-WIEDERHOLUNG"
style="text-decoration:none;display:flex;align-items:center;justify-content:space-between;width:100%;">
<span class="toc-item-title">A-B-WIEDERHOLUNG</span>
</a>
</li>
<li class="toc-row">
<a class="toc-item toc-item-anchor"
href="#programmwiedergabe"
data-ga-event="toc_item_click"
data-ga-location="toc"
data-ga-label="PROGRAMMWIEDERGABE"
style="text-decoration:none;display:flex;align-items:center;justify-content:space-between;width:100%;">
<span class="toc-item-title">PROGRAMMWIEDERGABE</span>
</a>
</li>
<li class="toc-row">
<a class="toc-item toc-item-anchor"
href="#1-audio-cd-2"
data-ga-event="toc_item_click"
data-ga-location="toc"
data-ga-label="AUDIO-CD"
style="text-decoration:none;display:flex;align-items:center;justify-content:space-between;width:100%;">
<span class="toc-item-title">AUDIO-CD</span>
</a>
</li>
<li class="toc-row">
<a class="toc-item toc-item-anchor"
href="#3-track-ordner-dateiliste"
data-ga-event="toc_item_click"
data-ga-location="toc"
data-ga-label="TRACK-/ ORDNER-/ DATEILISTE"
style="text-decoration:none;display:flex;align-items:center;justify-content:space-between;width:100%;">
<span class="toc-item-title">TRACK-/ ORDNER-/ DATEILISTE</span>
</a>
</li>
<li class="toc-row">
<a class="toc-item toc-item-anchor"
href="#4-programmierte-liste"
data-ga-event="toc_item_click"
data-ga-location="toc"
data-ga-label="PROGRAMMIERTE LISTE"
style="text-decoration:none;display:flex;align-items:center;justify-content:space-between;width:100%;">
<span class="toc-item-title">PROGRAMMIERTE LISTE</span>
</a>
</li>
<li class="toc-row">
<a class="toc-item toc-item-anchor"
href="#6-wiedergabestatus"
data-ga-event="toc_item_click"
data-ga-location="toc"
data-ga-label="WIEDERGABESTATUS"
style="text-decoration:none;display:flex;align-items:center;justify-content:space-between;width:100%;">
<span class="toc-item-title">WIEDERGABESTATUS</span>
</a>
</li>
<li class="toc-row">
<a class="toc-item toc-item-anchor"
href="#8-benutzerführung"
data-ga-event="toc_item_click"
data-ga-location="toc"
data-ga-label="BENUTZERFÜHRUNG"
style="text-decoration:none;display:flex;align-items:center;justify-content:space-between;width:100%;">
<span class="toc-item-title">BENUTZERFÜHRUNG</span>
</a>
</li>
<li class="toc-row">
<a class="toc-item toc-item-anchor"
href="#zufallswiedergabe"
data-ga-event="toc_item_click"
data-ga-location="toc"
data-ga-label="ZUFALLSWIEDERGABE"
style="text-decoration:none;display:flex;align-items:center;justify-content:space-between;width:100%;">
<span class="toc-item-title">ZUFALLSWIEDERGABE</span>
</a>
</li>
<li class="toc-row">
<a class="toc-item toc-item-anchor"
href="#3-track-dateiliste"
data-ga-event="toc_item_click"
data-ga-location="toc"
data-ga-label="TRACK-/DATEILISTE"
style="text-decoration:none;display:flex;align-items:center;justify-content:space-between;width:100%;">
<span class="toc-item-title">TRACK-/DATEILISTE</span>
</a>
</li>
<li class="toc-row">
<a class="toc-item toc-item-anchor"
href="#5-gesamtspielzeit-aller-tracks-nur-audio-cd"
data-ga-event="toc_item_click"
data-ga-location="toc"
data-ga-label="GESAMTSPIELZEIT ALLER TRACKS (NUR AUDIO-CD)"
style="text-decoration:none;display:flex;align-items:center;justify-content:space-between;width:100%;">
<span class="toc-item-title">GESAMTSPIELZEIT ALLER TRACKS (NUR AUDIO-CD)</span>
</a>
</li>
<li class="toc-row">
<a class="toc-item toc-item-anchor"
href="#2drücken-sie-play-um-die"
data-ga-event="toc_item_click"
data-ga-location="toc"
data-ga-label="2DRÜCKEN SIE [PLAY▶], UM DIE"
style="text-decoration:none;display:flex;align-items:center;justify-content:space-between;width:100%;">
<span class="toc-item-title">2DRÜCKEN SIE [PLAY▶], UM DIE</span>
</a>
</li>
<li class="toc-row">
<a class="toc-item toc-item-anchor"
href="#nützliche-funktion"
data-ga-event="toc_item_click"
data-ga-location="toc"
data-ga-label="NÜTZLICHE FUNKTION"
style="text-decoration:none;display:flex;align-items:center;justify-content:space-between;width:100%;">
<span class="toc-item-title">NÜTZLICHE FUNKTION</span>
</a>
</li>
<li class="toc-row">
<a class="toc-item toc-item-anchor"
href="#rauschminderung"
data-ga-event="toc_item_click"
data-ga-location="toc"
data-ga-label="RAUSCHMINDERUNG"
style="text-decoration:none;display:flex;align-items:center;justify-content:space-between;width:100%;">
<span class="toc-item-title">RAUSCHMINDERUNG</span>
</a>
</li>
<li class="toc-row">
<a class="toc-item toc-item-anchor"
href="#einstellung-pip-bonusview"
data-ga-event="toc_item_click"
data-ga-location="toc"
data-ga-label="EINSTELLUNG PIP (BONUSVIEW)"
style="text-decoration:none;display:flex;align-items:center;justify-content:space-between;width:100%;">
<span class="toc-item-title">EINSTELLUNG PIP (BONUSVIEW)</span>
</a>
</li>
<li class="toc-row">
<a class="toc-item toc-item-anchor"
href="#kamerawinkel"
data-ga-event="toc_item_click"
data-ga-location="toc"
data-ga-label="KAMERAWINKEL"
style="text-decoration:none;display:flex;align-items:center;justify-content:space-between;width:100%;">
<span class="toc-item-title">KAMERAWINKEL</span>
</a>
</li>
<li class="toc-row">
<a class="toc-item toc-item-anchor"
href="#abspielen-von-bd-live-disks-mit-onlineinhalten"
data-ga-event="toc_item_click"
data-ga-location="toc"
data-ga-label="ABSPIELEN VON BD-LIVE-DISKS MIT ONLINEINHALTEN"
style="text-decoration:none;display:flex;align-items:center;justify-content:space-between;width:100%;">
<span class="toc-item-title">ABSPIELEN VON BD-LIVE-DISKS MIT ONLINEINHALTEN</span>
</a>
</li>
<li class="toc-row">
<a class="toc-item toc-item-anchor"
href="#hinweis-für-aacs-online"
data-ga-event="toc_item_click"
data-ga-location="toc"
data-ga-label="HINWEIS FÜR AACS-ONLINE"
style="text-decoration:none;display:flex;align-items:center;justify-content:space-between;width:100%;">
<span class="toc-item-title">HINWEIS FÜR AACS-ONLINE</span>
</a>
</li>
<li class="toc-row">
<a class="toc-item toc-item-anchor"
href="#de"
data-ga-event="toc_item_click"
data-ga-location="toc"
data-ga-label="DE"
style="text-decoration:none;display:flex;align-items:center;justify-content:space-between;width:100%;">
<span class="toc-item-title">DE</span>
</a>
</li>
<li class="toc-row">
<a class="toc-item toc-item-anchor"
href="#23"
data-ga-event="toc_item_click"
data-ga-location="toc"
data-ga-label="23"
style="text-decoration:none;display:flex;align-items:center;justify-content:space-between;width:100%;">
<span class="toc-item-title">23</span>
</a>
</li>
<li class="toc-row">
<a class="toc-item toc-item-anchor"
href="#suche"
data-ga-event="toc_item_click"
data-ga-location="toc"
data-ga-label="SUCHE"
style="text-decoration:none;display:flex;align-items:center;justify-content:space-between;width:100%;">
<span class="toc-item-title">SUCHE</span>
</a>
</li>
<li class="toc-row">
<a class="toc-item toc-item-anchor"
href="#verwendung-von-search"
data-ga-event="toc_item_click"
data-ga-location="toc"
data-ga-label="VERWENDUNG VON [SEARCH]"
style="text-decoration:none;display:flex;align-items:center;justify-content:space-between;width:100%;">
<span class="toc-item-title">VERWENDUNG VON [SEARCH]</span>
</a>
</li>
<li class="toc-row">
<a class="toc-item toc-item-anchor"
href="#verwendung-von-nummerntasten-direktsuche"
data-ga-event="toc_item_click"
data-ga-location="toc"
data-ga-label="VERWENDUNG VON [NUMMERNTASTEN] (DIREKTSUCHE)"
style="text-decoration:none;display:flex;align-items:center;justify-content:space-between;width:100%;">
<span class="toc-item-title">VERWENDUNG VON [NUMMERNTASTEN] (DIREKTSUCHE)</span>
</a>
</li>
<li class="toc-row">
<a class="toc-item toc-item-anchor"
href="#titelsuche"
data-ga-event="toc_item_click"
data-ga-location="toc"
data-ga-label="TITELSUCHE"
style="text-decoration:none;display:flex;align-items:center;justify-content:space-between;width:100%;">
<span class="toc-item-title">TITELSUCHE</span>
</a>
</li>
<li class="toc-row">
<a class="toc-item toc-item-anchor"
href="#kapitelsuche"
data-ga-event="toc_item_click"
data-ga-location="toc"
data-ga-label="KAPITELSUCHE"
style="text-decoration:none;display:flex;align-items:center;justify-content:space-between;width:100%;">
<span class="toc-item-title">KAPITELSUCHE</span>
</a>
</li>
<li class="toc-row">
<a class="toc-item toc-item-anchor"
href="#track-dateisuche"
data-ga-event="toc_item_click"
data-ga-location="toc"
data-ga-label="TRACK-/ DATEISUCHE"
style="text-decoration:none;display:flex;align-items:center;justify-content:space-between;width:100%;">
<span class="toc-item-title">TRACK-/ DATEISUCHE</span>
</a>
</li>
<li class="toc-row">
<a class="toc-item toc-item-anchor"
href="#umschalten-der-untertitelsprache"
data-ga-event="toc_item_click"
data-ga-location="toc"
data-ga-label="UMSCHALTEN DER UNTERTITELSPRACHE"
style="text-decoration:none;display:flex;align-items:center;justify-content:space-between;width:100%;">
<span class="toc-item-title">UMSCHALTEN DER UNTERTITELSPRACHE</span>
</a>
</li>
<li class="toc-row">
<a class="toc-item toc-item-anchor"
href="#dvd-video-avchd-divx-2"
data-ga-event="toc_item_click"
data-ga-location="toc"
data-ga-label="DVD VIDEO AVCHD DIVX"
style="text-decoration:none;display:flex;align-items:center;justify-content:space-between;width:100%;">
<span class="toc-item-title">DVD VIDEO AVCHD DIVX</span>
</a>
</li>
<li class="toc-row">
<a class="toc-item toc-item-anchor"
href="#umschalten-der-tonspur"
data-ga-event="toc_item_click"
data-ga-location="toc"
data-ga-label="UMSCHALTEN DER TONSPUR"
style="text-decoration:none;display:flex;align-items:center;justify-content:space-between;width:100%;">
<span class="toc-item-title">UMSCHALTEN DER TONSPUR</span>
</a>
</li>
<li class="toc-row">
<a class="toc-item toc-item-anchor"
href="#dvd-video-cd-avchd-divx-2"
data-ga-event="toc_item_click"
data-ga-location="toc"
data-ga-label="DVD VIDEO CD AVCHD DIVX®"
style="text-decoration:none;display:flex;align-items:center;justify-content:space-between;width:100%;">
<span class="toc-item-title">DVD VIDEO CD AVCHD DIVX®</span>
</a>
</li>
<li class="toc-row">
<a class="toc-item toc-item-anchor"
href="#einstellen-des-bd-audiomodus"
data-ga-event="toc_item_click"
data-ga-location="toc"
data-ga-label="EINSTELLEN DES BD-AUDIOMODUS"
style="text-decoration:none;display:flex;align-items:center;justify-content:space-between;width:100%;">
<span class="toc-item-title">EINSTELLEN DES BD-AUDIOMODUS</span>
</a>
</li>
<li class="toc-row">
<a class="toc-item toc-item-anchor"
href="#1-schnell"
data-ga-event="toc_item_click"
data-ga-location="toc"
data-ga-label="SCHNELL"
style="text-decoration:none;display:flex;align-items:center;justify-content:space-between;width:100%;">
<span class="toc-item-title">SCHNELL</span>
</a>
</li>
<li class="toc-row">
<a class="toc-item toc-item-anchor"
href="#2-benutzerdefiniertes-menü"
data-ga-event="toc_item_click"
data-ga-location="toc"
data-ga-label="BENUTZERDEFINIERTES MENÜ"
style="text-decoration:none;display:flex;align-items:center;justify-content:space-between;width:100%;">
<span class="toc-item-title">BENUTZERDEFINIERTES MENÜ</span>
</a>
</li>
<li class="toc-row">
<a class="toc-item toc-item-anchor"
href="#3-initialisierungsmenü"
data-ga-event="toc_item_click"
data-ga-location="toc"
data-ga-label="INITIALISIERUNGSMENÜ"
style="text-decoration:none;display:flex;align-items:center;justify-content:space-between;width:100%;">
<span class="toc-item-title">INITIALISIERUNGSMENÜ</span>
</a>
</li>
<li class="toc-row">
<a class="toc-item toc-item-anchor"
href="#4-menüfenster"
data-ga-event="toc_item_click"
data-ga-location="toc"
data-ga-label="MENÜFENSTER"
style="text-decoration:none;display:flex;align-items:center;justify-content:space-between;width:100%;">
<span class="toc-item-title">MENÜFENSTER</span>
</a>
</li>
<li class="toc-row">
<a class="toc-item toc-item-anchor"
href="#navigieren-durch-die-einrichtungsmenüs"
data-ga-event="toc_item_click"
data-ga-location="toc"
data-ga-label="NAVIGIEREN DURCH DIE EINRICHTUNGSMENÜS"
style="text-decoration:none;display:flex;align-items:center;justify-content:space-between;width:100%;">
<span class="toc-item-title">NAVIGIEREN DURCH DIE EINRICHTUNGSMENÜS</span>
</a>
</li>
<li class="toc-row">
<a class="toc-item toc-item-anchor"
href="#liste-der-einrichtungsmenüs"
data-ga-event="toc_item_click"
data-ga-location="toc"
data-ga-label="LISTE DER EINRICHTUNGSMENÜS"
style="text-decoration:none;display:flex;align-items:center;justify-content:space-between;width:100%;">
<span class="toc-item-title">LISTE DER EINRICHTUNGSMENÜS</span>
</a>
</li>
<li class="toc-row">
<a class="toc-item toc-item-anchor"
href="#bildformat"
data-ga-event="toc_item_click"
data-ga-location="toc"
data-ga-label="BILDFORMAT"
style="text-decoration:none;display:flex;align-items:center;justify-content:space-between;width:100%;">
<span class="toc-item-title">BILDFORMAT</span>
</a>
</li>
<li class="toc-row">
<a class="toc-item toc-item-anchor"
href="#hinweis-für-hdmi-videoauflösung-und-component-ausgang"
data-ga-event="toc_item_click"
data-ga-location="toc"
data-ga-label="HINWEIS FÜR „HDMI-VIDEOAUFLÖSUNG“ UND „COMPONENT-AUSGANG"
style="text-decoration:none;display:flex;align-items:center;justify-content:space-between;width:100%;">
<span class="toc-item-title">HINWEIS FÜR „HDMI-VIDEOAUFLÖSUNG“ UND „COMPONENT-AUSGANG</span>
</a>
</li>
<li class="toc-row">
<a class="toc-item toc-item-anchor"
href="#digitalausgang"
data-ga-event="toc_item_click"
data-ga-location="toc"
data-ga-label="DIGITALAUSGANG"
style="text-decoration:none;display:flex;align-items:center;justify-content:space-between;width:100%;">
<span class="toc-item-title">DIGITALAUSGANG</span>
</a>
</li>
<li class="toc-row">
<a class="toc-item toc-item-anchor"
href="#sicherung"
data-ga-event="toc_item_click"
data-ga-location="toc"
data-ga-label="SICHERUNG"
style="text-decoration:none;display:flex;align-items:center;justify-content:space-between;width:100%;">
<span class="toc-item-title">SICHERUNG</span>
</a>
</li>
<li class="toc-row">
<a class="toc-item toc-item-anchor"
href="#zeitweise-stornierung-der-kindersicherung"
data-ga-event="toc_item_click"
data-ga-location="toc"
data-ga-label="ZEITWEISE STORNIERUNG DER KINDERSICHERUNG"
style="text-decoration:none;display:flex;align-items:center;justify-content:space-between;width:100%;">
<span class="toc-item-title">ZEITWEISE STORNIERUNG DER KINDERSICHERUNG</span>
</a>
</li>
<li class="toc-row">
<a class="toc-item toc-item-anchor"
href="#one-touch-wiedergabe"
data-ga-event="toc_item_click"
data-ga-location="toc"
data-ga-label="ONE-TOUCH-WIEDERGABE"
style="text-decoration:none;display:flex;align-items:center;justify-content:space-between;width:100%;">
<span class="toc-item-title">ONE-TOUCH-WIEDERGABE</span>
</a>
</li>
<li class="toc-row">
<a class="toc-item toc-item-anchor"
href="#bereitschaftszustand"
data-ga-event="toc_item_click"
data-ga-location="toc"
data-ga-label="BEREITSCHAFTSZUSTAND"
style="text-decoration:none;display:flex;align-items:center;justify-content:space-between;width:100%;">
<span class="toc-item-title">BEREITSCHAFTSZUSTAND</span>
</a>
</li>
<li class="toc-row">
<a class="toc-item toc-item-anchor"
href="#systeminformationen"
data-ga-event="toc_item_click"
data-ga-location="toc"
data-ga-label="SYSTEMINFORMATIONEN"
style="text-decoration:none;display:flex;align-items:center;justify-content:space-between;width:100%;">
<span class="toc-item-title">SYSTEMINFORMATIONEN</span>
</a>
</li>
<li class="toc-row">
<a class="toc-item toc-item-anchor"
href="#mensprache-abfragen-und-einstellen"
data-ga-event="toc_item_click"
data-ga-location="toc"
data-ga-label="MENSPRACHE ABFRAGEN UND EINSTELLEN"
style="text-decoration:none;display:flex;align-items:center;justify-content:space-between;width:100%;">
<span class="toc-item-title">MENSPRACHE ABFRAGEN UND EINSTELLEN</span>
</a>
</li>
<li class="toc-row">
<a class="toc-item toc-item-anchor"
href="#empfang-von-bediensignalen-der-fernbedienung-des-fernsehgeräts"
data-ga-event="toc_item_click"
data-ga-location="toc"
data-ga-label="EMPFANG VON BEDIENSIGNALEN DER FERNBEDIENUNG DES FERNSEHGERÄTS"
style="text-decoration:none;display:flex;align-items:center;justify-content:space-between;width:100%;">
<span class="toc-item-title">EMPFANG VON BEDIENSIGNALEN DER FERNBEDIENUNG DES FERNSEHGERÄTS</span>
</a>
</li>
<li class="toc-row">
<a class="toc-item toc-item-anchor"
href="#netzwerkverbindung"
data-ga-event="toc_item_click"
data-ga-location="toc"
data-ga-label="NETZWERKVERBINDUNG"
style="text-decoration:none;display:flex;align-items:center;justify-content:space-between;width:100%;">
<span class="toc-item-title">NETZWERKVERBINDUNG</span>
</a>
</li>
<li class="toc-row">
<a class="toc-item toc-item-anchor"
href="#verbindung-prüfen"
data-ga-event="toc_item_click"
data-ga-location="toc"
data-ga-label="VERBINDUNG PRÜFEN"
style="text-decoration:none;display:flex;align-items:center;justify-content:space-between;width:100%;">
<span class="toc-item-title">VERBINDUNG PRÜFEN</span>
</a>
</li>
<li class="toc-row">
<a class="toc-item toc-item-anchor"
href="#1-drücken-sie-im-stoppmodus-setup"
data-ga-event="toc_item_click"
data-ga-location="toc"
data-ga-label="1 DRÜCKEN SIE IM STOPPMODUS [SETUP]"
style="text-decoration:none;display:flex;align-items:center;justify-content:space-between;width:100%;">
<span class="toc-item-title">1 DRÜCKEN SIE IM STOPPMODUS [SETUP]</span>
</a>
</li>
<li class="toc-row">
<a class="toc-item toc-item-anchor"
href="#6mit-enter-können-sie-zum-vorherigen-bildschirm-zurückkehren-alternativ-betätigen-sie-setup-um-den-vorgang-zu-beenden"
data-ga-event="toc_item_click"
data-ga-location="toc"
data-ga-label="6MIT [ENTER] KÖNNEN SIE ZUM VORHERIGEN BILDSCHIRM ZURÜCKKEHREN. ALTERNATIV BETÄTIGEN SIE [SETUP], UM DEN VORGANG ZU BEENDEN"
style="text-decoration:none;display:flex;align-items:center;justify-content:space-between;width:100%;">
<span class="toc-item-title">6MIT [ENTER] KÖNNEN SIE ZUM VORHERIGEN BILDSCHIRM ZURÜCKKEHREN. ALTERNATIV BETÄTIGEN SIE [SETUP], UM DEN VORGANG ZU BEENDEN</span>
</a>
</li>
<li class="toc-row">
<a class="toc-item toc-item-anchor"
href="#aktivierenstandard"
data-ga-event="toc_item_click"
data-ga-location="toc"
data-ga-label="AKTIVIEREN(STANDARD)"
style="text-decoration:none;display:flex;align-items:center;justify-content:space-between;width:100%;">
<span class="toc-item-title">AKTIVIEREN(STANDARD)</span>
</a>
</li>
<li class="toc-row">
<a class="toc-item toc-item-anchor"
href="#1-folgen-sie-den-schritten-1-bis-4-unter-verbindung-prüfen-auf-seite-36"
data-ga-event="toc_item_click"
data-ga-location="toc"
data-ga-label="1 FOLGEN SIE DEN SCHRITTEN 1 BIS 4 UNTER „VERBINDUNG PRÜFEN“ AUF SEITE 36"
style="text-decoration:none;display:flex;align-items:center;justify-content:space-between;width:100%;">
<span class="toc-item-title">1 FOLGEN SIE DEN SCHRITTEN 1 BIS 4 UNTER „VERBINDUNG PRÜFEN“ AUF SEITE 36</span>
</a>
</li>
<li class="toc-row">
<a class="toc-item toc-item-anchor"
href="#2-betätigen-sie-zur-wahl-von-aktivierenstandard-und-drücken-sie-dann-enter"
data-ga-event="toc_item_click"
data-ga-location="toc"
data-ga-label="2 BETÄTIGEN SIE [▲ / ▼] ZUR WAHL VON „AKTIVIEREN(STANDARD)“, UND DRÜCKEN SIE DANN [ENTER]"
style="text-decoration:none;display:flex;align-items:center;justify-content:space-between;width:100%;">
<span class="toc-item-title">2 BETÄTIGEN SIE [▲ / ▼] ZUR WAHL VON „AKTIVIEREN(STANDARD)“, UND DRÜCKEN SIE DANN [ENTER]</span>
</a>
</li>
<li class="toc-row">
<a class="toc-item toc-item-anchor"
href="#3betätigen-sie-enter-um-die-netzwerkeinstellungen-zu-aktivieren-und-die-netzwerkverbindung-automatisch-festzulegen-drücken-sie-setup-um-das-menü-zu-verlassen"
data-ga-event="toc_item_click"
data-ga-location="toc"
data-ga-label="3BETÄTIGEN SIE [ENTER], UM DIE NETZWERKEINSTELLUNGEN ZU AKTIVIEREN UND DIE NETZWERKVERBINDUNG AUTOMATISCH FESTZULEGEN. DRÜCKEN SIE [SETUP], UM DAS MENÜ ZU VERLASSEN"
style="text-decoration:none;display:flex;align-items:center;justify-content:space-between;width:100%;">
<span class="toc-item-title">3BETÄTIGEN SIE [ENTER], UM DIE NETZWERKEINSTELLUNGEN ZU AKTIVIEREN UND DIE NETZWERKVERBINDUNG AUTOMATISCH FESTZULEGEN. DRÜCKEN SIE [SETUP], UM DAS MENÜ ZU VERLASSEN</span>
</a>
</li>
<li class="toc-row">
<a class="toc-item toc-item-anchor"
href="#aktivierenbenutzerdef"
data-ga-event="toc_item_click"
data-ga-location="toc"
data-ga-label="AKTIVIEREN(BENUTZERDEF.)"
style="text-decoration:none;display:flex;align-items:center;justify-content:space-between;width:100%;">
<span class="toc-item-title">AKTIVIEREN(BENUTZERDEF.)</span>
</a>
</li>
<li class="toc-row">
<a class="toc-item toc-item-anchor"
href="#ip-adresse-einrichten-dns-einstellungen"
data-ga-event="toc_item_click"
data-ga-location="toc"
data-ga-label="IP-ADRESSE EINRICHTEN /DNS-EINSTELLUNGEN"
style="text-decoration:none;display:flex;align-items:center;justify-content:space-between;width:100%;">
<span class="toc-item-title">IP-ADRESSE EINRICHTEN /DNS-EINSTELLUNGEN</span>
</a>
</li>
<li class="toc-row">
<a class="toc-item toc-item-anchor"
href="#3-wählen-sie-mit-die-option-ip-adresse-einrichten-und-drücken-sie-dann-wiederholt-auf-enter-um-die-gewünschte-einstellung-zu-erreichen"
data-ga-event="toc_item_click"
data-ga-location="toc"
data-ga-label="3 WÄHLEN SIE MIT [▲ / ▼] DIE OPTION „IP-ADRESSE EINRICHTEN“ UND DRÜCKEN SIE DANN WIEDERHOLT AUF [ENTER], UM DIE GEWÜNSCHTE EINSTELLUNG ZU ERREICHEN"
style="text-decoration:none;display:flex;align-items:center;justify-content:space-between;width:100%;">
<span class="toc-item-title">3 WÄHLEN SIE MIT [▲ / ▼] DIE OPTION „IP-ADRESSE EINRICHTEN“ UND DRÜCKEN SIE DANN WIEDERHOLT AUF [ENTER], UM DIE GEWÜNSCHTE EINSTELLUNG ZU ERREICHEN</span>
</a>
</li>
<li class="toc-row">
<a class="toc-item toc-item-anchor"
href="#nach-der-auswahl-von-manuell-gehen-sie-wie-folgt-vor-um-die-ip-adresse-und-dns-festzulegen"
data-ga-event="toc_item_click"
data-ga-location="toc"
data-ga-label="NACH DER AUSWAHL VON „MANUELL“ GEHEN SIE WIE FOLGT VOR, UM DIE IP-ADRESSE UND DNS FESTZULEGEN"
style="text-decoration:none;display:flex;align-items:center;justify-content:space-between;width:100%;">
<span class="toc-item-title">NACH DER AUSWAHL VON „MANUELL“ GEHEN SIE WIE FOLGT VOR, UM DIE IP-ADRESSE UND DNS FESTZULEGEN</span>
</a>
</li>
<li class="toc-row">
<a class="toc-item toc-item-anchor"
href="#4mit-return-können-sie-zum-vorherigen-bildschirm-zurückkehren-alternativ-betätigen-sie-setup-um-den-vorgang-zu-beenden"
data-ga-event="toc_item_click"
data-ga-location="toc"
data-ga-label="4MIT [RETURN] KÖNNEN SIE ZUM VORHERIGEN BILDSCHIRM ZURÜCKKEHREN. ALTERNATIV BETÄTIGEN SIE [SETUP], UM DEN VORGANG ZU BEENDEN"
style="text-decoration:none;display:flex;align-items:center;justify-content:space-between;width:100%;">
<span class="toc-item-title">4MIT [RETURN] KÖNNEN SIE ZUM VORHERIGEN BILDSCHIRM ZURÜCKKEHREN. ALTERNATIV BETÄTIGEN SIE [SETUP], UM DEN VORGANG ZU BEENDEN</span>
</a>
</li>
<li class="toc-row">
<a class="toc-item toc-item-anchor"
href="#proxy-einstellungen"
data-ga-event="toc_item_click"
data-ga-location="toc"
data-ga-label="PROXY-EINSTELLUNGEN"
style="text-decoration:none;display:flex;align-items:center;justify-content:space-between;width:100%;">
<span class="toc-item-title">PROXY-EINSTELLUNGEN</span>
</a>
</li>
<li class="toc-row">
<a class="toc-item toc-item-anchor"
href="#1-führen-sie-die-schritte-1-bis-4-des-abschnitts-verbindung-prüfen-auf-seite-36-durch"
data-ga-event="toc_item_click"
data-ga-location="toc"
data-ga-label="1 FÜHREN SIE DIE SCHRITTE 1 BIS 4 DES ABSCHNITTS „VERBINDUNG PRÜFEN“ AUF SEITE 36 DURCH"
style="text-decoration:none;display:flex;align-items:center;justify-content:space-between;width:100%;">
<span class="toc-item-title">1 FÜHREN SIE DIE SCHRITTE 1 BIS 4 DES ABSCHNITTS „VERBINDUNG PRÜFEN“ AUF SEITE 36 DURCH</span>
</a>
</li>
<li class="toc-row">
<a class="toc-item toc-item-anchor"
href="#3-wählen-sie-mit-die-option-proxy-einstellungen-und-drücken-sie-dann-wiederholt-auf-enter-um-die-gewünschte-einstellung-zu-erreichen"
data-ga-event="toc_item_click"
data-ga-location="toc"
data-ga-label="3 WÄHLEN SIE MIT [▲ / ▼] DIE OPTION „PROXY-EINSTELLUNGEN“ UND DRÜCKEN SIE DANN WIEDERHOLT AUF [ENTER], UM DIE GEWÜNSCHTE EINSTELLUNG ZU ERREICHEN"
style="text-decoration:none;display:flex;align-items:center;justify-content:space-between;width:100%;">
<span class="toc-item-title">3 WÄHLEN SIE MIT [▲ / ▼] DIE OPTION „PROXY-EINSTELLUNGEN“ UND DRÜCKEN SIE DANN WIEDERHOLT AUF [ENTER], UM DIE GEWÜNSCHTE EINSTELLUNG ZU ERREICHEN</span>
</a>
</li>
<li class="toc-row">
<a class="toc-item toc-item-anchor"
href="#nach-der-auswahl-von-verwenden-gehen-sie-wie-folgt-vor-um-proxy-adresse-und-proxy-port-festzulegen"
data-ga-event="toc_item_click"
data-ga-location="toc"
data-ga-label="NACH DER AUSWAHL VON „VERWENDEN“ GEHEN SIE WIE FOLGT VOR, UM PROXY-ADRESSE UND PROXY-PORT FESTZULEGEN"
style="text-decoration:none;display:flex;align-items:center;justify-content:space-between;width:100%;">
<span class="toc-item-title">NACH DER AUSWAHL VON „VERWENDEN“ GEHEN SIE WIE FOLGT VOR, UM PROXY-ADRESSE UND PROXY-PORT FESTZULEGEN</span>
</a>
</li>
<li class="toc-row">
<a class="toc-item toc-item-anchor"
href="#verbindungsgeschwindigk"
data-ga-event="toc_item_click"
data-ga-location="toc"
data-ga-label="VERBINDUNGSGESCHWINDIGK"
style="text-decoration:none;display:flex;align-items:center;justify-content:space-between;width:100%;">
<span class="toc-item-title">VERBINDUNGSGESCHWINDIGK</span>
</a>
</li>
<li class="toc-row">
<a class="toc-item toc-item-anchor"
href="#1führen-sie-die-schritte-1-bis-4-des-abschnitts-verbindung-prüfen-auf-seite-36-durch"
data-ga-event="toc_item_click"
data-ga-location="toc"
data-ga-label="1FÜHREN SIE DIE SCHRITTE 1 BIS 4 DES ABSCHNITTS „VERBINDUNG PRÜFEN“ AUF SEITE 36 DURCH"
style="text-decoration:none;display:flex;align-items:center;justify-content:space-between;width:100%;">
<span class="toc-item-title">1FÜHREN SIE DIE SCHRITTE 1 BIS 4 DES ABSCHNITTS „VERBINDUNG PRÜFEN“ AUF SEITE 36 DURCH</span>
</a>
</li>
<li class="toc-row">
<a class="toc-item toc-item-anchor"
href="#5mit-return-können-sie-zum-vorherigen-bildschirm-zurückkehren-alternativ-betätigen-sie-setup-um-den-vorgang-zu-beenden"
data-ga-event="toc_item_click"
data-ga-location="toc"
data-ga-label="5MIT [RETURN] KÖNNEN SIE ZUM VORHERIGEN BILDSCHIRM ZURÜCKKEHREN. ALTERNATIV BETÄTIGEN SIE [SETUP], UM DEN VORGANG ZU BEENDEN"
style="text-decoration:none;display:flex;align-items:center;justify-content:space-between;width:100%;">
<span class="toc-item-title">5MIT [RETURN] KÖNNEN SIE ZUM VORHERIGEN BILDSCHIRM ZURÜCKKEHREN. ALTERNATIV BETÄTIGEN SIE [SETUP], UM DEN VORGANG ZU BEENDEN</span>
</a>
</li>
<li class="toc-row">
<a class="toc-item toc-item-anchor"
href="#bd-live-einstellungen"
data-ga-event="toc_item_click"
data-ga-location="toc"
data-ga-label="BD-LIVE-EINSTELLUNGEN"
style="text-decoration:none;display:flex;align-items:center;justify-content:space-between;width:100%;">
<span class="toc-item-title">BD-LIVE-EINSTELLUNGEN</span>
</a>
</li>
<li class="toc-row">
<a class="toc-item toc-item-anchor"
href="#1führen-sie-die-schritte-1-bis-4-des-abschnitts-netzwerkumgepung-verbindung-prufen-auf-seite-36-durch"
data-ga-event="toc_item_click"
data-ga-location="toc"
data-ga-label="1FÜHREN SIE DIE SCHRITTE 1 BIS 4 DES ABSCHNITTS NETZWERKUMGEPUNG „VERBINDUNG PRUFEN“ AUF SEITE 36 DURCH"
style="text-decoration:none;display:flex;align-items:center;justify-content:space-between;width:100%;">
<span class="toc-item-title">1FÜHREN SIE DIE SCHRITTE 1 BIS 4 DES ABSCHNITTS NETZWERKUMGEPUNG „VERBINDUNG PRUFEN“ AUF SEITE 36 DURCH</span>
</a>
</li>
<li class="toc-row">
<a class="toc-item toc-item-anchor"
href="#deaktivieren"
data-ga-event="toc_item_click"
data-ga-location="toc"
data-ga-label="DEAKTIVIEREN"
style="text-decoration:none;display:flex;align-items:center;justify-content:space-between;width:100%;">
<span class="toc-item-title">DEAKTIVIEREN</span>
</a>
</li>
<li class="toc-row">
<a class="toc-item toc-item-anchor"
href="#software-update-2"
data-ga-event="toc_item_click"
data-ga-location="toc"
data-ga-label="SOFTWARE-UPDATE"
style="text-decoration:none;display:flex;align-items:center;justify-content:space-between;width:100%;">
<span class="toc-item-title">SOFTWARE-UPDATE</span>
</a>
</li>
<li class="toc-row">
<a class="toc-item toc-item-anchor"
href="#aktuelle-version"
data-ga-event="toc_item_click"
data-ga-location="toc"
data-ga-label="AKTUELLE VERSION"
style="text-decoration:none;display:flex;align-items:center;justify-content:space-between;width:100%;">
<span class="toc-item-title">AKTUELLE VERSION</span>
</a>
</li>
<li class="toc-row">
<a class="toc-item toc-item-anchor"
href="#disk-update"
data-ga-event="toc_item_click"
data-ga-location="toc"
data-ga-label="DISK-UPDATE"
style="text-decoration:none;display:flex;align-items:center;justify-content:space-between;width:100%;">
<span class="toc-item-title">DISK-UPDATE</span>
</a>
</li>
<li class="toc-row">
<a class="toc-item toc-item-anchor"
href="#7-nach-abschluss-des-disk-upgrades-startet-das-gerät-erneut-und-wirft-die-disk-aus"
data-ga-event="toc_item_click"
data-ga-location="toc"
data-ga-label="7 NACH ABSCHLUSS DES DISK-UPGRADES STARTET DAS GERÄT ERNEUT UND WIRFT DIE DISK AUS"
style="text-decoration:none;display:flex;align-items:center;justify-content:space-between;width:100%;">
<span class="toc-item-title">7 NACH ABSCHLUSS DES DISK-UPGRADES STARTET DAS GERÄT ERNEUT UND WIRFT DIE DISK AUS</span>
</a>
</li>
<li class="toc-row">
<a class="toc-item toc-item-anchor"
href="#initialisieren"
data-ga-event="toc_item_click"
data-ga-location="toc"
data-ga-label="INITIALISIEREN"
style="text-decoration:none;display:flex;align-items:center;justify-content:space-between;width:100%;">
<span class="toc-item-title">INITIALISIEREN</span>
</a>
</li>
<li class="toc-row">
<a class="toc-item toc-item-anchor"
href="#5-drücken-sie-setup-um-das-menü-zu-w-a-verlaspenate-ein-und"
data-ga-event="toc_item_click"
data-ga-location="toc"
data-ga-label="5 DRÜCKEN SIE [SETUP], UM DAS MENÜ ZU W A VERLASPENATE EIN UND"
style="text-decoration:none;display:flex;align-items:center;justify-content:space-between;width:100%;">
<span class="toc-item-title">5 DRÜCKEN SIE [SETUP], UM DAS MENÜ ZU W A VERLASPENATE EIN UND</span>
</a>
</li>
<li class="toc-row">
<a class="toc-item toc-item-anchor"
href="#problemlösungen"
data-ga-event="toc_item_click"
data-ga-location="toc"
data-ga-label="PROBLEMLÖSUNGEN"
style="text-decoration:none;display:flex;align-items:center;justify-content:space-between;width:100%;">
<span class="toc-item-title">PROBLEMLÖSUNGEN</span>
</a>
</li>
<li class="toc-row">
<a class="toc-item toc-item-anchor"
href="#technische-daten"
data-ga-event="toc_item_click"
data-ga-location="toc"
data-ga-label="TECHNISCHE DATEN"
style="text-decoration:none;display:flex;align-items:center;justify-content:space-between;width:100%;">
<span class="toc-item-title">TECHNISCHE DATEN</span>
</a>
</li>
</ul>
</div>
<script>
(function(){
document.addEventListener('click', function(e){
const item = e.target.closest('.toc-item');
if (item && typeof window.nfTrack === 'function') {
window.nfTrack('toc_item_click', {
page_target: parseInt(item.dataset.page || '0', 10),
label: item.dataset.gaLabel || '',
location: 'toc'
});
}
}, true);
// Recherche live dans le sommaire
var searchInput = document.getElementById('toc-search');
if (searchInput) {
var tocList = document.getElementById('toc-list');
var rows = tocList ? tocList.querySelectorAll('.toc-row') : [];
var tracked = false;
searchInput.addEventListener('input', function() {
var q = this.value.toLowerCase().trim();
// Analytics : tracker la première saisie
if (q.length > 0 && !tracked && typeof window.nfTrack === 'function') {
window.nfTrack('toc_search_used', { location: 'toc' });
tracked = true;
}
for (var i = 0; i < rows.length; i++) {
var title = rows[i].textContent.toLowerCase();
rows[i].style.display = (q === '' || title.indexOf(q) !== -1) ? '' : 'none';
}
});
}
})();
</script>
<div id="chatgpt-box-notice" class="panel panel-default" style="border:1px solid #e5e5e5;">
<div class="panel-heading" style="background-color:#115192;color:white;padding:10px;">
<div style="margin:0;font-size:18px;font-weight:bold;">
Handbuch-Assistent <svg xmlns="http://www.w3.org/2000/svg" viewBox="0 0 20 20" fill="currentColor" width="1em" height="1em" aria-hidden="true" style="vertical-align:-0.15em;display:inline-block;flex-shrink:0;"><path d="M10 1.5a.75.75 0 0 1 .75.75v.5h2.5a2 2 0 0 1 2 2v.25h.25a2 2 0 0 1 2 2v6.5a2 2 0 0 1-2 2h-.25v.25a2 2 0 0 1-2 2h-6.5a2 2 0 0 1-2-2v-.25H4.5a2 2 0 0 1-2-2v-6.5a2 2 0 0 1 2-2h.25V4.75a2 2 0 0 1 2-2h2.5v-.5a.75.75 0 0 1 .75-.75ZM7.5 8.25a.75.75 0 1 0 0 1.5.75.75 0 0 0 0-1.5Zm5 0a.75.75 0 1 0 0 1.5.75.75 0 0 0 0-1.5Zm-5.5 4a.75.75 0 0 0 0 1.5h6a.75.75 0 0 0 0-1.5H7Z"/></svg> </div>
<span class="small">Angetrieben von Anthropic</span>
</div>
<div class="panel-body" style="padding:10px;">
<div id="chatgpt-messages-notice"
style="height:500px;overflow:auto;background:#fafafa;border:1px solid #eee;padding:8px;border-radius:4px;margin-bottom:10px;display:flex;flex-direction:column;">
<div id="waiting-prompt" style="display:none;margin-bottom:6px;text-align:left;">
<span class="chat-bubble"
style="display:inline-block;background:#fff;border:1px solid #eee;padding:8px 12px;border-radius:12px;max-width:90%;white-space:pre-wrap;">
💬 Hallo! Ich bin Ihr Handbuch-Assistent.Ich kenne Ihr<strong> TOSHIBA BDX2000KE</strong>.
Wie kann ich Ihnen helfen? (Verwendung, Einstellungen, Fehlercodes, Wartung, Erklärung eines Schritts usw.)💡 <strong>Beispiele :</strong>
• Wie benutze ich es ?
• Fehlercode E3 ?
• Wie reinige ich es ?
</span>
</div>
<div id="chatgpt-waiting-line" class="chatgpt-waiting-line" style="margin-top:auto;">
<span class="chatgpt-waiting-text">
Warten auf Ihre Nachricht <span class="chatgpt-dots" aria-hidden="true"><span></span><span></span><span></span></span>
</span>
</div>
</div>
<div id="chatgpt-composer">
<div id="chatgpt-photo-preview" style="display:none;align-items:center;gap:8px;margin-top:8px;">
<span style="position:relative;display:inline-block;">
<img id="chatgpt-photo-thumb" src="" alt="" style="max-height:64px;max-width:90px;border-radius:8px;border:1px solid #cbd5e1;display:block;">
<button id="chatgpt-photo-remove" type="button" aria-label="Foto entfernen" style="position:absolute;top:-7px;right:-7px;width:20px;height:20px;border:none;border-radius:50%;background:#ef4444;color:#fff;font-size:13px;line-height:18px;cursor:pointer;padding:0;">×</button>
</span>
<span id="chatgpt-photo-status" style="font-size:12px;color:#64748b;"></span>
</div>
<div class="mt-2" style="display:flex;flex-wrap:nowrap;gap:6px;margin-top:8px;align-items:center;">
<div style="position:relative;flex:1 1 auto;min-width:0;">
<label id="chatgpt-photo-btn" for="chatgpt-photo-input"
title="Ein Foto anhängen"
aria-label="Ein Foto anhängen"
style="position:absolute;left:9px;top:50%;transform:translateY(-50%);margin:0;display:flex;align-items:center;justify-content:center;width:22px;height:22px;color:#64748b;cursor:pointer;user-select:none;">
<svg viewBox="0 0 24 24" width="19" height="19" fill="none" stroke="currentColor" stroke-width="1.7" stroke-linecap="round" stroke-linejoin="round" aria-hidden="true" focusable="false">
<path d="M3 8.5A1.5 1.5 0 0 1 4.5 7h2.7l1.2-1.9A1 1 0 0 1 9.2 4.6h5.6a1 1 0 0 1 .8.5L16.8 7h2.7A1.5 1.5 0 0 1 21 8.5v9A1.5 1.5 0 0 1 19.5 19h-15A1.5 1.5 0 0 1 3 17.5z"/>
<circle cx="12" cy="12.9" r="3.3"/>
</svg>
</label>
<input id="chatgpt-photo-input" type="file" accept="image/*" style="display:none;">
<input id="chatgpt-photo-camera" type="file" accept="image/*" capture="environment" style="display:none;">
<div id="chatgpt-photo-menu" hidden
style="position:absolute;left:0;bottom:calc(100% + 6px);z-index:30;background:#fff;border:1px solid #dbe1ea;border-radius:10px;box-shadow:0 6px 20px rgba(15,23,42,.15);overflow:hidden;min-width:190px;">
<button type="button" data-photo-act="camera"
style="display:flex;align-items:center;gap:8px;width:100%;padding:10px 12px;border:0;background:none;font-size:14px;color:#1f2937;text-align:left;cursor:pointer;">
<svg viewBox="0 0 24 24" width="17" height="17" fill="none" stroke="currentColor" stroke-width="1.7" stroke-linecap="round" stroke-linejoin="round" aria-hidden="true"><path d="M3 8.5A1.5 1.5 0 0 1 4.5 7h2.7l1.2-1.9A1 1 0 0 1 9.2 4.6h5.6a1 1 0 0 1 .8.5L16.8 7h2.7A1.5 1.5 0 0 1 21 8.5v9A1.5 1.5 0 0 1 19.5 19h-15A1.5 1.5 0 0 1 3 17.5z"/><circle cx="12" cy="12.9" r="3.3"/></svg>
Foto aufnehmen </button>
<button type="button" data-photo-act="gallery"
style="display:flex;align-items:center;gap:8px;width:100%;padding:10px 12px;border:0;border-top:1px solid #eef2f7;background:none;font-size:14px;color:#1f2937;text-align:left;cursor:pointer;">
<svg viewBox="0 0 24 24" width="17" height="17" fill="none" stroke="currentColor" stroke-width="1.7" stroke-linecap="round" stroke-linejoin="round" aria-hidden="true"><rect x="3" y="5" width="18" height="14" rx="2"/><circle cx="8.5" cy="10" r="1.5"/><path d="M21 15.5 16.5 11 6 19"/></svg>
Foto auswählen </button>
</div>
<input id="chatgpt-input-notice"
type="text"
class="form-control input-sm"
placeholder="Stellen Sie eine Frage zu dieser Anleitung..."
autocomplete="off"
style="width:100%;padding-left:38px;">
</div>
<button id="chatgpt-send-notice"
style="flex:0 0 auto;white-space:nowrap;"
class="btn btn-primary btn-sm"
data-ga-event="assistant_send_click"
data-ga-location="assistant_box"
data-ga-label="send_button">
Senden </button>
</div>
<div id="chatgpt-status-notice" class="small text-muted mt-1" style="min-height:18px;margin-top:4px;"></div>
</div><!-- /chatgpt-composer -->
</div>
</div>
<script>
(function () {
const input = document.getElementById('chatgpt-input-notice');
const send = document.getElementById('chatgpt-send-notice');
if (!input || !send) return;
let conversationStarted = false;
input.addEventListener('focus', function () {
if (typeof window.nfTrack === 'function') {
window.nfTrackOnce('assistant_input_focus', 'assistant_input_focus', {
location: 'assistant_box'
});
}
});
input.addEventListener('keydown', function (e) {
if (e.key === 'Enter') {
const val = (input.value || '').trim();
if (!val) return;
if (typeof window.nfTrack === 'function') {
window.nfTrack('assistant_message_send', {
method: 'enter_key',
message_length: val.length,
location: 'assistant_box'
});
if (!conversationStarted) {
conversationStarted = true;
window.nfTrack('assistant_conversation_start', {
first_message_length: val.length,
location: 'assistant_box'
});
}
}
}
});
send.addEventListener('click', function () {
const val = (input.value || '').trim();
if (!val) return;
if (typeof window.nfTrack === 'function') {
window.nfTrack('assistant_message_send', {
method: 'send_button',
message_length: val.length,
location: 'assistant_box'
});
if (!conversationStarted) {
conversationStarted = true;
window.nfTrack('assistant_conversation_start', {
first_message_length: val.length,
location: 'assistant_box'
});
}
}
});
})();
</script>
<div class="panel panel-default" style="margin-top:15px;border:1px solid #e5e5e5;">
<div class="panel-heading" style="background-color:#f5f5f5;padding:10px;">
<div style="margin:0;font-size:16px;font-weight:bold;">
<i class="fa fa-info-circle"></i>
Produktinformationen </div>
</div>
<div class="panel-body" style="padding:10px;">
<p><strong>Marke :</strong> TOSHIBA</p>
<p><strong>Modell :</strong> BDX2000KE</p>
<p><strong>Kategorie :</strong> Blu-ray player</p>
</div>
</div>
</div><!-- /ai-sidebar -->
</div>
</div>
<script>
(function(){
function moveMobile(){
if (window.innerWidth >= 992) return;
// Sommaire → avant le viewer
var toc = document.getElementById('toc-container');
var tocSlot = document.getElementById('toc-mobile-slot');
if (toc && tocSlot && !tocSlot.contains(toc)) {
tocSlot.appendChild(toc);
}
// Assistant notice + Questions fréquentes → sous le viewer
var assistantSlot = document.getElementById('mobile-assistant-slot');
if (!assistantSlot) return;
var chat = document.getElementById('chatgpt-box-notice');
if (chat && !assistantSlot.contains(chat)) {
assistantSlot.appendChild(chat);
}
var faqPanel = document.getElementById('sidebar-userfaq-panel');
if (faqPanel && !assistantSlot.contains(faqPanel)) {
assistantSlot.appendChild(faqPanel);
}
}
// 2026-07-31 : appel IMMEDIAT, sans attendre DOMContentLoaded.
// Le sommaire, l'assistant et la FAQ sont declares plus haut dans le
// document (lignes ~2080, 2170, 2290), ils existent donc deja ici. En
// attendant DOMContentLoaded, le deplacement avait lieu APRES le premier
// affichage : le sommaire s'inserait au-dessus du viewer et poussait toute
// la page vers le bas. C'etait la premiere cause de decalage de mise en
// page du site sur mobile (CLS 0,25 des le chargement).
moveMobile();
})();
</script>
</div>
<footer id="footer" class="nf-footer">
<style>
/* ============================================================
FOOTER MODERNE
============================================================ */
.nf-footer {
background: linear-gradient(180deg, #0f172a 0%, #0a1426 100%);
color: #cbd5e1;
margin-top: 40px;
padding: 40px 0 0;
font-size: 14px;
line-height: 1.6;
}
.nf-footer a { color: #cbd5e1; text-decoration: none; transition: color .15s; }
.nf-footer a:hover { color: #60a5fa; text-decoration: none; }
.nf-footer-top {
max-width: 1200px;
margin: 0 auto;
padding: 0 20px 32px;
display: grid;
grid-template-columns: 2fr 1fr 1fr 1fr 1fr;
gap: 32px;
}
@media (max-width: 1024px) {
.nf-footer-top { grid-template-columns: 1fr 1fr 1fr; gap: 28px; }
.nf-footer-col--about { grid-column: 1 / -1; }
}
@media (max-width: 600px) {
.nf-footer-top { grid-template-columns: 1fr 1fr; gap: 24px; padding: 0 16px 24px; }
.nf-footer-col--about { grid-column: 1 / -1; }
}
.nf-footer-col h4,
.nf-footer-col h5 {
color: #f1f5f9;
font-size: 14px;
font-weight: 700;
text-transform: uppercase;
letter-spacing: 0.5px;
margin: 0 0 14px;
}
.nf-footer-col ul {
list-style: none;
padding: 0;
margin: 0;
}
.nf-footer-col li {
margin-bottom: 8px;
}
/* Col "À propos" : branding + stats */
.nf-footer-brand {
display: flex;
align-items: center;
gap: 10px;
margin-bottom: 12px;
}
.nf-footer-brand h4 {
margin: 0;
font-size: 18px;
text-transform: none;
letter-spacing: 0;
color: #fff;
}
.nf-footer-brand i {
font-size: 22px;
color: #60a5fa;
}
.nf-footer-desc {
color: #cbd5e1;
margin: 0 0 16px;
max-width: 340px;
}
.nf-footer-stats {
display: flex;
gap: 18px;
flex-wrap: wrap;
}
.nf-footer-stat {
background: rgba(96, 165, 250, 0.08);
border: 1px solid rgba(96, 165, 250, 0.18);
border-radius: 10px;
padding: 10px 14px;
min-width: 120px;
}
.nf-footer-stat-num {
display: block;
font-size: 18px;
font-weight: 800;
color: #f1f5f9;
line-height: 1.2;
}
.nf-footer-stat-lbl {
display: block;
font-size: 12px;
color: #cbd5e1;
margin-top: 2px;
}
/* Badges de réassurance */
.nf-footer-badges {
display: flex;
flex-wrap: wrap;
gap: 10px;
margin-top: 16px;
}
.nf-footer-badge {
display: inline-flex;
align-items: center;
gap: 6px;
font-size: 12px;
color: #cbd5e1;
background: rgba(255, 255, 255, 0.04);
padding: 6px 10px;
border-radius: 999px;
border: 1px solid rgba(255, 255, 255, 0.06);
}
.nf-footer-badge i { color: #4ade80; }
/* Bas de footer : copyright + legal */
.nf-footer-bottom {
border-top: 1px solid rgba(255, 255, 255, 0.08);
background: rgba(0, 0, 0, 0.2);
padding: 16px 20px;
font-size: 13px;
color: #cbd5e1;
}
.nf-footer-bottom-inner {
max-width: 1200px;
margin: 0 auto;
display: flex;
justify-content: space-between;
align-items: center;
flex-wrap: wrap;
gap: 12px;
}
.nf-footer-bottom-links {
display: flex;
gap: 18px;
flex-wrap: wrap;
}
.nf-footer-bottom-links a { color: #cbd5e1; }
.nf-footer-bottom-links a:hover { color: #fff; }
.nf-footer-bottom-links button {
background: none;
border: 0;
padding: 0;
color: #cbd5e1;
font: inherit;
cursor: pointer;
}
.nf-footer-bottom-links button:hover { color: #fff; }
@media (max-width: 600px) {
.nf-footer-bottom-inner { justify-content: center; text-align: center; }
.nf-footer-bottom-links { justify-content: center; }
}
</style>
<!-- Bloc principal -->
<div class="nf-footer-top">
<div class="nf-footer-col nf-footer-col--about">
<div class="nf-footer-brand">
<i class="fa fa-book"></i>
<h4>EinfachAnleitung</h4>
</div>
<p class="nf-footer-desc">
Finden Sie alle Bedienungsanleitungen für Ihre Haushaltsgeräte, Fahrzeuge, Telefone und andere elektronische Geräte mit Notice Facile, dem vollständigen Anleitungsverzeichnis. </p>
<div class="nf-footer-badges">
<span class="nf-footer-badge"><i class="fa fa-lock"></i> Sichere Website</span>
<span class="nf-footer-badge"><i class="fa fa-check-circle"></i> 100% kostenlos</span>
<span class="nf-footer-badge"><i class="fa fa-download"></i> Ohne Anmeldung</span>
</div>
</div>
<!-- Navigation -->
<div class="nf-footer-col">
<h5>Navigation</h5>
<ul>
<li><a href="https://www.notice-facile.com/de/">Startseite</a></li>
<li><a href="/de/marques">Alle Marken</a></li>
<li><a href="/de/categories">Alle Kategorien</a></li>
<li><a href="/de/ueber-uns">Über uns</a></li>
<li><a href="/de/kontakt">Kontakt</a></li>
<li><a href="https://www.notice-facile.com/de/blog">Neuigkeiten</a></li>
<li><a href="/de/last">Neueste Ergänzungen</a></li>
</ul>
</div>
<div class="nf-footer-col">
<h5>Beliebte Marken</h5>
<ul>
<li><a href="https://www.notice-facile.com/de/marke/1/samsung">Samsung</a></li>
<li><a href="https://www.notice-facile.com/de/marke/18/bosch">Bosch</a></li>
<li><a href="https://www.notice-facile.com/de/marke/5/philips">Philips</a></li>
<li><a href="https://www.notice-facile.com/de/marke/16/lg">LG</a></li>
<li><a href="https://www.notice-facile.com/de/marke/6/sony">Sony</a></li>
<li><a href="https://www.notice-facile.com/de/marke/31/apple">Apple</a></li>
<li><a href="https://www.notice-facile.com/de/marke/57/miele">Miele</a></li>
<li><a href="https://www.notice-facile.com/de/marke/9/hp">HP</a></li>
</ul>
</div>
<!-- Catégories populaires — pointent vers les vraies pages catégories
/categorie/{id}/{slug} (indexables, contenu éditorial dédié) -->
<div class="nf-footer-col">
<h5>Beliebte Kategorien</h5>
<ul>
<li><a href="https://www.notice-facile.com/de/kategorie/55/refrigerateur">Kühlschrank</a></li>
<li><a href="https://www.notice-facile.com/de/kategorie/177/televiseur">Fernseher</a></li>
<li><a href="https://www.notice-facile.com/de/kategorie/4/lave-linge">Waschmaschine</a></li>
<li><a href="https://www.notice-facile.com/de/kategorie/30/lave-vaisselle">Geschirrspüler</a></li>
<li><a href="https://www.notice-facile.com/de/kategorie/148/aspirateur">Staubsauger</a></li>
<li><a href="https://www.notice-facile.com/de/kategorie/1472/four">Backofen</a></li>
<li><a href="https://www.notice-facile.com/de/kategorie/8/climatiseur">Klimaanlage</a></li>
<li><a href="https://www.notice-facile.com/de/kategorie/160/ordinateur-portable">Laptop</a></li>
</ul>
</div>
<div class="nf-footer-col">
<h5>Informationen</h5>
<ul>
<li><a href="/de/impressum">Impressum</a></li>
<li><a href="/de/datenschutz">Datenschutzerklärung</a></li>
<li><a href="/de/nutzungsbedingungen">Allgemeine Nutzungsbedingungen</a></li>
<li><a href="/de/kontakt">Inhalt melden</a></li>
</ul>
</div>
</div>
<!-- Bas de footer -->
<div class="nf-footer-bottom">
<div class="nf-footer-bottom-inner">
<div>
© 2026 <a href="https://www.notice-facile.com" style="text-decoration:underline !important;text-underline-offset:2px">EinfachAnleitung</a>
— Alle Rechte vorbehalten </div>
<div class="nf-footer-bottom-links">
<a href="/de/impressum">Impressum</a>
<a href="/de/datenschutz">Datenschutz</a>
<a href="/de/nutzungsbedingungen">Nutzungsbedingungen</a>
<a href="/de/kontakt">Kontakt</a>
</div>
</div>
</div>
</footer>
</main>
</body>
</html>
<script>
(function(){
var m = document.cookie.match(/(?:^|; )admingpt_role=([^;]+)/);
if (!m) return;
var role = decodeURIComponent(m[1]);
if (role !== 'admin' && role !== 'content_manager') return;
var nid = 1018651;
var label = role === 'admin' ? 'admin' : 'content';
var init = function(){
if (document.getElementById('admingpt-bar')) return;
var bar = document.createElement('a');
bar.id = 'admingpt-bar';
bar.href = '/admingpt/?q='+nid;
bar.target = '_blank';
bar.rel = 'noopener';
bar.title = 'Éditer #'+nid+' ('+label+')';
bar.style.cssText = [
'position:fixed','top:10px','right:10px','z-index:2147483647',
'width:42px','height:42px','border-radius:50%',
'background:linear-gradient(135deg,#6366f1,#8b5cf6)',
'color:#fff','text-decoration:none',
'display:flex','align-items:center','justify-content:center',
'box-shadow:0 2px 10px rgba(99,102,241,.35)',
'font-size:18px','line-height:1',
'transition:transform .15s ease,box-shadow .15s ease'
].join(';');
bar.textContent = '\u270F\uFE0F';
bar.onmouseover = function(){ this.style.transform='scale(1.15)'; this.style.boxShadow='0 4px 16px rgba(99,102,241,.5)'; };
bar.onmouseout = function(){ this.style.transform=''; this.style.boxShadow='0 2px 10px rgba(99,102,241,.35)'; };
document.body.appendChild(bar);
// Second bouton : vide le cache full-page de cette notice, puis recharge.
// Sert a voir tout de suite le resultat d'une modification sans attendre
// une invalidation depuis le backoffice.
var vider = document.createElement('button');
vider.id = 'admingpt-purge';
vider.type = 'button';
vider.title = 'Vider le cache de cette page et recharger';
vider.style.cssText = [
'position:fixed','top:60px','right:10px','z-index:2147483647',
'width:42px','height:42px','border-radius:50%','border:0','padding:0',
'background:linear-gradient(135deg,#0ea5e9,#22c55e)',
'color:#fff','cursor:pointer',
'display:flex','align-items:center','justify-content:center',
'box-shadow:0 2px 10px rgba(14,165,233,.35)',
'font-size:22px','line-height:1',
'transition:transform .15s ease,box-shadow .15s ease'
].join(';');
vider.textContent = '↻';
vider.onmouseover = function(){ this.style.transform='scale(1.15)'; this.style.boxShadow='0 4px 16px rgba(14,165,233,.5)'; };
vider.onmouseout = function(){ this.style.transform=''; this.style.boxShadow='0 2px 10px rgba(14,165,233,.35)'; };
var anim = document.createElement('style');
anim.textContent = '@keyframes nf-tourne{to{transform:rotate(360deg)}}';
document.head.appendChild(anim);
vider.onclick = function(){
if (vider.disabled) return;
vider.disabled = true;
vider.onmouseover = null;
vider.onmouseout = null;
vider.style.transform = '';
vider.style.animation = 'nf-tourne .8s linear infinite';
var cible = '/admingpt/purge_page.php?ajax=1&n=' + nid
+ '&u=' + encodeURIComponent(location.pathname + location.search);
fetch(cible, { credentials: 'same-origin', cache: 'no-store' })
.then(function(r){ return r.ok ? r.json() : Promise.reject(r.status); })
.then(function(){ location.reload(); })
.catch(function(err){
vider.style.animation = '';
vider.disabled = false;
vider.style.background = 'linear-gradient(135deg,#ef4444,#f97316)';
vider.title = 'Echec de la purge (' + err + ')';
});
};
document.body.appendChild(vider);
};
if (document.readyState === 'loading') {
document.addEventListener('DOMContentLoaded', init);
} else {
init();
}
})();
</script> 


