
FRP 350 B1 - Vandpumpe FLORABEST - Gratis brugsanvisning og manual
Find enhedens vejledning gratis FRP 350 B1 FLORABEST i PDF-format.

Brugerspørgsmål om FRP 350 B1 FLORABEST
0 spørgsmål om dette apparat. Besvar dem du kender, eller stil dit eget.
Stil et nyt spørgsmål om dette apparat
Download vejledningen til din Vandpumpe i PDF-format gratis! Find din vejledning FRP 350 B1 - FLORABEST og tag din elektroniske enhed tilbage i hånden. På denne side er alle dokumenter nødvendige for brugen af din enhed offentliggjort. FRP 350 B1 af mærket FLORABEST.
BRUGSANVISNING FRP 350 B1 FLORABEST
FRP 350 B1
florabest®


natural_image
Green outdoor lawn brush with a mounted power tool, placed on a wooden table beside a green trash bin (no text or symbols visible)GB IE
Rain Barrel Pump
Translation of original operation manual
GB IE
Before reading, unfold the page containing the illustrations and familiarise yourself with all functions of the device.
natural_image
Exterior view of a portable electric water heater with labeled component (no text or symbols beyond label)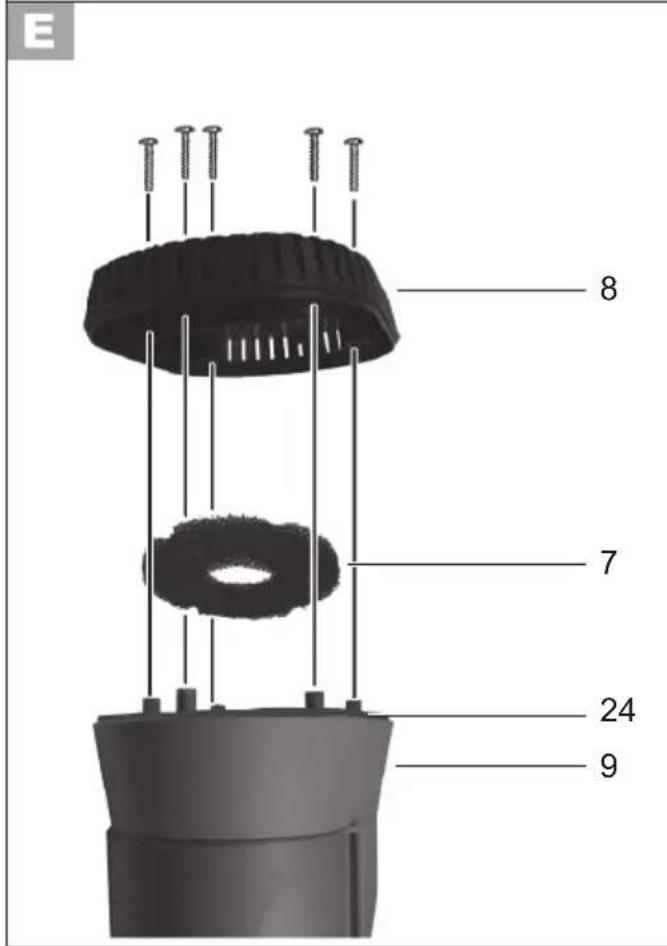


Before initial start-up, please read through these operating instructions carefully prior to using the machine. Keep the instructions safe and pass them on to any subsequent user so that the information is always available.
Contents
Notes on Safety 5
Symbols in the manual ......
Safety Instructions on the Equipment... 5
General notes on safety ......
Intended purpose 7
General description 7
Functional description ......
Functional parts ......
Explanation of the rating plate ....
Scope of Delivery ....
Putting into service 9
Installing the aluminium tubes ......
Submerging the pump ....
Power supply connection ....
Switching on and off ....
Adjusting the float switch 1
Cleaning and storage 10
General cleaning work ....
Cleaning the filter 11
Cleaning the impeller wheel .....11
Storage 11
Waste disposal and environmental protection ....11
Guarantee 12
Technical data 12
Performance data 12
Trouble-shooting 13
Spare parts 13
EU declaration of conformity .... 14
Exploded Drawings 15
Grizzly Service-Center 17
Notes on Safety
This section deals with the general safety regulations for working with the equipment.
Symbols in the manual

Warning symbols with information on damage and injury prevention.

Instruction symbols (the instruction is explained at the place of the exclamation mark) with information on preventing damage.

Help symbols with information on improving tool handling.
Safety Instructions on the Equipment

Caution!
Do not use for water with sand content!

Read the instructions for use thoroughly!

Caution! If the power supply cable is damaged or cut, withdraw the plug from the power socket immediately.
General notes on safety
Please note:
- Never allow children or other persons unfamiliar with the user manual to use the shredder. Local regulations or by-laws may determine the minimum age for using the device.
- The device must not be used by people (including children) with limited physical, sensory or mental faculties or who lack the necessary experience and/or knowledge - other than they are supervised by a person responsible for safety or are being instructed to operate the appliance by such a person.
- Keep the equipment away from children and pets.
• Children must be supervised in order to ensure that they do not play with the equipment.
Working with the equipment:

Caution: to avoid accidents and injuries:
- Should there be people in the water, do not operate the equipment.
- Do not use the equipment in the vicinity of flammable liquids or gases. Non-observance will result in a risk of fire or explosion.
- The transportation of aggressive, abrasive (grinding effect), corrosive, combustible (e.g. motor fuels) or explosive liquids, salt water, cleaning agents and foodstuffs is not permitted. The temperature of the liquid being transported must not exceed 35°C.
- Store the equipment in a dry place and out of reach of children.

Caution! To avoid damage to the equipment and any possible person injury resulting from this:
- Do not work with damaged or incomplete equipment, or with equipment that has been converted without the approval of the manufacturer. Before initial operation, have a specialist check that the required electrical protection measures are in place.
- Monitor the equipment during operation (particularly in residential spaces, in order to detect automatic switching off or dry running of the pumps in time. Regularly check the function of the float switch (see chapter "initial operation"). Non-observance will invalidate all guarantee and liability claims.
- Please note that the pump is not suitable for continuous operation (e.g. for watercourses in garden ponds). Check the equipment regularly for correct functioning.
- Note that the lubricants used in the equipment may cause damage or contamination if they escape. Do not use the pump in garden ponds with fish stocks or valuable plants.
• Pollution of the liquid could occur due to leakage of lubricants - Do not carry or fix the equipment by the cable or pressure line.
- Protect the equipment from frost and from running dry.
- Use only original accessories and do not carry out conversion work on the equipment.
- Please read the notes in the operating instructions on the topic of "maintenance and cleaning". Any measures above and beyond these, particularly
opening the equipment, are to be carried out by an electrician. In the case of repairs, always contact our service centre.
Electrical safety:

Caution: to avoid accidents and injuries from electric shocks:
• After erection, the mains plug must be freely accessible when the equipment is in operation.
- Ensure that the mains voltage matches the specifications on the rating plate.
- The device must only be connected to a mains socket via a residual-current circuit breaker (RCD) with a rated leakage current of not more than 30 mA; minimum fuse 10 amperes.
- Before each use, check the power supply lead and the extension cable for damage and ageing. Do not use the equipment if the cable is damaged or worn.
- If the power cable for this equipment is damaged, it must be replaced by the manufacturer, a customer service agent of the same or a similarly qualified person in order to prevent hazards.
- Before each use, check the equipment, cable and plug for damage. Defective cables are not to be repaired, but rather replaced by new ones. Have any damage to your equipment repaired by a specialist.
- If the supply cord is damaged, it must be replaced by the manufacture or its service agent or a similarly qualified person in order to avoid a hazard.
- Do not pull the plug from the socket by the cable. Protect the cable from heat, oil and sharp edges.
- Do not carry or fix the equipment by the cable.
- Only use a rubber-sheathed cable designated H05 RNF for mains connection. The cable length must be 10 m.
- Protect cables and electrical connections against moisture. Make sure that cables and electrical connections are located in areas safe from flooding.
Intended purpose
The rain barrel pump is intended for pumping water from a rainwater butt or rainwater collecting tank. It is particularly suitable for watering plants in the garden. Use of the pump for pumping aggressive, abrasive, corrosive, inflammable (e.g. motor fuels) or explosive liquids, salt water, cleaning agents and foodstuffs is prohibited. The temperature of the liquid to be pumped must not exceed 35^ C.
The operator or user is responsible for accidents or damage to other people or their property.
The manufacturer is not liable for any damage caused by infringement of the conditions of use or incorrect operation.
General description
Functional description
The pump is manufactured with a shock-resistant plastic casing and a stainless steel motor drive-shaft. It has a cooling jacket through which the water pumped flows around the motor to the pressure connection. The pump is fitted with a floating switch which automatically cuts the pump in or out, according to the water level. In the case of an overload, the pump is cut out by the built-in thermal protection
switch. When the motor has cooled down, it will restart again on its own.
A height-adjustable plastic hook on the aluminium tube can be suspended in the rainwater butt, enabling water to be easily removed with the use of a hosepipe. The shut-off tap functions in the same way as a water tap.

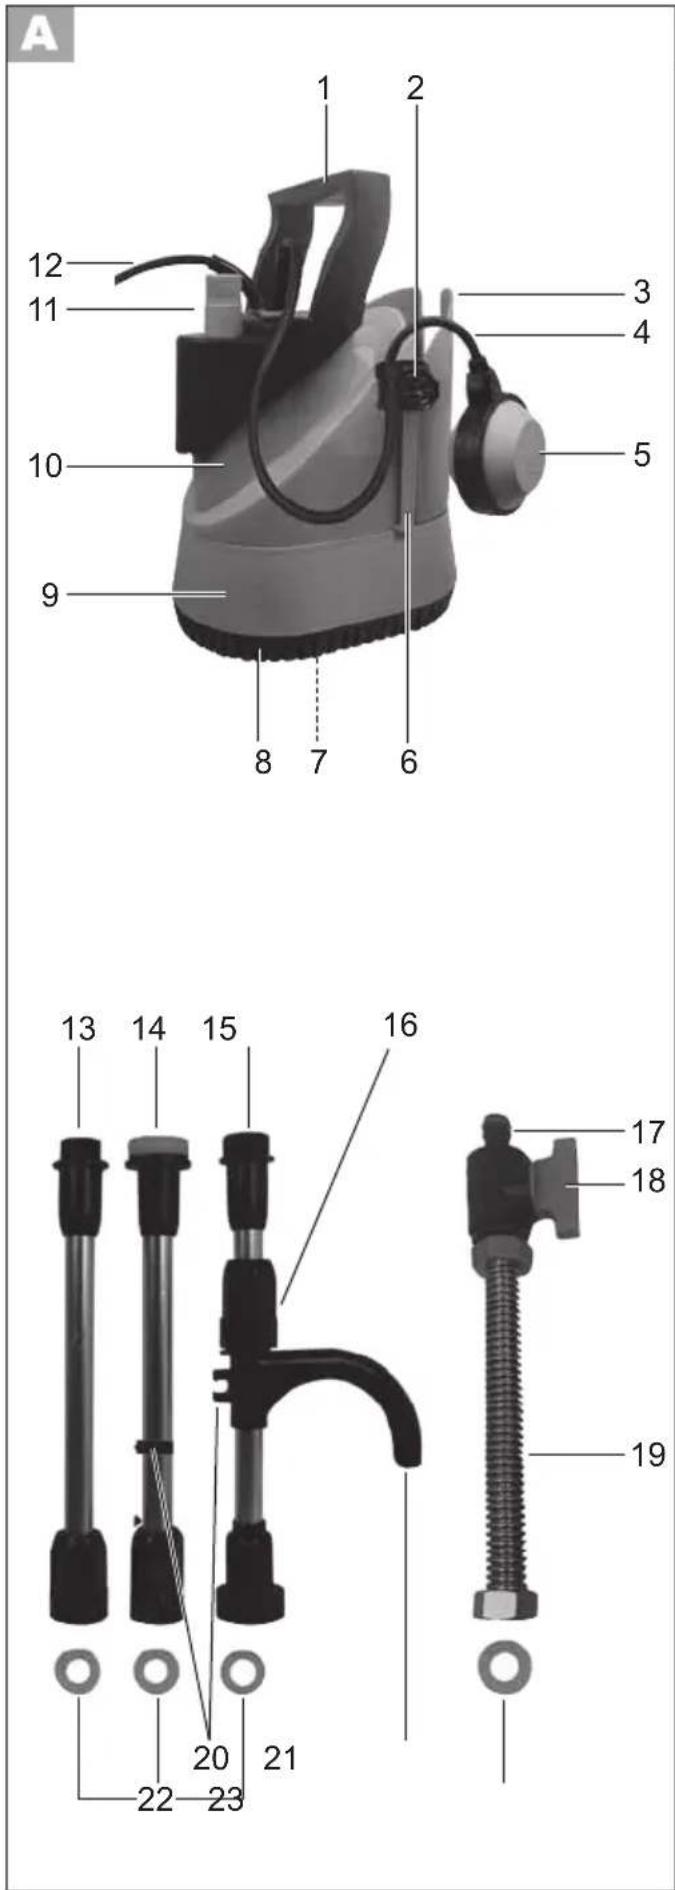
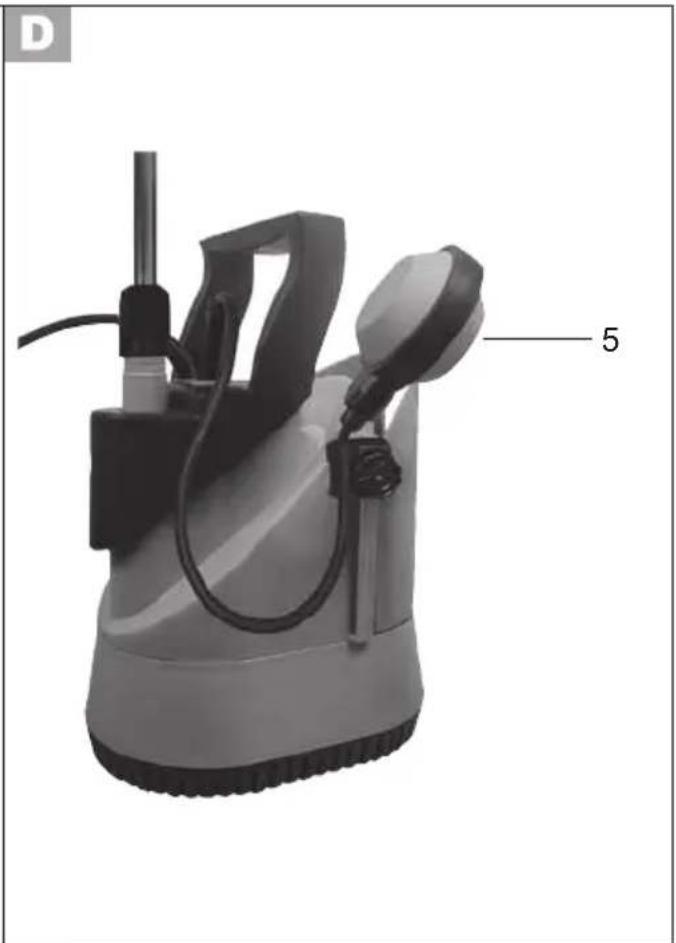
Illustration of the most important functional parts is to be found on the cover.
Functional parts

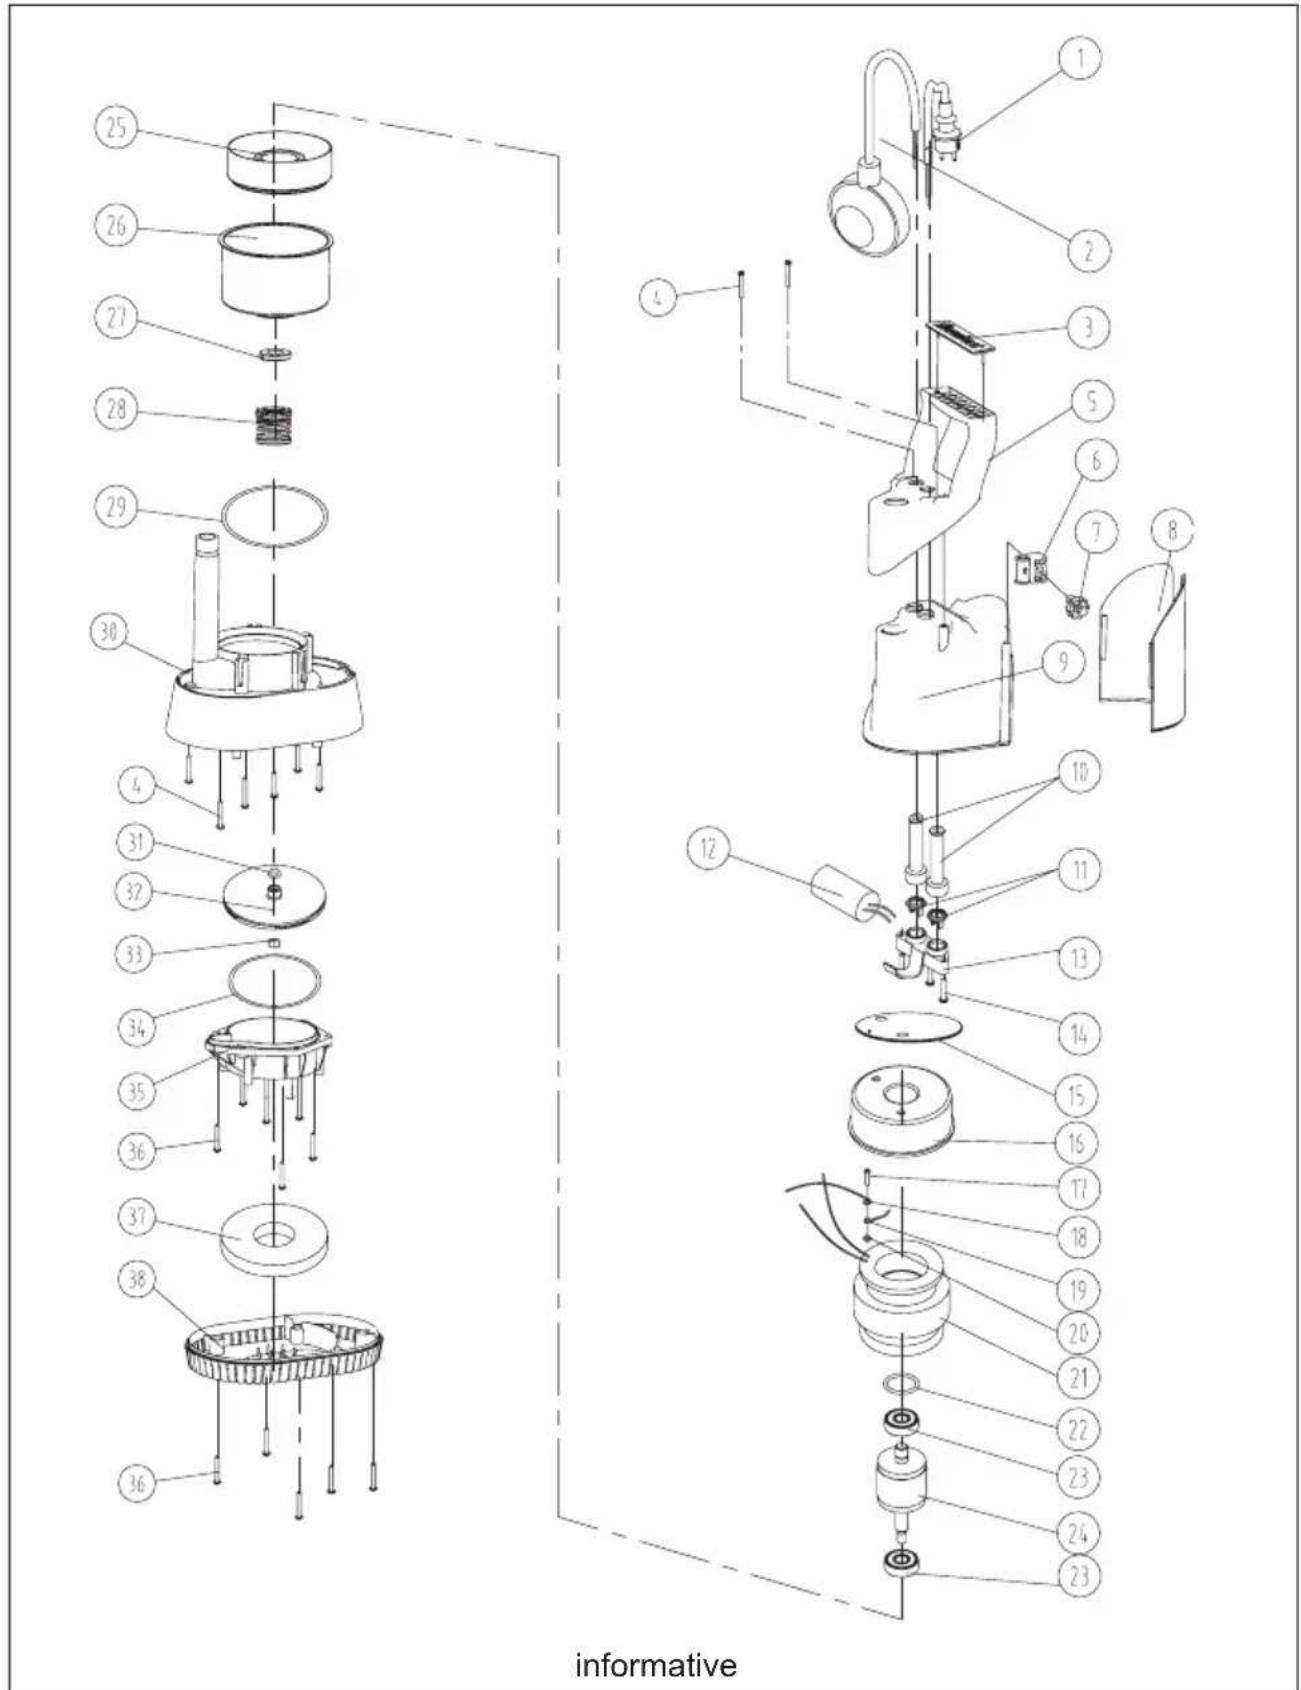
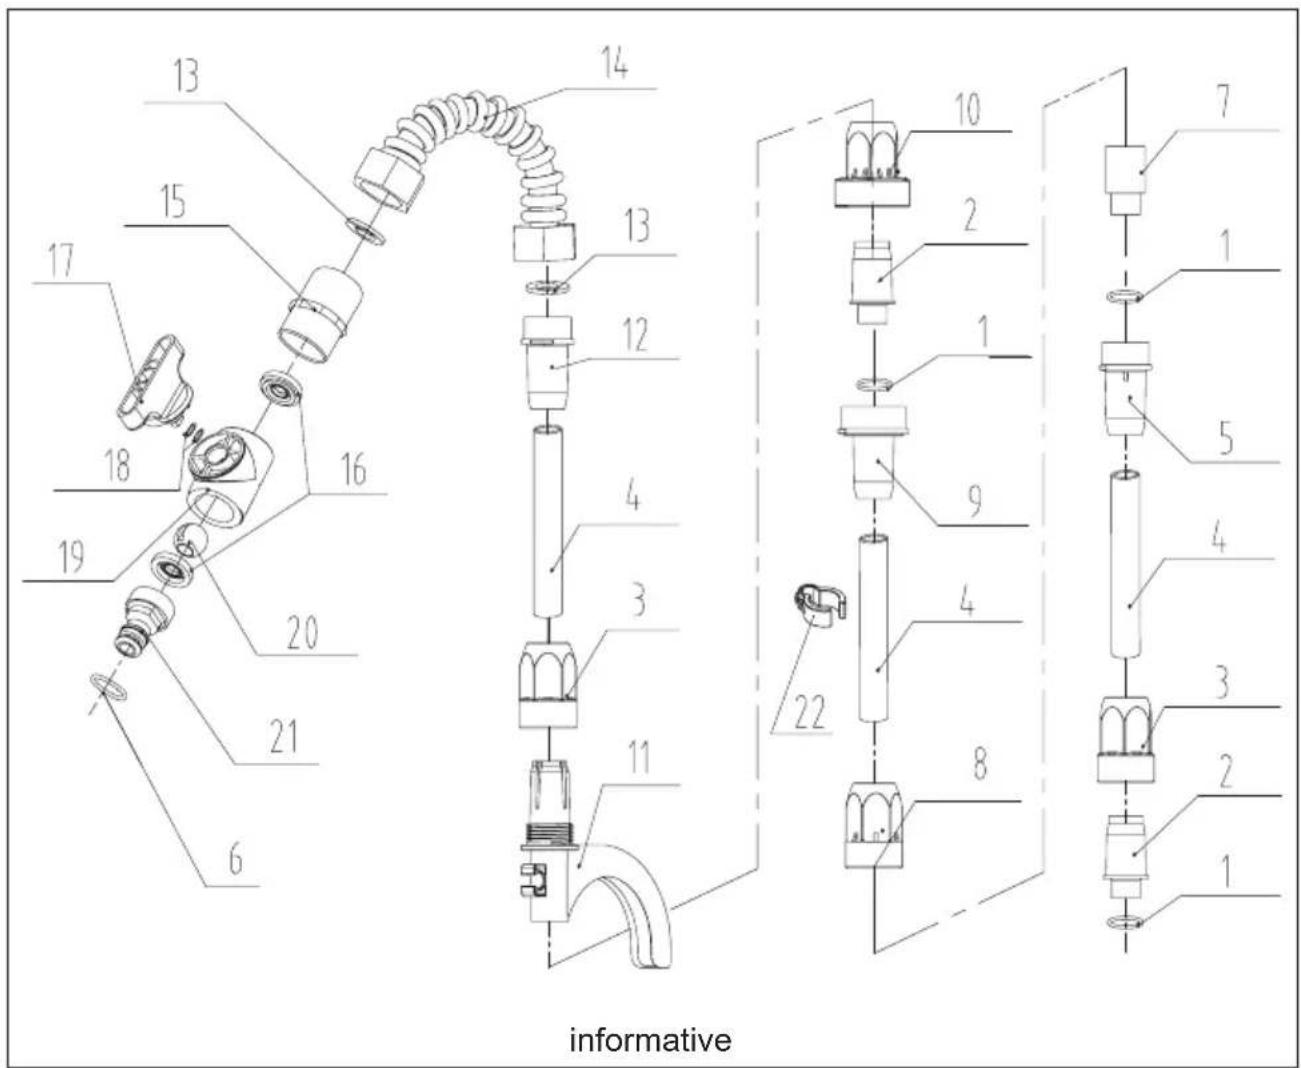
1 Carrying handle
Float switch height-adjustment
3 Storage compartment for aluminium tubes
4 Float switch cable
5 Floating switch
6 Float switch guide
7 Filter (not shown)
8 Suction foot
9 Pump housing
10 Cable storage area
11 Pressure connection, pump
12 Power supply cable/lead
13 Bottom aluminium tube
14 Middle aluminium tube
15 Aluminium tube with plastic hook
16 Height adjustment screw
17 Pressure connection for garden hosepipe
18 Shut-off tap
19 Flexible tube
20 Cable clips
21 Hook for suspending the pump
22 3 small sealing rings (already mounted)
23 1 large sealing ring (already mounted)
Explanation of the rating plate
a Model
b Electrical appliances do not belong in the domestic waste
c Max. discharge height
d Max. water temperature
e Protection type (watertight)
f Address of the manufacturer
g Maximum permitted immersion depth
h Conformity marking
i Max. pump capacity
j Year of manufacture
k GS marking
I Power consumption
m Input voltage
Scope of Delivery
Carefully unpack the appliance and check that it is complete:
- Fully assembled pump
- 2 aluminium tubes
- Aluminium tube with plastic hook
- Flexible tube with shut-off valve
- 4 sealing rings (already mounted)
- Cable clip
Putting into service
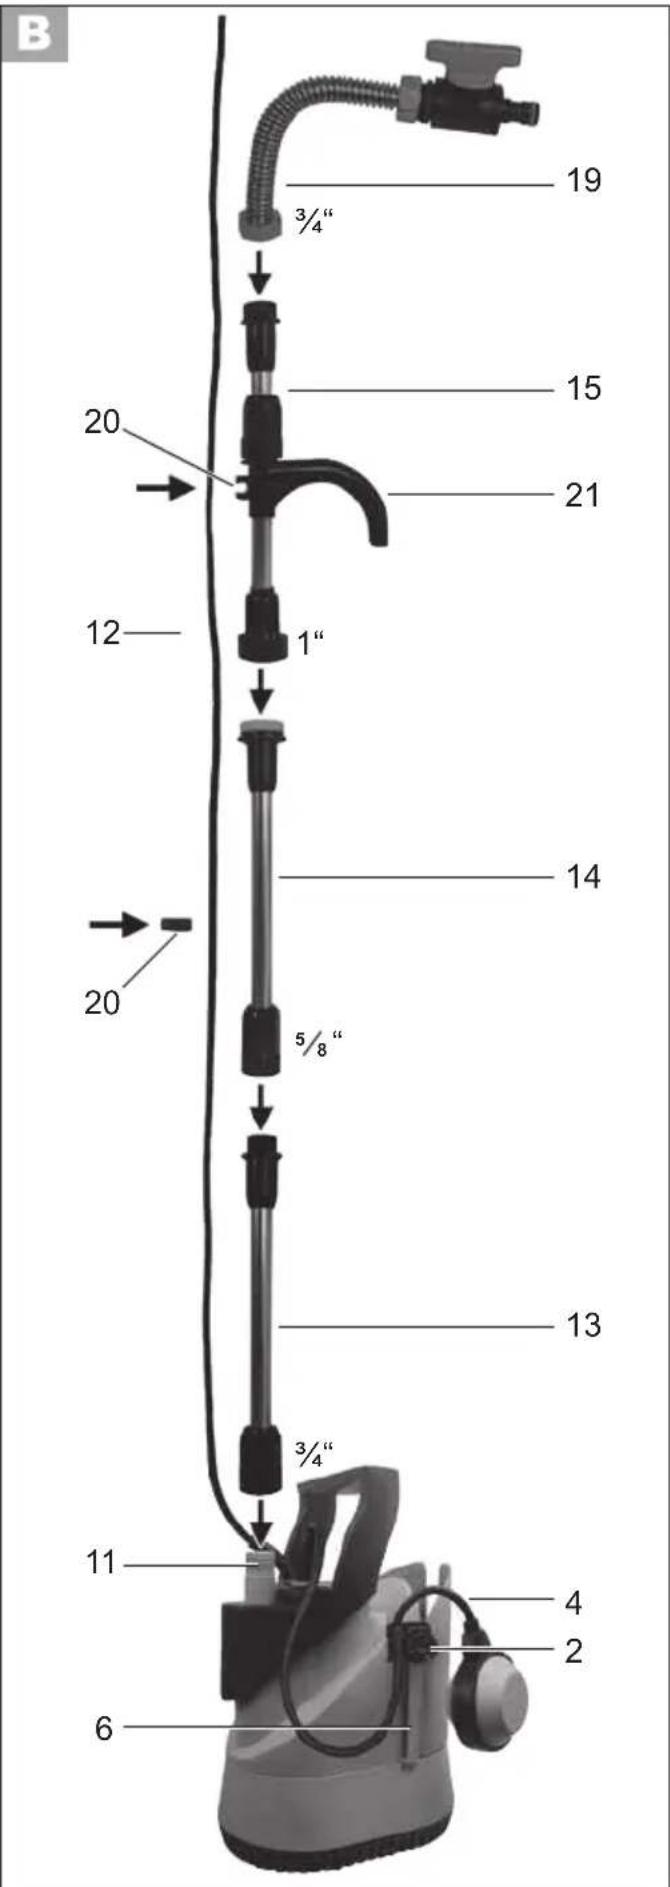
Installing the aluminium tubes

Before installing the aluminium tubes and the flexible tube, check that a sealing ring has been inserted in each screw socket. If not, insert the sealing ring in the following manner:

Inserting the sealing rings:
Press:
- One small sealing ring (22) into each of the threaded sleeves in the three aluminium tubes. (13/14/15),
- One large sealing ring (23) into the threaded sleeve on the flexible tube (19).

Screwing together the aluminium tubes:
- Screw together the tubes in the following order:
- Bottom aluminium tube (13) (without rib),
- Middle aluminium tube (14) (with 1 rib),
- Aluminium tube with plastic hook (15) (with 2 ribs),
- Flexible tube (19).
- Mount the tubes onto the pump (11) pressure connection.
Securing the mains cable:
- Secure the mains connection cable (12) to the cable clamp (20) on the plastic hook (21) and on the middle aluminium tube (14).
Mounting the height adjustment for the float switch:
- Loosen the screw on the float switch height adjustment (2) and push this over the float switch guide (6). Then guide the float switch cable (4) upwards (see also "Adjusting the float switch").

If you want to make use of the maximum pumping capacity of the pump rather than the maximum discharge height, we recommend that you fit a 34 “connecting tube, mounting it directly on the pump, without aluminium tube or shut-off tap. The larger cross-section of the hose will enable a greater volume of water to be pumped. At the same time, the potential discharge height will be correspondingly lower.
Submerging the pump

Ensure that the equipment is not hung up or held by the mains cable. There is a risk of electric shock from damaged mains cables.

Note that over the course of time dirt and sand which may damage the pump will collect in the bottom of the butt.
• Use the plastic hook (A 21) for sub-merging or lifting out the pump or fix a
GB IE
cord to the pump carrying handle ( A 1). Do not hang the equipment directly by the curved tube or on the water hose.
- You can adjust the height of the plastic hook after loosening the height-adjustment screw (A 16).
- When the water level is low, you can also place the pump in the butt. If you do, the shut-off tap must be above the level of the edge of the container.
Power supply connection
The rain barrel pump you have acquired is already fitted with a home office (safety) plug. The pump is intended to be plugged in to a home office socket with a 230 V \~ 50 Hz supply.
Switching on and off
- Insert the plug in the socket. The pump starts working immediately.
- Open the shut-off tap (A 18).
- To switch off, withdraw the plug from the socket. The pump stops.


If the water level is too low, the float switch will automatically switch off the pump.

Supervise the appliance while it is in operation in order to be immediately aware if the automatic cut-out operates or the pump runs dry, to limit any damage to a minimum.
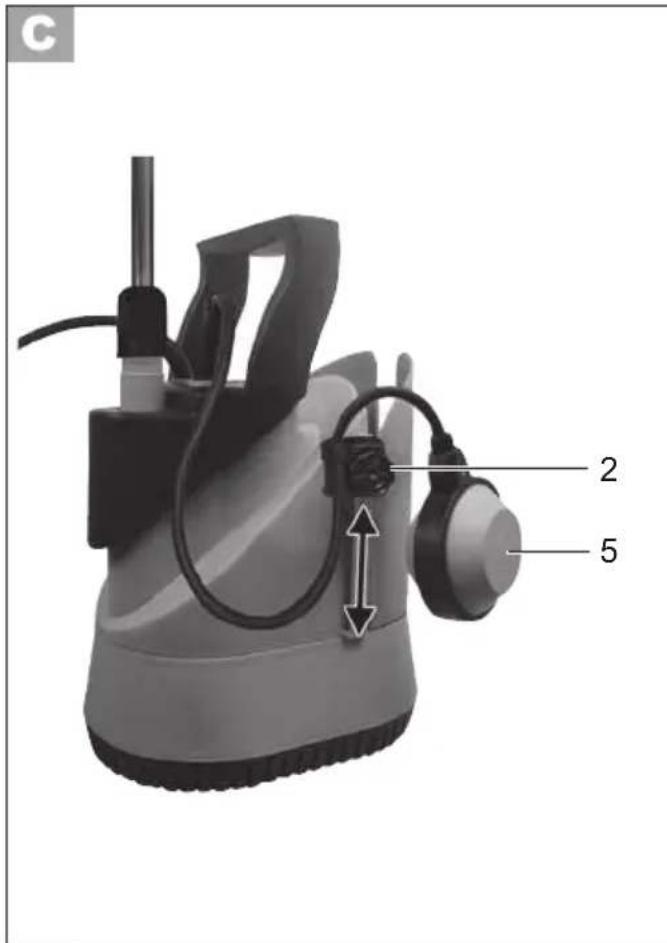
Adjusting the float switch
Automatic mode:
The on or off switching point on the float switch ( C 5) can be continuously adjusted.

Loosen the screw on the float switch height adjustment (2) and bring it into the required position (arrow has to show upwards).

Check the float switch (5). It must be positioned so that it can lift and lower freely. The switching point heights "On" and "Off" must be easy to reach.
Manual mode:
The pump runs continuously in manual mode.

Position the float switch (5) as shown.
Cleaning and storage
Clean and service your appliance on a regular basis. This will guarantee its optimum performance and a long service life.

Ask our service centre to carry out any work that is not described in these instructions. Use only original parts.

Pull out the power plug before every maintenance operation. There is a risk of electrocution or of injury from moving parts.
General cleaning work
- Clean the pump after every use with clean water.
- Remove fluff or particles of fibre, which may have found their way into the pump
housing and become stuck, by using a jet of water.
- Clean any deposits adhering to the floating switch ( A 5) with clean water.
Cleaning the filter
In the suction foot, the pump has a removable filter, designed to protect it from dirt. According to the level of dirt in the water, this should from time to time be checked and cleaned when necessary.
E
-
Unplug the appliance from the power supply.
-
Remove the five screws on the underneath of the pump housing (9).
-
Take the suction foot (8) off the pump and take out the filter (7).
-
Wash the filter (7) under running water and put it back in place.
-
Put the suction foot (8) back on the pump and fasten it with the five screws.
Cleaning the impeller wheel
If deposits in the pump housing become too heavy, the bottom part of the pump must be dismantled as follows.
-
Remove the 5 screws on the bottom of the pump casing and pull off the suction foot (E 8).
-
Unscrew the paddle wheel cover (€ 24) (6 screws).
-
Clean the inside wall of the pump housing and the impeller wheel with clear water.
-
For re-assembly, follow the same steps in reverse.
Storage
- Store the appliance in a dry, frost-free place, and where children cannot gain access to it.
- When the pump is not to be used for a longer period, it must be thoroughly cleaned after its last use, and before it is next used. Otherwise there may be problems in starting the pump, caused by deposits and residues.
F
- Wind the mains cable (12) around the cable storage area (A 10).
- Insert the dismantled aluminium tube (13/14/15/19) into the storage compartment (3).
All other work on the pump, and in particular opening it, must be carried out by a specialist electrical service engineer. If any repairs are necessary, you should always get in touch with the Grizzly Service Centre.
Waste disposal and environmental protection
Be environmental. Return the tool, accessories and packaging to a recycling centre when you are finished with them.
Machines do not belong with domestic waste.
Hand over the device at an utilization location. The plastic and metal parts employed can be separated out into pure materials and recycling can be implemented. Ask your Service Center (see Page 16) about this.
Defective units returned to us will be disposed of for free.
Guarantee
- This appliance has a 36-month guarantee; a shorter 12-month guarantee applies if the appliance is to be used for commercial purposes or for replacement appliances according to statutory regulations.
- Justified guarantee claims should be reported to our Service Centre (see page 17 for telephone & fax no.s, and email address). Our Service Team will tell you more about our complaints handling procedure.
- Damage due to natural wear and tear, overload or incorrect use is excluded from the guarantee. Certain components are subject to normal wear and tear and are excluded from the guarantee.
• Furthermore, the prerequisite for guarantee services is that the references indicated in the operating instructions regarding cleaning and maintenance have been adhered to. - Damage, which has been caused from material or manufacturing faults, will be made good free of charge, by replacement delivery or repair.
It is a condition of accepting guarantee claims that the appliance is returned dismantled (aluminium tubes) and together with evidence of purchase and guarantee form to our Grizzly Service Centre.
- Repairs, which are not covered by the guarantee, can be carried out for charge by our service center. Our service center will be glad to provide you with a cost estimate.
We can only process devices which have been packaged sufficiently and which have been dispatched with correct stamping.
• Note: In case of complaint or service, please deliver your device cleaned, and
with an indication of the defect, to our service address.
Devices sent in freight collect - by bulk freight, express or with other special freight - are not accepted.
• Defective units returned to us will be disposed of for free.
Technical data
Voltage .....230 V,\~ 50 Hz Power consumption .....350 W Protection class ..... I Protection type..... IPX8 Weight (incl. accessories) ..... 4,36 kg Max. capacity ..... 5200 l/h Max. discharge height .....11 m Max. immersion depth ..... 7 m Max. grain size (suctionable suspended particles) ..... 3 mm Water temperature max. ..... 35°C Power cable length (rubber cable)... 10 m
In the course of continued development, technical and optical alterations may be introduced at any time without notice. Hence all dimensions, instructions and details in these instructions for use are given without obligation. Consequently, no legal claims can be made on the basis of details given in these instructions for use.
Performance data
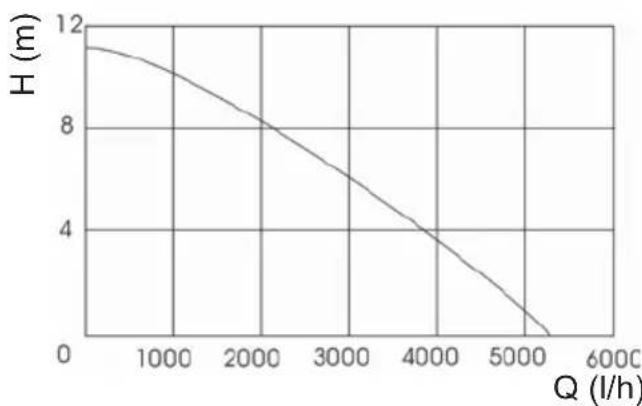
line
| Q (l/h) | H (m) | | ------- | ----- | | 0 | 12 | | 1000 | 10 | | 2000 | 8 | | 3000 | 6 | | 4000 | 4 | | 5000 | 2 | | 6000 | 0 |Trouble-shooting
| Problem | Possible cause(s) | To correct the fault |
| Pump does not start | No power supply | Check socket, cable lead and plug, if necessary have a repair carried out by an electrician |
| Float switch (A 5) does not operate | Check the position of the float switch | |
| Water level inadequate when starting | Submerge the pump deeper | |
| Thermal protection switch has tripped | Wait until motor cools down and switches on again. Unplug appliance and clean suction foot/impeller wheel. | |
| Pump is running, but not pumping water | Suction foot (A 8) / filter (A 7) blocked | Clean suction foot / filter |
| Pressure lead closed | Open the distributor shut-off tap, other tap or jet, etc. | |
| Pumping capacity affected by extreme dirt or abrasive solids mixed with the water | Withdraw the power plug and clean the pump, if necessary replacing worn parts. | |
| Pump does not switch off | Float switch (A 5) cannot sink | Check position of the float switch |
| Amount pumped is inadequate | Suction foot (A 8) / filter (A 7) blocked | Clean suction foot / filter |
| Pumping capacity affected by extreme dirt or abrasive solids mixed with the water | Withdraw the power plug and clean the pump, if necessary replacing worn parts (see “Cleaning, maintenance and storage”). If necessary, operated the pump without the distribution piece. | |
| Pump switches off after only running a short time | Motor protection switches off the pump because of excessively dirty water. | Withdraw the power plug and clean it. |
| Water temperature is too high, Motor protection switches the appliance off. | Maximum permitted water temperature of 35°C must be observed! |
Spare parts
When you wish to purchase spare parts, please contact our service address or the fax number given.
EU declaration of conformity
We hereby confirm that the
FRP 350 B1 series
Rain barrel pump
(serial number 201101000001 - 201101048500)
conforms with the following applicable relevant version of the EU guidelines
2006/42/EC • 2004/108/EC • 2000/14/EC
In order to guarantee consistency, the following harmonised standards as well as national standards and stipulations have been applied:
EN 60335-1:2002/A11:2004/A1:2004/A12:2006/A2:2006/A13:2008
EN 60335-2-41:2003/A1:2004
EN 62233:2008 • EN 55014-1:2006 • EN 55014-2:1997/A1:2001/A2:2008
EN 61000-3-2:2006 • EN 61000-3-3:2008
Grizzly Gartengeräte GmbH & Co. KG
Am Gewerbepark 2
D-64823 Groß-Umstadt 16.02.2011


Andreas Gröschl
(Technical Manager and
Documentation Representative)
Exploded Drawings
Grizzly Service-Center
DES UK Ltd.
Unit B7
Oxford Street Industrial Park
Vulcan Road
Bilston, West Midlands WV14 7LF
Tel: 0870 787 6177
Tel from Ireland: 0044 870 787 6177
Fax: 0870 7876168
Fax from Ireland: 0044 870 787 6168
Email: grizzly@deslimited.com
IAN 61038
Grizzly Gartengeräte GmbH & Co. KG
Am Gewerbepark 2
D-64823 Groß-Umstadt
Last Information Update: 12 / 2010
Ident.-No.: 79300622122010-6