
Discman D-7S - CD-afspiller SONY - Gratis brugsanvisning og manual
Find enhedens vejledning gratis Discman D-7S SONY i PDF-format.

Brugerspørgsmål om Discman D-7S SONY
0 spørgsmål om dette apparat. Besvar dem du kender, eller stil dit eget.
Stil et nyt spørgsmål om dette apparat
Download vejledningen til din CD-afspiller i PDF-format gratis! Find din vejledning Discman D-7S - SONY og tag din elektroniske enhed tilbage i hånden. På denne side er alle dokumenter nødvendige for brugen af din enhed offentliggjort. Discman D-7S af mærket SONY.
BRUGSANVISNING Discman D-7S SONY
SONY®
COMPACT DISC COMPACT PLAYER
D-7S
OPERATING INSTRUCTIONS
Before operating the unit, please read this manual thoroughly.
This manual should be retained for future reference
text_image
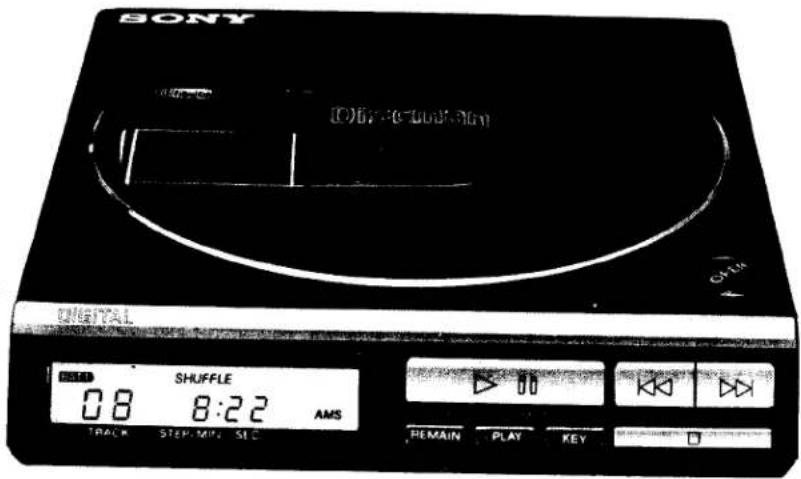
SONY 06:30-10:30 TITLE SHUFFLE 08 8:22 AMS TRACK STEP MIN SLC REMAIN PLAY KEY
OWNER'S RECORD
The model number and the serial number are located at the rear. Record the serial number in the space provided below. Refer to these numbers whenever you call upon your Sony dealer regarding this product.
Model No. D-7S
Serial No.
WARNING
To prevent fire or shock hazard, do not expose the unit to rain or moisture.
To avoid electrical shock, do not open the cabinet. Refer servicing to qualified personnel only.
INFORMATION
This equipment generates and uses radio frequency energy and if not installed and used properly, that is, in strict accordance with the manufacturer's instructions, may cause interference to radio and television reception. It has been type tested and found to comply with the limits for a Class B computing device in accordance with the specifications in Subpart J of Part 15 of FCC Rules, which are designed to provide reasonable protection against such interference in a residential installation. However, there is no guarantee that interference will not occur in a particular installation. If this equipment does cause interference to radio or television reception, which can be determined by turning the equipment off and on, the user is encouraged to try to correct the interference by one or more of the following measures:
Reorient the receiving antenna
Relocate this equipment with respect to the receiver
Move this equipment away from the receiver
Plug this equipment into a different outlet so that equipment and receiver are on different branch circuits.
If necessary, the user should consult the dealer or an experienced radio/television technician for additional suggestions. The user may find the following booklet prepared by the Federal Communications Commission helpful:
"How to Identify and Resolve Radio-TV Interference Problems".
This booklet is available from the U.S. Government Printing Office, Washington, DC 20402, Stock No. 004-000-00345-4.
DANGER
Invisible laser radiation when open and interlock failed or defeated.
Avoid direct exposure to beam.
CAUTION
- Use of controls or adjustments or performance of procedures other than those specified herein may result in hazardous radiation exposure.
● The use of optical instruments with this product will increase eye hazard.
Laser component in this product is capable of emitting radiation exceeding the limit for Class 1.
TABLE OF CONTENTS
Precautions 6
Location and function of controls 8
Power sources....11
House current 11
Rechargeable battery pack 12
Notes on compact discs.... 14
Disc playing 15
To search for a particular selection —AMS function .... 16
To search for a particular point in a selection —SEARCH function 17
Repeat play 18
To play the desired selections in the desired order —RMS play 20
To play the selections in a random order —Shuffle play 21
Using the time counter 22
Listening through a speaker system 23
To record the CD sound onto a tape recorder 24
Other power sources 25
Maintenance 26
Specifications 27
Troubleshooting guide.... back cover
FEATURES
● Extremely compact size for easy carrying
● High performance and high fidelity
- AMS (Automatic Music Sensor) for quick location of selections
- Search function for quick location of a desired point in a particular selection
- RMS (Random Music Sensor) allows selections to be played in a specified order:
- Shuffle-play function repeatedly plays selections in a random order.
- Repeat functions for the whole disc and for a particular portion
- Digital readout display—the track number on the disc and the elapsed or remaining playing time are shown on the LCD (Liquid Crystal Display) window.
natural_image
Black-and-white photo of Sony industrial computers and a CD/DVD unit (no visible text or symbols)PRECAUTIONS
- For ac operation, use the ac power adaptor supplied for this set. Do not use any other ac power adaptor.
For car battery operation, use the car battery cord recommended for this set. Do not use any other car battery cord.
- As the laser beam used in this Compact Disc player is harmful to the eyes, do not attempt to disassemble the casing. Refer servicing to qualified personnel only.
- Do not put anything in the safety slot inside the disc compartment. If you do, the laser beam may come out when the lid is open and your eyes may be subject to serious damage.
- Should any liquid or solid object fall into the set, disconnect the ac power adaptor, the rechargeable battery pack, the battery case or the car battery cord, and have the set checked by qualified personnel before operating it any further.
- When the set is not to be used for an extended period of time, be sure to disconnect the ac power adaptor from the wall outlet. To disconnect the adaptor, pull it out by grasping the adaptor itself.
Never pull it by the cord.
- Do not leave the set near heat sources such as radiators or airducts, or in a place subject to direct sunlight, excessive dust, moisture, rain, mechanical vibration or shock.
- Do not wrap the set with a cloth, blanket, etc. If you do, the temperature inside the set may rise, resulting in malfunction of the set.
- For the set to operate at its best, it should not be subject to temperatures below 5°C (41°F) or above 35°C (95°F).
- The temperature of the bottom of the set and the ac power adaptor may rise more than other parts of the set, but it is not a problem. However, if it becomes extremely hot, set the POWER switch to OFF, disconnect the power source and consult your nearest Sony dealer.
- The lens on the disc table should always be kept clean. Do not touch the lens or poke at it. If you do, the lens may be damaged and the set will not operate properly.
For cleaning of the lens, see "MAINTENANCE" on page 26.
Notes on moisture condensation
If the player is brought directly from a cold to a warm location, or is placed in a very damp room, moisture may condense on the lenses inside the unit. Should this occur, the player will not operate. In this case, remove the disc and leave the player in a warm place for about an hour to evaporate the moisture.
Notes on rechargeable battery pack
- Keep the unit away from fire.
- Do not short the battery plug (orange).
- Do not assemble the unit.
- If the electrolyte inside the unit should come into contact with cloth or skin, wash the contaminated objects with water immediately.
The electrolyte contains sulfuric acid.
● To avoid battey leakage, place the unit horizontally when charging. - Remember to recharge the unit after every use, no matter how short. Leaving the unit discharged may shorten its life.
- Do not charge the unit for more than 24 hours. Overcharging may shorten the battery pack's life. The suitable charging time for the unit is approximately eight hours.
- For the unit to operate at its best, it should not be subject to temperatures below 0°C (32°F) or above 40°C (104°F).
- If the unit will not be used for a long time, completeley recharge it and remove it from the CD player and store in a dry, cool place. Recharge it every six months while in storage.
About the headphones
- Avoid playing the set at so loud a volume that extended play might affect your hearing.
- At a high volume outside sounds may become inaudible. Avoid listening to the set in situations where hearing must not be impaired, for example, while driving or cycling.
- If your headphones are of open-air design, sounds go out through the headphones. Remember not to disturb those close to you.
If you have any questions or problems concerning your unit, please contact your nearest Sony dealer.
LOCATION AND FUNCTION OF CONTROLS
Refer to the pages indicated in ● for details.
text_image
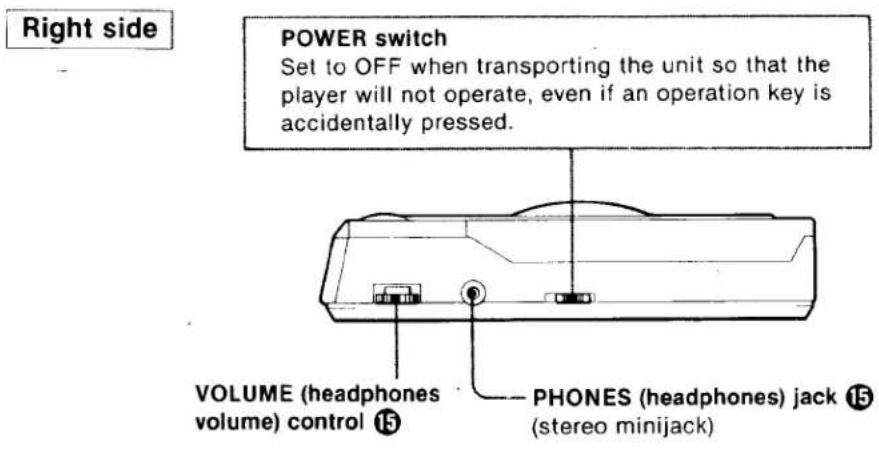
Right side POWER switch Set to OFF when transporting the unit so that the player will not operate, even if an operation key is accidentally pressed. VOLUME (headphones volume) control ⑮ PHONES (headphones) jack ⑮ (stereo minijack)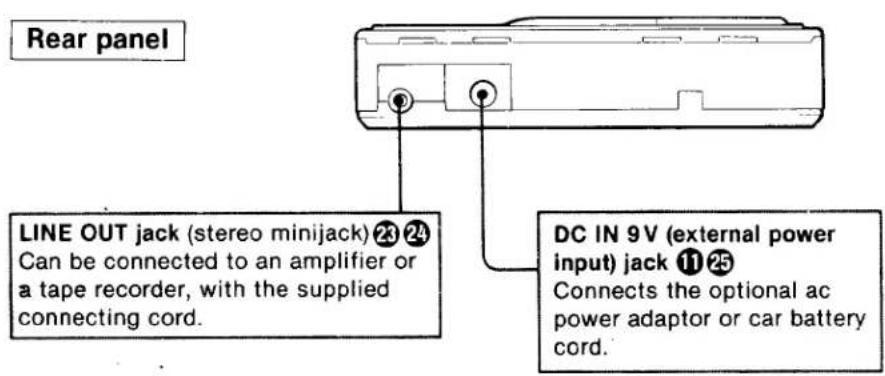
text_image
Rear panel LINE OUT jack (stereo minijack) 23 24 Can be connected to an amplifier or a tape recorder, with the supplied connecting cord. DC IN 9V (external power input) jack 11 25 Connects the optional ac power adaptor or car battery cord.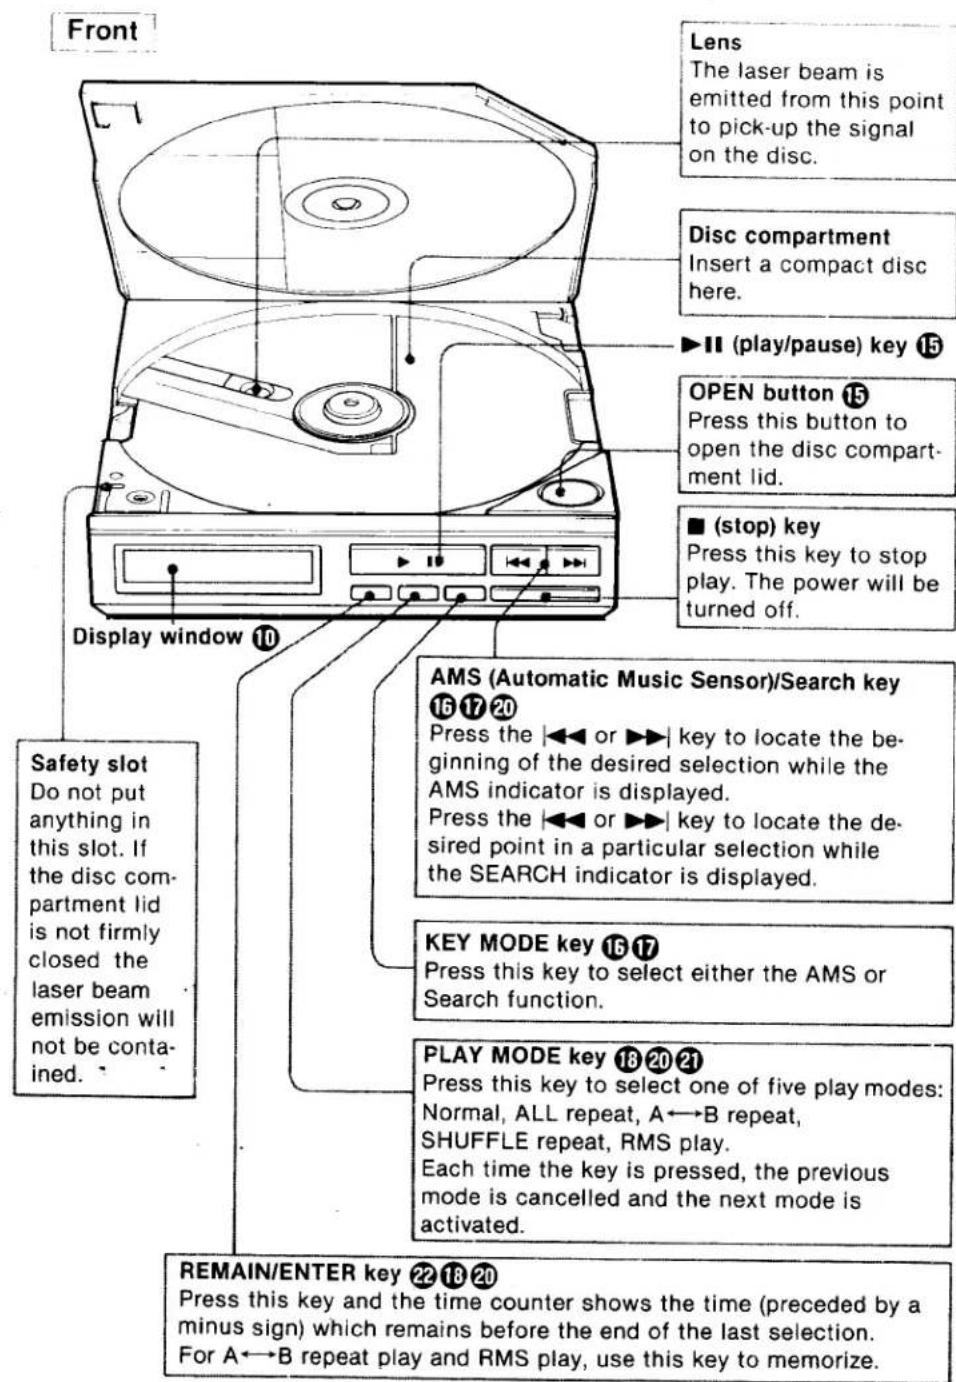
text_image
Front Lens The laser beam is emitted from this point to pick-up the signal on the disc. Disc compartment Insert a compact disc here. ▶II (play/pause) key 15 OPEN button 15 Press this button to open the disc compart- ment lid. ■ (stop) key Press this key to stop play. The power will be turned off. Display window 10 Safety slot Do not put anything in this slot. If the disc com- partment lid is not firmly closed the laser beam emission will not be con- ained. AMS (Automatic Music Sensor)/Search key 16 17 20 Press the ◀◀ or ▶▶ key to locate the be- ginning of the desired selection while the AMS indicator is displayed. Press the ◀◀ or ▶▶ key to locate the de- sired point in a particular selection while the SEARCH indicator is displayed. KEY MODE key 16 17 Press this key to select either the AMS or Search function. PLAY MODE key 18 20 21 Press this key to select one of five play modes: Normal, ALL repeat, A←→B repeat, SHUFFLE repeat, RMS play. Each time the key is pressed, the previous mode is cancelled and the next mode is activated. REMAIN/ENTER key 22 18 20 Press this key and the time counter shows the time (preceded by a minus sign) which remains before the end of the last selection. For A←→B repeat play and RMS play, use this key to memorize.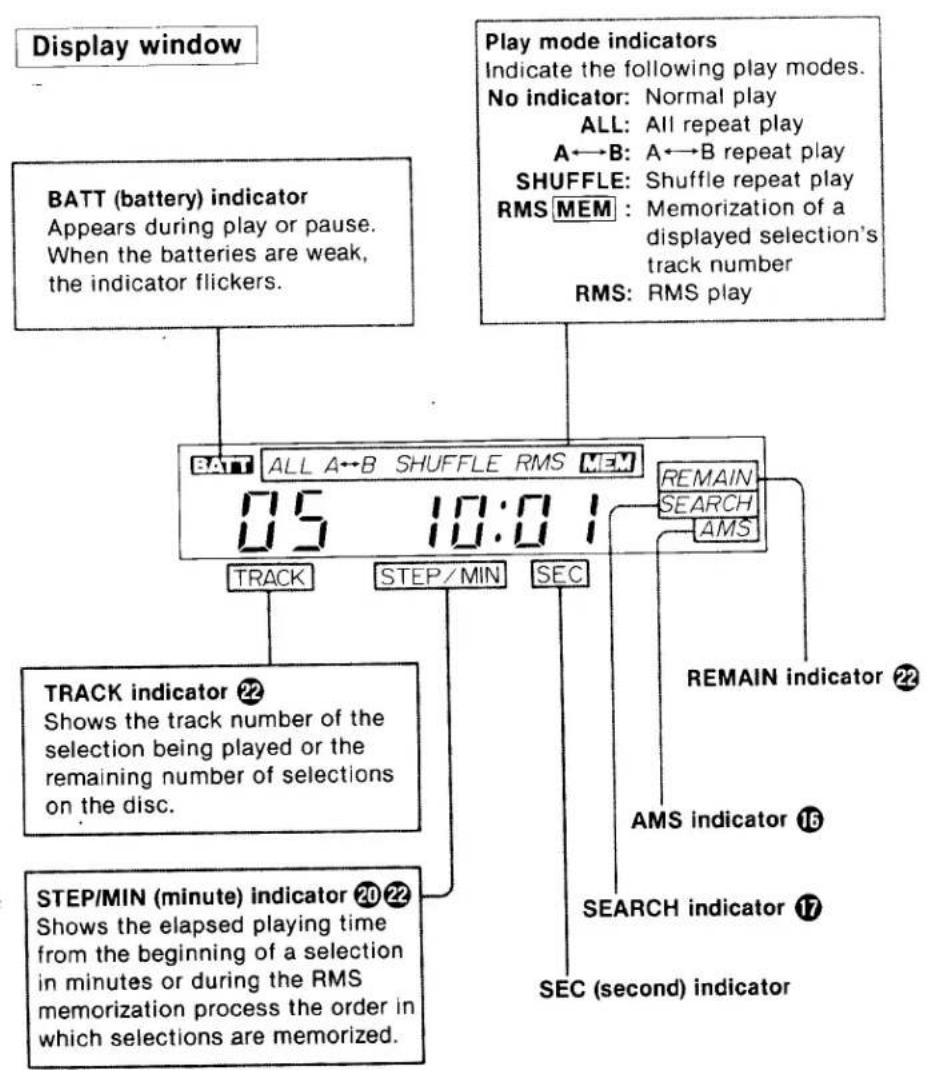
flowchart
graph TD
    A["Display window"] --> B["BATT (battery) indicator\nAppears during play or pause.\nWhen the batteries are weak,\nthe indicator flickers."]
    C["Play mode indicators\nIndicate the following play modes.\nNo indicator: Normal play\nALL: All repeat play\nA←B: A←B repeat play\nSHUFFLE: Shuffle repeat play\nRMS MEM: Memorization of a\ndisplayed selection's\track number\nRMS: RMS play"] --> D["05 10:01"]
    D --> E["TRACK"]
    D --> F["STEP/MIN"]
    D --> G["SEC"]
    E --> H["TRACK indicator 22\nShows the track number of the\nselection being played or the\remaining number of selections\non the disc."]
    F --> I["STEP/MIN (minute) indicator 20 22\nShows the elapsed playing time\nfrom the beginning of a selection\nin minutes or during the RMS\nmemorization process the order in\ncwhich selections are memorized."]
    G --> J["REMAIN indicator 22\nAMS indicator 16\nSEARCH indicator 17\nSEC (second) indicator"]
POWER SOURCES
Power can be supplied to the set in any of the following ways.
| Power source | Equipment required | |
| House current (120V ac) | AC power adaptor (supplied) | |
| Rechargeable battery | Sony BP-200 rechargeable battery pack (supplied) | |
| Eight alkaline batteries size AA (IEC designation LR6) | Sony EBP-380 battery case (optional) | See page 25 for details. |
| Car battery (12V) | Sony DCC-120 car battery cord (optional) | |
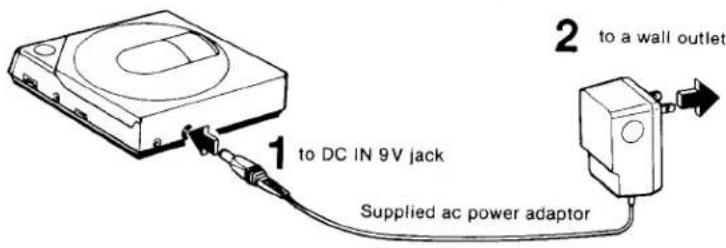
HOUSE CURRENT
Use the supplied ac power adaptor.
text_image
1 to DC IN 9V jack Supplied ac power adaptor 2 to a wall outletWhen the set is not used, be sure to disconnect the ac power adaptor.
Note: Use only the supplied ac power adaptor or the recommended car battery cord manufactured by Sony. Polarity of the plugs of other manufacturers may be different.
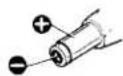
Polarity of Sony plug
RECHARGEABLE BATTERY PACK
Use the supplied rechargeable battery pack.
TO ATTACH TO THE CD PLAYER
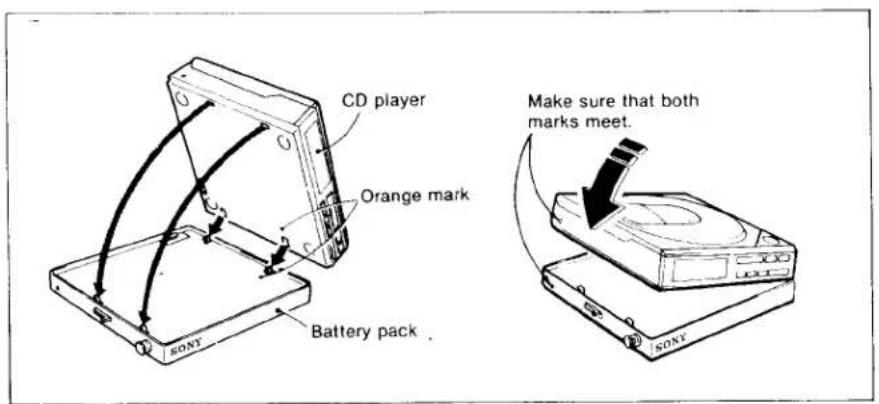
text_image
CD player Orange mark Battery pack KONTY Make sure that both marks meet. SONYTo remove the unit
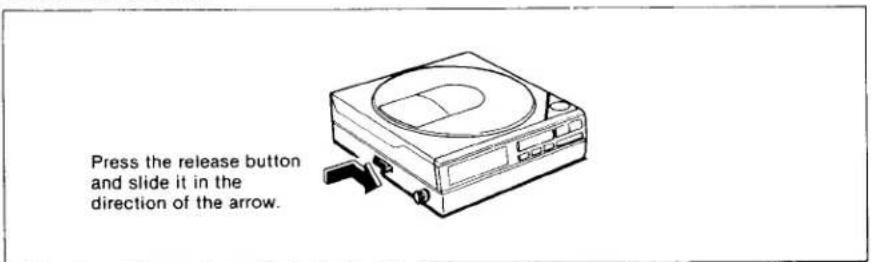
text_image
Press the release button and slide it in the direction of the arrow.HOW TO RECHARGE THE BATTERY PACK

text_image
CD player Battery pack to DC IN 9V Supplied ac power adaptor to a wall outlet 3 hoursNOTES ON COMPACT DISCS
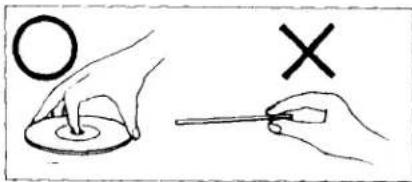
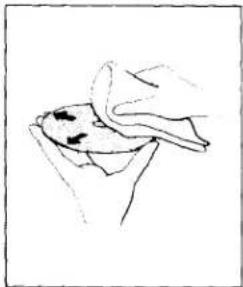
text_image
Illustration showing hand positioning of a ring and a cross with a tool, likely for a math or logic problem.Handle the disc by its edge, and to keep the disc clean do not touch the rainbow colored surface.
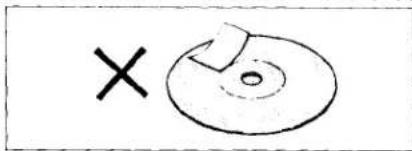
text_image
×Do not stick paper or tape nor write anything on the labeled surface.
Do not expose the disc to direct sunlight or heat sources such as hot air ducts, nor leave it in a car parked in direct sunlight where there can be a considerable rise in the temperature.
natural_image
Simple line drawing of a hand holding a bowl, no text or symbols presentBefore playing, clean the disc with the optional cleaning cloth.
Wipe the disc from the center out.
Do not use solvents such as benzine, thinner, commercially available cleaners or anti-static spray intended for analog discs.
After playing, store the disc in its case.
DISC PLAYING

text_image
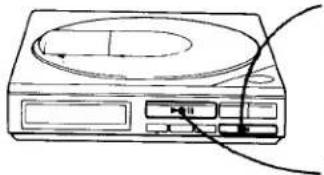
2 Press the OPEN button and insert a compact disc with the label surface up. Close the disc compartment lid. 1 Make sure that the POWER switch is set to ON. to PHONES jack 3 Press the ▶ key. Play will start from the beginning of the disc. 4 Turn the VOLUME control to adjust the headphones volume. 00 AMS TRACK STEP MIN SEC 01 00:01 AMS Track number Elapsed playing time of the selection being played. When the player reaches the end of the last selection of the disc, the indications on the display window will disappear after a few seconds and the disc will stop rotating.Do not press the ▶II key when there is no disc inserted, as it may cause severe noise.
natural_image
Line drawing of a CD or DVD device with a circular top and control buttons (no text or symbols)TO STOP DURING PLAY
Press the ■ key.
The indications on the display window will disappear after a few seconds and the disc will stop rotating.
TO PAUSE DURING PLAY
Press the ▶II key.
The time counter on the display will flicker.
To release the pause mode, press the ▶II again.
TO SEARCH FOR A PARTICULAR SELECTION
—AMS (Automatic Music Sensor) function
During play or pause, proceed as follows.

text_image
AMS Indicator When it is not displayed, press the KEY MODE key. KEY MODE key 02 03:15 AMS TRACK STEP MIN SETo search for a previous selection
When the |◀◀ key is pressed once, the beginning of the selection being played is searched for.
When the key is continuously pressed, the previous selection is searched for.
To search for a selection ahead
When the ▶▶| key is pressed once, the selection after the one being played is searched for.
When the key is continuously pressed, the selection after that will be searched for.
After the last selection the TRACK indicator will not change.
- In the pause mode press the |◀◀ or ▶▶| key by observing the TRACK indicator on the display. The player pauses at the beginning of the desired selection.
● During RMS play, AMS operates in the memorized order.
REPEAT PLAY
TO REPEAT THE WHOLE DISC —All repeat play
During play or pause, press the PLAY MODE key repeatedly until the ALL indicator appears on the display window.
When the disc reaches the end of the last selection, the player will automatically go back to the beginning of the first selection, and play will restart.
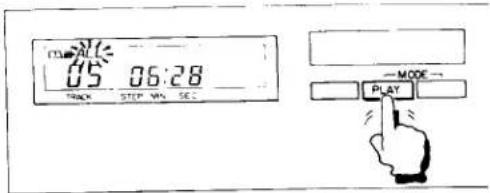
text_image
TIME 05 06:28 STICK STEP WIN SET — MODE — PLAYTo release the repeat mode, press the ■ key.
TO REPEAT PLAY BETWEEN TWO DESIGNATED POINTS
—A←→B repeat play
1 During play or pause, press the PLAY MODE key repeatedly until the A indicator appears on the display window.
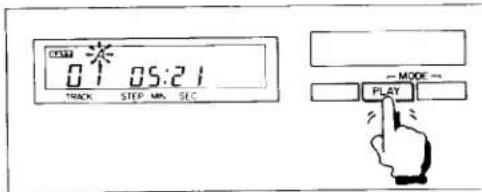
text_image
01:21 TRACK STEP MIN SEC — MODE → PLAY2 Locate the point from which the repeat play starts (point A) using the AMS or Search function and press the REMAIN/ENTER key.
The A indicator stops flickering showing that point A is memorized and the B indicator starts flickering.
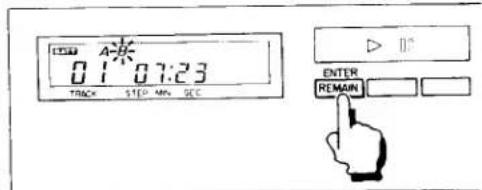
text_image
01:30 07:23 TRACK STEP MIN. SEC ENTER REMAIN3 Locate the stopping point (point B) and press the REMAIN/ENTER key.
The B indicator stops flickering showing that point B is memorized. The disc goes back to point A and play starts. During pause, press the ▶■ key to start the play.
To release the repeat mode, press the ■ key.
MORE ABOUT A←→B REPEAT FUNCTION
To repeat only one selection
1 Press the ▶II key to set the player in pause mode.
2 Press the PLAY MODE key repeatedly until the A indicator appears on the display window.
3 Locate the beginning of the desired selection (point A) using the AMS function and press the REMAIN/ENTER key.
4 Press the ▶▶| key once to locate the beginning of the following selection (point B) and press the REMAIN/ENTER key.
5 Press the ▶II key again to start playing.
Repeat play of the last selection of the disc cannot be done this way. Use the Search function (refer to "A B repeat play").
To repeat while eliminating an unwanted portion (jump repeat)
1 Press the ▶II key to set the player in pause mode.
2 Press the PLAY MODE kry repeatedly until the A indicator appears on the display window.
3 Locate the beginning of the selection following the one to be eliminated (point A) using the AMS function and press the REMAIN/ENTER key.
4 Locate the beginning of the selection to be eliminated (point B) and press the REMAIN/ENTER key.
The TRACK indicator returns to point A.
5 Press the ▶II key to start playing.
Example: To eliminate the 3rd selection

flowchart
graph TD
    A["Beginning of the disc"] --> B["3rd selection"]
    B --> C["Beginning of the 4th selection"]
    C --> D["End of the disc"]
    B -.->|Jump!| E["Point A"]
    B -.-> F["Point B"]
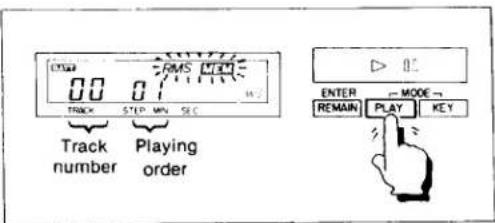
TO PLAY THE DESIRED SELECTIONS IN THE DESIRED ORDER
—RMS (Random Music Sensor) play
With the RMS feature, up to 16 selections can be played in the order you prefer.
HOW TO MEMORIZE SELECTIONS
1 During play or pause, press the PLAY MODE key repeatedly until the RMS MEM indicator appears on the display window.
The STEP/MIN indicator shows 01. If you press the ▶II, key in the pause mode, the player will stop.
2 Press the KEY MODE key so that the AMS indicator appears.
3 Press the |◀◀ or ▶▶| key and locate the beginning of the desired selection by observing the TRACK indicator on the display.
4 Press the REMAIN/ENTER key.
The selection shown by the TRACK indicator is memorized as the first selection and the STEP/MIN indicator changes to 02.
Repeat steps 3 and 4 to memorize up to 15 other selections.
When 16 selections have been memorized, the STEP/MIN indicator will return to 01. If you continue to memorize other selections, the last selection memorized will be cleared and the new one memorized in its place.
HOW TO START RMS PLAY
Press the ▶II key. (During pause, press the ▶II key twice.)
The MEM indicator will disappear and the selections are played in the memorized order.
To release the RMS play, press the ■ key.
Note
As the RMS searches for the next memorized selection very quickly, there may be little blank space between selections. When the selections played with the RMS feature are recorded on the tape, the AMS function of the cassette player may not be activated.
text_image
0.0 RMS 1.0 Track STEP MIN SEC Track Playing number order ENTER → MODE → REMAIN PLAY KEYTO PLAY THE SELECTIONS IN A RANDOM ORDER
—Shuffle play
In this mode, there is no way of knowing which selection will be played next. After all of the selections on the disc have been played in a random order, they are reshuffled so that you can listen to the same disc continuously, but with the selections played in a different order each time.
During play or pause, press the PLAY MODE key repeatedly until the SHUFFLE indicator appears on the display.
Shuffle play starts from the following selection.
To release the shuffle play mode, press the ■ key.
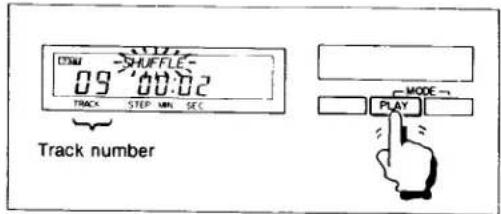
text_image
CDMA SHUFFLE 09 00.02 TRACK STEP MIN SEC Track number MODE PLAYAMS and Search operation during shuffle play
| Indicator\Operation | |◀◀ key | ▶▶| key |
| AMS | Beginning of the selection being played* | (with each press)Beginning of the following selection |
| SEARCH | (with continuous press)Ahead to the following selection |
* You cannot return to the previous selection. When the unit reaches the beginning of the selection being played, play starts automatically.
USING THE TIME COUNTER
Each time the REMAIN/ENTER key is pressed, the display shows the elapsed playing time or the remaining playing time.
TO MONITOR THE ELAPSED PLAYING TIME
Generally, the time counter shows the elapsed playing time from the beginning of the selection in minutes and seconds.
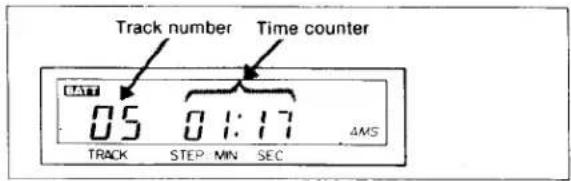
text_image
Track number Time counter 05 01:17 4MS TRACK STEP MIN SECShows 1 minute 17 seconds have elapsed from the beginning of the fifth selection.
When a new selection starts, the counter is reset to "00:00" and then starts counting again.
If the selection has a blank space at its beginning, the counter is reset to negative number such as “-00:02” or “-00:01”.
TO MONITOR THE REMAINING PLAYING TIME
When the REMAIN/ENTER key is pressed, the counter shows the remaining number of selections and the remaining time, each preceded by a minus.
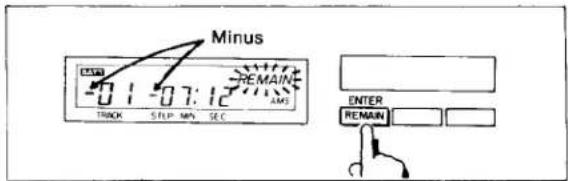
text_image
Minus -01 -07:12 TRACK S TLP MIN SEC AMS ENTER REMAINShows 1 selection and 7 minutes and 12 seconds are remaining before the end of the disc.
Note: During repeat play and shuffle play the counter shows the remaining selections and time as if the player is in the normal playling mode, rather than those actual remaining.
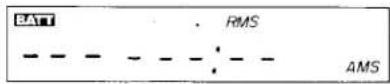
When the REMAIN/ENTER key is pressed during RMS play, the following appears on the display.
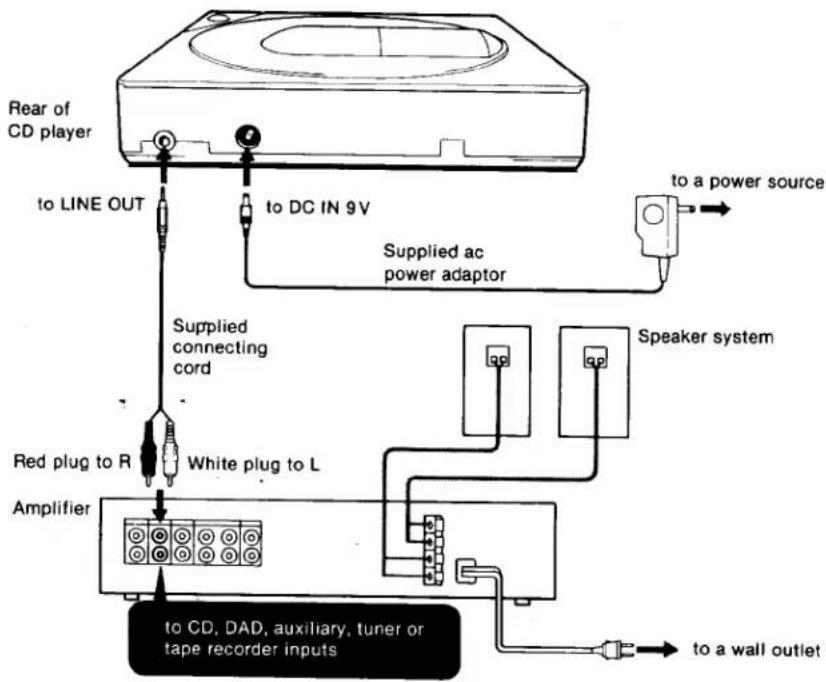
LISTENING THROUGH A SPEAKER SYSTEM
Connect the LINE OUT jack of the CD player to the appropriate jacks of an amplifier.
Notes on connection
- Turn off the amplifier before making connections.
- Be sure to insert the cable connectors firmly into the jacks.
Loose connections may cause hum and noise. - Be sure not to connect the CD player to the PHONO input jacks of the amplifier.
- If the CD player causes interference to radio and television reception, turn off the player or move the player away from the receiver.
An important point to remember
In the CD system, a wider dynamic range is achieved than that of the conventional analog system, and the peaks of high level inputs are recorded with high-fidelity. In addition, the noise level is very low.
If you turn up the volume inadvertently while listening to a portion where no audio signals or very low level inputs are recorded, the speakers may be damaged when the portion with peak levels is played.
flowchart
graph TD
    A["Rear of CD player"] -->|to LINE OUT| B["Supplied connecting cord"]
    A -->|to DC IN 9V| C["Supplied ac power adaptor"]
    C --> D["Speaker system"]
    B --> E["Red plug to R"]
    E --> F["White plug to L"]
    F --> G["Amplifier"]
    G --> H["to CD, DAD, auxiliary, tuner or tape recorder inputs"]
    G --> I["to a wall outlet"]
    style A fill:#f9f,stroke:#333
    style H fill:#bbf,stroke:#333
    style I fill:#bbf,stroke:#333
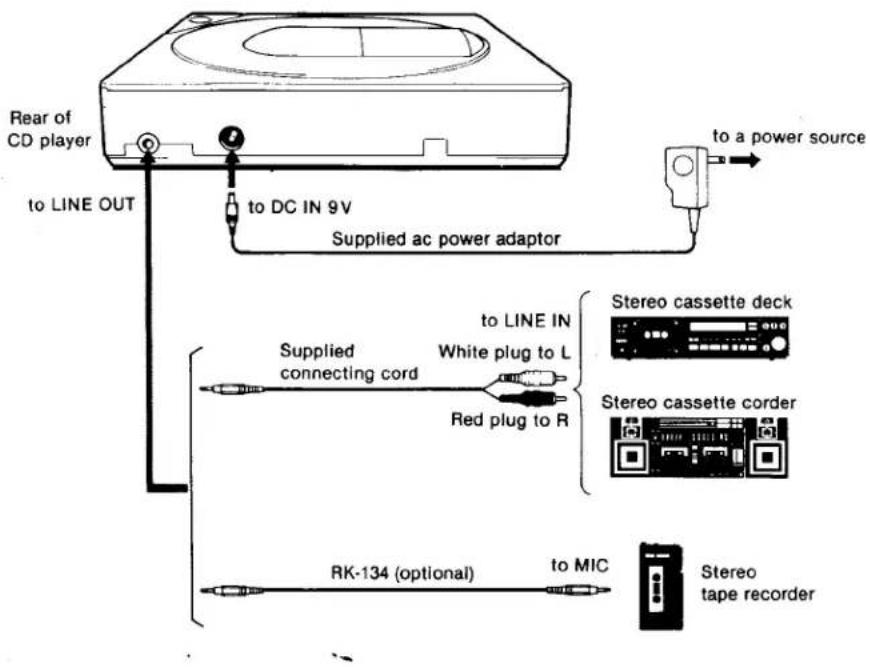
TO RECORD THE CD SOUND ONTO A TAPE RECORDER
Notes on connections
- Insert the connectors fully into the jacks. Loose connections may cause hum and noise.
- If the connected equipment is not a Sony product, refer to the instruction manual of that set.
text_image
Rear of CD player to LINE OUT to DC IN 9V Supplied ac power adaptor to a power source Supplied connecting cord to LINE IN White plug to L Red plug to R Stereo cassette deck Stereo cassette corder RK-134 (optional) to MIC Stereo tape recorderStart the disc.playing and set the connected equipment in the record mode.
OTHER POWER SOURCES
BATTERIES
Insert eight alkaline batteries, size AA (IEC designation LR6), in the Sony EBP-380 battery case (optional) with correct polarity and connect the DC IN 9V jack of the player.
You can expect Sony Eveready AM3 or Eveready No. E91 alkaline batteries to play the disc continuously for approx. 3 hours.
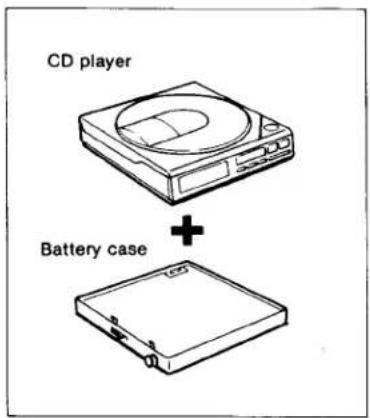
text_image
CD player + Battery case12V CAR BATTERY
Using the Sony DCC-120 car battery cord (optional), the DC IN 9V jack can be connected to the cigarette lighter socket of a car. You can listen to the disc through the connected to the PHONES jack, but not through the car stereo.
For further details, refer to the instruction manual of each product.
MAINTENANCE
CLEANING THE CASING
Clean the casing with a soft cloth slightly moistened with water or mild detergent solution. Do not use any type of abrasive pad, scouring powder or solvent such as alcohol or benzine as they may mar the finish of the casing.
CLEANING THE LENS
If you have accidentally touched the lens with a dirty finger or the dust on the lens prevents the set from operating properly, open the disc compartment lid with the OPEN button and clean the lens.
To remove dust
Blow on the lens a few times with a commercially available blower, brush the dust away in the direction of the arrow, then blow on the lens again.
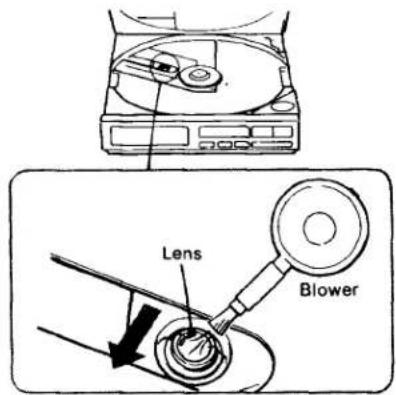
text_image
Lens BlowerIf the lens is still dirty after you have followed the above instructions and the set still does not function properly, please consult your nearest Sony dealer.
SPECIFICATIONS
| System | Compact disc digital audio system |
| Disc | Compact disc |
| Laser diode properties | Material: GaAlAsWavelength: 780 nmEmission duration: ContinuousLaser output: Max. 0.4 mV**This output is the value measured at a distance of about 1.6 mm fromthe objective lens surface on the Optical Pick-up Block. |
| Spindle speed | 500 r.p.m. to 200 r.p.m. (CLV) |
| Scan velocity | 1.2-1.4 m/sec. |
| Error correction | Sony Super Strategy Cross Interleave Reed Solomon Code |
| Number of channels | 2 |
| D-A conversion | 16-bit linear |
| Frequency response | 20-20,000 Hz · ^3 dB |
| Total harmonic distortion | Less than 0.008 % |
| Dynamic range | More than 90 dB (1 kHz) |
| Wow and flutter | Below measurable limit |
| Outputs (at 9 V input level) | Line output (stereo minijack)Output level 1.6 V rmsLoad impedance over 10 kilohmsHeadphones (stereo minijack)30 mW + 30 mW at 32 ohms |
| General | |
| Power requirements | Lead acid battery (closed type)using Sony BP-200 rechargeable battery pack (supplied), 6VEight size AA alkaline batteries (IEC designation LR6)using Sony EBP-380 battery case (optional), 12VDC IN 9 V jack accepts;Sony ac power adaptor (supplied) for use on 120 V ac, 60 HzSony DCC-120 car battery cord (optional) for use on 12 V carbattery |
| Power consumption | 2.6 W dc |
| Dimensions | Approx. 125.9×27×125.9 mm (w/h/d)(5×1 14 ×5 inches)not incl. inclined part (depth)not incl. projecting parts and controlsApprox. 126.9×31.5×132.5 mm (w/h/d)(5×1 14 ×5 14 inches)incl. projecting parts and controls |
| Weight | Approx. 510 g (1 lb 2 oz), net |
| Supplied accessories | AC power adaptor (1)Rechargeable battery pack (1)Carrying case (1)Carrying bell (1)Connecting cord (1) (stereo miniplug ↔ two phono plugs) |
Design and specifications subject to change without notice.
OPTIONAL ACCESSORIES
Stereo headphones · MDR-E282
Battery case EBP-380
Rechargeable battery pack BP-200
Car battery cord DCC-120
Stereo active speaker SRS-50
Active mini speaker system APM-007AV
Connecting cord RK-134
(stereo miniplug ↔ stereo miniplug, with attenuator)
Compact disc cleaner XP-CD1