
CD-2 - CD-afspiller YAMAHA - Gratis brugsanvisning og manual
Find enhedens vejledning gratis CD-2 YAMAHA i PDF-format.

Brugerspørgsmål om CD-2 YAMAHA
0 spørgsmål om dette apparat. Besvar dem du kender, eller stil dit eget.
Stil et nyt spørgsmål om dette apparat
Download vejledningen til din CD-afspiller i PDF-format gratis! Find din vejledning CD-2 - YAMAHA og tag din elektroniske enhed tilbage i hånden. På denne side er alle dokumenter nødvendige for brugen af din enhed offentliggjort. CD-2 af mærket YAMAHA.
BRUGSANVISNING CD-2 YAMAHA
YAMÂHA CD-2
Natural Sound Compact Disc Player
Compact 3-Beam Laser Pickup
Neu, Improved LSI Circuitry
High-Precision Digital Filter
Simplified 10-Key (Plus Index) Operation
Easy Memory Programming / Convenient Music Search
Versatile Play Mode Selection/Handy Repeat
Disc Remaining Time Indicator Cordless Remote Control
CENTER
Thank you for purchasing the YAMAHA CD-2 compact disc player.
CONTENTS
CAUTIONS 1-3
REMOVING THE TRANSPORT SCREWS....4
CONNECTION DIAGRAM 4
CONTROLS AND THEIR FUNCTIONS....5
HANDLING THE DISCS.
BASIC OPERATIONS....8
MUSIC SEARCH 8
MEMORY OPERATIONS....9
REPEAT FUNCTION....11
TIMER PLAYBACK....11
REMOTE CONTROL PLAYBACK....12
TROUBLESHOOTING....13
SPECIFICATIONS....13
OWNER'S MANUAL

IMPORTANT!
Please record the serial number of your in the space below:
Model : CD-2
Serial No.
The serial number is located on the rear of the chassis.
WARNING
To prevent fire or shock hazard, do not expose this appliance to rain or moisture.
CAUTION
Use of controls or adjustments or performance of procedures other than those specified
herein may result in hazardous radiation exposure.
CAUTION (PREPARED IN ACCORDANCE WITH UL STANDARD 1270)
1 Read Instructions — All the safety and operating instructions should be read before the appliance is operated.
2 Retain Instructions — The safety and operating instructions should be retained for future reference.
3 Heed Warnings — All warnings on the appliance and in the operating instructions should be adhered to.
4 Follow Instructions — All operating and other instructions should be followed.
5 Water and Moisture — The appliance should not be used near water — for example, near a bathtub, washbowl, kitchen sink, laundry tub, in wet basement, near swimming pool, etc.
6 Carts and Stands - The appliance should be used only with a cart or stand that is recommended by the manufacture.
7 Wall or Ceiling Mounting — The appliance should be mounted to a wall or ceiling only as recommended by the manufacturer.
8 Ventilation — The appliance should be situated so that its location or position does not interfere with its proper ventilation. For example, the appliance should not be situated on a bed, sofa, rug, or similar surface that may block the ventilation openings; or placed in a built-in installation, such as a bookcase or cabinet that may impede the flow of air through the ventilation openings.
9 Heat — The appliance should be situated away from heat sources such as radiators, stoves, or other appliances that produce heat.
10 Power Sources — The appliance should be connected to a power supply only of the type described in the operating instructions or as marked on the appliance.
11 Power-Cord Protection -- Power-supply cords should be routed so that are not likely to be walked on or pinched by items placed upon or against them, paying particular attention to cords at plugs, convenience receptacles, and the point where they exit from the appliance.
12 Cleaning — The appliance should be cleaned only as recommended by the manufacturer.
13 Nonuse Periods — The appliance should be unplugged from the outlet when left unused for a long period of time.
14 Object and Liquid Entry — Care should be taken so that objects do not fall into and liquids not spilled into the inside of the appliance.
15 Damage Requiring Service — The appliance should be serviced by qualified service personnel when:
A. The power-supply cord or the plug has been damaged; or
B. Objects have fallen, or liquid has been spilled into the appliance; or
C. The appliance has been exposed to rain; or
D. The appliance does not appear to operate normally or exhibits a marked change in performance; or
E. The appliance has been dropped, or the cabinet damaged.
16 Servicing - The user should not attempt to service the appliance beyond those means described in the operating instructions. All other servicing should be referred to qualified service personnel.
CD-2
CAUTION: READ THIS BEFORE OPERATING YOUR CD-2

CAUTION
RISK OF ELECTRIC SHOCK DO NOT OPEN

CAUTION: TO REDUCE THE RISK OF ELECTRIC SHOCK, DO NOT REMOVE COVER (OR RACK). NO USER-SERVICEABLE PARTS INSIDE. REFER SERVICING TO QUALIFIED SERVICE PERSONNEL.
• Explanation of Graphic Symbols
The lightning flash with arrowhead symbol, within an equilateral triangle, is intended to alert you to the presence of uninsulated "dangerous voltage" within the product's enclosure that may be of sufficient magnitude to constitute a risk of electric shock to persons.

The exclamation point within an equilateral triangle is intended to alert you to the presence of important operating and maintenance (servicing) instructions in the literature accompanying the appliance.
1 The CD-2 is a sophisticated Compact Disc Player. To ensure proper operation for the best possible sound reproduction, please read this manual carefully.
2 Choose the installation location of your CD-2 carefully. Avoid placing it in direct sunlight or close to a source of heat. Also avoid locations subject to vibration and excessive dust, heat, cold or moisture. Keep away from such sources of hum as transformers or motors.
3 Do not open the cabinet as this might result in damage to the seat or electrical shock. If a foreign object should get into the set, contact your dealer.
4 Be sure not to handle discs with dirty fingers. Never insert a disc which has a crack on the surface.
5 When removing the power plug from the wall outlet, always pull directly on the plug, never yank the cord.
6 Do not use force when using the switches and knobs.
7 When moving the set be sure to first pull out the power plug and remove cords connecting to other equipment.
8 To keep the laser-pickup clean, do not touch it, and do not forget to close the disc tray.
9 Do not attempt to clean the CD-2 with chemical solvents as this might damage the finish. Use a clean, dry cloth.
10 Be sure to read the "troubleshooting" section for advice on common operating errors before concluding that your CD-2 is faulty.
11 Keep this manual in a safe place for future reference.
12 The voltage selector switch on the back panel of this model must be set for the local voltage BEFORE the unit is plugged into the main supply. (GENERAL MODEL ONLY)
13 This equipment generates and uses radio frequency energy and if not installed and used properly, that is, in strict accordance with the manufacturer's instructions, may cause interference to radio and television reception. It has been type tested and found to comply with the limits for a Class B computing device in accordance with the specifications in Subpart J of Part 15 of FCC Rules, which are designed to provide reasonable protection against such interference in a residential installation. However, there is no guarantee that interference will not occur in a particular installation. If this equipment does cause interference to radio or television reception, which can be determined by turning the equipment off and on; the user is encouraged to try to correct the interference by one or more of the following measures:
Reorient the receiving antenna
Relocate the CD-2 with respect to the receiver
Move the CD-2 away from the receiver
Plug the CD-2 into a different outlet so that the CD-2 and
receiver are on different branch circuits.
If necessary, the user should consult the dealer or an experienced radio/television technician for additional suggestions. The user may find the following booklet prepared by the Federal Communications Commission helpful: "How to Identify and Resolve Radio-TV Interference Problems".
This booklet is available from the U.S. Government Printing Office, Washington, DC 20402, Stock No.004-000-00345-4.

CD-2
CAUTION - USE OF CONTROLS OR ADJUSTMENTS OR PERFORMANCE OF PROCEDURES OTHER THAN THOSE SPECIFIED HEREIN MAY RESULT IN HAZARDOUS RADIATION EXPOSURE.
THE COMPACT DISC PLAYER SHOULD NOT BE ADJUSTED OR REPAIRED BY ANYONE EXCEPT PROPERLY QUALIFIED SERVICE PERSONNEL.

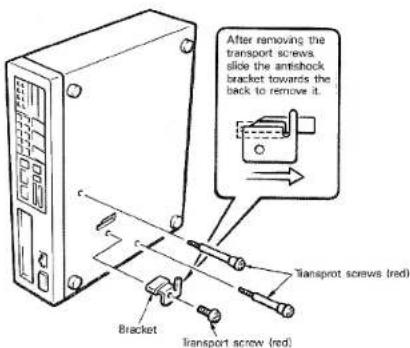
REMOVING THE TRANSPORT SCREWS
• Transport screws
To protect the internal laser pickup mechanism from shock and movement during transit, it has been secured by special transport screws and a bracket. The location of these screws is shown in the diagram.
-Removing the screws
All of the transport screws and the bracket must be removed before the unit is turned on.
The screws are removed with a standard screwdriver after the unit has been placed on its left side, on a firm smooth surface. Be sure to keep the screws and bracket in a safe place as they may be needed in the future.
Transporting the CD-2
Replace the transport screws and bracket if the CD-2 is going to be transported. This will protect the unit from shock during transport. Before replacing the screws, be sure that there is no disc in the player.
CONNECTION DIAGRAM

Important Points
- Be sure that the bracket and transport screws are removed before the CD-2 is connected to an amplifier.
- Connect the power plug to a standard AC wall outlet or to the accessory AC outlet provided on the amplifier. Power consumption of this compact disc player is 20W. Make sure that the amplifier's accessory AC outlet is rated to provide at least this much power. If not, use a wall outlet.
- Be sure that the left and right channels are properly connected.
- Do NOT connect the output cable of this unit to the PHONO jack of your amplifier.
Note:
If the CD player causes static interference with the tuner, increase the physical distance between them.

CD-2
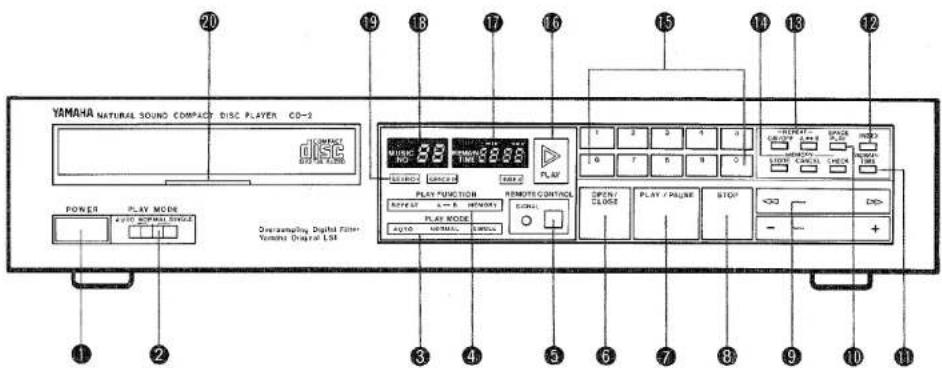
CONTROLS AND THEIR FUNCTIONS
POWER SWITCH
The power will come on when this button is pushed. It will go off when it is pushed again.
② PLAY MODE SELECTOR
The CD-2 will usually be used in the NORMAL playback mode. In the AUTO mode, playback of the disc begins automatically when the power is turned on. This position is also used for timer-controlled playback.
The SINGLE setting will stop playback after each selection is played. In the A → B repeat mode, playback will also stop after each selection is played.
3 PLAY MODE INDICATOR
Indicates Auto, Normal, or Single selection playback.
4 PLAY FUNCTION INDICATOR
Indicates Repeat, A ↔ B, or Memory playback.
⑤ REMOTE CONTROL (Remote Control Infrared Signal Receptor)
The SIGNAL LED will light to indicate reception of a signal from the remote control unit.
6 OPEN/CLOSE
This switch is used to open and close the disc tray.
7 PLAY/PAUSE
This button is pushed to begin playback. If it is pushed during playback, playback will be momentarily suspended (pause).
8 STOP
When this button is pushed once, playback stops and the pickup returns to the beginning of the selection being played. If it is pushed again, the pickup returns to the beginning of the first disc selection, and the player remains in the stop mode.
⑨ SEARCH
This function has priority over all other functions, including memory.
◀◀▶▶
| PLAYBACK mode | up to three seconds | low speed | sound output |
| over three seconds | high speed | sound output | |
| PAUSE mode | in minutes | high speed | no sound output |
| STOP mode | — | — | — |
CD-2

+●-
| PLAYBACK mode | +: Playback begins from the next selection. |
| -: Playback begins from the beginning of current selection. | |
| +/- Button pressed and held: Searches successively in either direction until released. | |
| PAUSE mode | +: Laser pickup moves to beginning of next selection. |
| STOP mode | -: Laser pickup moves to beginning of cur-rent selection. |
| +/- Button pressed and held: Laser pickup moves successively in either direction. |
10 SPACE PLAY
When this button is pushed, the "SPACE P" indicator lights and a blank interval of approximately 3 seconds is created between individual selections during playback, and prior to repeat play of an A-B repeat sequence. When pressed again, the SPACE PLAY function is cancelled.
REMAIN TIME
When this button is pressed during NORMAL playback, the TIME COUNTER displays REMAIN TIME (remaining disc playback time) in minutes and seconds. When pressed again, ELAPSED TIME is displayed.
12 INDEX
If there are index makers on the disc, this control is used to access index numbers and to change them. Changes are made by using the keyboard and +/- search buttons.
Note:
The CD-2 may take some time to call-up the beginning of INDEX selections.
13 REPEAT
When this button is pressed, the "REPEAT" section of the PLAY FUNCTION INDICATOR will light, and repeat playback of the entire disc or of an entire memory program will occur. Repeat playback of an individually determined "A-B REPEAT" phrase is controlled with the A-B REPEAT button.
14 MEMORY
Memory can be programmed for up to 12 selections for playback, even when the disc tray is open. Cancel, store, and check functions can only be performed in the STOP mode. The selections programmed in memory will be cleared if the disc tray is opened, or if the power is turned off.
STORE key: This key enters the desired selection number into memory.
| FUNCTION | DISPLAY | ||
| REMAIN ON | REMAIN OFF | ||
| STORE key | Enters the desired selection number into memory. | Displays total remaining program time of input selections. | Displays program number of input selection. |
| CHECK key | Displays programmed selection numbers in sequence, as they were entered. | Displays total playback time of input selection. | Displays number of programmed selections sequentially. |
| CANCEL key | Erases programmed selections from memory. | Total playback time display decreases by length of cancelled selection. | Number of programmed selection following cancelled selection is displayed. |
15 KEYBOARD
Those keys are used to access selections or the index numbers. The number of the selection pushed will be selected and playback will start. Pushing 1 2 3 will change the number from -01 to -02 to -03. If the selected number is not contained on the disc, the laser-pickup will return to the highest selection number. This also applies to the index numbers.
16 PLAY INDICATOR
This indicator lights in the play mode and goes out in the PAUSE mode. It also lights in the STOP mode.
⑰ TIME COUNTER: MINUTES/SECONDS DISPLAY
This indicator shows the elapsed playback time of the selection being played. The remaining playback time will be shown when the REMAIN TIME button is pushed. This display also functions as an INDEX display and indicator for the program number in the memory mode.
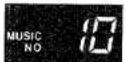
18 MUSIC NO. INDICATOR
This two digit display shows the number of the selection being played and the selection numbers stored in memory.
19 SEARCH INDICATOR
This will light when the laser pickup is searching for the desired selection.
20 DISC INDICATOR
This lights to indicate that a disc is in the player. It will go out when signals are being read from the disc. This indicator will also go out if the disc is incorrectly loaded into the disc tray.

CD-2
HANDLING THE DISCS
This unit has been designed specifically for reproduction of compact discs bearing the "DISC" mark. No other discs can be reproduced.
• Always place the compact disc in the disc tray with the label facing upward. (Compact discs can be played only on one side.)
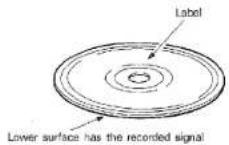
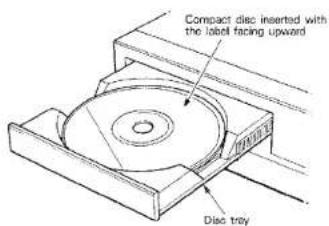
Compact discs are different from records in the sense that the signa's recorded on them are read by a laser. Thus there is no needle to cause wear and tear on the disc. However, scratched and bent discs are still liable to cause the laser to skip. Be sure to handle discs carefully.
- To remove a disc from its storage case, press down on the center of the case and lift the disc out, holding it carefully by the edges.

Proper way to hold compact disc

- Fingermarks and dust should be carefully wiped off the disc's recorded surface with a soft cloth. Unlike conventional records, the compact disc has no grooves to collect dust and microscopic debris so gently wiping with a soft cloth should remove most particles. Wipe in a straight motion from the inside to the outside of the disc. Small dust particles and light stains will have absolutely no effect on reproduction quality.
- Never use such chemicals as record sprays, antistatic sprays or fluid, benzine or thinner to clean compact discs. Such chemicals would irreperably damage the disc's plastic surface.
- Discs should be returned to their cases after use to avoid serious scratches that could cause the laser-pickup to "skip".
- Don't expose discs to direct sunlight or high humidity and temperature for extended periods. Long exposure to high temperatures can warp the disc.
- Don't stick paper or write anything with ballpoint pen on the surface of the label side.
BASIC OPERATION
Check all connections before use.
- Connect the player to the input terminals of the amplifier, (DAD, CD, AUX etc.)
- Turn the power of the amplifier on. Set the volume of the amplifier to the minimum level.
- Set the PLAY MODE selector of the CD-2 to the NORMAL position.
- Turn the power switch of the CD-2 to the ON position. The disc indicator will flash approximately 6 seconds after the switch is set to ON. The MUSIC NO, TIME, "min", and "sec" indicators will also light up. The NORMAL indicator will light up in the PLAY MODE indicator.
- Push the OPEN/CLOSE button. The disc tray will emerge when this button is pushed.
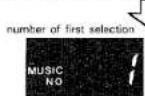
- Insert the disc with its label side up and push the OPEN/CLOSE button again. The disc indicator will light and the MUSIC NO indicator will display the total number of selections on the disc. The TIME indicator will display the total playback time. These two displays will go out after approximately 3 seconds, and the number "1" will be displayed to indicate the first selection (see diagram).

total number of selections
total playback time

-
Push the PLAY/PAUSE button and gradually increase the volume of the amplifier. The PLAY indicator will light to confirm playback, and elapsed time will be indicated in minutes and seconds by the TIME counter. 0:00 indicates the beginning of the selection.
-
If you push the PLAY/PAUSE button again, playback will be suspended and the PLAY indicator will flash. If you push it once more, playback will resume.
- Push the STOP button to get a feel of its operation. Playback will stop and the PLAY indicator and TIME counter will both go out, and the laser pickup returns to the beginning of the selection in play when the STOP button is pressed. Next, press the PLAY/PAUSE button. Playback will resume from the beginning of the same selection. When the STOP button is pressed once during playback of any selection after the first selection on the disc, the laser pickup will return to the beginning of that selection. If pressed more than once, it will return to the beginning of the first selection on the disc.
The disc tray can be closed in three ways:
By pushing the OPEN/CLOSE button. The indicators will function as described above.
2. By pushing the PLAY/PAUSE button. The PLAY indicator will light and playback will begin. The selection number and total playback time will not be displayed.
3. By lightly pushing the tray manually. The tray will be automatically closed, and the display will be the same as
MUSIC SEARCH
The CD-2 is provided with two music search methods. The ten-digit keyboard is used when you know the number of the selection you want. The search buttons (+/-) are used to find the beginning of selections sequentially.
- Music search using the keys:
After selecting the PLAY mode, lightly push key No. 3. The MUSIC NO indicator will display "03" and playback will start from the third selection. The tenth selection is selected by pushing the 1 and 0 keys.
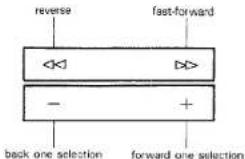
- Music search using the search buttons (+/-):
Push the minus side of the search button while the unit is playing. Playback will begin again from the beginning of the current selection. The player will continue to search back to the beginning of previous selections as long as you continue to depress the minus side. It will eventually return to the first selection and begin playback. Pushing the plus side will perform the opposite.
- Music search using the ▶▶/◀◀ buttons
Push the ▶▶ side of the search button. The player will move in the fast-forward mode; slowly for the first three seconds, and quickly after that. The ◀◀ side performs the same function in reverse. Sound will be barely audible during both of these modes. Remove your finger when you find the desired selection.
■ Fast forward, rewind, and selection of individual selections on the disc can be done while in the PAUSE mode; however, the PAUSE mode will remain engaged after these operations are completed. These operations can not be done while in the STOP mode.

CD-2
■Index
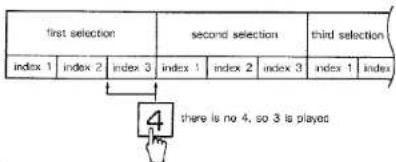
The INDEX button is used with the ten-digit keys and the +/- search keys to access the beginning of portions of selections encoded on a disc with INDEX codes. These INDEX codes are normally found on classical music discs, where a "selection" corresponds to an entire symphony (for uninterrupted playback of the entire symphony as a single selection), and movements within the symphony are separated by INDEX codes. When the INDEX button is pressed while in the STOP mode, the INDEX indicator will light, and the INDEX number is displayed in the "sec" position of the TIME COUNTER. The ten-digit keys and +/- keys can be used to change the INDEX number at this point. When the INDEX button is pressed during playback, the INDEX number of the portion currently in play will be displayed after a delay of approximately 3 seconds. INDEX numbers can be changed during this 3-second period using the +/- search buttons, or by directly inputting an INDEX number with the ten-digit keys. Playback of the selected INDEX portion begins when the PLAY button is pressed. If, for example, INDEX number 4 is selected when 3 is the highest INDEX number in a selection, playback will begin from the portion coded with INDEX number 3.
MEMORY OPERATIONS
This function allows you to listen to your favorite selections in any order.
- Use the keys to find the selections you wish to program into memory. (The memory function only works in the STOP model).
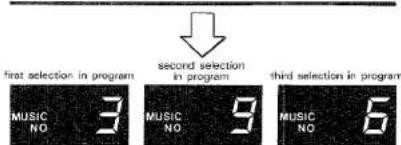
As the diagram shows, the procedure for entering selections into a memory program consists of pushing the number of the desired selection, then pushing the STORE button. The "MEMORY" portion of the PLAY FUNCTION indicator will light. In the diagram, the third, sixth, and ninth selections on the disc are being selected, in that order. Correspondingly, the numbers 3, 6 and 9 will be displayed in the MUSIC NO display as they are selected in turn. The TIME COUNTER will display them as the first, second, and third selections in a memory program, with "-01", "-02", and "-03" displays.

- Push the REMAIN TIME button:
The time count will drop in one second intervals as the playback time elapses. The display will indicate "0:00"
when playback is finished. Pushing the button again will return the display to an elapsed time indication. The elapsed time of the selection will also be indicated in the STOP and PAUSE modes.

- Next, push the STOP and CHECK buttons:
The programmed selection number will be displayed on the MUSIC NO indicator. The consecutive program numbers will be displayed on the TIME counter as “-01”, “-02” etc. The numbers will be repeated if you continue pushing the button. Playback will begin from the beginning of the program regardless of a CHECK display. * The CHECK function can not used during the PLAY and PAUSE modes. The programmed selections can only be checked in the STOP mode.
- Cancelling the programmed selection:
Push the STOP button and select the program number you want to cancel. The selection is cancelled by pushing the CANCEL button. The next program number will be displayed on the MUSIC NO indicator.

flowchart
graph TD
    A["CHECK"] --> B["MUSIC NO 9"]
    B --> C["CANCEL"]
    D["first selection"] --> E["MUSIC NO 3"]
    E --> F["cancel"]
    G["second selection"] --> H["MUSIC NO 6"]
    H --> I["cancel"]
    J["push"] --> B
    K["push"] --> C
CD-2

5. Changing the program:
As the first step, create a program identical to that in Figure 1.
a. Insert the sixth selection after the first selection. Select program number 1 by the CHECK button. Push key no. 6 and input it with the STORE button. Use the CHECK button to make sure that the program is changed to the same as that in Figure 2.
b. To cancel only the sixth selection (program number 2), select that program number. This will be displayed. Push the CANCEL button to remove the selection number. (Changes to the same as that in Figure 1).
c. The next step is to switch the positions of the second and fifth selections. (see Figure 1)
(1) Use the CHECK button to select program “-01” and push 5 on the keyboard. Pushing the STORE button will yield Figure 3.
(2) Select the second selection which should be program number “-03”, using the CHECK button. Pushing the STORE button will yield figure 4.
(4) Use the CHECK button to select program number "-06" and push the CANCEL button. This will yield Figure 6 and complete the procedure.
■ If the number of selections exceeds 20:
If you enter a selection number that isn't on the disc, it won't be accepted. Also, if more than 20 selections are entered into memory, total time will not be displayed even if RFMAIN ON is on.
■If memory program time exceeds 99 minutes 99 seconds:
Remaining time will be displayed from 99 minutes and 99 seconds, and will begin counting down when that point on the disc is reached.


CD-2
REPEAT FUNCTION
This function can be used for repeat playback of the entire disc, certain selections, or specific phrases.
1. For repeat playback of the entire disc:
Setting the REPEAT button to ON will repeat playback from the beginning of the first selection after the laser pickup reaches the end of the last selection. The entire disc will be repeated even if this button is pushed in the PLAY mode. Also, this button will repeat the memory program if it pushed while in that mode. It is released by pushing it once more.
2. To repeat only one selection:
Store the desired selection in memory (with the STORE button) and push the REPEAT button. Repeat playback of only this selection will occur.
3. To repeat a designated section (phrase) of the disc:
The section is designated by pushing the A→B button once at the beginning of the section, and one more at the end. The section between the two designated points will be repeated. The SPACE BUTTON is used to create a space of approximately 2 seconds between repeat playback operations. (This also can be used to create space between selections). If the A→B button is pushed when the PLAY mode is set to SINGLE, the player will pause at the beginning (A) of the designated section.

flowchart
graph TD
    A["first selection"] --> B{first section is repeated}
    B --> C["first selection"]
    C --> D{first section is repeated}
    D --> E["first selection"]
    E --> F{first section is repeated}
    F --> G["first selection"]
    G --> H{first section is repeated}
    H --> I["first selection"]
    I --> J{first section is repeated}
    J --> K["first selection"]
    K --> L{first section is repeated}
    L --> M["first selection"]
    M --> N{first section is repeated}
    N --> O["first selection"]
    O --> P{first section is repeated}
    P --> Q["first selection"]
    Q --> R{first section is repeated}
    R --> S["first selection"]
    S --> T{first section is repeated}
    T --> U["first selection"]
    U --> V{first section is repeated}
    V --> W["first selection"]
    W --> X{first section is repeated}
    X --> Y["first selection"]
    Y --> Z{first section is repeated}
    Z --> AA["first selection"]
    AA --> AB{first section is repeated}
    AB --> AC["first selection"]
    AC --> AD{first section is repeated}
    AD --> AE["first selection"]
    AE --> AF{first section is repeated}
    AF --> AG["first selection"]
    AG --> AH{first section is repeated}
    AH --> AI["first selection"]
    AI --> AJ{first section is repeated}
    AJ --> AK["first selection"]
    AK --> AL{first section is repeated}
    AL --> AM["first selection"]
    AM --> AN{first section is repeated}
    AN --> AO["first selection"]
    AO --> AP{first section is repeated}
    AP --> AQ["first selection"]
    AQ --> AR{first section is repeated}
    AR --> AS["first selection"]
    AS --> AT{first section is repeated}
    AT --> AU["first selection"]
    AU --> AV{first section is repeated}
    AV --> AW["first selection"]
    AW --> AX{first section is repeated}
    AX --> AY["first selection"]
    AY --> AZ{first section is repeated}
    AZ --> BA["first selection"]
    BA --> BB{first section is repeated}
    BB --> BC["first selection"]
    BC --> BD{first section is repeated}
    BD --> BE["first selection"]
    BE --> BF{first section is repeated}
    BF --> BG["first selection"]
    BG --> BH{first section is repeated}
    BH --> BI["first selection"]
    BI --> BJ{first section is repeated}
    BJ --> BK["first selection"]
    BK --> BL{first section is repeated}
    BL --> BM["first selection"]
    BM --> BN{first section is repeated}
    BN --> BO["first selection"]
    BO --> BP{first section is repeated}
    BP --> BQ["first selection"]
    BQ --> BR{first section is repeated}
    BR --> BS["first selection"]
    BS --> BT{first section is repeated}
    BT --> BU["first selection"]
    BU --> BV{first section is repeated}
    BV --> BW["first selection"]
    BW --> BX{first section is repeated}
    BX --> BY["first selection"]
    BY --> BZ{first section is repeated}
    BZ --> CA["first selection"]
    CA --> CB{first section is repeated}
    CB --> CC["first selection"]
    CC --> CD{first section is repeated}
    CD --> CE["first selection"]
    CE --> CF{first section is repeated}
    CF --> CG["first selection"]
    CG --> CH{first section is repeated}
    CH --> CI["first selection"]
    CI --> CJ{first section is repeated}
    CJ --> CK["first selection"]
    CK --> CL{first section is repeated}
    CL --> CM["first selection"]
    CM --> CN{first section is repeated}
    CN --> CO["first selection"]
    CO --> CP{first section is repeated}
    CP --> CQ["first selection"]
    CQ --> CR{first section is repeated}
    CR --> CS["first selection"]
    CS --> CT{first section is repeated}
    CT --> CU["first selection"]
    CU --> CV{first section is repeated}
    CV --> CW["first selection"]
    CW --> CX{first section is repeated}
    CX --> CY["first selection"]
    CY --> CZ{first section is repeated}
    CZ --> DA["first selection"]
    DA --> DB{first section is repeated}
    DB --> DC["first selection"]
TIMER PLAYBACK
Using an optional autio timer, the player can be set to begin playback at an specified time.
- Set the amplifier's input terminal to the position for the terminal to which the CD-2 is connected.
- Load a disc into the CD-2.
-
Turn on power to both the amplifier and the CD-2.
-
Set the CD-2 PLAY MODE selector to AUTO.
- Set the audio timer to the desired time for automatic play-back. When this time has been set, power to the amplifier and CD-2 will be cut.
- Power will be supplied to the amplifier and CD-2 at the specified time, and automatic playback will begin.

flowchart
graph TD
    A["Plug the CD-2 into the amplifier's SWITCHED AC outlet."] --> B["Set the PLAY MODE selector to AUTO."]
    B --> C["Leave all power switches on."]
    C --> D["Ampifier"]
    D --> E["Plug the amplifier into the audio timer's accessory AC outlet."]
    E --> F["audie timer"]
    F --> G["Output"]
    style A fill:#f9f,stroke:#333
    style B fill:#ccf,stroke:#333
    style C fill:#cfc,stroke:#333
    style D fill:#fcc,stroke:#333
    style E fill:#cff,stroke:#333
    style F fill:#ffc,stroke:#333
    style G fill:#fcc,stroke:#333
REMOTE CONTROL PLAYBACK
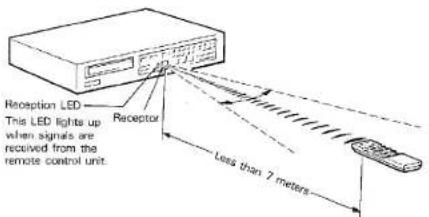
The remote control unit which is supplied with the unit allows the CD-2 player to be operated by remote control.
Playback, pause, stop, fast-forward and reverse search (+/-), repeat on/off, and index checking can all be operated via the remote control unit. The unit generates infra-red light signals which travel in a very straight line, so be sure not to point the unit at the player from an angle.
How often should the batteries be changed?
The batteries will normally last about six months. However if you notice that you have to shorten the distance between the remote control unit and the player in order to operate it, the batteries should be changed.
Replace the batteries with two new ones. When the batteries are totally drained the reception LED will not light.
Precautions regarding batteries
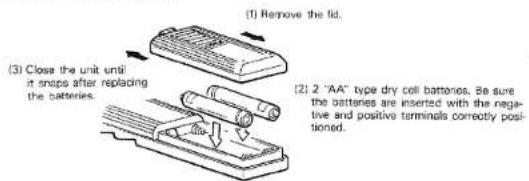
- Be sure to insert the batteries with the positive (+) and negative (−) terminals correctly positioned.
- Replace the batteries with the same type. Never try to use a different type of battery.
- Rechargeable and non-rechargeable batteries can be used. Refer to the battery precaution table.
- Remove the batteries from the remote control unit if it is not going to be used for a long period of time.
- Replace weak batteries as soon as possible.
- Do not heat, take apart, or place the batteries in a fire.
BATTERY REPLACEMENT
CD-2
TROUBLESHOOTING
If the CD-2 fails to operate normally, check the following points to determine whether the fault can be corrected by the simple measures given below. If it cannot, or if the fault is not listed in the SYMPTOM column below, disconnect the unit's power cord and contact the nearest Yamaha dealer for servicing.
| SYMPTOM | CAUSE | CURE |
| Power fails to turn on when POWER switch is depressed. | Incomplete insertion of power plug. | Firmly insert power plug into socket. |
| Playback does not begin. | Disc is loaded upside down. | Reload the disc with the label side UP. |
| The disc is very dirty. | Clean the disc. | |
| No sound. | Improper output cable connection. | Connect output cables properly. |
| Improper operation of amplifier. | Make sure that amplifier controls are set properly. | |
| Playback begins when the power is turned on. | PLAY MODE selector is set to AUTO. | Set to NORMAL. |
| Only one selection can be played. | PLAY MODE selector is set to SINGLE. | Set the PLAY MODE selector to the NORMAL mode. |
| Sound "skips". | Player subject to vibration or physical shock. | Change location of installation. |
| Memory playback will not function. | Memory has been erased. | Re-enter memory. |
| Unit is in normal playback mode. | Press STOP and then begin program playback. | |
| Hum. | Defective cable connections. | Firmly connect all audio plugs. |
| The remote control unit does not function. | The batteries are dead. | Replace the batteries. |
SPECIFICATIONS
SYSTEM.... Compact disc digital audio system
AUDIO CHARACTERISTICS
Frequency Response.... 3-20,000 Hz. ±0.5 dB
Harmonic Distortion..... Less than 0.0015% (1 kHz)
Noise +Harmonic distortion. Less than 0.004% (1 kHz)
Dynamic Range Better than 96 dB
Dynamic Range: 100 dB S/N Ratio Elot. 95 dB (1 kHz)
S/N Radio.... Flat 50 dB (1 kHz)
IEC Flat 100 dB (1 KH
IEC A 102 dB
Wow and Flutter.... Unmeasurable
Channel Separation...... Better than 95 dB (1 kHz)
Output Voltage..... 2 V r.m.s.(at FS)
FUNCTIONS
Program Selection.... Direct with 10-key panel. Se-
cuential with + and - keys.
Playback Programming.... 10-key entry, confirmation with
check key up to 12 selections
check key, up to random playbook
High Speed Search 2 speed fast forward/broze with
High-Speed Search...... 2 speed fast toward/reverse with
sound, high-speed search in
pause.
Remaining Time Display..... With remain time key
Space Play Spaced at intervals of 3 seconds
spada: 1.5,70000000000000000000000000000000000000000000000000000000000000000000
during normal, p
Repeat playback
Repeat.... A through B, all selections, or all
selections in memory
Reset.... Press the Stop key twice
Auto Pause Pause for each selection, or
Auto False.....Fuse for each selection, of each time A through B is reset
each time A through the (Single play mode)
ed (Single play mode)
Disc Loading.... Motor driven horizontal loading
DIGITAL SIGNAL PROCESSING
Optical Pickup.... 3-beam laser
Error correction.... CIRC
D/A Conversion 16-bit linear
Digital filters + /7th order LC
Filter Digital filter + (7th order LC filter)
CD-2

GENERAL
Power Supply...... AC120V, 60Hz (U.S.A. and
Canada
AC220/240V, 60/50Hz (Other
Area)
Power Consumption.... 20 W
Dimensions (W x H x D)..... 435 x 93 x 290 mm
(17-1/8" x 3-5/8" x 11-3/8")
Weight 4.8 kg (10 lbs. 9 oz.)
Specifications subject to change without notice.
SINCE 1887

YAMAHA
NIPPON GAKKI CO., LTD. HAMAMATSU, JAPAN


- YAMÂHA CD-2
- CENTER
- CAUTION (PREPARED IN ACCORDANCE WITH UL STANDARD 1270)
- CD-2
- CAUTION: READ THIS BEFORE OPERATING YOUR CD-2
- CAUTION
- REMOVING THE TRANSPORT SCREWS
- • Transport screws
- -Removing the screws
- Transporting the CD-2
- CONNECTION DIAGRAM
- Important Points
- Note:
- SPACE PLAY
- REMAIN TIME
- INDEX
- REPEAT
- MEMORY
- KEYBOARD
- PLAY INDICATOR
- ⑰ TIME COUNTER: MINUTES/SECONDS DISPLAY
- MUSIC NO. INDICATOR
- SEARCH INDICATOR
- DISC INDICATOR
- HANDLING THE DISCS
- BASIC OPERATION
- Check all connections before use.
- The disc tray can be closed in three ways:
- MUSIC SEARCH
- ■Index
- MEMORY OPERATIONS
- Changing the program:
- ■ If the number of selections exceeds 20:
- ■If memory program time exceeds 99 minutes 99 seconds:
- REPEAT FUNCTION
- For repeat playback of the entire disc:
- To repeat only one selection:
- To repeat a designated section (phrase) of the disc:
- TIMER PLAYBACK
- REMOTE CONTROL PLAYBACK
- How often should the batteries be changed?
- Precautions regarding batteries
- BATTERY REPLACEMENT
- TROUBLESHOOTING
- SPECIFICATIONS
- AUDIO CHARACTERISTICS
- FUNCTIONS
- DIGITAL SIGNAL PROCESSING
- GENERAL
Mærke : YAMAHA
Model : CD-2
Kategori : CD-afspiller