MXA-STMK-10 - Ukategoriseret AMX - Gratis brugsanvisning og manual
Find enhedens vejledning gratis MXA-STMK-10 AMX i PDF-format.

Brugerspørgsmål om MXA-STMK-10 AMX
0 spørgsmål om dette apparat. Besvar dem du kender, eller stil dit eget.
Stil et nyt spørgsmål om dette apparat
Download vejledningen til din Ukategoriseret i PDF-format gratis! Find din vejledning MXA-STMK-10 - AMX og tag din elektroniske enhed tilbage i hånden. På denne side er alle dokumenter nødvendige for brugen af din enhed offentliggjort. MXA-STMK-10 af mærket AMX.
BRUGSANVISNING MXA-STMK-10 AMX
MXA-STMK-10
The MXA-STMK-10 Secure Table Mount Kit (FG5968-66) is a beautifully styled plate that, when attached to the Modero X Serles® 10.1" Tabletop Touch Panel and secured with the under-table tamper resistant bolts, will make it virtually theft proof. If drilling into the table is not feasible, the secure mounting plate can be attached to the touch panel (but not the table) and then secured with a Kensington® Lock.
Use both methods simultaneously for extra security. The MXA-STMK-10 is compatible with all Modero X Series 10.1" Tabletop Touch Panels, including the MXT-1001 (FG5968-47), MXT-1000 (FG5968-03) and MXT-1000-NC (FG5968-24).
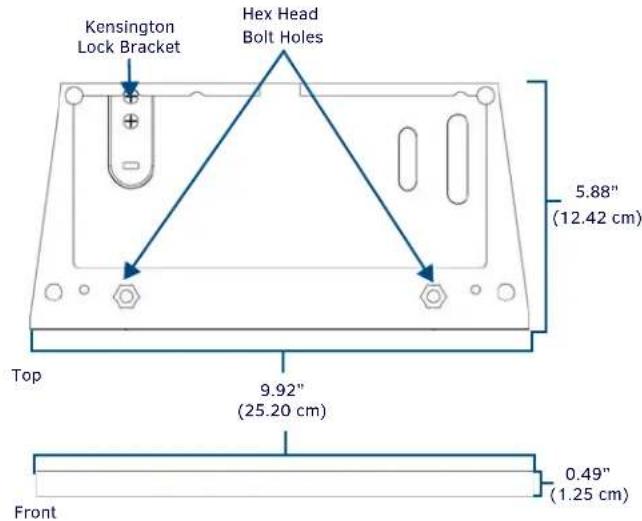
FIG. 1 MXA-STMK-10 SECURE TABLE MOUNT KIT
PRODUCT SPECIFICATIONS
| Dimensions (HWD): 0.49" x 9.92" x 5.88" (1.25 cm x 25.20 cm x 12.42 cm) | |
| Weight: 1.90 lbs (0.86 kg) | |
| Included Accessories: • Security Mount Base (62-5968-52)• Kensington Lock Bracket (62-5968-50)• Screw, 8-32 X .1.00, Torx Flat Head, Black (2) (80-5005)• Screw, 6-32 X .375, Phillips Flat Head, Black (2) (80-5006)• Nut, 1/4-20, Tamper Proof (3) (80-5007)• Washer, 1.5 Dia X .312 Thick , Nylon (2) (80-5008)• Bolt, 1/4-20 X 3.00 Hex Head, Black (2) (80-5009)• Round Dip-Molded End Cap, Black (2) (80-5010)• MXA-STMK-10 Quick Start Guide (93-5968-66) | |
| Other AMX Equipment: • MXT-1000 10.1" Modero X Series Tabletop Touch Panel (FG5968-03)• )MXT-1001 10.1" Modero X Series G5 Tabletop Touch Panel (FG5968-47)• MXT-1000-NC 10.1" Modero X Series Tabletop Touch Panel (no Camera, no Microphone) (FG5968-21) | |
| For more information on the MXT-1000 10.1" Modero X Series Tabletop Touch Panel, refer to the MSD/T-1000 Operation Reference Guide (available to view/download at www.amx.com). |
Installation
The MXA-STMK-10 may be mounted in one of two ways: It can be affixed to a table or other surface using the included hex head bolts and tamper-proof nuts, or it can be allowed to move freely but constrained by a Kensington Lock cable. For additional security, both options may be used at the same time.
NOTE: For the table mount installation, the tools necessary include a drill with a 1/4" bit, a Phillips head screwdriver, and an adjustable-head box wrench. The Kensington Lock installation requires use of a Phillips head screwdriver.
Table Mount Installation
To install the MXA-STMK-10 to a table or other surface:
- Place the security mount base in the location where it is to be installed, taking care not to put the mount base past the edge of the table.
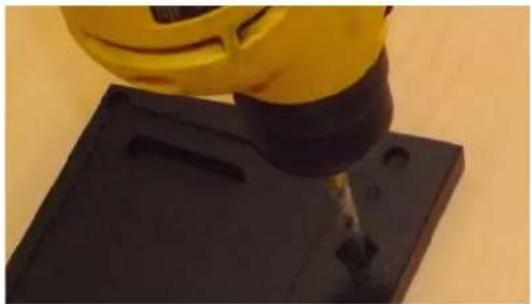
- Mark the location of the hex head bolt holes going through the security mount base, such as by drilling through the holes into the table (FIG. 2). When drilling through the holes, use a 1/4" or 5/16" drill bit to allow the bolts to pass through during installation. Clean out the drilling debris from the holes and from the surface of the table.
natural_image
Close-up of a yellow robotic arm operating on a black base with a tool inserted (no visible text or symbols)FIG. 2 MARKING THE LOCATION OF THE HEX HEAD BOLT HOLES
- On the touch panel, turn the touch panel upside down and remove the 2 Phillips head screws at each corner from the bottom of the device (FIG. 3). The screws to be removed are next to the rubber feet on the front end. Store these screws in a secure location in case you wish to uninstall the secure table mount plate.
Phillips head screw

natural_image
Close-up of a textured surface with a small circular object and a blue square highlighting it, no visible text or symbols.FIG. 3 LOCATION OF THE PHILLIPS HEAD SCREWS ON THE BOTTOM OF THE TOUCH PANEL
- Install the hex head bolts through the security mount base. Do NOT secure the bolts in the table at this time.
- Using the two Phillips flat head screws included in the kit, secure the security mount base to the bottom of the touch panel from the underside of the base (FIG. 4). These holes must align with the holes in the touch panel's base from which the screws were already removed (FIG. 3).
natural_image
Close-up of a metallic tool tip inserted into a dark metal surface, with no visible text or symbols.FIG. 4 SECURING THE SECURITY MOUNT BASE TO THE BOTTOM OF THE TOUCH PANEL
-
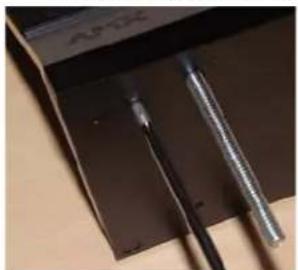
Pass the hex head bolts through the table.
-
On the underside of the table, put a washer and then one of the tamper-proof nuts on the end of each hex head bolt (FIG. 6). Make sure that the wide side of the tamper-proof nut is facing the underside of the table. Finger-tighten the tamper-proof nut.
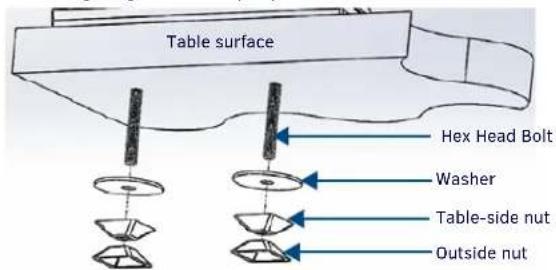
FIG. 5 INSTALLATION, UNDERSIDE OF THE TABLE SURFACE
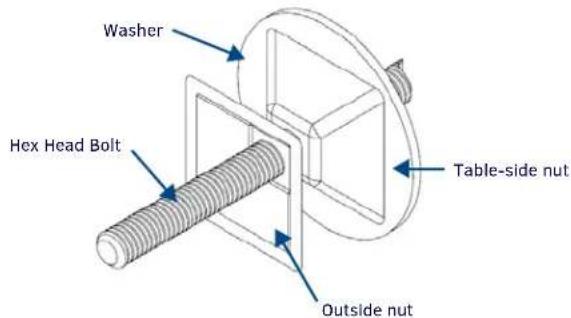
FIG. 6 TAMPER-RESISTANT NUT INSTALLATION, DETAIL
- With the wide side facing away from the table surface, put the spare tamper-proof nut on the end of one of the two bolts and finger-tighten the nut (FIG. 6). With the two nuts touching, use an adjustable-head box wrench to further tighten the table-side nut (FIG. 7). DO NOT OVERTIGHTEN.
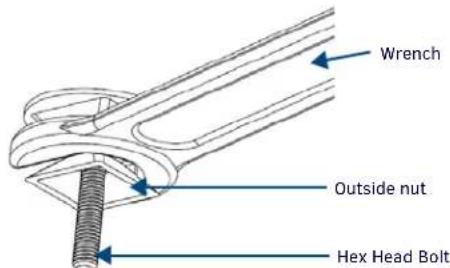
FIG. 7 TIGHTENING OF TAMPER-RESISTANT NUTS, DETAIL
-
When sufficiently tightened, remove the outside nut. Repeat step 8 with the other hex head bolt.
-
Save the remaining outside nut in a secure place. NOTE: When the table-side nut is sufficiently tightened and the touch panel is secure, the remaining hex head bolt may be trimmed back to prevent damage or injury from the excess length. In order to uninstall the touch panel and security mount base in the future, do NOT trim the bolt flush with the narrow side of the table-side nut. Always leave at least 1/4" (0.64 cm) of the bolt below the table-side nut to allow uninstallation of the panel.
-
When finished, cover the end of each hex head bolt with an end cap (80-5010) to protect against injury or damage from the bolt end.
Table Mount Removal
To remove the touch panel and security mount base:
- Attach the spare outside nut to the end of the hex head bolt, wide side away from the table, and finger-tighten to the table-side nut (FIG. 5).
- With the two nuts touching, use a wrench to loosen the table-side nut. Remove the table-side nut and the washer from the hex head bolt.
- Repeat step 2 with the other hex head bolt.
- Lift the touch panel and the security mount base from the table surface.
- On the bottom of the security mount base, remove the two Phillips head screws. Remove the security mount base.
Kensington Lock Installation
In installations that require the ability to move the touch panel around a table surface, but where the touch panel needs to remain secure, a Kensington Lock and cable, or similar cable locking system, may be used. To use the MXA-STMK-10's Kensington Lock bracket:
- On the security mount base (FIG. 1), loosen the two screws holding the Kensington Lock bracket to the base (FIG. 8) and remove the bracket.
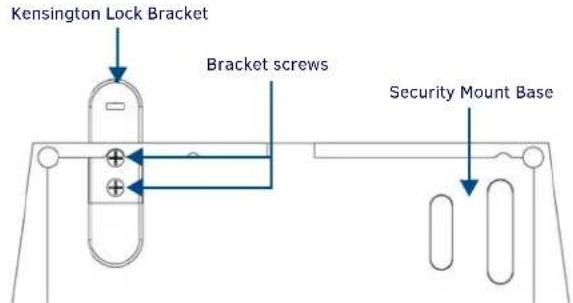
FIG. 8 KENSINGTON LOCK BRACKET INSTALLATION
- Reverse the bracket in its slot so the rounded end faces outward (FIG. 8), and re-secure it to the security mount base with the two bracket screws. On the touch panel, turn the touch panel upside down and remove the 2 Phillips head screws from the bottom of the device.
- Using the two Phillips flat head screws included in the kit, secure the security mount base to the bottom of the touch panel from the underside of the base. These holes must align with the holes in the touch panel's base from which the screws were already removed (FIG. 3).
- Following the manufacturer's Instructions, pass the Kensington Lock cable through the slot in the bracket and secure the end to the desired lock, post, or other secure location.
- To remove the Kensington Lock and hide the bracket, reverse the order of steps 1 through 5.