
D-NE800LS - CD播放器 SONY - 免费用户手册
免费查找设备手册 D-NE800LS SONY PDF格式.


| 产品类型 | 便携式CD播放器 |
| 品牌 | 索尼 (Sony) |
| 型号 | D-NE800LS |
| 播放格式 | Audio CD, CD-R, CD-RW |
| 防震保护 | G-防震系统 (约40秒) |
| 电源 | 2节AA电池或交流适配器 |
| 电池续航 | 约50小时 (使用碱性电池) |
| 尺寸 (宽×高×深) | 约127 × 14.8 × 127 mm |
| 重量 | 约150 g (不含电池) |
| 耳机输出 | 立体声迷你插孔 (3.5 mm) |
| 输出功率 | 5 mW + 5 mW (16 Ω) |
| 遥控器 | 附带线控器 |
| 显示 | 液晶显示屏 (带背光) |
| 播放模式 | 正常/随机/重复/编程 |
| 保养与清洁 | 用干软布擦拭外壳,避免使用酒精或稀释剂 |
| 安全注意事项 | 避免在潮湿、高温或强磁场环境下使用;切勿拆卸 |
| 可修复性 | 建议由专业维修人员处理,零件可订购 |
| 包含配件 | 耳机、线控器、交流适配器、说明书 |
常见问题 - D-NE800LS SONY
用户关于以下问题的提问 D-NE800LS SONY
0 问题 关于此设备。回答您知道的问题或提出自己的问题。
提出关于此设备的新问题
下载您的设备说明 CD播放器 免费PDF格式!查找您的手册 D-NE800LS - SONY 并重新掌握您的电子设备。本页发布了使用您的设备所需的所有文档。 D-NE800LS 品牌 SONY.
用户手册 D-NE800LS SONY
Portable CD Player
Operating Instructions
使用说明书
사용설명서 KR

"WALKMAN" is a registered trademark of Sony Corporation to represent Headphone
Stereo products. W. VALKMAN is a trademark of Sony Corporation.
D-NE800LS
© 2003 Sony Corporation
WARNING
To prevent fire or shock hazard, do not expose the unit to rain or moisture.
Do not install the appliance in a confined space, such as a bookcase or built-in cabinet.
To prevent fire, do not cover the ventilation of the apparatus with newspapers, tablecloths, curtains, etc. And don't place lighted candles on the apparatus.
To prevent fire or shock hazard, do not place objects filled with liquids, such as vases, on the apparatus.
CAUTION
The use of optical instruments with this product will increase eye hazard.
Certain countries may regulate disposal of the battery used to power this product. Please consult with your local authority.
CAUTION
• INVISIBLE LASER RADIATION WHEN OPEN
• DO NOT STARE INTO BEAM OR VIEW DIRECTLY WITH OPTICAL INSTRUMENTS
- CLASS 1M INVISIBLE LASER RADIATION WHEN OPEN
• DO NOT VIEW DIRECTLY WITH OPTICAL INSTRUMENTS
The validity of the CE marking is restricted to only those countries where it is legally enforced, mainly in the countries EEA (European Economic Area).
ATRAC3plus and ATRAC3 are trademarks of Sony Corporation.
Table of Contents
Enjoy your ATRAC CD Walkman!
Music sources playable on this CD player .. 6
ATRAC3plus and ATRAC3 7
MP3 7
The structure of ATRAC3plus/ATRAC3 and MP3 files 8
Getting started
Checking the supplied accessories .... 10
Locating the controls 11
Playing a CD
-
Insert a CD. 15
-
Connect your CD player. 15
-
Play a CD. 16
Playback options
Playing tracks repeatedly (Repeat play) .... 19
Playing all files in a selected group (Group play) (ATRAC CD/MP3 CD only) 19
Playing a single track (Single play)...... 20
Playing tracks in random order (Shuffle play).... 20
Playing all files in a selected group in random order (Group shuffle play) (ATRAC CD/MP3 CD only) 20
Playing your favorite play lists (m3u play list play) (MP3 CD only).... 20
Playing your favorite tracks by adding Bookmarks (Bookmark track play) ..... 21
Playing the 10 tracks you have played most frequently (Auto ranking play).... 22
Playing tracks you have played most frequently in random order (Auto ranking shuffle play) 22
Playing tracks in your favorite order (PGM play).... 23
Searching for groups or tracks/files...... 24
Available features
Adjusting sound quality (Parametric equalizer) 25
The G-PROTECTION function...... 26
Protecting your hearing (AVLS) 27
Stopping playback automatically (OFF TIMER) 27
Locking the controls (HOLD) 28
Turning off the beep sound 28
Saving power 29
Playing tracks continuously (SEAMLESS) (ATRAC CD only) 30
Connecting your CD player
Connecting a stereo system .... 31
Connecting to a power source
Using the rechargeable batteries.... 33
Using the dry batteries 35
Notes on the power source 36
Additional information
List of menus 37
Precautions 38
Maintenance 38
Troubleshooting.... 39
Specifications 42
Optional accessories 43
Enjoy your ATRAC CD Walkman!
Thank you for purchasing the D-NE800LS. This CD Walkman is called an “ATRAC CD Walkman,” because you can enjoy “ATRAC CDs” on it.
You can make your own ATRAC CD easily.
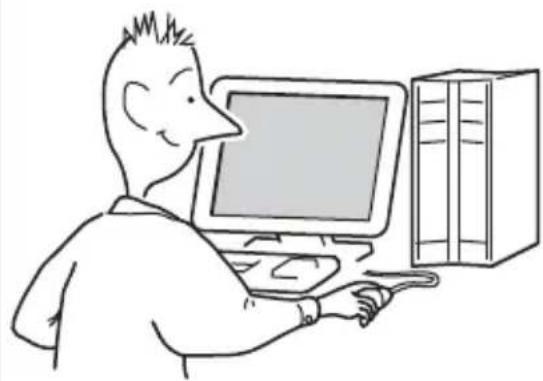
Step 1 Install
Install the supplied "SonicStage Simple Burner" software.
natural_image
Cartoon illustration of a person using a desktop computer (no text or symbols present)Step 2 Burn
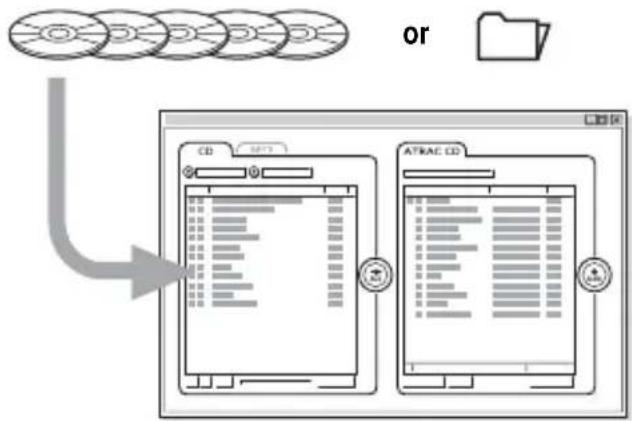
Create a disc image and burn it on a CD-R/RW using your PC.
MP3 filesAudio CDs
flowchart
graph TD
    A["CD"] --> B["ATRAC CD"]
    C["or"] --> D["Computer Interface"]
    style A fill:#f9f,stroke:#333
    style B fill:#bbf,stroke:#333
    style C fill:#dfd,stroke:#333
    style D fill:#dfd,stroke:#333
Audio data is converted to the ATRAC3plus/ATRAC3 format by the SonicStage Simple Burner.
How to use the SonicStage Simple Burner
Refer to the supplied booklet “SonicStage Simple Burner.”
What is an ATRAC CD?
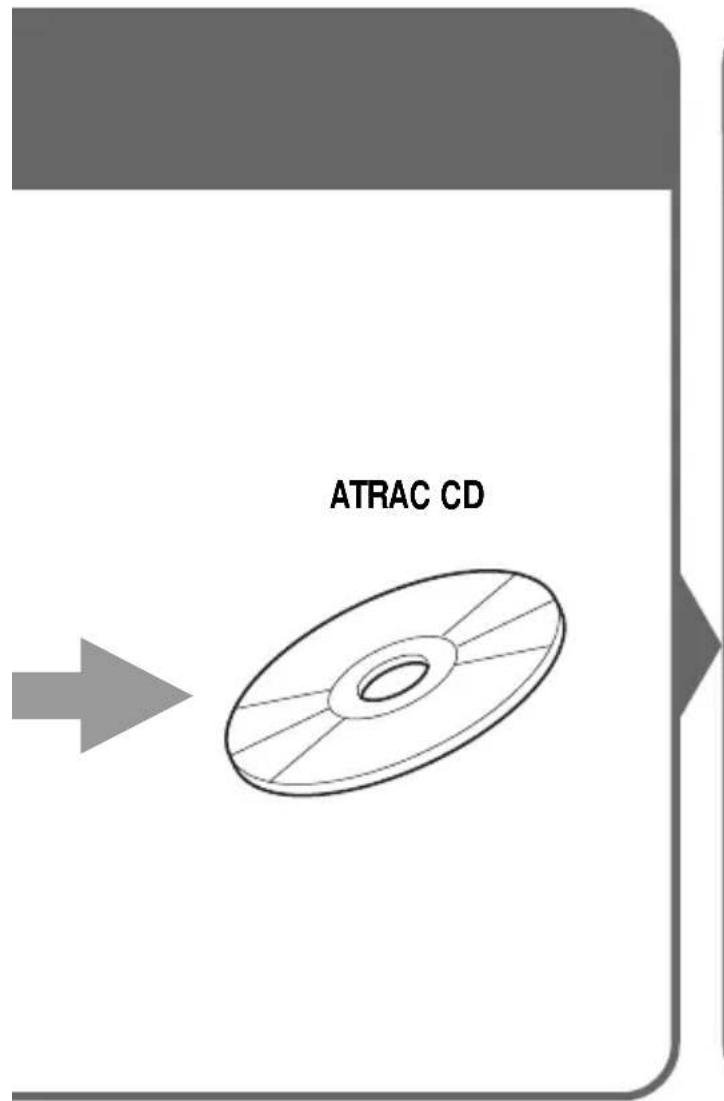
An ATRAC CD is a CD-R/RW on which audio data compressed in the ATRAC3plus/ATRAC3 format has been recorded. About 30 audio CDs can be recorded on a CD-R/RW.* You can also record MP3 files by converting the files to the ATRAC3plus/ATRAC3 format.
* When total playing time of one CD (album) is estimated at 60 minutes and you are recording on a 700 MB CD-R/RW at 48 kbps in ATRAC3plus format.
Step 3 Listen
You can enjoy listening to your own ATRAC CDs on your ATRAC CD Walkman.

natural_image
Cartoon illustration of a man running while holding a musical note and singing into a circle (no text or symbols)You can also enjoy audio CDs on your CD Walkman.
What is the ATRAC3plus/ATRAC3 format?
Refer to pages 6 - 9 of this manual.
Music sources playable on this CD player
You can play the following 3 music sources on this CD player:
• Audio CDs (CDDA format)
• CDs with ATRAC3plus/ATRAC3 format files (ATRAC CD)
• CDs with MP3 format files (MP3 CD)
Usable disc formats
You can use ISO 9660 Level 1/2 and Joliet extension format discs only.
About CD-Rs/RWs
This CD player can play CD-Rs/RWs recorded in the ATRAC3plus/ATRAC3, MP3 or CDDA* format, but playback capability may vary depending on the quality of the disc and the condition of the recording device.
* CDDA is the abbreviation for Compact Disc Digital Audio. It is a recording standard used for the Audio CDs.
Music discs encoded with copyright protection technologies
This product is designed to play back discs that conform to the Compact Disc (CD) standard. Recently, various music discs encoded with copyright protection technologies are marketed by some record companies. Please be aware that among those discs, there are some that do not conform to the CD standard and may not be playable by this product.
Notes
- This CD player cannot record music content on recordable media, such as CD-Rs/RWs.
- CD-Rs/RWs recorded in the ATRAC3plus/ATRAC3 format cannot be played on your computer.
ATRAC3plus and ATRAC3
“ATRAC3plus,” which stands for “Adaptive Transform Acoustic Coding3plus” is audio compression technology, developed from the ATRAC3 format. Though the ATRAC3plus format can compress music content to about 1/20 of its original size at 64 kbps, you can still enjoy high quality sound. The available transfer bit rates are 256 kbps, 64 kbps and 48 kbps.
“ATRAC3,” which stands for “Adaptive Transform Acoustic Coding3” is audio compression technology that satisfies the demand for high sound quality and high compression rates. The ATRAC3 format can compress music content to about 1/10 of their original size, which contributes to reduction of the media volume. The available transfer bit rates are 132 kbps, 105 kbps and 66 kbps.
The usable number of groups and files
• Maximum number of groups: 255
• Maximum number of files: 999
For details, refer to the supplied booklet “SonicStage Simple Burner.”
Note on saving files on the media
Do not save files in other formats (except MP3 files) and do not make unnecessary folders on a disc that has ATRAC3plus/ATRAC3 files.
MP3
MP3, which stands for MPEG-1 Audio Layer3, a standard for audio files compression supported by the Motion Picture Experts Group, an ISO (International Organization for Standardization) working group, enables compression of audio files to about 1/10 of the data size of a standard compact disc.
The major specifications of the acceptable disc format are:
• Maximum directory levels: 8
- Acceptable characters: A - Z, a - z, 0 - 9, _ (underscore)
Notes
- When naming files, be sure to add the file extension "mp3" to the file name.
- If you add the extension “mp3” to a file other than an MP3 file, the player will not be able to recognize the file properly.
(Continued)
The usable number of groups and files
• Maximum number of groups: 255
• Maximum number of files: 999
Settings for compression and writing software
- This CD player is able to play MP3 files with the following specifications: Bit rate: 16 - 320 kbps, and sampling frequencies: 32/44.1/ 48 kHz. Variable Bit Rate (VBR) file can also be played.
To compress a source for an MP3 file, we recommend setting the compression software to “44.1 kHz,” “128 kbps,” and “Constant Bit Rate.”
- To record up to the maximum capacity, set to “halting of writing.”
- To record at one time up to the maximum capacity on media that has nothing recorded on it, set to “Disc at Once.”
Notes on saving files on the media
- Do not save files in other formats (except MP3/ATRAC3plus/ATRAC3 format files) or unnecessary folders on a disc that has MP3 files.
- When a disc is inserted, the CD player reads all the information of folders and files on that disc. If there are many folders on the disc, it may take a long time for play to begin or for the next file to start playback.
The structure of ATRAC3plus/ATRAC3 and MP3 files
Groups and folders
The ATRAC3plus/ATRAC3 format has a very simple structure. It consists of “files” and “groups.” A “file” is equivalent to a “track” of an audio CD. A “group” is a bundle of files and is equivalent to an “album.” A “group” has no directory-type structure (a new group cannot be made within an existing group).
When referring to MP3 CDs, a “file” is equivalent to a “track” and a “group” is equivalent to an “album.” This CD player is designed to recognize an MP3 folder as a “group” so that it can play CD-Rs/RWs recorded in both the ATRAC3plus/ATRAC3 format and those recorded in the MP3 format with the same operation.
ATRAC3plus/ATRAC3/MP3 file structure and playing order
- ATRAC3plus/ATRAC3 - MP3

Notes
• A group that does not include an MP3 file is skipped.
- If ATRAC3plus/ATRAC3 files and MP3 files are recorded on the same CD, this CD player plays the ATRAC3plus/ATRAC3 files first.
- Depending on the method used to record MP3 files on the disc, the playing order may be different from the one shown above.
Checking the supplied accessories
AC power adaptor (1)

natural_image
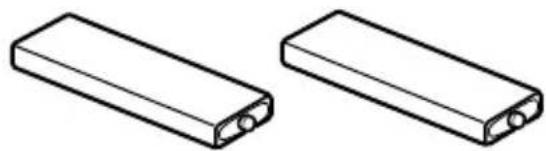
Line drawing of a cable being connected to a rectangular device (no text or symbols)Rechargeable batteries (2)
natural_image
Two rectangular electronic components with internal leads, shown in line drawing style (no text or symbols)Battery carrying case (1)

natural_image
Simple line drawing of a rectangular box (no text or symbols)Headphones/earphones (1)

natural_image
Line drawing of a medical or laboratory device with a coiled cable and connector (no text or symbols)Remote control (1)
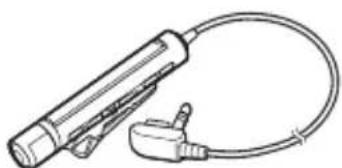
natural_image
Line drawing of a handheld electronic device with a coiled cable and connector (no text or symbols)Charging stand (1)
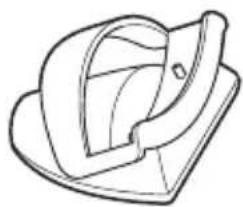
natural_image
Line drawing of a stylized hat or cushion with a handle and spout (no text or symbols)Carrying pouch (1)

natural_image
Simple line drawing of a bag with a rope tied around it (no text or symbols)External battery case (1)

natural_image
Line drawing of a cylindrical device with a coiled cable and plug, no text or symbols presentCD-ROM* (SonicStage Simple Burner) (1)
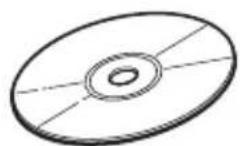
*Do not play a CD-ROM on an audio CD player.
User's guide for SonicStage Simple Burner (1)
Locating the controls
CD player
For details, see the pages in parentheses.
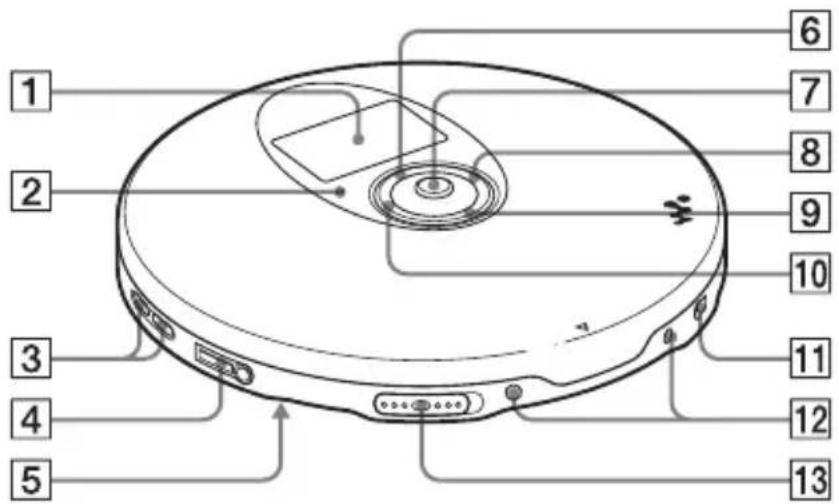
1Display (12, 17, 19, 24, 37)
2 OPR (operation) lamp (28, 29, 34)
Color of the lamp changes according to the type of music source being played.
Red: Audio CD, Green: ATRAC3plus/ATRAC3 file, Orange: MP3 file For some time after the CD is inserted, the lamp lights up in red, orange and green in turn.
This lamp also functions as the HOLD lamp and the CHG (charge) lamp.
3 VOL (volume) + *1/-buttons (16)
4 (headphones)/LINE OUT (OPTICAL) jack (15, 31)
Switch the function of the jack, using the menu.
5HOLD switch (rear) (28)
Slide the switch in the direction of the arrow to disable the buttons on the CD player.
6 union button (19 - 31, 37)
Use to select a file, play mode, etc.
75-way control key (15, 16, 19 - 31, 34, 37)

DISPLAY/MENU
▶II: play/pause
AMS ^*2 /rewind
▶▶▶:AMS/fast forward
■/CHG: stop/charge
DISPLAY/MENU: Use to select menu items and enter the selection.
Push the control key toward ▶II, ▶▶I,
◀◀ or ▪/CHG with your finger on DISPLAY/MENU.
8 (group) + button (16, 23, 24)
9↓ button (19 - 31, 37)
Use to select a file, play mode, etc.
10 (group) - button (16, 23, 24, 26, 28, 37)
[11]EXT BATT (external battery)/DC IN 4.5 V (external power input) jack (15, 34, 36)
12 Terminals for the charging stand (34, 38)
13 OPEN switch (15, 33)
Slide the switch to open the CD player lid.
*1 The button has a tactile dot.
*2 Automatic Music Sensor
(Continued)
Display (CD player)
For details, see the pages in parentheses.
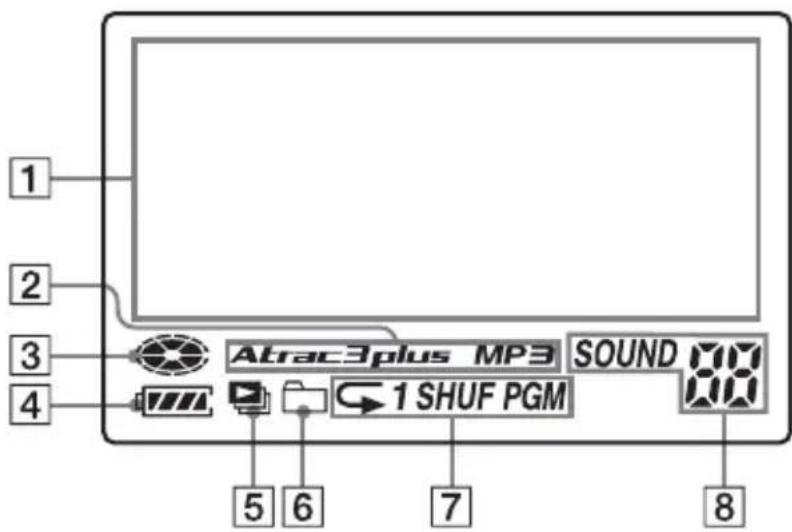
1 Character information display (17)
While playing an audio CD, disc name, track name, etc. appear in 4 lines, if recorded on the CD.
While playing an ATRAC CD/MP3 CD, group name, file name, etc. appear in 4 lines, if recorded on the CD.
Menu items also appear in this display.
②Atrac3plus/MP3 indication
3 Disc indication
Lights up while the CD player is playing.
4 Battery indication (33)
Roughly shows the remaining power of the battery. If “” flashes, the batteries are depleted.
5Play list indication (21)
For MP3 CD only
6 Group indication (19, 20)
For ATRAC CD/MP3 CD only
7Play mode indication (19 - 24)
Shows various play modes such as shuffle play and program play. “” shows repeat play.
8 SOUND indication (25, 26)
Shows the SOUND setting which has been selected on the menu.
Using the carrying pouch
You can carry your player and its battery case together using the supplied carrying pouch. Insert them into the proper places in the pouch as illustrated.

natural_image
Diagram of a device with a curved panel and a circular component connected to a tool (no text or symbols)Remote control
For details, see the pages in parentheses.
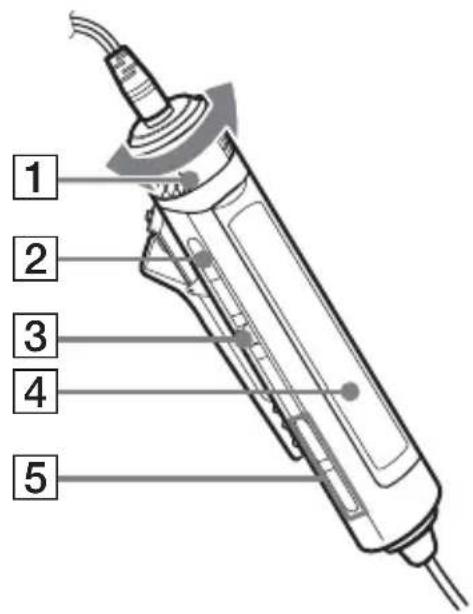
1 VOL (volume) +/- control (16, 26, 28)
Turn to adjust the volume.
2 ■ (stop) button (16, 26, 28, 37)
3 Jog lever (I ◀ ◀ ▶ II/ENT ▶ ▶ I) (16, 21 - 23, 25 - 31)
▶II (play/pause)/ENT (enter):
Press during stop to start play, and press during play to pause play. When selecting menu items, press to enter the selection.
Flick toward ◀◀◀ or ▶▶◀: AMS, rewind, fast forward
4Display (14, 17)
5 (group) +/- buttons (16, 23, 24)
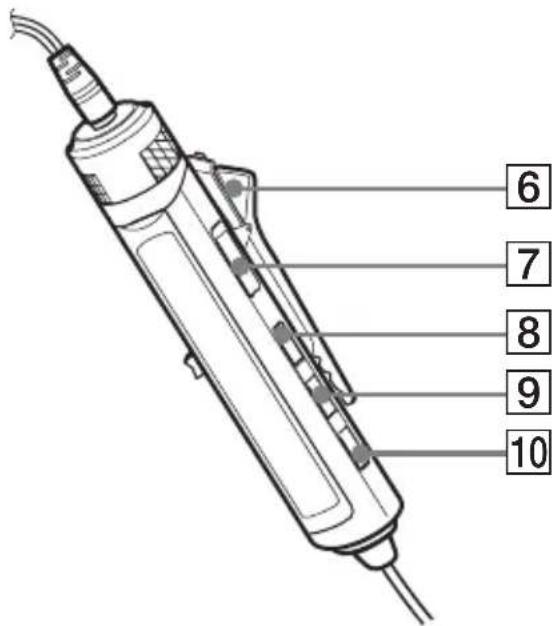
6Clip (14)
7HOLD switch (28)
Slide the switch in the direction of the arrow (a yellow mark appears) to disable the buttons on the remote control.
8DISPLAY button (24, 26 - 31, 37)
9P MODE/ button (19 - 24)
10 SOUND button (25, 37)
Note
Use only the supplied remote control. You cannot operate this CD player with the remote control supplied with other CD players.
(Continued)
Display (remote control)
For details, see the pages in parentheses.
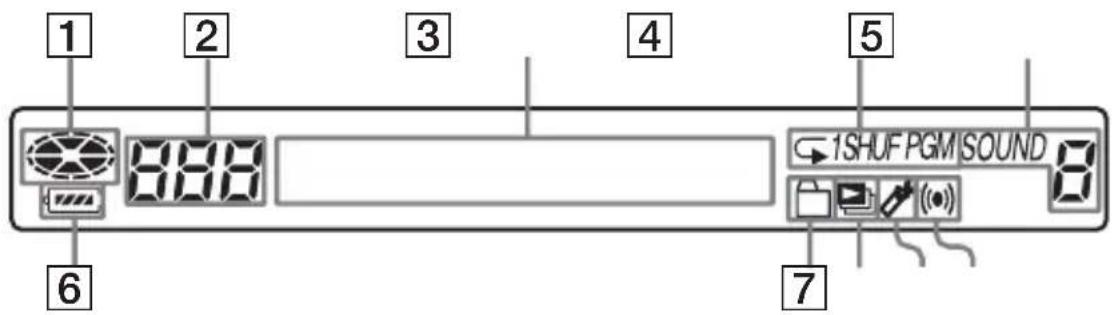
1 Disc indication
2 Track number indication (23)
3 Character information display (17)
4Play mode indication (19 - 23)
5 SOUND indication (25, 26)
6 Battery indication (33)
7 Group indication (19, 20)
8Play list indication (21)
9Bookmark indication (21, 22)
During play, the indication shows a track has a Bookmark.
10Timer indication (27)
Shows the OFF TIMER setting has been selected on the menu.
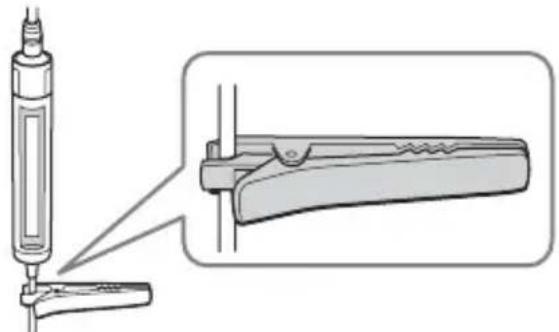
To use the clip on the remote control
You can remove the clip from the remote control and change the direction of the clip.
To remove To attach in the reverse direction


natural_image
Diagram showing a device being inserted into a housing, with an arrow indicating the process (no text or symbols present)You can pass the cord of the remote control through this clip.
natural_image
Diagram showing a syringe inserted into a tool with an inset close-up of the component (no text or symbols present)1. Insert a CD.
① Slide OPEN to open the CD player lid.

natural_image
Line drawing of a robotic vacuum cleaner with directional arrows indicating motion (no text or symbols)OPEN switch
② Place the CD on the tray and close the lid.

Label side up
2. Connect your CD player.
You can use the following power sources:
• Rechargeable batteries (page 33)
• LR6 (size AA) alkaline batteries (external battery case) (page 35)
• A C power adaptor
We explain how to use your CD player on house current on this page. Connect the plugs and terminals securely.
①Connect the AC power adaptor.
②Connect the headphones/earphones with the remote control to the CD player.
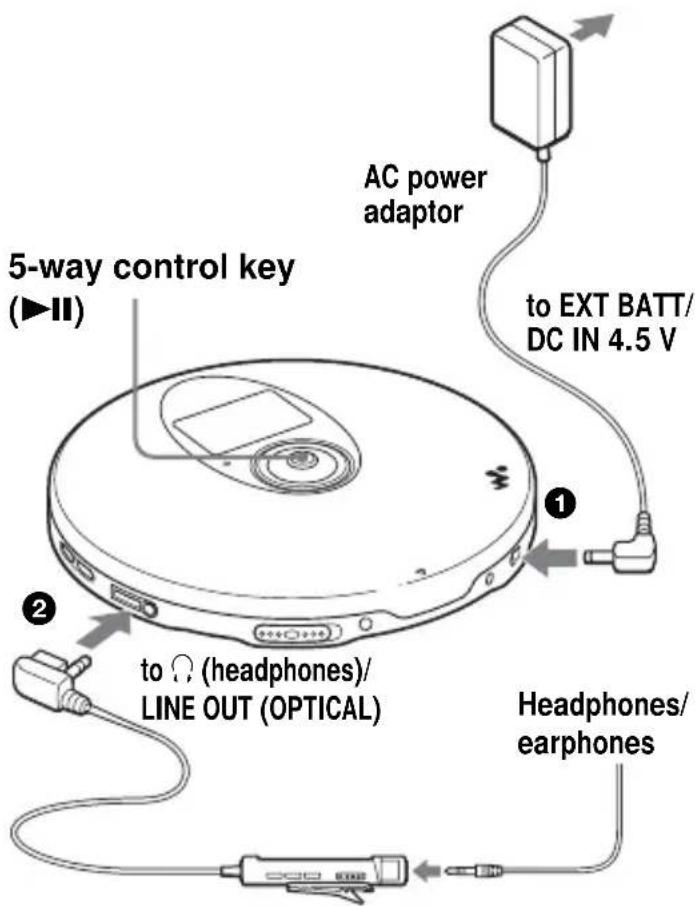
Remote control
to an AC outlet
(Continued)
3. Play a CD.
5-way control key (▶II)

①Push the control key toward ▶II.
②Adjust the volume by pressing VOL + or -.

①Press the jog lever.
②Adjust the volume by turning VOL +/-.
| To | CD player | Remote control |
| Play (from a point where you stopped previously) | Push the control key toward ▶II.Playback starts from the point where you stopped. | Press the jog lever.Playback starts from the point where you stopped. |
| Play (from the first track) | While the CD player is stopped, push and hold the control key toward ▶II until the play of the first track starts. | While the CD player is stopped, press and hold the jog lever until the play of the first track starts. |
| Pause/resume play after pause | Push toward ▶II. | Press the jog lever. |
| Stop^*2 | Push toward ■/CHG. | Press ■. |
| Find the beginning of the current track (AMS^*1)^*2 | Push toward ◀◀. | Flick the jog lever toward ◀◀once. |
| Find the beginning of previous tracks (AMS)^*3 | Push toward ◀◀ repeatedly. | Flick the jog lever toward ◀◀ repeatedly. |
| Find the beginning of the next track (AMS)^*2,*3 | Push toward ▶▶I. | Flick the jog lever toward ▶▶I once. |
| Find the beginning of succeeding tracks (AMS)^*3 | Push toward ▶▶I repeatedly. | Flick the jog lever toward ▶▶I repeatedly. |
| Go backwards quickly*2.*5 | Push and hold toward ◀◀. | Hold the jog lever toward ◀◀. |
| Go forward quickly*2.*5 | Push and hold toward ▶▶I. | Hold the jog lever toward ▶▶I. |
| Jump to succeeding groups*4 | Press 📄 repeatedly. | Press 📄 repeatedly. |
| Jump to previous groups*4 | Press 📄 repeatedly. | Press 📄 repeatedly. |
*1 Automatic Music Sensor
*2 These operations can be carried out during both play and pause.
*3 After you have played the last track, you can return to the beginning of the first track by flicking the jog lever toward ▶▶▶ (by pushing the control key toward ▶▶▶ on the CD player). Similarly, if you are at the first track, you can locate the last track by flicking the jog lever toward ◀◀◀ (by pushing the control key toward ◀◀◀ on the CD player).
*4 Only when you play an ATRAC CD/MP3 CD
*5 These operations cannot be carried out when using an MP3 file recorded on a CD-R/RW in a packet write format.
Checking CD information on the display
You can check CD information by repeatedly pressing DISPLAY/MENU on the CD player or DISPLAY on the remote control.
When you are playing a CD containing text information such as CD-TEXT, “track name,” “album name,” “artist name,” etc. are displayed as shown in parentheses in the following table. When you are playing an ATRAC CD, information you input using the SonicStage Simple Burner software is displayed. When you are playing an MP3 CD containing MP3 files with an ID3 tag ^*1 , ID3 tag information is displayed.
CD player
Each time you press DISPLAY/MENU, the display changes as follows:
Audio CD ATRAC CD/MP3 CD
| Track number, elapsed playing time File name, artist name*3, group name,(Track name, artist name, album name) file number, elapsed playing time |
| Track number, remaining time of File name, CODEC information*4,the current track file number, remaining time of the current file(Track name, artist name) |
| The total number of tracks on the CD, Total number of files, total number of groups,the total playing time of the CD, file number, elapsed playing timethe number of tracks left*2, the timeremaining on the CD*2 |
| List of track names List of group names/file names |
Remote control
Each time you press DISPLAY, the display changes as follows:
Audio CD ATRAC CD/MP3 CD
| Track number, elapsed playing time, File number, file name, elapsed playing time(Track name) | |
| Track number, remaining time of File number, artist name, CODEC information*the current track remaining time of the current file(Track name, artist name) | 4, |
| The number of tracks left*2, the time Group name, total number of filesremaining on the CD*2(Album name, artist name) |
Animation screen
(Continued)
Notes
• The following characters can be displayed on this CD player:
- the alphanumeric characters A - Z, a - z, 0 - 9 and
– Chinese characters (for the Chinese model)
- Korean characters (for the Korean model)
On the remote control supplied, neither Chinese nor Korean characters can be displayed.
- Before playing a file, the CD player reads all file and group (or folder) information on the CD. "READING" is displayed. Depending on the content of the CD, it may take some time to accomplish this reading.
- If the group does not have a group name, "ROOT" appears in the display.
- If the file does not have ID3 tag information, “- - - -” appears in the display.
Removing the CD
Remove the CD while pressing the pivot in the center of the tray.

natural_image
Line drawing of a hand holding a circular object with a pointed tip, no text or symbols present▶ Playback options
You can enjoy the following playback options using the P MODE/button on the remote control or the menu function on the CD player.
- Playing tracks repeatedly (Repeat play)
- Playing all files in a selected group (Group play)
- Playing a single track (Single play)
- Playing tracks in random order (Shuffle play)
- Playing files in a selected group in random order (Group shuffle play)
- Playing your favorite play lists (m3u play list play)
- Playing your favorite tracks by adding Bookmarks (Bookmark track play)
- Playing the 10 tracks you have played most frequently (Auto ranking play)
- Playing tracks you have played most frequently in random order (Auto ranking shuffle play)
- Playing tracks in your favorite order (PGM play)
Selecting playback options on the CD player
Enter the PLAY MODE menu using the following procedures, then select each playback option.
1 Press DISPLAY/MENU until the MENU screen appears.
2 Press ⇧ or ⇧ to select "PLAY MODE," then press DISPLAY/MENU.
3 Press or to select the playback option you want.
The default setting is “ALL” (normal).

Playback options appear.
Selecting playback options using the remote control
Press P MODE/repeatedly to select the playback option you want.
Playing tracks repeatedly (Repeat play)
You can repeat various playback options.
Using the remote control
During play, press and hold P MODE/ until “” appears.

On the CD player
1 Press DISPLAY/MENU until the MENU screen appears.
2 Press ↑ or ↓ to select "REPEAT," then press DISPLAY/MENU.
3 Press ↑ or ↓ to select "ON," then press DISPLAY/MENU to enter the selection.
Playing all files in a selected group
(Group play) (ATRAC CD/MP3 CD only)
During play, press P MODE/→ repeatedly until “☐”appears. (CD player: Perform steps 1 and 2 of “Selecting playback options on the CD player” (this page), press ↑ or ↓ to select “GROUP,” then press DISPLAY/MENU to enter the selection.)

Playing a single track (Single play)
During play, press P MODE/→ repeatedly until “1” appears. (CD player: Perform steps 1 and 2 of “Selecting playback options on the CD player” (page 19), press ↑ or ↓ to select “1,” then press DISPLAY/MENU to enter the selection.)

005
03:45
Playing tracks in random order (Shuffle play)
During play, press P MODE/→ repeatedly until “SHUF” appears. (CD player: Perform steps 1 and 2 of “Selecting playback options on the CD player” (page 19) and press ↗ or ↓ to select “SHUFFLE”, then press DISPLAY/MENU to enter the selection.)

003
01:25
SHF
Playing all files in a selected group in random order (Group shuffle play) (ATRAC CD/MP3 CD only)
During play, press P MODE/→ repeatedly until “SHUF” appears. (CD player: Perform steps 1 and 2 of “Selecting playback options on the CD player” (page 19) and press ↑ or ↓ to select “GROUP SHUFFLE”, then press DISPLAY/MENU to enter the selection.)

003
01:25

Playing your favorite play lists (m3u play list play) (MP3 CD only)
You can play your favorite m3u play lists.* * An “m3u play list” is a file for which an MP3 file playing order has been encoded. To use the play list function, record MP3 files on a CD-R/RW using encoding software that supports the m3u format.
1 During play, press P MODE/repeatedly until “(play list) appears. (CD player: Perform steps 1 and 2 of “Selecting playback options on the CD player” (page 19) and press ↑ or ↓ to select “PLAY LIST”, then press DISPLAY/MENU to enter the selection.)
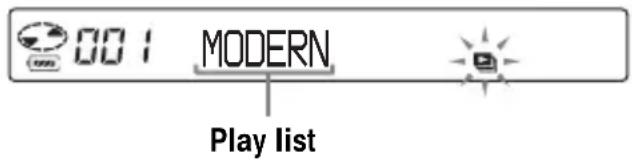
2 Flick the jog lever toward ◀◀◀ or ▶▶◀I to select a play list you want. (CD player: Press ↑ or ↓ to select a play list.)

3 Press the jog lever. (CD player: Push the 5-way control key toward ▶II.)

Playing your favorite tracks by adding Bookmarks (Bookmark track play)
While the CD player is playing, you can add Bookmarks to the tracks you want and play them only.
Audio CD: up to 99 tracks for each CD (up to 10 CDs)
ATRAC CD: up to 999 tracks for each CD (up to 5 CDs)
MP3 CD: up to 999 tracks for each CD (up to 5 CDs)
Adding Bookmarks
1 During play of the track to where you want to add a Bookmark, press and hold the jog lever until “” flashes. (CD player: Push and hold the 5-way control key toward ▶ll until “” flashes.) When the Bookmark has been added successfully, “” flashes slower.
2 Flick the jog lever toward ◀◀◀ or ▶▶◀ (CD player: Push the 5-way control key toward ◀◀◀ or ▶▶◀) to select the track to where you want to add a Bookmark, then repeat step 1 to add Bookmarks to the tracks you want.
Playing the tracks with Bookmarks
1 Press P MODE/ repeatedly until “” (Bookmark) flashes frequently. (CD player: Perform steps 1 and 2 of “Selecting playback options on the CD player” (page 19), press ↩ or ↓ to select “BOOK MARK,” then press DISPLAY/MENU. The play of the tracks with the Bookmarks starts.)
2 Press the jog lever to light up “” The play of the tracks with the Bookmarks starts.
(Continued)
Playing your favorite tracks by adding Bookmarks
To remove the Bookmarks
During play of the track with a Bookmark, press and hold the jog lever until “” disappears from the display. (CD player: Push and hold the 5-way control key toward ▶II until “” disappears from the display.)
To check the tracks with Bookmarks
During playback of the tracks with Bookmarks, “flashes slowly in the display.
Notes
- During play of tracks with Bookmarks, tracks are played in order of track number, and not in the order you added the Bookmarks.
- If you try to add Bookmarks to the tracks on the 11th CD (on a 6th CD when playing ATRAC CDs/MP3 CDs), the Bookmarks of the CD you played first will be erased.
- All Bookmarks stored in memory will be erased:
- if you remove all the power sources, or
- if you continue playing the CD player on the rechargeable batteries without charging the batteries even though “Lobatt” is displayed.
Playing the 10 tracks you have played most frequently (Auto ranking play)
The CD player automatically memorizes up to 10 tracks you have played most frequently from the CD being played, and plays them from the 10th to the top.
During play, press P MODE/ repeatedly to select “a00 (auto ranking)” and press the jog lever to enter the selection. (CD player: Perform steps 1 and 2 of “Selecting playback options on the CD player” (page 19), press ↑ or ↓ to select “AUTO RANKING,” then press DISPLAY/MENU to enter the selection.)

01:25
Playing tracks you have played most frequently in random order (Auto ranking shuffle play)
The CD player plays up to 32 tracks which the player has automatically memorized as the most frequently played ones. In Auto ranking shuffle play, these tracks are played in random order.
During play, press P MODE/→ repeatedly to select “a00 (auto ranking) SHUF” and press the jog lever to enter the selection. (CD player: Perform steps 1 and 2 of “Selecting playback options on the CD player” (page 19), press ↗ or ↓ to select “RANKING SHUF,” then press DISPLAY/MENU to enter the selection.)

01:25
SHF
Note
The CD player memorizes the tracks you have played from up to 10 CDs, whether you have changed the CDs or not. If the CD player tries to memorize tracks from an 11th CD, the data memorized first will be erased.
Playing tracks in your favorite order (PGM play)
You can program the CD player to play up to 64 tracks in your favorite order.
1 While play is stopped, press P MODE/repeatedly until “PGM” (program) appears. (CD player: While play is stopped, perform steps 1 and 2 of “Selecting playback options on the CD player” (page 19) and press ↑ or ↓ to select “PROGRAM”, then press DISPLAY/MENU to enter the selection.)
Audio CD/CD-TEXT
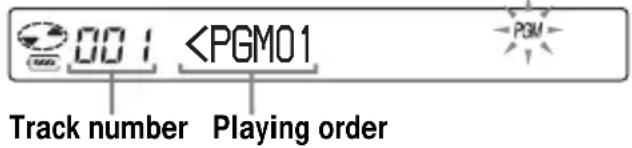
Playing tracks in your favorite order
Checking the program
While programming:
Press and hold the jog lever repeatedly before step 4. (CD player: Push and hold the 5-way control key toward ▶▶▶ repeatedly or press DISPLAY/MENU repeatedly.)While play is stopped:
Press DISPLAY. While the indications are displayed, press P MODE/repeatedly until “PGM” flashes, then press the jog lever until the display changes. (CD player: Press DISPLAY/MENU repeatedly until the list of the tracks programmed appears. To display tracks from the third track on, push the 5-way control key toward ▶II.)Notes
- When you finish entering the 64th track in step 3, the first selected track number (audio CD) or the first selected file name (ATRAC CD/MP3 CD) appears on the display. - If you select 65 tracks or more, the first selected tracks are erased.Searching for groups or tracks/files
While the CD player is playing, you can search for and play the group (ATRAC CD only) or track/file you want quickly using ↑ or ↓ on the CD player.1 During play, press ↑ or ↓ until the search screen appears.
2 Press 📄 or → to select the group you want, then push the 5-way control key toward ▶II.
The CD player starts playing from the first file in the group you selected.Selecting the track/file you want
1 Perform step 1 above, then press + or - to select the group you want. 2 Press ↗ or ↓ to select the track/file you want, then push the 5-way control key toward ▶II. The CD player starts playing from the track/ file you selected.To exit the search mode
Push the 5-way control key toward ■/CHG. If about 40 seconds at most have passed without any operation being performed, the screen returns to the previous one.Note
If you try to operate the CD player using the remote control during a search, "MENU" appears and you cannot perform any operation.Adjusting sound quality (Parametric equalizer)
You can enjoy your favorite sounds by adjusting sound quality in the following two ways: - Selecting a preset sound pattern "Selecting the sound quality you want" - Adjusting sound quality by yourself "Customizing sound quality"Selecting the sound quality you want
Indication Sound quality| SOFT/ For vocals, stressing middle |
| SOUND S range audio |
| ACTIVE/ Lively sounds, emphasizing |
| SOUND A high and low range audio |
| HEAVY/ Powerful sounds, further |
| SOUND H emphasizing high and low ranges compared with ACTIVE sound |
| CUSTOM/ Customized sound |
| SOUND C |
Using the remote control
Press SOUND repeatedly to select the sound quality you want.On the CD player
1 Press DISPLAY/MENU until the MENU screen appears. 2 Press ↑ or ↓ to select "SOUND," then press DISPLAY/MENU. 3 Press ⇧ or ⇧ to select the sound quality you want, then press DISPLAY/MENU to enter the selection.Customizing sound quality
You can customize sound quality by adjusting the sound volume in the 3 frequency ranges “LOW” (low range audio), “MID” (middle range audio) and “HIGH” (high range audio). For each frequency range, you can select the wave pattern from among 3 patterns, and can also adjust the sound volume in 7 levels for the pattern you select. Adjust sound quality by checking the shape of the wave on the display. 1 Press SOUND repeatedly to select "SOUND C", then press SOUND until the display changes. (CD player: Perform steps 1 - 3 of "Selecting the sound quality you want" and select "CUSTOM.") 2 Flick and hold the jog lever toward ◀◀◀ or ▶▶▶I until the frequency range you want appears. (CD player: Push the 5-way control key toward ◀◀◀ or ▶▶▶I for 2 seconds or more to select the frequency range.) “LOW” is displayed first. (CD player: “LOW” flashes.)  (Continued)Adjusting sound quality
3 Flick the jog lever toward I◀◀ or ▶▶▶I repeatedly to select the shape of the wave from the 3 shapes stored in memory for each frequency range, then turn the VOL +/- repeatedly to select the sound volume. (CD player: Push the 5-way control key toward I◀◀ or ▶▶▶I repeatedly to select the shape of the wave, then press ↑ or ↓ to select the sound volume.)  Ⓐ: Frequency range ⑧: Sound volume (To turn up the volume, use VOL -. To turn it down, use VOL +.)  4 Repeat steps 2 and 3 to make adjustment for the remaining 2 frequency ranges. 5 Press the jog lever to enter the selection. (CD player: Press DISPLAY/MENU to enter the selection.) To return to the previous screen Press 📄 on the CD player. To cancel the adjustment operation Press ■ for 2 seconds or more. (CD player: Push the 5-way control key toward ■/CHG.)Notes
- When you select CUSTOM sound, sound may be distorted depending on your sound settings when you turn up the volume. If this happens, turn the volume down. - Y ou may feel a difference in sound volume between the CUSTOM sound setting and other sound settings. Adjust the volume for your preference.The G-PROTECTION function
The G-PROTECTION function has been developed to provide excellent protection against sound skipping during many active uses. 1 While play is stopped, press DISPLAY until the display changes. (CD player: While play is stopped, press DISPLAY/MENU until the MENU screen appears. Press ↑ or ↓ to select "OPTION," then press DISPLAY/MENU.) 2 Flick the jog lever toward ◀◀◀ or ▶▶◀I to select “G-PRO,” then press the jog lever to enter the selection. (CD player: Press ↗ or ↓ to select “G-PROTECTION,” then press DISPLAY/MENU to enter the selection.) 3 Flick the jog lever toward I◀◀ or ▶▶▶I to select “G-PRO 1” or “G-PRO 2,” then press the jog lever to enter the selection. (CD player: Press ↑ or ↓ to select “G-PRO 1” or “G-PRO 2,” then press DISPLAY/MENU to enter the selection.) If you select “G-PRO 2,” the G-PROTECTION function will be enhanced compared to “G-PRO 1.” To enjoy high quality CD sound, select “G-PRO 1.”Note
Sound may skip: - if the CD player receives stronger continuous shock than expected, - if a dirty or scratched CD is played, or - when using poor-quality CD-Rs/RWs or if there is a problem with the original recording device or application software.Protecting your hearing (AVLS)
The AVLS (Automatic Volume Limiter System) function keeps the maximum volume down to protect your hearing. 1 Press DISPLAY until the display changes. (CD player : Press DISPLAY/MENU until the MENU screen appears. Press ↑ or ↓ to select “OPTION,” then press DISPLAY/MENU.) 2 Flick the jog lever toward ◀◀◀ or ▶▶◀I to select “AVLS,” then press the jog lever to enter the selection. (CD player: Press ↑ or ↓ to select “AVLS,” then press DISPLAY/MENU to enter the selection.) 3 Flick the jog lever toward ◀◀◀ or ▶▶◀I to select “ON,” then press the jog lever to enter the selection. (CD player: Press ↑ or ↓ to select “ON,” then press DISPLAY/MENU to enter the selection.)To cancel the AVLS function
Perform steps 1 - 3, changing the AVLS setting to “OFF.”Stopping playback automatically (OFF TIMER)
You can set the CD player to stop the play automatically within a range of 1 to 99 minutes. While the timer function is working, the following indications appear: - CD player: “” appears at about 5-second intervals. - Remote control: “((●)” is displayed. 1 Press DISPLAY until the display changes. (CD player: Press DISPLAY/MENU until the MENU screen appears. Press ↑ or ↓ to select "OPTION," then press DISPLAY/MENU.) 2 Flick the jog lever toward ◀◀◀ or ▶▶◀I to select “TIMER,” then press the jog lever to enter the selection. (CD player: Press ↑ or ↓ to select “TIMER,” then press DISPLAY/MENU to enter the selection.) 3 Flick the jog lever toward ◀◀◀ or ▶▶◀I to select “10 min\*”. (CD player: Press ↑ or ↓ to select “10 min,” then press DISPLAY/MENU.) \* Default setting. If you have changed the setting, the length of time already set appears. (Continued)Stopping playback automatically
4 Turn VOL +/- to select the length of time you want to set, then press the jog lever to enter the selection. (CD player: Press ↑ or ↓ to select the length of time you want to set, then press DISPLAY/MENU to enter the selection.) - T o increase/decrease by 5 minutes: Turn VOL +/- repeatedly. (CD player: Press ⇧ or ⇧ repeatedly.) - T o increase/decrease by 1 minute: Keep turning VOL +/-. (CD player: Press ↑ or ↓ for 2 seconds or more.)To return to the previous screen
Press ■. (CD player: Press 📄.)To cancel the setting operation
Press DISPLAY or ■ for 2 seconds or more. (CD player: Push the 5-way control key toward ■/CHG.)To check the length of time before the CD player stops playback
During play, perform steps 1 - 3.To cancel the OFF TIMER function
Perform steps 1 - 3, changing the OFF TIMER setting to "OFF."Locking the controls (HOLD)
You can lock the controls on your CD player to prevent accidental button presses. The OPR lamp flashes if you press any button when the HOLD function is activated.Slide HOLD in the direction of the arrow.
You can use the HOLD function with both the CD player and the remote control. You can still operate your CD player using the remote control when HOLD on the remote control is set to off.To unlock the controls
Slide HOLD in the direction opposite to that of the arrow.Note
Even if the HOLD function is working, “HOLD” will not appear in the display of the remote control.Turning off the beep sound
You can turn off the beep sound that is heard from your headphones/earphones when you operate your CD player. 1 Press DISPLAY until the display changes. (CD player: Press DISPLAY/MENU until the MENU screen appears. Press ↑ or ↓ to select "OPTION," then press DISPLAY/MENU.) 2 Flick the jog lever toward ◀◀◀ or ▶▶◀I to select “BEEP,” then press the jog lever to enter the selection. (CD player: Press ↑ or ↓ to select “BEEP,” then press DISPLAY/MENU to enter the selection.) 3 Flick the jog lever toward ◀◀◀ or ▶▶◀I to select “OFF,” then press the jog lever to enter the selection. (CD player: Press ↑ or ↓ to select “OFF,” then press DISPLAY/MENU to enter the selection.)To turn on the beep sound
Perform steps 1 - 3, changing the BEEP setting to “ON.”Saving power
You can select lighting options for the OPR lamp on the CD player so that you can save battery power. 1 Press DISPLAY until the display changes. (CD player: Press DISPLAY/MENU until the MENU screen appears. Press ↑ or ↓ to select "OPTION," then press DISPLAY/MENU.) 2 Flick the jog lever toward ◀◀◀ or ▶▶◀I to select “LIGHT,” then press the jog lever to enter the selection. (CD player: Press ↑ or ↓ to select “LIGHT,” then press DISPLAY/MENU to enter the selection.) 3 Flick the jog lever toward ◀◀◀ or ▶▶◀I to select “LIGHT OFF” or “LIGHT 2,” then press the jog lever to enter the selection. (CD player: Press ↑ or ↓ to select “LIGHT OFF” or “LIGHT 2,” then press DISPLAY/MENU to enter the selection.)About the LIGHT setting
Setting OPR lamp on the CD player LIGHT OFF Turned off LIGHT 1 Lights up fully during play or during operation LIGHT 2\* Lights up with less brightness during play or duringoperation \* Y ou can save power by selecting “LIGHT 2” rather than “LIGHT 1.”Playing tracks continuously (SEAMLESS)
(ATRAC CD only) You can play live concert music, etc. without space between the tracks. 1 While play is stopped, press DISPLAY until the display changes. (CD player: While play is stopped, press DISPLAY/MENU until the MENU screen appears. Press ↑ or ↓ to select "OPTION," then press DISPLAY/MENU.) 2 Flick the jog lever toward ◀◀◀ or ▶▶◀I to select “SEAMLESS,” then press the jog lever to enter the selection. (CD player: Press ↗ or ↓ to select “SEAMLESS,” then press DISPLAY/MENU to enter the selection.) 3 Flick the jog lever toward ◀◀◀ or ▶▶◀ to select “ON,” then press the jog lever to enter the selection. (CD player: Press ↗ or ↓ to select “ON,” then press DISPLAY/MENU to enter the selection.)Note
The tracks may not be played continuously depending on how the source music was recorded.Connecting a stereo system
You can listen to CDs through a stereo system and record CDs on a cassette tape or MiniDisc. For details, see the instruction manual that comes with the device you want to connect. Be sure to turn off all devices before making connections.  MiniDisc recorder, DAT deck, etc. Stereo system, cassette recorder, radio cassette recorder, etc. 1 While play is stopped, press DISPLAY until the display changes. (CD player: While play is stopped, press DISPLAY/MENU until the MENU screen appears. Press ↑ or ↓ to select "OPTION," then press DISPLAY/MENU.) 2 Flick the jog lever toward ◀◀◀ or ▶▶◀ to select “AUDIO OUT,” then press the jog lever to enter the selection. (CD player: Press ↑ or ↓ to select “AUDIO OUT,” then press DISPLAY/MENU to enter the selection.) 3 Flick the jog lever toward ◀◀◀ or ▶▶◀I to select the setting appropriate for the connected device, then press the jog lever to enter the selection. (CD player: Press ↑ or ↓ to select the setting, then press DISPLAY/MENU to enter the selection.)Connected device\* Setting
Headphones "HP" Device connected using "LINE" the connecting cord \* When you connect the device using the optical digital connecting cord, you do not have to choose the setting. The setting will be switched to that for an optical connection automatically. (Continued)Connecting a stereo system
Notes
- Before you play a CD, turn down the volume of the connected device to avoid damaging the connected speakers. - Use the AC power adaptor for recording. If you use the rechargeable batteries or dry batteries as a power source, the batteries may become completely depleted during recording. - Adjust the volume properly on the connected device so that the sound will not be distorted. - This CD player uses the Serial Copy Management System, which allows only first-generation digital copies to be made. - When recording or playing an ATRAC CD/MP3 CD using a connected device, use only the analog connecting cord. - If you change the connected device, make sure to change the “AUDIO OUT” setting.When the headphones or other devices are connected to the ⏻/LINE OUT (OPTICAL) jack
When an optical digital connecting cord is connected, the output is automatically switched to an optical digital output. When a remote control or a connecting cord is connected, the current AUDIO OUT setting (“HP” or “LINE”) flashes for about 5 seconds. If you connect another device to the Ⓞ/LINE OUT (OPTICAL) jack, first remove the device and connect the headphones again, then switch the AUDIO OUT setting to “HP.”When AUDIO OUT is set to "LINE"
You cannot adjust the volume of using VOL +/- on the CD player or the remote control.When using an optical digital connecting cord
To record a CD on a MiniDisc, DAT, etc., make sure that the CD player is paused before starting the recording procedures.About the G-PROTECTION and equalizer functions when using the connecting cord or the optical digital connecting cord
- T o record high quality CD sound, set the G-PROTECTION setting to “G-PRO 1” on the menu. - If the AUDIO OUT setting is set to "LINE," the parametric equalizer function does not work.▶ Connecting to a power source
You can check the remaining power of the batteries in the display.  Lobatt\* \* Beep sounds. When the batteries are depleted, charge the rechargeable batteries or replace the dry batteries with new ones. • Using the rechargeable batteries (this page) • Using the dry batteries (external battery case) (page 35)Notes
- The indicator sections of only show the remaining battery power. One section does not always indicate one-fourth of the battery power. - Depending on operating conditions, the indicator sections of □ may increase or decrease. - When using the rechargeable batteries and dry batteries together to extend power, use a fully charged rechargeable batteries and new dry batteries. For the battery life and charging time of the rechargeable batteries, see "Specifications."Using the rechargeable batteries
Charge the rechargeable batteries before using them for the first time. To keep the original battery capacity for a long time, charge the batteries only when it is completely depleted. You can use only the following rechargeable batteries for your CD player. • NH-10WM (supplied) • NH-14WM (not supplied) 1 Slide OPEN to open the lid of your CD player, then open the battery compartment lid inside the player.  2 Insert rechargeable batteries by matching the ⊕ to the diagram in the battery compartment and close the lid until it clicks into place. natural_image
Diagram of a device showing battery charging mechanism with arrows indicating direction (no text or labels)Using the rechargeable batteries
3 Connect the AC power adaptor to the DC IN 4.5 V jack of the supplied charging stand and an AC outlet. Then place the CD player on the supplied charging stand, aligning the ▼ mark on the CD player with the ▲ mark on the stand. Charging of the batteries starts. In the display of the remote control, “Charging” indication flashes and the indicator sections of light up in succession. The OPR lamp lights up on the CD player. When the batteries is completely charged, all indications on the display disappear and the OPR lamp goes off. OPR lamp Notes on the supplied charging stand
- The supplied charging stand can be used only with this CD player. No other model can be charged using this stand. - When using the supplied charging stand, charge the NH-10WM rechargeable batteries only. Do not charge any other batteries. - During charging, the CD player and the rechargeable batteries become hot. This poses no danger. - Do not place coins or other metallic objects on the charging stand. If the terminal on the charging stand is accidentally brought into contact with a metallic object, it may short-circuit and begin to heat up.To charge the rechargeable batteries without using the supplied charging stand
Connect the AC power adaptor to the EXT BATT/DC IN 4.5 V jack of your CD player and an AC outlet, then push the 5-way control key toward ■/CHG. Charging starts. 5-way control key (■/CHG) Notes
- When charging the batteries using the charging stand, be sure to remove the external battery case. - During charging, the CD player and the rechargeable batteries become hot. This poses no danger. - If you push the 5-way control key toward ▶II lever during charging, charging stops and playback of the CD starts. - If you place the CD player on the charging stand during play, play stops and charging starts. - Place the CD player on the charging stand securely, aligning the ▼ mark on the CD player with the ▲ mark on the stand. Make sure that the OPR lamp on the CD player lights up. Wrong placement interrupts charging or play.To remove the rechargeable batteries
Push end to remove the batteries. natural_image
Diagram of a device showing battery and charging mechanism with arrows indicating components (no text or labels)When to replace the rechargeable batteries
If the battery life becomes shorter by about half, replace the batteries with new rechargeable batteries.Note on the rechargeable batteries
If the batteries are new or have not been used for a long time, they may not be charged completely. In that case, charge them until the OPR lamp goes off and then use the CD player until the batteries are depleted completely (“Lobatt” appears in the display). Repeat this procedure several times.Note on carrying the rechargeable batteries
Use the supplied battery carrying case to prevent unexpected heat. If the rechargeable batteries and the metallic objects are contacted, heat or fire may occur due to a short circuit.Using the dry batteries
You can extend power by inserting rechargeable batteries in the CD player and attaching the external battery case.1 Align the lines below PUSH as illustrated, then draw out the battery case while pressing PUSH.
2 Insert two LR6 (size AA) alkaline batteries (not supplied) by matching the ⊕ to the diagram in the battery case. Insert the battery case and lock the case by turning LOCK in the direction of the arrow.
 (Continued)Using the dry batteries
3 Connect the external battery case to the CD player.
Notes
- When the batteries are depleted, replace the batteries with new ones. - The batteries in the CD player and those in the external battery case are discharged simultaneously.Notes on the power source
Disconnect all power sources when the CD player is not used for a long time.On AC power adaptor
\- Use only the AC power adaptor supplied. If your CD player is not supplied with the one, use the AC-E45HG AC power adaptor. Do not use any other AC power adaptor. It may cause a malfunction.Polarity of the plug
 - Do not touch the AC power adaptor with wet hands. - Connect the AC power adaptor to an easily accessible AC outlet. Should you notice an abnormality in the AC power adaptor, disconnect it from the AC outlet immediately.On rechargeable batteries and dry batteries
- Do not charge the dry batteries. - Do not throw the batteries into fire. - Do not carry the batteries with coins or other metallic objects. It can generate heat if the positive and negative terminals of the batteries are accidentally contacted by a metallic object. - Do not mix rechargeable batteries with dry batteries. - Do not mix new batteries with old ones. - Do not use different types of batteries together. - When the batteries are not to be used for a long time, remove them. - If battery leakage occurs, wipe off any deposit in the battery compartment, and install new batteries. In case the deposit adheres to you, wash it off thoroughly.List of menus
On the CD player, press DISPLAY/MENU until the MENU screen appears, then press ↗ or ↓ to select the menu you want. On the remote control, press SOUND (for sound settings) or DISPLAY (for other settings) repeatedly.   To return to the previous screen, press ■ (CD player: press ☐ -\*1). To cancel the setting operation, press DISPLAY (for OPTION menu only) or ■ for 2 seconds or more (CD player: push the 5-way control key toward ■/CHG). Items marked ● are default settings.| Setting of sound (page) | Menu 1 | → | Menu 2 | → | Menu 3 |
| Adjusting sound quality (25) SOUND* | 2 | ● OFF—SOFTACTIVEHEAVYCUSTOM | |||
| Setting various functions (page) | Menu 1 | → | Menu 2 | → | Menu 3 |
| Protecting against sound skipping (26) OPTION G-PROTECTION* | 4● G-PRO 1G-PRO 2 | ||||
| Protecting your hearing (27) | OPTION | AVLS | ON● OFF | ||
| Stopping playback automatically (27) | OPTION | TIMER | 10 min*3● OFF | ||
| Connecting a stereo system (31) | OPTION AUDIO OUT* | 4 | ● HPLINE | ||
| Turning off the beep sound (28) | OPTION | BEEP | ● ONOFF | ||
| Saving power (29) | OPTION | LIGHT | LIGHT OFF● LIGHT 1LIGHT 2 | ||
| Playing tracks continuously (30) | OPTION SEAMLESS* | 4,*5 | ON● OFF | ||
Precautions
On safety
- Should any solid objects or liquid fall into the CD player, unplug it and have it checked by qualified personnel before operating it any further. - Do not put any foreign objects in the DC IN 4.5 V (external power input) jack.On the CD player
- Keep the lens on the CD player clean and do not touch it. If you do so, the lens may be damaged and the CD player will not operate properly. - Do not put any heavy object on top of the CD player. The CD player and the CD may be damaged. - Do not leave the CD player in a location near heat sources, or in a place subject to direct sunlight, excessive dust or sand, moisture, rain, mechanical shock, unleveled surface, or in a car with its windows closed. - If the CD player causes interference to the radio or television reception, turn off the CD player or move it away from the radio or television. - Discs with non-standard shapes (e.g., heart, square, star) cannot be played on this CD player. Attempting to do so may damage the CD player. Do not use such discs.On handling CDs
- To keep the CD clean, handle it by its edge. Do not touch the surface. - Do not stick paper or tape onto the CD. - Do not expose the CD to direct sunlight or heat sources such as hot air ducts. Do not leave the CD in a car parked under direct sunlight.On headphones/earphones Road safety
Do not use headphones/earphones while driving, cycling, or operating any motorized vehicle. It may create a traffic hazard and is illegal in some areas. It can also be potentially dangerous to play your headsets at high volume while walking, especially at pedestrian crossings. You should exercise extreme caution or discontinue use in potentially hazardous situations.Preventing hearing damage
Avoid using headphones/earphones at high volume. Hearing experts advise against continuous, loud and extended play. If you experience a ringing in your ears, reduce volume or discontinue use.Consideration for others
Keep the volume at a moderate level. This will allow you to hear outside sounds and to be considerate to the people around you.Maintenance
To clean the casing
Use a soft cloth slightly moistened in water or a mild detergent solution. Do not use alcohol, benzine or thinner.To clean the terminals
If the terminals on the charging stand or on the CD player become dirty, the batteries may not be charged properly. Clean the terminals with a cotton swab or a dry cloth periodically as illustrated below. Troubleshooting
Should any problem persist after you have checked these symptoms, consult your nearest Sony dealer.| Symptom | Cause and/or corrective action |
| The volume does not increase even if you turn VOL +/- in the + direction repeatedly (even if you press VOL + repeatedly on the CD player). | →AVLS is set to “ON”. Set it to “OFF.” (page 27)→AUDIO OUT is set to “LINE”. Set it to “HP.” (page 31) |
| No sound, or noise is heard. | →Connect the headphones/earphones plugs firmly. (page 15)→Plugs are dirty. Clean the headphones/earphones plugs with a dry soft cloth periodically. |
| Certain files cannot be played. | →You tried to play files saved in a format that is not compatible with this CD player. (page 6) |
| The playing time is too short when powered with the dry batteries. | →Check that you are using alkaline batteries and not manganese batteries. (pages 35 - 36)→Replace the batteries with new LR6 (size AA) alkaline batteries. (pages 35 - 36) |
| The playing time is too short when powered with the rechargeable batteries. | →Charge and discharge the rechargeable batteries several times. (page 35) |
| “Lobatt” appears in the display. The CD does not play. | →The rechargeable batteries are used up completely. Charge the batteries. (pages 33 - 35)→Replace the batteries with new LR6 (size AA) alkaline batteries. (pages 35 - 36) |
| “HI dc In” appears in the display. | →An AC power adaptor which is rated higher than the one supplied or recommended is being used. Use only the supplied AC power adaptor or the car battery cord recommended in “Optional accessories.” (page 43) |
| Symptom | Cause and/or corrective action |
| The CD does not play or “No disc” appears in the display when a CD is placed in the CD player. | →The CD is dirty or defective.→Check that the CD is inserted with the label side up. (page 15)→Moisture condensation has occurred.Leave the CD player aside for several hours until the moisture evaporates.→Close the lid of the battery compartment firmly. (page 33)→Make sure the batteries are inserted correctly. (pages 33, 35)→Connect the AC power adaptor to an AC outlet securely. (page 15)→Press the jog lever (CD player: push the 5-way control key toward ▶II) after one second or more has passed since the AC power adaptor was connected.→The CD-R/RW is blank.→There is a problem with the quality of the CD-R/RW, recording device, or application software. |
| OPR lamp flashes on the CD player when you press a button, and the CD does not play. | →The buttons are locked. Slide the HOLD switch back. (page 28) |
| Cannot adjust the volume | →AUDIO OUT is set to “LINE.” Adjust the volume using the volume control on the connected device. (page 31)→Set AUDIO OUT to “HP.” Adjust the volume using VOL +/- on the CD player. (page 31) |
| During recording with optical digital connection, the track number cannot be recorded correctly. | →Record the track number again using a MiniDisc recorder, DAT recorder, etc. (page 31)→See the instruction manual that comes with the recording device. (page 31) |
| The rechargeable batteries cannot be charged. | →The rechargeable batteries are not inserted in the battery compartment.→The terminals on the CD player or the charging stand are dirty.Wipe them with a dry soft cloth. (page 38)→The CD is playing. Stop playing.→The CD player is not placed securely on the charging stand. Place the player on the stand, aligning the ▼ mark on the player and the▲ mark on the stand. Make sure that the OPR lamp lights up. (page 34) |
| Playback starts from the point you stopped. (resume function) | →The resume function is working. To start play from the first track, press the jog lever during stop (CD player: Push and hold the 5-way control key toward ▶II) until the first track starts playing, or open the lid of the CD player. Or remove all power sources, then insert the batteries or connect the AC power adaptor again. (pages 15, 16, 33, 35, 36) |
| Rustling noise is heard from the CD. | →Close the lid of the battery compartment firmly. (page 33) |
| When using with a connected stereo system, the sound is distorted or noisy. | →AUDIO OUT is set to “LINE.” Adjust the volume of the connected device. (page 31)→AUDIO OUT is set to “HP.” Adjust the volume using VOL +/- on the CD player. (page 31) |
| During playback of an ATRAC CD orMP3 CD, the CD does not rotate but you can hear the sound normally. | → The CD player is designed to stop the rotation of an ATRAC CD or MP3 CD during playback to reduce the power consumption. The player is not malfunctioning. |
| “NO FILE” appears in the display after the jog lever is pressed (CD player: after you push the 5-way control key toward ▶II) or the lid of the CD player is closed. | →There are no ATRAC3plus/ATRAC3/MP3 files in the CD.→A CD-R/RW from which the data has been erased is being used.→The CD is dirty. |
| When closing the lid of the CD player, the CD starts to rotate. | → The CD player is reading the information on the CD. The player is not malfunctioning. |
| The LCD display becomes hard to see or slows down. | →You are using your CD player at high temperatures (above 40°C/104°F) or at low temperatures (below 0°C/32°F). At room temperature, the display will return to its normal operating condition. |
| “ ”is flashing quickly in the display of the remote control, and you cannot locate the beginning of the track or a specific point in the track. | →The CD player has entered the preparation stage of Bookmark track play. Change the PLAY MODE setting to “ALL”. |
| You cannot operate the CD player properly using the remote control. | →The buttons on the CD player are kept pressed by mistake. |
| Play is stopped abruptly. | →OFF TIMER has been set. Change the setting to “OFF.” |
Specifications
System
Compact disc digital audio systemLaser diode properties
Material: GaAlAs Wavelength: = 770 - 800nm Emission duration: Continuous Laser output: Less than 44.6 μW (This output is the value measured at a distance of 200 mm from the objective lens surface on the optical pick-up block with 7 mm aperture.)D-A conversion
1-bit quartz time-axis controlFrequency response
20 - 20 000 Hz ^+1_-2 dB (measured by JEITA)Output (at 4.5 V input level)
Line output (stereo minijack) Output level 0.7 V rms at 47 kΩ Recommended load impedance over 10 kΩ Headphones (stereo minijack) Approx. 5 mW + Approx. 5 mW at 16 Ω Optical digital output (optical output connector) Output level: -21 - -15 dBm Wavelength: 630 - 690 nm at peak levelPower requirements
- T wo Sony NH-10WM rechargeable batteries: 1.2 V DC · 2 - Two LR6 (size AA) batteries: 1.5 V DC · 2 - A C power adaptor (DC IN 4.5 V jack): 220 V, 50 Hz (Model for China) 120 V, 60 Hz (Model for Mexico)Battery life\*1 (approx. hours)
When you use the CD player on a flat and stable surface. When LIGHT mode and SOUND mode are set to "OFF." Playing time varies depending on how the CD player is used. When using two NH-10WM (charged for about 5 hours\* 2)| G-PROTECTION“G-PRO 1” “G-PRO 2” | |
| Audio CD 25 23 | |
| ATRAC CD*3 | 44 44 |
| MP3 CD*4 | 33 33 |
| G-PROTECTION“G-PRO 1” “G-PRO 2” | |
| Audio CD 55 50 | |
| ATRAC CD*3 | 86 86 |
| MP3 CD*4 | 70 70 |
| G-PROTECTION“G-PRO 1” “G-PRO 2” | |
| Audio CD 80 73 | |
| ATRAC CD*3 | 130 130 |
| MP3 CD*4 | 103 103 |
Operating temperature
5^-35^(41^-95^)Dimensions (w/h/d) (excluding projecting parts and controls)
Approx. 130 · 20.7 · 130 mm (5 1/8 · 27/32 · 5 1/8 in.)Mass (excluding accessories)
Approx. 178 g (6.3 oz.) US and foreign patents licensed from Dolby Laboratories. Design and specifications are subject to change without notice. Optional accessories| AC power adaptor* AC-E45HG |
| Active speaker system SRS-Z1SRS-Z30 |
| Car battery cord DCC-E345 |
| Car battery cord with car connecting packDCC-E34CP |
| Car connecting pack CPA-9C |
| Connecting cord RK-G129RK-G136 |
| Earphones MDR-EX71SLMDR-Q55SL |
警告
为防火灾或触电危险,切勿让机器暴露于雨中或潮湿处。 别把机器安装在诸如书橱或壁橱等密闭处。 为防火灾,请勿让装置的通风孔盖住报纸,桌布,窗帘等。也不可在装置上点放蜡烛。 为防火灾或触电危险,不可在装置上摆饰花瓶等装满液体的物体。 一部分国家对于本产品的电源用电池可能规定有处置的标准。请洽询当地有关当局。注意
- 开着时,将有看不见的激光辐射 - 别凝视激光束或直接用光学仪器观看 - 开着时,将有看不见的 CLASS 1M 激光辐射 - 别直接用光学仪器观看 CE 标志的有效性,仅限于那些有法律限制的国家,主要在 EEA(欧洲经济区)国家。 ATRAC3plus 和 ATRAC3 是 Sony 公司的商标。目录
享用您的 ATRAC CD 随身听
可在本 CD 播放机上播放的音乐源……6 AT RAC3plus 和 A TRAC3 7 MP3 7 ATRAC3plus/ATRAC3 和 MP3 文件的结构 8准备使用
检查随机附件 10 控制器位置 11播放 CD
1.装入CD光盘。 15 2. 连接 CD 播放机。 15 3.播放 CD。……16播放选项
反复播放曲子(反复播放) 19 播放选定组中的所有文件(组播放) (只适用于 ATRAC CD/MP3 CD)....19 播放单首曲子(单曲播放) 20 按任意顺序播放曲子(随机播放)……20 按任意顺序播放选定组中的所有文件 (组随机播放) (只适用于 ATRAC CD/MP3 CD) 20 播放您喜爱的播放列表 (m3u 播放列表播放) (只适用于 MP3 CD)....20 给您喜爱的曲子加记Bookmark(书签)以便选播(播放加记书签的曲子)..21 播放您最常播放的 10 首曲子 (自动排列播放)……22 按任意顺序播放您最常播放的曲子(自动排列随机播放)……22 按您喜爱的顺序播放曲子 (PGM 播放).... 23 搜索组或曲子 / 文件 24适用功能
调节音质(参量均衡器)……25 G-PROTECTION 功能 26 保护听觉 (AVLS) 27 自动停止播放 (OFF TIMER) 27 锁定控制器 (HOLD) 28 关掉哔声 28 节电 29 连续播放曲子(无间隙播放) (只适用于ATRAC CD)……30连接 CD 播放机
连接立体声系统.... 31连接电源
使用充电式电池.... 33 使用干电池 35 电源须知 36附加信息
菜单列表 37 使用前须注意 38 保养 38 故障检修 39 规格 42 选购的附件 43享用您的 ATRAC CD 随身听
感谢您购买 D-NE800LS。此 CD 随身听名为“ATRAC CD 随身听”。因为您可以在上面欣赏“ATRAC CD”。 您可以用简单的方式制作自己的ATRAC CD。步骤 1
安装
安装附带的“SonicStage Simple Burner”软件。 natural_image
Cartoon illustration of a person using a desktop computer (no text or symbols present)步骤 2
刻录
制作光盘映像并使用 PC 将其刻录到 CD-R/RW 上。 声频 CD MP3 文件  或   用 SonicStage Simple Burner 把音频数据转换成 ATRAC3plus/ATRAC3 格式。 怎样使用 SonicStage Simple Burner 请参看附带的“SonicStage Simple Burner”手册。 什么是 ATRAC CD? AT RAC CD 是一张 CD-R/RW,上面录有按 ATRAC3plus/AT RAC3 格式压缩的音频数据。约 30 张声频 CD 可录制在一张 CD-R/RW 上。\* 也可以通过把文件转换成 ATRAC3plus/AT RAC3 格式来录制 MP3 文件。 \* 当一张 CD(专辑)总的播放时间估计为 60 分钟,并且按 48 kbps 以 ATRAC3plus 格式录制在 700 MB 大小的 CD-R/RW 上时。 步骤3收听
可以在您的 ATRAC CD 随身听上欣赏自己的 ATRAC CD。 natural_image
Cartoon illustration of a man running while holding a musical note (no text or symbols present)可在本 CD 播放机上播放的音乐源
可以在本 CD 播放机上播放下列 3 种音乐源: - 声频 CD(CDDA 格式) - 具有 ATRAC3plus/ATRAC3 格式文件的 CD (ATRAC CD) - 具有 MP3 格式文件的 CD (MP3 CD)可用的光盘格式
只能使用 ISO 9660 Level 1/2 和 Joliet extension 格式光盘。关于 CD-R/RW
本 CD 播放机能播放用 ATRAC3plus/ATRAC3,MP3 或 CDDA\* 格式录的 CD-R/RW。但,播放能力将视光盘的品质和记录装置的条件而异。 \* CDDA 是 Compact Disc Digital Audio(激光盘数码声频)的简称。是用于声频 CD 的录音标准。用版权保护技术编码的音乐光盘
本产品设计用于播放符合 Compact Disc (CD) 标准的光盘。近来,许多录制公司都出售各种用版权保护技术编码的音乐光盘。请注意,这些光盘中可能会有不符和 CD 标准的光盘,且可能无法用本产品播放。注
- 本 CD 播放机不能在可录制介质,如 CD-R/RW 上录制音乐内容。 - 按 ATRAC3plus/ATRAC3 格式录制的 CD-R/RW 不能在计算机上播放。ATRAC3plus 和 ATRAC3
“ ATRAC3plus” 表示“自适应转换声音编码 3+”,是一种音频压缩技术,从 ATRAC3 格式发展而来。虽然 ATRAC3plus 格式可以把音乐内容以 64 kbps 压缩到原来大小的 1/20,但您仍可欣赏到高质量的声音。可用的传输比特率为 256 kbps,64 kbps 和 48 kbps。 “ATRAC3”表示“自适应转换声音编码 3”,是一种音频压缩技术,它可满足对高质量声音和高压缩率的要求。ATRAC3 格式可以把音乐内容压缩到原来大小的 1/10,有助于减小介质体积。可用的传输比特率为 132 kbps·105 kbps 和 66 kbps。可用的组和文件数
- 最大组数:255 - 最大文件数:999 详细,请参看附带的“SonicStage Simple Burner”手册。 将文件保存到媒体上的注意事项 请勿以其他格式(除 MP3 文件外)保存文件或在有 ATRAC3plus/ATRAC3 文件存在的光盘上建立不需要的文件夹。MP3
MP3 表示 MPEG-1 Audio Layer3,由活动图像专家组(一个 ISO(国际标准化组织)工作组)支持的音频文件压缩标准,可使音频文件压缩到标准小型光盘数据大小的约 1/10。 可接受的光盘格式的主要规格是: - 最多目录层次:8 - 可接受的字符:A-Z'a-z'0-9'\_(下划线)注
- 当命名文件时,务必在文件名后加上文件扩展名“mp3”。 - 如果在非 MP3 文件名上加上扩展名“mp3”,播放机将不能正确识别此文件。 (接下页)可用的组数和文件数
- 最大组数:255 - 最大文件数:999压缩和写入软件设置
\- 本 CD 播放机支持播放下列规格的 MP3 文件:比特率:16-320 kbps,采样频率:32/44.1/48 kHz,也能播放可变比特率 (VBR) 文件。 要把声源压缩为 MP3 文件,建议把压缩软件设为“44.1 kHz”“128 kbps”和“Constant Bit Rate”。 - 要录制到最大容量,设为“ halting of writing”。 - 要一次性把空白介质录到最大容量,设为“Disc at Once”。将文件保存到媒体上的注意事项
- 请勿以其他格式(除 MP3/ATRAC3plus/ATRAC3 格式的文件外)保存文件或将文件保存到有 MP3 文件存在的光盘上不需要的文件夹中。 - 当插入一张光盘时,CD 播放机读取该光盘上的所有文件夹和文件信息。如果该光盘上有多个文件夹,开始播放或开始播放下一个文件可能要花一段时间。ATRAC3plus/ATRAC3 和 MP3 文件的结构
组和文件夹
ATRAC3plus/ATRAC3 格式的结构很简单。它由“文件”和“组”构成。“文件”相当于声频 CD 的“曲子”,“组”是文件的集合,相当于“专辑”。“组”没有目录类型结构(新组不能在现存组里建立)。 当涉及 MP3 CD 时,“文件”等效于“曲子”,而“组”等效于“专辑”。本 CD 播放机把 MP3 文件夹识别为“组”,所以它可以用同样的操作播放按 ATRAC3plus/ATRAC3 格式录制的 CD-R/RW 和按 MP3 格式录制的 CD-R/RW。 • ATRAC3plus/ATRAC3 • MP3 flowchart
graph TD
    A["CD-R"] --> B["1"]
    C["CD-RW"] --> B
    B --> D["①"]
    B --> E["②"]
    B --> F["③"]
    B --> G["④"]
    B --> H["⑤"]
    I["组"] --> J["ATRAC3plus/ATRAC3 文件"]
    K["组"] --> L["MP3 文件"]
注
- 不包括 MP3 文件的组被跳过。 - 如果 ATRAC3plus/ATRAC3 文件和 MP3 文件录在同一张 CD 上,本 CD 播放机先播放 ATRAC3plus/ATRAC3 文件。 - 根据将 MP3 文件录在光盘上的方法不同,播放顺序可能与上图所示的不同。检查随机附件
AC 电源转接器(1) (AC-ES455K) natural_image
Line drawing of a connected cable and plug with a rectangular component (no text or symbols)natural_image
Two identical rectangular electronic components with circular end caps, shown side by side (no text or symbols)natural_image
Simple line drawing of a rectangular box (no text or symbols)natural_image
Line drawing of a medical catheter with attached tubing (no text or symbols)natural_image
Line drawing of a handheld electronic device with a coiled cable and connector (no text or symbols)natural_image
Simple line drawing of a hat or cushion with no text or symbolsnatural_image
Simple line drawing of a bag with a handle and tied ribbon (no text or symbols)natural_image
Line drawing of a cylindrical device with a coiled cable and plug, no text or symbols present控制器位置
CD播放机
详细,请参看括弧中的页次。  ①显示器 (12, 17, 19, 24, 37) 2OPR(工作)灯(28,29,34) 灯的颜色取决于所播放音乐源的类型。 红色:声频 CD,绿色: ATRAC3plus/ATRAC3 文件,橙色:MP3 文件 在插入 CD 后的一段时间内,在插入 CD 后的一段时间内,灯按照红色,橙色和绿色的顺序循环发亮。 该灯还作为 HOLD(保持)灯和 CHG(充电)灯。 3VOL(音量)+ ^* 1/-按钮(16) 4(头戴耳机)/LINE OUT (OPTICAL)(线路输出(光频))插孔(15,31) 请使用菜单切换该插孔的功能。 5HOLD(保持)开关(背面)(28) 按照箭头的方向滑动开关以关闭CD播放机上的按钮。 6↑按钮(19-31,37) 用于选择文件、播放模式等。 75 功能控制键 (15, 16, 19 - 31, 34, 37)  DISPLAY/MENU ▶II:播放/暂停 AMS ^*2 /倒绕 ▶▶I: AMS/快进 ■/CHG:停止/充电 DISPLAY/MENU(显示器/菜单):用于选择菜单项以及输入选择项。 用手指向 DISPLAY/MENU 上的 ▶II,▶▶I,◀◀ 或 ■/CHG 按控制键。 8(组) + 按钮 (16, 23, 24) 9↓按钮(19-31,37) 用于选择文件、播放模式等。 10(组) - 按钮 (16, 23, 24, 26, 28, 37) 11EXT BATT(外部电池)/ DC IN 4.5 V(外部电源输入)插孔 (15, 34, 36) 12充电座端子(34,38) 13OPEN开关(15,33) 滑动该开关以打开 CD 播放机盖。 \*1按键带触感圆点。 \*2自动乐曲探测 (接下页) 显示器(CD 播放机) 详细,请参看括弧中的页次。  ①字符信息显示(17) 当播放声频 CD 时,用四行显示 CD 上记录的唱片名、曲名等。 当播放 ATRAC CD/MP3 CD 时,用四行显示 CD 上记录的组名、文件名等。 菜单项也在该显示中。 2Atrac3plus/MP3 指示 3 唱片指示 当 CD 播放机正在播放时发亮。 4电池指示(33) 粗示电池剩余电量。如果“ ”闪 烁,表示电池耗尽。 5 播放列表指示 (20, 21) 仅用于 MP3 CD 6组指示(19,20) 仅用于 ATRAC CD/MP3 CD 7 播放模式指示 (19 - 23) 表示诸如随机播放或程序播放等不同播放模式。“ ”表示反复播放。 8 SOUND(声)指示 (25, 26) 表示已在菜单上选择了的SOUND设置。利用携带软袋
可利用附带的携带软袋携带您的播放机和电池盒使用。如图所示适当地装插在软袋中。 natural_image
Diagram of a device with a curved panel and a circular component connected by wires (no text or symbols)遥控器
详细,请参看括弧中的页次。  ① VOL(音量)+/- 控制 (16, 26, 28) 旋转以调整音量。 2 ■(停止)按钮 (16, 26, 28, 37) ③ 微调杆 (I◀◀ ▶II/ENT ▶▶I)(16, 21 - 23, 25 - 31) ▶II(播放 / 暂停)/ENT(输入):在停止时按下以开始播放,在播放时按下则暂停播放。当选择菜单项时,按该键输入选择项。 向 ◀◀◀ 或 ▶▶◀ 轻按:AMS,倒绕,快进 4 显示器 (14, 17) 5 组)+/- 按钮 (16, 23, 24)  6 夹子 (14) ⑦ HOLD(保持)开关(28) 按照箭头方向(一个黄色标记)滑动 该开关以关闭遥控器上的按钮。 8 DISPLAY(显示)按钮 (23, 26 - 31, 37) 9 P MODE/按钮 (19 - 24) 10 SOUND(声)按钮(25,37)注
限使用附带的遥控器。不能用其他 CD 播放机所附带的遥控器去控制操作本 CD 播放机。 (接下页)显示器(遥控器)
详细,请参看括弧中的页次。  ① 唱片指示 2 曲号指示 (23) ③字符信息显示(17) 4 播放模式指示(19 - 23) 5 SOUND指示 (25, 26) 6电池指示(33) 7组指示(19,20) 8播放列表指示(20,21) 9Bookmark(书签)指示(21) 播放中,该指示表示一个曲子具有书签。 10定时器指示(27) 表示已在菜单中选择 OFF TIMER 设置。要用遥控器的夹子时
请从遥控器上卸下夹子并改变夹子的方向。 要卸下时 要以相反方向装上时  natural_image
Diagram showing a device being inserted into a package, with an arrow indicating the process (no text or symbols present)natural_image
Diagram showing a syringe inserted into a tool with an inset close-up of the component (no text or symbols)1. 装入 CD 光盘。
①滑动OPEN开关以打开CD播放机盖。 natural_image
Line drawing of a robotic vacuum cleaner with directional arrows indicating motion (no text or symbols)natural_image
Line drawing of a hand inserting a CD into a device (no text or symbols)2. 连接 CD 播放机。
您可以使用下列电源: - 充电式电池(第 33 页) - LR6(AA,5号)碱性电池(外附电池盒)(第35页) - AC 电源转接器 本页说明如何利用民用电使用您的 CD 播放机。 请安全连接插头和端子。 ①将 AC 电源转接器连接。 ②将头戴耳机 / 耳机通过遥控器与 CD 播放机连接。  (接下页)3. 播放 CD 。
5 功能控制键 (▶II)  ①向 ▶II 按控制键。 ②按 VOL + 或 - 以调整音量。  ①按微调杆。 ②旋转 VOL +/ - 以调整音量。| 要 | CD 播放机 | 遥控器 |
| 播放(从上次停止处开始播放) | 向 ▶II 按控制键。即从所停止地点开始播放。 | 按微调杆。即从所停止地点开始播放。 |
| 播放(从第一首曲子开始) | 当CD播放机停止时,向 ▶II 按住控制键直至第一首曲子开始播放。 | 停止中,请按住微调杆至开始第一曲的播放。 |
| 暂停/暂停后的复位播放 | 向 ▶II 按控制键。 | 按微调杆。 |
| 停止*2 | 向 ■/CHG按控制键。 | 按 ■° |
| 找出当前曲子的开头 (AMS*1)*2 | 向 ◀◀ 按控制键。 | 向 ◀◀ 轻按一次微调杆。 |
| 找出前面曲子的开头 (AMS)*3 | 反复向 ◀◀ 按控制键。 | 反复地向 ◀◀ 轻按微调杆。 |
| 找出下一首曲子的开头 (AMS)*2,*3 | 向 ▶▶ 按控制键。 | 向 ▶▶ 轻按一次微调杆。 |
| 找出接下曲子的开头 (AMS)*3 | 反复向 ▶▶ 按控制键。 | 反复地向 ▶▶ 轻按微调杆。 |
| 快速倒回*2,*5 | 向 ◀◀ 按住控制键。 | 向 ◀◀ 按住微调杆。 |
| 快速前进*2,*5 | 向 ▶▶ 按住控制键。 | 向 ▶▶ 按住微调杆。 |
| 跳到后面的组*4 | 反复按 [IMAGE]° | 反复按 [IMAGE]° |
| 跳到前面的组*4 | 反复按 [IMAGE]° | 反复按 [IMAGE]° |
检查显示器上显示的 CD 信息
您可以反复按 CD 播放机上的 DISPLAY/MENU(显示器/菜单)或遥控器上的 DISPLAY 来检查 CD 信息。 当播放包含诸如 CD-TEXT 文本信息的 CD 时,“曲名”、“专辑名”、“艺术家名”等按照下表括弧中的形式显示。当播放 ATRAC CD 时,将显示您用 SonicStage Simple Burner 软件输入的信息。当播放包含带 ID3 tag ^*1 MP3 文件的 MP3 CD 时,将显示 ID3 tag 信息。CD 播放机
每次您按 DISPLAY/MENU 时,显示将按以下方式改变:| 声频 CD ATRAC CD/MP3 CD | |
| 曲号、已播放时间 文件名、艺术家名*(曲名、艺术家名、专辑名)文件号、已播放时间 | 3、组名、 |
| 曲号、当前曲子剩余时间 文件名、CODEC 信息*(曲名、艺术家名)文件号、当前文件剩余时间 | 4, |
| CD上的总曲子数、CD 播放总时间、总文件数、总组数剩余曲子数*2·CD上的剩余时间*2 | 文件号、已播放时间 |
| 曲名列表 组名/文件名列表 | |
遥控器
每次您按DISPLAY时,显示将按以下方式改变:| 声频 CD ATRAC CD/MP3 CD | |
| 曲号、已播放时间(曲名)文件号、文件名、已播放时间 | |
| 曲号、当前曲子剩余时间 文件号、艺术家名、CODEC 信息*(曲名、艺术家名)当前文件剩余时间 | 4, |
| 剩余曲子数*2 CD 剩余时间*2(专辑名、艺术家名)组名、总文件数 | |
| 直观显示屏 | |
注
\- 下列字符可以显示在本 CD 播放机上: \- 字母及数字字符 A-Z, a-z, 0-9 和 \_。 \- 中文字符(中国型号) \- 韩文字符(韩国型号) 在随附的遥控器上,不能显示中文字符和韩文字符。 - 在播放文件之前,CD 播放机读取 CD 上的所有文件和组(或文件夹)信息,显示“READING”。取决于 CD 的内容,读取的时间可能要长一些。 - 如果该组没有组名,显示器上将显示“ROOT”。 - 如果该文件没有 ID3 tag 信息,显示器上将显示“----”。 卸下 CD 按住托盘中心的枢轴同时取下 CD。 natural_image
Line drawing of a hand holding a circular object with a pointed tip, no text or symbols present▶ 播放选项
使用遥控器上的 P MODE/按钮或 CD 播放机上的菜单功能,您可以享受下列播放选项。 - 反复播放曲子(反复播放) - 播放选定组中的所有文件(组播放) - 播放单首曲子(单曲播放) - 按任意顺序播放曲子(随机播放) - 按任意顺序播放选定组中的所有文件(组随机播放) - 播放您喜爱的播放列表(m3u 播放列表播放) - 给您喜爱的曲子加记 Bookmark(书签)以便选播(播放加记书签的曲子) - 播放您最常播放的 10 首曲子(自动排列播放) - 按任意顺序播放您最常播放的曲子(自动排列随机播放) - 按您喜爱的顺序播放曲子(PGM 播放) 在 CD 播放机上选择播放选项 按下列步骤输入 PLAY MODE(播放模式)菜单,然后选择各播放选项。 1 按 DISPLAY/MENU 直到出现 MENU(菜单)屏幕。 2 按 ☑ 或 ☑ 选择“PLAY MODE”,然后按DISPLAY/MENU 3 按 ⊙ 或 ∇ 以选择您想要的播放选项。默认设置为“ALL”(正常播放)。  出现播放选项。 使用遥控器选择播放选项 反复按 P MODE/以选择您想要的播放选项。反复播放曲子(反复播放)
您可以重复不同的播放选项。 使用遥控器 播放中,按住 P MODE/直到出现“→”。  001 02:34 在 CD 播放机上 1 按 DISPLAY/MENU 直到出现 MENU 屏幕。 2 按 ↑ 或 ↓ 选择“ REPEAT(反复)”,然后按 DISPLAY/MENU。 3 按 ⊥ 或 ↓ 选择“ON(开)”,然后按 DISPLAY/MENU 输入该选项。播放选定组中的所有文件
(组播放)(只适用于 ATRAC CD/MP3 CD) 播放中,反复按 P MODE/至显示“☐”。(CD 播放机:执行“在 CD 播放机上选择播放选项(本页)”的步骤 1 和 2,按 ↑ 或 ↓ 以选择“GROUP(组)”,然后按 DISPLAY/MENU 输入该选项。)  005 03:45 播放单首曲子(单曲播放)
播放中,反复按 P MODE/至显示“1”。(CD 播放机:执行“在 CD 播放机上选择播放选项(第 19 页)”的步骤 1 和 2,按 ↑ 或 ↓ 以选择“1”,然后按 DISPLAY/MENU 输入该选项。)  005 03:45按任意顺序播放曲子(随机播放)
播放中,反复按 P MODE/ 至显示 “SHUF”。(CD 播放机:执行“在 CD 播放机上选择播放选项(第 19 页)”的步骤 1 和 2,按 ☐ 或 ☑ 以选择 “SHUFFLE(随机)”,然后按 DISPLAY/MENU 输入该选项。)  003 01:25 SHF按任意顺序播放选定组中的所有文件(组随机播放)(只适用于ATRAC CD/MP3 CD)
播放中,反复按 P MODE/ 至显示 “SHUF”。(CD 播放机:执行“在 CD 播放机上选择播放选项(第 19 页)” 的步骤 1 和 2,按 ⊙ 或 ∇ 以选择 “GROUP SHUFFLE(组随机)”,然后按 DISPLAY/MENU 输入该选项。)  003 01:25 播放您喜爱的播放列表(m3u 播放列表播放)(只适用于 MP3 CD)
可以播放您喜爱的 m3u 播放列表\*。 \* “m3u 播放列表” 是一个编码 MP3 文件播放顺序的文件。要使用播放列表功能,请使用支持 m3u 格式的编码软件把 MP3 文件录制到 CD-R/RW 上。 1 播放中,反复按 P MODE/至显示“(播放列表)。(CD 播放机:执行“在 CD 播放机上选择播放选项(第19页)”的步骤 1 和 2,按 ↑ 或 ↓ 以选择“PLAY LIST(播放列表)”,然后按DISPLAY/MENU输入该选项。)  001 MODERN  播放列表 2 向 ◀◀ 或 ▶▶I 轻按微调杆选择所要的播放列表。(CD 播放机:按 ↑ 或 ↓ 选择一个播放列表。)  001 LATEST  3 按微调杆。(CD 播放机:向 ▶II 按 5 功能控制键。)  001:IS THAT 给您喜爱的曲子加记 Bookmark(书签)以便选 播(播放加记书签的曲子)
当 CD 播放机正在播放时,您可以为想要播放的曲子加记书签并且只播放这些曲子。 声频 CD:每张 CD 最多能给 99 首曲 子加记 Bookmark(最多 10 张 CD) AT RAC CD : 每张 CD 最多能给 999 首曲子加记 Bookmark(最多 5 张 CD) MP3 CD:每张 CD 最多能给 999 首 曲子加记 Bookmark(最多 5 张 CD)要加记 Bookmark 时
1 播放曲子当中,在所要加记 Bookmark(书签)处按住微调杆至“ ”闪烁。(CD 播放机:向 ▶II 按住5功能控制键直到“ ”闪烁。) 当成功加记完 Bookmark(书签) 时,“ ”闪烁即变慢。 2 向 I◀◀ 或 ▶▶▶ 轻按微调杆(CD 播放机:向 I◀◀ 或 ▶▶▶ 按 5 功能控制键)以选择想要加记 Bookmark(书签)的曲子,然后重复第 1 步为想要播放的其他曲子加记 Bookmark(书签)。要播放加记Bookmark的曲子时
1 反复按 P MODE/直到“”(书签)频繁闪烁。(CD 播放机:执行“在 CD 播放机上选择播放选项(第 19 页)”的步骤 1 和 2,按 ∥ 或 ∇ 选择“BOOK MARK(书签)”,然后按 DISPLAY/MENU,开始播放加记书签的曲子。) 2 按微调杆点亮“ ”。 开始播放加记 Bookmark(书签)的曲子。 要去除 Bookmark 时 请在播放带有 Bookmark(书签)的曲子当中,按住微调杆至显示器中的“ ”显示消失。(CD 播放机:向 ▶ 按住 5 功能控制键至显示器中的“ ”消失。) 要检查带有 Bookmark 的曲子时 在播放带有 Bookmark(书签)的曲子当中,显示器中的“√”将闪烁得较慢。注
- 在播放带有 Bookmark(书签)的曲子当中,是以曲号顺序播放曲子的,而不是以您加记的顺序播放的。 - 您如果试图给第 11 张 CD(播放 ATRAC CD/MP3 CD 时为第 6 张)加记Bookmark(书签),则第 1 张播放的 CD 其所加记的Bookmark(书签)将被擦去。 - 存储在存储器中的所有 Bookmark(书签)都将被擦去: - 您如果断开了所有的电源,或 - 如果可充电电池没有充电,即使显示“Lobatt”的情况下,继续播放 CD 播放机。播放您最常播放的 10 首曲子(自动排列播放)
本 CD 播放机自动从正在播放的 CD 中存储多达 10 首您最常播放的曲子,并从第 10 首到第 1 首播放。 播放中,反复按 P MODE/以选择“a00(自动排列)”,然后按微调杆输入该选项。(CD 播放机:执行“在 CD 播放机上选择播放选项(第 19 页)”的步骤 1 和 2,按 ↑ 或 ↓ 以选择“AUTO RANKING(自动排列)”,然后按 DISPLAY/MENU 输入该选项。)  01:25按任意顺序播放您最常播放的曲子(自动排列随机播放)
本 CD 播放机可播放多达 32 首由播放机自动存储的您最常播放的曲子。在自动排列随机播放时,上述曲子按随机顺序播放。 播放中,反复按 P MODE/以选择“a00(自动排列)SHUF”,然后按微调杆输入该选项。(CD 播放机:执行“在 CD 播放机上选择播放选项(第 19 页)”的步骤 1 和 2,按 ⊙ 或 ∇ 以选择“RANKING SHUF(自动排列随机播放)”,然后按 DISPLAY/MENU 输入该选项。)  01:25 SHF注
无论是否更换 CD,本 CD 播放机能存储最多 10 张 CD 中播放过的曲子。如果试图存储第 11 张 CD 中的曲子时,存储的第 1 张 CD 的信息将被擦去。按您喜爱的顺序播放曲子
(PGM 播放) 可按照所喜爱的顺序给 CD 播放机编程来播放最多 64 首曲子。 1 当播放停止时,反复按 P MODE/→ 至显示“PGM”(程序)。(CD 播放机:当播放停止时,执行“在 CD 播放机上选择播放选项(第 19 页)”的步骤 1 和 2,按 ↑ 或 ↓ 以选择“PROGRAM(程序)”,然后按 DISPLAY/MENU 输入该选项。) 声频 CD/CD-TEXT  ATRAC CD/MP3 CD  2 向 ◀◀ 或 ▶▶▶ 轻按住微调杆以选择您想要播放的曲子,然后按微调杆至显示改变输入该选项。(CD 播放机:向 ◀◀ 或 ▶▶▶ 按 5 功能控制键以选择曲子,然后按 DISPLAY/MENU 输入该选项。)该曲子被存储在存储器中。当播放 ATRAC CD/MP3 CD 时,您还可以使用 □ + 或 □ - 选择一个组。 声频 CD/CD-TEXT  播放 ATRAC CD/MP3 CD 时,显示播放顺序和文件名。 3 反复步骤 2 以您所喜爱的顺序选择曲子。 4 按微调杆开始 PGM(程序)播放。(CD 播放机:向 ▶II 按 5 功能控制键。)要检查程序时
编程中: 在步骤 4 之前,反复按住微调杆。(CD 播放机:反复向 ▶II 按住 5 功能控制键或反复按 DISPLAY/MENU。) 当播放停止时: 按 DISPLAY。当指示出现时,反复按 P MODE/直到“PGM”闪烁,然后按微调杆直到显示改变。 (CD 播放机:反复按 DISPLAY/MENU,直到已编排好的曲子列表出现。要从第 3 首曲子开始显示,向 ▶ 按 5 功能控制键)注
- 在步骤 3 当您输入完第 64 曲时,显示器即出现所选第一首曲号(声频 CD)/第一个文件名(ATRAC CD/MP3 CD)。 - 选择65首或65首以上曲子时,第一首选曲将被擦去。搜索组或曲子 / 文件
当 CD 播放机正在播放时,您可以用 CD 播放机上的 ↑ 或 ↓ 立即搜索并播放您想要的组(只适用于 ATRAC CD)或曲子 / 文件。 1 播放时,按 ↗ 或 ↓ 直至出现搜索屏幕。  2 按 □ + 或 □ - 以选择您想要的组,然后向 ▶ 按 5 功能控制键。 CD 播放机从您选择的组中第一个文件开始播放。选择您想要的曲子 / 文件
1 执行上述步骤 1,然后按 ☐ + 或 ☐ - 以选择您想要的组。 2 按 ⊕ 或 ↓ 以选择您想要的曲子 / 文件,然后向 ▶ II 按 5 功能控制键。 CD 播放机从您选择的组中第一个文件开始播放。要退出搜索模式时
向 ■/CHG 按 5 功能控制键。如果最多约 40 秒钟后未执行任何操作,屏幕将返回至前一屏。注
如果试图在搜索时使用遥控器操作 CD 播放机,将显示“MENU(菜单)”,并且无法执行任何操作。调节音质(参量均衡器)
您可按下列两步调节音质来享受您喜爱的声音: - 选择预设声音模式 → “选择您想要的音质” - 自行调节音质 “定制音质” 选择您想要的音质| 指示 音质 |
| SOFT/ 用于声乐,着重中音的音SOUNDS频 |
| ACTIVE/ 欢快的声音,着重高音和SOUND A 低音的音频 |
| HEAVY/ 强有力的声音,与SOUND H ACTIVE音相比,进一步着重高音和低音 |
| CUSTOM/ 定制声音SOUND C |
定制音质
您可在“LOW”(低音音频)、“MID”(中音音频)和“HIGH”(高音音频)3个频率范围中调整音量,从而定制音质。您可以从3种样式中为每个频率范围选择声波样式,也可以在7个等级中为您所选择的样式调整音量。 检查显示的波形以调节音质。 1 反复按 SOUND 以选择“SOUND C”,然后按 SOUND 至显示改变。(CD 播放机:执行“选择您想要的音质”的步骤 1 - 3 并选择“CUSTOM”。) 2 向 ◀◀ 或 ▶▶▶ 轻按住微调杆直至出现您想要的频率范围。(CD 播放机:向 ◀◀ 或 ▶▶▶ 按住 5 功能控制键 2 秒钟或更长时间以选择频率范围。) “LOW”最先显示。(CD播放机:“LOW”闪烁。)  (接下页)调节音质
3 反复向 ◀◀ 或 ▶▶I 轻按微调杆,从存储体中为每个频率范围所存储的 3 种波形中选择一种波形,然后反复旋转 VOL +/- 选择音量。(CD 播放机:向 ◀◀ 或 ▶▶I 反复按 5 功能控制键以选择波形,然后按 ↑ 或 ↓ 选择音量。)  Ⓐ频率范围 ⑧音量(要调大音量,使用 VOL -。要调小音量,使用 VOL +°)  4 重复步骤 2 和 3 以调节另两种频率范围。 5 按微调杆输入该选项。(CD 播放机:按 DISPLAY/MENU 输入该选项。) 要返回前一个屏幕时 在 CD 播放机上按 📄。 要取消调节操作时 按住 ■ 2 秒钟或更长时间。(CD 播放机:向 ■/CHG 按 5 功能控制键。)注
- 选择 CUSTOM 音时,当提高音量,声音根据设置可能会失真。此时请调小音量。 - CUSTOM 音设置与其他音设置时的音量有所不同。请按个人喜好调整音量。G-PROTECTION 功能
G-PROTECTION 功能已发展到能在许多活动使用过程中提供优秀的保护,防止跳音。 1 当播放停止时,按 DISPLAY 至显示改变。(CD 播放机:当播放停止时,按 DISPLAY/MENU 直到出现 MENU 屏幕。按 ↑ 或 ↓ 以选择 “OPTION(选项)”,然后按 DISPLAY/MENU。) 2 向 ◀◀ 或 ▶▶ 轻按微调杆以选择 “G-PRO”,然后按微调杆输入该选项。(CD 播放机:按 ⊥ 或 ▽ 以选择 “G-PROTECTION”,然后按 DISPLAY/MENU 输入该选项。) 3 向 ◀◀ 或 ▶▶ 轻按微调杆以选择“G-PRO 1”或“G-PRO 2”,然后按微调杆输入该选项。(CD 播放机:按 ↑ 或 ↓ 以选择“G-PRO 1”或“G-PRO 2”,然后按 DISPLAY/MENU 输入该选项。) 如果您选择“G-PRO 2”,G-PROTECTION 功能将比“G-PRO 1”更强大。要享受高 CD 音质,请选择“G-PRO 1”。注
下列情况可能会发生跳音: - 如果 CD 播放机受到连续的,意外强大的冲击, - 如果 CD 光盘污秽或有刮痕,或 - 当使用劣质的 CD-R/RW 或者当原始记录装置或应用程序软件有问题时。保护听觉 (AVLS)
AVLS(自动音量限制系统)功能限制最大的音量以保护您的听觉。 1 按 DISPLAY 至显示改变。(CD 播放机:按 DISPLAY/MENU 直到出现 MENU 屏幕。按 ↑ 或 ↓ 以选择 “OPTION”,然后按 DISPLAY/MENU。) 2 向 ◀◀ 或 ▶▶ 轻按微调杆以选择 “AVLS”,然后按微调杆输入该选项。(CD 播放机:按 ↑ 或 ↓ 以选择 “AVLS”,然后按 DISPLAY/MENU 输入该选项。) 3 向 ◀◀ 或 ▶▶ 轻按微调杆以选择 “ON”,然后按微调杆输入该选项。(CD 播放机:按 △ 或 ▽ 以选择“ON(开)”,然后按 DISPLAY/MENU 输入该选项。) 要取消 AVLS 功能时 执行步骤 1 - 3,将 AVLS 设置改为 “OFF(关)”。自动停止播放 (OFF TIMER)
您可以设置 CD 播放机在1至99分钟的时间范围内自动停止播放。当启用定时器功能时,将出现下列指示: - CD 播放机:“”以大约 5 秒钟间隔出现。 - 遥控器:显示“((●))”。 1 按 DISPLAY 至显示改变。(CD 播放机:按 DISPLAY/MENU 直到出现 MENU 屏幕。按 ↑ 或 ↓ 以选择 “OPTION”,然后按 DISPLAY/MENU。) 2 向 ◀◀ 或 ▶▶ 轻按微调杆以选择 “TIMER”,然后按微调杆输入该选项。(CD 播放机:按 ↑ 或 ↓ 以选择 “TIMER”,然后按 DISPLAY/MENU 输入该选项。) 3 向 ◀◀ 或 ▶▶▶ 轻按微调杆以选择 “10 min\*”。(CD 播放机:按 ◁ 或 ▽ 以选择“10 min”,然后按 DISPLAY/MENU。) \* 默认设置。如果默认设置已更改,将显示所设的时间长度。 (接下页)自动停止播放
4 旋转 VOL +/- 以选择您想要设置的时间长度,然后按微调杆输入该选项。
(CD 播放机:按 或 以选择您想要设置的时间长度,然后按 DISPLAY/MENU 输入该选项。) - 要增加/较少5分钟: 反复旋转 VOL +/−°(CD 播放机: 反复按 ↑ 或 ↓°) - 要增加/减少 1 分钟: 保持旋转 VOL +/−°(CD 播放机: 按 ↑ 或 ↓ 2 秒钟或更长时间。) 要返回前一个屏幕时 按 ■。(CD 播放机:按 📄-°) 要取消设置操作时 按住 DISPLAY 或 ■ 2 秒钟或更长时间。(CD 播放机:向 ■/CHG 按 5 功能控制键。) 在 CD 播放机停止播放前要检查时间长度时 播放中,执行步骤 1 - 3。 要取消 OFF TIMER 功能时 执行步骤 1 - 3,将 OFF TIMER 设置改为“OFF(关)”。锁定控制器 (HOLD)
您可以锁定 CD 播放机上的控制器以防意外按了按钮发生误操作。 当 HOLD 功能有效时按任何按钮,OPR 灯将闪烁。 沿箭头所指方向滑动 HOLD。 CD 播放机和遥控器上均可使用 HOLD 功能。当遥控器上的 HOLD 设置为关时,仍可用遥控器去控制操作 CD 播放机。 要解锁控制器时 请沿箭头所指反方向滑动 HOLD。注
即使 HOLD(保持)功能起着作用,遥控器的显示器中也并不显示“HOLD”。关掉哗声
可以关掉当操作 CD 播放机时在头戴耳机 / 耳机上听到的哔声。 1 按 DISPLAY 至显示改变。(CD 播放机:按 DISPLAY/MENU 直到出现 MENU 屏幕。按 ↑ 或 ↓ 以选择 “OPTION”,然后按 DISPLAY/MENU。) 2 向 ◀◀ 或 ▶▶ 轻按微调杆以选择 “BEEP”,然后按微调杆输入该选项。(CD 播放机:按 ↑ 或 ↓ 以选择“BEEP”,然后按 DISPLAY/MENU 输入该选项。) 3 向 ◀◀ 或 ▶▶ 轻按微调杆以选择 “OFF”,然后按微调杆输入该选项。(CD 播放机:按 ⊥ 或 ▽ 以选择“OFF”,然后按 DISPLAY/MENU 输入该选项。) 要打开哗声时 执行步骤 1 - 3,将 BEEP 设置改为 “ON”。节电
您可为 CD 播放机上的 OPR 指示灯选择亮度选项,以节省电池电能。 1 反复按 DISPLAY 至显示改变。 (CD 播放机:按 DISPLAY/MENU 直到出现MENU屏幕。按 ↑ 或 ↓ 以选择“OPTION”,然后按 DISPLAY/MENU。) 2 向 ◀◀ 或 ▶▶ 轻按微调杆以选择 “LIGHT”,然后按微调杆输入该选项。(CD 播放机:按 ⊥ 或 ▽ 以选择 “LIGHT”,然后按 DISPLAY/MENU 输入该选项。) 3 向 ◀◀ 或 ▶▶ 轻按微调杆以选择 “LIGHT OFF” 或 “LIGHT 2”,然后按微调杆输入该选项。(CD 播放机:按 ↑ 或 ↓ 以选择“LIGHT OFF”或“LIGHT 2”,然后按 DISPLAY/MENU 输入该选项。) 关于 LIGHT 设置| 设置 | CD 播放机上的 OPR 指示灯 |
| LIGHT OFF | 关闭 |
| LIGHT 1 | 播放或操作中,完全点亮 |
| LIGHT 2* | 播放或操作中,亮度较弱 |
连续播放曲子(无间隙播放)(只适用于ATRAC CD)
您可以连续播放如现场音乐会等音乐,曲子之间没有空隙。 1 当播放停止时,按 DISPLAY 至显示改变。(CD 播放机:当播放停止时,按 DISPLAY/MENU 直到出现 MENU 屏幕。按 ⊥ 或 ⊇ 以选择 “OPTION”,然后按 DISPLAY/MENU。) 2 向 ◀◀ 或 ▶▶I 轻按微调杆以选择 “SEAMLESS”,然后按微调杆输入该选项。(CD 播放机:按 ⊥ 或 ▽ 以选择“SEAMLESS”,然后按 DISPLAY/MENU 输入该选项。) 3 向 ◀◀ 或 ▶▶ 轻按微调杆以选择 “ON”,然后按微调杆输入该选项。(CD 播放机:按 ⊙ 或 ▽ 以选择“ON(开)”,然后按 DISPLAY/MENU 输入该选项。)注
根据音乐源录制方式不同,曲子可能不能连续播放。连接立体声系统
可以通过立体声系统听 CD 或把 CD 录到盒带或 MD(小型光盘)上。详细,请参看您想连接的装置所附带的使用说明书。 连接装置以前,请务必先关掉各装置的电源开关。  小型光盘录音机,DAT座等 立体声系统,磁带录音机,磁带收/录音机等 1 当播放停止时,按 DISPLAY 至显示改变。(CD 播放机:当播放停止时,按 DISPLAY/MENU 直到出现 MENU 屏幕。按 ☑ 或 ☑ 以选择“OPTION”,然后按 DISPLAY/MENU。) 2 向 ◀◀ 或 ▶▶ 轻按微调杆以选择 “AUDIO OUT”,然后按微调杆输入该选项。(CD 播放机:按 ↑ 或 ↓ 以选择“AUDIO OUT”,然后按 DISPLAY/MENU 输入该选项。) 3 向 ◀◀ 或 ▶▶▶ 轻按微调杆以选择对应于所连接装置的正确设置,然后按微调杆输入该选项。(CD 播放机:按 ↑ 或 ↓ 以选择该设置,然后按 DISPLAY/MENU 输入该选项。) 连接装置\* 设置 耳机“HP” 使用连接导线连接的装置“LINE” \* 当使用光学数码连接导线连接该装置时,您不必选择设置。它会自动切换到适合光学连接的设置。 (接下页)连接立体声系统
注
- 要播放 CD 以前,请调小所连接装置的音量以防损坏连接着使用的扬声器。 - 请用 AC 电源转接器接电录音。如果用充电式电池或干电池电源录音,可能会在录音中途耗光电池。 - 适当调整好所连接装置的音量以免声音发生失真。 - 本 CD 播放机使用序列复制管理系统,只允许进行第一代数码复制。 - 当使用连接的设备录制或播放 ATRAC CD/MP3 CD 时,只能使用模拟连接线。 - 如果改变连接的装置,请务必更改“AUDIO OUT(声频输出)”设置。当耳机或其他装置连接于 / LINE OUT (OPTICAL)插孔时
当连接了一根光学数码连接导线,输出自动转换至光学数码输出。 当连接了遥控器或一根连接导线,当前 AUDIO OUT 设置(“HP”或“LINE”)闪烁大约 5 秒钟。 当您把另一装置连接到 ☐/LINE OUT (OPTICAL) 插孔时,请先拔下本装置,再重新连接耳机。然后把 AUDIO OUT 设置切换到“HP”。 当 AUDIO OUT 设为“LINE”时 不能使用 CD 播放机或遥控器上的 VOL+/- 调整音量。 使用光学数码连接导线时 要把 CD 录到 MD(小型光盘),DAT 等上面时,必须在开始录音以前,先让 CD 播放机呈操作暂停状态。 使用连接导线或光学数码连接导线时有关G-PROTECTION和均衡器的功能 \- 为录制高质量的 CD 声频,在菜单上请将 G-PROTECTION 设置为“G-PRO1”。 \- 如果 AUDIO OUT 设置被设为 “LINE”,则参量均衡器功能无效。▶ 连接电源
可在显示器中检视电池的剩余电力。  \* 哗声。 当电池耗尽时,须对充电式电池充电或更换新的干电池。 - 使用充电式电池(本页) - 使用干电池(外附电池盒)(第 35 页)注
- 指示段节粗示剩余电池电力。其一个段节不一定正确代表电池电力的四分之一。 - 根据操作情况,的指示段节的使用时间可能增加或减少。 - 并用充电式电池和干电池以延长供电时间时,请使用完全充满电的充电式电池和全新的干电池。 有关充电式电池的使用时间和充电时间,请参看“规格”。使用充电式电池
初次使用充电式电池时,必须进行充电。为了长时间保持原来的电池容量,请在仅当电池完全耗尽时充电。 本 CD 播放机限使用下列充电式电池。 - NH-10WM(附带) - NH-14WM(不附带) 1 滑动 OPEN 开关以打开 CD 播放机盖,然后打开播放机内的电池室盖。  2 插入充电式电池使 ⊕ 对准电池室中的图示,然后关上盖子至卡搭一声定位。 natural_image
Diagram of a CD-ROM drive showing battery compartment and internal circuit (no text or labels)使用充电式电池
3 用 AC 电源转接器连接所附带充电座的 DC IN 4.5 V 插孔和 AC 电源插座。
然后将 CD 播放机放在附带的充电座上面,让 CD 播放机上的 ▼ 标志对准充电座上的 ▲ 标志。 电池开始充电。 遥控器的显示器中即闪烁 “Charging”(充电),而电池的指示段节将接续点亮。CD播放机上将点亮OPR指示灯。 当电池完成充电时,显示器中的所有指示都将消失,OPR 指示灯也将熄灭。 OPR(工作)指示灯 所附带充电座须知
- 附带的充电座只能用于此 CD 播放机。其他任何型号的播放机都不能用此充电座充电。 - 利用附带的充电座时,只能给 NH-10WM 充电式电池进行充电。请勿给任何其他类型的充电式电池充电。 - 充电当中,CD 播放机和充电式电池都会变热。但这并不会造成危险。 - 请勿把硬币或其他金属件放在充电座上。如果这些金属件意外地接触到充电座的端子将造成短路而生热。不用附带的充电座给充电式电池充电时
用 AC 电源转接器连接 CD 播放机的 EXT BATT/DC IN 4.5 V 插孔和 AC 电源插座,然后向 ■/CHG 按 5 功能控制键。 充电开始。 5 功能控制键 注
- 当使用充电座给电池充电时,务必取下外附电池盒。 - 充电当中,CD 播放机和充电式电池都会变热。但这并不会造成危险。 - 在充电当中,如果向 ▶II 按 5 功能控制键,即停止充电而开始播放 CD。 - 如果把正在播放的 CD 播放机放在充电座上,即停止播放而开始进行充电。 - 把 CD 播放机稳固地放在充电座上,让 CD 播放机上的 ▼ 标志对准充电座上的 ▲ 标志。请确认 CD 播放机上的 OPR 灯点亮。放置错误,将妨碍充电或播放。要取出充电式电池时
推 ⊖(负极)端以取出电池。 natural_image
Diagram of a device showing battery and socket components with arrows indicating assembly or connection (no text or symbols present)何时更换充电式电池
当电池使用时间缩短到大约一半时,即请更换新的充电式电池。充电式电池须知
如果电池是新的或已长时间不用,电池就可能没有充满电。此时,请给它充电直到 OPR 灯熄灭,然后使用 CD 播放机直到电池完全耗光(显示器上显示“Lobatt”)。重复此过程数次。携带充电式电池须知
请用附带的携带盒以防意外生热。让充电式电池和金属小件物品混合放置,可能因发生短路而生热,甚至有起火危险。使用干电池
您可在 CD 播放机中插入充电式电池并安装外附电池盒来扩充电能。 1 如图所示对准 PUSH 下面的直线,然后按着 PUSH 同时拉出电池盒。  2 插入两节 LR6(AA,5 号)碱性电池(非附带),使 ⊕ 对准电池盒中的图示。插回电池盒并沿箭头所示方向旋转 LOCK 以锁住电池盒。  (接下页)使用干电池
3 把外附电池盒连接到 CD 播放机。
注
- 电池耗光时,请换新电池。 - CD 播放机和外附电池盒里的电池同时放电。电源须知
当长期不使用 CD 播放机时,请卸下所有的电源。AC 电源转接器须知
\- 限使用附带的 AC 电源转接器。如果 CD 播放机没有附带 AC 电源转接器,请使用 AC-E45HG AC 电源转接器。请勿使用任何其他的 AC 电源转接器。否则可能造成故障。 插头电极  - 潮湿着手不要去碰 AC 交流电转换器。 - 将 AC 电源转接器接插到方便的 AC 电源插座。万一发现 AC 电源转接器有异常时,请立即从 AC 电源插座上拔下 AC 电源转接器。充电式电池和干电池须知
- 请勿试图给干电池充电。 - 请勿把电池投入火中。 - 电池不要和硬币等别的金属小件混在一起携带。因为电池的 + - 极若与金属件接触,将会生热造成危险。 - 请勿混用充电式电池和干电池。 - 请勿混用新、旧电池。 - 请勿混用不同类型的电池。 - 长时间不用电池时,请把它卸下保存。 - 电池发生漏液时,须即擦拭干净电池室,然后装入新电池。万一皮肤上沾染了漏液时,必须赶快洗净。菜单列表
在 CD 播放机上,按 DISPLAY/MENU 直到出现 MENU(菜单)屏幕,然后按 ⊥ 或 ↘ 以选择您想要的菜单。 在遥控器上,反复按 SOUND(用于声音设置)或反复按 DISPLAY(用于其他设置)。   要返回前一屏时,按 ■(CD 播放机:按 □ -\*1)。 要取消设置操作时,按 DISPLAY(只适用于 OPTION 菜单)或按住 ■ 2 秒钟或更长时间(CD 播放机:向 ■/CHG 按 5 功能控制键)。 具有 ● 标志的项目是默认设置。| 声音设置(页)菜单1→菜单2→菜单3 | |||
| 调节音质(25) SOUND* | 2 | ● OFF—SOFTACTIVEHEAVYCUSTOM | |
| 各种功能设置(页)菜单1→菜单2→菜单3 | |||
| 防止跳音保护(26) OPTION G-PROTECTION* | 4 ● G-PRO 1G-PRO 2 | ||
| 保护听觉(27) OPTION AVLS ON | ● OFF | ||
| 自动关闭电源(27) OPTION TIMER | 10 min* | 3 ● OFF | |
| 连接立体声系统(31) | OPTION AUDIO OUT* | 4 | ● HPLINE |
| 关掉哔声(28) OPTION BEEP | ● ON | OFF | |
| 节电(29) | OPTION LIGHT LIGHT OFF | ● LIGHT 1LIGHT 2 | |
| 连续播放曲子(30) OPTION SEAMLESS* | 4,*5 | ON● OFF | |
使用前须注意
安全须知
- 万一有任何异物或液体掉进 CD 播放机内时,即请立刻卸下电源并找有资格的人检查过以后才可再操作使用。 - 请勿试图用任何物体塞入 DC IN 4.5 V (外部电源输入)插孔。CD 播放机须知
- 须保持 CD 播放机上的透镜干净清洁,不要用手触摸。否则,透镜可能受损而 CD 播放机将不能操作正常。 - 请勿在 CD 播放机上堆置重物以免压坏 CD 播放机或 CD 光盘。 - 请勿把 CD 播放机放置靠近热源或可直接照射到阳光,或多沙尘、潮湿、淋到雨、有机械冲击、不平坦的地方,或紧闭着窗门的汽车里面。 - 如果 CD 播放机给附近的收音机或电视接收造成干扰,即请关掉 CD 播放机或把它移离收音机或电视机使用。 - 本 CD 播放机不能用于播放不规则形(例如心形,方形,星形)的光盘。若试图那样做,将可能损坏您的 CD 播放机。切不可使用该类光盘。CD 的管理须知
- 为维持 CD 清洁,必须拿 CD 的边缘。手不要接触到 CD 表面。 - 请勿在 CD 光盘上贴纸条或黏胶带。 - 请勿让 CD 直接照射到阳光或靠近热风管等热源,也不要把 CD 摆在停放在炎阳下的汽车中。头戴耳机 / 耳机须知
路上安全
开车、骑车、或在操作任何机动车辆时,请勿使用头戴耳机/耳机。因为可能有造成交通事故的危险。有些地区是禁止使用的。步行中如果用太大音量听耳机也会有潜在危险的,尤其是在横越马路时。在有潜在危险的地方,必须特别注意或暂停使用。防止损伤听觉
使用头戴耳机 / 耳机时,避免音量过大。最好也不要长时间连续使用。如有耳鸣经历,更应调小音量和避免连续用耳机听。顾虑他人
请用适当的音量听。如此则仍可听到周围的声音并且不至于骚扰到旁边的人。保养
清洁机壳
用软布蘸少量清水或温和的洗涤剂溶液擦拭清洁。不可使用酒精,汽油或稀疏剂。清洁端子
充电座或 CD 播放机上的端子如果变脏了,便可能不能适当地进行充电。如下图所示,请定期地用棉棒或干布片擦拭清洁端子。 故障检修
虽经检查过这些征候而问题仍未获解决时,即请洽询附近的 Sony 售店。| 征候 | 原因和/或校正方法 |
| 即使反复地往+的方向旋转VOL+/-(或即使在CD播放机上反复地按VOL+)都不能增大音量。 | →AVLS被设置为“ON”。将它设置为“OFF”(第27页)。→AUDIO OUT被设置为“LINE”。将它设置为“HP”(第31页)。 |
| 没声,或只听到噪声。 | →接稳头戴耳机/耳机插头。(第15页)→插头脏了。定期用干软布擦拭头戴耳机/耳机插头。 |
| 某些文件无法播放。 | →您试图播放以与本CD播放机不兼容的格式保存的文件。(第6页) |
| 用干电池电源时,播放时间太短。 | →检查一下确实用了碱性电池而不是锰电池。(第35-36页)→请用新LR6(AA,5号)碱性电池更换。(第35-36页) |
| 用充电式电池电源时,播放时间太短。 | →给充电式电池充、放电数次。(第35页) |
| 显示器出现“Lobatt”而CD不播放。 | →充电式电池完全耗光了。请加以充电。(第33-35页)→请用新LR6(AA,5号)碱性电池更换。(第35-36页) |
| 显示器显示“HldcIn”。 | →使用了一个比附带或推荐的AC电源转接器额定值高的AC电源转接器。只能使用附带的AC电源转接器或“选购的附件”中推荐的汽车电池导线。(第43页) |
| 征候 | 原因和/或校正方法 |
| CD装入CD播放机时,并不播放CD而在显示器中出现“No disc”(无光盘)。 | →CD太脏或损坏。→检查是否贴标签面朝上地装放CD。(第15页)→发生湿气冷凝。放置CD播放机数小时,等水分蒸发干。→关紧电池室盖。(第33页)→确认电池是否安装正确。(第33,35页)→把AC电源转接器接稳到AC电源插孔。(第15页)→连接了AC电源转接器之后,经过一秒或一秒以上再按微调杆(CD播放机:向▶II按5功能控制键)。→CD-R/RW是空白的。→CD-R/RW,记录装置,或所应用的软件的质量有问题。 |
| 当您按了按钮时,CD播放机上闪烁着OPR灯,而并不播放CD。 | →按钮被锁定。请推回HOLD开关。(第28页) |
| 不能调整音量。 | →AUDIO OUT被设为“LINE”。用所连接装置上的音量控制器去调整音量。(第31页)→将AUDIO OUT设为“HP”。用CD播放机上的VOL+/-调整音量。(第31页) |
| 用光学数码连接录音中,不能录正确曲号。 | →用小型光盘,DAT录音机等再录曲号。(第31页)→参看录音装置附带的使用说明书。(第31页) |
| 充电式电池不能充电。 | →充电式电池未插入电池室。→CD播放机或充电座上的端子脏了。请用干的软布擦拭干净。(第38页)→正在播放CD。请停止。→CD播放机没有稳固地放在充电座上。把播放机放在充电座上,让播放机上的▼标志对准充电座上的▲标志。确认OPR指示灯点亮。(第34页) |
| 播放从您的停止点开始。(复位功能) | →复位功能起作用。如果是要从第一首曲子开始播放,请在停止中按住微调杆(CD播放机:向▶II按住5功能控制键)至开始播放第一首曲子,或打开一下CD播放机的机盖。或,卸下所有的电源,然后再装入电池或再接上AC电源转接器。(第15,16,33,35,36页) |
| 可听到CD的沙沙噪声。 | →关紧电池室盖子。(第33页) |
| 当和连接着的立体声系统一起使用时,发生声音失真或噪音。 | →AUDIO OUT被设为“LINE”。请调整一下连接着的装置的音量。(第31页)→AUDIO OUT被设为“HP”。用CD播放机上的VOL+/-调整音量。(第31页) |
| 播放 ATRAC CD 或 MP3 CD 当中,CD 并不旋转,但可听到正常的声音。 | →CD 播放机是设计成播放中,停止 ATRAC CD 或 MP3 CD 的旋转以节省电力。因此,这是正常的现象,播放机并没有故障。 |
| 当按了微调杆(CD 播放机:向▶II 按 5 功能控制键。)或关上了 CD 播放机的盖子时,显示器中显示“NO FILE”。 | →CD 中没有 ATRAC3plus/ATRAC3/MP3 文件。→使用了数据已被清除了的 CD-R/RW。→CD 光盘脏了。 |
| 当关上了 CD 播放机的盖子时,CD 即开始旋转。 | →CD 播放机正在读取 CD 上的信息。不是故障。 |
| 液晶显示器变得看不清楚或减慢。 | →在高(超过 40°C)或低(0°C以下)气温中使用 CD 播放机。如果在正常室温条件下使用,显示器即可恢复正常的操作。 |
| 遥控器的显示器中快速地闪烁着“,而不能找出曲子的开头或曲子中的某指定点。 | →CD 播放机已进入 Bookmark(书签)曲子播放准备状态。更改 PLAY MODE 设置至“ALL”。 |
| 不能用遥控器顺利地操作 CD 播放机。 | →误按住着 CD 播放机上的按钮。 |
| 播放突然停止。 | →设置成 OFF TIMER。更改该设置为“OFF”。 |
规格
系统
CD 数码声频系统 激光二极管性质 材料:GaAlAs 波长: =770-800nm 发射持久性:连续 激光输出:小于 44.6 W (本输出值是在距离 7 mm 光圈的光学拾音元件的物镜镜面 200 mm 处测得。)D-A(数-模)转换
1 比特石英时轴控制 频率响应 20\~20 000 Hz ^+1_-2 dB(由 JEITA 测得) 输出(4.5 V 输入电平时) 线路输出(立体声小型插孔) 输出电平 0.7 V rms, 47 kΩ 时推奖负载阻抗超过 10 kΩ 耳机(立体声小型插孔) 大约 5 mW+ 大约 5 mW,16Ω 光频数字输出(光频输出连接器) 输出电平:-21~-15 dBm 波长:630~690 nm,峰值电平电源
- 两节 Sony NH-10WM 充电式电池:1.2 V DC × 2 - 两节 LR6(AA,5号)电池:1.5 V DC × 2 - AC 电源转接器(DC IN 4.5 V 插孔): 220 V,50 Hz(中国型号) 120 V,60 Hz(墨西哥型号) - 额定电流:500 mA 电池使用时间 ^*1 (大约时数) 在平稳表面使用 CD 播放机时。 当 LIGHT 模式和 SOUND 模式均设为“OFF”时。 播放时间因 CD 播放机的使用状况而异。 使用两节 NH-10WM(充电大约 5 小时 ^*2 )| G-PROTECTION“ G-PRO 1” “ G-PRO 2” | |
| 声频 CD 25 23 | |
| ATRAC CD^*3 | 44 44 |
| MP3 CD^*4 | 33 33 |
| G-PROTECTION“ G-PRO 1” “ G-PRO 2” | |
| 声频 CD 55 50 | |
| ATRAC CD^*3 | 86 86 |
| MP3 CD^*4 | 70 70 |
| G-PROTECTION“ G-PRO 1” “ G-PRO 2” | |
| 声频 CD 80 73 | |
| ATRAC CD^*3 | 130 130 |
| MP3 CD^*4 | 103 103 |
| AC电源转接器* AC-E45HG | |
| 有源扬声器系统 SRS-Z1 | SRS-Z30 |
| 汽车电池导线 DCC-E345 | |
| 带汽车接线包的汽车电池导线 | DCC-E34CP |
| 汽车接线包 CPA-9C | |
| 连接导线 RK-G129 | RK-G136 |
| 耳机 MDR-EX71SL | MDR-Q55SL |
□□ □□ □□□ □□□ □□□ □ □
□□ □□ □□□ □□ □□□ □□ □□
□□.
□ □□□ □□□□ □□□□ □□ □□
□□□ □□□□ □□□□.
□□□ □□□□ □□□ □ □□□ □□□□
□□□□ □□□ □□□ □□ □□ □□□
□□ □□□□. □ □ □□ □□ □□ □
□ □□ □□□□.
□□□ □□□ □□□□ □□□ □ □□ □
□ □□ □□□□ □□ □□ □□□□ □□
□□.
□ □□□ □□□□ □□□□ □□□□ □□
□ □□□ □□□ □□□□ □□ □□□ □
□□□. □□ □□□□ □□□□ □□□□.
C E  □□ □□□□ □□ E E A  □□( □□ □□ □□) □ □□ □□□□ □□□ □□□□
□□□ □□□□□.
ATRAC CD Walkman 0000!
□ C D □□□□□ □□ □□□ □□ □□ ....6 ATRAC3 plus □ ATRAC3 ....7 MP 3 7 ATRAC3plus/ATRAC3 MP3 8000
□□□ □□□□.... 1 0 □□□ □□□□□ □□ .... 1 1CD
1. CD I ..... 1 5 2. CD □□□□□ □□□□□. 15 3. CD □ □□□□. 16 □□ □□ □□ □□ □□□□( □□□□) ...... 1 9 □□□ □□□ □□ □□ □□□□ (□□□□) (ATRAC CD/MP3 CD) □ □ □□□□( □ □ □□) ...... 2 0 □□ □□□ □□□□ □□□□ ( 20) 20 □□□ □□□ □□ □□ □□□ □□□ □□□□ □□□□( □□ □□□□) (ATRAC CD/MP3 CD) □□□ □□□□ □□□□ ( m3 u □□□□ □□) ( MP 3 CD ) □□□□ □□□□ □□□ □ □□□□ ( 2111 1 11) 21 □□ □□□□ 1 0 □ □□□□ ( □□□□ □□) 2 2 □□ □□□□ □□ □□□ □□□□ □□□□( □□□□ □□□□) ...... 2 2 □□ □□□ □□□□ □□□□ ( PGM ) 23 □□□□ □/ □□ □□□□ ...... 2 4 □□ □□ □□□ □□ □□□□( □□□□□ □□□□□) 25 G- PROTECTION 26 □□ □□□(AVLS) 27 □□□ □□ □□□( OFF TIMER) ...27 □□□ □□□□ □□□(HOLD) ...... 28 □□□ □□....28 29 □□ □□ □□□(SEAMLESS) (ATRAC CD 30) CD 0000 0000 □□□□ □□□ □□□□ .... 3 1 00 0000 □□□ □□□ □□□ 3 3 19 35 □□□ □□ □□ .... 3 6 00 00 37 .....20 .....38 □□□ 38 2 0? □□ □□□ 3 9 □□ □□....4 2 □□ □□□□.... 4 3ATRAC CD Walkman □ □ □□□!
D-NE800LS□□□□□□□□□□□□. □CD Walkman□“ATRAC CD”□□□□□□□□“ATRAC CD Walkman”□□□. ATRAC CD □ □□ □□ □ □□ □  SonicStage Simple Burner "SonicStage Simple Burner" ATRAC CD? ATRAC CD ATRAC3plus/ATRAC3 CD-R/RW □□□. □ 30 □ □□ CD □ CD- R/ RW □ □ □ □□. \* □ □□ ATRAC3 plus / ATRAC3 MP3 \* 1 CD( ) 60 ATRAC3plus 48 kbps 700 MB CD-R/ R W□ □□□ □□□□□.   ATRAC3plus/ATRAC3 □□? □ □□□□ 6 - 9 □□□ □□□ □ □□. □ C D □□□□□ □□ □□□ □□ □□ □ C D □□□□□□ □□□ □□ 3 □□ □□ □□□ □□□ □ □□□: • CD(CDDA) \- ATRAC3plus/ATRAC3 CD(ATRAC CD) • MP 3 □□ □□□ □□□ CD ( MP 3 CD ) □□ □□□ □□□ □□ ISO 9660 Level 1/2 Joliet CD-R/RW□ CD ATRAC3plus/ATRAC3, MP3 CDDA\* CD- RW□ □□□ □ □□□ □□ □□ □□□ □□□□ □□ □□□ □□□ □□ □□ □ □□□ □□□□. \*CDDA Compact Disc Digital Audio CD CD □□□ □□ □□□□□ □□□□ □□ □□□ □ □□□□ □□□ □□□(CD) □ □□□ □□□ □□□□ □□□ □ □□□. □□ □, □□□ □□ □□□□□□ □□□□ □□□ □□ □□□□□ □ □ □□ □□□□□ □□□ □□□ □□□ □□□. □ □□□ C D □ □□ □□□ □□ □□□ □□, □ □□□ □□□ □□□□ □□□ □ □□□ □□□□ □□□ □□□□. 000 • CD CD-R/RW □ □ □□□ □ □□□ □□ □ □□□. \- ATRAC3 plus / ATRAC3 CD-R/RW□ □□□□□ □□□ □ □□□.ATRAC3plus □ ATRAC3
"ATRAC3plus" "Adaptive Transform Acoustic Coding ATRAC3plus 64 kbps 1 / 20 256 kbps, 64 kbps, 48 kbps. “ATRAC3” “Adaptive Transform Acoustic Coding3” ATRAC3 □ □ 1 / 1 0 □ □ □□□ □□ □ □□□ □□□ □□ □ □□□. □□□ 132 kbps, 105 kbps, 66 kbps. □□ □□□ □□□ □ □□□ • □□ □□□: 255 • □□ □□□: 9 9 9 “Sonic Stage Simple Burner” □□□□ □□□ □□□ □□ □□ □□□ □□ □□( MP3 □□□ □□) □□ □□□ □□ □ ATRAC3 plus / ATRAC3 □□ □ □□□ □□□□ □□ □□ □□□ □□□ □□ □□□□.MP 3
MPEG-1 Audio Layer 3 MP3 ISO( Motion Picture Experts Group □ □□ □□□ □□ □□ □□□ □□□ □□ □□ □□ □ 1 / 10 □□ □□□ □□□ □□□ □□ □□□ □□□ □□□: • □□ □□□□ □□: 8 • Ⅲ Ⅳ Ⅴ: A - Z, a - z, 0 - 9, \_ ( Ⅱ)000
\- “mp 3” \- MP 3 “mp 3” ]. ( □□ □□□□ □□) □□ □□□ □□□ □ □□□ • □□ □□□: 255 • □□ □□□: 9 9 9 □□ □ □□ □□□□□□ □□ • CD □□□□ □□ □ □□ MP3 □□ □□□: □ □□: 16 - 320 k b p s ☐ ☐☐ ☐☐: 32/44.1/48 kHz. 가☐ ☐☐ ☐☐(VBR) ☐☐ ☐☐☐☐. MP3 “4 4 . 1 kHz”,“1 2 8 kbps”,“Constant Bit Rate"□ □□□□ □□ □□□□. - “halting of writing” - “Disc at Once” □□□ □□□□. □□□□ □□□ □□□ □□ □□ \- MP3 000 000 000 000 000 (MP3 / ATRAC3 plus / ATRAC3 000 00) □□□□ □□ □□ □□□ □□□□ □□□□. • C D □□□□ □□□ □□□ □□ □□ □□ □□ □□ □□ □□ □□ □□ □□ □□ □□ □□ □□ □□ □□ □□ □□ □□ □□ □□ □□ □□ □□ □□ □□ □□ □□ □□ □□ □□ □□ □□ □ □□□□ □□□ □□ □□□ □□□ □□□□□ □□ □□□ □□□ □□□ □□□ □□□ □□□ □□□ □□□ □□□□. ATRAC3plus/ATRAC3 MP3 □□ □ □□ ATRAC3 plus / ATRAC3 □□□. “□□”□ □□□ CD □ “□”□ □□□□. “□□”□ □□□ □□□□ “□□”□ □□□ □□. “□□”□□ □□□□□ □□□ □□□□( □□ □□ □□ □ □□□ □□ □ □□□) . MP 3 CD □ “□”□ “□”□ “□”□ “□”□ □ CD □ ATRAC3 plus / ATRAC3 MP3 CD-R/RW MP3 “” - ATRAC3plus/ATRAC3 flowchart
graph TD
    A["CD-R"] --> B["1"]
    C["CD-RW"] --> B
    B --> D["①"]
    B --> E["②"]
    B --> F["③"]
    B --> G["④"]
    B --> H["⑤"]
    I["ATRAC3 plus"] --> J["①"]
    K["ATRAC3"] --> L["②"]
    M["MP3"] --> N["③"]
    O["CD-R"] --> P["1"]
    Q["CD-RW"] --> P
    P --> R["①"]
    P --> S["②"]
    P --> T["③"]
    P --> U["④"]
    P --> V["⑤"]
000
• MP 3 - CD ATRAC3plus/ATRAC3 MP3 CD ATRAC3plus/ATRAC3 • MP3 □□□ □□□□ A C □□ □□□(1) natural_image
Line drawing of a connected cable and plug with a rectangular component (no text or symbols)natural_image
Two isometric line drawings of rectangular electronic components with two leads (no text or symbols)natural_image
Simple line drawing of a rectangular box (no text or symbols)natural_image
Line drawing of a medical or laboratory device with a coiled cable and connector (no text or symbols)natural_image
Line drawing of a handheld device with attached cable (no text or symbols)natural_image
Simple line drawing of a folded or cushioned object with no text or symbolsnatural_image
Simple line drawing of a bag with a rope tied around it, no text or symbols present.natural_image
Line drawing of a cylindrical device with a coiled cable and connector (no text or symbols)natural_image
Diagram of a device with a curved panel, a circular device, and connected components (no text or symbols)000
□□□ □□□ □□□□ □□□□ □□□□. □ CD CD □□□□ □□□ □ □□□□. ( □□ □□□□ □□) □□□□□( □□□) □□□ □□ □□ □□ □□□□ □□□□ □□□□.  1 2 000 00(23) 3 17 4 19 - 23 5 SOUND (25, 26) 6 000 00(33) 7 19, 20 □□□□ □□□ □□□□□ □□□□ □□□ □□ □□ □□□ □□□ □ □□□. □□□ □□□ □□□ □□□□□  □□□ □□□ □□□ □□ □□ □ □□□. natural_image
Diagram showing a syringe inserted into a tool with an inset close-up of the component (no text or symbols)natural_image
Diagram showing a device being inserted into a plastic housing, with an arrow indicating the process (no text or symbols present)1.CD0000.
①OPEN □□ □□□. □□□ CD □□□□ □ natural_image
Line drawing of a robotic vacuum cleaner with directional arrows indicating motion (no text or symbols)natural_image
Line drawing of a hand holding a device with an open lid and a curved handle, no text or symbols present2. CD 00000 00000.
□□□ □□ □□□ □□□ □ □□□ □: • □□□ □□□( 3 3 □□□) • LR6 (AA) (35) • A C □□ □□□ CD □□□ □□□□ □□□ □□□□□. □□□□ □□□ □□□ □□□□ □ . ① A C □□ □□□□ □□□□□. ②□□□ □□□ □□□/ □□□□ C D □□□□□ □□□□□.  A C ( □□ □□□□ □□)3.CDO 10000.
5 □□ □□□ □( ▶II) natural_image
Line drawing of a circular electronic device with ports and a central hub (no text or symbols)| □□ | CD □□□□ | □□□ |
| □□( □□□ □□□ □□□□) | □□□ □□ ▶□□ □□□□ □□□.□□□ □□□□ □□□ □□□□ □□□ □□□ □□□ □□□ □□□. | □□ □□□ □□□□.□□□ □□□□ □□□ □□□□ □□□ □□□ □□□. |
| □□( □ □□□) | CD □□□□ □ □ □ □□□ □□□ □□□ □□□ □□□ □□□ □□□ □□ □ ▶□ □□□ □□□ □□□ □□ □ □□ □□□ □□□ □. | CD □□□□ □ □ □ □□ □□ □□ □□ □□ □□ □□ □□ □□ □□ □ □ □ □ □ □ □ □. |
| □□□/ □□□□ □ □□ □ □ □ | ▶□ □□□ □□□. | □□ □□□ □□□. |
| □□* 2 | ■/ CHG □□□ □□□. | ■□ □□□. |
| □□ □□ □□ □□ □□( AMS1)* 2: | I◀◀ □□□ □□□. | □□ □□ ▶◀◀ □□□ □□ □□ □□□. |
| □ □□ □□□ □□( AMS ) * 3 | I◀◀ □□□ □□□ □□□. | □□ □□ ▶◀◀ □□□ □□□ □□□ □□□ □□□. |
| □□ □□ □□□ □□( AMS ) * 2, *3 | ▶▶□ □□□ □□□. | □□ □□ ▶▶▶□ □□□ □□ □□ □□□. |
| □□ □ □ □□ □□( AMS ) * 3 | ▶▶□ □□□ □□□ □□□. | □□ □□ ▶▶▶□ □□□ □□□ □□□ □□□ □□□. |
| □□□□* 2, *5 | I◀◀ □□□ □□□ □□□□. | □□□□ ▶◀◀ □□□ □□ □□□□. |
| □□□* 2, *5 | ▶▶□ □□□ □□□ □□□□. | □□□□ ▶▶▶□ □□□ □□ □□□. |
| □□ □ □□□ □□* 4 | + □ □□□ □□□. | + □ □□□ □□□. |
| □□ □ □□□ □□* 4 | - □ □□□ □□□. | - □ □□□ □□□. |
| CD ATRAC CD/MP3 CD | |||||||||
| □□□, □□□□□ □□□, □□□* (□□, □□□□, □□□) | 3, | □□□, □□□□, □□□□□ | |||||||
| □□□, □□ □□ □□ □□ □□, CODEC □□* (□□, □□□□) □□ □□ □□ □□ □□ | 4, | □□□□, | |||||||
| CD □ □□□, CD □ □□□□□, □□□□□, □□ □□□, □□□□□ □□ □□*2, CD □ □ □□*2 | |||||||||
| □□ □□ □□□/ □□□ □□ | |||||||||
| □□□ CD A TRAC CD/ MP3 CD | |||||||
| □□□, □□□□□( □□) □□□□, □□□, □□□□□ | |||||||
| □□□, □□ □□ □□ □□ □□□, □□□□, CODEC □□*4,( □□, □□□□) □□ □□ □□□ □□ □□ | |||||||
| □□ □□*2, CD □ □ □□*2□□, □□ □□( □□□, □□□□) | |||||||
000
• CD □□□□□□ □□□ □□ □□□ □□□ □ □□□: \- A - Z, a - z, 0 - 9, \_ \- □□□ □□( □□ □□ □□) \- 000 00( 00 00 00) □□□ □□□□□□ □□□ □□□ □□□ □□□ □ □□□. • □□ □□□ □ □ CD □□□□ □ CD □ □□ □ □ □ □ ( □ □) □□ □□□. "READING" □ □□□□. CD □□□ □□□□ □□□ □□ □□□ □□ □□ □□ □□ □□ □□ □□ □□ □□ □□ □□ □□ □□ □□ □□ □□ □□ □□ □□ □□ □□ □□ □□ □□ □□ □□ □□ □□ □□ □□ □□ □□ □□ □○ \- ROOT "ROOT"가 • I D3 “- - - ”가 CD □□□ □□□ □□ □□□ □□□□ C D □ □□ □□□□. natural_image
Line drawing of a hand holding a circular object with a pointed tip, possibly a device or tool (no text or symbols present)1
  001 MODERN  □□□□2
  001 LATEST 3
  001:IS THAT                     CD/CD-TEXT  ATRAC CD/MP3 CD   CD/CD-TEXT  3 2 1 1 1 1 1 1 1 1 1 1 1 1 1 1.  ( □□ □□□□ □□)         □□ □□□□ ( □□□□□ □□□□□) □□□ □□ 2 □□ □□□□ □□□ □□□ □ □□□ □□□□ □□□ □ □□□□: • □□□□ □□□ □□ □□□□ → “□□ □ □□ □□□□” • □□□□ □□ □□□□ → “□□ □□□ □□□□” □□□ □□ □□□□ □□ □□ SOFT/ SOUND S ACTIVE/ SOUND A HEAVY/ ☐ ☐ ☐ ☐ ☐ ACTIVE SOUND H □□□ CUSTOM/ SOUND C □□□ □□□□ SOUND □□□□□. CD 1 MENU DISPLAY/MENU 2 ↑ □ ▼ □□ “SOUND” □ □□ DISPLAY/MENU □□□□. 3 ↑ □ ▼ □ □ □ □ □ DISPLAY/MENU □□□ □□□□□. □□ □□□ □□□□ “L O W”(□□□ □□□), “M I D”( □□ □□ □□□),“HIGH”(□□□□□□)□3□□ □□□ □□□ □□□ □□□□□□ □□□ □□□ □□□ □ □□□. □ □□□ □ 3 □ □□□ □ □□□ □□□ □□□ 7 □□□ □□□ □□□ □□ □□□□. □□□□□□□ □□□ □□□□□ □□□ □□□□□. 1 SOUND "SOUND C ”□ □□□□ □□□ □□□ □□□ SOUND □ □□□. (CD □□□): “□□□ □□ □□□□”□ □□ 1 - 3 □ “CUSTOM” 2 □ □□□ ▼◀ □□ ▶▶ □□□□ □□ □ □□□ □□□□. (CD □□□□: 5 □ □ □□□ □□ ◀◀ □□ ▶▶ □□ □ 2 □ □□ □□□ □□□ □□□ □□ □□□.) “LOW”가 (CD) □: “LOW”가 □□□□. )    (□□ □□□□ □□)          □□□
□□ □□□□(AVLS)
         ( □□ □□□□ □□)                         ( □□ □□□□ □□) 000
• C D □ □□□ □ □ □□ □□□ □□□ □ □□□ □□ □□ □□ □□ □ □□□. • A C □□ □□□ □□□ □□ □□. □□□ □□□ □□□ □□□ □□ □ □□ □□ □□□ □□□ □□□ □□ □□□. • □□□□ □□□□ □□□ □□□ □□□ □□□ □□□□ □□□□ □□□□. \- CD Serial Copy Management System - \- ATRAC CD/MP3 CD □ □□□□ □□□□ □□□□ □□□ □□□ □ □□ □□□ □□□□ □□□□. • 📄 📄 📄 📄 📄 “AUDIO OUT” 📄 📄 📄 LINE OUT (OPTICAL) □ □□□ □□ □□□ □□□□ □□□ □ □□□ □ □□□ □□□□ □□□□. □ □□□□ □□ □□□ □□□□ □□ AUDIO OUT (“HP” “LINE”) 5. Ω/ LINE OUT(OPTICAL) AUDIO OUT “HP” AUDIO OUT "LINE" CD VOL + / - □ □ □ □ □ □ □ □ □ □ □ □ □ □ □ □ □ □ □ □ □ □ □ □ □ □ □ □ □ □ □ □ □ □ □ □ □ □ □ □ □ □ □ □ □ □ □ □ □ □ ▢ □ □□□ □□ □□□ □□□□ □□ C D □ □□□□, DAT □□ □□□□ □□ □□□ □□□□ □□ □□□ C D □□ □□□ □□□□□□ □□□□. □□ □□ □□ □ □□□ □□ □□□ □□ □ □□ G - PROTECTION □ □□□□ □□□ □□□ \- CD □□□□ □□□□ G - PROTECTION "G - PRO □ □□□ □□□□. \- AUDIO OUT “LINE”▶ 00 0000
□□□□ □□□ □□□□□□ □□□ □ □□□□. Lobatt\*
\* □□□□ □□□. □□□□ □□□□□ □□□ □□□ □□□ □ □□□□□ □□□□ □ □□□ □□□□ □□□□. • □□□ □□□ □□□□( □ □□□) • □□□ □□□□( □ □□□ □□□) ( 3 5 □□□)000
• □□□□ □□□ □□□ □□□ □ □□□□. 1 □ □□ □□□ □□□ □□□ 1 / 4 □ □□□ □ □□□. \- □□ □□□ □□□ □ □□□ □□□□. • □□ □□□ □□□ □□□ □□□ □□ □□ □□ □□□ □□□ □□□ □□□ □□ □ □ □□□ □□□ □□□. □□□ □□□□ □□□□ □ □□□□ □ □□□ “□□ □□”□ □□□□ □□□□. □□□ □□□ □□□□ □□□ □□□□ □□ □□□□ □□ □□□ □ □□□□. □□ □□□ □□□ □□□□ □□□□ □□□□ □□□□ □□□ □□□ □ □□□ □□□. C D □□□□□ □ □□ □□□ □□□□ □□□ □ □□□. • NH - 10 WM( □□□) • NH - 1 4 WM( □□□) 1 OPEN □□□ CD □□□ □□□ □ □ □□□ □□ □□□ □□ □□.  2 ⊕ 1 2 3 4 5 6 7 8 9 10 11 12 13 14 15 16 17 18 19 20 21 22 23 24 25 26 27 28 29 30 31 32 33 34 35 36 37 38 39 40 natural_image
Diagram of a device with battery and switch components, showing internal wiring and mounting points (no text or symbols)000
• □□ □□□□ □□□□ □□□□ □□□ □□□ □□□ □□ □□□ □□□□ □□□□ □□□□. • C D • 5 □ □ □ □ ▶ □ □ □ □ □ □ □ □ □ □ □ □ □ □ □ □ □ □ □ □ □ □ □ □ □ □ □ □ □ □ □ □ □ □ □ □ □ □ □ □ □ □ □ □ □ □ □ □ □ □ ▢ • C D • • • • • • • • • • • • • • • • • • • • • • • • • • • • • • • • • • • • • • • • • • • • • • • • • • • • • • • • • • • • • • • • • • • • • • • • • • • • • • • • • • • • • • • • • • • • • • • • • • • • - CD □□□□ ▼□□ □□□ ▲□□ □ □□ □□□ □□ □□□ CD □□□□ □ □□□. CD □□□□ OPR □□ □ □ □□ □□□ □□□. □□ □□□ □□ □□□ □□ □□□. □□□ □□□□ □□□□ □□□□ □□□□ ⊖ □□□□ □□□□. natural_image
Diagram of a mechanical device showing battery and socket components with arrows indicating direction (no text or labels)natural_image
Technical line drawing of a circular device with attached components and a separate view of a mechanical component (no text or symbols)| □□□□? □□ □□□□ | |
| □□ □□□ □□□ □□□ □□□ □□ □□ □□ Sony □□□□ □□□□ □□□. | |
| □□ | □□ □□ |
| VOL + / - □ + □□□ □□ □□ □□( CD □□□) VOL + □ □□□ □□) □ □□ □□□ □□. | → AVLS가 “ON”□ □□□ □□□. “OFF”□ □□□ □ □. (27 □□) → AUDIO OUT □ “LINE”□ □□□ □□□. “HP”□ □ □ □□□. (31 □□) |
| □□ □□□ □□ □ □ □□. | →□□/ □□ □□□ □□ □□ □□. (15 □□) →□□○ □□○ □□○. □○/ □○ □○○ □○ □ □○○ □○○ □○○ □○○. |
| □□ □ □ □ □ □. | →CD □□○○ □○○ □ ○ □○○ □○ ○ □○ □ □○○. (6 □○) |
| □□○ □○○ □ ○ □○ ○ ○. | →○ ○ ○ ○ ○ ○ ○ ○ ○ ○ ○ ○ ○ ○○. (35-36) →○○○ □ LR6 (AA) ○○○ ○○ ○○ ○○ ■. (35-36) |
| □○ □○○ □○○ □ □ □○○○ ○ ○. | →○○ ○○ ○○ ○○ ■ ○ ○ ○○ ○○. (35) |
| □○○○ “Lobatt”가 ○○. CD가 ○○○ ■. | →○○ ○○ ○○ ○○ ○○. ○○ ○○ ○ ○○ ○○. (33-35) →○○○ □ LR6 (AA) ○○○ ○○ ○○ ○○ ■. (35-36) |
| □○○○ “HI dc In”가 ○○. | →○○ ○ ○ ○ ○ ○ AC ■ ○ ○ ○ ■ ○ ○●. ○○ ○● AC ■ ■ “■ ○●” ■ ○○○ ○○ ○○ ○● ○● (43) ■) |
| □□□? □□ □□□ | |
| □□ | □□□ □□ |
| CD □□□□ CD □□□ □ □□□ □□ □□ □□□ “No disc”가 □□□ □. | →CD 가 □□□ □□ □ □ □□. →CD □ □ □ □ □ □ □ □□□ □□□ □□□. (15) →□□ □□ □□□. □□ □□ □□ CD □□□ □ □ □□ □□. →□□□ □□ □□ □□. (33) →□□□ □ □ □□ □□□ □□□ □□. (33, 35) →AC □ □ AC □□□ □□ □□ (15) →AC □ □ □ □ 1 □ □ □ □ (CD : 5 □ □ □ ▲II □□) →CD - R / RW □□ □ □ →CD - R / RW □ □ □ (28) →CD - R / RW □ □ □ (28) →CD - R / RW □ □ □ (28) →CD - R / RW □ □ □ (28) →CD - R / RW □ □ □ (28) →CD - R / RW □ □ □ (28) →CD - R / RW □ □ □ (31) →CD - R / RW □ □ □ (31) →CD - R / RW □ □ □ (31) →CD - R / RW □ □ □ (31) →CD - R / RW □ □ □ (31) →CD - R / RW □ □ □ (31) →CD - R / RW □ □ □ [31] →CD - R / RW □ □ □ (31) →CD - R / RW □ □ □ (31) →CD - R / RW □ □ □ (31) →CD - R / RW □ □ □ (31) →CD - R / RW □ □ □ (31) →CD - R / RW □ □ □ (28) →CD - R / RW □ □ (28) →CD - R / RW □ □ (28) →CD - R / RW □ □ (28) →CD - R / RW □ □ (28) →CD - R / RW □ □ (28) →CD - R / RW □ □ (28) →CD - R / RW □ □ (28) - [31] →CD - R / RW □ (31) →CD - R / RW □ (31) →CD - R / RW □ (31) →CD - R / RW □ (31) →CD - R / RW □ (31) →CD - R / RW □ (31) →CD - R / RW □ (31) →CD - R / RW □ (31) →CD - R / RW □ |
| ATRAC CD MP3 →CD MP3 ATRAC □ □ □ CD가 □□□□ □□□ □□□ □□□ □ □□. | |
| →CD ATRAC3 plus / ATRAC3 / MP3 □□ □□□. →□□□ □□□ CD - R / RW □□□ □□□. →CD 가 □□□ □□□. →CD □□□ □□□ □ □ □□□ □□□ □□□. CD □□□ □□□ □□□. CD □□□ □□□ □□□. CD □□□ □□□ □□□. CD □□□ □□□ □□□. CD □□□ □□□ □□□. CD □□□ □□□ □□□. CD □□□ □□□ □□□. CD ▢□□ □□□ □□□ CD ▢□□ □□□ □□□ CD ▢□□ □□□ □□□ CD ▢□□ □□□ □□□ CD ▢□□ □□□ □□□ CD ▢□□ □□□ □□ CD ▢□□ □□□ □□ CD ▢□○ □○ ○ ○ CD ▢○ ○○ ○○ CD ▢○ ○○ ○○ CD ▢○ ○○ ○○ CD ▢○ ○○ ○○ CD ▢○ ○○ ○○ CD ▢○ ○○ ○○ CD ▢○ ○○ ○○ CD ▢○ ○○ ○○ CD ▢○ ○○ ○○ CD ▢○ ○○ ○○ CD ▢○ ○○ ○○ CD ▢○ ○○ ○○ | |
□□ □□
□□ □□□ □□□ □□□ □□□
□□□ □□□□ □□
□□: Ga Al As
□□: λ= 770 ~ 800 nm
□□□□□: □□
□□□ □□: 44.6 μW □□( □ □□□ □□
□□ 7 mm □□ □□ □□ □□□ □□
□□ 200 mm □□□□ □□ □□□. )
D - A □□
1 □□ □□ □□ □□
□□□ □□□
20 ~ 20 020B ( JHEI TA □ □ □)
□□( 4.5 V □□□)
□□□( □□□ □□)
□□□: 47 kΩ00 0.7 V r ms
□□ □□ □□□: 10 kΩ □
□□( □□□ □□)
16 Ω□□ 5 mW + □ 5 mW
□ □□ □( □ □ □□)
□□□: -21 ~ -15 dBm
□: □□□□○ 630 ~ 690 nm
□□ □
• Sony NH-10WM □□ □ 2 □:
1.2 V DC × 2
• LR6 ( AA □□) □□ 2 □:
1.5 V DC × 2
• AC □ □( DC IN 4.5 V □)
220 V, 50 Hz ( □ □)
120 V, 60 Hz ( □□ □)
□□□□ □□□□ * 1( □ □□)
CD □□□□ □□□□ □□□ □□□ □□□
□□□□.
LIGHT □□□ SOUND “OFF” □ □□
□□□□.
□□ □□□ CD □□□□ □□□□ □ □
□□.
N H - 1 0 WM 1 □ □□( □ 5 □ □*2)
G-PROTECTION
“G-PRO 1” “G-PRO 2”
□□□ C D 2 5 2 3
A T R A C C³D * 4 4 4 4
M P 3 C⁴D * 3 3 3 3
□□ □□□ □□□ □□□
( □□□□ □□ 1 □* 5)
G-PROTECTION
“G-PRO 1” “G-PRO 2”
□□□ C D 5 5 5 0
A T R A C C³D * 8 6 8 6
M P 3 C⁴D * 7 0 7 0
N H - 1 0 WM 1 00 00 000 000
( 0000 00 1 * 5) 000
G-PROTECTION
“G-PRO 1” “G-PRO 2”
□□□ C D 8 0 7 3
A T R A C C³D * 1 3 0 1 3 0
M P 3 C⁴D * 1 0 3 1 0 3
*1 JEITA( 📄❤️❤️❤️)
□ 📄❤️.
*2 📄❤️❤️ 📄❤️ 📄❤️ 📄❤️ 📄❤️
□❤️.
*3 48 kbps 📄❤️
*4 128 kbps 📄❤️
*5 Sony 📄❤️ 📄❤️ LR6 ( SG ) 📄❤️
( 📄❤️)
5 °C ~ 35 °C
□□□□( w/ h/ d) ( □□ □□ □ □□□ □
□□□□ □□)
□ 130 × 20.7 × 130 mm
□□( □□□□ □□)
□ 178 g

□□ □ □ □□ □□ Dol by Labor at c
□ □□□□.

□□ □ □ □□ □□ □ □ □□ □
□ □□□□.
□□ □□□□
AC □□ □□* AC - E4 5 HG
□□□ □□□ □□ SRS - Z1
SRS - Z3 0
□□□ □□□ □ DCC - E3 4 5
□ □□□ □□ □□□ □□ □□ □□
DCC - E3 4 CP
□S □□□ □ CPA - 9 C
□□ □□ RK - G1 2 9
RK - G1 3 6
□□□ MDR - EX7 1 SL
MDR - Q5 5 SL
* A C □□ □□□ □□□ □□ □□ □□□.
□□□□ □□ □□ □□□ □ □ □□□
□□ □□□ □□□.
□□ □□□□□ □□ □□□ □□□□
□□□□ □□ □□□ □□□□. □□ □□/
□□□ □□□□ □□ □□□ □□□ □□
□□□ □□□□ □□□□.
- Portable CD Player
- WARNING
- CAUTION
- Table of Contents
- Enjoy your ATRAC CD Walkman!
- Getting started
- Playing a CD
- Playback options
- Available features
- Connecting your CD player
- Connecting to a power source
- Additional information
- You can make your own ATRAC CD easily.
- Step 1 Install
- Step 2 Burn
- What is an ATRAC CD?
- Step 3 Listen
- What is the ATRAC3plus/ATRAC3 format?
- Music sources playable on this CD player
- Usable disc formats
- About CD-Rs/RWs
- Music discs encoded with copyright protection technologies
- Notes
- ATRAC3plus and ATRAC3
- The usable number of groups and files
- Note on saving files on the media
- MP3
- Settings for compression and writing software
- Notes on saving files on the media
- The structure of ATRAC3plus/ATRAC3 and MP3 files
- Groups and folders
- ATRAC3plus/ATRAC3/MP3 file structure and playing order
- - ATRAC3plus/ATRAC3 - MP3
- Checking the supplied accessories
- Locating the controls
- CD player
- Display (CD player)
- Using the carrying pouch
- Remote control
- Note
- Display (remote control)
- To use the clip on the remote control
- Insert a CD.
- Connect your CD player.
- Play a CD.
- Checking CD information on the display
- Animation screen
- Removing the CD
- ▶ Playback options
- Selecting playback options on the CD player
- Selecting playback options using the remote control
- Playing tracks repeatedly (Repeat play)
- Using the remote control
- On the CD player
- Playing all files in a selected group
- Playing a single track (Single play)
- Playing tracks in random order (Shuffle play)
- Playing all files in a selected group in random order (Group shuffle play) (ATRAC CD/MP3 CD only)
- Playing your favorite play lists (m3u play list play) (MP3 CD only)
- Playing your favorite tracks by adding Bookmarks (Bookmark track play)
- Adding Bookmarks
- Playing the tracks with Bookmarks
- Playing your favorite tracks by adding Bookmarks
- To remove the Bookmarks
- To check the tracks with Bookmarks
- Playing the 10 tracks you have played most frequently (Auto ranking play)
- Playing tracks you have played most frequently in random order (Auto ranking shuffle play)
- Playing tracks in your favorite order (PGM play)
- Playing tracks in your favorite order
- Checking the program
- While programming:
- While play is stopped:
- Searching for groups or tracks/files
- During play, press ↑ or ↓ until the search screen appears.
- Press 📄 or → to select the group you want, then push the 5-way control key toward ▶II.
- Selecting the track/file you want
- To exit the search mode
- Adjusting sound quality (Parametric equalizer)
- Selecting the sound quality you want
- Customizing sound quality
- Adjusting sound quality
- The G-PROTECTION function
- Protecting your hearing (AVLS)
- To cancel the AVLS function
- Stopping playback automatically (OFF TIMER)
- Stopping playback automatically
- To return to the previous screen
- To cancel the setting operation
- To check the length of time before the CD player stops playback
- To cancel the OFF TIMER function
- Locking the controls (HOLD)
- Slide HOLD in the direction of the arrow.
- To unlock the controls
- Turning off the beep sound
- To turn on the beep sound
- Saving power
- About the LIGHT setting
- Playing tracks continuously (SEAMLESS)
- Connecting a stereo system
- Connected device\* Setting
- When the headphones or other devices are connected to the ⏻/LINE OUT (OPTICAL) jack
- When AUDIO OUT is set to "LINE"
- When using an optical digital connecting cord
- About the G-PROTECTION and equalizer functions when using the connecting cord or the optical digital connecting cord
- ▶ Connecting to a power source
- Using the rechargeable batteries
- Notes on the supplied charging stand
- To charge the rechargeable batteries without using the supplied charging stand
- To remove the rechargeable batteries
- When to replace the rechargeable batteries
- Note on the rechargeable batteries
- Note on carrying the rechargeable batteries
- Using the dry batteries
- Align the lines below PUSH as illustrated, then draw out the battery case while pressing PUSH.
- Insert two LR6 (size AA) alkaline batteries (not supplied) by matching the ⊕ to the diagram in the battery case. Insert the battery case and lock the case by turning LOCK in the direction of the arrow.
- Connect the external battery case to the CD player.
- Notes on the power source
- On AC power adaptor
- Polarity of the plug
- On rechargeable batteries and dry batteries
- List of menus
- Precautions
- On safety
- On handling CDs
- On headphones/earphones Road safety
- Preventing hearing damage
- Consideration for others
- Maintenance
- To clean the casing
- To clean the terminals
- Troubleshooting
- Specifications
- System
- Laser diode properties
- D-A conversion
- Frequency response
- Output (at 4.5 V input level)
- Power requirements
- Battery life\*1 (approx. hours)
- Operating temperature
- Dimensions (w/h/d) (excluding projecting parts and controls)
- Mass (excluding accessories)
- 警告
- 注意
- 目录
- 享用您的 ATRAC CD 随身听
- 准备使用
- 播放 CD
- 播放选项
- 适用功能
- 连接 CD 播放机
- 连接电源
- 附加信息
- 步骤 1
- 安装
- 步骤 2
- 刻录
- 步骤3收听
- 可在本 CD 播放机上播放的音乐源
- 可用的光盘格式
- 关于 CD-R/RW
- 用版权保护技术编码的音乐光盘
- 注
- ATRAC3plus 和 ATRAC3
- 可用的组和文件数
- 可用的组数和文件数
- 压缩和写入软件设置
- 将文件保存到媒体上的注意事项
- ATRAC3plus/ATRAC3 和 MP3 文件的结构
- 组和文件夹
- 检查随机附件
- 控制器位置
- CD播放机
- 利用携带软袋
- 遥控器
- 显示器(遥控器)
- 要用遥控器的夹子时
- 装入 CD 光盘。
- 连接 CD 播放机。
- 播放 CD 。
- 检查显示器上显示的 CD 信息
- CD 播放机
- ▶ 播放选项
- 反复播放曲子(反复播放)
- 播放选定组中的所有文件
- 播放单首曲子(单曲播放)
- 按任意顺序播放曲子(随机播放)
- 按任意顺序播放选定组中的所有文件(组随机播放)(只适用于ATRAC CD/MP3 CD)
- 播放您喜爱的播放列表(m3u 播放列表播放)(只适用于 MP3 CD)
- 给您喜爱的曲子加记 Bookmark(书签)以便选 播(播放加记书签的曲子)
- 要加记 Bookmark 时
- 要播放加记Bookmark的曲子时
- 播放您最常播放的 10 首曲子(自动排列播放)
- 按任意顺序播放您最常播放的曲子(自动排列随机播放)
- 按您喜爱的顺序播放曲子
- 要检查程序时
- 搜索组或曲子 / 文件
- 选择您想要的曲子 / 文件
- 要退出搜索模式时
- 调节音质(参量均衡器)
- 定制音质
- 调节音质
- G-PROTECTION 功能
- 保护听觉 (AVLS)
- 自动停止播放 (OFF TIMER)
- 自动停止播放
- 旋转 VOL +/- 以选择您想要设置的时间长度,然后按微调杆输入该选项。
- 锁定控制器 (HOLD)
- 关掉哗声
- 节电
- 连续播放曲子(无间隙播放)(只适用于ATRAC CD)
- 连接立体声系统
- 当耳机或其他装置连接于 / LINE OUT (OPTICAL)插孔时
- ▶ 连接电源
- 使用充电式电池
- 用 AC 电源转接器连接所附带充电座的 DC IN 4.5 V 插孔和 AC 电源插座。
- 所附带充电座须知
- 不用附带的充电座给充电式电池充电时
- 要取出充电式电池时
- 何时更换充电式电池
- 充电式电池须知
- 携带充电式电池须知
- 使用干电池
- 把外附电池盒连接到 CD 播放机。
- 电源须知
- AC 电源转接器须知
- 充电式电池和干电池须知
- 菜单列表
- 使用前须注意
- 安全须知
- CD 播放机须知
- CD 的管理须知
- 头戴耳机 / 耳机须知
- 路上安全
- 防止损伤听觉
- 顾虑他人
- 保养
- 清洁机壳
- 清洁端子
- 故障检修
- 规格
- 系统
- D-A(数-模)转换
- 电源
- ATRAC CD Walkman 0000!
- 000
- CD
- ATRAC CD Walkman □ □ □□□!
- ATRAC3plus □ ATRAC3
- MP 3
- 1.CD0000.
- CD 00000 00000.
- 3.CDO 10000.
- 1
- 2
- 3
- □□□
- □□ □□□□(AVLS)
- ▶ 00 0000
- Lobatt\*
品牌 : SONY
型号 : D-NE800LS
类别 : CD播放器