VB558C0S0W - Lò nướng SIEMENS - Hướng dẫn sử dụng miễn phí
Tìm hướng dẫn sử dụng thiết bị miễn phí VB558C0S0W SIEMENS ở định dạng PDF.

Câu hỏi của người dùng về VB558C0S0W SIEMENS
0 câu hỏi về thiết bị này. Trả lời những câu bạn biết hoặc đặt câu hỏi riêng.
Đặt câu hỏi mới về thiết bị này
Tải xuống hướng dẫn cho thiết bị của bạn Lò nướng ở định dạng PDF miễn phí! Tìm hướng dẫn của bạn VB558C0S0W - SIEMENS và lấy lại thiết bị điện tử của bạn. Trên trang này được đăng tải tất cả các tài liệu cần thiết để sử dụng thiết bị của bạn. VB558C0S0W thương hiệu SIEMENS.
HƯỚNG DẪN NGƯỜI DÙNG VB558C0S0W SIEMENS
SIEMENS

text_image
SIEMENSBuilt-in oven
烤箱
VB558C0S0W
Instruction manual 3 说明手册 26

Register your product on My Siemens and discover exclusive services and offers. siemens-home.bsh-group.com/welcome
The future moving in.
Table of contents
Intended use.... 4
Important safety information 4
General information. 4
Causes of damage 5
General information. 5
Environmental protection 6
Saving energy 6
Environmentally-friendly disposal 6
Getting to know your appliance 7
Control panel.... 7
Buttons 7
Display....7
Types of heating and functions 8
Temperature selector 9
Cooking compartment functions 9
Accessories 9
Shelf positions....9
Locking function 10
Telescopic rail set 10
Special accessories.... 10
Before using for the first time.... 11
Setting the time on the clock 11
Baking out the oven. 11
Cleaning the accessories 11
Fitting the telescopic shelf set 11
Operating the appliance 12
Switching the oven on and off 12
Automatic safety switch-off function 12
Time-setting options 12
Overview of the time-setting options 12
Operating the electronic clock. 12
Setting the automatic timer 13
Childproof lock.... 14
Activating the childproof lock. 14
Deactivating the childproof lock. 14
Basic settings.... 14
List of basic settings 14
Changing the basic settings 15
Setting energy-saving mode 15
Cleaning 15
Suitable cleaning agents 15
Surfaces in the cooking compartment 16
Keeping the appliance clean 16
Cleaning the cooking compartment. 17
Rails.... 17
Detaching the shelf supports.... 17
Refitting the shelf supports 17
Appliance door....18
Removing and installing the door panels 18
Removing and fitting the appliance door 18
? Trouble shooting 20
Fault messages 20
Replacing the oven light bulb 21
Customer service....21
E number and FD number.... 21
Distributor and origin information: 21
Tested for you in our cooking studio.... 22
Table of dishes 22
User tips 23
Test dishes 25
Additional information on products, accessories, replacement parts and services can be found at www.siemens-home.bsh-group.com and in the online shop www.siemens-home.bsh-group.com/eshops

Intended use
Read these instructions carefully. Only then will you be able to operate your appliance safely and correctly. Retain the instruction manual and installation instructions for future use or for subsequent owners.
This appliance is only intended to be fully fitted in a kitchen. Observe the special installation instructions.
Check the appliance for damage after unpacking it. Do not connect the appliance if it has been damaged in transport.
Only a licensed professional may connect appliances without plugs. Damage caused by incorrect connection is not covered under warranty.
This appliance is intended for domestic use only. The appliance must only be used for the preparation of food and drink. The appliance must be supervised during operation. Only use this appliance indoors.
This appliance is intended for use up to a maximum height of 2000 metres above sea level.
This appliance is not intended for operation with an external clock timer or a remote control.
This appliance may be used by children over the age of 8 years old and by persons with reduced physical, sensory or mental capabilities or by persons with a lack of experience or knowledge if they are supervised or are instructed by a person responsible for their safety how to use the appliance safely and have understood the associated hazards.
Children must not play with, on, or around the appliance. Children must not clean the appliance or carry out general maintenance unless they are at least 15 years old and are being supervised.
Keep children below the age of 8 years old at a safe distance from the appliance and power cable.
Always slide accessories into the cooking compartment the right way round.
→ "Accessories" on page 9

Important safety information
General information
⚠ Warning – Risk of fire!
- Combustible items stored in the cooking compartment may catch fire. Never store combustible items in the cooking compartment. Never open the appliance door if there is smoke inside. Switch off the appliance and unplug it from the mains or switch off the circuit breaker in the fuse box.
- Loose food remnants, fat and meat juices may catch fire. Before using the appliance, remove the worst of the food remnants from the cooking compartment, heating elements and accessories.
- A draught is created when the appliance door is opened. Greaseproof paper may come into contact with the heating element and catch fire. Do not place greaseproof paper loosely over accessories during preheating. Always weight down the greaseproof paper with a dish or a baking tin. Only cover the surface required with greaseproof paper. Greaseproof paper must not protrude over the accessories.
⚠ Warning – Risk of burns!
- The appliance becomes very hot. Never touch the interior surfaces of the cooking compartment or the heating elements. Always allow the appliance to cool down. Keep children at a safe distance.
- Accessories and ovenware become very hot. Always use oven gloves to remove accessories or ovenware from the cooking compartment.
- Alcoholic vapours may catch fire in the hot cooking compartment. Never prepare food containing large quantities of drinks with a high alcohol content. Only use small quantities of drinks with a high alcohol content. Open the appliance door with care.
- The telescopic shelves become hot when the appliance is in use. Take special care not to get burnt when they are pulled out.


Environmental protection
Your new appliance is particularly energy-efficient. Here you can find tips on how to save even more energy when using the appliance, and how to dispose of your appliance properly.
Saving energy
- Only preheat the appliance if this is specified in the recipe or in the tables in the operating instructions.
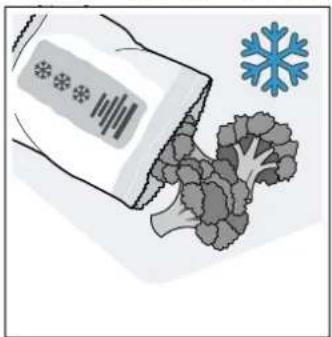
- Leave frozen food to defrost before placing it in the cooking compartment.
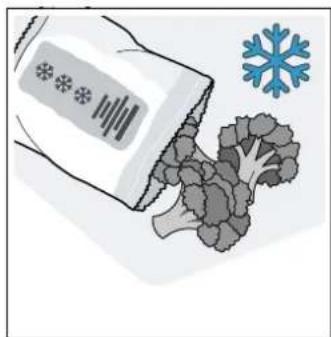
natural_image
Illustration of broccoli and a document with a snowflake (no text or symbols)
natural_image
Illustration of a bowl containing vegetables with three water droplets above and a green checkmark below (no text or symbols)- Use baking tins that are dark-coloured, painted black or have an enamel coating. These absorb the heat particularly well.
natural_image
Illustration of a mechanical component with blue striped background (no text or symbols)
natural_image
3D illustration of a mechanical component on a blue striped surface, with a green checkmark indicating approval (no text or symbols present)■ Remove any unnecessary accessories from the cooking compartment.
natural_image
Illustration of two metal grating trays containing food items, no text or symbols present
natural_image
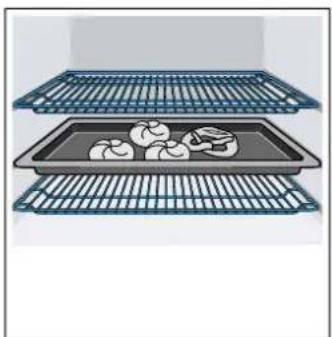
Illustration of a tray with five dumplings and a green checkmark (no text or symbols)- Open the appliance door as infrequently as possible when the appliance is in use.

natural_image
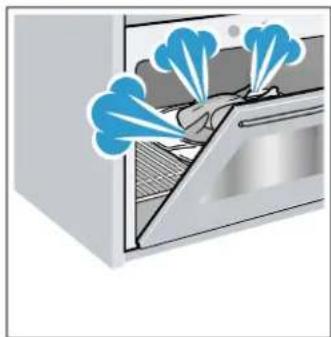
Illustration of a kitchen appliance with blue smoke rising from the window (no text or symbols)
natural_image
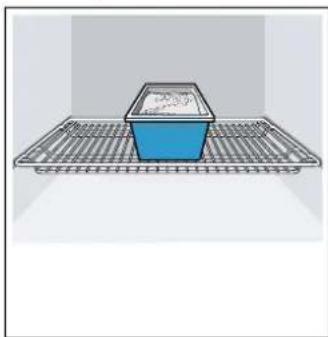
Illustration of a stainless steel oven with a green checkmark below it (no text or symbols)- It is best to bake several cakes one after the other. The cooking compartment stays warm. This reduces the baking time for the second cake. You can place two cake tins next to each other in the cooking compartment.
natural_image
Illustration of a blue container on a metal rack with grid lines (no text or symbols)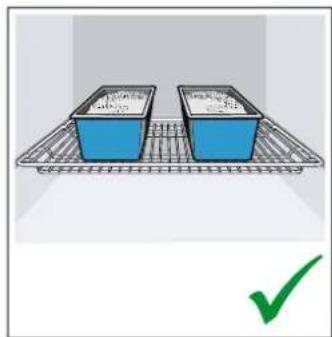
natural_image
Two blue plastic containers on a metal rack, one with a green checkmark (no text or symbols)- For longer cooking times, you can switch the appliance off 10 minutes before the end of the cooking time and use the residual heat to finish cooking.
Environmentally-friendly disposal
Dispose of packaging in an environmentally-friendly manner.
This appliance is labelled in accordance with European Directive 2012/19/EU concerning used electrical and electronic appliances (waste electrical and electronic equipment - WEEE). The guideline determines the framework for the return and recycling of used appliances as applicable throughout the EU.

Getting to know your appliance
In this section, we will explain the indicators and controls. You will also find out about the various functions of your appliance.
Note: Depending on the appliance model, individual details and colours may differ.
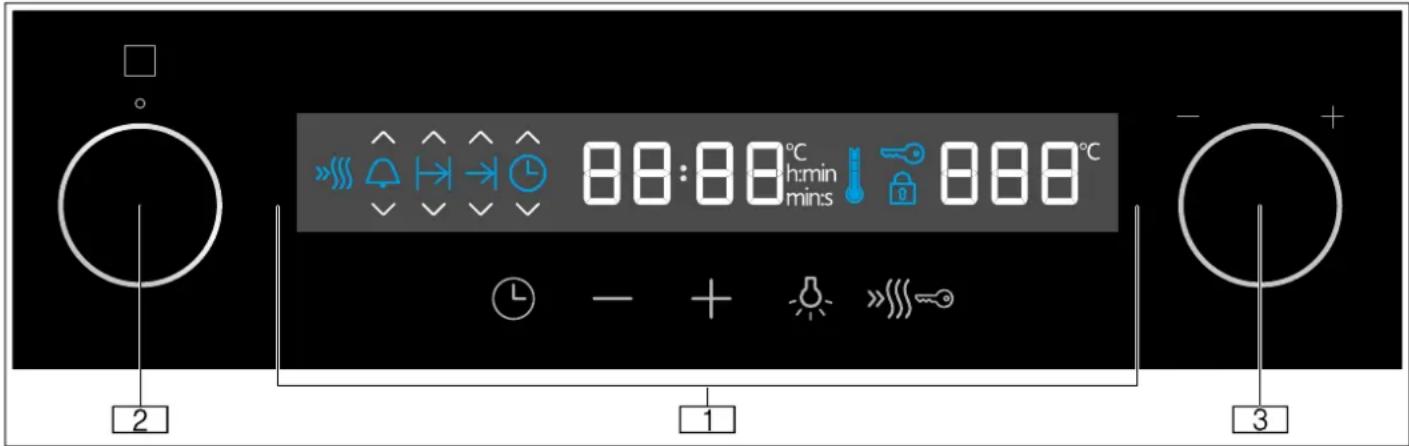
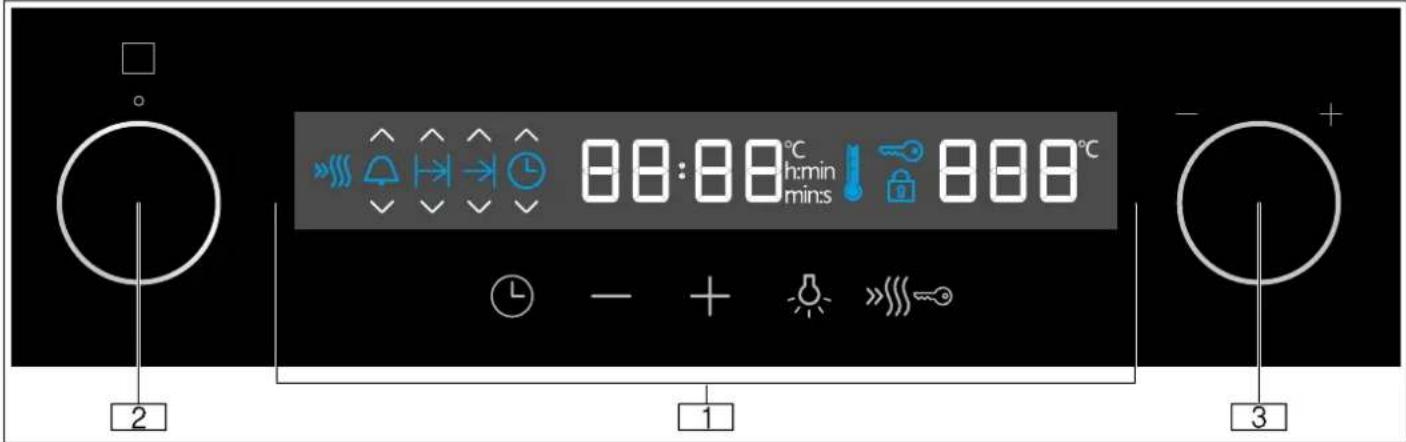
Control panel
- You can set your appliance's various functions on the control panel. Below, you will see an overview of the control panel and the layout of the controls.
text_image
88:88°C min:s 888°C - + 2 1 31 Buttons and display
The buttons are touch keys with sensors underneath. Simply touch a symbol to select the function.
The display shows symbols for active functions and the time-setting options.
2 Function selector
Use the function selector to set the heating function or other functions. Your chosen heating function or other function will light up.
You can turn the function selector clockwise or anticlockwise from the "Off" position.
3 Temperature selector
Use the temperature selector to set the temperature for the heating function or select the setting for other functions.
You can also turn the temperature selector clockwise or anti-clockwise. It does not have an "Off" position.
Buttons
You will find a brief explanation of the various buttons below.
If a button is not operational, an audible signal will sound.
| Button | Explanation | |
| Time-setting options | Set the timer 🔊, duration I→I,end time →I and clock time Ⓛ | |
| - | Minus Reduce the setting value | |
| + | Plus Increase the setting value | |
| Lighting Switch the interior lighting on/off | ||
| »»»»» | Rapid heat-up Switch rapid heat-up on/off | |
| Childproof lock Activate and deactivate thechildproof lock in standby mode | ||
Display
The display is structured so that the information can be read at a glance.
The value that you can currently set is in focus. It is displayed in white lettering with a dark background.
| Symbol | Explanation |
| »»» | Rapid heat-up |
| ♠ | Timer |
| I→I | Duration |
| →I | End time |
| ➊ | Clock time |
| 88:88 | Time |
| ➂ | Temperature indicator |
| ∞ | Childproof lock |
| ➁ | Door lock |
| 888 | Temperature |
Types of heating and functions
Use the function selector to set the types of heating and other functions.
To make sure you always use the right type of heating to cook your food, we have explained the differences and applications below.
| Heating function | Temperature/setting | Use |
| ○ "Off" position=--In this position, the oven is switched off. | ||
| 3D hot air=50-280=°C=For cooking food on one or two levels. The fans distribute the heat from the ring-shaped heating elements in the back panel evenly around the cooking compartment.This=heating=function=is=used=to=measure=the=energy=consumption=in=air=recirculation mode. | ||
| Air recirculation=50-280=°C=For baking cakes and baked items on one level. The fans distribute the heat from the heating elements evenly around the cooking compartment. | ||
| Pizza setting=50-280=°C=For cooking fresh pizza and frozen products, e.g. chips or strudel.The heating elements=and=fans=heat=quickly=and=distribute=the=heat-evenly=around=the=cooking compartment. | ||
| Defrosting=30-60=°C=For defrosting, e.g. meat, poultry, bread and cakes. The fan causes the warm air to circulate around the food. | ||
| Bottom heating | 50-280 °C Use when you want to cook the food for a little longer. The heat is emitted only from below. | |
| Centre-area grill | Grill settings:1 = low2 = medium3 = high | |
| Full-surface grill | Grill settings:1 = low2 = medium3 = high | |
| Circulated air grill | 50-280 °C For baking or roasting meat, poultry and whole fish. The fan causes the hot air to circulate around the food. | |
| Top/bottom heating gentle | 50-280 °C For gently cooking selected types of food (e.g. meat, vegetables) on one level without preheating.This heating function is unsuitable for food that rises as it bakes (e.g.=bread).This heating function is used to measure both the energy consumption in the conventional mode and the energy efficiency class. | |
| Top/bottom heating | 50-280 °C For cakes, bakes and lean joints. Heat is emitted evenly from above and below. | |
Note: For=each=heating=function,=the=appliance=specifies=a default=temperature=or=level.=You=can=accept=this=value=or change it in the appropriate area.
Temperature selector
Use the temperature selector to set the temperature. The temperature that has been set will be shown on the display.
Note: The temperature can be set in 1 degree increments up to 100^ , and in 5 degree increments thereafter.
Temperature indicator
The temperature indicator bars show the heating-up phases or residual heat in the cooking compartment.
| Heating-up indicator | The heating-up indicator displays the rising temperature in the cooking compartment. When all bars are filled, the optimal time for placing the food in the oven has been reached. In the grill and cleaning settings, the bars are all already filled at the start.The bars are not filled for the gentle top/bottom heating heating type. |
| Residual heat indicator | When the appliance is switched off, the temperature indicator shows the residual heat in the cooking compartment. Once the temperature has dropped to approximately 60 °C, the indicator goes out. |
Cooking compartment functions
Some functions make your appliance easier to use. This, for example, enables the cooking compartment to be well lit and a cooling fan to prevent the appliance from overheating.
Opening the appliance door
If you open the appliance door during an operation, the operation is paused. Operation continues to run when you close the door.
Interior lighting
When you open the appliance door, the interior lighting switches on. If the door remains open for longer than 15 minutes, the lighting switches off again.
In most operating modes, the interior lighting will switch on as soon as the appliance is started. Once the program is complete, the lighting will switch off.
Note: In "Top/bottom heating gentle" mode, the interior lighting will be switched off automatically after approx. 1 minute. It can be switched on using the button.
Cooling fan
The cooling fan switches on and off as required. The warm air escapes above the door.
Caution!
Do not cover the ventilation slots, otherwise the oven will overheat.
To cool the cooking compartment more quickly after operation, the cooling fan continues to run for a certain period afterwards.

Accessories
Your appliance is accompanied by a range of accessories. Here, you can find an overview of the accessories included and information on how to use them correctly.
| Accessories Description | |
| Baking and roasting shelfFor cookware, cake tins, joints of meat, grilled items and frozen foc | |
| Universal panFor moist cakes, pastries, frozen meals and large roasts. The univ- sal pan can be used to catch dripping fat when you are grilling directly on the wire rack. | |
| Enamel baking trayFor tray bakes and small baked products. | |
| Telescopic rail setYou can use the pull-out rails to pull the accessories out further. | |
 | Locking pinsFor locking the hinges. |
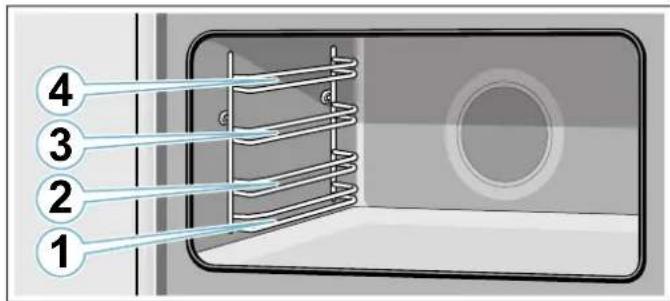
Shelf positions
The baking tray and the baking and roasting shelf can be moved into four different heights within the cooking compartment. Always insert them as far as they will go so that the accessories do not touch the door panel. Ensure that you always insert the accessories into the cooking compartment the right way round.
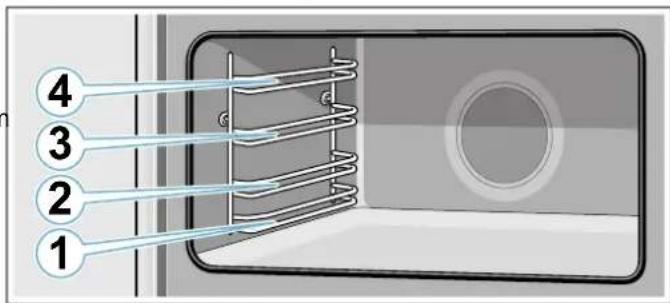
text_image
1 2 3 4Warning – Risk of fire!
Under no circumstances should a roasting tin, baking tray, frying pan or any other form of cookware be placed directly on the oven floor. This causes the floor of the appliance to overheat and can seriously damage the appliance.
Locking function
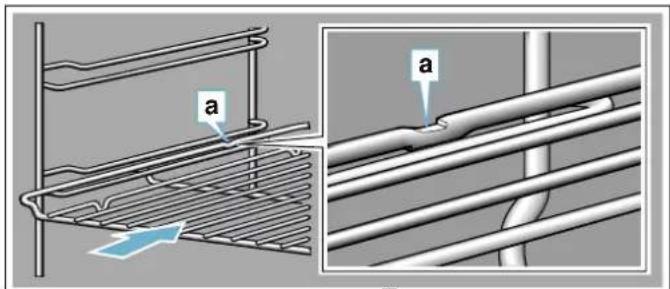
The accessories can be pulled out approximately halfway before they lock in place. The locking function prevents the accessories from tilting when they are pulled out. The accessories must be inserted into the cooking compartment correctly for the tilt protection to work properly.
When inserting the wire rack, ensure that the lug a is at the rear and is facing downwards. The open side must be facing the appliance door and the curvature must be at the bottom (i.e. —).
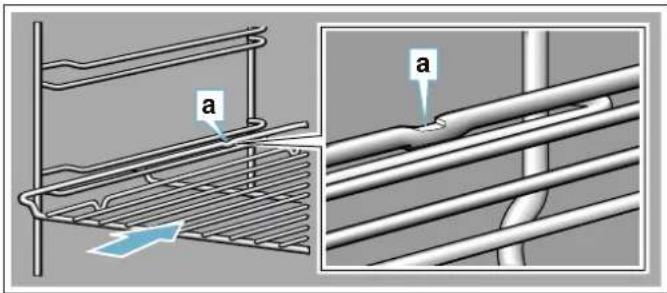
text_image
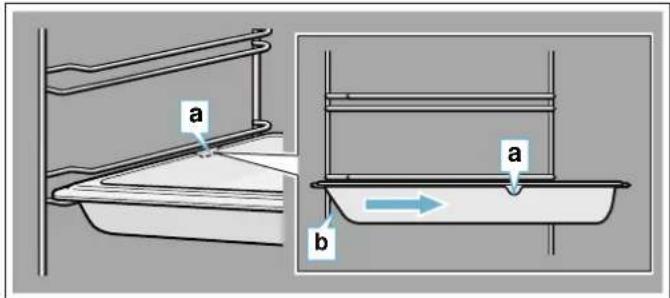
a aWhen inserting baking trays, ensure that the lug a is at the rear and is facing downwards. The sloping edge of the accessory b must be facing towards the appliance door.
Example in the picture: Universal pan

text_image
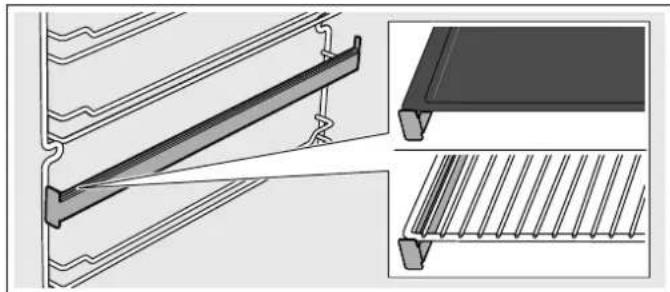
a b aTelescopic rail set
Warning – Risk of burns!
The telescopic shelves become hot when the appliance is in use. Take special care not to get burnt when they are pulled out.
The pull-out rails allow you to pull accessories out completely. When inserting the adapter for the baking tray and roasting shelf, ensure that it locks into place in front of the tab on the pull-out rails.
natural_image
Technical illustration of a structural panel assembly with two views: top shows diagonal beam connection, bottom shows horizontal slats (no text or symbols)Special accessories
You can buy accessories from the after-sales service.
| Accessories Description | |
| Enamelled baking tray | For tray bakes and small baked items.After-sales service number:11012235 |
| Universal pan For moist cakes, pastries, frozen meals and large roasts.The universal pan can be used to catch dripping fat when you are grilling directly on the wire rack.After-sales service number:11012236 | |
| Baking and roasting shelf | For cookware, cake tins, joints of meat, grilled items and frozen focAfter-sales service number:00776605 |
| Telescopic shelf set | Telescopic shelf set for one level.After-sales service number:12006236 |
Telescopic shelf set Telescopic shelf set for one level. After-sales service number: 12006236

Before using for the first time
Cleaning the accessories
Before using the accessories, clean them thoroughly using a cloth and warm soapy water.
In this section, you can find out what you must do before using your oven to prepare food for the first time.
Remove the appliance packaging and dispose of it appropriately.
Fitting the telescopic shelf set
Instructions on fitting the telescopic shelf set are enclosed with the set.
Setting the time on the clock
Once the appliance is connected to a power supply, 12:00 will flash on the display and the ⏻ symbol will be continuously lit. Set the time.
- Use the - or + button to set the time.
- Press the ⏻ button.
Note: Once the period allowed for setting the clock time has elapsed, the clock time will automatically be saved.
The time has now been set.
Baking out the oven
Precleaning the oven
- Remove the accessories and the shelf supports from the cooking compartment. → "Rails" on page 17
- Completely remove any leftover packaging, e.g. small pieces of polystyrene, from the cooking compartment.
- Some parts are covered with a protective film. Remove this scratch protection film.
- Clean the outside of the appliance with a soft, damp cloth.
- Clean the cooking compartment with hot soapy water.
Heating up the oven
To remove the new cooker smell, heat up the oven when it is empty and closed.
Note: Make sure that there is no leftover packaging, such as polystyrene pellets, in the cooking compartment.
Before heating up the appliance, wipe the smooth surfaces in the cooking compartment with a soft, damp cloth. Keep the kitchen ventilated while the appliance is heating.
- Turn the function selector to ☐.
- Turn the temperature selector to the maximum temperature.
- Switch the oven off after 1 hour.
Note: When the appliance is heating up for the first time, you may hear crackling noises coming from the oven.
Recleaning the oven
- Clean the cooking compartment with hot soapy water.
- Refit the hook-in racks.
- If necessary, clean the door panels. → "Appliance door" on page 18

Operating the appliance
Switching the oven on and off
Switching on the oven
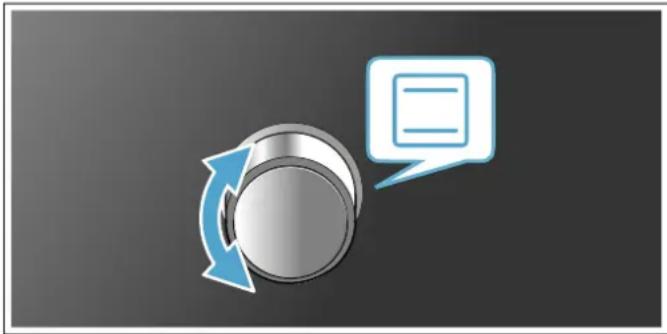
- Use the function selector to set the heating function.
Note: Each function has a default temperature or grill setting.

natural_image
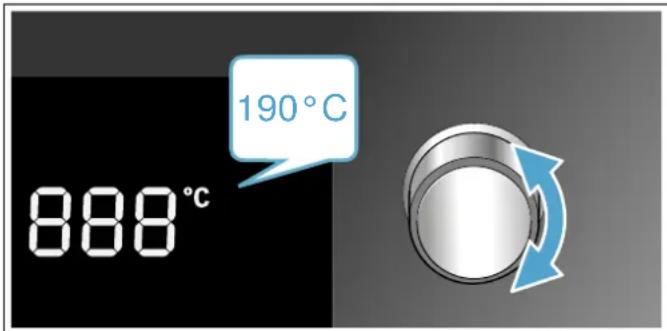
Icon showing a metallic knob with blue arrow and speech bubble, no text or symbols present- Use the temperature selector to alter the temperature or grill setting.
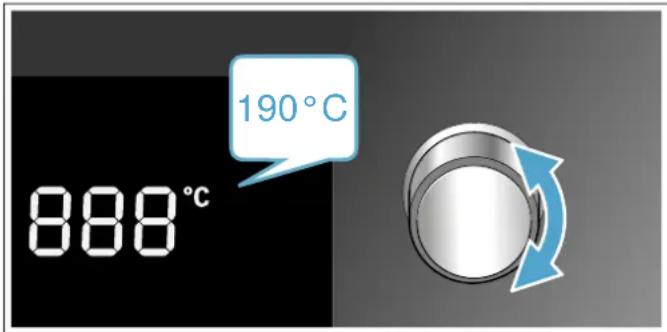
text_image
888°C 190°CThe oven will then begin to heat.
Note: The temperature indicator will show the current status of the heating-up phase.
Changing settings
The heating function and temperature or grill setting can be changed at any time using the relevant selector.
Switching off the oven
Turn the function selector to the "Off" position.
Switching on the rapid heat-up function
To heat up the cooking compartment as rapidly as possible, press the »||||« button.
Note: Rapid heat-up is available for 3D hot air mode, air recirculation mode, the pizza setting and top/bottom heating.
Automatic safety switch-off function
The appliance has an automatic safety cut-out function. The oven switches off automatically after 13 hours.

Time-setting options
Your appliance has different time-setting options.
Overview of the time-setting options
Time-setting option Use
| Timer The timer functions like an egg | |
| timer. It runs independently of the appliance when it is heating and of other time-setting options, and does not affect the appliance. | |
| Clock time When no other function is running in the foreground, the appliance will show you the time of day on the display. | |
| Cooking time Once the set cooking time has elapsed, the appliance will automatically stop heating. | |
| End time Enter a cooking time and the required end time. The appliance will start up automatically so that it finishes cooking at the required time. | |
Operating the electronic clock
Setting the timer
The timer has no effect on how the oven works. The time duration can be set to between 30 seconds and 13 hours. The duration can be set in 30-second increments up to 10 minutes, in 1-minute increments from 10 minutes to 1 hour, and then in 5-minute increments.
-
Press the ⏻ button. The 🔔 symbol will be lit.
-
Use the + and - buttons to set the required duration. An audible signal will sound once the time has elapsed.
Notes
- To change the remaining time, press the ⏻ button. Then change the remaining time using the + and - buttons.
- To stop the timer counting down, set the remaining time to zero.
Switching off the signal tone
To switch the signal off, press any button or open the appliance door.
Note: After a short time, the audible signal will stop automatically.
Setting the electronic clock
You can alter the clock if you need to (e.g. from summer to winter time). To do this, the oven must be switched off.
- Press the Ⓛ button.
The 🔔 symbol will be lit.
- Press the Ⓛ button again.
The Ⓛ symbol will be lit.
- Use the + and - buttons to set the current time.
Setting the automatic timer
The electronic clock can be used to switch the oven on or off automatically.
Setting the cooking time
You can set the cooking time for your food on the appliance. This prevents the food from accidentally being cooked for too long, and means that you do not have to stop what you are doing to switch off the oven.
- Set the type of heating and the temperature you require.
The oven will start.
-
Press the Ⓛ button twice.
-
Use the + and - buttons to set the required cooking time.
Note: The cooking time can be set to between 30 seconds and 13 hours. The cooking time can be set in 1-minute increments up to 1 hour, and then in 5-minute increments.
The symbol will be lit.
The cooking time has elapsed
An audible signal will sound. The appliance will stop heating.
- To switch the signal off, press any button or open the appliance door.
Note: After a short time, the audible signal will stop automatically.
- Turn the function selector to the "Off" position.
Setting the end time
Baking or roasting starts for the set duration at a later time which you chose.
- Set the type of heating and the temperature you require.
The oven will start.
-
Press the ⏻ button twice.
-
Use the + and - buttons to set the required cooking time.
Note: The cooking time can be set to between 30 seconds and 13 hours. The cooking time can be set in 1-minute increments up to 1 hour, and then in 5-minute increments.
The symbol will be lit.
-
Press the ⏻ button again.
-
Use the + and - buttons to set the end time.
Note: When the button is first pressed, a value will be suggested on the display. This suggested value is calculated using the current time on the clock and the cooking time. This value can be changed using the + and - buttons.
The symbol will be lit. The display will show the en time. The appliance will now switch to standby mode.
The cooking time has elapsed
An audible signal will sound. The appliance will stop heating.
- To switch the signal off, press any button or open the appliance door.
Note: After a short time, the audible signal will stop automatically.
- Turn the function selector to the "Off" position.

Childproof lock
The oven has a childproof lock to prevent children from switching it on by accident.
Note: If=the=hob=is=being=used,=it=will=not=be=affected=by=the childproof lock on the oven.
Activating the childproof lock
The appliance must be switched off.
Press and hold the=>>### button for approx. 4=seconds.
The= symbol=will=appear=on=the=display.=The=childproof lock has now been activated.
Deactivating the childproof lock
Press and hold the=>>### button for approx. 4=seconds.
The 🔗 symbol will go out on the display. The childproof lock has now been deactivated.

Basic settings
There are various settings available to you in order to help use your appliance effectively and simply. You can change these settings as required.
List of basic settings
Depending=on=the=features=of=your=appliance,=not=all=basi settings will be available.
| Basic setting Options | ||
| c01 | Audible signal durationupon completion of a cooking time or timer duration | 1 = approx. 10 seconds2 = approx. 30 seconds*3 = approx. 2 minutes |
| c02 | Amount of time until a setting is applied | 1 = approx. 3=seconds*2 = approx. 6=seconds3 = approx. 10=seconds |
| c03 | Button tone that sounds when a button is touched | 0 = off1 = on* |
| c04 | Brightness of the display illumination | 1 = dark2 = medium*3 = bright |
| c05 | Display time of day | 0 = hide the time1 = display the time* |
| c06 | Interior lighting on when appliance in operation | 0 = no1 = yes* |
| c07 | Cooling fan run-on time | 1 = short*2 = medium3 = long4 = extra long |
| c08 | Reset all values to factory settings | 0 = no*1 = yes |
| c09 | Activate demo modeDemo mode is provided for demonstration purposes only; the oven does not actually heat in Demo mode.=Demo=mode=can=only be activated within 5 minutes of connecting the appliance to the mains power supply. | 0 = no*1 = yes |
*=Factory setting
Changing the basic settings
The function selector must be set to the "Off" position.
- Press and hold the ⏻ button for approx. 4 seconds. The first basic setting will appear on the display, e.g. c011.
- Use the temperature selector to change the setting as required.
- Use the + button to navigate to the next basic setting.
- Use the - or + button to continue going through all the basic settings as described above, and use the temperature selector if you want to change any of these settings.
- When you have finished, press and hold the ⏻ button again for approx. 4 seconds to confirm the settings. This applies all the basic settings.
You can change the basic settings again at any time. Demo mode can only be activated within 5 minutes of connecting the appliance to the mains power supply.
Note: Your changes to the basic settings will be retained even after a power failure.
Setting energy-saving mode
You can save energy by reducing the display brightness. You can set the display brightness under basic setting c04.
Note: This setting changes the brightness of the display while the appliance is in operation. In standby mode, the appliance automatically reduces the display brightness. The display is at its dimmest at night, between the hours of 22:00 and 05:59.

Cleaning
With good care and cleaning, your appliance will retain its appearance and remain fully functioning for a long time to come. We will explain here how you should correctly care for and clean your appliance.

Warning – Risk of electric shock!
Do not use any high-pressure cleaners or steam cleaners, which can result in an electric shock.

Warning – Risk of burns!
The appliance becomes very hot. Never touch the interior surfaces of the cooking compartment or the heating elements. Always allow the appliance to cool down. Keep children at a safe distance.
Suitable cleaning agents
Observe the following information to ensure that the different surfaces are not damaged by using the wrong type of cleaning agent.
Do not use any of the following
on the oven:
■ Any harsh or abrasive cleaning agents,
■ Cleaning agents with a high concentration of alcohol,
- Hard scouring pads or sponges,
■ High-pressure cleaners or steam cleaners.
Wash new sponge cloths thoroughly before use.
Area Cleaning
| Appliance exterior | |
| Stainless steel front | Hot soapy water:Clean with a dish cloth and then dry with a soft cloth.Remove flecks of limescale, grease, starch and albumin (e.g. egg white) immediately. Corrosion can form under such flecks.Special stainless steel cleaning products suitable for hot surfaces are available from our after-sales service or from specialist retailers.Apply a very thin layer of the cleaning product with a soft cloth. |
| Control panel Hot soapy water:Clean with a dish cloth and then dry with a soft cloth.Do not use glass cleaner or a glass scraper. | |
| Door panels Hot soapy water:Clean with a dish cloth and then dry with a soft cloth.Do not use a glass scraper or a stainless steel scouring pad. | |
| Door handle Hot soapy water:Clean with a dish cloth and then dry with a soft cloth.If descaler comes into contact with the door handle, wipe it off immediately. Otherwise, any stains will not be able to be removed. | |
Appliance interior
| Enamel surfaces and self-cleaning surfaces | Observe the instructions for the surfaces of the cooking compartment that follow the table. |
| Glass cover for the interior lighting | Hot soapy water:Clean with a dish cloth and then dry with a soft cloth.If the cooking compartment is heavily soiled, use oven cleaner. |
| Door panels Hot soapy water:Clean with a dish cloth and dry with a soft cloth.Do not use a glass scraper or a stainless scouring pad.It is best to clean the door panels along with the rest of the cooking compartment.→ "Cleaning the cooking compartment" on page 17 | |
| Door sealDo not remove. | Hot soapy water:Clean with a dish cloth.Do not scour. |
| Door cover made from stainless steel:Use stainless steel cleaner. Follow the manufacturers' instructions. Do not use stainless steel care products.made from plastic:Clean using hot soapy water and a dish cloth.Dry with a soft cloth. Do not use glass cleaner or a glass scraper.Remove the door cover for cleaning. | |
| Rails Hot soapy water:Soak and clean with a dish cloth or brush. | |
| Pull-out system Hot soapy water:Clean with a dish cloth or a brush.Do not remove the lubricant while the pull-out rails are pulled out – it is best to clean them when they are pushed in. Do not clean in the dishwasher. | |
| Accessories Hot soapy water:Soak and clean with a dish cloth or brush.If there are heavy deposits of dirt, use a stainless steel scouring pad. | |
Notes
- Slight differences in colour on the front of the appliance are caused by the use of different materials, such as glass, plastic and metal.
- Shadows on the door panels, which look like streaks, are caused by reflections made by the interior lighting.
- Enamel is baked on at very high temperatures. This can cause some slight colour variation. This is normal and does not affect operation.
The edges of thin trays cannot be completely enamelled. As a result, these edges can be rough. This does not impair the anti-corrosion protection.
Surfaces in the cooking compartment
The back wall and side parts in the cooking compartment are self-cleaning. You can tell this from the rough surface. The cooking compartment floor and ceiling are enamelled and have smooth surfaces.
Cleaning enamel surfaces
Clean the smooth enamel surfaces with a dish cloth and hot soapy water or a vinegar solution. Then dry them with a soft cloth.
Soften baked-on food remnants with a damp cloth and soapy water. Use stainless steel wire wool or oven cleaner to remove stubborn dirt.
Caution!
Never use oven cleaner in the cooking compartment when it is still warm. This may damage the enamel.
Remove all food remnants from the cooking compartment and the appliance door before you next heat up the appliance.
Leave the cooking compartment open to dry after cleaning it.
Note: Food residues can cause white deposits to form. These are harmless and do not affect how the appliance works. You can remove these residues using lemon juice if required.
Self-cleaning surfaces
The self-cleaning surfaces are coated with a porous, matte ceramic layer. This coating absorbs and dispels splashes from baking and roasting while the appliance is in operation.
Caution!
Do not use oven cleaner on the self-cleaning surfaces. This will damage the surfaces. If oven cleaner does get onto these surfaces, dab it off immediately using water and a sponge cloth. Do not rub the surfaces or use abrasive cleaning aids.
Keeping the appliance clean
Always keep the appliance clean and remove dirt immediately so that stubborn deposits of dirt do not build up.
Warning – Risk of fire!
Loose food remnants, fat and meat juices may catch fire. Before using the appliance, remove the worst of the food remnants from the cooking compartment, heating elements and accessories.
Tips
- Clean the cooking compartment after each use. This will ensure that dirt cannot be baked on.
- Always remove flecks of limescale, grease, starch and albumin (e.g. egg white) immediately.
■ Use the universal pan for baking very moist cakes. - Use suitable ovenware for roasting, e.g. a roasting dish.
Cleaning the cooking compartment
- Pour 0.4 litres of water into the centre of the cooking compartment floor.
- Set the □ heating function.
- Use the temperature controller to set a temperature of 50 °C.
- Switch off the appliance after 18 minutes.
- Allow the appliance to cool down.
- Clean the cooking compartment with a cloth.
Warning – Risk of burns!
The appliance becomes very hot. Never touch the interior surfaces of the cooking compartment or the heating elements. Always allow the appliance to cool down. Keep children at a safe distance.
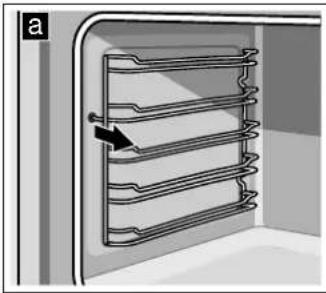
Rails
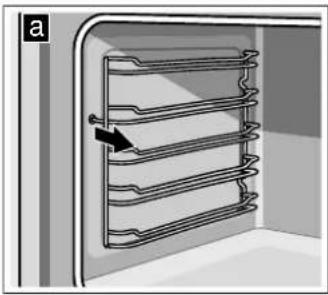
Detaching the shelf supports
The shelf supports are each fixed to the side panels of the cooking compartment at three points.
- Grip the front of the shelf support and pull it round to the middle of the cooking compartment. The front hook of the shelf support will come out of the hole.
- Swing the shelf support round further and pull it out of the rear holes in the side panel.
- Remove the shelf supports from the cooking compartment.
natural_image
Diagram of a coiled heating element inside a room, showing parallel rows with an arrow indicating direction (no text or symbols)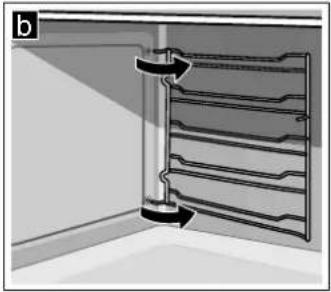
natural_image
Diagram of a mechanical assembly with a rotating shaft and spring, no text or symbols presentRefitting the shelf supports
- Insert the hooks of the shelf support into the rear holes in the side panel.
- Push the front hook of the shelf support into the hole.

Appliance door
With good care and cleaning, your appliance will retain its appearance and remain fully functional for a long time to come. This will tell you how to clean the appliance door.
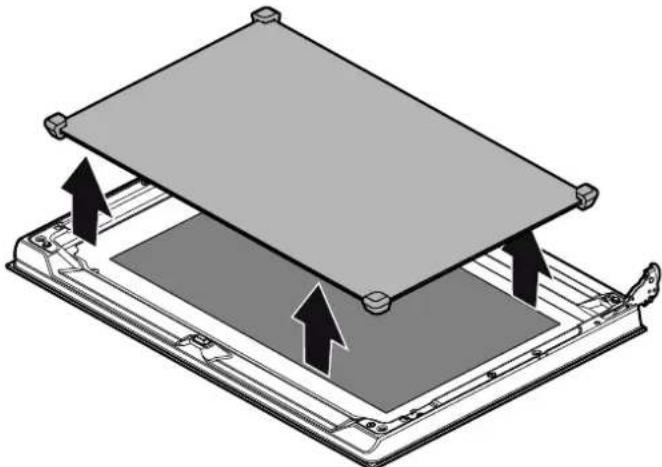
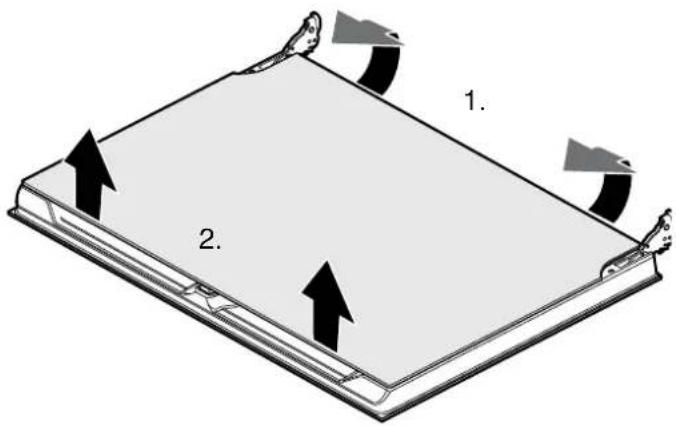
Removing and installing the door panels
To facilitate cleaning, you can remove the glass panels from the oven door.
Removing the door panels
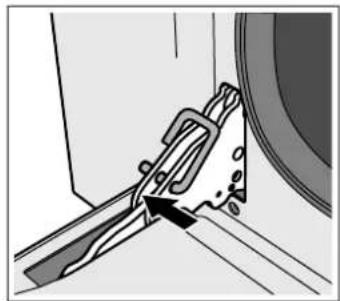
- Open the oven door fully.
- Lock both hinges on the left and right using the locking pin.
Note: The locking pins must be fully inserted into the holes in the hinges.
natural_image
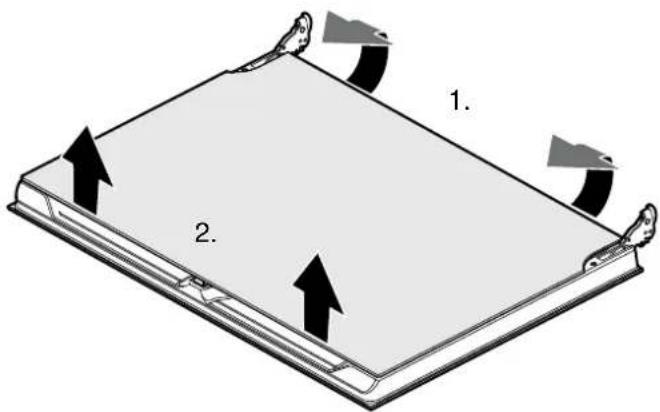
Mechanical assembly diagram showing a tool interacting with a circular component (no text or symbols visible)- Lift the bottom of the inner panel slightly until the fastening pins come out of the holder (1).
- Carefully lift the top of the inner panel until the fastening pins come out of the holder (2).
Caution!
When lifting the inner panel, the middle panel may stick to the inner panel. Make sure that the middle panel does not fall.
text_image
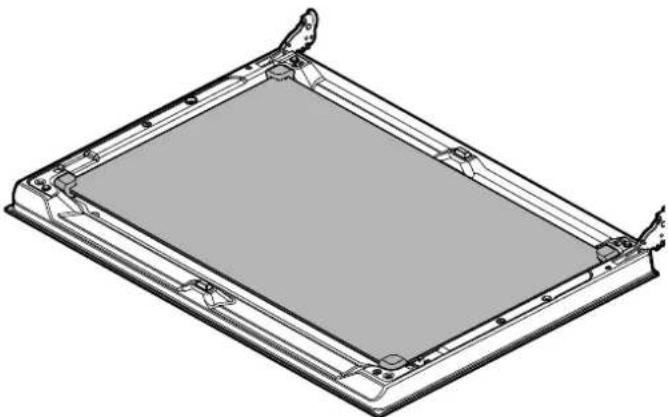
1. 2.- Remove the inner panel.
- Remove the middle panel.
natural_image
Technical line drawing of a rectangular frame with mounting flanges and a central shaded area (no text or symbols)Note: The middle panel is kept in place with rubber bushings rather than retaining pins.
natural_image
Diagram of a device's top-down assembly with arrows indicating movement or force, no text or symbols presentClean the panels with glass cleaner and a soft cloth.

Warning – Risk of injury!
Scratched glass in the appliance door may develop into a crack. Do not use a glass scraper, sharp or abrasive cleaning aids or detergents.
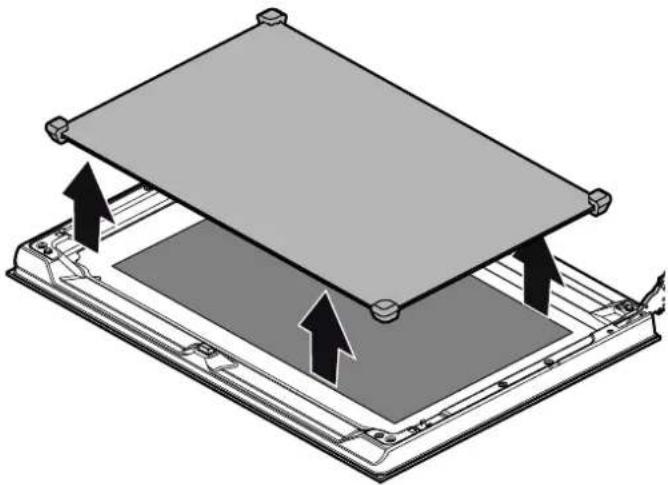
Fitting the door panels
-
Reinsert the middle panel. Notes
-
If the Low-E symbol can be read, the middle panel is inserted correctly.
-
Make sure that the panel is seated correctly. All rubber mounts must lay flat against the outer panel
-
Reinsert the inner panel.
Note: All four fastening pins must engage in the holders provided for them.
- Remove the locking pins and close the oven door.
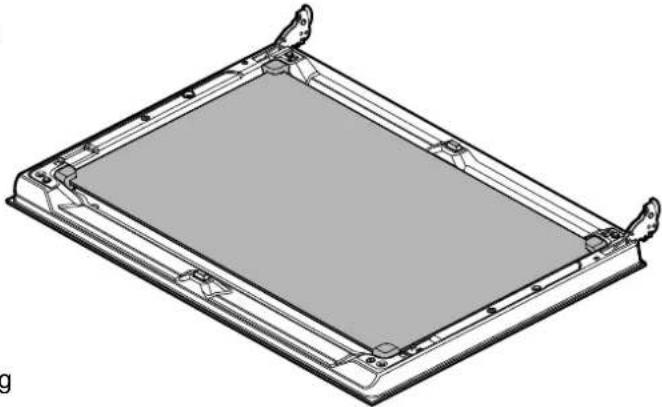
Removing and fitting the appliance door
If the oven is very heavily soiled, the oven door can be removed for easier cleaning. Normally, however, this is not necessary.
Removing the appliance door
- Open the oven door fully.
- Lock the two hinges on the left and right using the locking pin (a).
Note: The locking pins must be fully inserted into the holes in the hinges.
- Take hold of the sides of the oven door with both hands and close the oven door by approx. 30^ (b).

natural_image
Mechanical assembly diagram showing a tool interacting with a component (no text or symbols visible)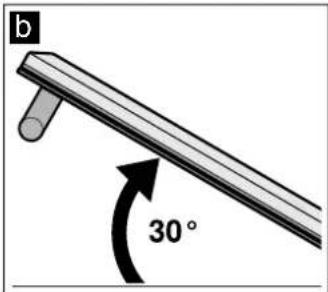
text_image
b 30°- Lift the oven door slightly and pull it out. Note: Do not close the oven door fully, otherwise the hinges could become bent and the enamel could be damaged.
Fitting the appliance door
- Take hold of the sides of the oven door with both hands.
- Slide the hinges into the slots in the oven (a). Note: The notch at the bottom of the hinges must engage into the frame of the oven (b).

natural_image
Mechanical assembly diagram showing a bracket and mounting bracket (no text or symbols)
text_image
Technical diagram showing mechanical assembly with an inset highlighting a detail of a component being inserted.- Lower the door.
- Remove the locking pins.
Warning – Risk of injury!
If the oven door falls out accidentally or a hinge snaps shut, do not reach into the hinge. Call the after-sales service.
Warning – Risk of injury!
The door may not close properly if the door hinges have not engaged correctly. This will allow heat to escape and the parts of the appliance may become very hot. To prevent this from happening, remove the door again. Then refit the door as shown in the drawing, making sure that the groove on the underside of the hinges engages in the oven frame.

Trouble shooting
Fault Possible cause Notes/remedy
| The appliance does not work The plug is not plugged into the mains Connect the appliance to the power supply | ||
| Power cut Check whether other kitchen appliances are working | ||
| The circuit breaker is faulty Check in the fuse box to make sure that the fuse for the appliance is OK | ||
| The appliance cannot be started The appliance door is not fully closed Close the appliance door | ||
| The appliance is not switched off Switch the appliance off and back on again | ||
| 12:00 is flashing on the display | Power failure | Reset the clock. |
| The interior lighting is not working | Top/bottom heating gentle mode is active | In top/bottom heating gentle mode, the interior lighting is not switched on. |
| The bulb is faulty | Replace the bulb. | |
| All food that is cooked in the oven burns within an extremely short period of time. | Thermostat faulty. | Call the after-sales service. |
| Door panels are steamed up. | This is normal and results from differences in temperature. | Heat the appliance up to 100 °C and then switch it back off after 5 minutes. |
| Although the appliance is switched on, it cannot be operated; the symbol is shown on the display | The childproof lock is activated. | Press and hold the »||||⊗| touch button until the symbol goes out. |
Fault messages
If a fault message beginning with Err appears on the display, set the function selector to "Off". If the fault
message does not disappear, please contact our after-sales service.
| Fault message | Possible cause | Information/remedy |
| Err1 | Temperature sensor failed. | Call the after-sales service. |
| Err2 | The temperature in the cooking compartment is too high. | Call the after-sales service. |
| Err4 | Door locking mechanism incorrectly activated. | Call the after-sales service. |
| Err5 | Fan heating element faulty or not connected. | Call the after-sales service. |
| Err6 | Motor faulty or not connected. | Call the after-sales service. |
| Err8 | Cooling fan faulty or not connected. | Call the after-sales service. |
Replacing the oven light bulb
If the oven light bulb fails, it must be replaced.
Replacement heat-resistant bulbs can be obtained from the after-sales service or from specialist retailers. Please specify the E number and FD number of your appliance. Do not use any other type of bulb.
Warning – Risk of electric shock!
When replacing the cooking compartment bulb, the bulb socket contacts are live. Before replacing the bulb, unplug the appliance from the mains or switch off the circuit breaker in the fuse box.
- Allow the cooking compartment to cool down.
- Open the appliance door.
- Place a tea towel in the cooking compartment to prevent damage.
- Remove the shelf supports.
- Remove the glass cover. To do this, open the glass cover from the front with your hand. Should you experience difficulties removing the glass cover, use a spoon to help you.
- Remove the oven light bulb.

natural_image
Illustration showing a hand using a spoon to clean or adjust a wall-mounted device inside a microwave oven (no text or symbols present)- Replace the oven light bulb with a bulb of the same type:
Voltage: 230 V;
Power: 40 W;
Fitting: G9;
Temperature resistance: 300 °C
- Refit the glass cover for the oven light bulb.
- Refit the shelf supports.
- Remove the tea towel.
- Switch the circuit breaker back on.
- Check that the oven lighting is working again.
Technical Data
Power supply: 220-240 V\~50 Hz
Max. total connected load: 3100 W
Customer service
Our after-sales service is there for you if your appliance needs to be repaired. We will always find an appropriate solution, also in order to avoid after-sales personnel having to make unnecessary visits.
E number and FD number
When calling us, please quote the full product number (E no.) and the production number (FD no.) so that we can provide you with the correct advice. The rating plate bearing these numbers can be found when you open the appliance door.
On some appliances with a steam-assisted cooking function, you will find the rating plate behind the control panel.

text_image
Z-Nr.FD-E-Nr Type:To save time, you can make a note of the numbers for your appliance and the telephone number of the after-sales service in the space below in case you need them.
E no. FD no.
After-sales service

Please note that a visit from an after-sales service engineer is not free of charge in the event that the appliance has been misused, even during the warranty period.
Please find the contact data of all countries in the enclosed customer service list.
To book an engineer visit and product advice CN 400 889 9999
Rely on the professionalism of the manufacturer. You can therefore be sure that the repair is carried out by trained service technicians who carry original spare parts for your appliances.
Distributor and origin information:
Place of origin: Italy
Chief Distributor: BSH Home Appliances (China) Co., Ltd.
Address: 20/F,21/F, CN International Mansion, No.
129 Zhongshan Road, Nanjing
Standards conform to:
GB 4706.1-2005 Safety of household and similar electrical appliances: General requirements
GB 4706.22-2008 Safety of household and similar electrical appliances - Particular requirements for stationed stoves, stoves, ovens and similar appliances

Tested for you in our cooking studio
Here, you can find a selection of dishes and the ideal settings for them. We will show you which type of and temperature are best suited to your dish. You information on suitable cooking accessories and the height at which they should be placed in the oven. You will also get tips about cookware and preparation methods.
Note: A lot of steam can build up in the cooking compartment when cooking food.
Your appliance is very energy-efficient and radiates very little heat to its surroundings during operation. Due to the high difference in temperature between the appliance interior and the external parts of the appliance,
heating condensation may build up on the door, control panel or will get adjacent kitchen cabinet panels. This is a normal physical phenomenon. Condensation can be reduced by preheating the oven or opening the door carefully.
Table of dishes
| Dish Weight (in kg) | Shelf position | Heating function | Temperature | in °C | Cooking time in minutes | |
| Lasagne 3-4 1 | ☐ | 220-230* 45-50 | ||||
| Pasta bake 3-4 1 | ☐ | 220-230* 45-50 | ||||
| Joint of veal 2 2 | ☒ | 180-190* 90-100 | ||||
| Pork loin 1.5-2 | 2 | ☒ | 190-200* 90-100 | |||
| Pork loin 2 2 | ☐ | 200** | 125 | |||
| Sausages | 1.5 | 3 | ☒ | 280* | First side: 10 | |
| Second side: 7 | ||||||
| Roast beef | 1 2 | ☒ | 200* | 45-55 | ||
| Roast rabbit 1.5 | 2 | ☒ | 180-190* 70-80 | |||
| Turkey breast | 2 2 | ☒ | 180-190* 110-120 | |||
| Pork neck joint | 2-3 2 | ☒ | 180-190* 170-180 | |||
| Roast chicken | 1.2 | 2 | ☒ | 190-200* 65-70 | ||
| Pork chops 1.5 | 3 | ☒ | 280* | First side: 15 | ||
| Second side: 5 | ||||||
| Spare ribs | 1.5 | 3 | ☒ | 280* | First side: 15 | |
| Second side: 10 | ||||||
| Bacon | 0.7 | 4 | ☐ | 3* | First side: 10 | |
| Second side: 8 | ||||||
| Fillet of pork | 1.5 | 3 | ☒ | 280* | First side: 12 | |
| Second side: 5 | ||||||
| Fillet of beef | 1 4 | ☐ | 3* | First side: 7 | ||
| Second side: 4 | ||||||
| Large rainbow trout | 0.7-1.2 | 2 | ☒ | 160-170* 35-40 | ||
| Monkfish | 0.7-1.5 | 2 | ☒ | 160* | 60-65 | |
| Turbot | 1.5 | 2 | ☒ | 160* | 45-50 | |
| Pizza | 1-1.5 | 2 | ☒ | 280* | 10-12 | |
| Bread | 1 2 | ☒ | 180-190* 25-30 | |||
| Focaccia | 1 2 | ☒ | 180-190* 20-25 | |||
| Bundt cake 1 2 | ☒ | 160* | 55-60 | |||
| Fruit flan | 1 2 | ☒ | 160* | 35-40 | ||
| Cheesecake | 1 2 | ☒ | 160-170* 45-55 | |||
| * Preheat** Do not preheat | ||||||
| Dish | Weight (in kg) | Shelf position | Heating function | Temperature in °C | Cooking time in minutes |
| Short-crust pastry 1 2 | 高 | 160-170* 35-40 | |||
| Short-crust pastry 1 2 | 二 | 170** 65 | |||
| Parfait cake 1.2 2 | 高 | 160* 55-60 | |||
| Cream puffs 0.7-1.2 2 | 高 | 180* 50-60 | |||
| Sponge cake 1 2 | 高 | 150-160* 55-60 | |||
| Rice pudding 1 2 | 高 | 160* 55-60 | |||
| Brioche 1-1.2 2 | 高 | 160* 30-35 | |||
| * Preheat** Do not preheat | |||||
User tips
In this section, you will find a selection of tips on how to use your cookware and prepare your food.
Notes
- Use the accessories provided. Additional accessories may be obtained as optional accessories from specialist retailers or from our after-sales service. Before using the oven, remove any unnecessary accessories and cookware from the cooking compartment.
- Always use an oven cloth or oven gloves when taking hot accessories or cookware out of the cooking compartment.
- Top/bottom heating gentle is an intelligent heating function that allows you to gently cook meat, fish and baked items that do not need to rise. The appliance optimally controls the supply of energy to the cooking compartment. The food is cooked in phases using residual heat. This means that it remains more succulent and browns less. If you open the door before the food has finished cooking or if you preheat the oven, you will not be able to achieve this result. Place the food into the empty cooking compartment before the oven has heated up. Always keep the appliance door closed when cooking.
Baking tips
| You want to find out whether the cake is completely cooked in the middle. | Push a cocktail stick into the highest point on the cake. If the cocktail stick comes out clean with no dough residue, the cake is ready. |
| The cake collapses. | Next time, use less liquid. Alternatively, set the temperature to be 10 °C lower and extend the baking time. Adhere to the specified ingredients and preparation instructions in the recipe. |
| The cake has risen in the middle but is lower around the edge. | Only grease the base of the springform cake tin. After baking, loosen the cake carefully with a knife. |
| The fruit juice overflows. | Next time, use the universal pan. |
| Small baked items stick to one another during baking. | There should be a gap of approx. 2 cm around each item. This gives enough space for the baked items to expand well and brown on all sides. |
| The cake is too dry. | Set the temperature 10 °C higher and shorten the baking time. |
| The cake is generally too light in colour. | If the shelf position and the cookware are correct, then you should increase the temperature if necessary or extend the baking time. |
| The cake is too light on top, and too dark underneath. | Bake the cake one level higher in the oven the next time. |
| The cake is too dark on top, and too light underneath. | Bake the cake one level lower in the oven the next time. Select a lower temperature and extend the baking time. |
| Cakes baked in a tray or tin are too brown at the back. | Place the baking tray in the middle of the accessories, not directly against the back wall. |
| The whole cake is too dark. | Select a lower temperature next time and extend the baking time if necessary. |
| The cake is unevenly browned. | Select a slightly lower temperature.Protruding greaseproof paper can affect the air circulation. Always cut greaseproof paper to size.Ensure that the baking tin does not stand directly in front of the openings in the cooking compartment back wall.When baking small items, you should use similar sizes and thicknesses wherever possible. |
| You were baking on several levels. Always select hot air when baking on several levels. Baked items that are placed into the oven on trays. The items on the top baking tray are darker than those on the lower baking tray. | |
| The cake looks good, but is not cooked properly in the middle. | Use a lower temperature and bake slightly longer; if necessary, add slightly less liquid. For ca a moist topping, bake the base first. Sprinkle it with almonds or breadcrumbs and then place the top- ping on top. |
| The cake cannot be turned out of the dish when it is turned upside down. | Allow the cake to cool down for 5 to 10 minutes after baking. If it still sticks, carefully loosen around the edges again using a knife. Turn the cake tin upside down again and cover it several times with a cold, wet cloth. Next time, grease the baking tin/dish and sprinkle with breadcrumbs. |
Tips for Roasting and Braising
| The roast is too dark and the crack. Check the shelf position and temperature. Select a lower temperature the next time and reduce the ling is burned in places, and/or the roasting time if necessary.roast is too dry. |
| The crackling is too thin. Increase the temperature or switch on the grill briefly at the end of the roasting time. |
| The roast looks good but the juic next time, use a smaller roasting dish and add more liquid if necessary.are burnt. |
| The roast looks good but the juic next time, use a larger roasting dish and add less liquid if necessary.are too clear and watery. |
| The meat gets burned during brais-ing. The roasting dish and lid must fit together well and close properly.Reduce the temperature and add more liquid when braising if necessary. |
Acrylamide in foodstuffs
Acrylamide is mainly produced in grain and potato products prepared at high temperatures, such as potato
crisps, chips, sliced bread, bread rolls, bread or fine baked goods (biscuits, gingerbread, spiced biscuit).
| Tips for keeping acrylamide to a minimum | |
| General | Keep cooking times as short as possible.Cook food until it is golden brown, but not too dark.Large, thick pieces of food contain less acrylamide. |
| Baking With top/bottom heating at max. 200 °C.With hot air at max. 180 °C. | |
| Biscuits With top/bottom heating at max. 190 °C.With hot air at max. 170 °CEgg or egg yolk reduces the production of acrylamide. | |
| Oven chips | Spread out a single layer evenly on the baking tray. Cook at least 400 g at once on a baking tray so that the chips do not dry out. |
Test dishes
These tables have been produced for test institutes to facilitate appliance testing.
As per EN 60350-1.
Baking
| Dish Accessories Shelf position Heating | function | Temperature in °C | Cooking time in minutes | ||
| Shortbread strips Baking tray with grease-proof paper | 2 | 160* 23-25 | |||
| Shortbread strips, 2 levels 2 baking trays with grease-proof paper | 2+4 | 160* 28 | |||
| Small cakes Baking tray with grease-proof paper | 2 | 160* 21-22 | |||
| Small cakes, 2 levels Baking tray + wire rack with greaseproof paper | 2+4 | 160* 30 | |||
| Hot water sponge cake Springform cake tin 2 | 160* 35 | ||||
| Hot water sponge cake, 2 levels 2 springform cake tins 2+4 | 155-165* 35-45 | ||||
| Double-crusted apple pie, x 1 | Springform cake tin 2 | 170* 75-80 | |||
| Double-crusted apple pie, x 2 | 2 springform cake tins 2 | 160* 75-80 | |||
| * Preheat | |||||
Grilling
Also slide in the universal pan. The liquid will be caught and the cooking compartment stays cleaner.
| Dish | Accessories | Shelf position | Heating | function | Grill setting | Cooking time in minutes | |
| Bread for toasting | Wire rack | 4 | 3* | 2 | |||
| Beef burger, x 10, 75 mm diameter | Baking tray + wire rack | 3+4 | 3* | First side: 15 | |||
| Second side: 5 | |||||||
| * Preheat | |||||||
目录

主要用途 27

重要安全信息 27
常规信息 27

损坏原因.... 28
常规信息 28

环境保护.... 29
节能 29
环保处理 29

了解您的电器 30
控制面板 30
按键 30
显示屏 30
加热类型和功能 31
温度选择钮 31
烹饪箱功能 31

附件 32
烹饪层 32
锁定功能 32
伸缩式轨道装置 32
专用附件 33

首次使用之前 33
设置时钟时间.... 33
使用烤箱烘焙.... 33
清洁附件 33
安装伸缩架套装 33

操作电器.... 34
打开和关断烤箱 34
自动安全关断功能 34

时间设置选项 34
时间设置选项一览 34
操作电子钟 34
设置自动定时器 35

儿童锁 35
激活儿童锁 35
取消激活儿童锁 35

基本设置.... 36
基本设置列表.... 36
更改基本设置.... 36
设置节能模式.... 36

清洁 37
合适的清洁剂.... 37
烹饪箱内表面.... 37
保持电器清洁.... 38
清洁烹饪箱 38

导轨 38
拆卸烤架支架 38
重新安装烤架支架 38

电器门 39
拆除和安装门面板 39
拆卸和安装电器门 39

故障检修.... 41
故障消息 41
更换烤箱灯泡. 42

客户服务.... 42
E 编号和 FD 编号 42
经销商及原产地信息 42

经由我们烹饪工作室测试过的菜谱 43
菜谱 43
用户提示 44
测试菜谱 45
关于产品、附件、更换部件以及服务的更多信息请参见
www.siemens-home.bsh-group.com 以及网上商店
www.siemens-home.bsh-group.com/eshops

主要用途
请认真阅读本手册。只有这样才能安全正确地使用电器。请保管好说明手册和安装说明,以备日后使用或供下一任所有者使用。专
本电器仅适合整体安装在厨房内。请遵守用的安装说明。
拆开包装后请检查电器是否有损坏。如果电器在运输过程中损坏,请勿连接电器。
仅限持有上岗证书的业人员才可以连接不带插头的电器。因不正确连接导致的损坏将不予保修。
本电器仅供家庭使用。本电器只能用于制备食物和饮料。电器工作时必须有人看管。本电器仅限室内使用。
本电器最高可在海拔 2000 米的高度使用。
本电器不适合用外部定时器或遥控器操作。
8 岁以上儿童以及身体、感官或精神有缺陷的人员或缺乏相关经验和知识的人员,必须在有人监督的情况下或在其安全责任人给予电器使用安全指导并了解相关危险的情况下,方可使用本电器。
严禁儿童玩耍本电器及在电器周围玩耍。儿童除非年满15岁并有人监督,否则不得清洁本电器或执行一般维护操作。
8岁以下儿童请远离本电器和电源线。
必须将附件滑入烹饪箱最里面。→ "附件" 第 32 页

重要安全信息
常规信息
警告 - 有着火危险!
- 易燃物品保存在烹饪箱中可能导致着火危险。切勿将易燃的物品保存在烹饪箱中。切勿在内部起烟时打开电器门。关断电器,拔下电源插头,或关断熔断器盒中的断路器。
- 松散的食物残渣、脂肪和肉汁可能会着火。在首次使用电器制备食物之前,去除烹饪箱、加热元件和附件上的食物残余物。
- 电器门打开时会产生一股气流。防油纸可能会与加热元件接触并着火。在预热期间,切勿将防油纸散铺在附件上。请务必用烤盘或烤模压住防油纸。防油纸应仅覆盖需要覆盖的表面。切勿伸出附件。
警告 - 有灼伤危险!
- 电器会变灼热。切勿触摸烹饪箱的内表面或加热元件。必须让电器冷却下来。请将小孩留在安全距离以外。
· 附件和烹饪容器会变得十分灼热。从烹饪箱中取出附件或烹饪容器时必须戴上烤箱手套。 - 酒精蒸汽可能会在热烹饪箱内着火。切勿烹饪混合了大量高浓度酒类的食物。只能使用少量高浓度酒类。打开电器门时需小心。
- 当设备在使用时,伸缩架子会变得灼热。抽出时千万小心,避免灼伤。
警告 - 有烫伤危险!
- 可接触的部位在使用期间可能会变得很烫。切勿触碰灼热部位。请将小孩留在安全距离以外。
- 在打开电器门时,可能会有热蒸汽逸出。由于温度原因,蒸汽可能不可见。开门时,不要站得离电器太近。打开电器门时要小心。不要让儿童靠近。
- 将水倒入高温烹饪箱会产生热蒸汽。切勿将水倒入高温烹饪箱中。
警告 - 有受伤危险!
- 电器门玻璃如果有刮伤,可能会导致裂开。请不要使用玻璃刮刀、剧烈或腐蚀性的清洁用品或洗涤剂。
- 电器门上的铰链会在开、关门时移动,您可能会被夹住。双手必须远离铰链。
电器门内侧部件可能有利刃。请戴上防护手套。
警告 - 有电击危险!
- 修理不当是很危险的。只能由我公司派出的经过培训的售后工程师进行修理。如果电器有故障,拔下电源插头或断开保险丝盒中的保险丝。联系售后服务部门。
- 如果接触到电器的灼热部件,电器的电线绝缘层会熔化。切勿使电器电源线接触电器的灼热部件。
- 请勿使用高压清洁器或蒸汽清洁器,以防触电。
- 更换烹饪箱灯泡时,灯泡插座触点是带电的。更换灯泡前,拔下电器电源插头或断开熔断器盒中的断路器。
- 故障电器会导致电击危险。切勿接通发生故障的电器。拔下电器的电源插头或断开保险丝盒中的断路器。联系售后服务部门。
若本电器或电源线遭到破坏,请勿强行使用,请联系售后,发生故障时,请立即拔除电源插头或关闭电源电压.
损坏原因
常规信息
注意!
- 烹饪箱箱底上的附件、薄膜、防油纸或烹饪容器:请勿将附件放置在烹饪箱箱底上。不要将任何薄膜或防油纸铺在烹饪箱箱底上。如果将温度设置在 50^ 以上,则不要将烹饪容器放在烹饪箱箱底上。这将导致热量积聚。烤制时间将不再准确,同时会损坏搪瓷。
- 铝箔:烹饪箱内的铝箔不得与门玻璃接触。否则会导致门玻璃永久褪色。
高温烹饪箱中的水:切勿将水倒入高温烹饪箱中。这将产生蒸汽。温度剧变可能导致搪瓷损坏。 - 烹饪箱中的水分:烹饪箱中长期有水分可能会导致腐蚀。让烹饪箱在使用后充分干燥。不要将潮湿的食物长期存放在密闭的烹饪箱内。不要将食物存储在烹饪箱内。
- 打开电器门进行冷却:高温操作之后,烹饪箱必须关门冷却。不要将任何东西夹在电器门中。否则,即使电器门只是略微开启,长时间下来,附近的橱柜表面也可能会损坏。
如果烤箱运行时产生大量水分,则只能打开电器门让烹饪箱干燥。
果汁:在烘焙汁水特别丰富的水果派时,烤盘中不要装得过满。因果汁从烤盘上滴落而留下的污渍很难清除。如有可能,请使用深底普通烤盘。 - 门封极为脏污:如果门封非常脏,电器门在操作过程中将无法正确关闭。附近橱柜的表面可能会损坏。应始终保持门封清洁。密封件损坏或缺失时,不得运行该设备。→ "清洁"第37页
- 把电器门当作座椅、搁架或工作台:请勿坐在电器门上,也不要在电器门上放置或悬挂任何物品。不要将任何烹饪容器或附件放在电器门上。
- 插入附件:根据电器型号,在关闭电器门时,附件可能会刮伤门板。将附件插入烹饪箱时使其尽可能靠里。
- 搬运电器:不要抓着门把手搬运电器。门把手不能承受电器的重量,可能会断开。
环境保护
您的新电器属于特别节能款。您可以在本章节找到关于在使用电器时如何节约更多能源和如何正确处置报废电器的提示。
节能
- 仅在菜谱有要求或操作说明表中有明确指示的情况下才预热电器。
- 放入烹饪箱之前让冷冻食物解冻
natural_image
Illustration of broccoli and a thermometer with a snowflake (no text or symbols)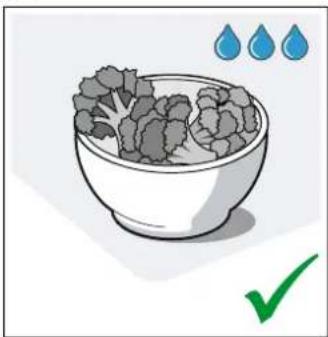
natural_image
Illustration of a bowl containing broccoli with three water droplets above and a green checkmark below (no text or symbols)- 使用深色黑漆或者具有搪瓷涂膜的烤模。吸热效果会特别好。

natural_image
Illustration of a mechanical component with blue striped background and star patterns (no text or symbols)
natural_image
3D rendering of a mechanical component with a cylindrical shaft and mounting bracket, placed on a blue striped surface (no text or symbols)从烹饪箱中取出不必要的附件。
natural_image
Illustration of two empty kitchen trays with food items inside (no text or symbols)
natural_image
Illustration of a tray with dough pieces and a green checkmark (no text or symbols)- 在烹饪食物时,尽可能不要频繁地打开电器门。
natural_image
Illustration of a kitchen oven with steam rising from the chimney (no text or symbols)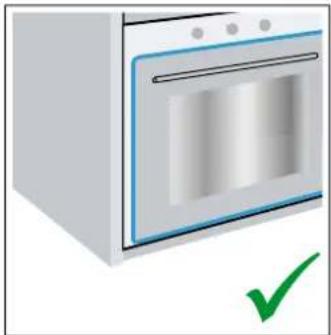
natural_image
Illustration of a kitchen oven with a green checkmark below it (no text or symbols)- 烤制多份糕点时最好一份接一份地烤。令烹饪箱留有余温。这可减少第二份糕点的烤制时间。您可以将两个蛋糕模挨着放在烹饪箱中。

natural_image
Illustration of a blue container placed on a metal rack (no text or symbols)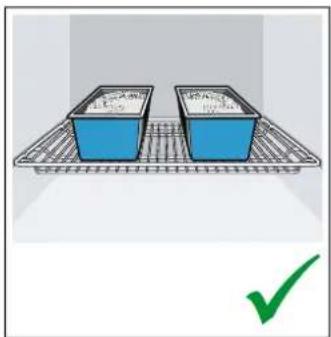
natural_image
Two blue food containers on a metal rack with a green checkmark below (no text or symbols)- 对于长时间的烹饪,您可以在烹饪时间结束前 10 分钟关断烤箱,用剩余的热量完成烹饪。
环保处理
按照环保要求处理包装材料。
本电器已经根据欧盟有关废弃电气和电子设备的法令2012/19/EU (waste electrical and electronic equipment - WEEE)进行了标记。该指令是在全欧盟范围内关于废弃设备回收处理和再生利用的有效法律依据。

了解您的电器
本节对指示符和控件进行说明。此外,您还会了解到电器的各种功能。
提示:根据电器型号,个别细节和颜色可能不同。
控制面板
您可以在控制面板上设置电器的各种功能。下面是控制面板总览和控件布局。
text_image
8:00:88°C h:min mins 8:00:88°C ① - + -1 按键和显示屏
按钮是下方带传感器的触摸键。只需触摸符号即可选择它所代表的功能。
显示屏显示激活的功能所对应的符号以及时间设置选项。
2 功能选择钮
使用功能选择钮设置加热功能和其它功能。所选择的加热功能或其他功能将亮起。
可从“关”位置顺时针或逆时针转动功能选择钮。
3 温度选择旋钮
使用温度选择钮可设置加热功能的温度或选择其他功能的相关设置。
还可以顺时针和逆时针转动温度选择钮。没有“Off”(关)位置。
| ♠ | 定时器 |
| 持续时间 | |
| → | 结束时间 |
| ➊ | 时钟 |
| 88:88 | 时间 |
| ♣ | 温度指示器 |
| ∞ | 儿童锁 |
| ➁门锁 | |
| 888 | 温度 |
按键
您可以在下文中找到有关各个按键的简短说明。
如果按键不动作,信号音响起。
按键 说明
| L | 时间设置选项 设置定时器 ♀、持续时间 |→|、结束时间 →| 和时钟时间 ⊙ |
| - | 减 减小设置值 |
| + | 加 增大设置值 |
| 照明 开启/关断内部照明 | |
| »|||∞ | 快速预热 关断/开启快速预热 |
| 儿童锁 在待机模式下启用/停用儿童锁 |
显示屏
显示屏结构鲜明,所示信息一目了然。
当前可以设置的值重点显示。即以深色背景白色字体显示。
符号 说明
| >> | 快速预热 |
加热类型和功能
使用功能选择钮设置加热类型和其它功能。
确保始终使用正确的加热类型烹饪食物,关于它们的差异及其应用请参见下文说明。
| 加热功能 温度/设置 用途 | |
| ○“关”位置=-=在该位置下,电器关断。 | |
| 3D 热风=50-280 °C=用于在一层或两层上烹饪食物。风扇将来自后壁的加热圈的热量均匀分配到烹饪箱各处。加热功能用于测量在热风循环模式下的能耗。 | |
| 空气循环=50-280 °C=用于在同一层烘焙和烘烤。风扇将来自加热元件的热量均匀分配到烹饪箱各处。 | |
| 匹萨设置=50-280 °C=用于烹饪新鲜匹萨和冷冻食物。加热元件和风扇快速加热并将热量均匀分配到烹饪箱各处。 | |
| 解冻=30-60 °C=用于解冻,用于肉类、家禽、面包和蛋糕。风扇使温热的空气在食物周围流通。 | |
| 底部加热=50-280 °C=在希望略微延长食物烹饪时间的情况下使用。热量仅从下方散发。 | |
| 小面积烧烤=烧烤设置: 用于烤少量肉排、香肠、面包和鱼块。烧烤加热元件中心区域变热。1 = 低火2 = 中火3 = 高火 | |
| 大面积烧烤=烧烤设置: 用于烧烤扁平食物,如肉排、香肠或面包及红烧食物。1 = 低火2 = 中火3 = 高火 | |
| 热风烧烤=50-280 °C=用于烤制肉类、家禽和全鱼。风扇使热空气在食物周围流通。 | |
| 顶部/底部温和加热=50-280 °C=用于在无预热情况下在单层上温和烹饪所选择的食物类型(如肉、蔬菜等)。该加热功能不适用于受热膨胀的食物(如面包)。加热功能用于测量在常规模式下的能耗和能效等级。 | |
| 顶部/底部加热=50-280 °C=用于烤制蛋糕、饼乾和瘦肉块。热量从上、下均匀散发。 | |
提示:对于每种加热类型,电器会指定默认温度或等级。您可以接受该值或进行适当更改。
温度选择钮
用温度选择钮设置温度。所设置的温度将出现在显示屏中。
提示: 温度可以按 1^ C 的增量进行设置, 达到 100 = ^ C 后按 5^ C 的增量进行设置。
温度指示器
温度指示器光柱显示加热阶段或烹饪箱中的余热。
| 加热指示器 | 加热指示器显示烹饪箱中不断升高的温度。当所有光柱都填满的时候就是将菜肴放入烤箱的最佳时刻。在烧烤和清洁设置下,光柱在启动时就已经填满。光柱在顶部/底部温和加热类型下不填充。 |
| 余热指示器 | 当电器关闭时,温度指示器显示的是烹饪箱中的余热。只要温度下降到60°C左右,指示器就熄灭。 |
烹饪箱功能
某些功能可使您的电器更易于使用。例如,这可使烹饪箱内更加明亮,而冷却风扇则可防止电器过热。
打开电器门
如果在操作期间打开电器门,则操作暂停。操作将在关上门后继续运行。
内部照明
当您打开电器门时,内部照明将打开。如果在 15 分钟以后门仍然打开,照明再次关断。
在大多数操作模式下,只要打开电器,内部照明亮起。程序结束后,照明将关断。
提示:在“顶部/底部温和加热”模式下,内部照明将在大约1分钟后自动关闭。可使用=按键将其打开。
冷却风扇
冷却风扇按要求开启和关断。暖空气从门上方逸出。
注意!
不要盖住通风槽,否则,烤箱将过热。
为了在操作后更快地冷却烹饪箱,冷却风扇将在操作后继续运行一段时间。
附件
电器随附一系列附件。您可以在本章节找到有关随附附件的概览以及正确使用附件的信息。
附件 描述
| 烘焙和烧烤架 用于烤箱器皿、烤模、烤肉、烧烤和冷冻食品。 | |
| 通用烤盘 用于烤制松软的蛋糕、糕点、冷冻食品和大块烤肉。直接在烤架上烤肉时,可以用通用盘子收集滴下的油脂。 | |
| 烤盘 用于制作烤盘蛋糕和小点心。 | |
| 伸缩式轨道装置 您可以使用拉出式导轨将附件进一步拉出。 | |
| 锁针 锁住铰链。 |
烹饪层
烤盘和烤架可以放置在烤箱内的四个高度上。尽量插入最里面,以免附件碰到门板。必须将附件插入烹饪箱最里面。
text_image
1 2 3 4警告 - 有着火危险!
在任何情况下,烤模、烤盘或其他烹饪容器都不得直接放在烤箱底板上。这导致电器底板过热,可能会严重损坏电器。
锁定功能
在卡到位之前,附件可以抽出一半。锁定功能防止附件在拉出时发生倾斜。附件必须正确插入烹饪箱内才能确保防倾斜保护功能正常发挥作用。
插入烤架时,确保凸耳 a 位于后方朝下。打开侧必须面向电器门,弯曲部分必须在下方 (即 —)。
text_image
a a插入烤盘时,确保凸耳 a 位于后方朝下。附件 b 的倾斜边缘必须朝向电器门。
图中实例:普通烤盘
text_image
a a b伸缩式轨道装置
警告 - 有灼伤危险!
当设备在使用时,伸缩架子会变得灼热。抽出时千万小心,避免灼伤。
您可以使用拉出式导轨将附件完全拉出。当插入烤盘和烤架底座时,确保其卡入拉出式导轨上的凸耳的前方。

natural_image
Technical diagram showing structural components and panel installation (no text or symbols)专用附件
可以从售后服务部购买附件。
附件 描述
| 搪瓷烤盘 | 用于制作烤盘蛋糕和小点心。售后服务订货号:11012235 |
| 通用烤盘 | 用于烤制松软的蛋糕、糕点、冷冻食品和大块烤肉。直接在烤架上烤肉时,可以用通用盘子收集滴下的油脂。售后服务订货号:11012236 |
| 烘培和烤架 | 用于烤箱器皿、烤模、烤肉、烧烤和冷冻食品。售后服务订货号:00776605 |
| 伸缩架套装 | 用于一层的伸缩架套装售后服务订货号:12006236 |

首次使用之前
在本节中,您可以查看在第一次使用烤箱制备食物之前必须要做的事。
取出电器包装并妥善处置。
设置时钟时间
电器接通电源后,12:00 将在显示屏上闪烁,① 符号将持续点亮。设置时间。
- 使用 - 或 + 按键设置时间。
- 按下 Ⓛ 按键。
提示:允许的时钟设置时间到时后,时钟时间将自动保存。
时间已经设置好了。
使用烤箱烘焙
预先清洁烤箱
- 从烹饪箱中取出附件和烤架支架。→ "导轨"第38页
- 从烹饪箱中取出遗留的包装,例如聚苯乙烯颗粒。
- 某些部件有一层保护膜。撕下保护膜。
- 用柔软的湿布擦拭电器的外部。
- 用热肥皂水清洁烹饪箱。
加热烤箱
为了去除新炊具的味道,可清空、关闭烤箱,进行加热。
提示:确保烹饪箱中没有遗留包装物品,例如聚苯乙烯颗粒。在加热电器之前,请用柔软的湿布擦拭烹饪箱中的光滑表面。电器加热时保持厨房通风。
- 将功能选择钮旋转至 ☐ 位置。
- 转动温度选择钮,设置最高温度。
- 1 小时后关断烤箱。
提示:第一次加热烤箱时,可能会听到劈啪声。
预先清洁烤箱
- 用热肥皂水清洁烹饪箱。
- 重新安装钩入式烤架。
- 必要时请清洁门面板。→ "电器门"第 39 页
清洁附件
在使用附件前,请用布和温肥皂水彻底清洁附件。
安装伸缩架套装
安装伸缩架套装说明随套装提供。

操作电器
打开和关断烤箱
开启烤箱
1. 将功能选择钮设置到所需的加热功能。
提示:每种功能都有默认温度或烧烤设置。
natural_image
Icon showing a metallic knob with blue arrow and speech bubble, no text or symbols present2. 使用温度选择钮改变温度或烧烤设置。
text_image
888°C 190°C烤箱将开始加热。
提示:温度指示器显示加热阶段的当前状态。
更改设置
可使用相关旋钮随时更改加热功能和温度或烧烤设置。
关断烤箱
将功能选择钮转到“关”位置。
打开快速加热功能
为了尽快加热烹饪箱,按下 >> ≈ 按键。
提示:在 3D 热风、热风循环、匹萨设置和顶部/底部加热模式下可以使用快速加热。
自动安全关断功能
本产品设有自动安全切断功能。电器在 13 小时后自动关断。

时间设置选项
您的电器具有不同的时间设置选项。
时间设置选项一览
时间设置选项 用途
| 定时器 定时器功能与煮蛋定时器类似。使用其他时间设置选项加热时,它独立于电器运行,不影响电器。 | |
| 时钟 当前台不再运行其它功能时,电器将在显示屏上显示时间。 | |
| → 烹饪时长 设置的烹饪时间到时后,电器会自动停止加热。 | |
| → 结束时间 输入烹饪时间和所需的结束时间。电器将自动启动,并在所需的时间完成烹饪。 |
操作电子钟
设置定时器
定时器对烤箱工作无影响。定时器持续时间设置范围为30秒至13小时。持续时间可以按30秒的增量进行设置,最长达10分钟;在10分钟和1小时之间按1分钟的增量进行设置;然后按5分钟的增量进行设置。
- 按下 Ⓛ 按键。
符号将点亮。
- 使用 + 和 - 按键设置所需要的烹饪时间。 时间到时后就会发出一个信号音。
提示
- 如要更改剩余时间,按下 ⏻ 按键。然后使用 + 和 - 按键更改剩余时间。
如要停止定时器倒计时,可将剩余时间设置为零。
关断信号音
要关闭信号,请按下任意按键或打开电器门。
提示:在很短时间后,信号音将自动停止。
设置电子时钟
您可在需要时更改时钟,例如,从夏令时更改到冬令时。为此必须关闭烤箱。
- 按下 Ⓛ 按键。
符号将点亮。
- 再次按下 Ⓛ 按键。
符号将点亮。
- 使用 + 和 - 按键设置当前时间。
设置自动定时器
电子钟可用于自动开启或关断烤箱。
设置烹饪时间
可以在电器上设置食物的烹饪时间。这可防止食物被意外地过长时间烹饪,同时意味着您不必为了关断烤箱而停下手头的工作。
- 设置需要的加热类型和温度。烤箱将启动。
- 按下 Ⓛ 按键两次。
- 使用 + 和 - 按键设置所需要的烹饪时间。 提示:烹饪时间设置范围为 30 秒至 13 小时。烹饪时间可以按 1 分钟的增量进行设置,达到 1 小时后按 5 分钟的增量进行设置。 符号将点亮。
烹饪时间到时
信号音响起。电器停止加热。
- 要关闭信号,请按下任意按键或打开电器门。
提示:在很短时间后,信号音将自动停止。 - 将功能选择钮转到“关”位置。
设置结束时间
稍后在您设置的时间烘焙或烤制。
- 设置需要的加热类型和温度。
烤箱将启动。 - 按下 Ⓛ 按键两次。
-
使用 + 和 - 按键设置所需要的烹饪时间。
提示:烹饪时间设置范围为 30 秒至 13 小时。烹饪时间可以按 1 分钟的增量进行设置,达到 1 小时后按 5 分钟的增量进行设置。
|→| 符号将点亮。 -
再次按下 ⏻ 按键。
- 使用 + 和 - 按键设置结束时间。
提示:当首次按下按键时,显示屏上将提示一个数值。该建议值通过时钟上的当前时间和烹饪时间计算得出。该值可使用 + 和 - 按键进行更改。
→I 符号将点亮。显示屏将显示结束时间。电器此时将切换至待机模式。
烹饪时间到时
信号音响起。电器停止加热。
- 要关闭信号,请按下任意按键或打开电器门。
提示:在很短时间后,信号音将自动停止。 - 将功能选择钮转到“关”位置。
儿童锁
烤箱有一个儿童锁,可防止儿童意外打开烤箱。
提示:如果连接了灶具,灶具不会受烤箱上的儿童锁的影响。
激活儿童锁
必须关断电器。
按下并按住 >>||||∞ 按键大约 4 秒钟。
符号将出现在显示屏上。儿童锁现已启用。
取消激活儿童锁
按下并按住 >>||||←○ 按键大约 4 秒钟。
符号将在显示屏上熄灭。儿童锁现已停用。
基本设置
为了帮助您有效地使用电器,我们为您提供了各种设置。您可以根据需要更改这些设置。
基本设置列表
根据电器的功能,并非所有基本设置都可供访问。
基本设置 选项
| c01 | 烹饪时间或定时器时间到时后的信号音持续时间 | 1 = 约10秒钟 2 = 约30秒钟* 3 = 约2分钟 |
| c02 | 应用某个设置之前需要等待的时间 | 1 = 约3秒钟 2 = 约6秒钟 3 = 约10秒钟 |
| c03 | 触碰按键时会有声音响起=0=关 | 1 = 开* |
| c04 | 显示亮度=1=暗 | 2 = 中 3 = 亮 |
| c05 | 显示时间=0=隐藏时间 | 1 = 显示时间* |
| c06 | 当电器工作时,内部照明打开=0=否 | 1 = 是* |
| c07 | 冷却风扇持续运行时间=1=短* | 2 = 中 3 = 长 4 = 超长 |
| c08 | 将所有值重置为出厂设置=0=否* | 1 = 是 |
| c09 | 激活演示模式演示模式仅用于演示目的;烤箱在演示模式下不会加热。演示模式仅在电器连接到电源后的前5分钟内可以启用。 | 0 = 否* 1 = 是 |
^* =工厂设置
更改基本设置
必须将功能选择钮转到“关”位置。
- 按下并按住=① 按键大约4秒钟。 第一个基本设置将显示在显示屏中,如c01。
- 转动温度选择钮,根据需要更改设置。
- 使用=+按键浏览下一个基本设置。
- 使用 - 或 + 按键继续按照上述说明完成所有基本设置,必要时使用温度选择钮更改设置。
- 结束后,再次按下并按住=① 按键约 4=秒,确认设置。这会应用所有基本设置。
您可以随时再次更改基本设置。演示模式仅在电器连接到电源后的前 5 分钟内可以启用。
提示:即使断电,所更改的基本设置仍然保留。
设置节能模式
通过降低屏幕亮度可以节能。显示屏亮度可在基本设置中进行设置 c04。
提示:在电器运行时,该设置可以改变显示屏亮度。在待机模式下,电器自动降低显示屏亮度。显示屏在晚上22:00和05:59之间亮度最低。

清洁
只要精心保养和清洁,您的电器将在未来的很长一段时间内保持其外观,并能正常工作。以下说明应如何正确保养和清洁电器。

警告 - 有电击危险!
请勿使用高压清洁器或蒸汽清洁器,以防触电。

警告 - 有灼伤危险!
电器会变灼热。切勿触摸烹饪箱的内表面或加热元件。必须让电器冷却下来。请将小孩留在安全距离以外。
合适的清洁剂
请遵守下表中的信息,以避免因清洗用品使用不当而损坏不同材质的表面。
请勿使用任何以下物品:
烤箱上:
- 强烈的或腐蚀性的清洁剂,
- 高酒精浓度的清洁剂
- 硬的清洗垫或海绵.
- 高压清洁器或蒸汽清洁器。
新海绵布使用前要彻底清洗。
| 区域 清洁 | |
| 电器外部 | |
| 不锈钢前面板 热肥皂水:用洗碗布清洁,然后用软布擦干。立即清除水垢、油脂、淀粉和蛋白(例如蛋清)形成的斑点。这类污渍可能会形成斑点。适用于灼热表面的用不锈钢清洁用品可从我们的售后服务部或从卖店购买。使用软布涂抹一薄层清洁产品。 | |
| 控制面板 热肥皂水:用洗碗布清洁,然后用软布擦干。不要使用玻璃清洁剂或玻璃刮刀。 | |
| 门面板 热肥皂水:用洗碗布清洁,然后用软布擦干。不要使用玻璃刮刀或不锈钢擦洗片。 | |
| 门把手 热肥皂水:用洗碗布清洁,然后用软布擦干。如果除垢工具接触到门把手,请立即擦掉。否则,将产生无法去除的污斑。 | |
| 电器内部 | |
| 釉面和自清洁表面 | 遵守表格之后与烹饪箱表面有关的说明。 |
| 内部照明玻璃灯罩 | 热肥皂水:用洗碗布清洁,然后用软布擦干。如果烹饪箱严重脏污,请使用烤箱清洁剂。 |
| 门面板 热肥皂水:用洗碗布清洁并用软布擦干。不要使用玻璃刮刀或不锈钢擦洗片。最好清洁门面板以及烹饪箱的其余部分。→ "清洁烹饪箱"第38页 | |
| 门密封不要拆下。 | 热肥皂水:用洗碗布清洁。不要擦洗。 |
| 门盖 不锈钢材质。 | 使用不锈钢清洁剂。遵守制造商说明。不要使用不锈钢护理产品。塑料制成用热肥皂水和洗碗布清洁。用软布擦干。不要使用玻璃清洁剂或玻璃刮刀。拆下门面板进行清洗。 |
| 导轨 热肥皂水: | 浸泡并用洗碗布或刷子清洁。 |
| 弹出系统 热肥皂水: | 用洗碗布或刷子清洁。抽出拉出式导轨时,请不要擦去润滑剂,最好在拉出式导轨处于推入位置时进行清洗。不要在洗碗机中清洁。 |
| 附件 热肥皂水: | 浸泡并用洗碗布或刷子清洁。如果有大量污垢积聚,则使用不锈钢擦洗片。 |
提示
- 由于使用不同的材料,例如,玻璃、塑料和金属等,电器正面的颜色会稍微有点偏差。
- 门面板上看起来像条纹的阴影是由内部照明的反光造成的。
搪瓷是用非常高的温度烤上去的。这可能会导致一些轻微的颜色变化。这是正常现象,不影响工作。 较薄的烤盘边缘可能有些地方没有涂上搪瓷。因此,这些边缘可能会比较粗糙。这不会损害抗腐蚀保护功能。
烹饪箱内表面
烹饪箱中的后壁和侧壁部件可以自清洁。您可以将其与粗糙表面区分开来。
烹饪箱箱底和顶部涂以珐琅,表面光滑。
清洁上釉区域
用洗涤布和热皂液或醋水 清洁光滑的上釉区域。用软布 擦干。
用湿布和皂液软化 烤糊的食物残渣。严重脏污时,使用不锈钢球刷 或烤箱清洁剂。
注意!
切勿在热的烹饪室内使用烤箱清洁剂。可能会损坏上釉区域。下一次加热前,将残渣从烹饪室内和设备门上完全清除。
清洁后,让烹饪室敞开,以便干燥。
提示:食物残渣可能形成白色覆盖物。这种覆盖物可以忽略不计,不会影响设备功能。必要时,用柠檬酸清除残渣。
自清洁表面
自清洁表面涂有一层渗水能力极强的哑光陶瓷层。在电器工作过程中,这个涂层可吸收和排除因烘焙和烧烤产生的飞溅物。
zh导轨
注意!
切勿在自清洁表面上使用烤箱清洁剂。这将损坏表面。如果烤箱清洁剂确实接触到这些表面,请使用水和海绵布立即擦去。不要摩擦表面,也不要使用腐蚀性清洁辅助物品。
保持电器清洁
始终保持电器清洁并立即清除污垢,以防形成顽固积垢。

警告 - 火灾危险!
散落的食物残渣、油脂和烤肉汁 可能自燃。投入运行前,去除烹饪室内、加热元件和附件上的脏污。
建议
- 每次使用后清洁烹饪箱。这将确保不会烘烤污垢。
- 一定要立即清除水垢、油脂、淀粉和蛋白 (例如蛋清) 形成的斑点。
- 使用普通烤盘烤制非常潮湿的蛋糕。
- 使用适用的烤箱器皿进行烘烤,例如烤肉盘。
清洁烹饪箱
- 将 0.4 升水倒入烹饪箱底板的中央。
- 设置 □ 加热功能。
- 使用温度控制器将温度设置为 50^ C。
- 在 18 分钟后关断电器。
- 让电器冷却下来。
- 用布清洁烹饪箱。

警告 - 有灼伤危险! !
电器会变灼热。切勿触摸烹饪箱的内表面或加热元件。必须让电器冷却下来。请将小孩留在安全距离以外。

导轨
拆卸烤架支架
烤架支架固定在烹饪箱侧壁的三个点上。
- 握住烤架支架前方,抽出至烹饪箱中间。烤架支架的前钩将从孔中脱出。
- 将烤箱支架摇开,将其从侧壁后方的孔中抽出。
- 从烹饪箱中取出附件和支架。
natural_image
Diagram of a coiled heating element inside a cabinet (no text or symbols)
natural_image
Diagram of a mechanical or electrical component with a vertical rod and horizontal grooves, no visible text or symbols重新安装烤架支架
- 将烤架支架的钩子插入侧壁后方的孔中。
- 将烤架支架的前钩推入孔中。

电器门
只要精心保养和清洁,您的电器将在未来的很长一段时间内保持其外观,并能正常工作。这里说明如何清洁电器门。
拆除和安装门面板
为了便于清洁,您可从烤箱门卸下玻璃面板。
拆除门面板
- 完全打开烤箱门。
- 使用锁针将左右两侧的铰链锁上。
提示:锁针必须完全插入铰链孔。

natural_image
Mechanical assembly diagram showing a tool interacting with a component (no text or symbols visible)-
轻轻抬起内门板底部,直到固定铰链从支架中取出(1)。
-
轻轻抬起内门板顶部,直到固定铰链从支架中取出(2)。
注意!
抬起内门板时,中间门板可能会黏到内门板。请确保中间门板不会掉落。
text_image
1. 2.- 拆除内面板。
- 拆除中间面板。
natural_image
Technical line drawing of a rectangular frame with mounting flanges and internal components (no text or symbols)提示: 中间面板是用橡胶衬套固定, 而非锁紧装置。
natural_image
Diagram of a device with a flat panel and two arrows indicating movement or assembly (no text or symbols present)用玻璃清洁剂和软布清洁面板。
警告 - 有受伤危险!
电器门玻璃如果有刮伤,可能会导致裂开。请不要使用玻璃刮刀、剧烈或腐蚀性的清洁用品或洗涤剂。
安装门面板
- 重新插入中间面板。
提示
- 如果显示低辐射符号,表示中间面板已正确插入。
-
请确保将面板安装至正确的位置。所有橡胶衬套必须平放在外门板上。
-
重新插入内门板。
提示: 所有固定铰链必须安装至提供的支架中。
- 拆除锁针并关上烤箱门。
拆卸和安装电器门
如果烤箱非常重,可拆卸烤箱门以便清洁。正常来说,此非必要步骤。
zh电器门
拆卸电器门
-
完全打开烤箱门。
-
使用锁针 (a) 将左右两侧的铰链锁上。
提示:锁针必须完全插入铰链孔。
- 双手握住烤箱门的两侧,关闭烤箱门约 30^ (b)。

natural_image
Mechanical assembly diagram showing a lever mechanism with an arrow indicating motion (no text or symbols present)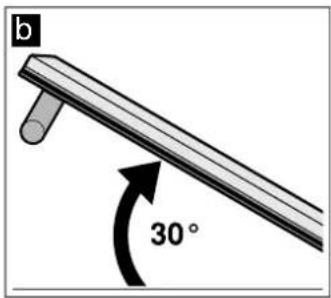
text_image
b 30°- 稍微抬起烤箱门,将其拉出。
提示:不要完全关闭烤箱门,否则铰链将弯折,珐琅会损坏。
安装电器门
-
双手握住烤箱门的两侧。
-
将铰链滑入烤箱中的开槽 (a)。
提示: 铰链底部的开槽必须卡入烤箱框架 (b)。

natural_image
Mechanical assembly diagram showing a bracket and mounting bracket (no text or symbols)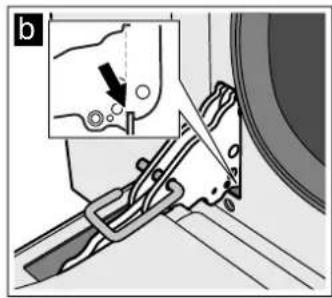
natural_image
Mechanical assembly diagram showing a clamp securing a component, with an inset highlighting a detail (no text or symbols present)-
降低门。
-
拆除锁针。
警告 - 有受伤危险!
如果烤箱门意外掉下或铰链猛然闭合,不要将手伸入铰链。致电售后服务部门。
警告 - 有受伤危险!
如果门铰链未正确定位,门可能无法正确关闭。这将造成热气溢出,电器各个部件可能会变得十分滚烫。为了防止这种情况,请再次拆下电器门。然后如图所示安装电器门,确保铰链下方的开槽卡入烤箱架。
?故障检修
故障 可能的原因 说明/补救措施
| 电器不工作插头没有插入电源将电器连接到电源 | ||
| 断电检查其他厨房电器是否工作 | ||
| 断路器故障检查保险丝盒,确保电器保险丝正常 | ||
| 电器不能启动 电器门没有完全关闭 关闭电器门 | ||
| 未关断电器关断电器,然后再重新接通 | ||
| 12:00在显示屏中闪烁电源故障复位时钟。 | ||
| 内部照明不工作顶部/底部温和加热模式已激活在顶部/底部温和加热模式下,内部照明不打开。 | ||
| 灯泡出现故障 | 更换灯泡。 | |
| 在烤箱中烹饪的所有食物均在极短时间内烧焦。 | 自动调温器故障。 致电售后服务部门。 | |
| 门面板有水气。这是正常现象,是由于温差引起的。 | 加热电器至100°C,在5分钟后重新关断。 | |
| 虽然电器已打开,但却无法操作;儿童锁启用。 | 按下并按住»按钮,直到符号消失。 | |
| 符号出现在显示屏中 | ||
故障消息
如果显示屏上显示以 Err 开头的出错消息,请将功能选择钮设置为“关”。如果出错信息不消失,请联系售后服务部。
| 出错信息 | 可能的原因 信息/纠正措施 | |
| Err1 | 温度感应器故障。 致电售后服务部门。 | |
| Err2 | 烹饪箱中的温度过高。 | 致电售后服务部门。 |
| Err4 | 错误启用门锁机构。 致电售后服务部门。 | |
| Err5 | 风扇加热元件发生故障或未连接。 | 致电售后服务部门。 |
| Err6 | 电动机发生故障或未连接。 | 致电售后服务部门。 |
| Err8 | 冷却风扇发生故障或未连接。 | 致电售后服务部门。 |
更换烤箱灯泡
如果烤箱灯的灯遭坏了,则必须进行更换。耐热备用灯泡可从售后服务部或卖店购买。请指定您的电器的 E 编号和 FD 编号。请勿使用其他类型的灯泡。
警告 - 有电击危险!
更换烹饪箱灯泡时,灯泡插座触点是带电的。更换灯泡前,拔下电器电源插头或断开熔断器盒中的断路器。
- 让烹饪箱冷却下来。
- 打开电器门。
- 将抹布放在冷烹饪箱中,防止损坏。
- 取出烤架支架。
- 拆下玻璃盖板。为此可从前面用手将玻璃盖板打开。如在拆下玻璃面板时感到困难,可借助勺子完成。
- 拆下烤箱灯泡。

natural_image
Illustration showing a hand inserting a component into a microwave oven with a spoon (no text or symbols)- 用相同类型的灯泡更换烤箱灯泡:
电压:230 V;
功率:40 W;
安装:G9;
耐热:300℃
- 重新安装烤箱灯的玻璃罩。
- 重新安装烤架支架。
- 取出茶巾。
- 将断路器重新拧好。
- 检查烤箱照明是否正常。
主要技术参数
额定电压范围: 220-240 V\~,
额定频率: 50 ~Hz
额定功率: 3100 W
客户服务
如果您的电器需要修理,我们为您提供售后服务。我们会找出合适的解决方法,并尽量避免售后人员不必要的上门服务。
E 编号和 FD 编号
联系我们时请您说明完整的 产品编号(E 编号)和生产编号 (FD 编号),以便我们为您提供高水平的服务。当您打开设备门后,就能看见带编号的型号铭牌。
在某些带蒸制功能的设备上,型号铭牌位于面板后。

text_image
Z-Nr:F0:E:Nr Type:为了避免您在需要时长时间寻找,请在这里记录设备数据和客户服务部门电话号码。
E 编号 FD 编号
客户服务部门
请注意,即使在保修期内,发生误操作后客户服务人员的现场服务也不是免费的。
请在随设备提供的客户服务列表中查找所有国家的联系信息。
预约工程师上门及产品咨询
中国 400 889 9999
专
专
制造商的业水平值得您信赖。因此,将由受过业训练的技术服务人员使用原装电器零件为您维修。
经销商及原产地信息
原产地:意大利
总经销商:博西家用电器(中国)有限公司,地址:南京市中山路129号中南国际大厦20、21楼
执行标准:
GB 4706.1-2005 家用和类似用途电器的安全 第1部分:通用要求
GB 4706.22-2008 家用和和类似用途电器的安全 驻立式电灶、灶台、烤箱及类似用途器具的特殊要求
经由我们烹饪工作室测试过的菜谱
这里提供了各种备选食谱及其理想设置。我们将向您展示,哪种加热类型和哪种温度最适合您的菜肴。您将了解
关于合适的烹饪附件及其在电器中放置高度的信息。您还将了解关于烹饪容器和制备方法的一些提示。
提示:在烹饪食物时,烹饪箱内会蓄积大量的蒸汽。在工作期间,您的电器非常节能,同时向其周围环境辐射的热量也很小。由于电器内部和电器外部部件之间的温差较大,因此电器门、控制面板或相邻的橱柜面板上可能会蓄积冷凝液。这是一种正常的物理现象。可通过预热微波炉或小心地打开电器门减少冷凝液。
菜谱
| 餐点 重量(kg) 烹饪层 加热功能 温度(°C) 烹饪时间(分钟) | ||||||
| 意式烤宽面 3-4 1 | 220-230* 45-50 | |||||
| 烤通心粉 3-4 1 | 220-230* 45-50 | |||||
| 小牛肉块 2 2 | 180-190* 90-100 | |||||
| 猪腰肉 1.5-2 2 | 190-200* 90-100 | |||||
| 猪腰肉 2 2 | 200** | 125 | ||||
| 香肠 1.5 | 3 | 280* | 第一面:10第二面:7 | |||
| 焖烧牛肉 1 2 | 200* | 45-55 | ||||
| 烤兔肉 1.5 | 2 | 180-190* 70-80 | ||||
| 火鸡胸肉 2 2 | 180-190* 110-120 | |||||
| 猪脖肉 2-3 2 | 180-190* 170-180 | |||||
| 烤子鸡 1.2 | 2 | 190-200* 65-70 | ||||
| 排骨 1.5 | 3 | 280* | 第一面:15第二面:5 | |||
| 肋排 1.5 | 3 | 280* | 第一面:15第二面:10 | |||
| 培根 0.7 | 4 | 3* | 第一面:10第二面:8 | |||
| 猪肉片 1.5 | 3 | 280* | 第一面:12第二面:5 | |||
| 牛肉片 1 4 | 3* | 第一面:7第二面:4 | ||||
| 大型虹鳟鱼 0.7-1.2 | 2 | 160-170* 35-40 | ||||
| 安康鱼 0.7-1.5 | 2 | 160* | 60-65 | |||
| 大比目鱼 1.5 | 2 | 160* | 45-50 | |||
| 匹萨 1-1.5 2 | 280* | 10-12 | ||||
| 面包 1 2 | 180-190* 25-30 | |||||
| 佛卡夏面包 1 2 | 180-190* 20-25 | |||||
| 邦特环形蛋糕 | 1 2 | 160* | 55-60 | |||
| 水果馅饼 1 2 | 160* | 35-40 | ||||
| 奶酪蛋糕 1 2 | 160-170* 45-55 | |||||
| 油酥面团 1 2 | 160-170* 35-40 | |||||
| 油酥面团 1 2 | 170** | 65 | ||||
*预热
**无需预热
| 餐点 | 重量(kg) | 烹饪层 | 加热功能 | 温度(°C) | 烹饪时间(分钟) |
| 冻糕 | 1.2 2 | 160* 55-60 | |||
| 奶油泡芙 | 0.7-1.2 2 | 180* 50-60 | |||
| 海绵蛋糕 | 1 2 | 150-160* 55-60 | |||
| 米饭布丁 | 1 2 | 160* 55-60 | |||
| 奶油蛋卷 | 1-1.2 2 | 160* 30-35 | |||
| *预热**无需预热 | |||||
用户提示
在本节中,您可以查看关于使用烹饪容器制备食物的一系列说明。
提示
- 使用所提供的附件。额外附件可以在售后服务部、专卖店的选配附件中购买。 在使用烤箱之前,先从烹饪箱中取出不必要的附件和烤箱器皿。
- 在从烹饪箱中取出灼热附件或烹饪容器时,一定要使用烤箱布或烤箱手套。
- 顶部/底部温和加热功能是智能加热功能,您可以温和地加热不需要膨胀的肉、鱼和烘焙食品。电器可以优化控制烹饪箱的馏源供给。食物以余热分段烹饪。这使食物更为鲜美滑嫩色泽较浅。如果在食物结束烹饪前打开门或者预热烤箱,将无法获得这样的结果。在烤箱预热之前将食物置于空烹饪箱中。烹饪期间始终保持电器门关闭。
烘焙技巧
| 您想确定蛋糕的中间部分是否已完全烤熟。 | 将取食签推入蛋糕的最高点。如果拿出后的取食签是干净的没有面团残留物,说明蛋糕已经烤熟。 |
| 蛋糕坍陷。下次使用更少的液体。另外,将温度设低10°C,并烹饪更长的时间。请遵循菜谱中指定的配料和制备说明。 | |
| 蛋糕中间已经膨起,但边缘坍陷。仅在弹性蛋糕模底部涂油脂。烘焙后,用小刀小心地松开蛋糕。 | |
| 果汁溢出。下次请使用普通烤盘。 | |
| 小烘焙食品在烘焙时会粘连在一起。 | 每件食品应相隔2厘米左右。这让烘焙食品有足够的空间充分膨胀,每一面都能着色。 |
| 蛋糕太干。将设置温度调高10°C,并缩短烘焙时间。 | |
| 蛋糕整体颜色太浅。 | 如果烹饪层和烹饪容器正确,则应根据需要增加温度或延长烘焙时间。 |
| 蛋糕顶部颜色太浅,底部颜色太深。 | 下次在烤箱中的较高一层烘焙蛋糕。 |
| 蛋糕顶部颜色太深,底部颜色太浅。 | 下次在烤箱中的较低一层烘焙蛋糕。选择较低的温度,并延长烘焙时间。 |
| 在烤盘或烤模中烘焙的蛋糕后部颜色太深。 | 将烤盘放在附件中间,不要紧贴后壁。 |
| 整个蛋糕颜色太深。 | 下次选择较低的温度,并根据需要延长烘焙时间。 |
| 蛋糕呈不均匀的褐色。 | 选择略低的温度。防油纸伸出会影响空气流通。一定要将防油纸剪裁到合适尺寸。确保烤模没有正对烹饪箱后壁中的开口。当烘焙小食品时,应尽可能使用类似的尺寸和厚度。 |
| 如果您正在同时使用好几层进行烘焙。顶层烤盘中的食品会比底层烤盘中的食品颜色深一些。 | 一定要在同时使用好几层进行烘焙时选择热风。同时放进烤箱烤盘或烤模/餐具的烘焙食品不一定会同时烤好。 |
| 蛋糕看起来很好,但中间部位没有烤熟。 | 请使用较低的温度,并稍微烤久一点;根据需要稍微少放点液体。对于有湿配料的蛋糕,首先烘焙底部。然后洒上杏仁或面包屑,并把配料点缀在顶部。 |
| 将蛋糕翻转后,不能将其翻出蛋糕模。 | 烘焙之后,让蛋糕冷却5到10分钟。如果仍然粘连,可用刀子小心切开蛋糕边缘。再次翻转蛋糕模,并用冷的湿布将其覆盖几次。下次在烤模/餐具上涂上油脂,再撒面包屑。 |
烤制和精烹提示
| 烤肉颜色太深,脆皮烧焦和/或烤肉太干。 | 检查烹饪层和温度。下次选择较低的温度,并根据需要缩短烤制时间。 |
| 脆皮太薄。 | 提高温度,或在烤制时间结束时短时打开烧烤。 |
| 烤肉看上去很好,但肉汁烧干了。 | 下次用一个小一些的烤肉盘,并根据需要多加汁液。 |
| 烤肉看上去很好,但肉汁太清,水淋淋的。 | 下次用大一些的烤肉盘,并根据需要少加汁液。 |
| 肉在炖煮时烧焦。 | 烤肉盘和盖子必须尺寸合适,闭合严密。炖煮时根据需要降低温度并添加更多汁液。 |
丙
食品中的烯酰胺
丙烯酰胺主要产生于以高温制备的谷类和土豆产品中,例如土豆条、土豆片、切片面包、面包卷、面包、精烘焙食物(饼干、姜饼、五香饼干)。
使烯酰胺降至最少的技巧
| 概述 | 保持烹饪时间尽量短。烹饪时食物颜色变为金黄褐色即可,颜色不要太深。又大又厚的食品包含的丙烯酰胺较少。 |
| 烘焙 顶部/底部加热,最高200°C。 | 热风,最高180°C。 |
| 饼干 顶部/底部加热,最高190°C。 | 热风,最高170°C。蛋或蛋黄可减少丙烯酰胺的产生。 |
| 烤薯片 在烤盘上均匀地铺开一层。每个烤盘上至少烤400g,这样不会烤干。 | |
测试菜谱
编制这些表格是为了供测试学会使用,方便他们对电器进行检查。
符合 EN 60350-1。
烘焙
| 餐点 | 附件 | 烹饪层 | 加热功能 | 温度(°C) | 烹饪时间(分钟) | |||
| 酥饼条 | 烤盘+防油纸 | 2 | 160* | 23-25 | ||||
| 酥饼条,2层 | 2个烤盘+防油纸 | 2+4 | 160* | 28 | ||||
| 小蛋糕 | 烤盘+防油纸 | 2 | 160* | 21-22 | ||||
| 小蛋糕,2层 | 烤盘+烤架+防油纸 | 2+4 | 160* | 30 | ||||
| 热水海绵蛋糕 | 弹性蛋糕模 | 2 | 160* | 35 | ||||
| 热水海绵蛋糕,2层 | 2个弹性蛋糕模 | 2+4 | 155-165* | 35-45 | ||||
| 双层脆皮苹果派 | 1个 | 弹性蛋糕模 | 2 | 170* | 75-80 | |||
| 双层脆皮苹果派 | 2个 | 2个弹性蛋糕模 | 2 | 160* | 75-80 | |||
| *预热 | ||||||||
烧烤
同时也滑入普通烤盘。烤盘接住汁液,确保烹饪箱更清洁。
| 餐点 附件 烹饪层 加热功能 烧烤设置 烹饪时间(分钟) | |||||
| 烤面包 烤架 4 | ☐ | 3* | |||
| 牛肉汉堡 10个,75 mm直径 烤盘+烤架 | 3+4 | ☐ | 3* | ||
| *预热 | |||||
产品保修指南
友情提示
- 如果您的机器出现异常现象,在联系客户服务之前,请先阅读机器说明书中的《故障检修》进行排除。
- 如果维修人员上面后发现机器并无故障,即使在包修期内,您也将承担相关费用。
您可以在本指南中找到客户服务的联系方式。
在上门服务前请提供下列信息:
详细地址和电话号码、故障描述、购机及收货日期、产品型号(E-Nr)、生产日期(FD)。上述信息有助于更好地为您提供服务,同时也可以为您省去不必要的开支。产品型号请参见铭牌。
友情提示
- 根据《中华人民共和国消费者权益保护法》和《部分商品修理更换退货责任规定》,本机作为家用电器,自购买收货之日起整机包修1年,主要部件包修1年。用于生产经营目的、商用、公司集体使用等用途所购买的家电,其整机及主要零配件自收货之日起包修期为3个月,除非购销合同中另有规定。法律法规另有规定的,按照其规定执行。
- 产品存在瑕疵但不影响产品的性能、功能,也不违反国家强制性规定,长方、商业单位作降价处理的,其包修条件同上,但因此而降价的部件不予包修。
- 包修期内,用户修理时必须提供修理产品的有效收货凭证、购买发票和厂方指定的相关三包凭证,三包包修期自购买收货之日算起。如果收货凭证遗失,按照购买发票日期顺延7日作为三包开始日期。如果收货凭证和购买发票同时遗失且不能提供有限信息,按照出厂日期顺延45日作为包修开始日期。
4.除另有规定外,下列项目不属于免费包修范围,应实行收费修理。 - 用户搬运,安装,使用,维护,保管不当而损坏的;
- 使用电源电压低于187伏或高于240伏而损坏的;
- 自行或非厂方特约维修点拆修的;
- 无有效购买发票和三包凭证的
- 购买发票或三包凭证型号与产品型号不符或涂改的;
用无可接线中进进信息提示的
西门子家用电器客户服务保修卡
SIEMENS
| 顾客姓名 | 联系电话 | ||
| 联系地址 | |||
| 购买日期 | |||
| 产品型号 | 发票号码 | ||
| 维修点名称 | 维修点电话 | ||
结算第五联

| 顾客姓名 | 联系电话 | ||
| 购买日期 | 发票号码 | ||
| 产品型号 | 出厂年月 | ||
| 维修日期 | 出厂序号 |
结算第四联

| 顾客姓名 | 联系电话 | ||
| 购买日期 | 发票号码 | ||
| 产品型号 | 出厂年月 | ||
| 维修日期 | 出厂序号 |
结算第三联

| 顾客姓名 | 联系电话 | ||
| 购买日期 | 发票号码 | ||
| 产品型号 | 出厂年月 | ||
| 维修日期 | 出厂序号 |
结算第二联


| 顾客姓名 | 联系电话 | ||
| 购买日期 | 发票号码 | ||
| 产品型号 | 出厂年月 | ||
| 维修日期 | 出厂序号 |
结算第一联

| 顾客姓名 | 联系电话 | ||
| 购买日期 | 发票号码 | ||
| 产品型号 | 出厂年月 | ||
| 维修日期 | 出厂序号 |
产品中有害物质的名称及含量
| 部件名称 | 有害物质 | |||||
| 铅(Pb) | 汞(Hg) | 镉(Cd) | 六价铬(Cr(VI)) | 多溴联苯(PBB) | 多溴二苯醚(PBDE) | |
| 印制电路组件 | × | ○ | ○ | ○ | ○ | ○ |
| 显示单元 | ○ | ○ | ○ | ○ | ○ | ○ |
| 电源线及连接线 | ○ | ○ | ○ | ○ | ○ | ○ |
| 电机、驱动部件及风扇 | ○ | ○ | ○ | ○ | ○ | ○ |
| 外壳组件 | ○ | ○ | ○ | ○ | ○ | ○ |
| 隔热组件 | ○ | ○ | ○ | ○ | ○ | ○ |
| 加热腔体组件 | ○ | ○ | ○ | ○ | ○ | ○ |
| 照明组件 | ○ | ○ | ○ | ○ | ○ | ○ |
| 门体组件 | ○ | ○ | ○ | ○ | ○ | ○ |
| 本表格依据SJ/T 11364的规定编制。○:表示该有害物质在该部件所有均质材料中的含量均在GB/T 26572规定的限量要求以下。×:表示该有害物质至少在该部件的某一均质材料中的含量超出GB/T 26572规定的限量要求。 | ||||||
注意:上表包含了本公司生产的此类产品的全部部件,本产品的部件以实际配置为准。如您对此有任何疑问,请拨打本产品所提供的公司客服电话。
产品环保信息提示性说明
请按照产品说明书的要求使用和维护本产品,不当利用或者处置本产品可能会对环境和人类健康造成影响。依照国家《废弃电器电子产品回收处理条例》的有关规定,当您计划将此产品废弃时,请将其交给具有废弃电器电子产品处理资格的处理企业进行处理。产品中有毒有害物质含量信息参照上表。
食品接触用材料及制品信息
本产品中下列预期或可能与食品接触用材料及制品,符合 GB 4806.1-2016 及相应食品接触材料及制品的食品安全国家标准要求。
| 食品接触用材料 | 用途 | 执行标准 | 备注 | |
| 钢1.0394(Mn:0.40,P:0.03,S:0.05)/搪瓷 | 内腔,烤盘等 | GB 4806.3-2016GB 4806.9-2016 | 不得长时间接触酸性食品 | |
| 陶瓷/搪瓷 | 披萨盘 | GB 4806.3-2016GB 4806.4-2016 | ||
| 金属 | 钢FE360基材(C:0.17,P:0.045,S:0.045,N2:0.09)(镀铬) | 烤架,烤肉架等 | GB 4806.9-2016 | 不得接触酸性食品 |
| 不锈钢10Cr17 | 烤肉叉等 | |||
注1:上表包含了本公司生产的此类产品的预期或可能与食品接触的全部部件,本产品的部件以实际配置为准。
注2:请根据说明书要求正常使用本产品,限制使用条件见上表备注栏。
未按上述要求使用本产品所造成的食品污染以及相应的人身损害由使用人自行承担相应法律责任。
如您对此有任何疑问,请拨打本产品所提供的公司客服电话。
BSH Hausgeräte GmbH
Carl-Wery-Str. 34
81739 München
GERMANY
Manufactured by BSH Hausgeräte GmbH under Trademark License of Siemens AG
由BSH家用电器有限公司根据西门子股份公司的商标许可制造
siemens-home.bsh-group.com

9001414382 (990725)
