
Expression Premium XP-615 - Skrivare EPSON - Gratis bruksanvisning och manual
Hitta enhetens manual gratis Expression Premium XP-615 EPSON i PDF-format.

Användarfrågor om Expression Premium XP-615 EPSON
0 fråga om denna apparat. Svara på dem du kan eller ställ din egen.
Ställ en ny fråga om denna apparat
Ladda ner instruktionerna för din Skrivare i PDF-format gratis! Hitta din manual Expression Premium XP-615 - EPSON och ta tillbaka ditt elektroniska enhet i hand. På denna sida publiceras alla dokument som behövs för att använda din enhet. Expression Premium XP-615 av märket EPSON.
BRUKSANVISNING Expression Premium XP-615 EPSON
User's Guide
NPD4898-00 EN
Copyright and Trademarks
Copyright and Trademarks
No part of this publication may be reproduced, stored in a retrieval system, or transmitted in any form or by any means, electronic, mechanical, photocopying, recording, or otherwise, without the prior written permission of Seiko Epson Corporation. No patent liability is assumed with respect to the use of the information contained herein. Neither is any liability assumed for damages resulting from the use of the information herein. The information contained herein is designed only for use with this Epson product. Epson is not responsible for any use of this information as applied to other products.
Neither Seiko Epson Corporation nor its affiliates shall be liable to the purchaser of this product or third parties for damages, losses, costs, or expenses incurred by the purchaser or third parties as a result of accident, misuse, or abuse of this product or unauthorized modifications, repairs, or alterations to this product, or (excluding the U.S.) failure to strictly comply with Seiko Epson Corporation's operating and maintenance instructions.
Seiko Epson Corporation and its affiliates shall not be liable for any damages or problems arising from the use of any options or any consumable products other than those designated as Original Epson Products or Epson Approved Products by Seiko Epson Corporation.
Seiko Epson Corporation shall not be held liable for any damage resulting from electromagnetic interference that occurs from the use of any interface cables other than those designated as Epson Approved Products by Seiko Epson Corporation.
EPSON® is a registered trademark, and EPSON EXCEED YOUR VISION or EXCEED YOUR VISION is a trademark of Seiko Epson Corporation.
PRINT Image Matching ^™ and the PRINT Image Matching logo are trademarks of Seiko Epson Corporation. Copyright © 2001 Seiko Epson Corporation. All rights reserved.
SDXC Logo is a trademark of SD-3C, LLC.

Memory Stick Duo, Memory Stick PRO Duo, Memory Stick PRO-HG Duo, Memory Stick Micro, and MagicGate Memory Stick Duo are trademarks of Sony Corporation.

PictBridge is a trademark.

PictBridge

PictBridge
User's Guide
Copyright and Trademarks
Intel ^® is a registered trademark of Intel Corporation.
PowerPC® is a registered trademark of International Business Machines Corporation.
Epson Scan software is based in part on the work of the Independent JPEG Group.
libtiff
Copyright © 1988-1997 Sam Leffler
Copyright © 1991-1997 Silicon Graphics, Inc.
Permission to use, copy, modify, distribute, and sell this software and its documentation for any purpose is hereby granted without fee, provided that (i) the above copyright notices and this permission notice appear in all copies of the software and related documentation, and (ii) the names of Sam Leffler and Silicon Graphics may not be used in any advertising or publicity relating to the software without the specific, prior written permission of Sam Leffler and Silicon Graphics.
THE SOFTWARE IS PROVIDED "AS-IS" AND WITHOUT WARRANTY OF ANY KIND, EXPRESS, IMPLIED OR OTHERWISE, INCLUDING WITHOUT LIMITATION, ANY WARRANTY OF MERCHANTABILITY OR FITNESS FOR A PARTICULAR PURPOSE.
IN NO EVENT SHALL SAM LEFFLER OR SILICON GRAPHICS BE LIABLE FOR ANY SPECIAL, INCIDENTAL, INDIRECT OR CONSEQUENTIAL DAMAGES OF ANY KIND, OR ANY DAMAGES WHATSOEVER RESULTING FROM LOSS OF USE, DATA OR PROFITS, WHETHER OR NOT ADVISED OF THE POSSIBILITY OF DAMAGE, AND ON ANY THEORY OF LIABILITY, ARISING OUT OF OR IN CONNECTION WITH THE USE OR PERFORMANCE OF THIS SOFTWARE.
Microsoft®, Windows®, and Windows Vista® are registered trademarks of Microsoft Corporation.
Apple, Macintosh, Mac OS, and OS X are trademarks of Apple Inc., registered in the U.S. and other countries.
AirPrint is a trademark of Apple Inc.
Google Cloud Print ^TM is a registered trademark of Google Inc.
ABBYY® and ABBYY FineReader® names and logos are registered trademarks of ABBYY Software House.
Adobe, Adobe Reader, Acrobat, and Photoshop are trademarks of Adobe systems Incorporated, which may be registered in certain jurisdictions.
General Notice: Other product names used herein are for identification purposes only and may be trademarks of their respective owners. Epson disclaims any and all rights in those marks.
© 2013 Seiko Epson Corporation. All rights reserved.
The contents of this manual and the specifications of this product are subject to change without notice.
Contents
Copyright and Trademarks
Copyright and Trademarks. 2
Introduction
Where to Find Information. 8
Caution, Important and Note. 8
Operating System Versions....8
Using Epson Connect Service....9
Important Instructions
Safety Instructions....10
Product Advisories and Warnings. 10
Setting up/using the product. 11
Using the product with a wireless connection 12
Using memory cards....12
Using the touchscreen and touchpad. . . . . . . . 12
Handling ink cartridges. 13
Restrictions on Copying. 13
Protecting Your Personal Information. 13
Getting to Know Your Product
Available features for your product. 15
Product Parts. 16
Notes regarding the control panel and the output tray....19
Guide to the Control Panel. 19
Button and LCD....20
Using the LCD screen. 21
Lights. 22
Paper and Media Handling
Introduction to Using, Loading, and Storing
Media. 23
Storing paper....23
Selecting Paper. 23
Paper type settings on the LCD screen. . . . . . . 25
Paper type settings from the printer driver. . . . . 26
Loading Paper....27
Into the paper cassette....27
Into the rear paper feed slot. 34
Loading a CD/DVD. 36
Removing a CD/DVD. 38
Inserting a Memory Card. 38
Placing Originals. 39
Automatic Document Feeder (ADF)....39
Scanner glass. 42
Copying
Copying Documents. 45
Basic copying. 45
2-Sided copying. 45
Layout copying. 46
Copy Mode Menu List. 47
Printing
Basic Operation from the Control Panel. . . . . . . . 48
Printing photos (XP-710 Series/XP-810
Series). 48
Printing photos (XP-610 Series) 49
Printing photos from a digital camera. . . . . . . 49
Print photos mode menu list. 51
Basic Operation from Your Computer. . . . . . . . . 51
Printer driver and status monitor. 51
Basic Printing. 53
Canceling Printing. 57
Other Options. 59
Printing photos the easy way....59
Printing on CD/DVD. 59
Product presets (for Windows only). . . . . . . . . . . 61
2-sided printing. 62
Fit to page printing. 64
Pages per sheet printing. 65
Sharing the Product for Printing. 66
Setup for Windows....66
Setup for Mac OS X. 69
Scanning
Let's Try Scanning. 70
Starting a Scan. 70
Image Adjustment Features....72
Basic Scanning from the Control Panel. . . . . . . . . 74
Scan mode menu list. 75
Basic Scanning from Your Computer....75
Contents
Scanning in Full Auto Mode. 75
Scanning in Home Mode. 77
Scanning in Office Mode. 79
Scanning in Professional Mode. 81
Previewing and Adjusting the Scan Area. . . . . . 83
Various Types of Scanning....85
Scanning a Magazine. 85
Scanning Multiple Documents to a PDF File 87
Scanning a Photo. 90
Software Information. 91
Starting Epson Scan Driver....91
Starting Epson Event Manager. 92
Faxing
Introducing FAX Utility. 93
Connecting to a Phone Line....93
About a phone cable....93
Using the phone line for fax only. . . . . . . . . . . . . 94
Sharing line with phone device. 94
Setting the line type. 96
Checking the fax connection. 97
Setting Up Fax Features. 97
Setting up speed dial entries. 97
Setting up group dial entries. 98
Creating header information. 99
Changing the received fax output settings. . . . . 100
Sending Faxes. 101
Sending faxes by entering a number. . . . . . . . 101
Sending faxes using speed dial/group dial. . . . . 102
Sending faxes by broadcasting. 102
Sending a fax at a specified time. . . . . . . . . . . 103
Sending a fax from a connected phone. . . . . . 104
Receiving Faxes. 105
Setting up to receive faxes automatically. . . . . 105
Receiving faxes manually....106
Viewing received faxes on the LCD screen. . . . 106
Receive a fax by polling. 107
Printing Reports.... 108
Fax Mode Menu List. 108
More Functions
Printing origami envelopes. 111
More Functions mode menu list....112
Menu List of Control Panel
Copy Mode. 113
XP-710 Series/XP-810 Series. 113
XP-610 Series. 114
Print Photos Mode.... 114
XP-710 Series/XP-810 Series ..... 114
XP-610 Series 115
Scan Mode. 117
XP-710 Series/XP-810 Series. 117
XP-610 Series. 117
Fax Mode....118
More Functions Mode....119
XP-710 Series/XP-810 Series. 119
XP-610 Series. 121
Wi-Fi Setup Mode....124
XP-710 Series/XP-810 Series. 124
XP-610 Series. 124
Setup Mode....124
XP-710 Series/XP-810 Series. 124
XP-610 Series. 127
Setup Mode - Fax Settings. 129
Help Mode. 131
XP-710 Series/XP-810 Series.... 131
XP-610 Series. 132
Quiet Mode.... 132
Ink Cartridge Information
Replacing Ink Cartridges
Ink Cartridge Safety Instructions, Precautions, and Specifications. 134
Safety instructions....134
Precautions on ink cartridge replacement....134
Ink Cartridge Specifications....135
Checking the Ink Cartridge Status. 136
For Windows.... 136
For Mac OS X. 137
Using the control panel. 138
Temporary Printing with Black Ink When Color Ink Cartridges or a Photo Black Ink Cartridge are Expended. 139
For Windows.... 139
For Mac OS X. 140
Conserving Black Ink When the Cartridge is Low (For Windows Only). 142
Replacing an ink cartridge. 142
Contents
Maintaining Your Product and Software
Checking the Print Head Nozzles....147
Using the Nozzle Check utility for Windows 147
Using the Nozzle Check utility for Mac OS X 147
Using the control panel. 148
Cleaning the Print Head. 148
Using the Head Cleaning utility for Windows 149
Using the Head Cleaning utility for Mac OS X 149
Using the control panel. 150
Aligning the Print Head. 150
Using the Print Head Alignment utility for Windows.... 150
Using the Print Head Alignment utility for Mac OS X. 151
Using the control panel.... 151
Setting/Changing Time and Region. 152
Saving Power.... 153
For Windows.... 153
For Mac OS X. 153
Using the control panel. 154
Quieter Printer Operations. 154
For Windows.... 154
For Mac OS X. 154
Using the control panel.... 155
Making Network Service Settings....155
Cleaning the Product. 156
Cleaning the exterior of the product. . . . . . . . 156
Cleaning the interior of the product. . . . . . . . 158
Transporting the Product. 158
Checking and Installing Your Software. . . . . . . . 160
Checking the software installed on your computer.... 160
Installing the software.... 161
Uninstalling Your Software....161
For Windows.... 162
For Mac OS X. 163
Transferring Data Using an External Storage Device
Precautions on Storage Devices. 164
Copying Files Between a Storage Device and Your
Computer....164
Copying files to your computer. 164
Saving files to a storage device.... 165
Error Indicators
Error Messages on the Control Panel. 167
Troubleshooting for Printing/Copying
Diagnosing the Problem. 169
Checking product status. 169
Paper Jams. 172
Removing jammed paper from the rear cover 172
Removing jammed paper from inside the product. 173
Removing jammed paper from the paper cassette....174
Removing jammed paper from the Automatic Document Feeder (ADF)....175
Preventing paper jams. 177
Reprinting after a paper jam (for Windows only). 177
Print Quality Help. 178
Horizontal banding....179
Vertical banding or misalignment....179
Incorrect or missing colors.... 180
Blurry or smeared print. 180
Miscellaneous Printout Problems....181
Incorrect or garbled characters....181
Incorrect margins.... 181
Printout has a slight slant. 182
Size or position of copied image is incorrect. . . 182
Inverted image.... 182
Paper or CD/DVD only prints halfway or is blank. 182
Printed side is smeared or scuffed. 183
Printing is too slow.... 183
Paper Does Not Feed Correctly or the CD/DVD
Tray is Not Inserted Correctly. 184
Paper does not feed. 184
Multiple pages feed. 184
Paper is improperly loaded. 185
Paper is not ejected fully or is wrinkled. . . . . . . 185
The CD/DVD tray is ejected or not inserted correctly when sending a CD/DVD print job 185
The Product Does Not Print. 185
All lights are off....185
Lights came on and then went out. 185
Only the power light is on. 186
Contents
An ink error is indicated after you replace the cartridge. 186
Increasing the Print Speed (For Windows Only) 187
Troubleshooting for Scanning
Problems Indicated by Messages on the LCD screen or Status Light. 189
Problems When Starting a Scan. 189 Using the Automatic Document Feeder (ADF) 189
Using the button....190
Using scanning software other than Epson Scan driver. 191
Problems When Feeding Paper.... 191
The paper gets dirty....191
Multiple sheets of paper are fed. 191
The paper jams in the Automatic Document Feeder (ADF)....191
Problems With Scanning Time.... 191
Problems With Scanned Images. 192
Scan quality is unsatisfactory. 192
The scanning area or direction is unsatisfactory. 193
Problems Remain After Trying All Solutions. . . . 194
Troubleshooting for Faxing
Cannot send and receive fax. 195
Quality problems (sending).... 195
Quality problems (receiving). 196
Answering machine cannot answer voice calls. . . 196
Incorrect time....196
Product Information
System Requirements. 197
For Windows.... 197
For Mac OS X. 197
Technical Specifications....197
Printer specifications....197
Scanner specifications.... 201
Automatic Document Feeder (ADF) specifications.... 201
Fax specifications....201
Network interface specification. 202
Memory card. 202
Mechanical....203
Electrical....205
Environmental. 206
Standards and approvals. 206
Interface. 207
External USB device. 207
Where To Get Help
Technical Support Web Site. 209
Contacting Epson Support. 209
Before Contacting Epson. 209
Help for Users in Europe. 210
Help for Users in Australia. 210
Index
Introduction
Where to Find Information
The latest version of the following manuals are available on the Epson support website. http://www.epson.eu/Support (Europe) http://support.epson.net/ (outside Europe)
□ Start Here (paper):
Provides you with information on setting up the product and installing the software.
□ User's Guide (PDF):
Provides you with detailed operating, safety, and troubleshooting instructions. See this guide when using this product with a computer, or when using advanced features such as 2 sided copying. To view the PDF manual, you need Adobe Acrobat Reader 5.0 or later, or Adobe Reader.
□ Network Guide (PDF):
Provides network administrators with information on both the printer driver and network settings.
☐ Help (on the product display):
Provides basic operating and troubleshooting instructions on the product's LCD screen. Select the Help menu on the control panel.
Caution, Important and Note
Caution, Important and Note in this manual are indicated as below and have the following meaning.

Caution
must be followed carefully to avoid bodily injury.

Important
must be observed to avoid damage to your equipment.
Note
contain useful tips and restrictions on product operation.
Operating System Versions
In this manual, the following abbreviations are used.
☐ Windows 8 refers to Windows 8 and Windows 8 Pro.
Introduction
Windows 7 refers to Windows 7 Home Basic, Windows 7 Home Premium, Windows 7 Professional, and Windows 7 Ultimate.
Windows Vista refers to Windows Vista Home Basic Edition, Windows Vista Home Premium Edition, Windows Vista Business Edition, Windows Vista Enterprise Edition, and Windows Vista Ultimate Edition.
☐ Windows XP refers to Windows XP Home Edition, Windows XP Professional x64 Edition, and Windows XP Professional.
☐ Mac OS X refers to Mac OS X 10.5.8, 10.6.x, 10.7.x, 10.8.x.
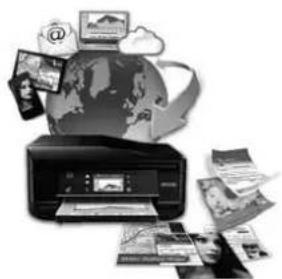
Using Epson Connect Service
Using Epson Connect and other companies' services, you can easily print directly from your smartphone, tablet PC or laptop, anytime and practically anywhere even across the globe! For more information about printing and other services, visit the following URL;
https://www.epsonconnect.com/ (Epson Connect portal site)
http://www.epsonconnect.eu/ (Europe only)
natural_image
Illustration of a printer emitting digital documents with a globe and cloud icons above (no text or symbols)Note:
You can make network service settings using a Web browser on your computer, smartphone, tablet PC, or laptop that is connected to the same network as the product.
→ "Making Network Service Settings" on page 155
Important Instructions
Safety Instructions
Read and follow these instructions to ensure safe use of this product. Make sure you keep this guide for future reference. Also, be sure to follow all warnings and instructions marked on the product.
☐ Use only the power cord supplied with the product and do not use the cord with any other equipment. Use of other cords with this product or the use of the supplied power cord with other equipment may result in fire or electric shock.
☐ Be sure your AC power cord meets the relevant local safety standard.
□ Never disassemble, modify, or attempt to repair the power cord, plug, printer unit, scanner unit, or options by yourself, except as specifically explained in the product's guides.
☐ Unplug the product and refer servicing to qualified service personnel under the following conditions: The power cord or plug is damaged; liquid has entered the product; the product has been dropped or the casing damaged; the product does not operate normally or exhibits a distinct change in performance. Do not adjust controls that are not covered by the operating instructions.
Place the product near a wall outlet where the plug can be easily unplugged.
☐ Do not place or store the product outdoors, near excessive dirt or dust, water, heat sources, or in locations subject to shocks, vibrations, high temperature or humidity.
☐ Take care not to spill liquid on the product and not to handle the product with wet hands.
☐ Keep this product at least 22 cm away from cardiac pacemakers. Radio waves from this product may adversely affect the operation of cardiac pacemakers.
☐ If the LCD screen is damaged, contact your dealer. If the liquid crystal solution gets on your hands, wash them thoroughly with soap and water. If the liquid crystal solution gets into your eyes, flush them immediately with water. If discomfort or vision problems remain after a thorough flushing, see a doctor immediately.
☐ Avoid using a telephone during an electrical storm. There may be a remote risk of electric shock from lightning (for fax capable models).
☐ Do not use a telephone to report a gas leak in the vicinity of the leak (for fax capable models).
Note:
The following provides safety instructions for ink cartridges.
→ "Replacing Ink Cartridges" on page 134
Product Advisories and Warnings
Read and follow these instructions to avoid damaging the product or your property. Make sure you keep this guide for future reference.
Setting up/using the product
☐ Do not block or cover the vents and openings in the product.
□ Use only the type of power source indicated on the product's label.
☐ Avoid using outlets on the same circuit as photocopiers or air control systems that regularly switch on and off.
☐ Avoid electrical outlets controlled by wall switches or automatic timers.
☐ Keep the entire computer system away from potential sources of electromagnetic interference, such as loudspeakers or the base units of cordless telephones.
☐ The power-supply cords should be placed to avoid abrasions, cuts, fraying, crimping, and kinking. Do not place objects on top of the power-supply cords and do not allow the power-supply cords to be stepped on or run over. Be particularly careful to keep all the power-supply cords straight at the ends and the points where they enter and leave the transformer.
☐ If you use an extension cord with the product, make sure that the total ampere rating of the devices plugged into the extension cord does not exceed the cord's ampere rating. Also, make sure that the total ampere rating of all devices plugged into the wall outlet does not exceed the wall outlet's ampere rating.
☐ If you plan to use the product in Germany, the building installation must be protected by a 10 or 16 amp circuit breaker to provide adequate short-circuit protection and over-current protection for the product.
☐ When connecting the product to a computer or other device with a cable, ensure the correct orientation of the connectors. Each connector has only one correct orientation. Inserting a connector in the wrong orientation may damage both devices connected by the cable.
Place the product on a flat, stable surface that extends beyond the base of the product in all directions. If you place the product by the wall, leave more than 10 cm between the back of the product and the wall. The product will not operate properly if it is tilted at an angle.
Place the product with its right side at least 10 cm away from the wall or any other objects (for fax capable models).
☐ When storing or transporting the product, avoid tilting it, placing it vertically, or turning it upside down; otherwise ink may leak.
☐ Allow spaces behind the product for the cables, and space above the product so that you can fully raise the document cover.
Leave enough space in front of the product for the paper to be fully ejected.
☐ Avoid places subject to rapid changes in temperature and humidity. Also, keep the product away from direct sunlight, strong light, or heat sources.
☐ Do not insert objects through the slots in the product.
☐ Do not put your hand inside the product or touch the ink cartridges during printing.
☐ Do not touch the white flat cable inside the product.
☐ Do not use aerosol products that contain flammable gases inside or around the product. Doing so may cause fire.
Important Instructions
☐ Do not move the print head by hand; otherwise, you may damage the product.
□ Always turn the product off using the ⏻ button. Do not unplug the product or turn off the power at the outlet until the LCD screen has turned off completely.
Before transporting the product, make sure that the print head is in the home (far right) position and the ink cartridges are in place.
☐ Be careful not to trap your fingers when closing the scanner unit.
☐ If you are not going to use the product for a long period, be sure to unplug the power cord from the electrical outlet.
☐ Do not press too hard on the scanner glass when placing the originals.
During the life of your product it may be necessary to replace the waste ink pad when it has become full. Whether and how often this is required will vary according to the number of pages you print, the type of material that you print and the number of cleaning cycles that the product performs. Epson Status Monitor, your LCD, or lights on the control panel will advise you when this part needs replacing. The need for replacement of the pad does not mean that your product has ceased to operate in accordance with its specifications. The replacement of this part is a routine product servicing activity within the product's specification and is not a problem which requires repair. The Epson warranty does not therefore cover the cost of this replacement. If your product needs the pad replacing this can be performed for you by any authorised Epson service provider. It is not a user-serviceable part.
Using the product with a wireless connection
☐ Do not use this product inside medical facilities or near medical equipment. Radio waves from this product may adversely affect the operation of electrical medical equipment.
☐ Do not use this product near automatically controlled devices such as automatic doors or fire alarms. Radio waves from this product may adversely affect these devices, and could lead to accidents due to malfunction.
Using memory cards
☐ Do not remove a memory card or turn off the product while the memory card light is flashing.
☐ The methods for using memory cards vary according to card type. Be sure to refer to the documentation packaged with your memory card for details.
☐ Use only memory cards compatible with the product.
→ "Memory card" on page 202
Using the touchscreen and touchpad
☐ The LCD screen may contain a few small bright or dark spots, and because of its features it may have an uneven brightness. These are normal and do not indicate that it is damaged in any way.
☐ Only use a dry, soft cloth to clean the touchscreen and touchpad. Do not use liquid or chemical cleansers.
☐ The exterior cover of the touchscreen and touchpad could break if it receives a heavy impact. Contact your dealer if the panel surface chips or cracks, and do not touch or attempt to remove the broken pieces.
Important Instructions
For XP-610 Series
The touchpad is a capacitive touchscreen, which responds only when touched directly with a finger. The panel may not respond when touched with wet hands, gloved hands, or touched through a protective sheet or sticker.
☐ Press the touchscreen and touchpad gently with your finger. Do not press force or operate with your nails.
☐ Do not operate by a sharp edge thing such as a ball point pen, sharp pencil, stylus pen and so on.
☐ Condensation inside the panel due to abrupt changes in temperature or humidity may cause performance to deteriorate.
Handling ink cartridges
→ "Replacing Ink Cartridges" on page 134
Restrictions on Copying
Observe the following restrictions in order to ensure the responsible and legal use of the product.
Copying of the following items is prohibited by law:
☐ Bank bills, coins, government-issued marketable securities, government bond securities, and municipal securities
☐ Unused postage stamps, pre-stamped postcards, and other official postal items bearing valid postage
□ Government-issued revenue stamps, and securities issued according to legal procedure
Exercise caution when copying the following items:
Private marketable securities (stock certificates, negotiable notes, checks, etc.), monthly passes, concession tickets, etc.
Passports, driver's licenses, warrants of fitness, road passes, food stamps, tickets, etc.
Note:
Copying these items may also be prohibited by law.
Responsible use of copyrighted materials:
☐ Products can be misused by improperly copying copyrighted materials. Unless acting on the advice of a knowledgeable attorney, be responsible and respectful by obtaining the permission of the copyright holder before copying published material.
Protecting Your Personal Information
Note:
This function is only available for XP-810 Series.
User's Guide
Important Instructions
This product allows you to store names and telephone numbers in its memory even when the power is turned off.
Use the following menu to erase the memory if you give the product to someone else or dispose of it.
Setup > Restore Default Settings > All Settings
Getting to Know Your Product
Available features for your product
Check what is available for your product.
| XP-610 Series | XP-710 Series | XP-810 Series | ||
| ✓ | ✓ | ✓ | ||
| Copy | ✓ | ✓ | ✓ | |
| Scan | ✓ | ✓ | ✓ | |
| Fax | - | - | ✓ | |
| ADF | - | - | ✓ | |
| Ethernet | - | - | ✓ | |
| Wi-Fi | ✓ | ✓ | ✓ | |
| Epson Connect services | Email Print | ✓ | ✓ | ✓ |
| Remote Print Driver | ✓ | ✓ | ✓ | |
| Scan to Cloud | ✓ | ✓ | ✓ | |
| iPrint* | ✓ | ✓ | ✓ | |
| Other companies' services | AirPrint | ✓ | ✓ | ✓ |
| Google Cloud Print | ✓ | ✓ | ✓ | |
| PictBridge | USB | ✓ | ✓ | ✓ |
| LAN | - | - | ✓ | |
| WLAN | ✓ | ✓ | ✓ | |
* Epson iPrint is an application for iOS and Android. Using Epson iPrint, you can wirelessly print and scan from your smartphone or tablet. For more information, visit the following website.

http://ipr.to/a
Getting to Know Your Product
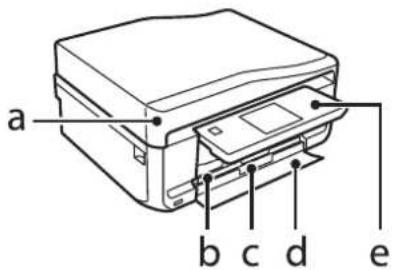
Product Parts
Note:
The illustrations in this manual are from a similar product model. Although they may differ from your actual product, the method of operation is the same.
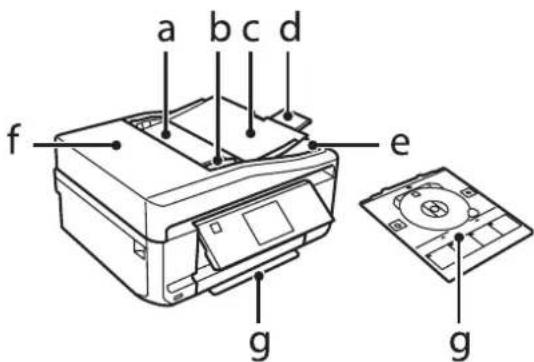
| a. | Automatic Document Feeder (ADF)* |
| b. | Edge guide* |
| c. | ADF input tray (place your originals here to be copied)* |
| d. | ADF output tray extension (slide out the extension when using the ADF)* |
| e. | ADF output tray (your originals are ejected here as they are copied)* |
| f. | ADF cover* |
| g. | CD/DVD tray |
* This part is only available for the XP-810 Series.
| a. | Document cover |
| b. | Paper cassette 1 (upper cassette)* ^1 |
| c. | Paper cassette 2 (lower cassette)* ^1 |
| d. | Front cover* ^1 |
| e. | Control panel* ^2 |
*1 See the following illustration for details.
*2 The control panel raises automatically when printing starts. Lower it manually if necessary. (XP-710 Series/XP-810 Series)
Getting to Know Your Product
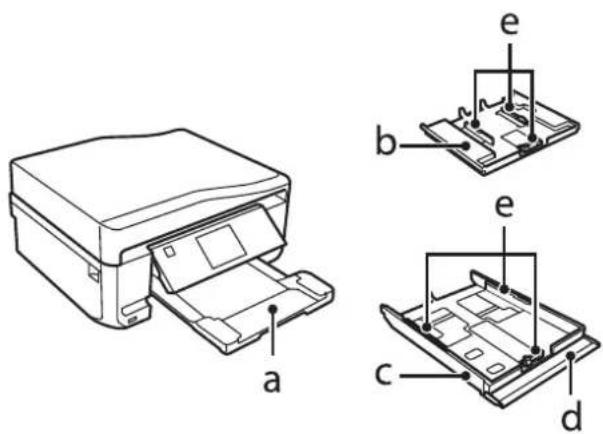
| a. | Output tray* |
| b. | Paper cassette 1 |
| c. | Paper cassette 2 |
| d. | Front cover |
| e. | Edge guides |
* The output tray slides out automatically when printing starts. Close it manually if necessary. (XP-710 Series/XP-810 Series)
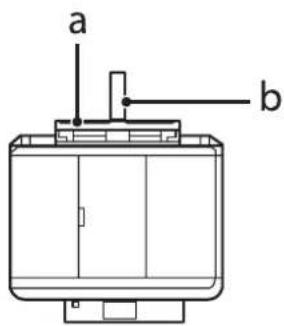
| a. | Rear paper feed slot* |
| b. | Paper support* |
* This part is only available for the XP-710 Series/XP-810 Series.
Getting to Know Your Product
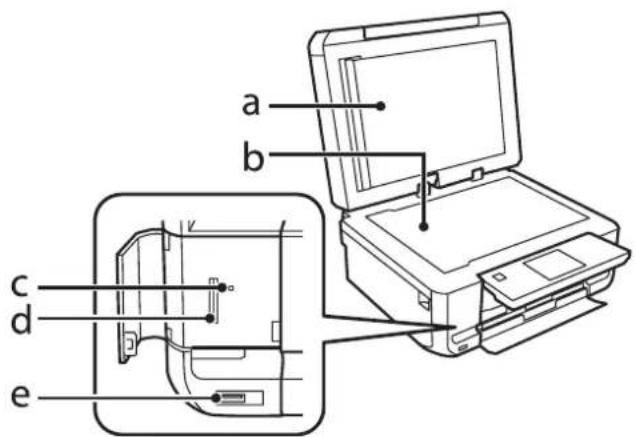
| a. | Document mat |
| b. | Scanner glass |
| c. | Memory card light |
| d. | Memory card slot |
| e. | External interface USB port |
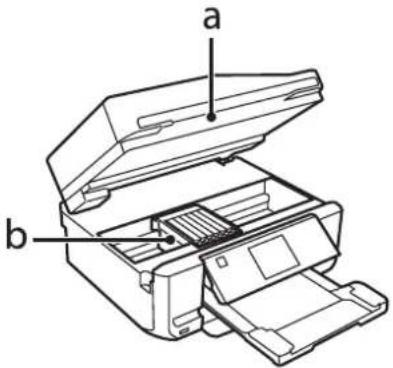
| a. | Scanner unit |
| b. | Print head / Ink cartridge holder |
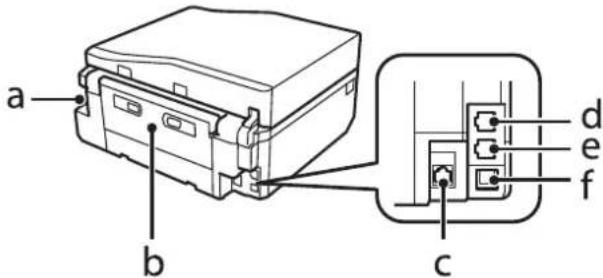
| a. | AC inlet |
| b. | Rear cover |
| c. | LAN port*1 |
| d. | LINE port*2 |
| e. | EXT. port*2 |
| f. | USB port |
*1 This part is only available for the XP-710 Series/XP-810 Series.
*2 This part is only available for the XP-810 Series.
Notes regarding the control panel and the output tray
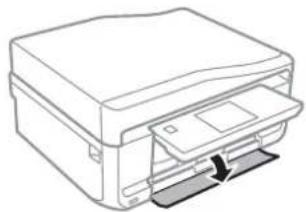
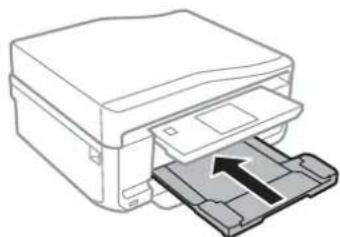
For the XP-710 Series/XP-810 Series, the control panel raises and the output tray slides out automatically when printing starts. This function is not available for the XP-610 Series.
After printing, close the output tray and lower the control panel manually for all models if necessary.
natural_image
Illustration of hands inserting a card into a printer (no text or symbols present)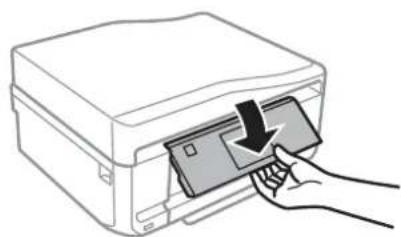
natural_image
Line drawing of a hand inserting a card into a printer (no text or symbols)Guide to the Control Panel
Note:
Although the control panel design and what displayed on the LCD screen such as menu names and option names may differ from your actual product, the method of operation is the same.
flowchart
graph TD
    subgraph Top
        a --> g
        b --> h
        c --> i
        j --> i
        g --> h
        h --> i
    end
    subgraph Bottom
        a --> g
        b --> h
        c --> h
        d --> e
        e --> f
        f --> o
        o --> h
        h --> i
    end
Getting to Know Your Product
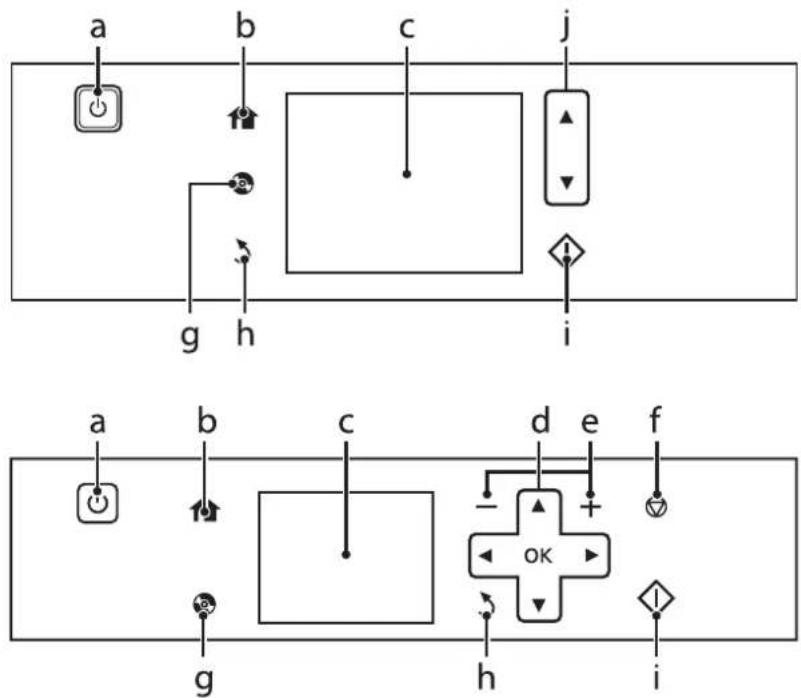
Button and LCD
| Buttons | Function | |
| a | [HC1S] | Turns the product on or off. |
| b | [036Z] | Displays the Home menu. |
| c | - | LCD screen displays menus.→ "Using the LCD screen" on page 21 |
| d | [200A] | Press ◀, ▲, ▶, ▼ to select menus. Press OK to confirm the setting you have selected and go to next screen. |
| e | + [802B] | Sets the number of copies and prints. |
| f | [143TD] | Stops the current operation or initializes the current settings. |
| g |  | Press to display the CD/DVD label menu.The product prepares CD/DVD label printing. |
| h | [743T] | Cancels/returns to the previous menu. |
| i |  | Starts copying/printing/scanning/faxing. |
| j | ▲, ▼ | Scrolls the screen. |
Using the LCD screen
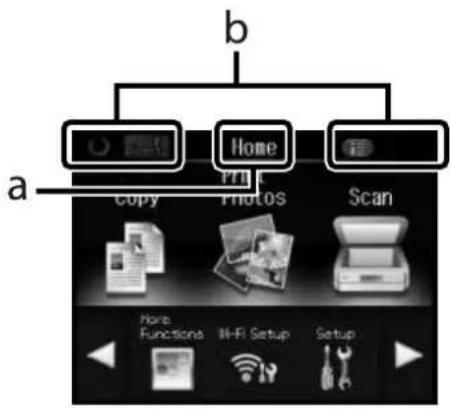
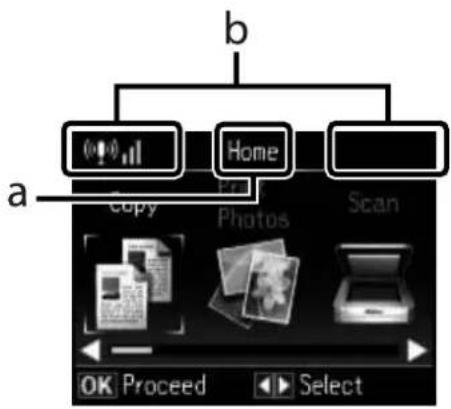
| a | Displays the screen name. |
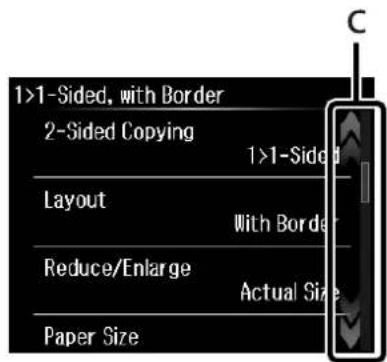
| b | Displays the status of the product.See the Help Mode for more information on the icons displayed on the LCD screen.Help > Icon ListFor XP-710 Series/XP-810 Series:You can display related menus or information by tapping the icons.(except [Auto] (Auto Answer icon).) |
| c | For XP-710 Series/XP-810 Series:You can scroll the screen by swiping the LCD screen while an arrow is displayed on the right-hand side of the screen. Try swiping a bit harder if the touchscreen is slow to respond. |
Getting to Know Your Product
About Auto Selection Mode
Auto Selection Mode displays menus according to your actions.

Note:
☐ Auto Selection Mode is not available for the XP-610 Series.
☐ When you insert a memory card, open the document cover, or load a document in the ADF, the LCD screen may not display the desired menu. In this case, press ↑ to display the Home menu.
☐ To disable this function, turn off each item in the Auto Selection Mode menu. Setup > Guide Functions > Auto Selection Mode.
Lights
| Lights | Function |
| On when the product is on.Flashes when the product is receiving data, printing/copying/scanning/faxing, replacing an ink cartridge, charging ink, or cleaning the print head.For XP-710 Series/XP-810 Series:Flashes slowly when the product is in sleep mode. |
Paper and Media Handling
Introduction to Using, Loading, and Storing Media
You can achieve good results with most types of plain paper. However, coated papers provide superior prints because they absorb less ink.
Epson provides special papers that are formulated for the ink used in Epson ink jet products, and recommends these papers to ensure high-quality results.
When loading special paper distributed by Epson, read the instruction sheets packed with the paper first and keep the following points in mind.
Note:
☐ Load the paper into the paper cassette printable side down. The printable side is usually whiter or glossier. See the instruction sheets packed with the paper for more information. Some types of paper have cut corners to help identify the correct loading direction.
☐ If the paper is curled, flatten it or curl it slightly in the opposite direction before loading. Printing on curled paper may cause ink to smear on your prints.
Storing paper
Return unused paper to the original package as soon as you finish printing. When handling special media, Epson recommends storing your prints in a resealable plastic bag. Keep unused paper and prints away from high temperature, humidity, and direct sunlight.
Selecting Paper
The table below lists supported papers. Loading capacity and borderless print availability varies by paper as shown.
Paper and Media Handling
| Media Type | Size | Loading capacity (sheets) | Borderless printing*7 | ||
| cassette 2 (lower cassette) | cassette 1 (upper cassette) | rear paper feed slot*5*6 | |||
| Plain paper*1 | Letter*2 | up to 11 mm | - | 1 | - |
| A4*2 | up to 11 mm | - | 1 | - | |
| B5*2 | up to 11 mm | - | 1 | - | |
| A5*2 | up to 11 mm | - | 1 | - | |
| A6*3 | up to 2 mm | up to 2 mm | 1 | - | |
| Legal*4 | 1*8 | - | 1 | - | |
| User defined size | 1 | - | 1 | - | |
| Envelope | #10 | 10 | - | 1 | - |
| DL | 10 | - | 1 | - | |
| C6 | 10 | - | 1 | - | |
| Epson Bright White Ink Jet Paper | A4*2 | 80 | - | 1 | - |
| Epson Photo Quality Ink Jet Paper | A4 | 80 | - | 1 | - |
| Epson Matte Paper-Heavyweight | A4 | 20 | - | 1 | ✓ |
| Epson Double-Sided Matte Paper | A4*4 | 1 | - | 1 | ✓ |
| Epson Photo Paper | A4 | 20 | - | 1 | ✓ |
| 10×15 cm (4×6 in.) | 20 | 20 | 1 | ✓ | |
| 13×18 cm (5×7 in.) | 20 | 20 | 1 | ✓ | |
| Epson Premium Glossy Photo Paper | A4 | 20 | - | 1 | ✓ |
| 10×15 cm (4×6 in.) | 20 | 20 | 1 | ✓ | |
| 13×18 cm (5×7 in.) | 20 | 20 | 1 | ✓ | |
| 16:9 wide size (102×181mm) | 20 | 20 | 1 | ✓ | |
| Epson Premium Semigloss Photo Paper | A4 | 20 | - | 1 | ✓ |
| 10×15 cm (4×6 in.) | 20 | 20 | 1 | ✓ | |
| Epson Photo Paper Glossy | A4 | 20 | - | 1 | ✓ |
| 10×15 cm (4×6 in.) | 20 | 20 | 1 | ✓ | |
| 13×18 cm (5×7 in.) | 20 | 20 | 1 | ✓ | |
Paper and Media Handling
| Media Type | Size | Loading capacity (sheets) | Borderless printing*7 | ||
| cassette 2 (lower cassette) | cassette 1 (upper cassette) | rear paper feed slot*5*6 | |||
| Epson Ultra Glossy Photo Paper | A4 | 20 | - | 1 | ✓ |
| 10×15 cm (4×6 in.) | 20 | 20 | 1 | ✓ | |
| 13×18 cm (5×7 in.) | 20 | 20 | 1 | ✓ | |
| Epson Glossy Photo Paper | A4 | 20 | - | 1 | ✓ |
| 10×15 cm (4×6 in.) | 20 | 20 | 1 | ✓ | |
| 13×18 cm(5×7 in.) | 20 | 20 | 1 | ✓ | |
| Epson Iron-On Cool Peel Transfer Paper | A4 | 1 | - | 1 | - |
| Epson Photo Stickers | A6 | 1 | 1 | 1 | - |
*1 Paper with a weight of 64 g/m² (17 lb) to 90 g/m² (24 lb).
*2 The loading capacity for manual 2-sided printing is 30 sheets.
*3 The loading capacity for manual 2-sided printing is 20 sheets.
*4 The loading capacity for manual 2-sided printing is 1 sheet.
*5 The rear paper feed slot is not available for XP-610 Series.
*6 Even though you can print on paper with a thickness of 0.05 to 0.6mm , some hard paper may not be fed correctly even if the thickness is within this range.
*7 Borderless printing is not available for 2-sided printing.
*8 This is only available for the XP-610 Series.
Note:
The availability of paper varies by location.
Paper type settings on the LCD screen
The product automatically adjusts itself for the type of paper you select in your print settings. That is why the paper type setting is so important. It tells your product what kind of paper you are using and adjusts the ink coverage accordingly. The table below lists the settings you should choose for your paper.
| For this paper | LCD paper type |
| Plain paper* | Plain Paper |
| Epson Bright White Ink Jet Paper* | Plain Paper |
| Epson Ultra Glossy Photo Paper | Ultra Glossy |
| Epson Premium Glossy Photo Paper | Prem. Glossy |
| Epson Premium Semigloss Photo Paper | Prem. Glossy |
| Epson Photo Paper Glossy | Glossy |
Paper and Media Handling
| Epson Glossy Photo Paper | Glossy |
| Epson Photo Paper | Photo Paper |
| Epson Photo Quality Ink Jet Paper | Matte |
| Epson Matte Paper-Heavyweight | Matte |
| Epson Double-Sided Matte Paper | Matte |
| Epson Photo Stickers | PhotoSticker16 |
* You can perform 2-sided printing with this paper.
Paper type settings from the printer driver
The product automatically adjusts itself for the type of paper you select in your print settings. That is why the paper type setting is so important. It tells your product what kind of paper you are using and adjusts the ink coverage accordingly. The table below lists the settings you should choose for your paper.
| For this paper | Printer driver paper type |
| Plain paper* | plain papers |
| Epson Bright White Ink Jet Paper* | plain papers |
| Epson Iron-On Cool Peel Transfer Paper | plain papers |
| Epson Ultra Glossy Photo Paper* | Epson Ultra Glossy |
| Epson Premium Glossy Photo Paper* | Epson Premium Glossy |
| Epson Premium Semigloss Photo Paper* | Epson Premium Semigloss |
| Epson Photo Paper Glossy* | Photo Paper Glossy |
| Epson Glossy Photo Paper* | Epson Glossy |
| Epson Photo Paper* | Epson Photo |
| Epson Photo Quality Ink Jet Paper* | Epson Photo Quality Ink Jet |
| Epson Matte Paper - Heavyweight* | Epson Matte |
| Epson Double-Sided Matte Paper* | Epson Matte |
| Epson Photo Stickers* | Epson Photo Stickers |
| Envelopes | Envelope |
* These paper types are compatible with Exif Print and PRINT Image Matching. For more information, refer to the documentation that came with the Exif Print or PRINT Image Matching compatible digital camera.
Note:
The availability of special media varies by location. For the latest information on media available in your area, contact Epson support.
→ "Technical Support Web Site" on page 209
Paper and Media Handling
Loading Paper
Into the paper cassette
Note:
The available paper type, size and loading capacity differs between cassette 1 and 2. See the following section for more information on paper availability.
→ "Selecting Paper" on page 23
Into the paper cassette 1
1 Open the front cover.
natural_image
Line drawing of a printer with paper feed and paper clip (no text or symbols)Note:
If the output tray has been ejected, close it before pulling out the paper cassette.

natural_image
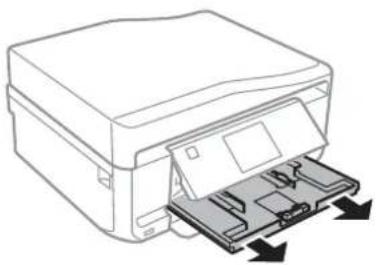
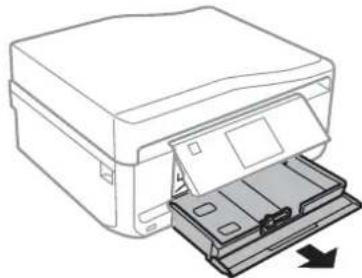
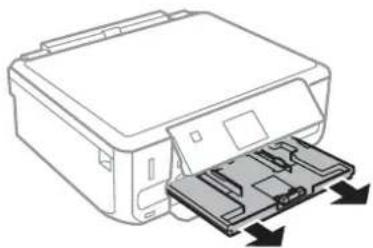
Diagram of a printer with an arrow indicating print direction (no text or symbols present)2 Pull out the paper cassette.
natural_image
Line drawing of a printer with a paper feed insert and paper tray, showing mechanical components (no text or symbols)Note:
If the cassette is too far inside the product, turn the product off and then back on again.
Paper and Media Handling
3
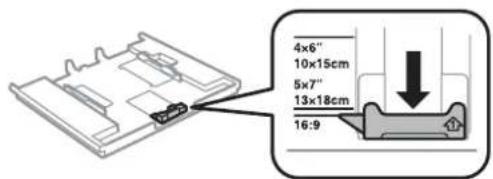
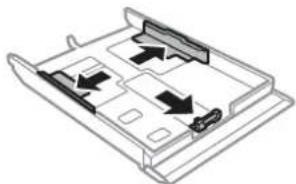
Slide the edge guides to the sides of the paper cassette.
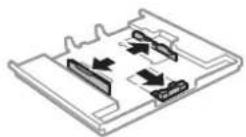
4
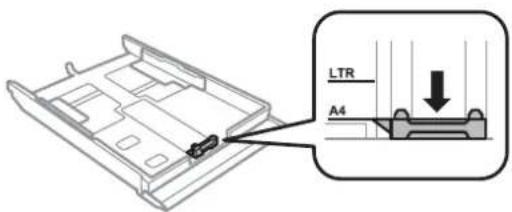
Slide the edge guide to adjust to the paper size you will use.
5
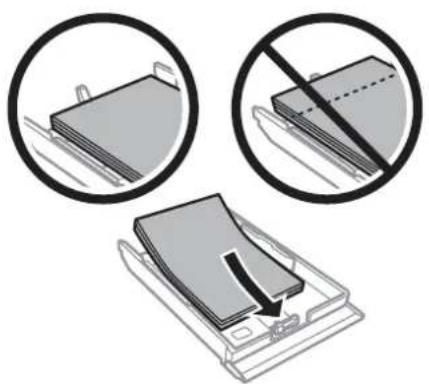
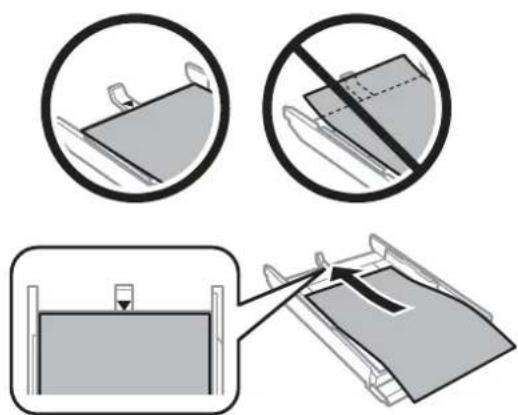
Load paper toward the edge guide with printable side face-down, and check that the paper is not sticking out from the end of the cassette.
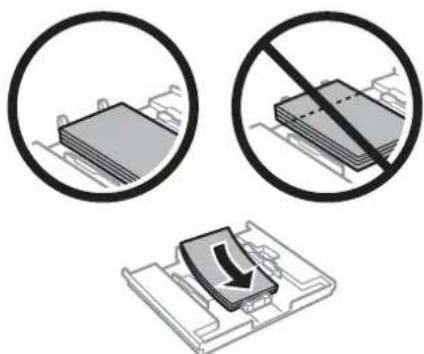
Note:
☐ Fan and align the edges of the paper before loading.
☐ For Epson special media, make sure the number of sheets is less than the limit specified for the media.
→ "Selecting Paper" on page 23
☐ When you select Cassette 1->2 as the Paper Source, load the same size and type of paper in both cassettes.
☐ When loading a Photo Stickers sheet, place it face down. Do not use the loading support sheet that came with the Photo Stickers.
natural_image
Diagram of a mechanical assembly with a curved arrow indicating direction (no text or symbols)Paper and Media Handling
6
Slide the edge guides to the edges of the paper.

7
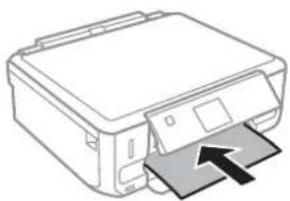
Keep the cassette flat and insert it back into the product carefully and slowly.
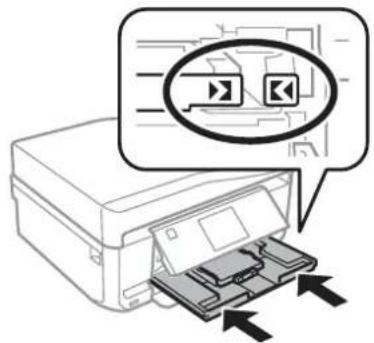
Note:
Leave enough space in front of the product for the paper to be fully ejected.
☐ Do not remove or insert the paper cassette while the product is operating.
Into the paper cassette 2
1
Open the front cover.
natural_image
Line drawing of a printer with paper feed and paper clip (no text or symbols)Paper and Media Handling
Note:
If the output tray has been ejected, close it before pulling out the paper cassette.
natural_image
Line drawing of a printer with an inserted paper showing the printer's internal structure (no text or symbols)2
Pull out the paper cassette.
natural_image
Line drawing of a printer with a paper feed insert and arrow indicating print direction (no text or symbols)3
Slide the edge guides to the sides of the paper cassette.
natural_image
Diagram of a device casing with internal components and directional arrows indicating movement (no text or symbols)4
Slide the edge guide to adjust to the paper size you will use.
Note:
If you are loading envelopes, skip this step.
Paper and Media Handling
5
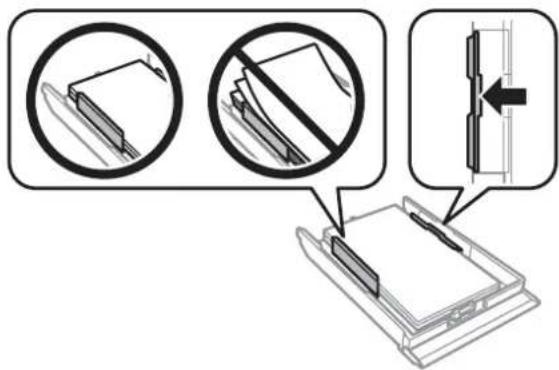
Load paper toward the edge guide with printable side face-down, and check that the paper is not sticking out from the end of the cassette.
Note:
☐ Fan and align the edges of the paper before loading.
☐ For plain paper, do not load paper above the line just under the arrow mark inside the edge guide. For Epson special media, make sure the number of sheets is less than the limit specified for the media.
→ "Selecting Paper" on page 23
☐ When you select Cassette 1->2 as the Paper Source, load the same size and type of paper in both cassettes.
☐ When loading a Photo Stickers sheet, place it face down. Do not use the loading support sheet that came with the Photo Stickers.
natural_image
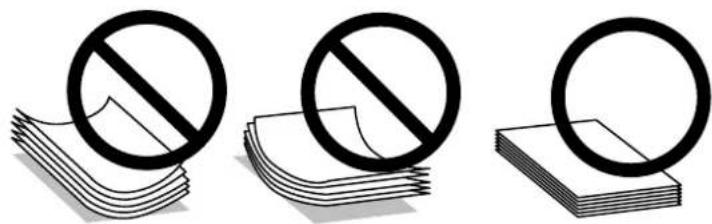
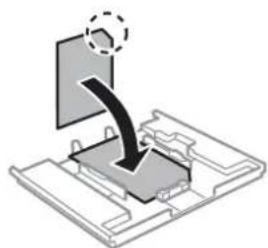
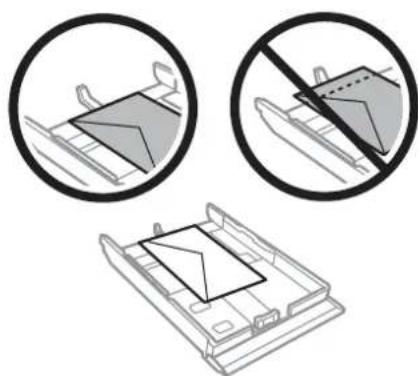
Diagram of a device with a curved arrow pointing to a screen, showing internal components (no text or symbols)Use cassette 2 when loading envelopes. Load envelopes short edge first with the flap facing up and to the left. Next, check that the envelopes are not sticking out from the end of the cassette.
natural_image
Three technical diagrams showing a vehicle chassis with no visible text or symbols, including prohibition signs (no text or symbols present)Paper and Media Handling
Note:
☐ The thickness of envelopes and their ability to fold vary widely. If the total thickness of the stack of envelopes exceeds 11 mm, press down on the envelopes to flatten them before loading. If print quality declines when a stack of envelopes is loaded, load one envelope at a time.
→ "Selecting Paper" on page 23
☐ Do not use envelopes that are curled or folded.
☐ Flatten the envelope and the flaps before loading.
natural_image
Illustration showing two hands performing a physical maneuver or motion technique (no text or symbols present)☐ Flatten the leading edge of the envelope before loading.
☐ Avoid using envelopes that are too thin, as they may curl during printing.
☐ Align the edges of the envelopes before loading.
6
Slide the edge guides to the edges of the paper.
Slide the edge guides to the edges of the envelopes.

natural_image
Diagram of a device with two arrows indicating directional movement or force, no text or symbols present7
Keep the cassette flat and insert it back into the product carefully and slowly.
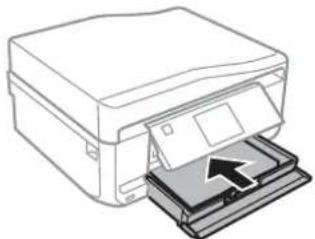
natural_image
Line drawing of a printer with an arrow indicating the paper's printing process (no text or symbols present)Paper and Media Handling
Note:
Leave enough space in front of the product for the paper to be fully ejected.
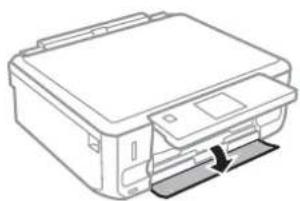
☐ Do not remove or insert the paper cassette while the product is operating.
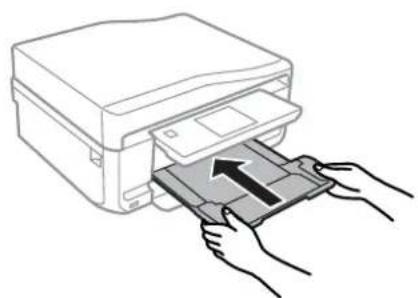
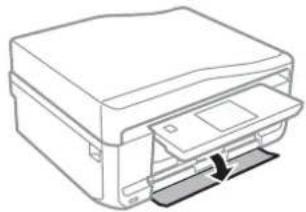
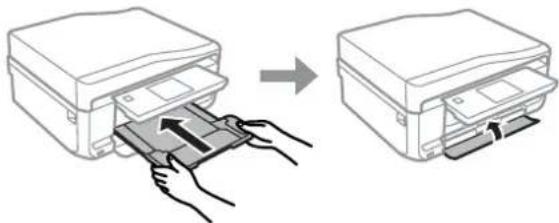
☐ For the XP-610 Series only, you need to pull out the output tray manually. Also make sure the control panel is raised.

natural_image
Illustration of a printer being inserted into a slot, with a hand holding the slot (no text or symbols present)Loading a legal paper or longer than A4 size paper
Note:
☐ For XP-710 Series/XP-810 Series: If you want to load a Legal-size or longer than A4 size paper, use the rear paper feed slot.
→ "Into the rear paper feed slot" on page 34
☐ For XP-610 Series: If you want to load a Legal-size or longer than A4 size paper, follow the steps below.
1
Open the front cover.
natural_image
Line drawing of a printer with a paper clip inserted (no text or symbols)2
Remove the paper cassette 1.
natural_image
Line drawing of a printer with a paper feed insert and directional arrows indicating print process (no text or symbols)Note:
Do not insert the paper cassette 1 while printing.
Paper and Media Handling
3
Remove the paper cassette 2.

natural_image
Line drawing of a printer with a paper holder inserted, showing internal structure and a loading arrow (no text or symbols)4
Load paper toward the ▼ arrow mark in the end of the paper cassette 2 with printable face-down.
Load one sheet at a time and leave the end of the paper protruding from the paper cassette.
5
Keep the cassette flat and insert it back into the product carefully and slowly.
natural_image
Line drawing of a printer with a paper feed insert (no text or symbols)Into the rear paper feed slot
Note:
☐ The rear paper feed slot is not available for the XP-610 Series.
☐ Even though you can print on paper with a thickness of 0.05 to 0.6 mm, some hard paper may not be fed correctly even if the thickness is within this range.
1
Send your print job to the product (from your computer, or by using the control panel).
Note:
Before sending your print job, you cannot load paper into the rear paper feed slot.
Paper and Media Handling
2 Open the rear paper feed slot cover and then pull out the paper support.
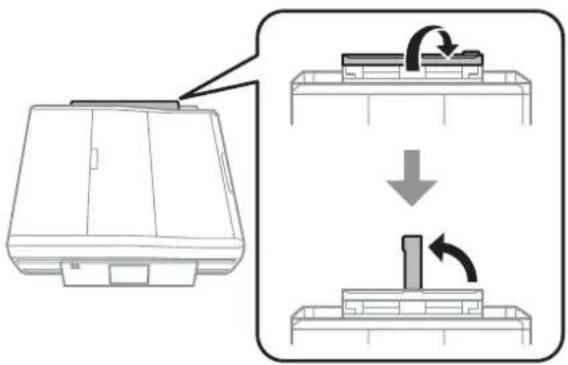
3 Slide the edge guide.
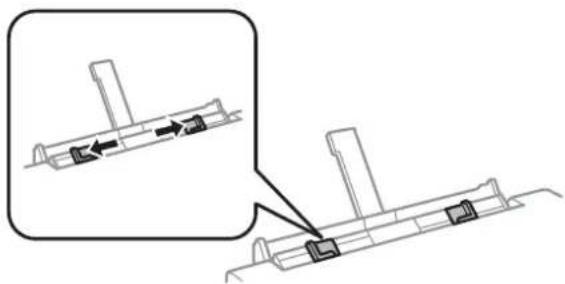
natural_image
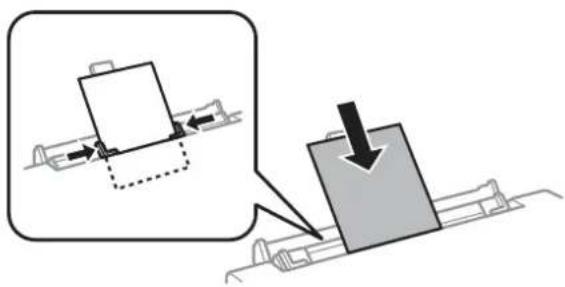
Technical diagram showing a mechanical assembly with two views of a component, one zoomed-in (no text or symbols)4 Load a single sheet of paper with the printable side face-up at the center of the rear paper feed slot, and then set the edge guide. The printable side is often whiter or brighter than the other side.
Note:
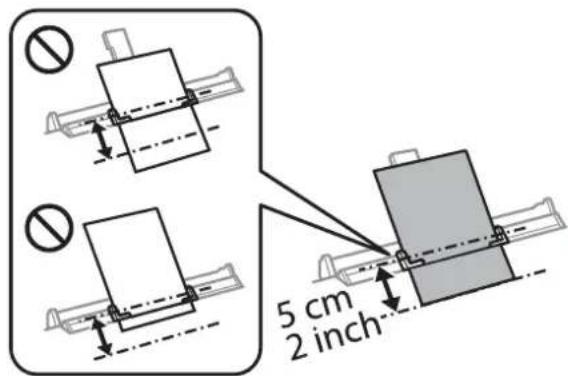
Insert the paper so that the leading edge is approximately 5 cm from the groove in the edge guides.
Paper and Media Handling
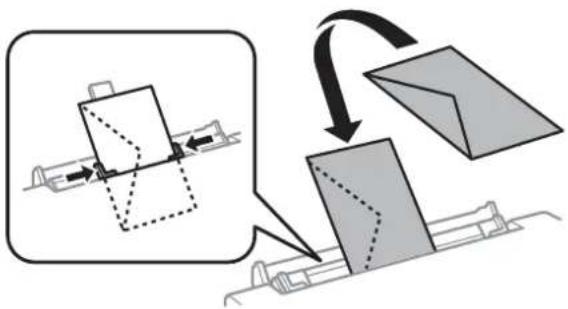
Load the envelope short edge first with the flap facing down and at the center of the rear paper feed slot, and then set the edge guide.
flowchart
graph TD
    A["Start"] --> B["Component 1"]
    B --> C["Component 2"]
    C --> D["Final Assembly"]
    style A fill:#f9f,stroke:#333
    style D fill:#bbf,stroke:#333
Note:
☐ Do not use an envelope that is curled or folded.
☐ Flatten the envelope and the flaps before loading.
natural_image
Illustration showing two hands performing a physical maneuver or folding task on a flat surface (no text or symbols present)☐ Flatten the leading edge of the envelope before loading.
☐ Avoid using an envelope that is too thin, as it may curl during printing.
5
Press ◊.
Note:
The paper or envelope ejects automatically after a certain period of time.
Loading a CD/DVD

Important:
☐ Do not insert the CD/DVD tray while the product is operating. Otherwise, your product may be damaged or the surface of the CD/DVD may become dirty or scratched.
☐ When ejecting/inserting the CD/DVD tray, make sure nothing is placed on the output tray.
Note:
You can also print on a Blu-ray Disc ^TM .
1
Press 📍 on the control panel, and then select Load CD/DVD.
Paper and Media Handling
2
Raise the panel as far as it will go.

natural_image
Line drawing of a hand inserting a card into a printer (no text or symbols)Note:
If the output tray has been ejected, close the tray and the front cover.
natural_image
Diagram showing two views of a printer's internal structure being inserted, with hands inserting into the paper (no text or symbols present)3
Remove the CD/DVD tray from the product.
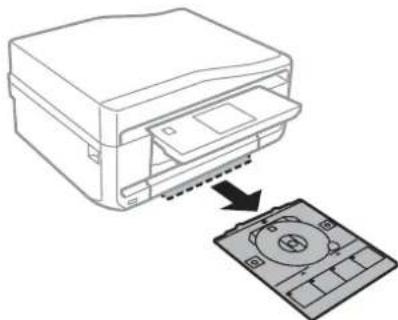
natural_image
Line drawing of a printer with a control panel and arrow indicating process (no text or symbols)4
Place a CD/DVD on the CD/DVD tray with the printable side face-up, and then insert the tray into the product. Make sure that the ▲ marks on the tray and the ▼ marks on the product match, so that the line on the tray aligns with the product.
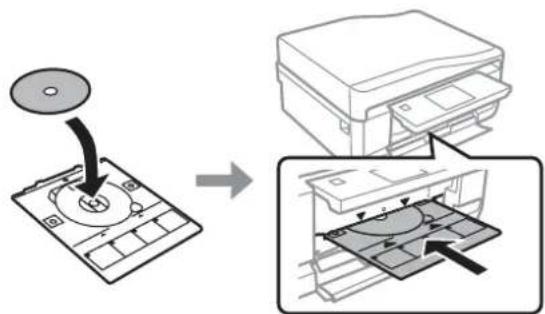
5
Press OK on the LCD screen or control panel.
Note:
The CD/DVD tray ejects automatically after a certain period of time.
Removing a CD/DVD
1 Remove the CD/DVD tray from the product, and then remove your CD/DVD from the tray.
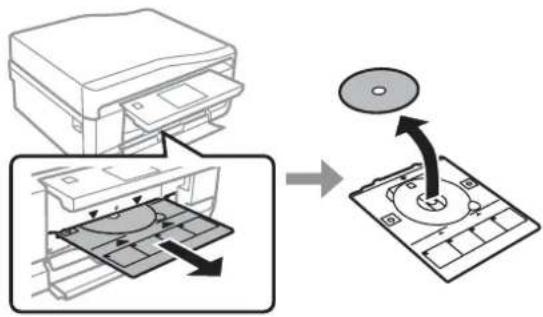

Be careful not to scratch the surface of the CD/DVD when removing it.
For the XP-710 Series/XP-810 Series, press OK on the LCD screen.
For the XP-610 Series, you can skip this step.
3 Lower the control panel.
4 Insert the CD/DVD tray back into the slot on the bottom of the product.
Inserting a Memory Card
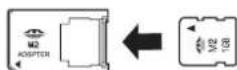
You can print photos in a memory card or save a scanned data in a memory card. The following memory cards are supported.
SD, miniSD, microSD, SDHC, miniSDHC, microSDHC, SDXC, microSDXC, Memory Stick Duo, Memory Stick PRO Duo, Memory Stick PRO-HG Duo, Memory Stick Micro, MagicGate Memory Stick Duo
Important
The following memory cards require an adapter. Attach it before inserting the card into the slot, otherwise the card may get stuck.
□ miniSD, microSD, miniSDHC, microSDHC, microSDXC
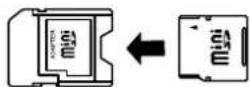
□ Memory Stick Micro
Paper and Media Handling
1 Open the cover, and insert a memory card.
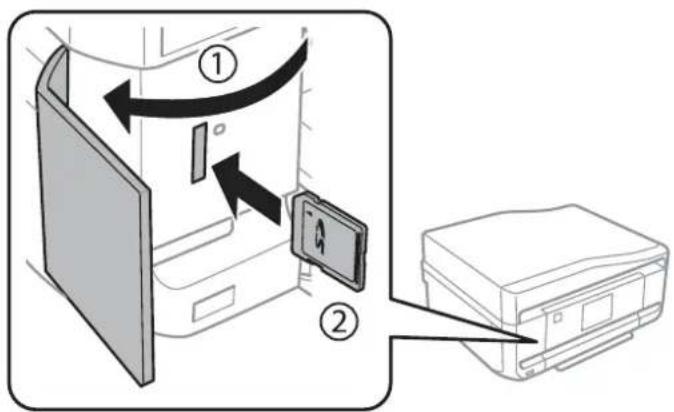
Note:
The memory card cover is not available for the XP-610 Series.
2 Check the light stays on.
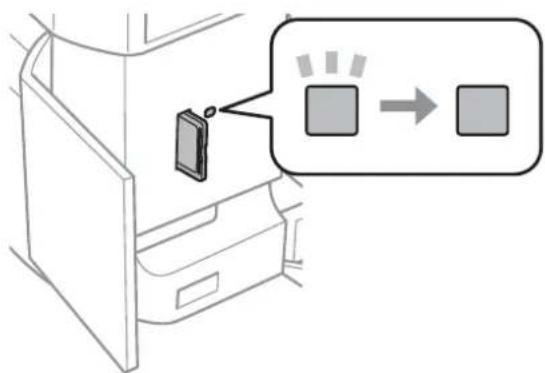
□ = on, □ = flashing
Important
☐ Do not try to force the card all the way into the slot. It should not be fully inserted.
☐ Do not remove the memory card while the light is flashing. The data in the memory card may be lost.
Placing Originals
Automatic Document Feeder (ADF)
Note:
This function is only available for XP-810 Series.
Paper and Media Handling
You can load your original documents in the Automatic Document Feeder (ADF) to copy, scan, or fax multiple pages quickly. The ADF can scan both sides of your documents. To do so, select the option in the copy setting menu.
You can use the following originals in the ADF.
| Size | A4/Letter/Legal |
| Type | Plain paper |
| Weight | 64 g/m2 to 95 g/m2 |
| Capacity | 30 sheets or 3 mm or less (A4, Letter)/10 sheets (Legal) |
When you scan a 2-sided document using the ADF, legal size paper is not available.

Important:
To prevent paper jams, avoid the following documents. For these types, use the scanner glass.
☐ Documents held together with paper clips, staples, etc.
☐ Documents that have tape or paper stuck to them.
☐ Photos, OHPs, or thermal transfer paper.
☐ Paper that is torn, wrinkled, or has holes.

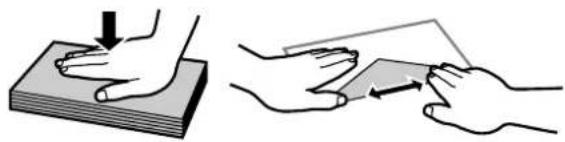
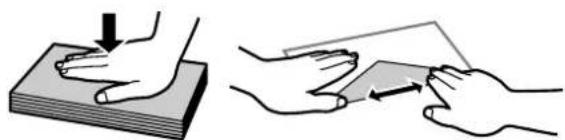
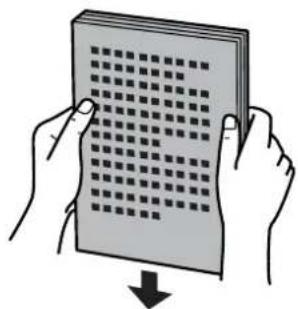
Tap the originals on a flat surface to even the edges.
natural_image
Illustration of two hands holding a grid-patterned document with a downward arrow indicating compression (no text or symbols)
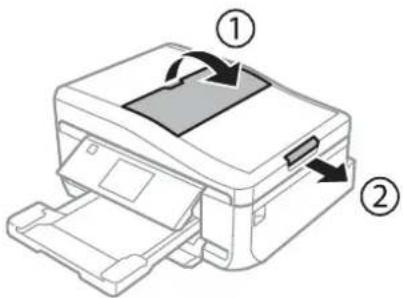
Open the ADF input tray, and then slide out the output tray extension.
Paper and Media Handling
3
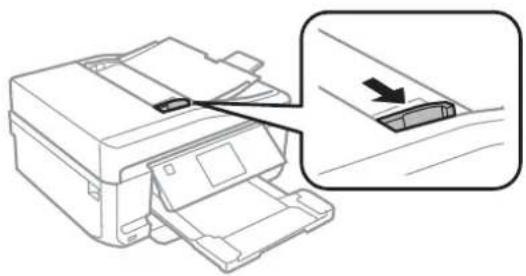
Slide the edge guide on the Automatic Document Feeder.
natural_image
Line drawing of a printer with an arrow indicating a process or insertion, showing no text or symbols present.Note for the Automatic Document Feeder (ADF):
Do not load paper above the line just under the ▼ arrow mark on the ADF.
4
Insert the originals face-up and short edge first into the Automatic Document Feeder, and then slide the edge guide until it is flush with the originals.
Note:
The ADF icon is displayed when originals are placed in the automatic document feeder.

natural_image
Diagram showing printer printing process with paper sheet being inserted (no text or symbols)Paper and Media Handling
Note:
☐ For A4, 2-up Copy layout, place the original as shown. Make sure the orientation of the original matches the Document Orientation settings.

☐ When you use the copy function with the Automatic Document Feeder (ADF), the print settings are fixed at Reduce/Enlarge - Actual Size, Paper Type - Plain Paper, and Paper Size - A4. The print is cropped if you copy an original larger than A4.
Scanner glass
1
Open the document cover.
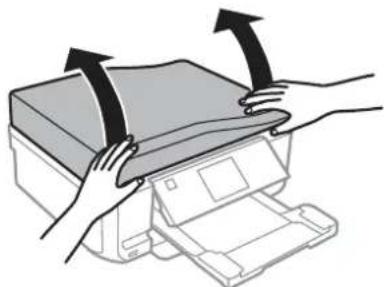
natural_image
Illustration of hands pressing down on a printer's cover (no text or symbols)2
Place your original face-down on the scanner glass, and slide it to the front-right corner.
natural_image
Illustration of a printer with a paper sheet being inserted, showing a downward arrow (no text or symbols)Paper and Media Handling
Note:
See the following sections if any problems occur with the scanning area or the scanning direction when using EPSON Scan.
→ "The edges of your original are not scanned" on page 193
→ "Multiple documents are scanned into a single file" on page 193
3
Close the cover gently.
Note:
When there is a document in the Automatic Document Feeder (ADF) and on the scanner glass, priority is given to the document in the Automatic Document Feeder (ADF).
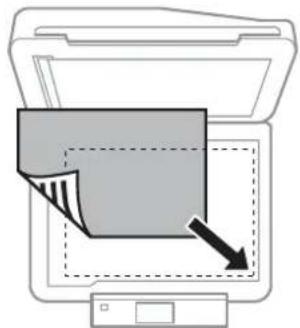
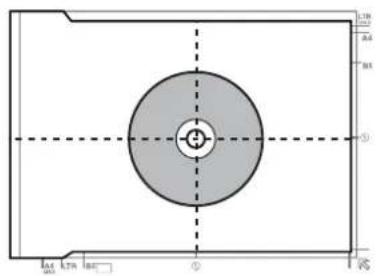
Placing a CD
Place the CD in the center.
Placing photos
Place photos 5 mm apart.
Note:
You can copy one photo or multiple photos of different sizes at the same time, as long as they are larger than 30 x 40 mm.
Paper and Media Handling
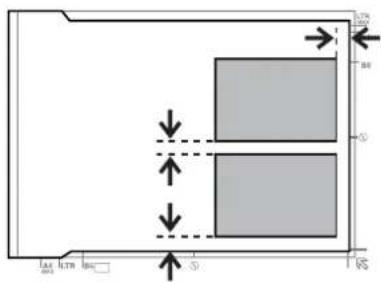
Placing a book
Place the first page, and then place the second page.

You can print two pages of a book on a single side of one sheet of paper. Select A4, Book/2-up or Book/2-Sided as the layout and place the book.
Note:
Close the document cover to avoid direct light, such as fluorescent lights, when scanning. Otherwise, the light may affect the scanning result.
Copying
Copying Documents
Basic copying
Follow the steps below to copy documents.
1 Load paper in the cassette 2.
→ "Into the paper cassette" on page 27
2 Place original.
→ "Placing Originals" on page 39
3 Enter Copy mode from the Home menu.
4 Press + or - to set the number of copies.
5 Set the color.
6 Press ▼ to make the copy settings.
7 Select the appropriate copy settings such as paper size, paper type, and quality.
Note:
☐ For XP-610 Series, you can make copy settings in Paper and Copy Settings.
☐ You can preview the copy results before you start copying.
☐ You can make various layout copies such as 2-sided copy, 2-up copy, and so on. Change the 2-sided or layout settings as necessary.
8 Press ◇ to start copying.
2-Sided copying
With duplex copying, you can create double-sided or single-sided copies from double-sided or single-sided originals. Follow the instructions below to perform duplex copying.
1 Load paper in the cassette 2.
→ "Into the paper cassette" on page 27
2 Place original.
→ "Placing Originals" on page 39
Copying
3 Enter Copy mode from the Home menu.
4 Press + or - to set the number of copies.
5 Set the color.
6 Press ▼ to make the copy settings.
Note:
For XP-610 Series, you can make copy settings in Paper and Copy Settings.
7 Select 2-Sided Copying.
8 Select the type of 2-sided copying.
| Setting | Description |
| 1>1-Sided | Normal copying. |
| 1>2-Sided | Two single-sided originals are printed onto each side of a single sheet of paper. |
| 2>1-Sided* | Each side of a double-sided original is printed onto one side of a single sheet of paper. |
| 2>2-Sided* | Each side of a double-sided original is printed onto each side of a single sheet of paper. |
* This function is only available for XP-810 Series.
9 Make the appropriate settings for Document Orientation, Binding Direction, or Binding Margin.
| Setting | Description |
| Document Orientation | Specifies the orientation of your originals. |
| Binding Direction* | Specifies the binding direction of your originals. |
| Binding Margin | Specifies the binding direction of your prints. |
* This function is only available for XP-810 Series.
Note:
Depending on the settings for 2-Sided Copying and Layout, these menus may not be available.
10 Press ◇ to start copying.
Layout copying
With the layout function, you can copy two single-sided originals onto a single page.
Copying
1 Load paper in the cassette 2.
→ "Into the paper cassette" on page 27
2 Place original.
→ "Placing Originals" on page 39
3 Enter Copy mode from the Home menu.
4 Press ▼ to make the copy settings.
Note: For XP-610 Series, you can make copy settings in Paper and Copy Settings.
5 Select Layout.
6 Select A4, 2-up Copy.
7 Press ◇ to start copying.
Copy Mode Menu List
Refer to the section below for the Copy mode menu list. → "Copy Mode" on page 113
Printing
Basic Operation from the Control Panel
Printing photos (XP-710 Series/XP-810 Series)
1 Load photo paper in the paper cassette.
→ "Into the paper cassette" on page 27
2 Insert a memory card.
→ "Inserting a Memory Card" on page 38
Note:
You can also print photos from an external USB device.
3 Enter Print Photos mode from the Home menu.
4 Select a photo and press + or - to set the number of copies.
Note:
☐ You can crop and enlarge your photo. Press Edit and Crop/Zoom, and then make the settings.
☐ To select more photos, press and repeat step 4.
☐ If you want to correct your images, press Edit and Photo Adjustments, and then make the settings. Scroll down if necessary.
☐ If the screen display (for example, "-" + ", or menus) disappears, touch the LCD screen.
☐ If you have more than 999 images on your memory card, images are automatically divided into groups and the group selection screen is displayed. Select the group that contains the image you want to print. Images are sorted by the date they were taken.
☐ To select another group, select Print Photos on the Home menu. Next, select Options, Select Location, and then Select Folder or Select Group.
5 Press Settings, and then make the print settings. Scroll down if necessary.
6 Press ◇ to start printing.
Note
See the following sections for more information on other printing functions available from the control panel.
→ "Print Photos Mode" on page 114
→ "More Functions" on page 109
Printing photos (XP-610 Series)
1 Load photo paper in the paper cassette. → "Into the paper cassette" on page 27
2 Insert a memory card. → "Inserting a Memory Card" on page 38
Note: You can also print photos from an external USB device.
3 Enter Print Photos mode from the Home menu.
4 Select a photo and press + or - to set the number of copies.
Note:
☐ You can make print settings and crop/enlarge your photo. Press ▼ and select Print Settings or Crop/Zoom, and then make the settings.
☐ To select more photos, repeat step 4.
☐ If you want to correct your images, press ▼ and select Photo Adjustments, and then make the settings.
☐ If you have more than 999 images on your memory card, images are automatically divided into groups and the group selection screen is displayed. Select the group that contains the image you want to print. Images are sorted by the date they were taken.
☐ To select another group, remove and reinsert the memory card, and then select the group.
5 Press ◇ to start printing.
Note
See the following sections for more information on other printing functions available from the control panel.
→ "Print Photos Mode" on page 114
→ "More Functions" on page 109
Printing photos from a digital camera
Printing using a USB connection
1 Load photo paper in the paper cassette. → "Into the paper cassette" on page 27
2 Remove a memory card.
3 Enter Setup mode from the Home menu.
Printing
4 Enter External Device Setup. Scroll down if necessary.
5 Select Print Settings.
6 Make the appropriate print settings. Scroll down if necessary.
7 Connect the camera to the product with a USB cable, and then turn on the camera.
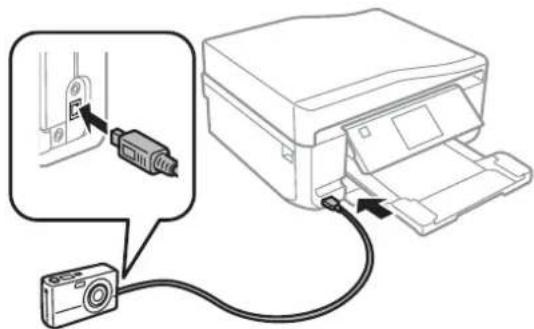
8 See your camera's guide to print.
| Compatibility | PictBridge |
| File Format | JPEG |
| Image Size | 80 × 80 pixels to 10200 × 10200 pixels |
Note:
☐ Depending on the settings on this printer and the digital camera, some combinations of paper type, size, and layout may not be supported.
☐ Some of the settings on your digital camera may not be reflected in the output.
Printing using a wireless connection
You can print photos directly from a digital camera using a wireless connection.
Make sure your digital camera can connect to a network and is PictBridge capable (DPS over IP).
For more details, see the documentation provided with your camera.
You can check the network connection status of your products.
→ "Setup Mode" on page 124
2 Load photo paper in the paper cassette.
→ "Into the paper cassette" on page 27
2 Enter Setup mode from the Home menu.
Printing
4 Enter External Device Setup. Scroll down if necessary.
5 Select Print Settings.
6 Make the appropriate print settings. Scroll down if necessary.
7 Configure the camera's network connection. The procedure depends on your camera. For more details, see the documentation provided with your camera.
Note:
☐ You can check the Printer Name that is connected to the network.
→ "Setup Mode" on page 124
☐ Connect the camera to the same network as the product.
8 Print the photo from the camera.
Note:
You cannot print photos or documents from other devices while the camera is connected to the product.
9 Disconnect the camera from the network.
Print photos mode menu list
Refer to the section below for the Print Photos mode menu list.
→ "Print Photos Mode" on page 114
Basic Operation from Your Computer
Printer driver and status monitor
The printer driver lets you choose from a wide variety of settings to get the best printing results. The status monitor and the printer utilities help you check the product and keep it in top operating condition.
Printing
Note for Windows users:
Your printer driver automatically finds and installs the latest version of the printer driver from Epson's Web site. Click the Software Update button in your printer driver's Maintenance window, and then follow the on-screen instructions. If the button does not appear in the Maintenance window, point at All Programs or Programs in the Windows Start menu, and check in the EPSON folder.*
* For Windows 8:
If the button does not appear in the Maintenance window, right-click on the Start screen, or swipe from the bottom or top edge of the Start screen, and select All apps, then select Software Update from EPSON category.
If you want to change the language of the driver, select the language you want to use from the Language setting in your printer driver's Maintenance window. Depending on the location, this function may not be available.
Accessing the printer driver for Windows
You can access the printer driver from most Windows applications, the desktop menu, or the taskbar.
To make settings that apply only to the application you are using, access the printer driver from that application.
To make settings that apply to all of your Windows applications, access the printer driver from the desktop or the taskbar.
Refer to the following sections to access the printer driver.
Note:
Screen shots of the printer driver windows in this User's Guide are from Windows 7.
From Windows applications
1
Click Print or Print Setup on the File menu.
2
In the window that appears, click Printer, Setup, Options, Preferences, or Properties. (Depending on your application, you may need to click one or a combination of these buttons.)
From the desktop
Windows 8:
Select Desktop, Settings charm, and Control Panel. Then select Devices and Printers from the Hardware and Sound category. Right-click on the product, or press and hold the product, and select Printing preferences.
Windows 7:
Click the start button, select Devices and Printers. Then right-click the product and select Printing preferences.
Windows Vista:
Click the start button, select Control Panel, and then select Printer from the Hardware and Sound category. Then select the product and then click Select printing preferences.
Windows XP:
Click Start, Control Panel, (Printers and Other Hardware,) then Printers and Faxes. Select the product, then click Printing Preferences on the File menu.
Printing
From the shortcut icon on the taskbar
Right-click the product icon on the taskbar, then select Printer Settings.
To add a shortcut icon to the Windows taskbar, first access the printer driver from the desktop as described above. Next, click the Maintenance tab, the Extended Settings button, and then the Monitoring Preferences button. In the Monitoring Preferences window, select the Shortcut Icon check box.
Getting information through online help
In the printer driver window, try one of the following procedures.
☐ Right-click the item, then click Help.
☐ Click the ? button at the top right of the window, then click the item (for Windows XP only).
Accessing the printer driver for Mac OS X
The table below describes how to access the printer driver dialog.
| Dialog Box | How to Access It |
| Page Setup | Click Page Setup on the File menu of your application.Note:Depending on your application, the Page Setup menu may not appear in the File menu. |
| Click Print on the File menu of your application. | |
| Epson Printer Utility 4 | For Mac OS X 10.8 or 10.7, click System Preferences on the Apple menu and then click Print & Scan. Select your product from the Printers list box, click Options & Supplies, Utility, and then click Open Printer Utility.For Mac OS X 10.6, click System Preferences on the Apple menu and then click Print & Fax. Select your product from the Printers list box, click Options & Supplies, Utility, and then click Open Printer Utility.For Mac OS X 10.5, click System Preferences on the Apple menu and then click Print & Fax. Select your product from the Printers list box, click Open Print Queue and then click Utility button. |
Basic Printing
Note:
☐ The screen shots in this manual may vary depending on the model.
Before you print, load paper properly.
→ "Loading Paper" on page 27
☐ Refer to the section below for the printable area.
→ "Printable area" on page 199
After completing the settings, print one test copy and examine the results before printing an entire job.
Basic product settings for Windows

Open the file you want to print.
Printing

Access the printer settings.
→ "Accessing the printer driver for Windows" on page 52

Click the Main tab.

Select the appropriate Source setting.
→ "Selecting Paper" on page 23

Select the appropriate Type setting.
→ "Paper type settings from the printer driver" on page 26
Note:
Print quality is automatically adjusted for the selected paper type setting.

Select Borderless if you want to print borderless photos.
→ "Selecting Paper" on page 23
If you want to control the amount of the image that extends beyond the edges of the paper, click the Page Layout tab, select Auto Expand as the Enlargement Method, and then adjust the Expansion slider.

Select the appropriate Size setting. You can also define a custom paper size. For details, see the online help.
Printing
8
Select Portrait (tall) or Landscape (wide) to change the orientation of your printout.
Note:
Select Landscape when printing on envelopes.
9
Click OK to close the printer settings window.
Note:
To make changes to advanced settings, refer to the relevant section.
10
Print your file.
Basic product settings for Mac OS X
Note:
Screen shots of the printer driver windows in this manual are from Mac OS X 10.7.
1
Open the file you want to print.
2
Access the Print dialog box.
→ "Accessing the printer driver for Mac OS X" on page 53
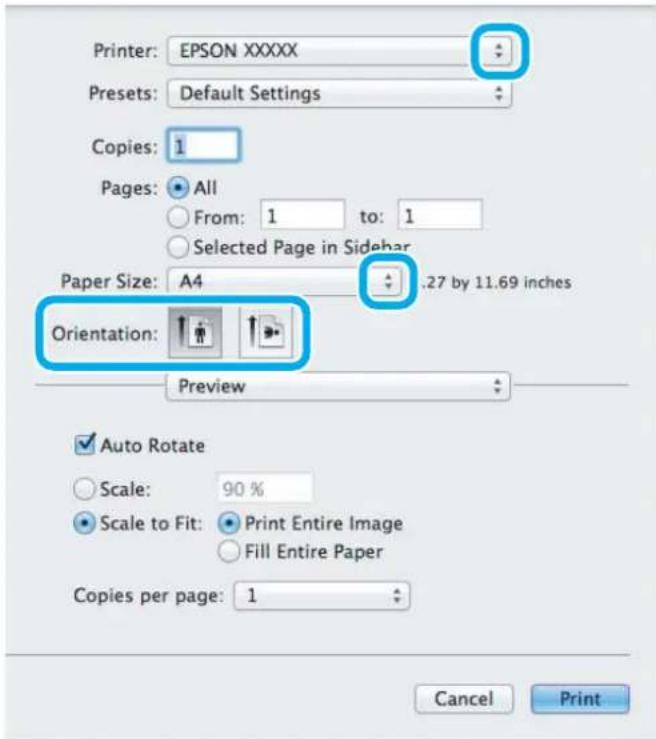
Printing
Note:
If the simplified dialog box is displayed, click the Show Details button (for Mac OS X 10.8 or 10.7) or the ▼ button (for Mac OS X 10.6 or 10.5) to extend this dialog box.
3
Select the product you are using as the Printer setting.
Note:
Depending on your application, you may not be able to select some of the items in this dialog box. If so, click Page Setup on the File menu of your application, and then make suitable settings.
4
Select the appropriate Paper Size setting.
Note:
Select XXX (Borderless) as the Paper Size if you want to print borderless photos. → "Selecting Paper" on page 23
5
Select the appropriate Orientation setting.
Note:
Select landscape orientation when printing envelopes.
6
Select Print Settings from the pop-up menu.
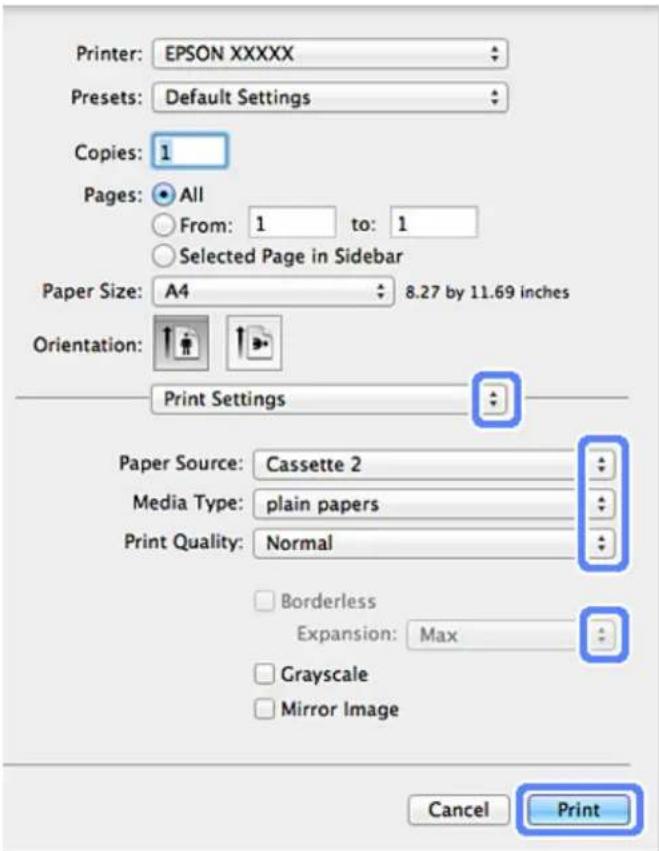
Printing
7 Select the appropriate Paper Source setting.
8 Select the appropriate Media Type setting.
→ "Paper type settings from the printer driver" on page 26
9 Select the appropriate Expansion setting during borderless printing to control the amount of the image that extends beyond the edges of the paper.
10 Click Print to start printing.
Canceling Printing
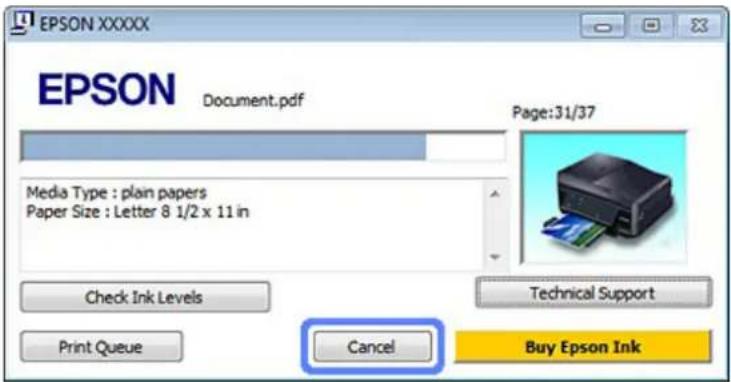
If you need to cancel printing, follow the instructions in the appropriate section below.
Using the control panel
Press ☑ to cancel a print job in progress.
For Windows
Note: You cannot cancel a print job that has been completely sent to the product. In this case, cancel the print job by the product.
Using the progress meter
When you start printing, the progress meter appears on your computer screen.
Click the Cancel button to cancel printing.
Using EPSON Status Monitor 3
1 Access the EPSON Status Monitor 3. → "For Windows" on page 169
2 Click the Print Queue button. The Windows Spooler appears.
3 Right click on the job you want to cancel and then select Cancel.
Printing
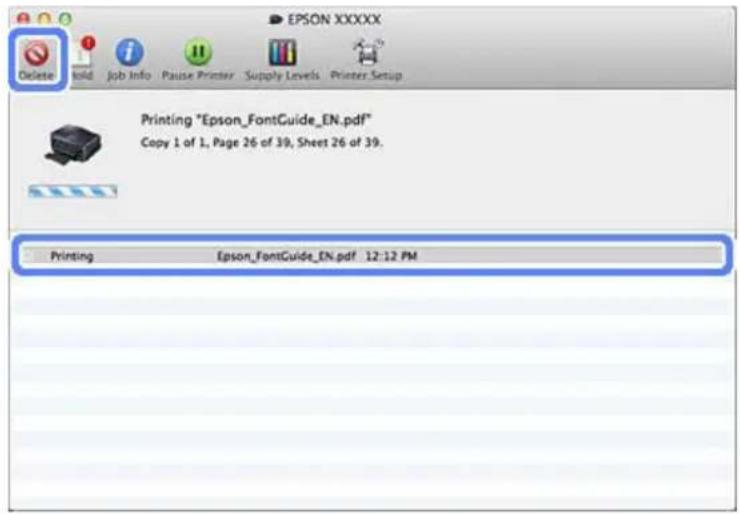
For Mac OS X
Follow the steps below to cancel a print job.
Note:
If you have sent a print job from a Mac OS X 10.6 or 10.5 through the network, you may not be able to cancel printing from the computer. Press ☺ on the product's control panel to cancel a print job. To solve this problem, see the online Network Guide.
1 Click your product icon in the Dock.
2 In the Document Name list, select the document which is printing.
3 Click the Delete button to cancel the print job.
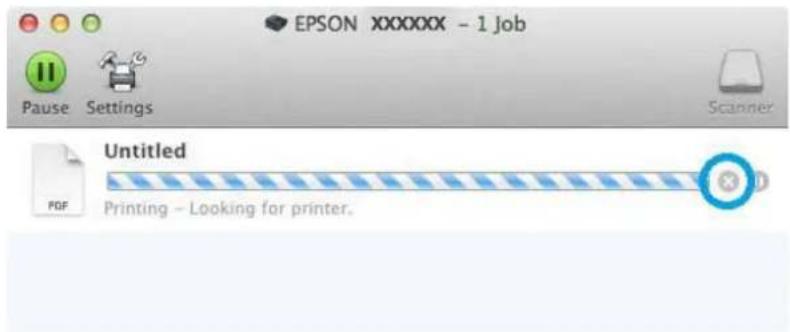
For Mac OS X 10.8:
Click the ✗ button to cancel the print job.
Other Options
Printing photos the easy way
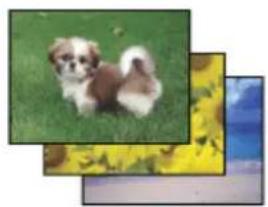
natural_image
Two separate photos: one of a small brown and white dog on grass, the other of a blue and yellow patterned background (no text or symbols)Epson Easy Photo Print lets you lay out and print digital images on various types of paper. The step-by-step instructions in the window let you preview the printed images and get the effects you want without having to make any difficult settings.
Using the Quick Print function, you can perform one-click printing with the settings you make.
Starting Epson Easy Photo Print
For Windows
☐ Double-click the Epson Easy Photo Print icon on the desktop.
For Windows 8:
Right-click on the Start screen, or swipe from the bottom or top edge of the Start screen and select All apps, then select Easy Photo Print from Epson Software.
For Windows 7 and Vista:
Click the start button, point to All Programs, click Epson Software, and then click Easy Photo Print.
For Windows XP:
Click Start, point to All Programs, point to Epson Software, then click Easy Photo Print.
For Mac OS X
Double-click the Applications folder on your Mac OS X hard drive, then double-click in turn on the Epson Software and Easy Photo Print folders and finally double-click the Easy Photo Print icon.
Printing on CD/DVD

Epson Print CD lets you create CD/DVD labels with text and images on your computer, then print the labels directly onto 12-cm CDs and DVDs.
Printing
Note:
Before you print, load the CD/DVD properly.
→ "Loading a CD/DVD" on page 36
☐ Try to test print on a spare CD/DVD and check the printed surface after waiting for one full day, especially before printing a large amount of CD/DVDs.
☐ You can also print on CD/DVDs from the control panel.
→ "More Functions" on page 109
Notice for CD/DVD printing
☐ Print only on a circular CD/DVD.
☐ See the documentation provided with your CD/DVD for more information on handling the CD/DVD.
☐ Do not print on the CD/DVD before writing your data to it. If you do, fingerprints, dirt, or scratches on the surface may cause errors while writing data.
☐ Store the CD/DVD tray in the bottom slot of the product. A warped or damaged CD/DVD tray may stop the product from operating normally.
☐ If the tray is ejected or not fed correctly when you start a CD/DVD print job, make sure that you inserted the tray properly.
→ "Loading a CD/DVD" on page 36
☐ If the tray is ejected when you start a CD/DVD print job, the product is not ready. Wait until you see a message on your computer screen asking you to insert the tray. Then reinsert the tray and press ◇.
☐ After you finish printing on a CD/DVD, remove the CD/DVD tray. For the XP-710 Series and the XP-810 Series, press OK on the LCD screen.
☐ Use only CD/DVD labelled as suitable for printing, for example "Printable on the label surface" or "Printable with ink jet printers".
☐ Depending on the CD/DVD type, smearing may occur depending on the level of color saturation.
☐ Moisture on the printable surface may cause smearing.
☐ If the CD/DVD tray or the internal transparent compartment are accidentally printed on, immediately wipe off the ink.
☐ Reprinting on the same CD/DVD may not improve the print quality.
☐ If you select CD/DVD Premium Surface as the Media Type setting in the printer driver and use a high quality CD/DVD, you can create high quality CD/DVD labels.
☐ Make sure you let CDs and DVDs dry completely out of direct sunlight before using them or touching the printed surface.
☐ If the printed surface is sticky even after it has dried, the color saturation level may be too high. In that case, lower the level of the color saturation in Epson Print CD.
☐ If the ink smears, adjust the color saturation using Epson Print CD.
Printing
☐ Set the printable area to fit the printable area of the CD/DVD.
☐ For details on the printable area, see the following section.
→ "Printable area" on page 199
☐ Only one CD or DVD can be printed at a time. When the Copies setting is set to 2 or more, remove each CD or DVD from the tray after it has been printed, and then place the next CD or DVD on the tray. Follow the on-screen instructions.
Starting Epson Print CD
For Windows
☐ Double-click the Epson Print CD icon on the desktop.
For Windows 8:
Right-click on the Start screen, or swipe from the bottom or top edge of the Start screen, select All apps, and then select Epson Print CD from Epson Software.
For Windows 7 and Vista:
Click the start button, point to All Programs, click Epson Software, and then click Print CD.
For Windows XP:
Click Start, point to All Programs, point to Epson Software, then click Print CD.
For Mac OS X
Double-click the Applications folder on your Mac OS X hard drive, then double-click in turn on the Epson Software and Print CD folders and finally double-click the Print CD icon.
Printing on a CD/DVD with a commercially available software package
When you print on a CD/DVD with a commercially available software package that supports CD/DVD printing, you have to make the following settings.
| Size | A4 |
| Orientation | Portrait |
| Source (Windows) | CD/DVD |
| Type | CD/DVD or CD/DVD Premium Surface |
| Tray type*1 | Epson Tray Type 2*2 |
*1 Needs to be specified depending on the software.
*2 The name varies depending on the software.
Product presets (for Windows only)
Printer driver presets make printing a snap. You can also create presets of your own.
Printing
Product settings for Windows
1 Access the printer settings.
→ "Accessing the printer driver for Windows" on page 52
2 Select a Printing Presets in the Shortcuts tab. Product settings are automatically set to the values displayed in the pop-up window.
2-sided printing
Use the printer driver to print on both sides of the paper.
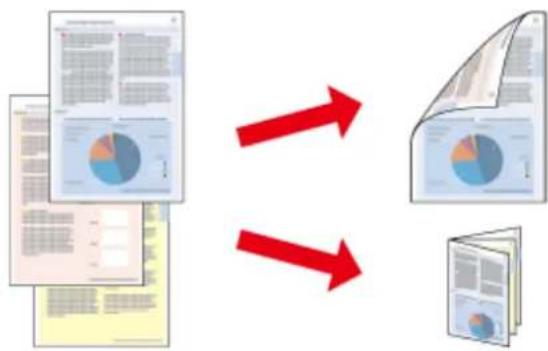
flowchart
graph TD
    A["Input Data"] --> B["Processing Step"]
    B --> C["Output Document"]
    D["Print"] --> B
    E["Print"] --> C
For Windows users:
Four types of 2-sided printing are available: automatic standard, automatic folded booklet, manual standard and manual folded booklet.
For Mac OS X users:
Mac OS X supports automatic standard 2-sided printing only.
2-sided printing is only available for the following papers and sizes.
| Paper | Size |
| Plain paper | Legal^*1*2 , Letter, A4, B5, A5^*1 , A6^*1 |
| Epson Bright White Ink Jet Paper | A4 |
| Epson Double-Sided Matte Paper | A4 |
*1 Manual 2-sided printing only.
*2 This is only available for the XP-610 Series.
Printing
Note:
☐ This feature is not available for rear paper feeding.
☐ This feature may not be available at some settings.
☐ Manual 2-sided printing may not be available when the product is accessed over a network or is used as a shared printer.
☐ If the ink runs low during automatic 2-sided printing, the product stops printing and the ink needs to be replaced. When ink replacement is complete, the product starts printing again, but there may be some missing parts in your print. If this happens, print again the page that has missing parts.
☐ The loading capacity differs during 2-sided printing.
→ "Selecting Paper" on page 23
☐ Only use papers that are suitable for 2-sided printing. Otherwise, the printout quality may deteriorate.
☐ Depending on the paper and the amount of ink used to print text and images, ink may bleed through to the other side of the paper.
☐ The surface of the paper may be smeared during 2-sided printing.
Note for Windows:
☐ Manual 2-sided printing is available only when EPSON Status Monitor 3 is enabled. To enable the status monitor, access the printer driver and click the Maintenance tab followed by the Extended Settings button. In the Extended Settings window, check the Enable EPSON Status Monitor 3 check box.
When automatic 2-sided printing is performed, printing may be slow depending on the combination of options selected for Select Document Type in the Print Density Adjustment window and for Paper & Quality Options in the Advanced window.
Note for Mac OS X:
When automatic 2-sided printing is performed, printing may be slow depending on the combination of options selected for Document Type in the Two-sided Printing Settings and for Print Quality in the Print Settings.
Product settings for Windows
1
Access the printer settings.
→ "Accessing the printer driver for Windows" on page 52
2
Choose the desired 2-sided printing option in the Page Layout tab. To print folded booklets, select Folded Booklet.
Note:
When using automatic printing, make sure Auto is selected.
3
Click Settings, and make the appropriate settings.
Printing
4
Check the other settings and print.
Note:
☐ When printing automatically, and if you are printing high-density data such as photos or graphs, we recommend making the settings in the Print Density Adjustment window.
☐ The actual binding margin may be different from the specified settings depending on your application. Experiment with a few sheets to examine actual results before printing the entire job.
☐ Manual 2-sided printing allows you to print the even-numbered pages first. When you print odd-numbered pages, a blank sheet of paper is output at the end of the print job.
☐ When you are printing manually, make sure that the ink is completely dry before reloading the paper.
Product settings for Mac OS X
1
Access the Print dialog box.
→ "Accessing the printer driver for Mac OS X" on page 53
2
Make the appropriate settings in the Two-sided Printing Settings pane.
3
Check the other settings and print.
Note:
If you are printing high-density data such as photos or graphs, we recommend adjusting Print Density and Increased Ink Drying Time settings manually.
Fit to page printing
Lets you automatically enlarge or reduce the size of your document to fit the paper size selected in the printer driver.
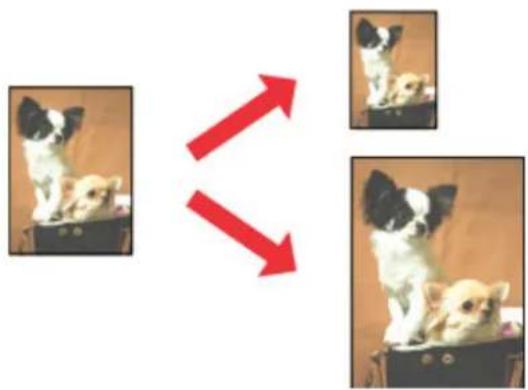
natural_image
Two small dog photos with black-and-white facial features, each pointing at a red arrow (no text or symbols)Note:
This feature may not be available at some settings.
Printing
Product settings for Windows
1 Access the printer settings.
→ "Accessing the printer driver for Windows" on page 52
2 Select Reduce/Enlarge Document and By Output Paper Size in the Page Layout tab, and then select the size of the paper you are using from the drop-down list.
3 Check the other settings and print.
Product settings for Mac OS X
1 Access the Print dialog box.
→ "Accessing the printer driver for Mac OS X" on page 53
2 Choose Scale to fit paper size for Destination Paper Size in the Paper Handling pane, and then select the size of the paper you are using from the pop-up menu.
3 Check the other settings and print.
Pages per sheet printing
Lets you use the printer driver to print two or four pages on a single sheet of paper.
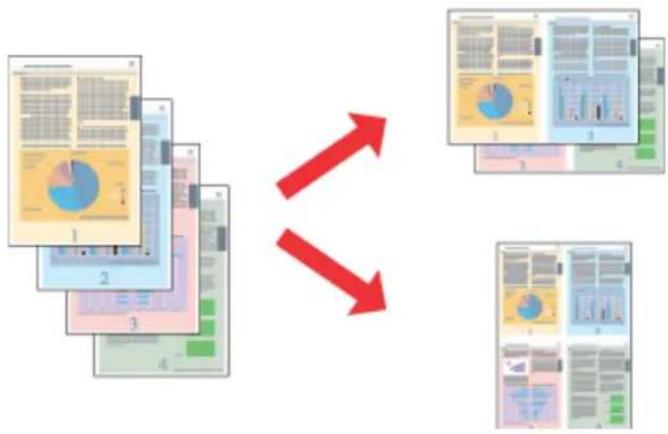
flowchart
graph TD
    A["Input Image 1"] --> B["Output Graph 1"]
    C["Input Image 2"] --> D["Output Graph 2"]
    E["Input Image 3"] --> F["Output Graph 3"]
    G["Input Image 4"] --> H["Output Graph 4"]
    I["Output Graph 5"] --> J["Output Graph 5"]
Note:
This feature may not be available at some settings.
Product settings for Windows
1 Access the printer settings.
→ "Accessing the printer driver for Windows" on page 52
2 Select Multi-Page and then select the Pages per Sheet in the Page Layout tab.
Printing
3 Choose the desired number of pages and page order.
4 Check the other settings and print.
Product settings for Mac OS X
1 Access the Print dialog box.
→ "Accessing the printer driver for Mac OS X" on page 53
2 Select the desired number of Pages per Sheet and the Layout Direction (page order) in the Layout pane.
3 Check the other settings and print.
Sharing the Product for Printing
Setup for Windows
These instructions tell you how to set up your product so other users on the network can share it.
First you will set up the product as a shared printer on the computer directly connected to it. Then you will add the product to each network computer that will access it.
Note:
These instructions are for small networks only. To share the product on a large network, consult your network administrator.
☐ The screen shots in the following section are from Windows 7.
Setting up the product as a shared printer
Note:
☐ To set up the product as a shared printer in Windows 8, 7 or Vista, you will need an account with administrator privileges and the password if you log on as a standard user.
☐ To set up the product as a shared printer in Windows XP, you must log on to a Computer Administrator account.
Follow the steps below on the computer that is connected directly to the product:
1
Windows 8:
Select Desktop, Settings charm, and Control Panel. Then select Devices and Printers from the Hardware and Sound category.
Windows 7:
Click the start button, select Devices and Printers.
Printing
Windows Vista:
Click the start button, select Control Panel, and then select Printer from the Hardware and Sound category.
Windows XP:
Click Start and select Control Panel, and then select Printers and Faxes, from the Printers and Other Hardware category.
2
Windows 8 and 7:
Right-click on the product, or press and hold the product, and select Printer properties, and then select Sharing. Then select the Change Sharing Options button.
Windows Vista:
Right-click the icon for your product, and then click Sharing. Click the Change sharing options button and then click Continue.
Windows XP:
Right-click the icon for your product, then click Sharing.
3
Select Share this printer, then type a Share name.
Note:
Do not use spaces or hyphens in the share name.
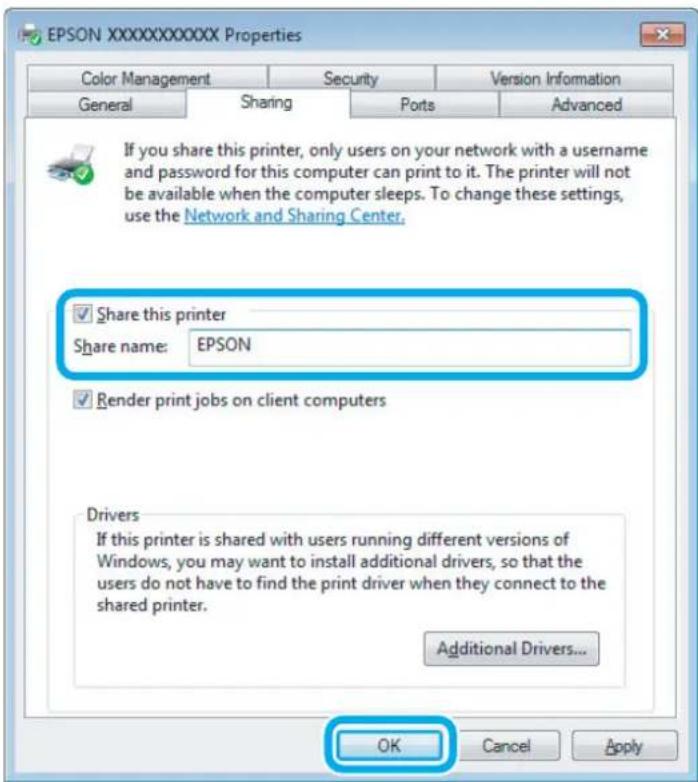
If you want to automatically download printer drivers for computers that are running different versions of Windows, click Additional Drivers and select the environment and the operating systems of the other computers. Click OK, then insert the product software disk.
Printing
4 Click OK or Close (if you installed additional drivers).
Adding the product to the other network computers
Follow these steps to add the product to each network computer that will access it.
Note:
Your product must be set up as a shared printer on the computer to which it is connected before you can access it from another computer.
→ "Setting up the product as a shared printer" on page 66
1 Windows 8:
Select Desktop, Settings charm, and Control Panel. Then select Devices and Printers from the Hardware and Sound category.
Windows 7:
Click the start button, select Devices and Printers.
Windows Vista:
Click the start button, select Control Panel, and then select Printer from the Hardware and Sound category.
Windows XP:
Click Start and select Control Panel, and then select Printers and Faxes, from the Printers and Other Hardware category.
Windows 8, 7 and Vista:
Select the Add a printer button.
Windows XP:
Click the Add a printer button. The Add Printer Wizard appears. Click the Next button.
2 Windows 8:
Go to Step 4.
Windows 7 and Vista:
Click Add a network, wireless or Bluetooth printer, and then click Next.
Printing
Windows XP:
Select A network printer, or a printer attached to another computer, then click Next.
4
Follow the on-screen instructions to select the product you want to use.
Note:
Depending on the operating system and the configuration of the computer to which the product is connected, the Add Printer Wizard may prompt you to install the printer driver from the product software disk. Click the Have Disk button and follow the on-screen instructions.
Setup for Mac OS X
To set up your product on a Mac OS X network, use the Printer Sharing setting. See your Macintosh documentation for details.
Scanning
Let's Try Scanning
Starting a Scan
Let's scan a document to get used to the process.
1 Place your original on the scanner glass.
→ "Placing Originals" on page 39
2 Start Epson Scan.
Windows 8:
Select the EPSON Scan icon on the desktop, or select EPSON Scan from the Start screen.
Windows 7, Vista and XP:
Double-click the Epson Scan icon on the desktop.
☐ Mac OS X:
Select Applications > Epson Software > EPSON Scan.
3 Select Home Mode.
Scanning
4
Select Text/Line Art as the Document Type setting.
5
Click Preview.
6
Click Scan.
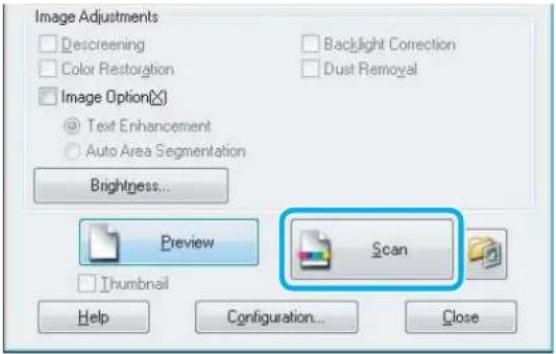
Scanning
7
Click OK.
![File Save Settings Location My Documents My Pictures Other: Desktop Browse... File Name (Prefix + 3-digit number) Prefix: img Start Number: 001 Image Format Type: JPEG (*.jpg) Details: Compression Level [16] Encoding Standard Embed IDC Profile: ON Options... Overwrite any files with the sage name Show this dialog box before next scan Open image folder after scanning Show Add Page dialog after scanning OK Cancel Help](/content/2026/06/1182615/images/75c902a9f6738e633608fee401afa91b5bfcd4946dec9de8d714cea42f34acec.jpg)
Your scanned image is saved.
Image Adjustment Features
Epson Scan offers a variety of settings for improving color, sharpness, contrast, and other aspects affecting image quality.
See the Help for more details on Epson Scan.
| Histogram | Provides a graphical interface for adjusting highlight, shadow, and gamma levels individually. | ||
 | → |  | |
| Tone Correction | Provides a graphical interface for adjusting tone levels individually. | ||
 | → |  | |
Scanning
| Image Adjustment | Adjusts brightness and contrast and the balance of red, green, and blue colors in the overall image. | ||
 | → |  | |
| Color Palette | Provides a graphical interface for adjusting mid-tone levels, such as skin tones, without affecting the highlight and shadow areas of the image. | ||
 | → |  | |
| Unsharp Mask | Sharpens the edges of image areas for an overall clearer image. | ||
 | → |  | |
| Descreening | Removes rippled patterns (known as moiré) that can appear in subtly shaded image areas such as skin tones. | ||
 | → |  | |
| Color Restoration | Restores the colors in faded photos automatically. | ||
 | → |  | |
Scanning
| Backlight Correction | Removes shadows from photos that have too much background light. | ||
 | → |  | |
| Dust Removal | Removes dust marks from your originals automatically. | ||
 | → |  | |
| Text Enhancement | Enhances text recognition when scanning text documents. | ||
 | → |  | |
| Auto Area Segmentation | Makes Black&White images clearer and text recognition more accurate by separating the text from the graphics. | ||
 | → |  | |
| Color Enhance | Enhance a certain color. You can select from red, blue, or green. | ||
 | → |  | |
Basic Scanning from the Control Panel
You can scan documents and send the scanned image from the product to a connected computer. Make sure you have installed software for the product on your computer and connected to the computer.
Scanning
Note:
If you want to scan your data to a memory card, insert a memory card first.
→ "Inserting a Memory Card" on page 38
1 Place your original(s).
→ "Placing Originals" on page 39
2 Enter Scan mode from the Home menu.
3 Select a scan menu item.
→ "Scan Mode" on page 117
If you select Scan to Memory Card, you can make scanning settings.
If you select Scan to PC, select your computer.
Note:
☐ If the product is connected to a network, you can select the computer to which you want to save the scanned image.
☐ You can change the computer name displayed on the control panel using Epson Event Manager.
☐ If you want to use the Scan to Cloud service, visit the Epson Connect portal site.
→ "Using Epson Connect Service" on page 9
5 Press ◊ to start scanning.
Your scanned image is saved.
Scan mode menu list
Refer to the section below for the Scan mode menu list.
→ "Scan Mode" on page 117
Basic Scanning from Your Computer
Scanning in Full Auto Mode
Full Auto Mode lets you scan quickly and easily, without selecting any settings or previewing your image. This mode is useful when you need to scan your originals at 100% size.
Note:
☐ This mode is not available when the Automatic Document Feeder is installed.
☐ See the Help for more details on Epson Scan.
Scanning
1 Place your original(s).
2 Start Epson Scan.
→ "Starting Epson Scan Driver" on page 91
3 Select Full Auto Mode from the Mode list.
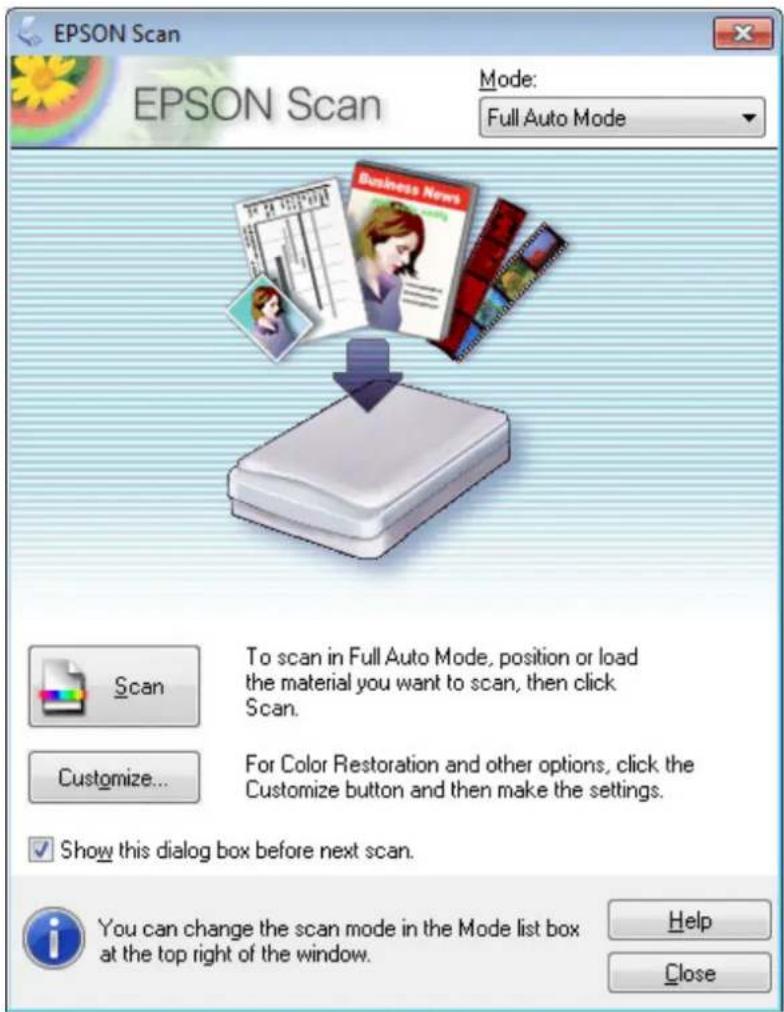
Note:
If the Show this dialog box before next scan check box is cleared, Epson Scan starts scanning immediately without displaying this screen. To return to this screen, click Cancel in the Scanning dialog box during scanning.
Scanning
4
Click Scan. Epson Scan starts scanning in Full Auto Mode.
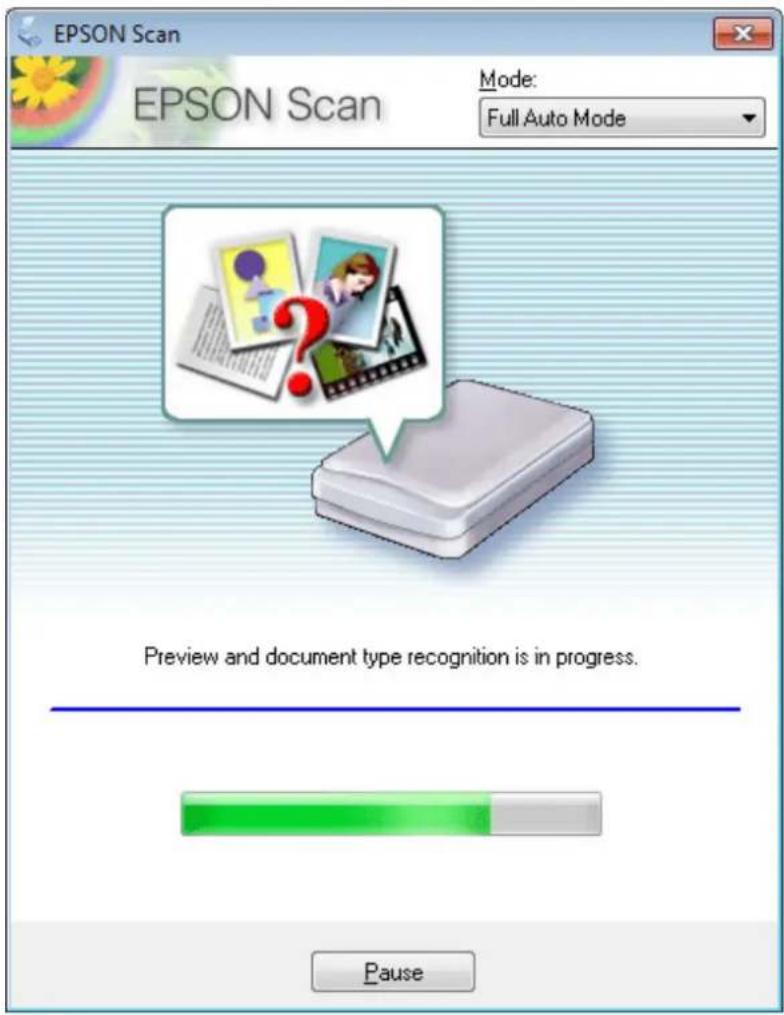
Epson Scan previews each image, detects what type of original it is, and selects the scan settings automatically.
Your scanned image is saved.
Scanning in Home Mode
Home Mode lets you customize some scanning settings and check the changes you have made in a preview image. This mode is useful for basic scanning of photos and graphics.
Note:
☐ In Home Mode, you can only scan from the scanner glass.
☐ See the Help for more details on Epson Scan.
1
Place your original(s).
→ "Scanner glass" on page 42
Scanning
2
Start Epson Scan.
→ "Starting Epson Scan Driver" on page 91
3
Select Home Mode from the Mode list.
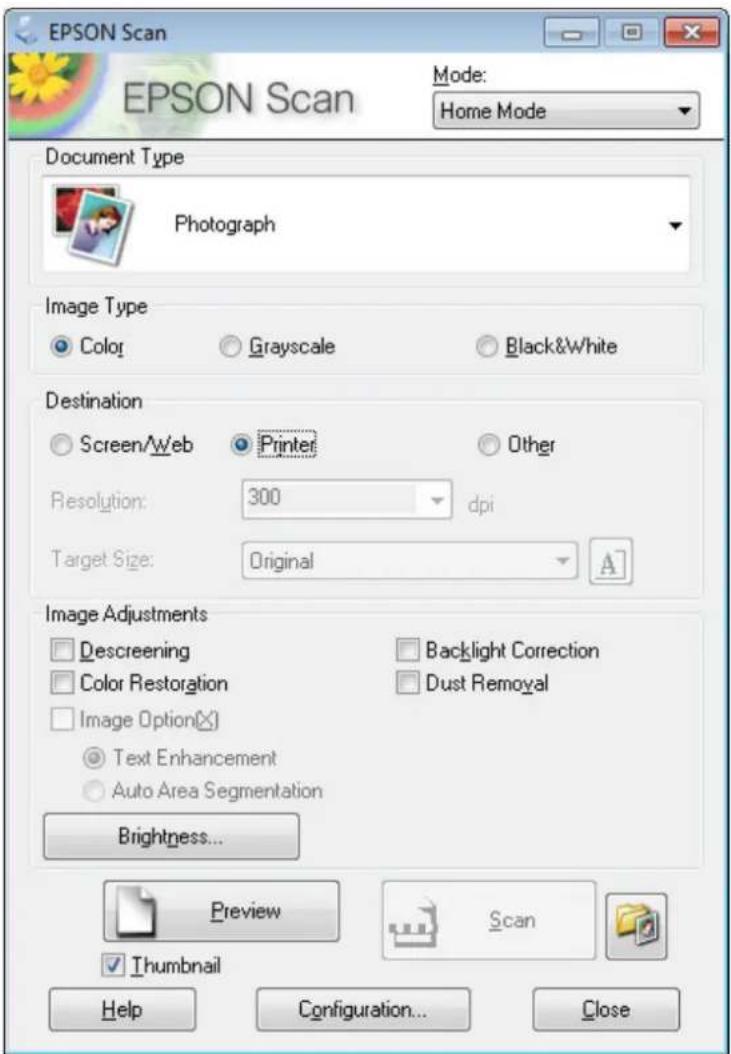
4
Select the Document Type setting.
5
Select the Image Type setting.
6
Click Preview.
→ "Previewing and Adjusting the Scan Area" on page 83
7
Adjust the exposure, brightness, and other image quality settings.
8
Click Scan.
Scanning
9
In the File Save Settings window, select the Type setting and then click OK.
Note:
If the Show this dialog box before next scan check box is cleared, Epson Scan starts scanning immediately without displaying the File Save Settings window.
Your scanned image is saved.
Scanning in Office Mode
Office Mode lets you quickly scan text documents without previewing your image.
Note:
See the Help for more details on Epson Scan.
1
Place your original(s).
→ "Placing Originals" on page 39
2
Start Epson Scan.
→ "Starting Epson Scan Driver" on page 91
Scanning
3
Select Office Mode from the Mode list.
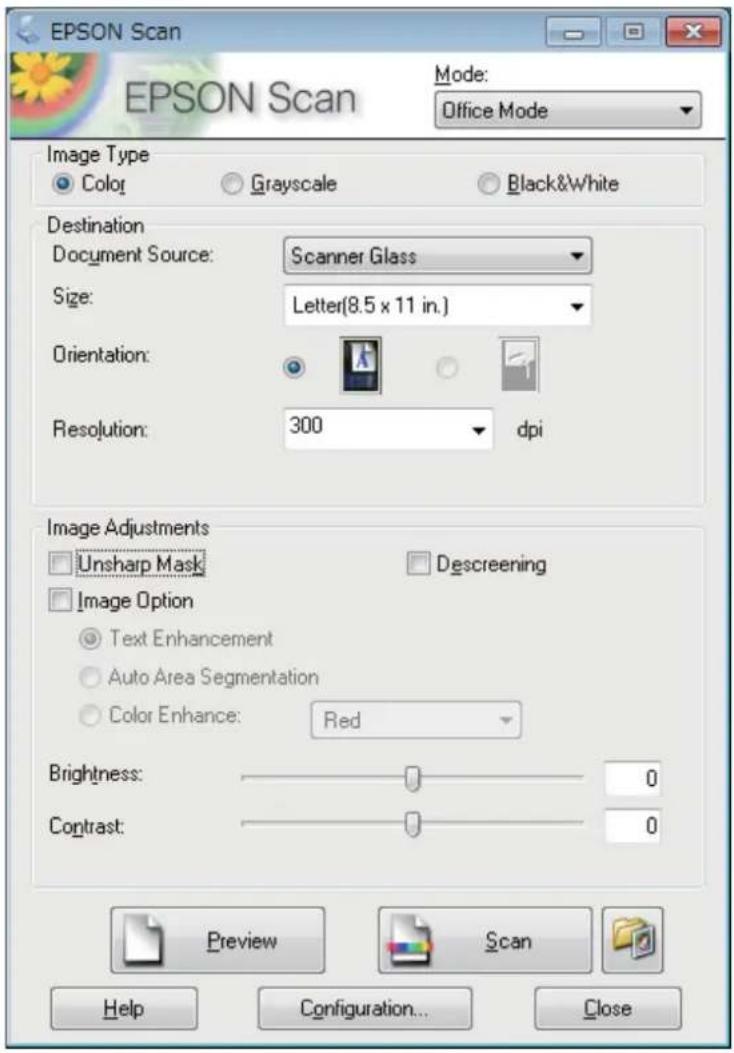
Select the Image Type setting.
Select the Document Source setting.
Select the size of your original as the Size setting.
Select an appropriate resolution for your original(s) as the Resolution setting.
Click Scan.
Scanning
9
In the File Save Settings window, select the Type setting and then click OK.
Note:
If the Show this dialog box before next scan check box is cleared, Epson Scan starts scanning immediately without displaying the File Save Settings window.
Your scanned image is saved.
Scanning in Professional Mode
Professional Mode gives you total control of your scanning settings and lets you check the changes you have made in a preview image. This mode is recommended for advanced users.
Note:
See the Help for more details on Epson Scan.
1
Place your original(s).
→ "Placing Originals" on page 39
2
Start Epson Scan.
→ "Starting Epson Scan Driver" on page 91
Scanning
3
Select Professional Mode from the Mode list.
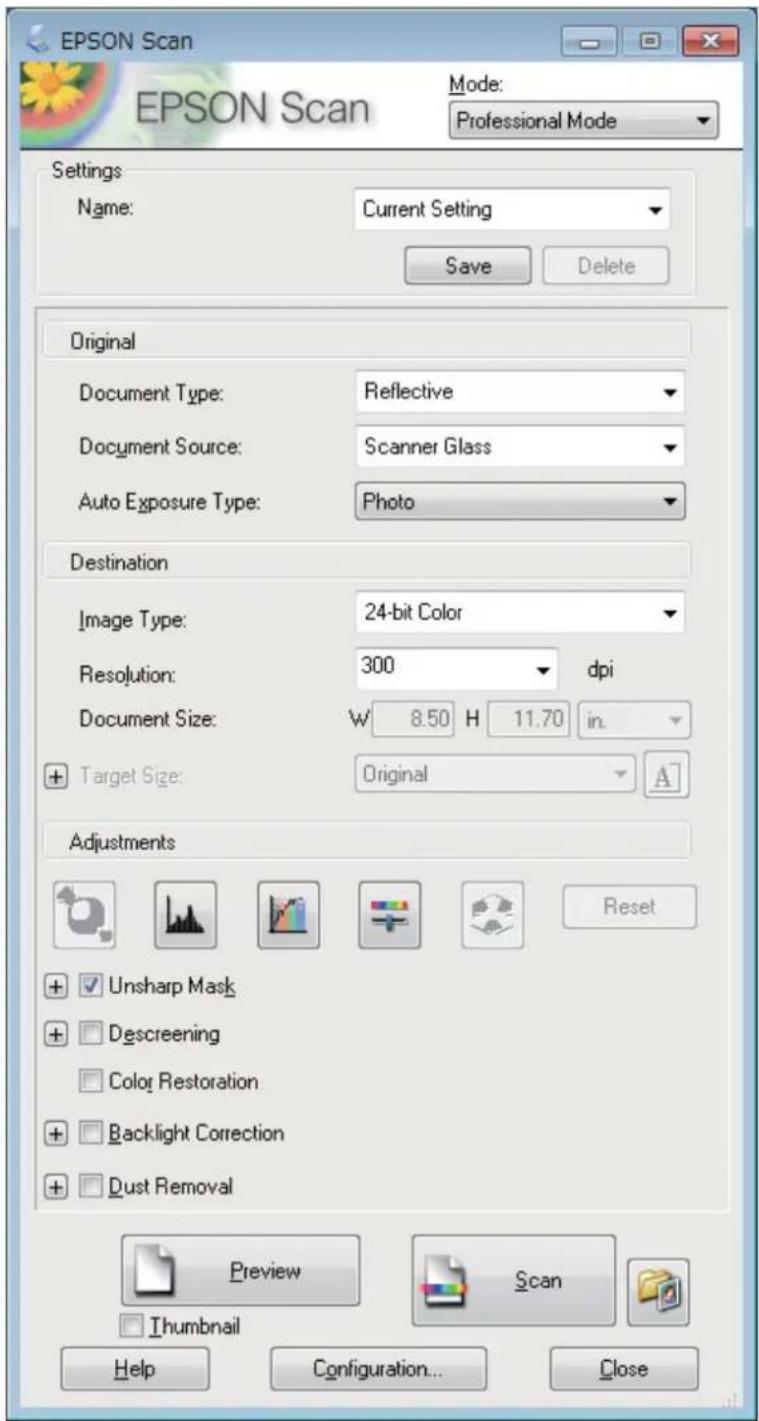
4
Select the type of original(s) you are scanning as the Document Type setting.
5
Select the Document Source setting.
6
Select Photo or Document as the Auto Exposure Type setting.
Scanning
7 Select the Image Type setting.
8 Select an appropriate resolution for your original(s) as the Resolution setting.
Click Preview to preview your image(s). The Preview window opens and displays your image(s).
→ "Previewing and Adjusting the Scan Area" on page 83
Note for the Automatic Document Feeder (ADF):
The ADF loads your first document page, and then Epson Scan prescans it and displays it in the Preview window. The ADF then ejects your first page.
Place your first document page on top of the rest of the pages, and then load the entire document into the ADF.
10 Select the size of the scanned image(s) as the Target Size setting if necessary. You can scan your images at their original size, or you can reduce or enlarge their size by selecting Target Size.
11 Adjust the image quality if necessary.
→ "Image Adjustment Features" on page 72
12 Click Scan.
13 In the File Save Settings window, select the Type setting and then click OK.
Note:
If the Show this dialog box before next scan check box is cleared, Epson Scan starts scanning immediately without displaying the File Save Settings window.
Your scanned image is saved.
Previewing and Adjusting the Scan Area
Selecting a preview mode
Once you have selected your basic settings and resolution, you can preview your image and select or adjust the image area in a Preview window. There are two types of preview.
☐ Normal preview displays your previewed image(s) in their entirety. You can select the scan area and make any image quality adjustments manually.
☐ Thumbnail preview displays your previewed image(s) as thumbnail(s). Epson Scan automatically locates the edges of your scan area, applies automatic exposure settings to the image(s), and rotates the image(s) if necessary.
Scanning
Note:
☐ Some of the settings that you change after previewing an image are reset if you change the preview mode.
☐ Depending on your document type and the Epson Scan mode you are using, you may not be able to change the preview type.
☐ If you preview image(s) without the Preview dialog displayed, image(s) are displayed in the default preview mode. If you preview with the Preview dialog displayed, image(s) are displayed in the preview mode that was displayed just before previewing.
☐ To resize the Preview window, click and drag the corner of the Preview window.
☐ See the Help for more details on Epson Scan.
Creating a marquee
A marquee is a moving dotted line that appears on the edges of your preview image to indicate the scan area.
Do one of the following to draw a marquee.
☐ To draw the marquee manually, position the pointer in the area where you want to place the corner of your marquee and click. Drag the cross-hairs over the image to the opposite corner of the desired scan area.
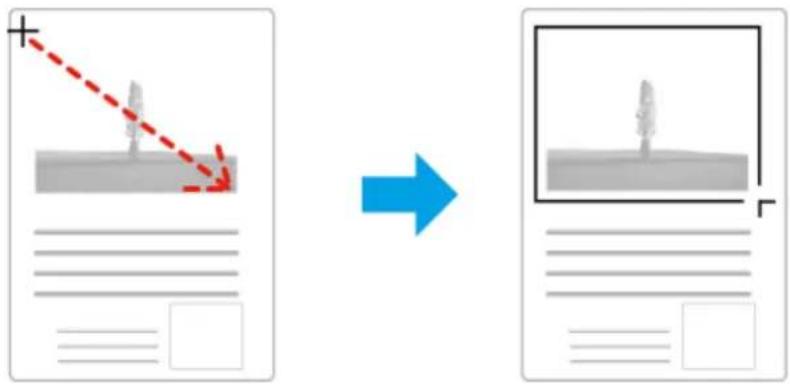
☐ To draw the marquee automatically, click the auto locate icon. You can only use this icon when you are viewing a normal preview and you only have one document on the scanner glass.
☐ To draw the marquee at a specified size, type in a new width and height in the Document Size setting.
☐ For best results and image exposure, make sure all sides of the marquee are located inside the preview image. Do not include any areas around the preview image in the marquee.
Adjusting a marquee
You can move the marquee and adjust its size. If you are viewing a normal preview, you can create multiple marquees (up to 50) on each image to scan different image areas as separate scan files.
 | To move the marquee, position your cursor inside the marquee. The pointer becomes a hand. Click and drag the marquee to the desired location. |
Scanning
 | To resize the marquee, position your cursor over the edge or corner of the marquee.The pointer becomes a straight or angled double-arrow. Click and drag the edge or corner to the desired size. |
 | To create additional marquees of the same size, click this icon. |
 | To delete a marquee, click inside the marquee and click this icon. |
 | To activate all marquees, click this icon. |
Note:
☐ To restrict the movement of the marquee to vertical or horizontal only, hold down the Shift key as you move the marquee.
☐ To restrict the size of the marquee to the current proportions, hold down the Shift key as you resize the marquee.
☐ If you draw multiple marquees, make sure you click All in the Preview window before you scan. Otherwise, only the area inside the last marquee you drew will be scanned.
Various Types of Scanning
Scanning a Magazine
First of all, place your magazine and start Epson Scan.
→ "Starting a Scan" on page 70
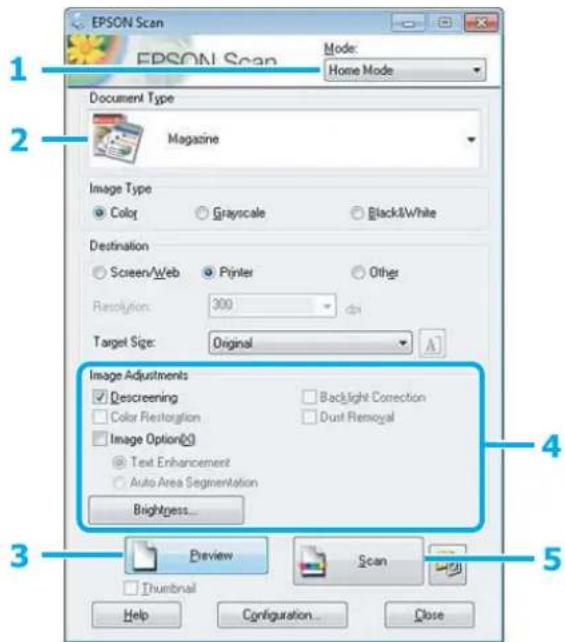
Scanning
1 Select Home Mode from the Mode list.
2 Select Magazine as the Document Type setting.
3 Click Preview.
4 Adjust the exposure, brightness, and other image quality settings.
See the Help for more details on Epson Scan.
5 Click Scan.
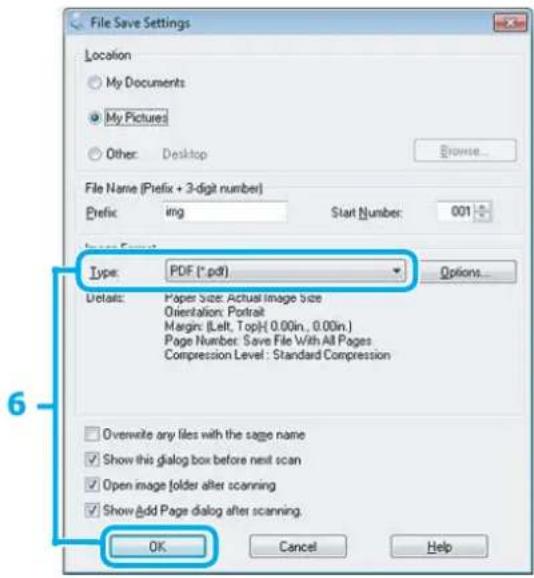
6 Select PDF as the Type setting, and then click OK.
Your scanned image is saved.
Scanning Multiple Documents to a PDF File
First of all, place your document and start Epson Scan.
→ "Starting a Scan" on page 70
1 Select Professional Mode from the Mode list.
2 Select the Document Source setting.
Scanning
3
Click Preview.
Note for the Automatic Document Feeder (ADF):
The document page ejected by the ADF has not been scanned yet. Reload the entire document into the ADF.
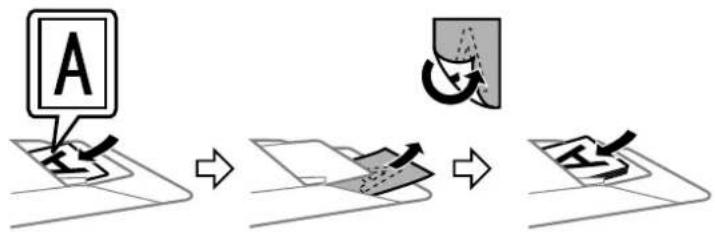
flowchart
graph TD
    A["Step A"] --> B["Arrow to next block"]
    B --> C["Arrow to next block with checkmark"]
    C --> D["Arrow to final mechanical component"]
4
Adjust the exposure, brightness, and other image quality settings.
See the Help for more details on Epson Scan.
5
Click Scan.
![File Save Settings Location My Documents My Pictures Other: Desktop Browse... File Name (Prefix + 3-digit number) Prefix: img Start Number: 001 Type: PDF (*.pdf) Details: Paper Size: Actual Image Size Orientation: Portrait Margin: [Left, Top] { 0.00in., 0.00in.] Page Number: Save File With All Pages Compression Level: Standard Compression Overwrite any files with the same name Show this dialog box before next scan Open image folder after scanning Show Add Page dialog after scanning. OK Cancel Help](/content/2026/06/1182615/images/ad675c2bd57872e208e4948fbe54fe9a396efc6ed225c870f738c5a748758065.jpg)
6
Select PDF as the Type setting, and then click OK.
Note:
If the Show Add Page dialog after scanning check box is cleared, Epson Scan automatically saves your document without displaying the Add Page Confirmation window.
Scanning
7
Epson Scan starts scanning your document.
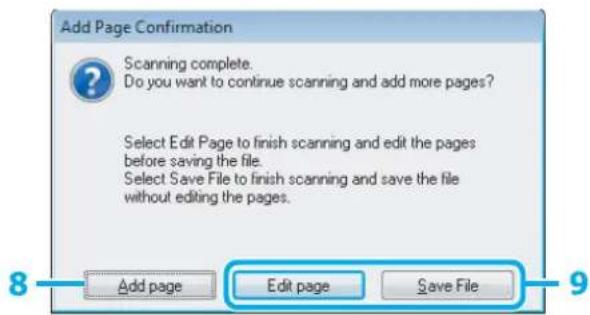
8
If you want to scan more pages, click Add page.
Load the document and scan again, repeating as necessary for each page.
If you have finished scanning, go to step 9.
9
Click Edit page or Save File.
| Edit page | Select this button if you want to delete or reorder any of the pages. Then use the icons on the bottom of the Editing Page window to select, rotate, reorder, and delete pages.See the Help for more details on Epson Scan. Click OK when you are finished editing your pages. Click OK when you are finished editing your pages. |
| Save File | Select this button when you are finished. |
The pages are saved in one PDF file.
Scanning a Photo
First of all, place your photo on the scanner glass and start Epson Scan.
→ "Starting a Scan" on page 70
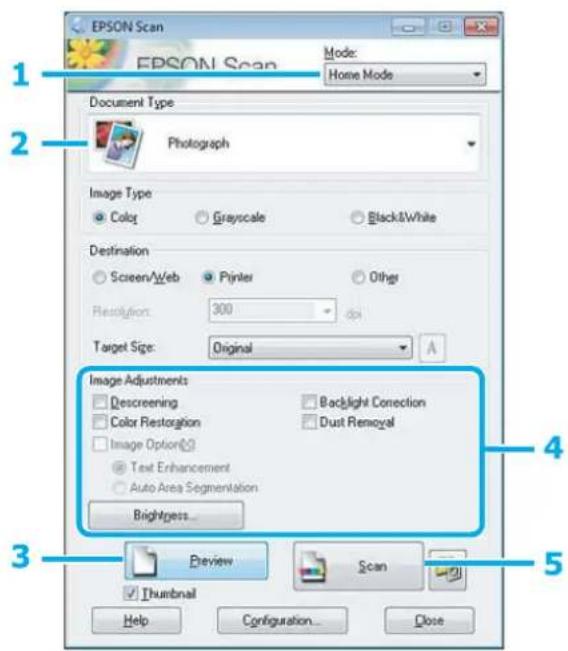
1 Select Home Mode from the Mode list.
2 Select Photograph as the Document Type setting.
3 Click Preview.
4 Adjust the exposure, brightness, and other image quality settings.
See the Help for more details on Epson Scan.
Scanning
5
Click Scan.
![File Save Settings Location My Documents My Pictures Other: Desktop Browse... File Name (Prefix + 3-digit number) Prefix: img Start Number: 001 Type: JPEG (*.jpg) Details: Compression Level [16] Encoding: Standard Embed ICC Profile: ON Options... Overwrite any files with the same name Show this dialog box before next scan Open image folder after scanning Show Add Page dialog after scanning. OK Cancel Help](/content/2026/06/1182615/images/98d40b0b0878dcb5cf772991decfb98af4b0452bf84a8946c32e668a9046f493.jpg)
6
Select JPEG as the Type setting, and then click OK.
Your scanned image is saved.
Software Information
Starting Epson Scan Driver
This software lets you control all aspects of scanning. You can use this as a standalone scanning program or use it with another TWAIN-compliant scanning program.
How to start
Windows 8:
Select the Epson Scan icon on the desktop.
Or, select Epson Scan from the Start screen.
Windows 7, Vista and XP:
Double-click the EPSON Scan icon on the desktop.
Or, select the start button icon or Start > All Programs or Programs > EPSON > EPSON Scan > EPSON Scan.
☐ Mac OS X:
Select Applications > Epson Software > EPSON Scan.
How to access the help
Click the Help button on the Epson Scan driver.
Starting Epson Event Manager
Note:
This scanning software may not be included in some countries.
This lets you assign any of the product buttons to open a scanning program. You can also save frequently used scanning settings, which can really speed up your scanning projects.
How to start
Windows 8:
Right-click on the Start screen, or swipe from the bottom or top edge on the Start screen, and select All apps > Epson Software > Event Manager.
Windows 7, Vista and XP:
Select the start button or Start > All Programs or Programs > Epson Software > Event Manager.
☐ Mac OS X:
Select Applications > Epson Software, and then double-click the Launch Event Manager icon.
How to access the help
Windows:
Click the 🔒 icon in the upper right corner of the screen.
☐ Mac OS X:
Click menu > Help > Epson Event Manager Help.
Faxing
Introducing FAX Utility
FAX Utility is a software capable of transmitting data such as documents, drawings, and tables created using a word processing or spreadsheet application directly by fax, without printing. In addition, this utility has a function to save a received fax as a PDF file on a computer. Use the following procedure to run the utility.
Windows
Click the start button (Windows 7 and Vista) or click Start (Windows XP), point to All Programs, select Epson Software, and then click FAX Utility.
For Windows 8, right-click on the Start screen, or swipe from the bottom or top edge on the Start screen, and select All apps > Epson Software > FAX Utility.
Mac OS X
Click System Preference, click Print & Fax or Print & Scan, and then select FAX (your printer) from Printer. Then click as follows;
Mac OS X 10.6.x, 10.7.x, 10.8.x: Option & Supplies - Utility - Open Printer Utility
Mac OS X 10.5.8: Open Print Queue - Utility
Note:
For more details, see the online help for FAX Utility.
Connecting to a Phone Line
About a phone cable
Use a phone cable with the following interface specification.
RJ-11 Phone Line
☐ RJ-11 Telephone set connection
Depending on the area, a phone cable may be included with the product. If so, use that cable.
Using the phone line for fax only
1 Connect a phone cable leading from a telephone wall jack to the LINE port.
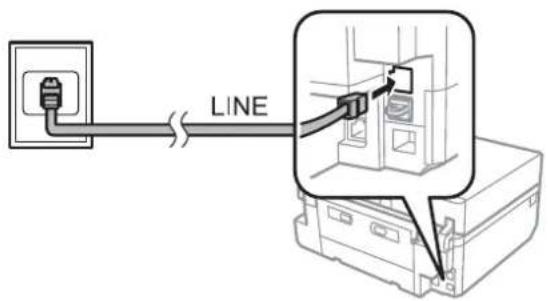
2 Make sure Auto Answer is set to On. → "Setting up to receive faxes automatically" on page 105
Important: If you do not connect an external telephone to the product, make sure you turn on auto answer. Otherwise, you cannot receive faxes.
Sharing line with phone device
1 Connect a phone cable leading from a telephone wall jack to the LINE port.
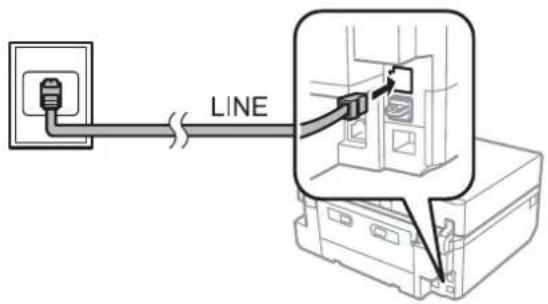
2 Remove the cap.
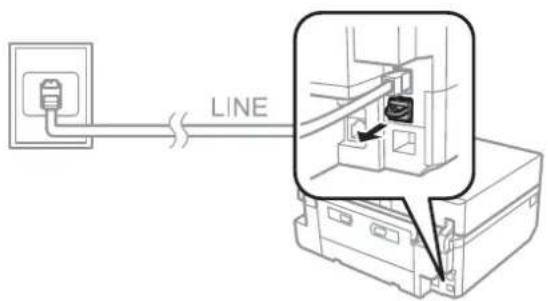
Faxing
3
Connect a phone or answering machine to the EXT. port.
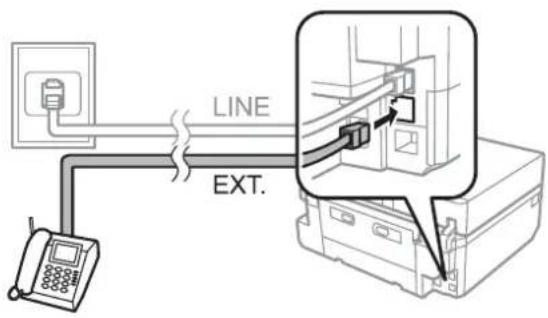
Note:
☐ See the following for other connection methods.
☐ For details, see the documentation that came with your devices.
Connecting to DSL
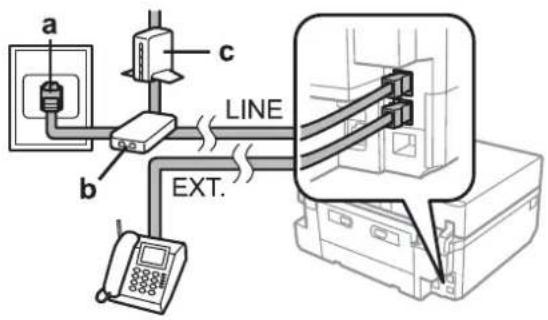
| a | Telephone wall jack |
| b | DSL filter |
| c | DSL modem |
Connecting to ISDN (one phone number)
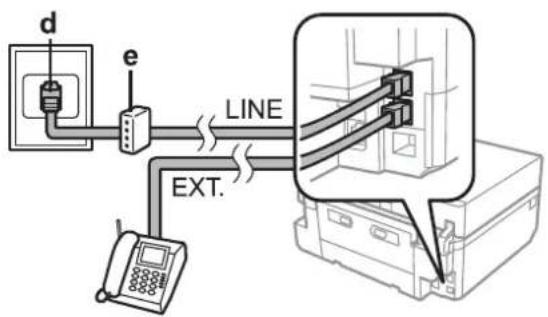
| d | ISDN wall jack |
| e | Terminal adapter or ISDN router |
Faxing
Connecting to ISDN (two phone numbers)
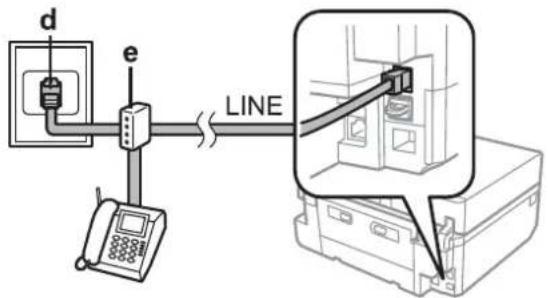
| d | ISDN wall jack |
| e | Terminal adapter or ISDN router |
Setting the line type
If you are using a PBX phone system and you have connected the product to the PBX phone line, change the Line Type setting as shown below.
Note:
PBX (Private Branch Exchange) is used in office environments where an external access code such as "9" must be dialed to call an outside line. The default Line Type setting is PSTN (Public Switched Telephone Network), which is a standard phone line, similar to the one in your home.
1 Enter Setup mode from the Home menu.
2 Select Fax Settings.
3 Select Communication.
4 Select Line Type.
5 Select PBX.
6 Select Use or Do Not Use on the Access Code screen. If you select Use, go to the next step.
7 Enter an external access code, and then press Done.
Note:
Using the access code setting is recommended. After you have made the setting, use # (hash) instead of the exact external access code when dialing outside fax numbers or storing them in the Contact list. The product automatically replaces the # with the set code when dialing. Compared to entering an exact code, using # may help avoid connection problems.
Checking the fax connection
You can check whether the product is ready to send or receive faxes.
1 Load A4-size plain paper in the cassette. "Loading Paper" on page 27
2 Enter Setup mode from the Home menu.
3 Select Fax Settings.
4 Select Check Fax Connection.
5 Press ◇ to print the report.
Note: If an errors are reported, try the solutions in the report.
Setting Up Fax Features
Setting up speed dial entries
You can create a speed dial list allowing you to select fax recipient numbers quickly when faxing. Up to 60 combined speed dial and group dial entries can be registered.
1 Enter Fax mode from the Home menu.
2 Press Contacts.
3 Select Add/Edit Contacts.
4 Select Speed Dial Setup. You see the available speed dial entry numbers.
5 Select the speed dial entry number that you want to register. You can register up to 60 entries.
Faxing
6
Enter a phone number. You can enter up to 64 digits.
Note:
A hyphen ("-") causes a slight pause when dialing. Only include it in phone numbers when a pause is necessary. Spaces entered between numbers are ignored when dialing.
☐ If you have set Line Type to PBX and made the access code setting, enter # (hash) at the beginning of the fax number instead of an external access code.
→ "Setting the line type" on page 96
7
Select Done.
8
Enter a name to identify the speed dial entry. You can enter up to 30 characters.
9
Select Done to register the name.
10
Select Options to specify the fax speed you want to use when sending a fax to the recipient. If you do not need to set the fax speed, select Done.
Note:
If sending a fax to a specific recipient often fails, set a lower fax speed for that recipient. If this is not set, the fax speed set in the following menu is used instead.
Setup > Fax Settings > Communication > Fax Speed
Setting up group dial entries
You can add speed dial entries to a group, allowing you to send a fax to multiple recipients at the same time. Up to 60 combined speed dial and group dial entries can be entered.
1
Enter Fax mode from the Home menu.
2
Select Contacts.
3
Select Add/Edit Contacts.
4
Select Group Dial Setup. You see the available group dial entry numbers.
5
Select the group dial entry number that you want to register.
6
Enter a name to identify the group dial entry. You can enter up to 30 characters.
7
Select Done to register the name.
Faxing
8 Select the speed dial entry number that you want to register in the group dial list.
9 Repeat step 8 to add other speed dial entries to the group dial list. You can register up to 30 speed dial entries in a group dial.
10 Select Done to finish creating a group dial list.
Creating header information
You can create a fax header by adding information such as your phone number or name.
Note:
Make sure you have set the time correctly.
→ "Setting/Changing Time and Region" on page 152
1 Enter Setup mode from the Home menu.
2 Select Fax Settings.
2 Select Communication.
Select Header.
5 Select Fax Header.
6 Enter the header information. You can enter up to 40 characters.
7 Select Done.
Select Your Phone Number.
Enter your phone number. You can enter up to 20 digits.
Note:
Press the # button to enter a plus sign (+) which represents the international call prefix. Note that the asterisk (*) is unavailable.
10 Select Done to register the header information.
Changing the received fax output settings
This product is initially set to print every fax received. You can change the settings to save received faxes in the product's memory, on a computer, or in an external USB storage device, which allows you to view them first and print only when needed. Follow the instructions below to change the settings.
1 Enter Setup mode from the Home menu.
2 Select Fax Settings.
3 Select Receive Settings.
4 Select Fax Output.
A confirmation screen is displayed. Press Change Settings.
5 Select the setting you want by referring to the following explanations.
You can enable one, all, or a combination of the settings.
Save to Inbox
Select to save received faxes in the product's memory. You can view the faxes on the LCD screen and print if needed.
→ "Viewing received faxes on the LCD screen" on page 106 If you only select this setting, received faxes are not automatically printed.

Important:
Faxes saved in the product's memory are not deleted until you delete them. Delete faxes after you print or view them to prevent the memory from becoming full. When the memory is full, the product cannot receive or send faxes.
□ Save to Computer
To enable this function, use Epson FAX Utility on the computer connected to the product.
→ "Introducing FAX Utility" on page 93
Received faxes are saved in a specified folder on the computer in PDF format.
After you have configured FAX Utility to save faxes on a computer, you can change to Yes then Print on the product to print received faxes automatically while saving them on the computer.

Important:
Received faxes are only saved on the computer while the computer is logged in. Because the product temporarily saves the received faxes in its memory until they are saved on the computer, the memory may become full if you leave the computer off for an extended period of time.
Note:
If you disable this option when there are received faxes that have not yet been saved on the computer, the faxes are automatically printed unless you have enabled at least one of the other options.
Faxing
□ Save to External Device
Enable this to save received faxes in a memory card or external USB storage device connected to the product. Select Yes then Print to print received faxes automatically while saving them to a memory card or device. Before you use this function, you need to let the product validate your memory card or external USB device and create a folder to save in the card or device. Select Create Folder to Save, and then follow the on-screen instruction. You cannot use cards or devices that have not been validated by the product.

Important:
Because the product temporarily saves received faxes in its memory until they are saved to a validated card or device, the memory may become full if you do not insert the card or device for an extended period of time.
Note:
☐ If saving faxes to the card or device fails due to an error such as memory full, the product temporarily saves the faxes in its memory until an error-free validated card or device is connected.
☐ If you disable this option when there are received faxes that have not yet been saved to the external device, the faxes are automatically printed unless you have enabled at least one of the other options.
Sending Faxes
Sending faxes by entering a number
1 Place your original in the Automatic Document Feeder or on the scanner glass.
→ "Placing Originals" on page 39
2 Enter Fax mode from the Home menu.
3 Touch the Enter Fax Number area on the LCD screen.
4 Enter the fax number, and then select Done. You can enter up to 64 digits.
Note:
☐ To display the last fax number you used, press Redial.
☐ Make sure you have entered the header information. Some fax machines automatically reject incoming faxes that do not include header information.
5 Press ▼, select Color or B&W, and then change the other settings if necessary.
Note:
For an explanation of each of the settings, see the fax mode menu list.
→ "Fax Mode" on page 118
6 Press ◇ to start sending.
Faxing
Note:
If the fax number is busy or there is some problem, this product redials after one minute. Press Redial to redial immediately.
Sending faxes using speed dial/group dial
Follow the instructions below to send faxes using speed dial/group dial.
Note:
When using group dial, you can only send B&W faxes.
1 Place your original in the Automatic Document Feeder or on the scanner glass.
→ "Placing Originals" on page 39
2 Enter Fax mode from the Home menu.
3 Press Contacts.
4 Select the entry number to send.
5 Press ▼, select Color or B&W, and then change the other settings if necessary.
Note:
For an explanation of each of the settings, see the fax mode menu list.
→ "Fax Mode" on page 118
6 Press ◇ to start sending.
Sending faxes by broadcasting
Broadcast allows you to easily send the same fax to multiple numbers (up to 30) using speed dial/group dial, or by entering the fax numbers. Follow the instructions below to send faxes by broadcasting.
Note:
You can only send B&W faxes.
1 Place your original in the Automatic Document Feeder or on the scanner glass.
→ "Placing Originals" on page 39
2 Enter Fax mode from the Home menu.
3 Select Advanced Options.
Faxing
4 Select Broadcast Fax.
Note:
To select recipients from a speed or group dial list, go to step 8.
5 Select Add New.
6 Select Enter Fax Number.
7 Enter a fax number, and then select Done.
Note:
☐ To add another number, repeat steps 5 through 7.
☐ If you do not need to add recipients from the speed dial/group dial lists, select Done, and then go to step 13.
8 Select Add New.
Select Select from Contacts.
10 Select the entry number.
11 Select Done.
12 Select Done.
13 Press ◇ to start sending.
Sending a fax at a specified time
Follow the instructions below to send a fax at a specified time.
Note:
☐ Make sure you have set the time correctly.
→ "Setting/Changing Time and Region" on page 152
☐ You can only send B&W faxes.
1 Place your original in the Automatic Document Feeder or on the scanner glass.
→ "Placing Originals" on page 39
2 Enter Fax mode from the Home menu.
Faxing
3 Enter a fax number. You can also use redial, speed dial, or group dial lists to select fax numbers.
4 Select Advanced Options.
5 Select Send Fax Later.
6 Select On.
7 Set the time that you want to send the fax, and then select Done.
8 Press ◇ to start scanning. The scanned image is sent at the specified time.
Note:
If you need to cancel faxing at the time you specified, press ☑.
Sending a fax from a connected phone
If the recipient has the same number for both phone and fax, you can send a fax after talking over the phone without hanging up.
1 Place your original in the Automatic Document Feeder or on the scanner glass.
→ "Placing Originals" on page 39
2 Dial a number from the phone connected to the product.
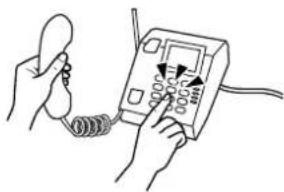
natural_image
Illustration of hands using a handheld device to interact with a coiled spring (no text or symbols visible)3 Select Send on the control panel of the product.
4 Press ◇ to send fax.
5 Hang up the phone.
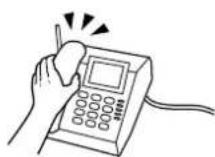
Receiving Faxes
Setting up to receive faxes automatically
Follow the steps below to make settings to receive faxes automatically.

Load A4-size plain paper in the cassette.
→ "Loading Paper" on page 27

Make sure Auto Answer is set to On.
Setup > Fax Settings > Receive Settings > Auto Answer > On
Note:
When an answering machine is connected directly to this product, make sure you set Rings to Answer correctly using the following procedure.
☐ Depending on the region, Rings to Answer may be unavailable.

Enter Setup mode from the Home menu.

Select Fax Settings.

Select Receive Settings.

Select Rings to Answer.

Press + or - to select the number of rings, and then select Done.

Important:
Select more rings than needed for the answering machine to pick up. If it is set to pick up on the fourth ring, set the product to pick up on the fifth ring or later. Otherwise the answering machine cannot receive voice calls.
Note:
When you receive a call and the other party is a fax, the product receives the fax automatically even if the answering machine picks up the call. If you pick up the phone, wait until the LCD screen displays a message saying that a connection has been made before you hang up. If the other party is a caller, the phone can be used as normal or a message can be left on the answering machine.

Make additional settings for receiving faxes as necessary.
□ Received fax output settings
→ "Changing the received fax output settings" on page 100
Fax print settings
Setup > Fax Settings > Print Settings
→ "Setup Mode - Fax Settings" on page 129
Faxing
You can also specify a time period to stop automatic printing of faxes or reports during that time. Select Print Inhibit Time from Print Settings, and then specify the time period by entering the start and end time.
DRD (Distinctive Ring)
Setup > Fax Settings > Receive Settings > DRD
→ "Setup Mode - Fax Settings" on page 129
Receiving faxes manually
If your phone is connected to the product, and Auto Answer mode has been set to Off, you can receive fax data after the connection is made.
1 Load A4-size plain paper in the cassette.
→ "Loading Paper" on page 27
2 When the telephone rings, lift the phone connected to the product.
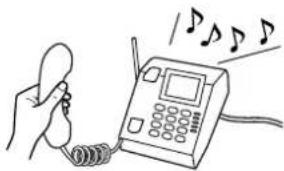
natural_image
Line drawing of a hand holding a microphone next to a telephone receiver with musical notes (no text or symbols)3 When you hear a fax tone, select Receive.
- Press ◇ to receive the fax, and then put the phone back on the hook.
Note:
By using the Remote Receive function, you can start transmitting faxes using your phone instead of selecting the menu on the product.
Enable Remote Receive (Setup > Fax Settings > Receive Settings > Remote Receive), and then enter a Start Code. This is useful if you have a cordless handset. You can start receiving a fax just by entering the code using the handset.
5 Press ◇ to print the fax if you have made settings to print received faxes.
Viewing received faxes on the LCD screen
To save received faxes in the product's memory and view them on the LCD screen, you need to enable the Save to Inbox setting.
→ "Changing the received fax output settings" on page 100
Follow the steps below to view the received faxes.
Important:
Faxes saved in the product's memory are not deleted until you delete them. Delete faxes after you print or view them to prevent the memory from becoming full. When the memory is full, the product cannot receive or send faxes.
Faxing
When the product receives a fax, a message is displayed notifying you of the new fax. Select Open Inbox displayed below the message.
You can also open Inbox by selecting Fax >Advanced Options >Open Inbox.
Note:
The icon stays on when there is one or more unread or unprinted faxes in Inbox. Touch the icon to see the number of unread or unprinted faxes and how much of the product's memory has been used.
2 Select the fax you want to view from the Inbox list.
The contents of the fax are displayed.
Note:
You can print or delete all of the faxes in the Inbox. Touch Menu at the bottom of the list screen, and then follow the on-screen instructions.
3 Touch ≡, and then select one of the options. If you select Print and Delete, the received fax will be printed and then deleted from the product's memory.
Note:
Select the following menu to check the print settings to print received faxes.
Setup > Fax Settings > Print Settings
→ "Setup Mode - Fax Settings" on page 129
Receive a fax by polling
This allows you to receive a fax from the fax information service you have called.
Follow the instructions below to receive a fax by polling.
1 Load A4-size plain paper in the cassette.
→ "Loading Paper" on page 27
2 Enter Fax mode from the Home menu.
3 Select Advanced Options.
Select Polling, and then select On.
5 Enter the fax number.
6 Press ◇ to receive the fax.
7 Press ◇ to print the fax if you have disabled Auto Answer and made settings to print received faxes.
Faxing
Printing Reports
Follow the instructions below to print a fax report.
1 Load A4-size plain paper in the cassette. → "Loading Paper" on page 27
2 Enter Fax mode from the Home menu.
3 Select Advanced Options.
4 Select Fax Report.
5 Select the item you want to print.
Note: Only Fax Log can be viewed on the screen.
6 Press ◇ to print the report you selected.
Note:
You can make settings to print a fax report automatically and configure various settings for fax reports in the following menu.
Setup > Fax Settings > Report Settings
→ "Setup Mode - Fax Settings" on page 129
Fax Mode Menu List
Refer to the section below for the Fax mode menu list.
→ "Fax Mode" on page 118
More Functions
More Functions provides you with many special menus that make printing easy and fun! For more details, select More Functions, select each menu, and then follow the instructions on the LCD screen.
| Menu | Functions | |
| Copy/Restore Photos | 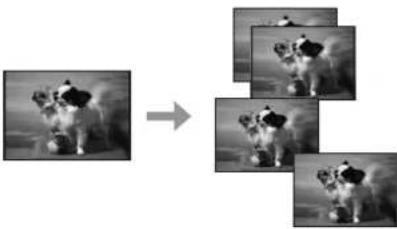 | You can make faithful copies of your originals. If your original photo is faded, you can restore color to bring it back to life. |
| Photo Layout Sheet | 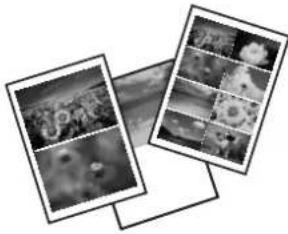 | You can print your photos on a memory card in various layouts. |
| Greeting Card | 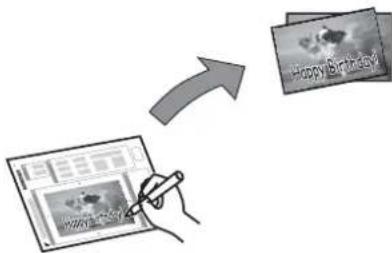 | You can create custom cards with handwritten messages by using an A4 template. First print a template, write your message, and then scan the template to print your cards. |
| Copy to CD/DVD |  | You can copy your photo or CD/DVD label onto a CD/DVD label. The image is automatically cropped and resized to fit the CD/DVD label. |
| Print on CD/DVD |  | You can create CD/DVD labels from photos on a memory card without using a computer. |
| Coloring Book* | 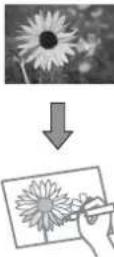 | You can create a coloring sheet from your photos or line drawings. |
More Functions
| Menu | Functions | ||
| Lined Papers | 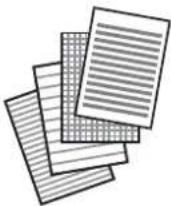 | You can print lined paper, graph paper, and music paper. Follow the on-screen instructions to print. | |
| Writing Papers |  | You can print your own lined paper with a photo set as the background. Follow the on-screen instructions to print. | |
| Calendar |  | You can print monthly or weekly calendars. For monthly calendars, you can specify the year and month. Follow the on-screen instructions to print. | |
 | |||
| Message Card | 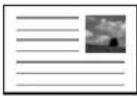 | You can create your own message cards with or without a photo or a pre-designed image set as the decoration. | |
| Origami Envelope | 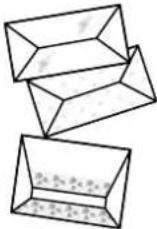 | You can create original envelopes with or without pre-designed images set as the background or as decoration. Two types of envelope are available. After printing, fold the paper following the instruction sheet that can be printed from the Origami Envelope Instruction menu.(→“Printing origami envelopes” on page 111) | |
| Origami Envelope Instruction |  |  | You can print an instruction sheet that shows you how to fold the paper you printed using the Origami Envelope function into an envelope.(→“Printing origami envelopes” on page 111) |
* Only use the Coloring Book function for drawings and pictures that you created yourself. When using copyrighted materials, make sure you stay within the range of laws governing printing for personal use.
More Functions
Printing origami envelopes
You can create original envelopes with or without pre-designed symbols or patterns as the background or as decoration. Two types of envelope are available. After printing, fold the paper following the instruction sheet that can be printed from the Origami Envelope Instruction menu.
1 Select More Functions.
2 Select Personal Stationery.
3 Select Origami.
4 Select Origami Envelope.
5 Select an icon.
6 Select whether or not to print fold lines on the envelope.
7 Select the image position.
8 Select an envelope size.
9 Load A4 size paper to print envelopes.
(→ "Into the paper cassette 2" on page 29)
10 Set the number of copies.
11 Press ◇ to start printing the origami envelope.
12 If you select Yes when a message is displayed asking whether or not you want to continue printing, go back to step 10. If you select No, go to the next step.
13 Select Origami Envelope Instruction.
14 Select an envelope size.
15 Load A4 size paper to print an origami envelope instruction sheet.
(→ "Into the paper cassette 2" on page 29)
16 Set the number of copies.
More Functions

Press ◇ to start printing the origami envelope instruction sheet.

Use the origami envelope instruction sheet to make the folds for the origami envelope in the correct order.
Note:
Place the instruction sheet on top of your envelope and fold both sheets together. When finished, unfold them and remove the instruction sheet. After that, fold the envelope only, using the creases in the paper as a guide.
More Functions mode menu list
Refer to the section below for the More Functions mode menu list.

"More Functions Mode" on page 119
Menu List of Control Panel
You can use this product as a printer, copier, scanner, and fax. When using one of these functions, except the printer function, select your desired function by pressing the corresponding Mode button on the control panel. Each mode's main screen appears as you select the mode.
Note:
Depending on the other settings selected in the mode, not all options or settings may be available.
Copy Mode
XP-710 Series/XP-810 Series
| Menu | Setting and Options |
| Color, B&W | |
| Density | -4 to +4 |
| 2-Sided Copying | 1>1-Sided, 2>2-Sided*1, 1>2-Sided, 2>1-Sided*1 |
| Layout | With Border, Borderless*2, A4, 2-up Copy, A4, Book/2-up, Book/2-Sided |
| Reduce/Enlarge | Custom Size, Actual Size, Auto Fit Page, 10x15cm->A4, A4->10x15cm, 13x18->10x15, 10x15->13x18, A5->A4, A4->A5 |
| Paper Size | A4, A5, 10x15cm(4x6in), 13x18cm(5x7in) |
| Paper Type | Plain Paper, Matte, Prem. Glossy, Ultra Glossy, Glossy, Photo Paper |
| Paper Source | Cassette 1, Cassette 2, Rear Paper Feed Slot |
| Document Type | Text, Text & Image, Photo |
| Quality | Draft*3, Standard, Best |
| Document Orientation | Portrait, Landscape |
| Binding Direction*1 | Left, Top |
| Binding Margin | Left, Top |
| Expansion | Standard, Medium, Minimum |
| Dry Time | Standard, Long, Longer |
| Clear All Settings | |
*1 This function is only available for XP-810 Series.
*2 Your image is slightly enlarged and cropped to fill the sheet of paper. Print quality may decline in the top and bottom areas of the printout, or the area may be smeared when printing.
*3 For users in Belgium, draft mode is not available.
XP-610 Series
| Menu | Setting and Options | |
| Color, B&W | ||
| Paper and Copy Settings | Density | -4 to +4 |
| 2-Sided Copying | 1>1-Sided, 1>2-Sided | |
| Layout | With Border, Borderless*1, A4, 2-up Copy, A4, Book/2-up, Book/2-Sided | |
| Reduce/Enlarge | Custom Size, Actual Size, Auto Fit Page, 10x15cm->A4, A4->10x15cm, 13x18->10x15, 10x15->13x18, A5->A4, A4->A5 | |
| Paper Size | A4, A5, 10x15cm(4x6 in), 13x18cm(5x7 in) | |
| Paper Type | Plain Paper, Matte, Prem. Glossy, Ultra Glossy, Glossy, Photo Paper | |
| Paper Source | Cassette 1, Cassette 2 | |
| Document Type | Text, Text & Image, Photo | |
| Quality | Draft *2, Standard, Best | |
| Document Orientation | Portrait, Landscape | |
| Binding Margin | Left, Top | |
| Expansion | Standard, Medium, Minimum | |
| Dry Time | Standard, Long, Longer | |
*1 Your image is slightly enlarged and cropped to fill the sheet of paper. Print quality may decline in the top and bottom areas of the printout, or the area may be smeared when printing.
*2 For users in Belgium, draft mode is not available.
Print Photos Mode
XP-710 Series/XP-810 Series
| Menu | Setting and Options |
| Browse | Browse by Date |
| Cancel Browse | |
| Select Photos | Select All Photos |
| Cancel Photo Selection | |
| Select Location | Select Folder |
| Select Group |
Menu List of Control Panel
| Menu | Setting and Options | |
| Print Settings | Paper Size | 10x15cm(4x6in), 13x18cm(5x7in), 16:9 Wide, A4, 100x148mm |
| Paper Type | Prem. Glossy, Ultra Glossy, Glossy, Photo Paper, Plain Paper, Matte, Photo Sticker | |
| Paper Source | Cassette 1, Cassette 2, Cassette 1->2, Rear Paper Feed Slot | |
| Borderless | Borderless^*1 , With Border | |
| Quality | Draft *2, Standard, Best | |
| Expansion | Standard, Medium, Minimum | |
| Date | Off, yyyy.mm.dd, mm.dd.yyyy, dd.mm.yyyy | |
| Print Info. On Photos | Off, Camera Settings, Camera Text, Landmark | |
| Fit Frame | On, Off | |
| Bidirectional | On, Off | |
| Clear All Settings | ||
| Edit Photos | Photo Adjustments | Enhance, Scene Detection, Fix Red-Eye *3, Brightness, Contrast, Sharpness, Saturation |
| Filter | Off, Sepia, B&W | |
| Crop/Zoom | ||
*1 Your image is slightly enlarged and cropped to fill the sheet of paper. Print quality may decline in the top and bottom areas of the printout, or the area may be smeared when printing.
*2 For users in Belgium, draft mode is not available.
*3 This setting does not change your original image. It only affects your printout. Depending on the type of photo, parts of the image other than the eyes may be corrected.
XP-610 Series
| Menu | Setting and Options |
| Browse | Browse by Date |
| Cancel Browse | |
| Select Photos | Select All Photos |
| Cancel Photo Selection | |
| Display Mode | 1-up |
| 1-up without Information | |
| 9-up |
Menu List of Control Panel
| Menu | Setting and Options | |
| Print Settings | Paper Size | 10x15cm(4x6in), 13x18cm(5x7in), 16:9 Wide, A4, 100x148mm |
| Paper Type | Prem. Glossy, Ultra Glossy, Glossy, Photo Paper, Plain Paper, Matte, Photo Sticker | |
| Paper Source | Cassette 1, Cassette 2, Cassette 1>2 | |
| Borderless | Borderless^*1 , With Border | |
| Quality | Draft *2, Standard, Best | |
| Expansion | Standard, Medium, Minimum | |
| Date | Off, yyyy.mm.dd, mm.dd.yyyy, dd.mm.yyyy | |
| Print Info. On Photos | Off, Camera Text, Landmark | |
| Fit Frame | On, Off | |
| Bidirectional | On, Off | |
| Photo Adjustments | Enhance, Scene Detection, Fix Red-Eye *3, Brightness, Contrast, Sharpness, Saturation | |
| Filter | Off, Sepia, B&W | |
| Crop/Zoom | ||
*1 Your image is slightly enlarged and cropped to fill the sheet of paper. Print quality may decline in the top and bottom areas of the printout, or the area may be smeared when printing.
*2 For users in Belgium, draft mode is not available.
*3 This setting does not change your original image. It only affects your printout. Depending on the type of photo, parts of the image other than the eyes may be corrected.
Menu List of Control Panel
Scan Mode
XP-710 Series/XP-810 Series
| Menu | Setting item and Description | |
| Scan to Memory Card | JPG, PDF | |
| Color, B&W | ||
| Contrast | -4 to +4 | |
| 2-Sided Scanning*1 | Off, On | |
| Scan Area | A4, Auto Cropping, Max Area | |
| Document | Text, Photograph | |
| Resolution | 200dpi, 300dpi, 600dpi | |
| Document Orientation | Portrait, Landscape | |
| Binding Direction*1 | Left, Top | |
| Clear All Settings | ||
| Scan to Cloud*1 | If you want to use the Scan to Cloud service, visit the Epson Connect portal site. ➔ "Using Epson Connect Service" on page 9 | |
| Scan to PC (JPEG) | ➔ "Basic Scanning from the Control Panel" on page 74 | |
| Scan to PC (PDF) | ||
| Scan to PC (Email) | ||
| Scan to PC (WSD)*2 | ||
*1 This function is only available for XP-810 Series.
*2 This feature is only available for English versions of Windows 8, 7 or Vista.
XP-610 Series
| Menu | Setting item and Description | |
| Scan to Memory Card | Format | JPEG, PDF |
| Color | Color, B&W | |
| Scan Area | A4, Auto Cropping, Max Area | |
| Document | Text, Photograph | |
| Resolution | 200dpi, 300dpi, 600dpi | |
| Contrast | -4 to +4 | |
| Document Orientation | Portrait, Landscape | |
Menu List of Control Panel
| Menu | Setting item and Description |
| Scan to Cloud | If you want to use the Scan to Cloud service, visit the Epson Connect portal site.→ "Using Epson Connect Service" on page 9 |
| Scan to PC (JPEG) | → "Basic Scanning from the Control Panel" on page 74 |
| Scan to PC (PDF) | |
| Scan to PC (Email) | |
| Scan to PC (WSD)* | |
* This feature is only available for English versions of Windows 8, 7 or Vista.
Fax Mode
| Note:This function is only available for XP-810 Series |
| Menu | Setting item and Description |
| Resolution | Select this option to change the resolution for fax data you are sending. |
| Contrast | Select this option to change the contrast for fax data you are sending. When sending text-based document, select Auto. |
| 2-Sided Faxing | Turn on when sending 2-sided originals in the ADF. |
| Direct Send | Select this to send a monochrome fax to a single recipient as soon as the connection is made without letting the product save the scanned image in its memory. You cannot use this option when sending to multiple recipients or color fax. |
| Send Preview | Select this to view scanned image before starting to send the fax. This option is disabled when sending a color fax, or when sending a monochrome fax with the Direct Send option enabled. |
| Clear All Settings | Returns the fax send settings to their default. |
| Send Fax Later | → "Sending a fax at a specified time" on page 103 |
| Broadcast Fax | → "Sending faxes by broadcasting" on page 102 |
| Polling | → "Receive a fax by polling" on page 107 |
| Open Inbox | → "Viewing received faxes on the LCD screen" on page 106 |
| Reprint Faxes | Reprints from the latest fax received. When the memory is full, the oldest faxes are erased first. |
Menu List of Control Panel
| Menu | Setting item and Description | |
| Fax Report | Fax Settings List | Prints the current fax settings. |
| Fax Log | Prints or displays the communication log. | |
| Last Transmission | Prints a communication log for the previous transmission or the previous polling results received. | |
| Contact List | Prints the Contact list. | |
| Speed Dial List | Prints the speed dial list. | |
| Group Dial List | Prints the group dial list. | |
| Protocol Trace | Prints the protocol for the latest communication. | |
More Functions Mode
XP-710 Series/XP-810 Series
| Menu | Setting and Options | |
| Copy/Restore Photos | Off, On | |
| Paper and Copy Settings | Paper Size, Paper Type, Paper Source, Borderless*1, Expansion | |
| Photo Adjustments | Enhance | |
| Filter | Off, B&W | |
| Crop/Zoom | ||
Menu List of Control Panel
| Menu | Setting and Options | |
| Photo Layout Sheet | 2-up, 4-up, 8-up, 20-up, Sticker 16-up, Upper 1/2, Lower 1/2, Photo ID, Jewel Upper, Jewel Index, P.I.F. | |
| Paper Size | 10x15cm(4x6in), 13x18cm(5x7in), 16:9 wide, A4, A6, 100x148mm | |
| Paper Type | Prem. Glossy, Ultra Glossy, Glossy, Photo Paper, Plain Paper, Matte, Photo Sticker, PhotoSticker16 | |
| Automatic Layout, Place Photos Manually | ||
| Browse | Browse by Date, Cancel Browse | |
| Select Photos | Select All Photos, Cancel Photo Selection | |
| Select Location | Select Folder, Select Group | |
| Photo Adjustments | Enhance, Scene Detection, Fix Red-Eye*2, Brightness, Contrast, Sharpness, Saturation | |
| Filter | Off, Sepia, B&W | |
| Crop/Zoom | ||
| Print Settings | Paper Source, Quality, Expansion, Date, Print Info. On Photos, Fit Frame, Bidirectional | |
| Greeting Card | Select Photo and Print Template, Print Greeting Cards from Template | |
| Browse | Browse by Date, Cancel Browse | |
| Select Location | Select Folder, Select Group | |
| Photo Adjustments | Enhance, Scene Detection, Fix Red-Eye*2, Brightness, Contrast, Sharpness, Saturation | |
| Filter | Off, Sepia, B&W | |
| Paper Size | 10x15cm(4x6in) | |
| Paper Type | Ultra Glossy, Prem. Glossy, Glossy, Photo Paper | |
| Layout | Borderless*1, Upper 1/2, Lower 1/2 | |
| Frame | Off, Oval, Oval - Soft Edge | |
| Copy to CD/DVD | Print on a CD/DVD, Test Print on A4 paper | |
| Document Type | Text & Image, Photo | |
| Quality | Standard, Best | |
Menu List of Control Panel
| Menu | Setting and Options | |
| Print on CD/DVD | Print Layout | CD/DVD 1-up, CD/DVD 4-up, CD/DVD Variety |
| Automatic Layout, Place Photos Manually | ||
| Browse | Browse by Date, Cancel Browse | |
| Select Location | Select Folder, Select Group | |
| Photo Adjustments | Enhance, Scene Detection, Fix Red-Eye*2, Brightness, Sharpness, Saturation | |
| Filter | Off, Sepia, B&W | |
| Crop/Zoom | ||
| Print on a CD/DVD, Test Print on A4 paper | ||
| Print Settings | CD Density | |
| Personal Stationery | Lined Papers | Wide Rule, Thin Rule, Graph Rule, Music Paper |
| Writing Papers | Horizontal Rule, Vertical Rule, Without Rule | |
| Calendar | Weekly, Monthly | |
| Message Card | Plain Paper, Matte | |
| Origami | Origami Envelope, Origami Envelope Instruction ➤ "Printing origami envelopes" on page 111 | |
| Coloring Book | Photo or Drawing on Scanner Glass, Photo on Memory Card | |
| Browse | Browse by Date, Cancel Browse | |
| Select Location | Select Folder, Select Group | |
| Print Settings | Paper Settings, Paper Source, Density, Line Detection | |
*1 Your image is slightly enlarged and cropped to fill the sheet of paper. Print quality may decline in the top and bottom areas of the printout, or the area may be smeared when printing.
*2 This setting does not change your original image. It only affects your printout. Depending on the type of photo, parts of the image other than the eyes may be corrected.
XP-610 Series
| Menu | Setting and Options | |
| Copy/Restore Photos | Color Restoration | Off, On |
| Display Mode | 1-up, 1-up without Information | |
| Paper and Copy Settings | Paper Size, Paper Type, Paper Source, Borderless*1, Expansion | |
| Photo Adjustments | Enhance | |
| Filter | Off, B&W | |
| Crop/Zoom | ||
Menu List of Control Panel
| Menu | Setting and Options | |
| Photo Layout Sheet | 2-up, 4-up, 8-up, 20-up, Sticker 16-up, Upper 1/2, Lower 1/2, Photo ID, Jewel Upper, Jewel Index, P.I.F. | |
| Paper Size | 10x15cm(4x6in), 13x18cm(5x7in), 16:9 wide, A4, A6, 100x148mm | |
| Paper Type | Prem. Glossy, Ultra Glossy, Glossy, Photo Paper, Plain Paper, Matte, Photo Sticker, PhotoSticker16 | |
| Layout Method | Automatic Layout, Place Photos Manually | |
| Browse | Browse by Date, Cancel Browse | |
| Select Photos | Select All Photos, Cancel Photo Selection | |
| Display Mode | 1-up, 1-up without Information, 9-up | |
| Print Settings | Paper Source, Quality, Expansion, Date, Fit Frame, Bidirectional | |
| Photo Adjustments | Enhance, Scene Detection, Fix Red-Eye*2, Brightness, Contrast, Sharpness, Saturation | |
| Filter | Off, Sepia, B&W | |
| Crop/Zoom | ||
| Print Photo Greeting Card | Select Photo and Print Template, Print Greeting Cards from Template | |
| Browse | Browse by Date, Cancel Browse | |
| Display Mode | 1-up, 1-up without Information, 9-up | |
| Photo Adjustments | Enhance, Scene Detection, Fix Red-Eye*2, Brightness, Contrast, Sharpness, Saturation | |
| Filter | Off, Sepia, B&W | |
| Paper Size | 10x15cm(4x6in) | |
| Paper Type | Ultra Glossy, Prem. Glossy, Glossy, Photo Paper | |
| Layout | Borderless*1, Upper 1/2, Lower 1/2 | |
| Frame | Off, Oval, Oval - Soft Edge | |
| Copy to CD/DVD | Print on a CD/DVD, Test Print on A4 paper | |
| Select the color | Color, B&W | |
| Paper and Copy Settings | Density, Document Type, Quality | |
| Preview | ||
Menu List of Control Panel
| Menu | Setting and Options | |
| Print on CD/DVD | CD/DVD 1-up, CD/DVD 4-up, CD/DVD Variety | |
| Automatic Layout, Place Photos Manually | ||
| Browse | Browse by Date, Cancel Browse | |
| Display Mode | 1-up, 1-up without Information, 9-up | |
| Print Settings | CD Density | |
| Photo Adjustments | Enhance, Scene Detection, Fix Red-Eye*2, Brightness, Sharpness, Saturation | |
| Filter | Off, Sepia, B&W | |
| Crop/Zoom | ||
| Print on a CD/DVD, Test print on A4 paper | ||
| Personal Stationery | Lined Papers | Wide Rule, Thin Rule, Graph Paper, Music Paper |
| Writing Papers | Horizontal Rule, Vertical Rule, Without Rule | |
| Calendar | Weekly, Monthly | |
| Message Card | Plain Paper, Matte | |
| Origami | Origami Envelope, Origami Envelope Instruction ➤ "Printing origami envelopes" on page 111 | |
| Coloring Book | Photo or Drawing on Scanner Glass, Photo on Memory Card | |
| Browse | Browse by Date, Cancel Browse | |
| Display Mode | 1-up, 9-up | |
| Print Settings | Paper Settings, Paper Source, Density, Line Detection | |
*1 Your image is slightly enlarged and cropped to fill the sheet of paper. Print quality may decline in the top and bottom areas of the printout, or the area may be smeared when printing.
*2 This setting does not change your original image. It only affects your printout. Depending on the type of photo, parts of the image other than the eyes may be corrected.
Menu List of Control Panel
Wi-Fi Setup Mode
XP-710 Series/XP-810 Series
| Menu | Description |
| Wi-Fi/Network Status | For details on the setting items, see the online Network Guide. |
| Wi-Fi Setup Wizard | |
| Push Button Setup (WPS) | |
| PIN Code Setup (WPS) | |
| Wi-Fi Auto Connect | |
| Disable Wi-Fi | Network problems may be resolved by disabling or initializing the Wi-Fi settings, and then making the settings again.For details, see the online Network Guide. |
| Wi-Fi Direct Routerless Setup | For details on the setting items, see the online Network Guide. |
XP-610 Series
| Menu | Description |
| Wi-Fi Setup Wizard | For details on the setting items, see the online Network Guide. |
| Push Button Setup (WPS) | |
| PIN Code Setup (WPS) | |
| Wi-Fi Direct Routerless Setup | |
| Wi-Fi Auto Connect | |
| Wi-Fi Status | |
| Disable Wi-Fi | Network problems may be resolved by disabling or initializing the Wi-Fi settings, and then making the settings again.For details, see the online Network Guide. |
Setup Mode
XP-710 Series/XP-810 Series
| Menu | Setting Item and Description | |
| Ink Levels | - | Checks the status of ink cartridges. |
Menu List of Control Panel
| Menu | Setting Item and Description | |
| Maintenance | Nozzle Check | Prints a nozzle check pattern to check the condition of the print head. |
| Head Cleaning | Cleans the print head to improve the condition of the print head. | |
| Print Head Alignment | Adjusts the alignment of the print head. | |
| Ink Cartridge(s) Replacement | Replaces ink cartridges. | |
| Printer Setup | CD/DVD | Adjusts the print position. |
| Stickers | Adjusts the print position. | |
| Thick Paper | Turn on when printing on thick paper. | |
| Sound | Button Press, Error Notification, Volume | |
| Quiet Mode | Off, On | |
| Screen Saver | Off, Memory Card Data | |
| Power Off Timer*1 | → "Using the control panel" on page 154 | |
| Sleep Timer | ||
| Clear All Settings | ||
| Basic Setup | Date/Time*2 | → "Setting/Changing Time and Region" on page 152 |
| Daylight Saving Time*2 | Off, On | |
| Country/Region*2 | → "Setting/Changing Time and Region" on page 152 | |
| Language | - | |
| Wi-Fi/Network Settings | Wi-Fi/Network Status | You can see the Printer Name, current network settings and you can also print a network status sheet. |
| Wi-Fi Setup | See the online Network Guide. You can access the Wi-Fi Setup menus directly by selecting Wi-Fi Setup on the LCD screen. | |
| Manual Wi-Fi/Network Setup | ||
| Wi-Fi/Network Connection Check | You can check the network connection status, and print the report. If there is any problem with the connection, the report helps you find the solution. | |
| Epson Connect Services | Status | You can check whether your printer is registered or connected to Epson Connect service. For instructions on use, visit the Epson Connect portal site.→ "Using Epson Connect Service" on page 9 |
| Email Address | You can see your e-mail address registered in Epson Connect. | |
| Suspend/Resume | Suspend/resume all Epson Connect services. | |
| Restore Default Settings | Delete your registered printer and initializes Epson Connect settings to the factory default settings. | |
Menu List of Control Panel
| Menu | Setting Item and Description | |
| Google Cloud Print Services | Status | You can check whether your printer is registered or connected to Google Cloud Print service. For instructions on use, visit the Epson Connect portal site. ➔ "Using Epson Connect Service" on page 9 |
| Suspend/Resume | Suspend/resume all Google Cloud Print services. | |
| Restore Default Settings | Delete your registered printer and initializes Google Cloud Print settings to the factory default settings. | |
| File Sharing Setup | USB, Wi-Fi/Network | Select which type of computer you want to give write access to the memory card. You can select a USB-connected or a networked computer. |
| Home NW Print Settings | Print Settings | Paper Size, Paper Type, Paper Source, Quality, Bidirectional, CD Inner/Outer, CD Density, Clear All Settings |
| Photo Adjustments | Enhance, Scene Detection, Fix Red-Eye*3, Filter, Brightness, Contrast, Sharpness, Saturation, Clear All Settings | |
| Fax Settings*2 | → "Setup Mode - Fax Settings" on page 129 | |
| External Device Setup | Print Settings | Paper Size, Paper Type, Paper Source, Layout, Quality, Expansion, Date, Print Info. On Photos, Fit Frame, Bidirectional, CD Inner/Outer, CD Density, Clear All Settings |
| Photo Adjustments | Enhance, Scene Detection, Fix Red-Eye*3, Filter, Brightness, Contrast, Sharpness, Saturation, Clear All Settings | |
| Guide Functions | Paper Size Alert | On, Off |
| Document Alert | On, Off | |
| Auto Selection Mode | Memory Card, Document Cover, Auto Document Feeder*2 | |
| All Functions | On, Off | |
| Clear All Settings | ||
Menu List of Control Panel
| Menu | Setting Item and Description | |
| Restore Default Settings | Fax Send/Receive Settings*2 | Initializes Fax Send/Receive Settings to the factory default settings. |
| Fax Data Settings*2 | Initializes Fax Data Settings to the factory default settings. | |
| Wi-Fi/Network Settings | Initializes Wi-Fi/Network Settings to the factory default settings. | |
| All Except Wi-Fi/Network Settings*1 | Initializes all settings except for Wi-Fi/Network Settings to the factory default settings. | |
| All Except Wi-Fi/Network & Fax Settings*1 | Initializes all settings except for Wi-Fi/Network & Fax Settings to the factory default settings. | |
| All Settings | Initializes all settings to the factory default settings. | |
*1 This function is only available for XP-710 Series.
*2 This function is only available for XP-810 Series.
*3 This setting does not change your original image. It only affects your printout. Depending on the type of photo, parts of the image other than the eyes may be corrected.
XP-610 Series
| Menu | Setting Item and Description | |
| Ink Levels | - | Checks the status of ink cartridges. |
| Maintenance | Nozzle Check | Prints a nozzle check pattern to check the condition of the print head. |
| Head Cleaning | Cleans the print head to improve the condition of the print head. | |
| Print Head Alignment | Adjusts the alignment of the print head. | |
| Ink Cartridge(s) Replacement | Replaces ink cartridges. | |
| Printer Setup | CD/DVD | Adjusts the print position. |
| Stickers | Adjusts the print position. | |
| Thick Paper | Turn on when printing on thick paper. | |
| Sound | Button Press, Error Notification, Volume | |
| Quiet Mode | Off, On | |
| Screen Saver | Off, Memory Card Data | |
| Power Off Timer | → "Using the control panel" on page 154 | |
| Sleep Timer | ||
| Language | - | |
Menu List of Control Panel
| Menu | Setting Item and Description | |
| Wi-Fi/Network Settings | Wi-Fi Setup | See the online Network Guide. You can access the Wi-Fi Setup menus directly by selecting Wi-Fi Setup on the LCD screen. |
| Manual Wi-Fi Setup | ||
| Connection Check | You can check the network connection status, and print the report. If there is any problem with the connection, the report helps you find the solution. | |
| Wi-Fi Status | You can see the Printer Name, current network settings and you can also print a network status sheet. | |
| Epson Connect Services | Status | You can check whether your printer is registered or connected to Epson Connect service. For instructions on use, visit the Epson Connect portal site. ➔ "Using Epson Connect Service" on page 9 |
| Email Address | You can see your e-mail address registered in Epson Connect. | |
| Suspend/Resume | Suspend/resume all Epson Connect services. | |
| Restore Default Settings | Delete your registered printer and initializes Epson Connect settings to the factory default settings. | |
| Google Cloud Print Services | Status | You can check whether your printer is registered or connected to Google Cloud Print service. For instructions on use, visit the Epson Connect portal site. ➔ "Using Epson Connect Service" on page 9 |
| Suspend/Resume | Suspend/resume all Google Cloud Print services. | |
| Restore Default Settings | Delete your registered printer and initializes Google Cloud Print settings to the factory default settings. | |
| File Sharing Setup | USB, Wi-Fi/Network | Select which type of computer you want to give write access to the memory card. You can select a USB-connected or a networked computer. |
| External Device Setup | Print Settings | Paper Size, Paper Type, Paper Source, Layout, Quality, Expansion, Date, Print Info. On Photos, Fit Frame, Bidirectional, CD Inner/Outer, CD Density |
| Photo Adjustments | Enhance, Scene Detection, Fix Red-Eye*, Filter, Brightness, Contrast, Sharpness, Saturation | |
| Guide Functions | Paper Size Alert | On, Off |
| Restore Default Settings | Wi-Fi/Network Settings | Initializes Wi-Fi/Network Settings to the factory default settings. |
| All Except Wi-Fi/Network Settings | Initializes all settings except for Wi-Fi/Network Settings to the factory default settings. | |
| All Settings | Initializes all settings to the factory default settings. | |
* This setting does not change your original image. It only affects your printout. Depending on the type of photo, parts of the image other than the eyes may be corrected.
Menu List of Control Panel
Setup Mode - Fax Settings
Note:
This function is only available for XP-810 Series.
| Menu | Setting Item and Description | |
| Send Settings | Resolution | → "Fax Mode" on page 118 |
| Contrast | ||
| 2-Sided Faxing | ||
| Direct Send | ||
| Send Preview | ||
| Receive Settings | Auto Answer | Turn on to receive faxes automatically. |
| DRD | Indicates the type of answer ring pattern you want to use to receive faxes. To select an option other than All (or Off), you must set up your phone system to use different ring patterns. This option may be On or Off depending on the region. | |
| Rings to Answer | Indicates the number of rings that must occur before the product automatically receives a fax. Depending on the region, this setting may not be displayed. | |
| Fax Output | → "Changing the received fax output settings" on page 100 | |
| Remote Receive | Allows you to start receiving fax from your cordless handset whose base unit is connected to the product. → "Receiving faxes manually" on page 106 | |
| Print Settings | Auto Reduction | Indicates whether large received faxes are reduced in size to fit on A4-size, or printed at their original size on multiple sheets. |
| Collation Stack | Select On to print received faxes from the last page (print in descending order) so that the printed documents are stacked in the correct page order. When the product is running low on memory, this option may not be available. | |
| Print Inhibit Time | Select a time period to stop automatic printing of faxes or reports during that time. Received faxes are saved in the product's memory. Make sure there is enough free memory before using this function. | |
Menu List of Control Panel
| Menu | Setting Item and Description | |
| Report Settings | Last Transmission Report | Indicates whether or when the product prints a report for outgoing faxes. Select Off to turn off report printing, select On Error to print reports only when an error occurs, or select On Send to print reports for every fax you send. |
| Attach Image to Report | Select On(Large Image) or On(Small Image) to print the Last Transmission Report with an image of the first page of the document. | |
| Fax Log Auto Print | Indicates whether or when the product prints a fax log report. Select Off to turn off report printing, select On(Every 30) to print reports each time 30 fax jobs are completed, or select On(Time) to print reports at the specified time. | |
| Report Format | Indicates whether to print fax log reports in simple format or detailed format. | |
| Communication | Header | → "Creating header information" on page 99 |
| Dial Tone Detection | When this is set to On, the product starts dialing after it detects a dial tone. If a dial tone detection error occurs, you can turn this off. However, doing so may drop the first digit of a fax number and send the fax to the wrong number.If you are connecting the product to a PBX phone system or terminal adapter, and the dial tone detection error occurs, change the Line Type setting to PBX.→ "Setting the line type" on page 96 | |
| Fax Speed | Indicates the speed at which you transmit and receive faxes. | |
| ECM | Indicates whether or not to use Error Correction Mode to automatically correct fax data sent/received with errors due to the line or any other problems. Color faxes cannot be sent/received when ECM is off. | |
| Line Type | → "Setting the line type" on page 96 | |
| Dial Mode | Indicates the type of phone system to which you have connected the product. Depending on the region, this setting may not be displayed. | |
| Security Settings | Auto Erase Backup Data | Select On to automatically erase sent or received faxes remained in the non-volatile memory of the product. |
| Erase Backup Data | Completely erases sent or received faxes remained in the non-volatile memory of the product. If you give the product to someone else or dispose of it, run this function in advance. | |
| Check Fax Connection | Checks the status of your fax connection.→ "Checking the fax connection" on page 97 | |
Help Mode
XP-710 Series/XP-810 Series
| Menu | Options |
| How to ... | Navigate Using the Touch Screen |
| Load Paper in the Rear Paper Feed Slot | |
| Load Paper in the Paper Cassette 1 | |
| Load Paper in the Paper Cassette 2 | |
| Load an Envelope in the Rear Paper Feed Slot | |
| Load Envelopes in the Paper Cassette | |
| Load a CD/DVD | |
| Place a Document in the ADF* | |
| Place a Document on the Scanner Glass | |
| Insert/Remove a Memory Card/USB Flash Drive | |
| Adjust the Angle of the Control Panel | |
| Ink Cartridges | Check Ink Cartridges Status |
| Replace Ink Cartridge(s) | |
| Troubleshooting | Cannot Connect to a Wi-Fi |
| Paper Feeding Incorrectly | |
| Poor Print Quality | |
| Cannot Send or Receive Fax* | |
| Cannot Scan to PC | |
| Icon List | |
* This function is only available for XP-810 Series.
XP-610 Series
| Menu | Options |
| How to ... | Load Paper in the Paper Cassette 1 |
| Load Paper in the Paper Cassette 2 | |
| Load Envelopes in the Paper Cassette | |
| Load a CD/DVD | |
| Place a Document on the Scanner Glass | |
| Insert/Remove a Memory Card/USB Flash Drive | |
| Adjust Angle of Control Panel | |
| Ink Cartridges | Check Ink Cartridges Status |
| Replace Ink Cartridge(s) | |
| Troubleshooting | Cannot Connect to a Wi-Fi |
| Paper Feeding Incorrectly | |
| Poor Print Quality | |
| Cannot Scan to PC | |
| Icon List | |
Quiet Mode
| Menu | Settings |
| Quiet Mode | Off |
| On |
Ink Cartridge Information
You can use the following ink cartridges with this product:
| XP-610 | Polar Bear | Black | Photo Black | Cyan | Magenta | Yellow |
| XP-615 | 26 | 26 | 26 | 26 | 26 | |
| XP-710 | 26XL | 26XL | 26XL | 26XL | 26XL | |
| XP-810 |  |
For Australia/New Zealand
| XP-610XP-710 | Black | Photo Black | Cyan | Magenta | Yellow |
| 273273XL | 273273XL | 273273XL | 273273XL | 273273XL |
* For information on Epson's ink cartridge yields, visit the following website. http://www.epson.eu/pageyield
| Note:Not all cartridges are available in all regions. |
| Color | Black, Photo Black, Cyan, Magenta, Yellow |
| Cartridge life | For best results, use up ink cartridge within six months of opening the package. |
| Temperature | Storage:-20 to 40 °C (-4 to 104 °F)1 month at 40 °C (104 °F)Freezing:*-16 °C (3.2 °F) |
* Ink thaws and is usable after approximately 3 hours at 25 °C (77 °F).
Replacing Ink Cartridges
Ink Cartridge Safety Instructions, Precautions, and Specifications
Safety instructions
Observe the following when handling the ink cartridges:
☐ Keep ink cartridges out of the reach of children.
☐ Be careful when you handle used ink cartridges, as there may be some ink around the ink supply port. If ink gets on your skin, wash the area thoroughly with soap and water.
If ink gets into your eyes, flush them immediately with water. If discomfort or vision problems continue after a thorough flushing, see a doctor immediately.
If ink gets into your mouth, spit it out immediately and see a doctor right away.
If you remove the cartridge from the product for later use or to dispose of it, make sure you put the cap back on the cartridge's ink supply port to prevent ink from drying out or to prevent surrounding areas from getting smeared by ink.
☐ Do not push hard or squeeze the ink cartridges, or be careful not to drop them. Doing so may cause ink leakage.
☐ Do not disassemble or remodel the ink cartridge, otherwise you may not be able to print normally.
☐ Do not touch the sections shown in the illustration. Doing so may prevent normal operation and printing.
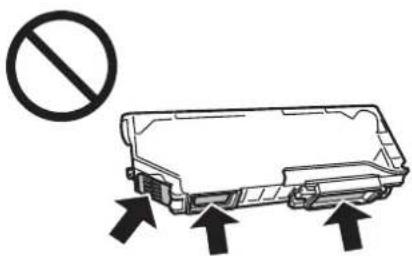
☐ Do not leave the product with the ink cartridges removed or do not turn off the product during cartridge replacement. Otherwise, ink remaining in the print head nozzles will dry out and you may not be able to print.
Precautions on ink cartridge replacement
Read all of the instructions in this section before replacing the ink cartridges.
☐ Epson recommends the use of genuine Epson ink cartridges. Epson cannot guarantee the quality or reliability of non-genuine ink. The use of non-genuine ink may cause damage that is not covered by Epson's warranties, and under certain circumstances, may cause erratic product behavior. Information about non-genuine ink levels may not be displayed.
Replacing Ink Cartridges
☐ Gently shake the black ink cartridge four or five times before opening the package. The color cartridges and photo black cartridge does not require shaking.
☐ Do not shake ink cartridges too vigorously; otherwise ink may leak from the cartridge.
☐ This product uses ink cartridges equipped with an IC chip that monitors information such as the amount of remaining ink for each cartridge. This means that even if the cartridge is removed from the product before it is expended, you can still use the cartridge after reinserting it back into the product. However, when reinserting a cartridge, some ink may be consumed to guarantee product performance.
☐ To maintain optimum print head performance, some ink is consumed from all cartridges not only during printing but also during maintenance operations such as ink cartridge replacement and print head cleaning.
☐ Be careful not to let dust or any objects get inside the ink cartridge holder. Anything inside the holder may adversely affect the printing results or result in an inability to print.
☐ For maximum ink efficiency, only remove an ink cartridge when you are ready to replace it. Ink cartridges with low ink status may not be used when reinserted.
☐ Do not open the ink cartridge package until you are ready to install it in the product. The cartridge is vacuum packed to maintain its reliability. If you leave a cartridge unpacked for a long time before using it, normal printing may not be possible.
☐ Install all ink cartridges; otherwise, you cannot print.
☐ When color ink is expended and black ink still remains, you can continue printing temporarily with black ink only. For more information refer to “Temporary Printing with Black Ink When Color Ink Cartridges or a Photo Black Ink Cartridge are Expended” on page 139.
☐ If an ink cartridge is running low, prepare a new ink cartridge.
☐ After bringing an ink cartridge inside from a cold storage site, allow it to warm up at room temperature for at least three hours before using it.
☐ Store ink cartridges in a cool, dark place.
☐ You cannot use the cartridges that came with your product for the replacement.
Ink Cartridge Specifications
☐ Epson recommends using the ink cartridge before the date printed on the package.
☐ The ink cartridges packaged with your product are partly used during initial setup. In order to produce high quality printouts, the print head in your product will be fully charged with ink. This one-off process consumes a quantity of ink and therefore these cartridges may print fewer pages compared to subsequent ink cartridges.
☐ Quoted yields may vary depending on the images that you are printing, the paper type that you are using, the frequency of your prints and environmental conditions such as temperature.
☐ To ensure you receive premium print quality and to help protect your print head, a variable ink safety reserve remains in the cartridge when your product indicates to replace the cartridge. The yields quoted for you do not include this reserve.
Although the ink cartridges may contain recycled materials, this does not affect product function or performance.
Replacing Ink Cartridges
☐ When printing in monochrome or grayscale, color inks instead of black ink may be used depending on the paper type or print quality settings. This is because a mixture of color inks is used to create black.
Checking the Ink Cartridge Status
For Windows
Note:
☐ Epson cannot guarantee the quality or reliability of non-genuine ink. If non-genuine ink cartridges are installed, the ink cartridge status may not be displayed.
☐ When an ink cartridge is running low, the Low Ink Reminder screen automatically appears. You can also check the ink cartridge status from this screen. If you do not want to display this screen, first access the printer driver and then click the Maintenance tab, the Extended Settings button, and then the Monitoring Preferences button. On the Monitoring Preferences screen, clear the See Low Ink Reminder alerts check box.
☐ If an ink cartridge is running low, prepare a new ink cartridge.
To check the ink cartridge status, do one of the following:
☐ Double-click the product shortcut icon on your Windows taskbar. To add a shortcut icon to the taskbar, see the following section:
→ "From the shortcut icon on the taskbar" on page 53
Replacing Ink Cartridges
Open the printer driver, click the Maintenance tab, then click the EPSON Status Monitor 3 button. A graphic displays the ink cartridge status.

Note:
☐ If EPSON Status Monitor 3 does not appear, access the printer driver and click the Maintenance tab and then the Extended Settings button. In the Extended Settings window, check the Enable EPSON Status Monitor 3 check box.
☐ The ink levels displayed are an approximate indication.
For Mac OS X
Note:
If an ink cartridge is running low, prepare a new ink cartridge.
You can check the ink cartridge status using EPSON Status Monitor. Follow the steps below.

Access the Epson Printer Utility 4.
→ "Accessing the printer driver for Mac OS X" on page 53
Replacing Ink Cartridges
2
Click the EPSON Status Monitor icon. The EPSON Status Monitor appears.
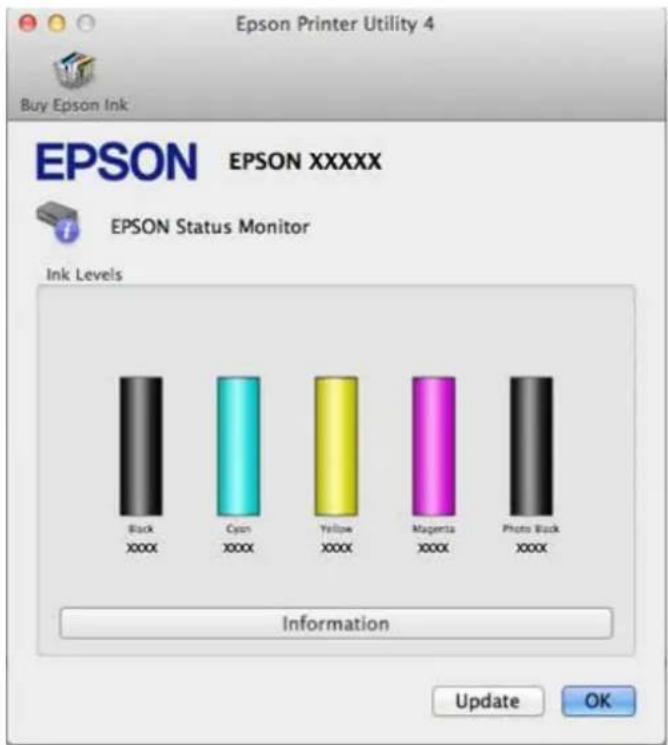
Note:
☐ The graphic displays the ink cartridge status when EPSON Status Monitor was first opened. To update the ink cartridge status, click Update.
☐ Epson cannot guarantee the quality or reliability of non-genuine ink. If non-genuine ink cartridges are installed, the ink cartridge status may not be displayed.
☐ The ink levels displayed are an approximate indication.
Using the control panel
1
Enter Setup mode from the Home menu.
2
Select Ink Levels.
Note:
The ink levels displayed are an approximate indication.
Replacing Ink Cartridges
Temporary Printing with Black Ink When Color Ink Cartridges or a Photo Black Ink Cartridge are Expended
When color ink or photo black ink is expended and black ink still remains, you can continue printing for a short time using only black ink. However, you should replace the expended ink cartridge(s) as soon as possible. See the following section to continue printing temporarily with black ink.
Note:
This feature is not available when photos and documents are printed or copied directly from the printer without using a computer.
☐ The actual amount of time will vary depending on the usage conditions, images printed, print settings, and frequency of use.
For Windows
Follow the steps below to continue printing temporarily with black ink.

When EPSON Status Monitor 3 tells you to cancel your print job, click Cancel or Cancel Print to cancel your print job.
![EPSON Status Monitor 3 : EPSON XXXXX Color cartridge(s) need to be replaced. Black printing is temporarily available. XXXX: XXXX / XXXX XXXX: XXXX / XXXX XXXX: XXXX / XXXX Epson recommends the genuine Epson cartridges listed above. Click [Replace Cartridge] for ink cartridge replacement instructions or click [Close] to see Status Monitor. You can cancel the job and reprint in black ink using the following settings: - Paper Type: plain papers or Envelope - Color: Grayscale - Borderless: Not Selected If [Cancel] is not displayed, cancel the print job from the control panel on the product. You can temporarily continue printing. To print with other settings, replace the expended cartridge(s). Replace Cartridge... Cancel Print Close](/content/2026/06/1182615/images/28d0f49901ae55f9aa7d004bb6fa3741c24b7b6fdad3d6b8a31403255665f13a.jpg)
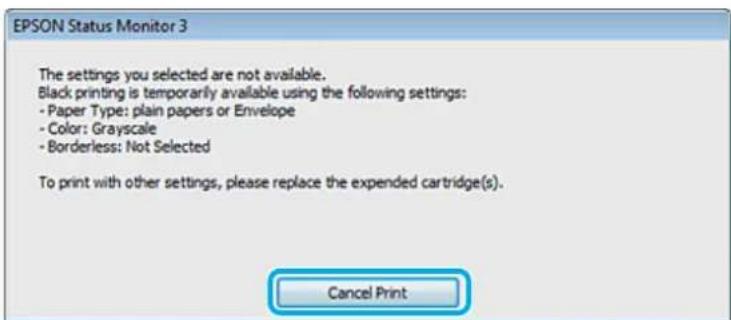
Replacing Ink Cartridges
Note:
If the error stating that a color ink cartridge or a photo black ink cartridge is expended originates with another computer on the network, you may need to cancel the print job at the product.
2
Load plain paper or envelope.
3
Access the printer settings.
→ "Accessing the printer driver for Windows" on page 52
4
Click the Main tab, and make suitable settings.
5
Select plain papers or Envelope as the Type setting.
6
Select the Grayscale check box in Advanced window.
7
Click OK to close the printer settings window.
8
Print your file.
9
EPSON Status Monitor 3 is displayed on your computer screen again. Click Print in Black to print with black ink.
For Mac OS X
Follow the steps below to continue printing temporarily with black ink.
1
If printing can not be resumed, click the product icon in the Dock. If an error message is displayed prompting you to cancel the print job, click Delete and follow the steps below to reprint the document with black ink.
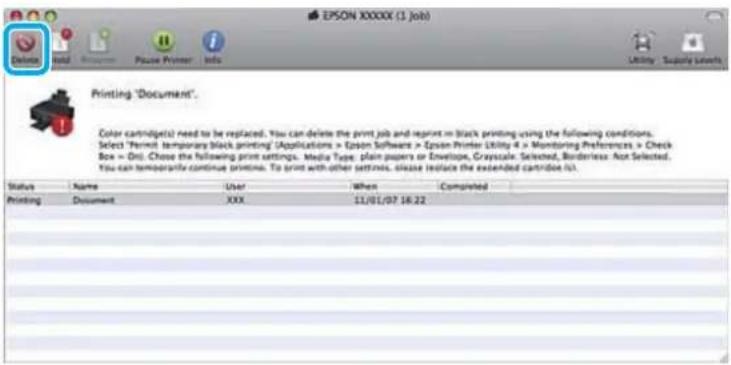
Note:
If the error stating that a color ink cartridge or a photo black ink cartridge is expended originates with another computer on the network, you may need to cancel the print job at the product.
Replacing Ink Cartridges
For Mac OS X 10.8:
Click the ✗ button, and if an error message appears, click OK. Follow the steps bellow to reprint the document with black ink.
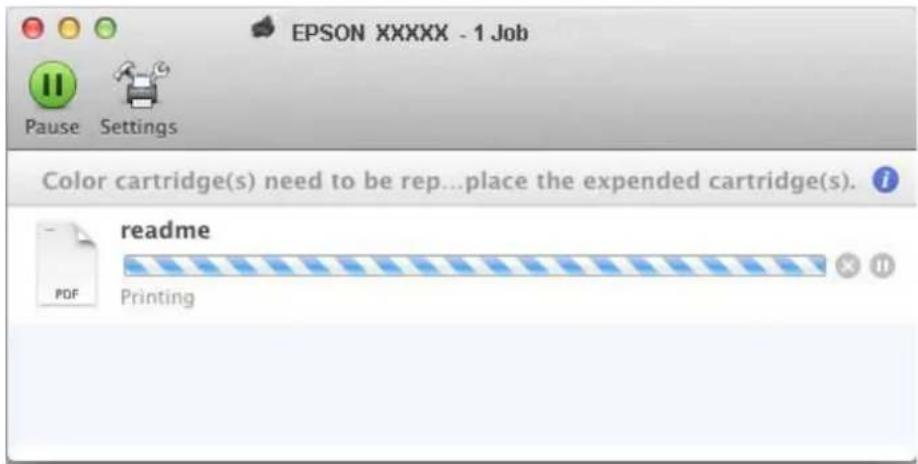
2 Open System Preferences, click Print & Scan (Mac OS X 10.8 or 10.7) or Print & Fax (Mac OS X 10.6 or 10.5), and select the product from the Printers list. Next, click Options & Supplies and then Driver.
3 Select On for Permit temporary black printing.
4 Load plain paper or envelope.
5 Access the Print dialog box.
→ ““Accessing the printer driver for Mac OS X” on page 53
6 Click the Show Details button (for Mac OS X 10.8 or 10.7) or the ▼ button (for Mac OS X 10.6 or 10.5) to extend this dialog box.
7 Select the product you are using as the Printer setting, and then make suitable settings.
8 Select Print Settings from the pop-up menu.
9 Select plain papers or Envelope as the Media Type setting.
10 Select the Grayscale check box.
11 Click Print to close the Print dialog box.
Replacing Ink Cartridges
Conserving Black Ink When the Cartridge is Low (For Windows Only)
The window below appears when black ink runs low and there is more color ink than black ink. It appears only when plain papers is selected as the paper type, and Text is selected as the Quality Option.
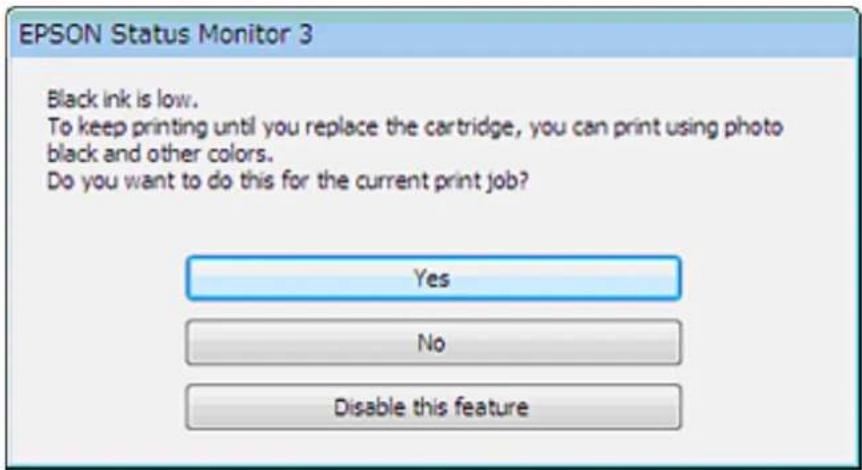
The window gives you the option to either continue using black ink normally or conserve black ink by using a mixture of color inks and photo black ink to create black.
☐ Click the Yes button to use a mixture of color inks and photo black ink to create black. The same window is displayed the next time you print a similar job.
☐ Click the No button to continue using the remaining black ink for the job you are printing. You will see the same window the next time you print a similar job, and again have the option to conserve black ink.
☐ Click Disable this feature to continue using the remaining black ink.
Replacing an ink cartridge
Note:
Make sure that the CD/DVD tray is not inserted in the product and that the ⏻ light is on, but not flashing.
1 For best results, gently shake only the new Black ink cartridge four or five times before opening the package.
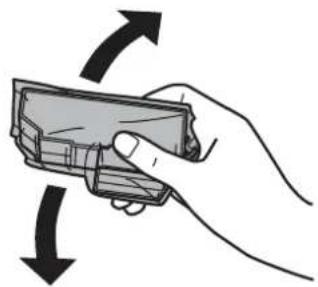
natural_image
Hand holding a handheld device with bidirectional arrows indicating rotation (no text or symbols)Replacing Ink Cartridges
Note:
☐ You do not need to shake the color ink cartridges and the Photo Black ink cartridge.
☐ Do not shake cartridges after opening the package, as they may leak.
2
Remove the ink cartridge from its package and then remove the cap from the bottom of the cartridge.
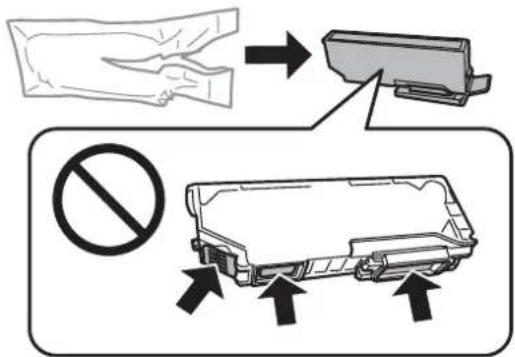
Note:
Do not touch the sections shown in the illustration. Doing so may prevent normal operation and printing.
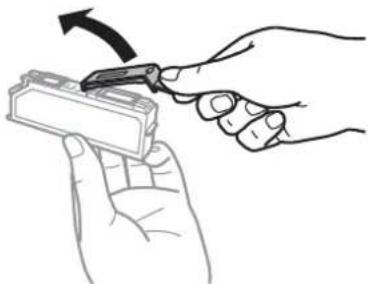
natural_image
Illustration of hands holding a small electronic device with a tool, no text or symbols present3
Open the scanner unit. The ink cartridge holder moves to the ink cartridge replacement position.
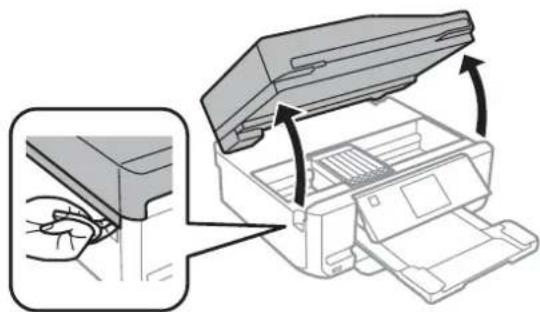
natural_image
Diagram showing a printer being inserted into a paper airplane, with arrows indicating the process (no text or symbols present)
Important:
Do not touch the flat white cable connected to the ink cartridge holder.
Replacing Ink Cartridges
Note:
☐ If the ink cartridge holder does not move to the ink cartridge replacement position, close the scanner unit and follow the instruction below.
Home > Setup > Maintenance > Ink Cartridge(s) Replacement
☐ Do not move the ink cartridge holder by hand; otherwise, you may damage the product.
4
Push the tab to unlock the ink cartridge holder and then remove the cartridge diagonally.
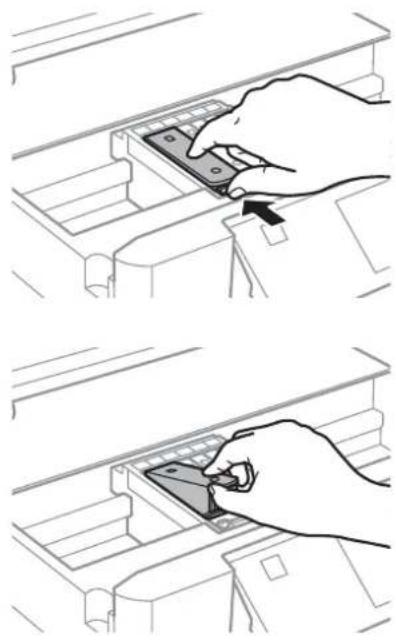
natural_image
Two-step diagram showing hand inserting a component into a device, with no visible text or symbolsNote:
The illustration shows replacement of the cartridge on the far left. Replace the cartridge appropriate to your situation.
Replacing Ink Cartridges
5 Insert the ink cartridge diagonally into the cartridge holder and gently push it down until it clicks into place.

natural_image
Two-step diagram showing a hand inserting a component into a device inside a storage unit (no text or symbols present)6 Close the scanner unit. The ink cartridge holder returns to its home position.

7 Follow the on-screen instruction.
Replacing Ink Cartridges
Note:
Put the cap back on to the removed cartridge's ink supply port. Dispose of the used cartridge properly.
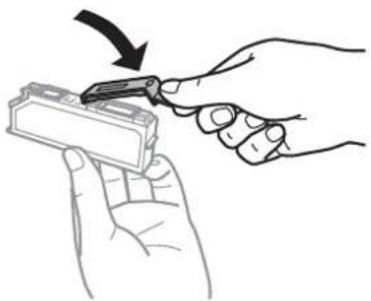
natural_image
Illustration of a hand holding a small electronic device with a tool, no text or symbols present☐ The ⏻ light continues to flash while the product is charging ink. Do not turn off the product during ink charging. If the ink charging is incomplete, you may not be able to print.
☐ Do not insert CD/DVD tray until ink charging complete.
Maintaining Your Product and Software
Checking the Print Head Nozzles
If you find that the printout is unexpectedly faint or that dots are missing, you may be able to identify the problem by checking the print head nozzles.
You can check the print head nozzles from your computer by using the Nozzle Check utility or from the product by using the buttons.
Using the Nozzle Check utility for Windows
Follow the steps below to use the Nozzle Check utility.
1 Make sure that no warnings or errors are displayed on the LCD screen, the CD/DVD tray is removed, and the output tray is ejected.
2 Make sure that A4-size paper is loaded in the cassette 2.
3 Right-click the product icon on the taskbar, then select Nozzle Check.
If the product icon does not appear, refer to the following section to add the icon.
→ "From the shortcut icon on the taskbar" on page 53
4 Follow the on-screen instructions.
Using the Nozzle Check utility for Mac OS X
Follow the steps below to use the Nozzle Check utility.
1 Make sure that no warnings or errors are displayed on the LCD screen, the CD/DVD tray is removed, and the output tray is ejected.
2 Make sure that A4-size paper is loaded in the cassette 2.
3 Access the Epson Printer Utility 4. → "Accessing the printer driver for Mac OS X" on page 53
4 Click the Nozzle Check icon.
5 Follow the on-screen instructions.
Using the control panel
Follow the steps below to check the print head nozzles using the product control panel.
1 Make sure that no warnings or errors are indicated in the control panel.
2 Make sure that A4-size paper is loaded in the paper cassette.
3 Enter Setup mode from the Home menu.
4 Select Maintenance.
5 Select Nozzle Check.
6 Press ◇ to print the nozzle check pattern.
Below are two sample nozzle check patterns.
Compare the quality of the printed check page with the sample shown below. If there are no print quality problems, such as gaps or missing segments in the test lines, the print head is fine.
natural_image
Abstract pattern of repeating rectangular blocks with horizontal lines, no text or symbols presentIf any segment of the printed lines is missing, as shown below, this could mean a clogged ink nozzle or a misaligned print head.

natural_image
Abstract pattern of repeating rectangular blocks with horizontal lines, no text or symbols present→ "Cleaning the Print Head" on page 148
→ "Aligning the Print Head" on page 150
Cleaning the Print Head
If you find that the printout is unexpectedly faint or that dots are missing, you may be able to solve these problems by cleaning the print head, which ensures that the nozzles are delivering ink properly.
You can clean the print head from your computer using the Head Cleaning utility in the printer driver or from the product by using the buttons.
Maintaining Your Product and Software
Important:
☐ Do not open the scanner unit or turn off the product. during head cleaning. If the head cleaning is incomplete, you may not be able to print.
☐ Do not insert the CD/DVD tray until head cleaning is complete.
Note:
☐ Use the Nozzle Check utility first to confirm that the print head needs to be cleaned. This saves ink.
☐ To maintain print quality, we recommend printing a few pages on a regular basis.
Because print head cleaning uses some ink from all cartridges, clean the print head only if quality declines; for example, if the printout is blurry or the color is incorrect or missing.
☐ When ink is low you may not be able to clean the print head. When ink is expended you cannot clean the print head. Replace the appropriate ink cartridge first.
Note only for products with fax function:
If print quality has not improved after repeating this procedure about two times, leave the product on and wait for at least six hours. Then run the nozzle check again and repeat the head cleaning if necessary. If print quality has still not improved, contact Epson support.
Note only for products without fax function:
If print quality has not improved after repeating this procedure about two times, turn the product off and wait for at least six hours. Then run the nozzle check again and repeat the head cleaning if necessary. If print quality has still not improved, contact Epson support.
Using the Head Cleaning utility for Windows
Follow the steps below to clean the print head using the Head Cleaning utility.
1 Make sure that no warnings or errors are displayed on the LCD screen, the CD/DVD tray is removed, and the output tray is ejected.
2 Right-click the product icon on the taskbar, then select Head Cleaning.
If the product icon does not appear, refer to the following section to add the icon.
→ "From the shortcut icon on the taskbar" on page 53
3 Follow the on-screen instructions.
Using the Head Cleaning utility for Mac OS X
Follow the steps below to clean the print head using the Head Cleaning utility.
1 Make sure that no warnings or errors are displayed on the LCD screen, the CD/DVD tray is removed, and the output tray is ejected.
Maintaining Your Product and Software
2 Access the Epson Printer Utility 4.
→ "Accessing the printer driver for Mac OS X" on page 53
3 Click the Head Cleaning icon.
4 Follow the on-screen instructions.
Using the control panel
Follow the steps below to clean the print head using the product control panel.
1 Make sure that no warnings or errors are indicated in the control panel.
2 Enter Setup mode from the Home menu.
3 Select Maintenance.
4 Select Head Cleaning.
5 Press ◇ to clean the print head.
Aligning the Print Head
If you notice a misalignment of vertical lines or horizontal banding, you may be able to solve this problem by using the Print Head Alignment utility in your printer driver or by using the product buttons.
Refer to the appropriate section below.
Note: Do not press ☑ to cancel printing while printing a test pattern with the Print Head Alignment utility.
Using the Print Head Alignment utility for Windows
Follow the steps below to align the print head using the Print Head Alignment utility.
1 Make sure that no warnings or errors are displayed on the LCD screen, the CD/DVD tray is removed, and the output tray is ejected.
2 Make sure A4-size paper is loaded in the cassette 2.
Maintaining Your Product and Software
3 Right-click the product icon on the taskbar, then select Print Head Alignment.
If the product icon does not appear, refer to the following section to add the icon.
→ "From the shortcut icon on the taskbar" on page 53
4 Follow the on-screen instructions to align the print head.
Using the Print Head Alignment utility for Mac OS X
Follow the steps below to align the print head using the Print Head Alignment utility.
1 Make sure that no warnings or errors are displayed on the LCD screen, the CD/DVD tray is removed, and the output tray is ejected.
2 Make sure A4-size paper is loaded in the cassette 2.
3 Access the Epson Printer Utility 4. → "Accessing the printer driver for Mac OS X" on page 53
Click the Print Head Alignment icon.
5 Follow the on-screen instructions to align the print head.
Using the control panel
Follow the steps below to align the print head using the product control panel.
1 Make sure that no warnings or errors are indicated in the control panel.
2 Make sure that A4-size paper is loaded in the paper cassette.
3 Enter Setup mode from the Home menu.
4 Select Maintenance.
5 Select Print Head Alignment.
6 Press ◇ to print the patterns.
Maintaining Your Product and Software
7 Find the most solid pattern in each of #1 to #5 groups.
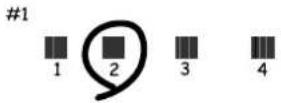
8 Enter the pattern number for the most solid pattern in #1 group.
9 Repeat step 8 for the other groups (#2 to #5).
10 Finish aligning the print head.
Setting/Changing Time and Region
Follow the steps below to set the time and region using the product control panel.
Note: This function is only available for fax capable models.
1 Enter Setup mode from the Home menu.
2 Select Basic Setup.
3 Select Date/Time.
4 Select the date format.
5 Set the date.
6 Select the time format.
7 Set the time.
Note: To select daylight saving time, set Daylight Saving Time to On.
8 Select Country/Region.
Maintaining Your Product and Software

Select the region.

Select Yes.
Note:
When the power is left off for an extended period of time, the clock may be reset. Check the clock when you turn the power back on.
Saving Power
Note only for products with fax function:
☐ The LCD screen turns black if no operations are performed for a set period.
☐ The automatic function to turn off the product is not available.
Note only for products without fax function:
The product enters sleep mode or turns off automatically if no operations are performed for a set period.
You can adjust the time before power management is applied. Any increase will affect the product's energy efficiency. Please consider the environment before making any change.
Follow the steps below to adjust the time.
For Windows

Access the printer settings.
→ "Accessing the printer driver for Windows" on page 52

Click the Maintenance tab, and then click the Printer and Option Information button.

Select Off, 30 minutes, 1 hour, 2 hours, 4 hours, 8 hours, or 12 hours as the Power Off Timer setting, and click the Send button.

Select 3 minutes, 5 minutes, 10 minutes, or 15 minutes as the Sleep Timer setting, and click the Send button.

Click the OK button.
For Mac OS X

Access the Epson Printer Utility 4.
→ "Accessing the printer driver for Mac OS X" on page 53
Maintaining Your Product and Software
2 Click the Printer Settings button. The Printer Settings screen appears.
3 Select Off, 30 minutes, 1 hour, 2 hours, 4 hours, 8 hours, or 12 hours as the Power Off Timer setting.
4 Select 3 minutes, 5 minutes, 10 minutes, or 15 minutes as the Sleep Timer setting.
5 Click the Apply button.
Using the control panel
1 Enter Setup mode from the Home menu.
2 Select Printer Setup.
3 Select Power Off Timer.
4 Select Off, 30 minutes, 1h, 2h, 4h, 8h, or 12h.
5 Select Sleep Timer.
6 Select 3 minutes, 5 minutes, 10 minutes, or 15 minutes.
Quieter Printer Operations
You can make printer operations quiet without changing the print quality. However, printing speed might be reduced.
For Windows
1 Access the printer settings. → "Accessing the printer driver for Windows" on page 52
2 In the Advanced window, select Off, On, or Printer Setting as the Quiet Mode.
For Mac OS X
1 Click System Preferences on the Apple menu.
Maintaining Your Product and Software
2 Click Print & Scan (for Mac OS X 10.8 or 10.7) or Print & Fax (for Mac OS X 10.6 or 10.5), and then select your product from the Printers list box.
3 Click Options & Supplies, and then Driver.
4 Select Off, On, or Printer Setting as the Quiet Mode.
Using the control panel
1 Enter Quiet Mode from the Home menu.
2 Select On or Off.
Making Network Service Settings
You can make network service settings such as Epson Connect, AirPrint, or Google Cloud Print using a Web browser on your computer, smartphone, tablet PC, or laptop that is connected to the same network as the product.
Enter the product's IP address in the address bar of the Web browser and search for the product.
IPv4: http://192.168.11.46
IPv6: http://[fe80::226:abff:feff:37cd]/
Note:
You can check your product's IP address on the product's control panel or by printing a network status sheet.
→ "Setup Mode" on page 124
Maintaining Your Product and Software
When the product is found successfully, the product's web page is displayed as shown below. Select the menu you want.
EPSON


Epson Connect Services
Register your printer with or delete it from Epson Connect services. Suspend or resume Epson Connect services. [Unregistered]

Google Cloud Print Services
Register your printer with or delete it from Google Cloud Print services.
Suspend or resume Google Cloud Print services.
[Unregistered]

DNS/Proxy Setup
Configure DNS/Proxy settings.

Firmware Update
Connect to the Internet and update the printer firmware to the latest version

Root Certificate Update
Update the root certificate to use cloud services. Current Version:

AirPrint Setup
Configure AirPrint settings

Wi-Fi Direct Setup
Configure Wi-Fi Direct connection settings.

Printer Information
Check ink levels, printer status and Wi-Fi/network settings.
Refresh
The web page also allows you to check the product's status and update the product's firmware.
Cleaning the Product
Cleaning the exterior of the product
To keep your product operating at its best, clean it thoroughly several times a year by using the following instructions.

Important:
Never use alcohol or thinner to clean the product. These chemicals can damage the product.
Note only for products with fax function:
Close the rear paper feed slot cover and the ADF input tray when you are not using the product to protect the product from dust.
Note only for products without fax function:
Close the rear paper feed slot cover and the output tray when you are not using the product to protect the product from dust.
☐ Use a soft, dry, clean cloth to clean the touchscreen/touchpad. Do not use liquid or chemical cleaners.
Maintaining Your Product and Software
☐ Use a soft, dry, clean cloth to clean the surface of the scanner glass. If straight lines appear in the printout or the scanned data, clean the left side of the scanner glass carefully.
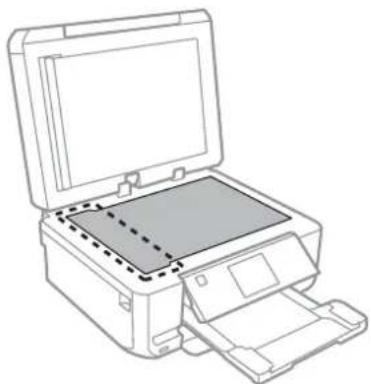
natural_image
Line drawing of a printer with open lid and paper feed (no text or symbols)☐ If the glass surface is stained with grease or some other hard-to-remove material, use a small amount of glass cleaner and a soft cloth to remove it. Wipe off all remaining liquid.
Open the ADF cover and use a soft, dry, clean cloth to clean the roller and the interior of the ADF (only for products with ADF function).
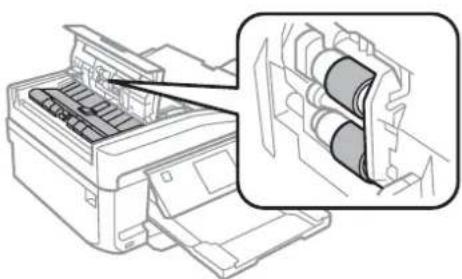
natural_image
Diagram of a printer with internal components and a magnified inset showing internal rollers (no text or symbols)☐ Do not press the surface of the scanner glass with any force.
☐ Be careful not to scratch or damage the surface of the scanner glass, and do not use a hard or abrasive brush to clean it. A damaged glass surface can decrease the scan quality.
☐ Remove the document mat as shown in the illustration (only for products with ADF function).
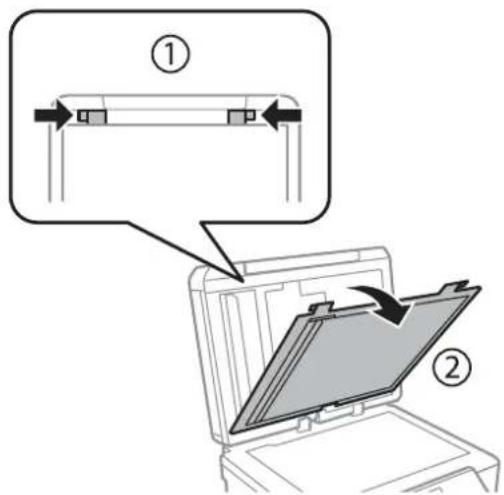
Maintaining Your Product and Software
☐ Use a soft, dry, clean cloth to clean the inside of the document mat (only for products with ADF function).
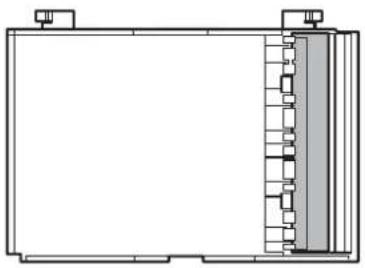
natural_image
Technical line drawing of a rectangular enclosure with internal partitioned structure (no text or symbols)Cleaning the interior of the product
To keep your print results at their best, clean the roller inside by using the following procedure.

Caution:
Be careful not to touch the parts inside the product.

Important:
☐ Be careful to keep water away from the electronic components.
☐ Do not spray the inside of the product with lubricants.
☐ Unsuitable oils can damage the mechanism. Contact your dealer or a qualified service person if lubrication is needed.
1 Make sure that no warnings or errors are displayed on the LCD screen, the CD/DVD tray is removed, and the output tray is ejected.
2 Load several sheets of A4-size plain paper in the cassette 2.
3 Enter Copy mode from the Home menu.
4 Press ◇ to make a copy without placing a document on the scanner glass.
5 Repeat step 4 until the paper is not smeared with ink.
Transporting the Product
If you move the product some distance, you need to prepare it for transportation in its original box or one of a similar size.
Maintaining Your Product and Software

Important:
☐ When storing or transporting the product, avoid tilting it, placing it vertically, or turning it upside down; otherwise ink may leak.
Leave the ink cartridges installed. Removing the cartridges can dry out the print head and may prevent the product from printing.
1
Plug in the product and turn it on. Wait until the ink cartridge holder returns to the home position.
natural_image
Line drawing of a printer with an open lid and a magnified inset showing the internal structure (no text or symbols)2
Secure the ink cartridge holder to the case with tape as shown, then close the scanner unit slowly.
natural_image
Line drawing of a printer with an open lid and a close-up inset showing internal components (no text or symbols)3
Turn off the product and unplug its power cord.
4
Disconnect all other cables from the product.
5
Remove all paper from the rear paper feed slot.
Maintaining Your Product and Software
6 Close the rear paper feed slot cover, the output tray, the ADF input tray, and the ADF output tray extension. Then lower the control panel to store.
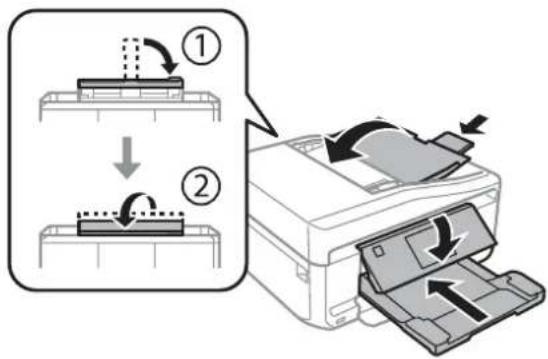
7 Remove all paper from the paper cassette and re-insert the cassette into the product.
8 Repack the product in its box, using the protective materials that came with it.
Important:
When storing this product in a box, place it so that the control panel does not get damaged.
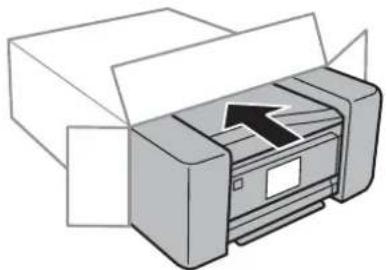
natural_image
Illustration of a printer with an arrow indicating print direction (no text or symbols present)Note:
☐ Keep the product level during transport.
☐ Be sure to remove the protective materials from the product before using it again.
Checking and Installing Your Software
Checking the software installed on your computer
To use the functions described in this User's Guide, you need to install the following software.
□ Epson Driver and Utilities
□ Epson Easy Photo Print
□ Epson Print CD
□ Epson Event Manager
Maintaining Your Product and Software
Follow the steps below to check that the software is installed on your computer.
For Windows
1 Windows 8: Select Desktop, Settings charm and Control Panel.
Windows 7 and Vista: Click the start button and select Control Panel.
Windows XP: Click Start and select Control Panel.
2 Windows 8, 7 and Vista: Click Uninstall a program from the Programs category.
Windows XP: Double-click the Add or Remove Programs icon.
3 Check the list of currently installed programs.
For Mac OS X
1 Double-click Macintosh HD.
2 Double-click the Epson Software folder in the Applications folder and check the contents.
Note:
☐ The Applications folder contains software provided by third parties.
☐ To check that the printer driver is installed, click System Preferences on the Apple menu and then click Print & Scan (for Mac OS X 10.8 or 10.7) or Print & Fax (for Mac OS X 10.6 or 10.5). Then locate your product in the Printers list box.
Installing the software
Insert the product software disk that came with your product and select the software you want to install on the Software Select screen.
If you are using Mac OS X, or if your computer does not have a CD/DVD drive, go to the following Epson website to download and install the software.
http://support.epson.net/setupnavi/
Uninstalling Your Software
You may need to uninstall and then reinstall your software to solve certain problems or if you upgrade your operating system.
See the following section for information on determining what applications are installed.
→ "Checking the software installed on your computer" on page 160
For Windows
Note:
☐ For Windows 8, 7 and Vista, you need an administrator account and password if you log on as a standard user.
☐ For Windows XP, you must log on to a Computer Administrator account.
1
Turn off the product.
2
Disconnect the product's interface cable from your computer.
3
Do one of the following.
Windows 8: Select Desktop, Settings charm and Control Panel.
Windows 7 and Vista: Click the start button and select Control Panel.
Windows XP: Click Start and select Control Panel.
4
Do one of the following.
Windows 8, 7 and Vista: Select Uninstall a program from the Programs category.
Windows XP: Double-click the Add or Remove Programs icon.
5
Select the software you want to uninstall such as your product's driver and the application from the list displayed.
6
Do one of the following.
Windows 8, 7: Select Uninstall/Change or Uninstall.
Windows Vista: Click Uninstall/Change or Uninstall, and then click Continue in the User Account Control window.
Windows XP: Click Change/Remove or Remove.
Note:
If you chose to uninstall your product's printer driver in step 5, select the icon for your product and then click OK.
7
When the confirmation window appears, click Yes or Next.
8
Follow the on-screen instructions.
In some cases, a message may appear to prompt you to restart your computer. If so, make sure I want to restart my computer now is selected and click Finish.
For Mac OS X
Note:
☐ To uninstall your software you need to download the Uninstaller.
Access the site at:
http://www.epson.com
Next, select the support section of your local Epson Web site.
☐ To uninstall applications, you must log on to a Computer Administrator account.
You cannot uninstall programs if you log on as a limited account user.
☐ Depending on the application, the Installer may be separated from the Uninstaller.
1
Quit all running applications.
2
Double-click the Uninstaller icon in your Mac OS X hard drive.
3
Select the check boxes for the software you want to uninstall, such as the printer driver and the application, from the list displayed.
4
Click Uninstall.
5
Follow the on-screen instructions.
If you cannot find the software you want to uninstall in the Uninstaller window, double-click the Applications folder in your Mac OS X hard drive, select the application you want to uninstall, and then drag it to the Trash icon.
Note:
If you uninstall the printer driver and the name of your product remains in the Print & Scan (for Mac OS X 10.8 or 10.7) or Print & Fax (for Mac OS X 10.6 or 10.5) window, select the name of your product and click the - remove button.
Transferring Data Using an External Storage Device
You can use the product's memory card slots or external USB port to copy files to a computer connected to the product. You can also use it to copy files on your computer to the storage device.
Precautions on Storage Devices
Keep the following in mind when copying files between your storage device and computer:
☐ Check the documentation that came with your storage device and any adapter you may be using for any handling guidelines.
☐ Do not copy files to a storage device while you are printing from your storage device.
☐ The product display does not update information about your storage device after you copy files to it or delete files from it. To update the information displayed, eject and reload the storage device.
☐ Do not eject your memory card or turn off the product while the memory card light is flashing or you may lose data.
Copying Files Between a Storage Device and Your Computer
Copying files to your computer
1 Make sure the product is turned on and a storage device is inserted or connected.
2 Windows 8: Right-click on the Start screen, or swipe from the bottom or top edge of the Start screen and select All apps, then select Computer.
Windows 7 and Vista: Click the start button and select Computer.
Windows XP: Click Start and select My Computer.
Mac OS X: The removable disk icon ( ) appears on your desktop automatically.
Transferring Data Using an External Storage Device
3
Double-click the removable disk icon, then select the folder in which your files are saved.
Note:
If you have set a volume label, it is displayed as the drive name. If you have not set the volume label, "removable disk" is displayed as the drive name on Windows XP.
4
Select the files you want to copy and drag them to a folder on your computer's hard drive.

Important:
For Mac OS X users
When you remove the storage device, always drag the removable disk icon on your desktop into the trash before you remove the storage device or you may lose data on the device.
Saving files to a storage device
Before inserting your memory card, make sure the write-protect switch is set to allow writing to the memory card.
Note:
After copying a file to a memory card from a Macintosh computer, an older digital camera may not be able to read the memory card.
1
Make sure the product is turned on and a storage device is inserted or connected.
2
Windows 8:
Right-click on the Start screen, or swipe from the bottom or top edge of the Start screen and select All apps, then select Computer.
Windows 7 and Vista:
Click the start button and select Computer.
Windows XP:
Click Start and select My Computer.
Mac OS X:
The removable disk icon ( ) appears on your desktop automatically.
3
Double-click the removable disk icon, then select the folder in which you want to save your files.
Note:
If you have set a volume label, it is displayed as the drive name. If you have not set the volume label, "removable disk" is displayed as the drive name on Windows XP.
Transferring Data Using an External Storage Device
4
Select the folder on your computer's hard drive that contains the files you want to copy. Then select the files and drag them to the folder on your storage device.

Important:
For Mac OS X users
When you remove the storage device, always drag the removable disk icon on your desktop into the trash before you remove the storage device or you may lose data on it.
Error Indicators
Error Messages on the Control Panel
This section describes the meaning of messages displayed on the LCD screen.
| Error Messages | Solutions |
| Paper jam | → See "Paper Jams" on page 172 |
| Paper out | → See "Loading Paper" on page 27 |
| Photos not recognized. Place the photos correctly on the scanner glass. | → See "Scanner glass" on page 42 |
| Printer error. Turn the power off and on again. For details, see your documentation. | Turn the product off and then back on. Make sure that no paper is still in the product. If the error message still appears, contact Epson support. |
| Communication error. Check if a computer is connected. | Make sure the computer is connected correctly. If the error messages still appears, make sure that scanning software is installed on your computer and that the software settings are correct. |
| A printer's ink pad is nearing the end of its service life. Please contact Epson Support. | Press ◇ to resume printing. The message will be displayed until the ink pad is replaced. Contact Epson support to replace ink pads before the end of their service life. When the ink pads are saturated, the printer stops and Epson support is required to continue printing. |
| A printer's ink pad is at the end of its service life. Please contact Epson Support. | Contact Epson support to replace ink pads. |
| Memory card or external device not recognized. | Make sure memory card or external device has been inserted correctly. |
| The phone line is connected to a different port. | Check if the phone cable is correctly connected to the product.→ See "Connecting to a Phone Line" on page 93 |
| No dial tone detected. Run Check Fax Connection under Fax Settings in Setup menu. | Make sure the phone cable is connected correctly and the phone line works.→ See "Connecting to a Phone Line" on page 93If you connected the product to a PBX (Private Branch Exchange) phone line or Terminal Adapter, change the Line Type setting to PBX.→ See "Setting the line type" on page 96If the problem still occurs, turn off the Dial Tone Detection.→ See "Setup Mode - Fax Settings" on page 129 |
| Combination of the IP address and the subnet mask is invalid. See your documentation. | Refer the online Network Guide. |
Error Indicators
| Error Messages | Solutions |
| Recovery Mode | The firmware update has failed. You will need to re-attempt the firmware update. Ready a USB cable and visit your local Epson website for further instructions. |
Troubleshooting for Printing/Copying
Diagnosing the Problem
Troubleshooting product problems is best handled in two steps: first diagnose the problem, then apply likely solutions until the problem is fixed.
The information that you need to diagnose and solve most common problems is provided by online problem solving, the control panel, or the status monitor. Refer to the appropriate section below.
If you have a specific problem relating to print quality, a printing problem not related to print quality, or a paper feeding problem, or if the product does not print at all, refer to the appropriate section.
To solve a problem, you may need to cancel printing.
→ "Canceling Printing" on page 57
Checking product status
If a problem occurs while printing, an error message will appear in the status monitor window.
If an error message appears indicating the product's ink pads are nearing the end of their service life, contact Epson support to replace them. The message will be displayed at regular intervals until the ink pads are replaced. When the product's ink pads are saturated, the product stops and Epson support is required to continue printing.
For Windows
There are two ways to access EPSON Status Monitor 3:
☐ Double-click the product shortcut icon on your Windows taskbar. To add a shortcut icon to the taskbar, see the following section:
→ "From the shortcut icon on the taskbar" on page 53
Open the printer driver, click the Maintenance tab, then click the EPSON Status Monitor 3 button.
Troubleshooting for Printing/Copying
When you access EPSON Status Monitor 3, the following window appears:
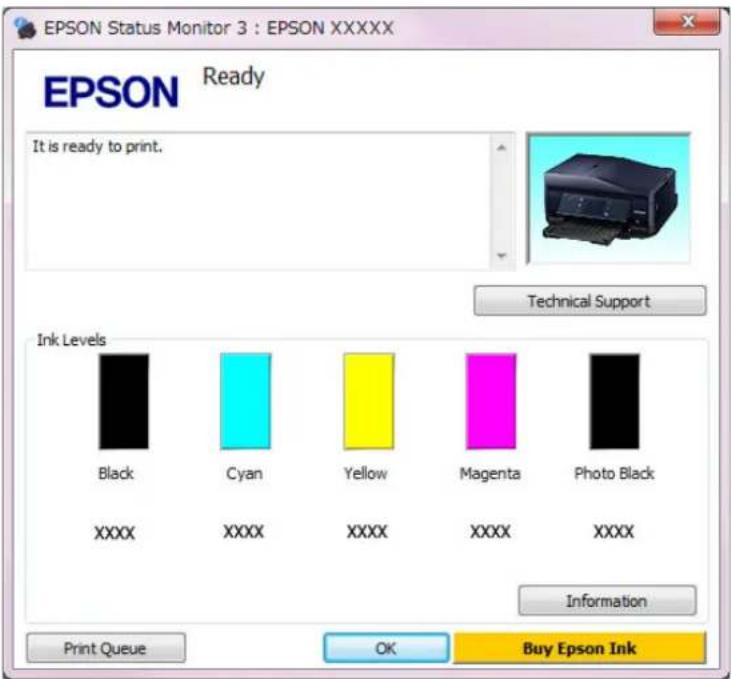
Note:
If EPSON Status Monitor 3 does not appear, access the printer driver and click the Maintenance tab and then the Extended Settings button. In the Extended Settings window, check the Enable EPSON Status Monitor 3 check box.
EPSON Status Monitor 3 provides the following information:
Current Status:
If the ink is low or expended, the How to button appears in the EPSON Status Monitor 3 window. Clicking How to displays ink cartridge replacement instructions.
□ Ink Levels:
EPSON Status Monitor 3 provides a graphic display of the ink cartridge status.
Information:
You can view information about the installed ink cartridges by clicking Information.
□ Technical Support:
Click Technical Support to access the Epson technical support website.
Print Queue:
You can view Windows Spooler by clicking Print Queue.
For Mac OS X
Follow these steps to access EPSON Status Monitor.
1
Access the Epson Printer Utility 4.
→ "Accessing the printer driver for Mac OS X" on page 53
Troubleshooting for Printing/Copying
2
Click the EPSON Status Monitor icon. The EPSON Status Monitor appears.

You can also use this utility to check the ink cartridge status before printing. EPSON Status Monitor displays the ink cartridge status at the time it was opened. To update the ink cartridge status, click Update.
When ink is low or expended, a How to button appears. Click How to, and EPSON Status Monitor will lead you step by step through the ink cartridge replacement procedure.
![Epson Printer Utility 4 Buy Epson Ink EPSON EPSON XXXXX Status description Replace Cartridge Photo Black: XXXX Actions to take Epson recommends the genuine Epson cartridges listed above. Click [How to] for ink cartridge replacement instructions. How to... Continue Cancel](/content/2026/06/1182615/images/64b67ee73e2181c708918d16ab57673881c1f47c6e82217b4045a99fe0f2427b.jpg)
Troubleshooting for Printing/Copying
Paper Jams

Caution:
Never touch the buttons on the control panel while your hand is inside the product.
Note:
☐ Cancel the print job if prompted by a message from the LCD screen or the printer driver.
☐ After you have removed the jammed paper, press the button indicated in the LCD screen.
Removing jammed paper from the rear cover
1 Pull out the rear cover and carefully remove the jammed paper.
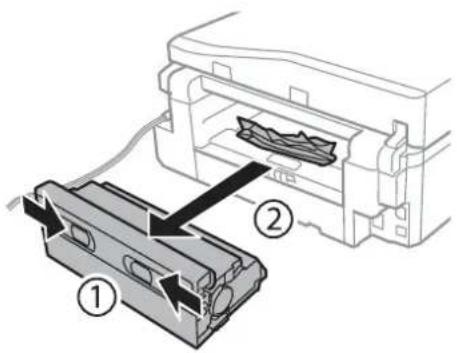
2 Carefully remove the jammed paper.
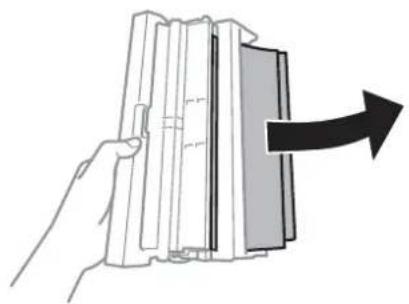
natural_image
Illustration of a hand holding a closed book with an arrow pointing to the right side (no text or symbols present)3 Open the rear cover and carefully remove the jammed paper.
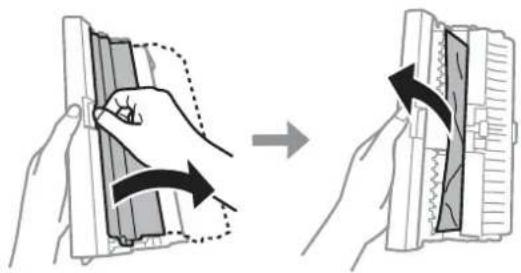
natural_image
Illustration of two hands holding a device with arrows indicating rotation or movement (no text or symbols present)Troubleshooting for Printing/Copying
4
Reattach the rear cover.
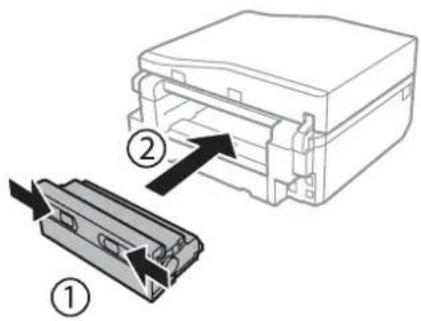
Removing jammed paper from inside the product
1
Carefully remove the jammed paper.
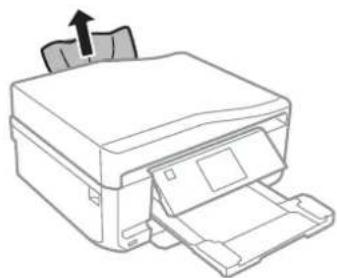
natural_image
Line drawing of a printer with an arrow indicating compression or shift (no text or symbols)2
Open the scanner unit. Then remove all of the paper inside, including any torn pieces.
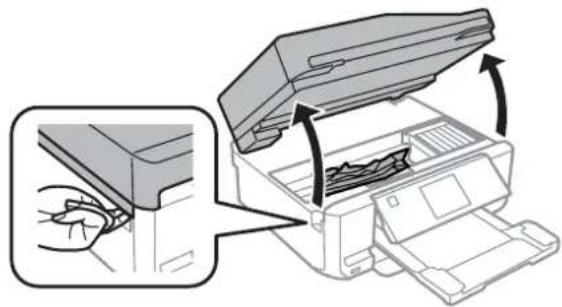
natural_image
Illustration of a printer being inserted into a paper airplane, showing the lid and paper feed (no text or symbols present)
Important:
Do not touch the flat white cable connected to the ink cartridge holder.
Troubleshooting for Printing/Copying
3
Close the scanner unit slowly.
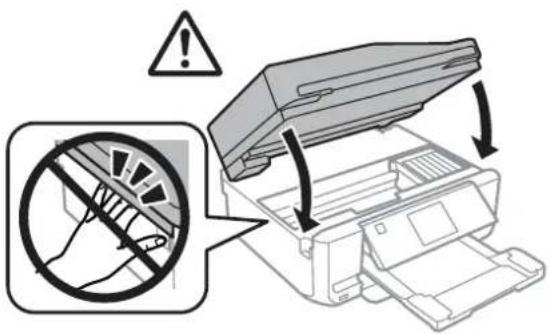
Removing jammed paper from the paper cassette
1
Pull out the paper cassette1.
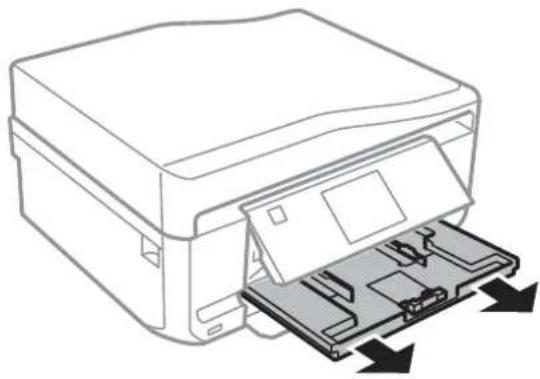
natural_image
Line drawing of a printer with a paper feed insert and arrows indicating process (no text or symbols)2
Pull out the paper cassette2.
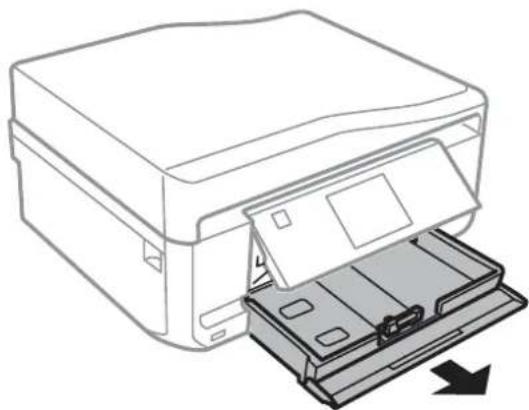
natural_image
Line drawing of a printer with an open paper feed being inserted, showing internal structure and page loading (no text or symbols)3
Remove the jammed paper from the cassette.
Troubleshooting for Printing/Copying
4
Align the edges of the paper.
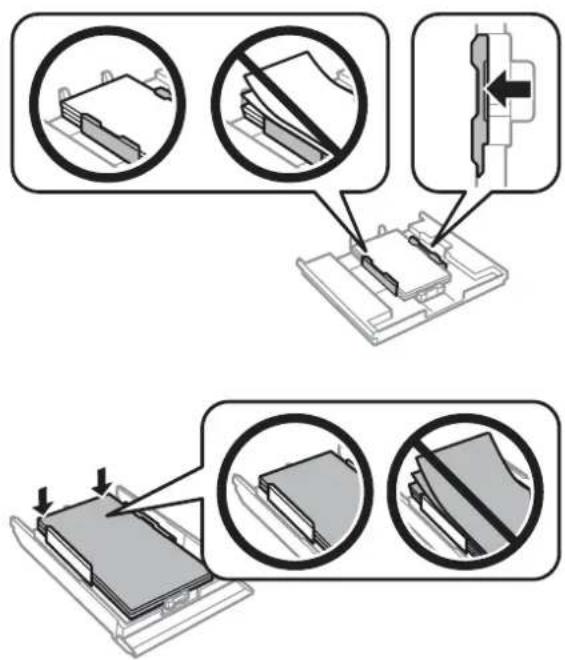
5
Keep the cassette flat and slowly and carefully reinsert it all the way into the product.
Removing jammed paper from the Automatic Document Feeder (ADF)
The availability of this feature varies by product.
1
Remove the stack of paper from the ADF input tray.
2
Open the ADF cover. Then carefully remove the jammed paper.
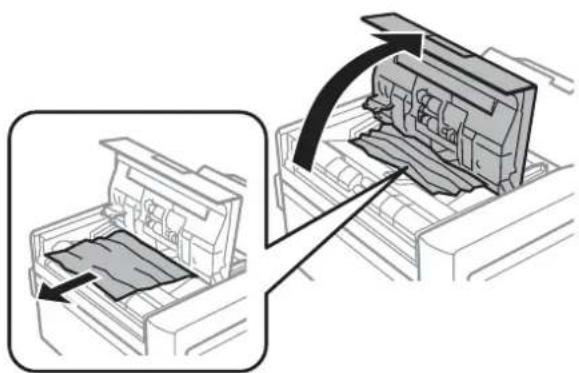
natural_image
Diagram showing a printer's internal structure being folded into a paper holder, with an arrow indicating the process (no text or symbols present)
Important:
Make sure you open the ADF cover before removing jammed paper. If you do not open the cover, the product may be damaged.
Troubleshooting for Printing/Copying
3
Open the document cover.
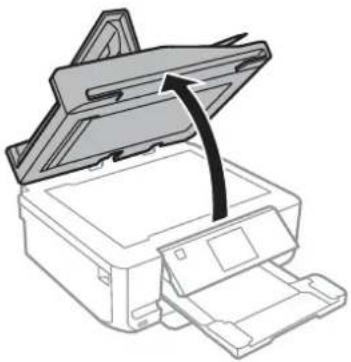
natural_image
Diagram of a printer with an open lid and paper feed, showing internal structure without any text or symbols.4
Remove the document mat.
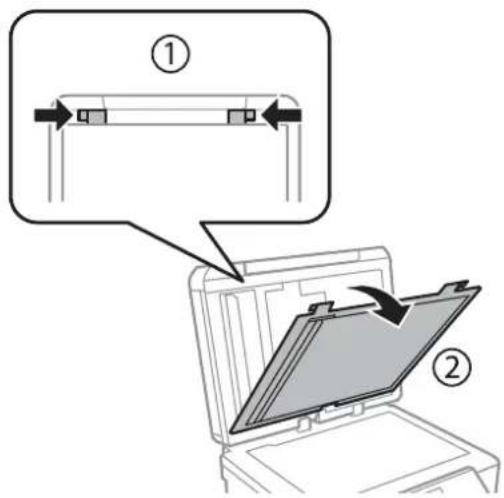
5
Carefully remove the jammed paper.
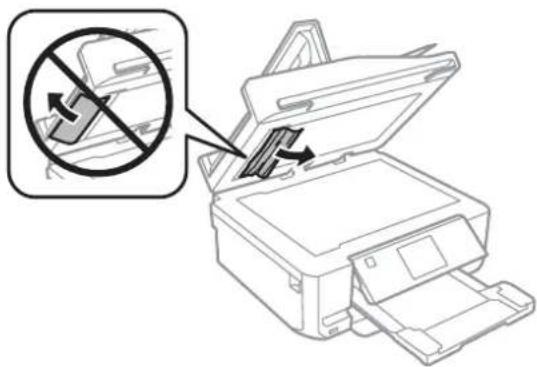
6
Reattach the document mat and close the document cover.
Troubleshooting for Printing/Copying
7 Open the Automatic Document Feeder (ADF).
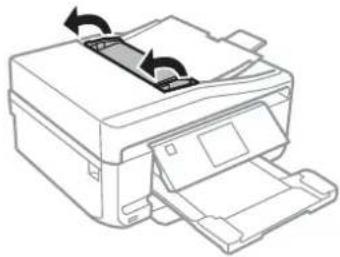
natural_image
Line drawing of a printer with paper and scroll, showing mechanical components and motion arrows (no text or symbols)8 Carefully remove the jammed paper.

natural_image
Line drawing of a printer with paper and paperstack being inserted (no text or symbols)9 Close the Automatic Document Feeder (ADF).
Preventing paper jams
If your paper jams frequently, check the following.
☐ The paper is smooth, not curled or wrinkled.
☐ You are using high-quality paper.
☐ The printable side of the paper is face down in the paper cassette.
☐ The printable side of the paper is face up in the rear paper feed slot.
☐ The paper stack was fanned before loading.
☐ For plain paper, do not load paper above the line just under the ▼ or ▲≡ arrow mark inside the edge guide. For Epson special media, make sure the number of sheets is less than the limit specified for the media.
→ "Selecting Paper" on page 23
☐ The edge guides are snug against the edges of the paper.
☐ The product is on a flat, stable surface that extends beyond the base in all directions. The product will not operate properly if it is tilted.
Reprinting after a paper jam (for Windows only)
After you cancel the print job because of a paper jam, you can reprint it without reprinting pages that have already been printed.
Troubleshooting for Printing/Copying
1 Solve the paper jam.
→ "Paper Jams" on page 172
2 Access the printer settings.
→ "Accessing the printer driver for Windows" on page 52
3 Select the Print Preview check box in the Main or Advanced window of your printer driver.
4 Make the settings that you want to use to print.
5 Click OK to close the printer settings window, and then print your file. Print Preview window opens.
6 Select a page that has already been printed in the page list box on the left side, and then select Remove Page from the Print Options menu. Repeat this step for all the pages that have already been printed.
7 Click Print on the Print Preview window.
Print Quality Help
If you are having print quality problems, then compare it with the illustrations below. Click the caption under the illustration that best resembles your prints.
| enthalten alle Aufdruck. W ↓ 5008 "RegelGood sample |  Good sample Good sample |
| enthalten alle Aufdruck. W ↓ 5008 "Regel→"Horizontal banding" on page 179 | enthalten alle Aufdruck. W ↓ 5008 "Regel→"Vertical banding or misalignment" on page 179 |
 →"Horizontal banding" on page 179 →"Horizontal banding" on page 179 |  →"Vertical banding or misalignment" on page 179 →"Vertical banding or misalignment" on page 179 |
Troubleshooting for Printing/Copying
natural_image
Close-up grayscale photo of a flower petal with visible petals and stamens (no text or symbols)→ "Incorrect or missing colors" on page 180

natural_image
Close-up of a plant with brown leaves against a green background (no text or symbols)→ "Blurry or smeared print" on page 180
Horizontal banding
☐ Make sure the printable side (the whiter or glossier side) of the paper is face up in the rear paper feed slot.
☐ Make sure the printable side (the whiter or glossier side) of the paper is face down in the paper cassette.
☐ Run the Head Cleaning utility to clear any clogged ink nozzles.
→ "Cleaning the Print Head" on page 148
☐ For best results, use up ink cartridge within six months of opening the package.
☐ Try to use genuine Epson ink cartridges.
☐ Make sure the paper type selected in the LCD menu or printer driver is appropriate for the type of paper loaded in the product.
→ "Selecting Paper" on page 23
→ "Aligning the Print Head" on page 150
☐ If banding appears at intervals of 2.5 cm, run the Print Head Alignment utility.
☐ If a moire (cross-hatch) pattern appears on your copy, change the Reduce/Enlarge setting in the LCD menu or shift the position of your original.
☐ If there is problem with copy quality, clean the surface of the scanner glass.
→ "Cleaning the exterior of the product" on page 156
Vertical banding or misalignment
☐ Make sure the printable side (the whiter or glossier side) of the paper is face up in the rear paper feed slot.
☐ Make sure the printable side (the whiter or glossier side) of the paper is face down in the paper cassette.
☐ Run the Head Cleaning utility to clear any clogged ink nozzles.
→ "Cleaning the Print Head" on page 148
☐ Run the Print Head Alignment utility.
→ "Aligning the Print Head" on page 150
Troubleshooting for Printing/Copying
☐ For Windows, clear the High Speed check box from the Advanced window in your printer driver. See the online help for details.
For Mac OS X, select Off from the High Speed Printing. To display the High Speed Printing, click through the following menus: System Preferences, Print & Scan (for Mac OS X 10.8 or 10.7) or Print & Fax (for Mac OS X 10.6 or 10.5), your product (in the Printers list box), Options & Supplies, and then Driver.
☐ Make sure the paper type selected in the LCD menu or printer driver is appropriate for the type of paper loaded in the product.
→ "Selecting Paper" on page 23
☐ If there is problem with copy quality, clean the surface of the scanner glass.
→ "Cleaning the exterior of the product" on page 156
Incorrect or missing colors
☐ For Windows, clear the Grayscale setting in the Advanced window in your printer driver.
For Mac OS X, clear the Grayscale setting in Print Settings in the Print dialog box in your printer driver.
See the online help for details.
☐ Adjust the color settings in your application or in your printer driver settings. For Windows, check the Advanced window.
For Mac OS X, check the Color Options dialog box from the Print dialog box. See the online help for details.
☐ Run the Head Cleaning utility to clear any clogged ink nozzles.
→ "Cleaning the Print Head" on page 148
☐ If you have just replaced an ink cartridge, make sure the date on the box. If you have not used the product for a long time, Epson recommends replacing the ink cartridges.
→ "Replacing an ink cartridge" on page 142
☐ Try to use genuine Epson ink cartridges and paper recommended by Epson.
Blurry or smeared print
☐ Try to use genuine Epson ink cartridges and paper recommended by Epson.
☐ Make sure the product is on a flat, stable surface that extends beyond the base in all directions. The product will not operate properly if it is tilted.
☐ Make sure your paper is not damaged, dirty, or too old.
☐ Make sure your paper is dry and the printable side (the whiter or glossier side) is face up in the rear paper feed slot.
☐ Make sure your paper is dry and the printable side (the whiter or glossier side) is face down in the paper cassette.
☐ If the paper is curled toward the printable side, flatten it or curl it slightly in the opposite direction.
☐ Make sure the paper type selected in the LCD menu or printer driver is appropriate for the type of paper loaded in the product.
→ "Selecting Paper" on page 23
Troubleshooting for Printing/Copying
☐ Remove each sheet from the output tray as it is printed.
☐ Do not touch or allow anything to come into contact with the printed side of paper with a shiny finish. To handle your prints, follow the instructions of the paper.
☐ Run the Head Cleaning utility.
→ "Cleaning the Print Head" on page 148
☐ Run the Print Head Alignment utility.
→ "Aligning the Print Head" on page 150
☐ If the paper is smeared with ink after printing, clean the interior of the product.
→ "Cleaning the interior of the product" on page 158
☐ If you are printing high-density data on plain paper using automatic 2-sided printing, lower the Print Density and choose a longer Increased Ink Drying Time in the Print Density Adjustment window (for Windows) or in the Two-sided Printing Settings (for Mac OS X) of your printer driver.
→ "2-sided printing" on page 62
☐ If there is problem with copy quality, clean the surface of the scanner glass.
→ "Cleaning the exterior of the product" on page 156
Miscellaneous Printout Problems
Incorrect or garbled characters
☐ Clear any stalled print jobs.
→ "Canceling Printing" on page 57
Turn off the product and computer. Make sure the product's interface cable is securely plugged in.
☐ Uninstall the printer driver, then reinstall it.
→ "Uninstalling Your Software" on page 161
Incorrect margins
☐ Make sure that the paper is loaded into the rear paper feed slot or the paper cassette correctly.
→ "Loading Paper" on page 27
☐ Check the margin settings in your application. Make sure that the margins are within the printable area of the page.
→ "Printable area" on page 199
☐ Make sure the printer driver settings are appropriate for the paper size you are using.
For Windows, check the Main window.
For Mac OS X, check the Page Setup dialog box or Print dialog box.
☐ Uninstall the printer driver, then reinstall it.
→ "Uninstalling Your Software" on page 161
Printout has a slight slant
☐ Make sure that the paper is loaded into the rear paper feed slot or the paper cassette correctly.
→ "Loading Paper" on page 27
☐ If Fast Economy is selected for Paper & Quality Options in the printer driver Advanced window (Windows) or for Print Quality (Mac OS X) in Print Settings, select another setting.
Size or position of copied image is incorrect
☐ Make sure the paper size, layout, or reduce/enlarge setting selected in the control panel matches the paper used.
☐ If the edges of the copy are cropped off, move the original slightly away from the corner.
□ Clean the scanner glass.
→ "Cleaning the exterior of the product" on page 156
Inverted image
☐ For Windows, clear the Mirror Image check box from the Page Layout window of your printer driver, or turn off the Mirror Image setting in your application.
For Mac OS X, clear the Mirror Image check box in Print Settings in the Print dialog box of your printer driver, or turn off the Mirror Image setting in your application.
For instructions, see the online help for your printer driver or for your application.
☐ Uninstall the printer driver, then reinstall it.
→ "Uninstalling Your Software" on page 161
Paper or CD/DVD only prints halfway or is blank
☐ If the scanner unit is open for a certain period of time, if data reception is interrupted for a certain period of time, or depending on your computer or the data, the product may stop printing halfway and the paper or CD/DVD may be ejected. If the scanner unit is open, close it. The product may resume printing, but if it does not, try printing again.
☐ Make sure the printer driver settings are appropriate for the paper size you are using.
For Windows, check the Main window.
For Mac OS X, check the Page Setup dialog box or Print dialog box.
☐ For Windows, check the Skip Blank Page setting by clicking the Extended Settings button on the Maintenance window of the printer driver.
For Mac OS X, select On from the Skip Blank Page. To display the Skip Blank Page, click through the following menus: System Preferences, Print & Scan (for Mac OS X 10.8 or 10.7) or Print & Fax (for Mac OS X 10.6 or 10.5), your product (in the Printers list box), Options & Supplies, and then Driver.
☐ Uninstall the printer driver, then reinstall it.
→ "Uninstalling Your Software" on page 161
Printed side is smeared or scuffed
☐ If the paper is curled toward the printable side, flatten it or curl it slightly in the opposite direction.
For Windows, select Thick paper and envelopes from Printer and Option Information in your printer driver's Maintenance window.
For Mac OS X 10.5 or later, select On from the Thick paper and envelopes. To display the Thick paper and envelopes, click through the following menus: System Preferences, Print & Scan (for Mac OS X 10.8 or 10.7) or Print & Fax (for Mac OS X 10.6 or 10.5), your product (in the Printers list box, Options & Supplies, and then Driver.
☐ Make several copies without placing a document on the scanner glass.
→ "Cleaning the interior of the product" on page 158
☐ Uninstall the printer driver, then reinstall it.
→ "Uninstalling Your Software" on page 161
Printing is too slow
☐ Make sure the paper type selected in the LCD menu or printer driver is appropriate for the type of paper loaded in the product.
→ "Selecting Paper" on page 23
For Windows, clear all customized settings and select Text as the Quality Option from your printer driver's Main window.
For Mac OS X, choose a lower Print Quality in the Print Settings dialog box from your printer driver's Print dialog box.
→ "Accessing the printer driver for Windows" on page 52
→ "Accessing the printer driver for Mac OS X" on page 53
☐ Close any unnecessary applications.
☐ If you print continuously for an extended period, the printing may be extremely slow. This is to slow down the printing speed and prevent the product mechanism from overheating and being damaged. If this happens, you can continue to print, but we recommend stopping and leaving the product idle for at least 30 minutes with the power on. (The product does not recover with the power off.) After you restart, the product will print at normal speed.
☐ Uninstall the printer driver, then reinstall it.
→ "Uninstalling Your Software" on page 161
If you try all of the methods above and cannot solve the problem, see the following:
→ "Increasing the Print Speed (For Windows Only)" on page 187
Troubleshooting for Printing/Copying
Paper Does Not Feed Correctly or the CD/DVD Tray is Not Inserted Correctly
Paper does not feed
Remove the stack of paper and make sure of the following:
☐ You have inserted the paper cassette all the way into the product.
☐ The paper is not curled or creased.
☐ The paper is not too old. See the instructions that came with the paper for more information.
☐ For plain paper, do not load paper above the line just under the ▼ or △≡ arrow mark inside the edge guide. For Epson special media, make sure the number of sheets is less than the limit specified for the media.
→ "Selecting Paper" on page 23
☐ Paper is not jammed inside the product. If it is, remove the jammed paper.
→ "Paper Jams" on page 172
☐ The ink cartridges are not expended. If a cartridge is expended, replace it.
→ "Replacing an ink cartridge" on page 142
☐ You have followed any special loading instructions that came with your paper.
Multiple pages feed
☐ For plain paper, do not load paper above the line just under the ▼ or △≡ arrow mark inside the edge guide. For Epson special media, make sure the number of sheets is less than the limit specified for the media.
→ "Selecting Paper" on page 23
☐ Make sure the edge guides are snug against the edges of the paper.
☐ Make sure the paper is not curled or folded. If so, flatten it or curl it slightly toward the opposite side before loading.
☐ Remove the stack of paper and make sure that the paper is not too thin.
→ "Paper" on page 198
☐ Fan the edges of the stack to separate the sheets, then reload the paper.
☐ If too many copies of a file are being printed, check the Copies setting in your printer driver as follows, and also check in your application.
For Windows, check the Copies setting on the Page Layout window.
Mac OS X, check the Copies setting in the Print dialog.
Paper is improperly loaded
If you have loaded the paper too far into the product, the product cannot feed the paper correctly. Turn the product off and gently remove the paper. Then turn the product on and reload the paper correctly.
Paper is not ejected fully or is wrinkled
☐ If the paper does not eject fully, press ◇ to eject the paper. If the paper is jammed inside the product, remove it by referring to the following section.
→ "Paper Jams" on page 172
☐ If the paper is wrinkled when it comes out, it may be damp or too thin. Load a new stack of paper.
Note:
Store any unused paper in its original packaging in a dry area.
The CD/DVD tray is ejected or not inserted correctly when sending a CD/DVD print job
☐ Reinsert the CD/DVD tray correctly.
→ "Loading a CD/DVD" on page 36
☐ If the tray is ejected when you start a CD/DVD print job, the product is not ready. Wait until you see a message on your screen asking you to insert the tray. Then reinsert the tray and press ◇.
The Product Does Not Print
All lights are off
☐ Press ⏻ to make sure the product is on.
☐ Make sure that the power cord is securely plugged in.
☐ Make sure that your outlet works and is not controlled by a wall switch or timer.
Lights came on and then went out
The product's voltage may not match the outlet rating. Turn off the product and unplug it immediately. Then check the label on the back of the product.

Caution:
If the voltage does not match, DO NOT PLUG YOUR PRODUCT BACK IN. Contact your dealer.
Only the power light is on
Turn off the product and computer. Make sure the product's interface cable is securely plugged in.
☐ If you are using the USB interface, make sure your cable meets the USB or Hi-Speed USB standards.
☐ If you are connecting the product to your computer via a USB hub, connect the product to the first-tier hub from your computer. If the printer driver is still not recognized on your computer, try to directly connect the product to your computer without the USB hub.
☐ If you are connecting the product to your computer via a USB hub, make sure the USB hub device is recognized by your computer.
☐ If you are trying to print a large image, your computer may not have enough memory. Try reducing the resolution of your image or printing the image at a smaller size. You may need to install more memory in your computer.
□ Users of Windows can clear any stalled print jobs from the Windows Spooler.
→ "Canceling Printing" on page 57
☐ Uninstall the printer driver, then reinstall it.
→ "Uninstalling Your Software" on page 161
An ink error is indicated after you replace the cartridge
1 Open the scanner unit.
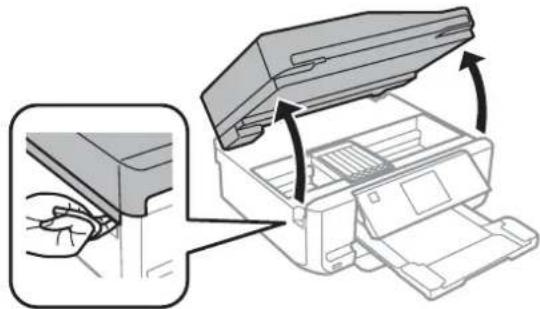
natural_image
Illustration of a printer being inserted into a paper airplane, showing the open lid and internal structure (no text or symbols)
Important:
Do not touch the white flat cable inside the product.
2 Make sure the ink cartridge holder is at the ink cartridge replacement position.
Troubleshooting for Printing/Copying
3 Remove and reinsert the ink cartridge and then continue with the ink cartridge installation.
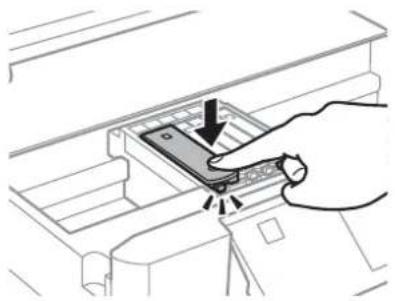
natural_image
Hand inserting a device into a rack, showing a black arrow pointing to the component (no text or symbols present)4 Close the scanner unit slowly.
5 Follow the on-screen instruction.
Increasing the Print Speed (For Windows Only)
Print speed may be increased by selecting certain settings in the Extended Settings window when the printing speed is slow. Click the Extended Settings button on your printer driver's Maintenance window.
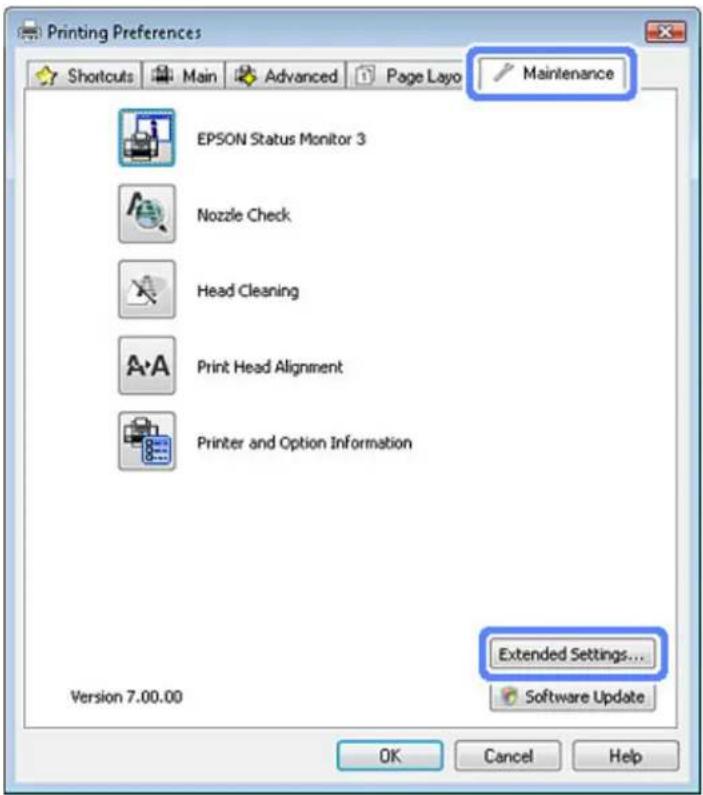
Troubleshooting for Printing/Copying
The following dialog box appears.
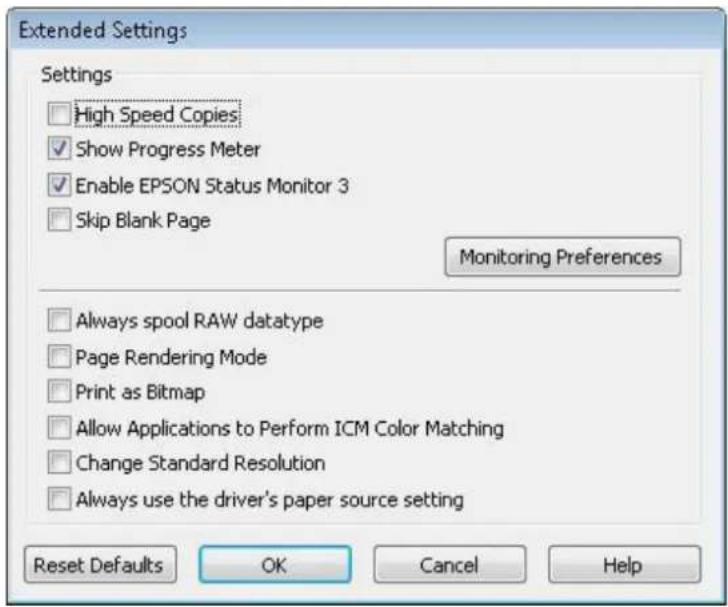
Select the following check boxes and print speed may be increased.
□ High Speed Copies
□ Always spool RAW datatype
Page Rendering Mode
Print as Bitmap
For more details on each item, see the online help.
Troubleshooting for Scanning
Problems Indicated by Messages on the LCD screen or Status Light
☐ Make sure the product is connected to your computer properly.
☐ Turn off the product and turn it on again. If the problem is not solved, the product may be malfunctioning, or the light source in the scanner unit may need to be replaced. Contact your dealer.
☐ Make sure the scanning software is fully installed.
See the paper manual for instructions on installing the scanning software.
Problems When Starting a Scan
☐ Check the status light and make sure the product is ready to scan.
Make sure your cables are securely connected to the product and a working electrical outlet. If necessary, test your product's AC adapter by plugging in another electrical device and turning it on.
☐ Turn off the product and computer, and then check the interface cable connection between them to make sure it is secure.
☐ Make sure you select the correct product if a scanner list appears when starting to scan.
Windows:
When you start Epson Scan using the EPSON Scan icon, and the Select Scanner list is displayed, make sure you select the model of your product.
Mac OS X:
When you start Epson Scan from the Applications folder and the Select Scanner list is displayed, make sure you select the model of your product.
Connect the product directly to the computer's external USB port or through one USB hub only. The product may not work properly when connected to the computer through more than one USB hub. If the problem persists, try connecting the product directly to the computer.
☐ If more than one product is connected to your computer, it may not work. Connect only the product you want to use, and then try scanning again.
☐ If the scanning software does not work properly, uninstall the software first and then reinstall it as described in the paper manual.
→ "Uninstalling Your Software" on page 161
Using the Automatic Document Feeder (ADF)
☐ If the document cover or ADF cover is open, close it and try scanning again.
Troubleshooting for Scanning
☐ Make sure you have selected either Office Mode or Professional Mode in Epson Scan.
☐ Make sure your cables are securely connected to the product and a working electrical outlet.
Using the button
Note: Depending on the product, the scanning function may not be available when using the button.
☐ Check if you have assigned a program to the button.
→ "Starting Epson Event Manager" on page 92
☐ Make sure Epson Scan and Epson Event Manager are installed correctly.
☐ If you have clicked the Keep Blocking button in the Windows Security Alert window during or after installation of the Epson Software, unblock Epson Event Manager.
→ "How to unblock Epson Event Manager" on page 190
How to unblock Epson Event Manager
1 Click Start or the start button, and then point to Control Panel.
For Windows 8: Select Desktop, Settings charm, and Control Panel.
2 Do one of the following.
☐ Windows 8 and Windows 7: Select System and Security.
Windows Vista: Select Security.
Windows XP:
Select Security Center.
3 Do one of the following.
☐ Windows 8, Windows 7 and Windows Vista: Select Allow a program through Windows Firewall.
Windows XP:
Select Windows Firewall.
4 Do one of the following.
Windows 8 and Windows 7: Confirm that the check box for EEventManager Application is selected in the Allowed programs and features list.
Troubleshooting for Scanning
Windows Vista:
Click the Exceptions tab, and then confirm that the check box for EEventManager Application is selected in the Program or port list.
Windows XP:
Click the Exceptions tab, and then confirm that the check box for EEventManager Application is selected in the Programs and Services list.
5
Click OK.
Using scanning software other than Epson Scan driver
☐ If you are using any TWAIN-compliant programs, make sure that the correct product is selected as the Scanner or Source setting.
☐ If you cannot scan using any TWAIN-compliant scanning programs, uninstall the TWAIN-compliant scanning program and then reinstall it.
→ "Uninstalling Your Software" on page 161
Problems When Feeding Paper
The paper gets dirty
You may need to clean the product.
→ "Cleaning the Product" on page 156
Multiple sheets of paper are fed
☐ If you load unsupported paper, the product may feed more than one sheet of paper at a time.
→ "Automatic Document Feeder (ADF) specifications" on page 201
☐ You may need to clean the product.
→ "Cleaning the Product" on page 156
The paper jams in the Automatic Document Feeder (ADF)
Remove the jammed paper inside the ADF.
→ "Removing jammed paper from the Automatic Document Feeder (ADF)" on page 175
Problems With Scanning Time
Scanning at a high resolution takes a long time.
Troubleshooting for Scanning
Problems With Scanned Images
Scan quality is unsatisfactory
Scan quality can be improved by changing the current settings or adjusting the scanned image.
→ "Image Adjustment Features" on page 72
An image on the back of your original appears in your scanned image
If your original is printed on thin paper, images on the back may be visible to the product and appear in your scanned image. Try scanning the original with a piece of black paper placed on the back of it. Also make sure the Document Type and Image Type settings are correct for your original.
Characters are blurred
☐ In Office Mode or Home Mode, select the Text Enhancement check box.
☐ Adjust the Threshold setting.
Home Mode:
Select Black&White as the Image Type setting, click the Brightness button, and then try adjusting the Threshold setting.
Office Mode:
Select Black&White as the Image Type setting, and then try adjusting the Threshold setting.
Professional Mode:
Select Black & White as the Image Type setting.
☐ Increase the resolution setting.
Characters are not recognized correctly when converted into editable text (OCR)
Place the document so that it is straight on the scanner glass. If the document is skewed, it may not be recognized correctly.
Ripple patterns appear in your scanned image
A ripple or cross-hatch pattern (known as moiré) may appear in a scanned image of a printed document.

☐ When scanning your document using the scanner glass, try moving your document.
User's Guide
Troubleshooting for Scanning
☐ Select Descreening as the image quality setting.
☐ Change a resolution setting and scan again.
Uneven color, smears, dots, or straight lines appear in your image
You may need to clean the interior of the product.
→ "Cleaning the Product" on page 156
The scanning area or direction is unsatisfactory
The edges of your original are not scanned
☐ If you are scanning in Full Auto Mode, or using thumbnail preview in Home Mode or Professional Mode, move the document or photo 6 mm (0.2 inch) away from the horizontal and vertical edges of the scanner glass to avoid cropping.
☐ If you are scanning using the button or using normal preview in Office Mode, Home Mode, or Professional Mode, move the document or photo about 3 mm (0.12 inch) away from the horizontal and vertical edges of the scanner glass to avoid cropping.
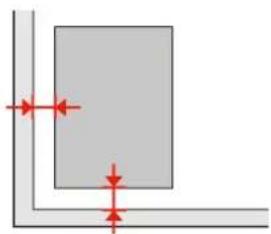
natural_image
Pure geometric diagram showing a rectangle with red arrows indicating direction, no text or symbols presentMultiple documents are scanned into a single file
Position documents at least 20 mm (0.8 inch) apart from each other on the scanner glass.
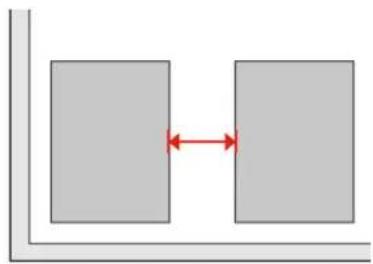
natural_image
Two gray rectangular blocks connected by a double-headed arrow, no text or symbols presentCannot scan the area you want
Depending on the documents, you may not be able to scan the area you want. Use normal preview in Office Mode, Home Mode, or Professional Mode and create marquees on the area you want to scan.
Cannot scan in the direction you want
Click Configuration, select the Preview tab, and then clear the Auto Photo Orientation check box. Then, place your documents correctly.
Troubleshooting for Scanning
Problems Remain After Trying All Solutions
If you have tried all the solutions and have not solved the problem, initialize the Epson Scan settings.
Click Configuration, select the Other tab, and then click Reset All.
Troubleshooting for Faxing
Cannot send and receive fax
☐ Make sure the phone cable is connected correctly and check that the phone line works. You can check the line status by using the Check Fax Connection function.
→ "Connecting to a Phone Line" on page 93
If the fax could not be sent, make sure that the recipient's fax machine is turned on and working.
☐ If this product is not connected to a phone and you want to receive faxes automatically, make sure you turn on auto answer.
→ "Receiving Faxes" on page 105
☐ If you connected the product to a DSL phone line, you must install a DSL filter on the line otherwise you cannot fax. Contact your DSL provider for the necessary filter.
☐ If you connected this product to a PBX (Private Branch Exchange) phone line or a Terminal Adapter, change the Line Type setting to PBX.
→ "Setting the line type" on page 96
If you still cannot send a fax, change the Dial Tone Detection setting to Off. However, doing so may drop the first digit of a fax number and send the fax to the wrong number.
→ "Setup Mode - Fax Settings" on page 129
☐ Transmission speed may be the cause of the problem. Lower the Fax speed setting. If sending a fax to a specific recipient in the Contacts list often fails, set a lower fax speed for that recipient in the Speed Dial Setup menu.
→ "Setup Mode - Fax Settings" on page 129
☐ Make sure that ECM is turned on. Color faxes cannot be sent and received when ECM is off.
→ "Setup Mode - Fax Settings" on page 129
☐ Try the following if you cannot send or receive faxes because the memory is full.
- If your product is set to save received faxes in the Inbox, delete received faxes you have already seen or printed from the Inbox.
- If your product is set to save received faxes on a computer or an external memory device, turn on the computer or connect the device to save the faxes to the computer or device.
- If an error occurs because of a paper jam or expended ink cartridges when receiving a fax, clear the error and ask the sender to send the fax again.
- Even if the memory is full, you can send a monochrome fax to a single recipient by enabling the Direct Send option.
- Send your documents in several batches.
Quality problems (sending)
☐ Clean the scanner glass and Automatic Document Feeder (ADF).
→ "Cleaning the exterior of the product" on page 156
☐ If the fax you sent was faint or not clear, change the Resolution or Contrast in the fax settings menu.
→ "Fax Mode" on page 118
Troubleshooting for Faxing
☐ Make sure that ECM is turned on.
→ "Setup Mode - Fax Settings" on page 129
Quality problems (receiving)
□ Make sure that ECM is turned on.
→ "Setup Mode - Fax Settings" on page 129
Answering machine cannot answer voice calls
☐ When auto answer is turned on and an answering machine is connected to the same phone line as this product, set the number of rings to answer for receiving faxes to a higher number than the number of rings for the answering machine.
→ "Receiving Faxes" on page 105
Incorrect time
☐ The clock may run fast/slow or may be reset after a power failure, or the power is left off for a long time. Set the correct time.
→ "Setting/Changing Time and Region" on page 152
Product Information
System Requirements
For Windows
| System | PC Interface |
| Windows 8 (32-bit, 64 bit), 7 (32-bit, 64-bit), Vista (32-bit, 64-bit), XP SP1 or higher (32-bit), or XP Professional x64 Edition | Hi-Speed USB |
For Mac OS X
| System | PC Interface |
| Mac OS X 10.5.8, 10.6.x, 10.7.x, 10.8.x | Hi-Speed USB |
Note:
The UNIX File System (UFS) for Mac OS X is not supported.
Technical Specifications
Note:
Specifications are subject to change without notice.
Printer specifications
| Paper path | Paper cassette 1 and 2, front entryRear paper feed slot*1, top entry |
| Capacity | 6.0 mm for cassette 1 and 11.0 mm for cassette 20.05 mm to 0.6 mm for rear paper feed slot*1*2 |
*1 The rear paper feed slot is not available for the XP-610 Series.
*2 Some hard paper may not be fed correctly, even if the thickness is within the specified range.
Product Information
Paper
Note:
☐ Since the quality of any particular brand or type of paper may be changed by the manufacturer at any time, Epson cannot attest to the quality of any non-Epson brand or type of paper. Always test samples of paper stock before purchasing large quantities or printing large jobs.
☐ Poor quality paper may reduce print quality and cause paper jams or other problems. If you encounter problems, switch to a higher grade of paper.
If all the conditions below are met, pre-punched paper with binding holes can be used for this product:
| Paper source | Rear paper feed slot |
| Hole position | Both sides are available. |
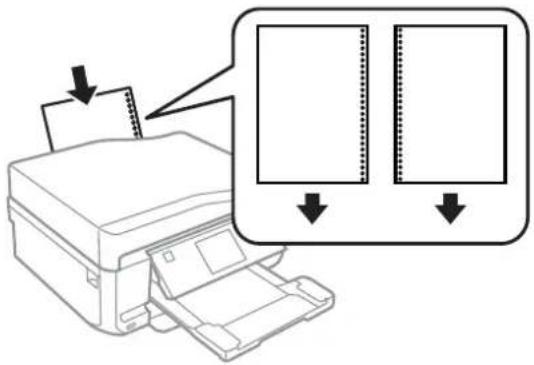
Note:
Adjust the size of your file to avoid printing over the binder holes.
Single sheets:
| Size | A4 210 × 297 mm10 × 15 cm (4 × 6 in.)13 × 18 cm (5 × 7 in.)A6 105 × 148 mmA5 148 × 210 mmB5 182 × 257 mm9 × 13 cm (3.5 × 5 in.)13 × 20 cm (5 × 8 in.)20 × 25 cm (8 × 10 in.)16:9 wide size (102 × 181 mm)100 × 148 mmLetter 8 1/2 × 11 in.Legal 8 1/2 × 14 in. |
| Paper types | Plain paper or special paper distributed by Epson |
Product Information
| Thickness(for plain paper) | 0.08 to 0.11 mm (0.003 to 0.004 in.) |
| Weight(for plain paper) | 64 g/m2(17 lb) to 90 g/m2(24 lb) |
Envelopes:
| Size | Envelope #10 4 1/8 × 9 1/2 in.Envelope DL 110 × 220 mmEnvelope C6 114 × 162 mm |
| Paper types | Plain paper |
| Weight | 75 g/m ^2 (20 lb) to 90 g/m ^2 (24 lb) |
Printable area
Highlighted portions show printable area.
Single sheets:
| Normal | Borderless |
 |  |
Product Information
Envelopes:
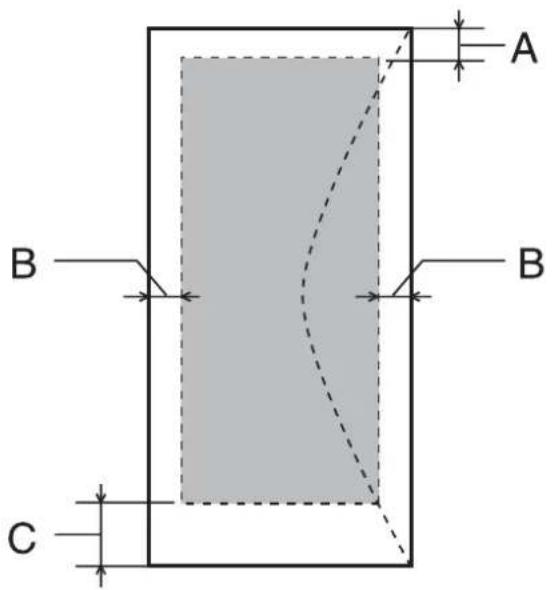
| Minimum margin | ||
| Media type | Single sheets | Envelopes |
| A | 3.0 mm (0.12 in.) | 3.0 mm (0.12 in.) |
| B | 3.0 mm (0.12 in.) | 5.0 mm (0.20 in.) |
| C | 3.0 mm (0.12 in.) | 21.0 mm (0.83 in.) |
Note:
Depending on the type of paper, print quality may decline in the top and bottom areas of the print, or the area may be smeared.
CD/DVD:
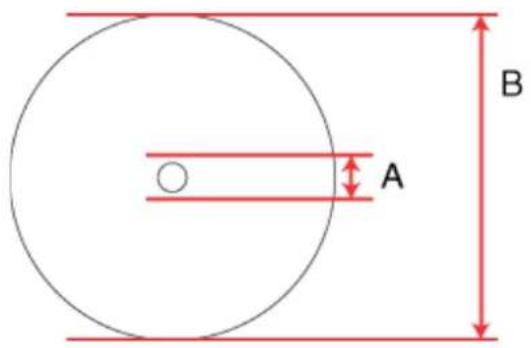
A: 18 ~mm
B: 120 mm
Product Information
Note: If you are printing in the following areas of the disc, the disc or the CD/DVD tray may get stained with ink.
| Inner hub area | 18 to 42 mm |
| Outer periphery area | 117 to 120 mm (12-cm CD/DVD) |
Scanner specifications
| XP-610 Series | XP-710 Series | XP-810 Series | |
| Scanner type | Flatbed color | ||
| Photoelectric device | CIS | ||
| Document size | 216 × 297 mm (8.5 × 11.7 inches) A4 or US letter size | ||
| Scanning resolution | 1200 dpi (main scan)2400 dpi (sub scan) | 2400 dpi (main scan)4800 dpi (sub scan) | 4800 dpi (main scan)4800 dpi (sub scan) |
| Output resolution | 50 to 4800, 7200, and 9600 dpi(50 to 4800 dpi in 1 dpi increments) | ||
| Image data | 16 bits per pixel per color internal8 bits per pixel per color external (maximum) | ||
| Light source | LED | ||
Automatic Document Feeder (ADF) specifications
This option is available only with the XP-810 Series.
| Paper input | Face-up loading |
| Paper output | Face-down ejection |
| Paper size | A4, Letter, Legal* |
| Paper types | Plain paper |
| Paper weight | 64 to 95 g/m2 |
| Paper capacity | Total thickness of 3 mm, up to about 30 sheets (Letter, A4) 10 sheets (Legal) |
* When you scan a 2-sided document using the ADF, the legal size paper is not available.
Fax specifications
This option is available only with the XP-810 Series.
| Fax type | Walk-up black and white and color fax capability (ITU-T Super Group 3) |
Product Information
| Support line | Standard analogue telephone line, PBX (Private Branch Exchange) telephone system |
| Speed | Up to 33.6 kbps |
| Resolution | MonochromeStandard: 200 × 100 dpiFine: 200 × 200 dpiPhoto: 200 × 200 dpiColorFine: 200 × 200 dpiPhoto: 200 × 200 dpi |
| Speed dial numbers | Up to 60 |
| Page memory | Up to 180 pages (ITU-T No.1 chart) |
| Redial* | 2 times (with 1 minute interval) |
| Interface | RJ-11 Phone LineRJ-11 Telephone set connection |
* The specification may differ by country or region.
Network interface specification
| Wi-Fi | Standard: | IEEE 802.11b/g/n*1 |
| Security: | WEP (64/128bit)WPA-PSK (TKIP/AES)*2 | |
| Frequency Band: | 2.4 GHz | |
| Communication Mode: | Infrastructure,Ad hocWi-Fi Direct*3 | |
| Ethernet*4 | Standard: | IEEE802.3i/u, IEEE802.3az*5 |
| Communication Mode: | Ethernet 100BASE-TX/10BASE-T |
*1 Complies with either IEEE 802.11b/g/n or IEEE 802.11b/g depending on location of purchase.
*2 Complies with WPA2 with support for WPA/WPA2 Personal.
*3 For the XP-810 Series, you can use Wi-Fi Direct Simple AP mode even if you connect the product to an Ethernet network.
*4 XP-610 Series/XP-710 Series are not supported.
*5 The connected device should comply with IEEE802.3az.
Memory card
Note:
The availability of this feature varies by product.
Product Information
| Compatible memory cards | Memory Stick DuoMemory Stick PRO DuoMemory Stick PRO-HG DuoMemory Stick Micro*MagicGate Memory Stick DuoSDXCSDHCSDminiSDHC*miniSD*microSDXC*microSDHC*microSD* |
| Media format DCF | DCF (Design rule for Camera File system) version 1.0 or 2.0 compliant.All card types standard version compliant. |
| Voltage Requirements | 3.3 v |
* Adapter required.
Photo data specifications
| File format | JPEG with the Exif Version 2.3 standard |
| Image size | 80 × 80 pixels to 10200 × 10200 pixels |
| Number of files | Up to 9990 |
Mechanical
XP-610 Series
| Dimensions | Storage (Without protruding parts)Width: 390 mm (15.4 inches)Depth: 338 mm (13.3 inches)Height: 138 mm (5.4 inches) |
| Storage (Including protruding parts*1)Width: 390 mm (15.4 inches)Depth: 341 mm (13.4 inches)Height: 138 mm (5.4 inches) | |
| Printing*3Width: 390 mm (15.4 inches)Depth: 504 mm (19.8 inches)Height: 138 mm (5.4 inches) |
Product Information
| Weight | Approx. 6.7 kg (14.8 lb) without the ink cartridges, the power cord, and the CD/DVD tray. |
*1 See the following illustration for details.
*3 With the output tray extension extended.
XP-710 Series
| Dimensions | Storage (Without protruding parts)Width: 390 mm (15.4 inches)Depth: 338 mm (13.3 inches)Height: 138 mm (5.4 inches) |
| Storage (Including protruding parts*1*2)Width: 390 mm (15.4 inches)Depth: 341 mm (13.4 inches)Height: 141 mm (5.6 inches) | |
| Printing*3Width: 390 mm (15.4 inches)Depth: 598 mm (23.5 inches)Height: 196 mm (7.7 inches) | |
| Weight | Approx. 6.9 kg (15.2 lb) without the ink cartridges, the power cord, and the CD/DVD tray. |
*1*2 See the following illustration for details.
*3 With the output tray extension extended.
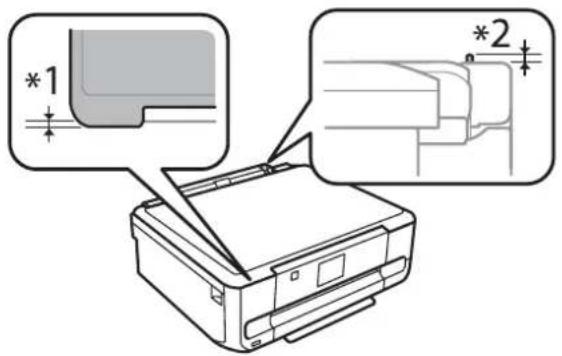
XP-810 Series
| Dimensions | StorageWidth: 390 mm (15.4 inches)Depth: 339 mm (13.3 inches)Height: 191 mm (7.5 inches) |
| Printing*Width: 438 mm (17.2 inches)Depth: 598 mm (23.5 inches)Height: 207 mm (8.1 inches) |
Product Information
| Weight | Approx. 8.2 kg (18.1 lb) without the ink cartridges, the power cord, and the CD/DVD tray. |
* With the output tray extension extended.
Electrical
XP-610 Series
| 100-120 V Model | 220-240 V Model | ||
| Input voltage range | 90 to 132 V | 198 to 264 V | |
| Rated frequency range | 50 to 60 Hz | 50 to 60 Hz | |
| Input frequency range | 49.5 to 60.5 Hz | 49.5 to 60.5 Hz | |
| Rated current | 0.7 A | 0.35 A | |
| Power consumption | Standalone copying | Approx. 18 W (ISO/IEC24712) | Approx. 18 W (ISO/IEC24712) |
| Ready mode | Approx. 6.0 W | Approx. 6.0 W | |
| Sleep mode | Approx. 1.7 W | Approx. 1.7 W | |
| Power off | Approx. 0.2 W | Approx. 0.4 W | |
XP-710 Series
| 100-120 V Model | 220-240 V Model | ||
| Input voltage range | 90 to 132 V | 198 to 264 V | |
| Rated frequency range | 50 to 60 Hz | 50 to 60 Hz | |
| Input frequency range | 49.5 to 60.5 Hz | 49.5 to 60.5 Hz | |
| Rated current | 0.7 A | 0.35 A | |
| Power consumption | Standalone copying | Approx. 19 W (ISO/IEC24712) | Approx. 19 W (ISO/IEC24712) |
| Ready mode | Approx. 6.5 W | Approx. 6.5 W | |
| Sleep mode | Approx. 1.7 W | Approx. 1.7 W | |
| Power off | Approx. 0.2 W | Approx. 0.4 W | |
XP-810 Series
| 100-120 V Model | 220-240 V Model | |
| Input voltage range | 90 to 132 V | 198 to 264 V |
| Rated frequency range | 50 to 60 Hz | 50 to 60 Hz |
| Input frequency range | 49.5 to 60.5 Hz | 49.5 to 60.5 Hz |
| Rated current | 0.7 A | 0.35 A |
Product Information
| Power consumption | Standalone copying | Approx. 19 W (ISO/IEC24712) | Approx. 19 W (ISO/IEC24712) |
| Ready mode | Approx. 7.0 W | Approx. 7.0 W | |
| Sleep mode | Approx. 2.0 W | Approx. 2.0 W | |
| Power off | Approx. 0.2 W | Approx. 0.4 W |
Note:
☐ Check the label on the back of the product for its voltage.
☐ For users in Belgium, power consumption when copying may vary. Check http://www.epson.be for the latest specifications.
Environmental
| Temperature | Operation:10 to 35 °C (50 to 95 °F)Storage:-20 to 40 °C (-4 to 104 °F)1 month at 40 °C (104 °F) |
| Humidity | Operation:*20 to 80% RHStorage:*5 to 85% RH |
* Without condensation
Standards and approvals
U.S. model:
| Safety | UL60950-1CAN/CSA-C22.2 No.60950-1 |
| EMC | FCC Part 15 Subpart B Class BCAN/CSA-CEI/IEC CISPR 22 Class B |
This equipment contains the following wireless module.
Manufacture: Askey Computer Corporation
Type: WLU6117-D69 (RoHS)
This product conforms to Part 15 of the FCC Rules and RSS-210 of the IC Rules. Epson cannot accept responsibility for any failure to satisfy the protection requirements resulting from a non-recommended modification of the product. Operation is subject to the following two conditions: (1) this device may not cause harmful interference, and (2) this device must accept any interference received, including interference that may cause undesired operation of the device.
To prevent radio interference to the licensed service, this device is intended to be operated indoors and away from windows to provide maximum shielding. Equipment (or its transmit antenna) that is installed outdoors is subject to licensing.
Product Information
European model:
| Low voltage directive 2006/95/EC | EN60950-1 |
| EMC directive 2004/108/EC | EN55022 Class BEN61000-3-2EN61000-3-3EN55024 |
| R&TTE directive 1999/5/EC | EN300 328EN301 489-1EN301 489-17TBR21*EN60950-1 |
* This only applies to the XP-810 Series.
For European users:
We, Seiko Epson Corporation, hereby declare that the equipment Models, C492B, C491D, C491E are in compliance with the essential requirements and other relevant provisions of Directive 1999/5/EC.
For use only in Ireland, UK, Austria, Germany, Liechtenstein, Switzerland, France, Belgium, Luxembourg, Netherlands, Italy, Portugal, Spain, Denmark, Finland, Norway, Sweden, Iceland, Cyprus, Greece, Slovenia, Malta, Bulgaria, Czech, Estonia, Hungary, Latvia, Lithuania, Poland, Romania, and Slovakia.
Epson can not accept responsibility for any failure to satisfy the protection requirements resulting a non-recommended modification of the products.
CE
Australian model:
| EMC | AS/NZS CISPR22 Class B |
Epson hereby declares that the equipment Models, C492B, C491D, C491E are in compliance with the essential requirements and other relevant provisions of AS/NZS4268. Epson cannot accept responsibility for any failure to satisfy the protection requirements resulting from a non-recommended modification of the product.
Interface
| Hi-Speed USB (Device Class for computers) |
| Hi-Speed USB (for PictBridge compliant devices/Mass storage class for external storage)* |
* Epson cannot guarantee the operation of externally connected devices.
External USB device
| Devices | The maximum capacities |
Product Information
| CD-R drive*, DVD-R drive*, Blu-ray drive* | CD-ROM / CD-R: 700MBDVD-ROM / DVD-R: 4.7GB(CD-RW, DVD-RW, DVD+R, DVD+RW and Blu-ray DiscTM are not supported.) |
| MO drive* | 1.3GB |
| Hard disk drive*USB Flash drive | 2TBFormatted in FAT, FAT32, or exFAT |
* External storage devices that are powered via USB are not recommended. Use only external storage devices with independent AC power sources.
| Photo data file format | DCF (Design rule for Camera File system) version 1.0 or 2.0* compliant.* Photo data stored in digital cameras with built-in memory are not supported.JPEG with the Exif Version 2.3 standard. |
Where To Get Help
Technical Support Web Site
Epson's Technical Support Web Site provides help with problems that cannot be solved using the troubleshooting information in your product documentation. If you have a Web browser and can connect to the Internet, access the site at:
http://support.epson.net/
http://www.epson.eu/Support (Europe)
If you need the latest drivers, FAQs, manuals, or other downloadables, access the site at:
http://www.epson.com
http://www.epson.eu/Support (Europe)
Then, select the support section of your local Epson Web site.
Contacting Epson Support
Before Contacting Epson
If your Epson product is not operating properly and you cannot solve the problem using the troubleshooting information in your product documentation, contact Epson support services for assistance. If Epson support for your area is not listed below, contact the dealer where you purchased your product.
Epson support will be able to help you much more quickly if you give them the following information:
☐ Product serial number
(The serial number label is usually on the back of the product.)
Product model
☐ Product software version
(Click About, Version Info, or similar button in the product software.)
☐ Brand and model of your computer
☐ Your computer operating system name and version
□ Names and versions of the software applications you normally use with your product
Note:
Depending on the product, the dial list data for fax and/or network settings may be stored in the product's memory. Due to breakdown or repair of a product, data and/or settings may be lost. Epson shall not be responsible for the loss of any data, for backing up or recovering data and/or settings even during a warranty period. We recommend that you make your own backup data or take notes.
Help for Users in Europe
Check your Pan-European Warranty Document for information on how to contact Epson support.
Help for Users in Australia
Epson Australia wishes to provide you with a high level of customer service. In addition to your product documentation, we provide the following sources for obtaining information:
Your Dealer
Don't forget that your dealer can often help identify and resolve problems. The dealer should always be the first call for advise on problems; they can often solve problems quickly and easily as well as give advise on the next step to take.
Internet URL http://www.epson.com.au
Access the Epson Australia World Wide Web pages. Worth taking your modem here for the occasional surf! The site provides a download area for drivers, Epson contact points, new product information and technical support (e-mail).
Epson Helpdesk
Epson Helpdesk is provided as a final backup to make sure our clients have access to advice. Operators on the Helpdesk can aid you in installing, configuring and operating your Epson product. Our Pre-sales Helpdesk staff can provide literature on new Epson products and advise where the nearest dealer or service agent is located. Many types of queries are answered here.
The Helpdesk numbers are:
Phone: 1300 361 054
Fax: (02) 8899 3789
We encourage you to have all the relevant information on hand when you ring. The more information you prepare, the faster we can help solve the problem. This information includes your Epson product documentation, type of computer, operating system, application programs, and any information you feel is required.
Index
2
20-up....120, 122
2-Sided....87
2-Sided Copying....45, 113, 114
2-Sided Faxing....118
2-sided printing....62
2-Sided Scanning....117
2-up....120, 122
2-up Copy....42, 46, 113, 114
4
4-up....120, 122
8
8-up....120, 122
A
Aligning print head....150
All Functions....126
Auto Answer....94, 105
Auto Selection Mode....126
Automatic Document Feeder (ADF)....39
paper jams in....191
problems....191
B
Banding....179
Basic Setup....125
Beep....125, 127
Bidirectional print photos....115, 116
Binding Direction
copy....113
scan....117
Binding Margin....113, 114
Blank pages....182
Blurry prints....180
Borderless print photos....115, 116
Broadcast Fax....102
Button problems....190
Buttons control panel....19
C
Cancel Photo Selection print photos....114, 115
Canceling printing....57
Mac OS X....58
Windows....57
CD/DVD
inserting....36
printable area....200
Check Fax Connection....97
Cleaning print head....148
Clock....152
Color problems....180
Color Restoration more functions....121
Coloring Book....109, 121, 123
Contact List....119
Contacting Epson....209
Contrast fax....118 scan....117
Control panel....19
Copy to CD/DVD....109, 120, 122
Copy/Restore Photos....109, 119, 121
Copying 2-sided.....45 basic.....45 layout.....46
Copyright....2
Crop/Zoom more functions....119, 120, 121, 122, 123 print photos....115, 116
D
Date print photos....115, 116
Date/Time....152
Daylight Saving Time....152
Disable Wi-Fi....124
Display Mode more functions....121, 122, 123 print photos....115
Document....117
Document Alert....126
Document Orientation copy....113, 114 scan....117
Document Type copy....113, 114 more functions....120
Documents printing....53
Double Sided Copy....45, 113, 114
Driver....91 accessing for Mac OS X....53 accessing for Windows....52 uninstalling....161
Dry Time copy....113, 114
Index
DSL....95
DVD printable area....200
E
Easy Photo Print....59
Edit Photos print photos....115
Enlarge....113, 114
Enlarging pages....64
Envelope loading....27,34
Envelopes printable area....200
Epson Easy Photo Print....59 paper....23
Epson Connect....9
Epson Connect Services....125, 128
Error messages....167
Errors fax....195 print....169 scan....189
Expansion copy....113, 114 print photos....115, 116
External Device Setup....126, 128
F
Fax from a connected phone....104
Fax header....99
Fax information service....107
Fax Log....119
Fax Report....108, 119
Fax scheduled transmission....103
Fax Settings....126
Faxing receiving....105 sending....101
Faxing to multiple recipients....102
File Sharing Setup....126, 128
Fit Frame print photos....115, 116
Fit to page printing....64
Frame more functions....120, 122
Full Auto Mode....75
G
Google Cloud Print Services....126, 128
Greeting Card....109, 120
Group Dial....98,102
Group Dial List....119
Guide Functions....126, 128
H
Head cleaning control panel....150
Mac OS X....149
Windows....149
Header....99
Help control panel....131
Epson....209
Epson Scan....91
Home Mode....77
Home NW Print Settings....126
Horizontal banding....179
|
Image Adjustment....72
Incorrect characters....181
Initialize....194
Ink BK printing....139
BK printing in Mac....140
BK printing in Windows....139
checking ink cartridge status in Mac OS X....137
checking ink cartridge status in Windows....136
checking ink cartridge status using the control panel.....138
precaution....134
saving black ink in Windows....142
temporarily printing with black ink....139
Ink cartridges replacing when expended....142
Ink Levels....124, 127
Interface cables....207
ISDN....95
J
Jewel Index....120, 122
Jewel Upper....120, 122
L
Last Transmission....119
Layout copy....113, 114
more functions....120, 122
Layout Method....122
Light status lights....189
Lights control panel....19 flashing....186
Loading paper....23, 27, 34
Lower 1/2....120, 122
Index
M
Mac OS X
accessing printer settings....53
checking product status....170
Maintenance....125, 127
Managing print jobs
Windows....169
Manual Wi-Fi/Network Setup....125, 128
Margins
problems....181
Marquee....84
Memory card
inserting....38
Memory cards
data specifications....202
supported types....202
Mirror image....182
Misalignment....179
More Functions....109
Multiple pages per sheet....65
N
Network service settings....155
Nozzle check....147
control panel....148
Mac OS X....147
Windows....147
0
Office Mode....79
P
P.I.F....120,122
Pages per sheet printing....65
Paper
Epson special paper....23
feeding problems....184
jams....172
loading....27,34
loading capacity....23, 27, 34
printable area....199
specifications....198
wrinkling....185
Paper and Copy settings
more functions....119, 121
Paper cassette....27
Paper jam....191
Paper Size
copy....113, 114
more functions....120, 122
print photos....115, 116
Paper Size Alert....126, 128
Paper Source
copy....113, 114
print photos....115, 116
Paper Type
copy....113, 114
more functions....120, 122
print photos....115, 116
PDF 87
Photo
software....59
Photo Adjustments
more functions....119, 120, 121, 122, 123
print photos....115, 116
setup....126, 128
Photo ID....120, 122
Photo Layout Sheet....109, 120, 122
PIN Code Setup (WPS)....124
Polling....107
Power Off Timer....125, 127
Previewing....83
Print head
aligning....150
checking....147
cleaning....148
Print Info. On Photos
print photos....115, 116
Print Layout
more functions....121
Print on CD/DVD....109, 121, 123
Print Photo Greeting Card....122
Print quality
improving....178
Print Settings
more functions....120, 121, 122, 123
print photos....115, 116
setup....126, 128
Print speed
increasing....183, 187
Printable area specifications....199
Printer Setup....125, 127
Printing
2-sided....62
borderless....53
canceling....57
digital camera....49
document....53
envelope....53
fit to page....64
multiple pages per sheet....65
photo....53
preset....61
printing from....49
shortcut....61
text....53
Problems
banding....179
blank pages....182
blurry prints....180
contacting Epson....209
diagnosing....169
fax....195
incorrect characters....181
incorrect colors....180
margins....181
mirror image....182
paper feeding....184
paper jams....172
Index
print....169
print speed....183
product does not print....185
scan....189
smeared prints....180, 183
solving....209
Product
checking status....169
cleaning....156
parts....16
transporting....158
Product settings
accessing for Mac OS X....53
accessing for Windows....52
Power Off Timer....153
Sleep Timer....153
Professional Mode....81
Protocol Trace....119
Push Button Setup (WPS)....124
Q
Quality
copy....113, 114
more functions....120
print photos....115, 116
R
Rear Paper Feed Slot....34
Redial....101
Reduce....113, 114
Reducing page size....64
Replacing ink cartridges....142
Resizing pages....64
Resolution
fax....118
scan....117
Restore Default Settings....127, 128
Restrictions on copying....13
Rings to Answer....105
S
Saving energy....153
Scan Area....117
Scan quality problems....192
Scan to Cloud....117, 118
Scan to Memory Card....117
Scan to PC....117, 118
Scan to PC (Email)....117, 118
Scan to PC (PDF)....117, 118
Scan to PC (WSD)....117, 118
Scan to USB Device....117
Scanner glass....42
Scanning software
bundle software....92
Screen Saver....125, 127
Select All Photos
print photos....114, 115
Select Folder print photos....114
Select Group print photos....114
Select Location more functions....120, 121 print photos....114
Select Photos more functions....120 print photos....114, 115
Send Fax Later....103
Service....209
Sharing printer Mac OS X....69 Windows....66
Sleep Timer....125, 127
Smeared prints....180, 183
Software uninstalling....161
Sound....125, 127
Specifications automatic document feeder....201 external USB device....207 fax....201 mechanical....203 memory card....202 paper....198 printer....197 scanner....201 standards and approvals....206
Speed increasing....183, 187
Speed Dial....97,102
Speed Dial List....119
Status lights....189
Status Monitor Mac OS X....170
Sticker 16-up....120, 122
System requirements....197
T
Technical support....209
Thick Paper....125, 127
Trademarks....2
Transporting product....158
U
Upper 1/2....120, 122
USB connector....207
V
Various printing....109
W
Web service....9
Index
Wi-Fi Auto Connect....124
Wi-Fi Setup....125, 128
Wi-Fi Setup Wizard....124
Wi-Fi Status....124
Wi-Fi/Network Connection Check....125, 128
Wi-Fi/Network Settings....125, 128
Wi-Fi/Network Status....124, 125
Windows
accessing printer settings....52
checking product status....169
managing print jobs....169

- User's Guide
- Copyright and Trademarks
- Contents
- Introduction
- Important Instructions
- Getting to Know Your Product
- Paper and Media Handling
- Copying
- Printing
- Scanning
- Faxing
- More Functions
- Menu List of Control Panel
- Ink Cartridge Information
- Replacing Ink Cartridges
- Maintaining Your Product and Software
- Transferring Data Using an External Storage Device
- Error Indicators
- Troubleshooting for Printing/Copying
- Troubleshooting for Scanning
- Troubleshooting for Faxing
- Product Information
- Where To Get Help
- Index
- Where to Find Information
- Caution, Important and Note
- Caution
- Important
- Note
- Operating System Versions
- Using Epson Connect Service
- Note:
- Safety Instructions
- Product Advisories and Warnings
- Setting up/using the product
- Using the product with a wireless connection
- Using memory cards
- Using the touchscreen and touchpad
- Handling ink cartridges
- Restrictions on Copying
- Responsible use of copyrighted materials:
- Protecting Your Personal Information
- Available features for your product
- Product Parts
- Notes regarding the control panel and the output tray
- Guide to the Control Panel
- Using the LCD screen
- About Auto Selection Mode
- Lights
- Introduction to Using, Loading, and Storing Media
- Storing paper
- Selecting Paper
- Paper type settings on the LCD screen
- Paper type settings from the printer driver
- Loading Paper
- Into the paper cassette
- Into the paper cassette 1
- Open the front cover.
- Pull out the paper cassette.
- 3
- 4
- 5
- 6
- 7
- Into the paper cassette 2
- 1
- 2
- Loading a legal paper or longer than A4 size paper
- Into the rear paper feed slot
- Loading a CD/DVD
- Important:
- Removing a CD/DVD
- Inserting a Memory Card
- Open the cover, and insert a memory card.
- Check the light stays on.
- Placing Originals
- Automatic Document Feeder (ADF)
- Scanner glass
- Placing a CD
- Placing photos
- Placing a book
- Copying Documents
- Basic copying
- 2-Sided copying
- Layout copying
- Copy Mode Menu List
- Basic Operation from the Control Panel
- Printing photos (XP-710 Series/XP-810 Series)
- Printing photos (XP-610 Series)
- Printing photos from a digital camera
- Printing using a USB connection
- Printing using a wireless connection
- Print photos mode menu list
- Basic Operation from Your Computer
- Printer driver and status monitor
- Note for Windows users:
- Accessing the printer driver for Windows
- From Windows applications
- From the desktop
- From the shortcut icon on the taskbar
- Getting information through online help
- Accessing the printer driver for Mac OS X
- Basic Printing
- Basic product settings for Windows
- 8
- 9
- 10
- Basic product settings for Mac OS X
- Canceling Printing
- Using the control panel
- For Windows
- Using the progress meter
- Using EPSON Status Monitor 3
- For Mac OS X
- Other Options
- Printing photos the easy way
- Starting Epson Easy Photo Print
- Printing on CD/DVD
- Notice for CD/DVD printing
- Starting Epson Print CD
- Printing on a CD/DVD with a commercially available software package
- Product presets (for Windows only)
- Product settings for Windows
- Access the printer settings.
- Select a Printing Presets in the Shortcuts tab. Product settings are automatically set to the values displayed in the pop-up window.
- 2-sided printing
- For Windows users:
- For Mac OS X users:
- Note for Windows:
- Note for Mac OS X:
- Product settings for Mac OS X
- Fit to page printing
- Pages per sheet printing
- Sharing the Product for Printing
- Setup for Windows
- Setting up the product as a shared printer
- Windows 8:
- Windows 7:
- Windows Vista:
- Windows XP:
- Windows 8 and 7:
- Adding the product to the other network computers
- Windows 8:
- Windows 8, 7 and Vista:
- Windows 8:
- Windows 7 and Vista:
- Setup for Mac OS X
- Let's Try Scanning
- Starting a Scan
- Image Adjustment Features
- Basic Scanning from the Control Panel
- Place your original(s).
- Enter Scan mode from the Home menu.
- Select a scan menu item.
- If you select Scan to Memory Card, you can make scanning settings.
- Press ◊ to start scanning.
- Scan mode menu list
- Basic Scanning from Your Computer
- Scanning in Full Auto Mode
- Scanning in Home Mode
- Scanning in Office Mode
- Scanning in Professional Mode
- Previewing and Adjusting the Scan Area
- Selecting a preview mode
- Creating a marquee
- Adjusting a marquee
- Various Types of Scanning
- Scanning a Magazine
- Scanning Multiple Documents to a PDF File
- Click Preview.
- Note for the Automatic Document Feeder (ADF):
- Scanning a Photo
- Software Information
- Starting Epson Scan Driver
- How to start
- How to access the help
- Starting Epson Event Manager
- Introducing FAX Utility
- Windows
- Mac OS X
- Connecting to a Phone Line
- About a phone cable
- Using the phone line for fax only
- Connect a phone cable leading from a telephone wall jack to the LINE port.
- Make sure Auto Answer is set to On. → "Setting up to receive faxes automatically" on page 105
- Sharing line with phone device
- Remove the cap.
- Connecting to DSL
- Connecting to ISDN (one phone number)
- Connecting to ISDN (two phone numbers)
- Setting the line type
- Checking the fax connection
- Setting Up Fax Features
- Setting up speed dial entries
- Setting up group dial entries
- Creating header information
- Changing the received fax output settings
- Save to Inbox
- □ Save to Computer
- □ Save to External Device
- Sending Faxes
- Sending faxes by entering a number
- Sending faxes using speed dial/group dial
- Sending faxes by broadcasting
- Select Broadcast Fax.
- Select Add New.
- Select Enter Fax Number.
- Enter a fax number, and then select Done.
- Select Add New.
- Select Select from Contacts.
- Select the entry number.
- Select Done.
- Select Done.
- Press ◇ to start sending.
- Sending a fax at a specified time
- Place your original in the Automatic Document Feeder or on the scanner glass.
- Enter Fax mode from the Home menu.
- Sending a fax from a connected phone
- Receiving Faxes
- Setting up to receive faxes automatically
- Receiving faxes manually
- Viewing received faxes on the LCD screen
- Receive a fax by polling
- Printing Reports
- Fax Mode Menu List
- Printing origami envelopes
- More Functions mode menu list
- Copy Mode
- Print Photos Mode
- Scan Mode
- Fax Mode
- More Functions Mode
- Wi-Fi Setup Mode
- Setup Mode
- Setup Mode - Fax Settings
- Help Mode
- Ink Cartridge Safety Instructions, Precautions, and Specifications
- Precautions on ink cartridge replacement
- Ink Cartridge Specifications
- Checking the Ink Cartridge Status
- Temporary Printing with Black Ink When Color Ink Cartridges or a Photo Black Ink Cartridge are Expended
- Conserving Black Ink When the Cartridge is Low (For Windows Only)
- Replacing an ink cartridge
- Checking the Print Head Nozzles
- Using the Nozzle Check utility for Windows
- Using the Nozzle Check utility for Mac OS X
- Cleaning the Print Head
- Note only for products with fax function:
- Note only for products without fax function:
- Using the Head Cleaning utility for Windows
- Using the Head Cleaning utility for Mac OS X
- Aligning the Print Head
- Using the Print Head Alignment utility for Windows
- Using the Print Head Alignment utility for Mac OS X
- Setting/Changing Time and Region
- Saving Power
- Quieter Printer Operations
- Making Network Service Settings
- EPSON
- Cleaning the Product
- Cleaning the exterior of the product
- Cleaning the interior of the product
- Caution:
- Transporting the Product
- Checking and Installing Your Software
- Checking the software installed on your computer
- Installing the software
- Uninstalling Your Software
- Precautions on Storage Devices
- Copying Files Between a Storage Device and Your Computer
- Copying files to your computer
- Saving files to a storage device
- Mac OS X:
- Error Messages on the Control Panel
- Diagnosing the Problem
- Checking product status
- Current Status:
- □ Ink Levels:
- Information:
- □ Technical Support:
- Print Queue:
- Paper Jams
- Removing jammed paper from the rear cover
- Removing jammed paper from inside the product
- Removing jammed paper from the paper cassette
- Removing jammed paper from the Automatic Document Feeder (ADF)
- Preventing paper jams
- Reprinting after a paper jam (for Windows only)
- Print Quality Help
- Horizontal banding
- Vertical banding or misalignment
- Incorrect or missing colors
- Blurry or smeared print
- Miscellaneous Printout Problems
- Incorrect or garbled characters
- Incorrect margins
- Printout has a slight slant
- Size or position of copied image is incorrect
- Inverted image
- Paper or CD/DVD only prints halfway or is blank
- Printed side is smeared or scuffed
- Printing is too slow
- Paper Does Not Feed Correctly or the CD/DVD Tray is Not Inserted Correctly
- Paper does not feed
- Multiple pages feed
- Paper is improperly loaded
- Paper is not ejected fully or is wrinkled
- The CD/DVD tray is ejected or not inserted correctly when sending a CD/DVD print job
- The Product Does Not Print
- All lights are off
- Lights came on and then went out
- Only the power light is on
- An ink error is indicated after you replace the cartridge
- Open the scanner unit.
- Make sure the ink cartridge holder is at the ink cartridge replacement position.
- Increasing the Print Speed (For Windows Only)
- Problems Indicated by Messages on the LCD screen or Status Light
- Problems When Starting a Scan
- Using the Automatic Document Feeder (ADF)
- Using the button
- How to unblock Epson Event Manager
- Using scanning software other than Epson Scan driver
- Problems When Feeding Paper
- The paper gets dirty
- Multiple sheets of paper are fed
- The paper jams in the Automatic Document Feeder (ADF)
- Problems With Scanning Time
- Problems With Scanned Images
- Scan quality is unsatisfactory
- An image on the back of your original appears in your scanned image
- Characters are blurred
- Characters are not recognized correctly when converted into editable text (OCR)
- Ripple patterns appear in your scanned image
- Uneven color, smears, dots, or straight lines appear in your image
- The scanning area or direction is unsatisfactory
- The edges of your original are not scanned
- Multiple documents are scanned into a single file
- Cannot scan the area you want
- Cannot scan in the direction you want
- Problems Remain After Trying All Solutions
- Cannot send and receive fax
- Quality problems (sending)
- Quality problems (receiving)
- Answering machine cannot answer voice calls
- Incorrect time
- System Requirements
- Technical Specifications
- Paper
- Printable area
- Automatic Document Feeder (ADF) specifications
- Fax specifications
- Network interface specification
- Memory card
- Photo data specifications
- Mechanical
- Electrical
- Environmental
- Standards and approvals
- For European users:
- Interface
- External USB device
- Technical Support Web Site
- Contacting Epson Support
- Before Contacting Epson
- Help for Users in Europe
- Help for Users in Australia
- Your Dealer
- Internet URL http://www.epson.com.au
- Epson Helpdesk
- A
- B
- C
- D
- E
- F
- G
- H
- |
- J
- L
- M
- N
- 0
- P
- Q
- R
- S
- T
- U
- V
- W
Märke : EPSON
Modell : Expression Premium XP-615
Kategori : Skrivare