
RT2000 BT - Умный дом SILVERCREST - Бесплатное руководство пользователя
Найдите руководство к устройству бесплатно RT2000 BT SILVERCREST в формате PDF.

Вопросы пользователей о RT2000 BT SILVERCREST
0 вопрос об этом устройстве. Ответьте на те, что знаете, или задайте свой.
Задать новый вопрос об этом устройстве
Скачайте инструкцию для вашего Умный дом в формате PDF бесплатно! Найдите своё руководство RT2000 BT - SILVERCREST и возьмите своё электронное устройство обратно в руки. На этой странице опубликованы все документы, необходимые для использования вашего устройства. RT2000 BT бренда SILVERCREST.
РУКОВОДСТВО ПОЛЬЗОВАТЕЛЯ RT2000 BT SILVERCREST
SILVERCREST®


GB IE
Before starting to read the information, fold out the page containing the illustrations and then familiarise yourself with all the functions provided by the device.
Olympia Business Systems Vertriebs GmbH
Zum Kraftwerk 1
45527 Hattingen
GERMANY
www.olympia-vertrieb.de
Information Status
10/2015 - Ident. No.: 102015-2
GB IE
RADIATOR THERMOSTAT RT2000 BT,
PROGRAMMABLE WITH BLUETOOTH
Operating and Safety Instructions
IAN 271726
GB IE
GB IE
Operating and Safety Instructions
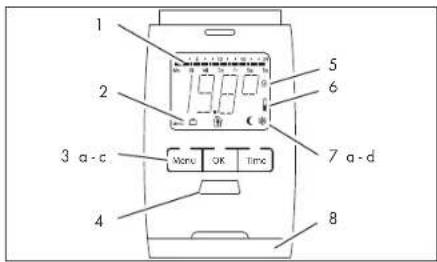
1 Heating times
2 AUTO or MANU mode
3a Menu button - opens the main menu (starting from the standard display); within a menu, navigate one step back by pressing the button
3b OK button - confirms settings
3c ☐ button - timer function
4 Adjusting wheel
5 Child safety lock
6 Battery is flat
7aHolidayfunction
7bComforttemperature

7c Energy-save temperature
7d Frost protection function *
8 Battery compartment
9 Fixing element
10 Maximum value, radiator
11 Thermostat head
12 Groove
13 Adapter
14 Plunger extension
DE
Supply package:
1 Radiator Thermostat RT2000 BT, programmable with Bluetooth
1 Coupling ring
3 Adapter
(Danfoss RA, Danfoss RAV, Danfoss RAVL)
1 Plunger extension
2 Batteries (mignon, AA), 1.5 V
1 Operating manual

Contents
Introduction......8
General Function......8
Intended Use....9
Operating and Display Elements....10
Settings menu 11
Technical Data 13
Safety Instructions....14
Inserting/Changing the Batteries......16
Setting the Date and Time......17
Installation....18
Disassembling the Old Thermostat Head....20
Installing the New Thermostat Head ....20
Disassembly 24
Operating the Device......26
Automatic Mode 26
Setting Comfort and Energy-Save Times 28
Setting an Individual Programme....29
Setting Comfort and Energy-Save Temperatures......30
Manual Mode....31
Timer Function 32
SILVERCREST®
GB IE

Offset 33
Window Function....34
Holiday Function 35
Child Safety Lock 36
Heating Pause 37
Summertime/Wintertime 38
Version Number 38
Resetting to Factory Default....39
Standby....39
Frost Protection Function 40
Calcification Protection Function 40
Operation by App ....41
Getting Started....43
Creating a Zone and Assigning a Device....44
Changing Device Name and PIN....46
Setting Comfort and Energy-Save Temperatures......47
Setting the Offset Temperature ....48
Individual Heating Times ....49
Comfort Times per Day....50
Child Safety Lock 51
Setting Comfort and Energy-Save Times ....52

Holiday Function....53
Transmitting the Profile to the Device 54
Saving and Loading Profiles....55
Deleting Profiles....57
Changing the Comfort and Energy-Save Temperatures ...58
Editing a Profile or Deleting a Device....59
Renaming or Deleting Zones....60
Troubleshooting ....61
Cleaning 62
Disposal 62
Guarantee....64
Manufacturer 66
Introduction

Congratulations on the purchase of your new device. You have chosen a high-quality product. Familiarise
yourself with the device before putting it into operation for the first time. Read the following operating instructions and safety information carefully. Only use the device as described and for the purpose for which it was intended. Keep this operating instruction manual in a safe place. Hand over all the documents with the device if it is transferred to third-parties.
General Function
The programmable radiator thermostat RT2000 BT with pre-programmed, individually adjustable heating and energy saving times allows you to regulate room temperatures using time settings. The device adjusts a radiator valve to control the heat flow to the radiator. The programmable

radiator thermostat RT2000 BT fits on all common radiator valves and is easy to install – it is not necessary to drain heating water or interfere with your heating system.
Intended Use
The programmable radiator thermostat RT2000 BT - in the following called "the device" - is used to regulate any common radiator valve.
The device may only be operated indoors. Any use other than that described in this operating manual is considered unintended use and results in loss of rights related to the terms of guarantee and exemption of liability. This also applies to any reconstruction and modification. The device is exclusively intended for private use.
Operating and Display Elements
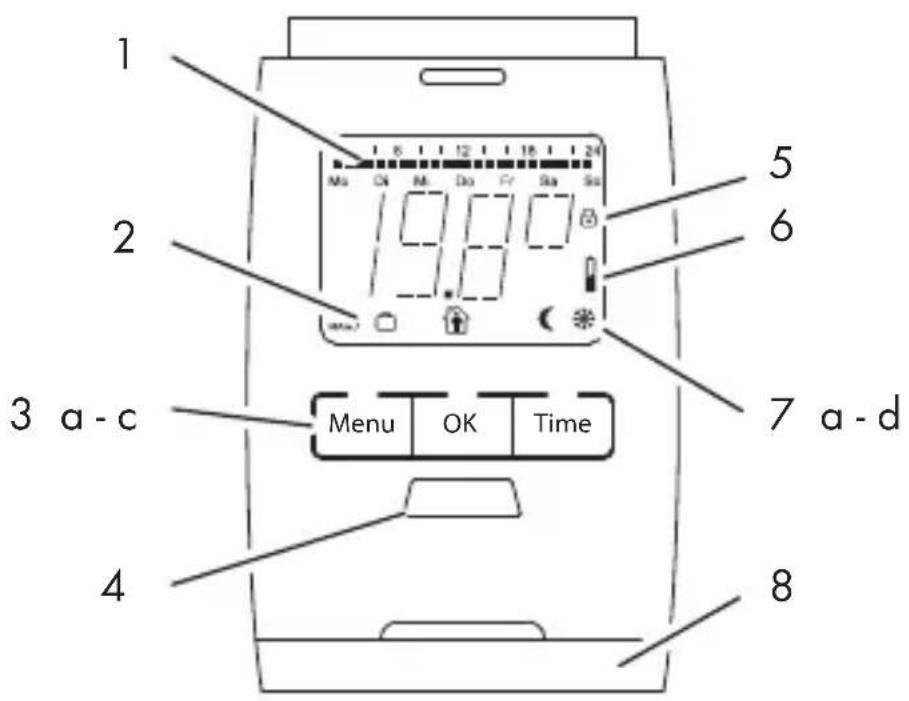
1 Heating times
2 AUTO or MANU mode active
3a Menu button - opens the main menu (starting from the standard display); when a menu is open, the display moves one menu level back each time the button is pressed
3b OK button - confirms a setting
3c Time button - timer function
4 Adjusting wheel
5 Child safety lock

6 Battery is flat
7aHolidayfunction
7bComforttemperature


7c Energy-save temperature
7d Frost protection function
8 Battery compartment

Settings menu
Press the ☐Menu button to open the settings menu.
Turn the adjusting wheel to select the func-
tion you want. Press the OK button to access
the function settings. Use the adjusting wheel
to change the parameters available. Confirm
changes with the OK button.
Press the ☐Menu button to go back one menu level.
Function Explanation
| MODE | AUTO = automatic modeMANU = manual mode |
| PROG | Timer programme |
| TEMP | Comfort and energy-save temperature |
| TIME | Date and time |
| WINW | Windowfunction |
| RES | Reset to default settings |
| ADAP | Adapt to the radiator valve |
| HOLI | Holidayfunction |
| INST | Installation function (only fit the device to the coupling ring in this position) |
| OFFS | Adjust temperature to local conditions or subjective temperature perception |
| VERS | Version number |
Technical Data
Model RT2000 BT
Supply voltage 3 V =
Max. power consumption 100 mA
Batteries 2 AA mn, 1.5 V
Battery service life Approx. 1 year
Display LCD
Dimensions 74 x 65 x 54 mm
Connection M30 x 1.5 mm
Ambient temperature +5 to +55 °C
Surface temperature Max. +90 °C
(on the radiator)
Linear stroke 4.3 mm
NOTE: We reserve the right to make technical changes to improve the product.
Safety Instructions

RISK OF ACCIDENTS AND FATAL INJURY TO INFANTS AND
CHILDREN! The packaging material
represents a risk of suffocation. Never leave children unattended when the packaging material is nearby. Children often underestimate the risks involved. Always keep children away from the packaging material. The device is not a toy.

This device can be used by children from the age of 8 and persons with restricted physical, sensory or mental
capabilities or a lack of experience and knowledge under supervision or if they have been instructed in safe use of the device and understand the resulting dangers. Children must not play with the device. The device must not be cleaned or serviced by children without appropriate supervision.


Do not open the device; it does not contain any parts which can be serviced by the user. In the event of any faults, send the device to the Service Department.
Safety Information on Batteries

Never attempt to recharge non-re-chargeable batteries and do not short circuit or open them. This could result in the risk of overheating, fire or bursting. Never throw batteries in a fire or water. The batteries could explode.

Leaking batteries could damage the device. Be particularly careful when handling damaged or leaking batteries and wear protective gloves. Switch the device off when it is not being used in order to save the batteries. Remove the batteries if the device will be out of use for a longer period.
Inserting/Changing the Batteries
- Remove the battery compartment cover.
- Insert 2 batteries (type Mignon, AA) into the battery compartment (8), ensuring correct polarity (see markings in the battery compartment).

Attention! Risk of damage to the device through reverse poling when inserting the batteries. Pay attention the
batteries are correctly aligned when inserted.
-
Replace the battery compartment cover.
-
The service life of new batteries is approx. 1 year. The battery icon 📁 is displayed when the batteries need to be changed.
NOTE: Do not use rechargeable batteries to operate the device.
Setting the Date and Time
After you have inserted the batteries, the device is in delivery condition. The year flashes. Set the date and time.
NOTE: You can also set the date and time later using the TIME menu option.
- Use the adjusting wheel to set the year.
Confirm by pressing OK. - Use the adjusting wheel to set the month.
Confirm by pressing OK. - Use the adjusting wheel to set the day's date.
Confirm by pressing OK. - Use the adjusting wheel to set the hour.
Confirm by pressing OK. - Use the adjusting wheel to set the minute.
Confirm by pressing OK.

PREP appears on the display. Wait a moment while the device prepares itself for installation.
As soon as the device is ready for installation, INST appears on the display.
NOTE: Only install the device when INST is displayed.
Installation

Caution! Risk of burns through hot radiator valve! Contact could lead to hands being burned. Allow the radiator to cool down before completing any installation, disassembly or repair work on the device! Wear work gloves!
Assembly of the programmable radiator thermostat is easy and can be completed without the need to drain any heating water or work on the heating system. It is not necessary to use any special tools or switch off the heating system.
natural_image
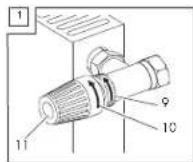
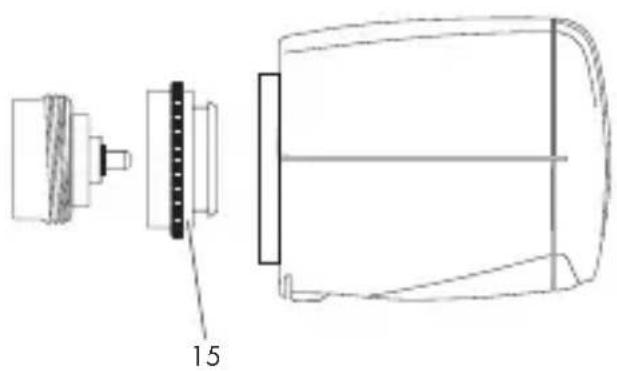
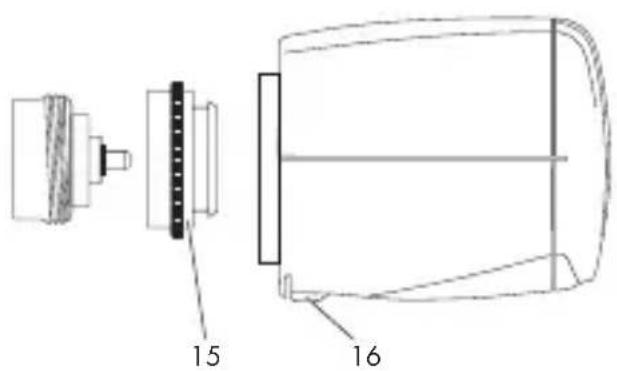
Technical line drawing of a mechanical component with labeled part '15' (no text or symbols beyond label)The coupling ring included in the supply package (15) fits without accessories on all radiator valves with thread size M30 x 1.5 mm from all common manufacturers such as Heimeier, MNG, Junkers, Landis&Gyr (Duodyr), Honeywell-Braukmann, Oventrop type A, Oventrop AV6, Schlösser, Comap D805, Valf, Sanayii, Mertik Maxitrol, Watts, Wingenroth (Wiroflex) R.B.M, Tiemme, Jaga, Siemens, Idmar.
Also included in the supply package is an adapter for fitting the device to Danfoss RA, Danfoss RAV and Danfoss RAVL radiator valves.

Disassembling the Old Thermostat Head
- Set thermostat head (11) to temperature range ON (or position 5) (see Fig. 1).
This means the thermostat head is no longer pressing on the spindle of the radiator valve and can be removed more easily.
- Unscrew fixing element (9) of the thermostat head and remove the thermostat head.
Installing the New Thermostat Head

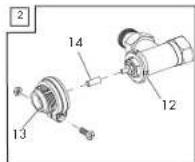
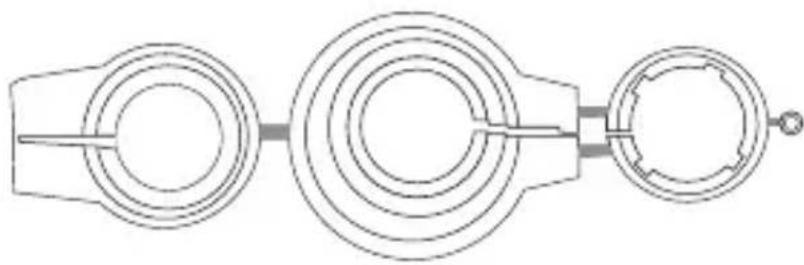
Risk of injury! During assembly, be careful not to jam your fingers between the halves of the adapter!

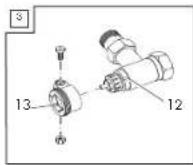
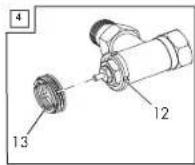
To fit the device to Danfoss radiator valves, you need the adapter provided. To determine which adapter (13) fits which radiator valve, please see Fig. 2 - 4.
natural_image
Pure mechanical component diagram without any text, numbers, or symbols
Risk of injury! The adapters supplied are joined together with plastic tabs. Snapped off edges can be sharp. Break off the plastic tabs carefully and smoothen the sharp eges on the adapter you use with a suitable tool.

The notches (12) on the circumference ensure the adapter fits perfectly.
- If required, slip the adapter (13) that fits the radiator valve onto the valve until the adapter snaps into place.
NOTE: If necessary, use a screwdriver to slightly prise open the adapter in the area of the screw.
- Fix the adapter with the screw and nut supplied (see Fig. 2 or Fig. 3).
NOTE: For the RAV valve type, you also need to place the stem extension (14) onto the valve pin (see Fig. 2).
-
Screw the coupling ring (15) onto the installed adapter or directly onto the radiator valve (see Fig. 1).
-
Fit the device onto the coupling ring.
-
INST. appears on the display. Confirm with OK. ADAP appears on the display.

The device starts the adaptation automatically.
The device adjusts to the regulation path of your radiator valve. For this purpose, the radiator valve is opened and closed several times so that the device learns the end points. This process may take a few minutes under certain circumstances.
After successful adaptation, the device goes into automatic mode.
Disassembly

Caution! Risk of burns through hot radiator valve! Contact could lead to hands being burned. Allow the radiator to cool down before completing any assembly, disassembly or repair work on the device! Wear work gloves!
-
Turn the adjusting wheel (4) to the right beyond the maximum temperature of 28 °C until ON appears on the display.
-
Wait a few seconds until the radiator valve is fully open.
-
Press the lock (16) to release the quick-release latch.
-
Pull the device off the coupling ring (15).
-
Unscrew the coupling ring.
-
If you have used an adapter, remove it and keep it in a safe place.
NOTE: You may have to undo the screw and nut.
Operating the Device
All operating modes are shown on the device display.
To increase the battery service life, the display automatically switches off 30 seconds after the last pressing of a button.
Press any button to reactivate the display, then operate the device as described in the following sections.

Automatic Mode
In AUTO mode (automatic mode), the device regulates between two temperatures according to the time program set:
comfort temperature (factory default: 21 °C)
energy-save temperature (factory default 16 °C)

You can define the comfort and energy-save times using the freely adjustable timer program. You can set eight switching points (four comfort and four energy-save times) per day.
As a default, the following comfort and energy-save times are pre-programmed:
1st comfort time: 07:00 hrs. 1st energy-save time: 22:00 hrs.
NOTE: If, in AUTO mode (automatic mode), you adjust the temperature using the adjusting wheel, this manually set temperature remains active until the next programmed switching point.
Setting Comfort and Energy-Save Times
You can use the device to set four comfort times and four energy-save times per day – either for individual days or for a range of several days.
DAY1 to DAY7 stand for the days of the week from Monday to Sunday.
71-5
Same program Monday to Friday
II-6
Same program Monday to Saturday
II1--7
Same program Monday to Sunday
NOTE: If certain days are not programmed, the preprogrammed factory settings are activated.
Setting an Individual Programme
- Press the ☐Menu button.
-
Use the adjusting wheel to select PROG. Confirm by pressing OK.
DAY! appears on the display for Monday. -
Use the adjusting wheel to select the day/ range of days. Confirm by pressing OK.
-
Use the adjusting wheel to set the start of the 1st comfort time (icon). Confirm by pressing OK.
-
Use the adjusting wheel to set the start of the 1st energy-save time (icon). Confirm by pressing OK.
Now, if you wish, you can enter second, third and fourth comfort/energy-save times.
The display shows the next day/range of days to be programmed. Continue as described above.
When you do not wish to set any further comfort/energy-save times, confirm the display .... with OK.
Setting Comfort and Energy-Save Temperatures
- Press the Menu button.
- Use the adjusting wheel to select the TEMP menu option. Confirm by pressing OK.
- Use the adjusting wheel to set the comfort temperature ( ). Confirm by pressing OK .
- Use the adjusting wheel to set the energy-save temperature ( ). Confirm by pressing OK .
Area Function
OFF 8 °C, frost protection function active
ON Radiator valve fully open
30
GB IE
Manual Mode
In MANU mode (manual mode), the device ensures the radiator achieves the temperature set manually (using the adjusting wheel).
- Press the ☐Menu button.
- Use the adjusting wheel to select the MODE menu option. Confirm by pressing OK
- Use the adjusting wheel to set the MANU menu option. Confirm by pressing OK.
- Use the adjusting wheel to set the required temperature.
NOTE: The set temperature is maintained until you either switch to automatic mode or change the temperature with the adjusting wheel.
Timer Function
Use this function to set any temperature for a certain period of time, e.g. for a party.
-
Press the Time button.
-
Turn the adjusting wheel to set the required time period (the time to be set flashes on the display next to the H symbol = hours). Confirm by pressing OK.
-
Set the required temperature with the adjusting wheel. Confirm by pressing OK.
NOTE: After this, it is not possible to change the temperature manually for the set period because the adjusting wheel is locked. Press the Menu button to unlock the wheel.

Offset
If the perceived temperature deviates from the set temperature, the temperature measured by the device can be adjusted.
- Press the ☐Menu button.
- Use the adjusting wheel to select the OFFS menu option. Confirm by pressing OK.
The degree setting 0,0°[ flashes on the display. - Turn the adjusting wheel to adjust the temperature (from -5 °C to +5 °C). Confirm by pressing OK.
NOTE: This does not alter the temperature indicated on the display!

Window Function
When the temperature drops dramatically, the device automatically detects that the room is being ventilated. To save heating costs, the radiator valve closes fully for 10 minutes (factory default). Following this period, the previous programme is reactivated.
- Press the ☐Menu button.
- Use the adjusting wheel to select the WINW menu option. Confirm by pressing OK.
- Set the sensitivity with the adjusting wheel (HIGH = high sensitivity, MID = medium sensitivity, LOW = low sensitivity). Confirm by pressing OK.
- Use the adjusting wheel to select the time 10 M - 60 M (minutes) you want the radiator valve to remain closed. Confirm by pressing OK
Holiday Function
You can define a freely selectable temperature which should be active for the period you are absent. Following this period, the previous programme is reactivated.
- Press the Menu button.
- Use the adjusting wheel to select the HOLI menu option. Confirm by pressing OK.
- Use the adjusting wheel to select the date of your return. Confirm by pressing OK.
- Set the time of day with the adjusting wheel. Confirm by pressing OK. On the display, OFF flashes.
- Set the temperature with the adjusting wheel. Confirm by pressing OK.
The 📋 icon appears in the display.
NOTE: Press the ☐Menu button to deactivate the function. The 🔔icon switches off.
Child Safety Lock
You can lock the device against unauthorised operation (child safety lock).
Activate the child safety lock to lock the device.
- Press and hold the OK + Time buttons simultaneously for approx. 2 seconds.
The ⏻ symbol appears and the child safety lock is activated.
Deactivate the child safety lock when you want to use the device again.
- Press and hold the OK + Time buttons simultaneously for approx. 2 seconds.
The 🔒 icon switches off and the child safety lock is deactivated.
Heating Pause
If you do not want to use the heating (e.g. in the summer months), program the device for a heating pause.
- Press the Menu button.
- Use the adjusting wheel to select the MODE menu option. Confirm by pressing OK.
- Use the adjusting wheel to select MANU. Confirm by pressing OK.
- Use the adjusting wheel to set the temperature to OFF.
NOTE: To turn the heating on again, switch e.g. to automatic mode (see Automatic Mode).
Summertime/Wintertime
The device automatically recognises summertime and wintertime and turns the clock one hour forward on the last Sunday in March and one hour back on the last Sunday in October.
Version Number
-
Press the ☐Menu button.
-
Use the adjusting wheel to select the VERS menu option. Confirm by pressing OK.
NOTE: The software version number appears in the display. You can use the adjusting wheel to display the full version number (as scrolling text).
Resetting to Factory Default
- Press the ☐Menu button.
- Use the adjusting wheel to select the RES menu option. Confirm by pressing OK.
- OK flashes on the display. Confirm by pressing OK.
NOTE: The device is now reset to the factory default and is in its delivery state again (see Setting the Date and Time).
Standby
This function is automatically active.
The display always automatically switches off 30 seconds after the last button has been activated.
Frost Protection Function
This function is automatically active.
If the temperature drops to below 6 °C, the device opens the radiator valve until the temperature increases again to over 8 °C.
This prevents the radiator from freezing.
Calcification Protection Function
This function is automatically active.
The device performs a calcification protection operation weekly to prevent calcification of the radiator valves.
Operation by App

Operate the device in comfort with your smartphone or tablet using the integrated Bluetooth interface.
You can alter the name of the device or the PIN, set the comfort and energy-save temperature, set heating periods, use the holiday and offset function, and use the child safety lock.
Activate the Bluetooth function of your smart-phone or tablet and download the free EURO-prog app from the app store or Google Play Store.


Your smartphone or tablet must support Bluetooth SMART.
SILVERCREST®
GB IE

NOTE: The following description uses as an example the iOS app EUROprog. Minor deviations are possible with the Android app. For instance, you access the „Profiles“, „Done“ and „Edit“ functions using the Menu button on your Android device.
NOTE: Please always use the current version of the app from the app store or Google Play Store. Some descriptions in these instructions may no longer apply to newer versions of the app.
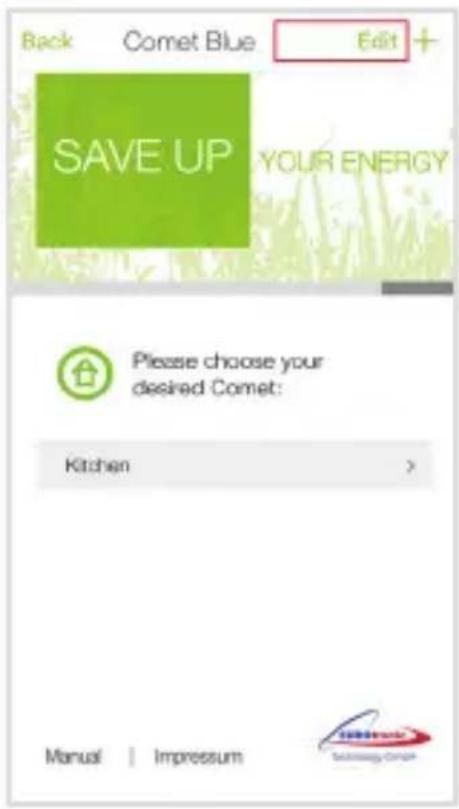
Getting Started

The start menu shows you various devices.
For the device described here, you exclusively need the „Comet Blue" menu.
- Tap „settings“.
- Deactivate all menus apart from „Comet Blue“.
- Tap „Back“.
- Tap „Comet Blue“.
Creating a Zone and Assigning a Device
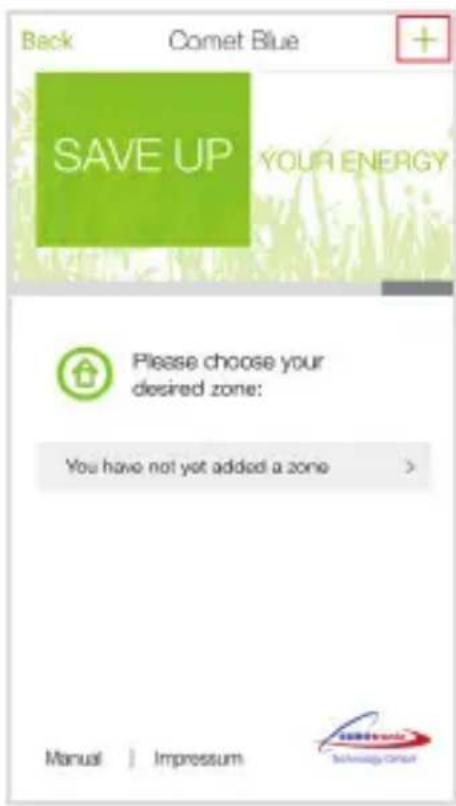
Create zones in which you use devices, and establish connections to the devices.
- Tap the „+“ symbol.
- Enter a name (title) for the zone. Confirm with „OK“.
-
Tap on the zone, then on the entry „You don't have a Comet Blue yet".
-
Tap „Connect“.

NOTE: If you want to use several devices, activate them in succession to clearly assign each device.
-
After a brief search, the message „Neuer Comet Blue“ appears on the display. Tap this entry to establish a connection to the device.
-
Enter a unique device name (see Changing Device Name and PIN).
NOTE: The first time you use the function, you will be asked to enter a PIN. The default PIN is 000000.
NOTE: The device adopts the date and time from your smartphone or tablet.
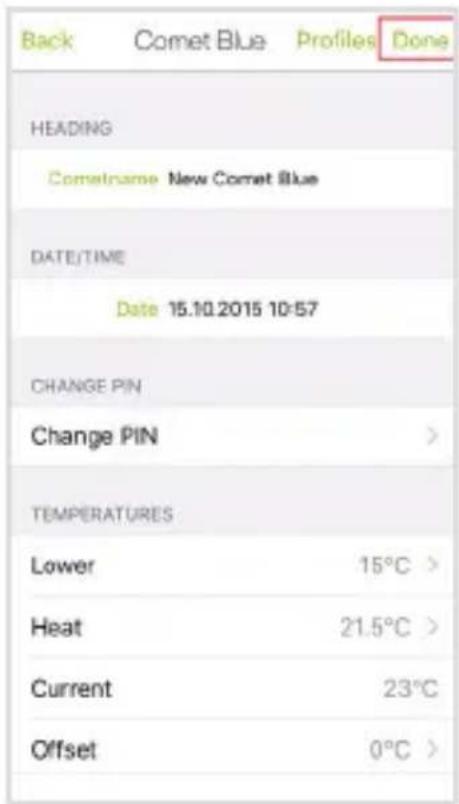
Changing Device Name and PIN
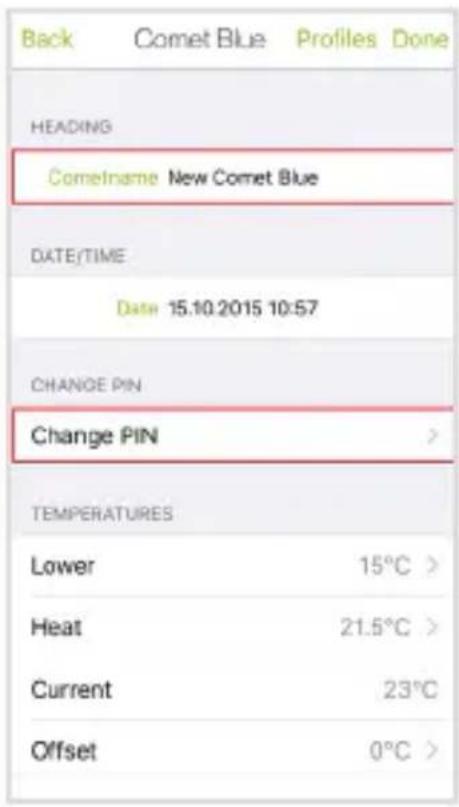
Give the device a unique name and change the pre-set PIN.
- To do this, tap „New Comet Blue“ and enter a new name, then confirm with „Return“.
- Tap „Change PIN“ and follow the instructions on the display.
Setting Comfort and Energy-Save Temperatures
| Back | Comet Blue | Profiles | Done |
| HEADING | |||
| Cometname New Comet Blue | |||
| DATE/TIME | |||
| Date 15.10.2015 10:57 | |||
| CHANGE PIN | |||
| Change PIN | > | ||
| TEMPERATURES | |||
| Lower | 15°C > | ||
| Heat | 21.5°C > | ||
| Current | 23°C | ||
| Offset | 0°C > | ||
Set the required comfort and energy-save temperatures in the corresponding fields.
-
Tap „Heat“ and enter the required comfort temperature. Confirm with „Choose“.
-
Tap „Lower“ and enter the required energy-save temperature. Confirm with „Choose“.
Setting the Offset Temperature
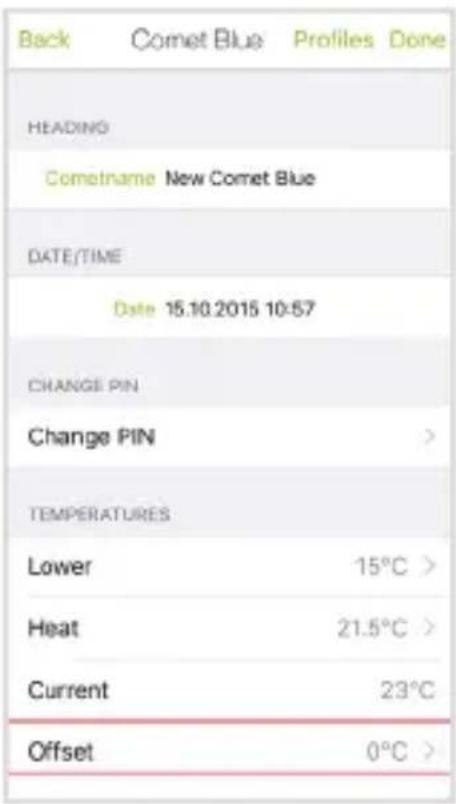
If the perceived temperature deviates from the set temperature, the temperature measured by the device can be adjusted.
- Tap „Offset“ and set the required offset temperature. Confirm with „Choose“.
Individual Heating Times
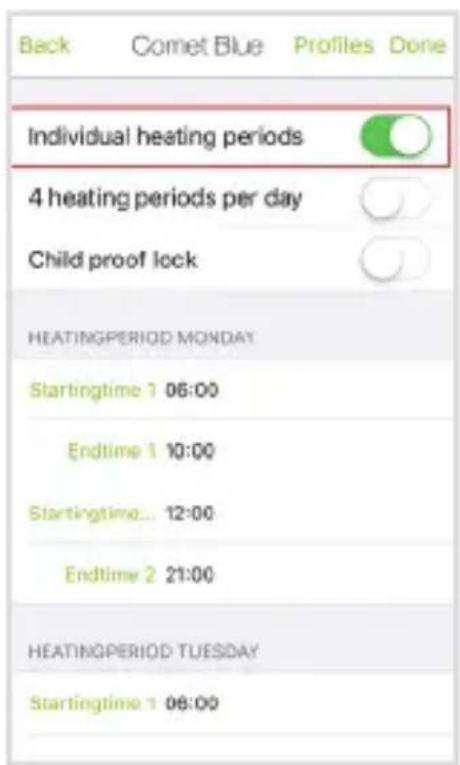
Set your comfort and energy-save temperatures individually for seven days or distinguish between working days and weekends.
-
Activate this function to program individual comfort or energy-save times for each day of the week.
-
Deactivate this func-
tion to program individual comfort or energy-save times for Monday to Friday and for Saturday and Sunday.
Comfort Times per Day
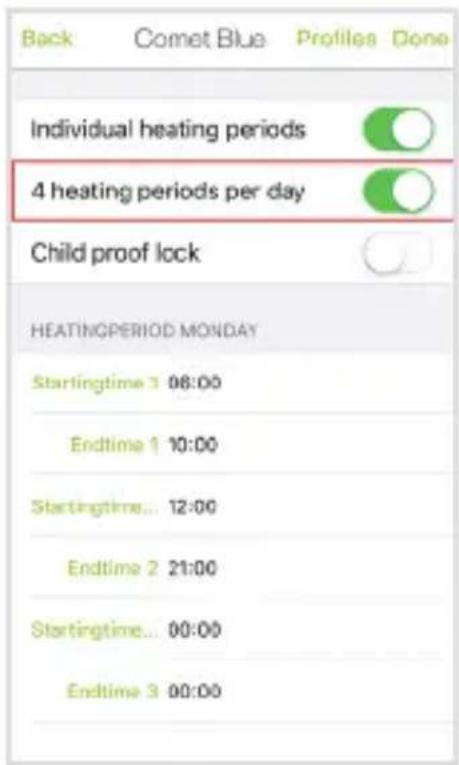
Program individual comfort and energy-save times for each day. You can set either a total of four or eight comfort and energy-save times per day.
- Activate this function to program eight comfort and energy-save times per day.
- Deactivate this func-
tion to program a total of four comfort and energy-save times per day.
Child Safety Lock
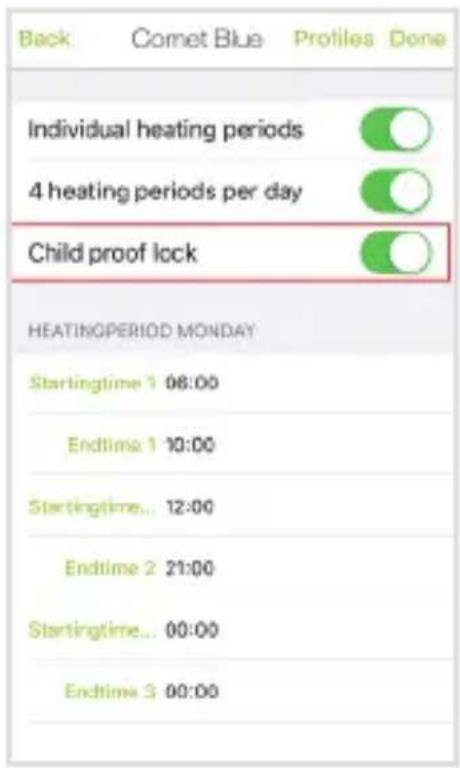
You can lock the device buttons so that functions are not unintentionally activated and/or temperatures changed.
- Activate this function to switch on the child safety lock.
The 🔒 icon appears on the display.
- Deactivate this function to switch off the
child safety lock. The 🔒 icon on the display switches off.
Setting Comfort and Energy-Save Times
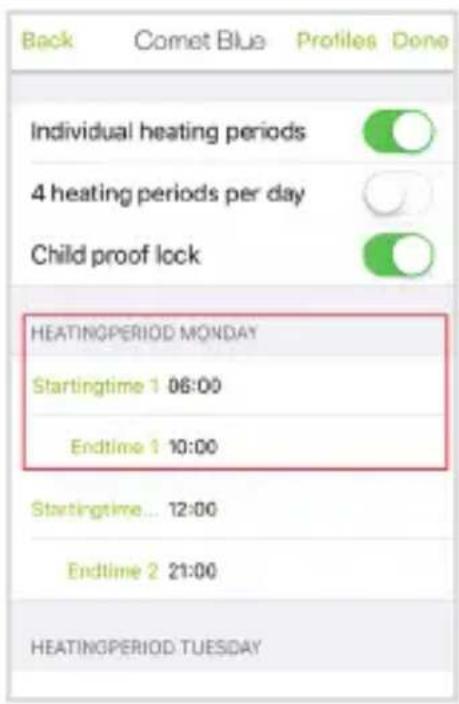
Depending on the previous settings (see Comfort Times per Day), you can set comfort and energy-save times.
- Tap „Startingtime 1" and select the time at which the radiator heats to comfort temperature. Confirm with „Choose".
- Tap „Endtime 1" and
select the time at which the radiator heats to energy-save temperature. Confirm with „Choose“.
NOTE: Repeat for all heating times.
Holiday Function
| Back | Comet Blue | Profiles | Done |
| VACATION 1 | |||
| Startingtime | 15.10.2015 10:30 > | ||
| Endtime | 15.10.2015 23:30 > | ||
| Temperature | 10.0°C > | ||
| VACATION 2 | |||
| Startingtime | 16.10.2015 22:00 > | ||
| Endtime | 16.10.2015 23:00 > | ||
| Temperature | 9.0°C > | ||
| VACATION 3 | |||
| Startingtime | 15.10.2015 23:30 > | ||
| Endtime | 15.10.2015 23:30 > | ||
You can pre-set eight holiday periods and temperatures.
-
Tap „Startingtime“ to define the start of the holiday. Confirm with „Choose“.
-
Tap „Endtime“ to define the end of the holiday. Confirm with „Choose“.
-
Tap „Temperature“,
to define a temperature for your holiday. Confirm with „Choose“.
NOTE: Follow this procedure for all holidays.
Transmitting the Profile to the Device
When you have completed the configuration, transmit the settings to the device.
-
Tap „Done“. A message appears confirming successful transmission of your settings to the device.
-
Tap „OK“ to confirm the message.
Saving and Loading Profiles
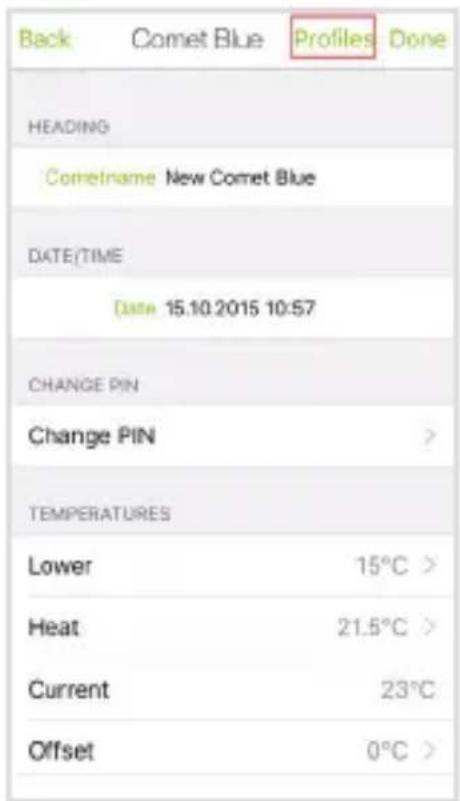
You can save profiles for access at a later time. The profile is saved under the device name.
NOTE: Save the device profile at the latest before you change the batteries so that you can transmit it to the device after the battery change.

-
Tap „Profiles“ then „Save“. The profile settings are saved to the app.
-
Tap „Profiles“ then „Loading“. Tap a previously saved profile in the list. The selected profile is loaded and transmitted to the device (see Transmitting the Profile to the Device).
Deleting Profiles
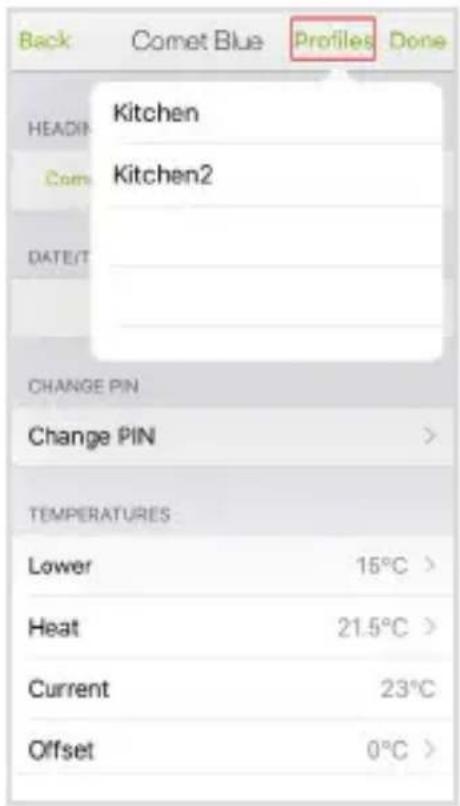
You can delete profiles you no longer need.
- Tap „Profiles“ then „Loading“.
- Swipe the profile you want to delete to the left, then tap „Delete“.
Changing the Comfort and Energy-Save Temperatures
bar
| Day | Active Time (°C) | |---|---| | Mon | 15.0 | | Tue | 15.0 | | Wed | 15.0 | | Thu | 15.0 | | Fri | 15.0 | | Sat | 15.0 | | Sun | 15.0 | | Mon | 6 | | Tue | 6 | | Wed | 6 | | Thu | 6 | | Fri | 6 | | Sat | 6 | | Sun | 6 | | Mon | 12 | | Tue | 12 | | Wed | 12 | | Thu | 12 | | Fri | 12 | | Sat | 12 | | Sun | 12 | | Mon | 18 | | Tue | 18 | | Wed | 18 | | Thu | 18 | | Fri | 18 | | Sat | 18 | | Sun | 18 | | Mon | 24 | | Tue | 24 | | Wed | 24 | | Thu | 24 | | Fri | 24 | | Sat | 24 | | Sun | 24 |You can change the saved comfort and energy-save temperatures. The temperatures set are directly transmitted to the device.
- Move the regulator for the comfort temperature („Heat“) or energy-save temperature („Lower“) to the required temperature.
NOTE: These manu-
ally set temperatures remain active until you change them again or load a different profile (see Saving and Loading Profiles).
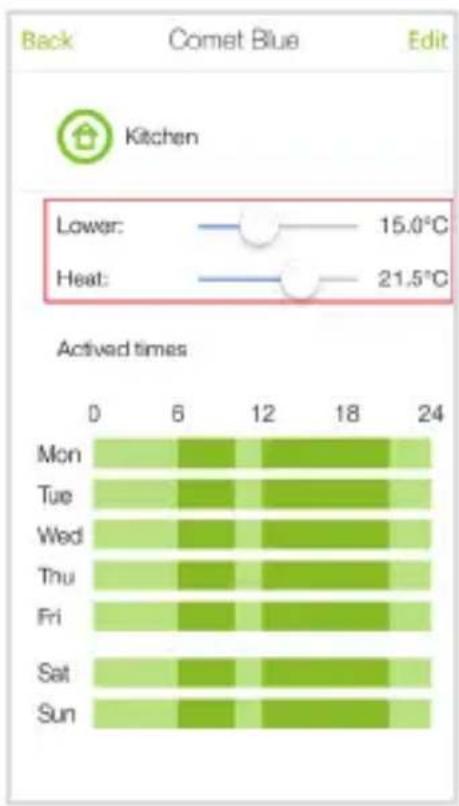
Editing a Profile or Deleting a Device
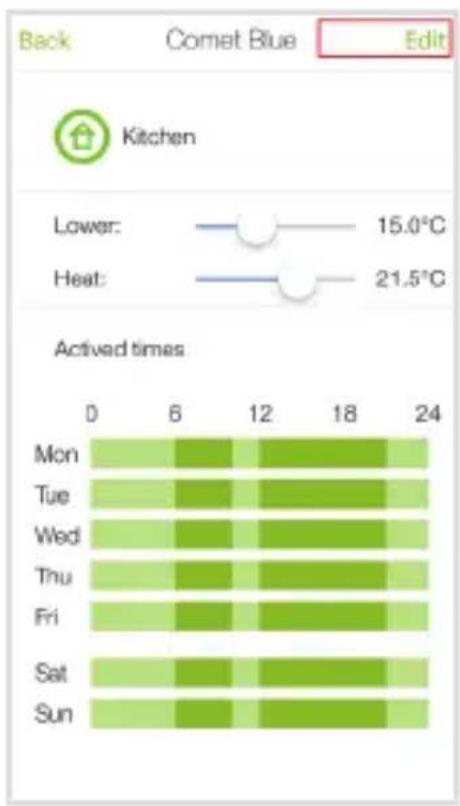
heatmap
| Day | 0 | 6 | 12 | 18 | 24 | |---|---|---|---|---|---| | Mon | Dark Green | Light Green | Dark Green | Light Green | Light Green | | Tue | Medium Green | Medium Green | Dark Green | Dark Green | Medium Green | | Wed | Medium Green | Medium Green | Dark Green | Dark Green | Medium Green | | Thu | Medium Green | Medium Green | Dark Green | Dark Green | Medium Green | | Fri | Medium Green | Medium Green | Dark Green | Medium Green | Medium Green | | Sat | Medium Green | Medium Green | Dark Green | Dark Green | Medium Green | | Sun | Medium Green | Medium Green | Dark Green | Medium Green | Medium Green | Back Comet Blue Edit KitchenYou can edit your profiles or delete devices at any time.
- Tap „Edit“.
- Tap „Edit Comet Blue" to edit the selected profile as described above.
- Tap „Delete Comet Blue“ to delete the device.
Renaming or Deleting Zones
You can rename or delete zones.
- Tap „Back“, until you see an overview of your zones.
- Tap the required zone.
- Tap „Edit“.
- Tap „Rename zone“, enter a new name and confirm with „OK“.
- Tap „Delete zone“
to delete the selected zone, and confirm with „OK“.
NOTE: When you delete a zone, all the devices in this zone are deleted!
Troubleshooting
Fault Cause Solution
| Battery icon | Battery power is too low. | Change the batteries. |
| E1 | No adaptation is possible. Device is not assembled on the radiator properly. | Is the device correctly assembled on the radiator? Assemble it according to the instructions. |
| E2 | Radiator valve stroke too short or battery power too weak. | Open and close the valve plunger several times by hand.OrInsert new batteries according to the instructions. |
Fault Cause Solution
83
No valve movement.
Is the valve plunger freely moveable? Make valve plunger moveable, if necessary.
E1 - E3
Press any button to clear the error message from the display and re-adapt the device automatically.
Cleaning
Clean the device regularly using a dry, lint-free cloth.
Disposal

The packing is made of environmentally friendly materials which can be disposed of through the local recycling centres. Refer to your local authorities or municipal offices for information on how to dispose of the device when no longer functional.
62
GB IE
SILVERCREST®


Never throw old devices in household waste in the interest of environmental protection but dispose of them
according to the applicable local regulations. Your local authorities can provide information regarding collection points and opening times. Defective or spent batteries must be recycled according to Directive 2006/66/EC. Return batteries and / or the device via the recycling services offered. Batteries must not be disposed of in household waste. They may contain toxic heavy metals and are subject to requirements on the treatment and disposal of hazardous waste. The chemical symbols of the heavy metals are as follows: Cd = cadmium, Hg = mercury, Pb = lead. Therefore, return used batteries to the appropriate local collection point.
EMCCE
SILVERCREST®
GB IE
Guarantee
ATTENTION!
IMPORTANT GUARANTEE CERTIFICATE!
KEEP IN A SAFE PLACE!
Dear Customer,
We are very pleased that you have decided to buy this high quality product. Should a technical problem arise with regard to the equipment, please observe the following points:
- The period of guarantee for the equipment is 36 months.
- It is essential to keep the purchase receipt and original packaging.
- The first line of action if a problem occurs is to contact our hotline:
00800 100 22 100 (international)
Our expert personnel can frequently provide help over the phone.
service.uk@gsl-servicenet.de service.ie@gsl-servicenet.de
However, if the problem cannot be solved via telephone, please send the equipment to the following address in its original packaging:
Our service partner: GSL mbH
Am Weimarer Berg 6 99510 Apolda Germany
Repairs under the terms of guarantee are only possible when the purchase receipt is enclosed.
Manufacturer
Olympia Business Systems Vertriebs GmbH
Zum Kraftwerk 1
45527 Hattingen
GERMANY
www.olympia-vertrieb.de
IAN 271726


Bluetooth®
SMART
The Bluetooth® word mark and logos are registered trademarks owned by Bluetooth SIG, Inc. and any use of such marks by Olympia Business Systems Vertriebs GmbH is under license. Other trademarks and trade names are those of their respective owners.
66
GB IE
SILVERCREST®

- DE
- Contents
- Introduction......8
- Safety Instructions....14
- Inserting/Changing the Batteries......16
- Setting the Date and Time......17
- Installation....18
- Disassembly 24
- Operating the Device......26
- Operation by App ....41
- Troubleshooting ....61
- Cleaning 62
- Disposal 62
- Guarantee....64
- Manufacturer 66
- Introduction
- General Function
- Intended Use
- Operating and Display Elements
- Settings menu
- Technical Data
- Model RT2000 BT
- Safety Instructions
- RISK OF ACCIDENTS AND FATAL INJURY TO INFANTS AND
- Safety Information on Batteries
- Inserting/Changing the Batteries
- Setting the Date and Time
- Installation
- Disassembling the Old Thermostat Head
- Installing the New Thermostat Head
- Disassembly
- Operating the Device
- Automatic Mode
- Setting Comfort and Energy-Save Times
- Setting an Individual Programme
- Setting Comfort and Energy-Save Temperatures
- Area Function
- Manual Mode
- Timer Function
- Offset
- Window Function
- Holiday Function
- Child Safety Lock
- Heating Pause
- Summertime/Wintertime
- Version Number
- Resetting to Factory Default
- Standby
- Frost Protection Function
- Calcification Protection Function
- Operation by App
- Getting Started
- Creating a Zone and Assigning a Device
- Changing Device Name and PIN
- Setting the Offset Temperature
- Individual Heating Times
- Comfort Times per Day
- Transmitting the Profile to the Device
- Saving and Loading Profiles
- Deleting Profiles
- Changing the Comfort and Energy-Save Temperatures
- Editing a Profile or Deleting a Device
- Renaming or Deleting Zones
- Troubleshooting
- Fault Cause Solution
- Cleaning
- Disposal
- EMCCE
- Guarantee
- 100 22 100 (international)
- service.uk@gsl-servicenet.de service.ie@gsl-servicenet.de
- Our service partner: GSL mbH
- Am Weimarer Berg 6 99510 Apolda Germany
- Manufacturer
Марка : SILVERCREST
Модель : RT2000 BT
Категория : Умный дом