
Cookie KP502 - Смартфон LG - Бесплатное руководство пользователя
Найдите руководство к устройству бесплатно Cookie KP502 LG в формате PDF.


| Тип продукта | Смартфон |
| Модель | Cookie KP502 |
| Бренд | LG |
| Размеры | Примерно 108 x 50 x 14 мм |
| Вес | Примерно 90 г |
| Тип дисплея | TFT, 262K цветов |
| Размер дисплея | 2.4 дюйма |
| Разрешение дисплея | 240 x 320 пикселей |
| Встроенная память | 50 МБ |
| Слот для карты памяти | microSD до 2 ГБ |
| Аккумулятор | Li-Ion, 1000 мАч, съемный |
| Тип SIM-карты | Обычная SIM (mini-SIM) |
| Сети | GSM 850/900/1800/1900 |
| Камера | 2 Мп, без вспышки |
| FM-радио | Да, с RDS |
| Bluetooth | Версия 2.1 |
| USB | micro-USB 2.0 |
| Операционная система | Проприетарная LG |
| Основные функции | Звонки, SMS, MMS, камера, FM-радио, будильник, календарь |
| Блокировка клавиатуры | Да, автоматическая и ручная |
| Уход и чистка | Протирать мягкой сухой тканью, избегать жидкостей |
| Съемная задняя крышка | Да, для доступа к аккумулятору и SIM-карте |
| Запасные части | Аккумулятор, зарядное устройство, USB-кабель |
Часто задаваемые вопросы - Cookie KP502 LG
Вопросы пользователей о Cookie KP502 LG
0 вопрос об этом устройстве. Ответьте на те, что знаете, или задайте свой.
Задать новый вопрос об этом устройстве
Скачайте инструкцию для вашего Смартфон в формате PDF бесплатно! Найдите своё руководство Cookie KP502 - LG и возьмите своё электронное устройство обратно в руки. На этой странице опубликованы все документы, необходимые для использования вашего устройства. Cookie KP502 бренда LG.
РУКОВОДСТВО ПОЛЬЗОВАТЕЛЯ Cookie KP502 LG
CE0168
KP502_HK_Cover_1.1.indd 18/18/11 11:49 AM
P/NO : MMBB0318345 (1.1)
www.lg.com
Bluetooth QD ID B014534

natural_image
Front view of a black LG mobile phone with blank screen and keypad (no visible text or symbols on device body)此手冊中的部份內容可能會因手機程式之改良或不同網絡商提供的服務而令實際情況有所不同,這並不會另行通知。
KP502 使用手册
恭喜您購買了 LG 先進輕巧的 KP502 手機,本手機專為利用最新的數碼流動通訊科技而設計。
| 設定 | 01 |
| 您的備用屏幕 | 02 |
| 基本功能 | 03 |
| 自製功能 | 04 |
| 管理功能 | 05 |
| 網絡功能 | 06 |
| 設定 | 07 |
| 配件 | 08 |
内容
設定
了解您的手機....8
手機背面 10
安裝智能咭和電池....11
記憶咭 14
您的備用屏幕
觸控屏幕提示 15
基本功能
通話功能 20
撥打電話 20
透過通訊錄撥打電話 20
接聽來電和拒接來電 20
通話中選項 21
快速撥號 22
撥打其他電話 22
關閉 DTMF 22
檢視通話記錄 22
使用來電轉接 23
使用通話限制 23
變更一般通話設定 24
通訊錄 25
搜尋通訊錄....25
新增通訊錄 25
建立群組 26
變更通訊錄設定 26
檢視資訊 27
訊息 28
訊息 28
發送訊息 28
輸入文字 28
T9模式 29
Abc 模式 ..... 29
鍵盤....29
手寫識別 29
設定電子郵件 30
擷取電子郵件 30
透過新帳戶發送電子郵件 30
變更電子郵件設定....31
訊息資料夾 31
變更文字訊息設定 32
變更多媒體訊息設定 32
變更其他設定 33
自製功能
相機....34
快速拍照 34
拍攝照片後 34
了解取景器 35
選擇拍攝類型 36
調整曝光 36
使用進階設定 36
變更圖像大小....37
選擇色彩效果....37
檢視已儲存照片 37
視像攝錄機....38
拍摄快速影片 38
錄製影片後....38
了解取景器 39
調整曝光....40
使用進階設定 40
變更影片圖像大小....41
選擇色調....41
觀看已儲存影片 41
照片及影片....42
檢視照片及影片 42
從影片中擷取圖像 42
以投影片播放形式檢視照片 42
將照片設定為待機圖片 43
編輯照片 43
在照片中加入文字 44
在照片中加入效果....44
多媒體 45
圖片 45
發送照片 45
使用圖像 45
列印圖像 46
移動或複製圖像 46
聲音....46
使用聲音 47
影片 47
發送錄像片段 47
遊戲和應用程式....47
透過本地安裝,安裝遊戲/應用程式..48
玩遊戲 48
文件 48
傳送檔案到手機....48
檢視檔案 49
其他 49
製作電影 49
内容
音樂....49
將音樂傳送至手機....50
播放歌曲 50
建立播放列表 50
使用收音機....51
搜尋電台 51
重設頻道....51
管理功能
記事簿 52
新增事件至日曆 52
新增項日至待辦事項 52
新增備忘錄....52
使用日期搜寻器....52
設定鬧鐘....53
使用繪圖面板 53
語音備忘錄....53
錄製聲音或語音 54
使用計算機....54
轉換單位 54
使用秒錶 54
新增城市至世界時間 55
PC Suite ....56
在電腦上安裝 LG PC Suit ....56
連接手機和電腦 56
備份和還原手機資訊 56
檢視電腦上的手機檔案....57
同步處理通訊錄....57
同步訊息 57
將手機用作音樂同步裝置....58
網絡功能
瀏覽器 59
存取網絡 59
新增並存取書簽 59
使用 RSS 讀取裝置 ..... 59
儲存網頁 60
存取已儲存的網頁 60
檢視瀏覽器記錄....60
變更網頁瀏覽器設定....60
將手機用作數據機....60
設定
個人化情景模式....62
變更屏幕設定....62
變更手機設定....62
變更連接設定....63
使用記憶體管理....64
使用藍芽發送和接收檔案 65
同其他藍芽裝置配對 66
使用藍芽耳機....66
配件 67
網絡服務 68
技術資料 68
指引
安全與有效使用準則 70
故障排解....74
了解您的手機

裁定
8
警告:手機置於口袋中時,若將較重物體置於手機上,或坐在手機上會損壞手機的觸控屏幕功能。
LG KP502 | 使用手册

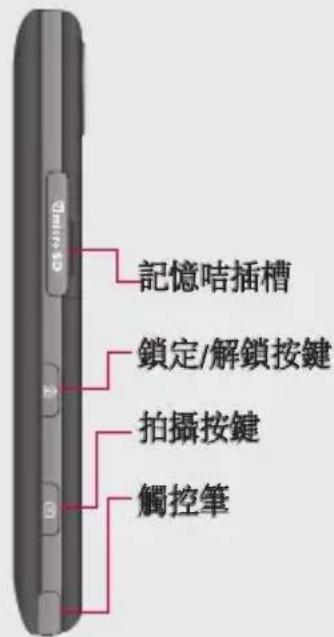
充電器、USB線、免提插孔
提示:如要連接 USB 線,請先開機並註冊到網絡。
側鍵
- 屏幕處於備用狀態時:鈴聲或觸控音量。
· 在通话中:耳機音量。 - 播放背景音樂時:控制音量。
01
02
03
04
05
06
07
08
設定
手機背面

設定
10
LG KP502 | 使用手册
安裝智能咭和電池
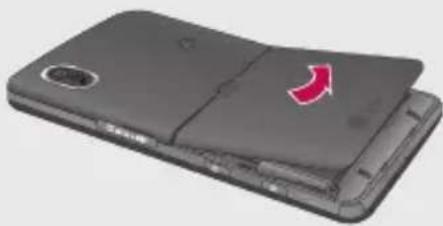
1 取下電池蓋
向下滑動電池蓋並取下。
natural_image
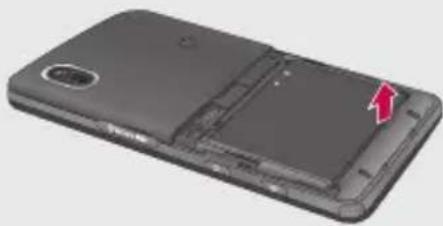
Foldable smartphone showing a closed body with a red arrow on the side (no text or symbols visible)2 取下電池
抬起電池下方的邊緣,將其從電池格中取出。
natural_image
3D model of a smartphone showing the rear panel and internal structure with a red arrow pointing to a component (no text or symbols visible)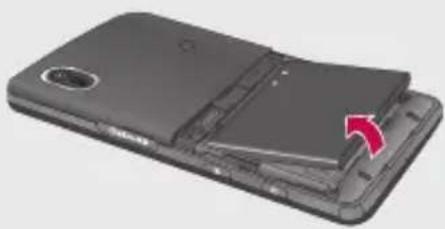
natural_image
Stacked smartphone phone showing internal components and a red arrow indicating rotation (no text or symbols)警告:請勿使用指甲取出電池。
警告:手機開機時,不要取下電池,因為這樣會損壞手機。
安裝智能咭和電池
3 安装智能咭
將智能咭滑入智能咭插槽中,確保智能咭的金屬接觸面朝下。若要取出智能咭,請向相反方向輕輕拉出。

natural_image
Close-up of a smartphone showing the internal battery compartment and its open casing, with a magnified inset highlighting the internal structure (no text or symbols visible)4 安装電池
先將電池頂部頂入電池格上方邊緣。請確保電池觸點對準手機觸點。將電池的底部壓入定位。

natural_image
3D illustration of a smartphone showing internal components with red arrows indicating rotation or movement (no text or symbols)設定
12
LG KP502 | 使用手册
5 手機充電
打開 KP502 手機側面的充電器插槽蓋。插入充電器並將充電器插頭插入電源插座。為您的 KP502 手機充電,直至屏幕上顯示「電池電量已滿」訊息。
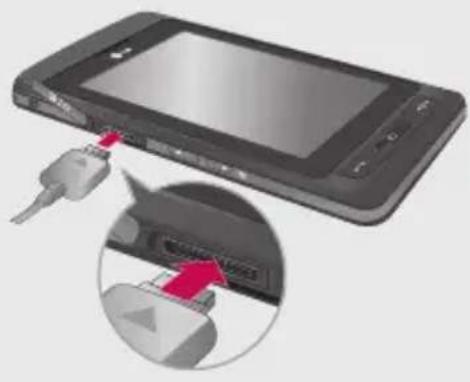
natural_image
Illustration of a smartphone with an attached USB port and a close-up of its internal cable (no text or symbols visible)記憶咭
安裝記憶咭
使用 MicroSD 記憶咭,擴展手機的記憶體空間。
注意:記憶咭是選購配件。
1 開啟手機的記憶咭插槽蓋。
2 將記憶咭滑入插槽,直到卡緊為止。
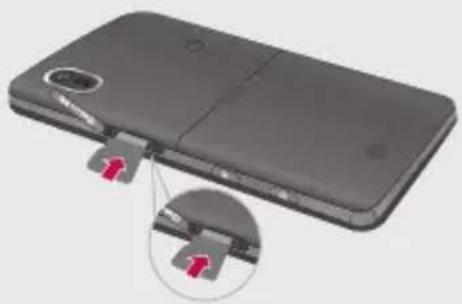
natural_image
3D model of a smartphone showing the rear panel and internal components, with a close-up inset highlighting a red arrow pointing to a component (no text or symbols visible)3 重新合上插槽蓋。
格式化記憶晴
您的記憶咭可能已格式化了。若記憶咭尚未格式化,則在開始使用前需要進行格式化。
1 從備用屏幕中選擇 然後點按並選擇手機設定。
2 點按記憶體管理,然後選擇外置記憶體。
3 點按格式化並確認您的選擇。
4 若設定有密碼,則輸入密碼,且咭將被格式化以便隨時使用。

注意:若記憶咭中已包含內容,則其中內容會被歸檔至正確的資料夾中;例如,影片會儲存到「我的影片」資料夾中。
設定
14
LG KP502 | 使用手册
您的備用屏幕
您可從備用屏幕存取功能表選項,快速撥打電話並檢視手機狀態以及很多其他內容。
觸控屏幕提示
主屏幕亦是熟悉觸控屏幕的最佳位置。
要選擇某個項目,請準確點按相應圖示。若能識別出您所點按的選項,KP502便會輕微震動。(視乎觸控設定)
如要捲動清單,請點按屏幕上顯示的最後一個項目並用手指向屏幕上方滑動。該清單會向上移動以便顯示更多項目。
- 點按觸控屏時無需重按,只需要輕輕按中即可。
- 使用指尖點按所需的選項。小心不要按附近的任何其他選項。
-
屏幕背燈熄滅後,按右側的解鎖/鎖定鍵即可返回屏幕。
-
請不要用護套或護蓋蓋住手機。因為一旦觸控屏幕上蓋有任何東西,它將無法正常運作。
- 有兩種類型的備用屏幕。左右捲動即可在備用屏幕中變更備用屏幕類型。
1 Widget 備用 - 點按時,手機 Widget 控制板會出現。
2 快速撥號備用 - 點按 時,快速撥號清單會出現。您可立即在兩種備用類型選擇所需內容。
您的備用屏幕
Widget 備用

快捷键
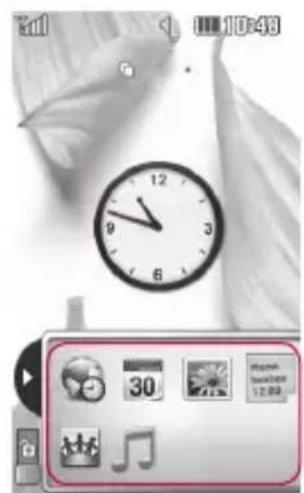
Mobile Widget
快速撥號備用

natural_image
Black-and-white photo of a banana with a hand interacting with it, showing no visible text or symbols.
快速撥號清單
您的備用屏幕
16
LG KP502 | 使用手册
快捷键
快捷鍵提供簡單、單觸式操作存取最常用的功能。

點按以顯示觸控撥號盤,以撥打電話。如同使用標準按鍵輸入號碼,並點按或按硬鍵

點按以開啟您的通訊錄。若要搜尋撥號號碼,請使用觸控板在屏幕輸入聯絡人名稱。您亦可以新增通訊錄或編輯現有通訊錄。詳情請參閱第25頁。
01
02
03
04
05
06
07
08

點按以存取「訊息」選項目錄。您可在此處建立新文字訊息或多媒體訊息,或檢視訊息資料夾。更多詳情,請參閱第28頁。

點按以開啟完整的上層功能表,此功能表分為四個垂直子功能表。點按各子功能表標籤以檢視進一步選項。
您的備用屏幕
狀態列
狀態列透過使用多種圖示,指明如訊號強度、新訊息和電池電量等情況,亦告訴您藍芽或GPRS是否已啟動。下表對最有可能在狀態列中看到的圖示的含義進行了解釋。
| 圖示 說說明 | |
| 多項工作列表 | |
| 網絡訊號強度(列數會有變化) | |
| 無網絡訊號 | |
| 電池電量 | |
| 電池已耗盡 | |
| 新文字訊息 | |
| 新語音訊息 | |
| 訊息收件匣已滿 | |
| 發送訊息失敗 | |
| 多媒體訊息發送失敗 | |
| 鬧鐘已設定 | |
您的備用屏幕
18
| 圖示 說明 | |
| 正在使用自訂情景模式 | |
| 正在使用標準情景模式 | |
| 正在使用戶外情景模式 | |
| 正在使用靜音情景模式 | |
| 正在使用耳機情景模式 | |
| 通話線路已轉接 | |
| 正在使用EDGE | |
| 漫遊 | |
| 飛航模式已開啟 | |
| 藍芽已啟動 | |
| 背景音樂播放 | |
| 背景音樂暫停 | |
| 記憶咭可使用 | |
LG KP502 | 使用手册
從狀態列變更狀態
點按狀態列上的「狀態摘要」符號。將顯示日前時間、網絡、SVC ID、電池、手機記憶體、外置記憶體、情景模式、MP3和藍芽狀態。您可在此處設定情景模式,播放/暫停MP3及啟用/暫停藍芽功能。
使用多項工作功能
按多項工作硬鍵,開啟多項工作功能表。您可從此處檢視已執行的所有應用程式並透過點按操作進行存取。 當某些應用程式正在使用時,則會顯示在狀態列中。
通話功能
撥打電話
1 點按 開啟按鍵。
2 使用鍵盤輸入號碼。若要刪除某個數字,請點按清除鍵。
3 按 硬鍵或點按 開始通話。
4 若要結束通話,請按硬鍵。
提示!若要在撥打國際電話時輸入「+」,請按住。
透過通訊錄撥打電話
1 從備用屏幕,點按以開啟通訊錄。
2 輸入要通話的聯絡人的前幾個字母。
3 從篩選清單中點按要通話的聯絡人,然後選擇要使用的電話號碼(若存有多個記錄)。
4 按 硬鍵或點按 開始通話。
接聽來電和拒接來電
手機響鈴後,按硬鍵或點按接聽來電。

點按靜音符號可使響鈴靜音。如果在開會時忘記將情景模式變更為「靜音」,此功能將十分有用。
按硬鍵或點按拒接來電。
LG KP502 | 使用手册
通話中選項
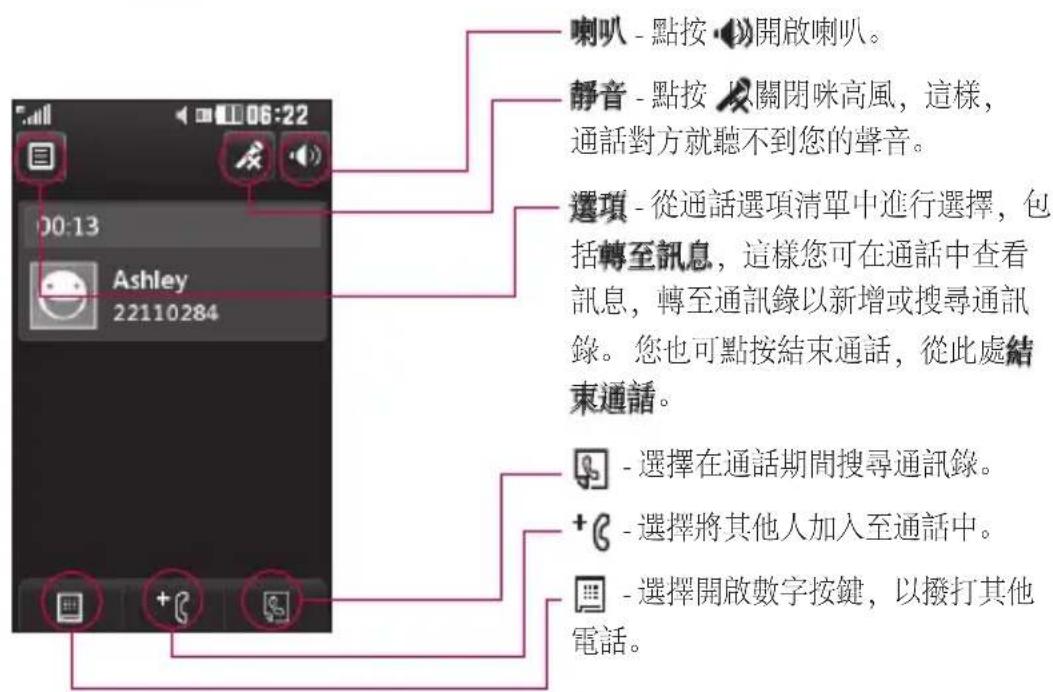
提示!如要捲動選項清單或通訊錄清單,請點按屏幕上顯示的最後一個項目並用指尖向上滑動屏幕。該清單會向上移動以便顯示更多項目。
通話功能
快速撥號
您可為常撥聯絡人指定一個快速撥號號碼。
1 從備用屏幕點按 📋 選擇 並按 📋 按
2 您的語音留言信箱已經設定至快速撥號1。您無法變更。點按其他號碼,為其指定快速撥號聯絡人。
3 通訊錄將開啟。透過點按一下相應的電話號碼,選擇要將其指定給此號碼的聯絡人。若要尋找某個聯絡人,請點按搜尋欄位方塊,然後輸入所需通訊錄名稱的首字母。
撥打其他電話
1 初始通話中,請點按☑選擇新增通話撥號。
2 撥號或搜尋通訊錄(詳情請參閱第20頁的撥打電話)。
3 按 連接通話。
4 兩個通話均將顯示於通話屏幕上。初始通話將會被鎖定,來電者被保留。
5 若要在通話間變換,請點按☑選擇切換通話或按保留通話的號碼。
6 要結束其中一個或兩個通話,請按☑並依次選擇結束和所有通話、保留通話或使用中通話。
提示!透過選擇加入通話, 以連接通話。檢查網絡供應商支援 會議呼叫。
注意:您需為撥打的每個電話付費。
關閉 DTMF
透過 DTMF,您可以使用數字指令在自動化通話內導覽功能表。預設情況下,雙音多頻處於開啟狀態。
若要在通話期間關閉 DTMF(例如記錄號碼),請點按 □ 並選擇 DTMF 關閉。
檢視通話記錄
提示!如要檢視更多選項清單,請點按屏幕上顯示的最後一個項目並用指尖向上滑動屏幕。該清單會向上移動以便顯示更多項目。
LG KP502 | 使用手册
點按,選擇並按。
提示!點按任何單個通話記錄項目,檢視通話的日期、時間和持續時間。
使用來電轉接
1 點按,依次選擇 和
2點按來電轉驗
3 可選擇全部語音通話、線路繁忙時、無人接聽或無法接通時。
4 輸入轉駁號碼。
5 點按要求予以啟用。
注意:轉駁電話需要收費。請聯絡網絡供應商,了解詳情。
提示!要關閉所有來電轉駁,請從來電轉駁功能表選擇停用全部。
使用通話限制
1 點按,依次選擇 和
2 點按通話限制。
3 選擇以下六個選項的任何一個:
所有撥出通話
國際通話撥號
本地以外的國際撥號
所有來電
國際漫遊時來電
停用全部
4 輸入通話限制密碼。請向您的網絡商查詢這項服務。
提示!選擇固定撥號號碼,
開啟並編輯可從此手機撥出的號碼清單。您需要從您的網絡商處得到一個 PIN2 碼。僅固定撥號清單中包含的號碼可從手機撥出。
通話功能
變更一般通話設定
1 點按,依次選擇 和
2點按通通殿設定 您可從此處修改以下選項的設定:
來電控接點按切換至開啟再按拒接列表。您可從所有通話、通訊錄或群組,或無名稱記錄(即不在通訊錄中的號碼)或無來電號碼中選擇。
發送我的機號碼-選擇撥出通話時,是否顯示您的號碼。
自動重複-點按以開啟或關閉。
接聽模式 - 選擇是否使用按發送鍵或按任何鍵接聽來電。
分鐘提示-點按以開/關,這樣您便可選擇通話時是否聽到分鐘提示音。
藍芽接聽模式 - 選擇免提,可使用藍芽耳機接聽來電,或選擇手機,便可透過按手機上的按鏈接聽來電。
儲存新號碼 - 選擇是儲存新號碼。
LG KP502 | 使用手册
通訊錄
搜尋通訊錄
有兩種方法可搜尋通訊錄:
從備用屏幕
1 從備用屏幕,點按以開啟通訊錄,然後搜尋。
2 點按或按硬鍵開始通話。
從主功能表
1 點按,選擇。
2 點按,選擇搜尋。
3 您會看到通訊錄清單,鍵入聯絡人名稱的第一個字母,使功能表跳至清單中包含該字母的通訊錄。
提示!點按空白方形區域後,將會會顯示文字觸控屏。
新增通訊錄
1 從備用屏幕,點按 並點按新增增通訊錄。
2 選擇將通訊錄儲存到手機或智能咭。
3 輸入新通訊錄的名字和姓氏。您不必同時輸入名和姓,但必須輸入其中一個。
4 您最多可為每個聯絡人輸入五個不同的號碼。每個記錄包含手機、家庭、辦公室、傳呼機、傳真和一般預設類型。完成後,請點按關閉。
5 新增電郵地址。
6 將聯絡人指定給一個群組。從以下選項中選擇:沒有群組、家庭、朋友、同事、學校或重要人士。
7 您亦可新增鈴聲、生日、週年紀念、主頁、住宅地址、公司名稱、職位、公司地址和備忘錄。
8 點按儲存可儲存通訊錄。
通訊錄
建立群組
1 點按並選擇。
2 點按,然後點按群組。
3 點按
4 選擇新增群組。
5 為您的新群組輸入名稱。您亦可為群組指定鈴聲。
6 點按儲存。
注意:若要刪除某群組,指定給該群組的通訊錄將不會遺失。它們仍會保留在您的通訊錄中。
變更通訊錄設定
您可對通訊錄設定進行調整,以便地址簿符合您自己的偏好。
提示!如要檢視更多選項清單,請點按屏幕上顯示的最後一個項目並用指尖向上滑動屏幕。該清單會向上移動以便顯示更多項目。
1 從備用屏幕點按並選擇。
2 點按 並選擇設定。
3 您可從此處對以下設定進行調整:
通訊錄列表設定 - 選擇檢視儲存於您的手機及智能咭中的通訊錄,還是僅檢視儲存於手機或智能咭中的通訊錄。
您亦可選擇通訊錄中先顯示名字還是姓氏。
複製 - 在手機與智能咭之間進行通訊錄複製。您可選擇依次序進行或同時複製全部。若選擇依次序,您需要逐一選擇要複製的每個通訊錄。
LG KP502 | 使用手册
移動 - 這和複製一樣,但通訊錄僅會儲存於您所移動至的位置。如果您將某個通訊錄從智能咭移動至手機,它將從智能咭記憶體中刪除。
透過藍芽傳送所有通訊錄 - 使用藍芽將您的通訊錄發送至另一裝置。若選定了此選項,系統將會確認藍芽開啟並讓您選擇藍芽裝置。
備份通訊錄 - 請參閱第 56 頁上的備份和還原手機資訊。
還原通訊錄 - 請參閱第 56 頁上的備份和還原手機資訊。
清除通訊錄資料 - 刪除您所有的通訊錄。若確定要清除通訊錄,選擇清除項目點按是。
檢視資訊
1 從備用屏幕點按並選擇。
2 點按 並選擇資訊。
3 您可以從此處檢視您的服務撥號號碼、本手機號碼、記憶體資訊(所剩記憶空間)及我的名片。
提示!若尚未為自己新增名片,請選擇我的名片,並輸入要用於聯絡的所有詳細資料。點按儲存以完成操作。
訊息
訊息
KP502 手機將短訊、多媒體訊息和電子郵件集中在同一功能表中,使用起來方便簡單。
您可以透過以下兩種方法,進入訊息中心:
1 從備用屏幕上點按
2 從備用屏幕點按,然後依次選擇

發送訊息
1 點按 開啟空白訊息。
2 您可從此處發送短訊或多媒體訊息。若要發送電子郵件,請從備用屏幕中點按然後選擇和詳情請參閱第30頁。
3 點按附加以便新增圖像、影片、聲音或常用範本等。
5 點按收件者以輸入收件者號碼,或點按搜尋圖示開啟通訊錄。您可以新增多個聯絡人。完成後,請點按發送。
警告:您將按收件者每頁文字訊息計費。
LG KP502 | 使用手册
警告:若在文字訊息加插了圖像、影片或聲音,它將自動轉換為多媒體訊息,而您亦需為此支付相應費用。
輸入文字
有五種方法輸入文字:
按鍵、鍵盤、手寫屏幕、手寫方塊、雙方格手寫輸入辨識。
您可透過點按 📄 和輸入法模式選擇輸入法。
T9 點按開啟 T9 模式。
您可選擇寫入語言。
123 點按以變換數字、符號和文字鍵盤。
使用 ↑ 變更指定文字輸入模式下的不同鍵盤類型(例如,大寫或小寫)。
T9 模式
在 T9 模式下,您將看到
T9 模式使用內置字典,識別根據點按按鍵順序寫入的單字。只需點按與要輸入字母關聯的數字按鍵,字典便可預測要使用的單字。
例如,按8、3、5、3、7、4、6、6、3可得到「telephone」。
Abc 模式
在 Abc 模式下,您将看到 79在 Abc 模式下,您必須重複點按按鍵,才能輸入字母。例如,要寫入「hello」,請點按 4 兩次、3 兩次、5 三次、5 又三次,然後按 6 三次。
鍵盤
在鍵盤模式下,屏幕會切換到全景模式,且屏幕上顯示完整的鍵盤。
只要點按各個字母,便可寫入訊息, 並按:
以切換到大寫/小寫
手寫識別
在手寫模式下,您只需要在屏幕上寫入要輸入的單字,KP502手機即會將手寫內容轉換為訊息。選擇手寫屏幕或手寫方塊,則視乎喜好而設定。
提示!在此模式下,您會發現使用觸控筆將十分容易。請記住輕按,以保護屏幕免受損壞。
手寫識別功能透過觸控筆繪出的型態換成字母、數字或其他字元,並將這些字元顯示為文字。
訊息
設定電子郵件
縱使出門在外,您亦可使用 KP502 上的電子郵件功能與其他人保持聯絡。 設定 POP3 或 IMAP4 電子郵件帳戶簡單方便。

1 點按,然後點按。
2 選擇,然後捲動功能表至設定
3 點按電子郵件並點按電子郵件帳號。
4 點按新增帳號。
5 「設定精靈」將協助您設定電子郵件設定。
6 透過選擇清單中的帳戶,您可查看和編輯設定。您亦可查看建立帳戶時自動填充的其他設定。
7 透過點按啟動,您可變更預設電子郵件帳戶。
擷取電子郵件
您可以自動或手動檢查您帳戶中的新電子郵件。請參閱第31頁的「變更電子郵件設定」,了解如何自動查收。 如要手動查收:

1 點按,然後依次選擇 和
2 點按重箱。
3 點按要使用的帳戶,然後點按
4 選擇擷取後,KP502便會連接到您的電子郵件帳戶並擷取您的新訊息。
透過新帳戶發送電子郵件
1 點按通訊功能表中的新電子件郵,且新電子郵件將開啟。
2 您可輸入收件者地址,然後編寫您的訊息。您亦可附加圖像、影片、聲音或其他檔案類型。
3 點按發送,您的電子郵件便會發出。
LG KP502 | 使用手册
變更電子郵件設定
您可根據自己的偏好,變更電子郵件設定。
1 點按,然後依次選擇 和
2 點按設定和電子郵件,然後您可調整以下設定:
允許回覆電郵-選擇是否允許發送「閱讀確認」訊息。
要求回覆電郵-選擇是否請求「讀取確認」訊息。
擷取時隔-選擇 KP502 查收新電子件郵訊息的頻率。
擷取數量 - 選擇任何一次擷取的電子郵件數量。
轉寄與回覆時加入原始訊息 - 選擇回覆中是否加入原始訊息。
包括附件-選擇是否在任何回覆中加入原始附件。
在漫遊時自動擷取 - 選擇是否在出國(漫遊)時自動擷取訊息。
新電子郵件通知 - 選擇是否要獲得新電郵的通知。
簽名 - 建立電郵簽名並啟用此功能。
重要性 - 選擇電郵的優先等級。
訊息資料夾
由於各資料夾的名稱相當清楚,您可辨識用於 KP502 的資料夾結構。
收件匣 - 接收到的所有訊息會置於收件匣中,您可從此處進行檢視、刪除及更多操作,詳情請參閱以下的管理您的訊息。
郵箱 - 在 KP502 上接收到的所有電子郵件會置於郵箱中。
草稿 - 若不夠時間完成編寫訊息,您可將寫完的部份儲存於此處。
訊息
寄件匣 - 這裡是發送中的訊息之臨時存放資料夾。
已發送項目 - 所有已發送出去的訊息會置於此資料夾中。
我的資料夾 - 建立資料夾,儲存您的訊息。
變更文字訊息設定
您的 KP502 已預先定義訊息設定,以便您可立即發送訊息。您可根據自己的偏好變更這些設定。
提示!如要檢視更多選項清單,請點按屏幕上顯示的最後一個項目並用指尖向上滑動屏幕。該清單會向上移動以便顯示更多項目。
點按,然後選擇設定設定選擇文字文字訊息。您可對以下各項進行變更:
文字訊息中心 - 輸入訊息中心的詳細資料。
發送報告 - 點按以開關,接收已發送訊息之確認訊息。
有效時期 - 選擇訊息儲存在訊息中心的時間。
訊息類型 - 將文字轉換成文字、語音、傳真、X.400 或電子郵件。
字元編碼 - 選擇字元的編碼方式。這將影響到您的訊息大小,進而影響資料費用。
發送長文字時設為 - 選擇以多個文字訊息或以多媒體訊息的方式發送長訊息。
變更多媒體訊息設定
您的 KP502 已預先定義訊息設定,以便您可立即發送訊息。您可根據自己的偏好變更這些設定。
點按 📄,然後依次選擇 📋。選擇設定和多媒體訊息。您可對以下各項進行變更:
LG KP502 | 使用手册
接收模式 - 選擇本地或漫遊網絡。隨後若選擇手動,您只會先收到多媒體訊息通知,以便您決定是否進行完整下載。
發送報告 - 選擇是否允許及/或要求發送報告。
閱讀回覆 - 選擇是否允許及/或要求回覆報告。
重要性 - 選擇多媒體訊息的優先等級。
有效時期 - 選擇訊息儲存在訊息中心的時間。
投影片播放時間 - 選擇投影片在屏幕上的播放時間。
建立模式 - 選擇您的訊息模式。
發送時間 - 選擇隔多久發送訊息。
多媒體訊息中心 - 輸入訊息中心的詳細資料。
變更其他設定
點按,選擇設定,然後:
留言信箱 - 聯絡網絡商,了解他們提供服務的更多詳情。
服務訊息 - 選擇要接收還是阻止服務訊息。您亦可透過建立受信任的和不受信任的寄件者列表來設定您的訊息安全性。
資訊服務 - 選擇區域廣播、頻道或語言。
相機
快速拍照
1 長按手機右側的。
2 取景器將顯示在屏幕上。
3 水平握住手機,將鏡頭對準拍照對象。
4 定位手機,這樣您可在屏幕中看到拍照對象。
5 相機對焦完成後,按手機側面的或按屏幕右下角的紅色方塊開始拍照。
拍攝照片後
拍攝的照片會顯示在屏幕上。圖像名稱會同右側的六個圖示一起顯示在屏幕。

點按以轉至圖片集。
點按以訊息、電子郵件或藍芽發送相片。請參閱第28頁了解如何「發送訊息」,並參閱第65頁了解如何「使用藍芽發送和接收檔案」。

點按以編輯相片。

點按將拍攝的圖片設為桌面牆紙。

點按以刪除剛剛拍攝的相片並點按認。取景器將再次出現。

點按直接拍攝另一張相片。當前將會被儲存。
LG KP502 | 使用手册
了解取景器
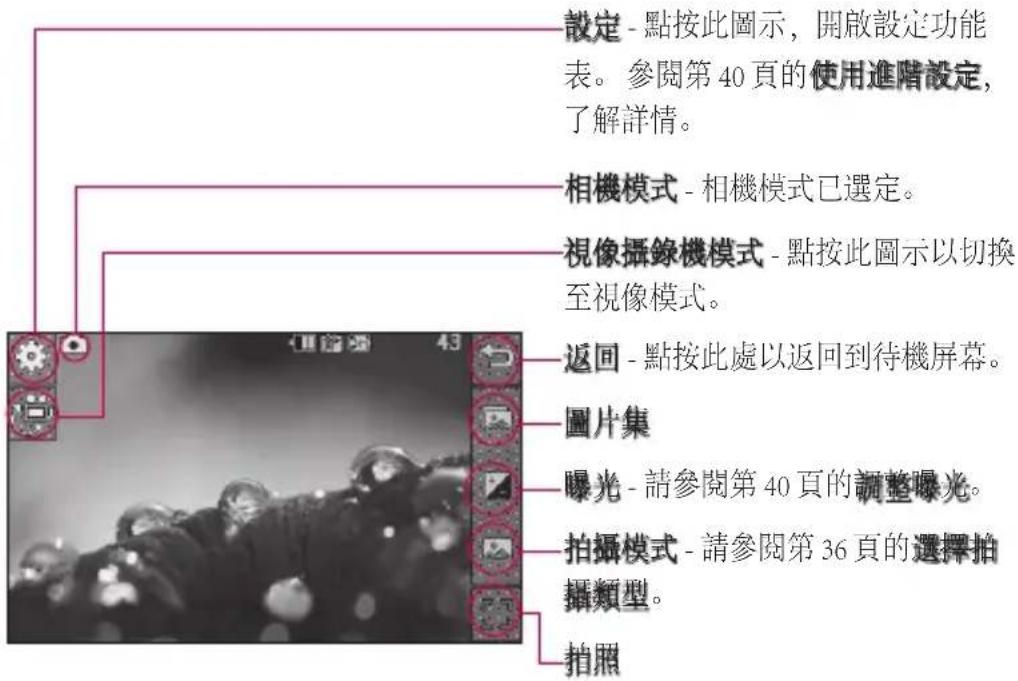
提示!您可透過點按屏幕顯示相關選項。這些選項在幾秒鐘後將自動關閉。
相機
選擇拍攝類型
1 點按以開啟可用的拍攝類型。
2 從以下兩個選項中選擇:
標準拍攝 - 這是預設拍攝類型,照片將以正常方式拍攝。
連環拍攝 - 此功能可讓您自動快速而連貫地拍攝 3 張、6 張或 9 張照片。
調整曝光
曝光定義圖像在有光和黑暗(對比度)中的區別。低對比度會將圖像顯示得較模糊,而高對比度會將圖像顯示得較清晰。
1 點按。
2 將對比度指示符沿列向左滑動,曝光度將降低,獲得的圖像較模糊,向右滑動,曝光度將提高,獲得的圖像較清晰。
使用進階設定
從取景器,點按以開啟所有進階設定選項。
預覽設定
LG KP502 | 使用手册
大小 - 變更相片大小,以儲存在記憶體空間中,請參閱第 37 頁的變更圖像大小。
色彩效果 - 選擇色調,以應用於拍攝的相片。請參閱第 37 頁的「選擇色彩效果」。
白平衡 - 從自動、白熱光、陽光、日光燈或陰天中進行選擇。
夜間模式 - 在黑暗區域使用時尤為有用。
自拍時計 - 自拍定時讓您設定按拍攝按鈕後,相機開始拍照前的延遲時間。可供選擇的選項為:3秒、5秒或10秒。當您要加入拍攝的群組照片中時,此選項十分有效。
質素 - 在特細緻、細緻及標準之間選擇。質量越細緻,相片便越清晰,但佔用的檔案空間會增大。這表示記憶體中儲存的相片會相應減少。
檢視模式 - 從全屏幕或完整圖像中選擇。在全屏幕模式下可能會對圖像進行一些剪輯。
其他設定
記憶體 - 選擇是將相片儲存至手機記憶體,還是儲存至外置記憶體。
快門聲 - 從三種快門聲音中選擇一種。
屏幕格線 - 從關閉、十字形或三等分 之間選擇
重設設定 - 重設所有相機設定。
提示!結束相機時,所有設定將返回為預設情況,但圖片大小和質素除外。所需的任何非預設設定需要重設,如色調。拍攝下一張照片前,需要進行檢查。
變更圖像大小
像素越高,檔案大小越大,從而佔據的記憶體空間便越多。若要使手機儲存更多的照片,請變更圖片像素,以縮小檔案大小。
1 從取景器中點按左上角的
2 從預覽功能表中選擇大小。
3 從以下六個數字選項(3M: 2048x1536、2M: 1600x1200、1M: 1280x960、640x480、400x240(W)、320x240)選擇像素值。
選擇色彩效果
1 從取景器中點按左上角的
2 從預覽功能表中選擇色彩效果。
3 可使用以下四種選項:關閉、黑色、負片或深褐色。
提示!拍攝相片後,您可將照片顏色從彩色變更為黑白或深褐色,但您無法將黑白色或深褐色照片變為彩色。
檢視已儲存照片
1 您可從相機模式存取已儲存的相片。只需點按您的圖片集即會顯示在屏幕上。
視像攝錄機
拍攝快速影片
1 長按手機右側的相機鍵。
2 在相機預覽模式下,點按取景器中的視像攝錄機圖示,切換至視像攝錄機模式。攝影機的取景器將顯示於屏幕上。
3 水平握住手機,將鏡頭對準拍攝對象。
4 按一下拍攝按鈕,開始錄製。或按屏幕右下方的紅點。
5 Rec 將顯示在取景器的頂部,計時器出現在底部,顯示拍攝影片的長度。
6 要暫停影片,請點按並透過選擇以繼續。
7 點按屏幕上的或再按一下拍攝按鈕,以停止錄製。
錄製影片後
已錄製的影片會顯示在屏幕上。影片名稱會同右側的六個圖示一起顯示在屏幕底部。
▶ 點按播放影片。
點按以訊息或電子郵件或藍芽方式發送影片。請參閱第28頁了解如何發送訊息,或參閱第65頁了解如何使用藍芽發送和接收檔案。
點按以編輯影片。
點按檢視已儲存影片和圖片的圖片集。
點按以刪除剛剛錄製的影片,透過點按是予以確定。取景器將再次出現。
點按此鍵可直接錄製另外一個影片。當前影片將會被儲存。
LG KP502 | 使用手册
了解取景器

01
02
03
04
05
06
07
08
提示! 您可以關閉所有快捷鍵
選項,以獲取較清晰的取景器屏幕。
只需要點按一下取景器中央。要再調用選項,請再按一下屏幕。
視像攝錄機
調整曝光
曝光定義影片在有光和黑暗(對比度)中的區別。低對比度會將影片顯示得較模糊,而高對比度會將影片顯示得較清晰。
1 點按
2 將曝光度指示符沿列向左滑動,曝光度將降低,獲得的影片較模糊,向右滑動,對比度將提高,獲得的影片較清晰。
使用進階設定
從取景器中,點按設定開啟所有進階設定選項。
預覽設定
影片大小 - 變更影片大小,以便節省記憶體空間。請參閱第 41 頁的變更影片圖像大小。
色彩效果 - 選擇色調,以應用於錄製的影片。請參閱第 41 頁的選擇色調。
自平衡-白平衡可確保影片中的任何白色顯示得真實。為了使相機正常調整白平衡,您可能需要確定光線條件。
從自動、自熱光、陽光、目光燈或陰天中進行選擇。
LG KP502 | 使用手册
質素 - 在特細緻、細緻及標準之間選擇。質量越細緻,則視像越清晰,佔用的檔案空間就會增加,從而使手機記憶體中儲存的視像數目減少。
設定時間 - 為影片設定播放時間限制。從無限制或多媒體訊息中選擇以限制影片大小,從而以多媒體訊息發送影片。
檢視模式 - 從全屏幕或完整圖像中選擇。在全屏幕模式下可能會對圖像進行一些剪輯。
提示!若選擇多媒體訊息播放時間,則可嘗試選擇較低質素,以讓您錄製較長的影片。
其他設定
記憶體 - 選擇是將影片儲存至手機記憶體,還是儲存至外置記憶體。
語音 - 選擇靜音以錄製沒有聲音的影片。
重設設定 - 重設所有視像攝錄機設定。
變更影片圖像大小
像素越高,檔案越大,從而佔據的記憶體空間使越多。若要使手機儲存更多影片,請變更圖片像素,以縮小檔案大小。
1 從取景器中點按左上角的
2 從預覽功能表中選擇影片大小。
3 從兩個選項中選擇像素值:
320x240 - 圖像大小較小,從而佔用的檔案空間較小。影片播放速度高達 24 fps,影片錄製速度高達 12 fps。
QCIF 176x144-圖像大小最小,從而佔用的檔案空間也最小。影片播放速度高達15 fps。
4 選擇要使用的大小選項。
提示!對於影片格式轉換軟件,請參閱隨 KP502 提供的光碟。
選擇色調
1 從取景器中點按左上角的
2 從設定功能表中選擇色彩效果。
3 在以下四種選項:關閉(標準)、黑白、負片或深褐色。
4 點按要使用的色調。
觀看已儲存影片
1 在取景器中,點按
2 圖片集將顯示於屏幕上。
3 點按一下要檢視的影片,使其顯示於圖片集。
4 再點按一下影片,以播放影片。
照片及影片
檢視照片及影片
1 點按相機預覽屏幕上的
2 圖片集將顯示於屏幕上。
3 點按以開啟影片或相片。
4 若要播放影片,請點按 ▶ 若要暫停播放,請點按 ▶
提示!左右滑動以檢視其他相片或影片。
從影片中擷取圖像
1 選擇要從其擷取圖像的影片。
2 點按||以暫停要將其轉換為圖像的影片,並點按屏幕右側以開啟選項目錄。
3 從選項功能表,選擇。
4 圖像將顯示於屏幕上,且包括其指定的圖像名稱。
5 點按圖像,然後按一下返回至圖片集。
圖像將儲存至「我的圖像」資料夾,且顯示在圖片集中。您需要結束圖片集,然後重新開啟以便使其顯示出來。
警告:若未在手機上記錄多媒體檔案,部份功能將無法正常使用。
以投影片播放形式檢視照片
投影片模式將以投影片播放的形式, 一次一張顯示圖片集中所有照片。無法以投影片播放形式檢視影片。
1 開啟要開始投影片播放的照片。
2 選擇
3 投影片播放開始。
投影片放映中有多個選項:
點按以隨機顯示。
■■ 點按以暫停特定相片的投影片放映。
再按一下繼續播放。
點按此鍵可加快或減慢投影片的放映速度。
LG KP502 | 使用手册
將照片設定為待機圖片
1 選擇要將其設為待機圖片的照片,予以打開。將相片轉換為橫向模式。
2 點按屏幕右側以開啟選項目錄。
3 點按
4 屏幕將切換到人像模式。然後,您可變更圖片的大小。
5 若對此圖片滿意,請點按設定。
編輯照片
可對照片執行多項操作,如編輯等。
1 開啟要編輯的相片,並點按顯示相關選項。
2 點按圖示,以修改照片:
裁剪相片,並用指尖在屏幕上滑動以選擇區域。
用手在相片上進行繪製。從四個選項中選擇線條粗細以及要使用的色彩。
T 在圖片上編寫文字。請參閱第44頁的在照片中加入文字。
使用印章裝飾相片。從不同印章中選擇並加到照片上。
清除剛繪製的線條。
儲存對相片作出的變更。可選擇儲存至原始檔案,或儲存為新檔案。如果選擇新檔案,輸入檔案名稱。
←復原對相片作出的上一次效果或編輯。
可對相片作出變更。
點按以開啟更多效果選項,請參閱第44頁的。
可對相片作出調整。
點按以返回圖片集。
照片及影片
在照片中加入文字
1 從編輯屏幕中點按 T
2 選擇簽名,新增無邊框文字,或選擇其中一個語音氣泡形狀。
3 使用鍵盤輸入文字並點按儲存。
4 透過點按並將其滑至目標位置,從而移動文字。
在照片中加入效果
1 從編輯屏幕中點按
2 選擇後,將選項應用於照片:
臉部美化-自動偵測圖像中的人物面部並使其變亮。
暗角效果 - Lomo 相機效果。
彩色負片-彩色負片效果。
黑白-黑白色彩效果。
深褐色-復古效果。
模糊-應用模糊效果。
銳利強化-沿著指示列移動,以銳化照片焦點。選擇OK圖示,應用變更或選擇予以復原。
馬賽克 - 點按以將模糊馬賽克效果應用於相片。
油畫 - 油畫效果。
素描 - 對圖片應用特殊效果,使其看起來像素描。
浮雕 - 浮雕效果。
曝光 - 變更光線的曝光效果
鮮艷 - 明亮鮮明效果。
月光 - 變更光線效果。
復古 - 老式圖像效果。
發光 - 光束效果。
卡通-卡通效果。
水彩 - 水彩效果。
3 要復原效果,只要點按復原
LG KP502 | 使用手册
多媒體
您可將多媒體檔案儲存在手機記憶體中,以便輕鬆存取所有圖像、聲音、影片和遊戲。您亦可將檔案儲存至記憶咭中。使用記憶咭的好處在於,您可以釋放手機記憶體的空間。
要存取多媒體功能表,請依次點按和點按以開啟儲存所有多媒體檔案的資料夾清單。
圖片
我的圖像包括圖片清單,其中有預載至手機的預設圖像、下載的圖像和透過手機相機拍攝的圖像。
點按 □ 將檢視模式從多格子檢視變更為列表檢視。
發送照片
1 依次點按和。
2 點按,然後選擇我的圖像
3 點按 📂 選送從訊訊息電郵郵轉藍芽中選擇。
4 若選擇訊息或電子郵件,您的相片會附加至訊息中,且您可按正常方式編寫和發送訊息。選擇藍芽後,藍芽功能將會自動開啟,且手機將搜尋裝置以發送圖片。
使用圖像
您可選擇用作牆紙,或甚至將其用於識別來電者。
1 依次點按 和 。
2 點按,然後點按我我的像
3 選擇一個圖像並點按
4 點按使用方式並選擇以下一項:
牆紙 - 為待機屏幕設定待機圖片。
通訊錄圖像 - 給通訊錄清單中的特定通訊錄分配一個圖像,以便在其向您致電時顯示。
開機圖像 - 設定開機時所顯示的圖像。
多媒體
關機圖像 - 設定關機時所顯示的圖像。
列印圖像
1 依次點按和。
2 點按,然後點按我的圖像
3 選擇一個圖像並點按
4 點按列印,然後在藍芽和PictBridge之間選擇。
提示!您可透過藍芽或連接至 PictBridge 相容打印機進行列印。
移動或複製圖像
您可以在手機記憶體和記憶咭之間移動或複製圖像。若要釋放某記憶庫中的部份空間,或要確保圖像不會遺失,您便需要進行這項作業。
1 依次點按和。
2 點按,然後點按我的圖像
3 點按□選擇移動動複製
4 透過連續點按圖像,您可標記/取消標記該圖像。標記要移動或複製的圖像並點按複製/移動。
聲音
我的聲音資料夾包含已下載的聲音、預設聲音和錄音記錄。您可在此處管理、發送或將聲音設定為鈴聲。
LG KP502 | 使用手册
使用聲音
1 依次點按和。
2 依次點按 和我的聲音
3 選擇預設聲音或錄音記錄。
4 選擇某個聲音,並開始播放此聲音。
5 點按 📋 選擇使使用式式
6 從以下選項中選擇:鈴聲、訊息提示音、開機或關機。
影片
我的影片資料夾會顯示已下載的影片清單以及您在手機上錄製的影片清單。
觀看影片
1 依次點按和。
2 依次點按和我的影片
3 選擇一個影片進行播放。
發送錄像片段
1 選擇影片並點按
2 點按發送並從以下選項中選擇訊息、電子郵件或藍芽。
3 若選擇訊息或電子郵件,則錄像片段會附加至訊息中,您亦可正常編寫和發送訊息。選擇藍芽後,藍芽功能將自動開啟,且手機將搜尋裝置以發送影片。
遊戲和應用程式
您可以將新遊戲與應用程式安裝在手機上,以便用其打發空間時間。
多媒體
透過手機安裝,安裝遊戲/應用程式
1 依次點按 和 。
2 插入外置記憶體後,依次點按「和其他或我的記憶咭。
3 選擇要安裝的檔案 (*.jad 或 *.jar) 並按安裝指令。應用程式將進行安裝。
注意: jad 應包含其自身的 jar。
玩遊戲
1 依次點按 和 。
2 依次點按 📂 和我我的戲應應程程式。
3 開啟遊戲資料夾,選擇並點按一個遊戲以啟動遊戲。
LG KP502 | 使用手册
文件
從文件功能表,您可檢視所有文件檔案。您可從此處檢視 Excel、PowerPoint、Word、文字和 PDF 檔案。
傳送檔案到手機
藍芽很可能是將檔案從電腦傳送到手機的最簡易方式。您也可以透過USB線使用LG PC Suite,詳細資訊請參閱第56頁。
接收藍芽傳送:
1 確保您的手機與電腦均已開啟藍芽,並已被對方偵測到。
2 使用電腦,透過藍芽發送檔案。
3 檔案發送後,您需要按是予以接受。
4 該檔案應出現於您的文件或其他資料夾中。
檢視檔案
1 依次點按和。
2 依次點按相文件
3 選擇一個文件,以檢視。
其他
此其他資料夾用於儲存圖片、聲音、影片、遊戲或應用程式以外的檔案。其使用方式與文件資料夾相同。您可能會發現,從電腦將檔案傳送到手機時,這些檔案將出現於其他資料夾而不是文件資料夾中。
若發生這種情況,您可以將其移走。
1 依次點按和。
2 依次點按和其他
3 點按
4 點按移動,並透過點按要移動的檔案,再按移動。傳輸完成後,屏幕將顯示已移動。
製作電影
1 依次點按和。
2 點按 (Muvee studio)。
3 點按 + 新增圖像。選擇要包含的圖像,然後選擇附加。
4 點按式樣標籤,選擇 Muvee 式樣。
5 點按顔設聲音以變更聲音。
6 點按 查看所創建的內容。
7 依次點按順順進行排序。
8 依次點按儲儲儲位置選擇電影儲存位置。
音樂
LG KP502 具有內置的音樂播放器,這樣,您可播放所有喜愛的曲目。若要存取音樂播放器,請依次點按
和 📌 您可從此處存取大量資料夾:
最近播放 - 檢視所有最近播放的歌曲。
全部曲目 - 包含手機上的所有歌曲。
演出者 - 按演出者瀏覽音樂收藏。
專輯 - 按專輯瀏覽音樂收藏。
類型 - 按類型瀏覽音樂收藏。
播放列表 - 包含已建立的所有播放列表。
多媒體
隨機播放曲目 - 按隨機順序播放曲目。
將音樂傳送至手機
將音樂傳送至手機的最簡單方式是透過藍芽或USB線。
您亦可使用 LG PC Suite,詳情請參閱第 56 頁。接收藍芽傳送:
1 確保兩個裝置均開啟藍芽,且彼此可看見對方。
2 選擇其他裝置上的音樂檔案並選擇透過藍芽發送。
3 準備發送檔案時,您應透過在手機上點按是予以接受。
4 檔案應顯示於音樂>全部曲目。
播放歌曲
1 依次點按和。
2 依次點按加全部曲目。
3 选择要播放的歌曲。
4 點按以暫停歌曲。
5 點按以跳至下一首歌曲。
6 點按以跳至上一首歌曲。
7 點按 返回至音樂功能表。
建立播放列表
透過從全部曲目資料夾中選擇歌曲項目,從而建立自己的播放列表。
1 依次點按和。
2 依次點按加播放列表。
3 點按新增播放列表,輸入播放列表名稱並點按儲存。
4 全部曲目資料夾將顯示手機中的所有歌曲。點按要納入播放列表的所有歌曲;記號將顯示於對應的曲目名稱旁。
5 點按完成。
LG KP502 | 使用手册
使用收音機
LG KP502 手機具有 FM 收音機功能,以便您可外出時收聽喜歡的電台節目。
注意:您需要插入耳機才可收聽收音機。將耳機插入耳機插孔(與插入充電器的插孔相同)。
搜尋電台
透過手動或自動搜尋電台節目,將其保留到手機中。這些節目將儲存至特定頻道編號,如此以來,您就不需要重新調諧。手機中最多可儲存50個頻道。您必須首先將耳機連接至手機以作為天線使用。
自動調諧:
1 依次點按和。
2 點按然後按。
3 點按自動掃描。手機將自動搜尋電台,並將找到的電台分配至手機的某個頻道上。
注意:您亦可透過使用顯示在電台頻率旁的◀和,▶手動調諧電台。若按住◀和,▶則將自動搜尋電台。
重設頻道
1 依次點按 和 。
2 依次點按。
3 選擇重設頻道以重設目前頻道,或選擇重設所有頻道以重設全部頻道。每個頻道將返回至開始 87.5Mhz 頻率。
記事簿
新增事件至日曆
1 從備用屏幕中選擇,然後點按並選擇 30 選擇日曆。
2 選擇要將事件新增至的日期。
3 依次點按 70 新新事件
4 點按類型,然後從以下選項中選擇:
約會、週年紀念或生日。
檢查日期,並輸入開始事件的時間。
5 對於約會和週年紀念日,請在下方兩個時間和日期方塊中輸入結束事件的時間和日期。
6 若要為事件加入備註或位置,請點按備註,並鍵入備註內容,然後按儲存。
7 設定轉鐘和重複。
8 選擇儲存,則事件將儲存至日曆中。方形游標會標記已儲存事件的日期,且於事件開始時間會響鈴(視乎鬧鐘設定),以便您可以進行組織。
LG KP502 | 使用手册

新增項目至待辦事項
1 從備用屏幕中選擇,然後點按並選擇 30

2 選擇在辦事項並點按新增辦事項。
3 為待辦事項項目設定日期,新增備註並選擇重要性:高、申或低。
4 透過選擇儲存,儲存您的待辦事項清單項目。
新增備忘錄
1 從備用屏幕中選擇,然後點按並選擇 30 選擇備備錄錄

2 點按新增備忘錄。
3 鍵入備忘錄,然後按儲存。
4 下次開啟備忘錄應用程式時,備忘錄將顯示在屏幕上。
使用日期搜尋器
日期搜尋器是一種方便快捷的工具, 有助於您計算特定天數後的日期。例如,自07年10月10日60天後的日期為2007年12月09日。 非常適合標記時限。
1 從備用屏幕中選擇,然後點按並選擇 30

2 選擇日期變異器。
3 在由標籤中設定所需日期。
4 在之後標籤中設定天數。
5 以下將顯示預計日期。
設定鬧鐘
1 從備用屏幕中選擇,然後點按並選擇
2 點按新增制罐。
3 設定鬧鐘響鈴的時間。
4 選擇鬧鐘響鈴方式:不重覆、每天、星期一至星期五、星期一至星期六、星期六至星期日、假日除外或選取工作天。
圖示指明您選擇的工作日。
5 選擇鐘鐘類型,為鬧鐘選擇一種類型。
6 點按鬧鐘提示音,然後選擇顛設聲音或錄製記錄資料夾搜尋聲音。若要收聽聲音,請點按
7 新增鬧鐘備忘錄。完成鍵入備忘錄時,點按向下圖示。
最後,您可將延後時隔設定為5、10、20、30分鐘、1小時或關閉。
9 一旦設定鬧鐘後,點按儲存。
注意:您最多可設定5個鬧鐘。
提示!點按鬧鐘右側的開啟/關閉圖示進行設定。
使用繪圖面板
1 從備用屏幕中選擇,然後點按並選擇
2 點按新增繪圖。
3 在觸控屏幕上編寫備忘錄,然後點按。
4 下次開啟繪圖面板時,檔案將顯示在屏幕上。
語音備忘錄
使用語音備忘錄錄製語音備忘錄或其他聲音。
1 依次點按和。
2 依次點按 📄 和 📋 定義從以下選項中選擇:
長度 - 設置錄製時間。從以下選項中選擇:無限制、多媒體訊息大小或1分鐘。
01
02
03
04
05
06
07
08
記事簿
質素 - 選擇聲音質素。從特細緻、細緻或標準中進行選擇。
錄製聲音或語音
1 依次點按和。
2 點按
3 點按以開始錄製。
4 點按以結束錄製。
5 點按▶收聽錄音。
使用計算機
1 從備用屏幕中選擇,然後點按並選擇
2 選擇計算機。
3 點按數字鍵,輸入數字。
4 對於簡單計算,點按所需的功能 (+、-、*、/),然後按 =。
5 對於較複雜的計算,請點按從
sin、cos、tan、log、ln、exp、sqrt、deg 或 rad 等中選擇.
轉換單位
1 從備用屏幕中選擇,然後點按並選擇
2 選擇單位轉換器。
3 選擇是要轉換匯率、面積、重量、長度、溫度、體積還是速度。
4 然後,您可選擇單位,輸入要轉換的值,然後輸入要轉換至的單位。
5 對應值將顯示於屏幕上。

使用秒錶
1 從備用屏幕中選擇,然後點按並選擇
2 選擇秒表。
3 點按開始開始使用計時器。
4 如果要記錄圈速,點按分段。
5 點按停止結束計時器。
6 點按恢復以在停止的時刻處重新啟動秒錶,或點按重新設定重新開始計時。

LG KP502 | 使用手册
新增城市至世界時間
1 從備用屏幕中選擇 ▶ 然後點按並選擇

2 選擇世界時間。
3 依次點按☑和新新增城市開始鍵入所需的城市名稱,且其將顯示於屏幕的頂端。
電腦同步
您可將電腦同手機保持同步,從而確保所有重要詳情和日期相匹配,同時作為重要檔案備份,讓您完全放心。
在電腦上安裝 LG PC Suit
1 從手機備用屏幕按並依次選擇
和。
2 選擇 USB 連接模式並選擇 PC suite。
3 將附上的光碟 插入電腦。按一下出現在螢幕上的 LG PC Suite 安装程式。
4 選擇執行安裝程式時使用的語言並按一下確定。
5 遵循屏幕上的說明,完成 LG PC Suite 安裝程式精靈。
6 安裝完成後,LG PC Suite 圖示將顯示於桌面上。
連接手機和電腦
1 將 USB 線連接到手機和電腦。
2 連按兩下位於桌面上的 LG PC Suite 圖示。
3 依次按連線精確和 USB。
4 依次按下一步、下一步和完成。
手機和電腦現已連接。
備份和還原手機資訊
1 如同以上所述,將手機連接到電腦。
2 按一下備份圖示,並選擇備份或還原。
3 標記要備份或還原的內容。選擇要將資訊備份至的位置或還原自其資訊的位置。按一下開始備份。
4 將對您的資訊進行備份或還原。
LG KP502 | 使用手册
檢視電腦上的手機檔案
1 如同前文所述,將手機連接到電腦。
2 按一下內容圖示。
3 所有儲存至手機上的文件、flash 内容、圖像、聲音和影片將會顯示於 LG 手機資料夾的屏幕上。
提示!在電腦上檢視手機的內容,有助您整理檔案、管理文件並刪除不再需要的內容。
同步處理通訊錄
1 將手機連接到電腦。
2 按一下連絡人圖示。
3 現在,電腦匯入並顯示儲存至智能卡和手機的所有通訊錄。
4 按一下檔案並選擇儲存。現在,您可選擇要儲存通訊錄的位置。
注意:要備份儲存 SIM 咕的通訊錄,請按一下位於電腦屏幕左側的 SIM 咕資料夾。然後在右方其中通訊錄上按滑鼠右鍵,然後選擇全部選擇。
再於同一位置上按滑鼠右鍵,並選擇複製到手機記憶體。現在按一下位於屏幕左側的電話記憶體,顯示所有號碼。
同步訊息
1 將手機連接到電腦。
2 按一下訊息圖示。
3 手機的訊息將顯示於屏幕的資料夾中。
4 使用位於屏幕頂端的工具列以整理訊息。
電腦同步
將手機用作音樂同步裝置
您的手機可用作音樂同步裝置,以僅同步音樂檔案。
使用 Windows Media Player 10 / 11 可完成音樂同步,且支援手機記憶體和外置記憶咭。
1 中斷電腦與手機之連接。
2 從備用屏幕中選擇,然後點按
3 依次選擇 和 USB 連接機模式
4 點按音樂同步。
5 將手機連接到電腦。手機將讀取:以音樂同步連接…以及中斷連接以停止音樂同步。
LG KP502 | 使用手册
網絡功能
瀏覽器
瀏覽器可讓您快速、盡情享受遊戲、音樂、新聞、體育和娛樂,並直接往手機中載入更多內容。而無論您身在何處,有何種需求,均能一一滿足您。
存取網絡
1 從備用屏幕中選擇 📋 然後點按並選擇 📃

2 要直接存取瀏覽器主頁,請選擇主頁。或者,選擇輸入網址並鍵入所需的 URL,然後點按連接。
注意:連線至此服務和下載內容,需另行收費。請向網絡供應商諮詢收費詳情。
新增並存取書簽
為了方便快捷存取喜愛的網站,您可新增書簽並儲存網頁。
1 從備用屏幕中選擇,然後點按並選擇

2 選擇書簽。書簽清單顯示在屏幕上。
3 要新增書簽,請選擇☑然後點按新增書簽。依次輸入書簽標題和連結。
4 點按儲存。此時,書簽將顯示於書簽清單中。
5 若要存取書簽,只需點按書簽,然後點按連接。您將連線到該網頁。
使用 RSS 讀取装置
RSS (Really Simple Syndication) 是網絡 Feed 格式成員之一,用於發布經常更新的內容,如 Blog 條目、新聞標題或 Podcasts。RSS 文件也稱為 feed、web feed 或頻道,包含來自關聯網站的內容概要或完整文字。RSS 使得人們可以自動跟蹤其最愛網站的更新,這比手動查看要容易多了。
用戶可透過在閱讀器中輸入 feed 連結或按一下啟動訂閱程序的瀏覽器中的 RSS 圖示,即可訂閱 feed 服務。閱讀器會定期檢查用戶訂閱的 feeds,查看是否有新內容更新,並下載其發現的任何更新。
網絡功能
儲存網頁
1 按照以上所述操作,存取所需的網頁。
2 點按 📄 選擇儲 此此頁面
3 為網頁輸入名稱,這樣,您可方便進行識別。
4 點按儲存。
提示!此功能表亦讓您編輯已儲存頁面標題,保護或取消保護屏幕備忘錄並刪除已儲存頁面。
存取已儲存的網頁
1 從備用屏幕中選擇,然後點按並選擇
2 選擇儲有的網頁。
3 選擇所需的頁面後,頁面即會開啟。
檢視瀏覽器記錄
從備用屏幕中選擇,然後點按並選擇。 選擇記錄。


LG KP502 | 使用手册
2 最近存取的網頁標題清單會顯示。若要存取這些網頁中的某個網頁,只要選擇所需網頁即可。
變更網頁瀏覽器設定
1 從備用屏幕中選擇,然後點按並選擇。 選擇設定。

2 您可以选择編輯網絡設定、外觀設定、快取記憶、Cookies、安全,或者,您亦可選擇重設設定以重設所有設定。
將手機用作數據機
KP502 亦可用作電腦的數據機,為您提供電子郵件和互聯網存取功能。您可以使用 USB 線或藍芽連接。
使用 USB 線:
1 確保 LG PC Suite 已安裝於電腦上。
2 使用 USB 線連接 KP502 手機和電腦,並啟動 LG PC Suite 軟件。
3 按一下電腦上的 Internet Kit。然後按一下新增按鈕並選擇數據機。
4 選擇 LG Mobile USB 數據機並選擇確定。此時,它將顯示在屏幕上。
5 編寫可連接至互聯網的設定檔並儲存相關值。
6 建立的設定檔會顯示在電腦屏幕上。選擇該設定檔並按一下連接。
電腦將透過 KP502 連接。
注意:有關使用 LG PC Suite 進行同步的詳情,請參閱第 56 頁。
使用藍芽:
1 確保藍芽已開敞,且可見於電腦和KP502手機。
2 配對電腦和 KP502 手機,以便在連線時需要密碼。
3 使用 LG PC Suite 上的連線精靈,建立有效的藍芽連線。
4 按一下電腦上的 Internet Kit。然後按一下新增按鈕。
5 選擇 LG Mobile USB 數據機並選擇確定。此時,它將顯示在屏幕上。
6 編寫可連接至互聯網的設定檔並儲存相關值。
7 建立的設定檔會顯示在電腦屏幕上。 選擇該設定檔並按一下連接。 電腦將透過 KP502 連接。
注意:有關藍芽的更多資訊,請參閱第65頁。
設定
在此資料夾內,您可調整設定,以便讓此 KP502 彰顯您的個性。
注意:有關通話設定的詳情,請參閱第24頁。
個人化情景模式
您可以在備用屏幕中快速變更您的情景模式。可點按狀態摘要符號,並點按情景模式標籤。
使用設定功能表,您便可個人化每種情景模式設定。
1 按並選擇。
2 點按情景模式,然後選擇您要編輯的情景模式。
3 然後,您可變更清單中可用的所有聲音和提示選項,包括語音鈴聲和音量、訊息提示音設定等。
變更屏幕設定
1 點按並選擇。
2 點按並從以下選項中選擇:牆紙-為備用屏幕選擇牆紙。上層功能表-選擇功能表樣式。
LG KP502 | 使用手册
撥號 - 調校號碼大小和色彩。
字體 - 調整字體大小。
背光燈 - 選擇背光燈的維持時間。
注意:背光燈開啟時間越長,耗費的電量就越多,這樣,手機充電將更頻繁。
亮度 - 調校屏幕的亮度。
問候語訊息 - 選擇開啟或關閉,填寫問候語訊息。
開機/關機 - 為開機/關機屏幕選擇主題。
3 點按儲存,儲存您的設定。
變更手機設定
您可隨意變更 KP502 的設定,以便適合您的個人喜好。
提示!如要檢視更多選項清單,請點按屏幕上顯示的最後一個項目並用指尖向上滑動屏幕。該清單會向上移動以便顯示更多項目。
1 點按並選擇。
2 點按然後從以下清單中選擇。
日期及時間 - 調整您的日期和時間設定,或選擇根據旅遊或夏令時間來自動更新時間。
電源節省 - 選擇關閉、僅限夜間或常開。
語言 - 變更 KP502 的顯示語言。
自動按鍵鎖 - 在備用屏幕下自動鎖定按鍵。
安全 - 調節您的安全設定,包括 PIN 碼及手機鎖。
記憶體管理 - 請參閱第 64 頁的使用 記憶體管理,了解更多資訊。
重設設定 - 將所有設定重設為原廠設定。
手機資訊 - 檢視 KP502 手機的技術資訊。
變更連接設定
您的網絡商已經為您設定連線設定,因而,您可以立即享用您的新手機。若要變更任何設定,請使用此功能表。
點按,然後按
選擇。
網路設定
選擇網絡 - 若設定為自動,則 KP502 會自動搜尋網絡,並在網絡上註冊手機。推薦使用這種方式以便獲得最佳的服務和品質。
若設定為手動,則將顯示目前可用的所有網絡並且您可選擇其中一個進行註冊。若網絡註冊失敗,則網絡清單會再次列示,且您可選擇任何其他一個進行註冊。
注意:若手機在手動模式下丟失網絡連接,則會在備用屏幕上顯示一則快顯訊息,提示選擇可用網絡。
設定
首選列表 - 若網絡正進行自動搜尋,您可新增首選網絡進行連接。
互聯網設定 - 此功能表顯示互聯網設定檔。透過「選項」功能表,您可新增網絡設定、刪除或編輯這些設定。但是,視乎國家的不同,您可能無法刪除或編輯預設設定。
存取點 - 您的網絡商已經為您儲存此資訊。您可以使用此功能表來新增存取點。
分組數據連線 - 選擇何時應為分組資料將裝置連接至網絡。
USB 連接模式 - 選擇資料服務並透過 LG PC Suite 軟件同步您的 KP502,藉此複製您手機中的檔案。有關同步的詳情,請參閱第 56 頁。
若將音樂同步與 Windows Media Player 配合使用,則選擇此功能表中的音樂同步。音樂同步功能僅可用於同步音樂內容。
使用記憶體管理
KP502 手機具有三種可用記憶體:手機、智能咭和外置記憶咭(您可能需要另行購買記憶咭)。
您可以查看記憶體可用的空間。
依次點按 和 依次選擇 和
記憶體管理。
手機共用記憶體 - 檢視 KP502 手機上可用於圖片、聲音、影片、Flash內容、和其他的記憶體。
手機預留記憶體 - 查看手機上可用於文字訊息、通訊錄、日曆、待辦事項、備忘錄的記憶體。
智能咭記憶體 - 檢視智能咭上的可用記憶體。
外置記憶體 - 檢視可用於外置記憶咭的記憶體(您可能需要另行購買記憶咭)。
主要儲存裝置設定 - 選擇首選儲存項目的位置。
設定
64
LG KP502 | 使用手册
使用藍芽發送和接收檔案
藍芽是一種發送和接收檔案的好方法,因為不需要USB線,且連線方便快捷。您亦可連接藍芽到手機,以接聽來電。
發送檔案:
1 開啟要發送的檔案,通常為照片、影片或音樂檔案。
2 選擇發送。
選擇藍芽。
3 若已配對藍芽裝置,則 KP502 不會自動搜尋其他藍芽裝置。否則,KP502 手機將搜尋範圍內其他已啟動藍芽的裝置。
4 選擇要將檔案發送至的裝置並點按是。
5 您的檔案將會送出。
提示!留意進度列,確保檔案已發送。
接收檔案:
1 接收檔案前,藍芽必須均設定為開啟和可見。請參閱右側的「變更藍芽設定」,了解更多資訊。
2 系統顯示一則訊息,提示您接受來自寄件者的檔案。點按是以接收檔案。
3 您可查看到儲存檔案的位置且選擇檢視檔案或用作牆紙。檔案通常會儲存至媒體集中的合適資料夾。
變更藍芽設定:
1 點按並選擇。
2 選擇,然後點按 立選擇設 設定。
對以下選項作出變更:
顯示我的手機 - 選擇可見或隱藏或可見時間為 1 分鐘。
設定
我的裝置名稱 - 為 KP502 手機輸入名稱。
支援的服務-根據不同服務選擇如何使用藍芽。請參閱第60頁的將手機用作數據機或第66頁的使用藍芽耳機。
遠端智能咭模式 - 開啟或關閉。
我的位址 - 顯示您的藍芽地址。
同其他藍芽裝置配對
透過將 KP502 手機同其他裝置配對,您可設定一個密碼保護連接。這意味著配對會更安全。
1 檢視藍芽是否為闌敞和可見。您可在設定功能表中變更您的可見狀態。
2 點按搜尋。
3 您的 KP502 手機將搜尋裝置。完成搜尋後,更新將顯示在屏幕上。
4 選擇要配對的裝置並輸入密碼,然後點按確定。
5 然後,手機將連接到其他裝置,且您必須在此裝置上輸入相同的通行碼。
6 密碼保護藍芽連線已準備就緒。
使用藍芽耳機
1 檢視藍芽是否為開敞和可見。
2 遵循隨手機附帶的說明,將手機置於配對模式中並配對裝置。
3 點按永遠詢問或不詢問即允許,點按是立即連接。KP502 手機將自動切換到耳機情景模式。
設定
66
LG KP502 | 使用手册
配件
以下配件隨 KP502 手機一起提供。
充電器

電池

立體聲耳機 使用手冊

natural_image
Coiled black cable with two connectors and a rectangular connector, labeled '手册' (Table of Contents) in the top-left corner.USB 線及光碟
在 KP502 和電腦間建立連接並進行同步。
使用手册
了解更多 KP502 手機的 資訊。


注意:
- 只可用原装 LG 配件。
- 不使用原装 LG 配件,保養可能失效。
- 不同的地區可能有不同的配件,請向我們的地區服務公司或代理商了解更多詳情。
保護貼
警告:在觸控屏幕上貼保護貼後,觸控靈敏度可能會有所降低。

01
02
03
04
05
06
07
08
配件
網絡服務 技術資料
本手冊所述之無線電話經認可適用於GSM 900、DCS 1800、GSM 850及PCS 1900網絡。
手冊中提及的多項功能均為網絡服務。這些特殊服務需向您的無線服務供應商申請。使用這些網絡服務前,您必須向無線網絡供應商訂閱服務並獲取有關如何使用的說明。
技術資料
一般
產品名稱:KP502
系統:GSM 900 / DCS 1800 / GSM 850
/ PCS 1900
環境溫度
最高: +55^ C(放電),
+45°C (充電中)
最低: -10^ C
LG KP502 | 使用手册
Declaration of Conformity

LG Electronics
Suppliers Details
Name
LG Electronics Inc
Address
LG Twin Tower 20, Yeouido-dong, Yeongdeungpo-gu Seoul, Korea 150-721
Product Details
Product Name
E-GSM 900 / DCS 1800 / GSM 850 / PCS 1900 Quad Band Terminal Equipment
Model Name
KP502
Trade Name
LG
CE0168
Applicable Standards Details
R&TTE Directive 1999/5/EC
EN 301 489-01 v1.6.1 / EN 301 489-07 v1.3.1 / EN 301 489-17 v1.2.1
EN 60950-1:2001
EN 50360 / EN62209-1:2006
EN 301 511 V9.0.2
EN 300 328 V1.7.1
Supplementary Information
The conformity to above standards is verified by the following Notified Body(BABT)
BAST, Balfour House, Churchfield Road, Walton-on-Thames, Surrey, KT12 2TD, United Kingdom
Notified Body Identification Number: 0168
Declaration
I hereby declare under our sole responsibility that the product mentioned above to which this declaration relates complies with the above mentioned standards and Directives
European Standard Center
LG Electronics Logistics and Services B.V.
Veluwezoom 15, 1327 AE Almere, The Netherlands
Tel: +31-36-547-8940, Fax: +31-36-547-8794
e-mail: jacob@lpe.com
Name
Issued Date
Seung Hyoun, Ji / Director
18, March, 2009

Signature of representative
安全與有效使用準則
請讀取以下簡易的使用規則。違反這些準則可能會發生危險或觸犯法律。
射頻能量暴露準則
無線電波暴露及比吸收率 (SAR) 資訊。本手機型號 KP502 已為遵守無線電波暴露的應用安全要求而設計。此要求包括可確保市民安全的設計準則,範圍涵蓋各年齡階層與所有的健康狀況。
- 無線電波暴露指引的量度單位叫作比吸收率或 SAR。SAR 測試使用標準方法進行,用手機以在所有使用的頻帶最高的合格電源水平傳輸。
- 雖然不同型號的 LG 電話的 SAR 水平有所差異,但所有這些電話都為達到無線電波暴露的相關指引而設。
- 國際非離子化輻射保護委員會 (ICNIRP) 建議的 SAR 限制,即平均 10 克組織 2W/kg。
- 經 DASY4 測試,本型號手機在耳邊使用的最高 SAR 值為 0.827 W/kg (10g),攜帶於身上時則為 1.40 W/kg (10g)。
- 採用了電氣與電子工程師學會 (IEEE) 建議的 SAR 限制,即平均 1 克組織 1.6 W/kg 的國家/地區居民的 SAR 數據資訊。
產品護理及維修
警告
僅請使用經認可可用於此特定手機型號的電池、充電器及配件。使用其他種類可能使手機的認可或保養失效,並可能引致危險。
- 請勿拆開此裝置。需要對手機進行維修時,請將其帶到合資格的維修技師處。
- 請遠離電視、收音機或電腦等電器產品而使用手機。
- 裝置需遠離發熱來源,如散熱器或烹調器具。
- 請勿摔落手機。
- 請勿讓此裝置遭機械震動或電擊。
- 請於任何有特殊限制的地方關閉手機。例如,請勿在醫院內使用手機,否則,它可能會對敏感的醫療設備造成影響。
LG KP502 | 使用手册
- 請勿以潮濕的雙手對充電中的手機進行操作。這可能會引致觸電或造成手機嚴重損壞。
- 請不要在易燃材料附近為手機充電,因為充電期間手機會發熱並導致火災。
- 使用乾布清潔裝置表面(請勿使用如苯、稀釋劑或酒精等溶劑)。
切勿在柔軟家具上為手機充電。 - 手機應在通風良好的環境中充電。
- 請勿讓此裝置接觸過多煙或塵埃。
- 請勿將手機置於信用卡或車票附近,這可能會影響磁帶上的資料。
- 請勿以尖銳物件敲打屏幕,否則可能會對手機造成損毀。
- 請勿將手機暴露於液體或濕氣中。
- 請小心使用配件,如耳機。如非必要,請勿觸及天線。
有效手機操作
電子裝置
所有手機都可能會因為受到干擾而影響效能。
- 請勿在未得到批准下在醫療儀器附近使用您的手機。避免將手機放置在起搏點上,例如您的胸部口袋。
- 手機可能影響到某些助聽器。
- 輕微干擾可影響電視、收音機、個人電腦等。
道路安全
檢查您駕駛時地區使用手機的法例及規則。
- 駕駛時請勿使用手提手機。
- 請專心一致駕駛。
- 如有免提聽筒套件,請使用免提聽筒套件。
若有駕駛條例要求,請駛離馬路並停泊好汽車後才撥打或接聽電話。 - RF 能量可能會影響車內某些電子設備,例如立體聲音響及安全設備等。
- 如果您的汽車配有氣囊,切勿讓已安裝的無線設備或手提無線設備阻擋氣囊。它有可能因使用不當而失靈或造成嚴重損傷。
安全與有效使用準則
- 如果在外出時聆聽音樂,請確保將音量設定至合適水平,以便可以對周圍環境產生警覺。這在馬路旁邊時尤爲必要。
避免損害您的聽覺
如果長時間以較大音量收聽,可能會對聽覺造成損害。所以我們建議開啓或關閉手機時,不要將它放於太近耳朵。我們亦建議將音樂及通話音量設定至合適水平。
玻璃部件
手機的部分部件采用玻璃製成。若手機墜落至堅固表面或受到硬物碰撞,玻璃會破碎。若玻璃破碎,則切勿觸碰或企圖移除玻璃。應停止使用手機,直到經由授權服務供應商更換玻璃才能再次使用。
爆破地區
請勿在進行爆破時使用手機。請嚴格遵守相關限制、規定或條例。
潛在爆炸氣壓
- 請勿在燃料補給點使用手機。
- 請勿在燃料或化學物質旁使用。
- 請勿使用放置了手機及配件的汽車傳輸或放置易燃氣體、液體或爆炸物。
在飛機上
無線裝置可引致飛機干擾。
- 登機前,請先關掉手機。
- 未經地勤人員批准,請勿在陸上使用手機。
兒童
請將手機放在兒童接觸不到的安全地方。手機包含微細零件,如果拆開,可能造成哽咽危險。
緊急呼叫
緊急電話可能在某些流動網絡中不能發出。因此,您不應僅倚賴手機作為緊急電話方式。請向您本地的服務供應商查詢。
LG KP502 | 使用手册
電池資料及保護
- 充電前,您無需完全放電。跟其他電池系統不同,沒有記憶影響可緩和電池的效能。
- 只使用 LG 電池及充電器。LG 充電器是為將電池壽命擴至最大而設。
- 請勿拆解電池組或造成電池組短路。
• 請保持電池組的金屬接點清潔。 - 常電池不再提供可接受的效能,請更換電池。電池組可重充數百次直至需要更換為止。
- 如果電池很久沒有使用來擴展其用量,需重充電池。
- 請勿直接將充電器暴露於日光下或高濕度環境(如浴室)中。
- 請勿把電池放置在熱或冷的地方,這可損害電池效能。
- 若使用類型不當的電池,則有發生爆炸的危險。
-
請根據製造商的指示來處理廢棄電池。請盡量回收利用。請勿作為家庭廢棄物處理。
-
如果需要更換電池,請帶同手機前往最近的授權 LG 電子產品服務點或經銷商以尋求協助。
- 請謹記在手機完全充電後從牆壁插座拔出充電器,避免充電器造成不必要的電力損耗。
- 電池的實際壽命將取決於網絡設定、產品設定、使用模式、電池及環境條件。
故障排解
本章列出了您在使用手機過程中可能會遇到的一些問題。部份問題可能需要諮詢服務供應商,而絕大部份的問題都可自行輕鬆解決。
| 訊息可能原因 可用能原因方法 | 可用解決方法 | |
| 智能咭錯誤 | 手機中無智能咭,或插入方式不正確。 | 請確保智能咭正確插入。 |
| 無網絡 | 訊號較弱位於 GSM 網絡服務範圍外 | 舉高手機面向窗口或移到開闊的位置。諮詢服務供應商,瞭解服務區域地圖。 |
| 代碼不匹配 | 在變更安全密碼前,您必須再次輸入以確認新密碼。兩次輸入的密碼不匹配。 | 聯絡服務供應商。 |
| 無法設定功能 | 服務供應商不支援此功能或功能需要註冊 | 聯絡服務供應商。 |
| 無法撥打電話 | 撥號錯誤新插入的智能咭已達通話費用上限 | 未獲得新網絡的使用授權。查看新的限制條款。聯絡服務供應商或使用 PIN 2 碼重設限制。 |
| 無法開機 | 按開/關鍵時間太快電池已耗盡電池觸片不潔淨 | 按開/關鍵至少兩秒鐘。為電池充電。檢查屏幕充電指示器。清潔觸片。 |
故障排解
74
LG KP502 | 使用手册
| 訊息可能原因 可用解決方法 | 可用解決方法 | |
| 電池完全無電 | ||
| 不在適當溫度範圍內 | 為電池充電。 | |
| 接觸問題 | 確定室溫合適,稍候再充電。檢查電源以及與手機的連接。檢查電池觸片,必要時進行清潔。 | |
| 充電錯誤 | 電源無電 | 插入到其他插座或檢查電壓。如果充電器沒有反應,請更換充電器。只可使用原廠LG配件。 |
| 充電器故障 | ||
| 使用不當充電器 | 更換電池。 | |
| 電池故障 | ||
| 手機失去網絡連接 | 訊號太弱自動重新連接到其他服務供應商。 | |
| 號碼不准許固定撥號功能已開啟。檢查設定。 | ||

natural_image
Front view of a black LG mobile phone with blank screen and control buttons (no visible text or symbols on device body)此手册中的部份内容可能会因手机程序之改良或不同网络商提供的服务而令实际情况有所不同,这并不会另行通知。
KP502 用户指南
恭喜您购买此款功能先进、外观小巧的 LG KP502 手机,它采用了最新的数码移动通信技术,专注于为您提供便利的操作。
| 设定 | 01 |
| 待机屏幕 | 02 |
| 基本功能 | 03 |
| 高级功能 | 04 |
| 管理功能 | 05 |
| 网络 | 06 |
| 设置 | 07 |
| 配件 | 08 |
内容
设定
开始了解您的手机 8
打开视图 10
安装 USIM 卡和电池 ..... 11
存储卡 14
待机屏幕
触摸屏提示....15
基本功能
通话 20
拨打电话....20
从电话本拨打电话....20
接听和拒绝电话....20
通话选项 21
快速拨号 22
拨打第二个电话 22
关闭DTMF 22
查看通话记录 23
使用呼叫转接 23
使用呼叫限制 23
更改常用通话设置....24
电话本 25
搜索联系人 25
添加新联系人 25
创建群组 25
更改联系人设置....26
查看信息....26
信息....27
发送信息....27
输入文本 27
T9 预测 ..... 27
Abc 手动 ..... 28
键盘 28
手写识别....28
设置电子邮件 28
检索电子邮件 29
使用新帐户发送电子邮件 29
更改电子邮件设置....29
信息文件夹....30
更改文本信息设置....30
更改多媒体信息设置....31
更改其它设置....31
高级功能
相机 32
快速拍照 32
拍照后 32
了解取景器 33
选择拍摄类型 34
调节曝光 34
使用高级设置....34
更改图像大小 35
选择色彩效果 35
查看保存的照片 35
摄像机 36
快速摄像 36
拍摄视频后 36
了解取景器 37
调节曝光 38
使用高级设置....38
更改视频大小 39
选择色调 39
观看保存的视频....39
照片和视频....40
查看照片和视频 40
从视频中拍摄图像 40
以幻灯片显示方式查看照片 40
将照片设为墙纸 41
编辑照片 41
为照片添加文本 41
为照片添加效果....42
多媒体 43
图片 43
发送照片 43
使用图像 43
打印图像 43
移动或复制图像 44
声音 44
使用声音 44
视频 44
发送视频剪辑 45
游戏和应用程序 45
通过本地安装安装游戏/应用程序……45
玩游戏 45
文档 45
将文件传输到手机 45
查看文件 46
其它 46
创建电影 46
内容
音乐 47
将音乐传输到手机 47
播放歌曲 47
创建播放列表 48
使用收音机 48
搜索电台 48
重设频道 48
管理功能
管理器 49
将事件添加到日历中 49
向任务列表添加项目 49
添加备忘录 49
使用日期计算器....50
设置闹钟 50
添加带绘图面板的备忘录 50
语音备忘录 51
录制声音或语音 51
使用计算器....51
换算单位 51
使用秒表....52
向世界时间添加城市 52
PC 同步 ..... 53
在电脑上安装 LG PC 套件 ..... 53
连接手机和 PC 53
备份和恢复手机信息....53
在 PC 上查看手机文件 ..... 53
同步电话本 54
同步信息....54
将手机用作音乐同步设备....54
网络
浏览器....55
访问网页 55
添加并访问书签 55
使用 RSS 阅读器.....55
保存页面 56
访问已保存页面 56
查看浏览器历史记录 56
更改网络浏览器设置....56
将手机用作调制解调器 56
设置
更改情景模式 58
更改屏幕设置....58
更改手机设置 58
更改连接设置....59
使用内存管理器....60
LG KP502 | 用户手册
使用蓝牙发送和接收文件....61
与其它蓝牙设备配对....62
使用蓝牙耳机 62
配件 63
网络服务 64
技术参数 64
准则
关于安全有效使用手机的准则 ……66
开始了解您的手机
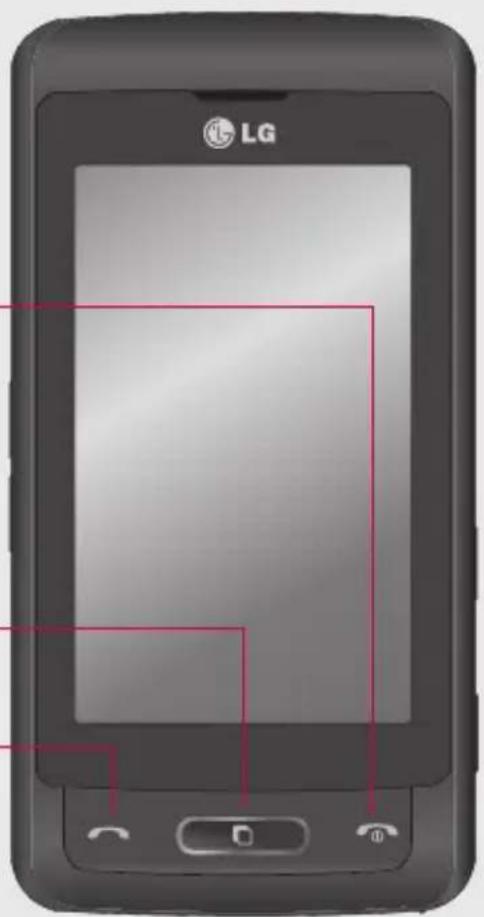
结束/电源键
挂断或拒接来电。
开机/关机。按一次返回待机屏幕。
多任务键
通话键
拨打电话号码并接听来电。
设定
警告:在手机上放置重物或将手机卧放在口袋中可能会损坏手机的 LCD 屏幕及触摸屏的功能。
8
LG KP502 | 用户手册

充电器、数据线、免提连接器
提示:要连接 USB 数据线,请等到手机开机并注册网络。
侧键
- 屏幕处于待机模式时:按此键调整音量。
- 通话时:耳机音量。
- 播放BGM曲目时 - 短按:控制音量。

natural_image
Close-up of a black cylindrical electronic device with multiple ports and a small indicator button (no visible text or symbols)Micro SD 存储卡插槽
锁定/解锁键
相机键
手写笔
打开视图

设定
10
LG KP502 | 用户手册
安装 USIM 卡和电池
1 卸下电池盖
将电池盖沿手机底部滑动,卸下电池盖。

natural_image
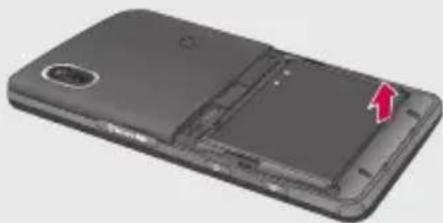
Foldable smartphone showing internal components and a red arrow indicating a specific area (no text or symbols visible)2 取出电池
从电池仓中抬起电池的底部边缘。
natural_image
3D model of a smartphone showing internal components and a red arrow indicating a location (no text or symbols present)
natural_image
Black smartphone with open rear panel showing internal structure and a red arrow indicating rotation (no text or symbols)
警告:不要使用指甲取出电

警告:手机开机时,不要取出地,这可能会损坏手机。
安装 USIM 卡和电池
3 安装USIM卡
将 USIM 卡滑入 USIM 卡插槽,确保卡的金属接触区域面朝下。要取出 USIM 卡,沿反方向轻推。
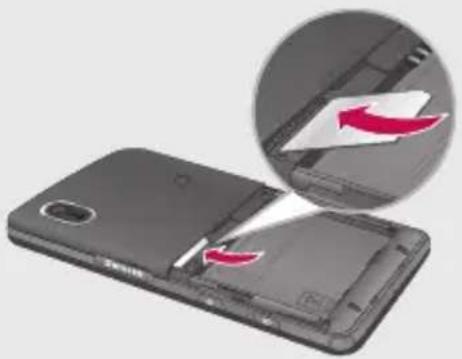
natural_image
3D illustration of a smartphone showing internal components and a magnified view of the lid (no text or symbols)4 安装电池
先将电池顶端插入电池室顶部。请确保电池触点与手机端子对齐。 向下推电池底端,直至电池卡入到位。

natural_image
3D illustration of a smartphone showing internal components with red arrows indicating movement or change (no text or symbols)设定
12
LG KP502 | 用户手册
5充电
掀开并旋转 KP502 侧面的充电器插槽盖,插入充电器并将其插入电源插座。当屏幕上出现 “电量已满” 时,KP502 才充电完毕。
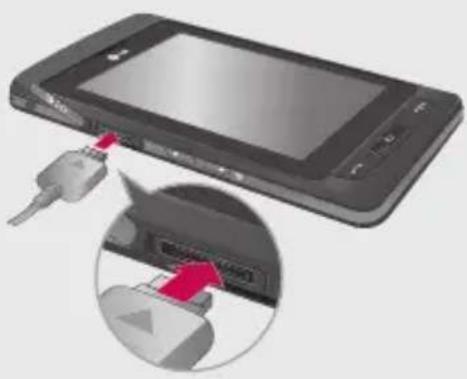
natural_image
Illustration of a smartphone with an attached USB port and a close-up of its internal cable (no text or symbols visible)01
02
03
04
05
06
07
08
设定
13
存储卡
安装存储卡
使用 MicroSD 存储卡,可以扩展手机的可用存储空间。
提示:存储卡是可选配件。
1 打开手机右侧边缘的存储卡插槽盖。
2 将存储卡滑入插槽,直到卡入到位。

natural_image
3D model of a smartphone showing the rear panel and internal components, with a close-up inset highlighting the edge detail (no text or symbols present)3 装好插槽盖。
格式化存储卡
您的存储卡或许已格式化。如果您的存储卡尚未格式化,那么在开始使用之前,请先格式化。
1 从待机屏幕选择 📋 然后点触 🌐 并选择“手机设定”。
2 点触 “内存管理器”,然后选择 “外部存储器”。
3 点触“格式化”,然后确认选择。
4 输入密码(如果已设置)以格式化存储卡,现在,您可以使用该存储卡了。
备注:如果存储卡中已有内容,它将自动保存在正确的文件夹中,例如,视频将保存到“我的视频”文件夹中。
设定
14
LG KP502 | 用户手册
待机屏幕
不使用 KP502 时,将返回主屏。在此,您可以访问所有菜单选项、快速拨打电话、查看手机状态以及进行其它一些操作。
触摸屏提示
您也可以在主屏上熟悉使用触摸屏。 要选择项目,请准确点触图标。当 KP502 识别您点触的选项时,会轻微振动。(视乎触控设定)
要在列表中滚动,请点触所见的最后一个条目,然后使用手指向上滑过屏幕。列表向上滚动,您将看到更多条目。
- 无需大力按,触摸屏非常敏感,仅需点触即可。
- 使用指尖点触所需选项。请注意不要触碰到旁边的其它选项。
- 屏幕背景灯关时,按右手边的解锁/锁定键可以返回主屏。
- 不要使用手机套。使用手机套可能导致触摸屏不可用。
- 有两种类型的待机屏幕。向左或向右轻弹以更改待机屏幕类型。
1 小工具待机屏 - 点触时,将出现手机小工具面板。
2 快速拨号待机屏 - 点触时,将出现快速拨号列表。在两种待机类型下,您都可以拖动并单击所需内容。
待机屏幕
小工具待机屏

快速键
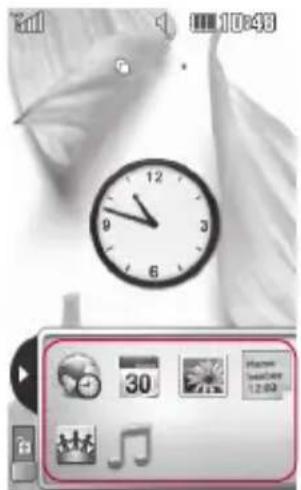
手机小工具
快速拨号待机屏

natural_image
Grayscale image of a banana with blurred background and a hand interacting with a button (no readable text or symbols)传感器常

快速拨号列表
LG KP502 | 用户手册
快速键
快速键使您可以一键式轻松访问常用功能。

点触可打开触摸拨号键盘,以拨打电话。按使用普通键盘的方式输入号码,然后点触呼叫或按硬键。

点触以打开电话本。要搜索您要呼叫的号码,请使用触式键盘在屏幕顶部输入联系人的姓名。您也可以创建新的联系人以及编辑现有联系人。有关详细信息,请参阅第25页。
01
02
03
04
05
06
07
08

点触以进入“信息”选项菜单。在此,您可以创建新短信或彩信,或查看信息文件夹。有关详细信息,请参阅第27页。

点触可以打开完整顶层菜单,该菜单被划分为四个垂直子菜单。点触每个子菜单的选项卡以查看更多选项。
待机屏幕
状态栏
状态栏使用不同图标指示诸如信号强度、新信息和电池使用寿命等信息,以及告知您是否启动了蓝牙或GPRS。下表说明了您最可能在状态栏中看到的不同图标的涵义。
| 图标说说明 | |
| 多任务 | |
| 网络信号强度(指示栏数不同) | |
| 无网络信号 | |
| 剩余电量 | |
| 电池电量空 | |
| 新建文本信息 | |
| 新语音信息 | |
| 收件箱已满 | |
| 信息发送失败 | |
| 多媒体信息发送失败 | |
待机屏幕
| 图标 | 说明 |
| 已设定闹钟 | |
| 正在使用“用户定义”情景模式 | |
| 正在使用“标准”情景模式 | |
| 正在使用“户外”情景模式 | |
| 正在使用“静音”情景模式 | |
| 正在使用“耳机”情景模式 | |
| 呼叫被转接 | |
| 正在使用EDGE | |
| 正在漫游 | |
| 飞行模式开 | |
| 蓝牙已启动 | |
| BGM播放 | |
| BGM停顿 | |
| 外部存储器启用 |
LG KP502 | 用户手册
从状态栏更改状态
点触状态栏打开“状态摘要”。它显示当前时间、网络、服务ID、电池、手机内存、外部存储器、情景模式、MP3及蓝牙状态。您可以在此设置情景模式类型、播放/暂停MP3及启动/关闭蓝牙。
使用多任务功能
按多任务硬键打开“多任务”菜单。在此,您可以查看正在运行的所有应用程序,并通过一个点触操作进入该应用程序。
如果背景正在运行某个应用程序(如,游戏或 FM 收音机),状态栏中将显示。
防盗手机追踪器
1 此手机的防盗手机追踪器功能提供您一个手机跟踪系统,以防您遗失它。
2 一旦有未授权的用户使用您的电话,信息将被启动,从您的手机发送至您预定的号码。
3 启动防盗手机追踪器 [→ - > 安全性]
- 选择“防盗手机追踪器”
- 选择“ATMT开”
- 输入默认追踪功能密码
- 选择“设置”
- 输入默认追踪功能密码
- 输入“追踪使用的号码”详细资料
- 然后选择“保存”
注意
- 若您要在手机里使用其他 SIM 卡,请确保追踪功能已关闭。
- 建议您在输入追踪功能号码时,附上国家地区标准代码(即为印度:+91<手机号码>)
- 默认追踪功能密码为 “000000”。
通话
拨打电话
1 点触 以打开键盘。
2 使用键盘键入号码。要删除一个数字,请点触清除键。
3 按 硬键或点触来启动通话。
4 要结束通话,请按 📄 硬键。
提示!要输入 + 以拨打国际电话,请按住 0+。
从电话本拨打电话
1 从待机屏幕点触,以打开电话本。
2 输入您要呼叫的联系人的前几个字母。
3 从过滤列表中点触您要呼叫的联系人,如果保存了多个号码,请选择您要使用的那个。
4 按硬键或点触来启动通话。
接听和拒绝电话
电话铃响起时,按硬键或点触接听电话。

轻触()以静音。如果您在开会时忘记将情景模式更改为“静音”,这非常有帮助。
按硬键或点触拒接来电。
LG KP502 | 用户手册
通话选项

提示!要在选项列表或联系人列表中滚动,请点触所见的最后一个条目,然后使用手指向上滑过屏幕。列表向上滚动,您将看到更多条目。
通话
快速拨号
您可以为常用联系人指定快速拨号号码。
1 从待机屏幕点触 📋,选择 📊 点触 🙏
2 语音邮箱已设为快速拨号1。不能对此设置进行更改。点触任意其它号码,为其指定快速拨号联系人。
3 此时将打开您的电话本。点触要指定到该号码的联系人的电话号码一次,以选择该联系人。要查找联系人,请点触搜索字段框,输入所需联系人姓名的第一个字母。
拨打第二个电话
1 在初始呼叫中,点触 📂 选择您要呼叫的号码。
2 拨打号码或搜索联系人(有关详细信息,请参阅第20页的拨打电话。)
3 按以连接通话。
4 此时呼叫屏幕上将显示两个呼叫。初始呼叫被锁定,通话方进入保持状态。
5 要在通话间更改,请点触☑,然后选择切换通话或按保持的通话的号码。
6 要结束一个呼叫或同时结束两个呼叫,请按 📄,选择结束通话,然后选择当前通话、保持的通话或所有通话。
提示!您可以通过选择接受和加入连接通话。查看您的网络提供商是否支持多方通话。
备注:您需要对每通电话付费。
关闭DTMF
DTMF 允许您使用自动通话中的数字命令导航。DTMF 默认为启动。 要在通话过程中关闭它(例如,要记下某个电话号码),请点触并选择“关闭双音多频”。
LG KP502 | 用户手册
查看通话记录
提示!要在选项列表中滚动,请点触所见的最后一个条目,然后使用手指向上滑过屏幕。列表向上滚动,您将看到更多条目。
点触

选择

后轻触。

提示!点触任意单个通话记录条目,以查看通话日期、时间和时长。
使用呼叫转接


1 点触,然后依次选择
2点触 呼叫转接。
3 选择转接电话的情况:转接所有语音来电、正在通话时转接、无人接听时转接,或无网络/关机时转接。
4 输入您要转接的号码。
5 点触请求以启动。
备注:转接通话会产生相应费用。有关详细信息,请联系您的网络提供商。
提示!要关闭所有通话转接,请从呼叫转接菜单中选择全部关闭。
使用呼叫限制
1 点触,然后依次选择和


2 点触呼叫限制。
3 选择以下六个选项中的一项或所有项:
所有拨出电话
拨出的国际电话
国际漫游时拨打电话
所有来电
国际漫游时来电
关闭全部
4 输入呼叫限制密码。请与您的网络运营商联系,了解有关此服务的信息。
提示!选择固定拨号打开并汇集一个号码列表,可从手机拨打此列表中的号码。您需要运营商提供的PIN2码。仅可以使用手机拨打此号码列表中的号码。
01
02
03
04
05
06
07
08
通话
更改常用通话设置
1 点触,选择,然后选。
2 点触常用设置。在此,您可以修改以下设置:
将开关滑动到“开”以突出显示拒绝列表。您可以点触文本框,从所有通话、特定联系人或未知号码(不在电话本中的号码)中进行选择。点触“保存”以更改设置。
发送本机号码-选择当您呼叫对方时是否显示您的号码。
自动重拨-向左滑动开关为“开”,向右滑动开关为“关”。
接听模式 - 选择是使用发送键还是任意键接听电话。
分钟提示- 向左滑动开关打开,在通话过程中每隔一分钟将听到提示音。
蓝牙接听模式 - 选择 “免提” 可使用蓝牙耳机接听来电,或选择 “手机” 按手机任意键接听来电。
保存新号码-选择“是”以保存新号码。
LG KP502 | 用户手册
电话本
搜索联系人
有两种方式可搜索联系人:
从待机屏幕
1 从待机屏幕点触,以打开电话本。从列表中选择您要呼叫的联系人。
2 点触或按硬键激活通话。
从主菜单
1 点触,选择
2 点触。
3 您将看到一个联系人列表,键入联系人姓名的首字母会使菜单跳转到该字母区域。
提示!当您点触空白方框时,将显示字母键盘。
添加新联系人
1 从待机屏幕点触,然后点触添加联系人。
2 选择是将联系人保存到手机还是USIM卡。
3 输入新联系人的姓氏和名称。您无需同时输入姓氏和名称,但必须输入一个。
4 对同一个联系人,您最多可以输入 5 个不同的号码。每个条目下的类型包括:手机、家庭、办公室、传呼机、传真和普通。完成后,请点触关闭。
5 添加电子邮件地址。
6 将联系人分配到一个或更多群组。从以下选项选择:无群组、家人、朋友、同事、同学或重要人士。
7 您还可以添加铃声、生日、周年纪念、主页、家庭地址、公司名称、职位、公司地址和备忘录。
8 点触保存以保存联系人。
创建群组
1 点触,然后选择。
2 点触,然后点触群组
3 点触。
4 选择添加群组。
5 输入新群组的名称。您也可以为群组指定铃声。
6 点触保存。
备注:如果您删除一个群组,分配至该群组的联系人不会被删除。他们仍将保留在电话本中。
电话本
更改联系人设置
您可以调整您的电话本设置,使电话本符合您的需要。
提示!要在选项列表中滚动,请点触所见的最后一个条目,然后使用手指向上滑过屏幕。列表向上滚动,您将看到更多条目。
1 从待机屏幕点触 并选择。
2 点触,然后选择设置。
3 在此,您可以调整以下设置:
联系人列表设置 - 选择要查看的联系人的保存位置:手机 + USIM 卡、仅限手机、仅限 USIM 卡。
您还可以选择是先显示联系人的姓还是名。
复制 - 将联系人从 USIM 卡复制到手机,或从手机复制到 USIM 卡。请选择是一次复制一个还是全部复制。如果选择一次复制一个,您需要逐个选择每个联系人以进行复制。
移动 - 其操作与 “复制” 相同,但联系人进保存在移动目标位置。 因此,如果将联系人从 USIM 卡移动到手机,其将从 USIM 存储卡中删除。
通过蓝牙发送所有联系人 - 使用蓝牙,将所有联系人发送到其它设备或电脑。如果选择此选项,您会收到打开蓝牙的提示。
备份电话本 - 请参阅第 53 页的“备份和恢复手机信息”。
恢复电话本 - 请参阅第 53 页的“备份和恢复手机信息”。
清空电话本 - 删除所有联系人。如果确定要清空地址簿,请点触是。
查看信息
1 从待机屏幕点触并选择。
2 点触,然后选择信息
3 您可以在此查看服务号码、本机号码、内存信息(剩余内存空间)和我的名片。
提示!如果您为自己添加了名片,选择我的名片并输入所有您可能为其他联系人输入的详细信息。点触保存完成。
LG KP502 | 用户手册
信息
信息
KP502 将短信、多媒体信息和电子邮件结合到一个直观易使用的菜单中。 有两种方式进入信息中心:
1 从待机屏幕点触。
2 从待机屏幕点触 📋,选择 📋 然后选择 📋。
发送信息
1 点触 打开空白信息。
2 在此,您可以发送短信或彩信。要发送电子邮件,从待机屏幕点触 📋,然后选择 📋。有关详细信息,请参阅第 29 页。
3点触 插入添加图像、视频、声音或模板。
4 点触屏幕顶部的收件人1输入收件人号码,或点触搜索图标打开电话本。您可以添加多个联系人。就绪后,请点触发送。
警告:您将按每个收件人每条文本信息160个字符付费。
警告:如果在短信中添加图像、视频或声音,则短信将自动转换为彩信,您需要支付相应费用。
输入文本
有五种方式可输入文本: 按键、键盘、手写屏幕、手写箱、手写双屏。
通过点触 ☐ 并点触输入法,您可以选择输入方法。
点触屏幕一次,将出现键盘。
T9 点触以打开 T9 预测文本。
您可以选择编写语言。
点触以更改号码、符号和文本键盘。
在每种文本输入模式中,使用 ↑ 在不同键盘类型之间滚动(例如,大写字母或小写字母)。
T9 预测
在 T9 模式中,您将看到 T9 模式使用内置字典,根据您点触按键的顺序识别您写入的内容。只需点触与您要输入的字母关联的数字键即可,随着您的键入内容,字典将预测您想要使用的单词。
例如,依次按8、3、5、3、7、4、6、6、3输入“telephone”。
信息
Abc 手动
在 Abc 模式中,您将看到 T9 在 Abc 模式中,要输入字母,您必须重复点触按键。例如,要写入 “hello”,需要点触两次 4、两次 3、三次 5,再点触三次 5,最后点触三次 6。
键盘
在键盘模式中,屏幕横向展开,屏幕上显示完整的标准键盘。
点触每个字母即可写入您的信息,然后按:
切换到大写
手写识别
在手写模式中,您只需在屏幕上书写内容,KP502即可将您的手写内容转换为信息。可以选择屏幕或箱,取决于您选择的视图。
提示!您可能会发现,在此模式中使用手写笔会非常轻松,请记住,轻触屏幕以保护屏幕不受损坏。
手写识别会将手写笔操作内容转化为字母、数字或其它字符,然后以文本方式显示这些字符。只有在可输入文本的位置,才会激活手写识别。
LG KP502 | 用户手册
设置电子邮件
使用 KP502 中的电子邮件,您可以在旅途中随时与他人保持联系。设置 POP3 或 IMAP4 电子邮件帐户非常快捷。
1 点触,然后轻触
2 选择 📋,然后将菜单滚动到设置。然后,点触设置。
3 点触电子邮件,然后点触电子邮件帐户。
4 点触添加帐户。
5 设置向导将帮助您设置电子邮件设置。
6 通过选择列表中的帐户,您可以检查并编辑设置。您还可以检查当您创建帐户时自动填写的其它设置。
7 通过点触启动,您可以更改默认电子邮件帐户。
检索电子邮件
您可以自动或手动查看帐户的新电子邮件。请参阅第29页上的“更改电子邮件设置”以自动查看。
手动查看:
1 点触,然后选择。
2 点触电子邮箱。
3 点触您要使用的帐户,然后点触。
4 选择检索,KP502 将连接到您的电子邮件帐户并检索新邮件。
使用新帐户发送电子邮件
1 点触通信菜单中的新建电子邮件,此时将打开新的电子邮件。
2 您可以输入收件人的地址,写信息。您还可以附加图像、视频、声音或其它文件类型。
3 点触发送,您的电子邮件将被发送。
更改电子邮件设置
您可以更改电子邮件设置以满足您的个人需要。
1 点触 📋,然后选择 📊。
2 点触设置和电子邮件,然后,您可以调整以下设置:
允许回复电子邮件 - 选择是否允许发送“读取确认”邮件。
请求回复电子邮件 - 选择是否要请求“读取确认”邮件。
检索间隔 - 选择 KP502 检查新电子邮件信息的频率。
检索数量 - 选择一次要检索的电子邮件数目。
转发或回复时包括邮件 - 选择在回复时是否要包括原始邮件。
包含附件-选择在回复中是否包含原始附件。
漫游时自动检索 - 选择在国外(漫游)时是否自动检索邮件。
新电子邮件通知 - 选择在收到新电子邮件时是否需要提示。
签名-创建电子邮件签名并打开此功能。
优先级 - 选择电子邮件信息的优先级级别。
信息
信息文件夹
您可以识别 KP502 中的文件夹结果,完全无需进行说明。
收件箱 - 您接收到的所有信息将放置在收件箱。在此,您可以查看、删除及执行其它操作,有关详细信息,请参阅管理信息。
电子邮箱 - KP502 接收到的所有电子邮件将放置在电子邮箱中。
草稿箱 - 如果您来不及写完一条信息,您可以将已写信息保存在此。
发件箱 - 这是发送信息时的临时存储文件夹。
已发送 - 您所发送的所有信息将放置在此文件夹。
我的文件夹 - 创建文件夹以存储信息。
更改文本信息设置
KP502 已预定义信息设置,因此,您可以立即发送信息。可以根据您的个人需要更改这些设置。
提示!要在选项列表中滚动,请点触所见的最后一个条目,然后使用手指向上滑过屏幕。列表向上滚动,您将看到更多条目。
点触,然后选择通信清单中的设置。选择文本信息。您可以更改:
文本信息中心 - 输入信息中心的详情。
状态报告 - 向左滑动开关,在对方收到您发送的信息时接收确认。
有效期 - 选择信息在信息中心中的最长保存时间。
信息类型 - 将文本转换为语音、传真、X.400 或电子邮件。
字符编码 - 选择符号编码方式。这将影响信息大小并因此产生数据费用。
将长文本男发送为 - 选择是以多条短信还是一条彩信发送长信息。
LG KP502 | 用户手册
更改多媒体信息设置
KP502 已预定义信息设置,因此,您可以立即发送信息。可以根据您的个人需要更改这些设置。
点触 📋,选择 📋 然后选择。选择设置和多媒体信息。您可以更改:
检索模式 - 选择是本地还是漫游网络。如果选择手动,那么您仅会收到彩信通知,随后,您可以决定是否要完整下载该信息。
状态报告 - 选择是否允许请求状态报告。
阅读报告 - 选择是否允许和/或请求阅读报告。
优先级 - 选择多媒体信息的优先级级别。
有效期 - 选择信息在信息中心中的最长保存时间。
幻灯片持续时间 - 选择幻灯片在屏幕上显示多长时间。
创建模式 - 选择信息模式。
发送时间 - 选择信息发送前的时间。
网络设定 - 输入信息中心的详细信息。
更改其它设置
点触,然后选择通信菜单中的设置:
语音邮件 - 点触 加新的语音邮件服务。有关其提供的服务的详细资料,请联系您的网络运营商。
服务信息 - 选择是接收还是阻止服务信息。您也可以通过创建可信和不可信发件人列表来设置信息安全性。
小区服务 - 选择接收状态、语言和其它设置。
相机
快速拍照
1 短按手机右侧的钟。
2 屏幕上将显示取景器。
3 水平放置相机,将镜头对准要拍摄的物体。
4 使用相机定位,以便在预览屏中看到要拍摄的物品。
5 当相机对好焦后,按相机侧面的或屏幕右下角的红色框拍照。
拍照后
拍好的照片将显示在屏幕上。图像名称在屏幕底部显示,屏幕右侧将显示六个图标
点触可以移动图片库。
点触可以信息、电子邮件或蓝牙方式发送照片。有关发送信息的信息,请参阅第27页,有关使用蓝牙发送和接收文件的信息,请参阅第61页。
点触可以编辑您拍摄的图片。
点触可以将您拍摄的图片设为墙纸。
点触可以删除您拍摄的照片,然后点触是确认。此时将出现取景器。
点触可以立即拍摄其它照片。将保存您的当前照片。
LG KP502 | 用户手册
了解取景器

提示! 您可以通过点触屏幕获取选项。几秒钟后, 它们将自动关闭。
相机
选择拍摄类型
1 点触打开可用的拍摄类型。
2 从两个选项间选择:
标准拍摄 - 此为默认拍摄模式,照片将以标准方式拍摄,如快速拍照中所述。
连拍 - 这允许您快速地连续拍摄 3/6/9 张照片。
调节曝光
曝光定义图像的深浅(对比度)差别。对比度低的图像显示模糊,而对比度高的图像则显示更为清晰。
1 点触
2 沿滚动条滑动对比度指示器,向左得到对比度更低、更模糊的图像,向右得到对比度更高、更清晰的图像。
使用高级设置
从取景器中点触以打开所有高级设置选项。
LG KP502 | 用户手册
预览设置
大小 - 更改保存在内存中的照片大小,或预设的拍摄照片的大小,使其大小适用于电话本。请参阅第 35 页的“更改图像大小”。
色彩效果 - 选择适用于您所拍摄的照片的色调。请参阅第35页的“选择色彩效果”。
白平衡 - 从以下选项中选择:自动、白炽灯、日光、荧光灯或阴天。
自拍器 - 使用自拍器,您可以设置拍照前按下拍摄按钮后的延迟。从 3 秒、5 秒或 10 秒中选择。如果照片中要包括您自己,自拍器非常有用。
质量 - 在 “超精细”、“精细” 和 “标准” 之间选择。质量越精细,照片将越清晰,同时,文件更大。这意味着存储器中保存的照片将越少。
查看模式 - 在 “全屏” 和 “完整图像” 之间选择。在 “全屏” 模式下,可能会剪切部分图像。
其它设置
存储位置 - 选择是将照片保存到手机内存还是外部存储器。
快门声音 - 从三种快门声音中选择一种。
网格屏幕 - 从 “关”、“简单十字” 或 “三等分” 中选择。
恢复初始设置 - 重设所有相机设置。
提示!退出相机时,除图像大小和图像质量外,所有设置将恢复回默认设置。您需要对任何所需的非默认设置进行重设,例如,色调。拍摄下一张照片之前,请先查看。
更改图像大小
像素越高,文件越大,同时意味着将占用更多内存。如果要在手机中保存更多图片,请更改像素大小,使文件更小。
1 从取景器点触左上角的。
2 从 “预览” 菜单中选择大小。
3 从以下六个数值选项中选择像素值 (3M: 2048x1536, 2M: 1600x1200, 1M: 1280x960, 640x480 400x240(W), 320x240)
选择色彩效果
1 从取景器点触左上角的。
2 从 “预览” 菜单中选择色彩效果。
3 有四个选项可供选择:关闭、黑白、反色或棕褐色。
提示!您可以将照片从彩色更改为黑白或怀旧,但是,您不可以将黑白或怀旧照片还原为彩色。
查看保存的照片
1 您可以在相机模式下访问保存的照片。轻触此时屏幕上将显示图片库。
摄像机
快速摄像
1 按手机右侧的相机键。
2 在相机预览模式下,点触取景器中的录像机图标 📋 切换到视频模式。屏幕上将显示摄像机的取景器。
3 水平放置相机,将镜头对准要拍摄的物体。
4 按拍摄按钮一次,开始录制。或者,按屏幕右下方的红点 ☐。
5 取景器顶部将出现 Rec,底部计时器显示视频长度。
6 要暂停视频,请点触 ☐,要恢复录制,请选择
7 点触屏幕上的 □ 或再按一次拍摄按钮停止录制。
拍摄视频后
屏幕上将显示所拍摄视频的静态图像。视频名称在屏幕底部显示,屏幕右侧将显示六个图标。
▶ 点触可以播放视频。
点触可以将视频作为信息或电子邮件,或蓝牙发送。有关发送信息的信息,请参阅第27页,有关使用蓝牙发送和接收文件的信息,请参阅第61页。
点触可以编辑您拍摄的视频
点触可以查看保存的视频与图像。
点触可以删除您刚拍摄的视频,然后点触”是”以确认。此时将出现取景器。
点触可以立即拍摄另一段视频。将保存您的当前视频。
LG KP502 | 用户手册
了解取景器
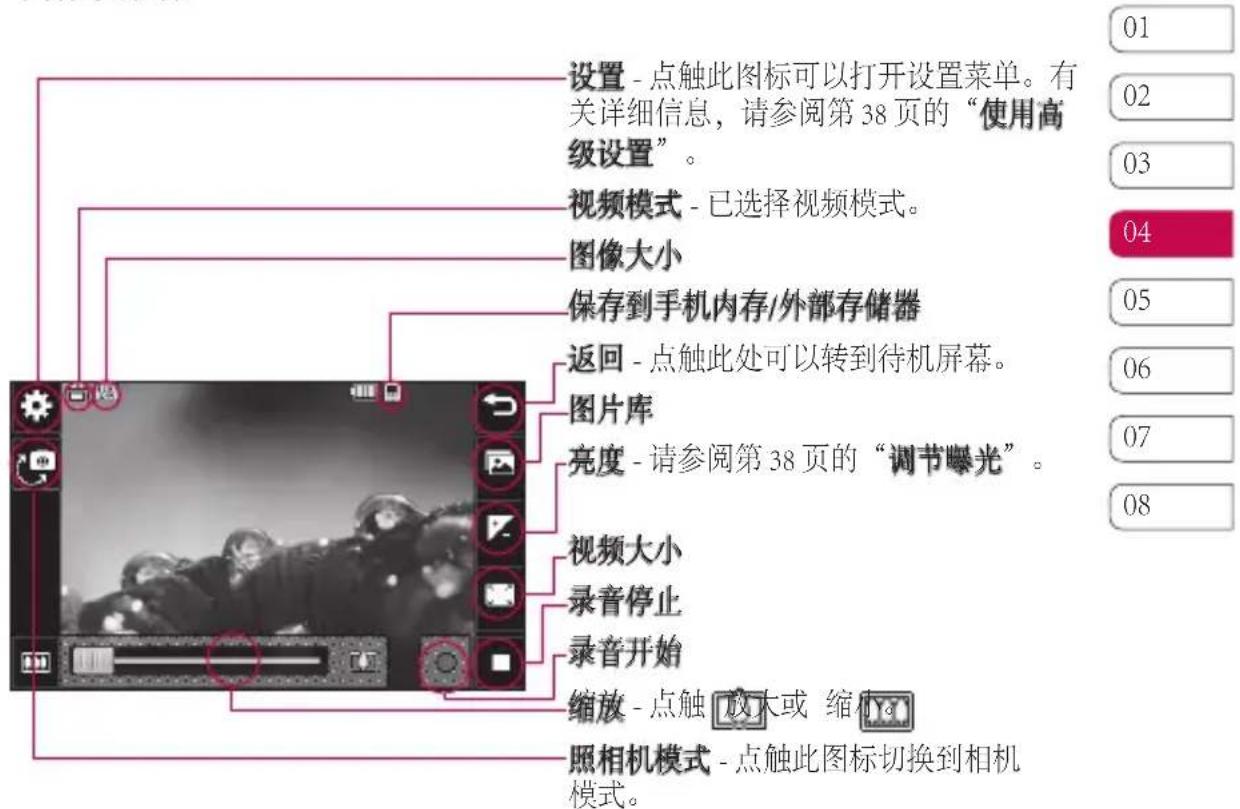
提示!您可以关闭所有快捷键选项,使取景器屏幕看起来干净利落。点触一次取景器中心即可。要调用选项,请再次点触屏幕。
摄像机
调节曝光
曝光定义视频的深浅(对比度)差别。对比度低的视频显示模糊,而对比度高的视频则显示更为清晰。
1 点触+。
2 沿滚动条滑动曝光指示器,向左对应曝光度更低、更模糊的视频,向右对应曝光度更高、更清晰的视频。
使用高级设置
从取景器中点触设置以打开所有高级设置选项。
预览设置
视频大小 - 更改保存在存储空间中的视频大小。请参阅第 39 页的更改视频图像大小。
色彩效果 - 选择适用于您所拍摄的视频的色调。请参阅第39页的选择色调。
白平衡 - 白平衡确保视频中的白色显示真实。要正确调整相机的白平衡,您需要确定光照条件。从自动、自炽灯、目光、荧光灯或阴天中选择。
质量 - 在超精细、精细和标准之间选择。质量越精细,视频将越清晰,同时,文件更大,这意味着内存中可存储的视频越少。
设置时间 - 设置视频的长度限制。选择无限制或彩信以限制可作为彩信发送的视频的大小。
查看模式 - 在 “全屏” 和 “完整图像” 之间选择。在 “全屏” 模式下可能会剪切部分图像。
提示!如果长度选择“彩信”,请尝试选择较低的图像质量以拍摄更长视频。
其它设置
存储位置 - 选择是将照片保存到手机内存还是外部存储器。
语音 - 选择 “静音”,录制视频而不录制声音。
恢复初始设置 - 重设所有摄像机设置。
LG KP502 | 用户手册
更改视频大小
像素越高,文件越大,同时意味着将占用更多内存。如果要在手机中保存更多视频,请更改像素大小,使文件更小。
1 从取景器点触左上角的。
2 从 “预览” 菜单中选择视频大小。
3 从两个选项中选择像素值:
320x240 - 图像较小,因此文件较小。上至24 fps能用于视频重放,上至12 fps能用于视频拍摄。
176x144 - 图像最小,文件最小。上至15 fps能用于视频重放。
4 选择您要使用的大小选项。
提示!有关视频格式转换软件,请查看 KP502 随附的 CD。
选择色调
1 从取景器点触左上角的。
2 从 “设置” 菜单中选择色彩效果。
3 有四个选项可供选择:关闭(标准)、黑白、反色或棕褐色。
4 点触您要使用的色调。
观看保存的视频
1 在取景器中,点触
2 屏幕上将显示您的图片库。
3 点触您要查看的视频一次,将其调到图片屏幕的前方。
4 再次点触该视频,完全打开。
照片和视频
查看照片和视频
1 点触相机预览屏幕上的
2 屏幕上将显示您的图片库。
3 点触视频或照片两次以完全打开。
4 要播放视频,请点触 ▷。要暂停播放,请点触 ||
提示!向左或向右轻弹以查看其它照片或视频。
从视频中拍摄图像
1 选择您要从中拍摄图像的视频。
2 点触以暂停您要从中拍摄照片的视频,点触屏幕右侧以打开选项菜单。
3 从选项菜单中选择。
4 屏幕上将显示图像,以及为其指定的名称。
5 点触图像,然后点触←返回图片库。
6 图像将保存在“媒体相册”文件夹,并显示在图片库中。您需要退出图片库,然后重新打开以显示该图像。
警告:如果手机中没有录制多媒体文件,某些功能可能无法使用。
LG KP502 | 用户手册
以幻灯片显示方式查看照片
幻灯片模式允许以幻灯片的形式一次性显示图片库中的所有照片。无法以幻灯片模式观看视频。
1 点触您要开始以幻灯片放映的照片两次,以打开它。
2 选择t。
3 开始幻灯片放映。
幻灯片下有多个选项:
点触以显示随机照片。
点触可以在放映到特定照片时,暂停幻灯片放映。
再次点触以恢复播放。
点触可以使幻灯片放映速度更快或更慢。
将照片设为墙纸
1 点触您要设为墙纸的照片两次,以打开它。横向放置手机。
2 点触屏幕右侧,打开选项菜单。
3 点触。
4 屏幕将切换到肖像模式。随后,您可以更改图片大小。
5 对图片满意后,请点触设置。
编辑照片
您可以对照片进行多方面的更改、修饰或使其更具趣味性。
1 打开您要编辑的照片,点触以显示选项。
2 点触图标以调整照片:
裁切照片。使用手指移过选定区域。
徒手对照片进行绘制更改。从四个选项中选择线条粗细,并选择您要使用的颜色。
T 在图片上写字。请参阅第 41 页的为照片添加文本。
使用标记修饰照片。从可用的标记中进行选择,点触照片中要放置标记的位置。
擦掉任何您所画的线条。
保存您对照片所做的更改。选择是将更改保存在源文件中,还是另存为新文件。如果选择新文件,请输入文件名。
←撤消上一个效果,或您对照片所做的更多编辑。
点触可以打开更多效果选项。
可对相片作出调整。
点触可以返回图片库。
为照片添加文本
1 从编辑屏幕点触 T
2 选择签名添加无框文本,或选择“speech bubble”形式中的一种。
3 使用键盘输入文本,然后点触保存。
4 通过点触文本来移动它,然后将其拖到所需位置。
照片和视频
为照片添加效果
1 从编辑屏幕点触。 2 选择为照片应用选项中的任意一个:
面部修饰 - 自动检测图像中的面部,并突出显示。
隧道效果 - 隧道相机效果。
彩色负片 - 彩色负片效果。
黑白-黑白效果。
棕褐色 - 棕褐色效果。
模糊 - 应用模糊效果。
锐度 - 沿滚动条移动滑块,锐化照片对焦效果。选择确定图标以应用更改,或选择 取消。
马赛克 - 点触以为照片应用马赛克效果。
油画 - 油画效果。
素描 - 应用效果以使图片看上去像素描。
浮雕 - 浮雕效果。
曝光-将曝光效果更改为日光
逼真 - 一种清晰真实的效果。
月光-使灯光看起来像月光。
怀旧 - 老相片效果。
明亮 - 光束效果。
卡通 - 卡通效果。
水彩 - 水彩效果。
3 要撤消效果,点触撤消即可
LG KP502 | 用户手册
多媒体
您可以将任意多媒体文件存储到手机内存中,这样,您可以轻松访问所有图片、声音、视频和游戏。您也可以将文件保存到存储卡中。使用存储卡的优点是:您可以释放手机内存的存储空间。
要访问“多媒体”菜单,请点触 📋,然后点触 📋。点触 📋以打开文件夹列表,该列表保存您所有的多媒体文件。
图片
我的图像包含一个图片列表,其中包括预先加载到手机中的默认图像、您下载的图像以及手机相机拍摄的图像。
点触 将视图从网格视图更改为列表视图。
发送照片
1 点触,然后点触。
2 点触,然后选择我的图像。
3 点触发送并从信息、电子邮件或蓝牙中选择。
4 如果选择信息或电子邮件,照片将被附加到信息中,您可以照常撰写和发送信息。如果选择蓝牙,手机将自动打开蓝牙并搜索要将图片发送至的设备。
使用图像
您可以选择图像以用作墙纸和屏幕保护程序,或用来识别呼叫者。
1 点触,然后点触。
2 点触,然后选择我的图像。
3 选择图像并点触。
4 点触用作并从以下选项中选择:墙纸 - 设为待机屏幕的墙纸。
联系人图像 - 将图像分配给联系人列表中的某人,当其呼叫时,您的手机上会显示该图片。
开机图像 - 设为开机时显示的图像。 关机图像 - 设为关机时显示的图像。
打印图像
1 点触,然后点触。
2 点触,然后选择我的图像。
3 选择图像并点触。
4 点触打印,然后再蓝牙和图片打印器之间选择。
提示! 您可以通过蓝牙或连接到图片打印器兼容的打印机打印。
多媒体
移动或复制图像
您可以在手机内存和存储卡之间移动或复制图像。您可能需要执行此操作以释放其中一个存储位置的存储空间,或保护图像不丢失。
1 点触,然后点触
2 点触,然后选择我的图像。
3 点触,然后选择移动或复制。
4 您可以依次点触图像以标记/取消标记。标记您要移动或复制的图像,然后点触复制/移动。
声音
我的声音文件夹包含“下载的声音”、默认声音和录音。在此,您可以管理、发送或将声音设为铃音。
使用声音
1 点触,然后点触。
2 点触,然后点触我的声音。
3 选择默认声音或录音。
4 选择一个声音,随即将播放此声音。
5 点触,然后选择用作。
6 从铃声、视频铃声、信息提示音、开机铃声或关机铃声中选择。
视频
我的视频文件夹显示已下载的视频以及手机中录制的视频列表。
观看视频
1 点触,然后点触
2 点触,然后点触我的视频。
3 选择要播放的视频
LG KP502 | 用户手册
发送视频剪辑
1 选择视频,然后点触
2 点触发送并从信息、电子邮件或蓝牙中选择。
3 如果选择信息或电子邮件,视频剪辑将被附加到信息中,您可以照常撰写和发送信息。如果选择蓝牙,手机将提示您打开蓝牙并搜索要将视频发送至的设备。
游戏和应用程序
您可以在手机中安装新游戏和应用程序,它们将在闲暇时为您带来乐趣。
通过本地安装安装游戏/应用程序
1 点触,然后点触。
2 点触,然后点触其它或外部存储器(如果插入了外部存储器)。
3 选择您要安装的文件 (*.jad 或 *.jar),然后按安装命令。应用程序即被安装。
备注: jad 文件应包含自己的 jar 文件。
玩游戏
1 点触,然后点触。
2 点触 和我的应用程序。
3 打开 “游戏” 文件夹,选择并点触要启动的游戏。
文档
从文档菜单中,您可以查看所有文档文件。在此,您可以查看Excel、PowerPoint、Word、文本和PDF文件。
将文件传输到手机
蓝牙可能是将文件从计算机传输到手机最简便的方法。您也可以通过同步数据线使用 LG PC 套件,有关详细信息,请参阅第 53 页。
使用蓝牙传输:
1 请确保手机和电脑都已打开蓝牙,彼此可见。
2 通过蓝牙,使用电脑发送文件。
3 文件发出后,您必须点触是在您的手机上接受它。
4 文件应出现在文档或其它文件夹中。
多媒体
查看文件
1 点触,然后点触。
2 点触,然后点触文档。
3 选择文档,然后点触查看。
其它
其它文件夹用于存储非图片、声音、视频、游戏或应用程序文件。其使用方式与文档文件夹相同。当您将文件从电脑传输到手机时,您可能发现文件保存在其它而不是文档文件夹中。如果这样,您可以移动文件。
将文件从其它文件夹移到文档:
1 点触,然后点触
2 点触,然后点触其它。
3 选择文件,然后点触。
4 点触移动,然后点触箭头图标从列表中选择目标文件夹。传输完成后,屏幕上将显示已移动。
创建电影
1 点触,然后点触。
2 点触 (Muvee 工作室)。
3 点触 + 以添加图像。复选您要包含其中的图像,然后选择插入。
4 点触样式标签,然后选择 “Muvee 样式”。
5 点触默认声音以更改声音。
6 点触 ▶ 以观看您创建的内容。
7 点触,然后点触排序以排序。
8 点触☑,然后点触保存位置以选择电影的保存位置。
LG KP502 | 用户手册
音乐
LG KP502 拥有内置的音乐播放器,因此,您可以播放所有喜爱的曲目。要进入音乐播放器,请依次点触和。您可以在此访问多个文件夹:
最近播放 - 查看您最近播放的所有歌曲。
所有曲目 - 包含手机中的所有歌曲。
艺术家 - 按艺术家浏览音乐集合。
专辑 - 按专辑浏览音乐集合。
流派 - 按流派浏览音乐集合。
播放列表 - 包含您创建的所有播放列表。
随机曲目 - 以随机顺序播放您的曲目。
将音乐传输到手机
将音乐传输到手机的最轻松的方法是通过蓝牙或同步数据线。
您也可以使用 LG PC 套件,有关详细信息,请参阅第 53 页。使用蓝牙传输:
1 请确保双方设备都已打开蓝牙,对对方可见。
2 选择另一个设备上的音乐文件,选择通过蓝牙发送。
3 文件准备就绪可以发送后,您应点触是以在手机上接受。
4 文件应显示在音乐 > 所有曲目中。
播放歌曲
1 点触,然后点触。
2 点触,然后点触所有曲目。
3 选择您要播放的歌曲。
4 点触 品暂停歌曲。
5 点触以跳到下一首歌曲。
6 点触以跳到上一首歌曲。
7 点触,返回到音乐菜单。
多媒体
创建播放列表
您可以从所有曲目文件夹中进行选择,以创建自己的播放列表。
1 点触,然后点触
2 点触,然后点触播放列表。
3 点触新建播放列表,输入播放列表名称,然后点触保存。
4 所有曲目文件夹将显示手机中的所有歌曲。点触所有要包含在播放列表中的歌曲;这些曲目名称旁边将显示一个勾号。
5 点触保存。
要播放播放列表,请选择列表,然后点触播放。
使用收音机
LG KP502 拥有 FM 收音机功能,以便您转到喜爱的电台并收听无线广播。
备注:要收听收音机,您需要插入耳机。将耳机插入耳机插槽(与插入充电器的插槽相同)。
搜索电台
您可以手动或自动微调电台。搜索后,它们将保存为特定频道编号,这样,您就不用重复进行微调。您可以在手机中最多保存50个频道。您必须首先将耳机插入手机以将其用作天线。
LG KP502 | 用户手册
自动微调:
1 点触,然后点触。
2 点触,然后点触
3 点触“自动扫描”。随后,将自动查找电台并分配给手机中的频道。
备注:您也可以使用电台频率旁显示的和手动微调电台。如果按住和将自动查找电台。
重设频道
1 点触,然后点触。
2 点触,然后点触
3 选择重设以重设当前频道,或选择全部重设以重设所有频道。每个频道的开始频率将返回为 87.5Mhz。
管理器
将事件添加到目历中
1 从待机屏幕选择 📋 然后点触并选择 📃。选择日程表。

2 选择您要添加事件的日期。
3 点触,然后选择添加事件。
4 点触类别,然后从约会、周年纪念或生日中选择。 查看日期并输入事件开始的时间。
5 对于约会和周年纪念,请在下面的“时间”和“日期”框中输入事件结束的时间和日期。
6 如果您要为事件添加主题或备注,请点触备注,键入备忘录后点触保存。
7 设置闹钟和重复。
8 选择保存,您的事件将保存在日程表中。方形光标标记已保存事件的日期,在事件开始时间会有闹钟提醒,以便您进行安排。
向任务列表添加项目
1 从待机屏幕选择 📋 然后点触并选择 📃。

2 选择任务然后点触添加任务。
3 为任务项设置日期、添加备注或选择优先级:高、中或低。
4 选择保存以保存任务列表项。
添加备忘录
1 从待机屏幕选择 📋 然后点触选择 📃。选择备忘录。

2 点触添加备忘录。
3 键入备忘录,然后选择保存。
4 在您下一次打开备忘录应用程序时,屏幕上将显示此备忘录。
01
02
03
04
05
06
07
08
管理器
使用日期计算器
日期计算器是一款便捷的工具,有助于您计算特定天数后的日期。例如,2007年10月10日后60天是2007年12月9日。
这有助于确保不误期。
1 从待机屏幕选择 📁 ,然后点触并选择 📄 。
2 选择日期计算器。
3 在自选项卡中,设置所需日期。
4 在之后选项卡中,设置天数。
5 此时会在下面显示预定日期。
设置闹钟
1 从待机屏幕选择,然后点触并选择。
2 点触添加闹钟。
3 设置您希望闹钟响起的时间,然后点触保存。
4 选择您希望闹钟响起的方式: 每天、星期一至星期五、星期一至星期六、星期六至星期天、节假日除外或选择工作日。
图标指示您选择的工作日。
5 选择闹钟提示音为您的闹钟选择一个类型。
6 点触闹钟提示音,然后选择默认声音或录音文件夹以查找声音。要听声音,请点触声音,然后点触 ▶。
7 为闹钟添加备忘录。键入备忘录后,点触保存。
8 最后,您可以设置暂停间隔:5、10、20、30 分钟、1 小时或关。
9 设置闹钟后,请点触保存。
备注:您最多可以设置5个闹钟。
提示!点触闹钟右侧的开/关图标。
添加带绘图面板的备忘录
1 从待机屏幕选择 📁,然后点触并选择 📄。

2 点触添加图画。
3 在触摸屏 LCD 上画下备忘录,然后点触 ☐。
4 在您下一次打开绘图面板应用程序时,屏幕上将显示此备忘录。
LG KP502 | 用户手册
语音备忘录
使用语音备忘录录制语音备忘录或其它声音。
1 点触,然后点触。
2 依次点触、设置, 然后从以下选项中选择:
时长 - 设置录音长度。从“无隙制”、“彩信大小”或“1分钟”中选择。
质量 - 选择声音质量。从“超精细”、“精细”或“正常”中选择。
存储位置 - 选择录音文件的保存位置。
录制声音或语音
1 点触,然后点触。
2 点触。
3 点触开始录音。
4 点触 □ 结束录音。
5 点触▶收听录音。
使用计算器
1 从待机屏幕选择 📋 然后点触并选择 📁。

2 选择计算器。
3 点触数字键以输入数字。
4 对于简单计算,点触您所需的函数 (+, -, *, /) ,然后点触 =。
5 对于较复杂的计算,请点触并从sin、cos、tan、log、ln、exp、sqrt、deg或rad等中选择。
换算单位

1 从待机屏幕选择 🎟 然后点触并选择 📁。
2 选择换算器。
3 选择要换算的内容: 币种、面积、重量、长度、温度、体积或速率。
4 随后,您可以选择单位,输入要换算的初始值,然后选择要换算的目标单位。
5 屏幕上将显示相应的值。
01
02
03
04
05
06
07
08
管理器
使用秒表
1 从待机屏幕选择,然后点触并选择。

2 选择秒表。
3 点触开始启动计时器。
4 如果您要记录时间,请点触记录。
5 点触停止结束计时器。
6 点触恢复从您停止的时间重新开始秒表,或点触重置重新开始计时。
向世界时间添加城市
1 从待机屏幕选择 🎨 然后点触并选择 📁。

2 选择世界时间。
3 点触,然后选择添加城市。开始键入所需城市的名称时,屏幕顶部即显示该城市。
LG KP502 | 用户手册
PC 同步
您可以使用手机同步电脑,以确保所有重要信息和日期匹配,同时做好备份。
在电脑上安装 LG PC 套件
1 从待机屏幕按,选择


2 选择 USB 连接模式,然后选择:PC suite
3 将随附的 CD 插入 PC。单击显示在屏幕上的 LG PC 套件安装程序。
4 选择安装程序运行的语言,然后单击确定。
5 根据屏幕说明完成 LG PC 套件安装程序向导。
6 安装完成后,桌面上将显示 LG PC 套件图标。
连接手机和 PC
1 将 USB 数据线连接到手机和 PC。
2 双击桌面上的LG PC套件图标。
3 单击连接向导,然后单击 USB。
4 单击下一步,再单击下一步,最后单击完成。
现在,手机与 PC 已连接。
备份和恢复手机信息
1 如上所述,将手机连接到 PC。
2 单击备份图标,选择备份或恢复。
3 标记您要备份或恢复的内容。选择您要保存备份信息的位置,或恢复信息的位置。单击确定。
4 将备份或保存您的信息。
在 PC 上查看手机文件
1 如前所述,将手机连接到电脑。
2 单击内容图标。
3 手机中保存的所有文档、Flash 内容、图像、声音和视频将显示在“LG 手机”文件夹屏幕中。
提示!在 PC 中查看手机内容有助于您排列文件、整理文档或删除不再需要的内容。
PC 同步
同步电话本
1 将手机连接到 PC。
2 单击电话本图标。
3 PC 中将导入并显示 USIM 卡和手机中保存的所有联系人。
4 单击文件,然后选择保存。现在,您可以选择要保存电话本的位置。
备注:要备份保存在 USIM 卡中的电话本,请单击电脑屏幕左侧的“SIM 卡”文件夹。选择屏幕顶部的编辑,然后选择全选。
右键单击联系人,然后选择复制到电话本。现在,请单击屏幕左侧的手机文件夹,此时将显示您的所有号码。
将手机用作音乐同步设备
您的手机可以用作音乐同步设备,仅用于同步音乐文件。
使用 Windows Media Player 10/11 可完成音乐同步,同时支持手机内存和外部存储卡。
1 断开手机与 PC 的连接。
2 从待机屏幕选择 📁 ,然后点触 🏠 。
3 选择,然后选择 USB 连接模式。
4 点触音乐同步。
5 将手机连接到 PC。手机将显示:正在以音乐同步模式连接…,随后显示断开数据线连接以停止音乐同步。
同步信息
1 将手机连接到 PC。
2 单击信息图标。
3 手机信息将显示在屏幕上的文件夹中。
4 使用屏幕顶部的工具栏排列信息。
LG KP502 | 用户手册
网络
浏览器
浏览器为您提供了一个涵盖游戏、音乐、新闻、体育、娱乐和下载的缤纷世界,您可以快速、直接地通过手机访问。畅行无阻、精彩无限。
访问网页
1 从待机屏幕选择 🎨 然后点触并选择 🎩。

2 要直接访问浏览器主页,请选择主页。或者,选择输入地址并键入所需的 URL,然选择连接。
备注:连接此服务并下载内容时,可能会产生额外费用。查看网络提供商要求的数据付费。
添加并访问书签
为了轻松快速地访问收藏的网站,您可以添加书签并保存网页。
1 从待机屏幕选择 🎨 ,然后点触并选择 🎨 。
2 选择书签。此时屏幕上将出现一个书签列表。
3 要添加一个新的书签,请选择 📋 并点触 “添加书签”。输入书签名称和 URL。
4 点触 “保存”。现在,您添加的书签将显示在书签列表中。
5 要访问书签,点触书签后点触“连接”即可。您将连接到书签。
使用 RSS 阅读器
RSS(简易供稿)是一种网络订阅源格式,可用于发布最近更新的内容,如博客、新闻标题或播客。RSS文档通常被称为订阅源、网络订阅源或频道,它包含相关网站的内容摘要或完整文本。RSS使人们可以以主动方式随时关注其感兴趣的网站,而无需手动查看。
用户订阅源的方式:将订阅源的链接输入阅读器,或单击浏览器中的 RSS 图标即可开始订阅流程。阅读器将定期检查用户订阅的源以查看新内容并下载找到的任何更新。
网络
保存页面
1 如上所述,访问所需网页。
2 点触 □ 并选择 “保存本页面”。
3 为网页输入一个名称,便于您轻松识别。
4 点触“保存”。
提示!此菜单还允许您编辑已保存页面的标题、保护或取消保护屏幕备忘录,以及删除已保存页面。
访问已保存页面
1 从待机屏幕选择,然后点触并选择。
2 选择 “已保存页面”。
3 选择所需页面,随即将打开该页面。

查看浏览器历史记录
1 从待机屏幕选择,然后点触并选择。 选择 “记录”。

2 此时将显示一个您最近访问过网页的标题列表。要访问其中一个网页,只需选择所需页面,点触“连接”即可。
LG KP502 | 用户手册
更改网络浏览器设置
1 从待机屏幕选择 📋 然后点触并选择 📃。
选择设置。

2 您可以选择以编辑模式、外观设置、缓存、Cookie、安全性,或者,您可以选择“恢复初始设定”以重置所有设置。
将手机用作调制解调器
KP502 可以同时用作电脑的调制解调器,使您在无法使用有线连接时仍可访问电子邮件和互联网。您可以使用 USB 数据线或蓝牙。
使用 USB 数据线:
1 确保 PC 上已经安装了 LG PC 套件。
2 用 USB 电缆连接 KP502 和您的电脑并启动 LG PC 套件软件。
3 单击电脑上的 Internet Kit。随后,单击新建按钮并选择“调整解调器”。
4 选择LG Mobile USB 调制解调器,然后选择确定。此时将在屏幕上打开。
5 写入可连接到互联网的配置,然后保存值。
6 您创建的配置将显示在电脑屏幕上。
选择并单击“连接”。
电脑将通过 KP502 连接。
备注: 有关使用 LG PC 套件同步的
详细信息,请参阅第53页。
使用蓝牙:
1 确保已打开蓝牙并在电脑和 KP502 上均可见。
2 配对电脑和 KP502,以便需要通行码才能建立连接。
3 使用 LG PC 套件上的连接向导创建一个活动的蓝牙连接。
4 单击电脑上的 Internet Kit。然后,单击新建按钮。
5 选择LG Mobile USB 调制解调器,然后选择确定。此时将在屏幕上打开。
6 写入可连接到互联网的配置,然后保存值。
7 您创建的配置将显示在电脑屏幕上。选择并单击“连接”。
电脑将通过 KP502 连接。
备注:有关蓝牙的详细信息,请参阅第61页。
设置
使用此文件夹,您可以调整设置以使KP502更具个性化。
备注:有关通话设置的信息,请参阅第24页。
更改情景模式
您可以在待机屏幕上快速更改情景模式。点触顶部的状态摘要栏及情景模式标签即可。
使用设置菜单,您可以个性化每个情景模式设置。
1 按 🎨 ,然后选择 🎩
2 点触情景模式,然后选择您要编辑的情景模式。
3 随后,您可以更改列表中可用的所有声音和提示选项,包括语音提示音和音量、信息提示设置等。
更改屏幕设置
1 点触,然后选择
2 点触然后从以下选项中选择:
墙纸-为待机屏幕选择主题。顶层菜单-选择顶层菜单样式。
拨号-调整数字大小和颜色。
字体-调整字体大小。
背景灯 - 选择背景灯持续时间。

LG KP502 | 用户手册
备注:背景灯打开时间越长,电池耗电量就越大,您可能需要更频繁的对手机进行充电。
亮度 - 调整屏幕亮度。
问候语信息 - 选择开或关,然后填写问候语信息。
开机/关机 - 选择开机/关机屏幕的主题。
3 点触保存以保存设置。
更改手机设置
您可以根据自己的需要,随心所欲地对 KP502 进行调节。
提示!要在选项列表中滚动,请点触所见的最后一个条目,然后使用手指向上滑过屏幕。列表向上滚动,您将看到更多条目。
1 点触 🎟 然后选择

2 点触
日期和时间 - 调整日期和时间设置,或者,选择在旅行时或针对夏令时自动更新时间。
省电 - 选择开或关以开启或关闭初始的省电设置。
语言 - 更改 KP502 的显示语言。
自动键盘锁 - 在待机屏幕下自动锁定键盘。
安全性 - 调整您的安全设置,包括 PIN 码和手机锁。
内存管理器 - 有关详细信息,请参阅第 60 页的“使用内存管理器”。
恢复初始设定 - 将所有设置重置到其出厂设置
手机信息 - 查看 KP502 的技术信息。
更改连接设置
网络运营商已为您设置连接设置,因此,您开机即可使用手机。如果要更改设置,请使用此菜单。
点触 📋,然后点触 🏠 选择 。
网络设定
网络选择 - 如果设置为 “自动”,KP502 将自动搜索网络并向网络注册手机。为了得到最佳的服务和质量,建议选择此设置。
如果设置为“手动”,将显示当前可用的所有网络,您可以从中选择一个注册。如果网络注册失败,则屏幕上会重新列出网络列表,您可以选择另外一个进行注册。
备注:在手动模式下,如果手机失去网络,待机屏幕上会弹出一条信息,其中显示所有可供选择的网络。
首选列表 - 如果自动搜索网络,您可以添加要连接的首选网络。可以使用以下选项。
设置
互联网网络设定 - 此菜单显示互联网网络设定。您可以使用“选项”菜单新建、删除或编辑网络设定。但是根据国家/地区不同,您可能无法删除或编辑默认配置。
存取点 - 网络运营商已保存此信息。您可以使用此菜单添加新的接入点。
分组数据连接 - 选择设备何时连接到网络以传输分组数据。
USB 连接模式 - 选择数据服务并使用 LG PC 套件软件同步 KP502 以复制手机中的文件。有关同步的详细信息,请参阅第 53 页。
如果使用带 Windows Media Player 的音乐同步,请在此菜单中选择“音乐同步”。音乐同步仅可用于音乐内容。
使用内存管理器
KP502 有三种可用存储器:手机、SIM 卡和外部存储卡(您可能需要单独购买存储卡)。
您可以使用内存管理器确定每种存储器的使用方式以及查看可用空间。
点触 🚗 ,然后点触 ⚗ 。选择 ⚗ ,然后选择内存管理器。
手机公用内存 - 查看 KP502 中针对以下各项的可用内存:图片、声音、视频、Flash、彩信、电子邮件、Java 应用程序、其它。
手机预留内存 - 查看手机日前针对以下各项的可用内存:短信、电话本、日历、任务列表、备忘录、闹钟、通话记录、书签及其它。
SIM 卡内存 - 查看 USIM 卡的可用内存。
外部存储器 - 查看外部存储卡的可用内存(您可能需要单独购买存储卡)。
主存储器设置 - 选择项目的首选保存位置。
设置
60
LG KP502 | 用户手册
使用蓝牙发送和接收文件
蓝牙适用于在无线条件下发送和接收文件,连接快速且方便。您也可以连接蓝牙耳机接听电话。
发送文件:
1 打开要发送的文件,通常是照片、视频或音乐文件。
2 选择发送。
选择蓝牙。
3 如果已配对蓝牙设备,KP502 将不会自动搜索以配对其它蓝牙设备。否则,KP502 将搜索范围内其它启用了蓝牙的设备。
4 选择您要向其发送文件的设备,然后点触选择。
5 您的文件将被发送。
提示!注意进度栏,确保文件已发送。
接收文件:
1 要接收文件,您的蓝牙必须为并且可见。有关详细信息,请参阅右侧的“更改蓝牙设置”。
2 手机会提示您一条信息,是否接收来自其他发件人的文件。点触是以接收文件。
3 您可以查看文件的保存位置,可以选择查看文件或用作墙纸。文件通常保存在“媒体相册”中的相应文件夹。
更改蓝牙设置:
1 点触 📋 ,然后选择 🌿 2 选择 📋 然后点触 并 🕒 择设置 设置 进行更改:
我的设备可见性 - 选择 “可见”、“隐藏” 或 “可见1分钟”。
我的设备名称 - 为您的 KP502 输入一个名称。
支持的服务 - 选择在其它关联服务中如何使用蓝牙。请参阅第 56 页的 “将手机用作调制解调器” 和第 62 页的 “使用蓝牙耳机”。
远程 SIM 卡模式 - 打开或关闭。 我的地址 - 显示您的蓝牙地址。
设置
与其它蓝牙设备配对
要将您的 KP502 与其它设备配对,您可以设置受通行码保护的连接。这意味着配对更加安全。
1 查看蓝牙是否为开且可见。您可以在设置菜单中更改可见性。
2 点触搜索。
3 KP502 将搜索设备。搜索完成时,屏幕上将显示刷新。
4 选择您要与之配对的设备,输入通行码,然后点触确定。
5 随后,您的手机将连接到其它设备,您可以在该设备上输入相同的通行码。
6 现在,受通行码保护的蓝牙连接已经准备就绪了。
使用蓝牙耳机
1 查看蓝牙是否为开且可见。
2 根据耳机随附的说明书将耳机置于配对模式下并配对设备。
3 点触连接前询问或始终连接,然后点触是立即连接。KP502 将自动切换到“耳机”情景模式。
设置
62
LG KP502 | 用户手册
配件
这些配件随 KP502 提供。
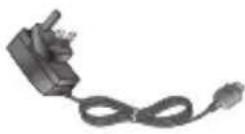
充电器
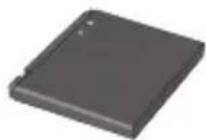
电池
立体声耳机 用户手册

USB线和光碟
在 KP502 和电脑间建立连接并同步。

用户手册
了解更多关于 KP502 的信息。
备注:
- 务必使用原装 LG 配件。
- 否则可能导致保修失效。
- 在不同地区提供的配件可能不同;如需要进一步查询有关情况,请与我们的地区服务公司或代理联系。
保护膜

警告:如果触摸屏上贴了保护膜,触摸屏的敏感度将降低。
01
02
03
04
05
06
07
08
配件
网络服务 技术参数
本指南中描述的无线手机适用于 GSM 900、DCS 1800、GSM 850 和 PCS1900 网络。
本指南中包含的一系列功能称为网络服务。这些服务是由您的无线服务提供商提供的特殊服务。在利用这些网络服务之前,必须先向您的服务提供商预订,并获取使用说明。
技术参数
标准
产品名称:KP502
系统:GSM 900 / DCS 1800 / GSM 850
/ PCS 1900
外部环境
最大: +55^ C(放电)、
+45°C (充电)
最低温度: -10^ C
Declaration of Conformity

LG Electronics
Suppliers Details
Name
LG Electronics Inc
Address
LG Twin Tower 20,Yeouido-dong, Yeongdeungpo-gu Seoul, Korea 150-721
Product Details
Product Name
E-GSM 900 / DCS 1800 / GSM 850 / PCS 1900 Quad Band Terminal Equipment
Model Name
KP502
Trade Name
LG
CE0168
Applicable Standards Details
R&TTE Directive 1999/5/EC
EN 301 489-01 v1.6.1 / EN 301 489-07 v1.3.1 / EN 301 489-17 v1.2.1
EN 60950-1:2001
EN 50360 / EN62209-1:2006
EN 301 511 V9.0.2
EN 300 328 V1.7.1
Supplementary Information
The conformity to above standards is verified by the following Notified Body(BABT)
BAST, Balfour House, Churchfield Road, Watton-on-Thames, Surrey, KT12 2TD, United Kingdom
Notified Body Identification Number: 0168
Declaration
I hereby declare under our sole responsibility that the product mentioned above to which this declaration relates complies with the above mentioned standards and Directives
European Standard Center
LG Electronics Logistics and Services B.V.
Veluwezoom 15, 1327 AE Almere, The Netherlands
Tel: +31-36-547-8940, Fax: +31-36-547-8794
e-mail: jacob@lge.com
Name
Issued Date
Seung Hypun, JI / Director
18, March, 2009

Signature of representative
关于安全有效使用手机的准则
请阅读以下简单的准则。违反这些准则可能造成危险或者触犯法律。
暴露在射频能量之下
无线电波暴露和“特定吸收率”(SAR)信息。此款 KP502 型手机已设计为遵守有关适用的无线电波暴露安全要求。此要求基于相关的科学准则,其中包括为确保所有人员(无论年龄和健康状况)安全而设计的安全裕量。
- 无线电波暴露准则采用一种称为“特定吸收率”或SAR的测量单位。SAR测试是在所有用到的频带中以手机的最高认可功率电平进行发射时使用标准化方法执行的。
- 不同的 LG 手机型号可能有不同的 SAR 能级,但它们均符合相关的无线电波暴露准则。
- 国际非游离辐射防护委员会(ICNIRP)建议的SAR上限值为:每10克重的人体组织吸收的能量平均值不超过2W/kg。
- 由 DASY4 对该型号手机进行的测试,人耳能够承受的 SAR 最大值为 0.827 W/kg(10 克),戴在身体上时,其值为 1.40 W/kg(10 克)。
- 电气电子工程师协会 (IEEE) 建议的 SAR 上限值为 1.6 W/kg,平均值超过 1 克薄纸,此 SAR 数据适用于各个国家/地区的居民。
产品保养和维护
警告
仅使用经核准为用于此特定手机型号的电池、充电器和配件。使用任何其它类型可能导致适用于此手机的许可或保修失效,并可能造成危险。
- 不要拆解本机。当需要维修时,请将手机送往合格的服务技术人员处。
- 远离诸如电视、收音机或个人计算机之类的电器。
- 远离诸如暖气片或厨灶之类的热源。
- 小心不要让手机摔落。
- 不要让手机受到机械振动或撞击。
- 在任何有特殊条例要求的区域关闭手机。例如,请勿在医院使用手机,因为它可能影响敏感的医疗设备。
- 手机充电时,请勿用湿手操作手机。这可能会导致电击或手机严重受损。
- 请勿在靠近易燃物体的位置充电,因为手机可能因加热而引发火灾。
LG KP502 | 用户手册
- 使用干布清洁手机外壳(不要使用如苯、稀释剂或酒精之类的溶剂)。
- 如果手机置于柔软物体之上,请不要充电。
- 应在通风条件好的位置对手机进行充电。
- 不要在烟雾或灰尘过多的环境中使用或存放手机。
- 不要将手机放在信用卡或卡式车票旁边,它可能会影响磁条上的信息。
- 不要用尖锐物体敲击屏幕,这可能会损坏手机。
- 不要将手机暴露在液体或潮气中。
- 谨慎使用如耳机之类的配件。在不必要的情况下,不要触摸天线。
有效的手机操作
电子设备
所有手机都可能受到干扰,这种干扰会对性能造成影响。
- 在未经允许的情况下,不得在医疗设备附近使用手机。不要将手机放在心脏起搏点上,例如,胸前的口袋内。
- 手机可能会对某些助听器造成干扰。
- 微弱的干扰可能会影响电视、收音机、个人计算机等。
行车安全
查阅有关在驾驶时使用手机的本地法律法规。
- 不要在驾驶时使用手持式手机。
- 将注意力完全集中在驾驶上。
- 如果有免提装置,请使用免提装置。
- 如果行驶条件需要,请在拨打或接听电话之前将车辆驶离道路并停车。
- 射频能量可能影响车辆内的电子系统,例如立体声音响、安全设备等。
- 当车辆配备气囊时,不要让安装的或便携式的无线设备阻挡气囊。否则,可能导致安全气囊失效,或由于不适当的个人行为造成严重伤害。
- 如果您在外出时使用耳机收听音乐,请确保将音量设置为合理的音量级别,以便注意周围的情况。在过马路时,尤其要注意这一点。
关于安全有效使用手机的准则
避免对您的听力造成伤害
如果您长时间置于高音环境中,那么您的听力可能会遭到伤害。因此,我们建议您在开机或关机时不要将手机置于耳边。同时,我们还建议您将音乐和通话音量设置为合理的音量级别。
玻璃部分
手机部分为玻璃制。如果手机摔落到坚硬表面或受到强烈撞击,玻璃会破碎。如果玻璃破碎,请勿触摸或尝试取出玻璃碎片。停止使用手机,在授权的服务供应商处更换玻璃。
爆破区域
不要在正进行爆破的地区使用手机。请依照有关限制,并遵守任何规章或规定。
易爆环境
- 不要在加油站内使用手机。
- 请勿在加油点或化工厂附近使用手机。
- 不要在放有手机和配件的车厢内运输或存放可燃气体、液体或爆炸品。
在飞机上
无线设备可能对飞机造成干扰。
- 登机前,请关机。
- 未经机务人员允许,不得在地面上使用手机。
儿童
将手机放在儿童接触不到的安全地方。手机中包含细小零件,如果脱落可能导致窒息危险。
紧急电话
并非在所有手机网络中均可使用紧急电话。因此,您不应仅依赖于手机的紧急呼叫功能。请向本地的服务提供商核准。
电池信息及保养
- 您无需在再次充电前对电池进行完全放电。与其它电池系统不同,本机电池不具有可能影响电池性能的记忆效应。
- 只能使用 LG 电池和充电器。LG 充电器设计为最大程度地延长电池使用寿命。
- 不要拆解电池组或将其短路。
LG KP502 | 用户手册
- 保持电池组的金属触点清洁。
- 当电池不再提供合乎要求的性能时,请更换电池。在需要更换之前,电池组可以反复充电数百次。
- 如果电池已经使用很长一段时间,请对电池再次进行充电以保持最佳使用状态。
- 不要将电池充电器暴露在直射阳光下,也不要在诸如浴室之类的高湿环境中使用。
- 不要将电池存放在过热或过冷的地方,这可能损害电池的性能。
- 如果用不适当的电池进行替换,可能会有爆炸危险。
- 请按制造商的说明处置用过的电池。如果可能,请循环使用电池。不要象处理家用废物一样处理电池。
- 如果要更换电池,请将其携带至LG Electronics授权服务点或经销商处以寻求帮助。
- 手机充好电后,请务必将充电器从墙上插座拔下,以避免不必要的耗电。
- 实际的电池寿命将取决于网络配置、产品设置、使用方式、电池和环境条件。
natural_image
Front view of a black LG mobile phone with blank screen and keypad (no visible text or symbols on device body)Some of the contents in this manual may differ from your phone depending on the software of the phone or your service provider.
KP502 User Guide
Congratulations on your purchase of the advanced and compact KP502 phone by LG, designed to operate with the latest digital mobile communication technology.
| Set up | 01 |
| Your standby screen | 02 |
| The basics | 03 |
| Get creative | 04 |
| Get organised | 05 |
| The web | 06 |
| Settings | 07 |
| Accessories | 08 |
Contents
Using your phone as Music Syncp
Getting to know your phone 8
Open view 10
Installing the USIM and battery .....11
Memory card ....14
Your standby screen
Touch screen tips ....15
The basics
Calls 20
Making a call 20
Making a call from your contacts .....20
Answering and rejecting a call ......20
In-call options ......21
Speed dialling 22
Making a second call 22
Turning off DTMF 22
Viewing your call logs 22
Using call divert 23
Using call barring 23
Changing the common call setting .....24
Contacts 25
Searching for a contact 25
Adding a new contact 25
Creating a group 26
Changing your contact settings .....26
Viewing information 27
Messaging 28
Messaging 28
Sending a message 28
Entering text 28
T9 predictive ....29
Abc manual 29
Keyboard 29
Handwriting recognition ....29
Setting up your email 30
Retrieving your email 30
Sending an email using your new account ....30
Changing your email settings ....31
Message folders ......31
Changing your text message settings 32
Changing your multimedia message settings ....32
Changing your other settings....33
Get creative
Camera 34
Taking a quick photo 34
After you've taken your photo 34
Getting to know the viewfinder ....35
Choosing a shot type ....36
Adjusting the exposure 36
Using the advanced settings ....36
Changing the image size ....37
Choosing a colour effect 37
Viewing your saved photos ....37
Video camera 38
Shooting a quick video 38
After you've shot your video 38
Getting to know the viewfinder .....39
Adjusting the Exposure...... 40
Using the advanced settingss 40
Changing the video image size .....41
Choosing a colour tone....41
Watching your saved videos .....41
Your photos and videos ....42
Viewing your photos and videos ......42
Capturing an image from a video .....42
Viewing your photos as a slide show ....42
Setting a photo as wallpaper ....43
Editing your photos....43
Adding text to a photo 43
Adding an effect to a photo 44
Multimedia....45
Pictures 45
Sending a photo 45
Using an image 45
Printing an image 46
Moving or copying an image .....46
Sounds 46
Using a sound 47
Videos 47
Editing a video clip ....46
Sending a video clip 47
Games and Applications ....47
Installing a game/application via
local install 48
Playing a game 48
Documents 48
Transferring a file to your phone .....48
Viewing a file 49
Contents
Others 49
Creating a movie 49
Music....49
Transferring music onto your phone ....50
Playing a song 50
Creating a playlist....50
Using the radio ....51
Searching for stations 51
Resetting channels ....51
Get organised
Organiser 52
Adding an event to your calendar .....52
Adding an item to your to do list .....52
Adding a memo 52
Using date finder 52
Setting your alarm 53
Adding a memo with drawing panel ....53
Voice recorder 53
Recording a sound or voice ....54
Using your calculator ....54
Converting a unit ....54
Using the stopwatch ....54
Adding a city to your worldtime .....55
PC Sync 56
Installing LG PC Suite on your computer ....56
Connecting your phone and PC .... 56
Backing up and restoring your phone's information ....56
Viewing your phone files on your PC ....57
Synchronising your contacts ....57
Synchronising your messages ....57
Using your phone as Music Sync device ....57
The web
Browser 59
Accessing the web 59
Adding and accessing your bookmarks ....59
Using RSS reader 59
Saving a page 60
Accessing a saved page 60
Viewing your browser history ......60
Changing the web browser settings .....60
Using your phone as a modem ....60
Settings
Personalising your profiles ....62
Changing your screen settings ......62
Changing your phone settings ......62
Changing your connectivity settings....63
Using memory manager....64
Sending and receiving your files
using Bluetooth 65
Pairing with another Bluetooth
device 66
Using a Bluetooth headset ......66
Accessories 67
Network service 68
Technical data 68
Guidelines
Guidelines for safe and efficient use ..... 70
Getting to know your phone
End/Power key
Ends or rejects a call.
Turns the phone on/off.
Press once to return to the
standby screen.
Multitasking key
Call key
Dials a phone number and
answers incoming calls.


WARNING: Placing a heavy object on the phone or sitting
on it while it is in your pocket can damage the phone's LCD and touch screen functionality.
LG KP502
User Guide

Charger, Cable, Handsfree connector
TIP: To connect the USB cable, wait until the phone has powered up and has registered to the network.
Side keys
- When the screen is idle: volume of key tone.
- During a call: volume of the earpiece.
- When playing a BGM track - Short press: controls the volume.

natural_image
Close-up of a black electronic device with a control knob and three buttons (no visible text or symbols)Micro SD memory card socket
Lock/Unlock key
Capture button
Stylus
Open view

set up
10
LG KP502 | User Guide
Installing the USIM and battery
1 Remove the battery cover
Slide the battery cover towards the bottom of the phone and away from it.

natural_image
Stacked smartphone rear panel with a red arrow indicating the portion of the cover (no text or symbols visible)2 Remove the battery
Using the cut-out at the bottom lift it from the battery compartment.

natural_image
3D model of a smartphone showing the front panel and internal structure, with a red arrow pointing to a specific portion (no text or symbols visible)
natural_image
3D rendering of a smartphone showing internal components and a red arrow indicating a specific portion (no text or symbols present)
WARNING: Do not use your jernail when removing the tery.

WARNING: Do not remove the livery when the phone is switched as this may damage the phone.
Installing the USIM and battery
3 Install the USIM card
Slide the USIM card into the USIM card holder making sure that the gold contact area on the card is facing downwards. To remove the USIM card, pull it gently in the opposite direction.

natural_image
Close-up of a smartphone showing internal components and a magnified view of the device's internal structure (no text or symbols visible)4 Install the battery
Insert the top of the battery first into the top edge of the battery compartment. Ensure that the battery contacts align with the terminals on the phone. Press down the bottom of the battery until it clicks into place.
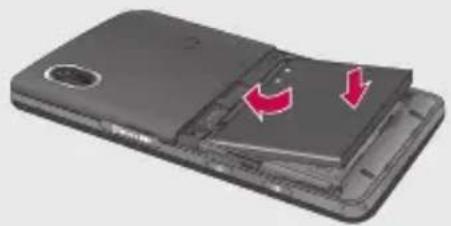
natural_image
3D rendering of a smartphone showing internal components with red arrows indicating movement or change (no text or symbols)LG KP502 | User Guide
5 Charging your phone
Lift and twist the charger socket cover of the on the side of your KP502. Insert the charger and plug it into a mains electricity socket. Your KP502 needs to be charged until "Battery full" appears on screen.

natural_image
Illustration of a smartphone with an attached USB port and a close-up view showing the internal connection (no text or symbols)Memory card
Installing a memory card
You can expand the memory space on your phone by using a MicroSD memory card.
NOTE: A memory card is an optional accessory.
1 Open the memory card slot cover on the right hand edge of the phone.
2 Slide the memory card into the slot until it clicks into place.

natural_image
3D model of a smartphone showing the front panel and internal components, with a magnified inset highlighting the edge detail (no text or symbols visible)3 Replace the cover.
Formatting the memory card
Your memory card may already be formatted. If your card isn't formatted, you will need to format it before you can begin using it.
1 From the standby screen select , then touch and choose Phone settings.
2 Touch Memory manager then chose External memory.
3 Touch Format and then confirm your choice.
4 Enter the password, if one is set, and your card will then be formatted and ready to use.
NOTE: If your memory card already has content, it will automatically be filed in the correct folder; for example, videos will be stored in the My Videos folder.
LG KP502 | User Guide
Your standby screen
Whenever your KP502 is not in use it will return to your home screen. From here you can access all the menu options, make a quick call and view the status of your phone as well as many other things.
Touch screen tips
The home screen is also a great place to get accustomed to the touch screen.
To select an item, touch the icon accurately. Your KP502 will vibrate slightly when it recognises you've touched an option. (depends on your touch settings)
To scroll through lists, touch the last item visible and slide your finger up the screen. The list will move up so more items are visible.
- There's no need to press too hard, the touchscreen is sensitive enough to pick up on a light, yet firm, touch.
- Use the tip of your finger to touch the option you want. Be careful not to touch any other options around it.
-
When the screen back light is off, press the Unlock/Lock key on the right hand side to bring back the home screen.
-
Don't cover the phone with a case or cover. The touchscreen won't work with any material covering it.
- There are two types of idle screen. Flick left or right to change your idle screen types on the standby screen.
1 Widget idle - When you touch 🔔, the mobile widget panel appears.
2 Speed dial idle - When you touch, the speed dial list appears. You can drag and click what you need right away in both idle types.
Your standby screen
Widget idle
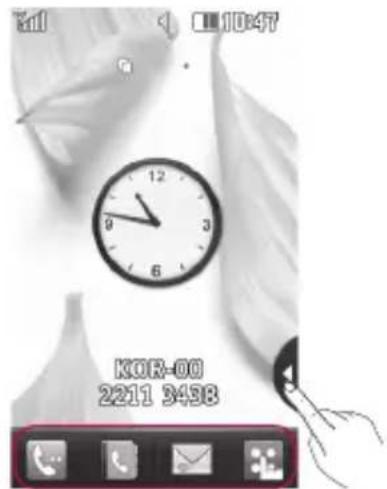
Quick keys
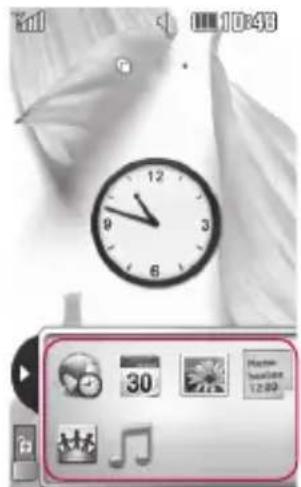
Mobile widget
Speed dial idle

natural_image
Black-and-white photo of a hand pointing at a telephone app interface (no readable text or symbols on the image itself)Your standby screen
16

Speed dial list
LG KP502 | User Guide
The quick keys
The quick keys provide easy, one-touch access to your most used functions.

Touch to bring up the touch dialling pad to make a call. Input the number as you would using a normal key pad and touch Calls or press the hard key.

Touch to open your address book. To search for the number you want to call, enter the name of the contact at the top of the screen using the touchpad. You can also create new contacts and edit existing ones. See page 25 for details.
01
02
03
04
05
06
07
08

Touch to access the Messaging options menu. From here you can create a new SMS or MMS, or view your message folder. See page 28 for details.

Touch to open the full Top menu which is divided into four vertical sub-menus. Touch each sub-menu's tab to view further options.
Your standby screen
The status bar
The status bar uses various icons to indicate things like signal strength, new messages and battery life, as well as telling you whether your Bluetooth or GPRS is active.
Below is a table which explains the meaning of the icons you're most likely to see in the status bar.
| Icon Description | |
| Multitasking | |
| Network signal strength(number of bars will vary) | |
| No network signal | |
| Remaining battery life | |
| Battery empty | |
| New text message | |
| New voice message | |
| Message inbox is full | |
| Message sending failed | |
| Multimedia message sending failed | |
Your standby screen
| Icon D | Description |
| An alarm is set | |
| Customised Profile in use | |
| Normal profile in use | |
| Outdoor profile in use | |
| Silent profile in use | |
| Headset profile in use | |
| Calls are diverted | |
| EDGE in use | |
| Roaming | |
| Flight mode is on | |
| Bluetooth is active | |
| BGM play | |
| BGM pause | |
| Memory card is enable to use |
LG KP502 | User Guide
Changing your Status from the status bar
Touch the status bar to open the Status Summary. It shows the current Time, Network, SVC ID, Battery, Handset memory, External Memory, Profile, MP3 and Bluetooth status. Here you can set Profile type, play/pause MP3 and activate/deactivate Bluetooth.
Using the Multitasking function
Press the multitasking hard key to open the Multitasking menu. From here you can view all the applications you have running and access them with one touch.
When you have an application running in the background (e.g. a game or the FM radio), will appear in the status bar.
Calls
Making a call
1 Touch to open the keypad.
2 Key in the number using the keypad. To delete a digit touch the clear key.
3 Press the Hard key or touch to initiate the call.
4 To end the call press the hard key.
TIP! To enter + for making an international call, press and hold 0+.
Making a call from your contacts
1 From the standby screen touch to open the address book.
2 Enter the first few letters of the contact you would like to call.
3 From the filtered list, touch the contact you'd like to call and select the number to use if you have more than one saved.
4 Press the Hard key or touch to initiate the call.
Answering and rejecting a call
When your phone rings press the hard key or touch 📞 to answer the call.
Tap ✦ to mute the ringing. This is great if you've forgotten to change your profile to Silent for a meeting.
Press the Ⓞ hard or touch 📋 reject an incoming call.
LG KP502 | User Guide
In-call options
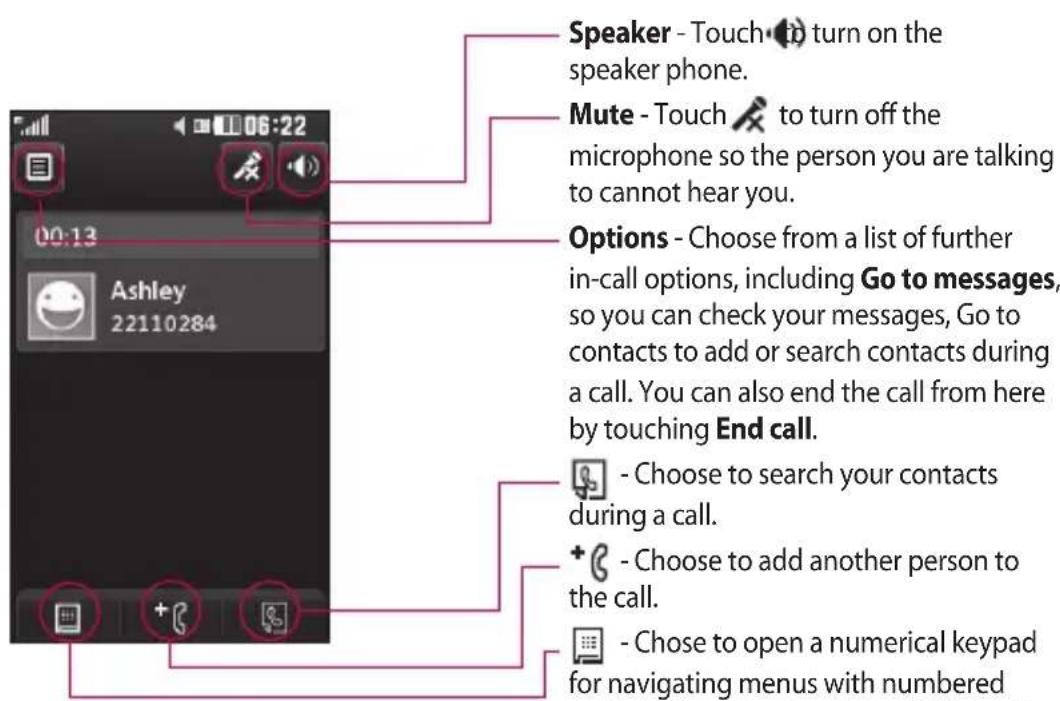
TIP! To scroll through a list of options or your list of contacts, touch the last item visible and slide your finger up the screen. The list will move up so more items become visible.
01
02
03
04
05
06
07
08
The basics
Calls
Speed dialling
You can assign a frequently-called contact to a speed dial number.
1 From the standby screen touch and select 📞 and tap 🏠
2 Your Voicemail is already set to speed dial 1. You cannot change this. Touch any other number to assign it a speed dial contact.
3 Your address book will open. Select the contact you'd like to assign to that number by touching their phone number once. To find a contact tap the search field box and enter the first letter of the name of the contact required.
Making a second call
1 During your initial call, touch and select the number you want to call.
2 Dial the number or search your contacts (see Making a call on page 20 for details).
3 Press to connect the call.
4 Both calls will be displayed on the call screen. Your initial call will be locked and the caller put on hold.
5 To change between the calls, touch and choose Swap call or press the number of the held call.
LG KP502 | User Guide
6 To end one or both calls press and select End followed by All, Held or Active.
TIP! You can combine your calls by selecting Accept then Join. Check that your network provider supports conference calling.
NOTE: You will be charged for each call you make.
Turning off DTMF
DTMF allows you to use numerical commands to navigate menus within automated calls. DTMF is switched on as default.
To turn it off during a call (to make a note of a number for example) touch 📄 and select DTMF off.
Viewing your call logs
TIP! To scroll through a list of options, touch the last item visible and slide your finger up the screen. The list will move up so more items are visible.
Touch and select and cap .
TIP! Touch any single call log entry to view the date, time and duration of the call.
Using call divert

1 Touch, select and choose.
2 Touch Call divert.
3 Choose whether to divert all calls, when the line is busy, when there is no answer or when you are not reachable.
4 Input the number you'd like to divert to.
5 Touch Request to activate.
NOTE: Charges are incurred for diverting calls. Please contact your network provider for details.
TIP! To turn off all call diverts, choose Deactivate all from the Call divert menu.
Using call barring
1 Touch ,select and choose .

2 Touch Call barring.
3 Choose any or all of the six options: All outgoing
Outgoing international Outgoing international calls except home country All incoming Incoming when abroad Deactivate all
4 Enter the call barring password. Please check with your network operator for this service.
TIP! Select Fixed dial number to turn on and compile a list of numbers which can be called from your phone. You'll need your PIN2 code from your operator. Only numbers included in the fixed dial list can be called from your phone.
01
02
03
04
05
06
07
08
Calls
Changing the common call setting
1 Touch ,select and choose .

2 Touch Common setting. From here you can amend the settings for:
Call reject - Slide the switch to On to highlight the Reject list. You can touch the text box to choose from all calls, specific contacts or groups, or those from unregistered numbers (those not in your contacts). Touch Save to change the setting.
Send my number - Choose whether your number will be displayed when you call someone.
Auto redial - Slide the switch left for On or right for Off.
Answer mode - Choose whether to answer the phone using the send key or any key.
Minute minder - Slide the switch left to On to hear a tone every minute during a call.
BT answer mode - Select Hands-free to be able to answer a call using a Bluetooth headset, or select Handset to press a key on the handset to answer a call.
Save new number - Select Yes to save a new number.
LG KP502 | User Guide
Contacts
Searching for a contact
There are two ways to search for a contact:
From the standby screen
1 From the standby screen touch to open the address book. Select the contact from the list that you want to make a call.
2 Touch or press the hard key to initiate the call.
From the main menu
1 Touch , select
2 Touch.
3 You see a list of contacts, typing in the first letter of a contact's name will jump the menu to that alphabetical area of the list.
TIP! The alphabetical keypad is displayed once you tap the blank square.
Adding a new contact
1 From the standby screen touch and touch Add contact.
2 Choose whether to save the contact to your Handset or SIM.
3 Enter the first and last name of your new contact. You do not have to enter both, but you must enter one or the other.
4 You can enter up to five different numbers per contact. Each entry has a preset type Mobile, Home, Office, Pager, Fax and General. When you have finished, touch Close.
5 Add an email addresse.
6 Assign the contact to one or more groups. Choose from No group, Family, Friends, Colleagues, School or VIP.
7 You can also add a Ringtone, Birthday, Anniversary, Homepage, Home address, Company name, Job title, Company address and a Memo.
8 Touch Save to save the contact.
Contacts
Creating a group
1 Touch and select .
2 Touch then Groups.
3 Touch.
4 Select Add group.
5 Enter a name for your new group. You can also assign a ringtone to the group.
6 Touch Save.
NOTE: If you delete a group, the contacts which were assigned to that group will not be lost. They will remain in your address book.
Changing your contact settings
You can adapt your contact settings so that your address book suits your own preferences.
TIP! To scroll through a list of options, touch the last item visible and slide your finger up the screen. The list will move up so more items are visible.
1 From the standby screen touch and select
2 Touch and select Settings.
3 From here you can adjust the following settings:
Contact list settings - Choose whether to view contacts saved to both your Handset & USIM, Handset only or USIM only
You can also choose to show the first name or last name of a contact first.
Copy - Copy your contacts from your USIM to your handset or from your handset to your USIM. Choose to do this one at a time, or all at once. If you select one at a time, you'll need to select each contact to copy one by one.
LG KP502 | User Guide
Move - This works in the same way as Copy, but the contact will only be saved to the location you've moved it to. So if you move a contact from the USIM to the handset it will be deleted from the USIM memory.
Send all contacts via Bluetooth
- Send all of your contacts to another device using Bluetooth. You will be prompted to turn on Bluetooth if you select this option.
Backup contacts - See Backing up and restoring your phone's information on page 56.
Restore contacts - See Backing up and restoring your phone's information on page 56.
Clear contacts - Delete all your contacts. Touch Yes if you are sure you want to wipe your address book.
Viewing information
1 From the standby screen touch and select 📞.
2 Touch and select Information.
3 From here you can view your Service dial numbers, your Own number, your Memory info. (how much memory space you've got left) and My business card.
TIP! If you've yet to add a business card for yourself, select My business card and enter all your details as you would for any contact. Touch Save to finish.
Messaging
Messaging
Your KP502 combines SMS, MMS and email into one intuitive and easy to use menu.
There are two ways to enter the messaging centre:
1 Touch from the standby screen.
2 Touch from the standby screen, then select and choose.
Sending a message
1 Touch to open a blank message.
2 From here you can send an SMS or MMS. To send an email, touch from the standby screen, them select and . See page 30 for details.
3 Touch Insert, to add an image, video, sound or template.
4 Touch To(1) at the top of the screen to enter the recipient's number, or touch the search icon to open your address book. You can add multiple contacts. Touch Send when ready.
WARNING: You will be charged per 1 page text message for each person that you send the message to.
WARNING: If an image, video or sound is added to an SMS it will be automatically convert to an MMS and you will be charged accordingly.
Entering text
There are five ways to enter text:
Keypad, Keyboard, Handwriting-Screen, Handwriting-Box, Handwriting-Double Box.
You can chose your input method by tapping and Input method.
Tap the screen once, the keyboard appears.
T9 Touch to turn on T9 predictive text.
You can choose writing languages.
123 Tap to change numbers, symbols and text keypad.
Use ↑ to scroll through the different keyboard types in each text entry mode (for example, capitals or lowercase).
LG KP502 | User Guide
T9 predictive
In T9 mode you will see

T9 mode uses a built-in dictionary to recognise words you're writing based on the key sequences you touch. Simply touch the number key associated with the letter you want to enter, and the dictionary will predict the word you want to use.
For example, press 8, 3, 5, 3, 7, 4, 6, 6, 3 to write 'telephone'.
Abc manual
In Abc mode you will see In Abc mode you must touch the key repeatedly to enter a letter. For example, to write 'hello', touch 4 twice, 3 twice, 5 three times, 5 three times again, then 6 three times.
Keyboard
In Keyboard mode the screen flips to landscape and a full keyboard appears on screen.
Simply touch each letter to write your message and press:

to switch to upper case
Handwriting recognition
In Handwriting mode you simply write on the screen and your KP502 will convert your handwriting into your message. Select Screen or Box depending on your preferred view.
TIP! You may find it easier to use the stylus in this mode, please remember to press lightly to protect your screen from damage.
Handwriting recognition translates stylus gestures into letters, numbers or other character, and displays these characters as text. Handwriting recognition is only active where text can be entered.
01
02
03
04
05
06
07
08
Messaging
Setting up your email
You can stay in touch on the move using email on your KP502. It's quick and simple to set up a POP3 or IMAP4 email account.
1 Touch then tap
2 Select 📋 then scroll menu to Settings.
3 Touch Email then Email accounts.
4 Touch New Account.
5 Setup Wizard will help you set up your email settings.
6 You can check and edit settings by selecting the account in the list. You can also check the additional settings that were filled in automatically when you created the account.
7 You can change your default email account by touching Activate.
Retrieving your email
You can automatically or manually check your account for new emails. See 'Changing your email settings' on page 30 to check automatically.
To check manually:
1 Touch then select and.
2 Touch Mailbox.
3 Touch the account you want to use then .
4 Choose Retrieve and your KP502 will connect to your email account and retrieve your new messages.
Sending an email using your new account
1 Touch New Email in the Communicate menu and a new email will open.
2 You can enter the recipient's address and write your message. You can also attach images, videos, sounds or other file types.
3 Touch Send and your email will be sent.
LG KP502 | User Guide
Changing your email settings
You can change your email settings according to your own preferences.
1 Touch 🎨 then select and .
2 Touch Settings and Email and then you can adapt the following settings:
Allow reply Email - Choose to allow the sending of 'read, confirmation' messages.
Request reply Email - Choose whether to request read confirmation messages.
Retrieve interval - Choose how often your KP502 checks for new email messages.
Retrieve amount - Choose the number of emails to be retrieved at any one time.
Include message in Fwd & Reply
- Choose to include the original message in your reply.
Include attachment - Choose to include the original attachment in any reply.
Auto Retrieval in Roaming -
Choose whether to retrieve your messages automatically when abroad (roaming).
New email notification - Choose whether to be alerted to new emails.
Signature - Create an email signature and switch this feature on.
Priority - Choose the priority level of your email messages.
Message folders
You'll recognise the folder structure used on your KP502, which is fairly self-explanatory.
Inbox - All the messages you receive are placed into your inbox From here you can view, delete and more, see
Managing your messages below for details.
Mailbox - All the emails you receive on your KP502 will be placed in your mailbox.
Drafts - If you don't have time to finish writing a message, you can save what you've done so far here.
Messaging
Outbox - This is a temporary storage folder while messages are being sent.
Sent items - All the messages you have sent are placed in this folder.
My Folders - Create folders to store your messages.
Changing your text message settings
Your KP502 message settings are pre-defined so that you can send messages immediately. These settings can be changed according to your preferences.
TIP! To scroll through a list of options, touch the last item visible and slide your finger up the screen. The list will move up so more items are visible.
Touch then choose Settings on the Communicate menu. Select Text message. You can make changes to:
Text message centre - Enter the details of your message centre.
Delivery report - Slide the switch left to receive confirmation that your messages have been delivered.
Validity period - Choose how long your messages are stored at the message centre.
Message types - Convert your text into Text, Voice, Fax, X.400 or Email.
Character encoding - Choose how your characters are encoded. This impacts the size of your messages and therefore data charges.
Send long text as - Choose to send long messages as Multiple SMS or as MMS.
Changing your multimedia message settings
Your KP502 message settings are pre-defined so that you can send messages immediately. These settings can be changed according to your preferences.
Touch ,select then .Chose
Settings and Multimedia message. You can make changes to:
LG KP502 | User Guide
Retrieval mode - Choose Home or Roaming network. If you then choose Manual you will receive only notifications of MMS and you can then decide whether to download them in full.
Delivery report - Choose to allow and/or request a delivery report.
Read report - Choose to allow and/or request a reply report.
Priority - Choose the priority level of your MMS.
Validity period - Choose how long your message is stored at the message centre.
Slide duration - Choose how long your slides appear on screen.
Creation mode - Choose your message mode.
Delivery time - Choose how long before a message is delivered.
Multi msg centre - Enter the details of your message centre.
Changing your other settings
Touch, choose Settings on the
Communicate menu then:
Voicemail - Touch 📋 to add a new
Voicemail service. Contact your network operator for more information on the service they provide.
Service message - Choose to receive or block service messages. You can also set your message security by creating trusted and untrusted lists of senders.
Info service - Choose your reception status, language and other settings.
Camera
Taking a quick photo
1 Press the key on the right side of the phone briefly.
2 The viewfinder will appear on screen.
3 Holding the phone horizontally, point the lens towards the subject of the photo.
4 Position the phone so you can see the subject of your photo in the preview screen.
5 When the camera has focused on your subject, either press the 📷 on the side of the phone firmly or press the red box on the lower right of the screen to take the photo.
After you've taken your photo
Your captured photo will appear on screen. The name of the image runs along the bottom of the screen together with six icons down the right side.

Touch to move to your gallery.

Touch to send the photo as a sage, e-mail or Bluetooth. See page or Sending a message, and page 65 ending and receiving your files using tooth.

Touch to edit the photo.

Touch to set the picture you have n as Wallpaper.

Touch to delete the photo you have taken and confirm by touching Yes. viewfinder will reappear.

Touch to take another photo ghtaway. Your current photo will saved.
LG KP502 | User Guide
Getting to know the viewfinder

TIP! You can bring up the options by tapping the screen. They auto turn off after a few seconds.
Camera
Choosing a shot type
1 Touch to open the available shot types.
2 Choose from two options:
Normal shot -This is the default shot type, the photo will be taken in the normal way, as outlined in taking a quick photo.
Burst shot - This enables you to take 3/6/9 shots automatically in very quick succession.
Adjusting the exposure
Exposure defines the difference between light and dark (contrast) in an image. A low contrast image will appear foggy, whereas a high contrast image will appear much sharper.
1 Touch ^+ .
2 Slide the contrast indicator along the bar - left for a lower exposure, hazier image or right for a higher exposure, sharper image.
Using the advanced settings
From the viewfinder touch to open all the advanced settings options.
Preview settings
Size - Change the size of the photo to save on memory space or take a picture
LG KP502 | User Guide
preset to the correct size for contact. See Changing the image size on page 37.
Colour Effect - Choose a colour tone to apply to the photo you're taking. See Choosing a colour effect on page 37.
White balance - Choose from Auto, Incandescent, Sunny, Fluorescent or Cloudy.
Night mode - Useful to use at dark place.
Self-timer - The self-timer allows you to set a delay after the capture button is pressed before the camera takes the picture. Choose from 3 seconds, 5 seconds or 10 seconds. Great for that group photo you want to be part of.
Quality - Choose between Super fine, Fine and Normal. The finer the quality the sharper a photo will be, but the file size will increase. This means you'll be able to store fewer photos in your memory.
View mode - Choose from Full screen or Full image. In Full screen some clipping of the image may occur.
Other settings
Memory - Choose whether to save your photos to the Handset memory or to the External memory.
Shutter sound - Select one of the three shutter sounds.
Grid screen - Choose from Off, Simple cross or Trisection
Reset settings - Reset all the camera settings.
TIP! When you exit the camera all your settings will return to default, except image size and image quality. Any non-default settings you require will need to be reset, for example colour tone. Check them before you shoot your next photo.
Changing the image size
The more pixels, the larger the file size, which in turn means they take up more of your memory. If you want to fit more pictures on to your phone you can alter the pixel number to make the file size smaller.
1 From the viewfinder touch ⚙ in the top left corner.
2 Select Size from the Preview menu.
3 Select a pixel value from the six numerical options (3M: 2048x1536, 2M: 1600x1200, 1M: 1280x960, 640x480, 400x240(W), 320x240)
Choosing a colour effect
1 From the viewfinder touch in the top left corner.
2 Select Colour Effect from the Preview menu.
3 There are five colour tone options: Off, Black & White, Negative or Sepia.
TIP! You can change a photo taken in colour to black and white or sepia after it's taken, but you cannot change a picture taken in black and white or sepia back to colour.
Viewing your saved photos
1 You can access your saved photo's from within the camera mode. Simply touch 📄 and your gallery will appear on screen.
Video camera
Shooting a quick video
1 Press the camera key on the right side of the phone.
2 On the Camera preview mode touch the Video camera icon 📋 in the view finder to switch to video mode. The video camera's viewfinder will appear on screen.
3 Holding the phone horizontally, point the lens towards the subject of the video.
4 Press the capture button once to start recording. Or press the red dot ☐ at the bottom right of the screen.
5 Rec will appear at the top of the viewfinder and a timer at the bottom showing the length of your video.
6 To pause the video touch □□ and resume by selecting ●.
7 Touch □ on screen or press the capture button a second time to stop recording.
After you've shot your video
A still image representing your captured video will appear on screen. The name of the video runs along the bottom of the screen together with six icons down the right side.
▶ Touch to play the video.
Touch to send the video as a
Message or Email or by Bluetooth. See page 28 for Sending messages, or page 65 for Sending and receiving your files using Bluetooth.
Touch to edit the video.
Touch to view a gallery of saved videos and images.
Touch to delete the video you have just captured and confirm by touching
Yes. The viewfinder will reappear.
NEK Touch to shoot another video straight away. Your current video will be saved.
LG KP502 | User Guide
Getting to know the viewfinder

TIP! You can close all the shortcut options for a clearer viewfinder screen. Simply touch the centre of the viewfinder once. To recall the options touch the screen again.
01
02
03
04
05
06
07
08
Get creative
Video camera
Adjusting the Exposure
Exposure defines the difference between light and dark (contrast) in an video. A low contrast video will appear foggy, whereas a high contrast video will appear much sharper.
1 Touch ^+ .
2 Slide the exposure indicator along the bar, left for a lower exposure, hazier video, or right for a higher contrast, sharper video.
Using the advanced settings
From the viewfinder touch Settings to open all the advanced settings options.
Preview settings
Video size - Change the size of the video to save on memory space. See Changing the video image size on page 41.
Colour Effect - Choose a colour tone to apply to the video you're taking. See Choosing a colour tone on page 41.
White balance - The white balance ensures that any white in your videos is realistic. In order for your camera to correctly adjust the white balance you may need to determine the light conditions. Choose from Auto, Incandescent, Sunny, Fluorescent or Cloudy.
LG KP502 | User Guide
Quality - Choose between Super fine, Fine and Normal. The finer the quality the sharper a video will be, but the file size will increase as a result, which means you'll be able to store fewer videos in the phone's memory.
Set time - Set a duration limit for your video. Choose from No limit, or MMS to limit the size so that you can send the video as an MMS.
View mode - Choose from Full screen or Full image. In Full screen some clipping of the image may occur.
TIP! If you choose MMS duration, try choosing a lower image quality to enable you to shoot a longer video.
Other settings
Memory - Choose whether to save your videos to the Handset memory or to the External memory.
Voice - Choose Mute to record a video without sound.
Reset settings - Reset all the video camera settings.
Changing the video image size
The more pixels, the larger the file size, which in turn means they take up more memory. If you want to fit more videos on to your phone you can alter the pixel number to make the file size smaller.
1 From the viewfinder touch ⚙ in the top left corner.
2 Select Video size from the Preview menu.
3 Select a pixel value from the two options:

320x240 - Smaller image size, fore smaller file size. Up to 24 re available for video play back, 12 fps are available for video ding.

176x144 - Smallest image size herefore smallest file size. Up fps are available for video play
4 Select the size option you'd like to use.
TIP! For video format conversion software, see the CD you received with your KP502.
Choosing a colour tone
1 From the viewfinder touch in the top left corner.
2 Select Colour Effect from the settings menu.
3 There are four colour tone options, Off (Normal), Black & White, Negative, Sepia.
4 Touch the colour tone you'd like to use.
Watching your saved videos
1 In the viewfinder touch
2 Your gallery will appear on screen.
3 Touch the video you want to view once to bring it to the front of the gallery.
4 Touch the video a second time to open it fully.

Your photos and videos
Viewing your photos and videos
1 Touch on your camera preview screen.
2 Your gallery will appear on screen.
3 Touch the video or photo twice to open it fully.
4 To play the video touch ▷. To pause playback touch ||.
TIP! Flick left or right to view other photos or videos.
Capturing an image from a video
1 Select the video you would like to capture an image from.
2 Touch || to pause the video on the frame you'd like to convert to an image and touch the right side of the screen to open the options menu.
3 From the options menu select □.
4 The image will appear on screen, with its assigned image name.
5 Touch the image then ← to return to the gallery.
6 The image will be saved in your Media Album folder and appear in the gallery. You need to exit the gallery and then re-open it for this to appear.
LG KP502 | User Guide
WARNING: Some functions will not work properly if the multimedia file has not been recorded on the phone.
Viewing your photos as a slide show
Slideshow mode will show all the photos in your gallery one at a time as a slideshow. Videos can not be viewed as a slideshow.
1 Touch the photo you would like to begin the slideshow twice to open it.
2 Select .
3 The slideshow will begin.
There are options within slideshows:
Touch to show random.
■ Touch to pause the slideshow on a particular photo.
▶ Touch again to resume playback.
Touch to increase or decrease the speed of the slideshow.
Setting a photo as wallpaper
1 Touch the photo you would like to set as wallpaper twice to open it. Turn the phone to landscape.
2 Touch the right side of the screen to open the options menu.
3 Touch
4 The screen will switch to portrait mode. You can then change the size of the picture.
5 When you are happy with the picture touch Set.
Editing your photos
There are loads of great things you can do to your photos to change them, add to them or liven them up a little.
1 Open the photo you'd like to edit and touch 📋 to bring up the options.
2 Touch the icons to adapt your photo:
Crop your photo and move your finger across the screen to select the area.
Draw something on your photo freehand. Select the thickness of the line from the four options and the colour you would like to use.
T Put writing on the picture. See Adding text to a photo on page 44.
Decorate your photo with stamps. Choose from the different stamps available and touch your photo wherever you'd like them to be.
Erase whatever you draw.
Save the changes you have made to the photos. Select to save the changes over the Original file, or as a New file. If you select New file enter a file name.
Undo the last Effect or edit you made to the photo.
Touch to open further effect options.
You can adjust the selected photo. Touch to return to the gallery.
Your photos and videos
Adding text to a photo
1 From the editing screen, touch T
2 Select Signature to add unframed text or choose one of the speech bubble shapes.
3 Enter your text using the keypad and touch Save.
4 Move the text by touching it and sliding it to the place you'd like it to be.
Adding an effect to a photo
1 From the editing screen, touch
2 Choose to apply any of the six options to the photo:
Face beautify - Automatically detect a face in the image and brighten it up.
Tunnel effect - Lomo camera effect.
Colour negative - Colour negative effect.

Black and white - Black and white colour effect.
Sepia - Sepia effect.
Blur - Apply a blurred effect.
Sharpen - Move the marker along the bar to sharpen the focus of the photo.
Select OK icon to apply the changes or choose ← to cancel.
Mosaic blur - Touch to apply a blurred mosaic effect to the photo.
Oil painting - Oil painting effect.
Sketch - Apply an effect to make the picture look like a sketch.
Emboss - Emboss effect.
Solarize - Change the effect of exposure to the light
Vivid - An effect of clearness and brilliance.
Moonlight - Change the light to look like moonlight.
Antique - An old image effect.
Glow - A light beam effect.
Cartoon - A cartoon effect.
Water color - A water color effect.
3 To undo an effect simply touch Undo
LG KP502 | User Guide
Multimedia
You can store any multimedia files into your phone's memory so that you have easy access to all of your pictures, sounds, videos and games. You can also save your files to a memory card. The advantage of using a memory card is that you can free up space on your phone's memory.
To access the Multimedia menu, touch then touch to open a list of folders storing all of your multimedia files.
Pictures
My images contains a list of pictures including default images pre-loaded onto your phone, images downloaded by you and images taken on your phone's camera.
Touch ☐ to change the view from thumbnail view to list view.
Sending a photo
1 Touch then .
2 Touch then choose My images.
3 Touch 📄 Send and choose from Message, Email or Bluetooth.
4 If you choose Message or Email, your photo will be attached to a message and you can write and send the message as normal. If you choose Bluetooth, Bluetooth will be turn on automatically and your phone will search for a device to send the picture.
Using an image
You can choose images to use as wallpapers and screensavers or even to identify a caller.
1 Touch then
2 Touch then My images.
3 Select an image and touch
4 Touch Use as and choose from:
Wallpaper - Set a wallpaper for the standby screen.
Contacts image - Allocate an image to a particular person in your contacts list so that their picture shows when they call you.
Multimedia
Start-up image - Set an image to appear when you switch the phone on.
Power off image - Set an image to appear when you switch the phone off.
Printing an image
1 Touch then .
2 Touch then My images.
3 Select an image and touch □.
4 Touch Print then choose between Bluetooth and PictBridge.
TIP! You can print via bluetooth or by connecting to a PictBridge compatible printer.
Moving or copying an image
You can move or copy an image between the phone memory and the memory card. You might want to do this to either free up some space in one of the memory banks or to safeguard your images from being lost.
1 Touch then
2 Touch then My images.
3 Touch and select Move or Copy.
4 You can mark/unmark the images by tapping it sequentially. Mark the image that you want to move or copy and touch Copy/Move.
Sounds
The My sounds folder contains the Downloaded sounds, Default sounds and Voice recordings. From here you can manage, send or set sounds as ringtones.
LG KP502 | User Guide
Using a sound
1 Touch then .
2 Touch then My sounds.
3 Select Default sounds or Voice recordings.
4 Select a sound and and it will begin to play.
5 Touch and select Use as.
6 Choose from Ringtone, Message tone, Start-up or Shut down.
Videos
The My videos folder shows a list of downloaded videos and videos you have recorded on your phone.
Watching a video
1 Touch then
2 Touch then My videos.
3 Select a video to play.
Sending a video clip
1 Select a video and touch
2 Touch Send and choose from Message, Email or Bluetooth.
3 If you choose Message or Email, your video clip will be attached to the message and you can write and send the message as normal. If you choose Bluetooth, Bluetooth turns on automatically and your phone will search for a device to send the video.
Games and Applications
You can install new games and applications to your phone to keep you amused when you have time to spare.
Multimedia
Installing a game/application via local install
1 Touch then .
2 Touch and Others or My memory card if external memory is inserted.
3 Select the file(*.jad or *.jar) to install and press Install command. An application will be installed.
NOTE: The jad should contain its own jar.
Playing a game
1 Touch then .
2 Touch and My games & Apps.
3 Open the Games folder and choose and touch a game to launch.
Documents
From the Documents menu, you can view all of your document files. From here you can view Excel, Powerpoint, Word, Text and PDF files.
Transferring a file to your phone
Bluetooth is probably the easiest way to transfer a file from your computer to your phone. You can also use LG PC Suite via your sync cable, see page 56 for details.
To transfer using Bluetooth:
1 Make sure your phone and computer have Bluetooth switched on and are visible to one another.
2 Use your computer to send the file via Bluetooth.
3 When the file is sent you will have to accept it on your phone by touching Yes.
4 The file should appear in your Documents or Others folder.
LG KP502 | User Guide
Viewing a file
1 Touch then .
2 Touch then Documents.
3 Select a document and touch View.
Others
The Others folder is used to store files which are not pictures, sounds, videos, games or applications. It is used in the same way as the Documents folder. You may find that when you transfer files from your computer to your phone that they appear in the Others folder rather than the Documents folder. If this happens you can move them.
To move a file from Others to
Documents:
1 Touch then
2 Touch then Others.
3 Select a file and touch 📄.
4 Touch Move, choose the destination folder from the list by touching the arrow icon. The screen will display Moved when the transfer is complete.
Creating a movie
1 Touch then .
2 Touch (Muvee studio).
3 Touch + to add an image. Checkbox images you want to include then select Insert.
4 Touch style tab to choose a Muvee style.
5 Touch Default sound to change the sound.
6 Touch ▶ to see what you've created.
7 Touch then Order to make an order.
8 Touch 📋 then Save Location to choose where to save the movie.
Music
Your LG KP502 has a built-in music player so you can play all your favourite tracks. To access the music player, touch then then From here you can access a number of folders:
Recently played - View all of the songs you have played recently.
All tracks - Contains all of the songs you have on your phone.
Artists - Browse through your music collection by artist.
Albums - Browse through your music collection by album.
Multimedia
Genres - Browse through your music collection by genre.
Playlists - Contains all playlists you have created.
Shuffle tracks - Play your tracks in a random order.
Transferring music onto your phone
The easiest way to transfer music onto your phone is via Bluetooth or your sync cable.
You can also use LG PC Suite, see page 56 for details. To transfer using Bluetooth:
1 Make sure both devices have Bluetooth switched on and are visible to one another.
2 Select the music file on the other device and choose to send it via Bluetooth.
3 When the file is ready to be sent you should accept it on your phone by touching Yes.
4 The file should appear in Music > All tracks.
Playing a song
1 Touch then .
2 Touch, then All tracks.
3 Select the song you want to play.
4 Touch II to pause the song.
5 Touch to skip to the next song.
6 Touch to skip to the previous song.
7 Touch ← to return to the Music menu.
Creating a playlist
You can create your own playlists by choosing a selection of songs from the All tracks folder.
1 Touch then
2 Touch, then Playlists.
3 Touch Add new playlist, enter the playlist name and touch Save.
4 The All tracks folder will show all the songs in your phone. Touch all of the songs that you would like to include in your playlist; a tick will show next to the track names.
5 Touch Save.
LG KP502 | User Guide
Using the radio
Your LG KP502 has an FM radio feature so you can tune into your favourite stations to listen to on the move.
NOTE: You will need to insert your headphones in order to listen to the radio. Insert them into the headphone socket (this is the same socket that you plug your charger into).
Searching for stations
You can tune radio stations into your phone by searching for them either manually or automatically. They will then be saved to specific channel numbers so you don't have to keep re-tuning. You can save up to 50 channels in your phone. You must first attach the headset to the phone as this acts as the antenna.
To auto tune:
1 Touch then
2 Touch then
3 Touch Auto scan. Then the stations will be automatically found and allocated to a channel in your phone.
NOTE: You can also manually tune into a station by using ◀ and ▶ displayed next to the radio frequency. If you press and hold ◀ and ▶ the stations will be automatically found.
Resetting channels
1 Touch then .
2 Touch then
3 Choose Reset to reset the current channel or choose Reset all to reset all of the channels. Each channel will return to the starting 87.5Mhz frequency.
Organiser
Adding an event to your calendar
1 From the standby screen select then touch and choose Select Calendar.
2 Select the date you would like to add an event to.
3 Touch then Add new event.
4 Touch Category then choose from Appointment, Anniversary or Birthday.
Check the date and enter the time you would like your event to begin.
5 For appointments and anniversaries enter the time and date your event finishes in the lower two time and date boxes.
6 If you would like to add a subject or a note to your event, touch Note and type in your note, followed by Save.
7 Set Alarm and Repeat.
8 Select Save and your event will be saved in the calendar. A square cursor will mark the day that any events have been saved to and a bell will ring at the start time of your event, so that you can stay organised.
LG KP502 | User Guide
Adding an item to your to do list
1 From the standby screen select, then touch and choose
2 Select To do and touch Add To do.
3 Set the date for the to do item, add notes and select a priority level: High, Medium or Low.
4 Save your to do list item by selecting Save.
Adding a memo
1 From the standby screen select, then touch and choose Select Memo.
2 Touch Add memo.
3 Type your memo, followed by Save.
4 Your memo will appear on screen next time you open the Memo application.
Using date finder
Date finder is a handy tool to help you calculate what the date will be after a certain amount of days has passed. For example, 60 days from 10.10.07 will be 09.12.2007.
This is great for keeping tabs on deadlines.
1 From the standby screen select , then touch and choose
2 Select Date finder.
3 In the From tab set your required date.
4 In the After tab set the number of days.
5 The Target date will be shown below.
Setting your alarm
1 From the standby screen select, then touch and choose
2 Touch Add alarm.
3 Set the time you would like the alarm to sound and touch Save.
4 Choose whether you would like your alarm to repeat Once, Daily, Mon - Fri, Mon - Sat, Sat - Sun, Except holiday or Choose weekday.
The icons indicate the weekday you select.
5 Select Alarm type to select a type for your alarm.
6 Touch alarm tone then choose Default sounds or Voice recordings folder to find sounds. To listen to sounds touch the sound, followed by ▶.
7 Add a memo for the alarm. Touch Save when you have finished typing the memo.
8 Finally you can set the snooze interval at 5, 10, 20, 30 minutes, 1 hour or off.
9 Once you have set your alarm, touch Save. NOTE: You can set up to 5 alarms.
TIP! Touch on/off icon on the right hand side of the alarm to set.
Adding a memo with drawing panel
1 From the standby screen select then touch and choose
2 Touch Add Drawing.
3 Draw your memo on the touch screen LCD followed by 📄.
4 Your memo will appear on screen next time you open the Drawing Panel application.
Voice recorder
Use your voice recorder to record voice memos or other sounds.
1 Touch 📁 then 📁
2 Touch 📁 then 📁 and Settings choose from:
Duration – Set the recording duration. Choose from No limit, MMS message size or 1 minute.
Organiser
Quality – Select the sound quality. Choose from Super Fine, Fine or Normal.
Recording a sound or voice
1 Touch then .
2 Touch.
3 Touch to begin recording.
4 Touch to end recording.
5 Touch ▶ to listen to your recording.
Using your calculator
1 From the standby screen select then touch and choose
2 Select Calculator.
3 Touch the numeric keys to input numbers.
4 For simple calculations, touch the function you require (+,-,*,/), followed by =.
5 For more complex calculations, touch and choose from sin, cos, tan, log, ln, exp, sqrt, deg or rad etc..
Converting a unit
1 From the standby screen select, then touch and choose
2 Select Converter.
3 Choose whether you would like to convert Currency, Surface, Weight, Length, Temperature, Volume or Velocity.
4 You can then select the unit, and enter the value you would like to convert from, followed by the unit you would like to convert to.
5 The corresponding value will appear on the screen.
Using the stopwatch
1 From the standby screen select, then touch and choose
2 Select Stopwatch.
3 Touch Start to begin the timer.
4 Touch Lap if you want to record a lap time.
5 Touch Stop to end the timer.
6 Touch Resume to restart the stopwatch at the time you stopped it at, or touch Reset to begin the time again.
LG KP502 | User Guide
Adding a city to your world time
1 From the standby screen select then touch and choose
2 Select World time.
3 Touch the 📄, followed by Add city. Start typing the name of the city you require and it will show at the top of the screen.
PC Sync
You can synchronise your PC with your phone to make sure all your important details and dates match, and also to backup your files to put your mind at ease.
Installing LG PC Suite on your computer
1 From the standby screen press and select and choose.
2 Select USB connection mode and choose.
Mass storage
PC suite
Music sync
3 Insert the supplied CD into your PC. Click on the LG PC Suite Installer which will appear on your screen.
4 Select the language you would like the installer to run in and click OK.
5 Follow the instructions on the screen to complete the LG PC Suite Installer wizard.
6 Once installation is complete, the LG PC Suite icon will appear on your desktop.
Connecting your phone and PC
1 Connect the USB cable to your phone and your PC.
2 Double click on the LG PC Suite icon on your desktop.
3 Click on Connection Wizard, then USB.
4 Click on Next, then Next again, then Finish.
Your phone and PC are now connected.
Backing up and restoring your phone's information
1 Connect your phone to your PC as outlined above.
2 Click on the Backup icon, and select Backup or Restore.
3 Mark the contents you would like to back up or restore. Select the location you would like to backup information to, or restore information from. Click OK.
4 Your information will be backed up or restored.
LG KP502 | User Guide
Viewing your phone files on your PC
1 Connect your phone to your PC as outlined previously.
2 Click on the Contents icon.
3 All of the documents, flash contents, images, sounds and videos you have saved onto your phone will be displayed on the screen in the LG Phone folder.
TIP! Viewing the contents of your phone on your PC helps you to arrange files, organise documents and remove contents you no longer need.
Synchronising your contacts
1 Connect your phone to your PC.
2 Click on the Contacts icon.
3 Your PC will now import and display all contacts saved to your USIM card and handset.
4 Click on File and select Save. You can now select where you would like to save your contacts to.
NOTE: To backup contacts saved to your USIM card, click on the SIM card folder on the left side of your PC screen.
Right-click your contacts and then Select all.
Right-click at the same position and select Copy to contact. Now click on the Handset folder on the left of your screen and all your numbers will be displayed.
Synchronising your messages
1 Connect your phone to your PC.
2 Click on the Messages icon.
3 All of your phone messages will be displayed in folders on your screen.
4 Use the tool bar at the top of your screen to edit and rearrange messages.
Using your phone as Music Sync device
Your Phone can be used as Music Sync device to Sync Music Files only. Music Sync can be done using Windows Media Player 10 / 11 and supports both Handset Memory and External Memory Card.
PC Sync
1 Disconnect your phone from your PC.
2 From the standby screen select 🧑, then touch 🧑
3 Select and then USB connection mode.
4 Touch Music sync.
5 Connect your phone to your PC. Your phone will read: Connecting as Music Sync ... followed by Disconnect Cable to Stop Music Sync.
LG KP502 | User Guide
The web
Browser
Browser gives you a fast, full colour world of games, music, news, sport, entertainment and loads more, straight to your mobile phone. Wherever you are and whatever you're into.
Accessing the web
1 From the standby screen select then touch and choose
2 To access the browser homepage directly, select Home. Alternately select Enter address and type in your desired URL, followed by Connect.
NOTE: An additional cost is incurred when connecting to this service and downloading content. Check your data charges with your network provider.
Adding and accessing your bookmarks
For easy and fast access to your favourite websites, you can add bookmarks and save web pages.
1 From the standby screen select 📁, then touch 📋 and choose 📄
2 Select Bookmarks. A list of your Bookmarks will appear on the screen.
3 To add a new bookmark, select and touch Add Bookmark. Enter a name for your bookmark followed by the URL.
4 Touch Save. Your Bookmark will now appear in the list of bookmarks.
5 To access the bookmark simply touch the bookmark and then touch Connect. You will be connected to your bookmark.
Using RSS reader
RSS (Really Simple Syndication) is a family of web feed formats used to publish frequently updated content such as blog entries, news headlines or podcasts. An RSS document, which is called a feed, web feed, or channel, contains either a summary of content from an associated web site or the full text. RSS makes it possible for people to keep up with their favourite web sites in an automated manner that is easier than checking them manually. The user subscribes to a feed by entering the feed's link into the reader or by clicking an RSS icon in a browser that initiates the subscription process. The reader checks the user's subscribed feeds regularly for new content, downloading any updates that it finds.
The web
Saving a page
1 Access your required webpage as described above.
2 Touch and select Save this page.
3 Enter a name for the webpage so you can easily recognise it.
4 Touch Save.
TIP! This menu will also allow you to edit titles of saved pages, protect or unprotect the screen memo, and delete saved pages.
Accessing a saved page
1 From the standby screen select then touch and choose
2 Select Saved pages.
3 Select the required page and it will open.
Viewing your browser history
1 From the standby screen select then touch and choose Select History.
2 A list of web page titles you have accessed recently will be displayed. To access one of these pages, simply select the required page.
LG KP502 | User Guide
Changing the web browser settings
1 From the standby screen select then touch and choose Select Settings.
2 You can choose to edit Profiles, Appearance settings, Cache, Cookies, Security, or to reset all settings, select Reset Settings.
Using your phone as a modem
Your KP502 can double as a modem for your PC, giving you email and internet access even when you can't connect using wires. You can use either the USB cable or Bluetooth.
Using the USB cable:
1 Ensure you have the LG PC Suite installed on your PC.
2 Connect your KP502 and your PC using the USB cable and launch the LG PC Suite software.
3 Click Internet Kit on your PC. Then click New button and select Modem.
4 Choose LG Mobile USB Modem and select OK. It will now appear on screen.
5 Write the Profile that can connect to the Internet and save the values.
6 The profile that you create will appear on your PC screen. Select it and click Connect.
Your PC will connect through your KP502.
NOTE: For more information on synchronising using the LG PC Suite see page 56.
Using Bluetooth:
1 Ensure Bluetooth is switched On and Visible for both your PC and KP502.
2 Pair your PC and KP502 so that a passcode is required for connection.
3 Use the Connection wizard on your LG PC Suite to create an active Bluetooth connection.
4 Click Internet Kit on your PC. Then click New button.
5 Choose LG Mobile USB Modem and select OK. It will now appear on screen.
6 Write the Profile that can connect to the Internet and save the values.
7 The profile that you create will appear on your PC screen. Select it and click Connect.
Your PC will connect through your KP502.
NOTE: For more information on Bluetooth see page 65.
Settings
Within this folder you can adapt your settings to make your KP502 personal to you.
NOTE: For information on call settings see page 24.
Personalising your profiles
You can quickly change your profile on the standby screen. Simply touch the status summary bar on the top and touch the profile tab.
Using the settings menu you can personalise each profile setting.
1 Press and then choose
2 Touch Profiles and then choose the profile you want to edit.
3 You can then change all of the sounds and alert options available in the list, including your Voice Ring tone and Volume, Message alerts settings and more.
Changing your screen settings
1 Touch then choose.

2 Touch and then choose from:
Wallpaper - Choose the theme for your standby screen.
Top Menu - Choose the style of the top menu.
LG KP502 | User Guide
Dialling - Adjust the number size and colour.
Font - Adjust the font size.
Backlight - Choose how long the backlight remains ON.
NOTE: The longer the backlight is on for, the more battery power is used and you may need to charge your phone more often.
Brightness - Adjust the screen brightness.
Greeting message - Choose on or off and fill in the greeting message.
Start-up/Shut down - Choose the theme for your start-up/shut down screen.
2 Touch Save to save your settings.
Changing your phone settings
Enjoy the freedom of adapting how your KP502 works to your own style.
TIP! To scroll through a list of options, touch the last item visible and slide your finger up the screen. The list will move up so more items are visible.
1 Touch then choose.
2 Touch 🙏 then choose from the list below.
Date and time - Adjust your date and time settings or choose to auto update the time when you travel or for daylight saving.
Power save - Choose to switch the factory set power saving settings On or Off.
Languages - Change the language of your KP502's display.
Auto key lock - Lock the keypad automatically in standby screen.
Security - Adjust your security settings, including PIN codes and handset lock.
Memory manager - See Using memory manager on page 64 for more information.
Reset settings - Reset all the settings to their factory definitions.
Handset information - View the technical information for your KP502.
Changing your connectivity settings
Your connectivity settings have already been set up by your network operator, so you can enjoy your new phone from the off. If you want to change any settings, use this menu.
Touch then Select
Network settings
Select Network - If you set to
Automatic, KP502 automatically searches for the network and registers the handset to the network. This is recommended for best service and quality.
If you set to Manual all the currently available networks are shown and you can select one of them for registration. If the registration of the network has failed, the network lists are listed again and you can select any other one for registration.
NOTE: When your handset loses the network in manual mode, the popup message to select the available network will be shown on the Idle screen.
Settings
Preferred lists - If the network is searching automatically, you can add a preferred network to be connected to.
Internet profiles - This menu shows the Internet profiles. You can create new profiles, delete or edit them by using the Option Menu. However, you cannot delete or edit default configurations depending on country variant.
Access points - Your network operator has already saved this information. You can add new access points using this menu.
Packet data conn. - Choose when your device should be connected to network for packet data.
USB connection mode - Choose Data service and synchronise your KP502 using the LG PC Suite software to copy files from your phone. See page 56 for more information on synchronisation. If you use Music sync with Windows Media Player, select Music sync in this menu. Music sync is only available for music content.
Using memory manager
Your KP502 has three memories available: the phone, the SIM Card and an external memory card (you may need to purchase the memory card separately).
You can use memory manager to determine how each memory is used and see how much space is available.
Touch 🧑 followed by ⚙ Select then Memory Manager.

Handset common memory - View the memory available on your KP502 for Pictures, Sounds, Video, Flash, MMS, Email, Java applications and others.
Handset reserved memory - View the memory available on your handset for SMS, Contacts, Calendar, To do list, Memo, Alarm, Call history, Bookmarks and Miscellaneous items.
SIM memory - View the memory available on your SIM Card.
External memory - View the memory available on your external memory card (you may need to purchase the memory card separately).
Primary storage settings - Choose the location you prefer items to be saved to.
LG KP502 | User Guide
Sending and receiving your files using Bluetooth
Bluetooth is a great way to send and receive files as no wires are needed and connection is quick and easy. You can also connect to a Bluetooth headset to receive calls.
To send a file:
1 Open the file you want to send, typically this will be a photo, video or music file.
2 Choose Send.
Choose Bluetooth.
3 If you have already paired the Bluetooth device, your KP502 will not automatically search for other Bluetooth devices. If not, your KP502 will search for other Bluetooth enabled devices within range.
4 Choose the device you want to send the file to and touch Select.
5 Your file will be sent.
TIP! Keep an eye on the progress bar to make sure your file is sent.
To receive a file:
1 To receive files your Bluetooth must be both On and Visible. See Changing your Bluetooth settings on the right for more information.
2 A message will prompt you to accept the file from the sender. Touch Yes to receive the file.
3 You will see where the file has been saved and you can choose to View the file or Use as wallpaper. Files will usually be saved to the appropriate folder in your Media Album.
Changing your bluebooth settings:
1 Touch and choose
2 Choose 📣 then touch 🐎 and choose Settings.
Make your changes to:
My device visibility - Choose to be Visible or Hidden or Visible for 1 min.
My device name - Enter a name for your KP502.
Supported services - Choose how to use Bluetooth in association with different services. See Using your phone as a modem on page 60 or Using a Bluetooth headset on page 66.
Settings
Remote SIM Mode - Turn on or off. My address - Show your Bluetooth address.
Pairing with another Bluetooth device
By pairing your KP502 and another device, you can set up a passcode protected connection. This means your pairing is more secure.
1 Check your Bluetooth is On and Visible. You can change your visibility in the Settings menu.
2 Touch Search.
3 Your KP502 will search for devices. When the search is completed Refresh will appear on screen.
4 Choose the device you want to pair with and enter the passcode, then touch OK.
5 Your phone will then connect to the other device, on which you should enter the same passcode.
6 Your passcode protected Bluetooth connection is now ready.
Using a Bluetooth headset
1 Check your Bluetooth is On and Visible.
2 Follow the instructions that came with your headset to place your headset in pairing mode and pair your devices.
3 Touch Ask before connect or Always connect and touch Yes to Connect now. Your KP502 will automatically switch to Headset profile.
LG KP502 | User Guide
Accessories
These accessories are supplied with KP502.
Charger

Battery
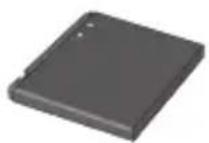
Stereo headset
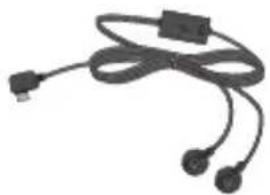
natural_image
Coiled black cable with two connectors and a rectangular connector (no text or symbols visible)Data cable and CD
Connect and synchronise your KP502 and PC.
User Guide
Learn more about your KP502.


NOTE:
• Always use genuine LG accessories.
- Failure to do this may invalidate your warranty.
• Accessories may be different in different regions; please check with our regional service company or agent for further inquires.
Protection Film

WARNING:
When the protection film is attached on touch window, touch sensitivity might be decreased.
01
02
03
04
05
06
07
08
Network service Technical data
The wireless phone described in this guide is approved for use on the GSM 900, DCS 1800, GSM 850 and, PCS 1900 network.
A number of features included in this guide are called Network Services. These are special services that you arrange through your wireless service provider. Before you can take advantage of any of these Network Services, you must subscribe to them through your service provider and obtain instructions for their use from your service provider.
General
Product name : KP502
System : GSM 900 / DCS 1800 / GSM 850
/ PCS 1900
Ambient Temperatures
Max: +55°C (discharging),
+45°C (charging)
Min : -10°C
LG KP502 | User Guide
Declaration of Conformity

LG Electronics
Suppliers Details
Name
LG Electronics Inc
Address
LG Twin Tower 20, Yeouido-dong, Yeongdeungpo-gu Seoul, Korea 150-721
Product Details
Product Name
E-GSM 900 / DCS 1800 / GSM 850 / PCS 1900 Quad Band Terminal Equipment
Model Name
KP502
Trade Name
LG
CE0168
Applicable Standards Details
RATTE Directive 1999/5/EC
EN 301 489-01 v1.6.1 / EN 301 489-07 v1.3.1 / EN 301 489-17 v1.2.1
EN 60950-1:2001
EN 50360 / EN62209-1:2006
EN 301 511 V9.0.2
EN 300 328 V1.7.1
Supplementary Information
The conformity to above standards is verified by the following Notified Body(BABT)
BAST, Balfour House, Churchfield Road, Walton-on-Thames, Surrey, KT12 2TD, United Kingdom
Notified Body Identification Number: 0168
Declaration
I hereby declare under our sole responsibility that the product mentioned above to which this declaration relates complies with the above mentioned standards and Directives
European Standard Center
LG Electronics Logistics and Services B.V.
Veluwezoom 15, 1327 AE Almere, The Netherlands
Tel: +31-36-547-8940, Fax: +31-36-547-8794
e-mail: jacob@lpe.com
Name
Issued Date
Seung Hyoun, Ji / Director
18, March, 2009

Signature of representative
Guidelines for safe and efficient use
Please read these simple guidelines. Not following these guidelines may be dangerous or illegal.
Exposure to radio frequency energy
Radio wave exposure and Specific Absorption Rate (SAR) information This mobile phone model KP502 has been designed to comply with applicable safety requirements for exposure to radio waves. These requirements are based on scientific guidelines that include safety margins designed to assure the safety of all persons, regardless of age and health.
- The radio wave exposure guidelines employ a unit of measurement known as the Specific Absorption Rate, or SAR. Tests for SAR are conducted using standardised methods with the phone transmitting at its highest certified power level in all used frequency bands.
- While there may be differences between the SAR levels of various LG phone models, they are all designed to meet the relevant guidelines for exposure to radio waves.
- The SAR limit recommended by the International Commission on Non-Ionizing Radiation Protection (ICNIRP) is 2W/kg averaged over 10g of tissue.
LG KP502 | User Guide
- The highest SAR value for this model phone tested by DASY4 for use at the ear is 0.827 W/kg (10g) and when worn on the body is 1.40 W/Kg(10g).
- SAR data information for residents in countries/regions that have adopted the SAR limit recommended by the Institute of Electrical and Electronics Engineers (IEEE), which is 1.6 W/kg averaged over 1g of tissue.
Product care and maintenance

WARNING
Only use batteries, chargers and accessories approved for use with this particular phone model. The use of any other types may invalidate any approval or warranty applying to the phone, and may be dangerous.
- Do not disassemble this unit. Take it to a qualified service technician when repair work is required.
- Keep away from electrical appliances such as TVs, radios, and personal computers.
- The unit should be kept away from heat sources such as radiators or cookers.
-
Do not drop.
-
Do not subject this unit to mechanical vibration or shock.
- Switch off the phone in any area where you are required by special regulations. For example, do not use your phone in hospitals as it may affect sensitive medical equipment.
- Do not handle the phone with wet hands while it is being charged. It may cause an electric shock and can seriously damage your phone.
- Do not charge a handset near flammable material as the handset can become hot and create a fire hazard.
- Use a dry cloth to clean the exterior of the unit (do not use solvents such as benzene, thinner or alcohol).
- Do not charge the phone when it is on soft furnishings.
- The phone should be charged in a well ventilated area.
- Do not subject this unit to excessive smoke or dust.
- Do not keep the phone next to credit cards or transport tickets; it can affect the information on the magnetic strips.
- Do not tap the screen with a sharp object as it may damage the phone.
- Do not expose the phone to liquid or moisture.
- Use the accessories like earphones cautiously. Do not touch the antenna unnecessarily.
Efficient phone operation
Electronics devices
All mobile phones may get interference, which could affect performance.
- Do not use your mobile phone near medical equipment without requesting permission. Avoid placing the phone over pacemakers, for example, in your breast pocket.
- Some hearing aids might be disturbed by mobile phones.
• Minor interference may affect TVs, radios, PCs, etc.
Road safety
Check the laws and regulations on the use of mobile phones in the area when you drive.
- Do not use a hand-held phone while driving.
- Give full attention to driving.
• Use a hands-free kit, if available. - Pull off the road and park before making or answering a call if driving conditions so require.
Guidelines for safe and efficient use
- RF energy may affect some electronic systems in your vehicle such as car stereos and safety equipment.
- When your vehicle is equipped with an air bag, do not obstruct with installed or portable wireless equipment. It can cause the air bag to fail or cause serious injury due to improper performance.
- If you are listening to music whilst out and about, please ensure that the volume is at a reasonable level so that you are aware of your surroundings. This is particularly imperative when near roads.
Avoid damage to your hearing
Damage to your hearing can occur if you are exposed to loud sound for long periods of time. We therefore recommend that you do not turn on or off the handset close to your ear. We also recommend that music and call volumes are set to a reasonable level.
Glass Parts
Some parts of your mobile device are made of glass. This glass could break if your mobile device is dropped on a hard surface or receives a substantial impact. If the glass breaks, do not touch or attempt to remove. Stop using your
LG KP502 | User Guide
mobile device until the glass is replaced by an authorized service provider.
Blasting area
Do not use the phone where blasting is in progress. Observe restrictions, and follow any regulations or rules.
Potentially explosive atmospheres
- Do not use the phone at a refueling point.
- Do not use near fuel or chemicals.
- Do not transport or store flammable gas, liquid, or explosives in the same compartment of your vehicle as your mobile phone and accessories.
In aircraft
Wireless devices can cause interference in aircraft.
- Turn your mobile phone off before boarding any aircraft.
- Do not use it on the aircraft without permission from the crew.
Children
Keep the phone in a safe place out of the reach of small children. It includes small parts which may cause a choking hazard if detached.
Emergency calls
Emergency calls may not be available under all mobile networks. Therefore, you should never depend solely on the phone for emergency calls. Check with your local service provider.
Battery information and care
- You do not need to completely discharge the battery before recharging. Unlike other battery systems, there is no memory effect that could compromise the battery's performance.
- Use only LG batteries and chargers. LG chargers are designed to maximize the battery life.
- Do not disassemble or short-circuit the battery pack.
- Keep the metal contacts of the battery pack clean.
- Replace the battery when it no longer provides acceptable performance. The battery pack maybe recharged
hundreds of times until it needs replacing.
- Recharge the battery if it has not been used for a long time to maximize usability.
- Do not expose the battery charger to direct sunlight or use it in high humidity, such as in the bathroom.
- Do not leave the battery in hot or cold places, this may deteriorate the battery performance.
- There is risk of explosion if the battery is replaced by an incorrect type.
- Dispose off used batteries according to the manufacturer's instructions. Please recycle when possible. Do not dispose as household waste.
- If you need to replace the battery, take it to the nearest authorized LG Electronics service point or dealer for assistance.
• Always unplug the charger from the wall socket after the phone is fully charged to save unnecessary power consumption of the charger. - Actual battery life will depend on network configuration, product settings, usage patterns, battery and environmental conditions.

LG
Life's Good
Warranty Card
產品保用證
Mobile Phone
手提電話
Service Commitment 服務承諾
LG's mission is to create value for customers. We are committed to improve the life of our customers by putting the customers first, and delivering the best possible pre and after sales services in the way they want.
為顧客創造價值乃LG一貫宗旨。我們致力提供最貼心的售前及售後服務,一切以顧客為先,希望為客戶帶來最優質的生活。
Warranty Card
產品保用證
LG Customer Care Centre
客戶維修服務中心
Welcome to contact for detailed information
歡迎致電查詢詳細資料
Customer Service Hotine 客戶服務熱線 : (852) 3543 7777
E-mail Us 客戶查詢電郵 : cshelpdesk@lge.com
LG Website 瀏覽網站 : www.lg.com
Privacy Statement
You are aware that any information supplied by you after purchase of our product will be retained by LG Electronics HK Ltd. and will not be released to third parties. You also authorize LG Electronics HK Ltd. to send you direct promotion materials. Please contact our Customer Service Hotline at (852) 3543 7777 if you wish to modify or erase your provided personal information.
私隱聲明
閣下在購買本公司產品後所提供的任何資料,將會由LG Electronics HK Ltd.保有,不會透露給予第三方,並授權本公司對閣下發出直接推廣通訊。如希望修改或刪除所提供的個人資料,可聯絡本公司客戶服務熱線(852)35437777作出相關安排。
Thank you for your purchase of LG Electronics product under the terms and conditions listed on this warranty card.
多謝閣下購買及使用本公司之產品,請參閱保用證所列之產品保用條款。
IMPORTANT: Please keep and present this warranty card and purchase invoice when services are rendered. Otherwise, this warranty will be voided.
重要事項:顧客請保留此保用證及購貨發票,並需在檢查/維修時出示,否則保用無效。
Mobile Phone Warranty Policy
手提電話保用條款
(1) LG Electronics Hong Kong Limited (hereafter LGEHK) provides warranty period from the date of purchase are as follows and only valid for mobile purchase in Hong Kong only (any promotion gift item is not included):
(i) Handset : 12 months (ii) Charger : 6months
(iii) Battery : 6months (iv) Hand free earphone : 3months
(2) Warranty is valid only for authorized product; parallel import and counterfeit product are invalid.
(3) Product is under warranty against manufacturing defects by reason of faulty workmanship or internal electronic parts materials. This warranty does not cover defects arising from natural wear of the product (Including casing, key pad, display, antenna, and accessories, etc.)
(4) If check-up or repairing are required, customer must present the original invoice and warranty card on which the relevant IMEI number was printed. Upon any failure to present the above documentation, customer must pay for the costs of the services provided.
(5) All parts replaced within the warranty period are the property of LGEHK. We have rights to handle those parts as necessary.
(6) Data stored in handsets may be lost after the repair and thus should be properly stored by customer beforehand.
(7) Warranty will be voided under the following conditions, and LGEHK reserves the right to refuse providing service and/or shall demand charges for any costs of servicing from customer:
(i) Product has been tampered with or undergone unauthorized repair by third parties, improper installation, alternation or modification to this product, or damage, tearing, removal of the warranty sticker that is a fixed to this product.
(ii) Defects arising from misuse, mishandling, abuse, accident, negligence and damage caused directly or indirectly by re, ood, liquid water, corrosion, convulsion of nature, war, riot or civil commotion.
(iii) The IMEI number sticker on this product has been erased or modified.
(iv) The content of warranty policy has been modified without authorization.
(8) LGEHK is not responsible for any loss of data or system corruption during the process of transportation or repair to and from the Service Centre and due to the forces of nature.
(9) LGEHK reserves the right to terminate or modify the terms of this warranty card. For exceptional cases, subject to report of our investigation, we reserve the right to terminate this warranty card or modify terms of warranty policy.
(10) Our company will not be liable for any loss directly or indirectly caused by the breakdown of the product.
(11) This warranty card is restricted within Hong Kong SAR only.
(12) LG and its Authorized Service Centers reserve the right to use refurbished or reconditioned parts or whole products for the same or functionally equivalent model when conducting product repairs and replacement.
(1) 本公司為客戶提供保修期如下,只適用於香港購買之手機,並不包括各促銷活動之贈品(由購買日起計)
(i) 機身 : 12個月 (ii) 充電器 : 6個月
(iii)電池:6個月 (iv)免提耳機:3個月
(2) 保修服務只適用於原裝行貨;水貨及冒牌貨均屬無效。
(3) 此保修只適用於生產上的瑕疵,如電子零件偶然出現毛病,並不包括手機的自然磨損包括外殼、鍵盤、顯示屏、天線、附件等。
(4) 用戶要求維修服務時,須同時攜同手機、保用證及印有IMEI號碼之有效發票正本到本公司指定之維修中心進行維修,否則保修服務無效,客戶須繳付維修費用。
(5) 在保修期内維修更換後的所有零件、配置及附件,均屬本公司所有,本公司有權作出任何處理。
(6) 手機內存資料有可能因維修後遺失,請顧客要自行保存。
(7) 在下列情況下本保用證將自動失效,本公司有權拒絕維修該手機或向客人徵收所有的維修費用。
(i) 手機曾作未許可之維修、不適當的安裝、更改,或貼於其上的維修貼紙遭受損毀、撕破、除去,保修服務即無效。
(ii) 手機曾被錯誤使用,錯誤處理,疏忽使用,直接或間接意外由火、液體、火災、腐蝕、地震、戰爭、暴亂或大災所造成的損壞。
(iii) 手機上的IMEI號碼貼紙一經修改或除去,保修服務即無效。
(iv) 擅自修改本保用證的內容。
(8) 本公司將對任何於使用、維修或運送時引致之系統錯誤及資料流失,或因天然災害,意外事件造成之損失概不負責。
(9) 本保用證的發出及終止權均屬本公司所有。就不明的情況或個案,經審查後,本公司有權發出或終止本保用證。
(10) 本公司將不負責由於產品損壞而直接或間接引致之任何損失。
(11) 此保用證只適用於香港特別行政區範圍內。
(12) 本公司及其授權之維修中心在維修或更換產品時,保留使用與產品或功能相同的部分或全部再生零件之權利。

- KP502 使用手册
- 内容
- 設定
- 您的備用屏幕
- 基本功能
- 自製功能
- 管理功能
- 網絡功能
- 了解您的手機
- 充電器、USB線、免提插孔
- 側鍵
- 手機背面
- 安裝智能咭和電池
- 取下電池蓋
- 取下電池
- 安装智能咭
- 安装電池
- 手機充電
- 記憶咭
- 安裝記憶咭
- 格式化記憶晴
- 觸控屏幕提示
- 快捷键
- 狀態列
- 從狀態列變更狀態
- 使用多項工作功能
- 通話功能
- 撥打電話
- 透過通訊錄撥打電話
- 接聽來電和拒接來電
- 快速撥號
- 撥打其他電話
- 關閉 DTMF
- 檢視通話記錄
- 使用來電轉接
- 使用通話限制
- 變更一般通話設定
- 通訊錄
- 搜尋通訊錄
- 從備用屏幕
- 從主功能表
- 新增通訊錄
- 建立群組
- 變更通訊錄設定
- 檢視資訊
- 訊息
- 發送訊息
- 輸入文字
- T9 模式
- Abc 模式
- 鍵盤
- 手寫識別
- 設定電子郵件
- 擷取電子郵件
- 透過新帳戶發送電子郵件
- 變更電子郵件設定
- 訊息資料夾
- 變更文字訊息設定
- 變更多媒體訊息設定
- 變更其他設定
- 相機
- 快速拍照
- 拍攝照片後
- 了解取景器
- 選擇拍攝類型
- 調整曝光
- 使用進階設定
- 預覽設定
- 其他設定
- 變更圖像大小
- 選擇色彩效果
- 檢視已儲存照片
- 視像攝錄機
- 拍攝快速影片
- 錄製影片後
- 變更影片圖像大小
- 選擇色調
- 觀看已儲存影片
- 照片及影片
- 檢視照片及影片
- 從影片中擷取圖像
- 以投影片播放形式檢視照片
- 將照片設定為待機圖片
- 編輯照片
- 在照片中加入文字
- 在照片中加入效果
- 多媒體
- 圖片
- 發送照片
- 使用圖像
- 列印圖像
- 移動或複製圖像
- 聲音
- 使用聲音
- 影片
- 發送錄像片段
- 遊戲和應用程式
- 透過手機安裝,安裝遊戲/應用程式
- 玩遊戲
- 文件
- 傳送檔案到手機
- 檢視檔案
- 其他
- 製作電影
- 音樂
- 將音樂傳送至手機
- 播放歌曲
- 建立播放列表
- 使用收音機
- 搜尋電台
- 自動調諧:
- 重設頻道
- 記事簿
- 新增事件至日曆
- 新增項目至待辦事項
- 新增備忘錄
- 使用日期搜尋器
- 設定鬧鐘
- 使用繪圖面板
- 語音備忘錄
- 錄製聲音或語音
- 使用計算機
- 轉換單位
- 使用秒錶
- 新增城市至世界時間
- 電腦同步
- 在電腦上安裝 LG PC Suit
- 連接手機和電腦
- 備份和還原手機資訊
- 檢視電腦上的手機檔案
- 同步處理通訊錄
- 同步訊息
- 將手機用作音樂同步裝置
- 瀏覽器
- 存取網絡
- 新增並存取書簽
- 使用 RSS 讀取装置
- 儲存網頁
- 存取已儲存的網頁
- 檢視瀏覽器記錄
- 變更網頁瀏覽器設定
- 將手機用作數據機
- 使用 USB 線:
- 使用藍芽:
- 個人化情景模式
- 變更屏幕設定
- 變更手機設定
- 變更連接設定
- 網路設定
- 使用記憶體管理
- 記憶體管理。
- 使用藍芽發送和接收檔案
- 發送檔案:
- 接收檔案:
- 變更藍芽設定:
- 同其他藍芽裝置配對
- 使用藍芽耳機
- 配件
- 充電器
- 電池
- 立體聲耳機 使用手冊
- USB 線及光碟
- 使用手册
- 注意:
- 保護貼
- 網絡服務 技術資料
- 技術資料
- 一般
- 環境溫度
- Declaration of Conformity
- Suppliers Details
- Product Details
- Applicable Standards Details
- Supplementary Information
- Declaration
- 安全與有效使用準則
- 射頻能量暴露準則
- 產品護理及維修
- 警告
- 有效手機操作
- 電子裝置
- 道路安全
- 避免損害您的聽覺
- 玻璃部件
- 爆破地區
- 潛在爆炸氣壓
- 在飛機上
- 兒童
- 緊急呼叫
- 電池資料及保護
- 故障排解
- KP502 用户指南
- 设定
- 待机屏幕
- 高级功能
- 网络
- 设置
- 准则
- 开始了解您的手机
- 结束/电源键
- 多任务键
- 通话键
- 充电器、数据线、免提连接器
- 侧键
- 打开视图
- 安装 USIM 卡和电池
- 卸下电池盖
- 取出电池
- 安装USIM卡
- 安装电池
- 5充电
- 存储卡
- 安装存储卡
- 格式化存储卡
- 触摸屏提示
- 快速键
- 状态栏
- 从状态栏更改状态
- 使用多任务功能
- 防盗手机追踪器
- 通话
- 拨打电话
- 从电话本拨打电话
- 接听和拒绝电话
- 快速拨号
- 拨打第二个电话
- 关闭DTMF
- 查看通话记录
- 使用呼叫转接
- 使用呼叫限制
- 更改常用通话设置
- 电话本
- 搜索联系人
- 从待机屏幕
- 从主菜单
- 添加新联系人
- 创建群组
- 更改联系人设置
- 查看信息
- 信息
- 发送信息
- 输入文本
- T9 预测
- Abc 手动
- 键盘
- 手写识别
- 设置电子邮件
- 检索电子邮件
- 使用新帐户发送电子邮件
- 更改电子邮件设置
- 信息文件夹
- 更改文本信息设置
- 更改多媒体信息设置
- 更改其它设置
- 相机
- 拍照后
- 选择拍摄类型
- 调节曝光
- 使用高级设置
- 预览设置
- 其它设置
- 更改图像大小
- 选择色彩效果
- 查看保存的照片
- 摄像机
- 快速摄像
- 拍摄视频后
- 更改视频大小
- 选择色调
- 观看保存的视频
- 照片和视频
- 查看照片和视频
- 从视频中拍摄图像
- 以幻灯片显示方式查看照片
- 将照片设为墙纸
- 编辑照片
- 为照片添加文本
- 为照片添加效果
- 多媒体
- 图片
- 发送照片
- 使用图像
- 打印图像
- 移动或复制图像
- 声音
- 使用声音
- 视频
- 发送视频剪辑
- 游戏和应用程序
- 通过本地安装安装游戏/应用程序
- 玩游戏
- 文档
- 将文件传输到手机
- 查看文件
- 其它
- 创建电影
- 音乐
- 将音乐传输到手机
- 创建播放列表
- 使用收音机
- 搜索电台
- 自动微调:
- 重设频道
- 管理器
- 将事件添加到目历中
- 向任务列表添加项目
- 添加备忘录
- 使用日期计算器
- 设置闹钟
- 添加带绘图面板的备忘录
- 语音备忘录
- 录制声音或语音
- 使用计算器
- 换算单位
- 使用秒表
- 向世界时间添加城市
- PC 同步
- 在电脑上安装 LG PC 套件
- 连接手机和 PC
- 备份和恢复手机信息
- 在 PC 上查看手机文件
- 同步电话本
- 将手机用作音乐同步设备
- 同步信息
- 浏览器
- 访问网页
- 添加并访问书签
- 使用 RSS 阅读器
- 保存页面
- 访问已保存页面
- 查看浏览器历史记录
- 更改网络浏览器设置
- 将手机用作调制解调器
- 使用 USB 数据线:
- 使用蓝牙:
- 更改情景模式
- 更改屏幕设置
- 更改手机设置
- 更改连接设置
- 网络设定
- 使用内存管理器
- 使用蓝牙发送和接收文件
- 发送文件:
- 接收文件:
- 更改蓝牙设置:
- 与其它蓝牙设备配对
- 使用蓝牙耳机
- 充电器
- 电池
- 立体声耳机 用户手册
- USB线和光碟
- 用户手册
- 备注:
- 保护膜
- 网络服务 技术参数
- 技术参数
- 标准
- 外部环境
- 关于安全有效使用手机的准则
- 暴露在射频能量之下
- 产品保养和维护
- 有效的手机操作
- 电子设备
- 行车安全
- 避免对您的听力造成伤害
- 玻璃部分
- 爆破区域
- 易爆环境
- 在飞机上
- 儿童
- 紧急电话
- 电池信息及保养
- KP502 User Guide
- Contents
- Using your phone as Music Syncp
- Your standby screen
- The basics
- Get creative
- Get organised
- The web
- Settings
- Guidelines
- Getting to know your phone
- End/Power key
- Multitasking key
- Call key
- Charger, Cable, Handsfree connector
- Side keys
- Open view
- Installing the USIM and battery
- Remove the battery cover
- Remove the battery
- Install the USIM card
- Install the battery
- Charging your phone
- Memory card
- Installing a memory card
- Formatting the memory card
- Touch screen tips
- The quick keys
- The status bar
- Changing your Status from the status bar
- Using the Multitasking function
- Calls
- Making a call
- Making a call from your contacts
- Answering and rejecting a call
- Speed dialling
- Making a second call
- Turning off DTMF
- Viewing your call logs
- Using call divert
- Using call barring
- Changing the common call setting
- Contacts
- Searching for a contact
- From the standby screen
- From the main menu
- Adding a new contact
- Creating a group
- Changing your contact settings
- Send all contacts via Bluetooth
- Viewing information
- Messaging
- Sending a message
- Entering text
- T9 predictive
- Abc manual
- Keyboard
- Handwriting recognition
- Setting up your email
- Retrieving your email
- Sending an email using your new account
- Changing your email settings
- Include message in Fwd & Reply
- Auto Retrieval in Roaming -
- Message folders
- Changing your text message settings
- Changing your multimedia message settings
- Changing your other settings
- Camera
- Taking a quick photo
- After you've taken your photo
- Choosing a shot type
- Adjusting the exposure
- Using the advanced settings
- Preview settings
- Other settings
- Changing the image size
- Choosing a colour effect
- Viewing your saved photos
- Video camera
- Shooting a quick video
- After you've shot your video
- Changing the video image size
- Choosing a colour tone
- Watching your saved videos
- Your photos and videos
- Viewing your photos and videos
- Capturing an image from a video
- Viewing your photos as a slide show
- Setting a photo as wallpaper
- Editing your photos
- Adding text to a photo
- Adding an effect to a photo
- Multimedia
- Pictures
- Sending a photo
- Using an image
- Printing an image
- Moving or copying an image
- Sounds
- Using a sound
- Videos
- Sending a video clip
- Games and Applications
- Installing a game/application via local install
- Playing a game
- Documents
- Transferring a file to your phone
- Viewing a file
- Others
- Documents:
- Creating a movie
- Music
- Transferring music onto your phone
- Playing a song
- Creating a playlist
- Using the radio
- Searching for stations
- To auto tune:
- Resetting channels
- Organiser
- Adding an event to your calendar
- Adding an item to your to do list
- Adding a memo
- Using date finder
- Setting your alarm
- Adding a memo with drawing panel
- Voice recorder
- Recording a sound or voice
- Using your calculator
- Converting a unit
- Using the stopwatch
- Adding a city to your world time
- PC Sync
- Installing LG PC Suite on your computer
- Connecting your phone and PC
- Backing up and restoring your phone's information
- Viewing your phone files on your PC
- Synchronising your contacts
- Synchronising your messages
- Using your phone as Music Sync device
- Browser
- Accessing the web
- Adding and accessing your bookmarks
- Using RSS reader
- Saving a page
- Accessing a saved page
- Viewing your browser history
- Changing the web browser settings
- Using your phone as a modem
- Using the USB cable:
- Using Bluetooth:
- Personalising your profiles
- Changing your screen settings
- Changing your phone settings
- Changing your connectivity settings
- Network settings
- Using memory manager
- Sending and receiving your files using Bluetooth
- To send a file:
- To receive a file:
- Changing your bluebooth settings:
- Pairing with another Bluetooth device
- Using a Bluetooth headset
- Accessories
- Charger
- Battery
- Stereo headset
- Data cable and CD
- User Guide
- NOTE:
- Protection Film
- WARNING:
- Network service Technical data
- General
- Ambient Temperatures
- Guidelines for safe and efficient use
- Exposure to radio frequency energy
- Product care and maintenance
- WARNING
- Efficient phone operation
- Electronics devices
- Road safety
- Avoid damage to your hearing
- Glass Parts
- Blasting area
- Potentially explosive atmospheres
- In aircraft
- Children
- Emergency calls
- Battery information and care
- Warranty Card
- 產品保用證
- Service Commitment 服務承諾
- LG Customer Care Centre
- 客戶維修服務中心
- Welcome to contact for detailed information
- 歡迎致電查詢詳細資料
- Privacy Statement
- 私隱聲明
- Mobile Phone Warranty Policy
- 手提電話保用條款
Марка : LG
Модель : Cookie KP502
Категория : Смартфон