KT16RAW30 - Frigider SIEMENS - Manual de utilizare gratuit
Găsiți gratuit manualul dispozitivului KT16RAW30 SIEMENS în format PDF.

Întrebările utilizatorilor despre KT16RAW30 SIEMENS
0 întrebare despre acest aparat. Răspundeți la cele pe care le cunoașteți sau puneți-vă propria.
Pune o întrebare nouă despre acest aparat
Descărcați instrucțiunile pentru Frigider în format PDF gratuit! Găsiți manualul dvs. KT16RAW30 - SIEMENS și luați din nou în mână dispozitivul dvs. electronic. Pe această pagină sunt publicate toate documentele necesare pentru utilizarea dispozitivului dvs. KT16RAW30 mărcii SIEMENS.
MANUAL DE UTILIZARE KT16RAW30 SIEMENS
natural_image
Illustration of an open refrigerator with shelves and a door, showing internal compartments (no text or symbols)KT16R..
enInstructionforUse
en Index
Informationconcerningdisposal3......
Safetyandwarninginformation3......
Changingoverthedoorhinges5......
Installingapplianceunderworktop5.....
Connectingthe appliance6......
Gettingtoknowyourappliance7......
Fascia7......
Observingambienttemperature and ventilation .... 8
Switchingtheapplianceon 8
Settingthetemperature 8
Refrigerator compartment ..... 9
"super" cooling 9
Store food in the appliance ..... 9
Usable capacity 10
Interiorfittingsof refrigerator compartment 10
Sticker"OK" 10
Switchingoffanddisconnecting the appliance 11
Cleaningtheappliance ..... 11
Tips for saving energy 12
Operating noises 12
Eliminatingminorfaults yourself 13......
Customer service 15
Informationconcerning disposal

Disposalofpackaging
The packaging protects your appliance from damage during transit. All utilised materials are environmentally safe and recyclable. Please help us by disposing the packaging in an environmentally friendly manner.
Please ask your dealer or inquire at your local authority about current means of disposal.

Disposalofyourold oppliance
Old appliances are not worthless rubbish! Valuable raw materials can be reclaimed by recycling old appliances.
This appliance has been identified in accordance with the European directive 2002/96/EG on Waste Electrical and Electronic Equipment – WEEE.
The directive specifies the framework for an EU-wide valid return and recycling of old appliances.

Warning
Redundant appliances
- Pull out the mains plug.
- Cut off the power cord and discard with themainsplug.
Refrigerators contain refrigerant and gases in the insulation. Refrigerant and gases must be disposed of professionally. Ensure that tubing of the refrigerant circuit is not damaged prior to proper disposal.
Safetyandwarning information
BeforeyouswitchONthe appliance
Please read the operating and installation instructions carefully.
They contain important information on how to install, use and maintain the appliance.
Keep all documentation for subsequent use or for the next owner.
Technicalsafety
- This appliance contains a small quantity of environmentally-friendly but flammable R600a refrigerant. Ensure that the tubing of the refrigerant circuit is not damaged during transportation and installation. Leaking refrigerant may cause eye injuries or ignite.
Ifdamagehasoccurred
- Keep naked flames and/or ignition sources away from the appliance.
– Thoroughly ventilate the room for several minutes. - Switch off the appliance and pull out themainsplug.
- Notify customer service.
The more refrigerant an appliance contains, the larger the room must be. Leaking refrigerant can form a flammable gas-air mixture in rooms which are too small.
en
The room must be at least 1 m ^3 per8 g of refrigerant. The amount of refrigerant in your appliance is indicated on the rating plate inside the appliance.
- Only customer service may change the power cord and carry out any other repairs. Improper installations and repairs may put the user at considerable risk.
Importantinformationwhen usingtheappliance
- Never use electrical appliances inside the appliance (e.g. heater, electric ice maker, etc.). Riskofexplosion!
- Never use a steam cleaner to defrost or clean the appliance! The steam may penetrate electrical parts and cause a short-circuit. Riskofelectricshock!
- Do not use pointed or sharp-edged implements to remove frost or layers of ice. You could damage the refrigerant tubing. Leaking refrigerant may ignite or cause eye injuries.
- Do not store products which contain flammable propellants (e.g. spray cans) or explosive substances in the appliance. Riskofexplosion!
-
Do not stand on or lean heavily against base of appliance, drawers or doors, etc.
-
Before defrosting and cleaning the appliance, pull out the mains plug or switch off the fuse. Do not pull out the mains plug by tugging the cable.
- Bottles which contain a high percentage of alcohol must be sealed and stored in an upright position.
- Keep plastic parts and the door seal free of oil and grease. Otherwise, parts and door seal will become porous.
- Never cover or block the ventilation openings for the appliance.
- People who have limited physical, sensory or mental abilities or inadequate knowledge must not use this appliance unless they are supervised or given meticulous instructions.
Childreninthehousehold
- Keep children away from packaging and its parts. Danger of suffocation from collapsible boxes and foil!
- Do not allow children to play with the appliance!
- If the appliance features a lock, keep the key out of the reach of children.
Generalregulations
The appliance is suitable
• for refrigerating food.
The appliance is intended for domestic use only.
The appliance is suppressed according to EUDirective2004/108/EC.
The refrigeration circuit has been checked for leaks.
This product complies with the relevant safety regulations for electrical appliances (EN 60335/2/24).
Installation
Installationlocation
Install the appliance in a dry, well ventilated room. The appliance should not be installed in direct sunlight or near a heat source such as a cooker, radiator, etc. If installation next to a heat source is unavoidable, use a suitable insulating plate.
Observe the following minimum distances toheatsources:
- 3 cm to electric or gas cookers.
- 30 cm to an oil or solid-fuel cooker.
If the appliance is installed next to another refrigerator or freezer, observe a minimum lateral distance of 2 cm to prevent condensation.
Aligningtheappliance
Fig. 2/A
The appliance must be level. If the floor is uneven, use the front height-adjustable feet.
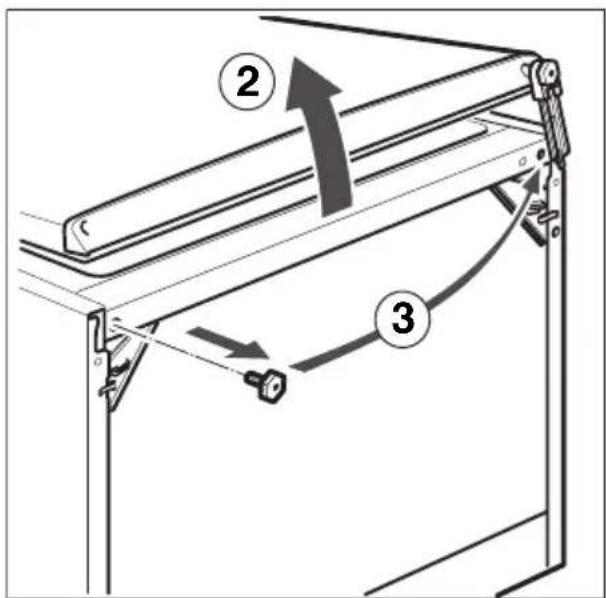
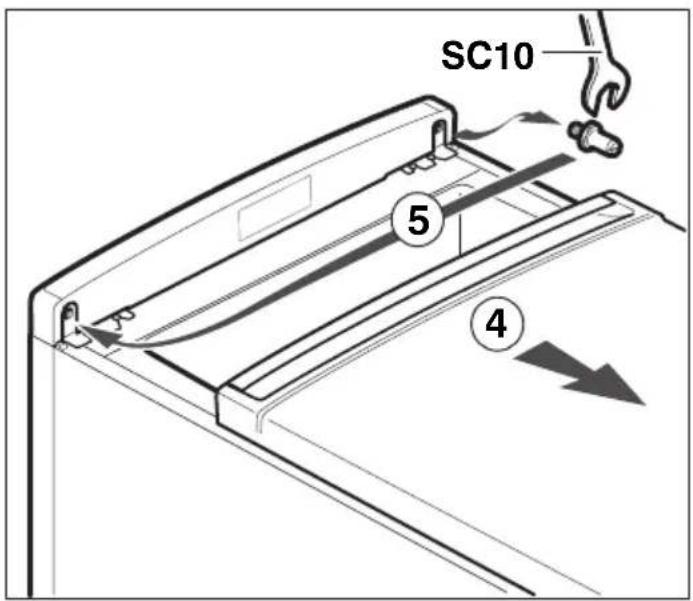
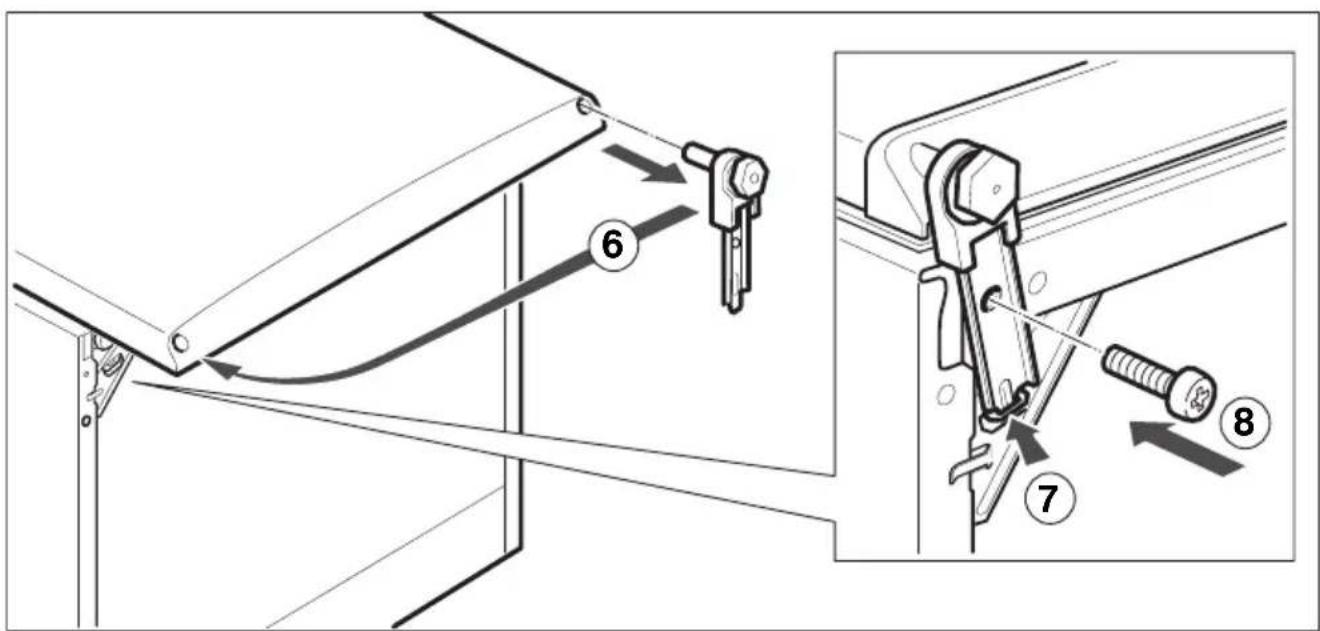
Changingoverthedoor hinges
⚠ Warning!
While changing over the door hinges, ensure that the appliance is not connected to the power supply. Pull out the mains plug beforehand. Tilt back the appliance (if required, place packaging material, etc. underneath).
Fig. 3
The door hinges can be changed over if required by the installation location.
Installation in numerical sequence.
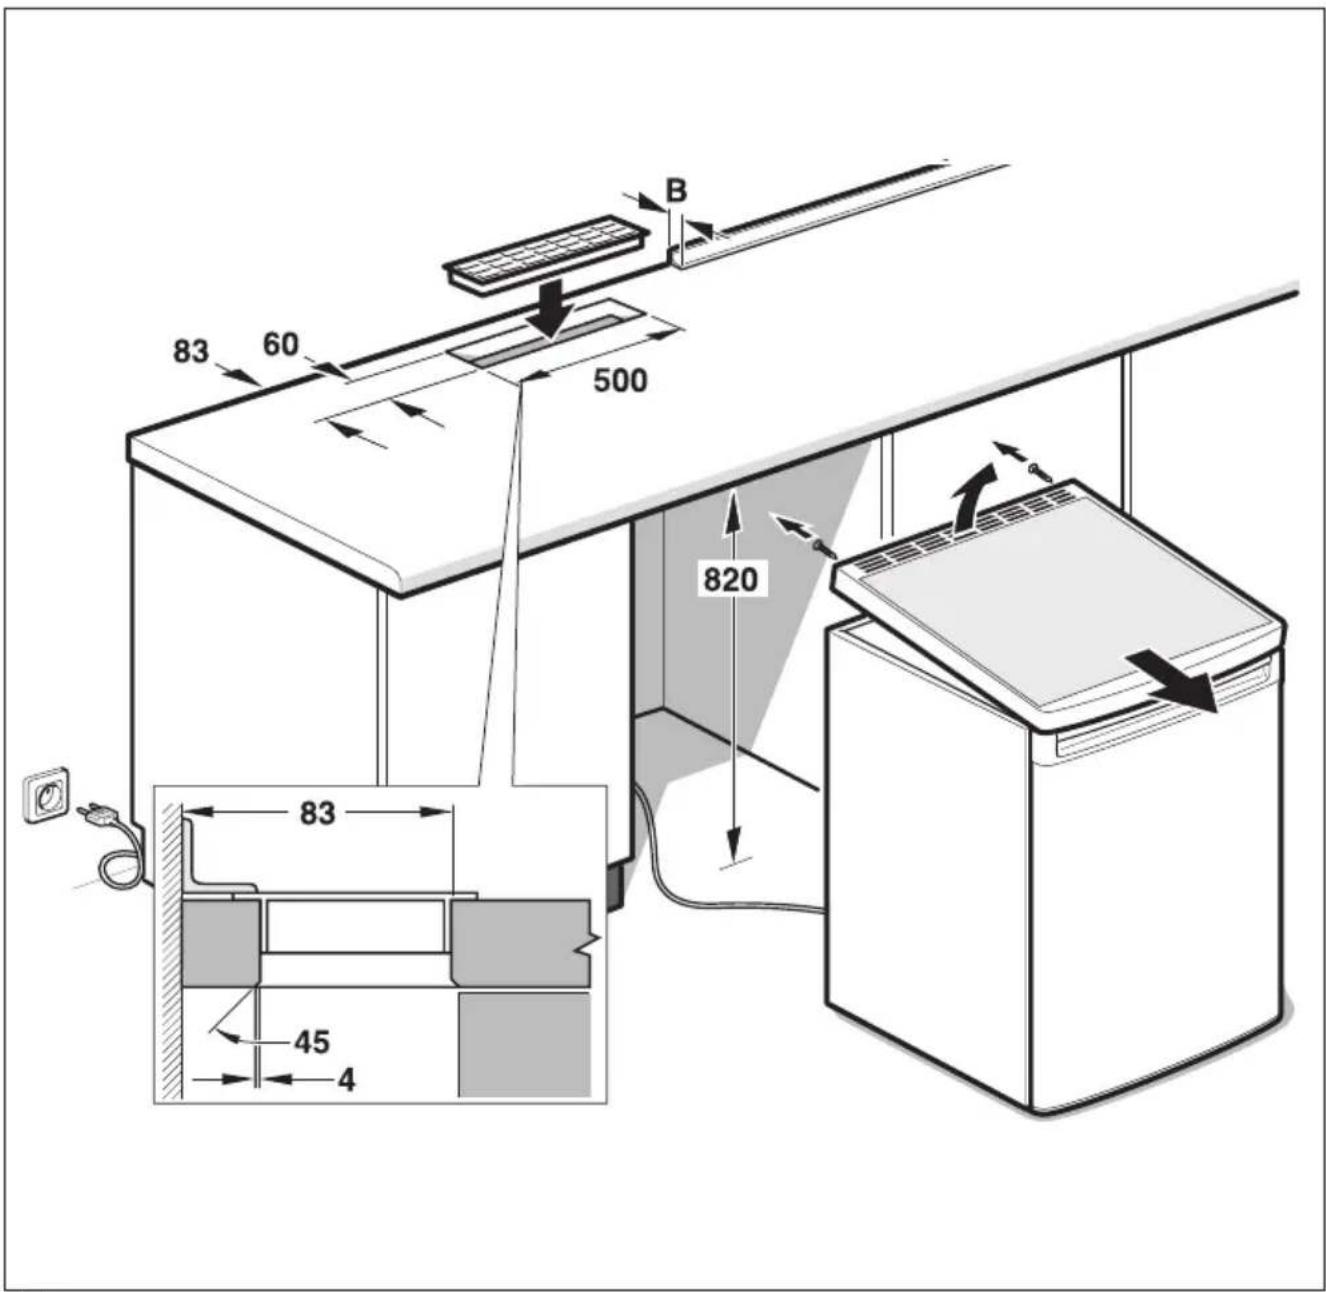
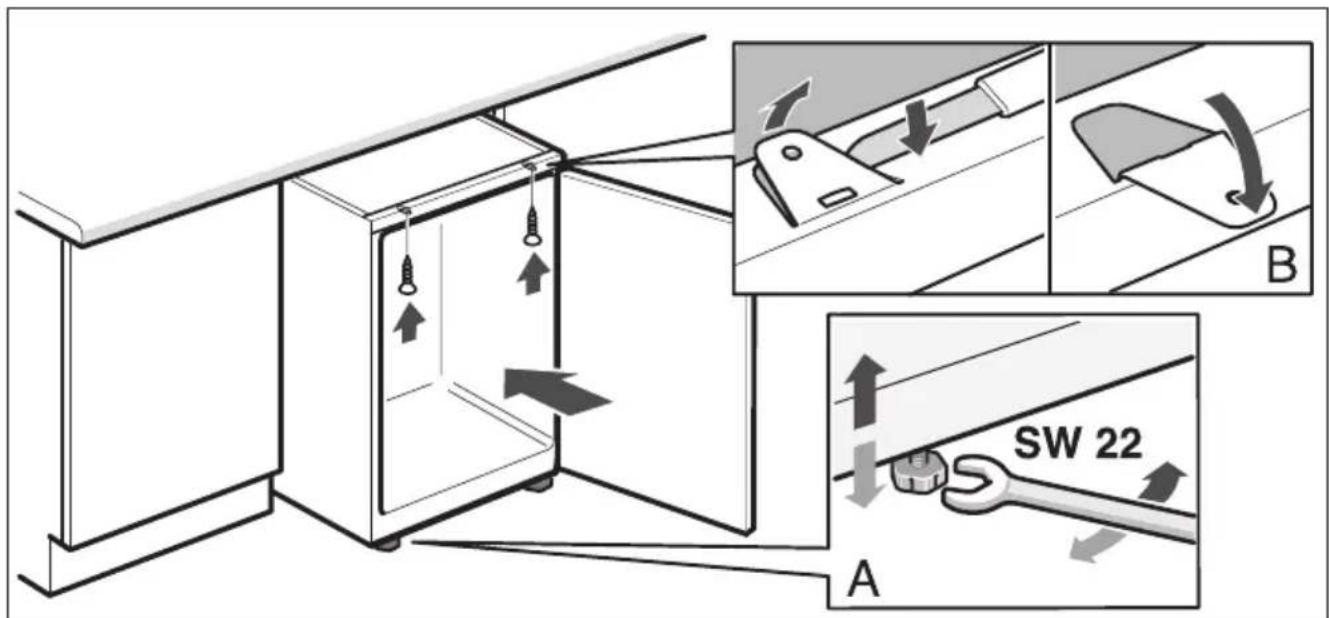
Installing appliance underworktop
After removing the worktop, the appliance can be installed under a worktop.
Fig. 1
Removingtheworktop
- Unscrew screws at the rear of the worktop.
- Lift worktop slightly and remove.
Applianceventilation
A ventilation cross-section of minimum 160 cm ^2 isnecessary for installation below a worktop. For this purpose, a vent measuring about 500 x 60 mm is required, which is available from DIY shops or specialist retailers.
- Mark the cut-out for the vent on the worktop centric to the appliance.
• Max. distance to wall 83 mm. - Note width "B" of the wall connection rail!
- Saw out the cutout. Chamfer the underside by approx. 4 mm.
- Insert and attach the ventilation grille.
Note:
The vent is not required when the distance between the worktop and appliance is more than 5 cm.
Priortoinstallation
Before the appliance is pushed into the cavity, the tabs from the top cover strip must be bent upwards; the tabs should previously be lifted with a knife or similar.
Fig. 2/B
Applianceinstallationunderworktop
Insert the appliance into the cavity until the front edge of the appliance door is flush with the furniture doors of the adjacent cupboards.
Align the appliance with the height-adjustable feet until the upper edge of the appliance is situated on the worktop.
Adjust the height-adjustable feet with a wrench. Fig. 2/A
Fixingappliancetotheworktop
Secure the appliance to the worktop with standard chipboard screws.
Connecting the appliance
After installing the appliance, wait at least 1 hour until the appliance starts up.
During transportation the oil in the compressor may have flowed into the refrigeration system.
Before switching on the appliance for the first time, clean the interior of the appliance (see chapter “Cleaning the appliance”).
The socket should be freely accessible. Connect the appliance only to 220–240 V/50 Hz alternating current via a correctly installed earthed socket. The socket must be fused with a 10 A to 16 A fuse.
If the appliance is to be operated in a non-European country, check whether the stated voltage and current type on the rating plate match the values of your mains supply match the values of the mains supply. The rating plate is situated in the bottom left-hand side of the appliance. The power cord may be replaced by a technician only.
Warning
Never connect the appliance to electronic energy saver plugs or to power inverters which convert the direct current to 230 V alternating current (e.g. solar equipment, power supplies on ships).
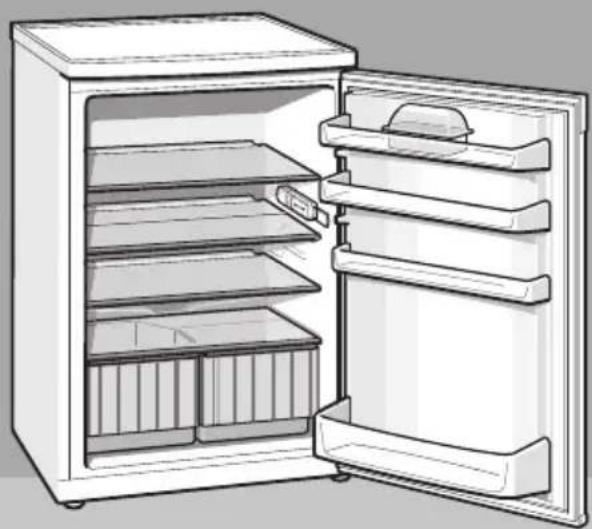
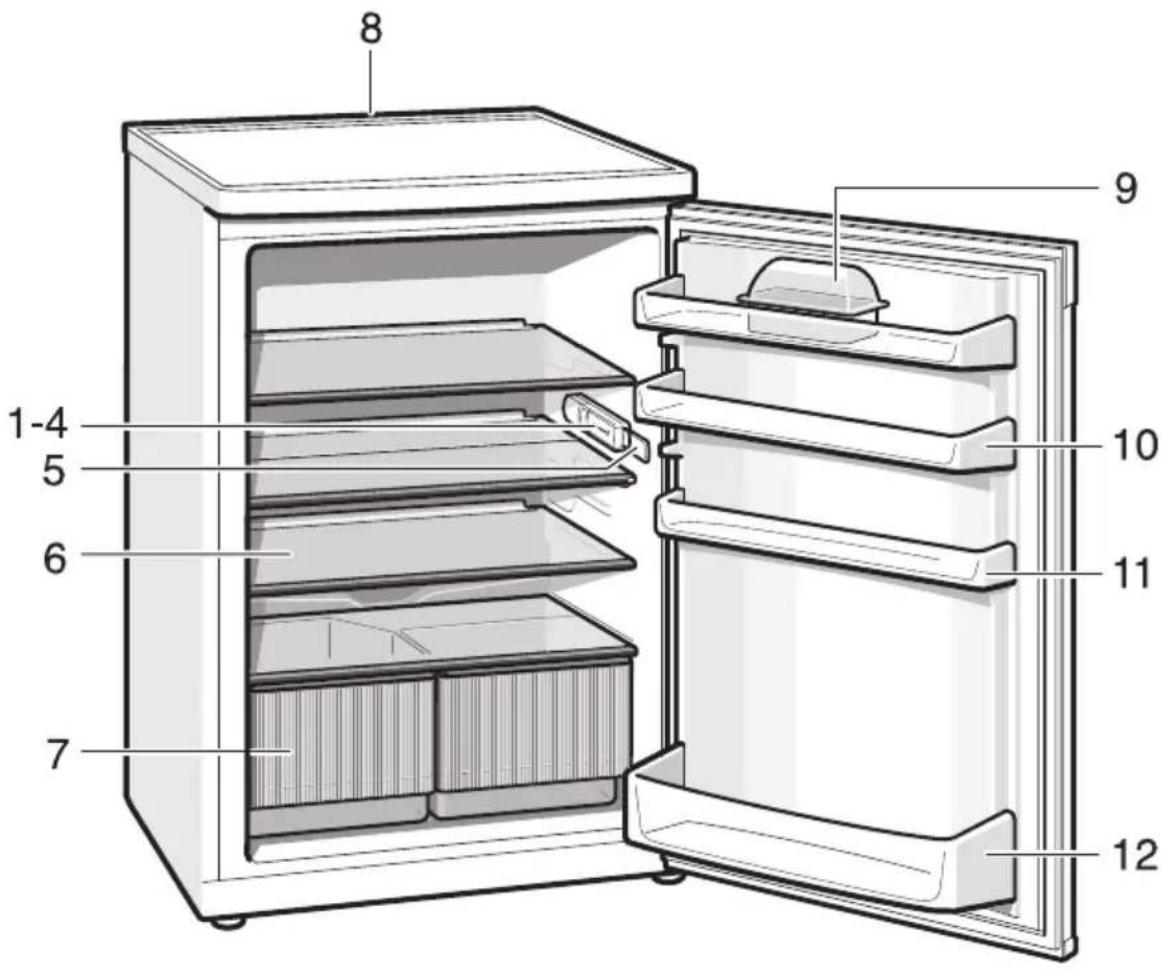
Gettingtoknowyour appliance
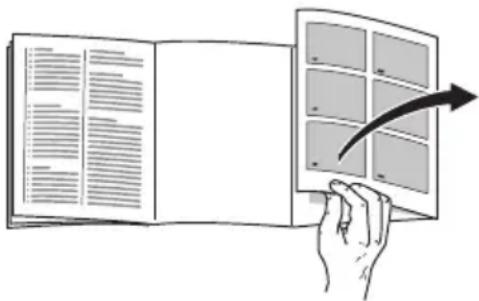
Please fold out the illustrated last page. These operating instructions apply to several models.
The diagrams may differ.
* notallmodels
Fig. 4
1-4 Fascia/Interiorlight
5Lightswitch
6Shelfintherefrigerator compartment
7Vegetablecontainer
8Ventilationopenings*
9Butterandcheesecompartment*
10Eggrack
11 Shelffortubesandsmalltins
12Trayforlargebottles
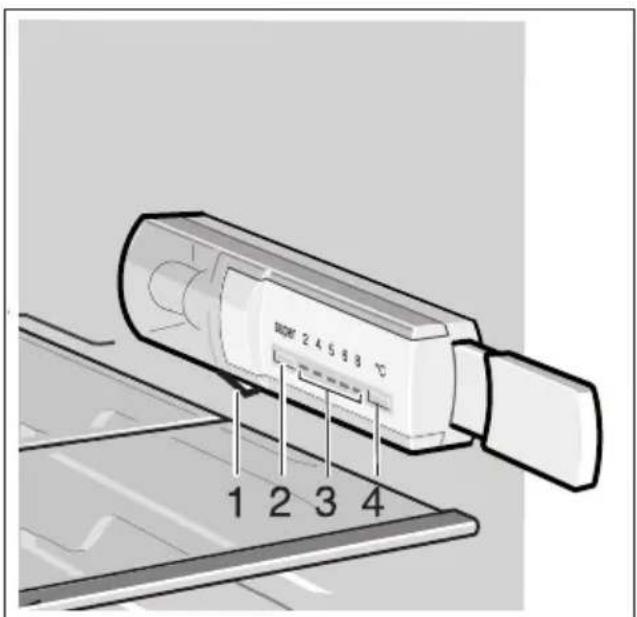
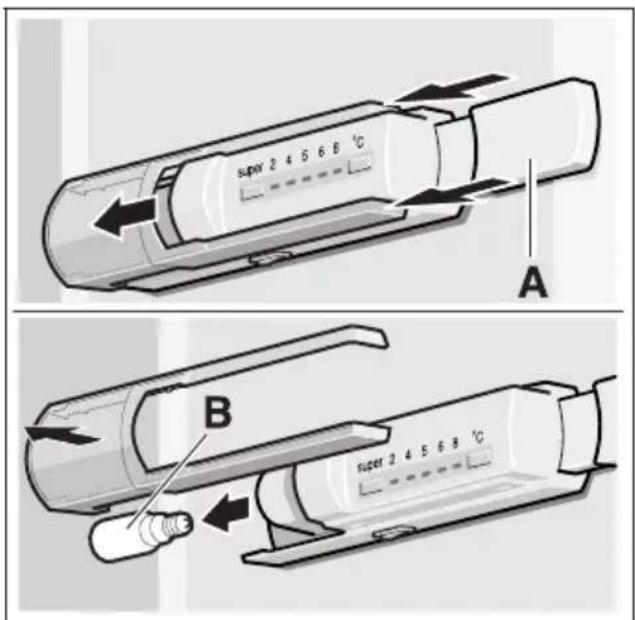
Fascia
Fig. 5
1 MainOn/Offswitch
Switches the whole appliance on and off.
2"super"button
Switches super cooling on and off.
3Temperaturedisplayrefrigerator compartment
The numbers correspond to the set refrigerator compartment temperatures in ^ C.
4Refrigeratorcompartment temperatureselectionbutton
The button sets the temperature in the refrigerator compartment.
Observingambient temperatureand ventilation
The climate class can be found on the rating plate. It states the room temperature within which the appliance can be operated. The rating plate is located in the refrigerator compartment at the bottom left-hand side.
| Climateclass | Permittedambient temperature |
| SN+10°Cto32°C | |
| N+16°Cto32°C | |
| ST+16°Cto38°C | |
| T+16°Cto43°C |
Note
At room temperatures below +20 °C and when super freezing is on, the interior light may come on at a reduced luminosity when the door is almost closed (or when the light switch is depressed).
This is quite normal and can be ignored.
Ventilation
Fig. 6
The air on the rear panel of the appliance heats up. Conduction of the heated air must not be obstructed. Otherwise, the refrigeration unit must work harder. This increases power consumption. Therefore: Never cover or block ventilation openings!
Switchingthe applianceon
Switch on the appliance with the main switch. Fig. 5/1
The temperature display flashes, Fig. 5/3, until the appliance has reached the set temperature.
Interior light in refrigerator compartment is switched on when the door is open.
Setting the temperature
Fig. 5
Refrigeratorcompartment
(can be selected from +2 °C to +8 °C)
Keep pressing temperature selection button 4 until the required refrigerator compartment temperature is set. The value last selected is stored.
The set temperature is indicated on display3.
We recommend a setting of +4 °C.
Perishable food should not be stored above+4 °C.
Refrigerator compartment
The temperature in the refrigerator compartment can be set from +2 °C to +8 °C.
The refrigerator compartment is the ideal storage location for ready meals, cakes and pastries, preserved food, condensed milk, hard cheese, fruit and vegetables sensitive to cold as well as tropical fruit.
"super" cooling
Super cooling cools the refrigerator compartment as cold as possible for approx. 6 hours. Then the temperature set before super cooling mode is automatically restored.
Switch on "super" cooling mode, e.g.:
- before placing large quantities of food in the refrigerator compartment,
• to cool drinks quickly.
Switchingonandoff
Fig. 5
Press "super" button 2.
The button is lit when "super" cooling is switchedon.
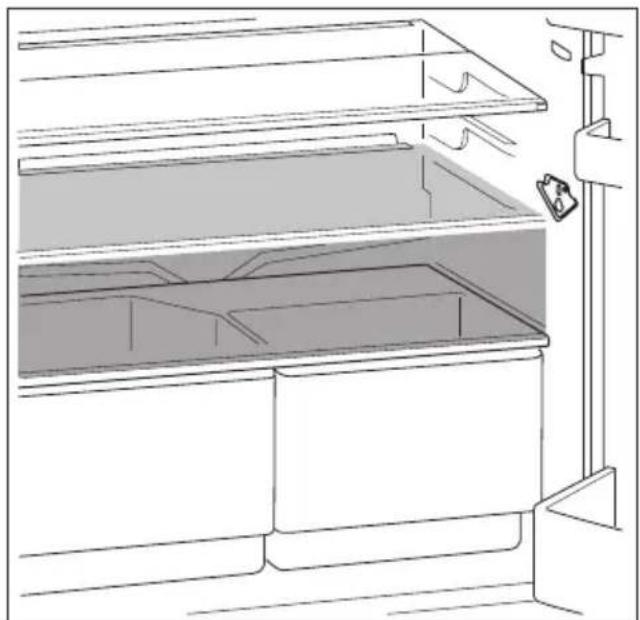
Storefoodinthe appliance
Notethechillzonesinthe refrigeratorcompartment!
The air circulation in the refrigerator compartment produce different refrigerant zones:
•Coldestzone
is between the arrow stamped on the side and the glass shelf situated below.
Fig. 7
Note: Store perishable food (e.g. fish, sausage, meat) in the coldest zones.
•Warmestzone
is at the very top of the door.
Note: Store e.g. cheese and butter in the warmest zone. When served, the cheese will not have lost its flavour and the butter will be easy to spread.
Notewhenloadingproducts
Wrap or cover food before placing in the appliance. This will retain the aroma, colour and freshness of the food. In addition, flavours will not be transferred between foods and the plastic parts will not become discoloured.
Werecommendarrangingthefoodas follows:
- On the shelves in the refrigerator compartment (from top to bottom): cakes and pastries, ready meals, dairy products, meat and sausage
- In the vegetable container: vegetables, salad, fruit
- In the door (from top to bottom): butter, cheese, eggs, tubes, small bottles, large bottles, milk, juice cartons
Usablecapacity
Information on the usable capacity can be found inside your appliance on the rating plate.
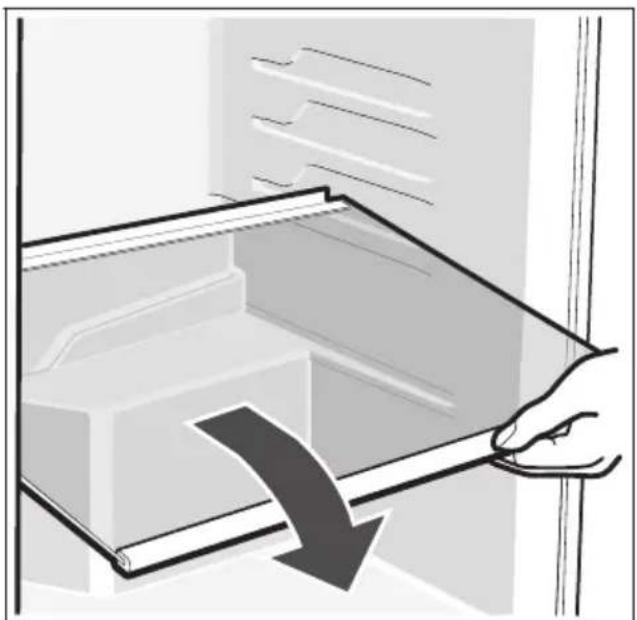
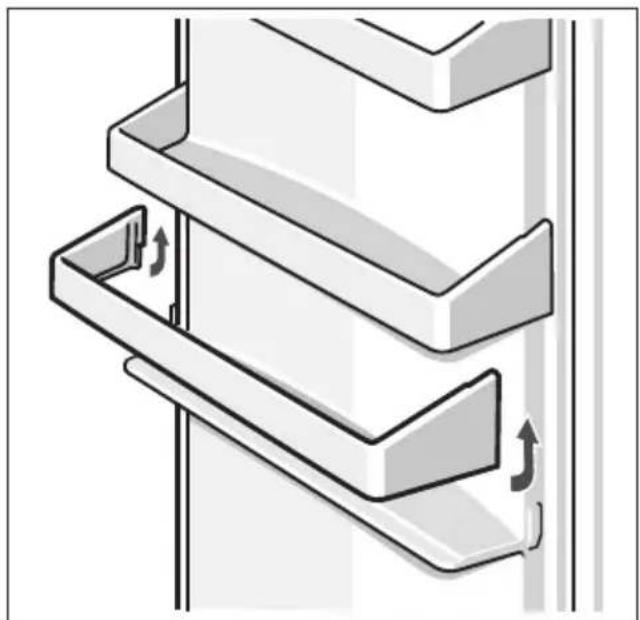
Interiorfittings of refrigerator compartment
If required, you can vary the shelves inside the appliance: pull the shelf forwards, lower and swivel out to the side. Fig. 8
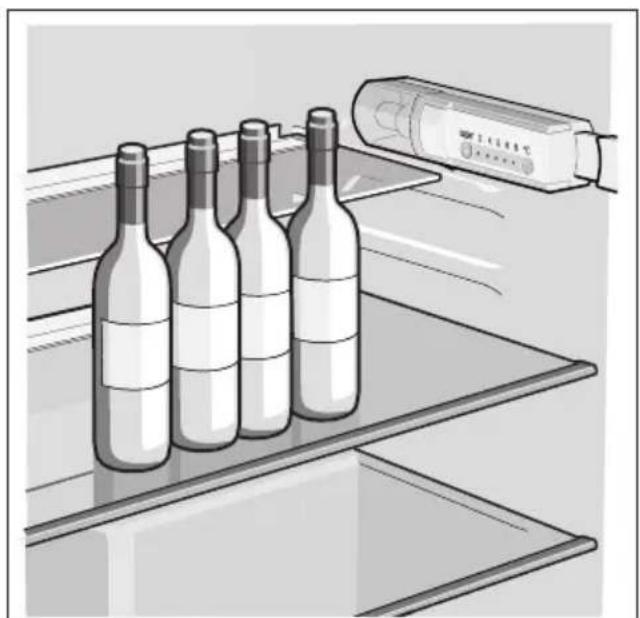
Bottleshelf
Fig. 9
Bottles can be stored securely on the bottleshelf.
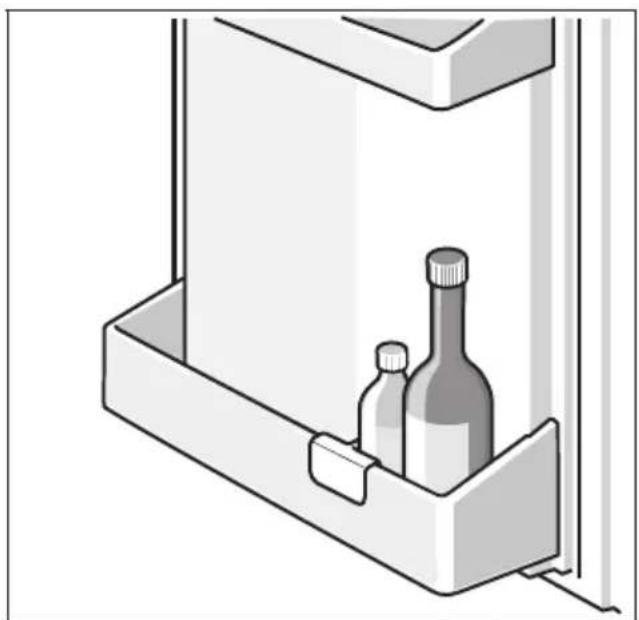
Bottleholder
Fig. 10
The bottle holder prevents bottles from falling over when the door is opened and closed.
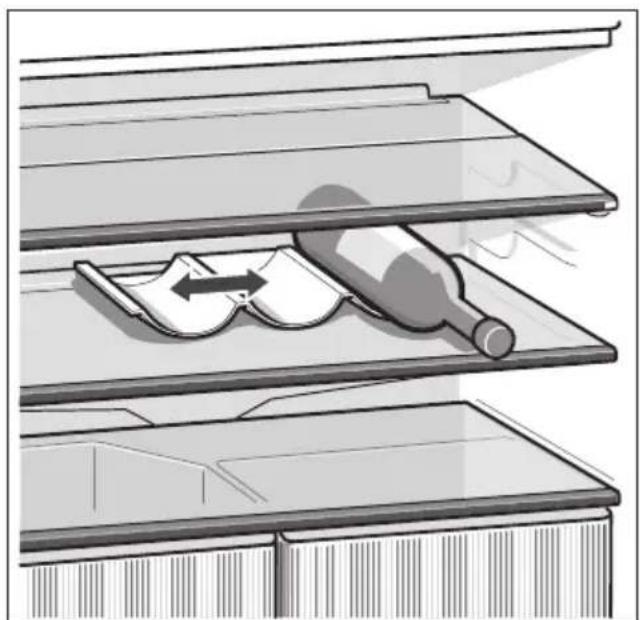
Varioshelf
Fig. 11
The front half of the Vario shelf can be taken out. You can then place tall items (e.g. cans, bottles) on the shelf below.
Sticker"OK"
notallmodels
The “OK” temperature monitor can be used to determine temperatures below +4 °C. Gradually reduce the temperature if the sticker does not indicate “OK”.
Note
When the appliance is switched on, it may take 12 hours until the temperature is reached.


CorrectsettingTemperature too high, reduce temperature.
Switchingoffand disconnectingthe appliance
Switchingtheapplianceoff
Press main switch. Fig. 5/1
Refrigeration unit and interior light switch off.
Disconnecting the appliance
If you do not use the appliance for a prolonged period:
- Switch the appliance off.
- Pull out the mains plug or switch off the fuse.
- Cleaning the appliance.
- Leave the appliance door open.
Cleaningtheappliance
Attention!
Do not use abrasive, chloride or acidic cleaning agents or solvents.
Do not use scouring or abrasive sponges. The metallic surfaces in the appliance could corrode.
Never clean shelves and containers in the dishwasher. The parts may become deformed!
Proceedasfollows:
- Before cleaning: Switch the appliance off.
- Pull out the mains plug or switch off the fuse.
- Take out the frozen food and store in a cool location. Place the ice pack (if enclosed) on the food.
- Clean the appliance with a soft cloth, lukewarm water and a little pH-neutral washing-up liquid. The rinsing water must not run into the light.
- Wipe the door seal with clear water only and then wipe dry thoroughly.
- After cleaning reconnect and switch the appliancebackon.
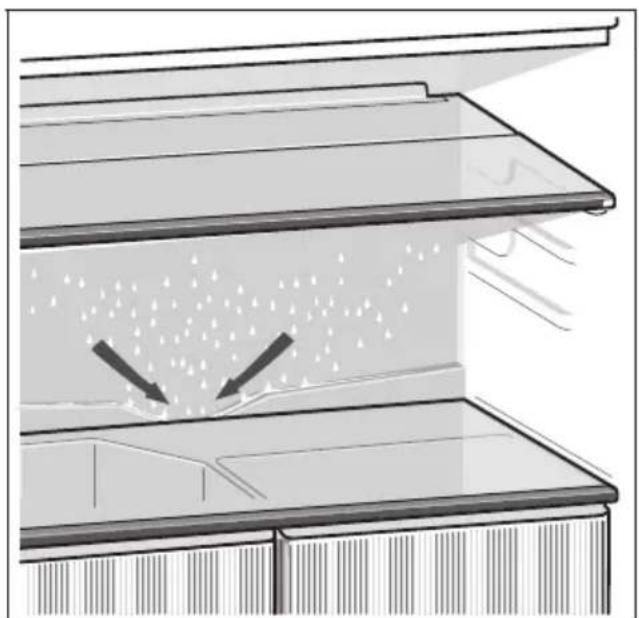
Note
Regularly clean condensation channels and drainage hole, Fig. 12, with cotton buds, etc. so that the condensation can runout.
Door shelves can be removed for cleaning. Fig. 13
Tipsforsavingenergy
- Install the appliance in a dry, well ventilated room! but not in direct sunlight and not near a heat source (e.g. radiator, cooker, etc.). If required, use an insulating plate.
- Allow warm food and drinks to cool down before placing in the appliance!
- When thawing frozen products, place them in the refrigerator. The low temperature of the frozen products cools the food in the refrigerator.
- Open and close the door as briefly as possible.
- Occasionally clean the rear of the appliance with a vacuum cleaner or paint brush to prevent an increased power consumption.
Operatingnoises
Quitenormalnoises
Humming - refrigeration unit is running.
Bubbling, gurgling or whirring noises—refrigerant is flowing through the tubing.
Clicking – motor is switching on or off.
Preventingnoises
Theapplianceisnotlevel
Please align the appliance with a spirit level. Use the height-adjustable feet or place packing underneath them.
The appliance is not free-standing
Please move the appliance away from adjacent furniture or appliances.
Drawersorstorageareaswobbleor stick
Please check the removable parts and re-insert them if required.
Bottlesorreceptaclesaretouching eachother
Move the bottles or receptacles slightly away from each other.
Eliminatingminorfaultsyourself
Beforeyoucallcustomerservice:
Please check whether you can eliminate the fault yourself based on the following information.
Customer service will charge you for advice, even if the appliance is still under guarantee!
| Fault | PossiblecauseRemedialaction | |
| Temperaturediffers greatlyfromtheset value. | Insomecasesitisadequatetoswitchoffthe appliancefor5minutes.Ifthetemperatureistoohigh,waitafew hoursandcheckwhetherthetemperature hasapproachedthesetvalue.Ifthetemperatureistoolow,checkthe temperatureagainthenextday. | |
| Interiorlightdoesnot work. | The bulb is defective. | Change the bulb. Fig. 14/B1.Pulloutthemainsplugordisconnectthe fuse.2.Slidecovergrilleforwardsandremove.3.Changethebulb;replacementbulb, 220–240 Va.c.,E14lampholder,see defectivebulbforwattage.(Attention! Kryptonbulbavailablefromcustomer serviceonly.)InthecaseofhalogenlampsReplacementbulbareavailablefrom customerservice.Incandescentlight bulbs(max.25 watts)canalsobeused. |
| Lightswitchisjammed. Fig. 14/A | Checkwhetheritcanbemoved. | |
| Thefrozenfoodisfrozen solid. | Loosenfrozenfoodwithabluntobject. Donotuseaknifeorpointedobject.You coulddamagetherefrigeranttubingorthe plasticsurface. | |
| Thereisathicklayer of frostinthefreezer compartment.Fault | Defrostingthefreezercompartment (see Defrosting).Alwaysensurethatthe freezercompartmentdoorisclosedproperly. Freezercompartmentdoormust“click”shut.RemedialactionPossiblecause | |
| Flooroftherefrigerator compartmentiswet. | Thecondensationoutletis blocked.Fig. 12 | Cleanthecondensationchannelandthe drainagepipe(see“Cleaningtheappliance”) |
| Thetemperatureinthe refrigerator compartmentistoocold. | Thefreezercompartment doorhasnotbeenclosed properly. | Closethefreezercompartmentdoor.Freezer compartmentdoormust“click”shut. |
| Temperaturehasbeenset toolow. | Increasethetemperature. | |
| Iflargequantitiesoffresh foodarebeingfrozen,the temperatureinthe refrigeratorcompartment dropstemporarily,asthe refrigerationunitrunsfora longtime. | Donotexceedmax.freezingcapacity. | |
| Therefrigerationunitis switchingonmore frequentlyandforlonger. | Appliancedooropened frequently; | Donotopenthedorunnecessarily. |
| Largequantitiesoffresh foodarebeingfrozen. | Donotexceedmax.freezingcapacity. | |
| Theventilationopenings havebeencovered. | Removeobstacles. | |
| Temperaturedisplay lampflashes.Fig. 5/3 | Appliancedooropened frequently. | Donotopenthedorunnecessarily. |
| Alotoffoodwasplacedin thefreezer. | ||
| Theventilationopenings havebeencovered. | Removeobstacles. | |
| Refrigeratorhasno coolingcapacity. | Theappliancemainswitch hasnotbeenswitchedon. | Presstheappliancemainswitch. |
| Powerfailure;thefusehas beenswitchedoff;the mainsplughasnotbeen insertedproperly. | Checkwhetherthepowerison,checkthe fuses. | |
| Theinteriorlightglows atareducedluminosity whenthedoorisalmost closed(orlightswitch depressed). | Ambienttemperatureis below20 °Corsuper freezinghasbeen switchedon.Notafault! | Theinteriorlightgoesoutagainatambient temperaturesabove20°Coraftersuper freezinghasbeenswitchedoff. |
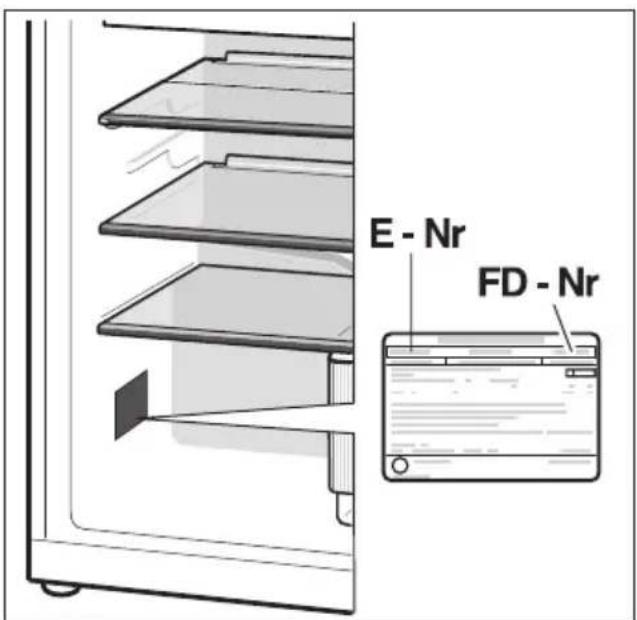
Customerservice
Your local customer service can be found in the telephone directory or in the customer-service index. Please provide customer service with the appliance product number (E-Nr.) and production number(FD).
These specifications can be found on the rating plate. Fig. 15
To prevent unnecessary call-outs, please assist customer service by quoting the product and production numbers. This will save you additional costs.
1
2
4
5

6
natural_image
Line drawing of a refrigerator interior showing storage compartments and door handle (no text or symbols)7
natural_image
Illustration of a hand inserting a card into a refrigerator (no text or symbols)8
natural_image
Illustration of a wine bottle being placed on a shelf with an open bag, no text or symbols present9
natural_image
Illustration of a container with two bottles and a side clip, no text or symbols present10
natural_image
Illustration of a wine bottle on a shelf with a plastic bag attached (no text or symbols)11
natural_image
Diagram of a multi-level storage or cleaning system with arrows indicating flow or particle movement (no text or symbols present)12
natural_image
Diagram of a multi-level mechanical or architectural component with directional arrows indicating movement or force (no text or symbols present)13
14
15
Siemens-Electrogeräte GmbH Carl-Wery-Str. 34, 81739 München
©Siemens-ElectrogeräteGmbH.
www.siemens-homeappliances.com 9000 681 131 (9106)
