VTC2940NB - Odkurzacz LG - Bezpłatna instrukcja obsługi
Znajdź bezpłatnie instrukcję urządzenia VTC2940NB LG w formacie PDF.

Pytania użytkowników dotyczące VTC2940NB LG
0 pytanie dotyczące tego urządzenia. Odpowiedz na te, które znasz, lub zadaj własne.
Zadaj nowe pytanie dotyczące tego urządzenia
Pobierz instrukcję dla swojego Odkurzacz w formacie PDF za darmo! Znajdź swoją instrukcję VTC2940NB - LG i weź swoje urządzenie elektroniczne z powrotem w ręce. Na tej stronie opublikowane są wszystkie dokumenty niezbędne do korzystania z urządzenia. VTC2940NB marki LG.
INSTRUKCJA OBSŁUGI VTC2940NB LG

LG

natural_image
Line drawing of a vacuum cleaner device with no text or symbolsV-C2940NB/ND
V-C2940RB/RD/RT
V-C2950RDB/RDR

text_image
V-C2940NB/ND V-C2940RB/RD V-C2950RDB/F
text_image
Technical diagram of a vacuum cleaner with numbered parts and exploded view, including handlebars, spray hook, and air purifier.
text_image
Technical diagram of a vacuum cleaner with labeled parts 1, 2, and 3
text_image
Diagram illustrating a mechanical or electrical component being twisted with labeled parts 4 and 5, showing rotational motion.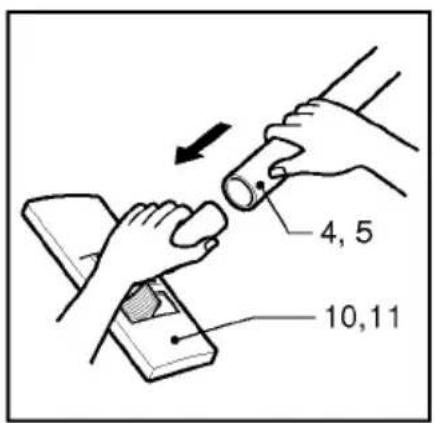
text_image
4, 5 10, 11
text_image
10 11 12
text_image
14
text_image
15 16
text_image
18 17
text_image
22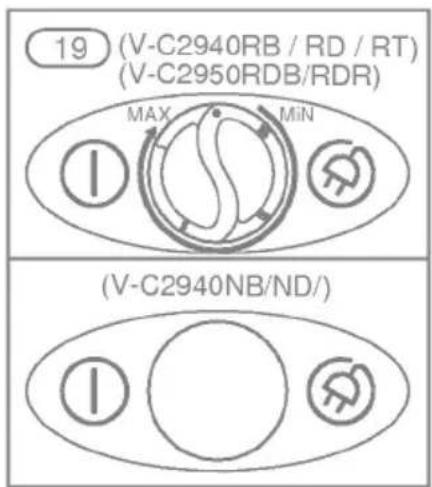
text_image
19 (V-C2940RB / RD / RT) (V-C2950RDB/RDR) MAX MIN (V-C2940NB/ND/)
text_image
20 21
text_image
27
text_image
23 24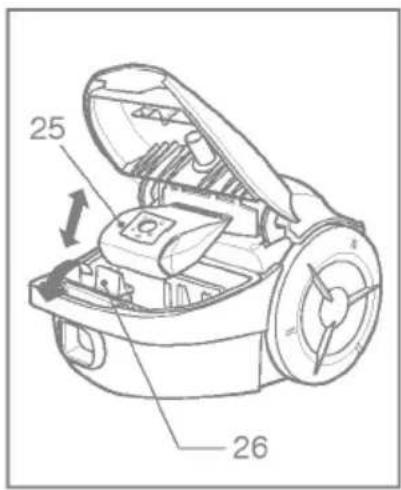
text_image
25 26
text_image
27
natural_image
Line drawing of a hand holding a small mechanical component with a circular hole, no text or symbols present
text_image
29
natural_image
Diagram of a remote control device with labeled parts and a dimension line (30), showing internal components without any text or symbols.Information for your safety
Please read all the following information, which contains important instructions for the safety, the use and the maintenance of the appliance.
This appliance complies with the following EC Directives: -73/23/EEC, 93/68/EEC-Low Voltage Directive-89/336EEC -EMC Directive.
♦ Never allow children to use the appliance unsupervised.
Do not use the appliance If the mains lead is damaged or faulty.
If the mains lead is damaged, it must be replaced by an approved LG Electronics Service Agent in order to avoid a hazard.
◆ Always switch the vacuum cleaner off before :
- changing the dust bag
- changing or cleaning the filters.
If no dustbag is inserted, the cover cannot be closed. Please do not use force!
Do not vacuum flammable or explosive substances(liquids or gases).
Do not vacuum hot ash, embers etc. nor sharp objects.
♦ Do not vacuum water or other liquids.
When you vacuum with an attachment appliance that has a rotating brush roller:
- do not reach into the running brush roller.
WARNING! Should it become necessary to replace the moulded on plug then the detective plug should be destroyed to avoid any possible shock hazard that could occur should such a plug be inserted into a 13 amp socket elsewhere in the house.
How to Use
Connecting the flexible hose
Push the end of the head (1) on the flexible hose (2) into the attachment point on the vacuum cleaner.
To remove the flexible hose from the vacuum cleaner, press on the button (3) situated on the head, then pull upwards.
Assembling the tubes
(depending on model)
- Plastic (4) or metal (5) tube.
- Fit together the two tubes by twisting slightly.
• Telescopic tube (6)
- Push spring latch (7) forward.
- Pull out tube to required length.
- Release spring latch to lock.
• Telescopic tube (8)
- Release locking knob (9) (turn clockwise).
- Pull out tube to required length.
- Turn locking knob anti-clockwise as far as it will go.
Using the cleaning head and Accessory Nozzles (depending on model) Fit the large cleaning head onto the end of the tube.
- The 2 position head (10) is equipped with a pedal (11) which allows you to alter its position according to the type of floor to be cleaned. Hard floor position(tiles, parquet floors...). Press on the pedal to lower the brush.Carpet or rug position. Press on the pedal to lift the brush up.
- If your appliance is equipped with an automatic cleaning head (12) without pedal, it automatically adapts to the type of floor to be cleaned.
The accessories compartment contains accessory (13).
- Crevice Tool (14)
For vacuuming in those normally inaccessible places i.e. reaching cobwebs, or down the side of a sofa!
• Upholstery Nozzle (15)
For vacuuming upholstery, mattresses, etc. The thread collectors help to pick up the threads and fluff.(option)
• Dusting brush (16)
For vacuuming picture frames furniture outlines, books and other uneven objects. (option)
How to plug in and use
Pull out the mains lead to the desired length and plug into the socket.
Press button (17) to start the vacuum cleaner. To stop it press the button (17) again.
Adjusting the power level
(depending on model)
- Suction capacity increases steplessly up to MAX.(19)
- The flexible hose handle (20) has a manual air flow regulator (21) which allows you to briefly reduce the suction level.
Carrying and storage
When you have switched off and unplugged the appliance, press on the button (18) to automatically rewind the cord.
- Use stowage clip as shown when storing the cleaner (22).
Changing the dust bag
The dustbag needs changing when the cleaner is set to maximum power and the cleaner head is off the floor but the "bag full" indicator window (23) is completely coloured red.
Even if the dustbag does not appear to be full at this stage, it should be changed.
It could be that a great deal of very fine dust has clogged up the pores of the dust bag.
- Turn off the appliance and unplug it.
- Remove hose.
- Open the cover (24)
Your appliance is equipped with either a paper dust bag or a fabric dust bag (25) (depending on model)
- Push the lever forwards in the direction of the arrow (26), and pull off the full paper filter bag towards the rear. Remove the bag and throw it away.
- Insert the new paper filter bag into the unit with the arrow pointing downwards (27).
If your appliance is fitted with a fabric dust bag follow the same instructions as above.
Empty it and reuse it (28). Wash it periodically. Note: as the appliance is fitted with a safety device which checks that the bag is in place you cannot close the lid if the bag is not fitted correctly.
Cleaning the motor filter
The motor filter is situated inside the appliance between the dust bag and the motor. Each time that you change the air outlet filter we advise you to remove the motor filter (29) and to clean it by tapping to remover the dirt and then replacing it in the vacuum cleaner.
Cleaning the exhaust filter (30)
- Check the exhaust filter occasion-ally and clean when dirty.
• Unplug cord from outlet. - Open the exhaust cover and remove exhaust filter as shown.
- Next procedures are the same as the moter safety filter.
What to do if your appliance does not work
Check that the appliance is correctly plugged in and that the electrical socket is working.
What to do when the suction performance reduces?
- Stop the appliance and unplug it.
- Check that the tubes, flexible hose and cleaning tool are not blocked.
- Check that the dust bag is not full. Replace if necessary.