48-22-9419 - Młotek MILWAUKEE - Bezpłatna instrukcja obsługi
Znajdź bezpłatnie instrukcję urządzenia 48-22-9419 MILWAUKEE w formacie PDF.

| Typ produktu | Młotek |
| Marka | Milwaukee |
| Model | 48-22-9419 |
| Waga | Około 0,5 kg |
| Długość całkowita | Około 330 mm |
| Materiał główki | Stal hartowana |
| Materiał rękojeści | Guma antypoślizgowa z rdzeniem stalowym |
| Typ główki | Gładka (płaska) |
| Zastosowanie | Prace ciesielskie, stolarskie, ogólne budowlane |
| Funkcje dodatkowe | Ergonomiczny uchwyt, zrównoważona konstrukcja |
| Konserwacja | Czyścić suchą szmatką, przechowywać w suchym miejscu |
| Bezpieczeństwo | Używać okularów ochronnych, sprawdzać stan przed użyciem |
| Części zamienne | Rękojeść i główka dostępne w autoryzowanych serwisach |
| Gwarancja | Dożywotnia gwarancja producenta |
Często zadawane pytania - 48-22-9419 MILWAUKEE
Pytania użytkowników dotyczące 48-22-9419 MILWAUKEE
0 pytanie dotyczące tego urządzenia. Odpowiedz na te, które znasz, lub zadaj własne.
Zadaj nowe pytanie dotyczące tego urządzenia
Pobierz instrukcję dla swojego Młotek w formacie PDF za darmo! Znajdź swoją instrukcję 48-22-9419 - MILWAUKEE i weź swoje urządzenie elektroniczne z powrotem w ręce. Na tej stronie opublikowane są wszystkie dokumenty niezbędne do korzystania z urządzenia. 48-22-9419 marki MILWAUKEE.
INSTRUKCJA OBSŁUGI 48-22-9419 MILWAUKEE
Milwaukee®
SERVICEPARTSLIST
BULLETIN NO.
54-49-9419
| SPECIFY CATALOG NO. AND SERIAL NO. WHEN ORDERING PARTS | REVISED BULLETIN | DATEJuly 2018 |
| HICKORY HAMMERS | ||
| CAT. NO. 48-22-9419 Milled Face Hickory Hammer48-22-9519 Smooth Face Hickory Hammer | WIRING INSTRUCTION | |

EXAMPLE:
Component Parts (Small #) Are Included
When Ordering The Assembly (Large #).
natural_image
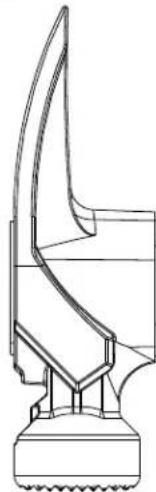
Technical line drawing of a mechanical component or bracket (no text or symbols)Model 48-22-9419
Shown with milled face
text_image
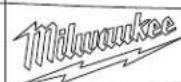
Technical diagram of a robotic arm with numbered components and a 5x5 grid for identification
natural_image
Technical line drawing of a robotic arm joint (no text or symbols)FIG. PART NO. DESCRIPTION OF PART NO. REQ.
1 Steel Wedge (2)
2 Wood Wedge (1)
3 ---- Hammer Head (Milled: 48-22-9419, Smooth: 48-22-9519) (1)
4 ---- Hickory Hammer Handle (1)
5 14-46-9419 Handle Replacement Kit (1)
text_image
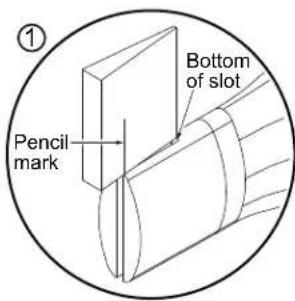
Pencil mark Bottom of slot
MILWAUKEE Hickory Replacement Instructions
USE CAUTION and Wear safety glasses when performing the following procedure.

- Before beginning, line up the wooden wedge with the slot in the top of the replacement handle. With a pencil, make a mark on the thick side of the wooden wedge where the top of the handle ends. This will allow you to see when the wooden wedge is fully inserted down into the handle slot. It is important not to exceed the slot depth with the wedge, as this can cause damage to the new handle.
- After cutting the old handle off below the head, turn the head over and punch the remaining handle material out from the top of the 'eye' of the hammer head. Insert slotted end of the new replacement handle into the bottom of the hammer head. Firmly tap the bottom of handle with a mallet or other hammer to tightly set the handle into eye of the head, but not so far as to 'peel' or cut into the wood of the handle at the bottom of the eye. Rely on the mechanical bond of the wood and steel wedges to make the head-to-handle connection strong.
-
Next place the thin tip of the wooden wedge into the slotted end of the handle that is protruding out of the top of the hammer head. It is normal for the wooden wedge to be wider than the slot and eye opening. Firmly tap the wooden wedge all the way to the pencil mark on wedge, so that the wedge is fully inserted in the handle slot. There should be approximately 1/2" of the wedge protruding past the end of the handle. DO NOT continue driving the wedge in any further.
-
After driving the wooden wedge in, trim off excess wedge and handle material as close to the top of the head as possible. USE CAUTION when cutting off excess material. Position the two steel wedges on trimmed end of handle and wood wedge to get an idea of spacing. Position the larger steel wedge to the wider front of the eye, and the smaller steel wedge to the back of the eye. When you have wedges evenly spaced in the eye, not in contact with the side of the eye, firmly tap the wedges in, one at a time completely flush with the trimmed surface.
- To keep the cut end of the handle from losing moisture and shrinking inside the hammer head, put a few drops of mineral or 'butcherblock' oil on the end grain to help retain the moisture content. This will prolong the service life of the handle.