48-22-3532 - Niekategoryzowane MILWAUKEE - Bezpłatna instrukcja obsługi
Znajdź bezpłatnie instrukcję urządzenia 48-22-3532 MILWAUKEE w formacie PDF.

Pytania użytkowników dotyczące 48-22-3532 MILWAUKEE
0 pytanie dotyczące tego urządzenia. Odpowiedz na te, które znasz, lub zadaj własne.
Zadaj nowe pytanie dotyczące tego urządzenia
Pobierz instrukcję dla swojego Niekategoryzowane w formacie PDF za darmo! Znajdź swoją instrukcję 48-22-3532 - MILWAUKEE i weź swoje urządzenie elektroniczne z powrotem w ręce. Na tej stronie opublikowane są wszystkie dokumenty niezbędne do korzystania z urządzenia. 48-22-3532 marki MILWAUKEE.
INSTRUKCJA OBSŁUGI 48-22-3532 MILWAUKEE
| SPECIFY CATALOG NO. AND SERIAL NO. WHEN ORDERING PARTS | REVISED BULLETIN | DATEApr. 2014 | |||
| TORQUE LOCKTM PLIERS / CLAMPS | |||||
| 48-22-3405 5" Curved Jaw | 48-22-3410 | 10" Curved Jaw | 48-22-3522 | 6" Swivel C-Clamp | |
| 48-22-3406 6" Long Nose | 48-22-3507 | 7" Straight Jaw | 48-22-3521 | 11"Swivel C-Clamp | |
| 48-22-3407 7" Curved Jaw | 48-22-3510 | 10" Straight Jaw | 48-22-3531 | 11" C-Clamp | |
| 48-22-3409 9" Long Nose | 48-22-3520 | 10" Curved Jaw | 48-22-3532 | 6" C-Clamp | |
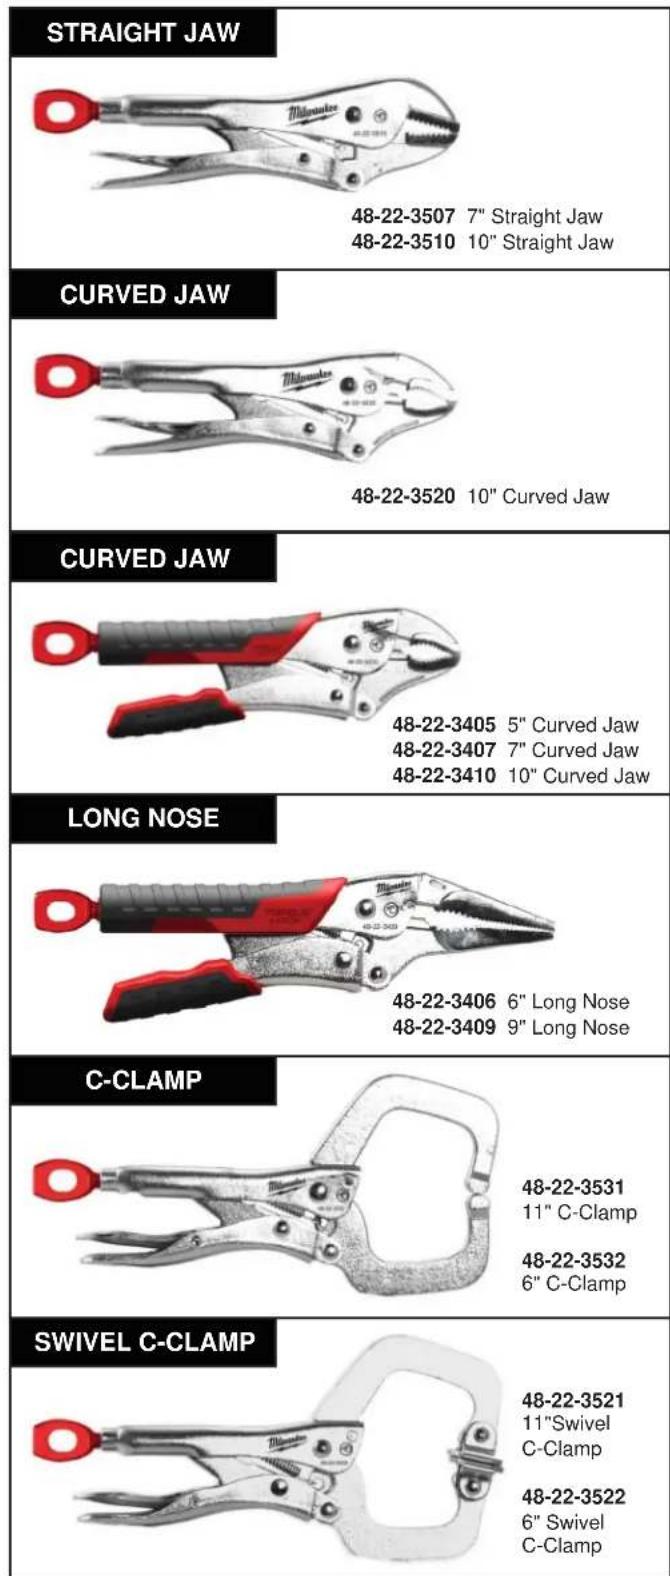
48-22-3507 7" Straight Jaw
48-22-3510 10" Straight Jaw
48-22-3520 10" Curved Jaw
48-22-3405 5" Curved Jaw
48-22-3407 7" Curved Jaw
48-22-3410 10" Curved Jaw
48-22-3406 6" Long Nose
48-22-3409 9" Long Nose
48-22-3531
11" C-Clamp
48-22-3532
6" C-Clamp
48-22-3521
11"Swivel
C-Clamp
48-22-3522
6" Swivel
C-Clamp
text_image
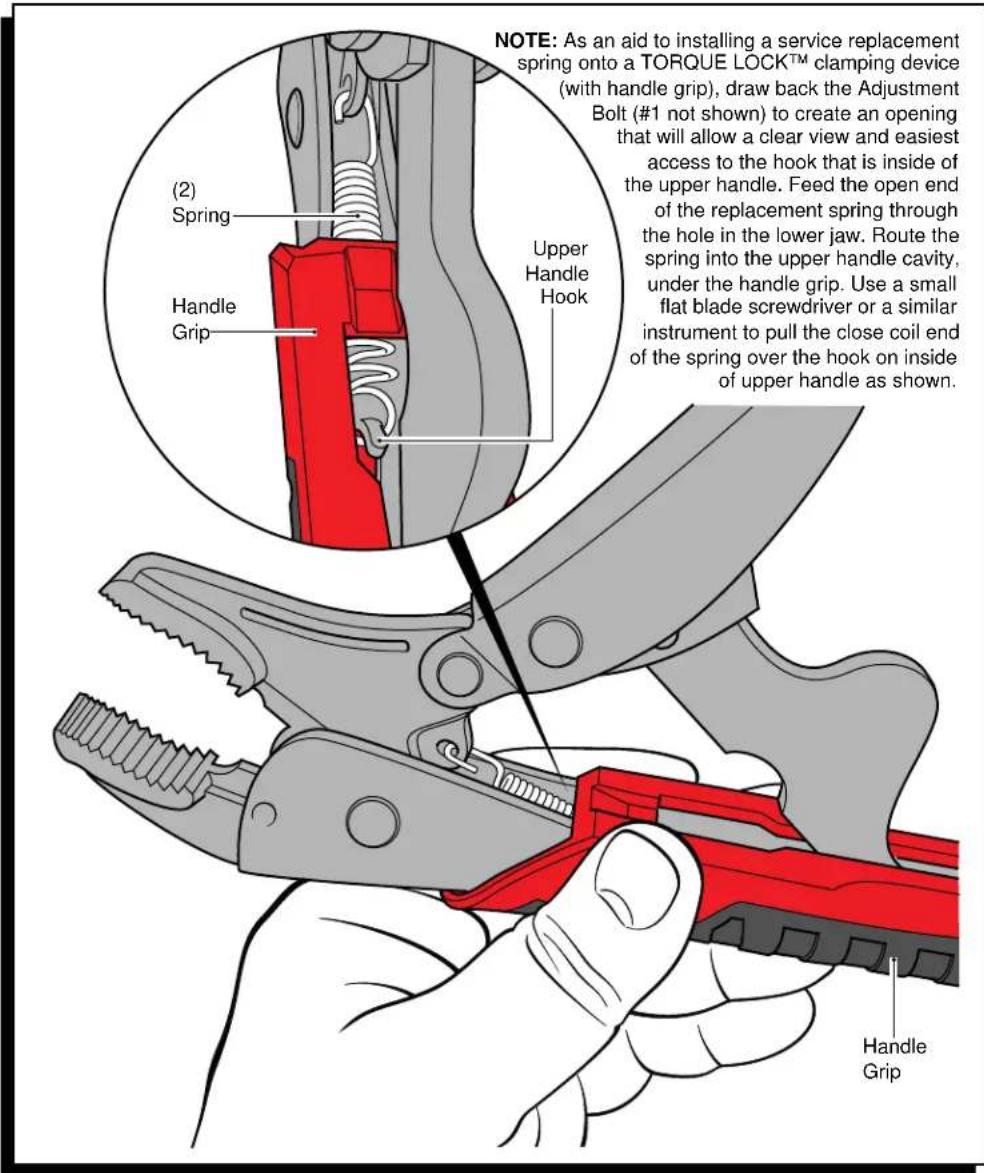
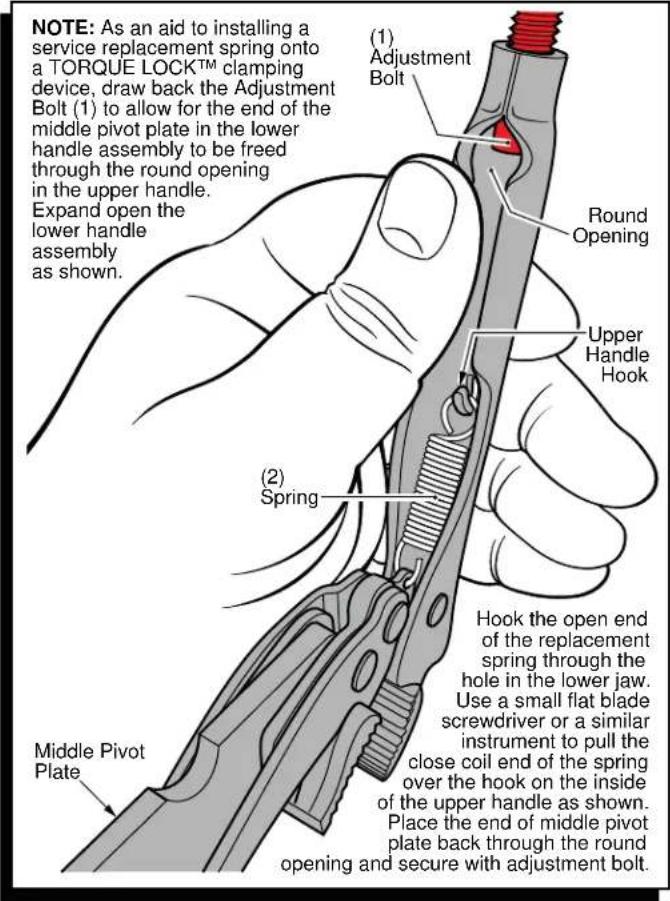
NOTE: As an aid to installing a service replacement spring onto a TORQUE LOCK™ clamping device, draw back the Adjustment Bolt (1) to allow for the end of the middle pivot plate in the lower handle assembly to be freed through the round opening in the upper handle. Expand open the lower handle assembly as shown. (1) Adjustment Bolt Round Opening Upper Handle Hook (2) Spring Middle Pivot Plate Hook the open end of the replacement spring through the hole in the lower jaw. Use a small flat blade screwdriver or a similar instrument to pull the close coil end of the spring over the hook on the inside of the upper handle as shown. Place the end of middle pivot plate back through the round opening and secure with adjustment bolt.Illustration above serves as an aid for the installation of a Spring Kit in a hand tool without handle grips. See page 2 for the illustration showing spring installation into a hand tool with handle grips.
| TOOL NO. | TOOL DESCRIPTION SPRING KIT ADJ. BOLT KIT | ||
| 48-22-3405 | 5" Curved Jaw 40-50-0935 | 06-14-0115 | |
| 48-22-3406 | 6" Long Nose | 40-50-0935 | 06-14-0115 |
| 48-22-3407 | 7" Curved Jaw 40-50-0940 | 06-14-0110 | |
| 48-22-3409 | 9" Long Nose 40-50-0940 | 06-14-0110 | |
| 48-22-3410 | 10" Curved Jaw 40-50-0945 | 06-14-0105 | |
| 48-22-3507 | 7" Straight Jaw 40-50-0940 | 06-14-0110 | |
| 48-22-3510 | 10" Straight Jaw | 40-50-0945 06 | 14-0105 |
| 48-22-3520 | 10" Curved Jaw 40-50-0945 | 06-14-0105 | |
| 48-22-3521 | 11" Swivel C-Clamp | 40-50-0945 | 06-14-0105 |
| 48-22-3522 | 6" Swivel C-Clamp | 40-50-0935 | 06-14-0115 |
| 48-22-3531 | 11" C-Clamp | 40-50-0945 | 06-14-0105 |
| 48-22-3532 | 6" C-Clamp | 40-50-0935 | 06-14-0115 |
MILWAUKEE TOOL • www.milwaukeetool.com
13135 W. LISBON RD., BROOKFIELD, WI 53005
Drwg. 1