
DVD-DX506 - Lecteur dvd SANYO - Notice d'utilisation et mode d'emploi gratuit
Retrouvez gratuitement la notice de l'appareil DVD-DX506 SANYO au format PDF.


| Type de produit | Lecteur DVD de salon |
| Marque | SANYO |
| Modèle | DVD-DX506 |
| Dimensions (L x H x P) | 430 x 38 x 258 mm |
| Poids net | 2,2 kg |
| Alimentation | 100-240 V~, 50/60 Hz, 12 W |
| Laser | Longueur d'onde 650 nm |
| Sorties vidéo | Composite, S-Vidéo, Composante (Y/Pb/Pr) |
| Sorties audio | Analogique (L/R), numérique coaxiale et optique |
| Formats de disques compatibles | DVD-Vidéo (région 1 ou ALL), DVD-R/RW, DVD+RW, CD-DA, CD-R/RW, MP3, JPEG, DivX (3.11, 4.x, 5.x, XviD, ISO-MPEG4) |
| Fonctions de lecture | Lecture normale, rapide, lente, image par image, répétition (chapitre/titre/disque), répétition A-B, zoom, recherche par temps/chapitre/titre |
| Fonctions karaoké | 2 entrées microphone, réglages niveau et écho, contrôle de tonalité |
| Fonctions spéciales | Multi-angle, multi-langue (audio et sous-titres), verrouillage parental, programmation de titres/chapitres, digest (sommaire) |
| Écran de veille | Oui : activation après 5 minutes d'arrêt, puis passage en veille après 1 heure |
| Accessoires fournis | Télécommande, piles AAA, câble audio/vidéo, manuel d'utilisation |
| Entretien et nettoyage | Nettoyer le boîtier avec un chiffon doux et un détergent neutre. Nettoyer les disques du centre vers l'extérieur. Ne pas utiliser de solvants. |
| Sécurité | Déconnecter l'appareil en cas d'orage ou de non-utilisation prolongée. Ne pas exposer à l'humidité. Ne pas ouvrir le boîtier (rayon laser). |
| Informations générales | Garantie d'un an au Canada (SANYO). Pour le service, contacter un dépositaire agréé. |
FOIRE AUX QUESTIONS - DVD-DX506 SANYO
Questions des utilisateurs sur DVD-DX506 SANYO
0 question sur cet appareil. Repondez a celles que vous connaissez ou posez la votre.
Poser une nouvelle question sur cet appareil
Téléchargez la notice de votre Lecteur dvd au format PDF gratuitement ! Retrouvez votre notice DVD-DX506 - SANYO et reprennez votre appareil électronique en main. Sur cette page sont publiés tous les documents nécessaires à l'utilisation de votre appareil DVD-DX506 de la marque SANYO.
MODE D'EMPLOI DVD-DX506 SANYO
INSTRUCTION MANUAL
DVD-DX506
DVD Player



Please Read This Manual.
Because DVD is a new technology, we recommend that you read this manual carefully before connecting your DVD video player and operating it for the first time. Keep this manual in a safe place for future reference.
IMPORTANT SAFETY PRECAUTIONS .... 2
FEATURES 5
ABOUT DISCS 6
BEFORE OPERATION 8
PREPARATIONS BEFORE OPERATION. 10
Front Panel 10
Rear Panel 11
VFD. 12
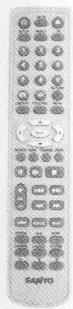
Names and Layout of Remote Controls 13
CONNECTIONS 14
BASIC OPERATIONS 15
Play Discs 15
System Setting. 16
V-Mode 16
Display 16
Fast Play 17
Slow Play 17
Pause/ Step. 17
Select Audio Language 18
Select Channels 18
Select 3D Audio 18
MICROPHONE CONTROL 19
Microphone Set up 19
Tone Control 20
PLAYING A DESIRED SCENE 21
To skip scenes in a disc 21
Directly moving to a desired title (DVD/VCD). 21
Playing a disc containing MP3 files 22
Repeat Play 22
Repeating a defined period from A to B (DVD) .. 23
Select a Subtitle Language 23
Searching. 24
PLAY DISCS IN VARIOUS WAYS. 25
Select Angle 25
Zoom Play 25
Book Mark 25
Program Play (DVD) 26
Program Play (VCD) 27
Digest Play (DVD) 28
Digest Play (VCD) 29
Digest Play (CD) 29
Playing DivX disc on CD-R(W) 30
Play MP3, JPEG or PICTURE CD 31
FUNCTION SETTING 32
Menu Setting 32
Language 34
Video 35
Audio 36
Preference 38
OTHERS 39
Troubleshooting 39
Technical Specifications 40
IMPORTANT SAFETY PRECAUTIONS

CAUTION
RISK OF ELECTRIC SHOCK DO NOT OPEN

CAUTION: TO REDUCE THE RISK OF ELECTRIC SHOCK, DO NOT REMOVE COVER (OR BACK). NO USER-SERVICEABLE PARTS INSIDE. REFER SERVICING TO QUALIFIED SERVICE PERSONNEL.


The lightning flash with arrowhead symbol, within an equilateral triangle, is intended to alert the user to the presence of uninsulated "dangerous voltage" within the product's enclosure that may be of sufficient magnitude to constitute a risk of electric shock.
The exclamation point within an equilateral triangle is intended to alert the user to the presence of important operating and servicing instructions in the literature accompanying the appliance.
WARNING : TO REDUCE THE RISK OF FIRE OR ELECTRIC SHOCK, DO NOT EXPOSE THIS APPLIANCE TO RAIN OR MOISTURE.
CAUTION : TO PREVENT ELECTRIC SHOCK, MATCH WIDE BLADE OF PLUG TO WIDE SLOT, FULLY INSERT.
IMPORTANT FOR LASER PRODUCTS
- LASER: This Digital Video Disc Player employs a Laser System. To ensure proper use of this product please read this owner's manual carefully and retain for future reference. Should the unit require maintenance, contact an authorized service location - see service procedure.
Use of control adjustments or the performance of procedures other than those specified may result in hazardous radiation exposure.
To prevent direct exposure to the laser beam, do not try to open the enclosure. Visible laser radiation when open and interlocks defeated.
DO NOT STARE INTO THE BEAM.

DANGER:Visible laser radiation when open and interlock failed or defeated. Avoid direct exposure to beam.
- CAUTION: Do not open the top cover. There are no user serviceable parts inside the Unit; leave all servicing to qualified service personnel.
CAUTION: Any changes or modification in construction of this device which are not expressly approved by the party responsible for compliance could void the user's authority to operate the equipment.
ATTENTION: KEEPING THE STATUS OF STOP MORE THAN 5 MINUTES ENTERS SCREEN SAVE MODE. WHEN THE SCREEN SAVE MODE IS KEPT MORE THAN AN HOUR, THE SET ENTERS STAND-BY MODE.
CAUTION: Apparatus shall not be exposed to dripping or splashing and no objects filled with liquids, such as vases, shall be placed on the apparatus.
This set has been designed and manufactured to assure personal safety. Improper use can result in electric shock or fire hazard. The safeguards incorporated in this unit will protect you if you observe the following procedures for installation, use and servicing. This unit is fully transistorized and does not contain any parts that can be repaired by the user.
1 READ INSTRUCTIONS
All the safety and operating instructions should be read before the unit is operated.
2 RETAIN INSTRUCTIONS
The safety and operating instructions should be retained for future reference.
3 HEED WARNINGS
All warnings on the unit and in the operating instructions should be adhered to.
4 FOLLOW INSTRUCTIONS
All operating and use instructions should be followed.
5 CLEANING
Unplug this unit from the wall outlet before cleaning. Do not use liquid cleaners or aerosol cleaners. Use a damp cloth for cleaning.
6 ATTACHMENTS/ACCESSORIES
Do not use attachments unless recommended by the unit's manufacturer as they may cause hazards.
Caution: Apparatus shall not be exposed to dripping or splashing and no objects filled with liquids, such as vases, shall be placed on the apparatus.
7 WATER AND MOISTURE
Do not use this unit near water- for example, near a bath tub, wash bowl, kitchen sink or laundry tub, in a wet basement, or near a swimming pool.
8 PLACEMENT
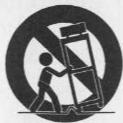
Do not place this unit on an unstable cart, stand, tripod, bracket, or table. The unit may fall, causing serious injury to a child or adult as well as serious damage to the unit. Use this
unit only with a cart, stand, tripod, bracket, or table recommended by the manufacturer.
PORTABLE CART WARNING (symbol provided by RETAC)
8A
A unit and cart combination
should be moved with care. Quick stops, excessive force, and uneven surfaces may cause the video product and cart combination to overturn.
9 VENTILATION
Slots and openings in the case are provided for ventilation to ensure reliable operation of the unit and to protect it from overheating. These openings must not be blocked or covered. These openings must not be blocked by placing the unit on a bed, sofa, rug, or other similar surface. This unit should never be placed near or over a radiator or heat radiator. This unit should not be placed in a built-in installation such as a bookcase or rack unless proper ventilation is provided or the manufacturer's instructions have been adhered to.
10 POWER SOURCES
This unit should be operated-only from the type of power source indicated on the marking label. If you are not sure of the type of power supply to your home, consult
your video dealer or local power company. For units intended to operate from battery power, or other sources, refer to the operating instructions.
11 GROUNDING OR POLARIZATION
This unit is equipped with a polarized alternating - current line plug (a plug having one blade wider than the other). This plug will fit into the power outlet only one way.
This is a safety feature. If you are unable to insert the plug fully into the outlet, try reversing the plug. If the plug still fails to fit, contact your electrician to replace your obsolete outlet. To prevent electric shock, do not use this polarized plug with an extension cord, receptacle, or other outlet unless the blades can be fully inserted without blade exposure. If you need an extension cord, use a polarized cord.
12 POWER-CORD PROTECTION
Power-supply cords should be routed so that they are not likely to be walked on or pinched by items placed upon or against them, paying particular attention to cords at plugs and the point where they exit from the unit.
13 LIGHTNING
For added protection for this unit during a lightning storm, or when it is left unattended and unused for long periods of time, unplug it from the wall outlet and disconnect the antenna or cable system.
This will prevent damage to the unit due to lightning and power line surges.
14 DISC TRAY
Keep your fingers well clear of the disc as it is closing. It may cause serious personal injury.
15 OVERLOADING
Do not overload wall outlets or extension cords as this can result in a risk of fire or electric shock.
16 OBJECT AND LIQUID ENTRY
Never press objects of any kind into this unit through openings as they may touch dangerous voltage points or "short-out" parts that could result in a fire or electric shock. Never spill liquid of any kind on the unit.
17 BURDEN
Do not place a heavy object on or step on the product. The object may fall, causing serious personal injury and serious damage to the product.
18 DISC
Do not use a cracked, deformed or repaired disc. These discs are easily broken and may cause serious personal injury and product malfunction.
19 SERVICING
Do not attempt to service this unit yourself as opening or removing covers may expose you to dangerous voltage or other hazards. Refer all servicing to qualified service personnel.
20 DAMAGE REQUIRING SERVICE
Unplug this unit from the wall outlet and refer servicing to qualified service personnel under the following conditions.
A. When the power-supply cord or plug is damaged.
B. If liquid has been spilled, or objects have fallen into the unit.
C. If the unit has been exposed to rain or water.
D. If the unit does not operate normally by following the operating instructions. Adjust only those controls that are covered by the operating instructions. Improper adjustment of other controls may result in damage and will often require extensive work by a qualified technician to restore the unit to its normal operation.
E. If the product has been dropped or the cabinet has been damaged.
F. When the unit exhibits a distinct change in performance this indicates a need for service.
21 REPLACEMENT PARTS
When replacement parts are required, have the service technician verify that the replacements he uses have the same safety characteristics as the original parts. Use of replacements specified by the unit manufacturer can prevent fire, electric shock, or other hazards.
22 SAFETY CHECK
Upon completion of any service or repairs to this unit, ask the service technician to perform safety checks recommended by the manufacturer to determine that the unit is in safe operating condition.
23 WALL OR CEILING MOUNTING
The product should be mounted to a wall or ceiling only as recommended by the manufacturer.
24 HEAT
The product should be situated away from heat sources such as radiators, heat registers, stoves, or other products (including amplifiers) that produce heat.
FCC NOTICE :
This equipment has been tested and found to comply with the limits for a Class B digital device, pursuant to part 15 of the FCC Rule. These limits are designed to provide reasonable protection against harmful interference in a residential installation. This equipment generates, uses and can radiate radio frequency energy and if not installed and used in accordance with the instructions, may cause harmful interference to radio communications. However, there is no guarantee that interference will not occur in a particular installation. If this equipment does cause harmful interference to radio or television reception; which can be determined by turning the equipment off and on, the user is encouraged to try to correct the interference by one or more of the following measures:
- Reorientate or relocate the receiving antenna.
- Increase the separation between the equipment and receiver.
- Connect the equipment to an outlet on a circuit different from that to which the receiver is connected.
- Consult the dealer or an experience radio/TV technical for help.
Thank you for choosing SANYO. Please read this manual carefully to obtain maximum benefits from your product.
OUTSTANDING SOUND QUALITY
Dolby Digital DOOLBY system developed by Dolby Laboratories and DTS developed by DTS Inc., features high quality surround sound which can be played in DVD or CD disc at home, to reproduce high quality sound effects.
HIGHDEFINITION
The unit adopts MPEG2 coding format and good high horizontal resolution.
SPECIAL FUNCTIONS
Multi-angle and multi-language bring additional functions. Parent lock makes it easy to control the content of discs.
SCREEN
Regular 4:3 screen and wide screen (16:9) are available.
COMPATIBILITY
The unit can play DVD-video discs, and is compatible with CD, CD-G, CD-R, CD-RW, PIC-CD, MP3, DVD-R, DVD-RW, DVD+RW.
ZOOM
It can enlarge pictures.
MULTI-FUNCTIONS
Fast forward, fast reverse, forward and reverse slow, frame play, repeat play and program play.
TIME SEARCH
It can search a specific part on a disc, especially good for watching movies.
RESUME PLAY
It can memorize the position where the disc is stopped and resume playback.
VIDEO OUTPUT
Standard video, S-video, component (progressive, interlace) video output mode.
AUDIO OUTPUT
Analog audio output, coaxial and optical digital audio output, can be connected with the appropriate amplifier to enjoy high-quality sound.
KARAOKE
Sing along with the music! Microphone input, KARAOKE channel selection.
PLAYABLE DISCS
| DVD-video | Region number 1 or Region number ALL |
| DVD-R/+R | DVD video |
| DVD-RW/+RW | DVD video |
| DVD-ROM | DVD video |
| CD-G | Playback audio/ graphic files |
| CD-DA | Digital audio files |
| CD-R/ CD-RW | Digital audio/ MP3/ JPEG format files |
| CD-DA/JPEG/MP3 | Total disc capacity : over 4M, Each file : under 1M |
| CD-ROM | Digital audio/ MP3/ JPEG format files |
NONE PLAYABLE DISCS
| DVD-video | Different region number |
| DVD-ROM | Files for PC application / Data files |
| CD-ROM | Files for PC application / Data files |
| CD-MP3 | Files under windows format |
| DVD-RAM | All format |

STRUCTURE OF DVD
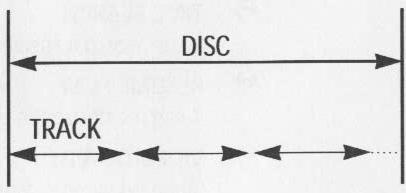
STRUCTURE OF CD
TITLE
The images or music of a DVD are divided into some units, among which title is the biggest one.
When playing a DVD, the movie is the title.
When playing a CD, the combined tracks make up the title.
CHAPTER
It is smaller than title among the units of a DVD. A title is made up of several chapters, and each chapter has a number for search. But some discs may not have numbered chapters.
TRACK
In a CD, each track has a number to enable search functions.
SCENE
The menu pictures, motion and motionless pictures of a CD can be divided into some parts, these parts are scenes. Each scene has a number for search.
REGION MANAGEMENT INFORMATION
This unit is designed and manufactured to respond to the Region Management information that is recorded on a DVD disc. The region number of this player is "1". If the region number described on the DVD discs does not correspond to the Region number of this player, the player will not play this disc. This player will play DVD discs made for "ALL" regions. Therefore, this player will play DVD discs marked with labels containing the region number "1" or "ALL".

(Region 1)

(Region ALL)
MACROVISION
This product incorporates copyright protection technology that is protected by U.S patents and other intellectual property rights. Use of this copyright protection technology must be authorized by Macrovision, and is intended for home and other limited viewing uses only unless otherwise authorized by Macrovision. Reverse engineering or disassembly is prohibited.
SECURITY
- Before operation, check if the voltage of the unit is in line with the local voltage.
- Hold the plug to disconnect it from the mains outlet. Do not pull the power cord.
- When the plug of the unit is connected to the mains outlet, the unit will be still connected to AC even if the power is turned off.
- Disconnect the plug as soon as liquid or objects enter the unit. The unit can not be used until being checked by experts.
- Do not open the cabinet as laser rays employed by the unit may damage eyes. Any servicing should be done by qualified service personnel.
PLACEMENT
- Put the unit where ventilation is good enough to prevent overheating.
- Never put the unit in direct sunlight or near heat sources.
- Put the unit horizontally, never put any heavy object on the unit.
- To protect the pickup, do not put the unit where there is dust. If there is dust on the pickup, use a cleaning disc to clean it. Paying particular attention to the operating instructions of the cleaning disc.
CONDENSATION
Moisture will appear on the pickup lens in the following cases:
- The unit is suddenly moved from a cold place to a warm place.
- The unit is put in a room with a heater, or in cold air from an air-conditioner.
- Using the unit in a humid place. In these cases, the unit can not work. Unload the disc and leave the unit on for about one hour to evaporate the moisture.
CLEANING
- Use a soft cloth with a little neutral detergent to wipe the cabinet, panel and controls.
Never use abrasive paper, polishing powder, solvent like alcohol or gasoline.
HANDLING DISC
- To keep the disc clean, do not touch the playsides of the disc.
- Do not attach paper or tape to the disc.
- Keep the disc away from direct sunlight or heat sources.
- Store the disc in a disc case after playback.
CLEANING DISC
- Before playback, wipe the disc outward from the centre with clean cloth.
- Do not use any type of solvent such as thinner, benzine, commercially available cleaners or antistatic spray.
CHECK ACCESSORIES
Check if you have all the accessories after the carton is opened.
| Remote control | AAA batteries | Video/Audio cord | Instruction manual |
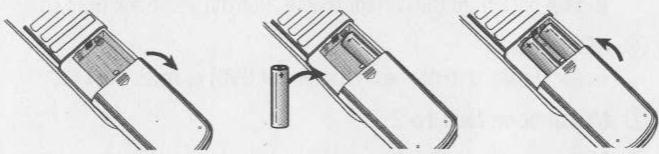
USE REMOTE CONTROL
1 Open the battery compartment.
2 Insert two AAA batteries, make sure to match "+" and "-" of the batteries to the marks in the battery compartment.
3 Close the battery compartment.
4 Point the remote control at the remote sensor.

Note:
- Batteries can last for about 6 months generally. Change the batteries of that does not work.
- If the remote control is not used for a long time, remove the batteries to prevent battery leakage.
FRONT PANEL

① STANDBY/ON button
To switch the unit On or Off when connected to AC power outlet
② OPEN/CLOSE button
To open or close the disc tray.
③ PLAY button
To play the loaded disc. Press this button to go to the preferred item when the menu is displayed on the TV screen.
④ STOP
⑤ PREV button
To skip back from the current chapter (for DVD) or track (for CD).
⑥ NEXT button
To skip forward to the next chapter (for DVD) or track (for CD).
⑦ Microphone Jack 1&2
⑧ Microphone Level adjustment knob.
⑨ Microphone Echo adjustment knob.
10 DISPLAY
Displays operation status
11 REMOTE SENSOR
Receives a light signal from the remote control.
REAR PANEL
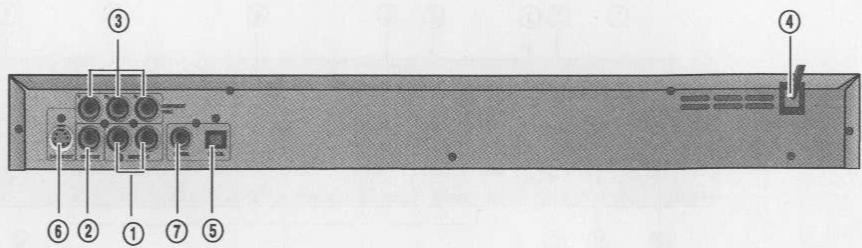
① AUDIO OUT (L/R TRACK)
Two phono sockets for analogue 2 Channel audio in order to a TV or stereo amplifier.
②VIDEO OUT
Connects composite video signal to input AV or PHONO sockets of TV or monitor to achieve high fidelity colour reproduction.
③ COMPONENT (Y.Pb.Pr)
Connects to TV or monitor equipped with Component input. In order to achieve a sharper and cleaner picture than when connected via VIDEO OUT (composite video).
④ POWER SUPPLY SOCKET WIRE
Creates POWER between wall outlet and the unit.
⑤ DIGITAL AUDIO OPTICAL OUT
Connects digital audio under play mode into an AV amplifier or a receiver equipped with digital audio decoder for you to enjoy the theatre-quality sound in your home.
⑥ S-VIDEO OUTPUT
Connects to TV or monitor equipped with S-VIDEO input. In order to achieve a sharper and cleaner picture than when connected via VIDEO OUT (composite video).
⑦ DIGITAL AUDIO COAXIAL OUT
Connects digital audio under play mode into an AV amplifier or a receiver equipped with digital audio decoder for you to enjoy the theatre-quality sound in your home.
VFD
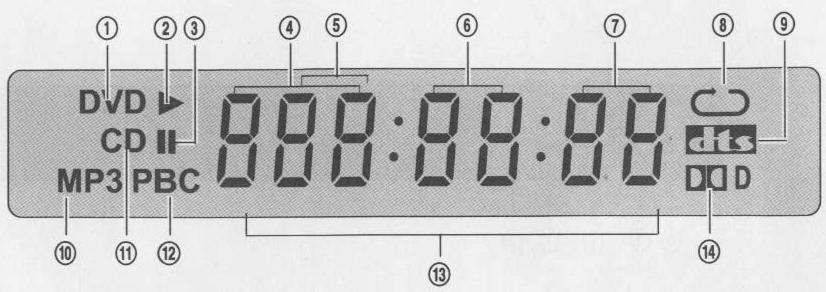
① Recognized DISC TYPE indicator : DVD
② PLAY indicator
③ PAUSE indicator
④ DVD/CD/MP3indicator Indicates the title, chapter or track number.
⑤ DVD/CD/MP3 indicator Indicates the hour.
^ 6 DVD/CD/MP3 indicator Indicates the minutes.
⑦ DVD/CD/MP3 indicator Indicates the seconds.
REPEAT MODE indicator : In case you want to repeat and play a chapter, track, title or disc.
DVD AUDIO STREAM indicator :dtsdigital out
10 Recognized DISC TYPE indicator : MP3
1 Recognized DISC TYPE indicator : CD
PBC indicator
This indicator is lit up in selecting PBC ON while this indicator disappears in selecting PBC OFF.
13 NUMBER/CHARACTERindicator
Chapter, track number, and time are displayed in loading DVD/CD disc, while track number and time are displayed in loading MP3.
OPEN:Tray is opened
CLOSE:Tray is closed
LORD:Discisloaded
nD:There is no disc in tray
Err or : Disc has some error
14 DVD AUDIO STREAM indicator Indicates the audio type of the disc under playing is DOLBY DIGITAL.
NAMES AND LAYOUT OF REMOTE CONTROLS
- After setting the mode by using SETUP menu (for example, NTSC select in NTSC/PAL/AUTO setup), the setting is kept though you switch the unit off and turn it on.

Turn off all equipment before operation.
The unit has many kinds of output modes like A/V output, S-VIDEO output and digital signal output (COAXIAL, OPTICAL). You may select as you need.
CONNECTED TO A TV AND AN AUDIO AMPLIFIER

TV set
Connects either (1 + ), (2 + ), (3 + ), (1 + ), (2 + ), (3 + ), (1 + )
② +① ③ +① ① +① ② +① or ③ +①
Manufactured under license from Dolby Laboratories. "Dolby" and the double-D symbol are trademarks of Dolby Laboratories. Confidential Unpublished works.
©1992-1997 Dolby Laboratories, Inc. All rights reserved.
"DTS" and "DTS Digital Out" are trademarks of Digital Theater Systems, Inc.
Note: The Step2 can be cancelled if you do not connect it to the amplifier.
PLAY DISCS
Press "POWER" button on the TV and audio system, Press "TV/VIDEO" button on the TV, select VIDEO mode (TV).
Select S-Video mode if using an S-VIDEO connection.

2 Select the correct audio input on the amplifier.
Each amplifier is different from another, please refer to the manual for the amplifier. (e.g., connect the audio output of the DVD player to the DVD audio input of an amplifier.)
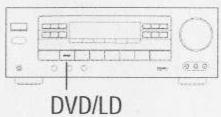
3 Press "STAND BY/ON" button on the front panel or "O" button on the remote control to turn the unit on.
Press "OPEN/CLOSE " button to open the disc tray and insert the disc with its label upward. Press "OPEN/CLOSE " button again to close the disc tray. The unit begins to read the disc. The TV screen shows the DVD menu and title menu.
- When playing a DVD, DVD menus and titles are displayed on TV screen.
- In the case of CD, the disc plays in order of its track number.
5 Stop playback.
Press
6 Press to remove the disc.
SYSTEM SETTING
According to the system of the TV to be connected, set the system of the unit to make it match the TV.
Press SYSTEM button on the remote control, then choose TV TYPE.
- When you press the [SYSTEM] button, the TV screen shows the information as: "If you want to change, press [SYSTEM] again." Press the [SYSTEM] button again, the video out system changes as follows.

PAL
AUTO
NTSC
V-MODE (WHEN SELECTING INTERLACE or PROGRESSIVE)
- When connecting to your TV's component video inputs, press the V-MODE on the remote control to select INTERLACE or PROGRESSIVE.
When you press the [V-MODE] button, the TV screen shows the information as: "If you want to change, press [V-MODE] again." Press the [V-MODE] button again to change the video mode.


If you connect to Composite (basic A/V) inputs after selecting one of the 2 above option, picture is not displayed. Press the V-MODE on the remote control to select Composite video.
DISPLAY
Each time you press the "DISPLAY" button when playing a disc, the TV screen shows the information as:
DVD
Title Elapsed → Title Remain → Chapter Elapsed → Chapter Remain → Display Off

CD
Single Elapsed → Single Remain → Total Elapsed → Total Remain → Display Off
MP3
Folder
FAST PLAY
When playing disc, you may play it forward fast or reverse it fast to find what you need.
Note:
Press PLAY to play normally when playing fast.
Note:
The marked FAST PLAY speed on owner's manual and real fast play speed can be different depending on which disc you play.
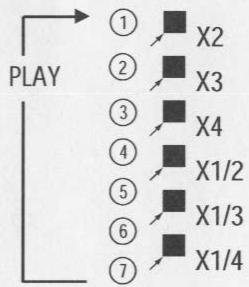
Press to play forward fast. Each time you press the button, the speed of picture changes like the right sides.
Press to reverse the disc fast. Each time you press the button, the speed of picture changes like the right sides.

① X2
② X4
③ X8
④ X16
⑤ X32
⑥ PLAY
① X2
② X4
③ X8
④ X16
⑤ X32
⑥ PLAY
SLOW PLAY
Note:
Press PLAY to play normally.
Press "SLOW" button to play slowly.
Note:
Press PLAY to play normally.
PAUSE/STEP
Press PAUSE on the remote control to make the playback pause. Pressing STEP again moves the picture forward frame by frame.
SELECT AUDIO LANGUAGE
You can choose the language according to your choice when playing multilingual DVD.
Press "AUDIO" button, select different languages.

Note:
- Different disc has different languages
- You can press "AUDIO" button to choose the language you want when you play multi-language DVD discs.
*Attention:
Please select the AUDIO language in SETUP menu to keep the setting!!!
SELECT CHANNELS (VCD)
You may select the right channel or left channel or stereo from a multi-channel. Press "CHANNEL" button, the screen show alternately and select the desired audio channel:


Note:
Use channel function when you play the disc, to choose mono audio output (left or right channel), stereo or mix-mono
SELECT 3D AUDIO
This function outputs 3D effects on the stereo audio analog output where 3D effects are broken down into 7 surround modes.
1 Press [3D] button.
Every time the user presses [3D] button, CONCERT, LIVING ROOM, HALL, BATHROOM, CAVE, ARENA and CHURCH appear one by one.
2 Select the desired 3D sound mode.
3D:CONCERT
Sing along with the music. Microphone set up
(1-2 microphones required, not supplied)
1 Turn on Microphone Switch.
2 Connect the Microphone to the input socket on the front panel.

3 Insert a Karaoke disc (label side uppermost) and select track to play.
4 Adjust the microphone level & echo on the front panel of DVD.

5 Select either the Left, Right, Mixed or Stereo mode, using channel button on the remote control.
6 Adjust to a comfortable volume using the volume (+/-) button on the remote control of the DVD player and the volume on the Monitor/TV.
TONE CONTROL
You may change the pitch to adapt to your voice
- Press # to raise the pitch.

Each time you press the button, the pitch is raised by one step.
Press to lower the pitch.
Each time you press the button, the pitch is lowered by one step.
- Retune to the preliminary atonic-tone.

TO SKIP SCENES IN A DISC
Press to move to the next chapter (or track).
The current chapter (or track) moves to the next chapter (or track).
Press to move to previous chapter (or track).
The current chapter (or track) moves to the previous chapter (or track) or first scene of current chapter (or track).
DIRECTLY MOVING TO A DESIRED TITLE (DVD, VCD)
Some movie discs may contain multiple titles. If the disc has a movie title menu recorded on it, the [TITLE/PBC] button can be used to select the movie title. Details of operation may differ depending on the disc used.
Note:
You can select the desired title directly by using number button.
Press the [TITLE/PBC] or [MENU] button.
A list of the titles on the disc is displayed.
If using some disc, the menu screen will appear only when the disc has PBC function and PBC ON is activated.

- In the case of PBC play, press RETURN to return to the sub-menu, press it again to return to the home menu.
Press the [PLAY] button after pressing the [ ] or number button to select the desired title.
The selected title now starts playing.
PLAYING A DISC CONTAINING MP3 FILES
When a MP3 disc is loaded, MP3 menu screen is displayed automatically depending on MP3 disc's folder structure.
Use the direction button to select the folder you want to play and press the [PLAY] button. This button allows you to see the file lists under the folder.
3 Use the direction button to select a MP3 title. Press the PLAY button then play will start automatically. When you know the title number, enter the MP3 title number using the numeric buttons on the remote control and then press [PLAY] button.
4 Press on the remote control to choose next title (next files in play mode). Press for previous title (previous files in play mode).
When you know the title number, enter MP3 title number using the numeric buttons on the remote control and then press [PLAY] button.
REPEAT PLAY
When play a disc, this function can be used to repeatedly play a title, chapter or disc.
Press "REPEAT" button, the screen shows orderly.

DVD

CD

MP3
Single

Repeat Off
REPEATING A DEFINED PERIOD FROM A TO B
You may press A-B to enjoy some parts repeatedly when playing a disc.
- Press "A-B" to set a starting point A.
- Press "A-B" twice to an end point B. Afterwards, the unit plays from A to B.
- Press "A-B" three times to remove A-B repeat.


REPEAT OFF
SELECT A SUBTITLE LANGUAGE
When play a multi-subtitle DVD, you may select one subtitle to show it on the screen.
Note:
- For some discs, subtitles cannot be removed.
2.Subtitle function is only available for some discs with subtitle recorders.
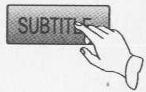
1 Keep pressing [SUBTITLE] button till the user's preferred language appears.
If a DVD disc includes subtitle information, every time the user presses [SUBTITLE] button, ENGLISH, FRENCH, SPANISH and others appear one by one.
2 Remove the subtitle.
Press SUBTITLE button until the screen shows "Subtitle Off".

SEARCHING
SEARCHING DVD WITH A TITLE/CHAPTER NUMBER OR A TIME
You may directly enter a title or chapter number to search fast on a disc. The unit plays from the point.
1 If you want to search with a chapter or a title number, press [SEARCH] button.
It shows the current disc mode; TITLE, CHAPTER, AUDIO, SUBTITLE, ANGLE, REPEAT, TIME Disp..
Select the TITLE or CHAPTER and enter the new chapter or title number to be searched using the [PLAY], [NUMBER] and [ ] buttons.
2 In completing entering, please press [SEARCH] button. PLAY starts from the selected position.

SEARCHING CD WITH A DISC /TRACK TIME OR TRACK NUMBER
Press the [SEARCH] button to play at a desired Time or Track.
Press the [SEARCH] button to select SEARCH mode.
Press or button highlight desired item.

Disc Go To --: Input disc time
Track Go To --: Input track time
Select Track --/02 Input track number
Note: Multi Angle function is limited to a DVD disc supporting multi angle information.
SELECT ANGLE
Some discs have images with different screen angles, you may select among them. For example, when you watch a running train, you may select to watch it from the front, the left window or the right window without stopping it.
Keep pressing [ANGLE] button till the preferred angle appears.
2/4 (select ANGLE2)
3/4 (select ANGLE3)
4/4 (select ANGLE4)
![SANYO DVD-DX506 - Keep pressing [ANGLE] button till the preferred angle appears. - 1](/content/2025/01/96735/images/7849f09321a3c89f60a4136b6e10c967cb3585188412f85d01ab93e2d61f32d8.jpg)
![SANYO DVD-DX506 - Keep pressing [ANGLE] button till the preferred angle appears. - 2](/content/2025/01/96735/images/5708c1c3ce362c21e624f20fffd81e1cf3dd40245ed23e5b759aabeb5185992f.jpg)
ZOOM PLAY
This function can be used to enjoy a motion or motionless picture.
Press "ZOOM" button when playing, the screen shows orderly:

2 Press "UP/DOWN/LEFT/RIGHT [▲▶▲▼] button to move the enlarged picture.
Note:
If you erase a book mark function, press "RETURN" button.
Book Mark
1 Press MARK button, the screen will show the following frame:
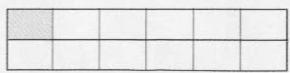
2 Moving direction button to select the saving position on the screen. Press PLAY button to save the time tag.
3 Press MARK button when you need book mark function, then choose the item you want to resume playing, then press PLAY button to continue playing from the saving point.
| 02 | 05 | |||
| 08 |
PROGRAM PLAY (DVD)
You may program the title and chapter on a disc and play them in the programmed order.
Note:
First one is title, second one is chapter.
- If the disc has only one title, TT will not be displayed.
Press "PROGRAM" button, the screen shows:
PROGRAM

2 Input the sequence number you want to program playing.

After the programming is finished, move cursor to "START" by direction button and press "PLAY" button to start playing.
4 Press "STOP" button two times to remove program play.
- If you want to remove any program number, put the cursor in the position of the program number and press "RETURN" button.
PROGRAM PLAY (VCD)
You may program the track on a disc and play them in the programmed order.
Press "PROGRAM" button, the screen shows:

PROGRAM

2 Input the sequence number you want to program playing.

After the programming is finished, move cursor to "START" by direction button and press "PLAY" button to start playing.
Press "STOP" button two times to remove program play.
- If you want to remove any program number, put the cursor in the position of the program number and press "RETURN" button.
DIGEST PLAY (DVD)
Push "INTRO" button when the unit is playing disc, the screen shows:
2 Push direction button to select the digest type. And push "PLAY" button.
SELECT DIGEST TYPE : TITLE DIGEST CHAPTER DIGEST TITLE INTERVAL CHAPTER INTERVAL
Note:
- TITLE DIGEST
The player will play 5 seconds of each title. After moving the cursor in the position "--", push NUMBER button to select the title and push PLAY button. Then the player will begin to play from the title you selected. Or put the cursor in the position of desired picture and push PLAY button.
CHAPTER DIGEST
The player will display the beginning picture of each chapter in current selected title.
- TITLE INTERVAL
Scan the story in the title from 00: 00 :00 on, the unit will play the disc every other 10 minutes.
CHAPTER INTERVAL
Scan the story in the current chapter from 00:00:00 on, the unit will play the disc every other 10 minutes.
DIGEST PLAY (VCD)
Push "INTRO" button when the unit is playing disc, the screen shows:
2 Push direction button to select the digest type. And push "PLAY" button.
SELECT DIGEST TYPE :
TRACK DIGEST
DISC INTERVAL
INTRO

Note:
- TRACK DIGEST
The player will play 5 seconds of each track. Push NUMBER button to select the track, then push PLAY button, the player will begin to play from the track you selected.
DISC INTERVAL
Scan the story in the disc from 00: 00 :00 on, the unit will play the disc every other 10 minutes.
DIGEST PLAY (CD)
Push "INTRO" button when the unit is playing disc, the screen shows :
The player will play 5 seconds of each track.
T:01/10
SCAN
00:05
PLAYING DivX DISC ON CD-R(W)
When a DivX disc is loaded, the DivX menu screen is displayed automatically depending on DivX disc's folder structure.
2 Move the cursor to DivX file you want to play and press play button.
3 On your disc, if there are many subtitles, press the [SUBTITLE] button for selecting subtitle you want to display.
YOUR DVD PLAYER CAN PLAY;
- Picture DivX version: DivX 3.11, 4.x, 5.x, XviD, ISO-MPEG4, DivX PRO (Excluding QPEL and GMC)
- Subtitle file extension : It can support Smi, Srt, Sub, TXT.
- Subtitle Support language: It can display ENGLISH and some languages.
PLAY MP3, JPEG OR PICTURE CD
SELECT TRACKS
1 The screen will display right after the disc is loaded
2 You can select the file you want using the direction buttons.
3 Press the PLAY button after selecting the file you want. The file will be played back.


Note:
If you go to Menu screen or File list during Playback mode, press STOP button.
SELECT REPEAT PLAYBACK MODE (MP3)
Press "REPEAT" button, you can select "Single", "Repeat One", "Repeat Folder" and "Repeat Off".
- Single : the player will stop after finished playing the current item
- Repeat One mode: repeat the current item
- Repeat Folder mode: repeat the items in the current directory
Note:
If you go to Menu screen or File list during Playback mode, press STOP button.
MENUSTTING
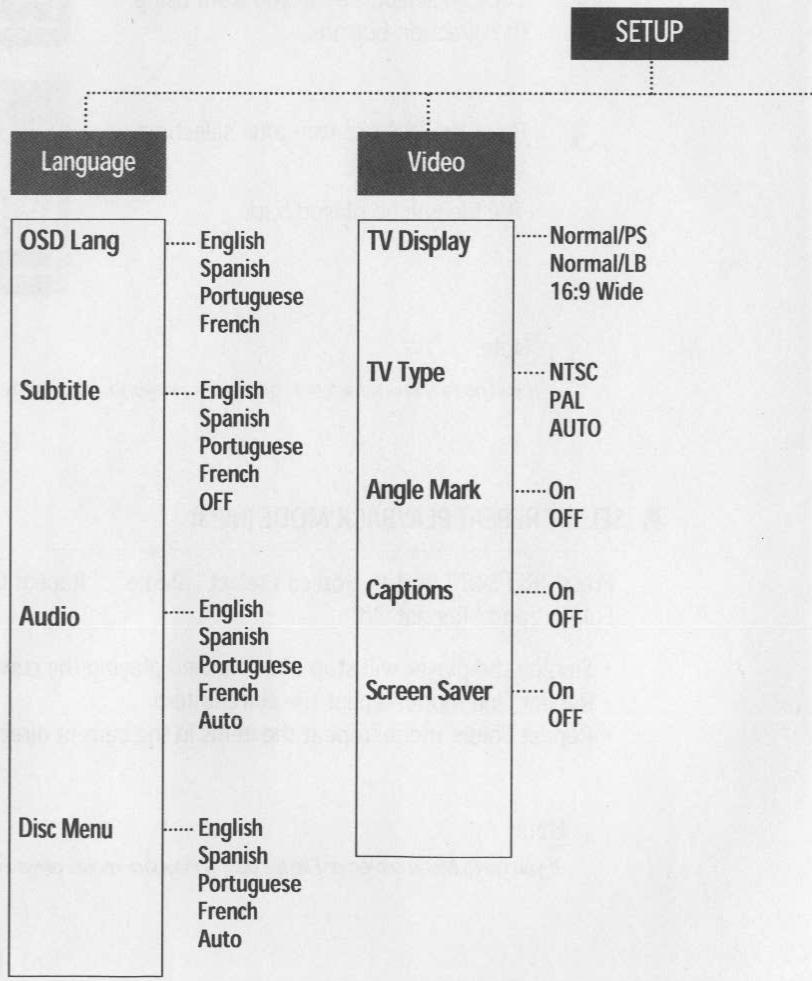
According to the recorded information and external equipment, set the following functions for DVD to obtain the best playing status. Press "SETUP" button to set the main menu.
BASIC NAVIGATION
To navigation through the setting on the screen, use the direction buttons to scroll through the list of settings and use "PLAY" button to select the high lighted function.
SETUP MENU
Press the SETUP button to enter the On Screen Display and to exit at any time. In each of the menus, selecting MAIN PAGE (SETUP menu) will immediately return you to the initial screen.
Audio
Digital Out
OFF
Bitstream LPCM
Downmix
LT/RT
Stereo
Dual Mono
Stereo
L-Mono
R-Mono
Mix-Mono
Dynamic
-FULL
-
-3/4
-
-1/2
-
-1/4
-
OFF
Preference
Password
Change
Parental
1 KIDS SAFE
2G
3PG
4 PG-13
5-PGR
6R
7 NC-17
8 Adult
Defaults
Reset
Note:
"OSD" means "On Screen Display".
LANGUAGE
OSD LANG.
When select a language, the screen show this language. For example, if you select ENGLISH, the OSD is in English.
SUBTITLE
- Selecting Subtitle language.
Please set it as the preferred language. In case the subtitle language is set and recorded in the DISC, it is automatically played in the set language in every playing. For example, English is set and recorded as subtitle language in the DISC, it is played in English.
AUDIO
- Selecting an audio language.
Set it as the preferred audio language. In case the audio language is set and recorded in the DISC, it is automatically played in the set language in every playing. For example, English is set and recorded as audio language in the DISC, it is played in English.
DISC MENU
- Selecting Disc Menu language.
Please set it as the preferred DISC MENU language. In case the DISC MENU language is set and recorded in the DISC, it is automatically played in the set language in every playing. For example, English is set and recorded as a DISC MENU language in the DISC, it is played in English.
VIDEO
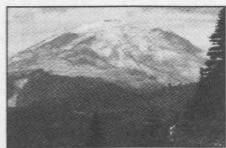
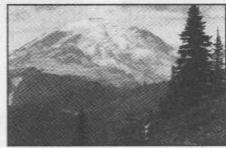
TV DISPLAY
1 NORMAL/PS
This is selected when the unit is connected with a normal TV. Wide-screen images are shown on the screen, but with some parts cut automatically.
2 NORMAL/LB
This is selected when the unit is connected with a normal TV. Wide-screen images are shown on screen, with black belts on the top and bottom.
3 16:9 WIDE
This is selected when the unit is connected with a wide-screen TV.

TV TYPE
You may select according to the colour system of the TV to be connected.
- Select "NTSC" for a NTSC TV.
- Select "PAL" for a PAL TV.
- Select "AUTO" for a multi-system TV.
ANGLE MARK
This only works when there is an angle mark on the disc.
- Select "ON", the screen shows the mark when playing a DVD.
- Select "OFF", the mark is not shown.
CAPTIONS
The hidden subtitle is shown or turn off.
SCREENSAVER
Start the screen saver, the screen saver image appears when the unit stops or the image is motionless for a few seconds. This saver can keep the screen from being damaged.
AUDIO
Digital OUT
OFF
No signal is output from the coaxial, optical port.
- Bitstream
Select this when the DVD player is connected with a power amplifier through optical or coaxial port. Please refer to the page 14. When a Dolby Digital DVD, DTS DVD or MPEG DVD is played, select this, the coaxial or optical port will output in the corresponding digital format (source code).
LPCM
Select this when the DVD player is connected with a TV or a power amplifier through audio cord.
Down Mix
Select Down Mix mode to LT/RT or Stereo
DUAL MONO
This is the output mode of the L and R signals of the set audio output. If it is set to "MIX MONO", the function only works when the DVD being played is 2.0-channel.
-STEREO
Choose this option, the audio output should be dummy stereo signal.
-L-MONO
-R-MONO
-MIX-MONO
DYNAMIC RANGE
Set "Off" to view a program in the dynamic range as recorded in disc. To hear loud sound softer and soft sound louder, set "Full".

PREFERENCE
■ PASSWORD
Select "password" in PREFERENCE SETUP menu to setup password, input a password.
Enter a password according to the screen.

Note:
- The password is 3308 when the unit is turned on initially or you forget the password.
The password is set by yourself.
PARENTAL
The content of a disc with lock function is evaluated by grades. You can select an age grade as your need.
Example: Select "1 Kids Safe", the scenes of violence inadvisable to children are not played.
For adults, the screen suggests you enter the code after pressing "PLAY" button, you can watch if the code is right.
DEFAULT>>RESET
Each function setting returns to the factory initial status if you select this.
TROUBLESHOOTING
If you experience the following problems while using the unit, this troubleshooting guide can help you.
- NO SOUND
- Check if the unit is connected securely.
- Make sure you operate the TV or amplifier correctly.
NO IMAGE, IMAGE ROLLs AND NO COLOR
- Check if the unit is connected securely.
- Make sure you operate the TV correctly.
- Make sure you set the color system correctly.
- BAD SOUND QUALITY
- Make sure the audio output mode is set correctly.
- Make sure the audio connection between the unit and amplifier is right.
DISC CAN NOT BE PLAYED
- There is no disc in the unit.
- Insert the disc on the disc tray properly with the label side up.
- Clean the disc.
- Moisture has condensed in the unit.
Remove the disc and leave the unit on for about one hour.
- NO MICROPHONE SOUND
- Switch on the microphone.
- Turn the MIC LEVEL away knob clockwise.
- MICROPHONE DISTORTION
- Keep the phone far away from the speaker
- Turn down the volume
- Turn down the volume of microphone and echo.
- REMOTE CONTROL DOES NOT WORK
- Remove barriers between the remote control and the unit.
- Replace the batteries with new ones.
- Point the remote control at the remote control sensor of the unit.
ATTENTION: KEEPING THE STATUS OF STOP MORE THAN 5 MINUTES ENTERS SCREEN SAVE MODE. WHEN THE SCREEN SAVE MODE IS KEPT MORE THAN AN HOUR, THE SET ENTERS STAND-BY MODE.
TECHNICAL SPECIFICATIONS
| Laser | wavelength 650nm | |
| Video | PAL/AUTO/NTSC | |
| Frequency response | 20Hz ~ 20kHz (±1dB) | |
| Signal/noise ratio | ≥90dB | |
| Channel separation | ≥85dB (1kHz) | |
| Dynamic range | ≥80dB (1kHz) | |
| Output Audio | Analog | output level : 2.0 + 0/-0.2Vrms (Load impedance : 1,0kΩ) |
| Digital | output level : 0.5 ± 0.1Vp-p (Load impedance : 75Ω) | |
| Output Video | Composite | output level : 1.0 ± 0.1Vp-p (Load impedance : 75Ω, imbalance, negative polarity) |
| S-video | output level : brightness (Luma) 1.0 ± 0.1Vp-p chromaticity (Color) 0.286 ± 20% (Load impedance : 75Ω) | |
| Component | Y: 1Vp-p, Pb/Pr: 0.7Vp-p (Load impedance : 75Ω) | |
| Power | 100-240V~, 50/60Hz 12W | |
| Dimensions | Body (W x H x D) | 430 x 38 x 258 mm |
| Packing | 495 x 100 x 365mm | |
| Weight (Gross/ Net) | 2.9kg / 2.2kg | |
Notes: Design and specifications in this instruction manual are subjected to change without prior notice to improve quality and function.
THE SANYO COMFORT WARRANTY AUDIO/VIDEO PRODUCTS
WARRANTY APPLICATION
New, unused Sanyo Audio/Video products purchased through a Sanyo authorized dealer in Canada are warranted against manufacturing defects in materials and workmanship for ONE YEAR from the date of purchase by the original retail purchaser. This warranty only applies in favor of the original retail purchaser of the warranted product.
SANYO CANADA INC.'S RESPONSIBILITY
During the warranty period, SANYO Canada Inc. will repair, or at our option, replace an Audio/Video product which shows evidence of a manufacturing defect in materials or workmanship.
Replacement PARTS are warranted for the remaining portion of the warranty period.
WHAT IS NOT COVERED
(a) Products purchased outside Canada.
(b) Products purchased in a used condition.
(c) Problems due to product set-up and installation.
(d) Adjustments that are outlined in the Operating Manual.
(e) Accessory items including antenna, batteries, cassette tapes, cables, etc.
(f) Damage in or due to transportation.
(f) Damage due to improper maintenance, improper wiring, accident, abuse, misuse or negligence.
(h) Damage caused by lightning and power surges.
ORIGINAL RETAIL PURCHASER'S RESPONSIBILITY
You, the original retail purchaser, must present your original, dated bill-of-sale together with this warranty to SANYO Canada Inc. or to an authorized Sanyo Service Depot when you make a claim under this Warranty.
You, the original retail purchaser, are responsible for any costs of TRANSPORTING the product to and from SANYO Canada Inc. or an authorized Sanyo Service Depot. You also are responsible for the cost of any MAINTENANCE necessary in respect of the product.
WARRANTY BECOMES VOID
This warranty becomes void if the product's serial numbers are altered or removed or if any repair to the product is made
other than by SANYO Canada Inc. or by an authorized Sanyo Service Depot.
LIMITATIONS
(a) SANYO Canada Inc. reserves the right to change or improve the design of the model of the product warranted hereunder without incurring any obligation to make any modifications to or to install any improvement in or on the product.
(b) In no event shall SANYO Canada Inc. or any of its Authorized Dealers be liable for special or consequential damage arising from the use of this product.
STATUTORY WARRANTY
The above provisions do not preclude the operation of any applicable provincial statute which in certain circumstances may not allow some of the limitations and exclusions described in this Warranty. Where any terms of this Warranty
are prohibited by such a statute, they shall be deemed null and void but the remainder of this warranty shall remain in effect.
HOW TO OBTAIN WARRANTY SERVICE
Please contact the Sanyo Authorized Dealer from whom the product was purchased, or contact us directly at:
SANYO Canada Inc.
1-300 Applewood Cres.
Concord, Ont. L4K 5C7
(905) 760-9944
1-800-263-2244
http://www.sanyocanada.com
(R12)
- INSTRUCTION MANUAL
- DVD-DX506
- PLEASE READ THIS MANUAL
- IMPORTANT SAFETY PRECAUTIONS .... 2
- FEATURES 5
- ABOUT DISCS 6
- BEFORE OPERATION 8
- PREPARATIONS BEFORE OPERATION. 10
- CONNECTIONS 14
- BASIC OPERATIONS 15
- MICROPHONE CONTROL 19
- PLAYING A DESIRED SCENE 21
- PLAY DISCS IN VARIOUS WAYS. 25
- FUNCTION SETTING 32
- OTHERS 39
- IMPORTANT SAFETY PRECAUTIONS
- CAUTION
- IMPORTANT FOR LASER PRODUCTS
- 1 READ INSTRUCTIONS
- 2 RETAIN INSTRUCTIONS
- 3 HEED WARNINGS
- 4 FOLLOW INSTRUCTIONS
- 5 CLEANING
- 6 ATTACHMENTS/ACCESSORIES
- 7 WATER AND MOISTURE
- 8 PLACEMENT
- 8A
- 9 VENTILATION
- 10 POWER SOURCES
- 11 GROUNDING OR POLARIZATION
- 12 POWER-CORD PROTECTION
- 13 LIGHTNING
- 14 DISC TRAY
- 15 OVERLOADING
- 16 OBJECT AND LIQUID ENTRY
- 17 BURDEN
- 18 DISC
- 19 SERVICING
- 20 DAMAGE REQUIRING SERVICE
- 21 REPLACEMENT PARTS
- 22 SAFETY CHECK
- 23 WALL OR CEILING MOUNTING
- 24 HEAT
- FCC NOTICE
- OUTSTANDING SOUND QUALITY
- HIGHDEFINITION
- SPECIAL FUNCTIONS
- SCREEN
- COMPATIBILITY
- ZOOM
- MULTI-FUNCTIONS
- TIME SEARCH
- RESUME PLAY
- VIDEO OUTPUT
- AUDIO OUTPUT
- KARAOKE
- TITLE
- CHAPTER
- TRACK
- SCENE
- REGION MANAGEMENT INFORMATION
- MACROVISION
- SECURITY
- PLACEMENT
- CONDENSATION
- CLEANING
- HANDLING DISC
- CLEANING DISC
- CHECK ACCESSORIES
- USE REMOTE CONTROL
- NOTE
- FRONT PANEL
- REAR PANEL
- VFD
- NAMES AND LAYOUT OF REMOTE CONTROLS
- CONNECTED TO A TV AND AN AUDIO AMPLIFIER
- PLAY DISCS
- SYSTEM SETTING
- V-MODE (WHEN SELECTING INTERLACE OR PROGRESSIVE)
- DISPLAY
- DVD
- CD
- MP3
- FAST PLAY
- SLOW PLAY
- PAUSE/STEP
- SELECT AUDIO LANGUAGE
- SELECT CHANNELS (VCD)
- SELECT 3D AUDIO
- SING ALONG WITH THE MUSIC. MICROPHONE SET UP
- (1-2 MICROPHONES REQUIRED, NOT SUPPLIED)
- TONE CONTROL
- TO SKIP SCENES IN A DISC
- DIRECTLY MOVING TO A DESIRED TITLE (DVD, VCD)
- PLAYING A DISC CONTAINING MP3 FILES
- REPEAT PLAY
- REPEATING A DEFINED PERIOD FROM A TO B
- SELECT A SUBTITLE LANGUAGE
- 2 REMOVE THE SUBTITLE
- SEARCHING
- SEARCHING DVD WITH A TITLE/CHAPTER NUMBER OR A TIME
- SEARCHING CD WITH A DISC /TRACK TIME OR TRACK NUMBER
- SELECT ANGLE
- KEEP PRESSING [ANGLE] BUTTON TILL THE PREFERRED ANGLE APPEARS
- ZOOM PLAY
- BOOK MARK
- PROGRAM PLAY (DVD)
- PROGRAM PLAY (VCD)
- DIGEST PLAY (DVD)
- TITLE DIGEST
- CHAPTER DIGEST
- TITLE INTERVAL
- CHAPTER INTERVAL
- DIGEST PLAY (VCD)
- TRACK DIGEST
- DISC INTERVAL
- DIGEST PLAY (CD)
- PLAYING DIVX DISC ON CD-R(W)
- YOUR DVD PLAYER CAN PLAY
- PLAY MP3, JPEG OR PICTURE CD
- SELECT TRACKS
- SELECT REPEAT PLAYBACK MODE (MP3)
- MENUSTTING
- BASIC NAVIGATION
- SETUP MENU
- AUDIO
- DIGITAL OUT
- DOWNMIX
- DUAL MONO
- DYNAMIC
- PREFERENCE
- PASSWORD
- PARENTAL
- DEFAULTS
- LANGUAGE
- VIDEO
- TV DISPLAY
- 1 NORMAL/PS
- 2 NORMAL/LB
- 3 16:9 WIDE
- TV TYPE
- ANGLE MARK
- CAPTIONS
- SCREENSAVER
- DOWN MIX
- DYNAMIC RANGE
- DEFAULT>>RESET
- TROUBLESHOOTING
- NO SOUND
- NO IMAGE, IMAGE ROLLS AND NO COLOR
- BAD SOUND QUALITY
- DISC CAN NOT BE PLAYED
- NO MICROPHONE SOUND
- MICROPHONE DISTORTION
- REMOTE CONTROL DOES NOT WORK
- THE SANYO COMFORT WARRANTY AUDIO/VIDEO PRODUCTS
- WARRANTY APPLICATION
- SANYO CANADA INC.'S RESPONSIBILITY
- WHAT IS NOT COVERED
- ORIGINAL RETAIL PURCHASER'S RESPONSIBILITY
- WARRANTY BECOMES VOID
- LIMITATIONS
- STATUTORY WARRANTY
- HOW TO OBTAIN WARRANTY SERVICE
Marque : SANYO
Modèle : DVD-DX506
Catégorie : Lecteur dvd