
DMP-P6 - Lecteur de DVD portable SANYO - Notice d'utilisation et mode d'emploi gratuit
Retrouvez gratuitement la notice de l'appareil DMP-P6 SANYO au format PDF.


| Type de produit | Système audio avec réveil, radio et station d'accueil iPod |
| Marque | SANYO |
| Modèle | DMP-P6 |
| Dimensions (L x P x H) | 265 x 160 x 85 mm |
| Alimentation | AC 120 V ~ 60 Hz (adaptateur secteur fourni) ; sauvegarde mémoire : 2 piles AA (non fournies) ; télécommande : pile lithium CR2032 (incluse) |
| Consommation électrique | 25 W |
| Fonctions principales | Double réveil avec alarme (iPod, radio ou buzzer) ; radio AM/FM (10 présélections par bande) ; station d'accueil pour iPod et Shuffle ; entrée auxiliaire (AUX IN) ; sortie auxiliaire (AUX OUT) ; minuterie de sommeil (15/30/60/90/120 min) avec volume progressif ; fonction Snooze (9 min) ; réglage de luminosité de l'écran |
| Plages de réception radio | AM : 520-1710 kHz ; FM : 87,5-107,9 MHz |
| Puissance de sortie audio | 2 x 3 W (canaux) |
| Impédance des haut-parleurs | 6 Ω |
| Impédance du casque | 8-32 Ω |
| Sensibilité d'entrée AUX | 600 mV |
| Accessoires inclus | Adaptateur secteur, télécommande avec pile, 5 inserts pour iPod, antenne cadre AM, manuel d'utilisation |
| Entretien et nettoyage | Nettoyer avec un chiffon doux et sec. Ne pas utiliser de produits liquides ou abrasifs. Débrancher avant nettoyage. |
| Sécurité | Ne pas utiliser près de l'eau ; ne pas obstruer les ouvertures de ventilation ; éviter les sources de chaleur ; ne pas ouvrir l'appareil ; utiliser uniquement les accessoires recommandés. |
| Pièces détachées et réparabilité | Confier toute réparation à un personnel qualifié. Garantie constructeur 1 an (Canada). Pour obtenir un service, contacter SANYO Canada Inc. au 1-800-263-2244. |
| Informations générales | Appareil conçu et testé selon les normes CSA et FCC. Conforme à la partie 15 des règles FCC. |
FOIRE AUX QUESTIONS - DMP-P6 SANYO
Questions des utilisateurs sur DMP-P6 SANYO
0 question sur cet appareil. Repondez a celles que vous connaissez ou posez la votre.
Poser une nouvelle question sur cet appareil
Téléchargez la notice de votre Lecteur de DVD portable au format PDF gratuitement ! Retrouvez votre notice DMP-P6 - SANYO et reprennez votre appareil électronique en main. Sur cette page sont publiés tous les documents nécessaires à l'utilisation de votre appareil DMP-P6 de la marque SANYO.
MODE D'EMPLOI DMP-P6 SANYO
INSTRUCTION MANUAL
Media System with Dual Alarm Clock,
Digital Tuning Radio and
iPod/Shuffle Docking
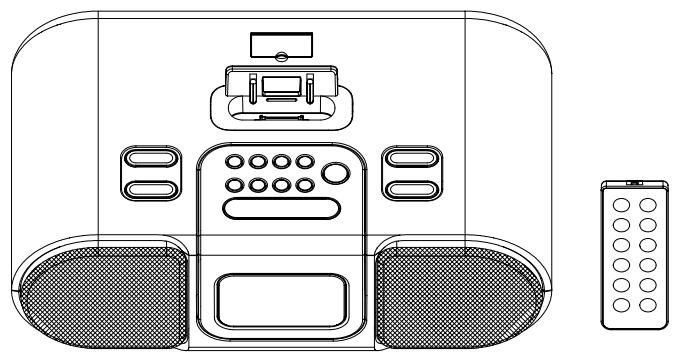
Thank-you for choosing the SANYO DMP-P6 Dual alarm clock PLL radio with iPod and Shuffle docking. Designed specifically to work with your docking iPod, this system provides high quality audio and radio performance that brings out the best in your music. An auxiliary input enables connection of a non-iPod or Shuffle device.
Please read this instruction book carefully before operating the DMP-P6, and keep it for future reference.
SAFETY CERTIFICATION
This unit is made and tested to meet exacting safety standards. It meets CSA and FCC requirements.
THIS UNIT SHOULD NOT BE ADJUSTED OR REPAIRED BY ANYONE EXCEPT QUALIFIED SERVICE PERSONNEL.
DO NOT DROP THE UNIT OR SUBJECT IT TO STRONG SHOCKS. DOING SO COULD RESULT IN DAMAGE.
A Consumer Guide to Product Safety
FCC Information
This device complies with part 15 of the FCC rules. Operation is s subject to the condition that this device does not cause harmful interference.
This equipment complies with the limits for a Class B digital device as specified in Part 15 of FCC Rules. These limits provide reasonable protection against radio and TV interference in a residential area.
However, your equipment might cause TV or radio interference even when it is operating properly. To eliminate interference you can try one or more of the following corrective measures:
Reorient or relocate the receiving antenna.
- Increase the distance between the equipment and the radio or TV.
- Use outlets on different electrical circuits for the equipment and the radio or TV.
Consult your dealer or an experienced radio/television technician if the problem still exists.
Modifying or tampering with your system's internal components can cause a malfunction and might invalidate the system's warranty and void your FCC authorization to operate it.
A Consumer Guide to Product Safety
IMPORTANT SAFETY INSTRUCTIONS
When used in the directed manner, this unit has been designed and manufactured to ensure your personal safety. However, improper use can result in potential electrical shock or fire hazards. Please read all safety and operating instructions carefully before installation and use, and keep these instructions handy for future reference. Take special note of all warnings listed in these instructions and on the unit.
- Water and Moisture- The unit should not be used near water. For example: near a bathtub, washbowl, kitchen sink, laundry tub, swimming pool or in a wet basement.
- Ventilation- The unit should be situated so that its location or position does not interfere with its proper ventilation. For example, it should not be situated on a bed, sofa, rug or similar surface that may block ventilation openings. Also, it should not be placed in a built-in installation, such as a bookcase or cabinet, that may impede the flow of air through the ventilation openings.
- Heat - The unit should be situated away from heat sources such as radiators, heat registers, stoves or other appliances (including amplifiers) that produce heat.
- Power Sources - The unit should be connected to a power supply only of the type described in the operating instructions or as marked on the appliance.
- Power-Cord Protection - Power supply cords should be routed so that they are not likely to be walked on or pinched by items placed upon or against them. It is always best to have a clear area from where the cord exits the unit to where it is plugged into an AC outlet.
- Cleaning - The unit should be cleaned only as recommended. See the Maintenance section of this manual for cleaning instructions.
- Objects and Liquid Entry - Care should be taken so that objects do not fall and liquids are not spilled into any openings or vents located on the product.
- Attachments - Do not use attachments not recommended by the product manufacturer.
- Lightning and Power Surge Protection - Unplug the unit from the wall outlet and disconnect the antenna or cable system during a lightning storm or when it is left unattended and unused for long periods of time. This will prevent damage to the product due to lightning and power-line surges.
- Overloading - Do not overload wall outlets, extension cords, or integral convenience receptacles as this can result in a risk of fire or electric shock.
- Damage Requiring Service - The unit should be serviced by qualified service personnel when:
A. the power supply cord or plug has been damaged.
B. objects have fallen into or liquid has been spilled into the enclosure.
C. the unit has been exposed to rain.
D. the unit has been dropped or the enclosure damaged.
E. the unit exhibits a marked change in performance or does not operate normally.
-
Antenna - Do not connect an external antenna to the unit (other than that provided).
-
Periods of Nonuse - If the unit is to be left unused for an extended period of time, such as a month or longer, the power cord should be unplugged from the unit to prevent damage or corrosion.
- Servicing - The user should not attempt to service the unit beyond those methods described in the user's qualified service personnel.
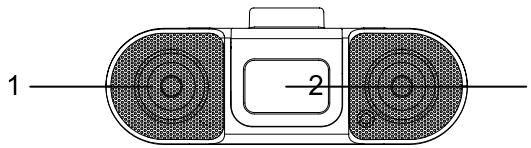
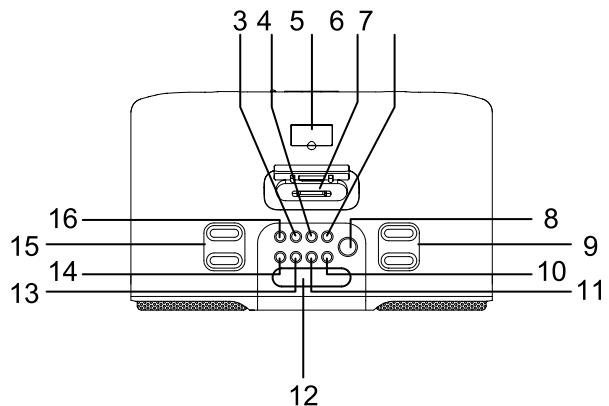
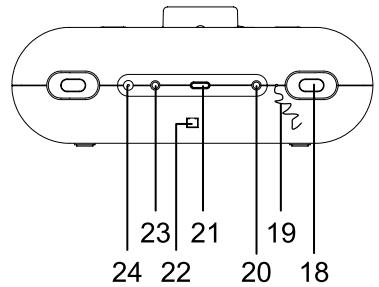
- Speaker
- LCD Display
- AUX Button
- BAND/RADIO Button
- USB port for iPod shuffle
- Dock
- SLEEP Button
- POWER Button
- SKIP FORWARD/BACKWARD Button
- ALARM 2 Button
- ALARM 1 Button
-
SNOOZE/DIMMER Button
-
WAKE Button
- iPod/SHUFFLE Button
- VOLUME UP/DOWN Button
- PLAY/PAUSE Button
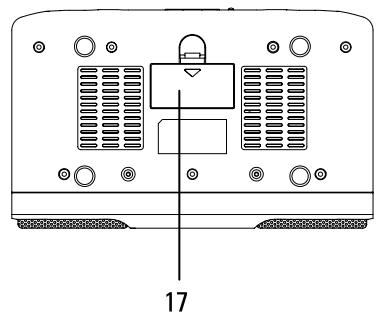
- Battery compartment
- Speaker Port
- FM Antenna Wire
- AUX IN Jack
- CLOCK Button
- AM Loop Antenna Socket
- AUX OUT Jack
- AC Adaptor Jack
Install/Replace the Remote Control Battery
The remote control battery is already installed at the factory. When the remote control stops operating, replace the battery with a new one.
- The battery door is located on the back end of the remote control.
- Squeeze notched tab A while pulling battery door latch B to release the battery door latch and take out the battery holder.
- Insert a "R2025" 3-volt lithium battery. Make sure the polarity (the + and - side of the battery) is correct.
- Replace the battery holder back in the remote control.
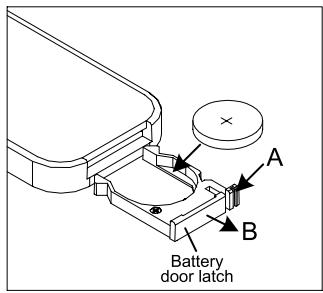
NOTE: PLEASE DISCARD BATTERY PROPERLY
The Remote Control controls basic functions on the DMP-P6. For best results, aim remote control towards the grill by the lower right corner of the display.
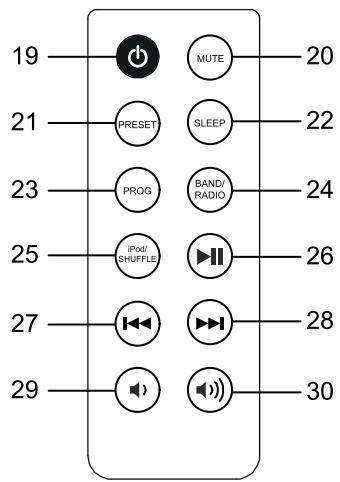
- POWER ON/OFF Button ( )
- MUTE Button
- PRESET Button
- SLEEP Button
- PROG Button
- BAND/RADIO Button
- iPod SHUFFLE Button
- iPod PLAY/PAUSEButton( II)
- 14 Button
28.▶▶Button - VOLUME DOWN Button (▼)
- VOLUME UP Button (▲)
Getting Started
iPod Inserts
Your DMP-P6 comes with removable inserts to ensure your iPod fits properly in the dock on the top of the system.
Pending new iPod models, new inserts will be subject to availability.
| Shuffle | Mini Insert | Thin iPods Insert | Thick iPods Insert | Nano Insert | |||
| Use with iPod Shuffle | Use with iPod Mini | iPod 3 Gen | 10-15 GB | iPod 3 Gen | 30 GB | iPod Nano | 2 GB |
| iPod 3 Gen | 20 GB | iPod 3 Gen | 40 GB | iPod Nano | 4 GB | ||
| iPod 4 Gen | 20 GB | iPod 4 Gen | 40 GB | ||||
| iPod Photo | 30 GB | iPod Photo | 40 GB | ||||
| iPod Photo | 60 GB | ||||||
To place an insert:
- Select the insert for your iPod. Using the correct insert ensures the proper fit for your iPod.
- Gently press the iPod insert into the dock.
- Carefully place your iPod into the dock. (The iPod must not be in a case or skin).
- To remove/replace an insert, first remove your iPod, then grip the insert and pull gently upwards.
Install AM loop antenna
Plug the AM loop antenna into the connector located on the back of the unit for AM band radio operation. For best reception, please move the AM antenna 12" away from the unit and iPod.
Install AC Adaptor
Connect the AC adaptor cable plug into the jack on the back of the system, then plug the AC adaptor into the wall outlet.
Battery Supply (For Tuner/Clock Memory Back-up)
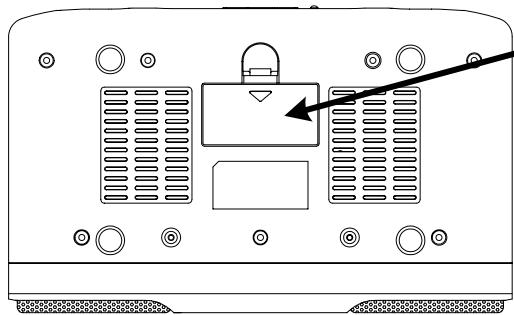
Install batteries (not supplied). Observe + and - signs.
Remember to replace the battery compartment lid 2 "AA" size batteries
IMPORTANT NOTE:
SPENT OR DISCHARGED BATTERIES
MUST BE RECYCLED OR DISPOSED OF PROPERLY IN COMPLIANCE WITH ALL APPLICABLE LAWS. FOR DETAILED INFORMATION, CONTACT YOUR LOCAL COUNTRY SOLID WASTE AUTHORITY.
CAUTION:
WHEN INSTALLING BATTERIES
To prevent leakage from the batteries, which are corrosive and can cause personal injury and damage to the unit, observe the following precautions:
- The batteries must be installed correctly. Match the polarities (+ and - signs) on the batteries, to the polarities shown on the battery compartment of the unit (see above).
- Do not mix new batteries with old or used batteries.
- Only use batteries of the same type and brand.
- If the unit will not be used for an extended period of time, remove the batteries and store them in a cool place.
- Carefully follow the battery Manufacturer's instructions for proper use and disposal.
- DO NOT ALLOW YOUNG CHILDREN TO HANDLE BATTERIES.
Setting Up the DMP-P6
Setting Clock Time and Calendar
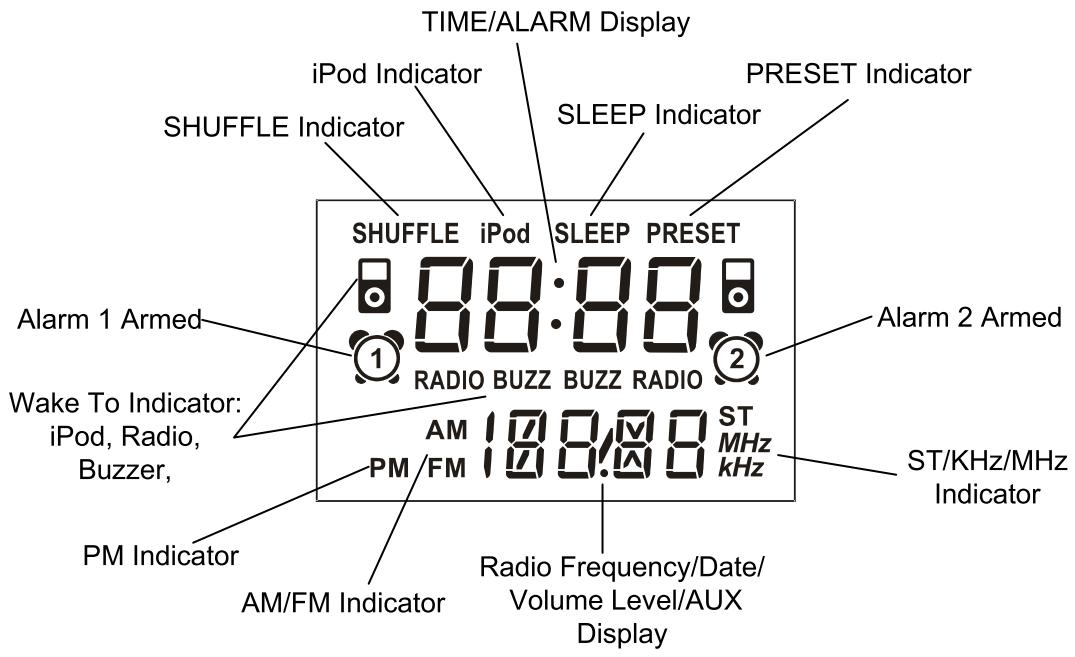
- Press and hold the CLOCK Button located on the back of the unit until the display flashes. Press the SKIP FORWARD or BACKWARD Button until the current time is displayed. Remember to set the correct AM or PM (an icon to the right of the time display is the PM indicator; there is no AM indicator).
- Press the CLOCK Button again to confirm clock setting.
- The year display at the lower right will flash. Press the CLOCK Button to accept the current setting, or press the SKIP FORWARD or BACKWARD Button until current year is display. Press the CLOCK Button to confirm year setting.
- The date display at the lower right will flash. Press the CLOCK Button to accept the current setting or press the SKIP FORWARD or BACKWARD Button until current date is displayed. Press the CLOCK Button to confirm date setting.
Setting Alarm Time
- You can set two Alarm Times.
- Press and hold the ALARM 1 Button or ALARM 2 Button until the display flashes. Press the SKIP FORWARD or BACKWARD Button until the desired alarm time is displayed. Remember to set the correct AM or PM (an icon to the right of the time display is the PM indicator; there is no AM indicator).
- Press the WAKE Button to select the iPod, radio or alarm buzzer to wake to. A corresponding Wake icon will light up for the selected Wake sound.
- Press the ALARM 1 Button or ALARM 2 Button again to exit the setting mode. The alarm time and wake to mode are set.
Note: Once you set the alarm time, the alarm will be automatically armed. The Alarm icon and Wake icon will appear to indicate the alarm is armed.
Note: Make sure to adjust volume level for comfortable wake up volume.
Charging your iPod
Note: Please make sure you are using the correct insert for your iPod and that it is properly docked into the DMP-P6. Failure to do so may damage your iPod.
- While your iPod is docked in the system, it recharges (until fully charged). Note that non-docking iPods and other players will NOT charge.
Listening to your iPod
- Dock the already playing iPod. The DMP-P6 will automatically turn on and you will hear the music playing from your iPod.
Note: If the iPod volume is too low, the DMP-P6 may not detect that the iPod is in play mode. Press the PLAY/PAUSE Button on the DMP-P6 (or PLAY/PAUSE Button on the remote control) twice to play it.
- When the iPod is docked and in standby mode, press the PLAY/PAUSE Button on the DMP-P6 (or PLAY/PAUSE Button on the remote control) to play it. The iPod Icon will appear on the DMP-P6 LCD display, showing iPod Playing mode.
- Press the PLAY/PAUSE Button again to pause play; press again to resume play.
- Press the VOLUME UP or DOWN on the DMP-P6 (or Volume up and Volume down Button on the remote control) to adjust the system volume.
- Press the MUTE Button on the remote control to turn OFF the sound. Press the MUTE Button again or Volume / buttonson remote control to restore the sound.
- Press or Button to go to the next or previous track. Press and hold while track is playing for high speed forward or reverse music search of the current track.
- To turn off the unit, press the POWER Button or POWER ON/OFF Button on remote control. The iPod will continue charging while in the dock.
Listening to a non-docking iPod or other portable audio devices
If you are using an iPod without a docking port or other MP3 player or other portable audio device, you can still play it through the DMP-P6 via the AUX IN Jack.
NOTE: To use the AUX IN Jack, make sure no iPod is docked in the DMP-P6.
- Plug one end of an audio patchcord (not included) into the headphone or AUX OUT Jack on your device and the other end of the patchcord (not included) into the DMP-P6 AUX IN Jack, located on the back of the unit.
- Turn on and play your device.
- Press the VOLUME UP or DOWN on the DMP-P6 (or Volume up and Volume down Button on the remote control) to adjust the system volume. You may need to adjust your device volume, too.
- To turn off the unit, press the POWER Button (or POWER ON/OFF Button on the remote control). Please remember to turn off your device, too.
Listening to Radio
Note: Extend FM wire antenna fully for best FM reception (do not strip, alter or attach to other antennas). The AM loop antenna should be placed up to 12" away from the unit for best reception. Rotate the AM loop antenna as required for best AM reception.
- Press the BAND/RADIO Button on the DMP-P6 (or the remote control) to play the radio. The radio frequency appears at the lower of the display.
- Press the BAND/RADIO Button on the DMP-P6 (or the remote control) to select AM or FM band.
- Press the SKIP FORWARD or BACKWARD Button on the DMP-P6 (or or Button on the remote control) to tune in the desired station. Press the or Button on the remote control again to Auto scan to the next clear station. Hold for seek mode.
- Press the VOLUME UP or DOWN Button on the DMP-P6 (or Volume up and Volume down Button on the remote control) to adjust the system volume.
- Press the MUTE Button on the remote control to turn OFF the sound. Press the MUTE Button again or Volume / buttons on remote control to restore the sound.
- To turn off the unit, press the POWER Button (or POWER ON/OFF Button on the remote control).
Storing preset stations
The unit enables you to program 10 stations of FM and 10 stations of AM band.
- Press the SKIP FORWARD or BACKWARD Button on the DMP-P6 (or 口 口 or Button on the remote control) to tune to the station you wish to store.
- Press the PROG Button once on the remote control to store the station.
- To store other stations, repeat above steps.
RECALLING PRESET STATION
Press the PRESET Button on remote control repeatedly to select the desired station.
Alarm Operation
- Set the alarm time per Setting Alarm time. To preview the alarm time, just press the ALARM 1 Button or ALARM 2 Button once.
- You can change the sound mode you wish to wake to at any time by pressing the WAKE Button.
- Press the ALARM 1 Button or ALARM 2 Button again to arm or disarm the alarm.
- When the alarm is sounding, press the POWER Button on the DMP-P6 (or POWER ON/OFF Button on the remote control) to turn the alarm OFF. The alarm will come on again the next day at the same time.
- To stop the alarm from coming on the following day, press the ALARM 1 Button or ALARM 2 Button to turn it OFF. The Alarm Icon and Wake Icon will disappear to indicate the alarm is disarmed.
- If the alarm is not turned off after it sounds it will play for approximately 1 hour and then turn off automatically. This cycle will repeat every 24 hours unless the controls are changed.
Note: If a power failure occurs or the AC adaptor is accidentally disconnected, the unit will change to Buzzer alarm to wake you up (provided you have installed back up batteries).
Note: To Wake to iPod, your iPod must be properly docked and off (not in play mode) or no alarm will sound.
Note: When you select Wake To iPod, please make sure your iPod has enough songs to play for 1 hour, otherwise please set the iPod repeat mode to ON.
Note: If you select Wake To iPod but no iPod is present or there is no music on the iPod at alarm time, the DMP-P6 will automatically switch to buzzer alarm.
Sleep Operation
- When the DMP-P6 is off, press the SLEEP Button to enter sleep mode. The unit will automatically turn off after the selected time. Sleep mode has a Gentle Sleep feature which gradually lowers the volume.
- You can adjust the sleep timer to 120, 90, 60, 30, 15 minutes by pressing the SLEEP Button again. Pressing the SLEEP Button while sleep is set to 30 minutes will turn off the unit.
- When the display changes back to show the real time, pressing the SLEEP Button once will show the sleep time remaining. Pressing it again will change sleep time to the next lowest increment.
- DMP-P6 has independent volume setting for sleep mode so you can adjust the sleeping volume without affecting the alarm volume. Press the VOLUME UP or DOWN (or press Volume up and Volume down Button on the remote control) to adjust sleep volume. The sleep volume will remain at that level the next time the you enter sleep mode until controls are changed.
- To stop listening at any time, press the POWER Button (or POWER ON/OFF Button on the remote control).
Snoopze/Dimmer Operation
- Press the SNOOZE/Dimmer Button on the DMP-P6 after the alarm sounds. The alarm will go off and will come on again in approx. 9 minutes. You may repeat this cycle several times during the 1 hour alarm cycle.
- During normal operation, press the SNOOZE/DIMMER Button to control the brightness of the LCD display.
AUX Out Operation
You can connect the DMP-P6 to another line-level device such as an amplifier or recording device through the AUX OUT Jack located at the back of the unit. The volume setting on the DMP-P6 does not affect the line level. Adjust volume level using the volume control on the device you connect to.
Troubleshooting
| Symptom | Possible Problem | Solution |
| Unit doesn't respond (no power) | AC adaptor isn't plugged into a wall outlet or the connector is not plugged into the power supply jack on the back of the unit | Plug the AC adaptor into a wall outlet and plug the connector into the supply jack on the unit |
| Wall outlet is not functioning | Plug another device into the same outlet to confirm the outlet is working | |
| iPod does not dock properly | Using no or wrong iPod insert | Make sure the dock insert is the proper fit for your iPod |
| iPod didn't install properly | Remove your iPod from the dock and check for obstruction on the connectors in the dock and on your iPod. Then reseat it in the dock. | |
| iPod does not respond to the unit | iPod is not installed properly | Remove your iPod from the dock and check for obstruction on the connectors in the dock and on your iPod. Then reseat it in the dock. |
| Your iPod software is too old | Upgrade software on your iPod. For details visit http://www.apple.com/ipod/download | |
| iPod is locked up | Please make sure your iPod is working properly before docking into the unit. Please refer to your iPod manual for details. | |
| Using 1stor 2ndgeneration iPod, iPod Shuffle or other devices. | DMP-P6 cannot control those iPods or other devices. |
Troubleshooting
| Symptom | Possible Problem | Solution |
| iPod didn't charge up | iPod is not installed properly | Remove your iPod from the dock and check for obstruction on the connectors in the dock and on your iPod. Then reseat it in the dock. |
| iPod is locked up/ frozen | Please make sure your iPod is working properly before docking into the unit. Please refer to your iPod manual for details. | |
| iPod is locked up/ frozen | ||
| No AM band radio sound but others OK | AM loop antenna is not connected to the unit | Plug the AM loop antenna connector to the jack on the back of the unit |
| AM band radio is very noisy | AM loop antenna isn't located properly | Move the AM loop antenna away from the main unit and rotate it for best reception |
| Sound is distorted | Volume level is set too high | Decrease the volume |
| Sound source is distorted | If the iPod original sound source (MP3) is of poor quality, distortion and noise are easily noticed with high-power speakers. Try a different audio source such as a music CD. | |
| Remote Control didn't work | Battery weak | Replace current battery with new battery |
| Remote Control is not pointed toward to the DMP-P6 | Point the Remote Control toward the DMP-P6, move within 10 feet of the unit. | |
| Unit gets warm after extended play at high volume | This is normal | Turn unit off for awhile or lower volume |
| Can't hear speakers attached to aux out jack | Speakers lack power source | The signal from the aux out jack needs amplification. Use powered speakers/monitors or other amplified audio device. |
SPECIFICATIONS
GENERAL
Power requirement AC 120V~60Hz
DC 3V "AA" size/UM-3 x 2 pcs for
Tuner MEMORY back up
DC CR2032 3V lithium battery for
Remote control handset
Power consumption AC 25 Watts
Dimension Unit 265 (W) x 160 (D) x 85 (H)mm
RECEIVER SECTION
Receiving bands AM/FM
Tuning range AM 520 - 1710KHz
FM 87.5 - 107.9MHz
AUDIO SECTION
Power output 3 Watts per channel
Speaker impedance 6 ohms
Headphone impedance 8-32 ohms
AUX input sensitivity- 600 mV
ACCESSORIES
Power AC Adaptor 1 pc
Instruction Manual 1 pc
Insert 5 pcs
Remote Control handset with battery 1 pc
AM loop antenna 1 pc
WARRANTY
WARRANTY APPLICATION
New, unused SANYO Audio products purchased through a SANYO authorized dealer in Canada are warranted against manufacturing defects in materials and workmanship for ONE YEAR from the date of purchase by the original retail purchaser for non-commercial use. This warranty only applies in favour of the original retail purchaser of the warranted product.
SANYO CANADA INC.'S RESPONSIBILITY
During the warranty period, SANYO Canada Inc. will repair, or at our option, replace an Audio product which shows evidence of a manufacturing defect in materials or workmanship. Replacement PARTS are warranted for the remaining portion of the warranty period.
WHAT IS NOT COVERED
(a) Audio products purchased outside Canada.
(b) Audio products purchased in a used condition.
(c) Problems due to product set up and installation.
(d) Adjustments that are outlined in the Operating Manual.
(e) Accessory items including antenna, batteries.
(f) Damage in or due to transportation.
(g) Damage due to improper maintenance, improper wiring, accident, abuse, misuse or negligence.
(h) Damage caused by lightning and power surges.
(I) The cost of removal and reinstallation of an Audio product designed for automobile use.
ORIGINAL RETAIL PURCHASER'S RESPONSIBILITY
You, the original retail purchaser, must present your original, dated bill of sale together with this warranty to SANYO Canada Inc. or to an authorized SANYO Service Depot when you make a claim under this Warranty. You, the original retail purchaser, are responsible for any costs of TRANSPORTING the product to and from SANYO Canada Inc. or an authorized SANYO Service Depot.
You also are responsible for the cost of any MAINTENANCE necessary in respect of the product.
WARRANTY BECOMES VOID
This warranty becomes void if the product's serial numbers are altered or removed or if any repair to the product is made other than by SANYO Canada Inc. or by an authorized SANYO Service Depot.
LIMITATIONS
(a) SANYO Canada Inc. reserves the right to change or improve the design of the model of the product warranted hereunder without incurring any obligation to make any modifications to or to install any improvement in or on the product.
(b) In no event shall SANYO Canada Inc. or any of its Authorized Dealers be liable for special or consequential damage arising from the use of this product.
STATUTORY WARRANTYIS
The above provisions do not preclude the operation of any applicable provincial statute which in certain circumstances may not allow some of the limitations and exclusions described in this Warranty. Where any terms of this Warranty are prohibited by such a statute, they shall be deemed null and void but the remainder of this warranty shall remain in effect.
HOW TO OBTAIN WARRANTY SERVICE
Please contact the SANYO Authorized Dealer from whom the product was purchased, or contact us directly at:
SANYO Canada Inc.
1-300 Applewood Cres.
Concord, Ontario
L4K 5C7
1-800-263-2244
www.sanyo.ca