
DMC-1126 - Lecteur audio portable SANYO - Notice d'utilisation et mode d'emploi gratuit
Retrouvez gratuitement la notice de l'appareil DMC-1126 SANYO au format PDF.


| Type de produit | Lecteur audio portable MP3/WMA |
| Marque | SANYO |
| Modèle | DMC-1126 |
| Mémoire interne | 1 Go (Flash) |
| Affichage | OLED bicolore |
| Formats audio pris en charge | MP3 (MPEG1/2/2.5 couche 3), WMA (sans DRM10) |
| Radio FM | Oui, 87,5-108 MHz, 30 stations préréglables |
| Enregistrement | Voix (micro intégré) et radio FM |
| Connectivité | USB 2.0 haute vitesse, prise casque 3,5 mm, logement carte SD/MMC |
| Alimentation | Batterie lithium-polymère rechargeable intégrée |
| Autonomie | Environ 3 heures de charge complète |
| Dimensions | 90,0 x 40,0 x 10,0 mm |
| Poids | 36 g |
| Fonctions supplémentaires | Effets sonores (Normal, Pop, Rock, Classique, Jazz, Basse), modes de lecture (Normal, Répétition une, Répétition tout, Aléatoire), affichage des paroles (ID3), mise à jour du firmware, horloge |
| Systèmes d'exploitation compatibles | Windows 2000/XP (sans pilote), Windows 98 SE (pilote requis) |
| Température de fonctionnement | 0 à 40 °C |
| Accessoires inclus | Casque, câble USB, CD de pilotes (pour Windows 98 SE) |
FOIRE AUX QUESTIONS - DMC-1126 SANYO
Questions des utilisateurs sur DMC-1126 SANYO
0 question sur cet appareil. Repondez a celles que vous connaissez ou posez la votre.
Poser une nouvelle question sur cet appareil
Téléchargez la notice de votre Lecteur audio portable au format PDF gratuitement ! Retrouvez votre notice DMC-1126 - SANYO et reprennez votre appareil électronique en main. Sur cette page sont publiés tous les documents nécessaires à l'utilisation de votre appareil DMC-1126 de la marque SANYO.
MODE D'EMPLOI DMC-1126 SANYO

INSTRUCTION MANUAL
DMC-526/1126
MP3 PLAYER
SANYO Canada Inc.
www.sanyo.ca
NOTES:
- Make sure the player is powered off to prevent it from damage by battery leakage and erosion if the player is not to be used for a long time. Make sure the player is charged once a month at least to prevent the Lithium battery from being exhausted.
- Use of this player is prohibited in atmosphere that is extremely hot, dusty and humid.
- Do not drop the player while using it.
- The battery life time can vary depending on conditions it is used, and the frequency of key operations.
- The player should be charged when:
The icon "□" show.
- Keys are pressed and does not respond
- The player turns off in normal operating process
- The charging is initiated the moment the player is connected to a turned-on PC no matter the player is turned on or not.
FEATURES
- Dual colour OLED display
- Exquisite graphical menu
MP3/WMA digital playback - EARPHONE jack
FM radio, 30 stations can be stored
FM recording, FM broadcast recordable - No driver is needed for WINDOWS 2000/XP
- USB2.0 High speed removal storage hard disc capable of storing data
High quality digital sound recording - Various sound effects
- ID3 text displays song's name, the artist and Lyric sync (pre-programming is needed)
- On line firmware upgrades
Low power consumption
Built-in Lithium battery rechargeable
PLAYER OVERVIEW
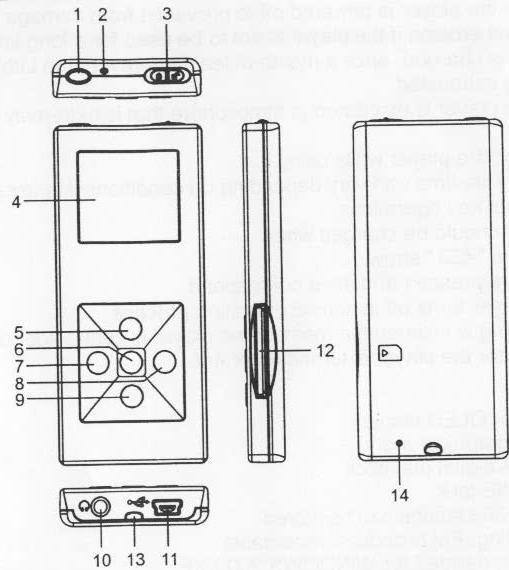
- PLAY/PAUSE/POWER ON/ POWER OFF KEY
- BUILT-IN MICROPHONE
- HOLD BUTTON
- OLED DISPLAY
- VOL+ KEY
-
M KEY (MENU)
-
Prev
8 Next - VOL-KEY
- EARPHONE JACK
- USB port
- SD/MMC CARD SLOT
- HOLE FOR STRING
- RESET KEY
OLED Display
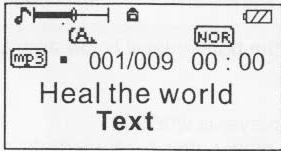
Vol Status 1
USB connection
Battery level
Title of music or recording, track number, time display 001 009 00:00
Play mode selection
Normal, Repeat One, Repeat All, Shuffle Repeat.
EQ sound Effects: Normal, Pop, Rock, Classical, Jazz and Bass
Basic operations
1) Powering on/off
Powering on: Press "PLAY/PAUSE" key to power the player on. The player's LOGO appears in the OLED and then enters the mode at the power off stop play mode. e.g. when power off the player at radio mode, then it enters the radio play mode after power on the player again.
Powering off: Press and Hold "PLAY/PAUSE" key(About 5 seconds will be needed); the Progress bar will show in the OLED. Hold this key until the progress bar has run out.
2) Charging
When the battery level in the OLED of the player shows "□", you need charge it. You may charge it below: Powered on or not, the player begins charging immediately it is connected to a turned-on PC.
NOTES:
- The player needs charging when the battery level is so low that it is not powered on.
- The player will turn off automatically when the battery level is low and "Low battery" shows in the OLED.
- Charging should not exceed 8 hours.
- The battery indicator may flicker when the player is working.
NOTES: You are recommended to charge the player after it is turned off.
Charging it fully takes about 3 hours.
MP3/WMA play back
Notes: the player is capable of playing MP3 (the third layer of MPEG1, MPEG2 and MPEG2.5) and WMA.
1) Play back
Press"PLAY/PAUSE" key to begin the current track in STOP or PAUSE mode. The OLED shows Play indicator, Repeat mode, Vol level, track number that is playing, the elapsed time of the playing track, and sound effects. And also the lyrics if programmed before hand.
2) Pause/Stop/Power off
PAUSE: Press "PLAY/PAUSE" key to pause in Play mode. The Pause indicator "II" shows in the OLED.
STOP: Press and hold "PLAY/PAUSE" key (about 2 seconds is needed) in Play or Pause mode, and the Stop indicator "■" shows in the OLED. It stops play. Powering off: Hold "PLAY/PAUSE" key (about 5 seconds is needed) in Play or Pause or Stop mode until the progress bar has run out to power the player off. Notes: For power saving purposes, the system turns off automatically by default if the player is not touched in a period of 60 seconds.
3) Prev/Next
Press "▶" key briefly to go the next track and "▶" key to previous track. Hold "▶" to search forward and OLED shows "▶", the elapsed time increases rapidly; hold "▶" to search backward and OLED shows "▶", the elapsed time decreases rapidly.
4) Adjusting the Volume
Press "VOL+" key to increment the volume and "VOL-" key to reduce the volume. The OLED shows the changing volume level "1 1 1".
5) Setting EQ sound effect
Press "M" key briefly in music or audio file play to enter the main menu, use "▶" or "←" key to select "setting" and press "M" key again to confirm. Select "EQ" item and press "M" key to confirm. Use "▶" or "←" key to select between the six sound effects.
6) Setting play modes
Press "M" key briefly in music or audio file play mode to enter main menu, use "▶→" or "▶←" key to select "setting" and press "M" key to confirm, select "Play mode" and press "M" key again to confirm. Use "▶→" or "▶←" key to select among the various play modes: Normal, Repeat One, Repeat All, Shuffle Repeat.
Press "M" at last to confirm the selection and return to the previous menu.
Voice Play
Notes: the player plays only WAV files in IMA ADPCM format. You may refer to the Trouble Shooting page for detail. WAV files do not support Id3 display.
Operations:
1) Play
2) Pause/Stop/Power off
3) Previous Recorded file/Next Recorded file, Fast Forward/Fast Backward
4) Volume Adjusting
5) Play modes settings
Please refer to the detailed description about Music play in this same book.
Folder feature
This Folder feature facilitates you to locate a specific file in a convenient way. In music play/stop/pause mode, Press briefly "M" key to enter main menu and use "▶▶" or "▶▶" key to select "Folder" and the "M" to enter Folder menu. Use "▶▶" or "▶▶" key to select the desired file, Pressing "M" key when you have located the track will appear three options menu(Play, Delete, Exit) in the OLED, Choosing "Play" to play the chosen file or choosing "Delete" to initiate deleting it, then an menu confirming words "Yes" and "Cancel" show in the OLED. Use "▶▶" or "▶▶" to switch to "Yes" and then press "M" key to permanently delete the file and skip to the file immediately after this deleted one. You may use "▶▶" or "▶▶" key to switch to "Cancel" and then press "M" key to give up deletion.
You can select the Exit to exit the current menu.
Notes: A maximum of 50 folders or 650 files can be stored in the player.
You can press "POWER/PLAY/PAUSE" key return to music PLAY/STOP /PAUSE menu mode.
FM Tuner
1) Entering FM Tuner
Press briefly "M" key to enter main menu and use "▶▶" or "▶▶" to key select "FM TUNER" and then "M" to confirm.
2) Play music
Press"M" key in radio broadcasts to enter FM menu, select Play music and then press "M" key again to confirm returning to Music play.
3) Auto scan
A. When in FM TUNER mode:
Search for the next available station: press "PLAY/PAUSE" key to switch to FM search mode, and hold 一一 key to search for the next station available at higher frequency; hold 一一 key to search for the next station available at lower frequency.
Cease Auto scan: Press "▶▶" or "▶▼" key in Auto scan process to stop.
B. Auto Scan: When in FM TUNER mode, press "M" key to enter the FM menu and use "▶→" or "←" to select Auto Scan, and then press "M" key to scan all stations within the frequency range and store those available automatically. The player can store a maximum of 30 stations in memory.
Notes: 1. The preset station is 87.5MHz by default when no searching is done or no station is stored.
2. Use "POWER/PLAY/PAUSE" key to select between the search and preset mode.
4) Saving a station
When in FM seek broadcast mode:
Press "M" key in radio broadcasts to enter FM menu, select "Save station" item and then press "M" key again. Use "▶" or "▶" key to select a preset position, then press "M" key to confirm saving the current station to memory.
Notes: the saving operation described above is temporary and the stations saved could be lost in case of abnormal shutting off (e.g. Player is switched off by means of the power switch). You should hold "M" to turn off the player to make sure the stations saved will not be lost.
5) Delete a preset station
When in preset FM station broadcast mode:
Press" M" key in radio broadcasts to enter FM menu, select DELETE station item and then press MENU key to confirm. OLED shows "DEL ?", press "M" key to confirm your final deletion step or press "POWER/PLAY/PAUSE" key to exit DELETE mode.
6) To exit: Press "M" key to exit FM Tuner mode and enter the playback mode.
Record
A. Shortcut to Record Operation:
Press and hold "M" key until the OLED shows an icon REC and flashing to prepare the player for recording through the in-built MIC. Speak directly to the Player or position it to a sound source, the player begins recording and storing simultaneously the sound in IM ADPCM 8KHz format.
B. To listen to what is recorded:
Press "M" key to enter main menu display and scroll among the many items to locate Voice. Press "M" key to confirm selection. The file first recorded will be listed as Voice No. one, you may press PREV/NEXT key to select the specific file for playback. Press PLAY/PAUSE key to begin.
C. Record from an FM station:
Press and hold "M" key in FM broadcast mode, and use "M" key much in the same way as you do settings above to record FM broadcasts. You may listen to what is recorded via the earphones.
Notes: Fxxx.wav indicates recorded file from FM broadcasts and is saved in FM leaflet; MIC xxx.wav indicates recorded file from MIC and is saved in VOICE leaflet.
D) Stop Recording:
Press briefly "M" key to stop recording while it is going on.
Power saving setting
Press briefly "M" key to enter the main menu and use "▶" or "←" key to select "SETTING" and press "M" to confirm.Scroll to "Powerset" and press "M" to enter. Use "▶" or "←" key to select among(Disable,30 MIN, 60MIN, 90MIN).
Press "M" key to confirm and return to the previous menu.
Notes: when "Disable" is selected, the player will not shut off automatically until the battery runs out.
Language setting (optional)
Press "M" key to enter Main Menu, use "▶▶" or "▶▼" key to Scroll to "Setting" item and press "M" key to confirm. Scroll To "Language" and press "M" to enter. If there are several language options, You may use "▶▶" or "▶▼" key choose among them (ENGLISH, GERMAN, FRENCH, SPANISH, ITALIAN PORTUGUESE). Language selection is instantly effective, and you need turn off the player as described in this Instruction book in order to save this language setting. Finally you May press "M" to confirm.
Backlight setting
Press "M" key briefly to enter the Main Menu, use or key to scroll to "Setting" and press "M" key to confirm. Scroll to "Backlight" and press "M" to enter. You may use or key to select among "5 seconds", "10 seconds", "Always on" and "Always off". And finally press "M" key to confirm.
Contrast setting
Press "M" key briefly to enter the Main Menu, use "▶" or "▶" key to scroll to "Setting" and press "M" key to confirm. Scroll to "Contrast" and press "M" to enter. Use "▶" or "▶" key to adjust the Contrast level. And finally press "M" key to confirm.
Reset Setting
Press "M" key briefly to enter main menu, use "▶▶" or "▶▼" key to select "setting" and press "M" key to confirm, select "reset" and press "M" key again to confirm, the player will reset its function.
About
Press briefly "M" key, use "▶" or "←" key to scroll to "About" and then press "M" key to confirm. The Version, Total bytes and Free bytes will show in the OLED. Press "M" key to exit this mode.
Storage
Press briefly "M" key, use or key to scroll to "Storage" and then press "M" key to confirm. Use or key to make choice between Internal and SD/MMC Card.
Lock function
The lock function disables all of the buttons on the MP3 player. This prevents you from accidentally pressing the buttons while using the MP3 player on the move. Once all adjustments/selections are finished, slide the HOLD switch to the ON position, " 品 " appears on the display. This deactivates all buttons functions and eliminates the possibility of accidentally pressing buttons. Slide the HOLD switch to the OFF position to unlock all buttons, " 品 " disappears.
Reset button
When using the Mp3 player, you will come across some problems that the player doesn't work or halt accidentally; you can use a needle or a small, slender implement to poke the Reset button in the bottom of the player, the Mp3 player will turn off automatically and then please reboot the player, the player will recover the normal mode.
INSERT AN SD OR MMC CARD INTO THE PLAYER
Insert an SD or MMC card into the slot of the player.
Press and hold the Play/Pause button to turn on the player;
The player will read by default from the SD or MMC card connected.
To alter playback from the SD/MMC card to the flash memory unit,
Press briefly "M" key, use or key to scroll to "Storage" and then press "M" key to confirm. Use or key to make choice between Internal and SD/MMC Card.
Note: It is strongly recommended that you insert the SD/MMC card in the Card Slot while the player is in OFF mode.
Note: When the SD/MMC card is inserted and the Player is reading data from the Card memory, you will need to be patient while it is reading because sometime (e.g. 6-8 sec for 256MB SD card) will be needed.
Interacting with the Personal Computer
(1) Install the driver program
NOTE: A. It is no need to install the driver program if you are a Win 2000/XP user. While you need install this driver program if you are Win98 SE user.
B. Do not connect the MP3 player to your PC while the installation is under way.
Follow the steps specified below to install the driver program.
A. Place the included driver disc in the disc driver of your PC.
B. Double click on the USB Disk Win98 Driver Version 1.51.20 file to activate the windows instructions for installation.
C. Selecting the language in the menu that you want to install, Click the "Yes".
D. The screen shows a window with" Welcome to the Install Shield Wizard for USB Disk Win98 Driver"requesting you to click NEXT, Click the "Browse" to select the folder to locate the destination, then Click the NEXT; then select a program folder, then click the NEXT.
Your PC will upload the selected Driver program automatically.
(2) Connected to a PC
Connect the player to your PC .There will be a minor window indicating that "A new hardware is detected" on the screen, then the PC will automatically upload the driver program and install the detected hardware (the player). Click on the icon "My Computer" and you will find another hard disc named "Removable Disc E" (the name for this device may vary according to your computer) and the OLED of the player says " MTP
(3) Upload or Download files
This MP3 player has the same features of a hard disc of the PC after it is connected correctly to the PC with the help of the driver program, and you may upload onto or download from the player files as you do other hard discs of the PC.
Special Notes: Do not unplug the Mp3 player while file transferring is in progress. This may destroy the player's firmware and thus make it unworkable. Refer to the Trouble shooting page for details.
To copy MP3 format files and WMA (without DRM10) files:
- Click on the My Computer icon on desktop and then click on the Removable Drive Icon;
-
Copy music files of MP3/WMA format in one of your hard discs and paste them in the Removable Disc;
-
DRM: Windows Media digital rights management (DRM) is a proven platform to protect and securely deliver contents for playback on a computer, portable or Internet devices. For more information, please access the website of Microsoft.com.
To copy WMA files with DRM protection (Optional) (A specific Player is needed for this feature):
Before you can play digital music with DRM protection, you may first of all install Windows Media Player 10 or later version onto your PC. And you need have your PC equipped with Windows XP Service Pack 2 as the operating system.
- Follow the steps below to synchronize WMA music files with DRM protection
- Open the Windows Media Player and click on SYNCHRONIZE on its operation panel.
- Select the desired track(s) then press START to begin synchronization.
- Close the Windows Media Player to terminate the synchronization process. To exit the Removable Disc click the Removable disc icon on the lower right corner of the computer screen and follow the instructions given by the computer system; unplug the USB cable only after you have received the instructions from the PC which guarantee that this device connected to it can be safely removed.
Special Notes: You need uninstall the USB device following the steps given by the computer if you are a Win2000/Win XP user. Otherwise you are risking losing or damaging data stored in the player.
It is necessary you observe the steps below to unplug the player:
A. Double click on the USB icon on the lower right corner of the screen as indicated below:
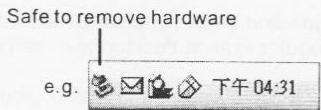
B. Click STOP button after a window is prompted up on the PC screen.
C. Click OK button afterwards.
D. Click on OK button when as indicated on the right is shown on the screen and you may unplug the player safely at this time.
(4) Upgrade/restore firmware
Do not upgrade the player's firmware unless it does not work normally (for instance, it is not to be powered on). Follow the steps below to upgrade the player's firmware.
A. Connect the player firmly and correctly to the PC with the supplied USB cable.
B. After that, the PC should display the USB icon as shown below.
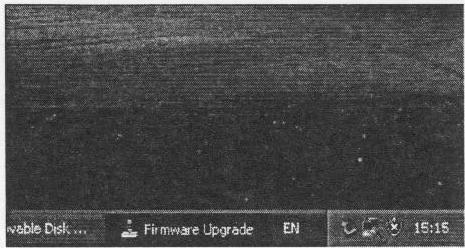
C. Double click on the Upgrade program (FWISP.exe in this example) to execute.

FWISP Upgrade MFC Application
D. Press OK for the upgrade program to proceed. (The upgrade program is developed to support multi-language by Unicode).
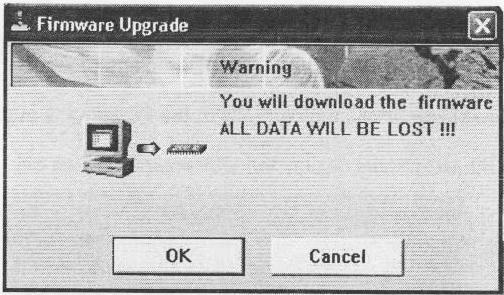
Note: If you upgrade the player, you will lost all data in the flash memory, pls backup the data before you upgrade.
E. Press Yes, for the firmware to be upgraded, where the Device Firmware will indicate the Existing Firmware version as already stored in the device, and Upgrade Firmware will show the new firmware version to be written in.
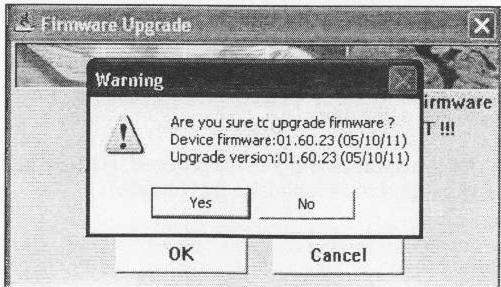
F. Press OK when firmware upgrade completed. After that, please plug the upgraded device and re-plug-in for the target PC Host to recognize this latest firmware and operate as expected.
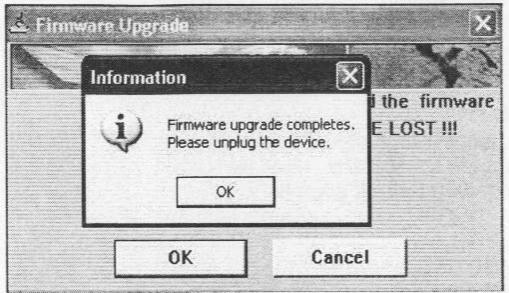
Now, firmware upgrade operation is completed successfully.
(5) Formatting
A. Connect the player correctly to the PC and press P button of the player.
B. Click on the right button of the mouse after highlighting the Removable Disc with the mouse.
C. Click on the Format item as indicated on the right:
D. Click on Start button when the Format window pops up, and then OK button to begin formatting the Flash Memory.
E. Click on Ok button when formatting is done.
SPECIFICATIONS
Internal Flash Memory: 512MB/1GB(Refer to indicator of outer packaging)
Recording duration: 32H/64H
Outer dimensions: 90.0mm40.0mm10.0mm
Net weight: 36 G
Power supply: Built-in rechargeable Lithium polymer battery.
Memory Media: Built in Flash Memory
MIC: Built in Condenser MIC
Input: Built in MIC
Output: Dual channel Earphones (32 Ohms)
FM Tuning Range: 87.5-108MHz
Operating Temp: 0-40 Celsius degrees
TROUBLE SHOOTING
1) Why this MP3 does not play some MP3 music?
Standard MP3 music refers to the third layer of MPEG1, MPEG 2 and MPEG
2.5. While the second layer of MPEG1 can have MP3 as its ext filename, it is not standard MP3 music and incompatible with this player. User can use some related software on the PC to rip them to standard MP3 music file.
2) Why are the total bytes of the player inconsistent with what is claimed?
The internal firmware of the player can take some space, so the total bytes of the player shown in an OS can be inconsistent with what is claimed. This is in conformity with related regulations.
3) About WAV format.
The player supports only WAV files in IMA ADPCM format. If you expect the player to support other WAV file in another format, you may create a new folder in Removable disc and copy the WAV files to this folder. Never put these WAV files in Root folder or VOICE folder because this will cause the player to go dead when it is playing these files in this case.
4) Why does the player make slower responses?
Fragments (similar to fragments in hard disc of PC) that would exist in the internal flash memory of the player when it has worked for a pretty long time and is subject to constant deleting operations can result in slow responses from the player. The suggested solution is that flash memory of the player should be formatted with the help of a special software of the PC.
5) What should I do when the internal firmware of the player is damaged? This is caused by ill operation. And you can upgrade/restore software using your PC.
6) What should I do when the player responds in an abnormal way (e.g dead)? You may power off the player with the Power switch when the player is not working in a normal manner, and then power on the player again after a period of time.
7) What should I do when the player refuses to be powered on after a period of non-use?
The player cannot be turned on when the battery level is extremely low or it has ever shut off in an abnormal manner. This is for the protection of the Lithium battery. You may charge the player with the USB cable or the supplied charger. After fully charged, the player can be turned on again.
8) How to update the firmware of my player?
Visit the website: http://www.mp3omni.com for detailed instructions to update the firmware of your player. Download the related Manual for flesh-out instructions on the link Firmware update directive.
NOTE: This equipment has been tested and found to comply with the limits for a Class B digital device, pursuant to Part 15 of the FCC Rules. These limits are designed to provide reasonable protection against harmful interference in a residential installation. This equipment generates, uses and can radiate radio frequency energy and, if not installed and used in accordance with the instructions, may cause harmful interference to radio communications.
However, there is no guarantee that interference will not occur in a particular installation. If this equipment does cause harmful interference to radio or television reception, which can be determined by turning the equipment off and on, the user is encouraged to try to correct the interference by one or more of the following measures:
-- Reorient or relocate the receiving antenna.
-- Increase the separation between the equipment and receiver.
-- Connect the equipment into an outlet on a circuit different from that to which the receiver is connected.
-- Consult the dealer or an experienced radio/TV technician for help.
The manufacturer is not responsible for any radio or TV interference caused by unauthorized modifications to this equipment. Such modifications could void the user authority to operate the equipment.
This device complies with Part 15 of the FCC Rules. Operation is subject to the condition that this device does not cause harmful interference.

Trade name Model: SW0018
- INSTRUCTION MANUAL
- DMC-526/1126
- NOTES:
- FEATURES
- PLAYER OVERVIEW
- OLED Display
- Basic operations
- 1) Powering on/off
- 2) Charging
- MP3/WMA play back
- 1) Play back
- 2) Pause/Stop/Power off
- 3) Prev/Next
- 4) Adjusting the Volume
- 5) Setting EQ sound effect
- 6) Setting play modes
- Voice Play
- Operations:
- Folder feature
- FM Tuner
- 1) Entering FM Tuner
- 2) Play music
- 3) Auto scan
- 4) Saving a station
- 5) Delete a preset station
- Record
- Shortcut to Record Operation:
- To listen to what is recorded:
- Record from an FM station:
- D) Stop Recording:
- Power saving setting
- Language setting (optional)
- Backlight setting
- Contrast setting
- Reset Setting
- About
- Storage
- Lock function
- Reset button
- INSERT AN SD OR MMC CARD INTO THE PLAYER
- Interacting with the Personal Computer
- Install the driver program
- Follow the steps specified below to install the driver program.
- Connected to a PC
- Upload or Download files
- To copy MP3 format files and WMA (without DRM10) files:
- Upgrade/restore firmware
- Formatting
- SPECIFICATIONS
- TROUBLE SHOOTING
Marque : SANYO
Modèle : DMC-1126
Catégorie : Lecteur audio portable