
CLT-D6720 - Téléphone fixe SANYO - Notice d'utilisation et mode d'emploi gratuit
Retrouvez gratuitement la notice de l'appareil CLT-D6720 SANYO au format PDF.


| Type de produit | Téléphone fixe combo avec répondeur numérique (combiné filaire et sans fil DECT 6.0) |
| Dimensions de la base | 196 x 152 x 67 mm |
| Poids de la base | 541 g |
| Dimensions du combiné sans fil | 141 x 44 x 24 mm |
| Poids du combiné sans fil | 125 g |
| Dimensions du chargeur | 91 x 80 x 45 mm |
| Poids du chargeur | 75 g |
| Alimentation de la base | 120 V / 60 Hz, 8 V CC, 500 mA (adaptateur secteur UD4120080050G) |
| Alimentation du chargeur | 120 V / 60 Hz, 6 V CC, 300 mA (adaptateur secteur DPX351314) |
| Batterie du combiné | NiMH 3,6 V, 650 mAh (AAA), préinstallée (modèle 3SN-AAA65H-S-F) |
| Piles de secours de la base | 3 piles alcalines AA (non incluses) pour sauvegarde des réglages et appels |
| Autonomie du combiné | Veille : 120 h / Communication : 5 h |
| Capacité du répondeur | 13 minutes d'enregistrement, jusqu'à 50 messages |
| Répertoire | 60 contacts (24 chiffres, 16 caractères) |
| Identification d'appel | 40 entrées |
| Fonctions principales | Intercom, conférence à 3, transfert d'appel, écran LCD, touches tactiles, mode conversation confidentielle, verrouillage intelligent des touches, fonction bébé, horloge et alarme |
| Entretien et nettoyage | Nettoyer avec un chiffon doux et humide. Ne pas utiliser de produits chimiques (benzène, solvants). Nettoyer les contacts de charge avec une gomme à effacer. |
| Sécurité | Ne pas utiliser près de l'eau. Débrancher en cas d'orage. Utiliser uniquement les adaptateurs SANYO spécifiés. |
| Pièces détachées et réparabilité | Batterie de rechange (NiMH 3,6 V, 650 mAh) ; adaptateurs secteur. Réparations par un centre agréé SANYO. Garantie 1 an. |
| Informations générales | Marque : SANYO ; Modèle : CLT-D6720 ; Conçu pour le Canada ; Assistance SOS : 1-800-263-2244 |
FOIRE AUX QUESTIONS - CLT-D6720 SANYO
Questions des utilisateurs sur CLT-D6720 SANYO
0 question sur cet appareil. Repondez a celles que vous connaissez ou posez la votre.
Poser une nouvelle question sur cet appareil
Téléchargez la notice de votre Téléphone fixe au format PDF gratuitement ! Retrouvez votre notice CLT-D6720 - SANYO et reprennez votre appareil électronique en main. Sur cette page sont publiés tous les documents nécessaires à l'utilisation de votre appareil CLT-D6720 de la marque SANYO.
MODE D'EMPLOI CLT-D6720 SANYO
MANUEL D'INSTRUCTIONS
CLT-D6720
Combiné téléphonique numérique sans fil et avec fil avec répondeur numérique
tactile
dect 6.0
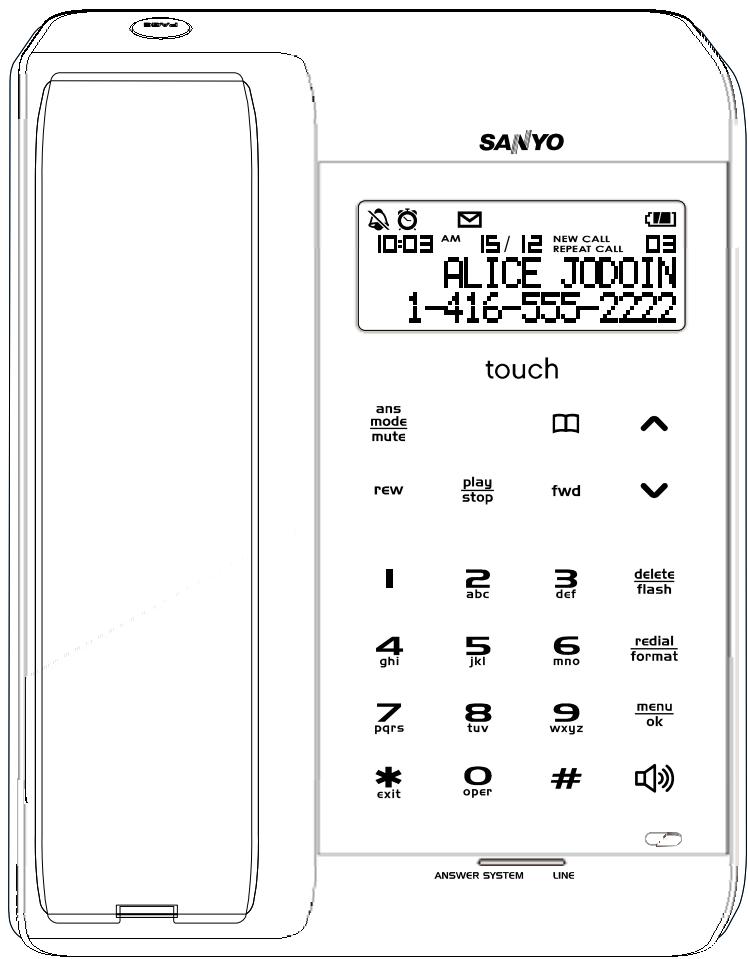
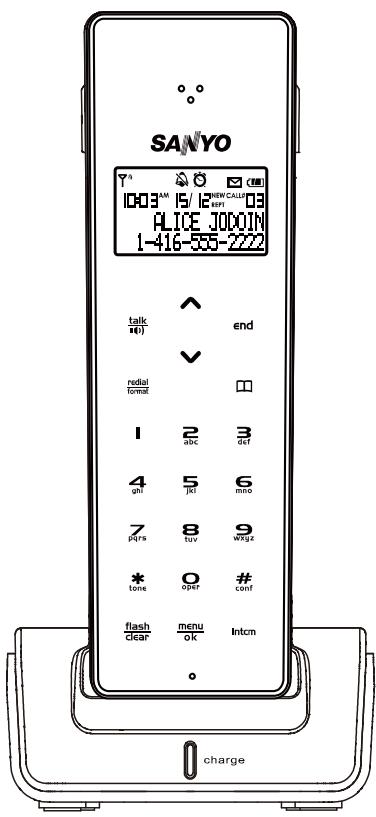
IMPORTANT
Chargez la batterie du combiné pendant 15 heures ou plus avant la première utilisation du combiné sans fil.
INSTALLATION IMMÉDIATE : 3 piles alcalines AA (non incluses) dans la base pour une alimentation de secours en cas de panne de courant.
CONSIGNES DE SÉCURITÉ IMPORTANTES
Lors de l'utilisation de votre équipement téléphonique, des précautions de sécurité de base doivent toujours être suivies pour réduire les risques d'incendie, de choc électrique et de blessures, notamment :
- Ne pas utiliser ce produit près de l'eau, par exemple près d'une baignoire, d'un lavabo, d'un évier de cuisine ou d'un bac à lessive, dans un sous-sol humide ou près d'une piscine.
- Évitez d'utiliser un téléphone (autre qu'un téléphone sans fil) pendant un orage électrique. Il peut y avoir un risque à distance de choc électrique dû à la foudre.
- N'utilisez pas le téléphone pour signaler une fuite de gaz à proximité de la fuite.
- Utilisez uniquement le cordon d'alimentation et les piles indiqués dans ce manuel. Ne jetez pas les piles au feu. Elles peuvent exploser. Consultez les codes locaux pour d'éventuelles instructions spéciales d'élimination.
- ATTENTION RISQUE D'EXPLOSION SI LA BATTERIE EST REMPLACÉE PAR UN TYPE INCORRECT. ÉLIMINEZ LES BATTERIES USAGÉES CONFORMÉMENT AUX INSTRUCTIONS. UTILISEZ UNIQUEMENT AVEC (MARQUE : SANIK MODÈLE N° : 3SN-AAA65H-S-F ; (3,6 V 650 mAh) BATTERIE RECHARGEABLE NiMH)
CONSERVEZ CES INSTRUCTIONS
TABLE DES MATIÈRES
INTRODUCTION 4
Caractéristiques principales 4 Contenu de l'emballage 4
NOMS ET COMMANDES 5
Unité de base - vue de face. 5 Unité de base - vue de dessous et support mural. 6 Combiné sans fil tactile - vue de face. 7 Symboles de l'écran LCD 8
SÉCURITÉ ET ENTRETIEN 8
Précautions de sécurité 8 Entretien de votre produit 8 Attention. 9
POUR COMMENCER 10
Connexion de l'alimentation et de la ligne téléphonique 10 Installation des batteries 10 Avertissement de batterie faible. 12 Fixation du clip de ceinture 12 Montage mural de l'unité de base. 12 Réception entre l'unité de base et le combiné sans fil 13
MENUS DU TÉLÉPHONE 13
Statut et messages 13 Navigation dans les menus principaux des téléphones 14 Menus de l'unité de base 15 Menus du combiné sans fil 16
FONCTIONS DE BASE 18
Mode veille et mode économie d'énergie 18 Passer et recevoir des appels 18
RÉPERTOIRE 20
Utilisation des touches pour saisir du texte 20 Enregistrer des numéros 21 Modifier des numéros 21 Appeler des numéros enregistrés 21 22
IDENTIFICATION DE L'APPELANT 22
Consulter / appeler les enregistrements d'identification de l'appelant 22 Supprimer 1 ou tous les enregistrements d'identification de l'appelant 22 Enregistrer les enregistrements d'identification de l'appelant dans le répertoire 23 Modifier le numéro d'identification de l'appelant avant de composer 23 23 Appels manqués 23 Message en attente 23
RÉGLAGES DES FONCTIONS 24
Modifier les réglages d'affichage 24 Pour attribuer un nom à un combiné - combiné sans fil uniquement 24 Modifier la sonnerie et les tonalités des touches 25
SOMMAIRE
Configuration tonalité/impulsions 25 Durée de flash 26 Verrouillage intelligent des touches - combiné sans fil uniquement 26 Verrouillage manuel des touches 26 Modifier l'indicatif régional 26 Appel bébé 26 Réponse automatique - combiné sans fil uniquement 27
FONCTIONS SPÉCIALES 27
Réglages de l'horloge et de l'alarme 27 Appel de la base vers le combiné 28 Enregistrement 29
RÉPONDEUR NUMÉRIQUE 29
Options du menu 30
FONCTIONS DU RÉPONDEUR - UNITÉ DE BASE UNIQUEMENT 30
Annonces 31 Délai de sonnerie 32 Filtrer les appels 32 Accès à distance au répondeur 33 Mémoire pleine 34
RESET 34
PARAMÈTRES PAR DÉFAUT 34
AJOUT DE COMBINÉS SANS FIL SUPPLÉMENTAIRES 35
DÉPANNAGE 35
REMPLACEMENT DE LA BATTERIE - COMBINÉ SANS FIL UNIQUEMENT 36
Remplacement et manipulation de la batterie 36 Assurez-vous que le téléphone est éteint avant de remplacer la batterie. 36
COUPURE DE COURANT 36
RECYCLAGE DES BATTERIES NICKEL-MÉTAL HYDRURE 36
PRISE POUR CASQUE D'ÉCOUTE 37
ENTRETIEN 37
OPTIMISER LES PERFORMANCES DE LA BATTERIE 37
CARACTÉRISTIQUES TECHNIQUES 38
INFORMATIONS TECHNIQUES 39
GARANTIE SANYO COMFORT 40
LIGNE D'ASSISTANCE SOS 42
INTRODUCTION
Félicitations pour l'achat de ce téléphone SANYO Combo Touch – filaire/sans fil avec répondeur numérique. C'est la solution complète pour la maison ou le SOHO (petit bureau / bureau à domicile), vous offrant un téléphone élégant avec une technologie innovante de détection tactile sans clé qui améliore votre expérience.
Caractéristiques principales
- Première technologie mondiale de détection tactile sans clé
- Le capteur de mouvement détecte le mouvement de la main pour le déclenchement automatique du clavier
- La dernière plateforme DECT (téléphone sans fil numérique amélioré) n'interfère pas avec les fours à micro-ondes, les routeurs sans fil, les moniteurs pour bébé, etc.
- Le mode exclusif de conversation confidentielle bloque l'audio des autres téléphones du système combo (filaire ou sans fil) pendant un appel actif, jusqu'à ce qu'il soit "invité"
- 60 entrées de répertoire avec fonction de recherche et d'édition
- Enregistre les 20 derniers numéros. Stocke 40 enregistrements d'identification de l'appelant entrants
- Indicateur visuel d'appel en attente (abonnement au service du fournisseur requis) avec bouton flash et temps de flash réglable pour correspondre aux caractéristiques de tout fournisseur. Un seul jack téléphonique requis
- Interphone / Transfert d'appel
- Conférence entre le combiné et le téléphone filaire sur la base
- Notification de message en attente / appels manqués. Fonctions d'horloge / réveil
Unité de base avec fil :
5 sonneries - Affichage multilingue - Répondeur numérique sans cassette avec une capacité de 13 minutes pour jusqu'à 50 messages - Message sortant personnalisé ou prédéfini et fonction d'écran d'appel - Accès à distance au répondeur
Combiné sans fil :
- Verrouillage intelligent des touches pour éviter les pressions accidentelles lors d'une conversation
- Haut-parleur du combiné
- Autonomie en veille : 120 heures / Autonomie en communication : 5 heures
Contenu de l'emballage
Assurez-vous que votre emballage contient chacun des articles suivants :
Unité de base avec fil
- Unité de base avec combiné et répondeur
- Support mural pour l'unité de base
- Adaptateur secteur de l'unité de base (Modèle : UD4120080050G) Cordon téléphonique et cordon en spirale
Combiné sans fil
- Chargeur du combiné
- Batterie rechargeable haute performance NiMH du combiné (préinstallée)
- Clip ceinture
- Adaptateur secteur pour chargeur (Réf. : DPX351314)
Articles généraux
- Manuel d'utilisation
- Chiffon de nettoyage
REMARQUE : Gardez ce manuel à portée de main lorsque vous utilisez votre nouveau produit. Il contient des instructions pratiques étape par étape, ainsi que des spécifications techniques et des avertissements.
Unité de base - vue de face
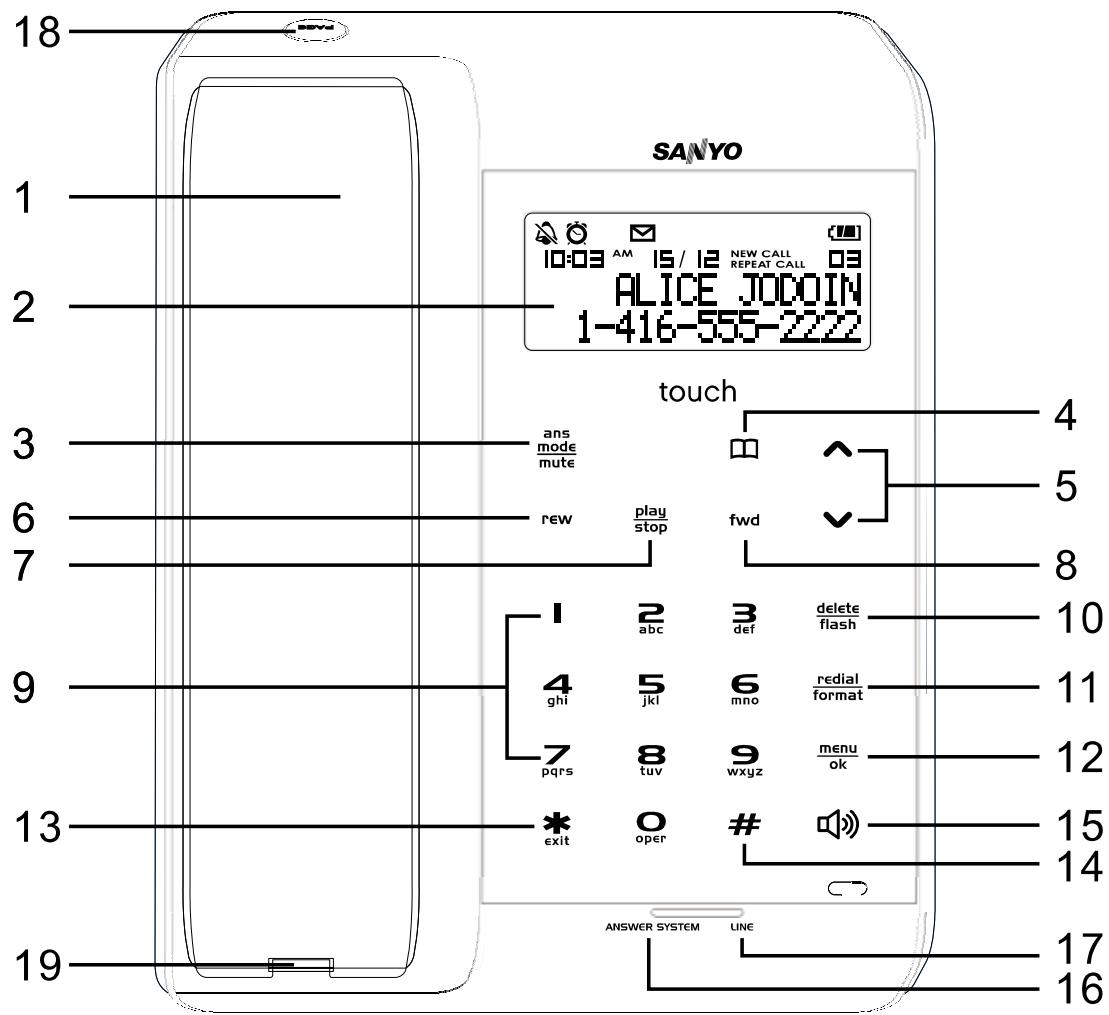
- Combiné
- Écran LCD
- : Mode répondeur / Mute et réactivation du microphone
- : Répertoire
- et : Contrôle du volume / Consultation du journal des appels / Navigation dans les menus et les paramètres
- rew : Retour arrière du message
- play : Lecture / Arrêt du message
- fwd : Avance rapide du message
- Clavier : clavier alphanumérique
- : Supprimer du texte / Activer le mode appel en attente / Quitter le sous-menu
- : Recomposer le dernier numéro / Formater l'indicatif régional ou les numéros longue distance
- [menu] : Accéder au menu principal / Confirmer un réglage / Transfert d'appel
- Caractère spécial / Retour au mode veille
- # : Basculer entre majuscules et minuscules
- : Active le haut-parleur
- VOYANT DU RÉPONDEUR : indicateur de mode du répondeur 17. VOYANT DE LIGNE : indicateur de ligne en usage 18. PAGE : appelle le combiné 19. Prise du cordon en spirale du combiné
Base - vue de dessous et support mural
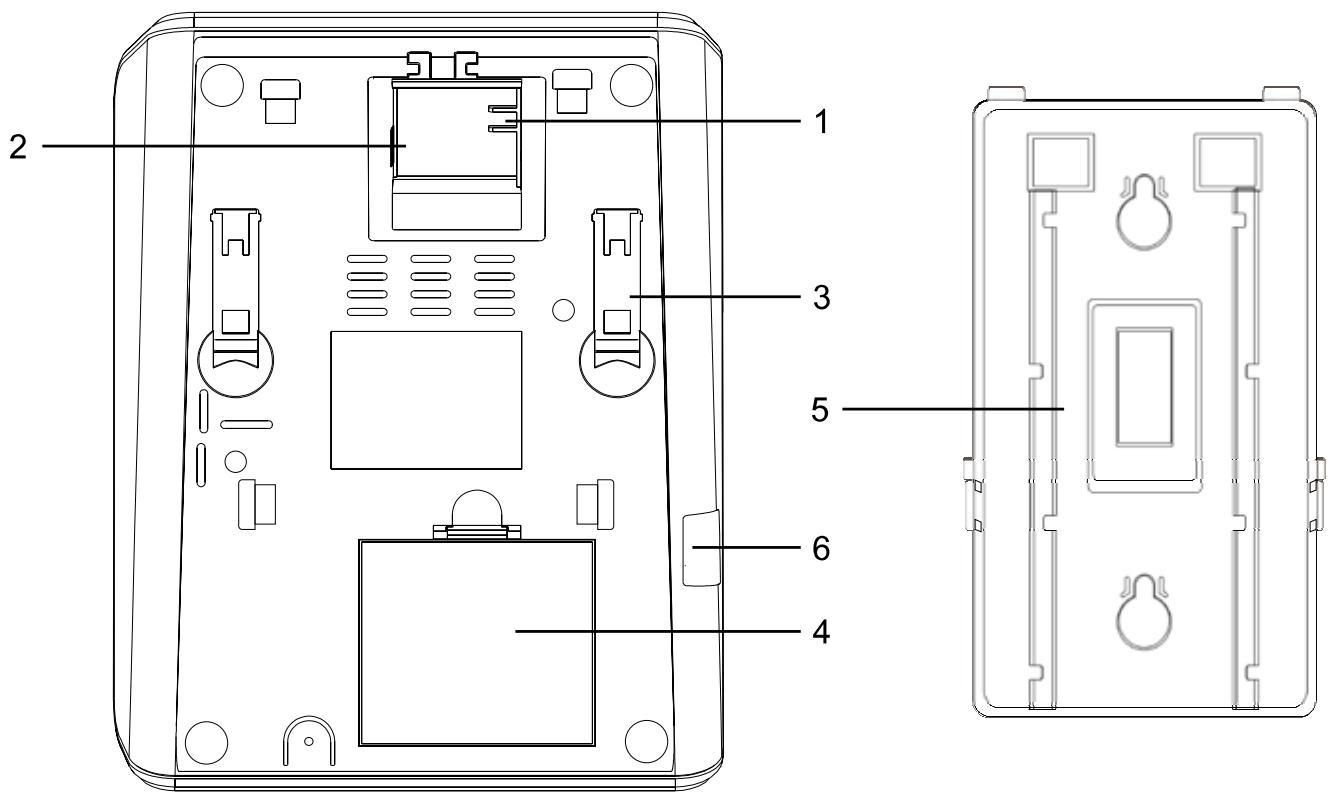
- Prise de ligne téléphonique
- Prise de l'adaptateur secteur
- Pieds de support pliables
- Compartiment à piles pour secours en cas de panne de courant
- Support mural
- Prise du cordon en spirale de la base
Téléphone sans fil à combiné tactile - vue de face
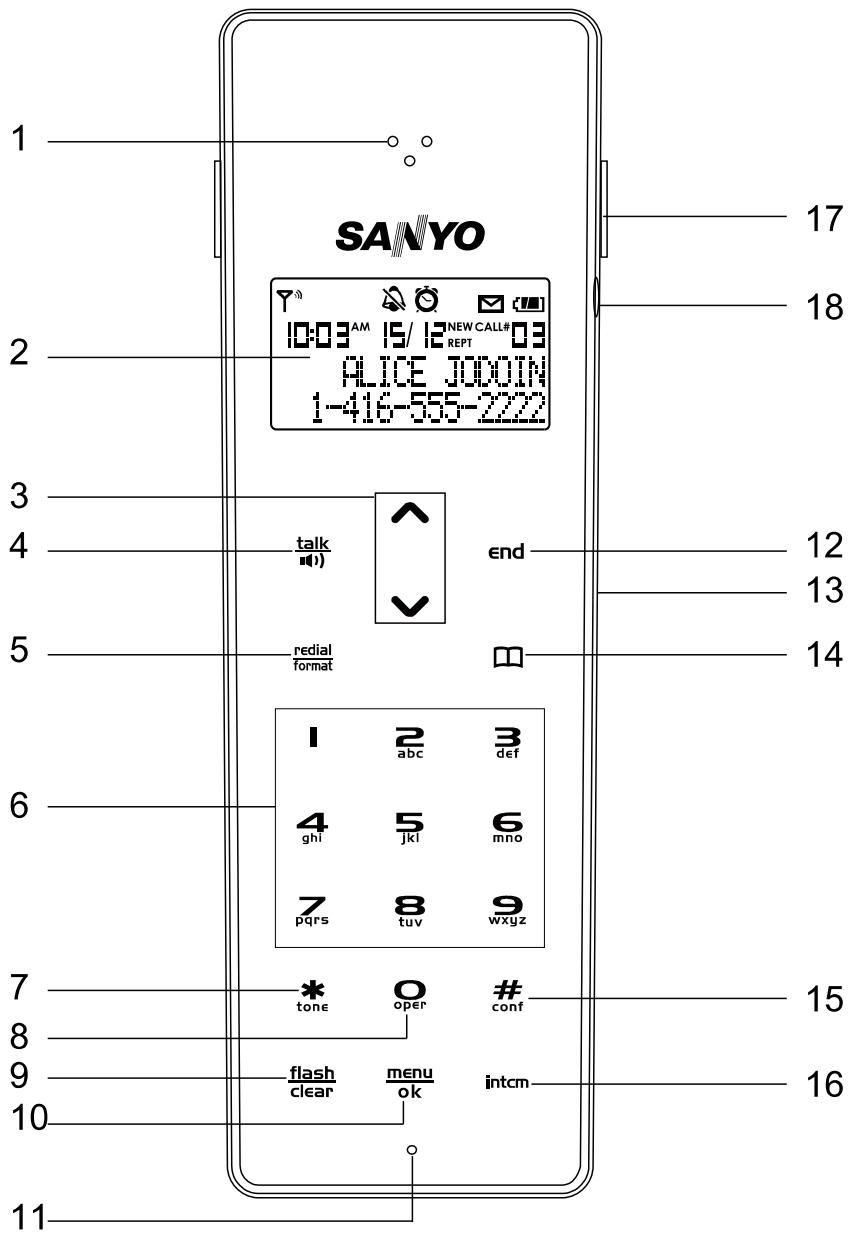
- Récepteur
- Écran LCD
- et : Contrôle du volume / Consulter le journal des appels entrants / Naviguer dans les menus et paramètres
- : Répondre aux appels et composer
- : Consulter, composer les appels précédents / Formater l'indicatif régional / Numéros longue distance
- 1-9 : Saisir des chiffres et des caractères
- : Saisir des caractères spéciaux
- : Saisir des chiffres et des caractères spéciaux
- : Activer l'attente d'appel / Supprimer du texte / Quitter le sous-menu
- menu : Accéder au menu principal / Confirmer un réglage / Verrouillage manuel du clavier / Fonction muet pendant un appel
- Microphone
- fin : Terminer les appels / Revenir en mode veille
- Haut-parleur
- : Entrer dans le répertoire
- # : Basculer entre majuscules et minuscules lors de la saisie de texte
- Intcm : Interphone - Composer une ligne interne
- Clip ceinture amovible
- Prise casque
Symboles de l'écran LCD
| ICON | DISPLAY |
| Ringer silenced | |
| Alarm set | |
| Lowercase mode activated | |
| Message waiting | |
| DTAM mailbox new message present / (blinking) Mailbox is full (For base only) | |
| Phonebook menu is entered (For base only) | |
| Speakerphone on (For base only) | |
| AC Power off (For base only) | |
| Battery level | |
| Date and time | |
| Call counter | |
| NEW CALL REPEAT CALL | New / Repeat call indicator |
SÉCURITÉ ET ENTRETIEN
Respectez les précautions de sécurité et les avertissements suivants lors de l'installation et de l'utilisation de ce produit.
Précautions de sécurité
- Écran LCD - L'écran LCD est en verre et peut se briser si l'appareil tombe. Placez l'appareil solidement sur une surface stable.
- Sources de chaleur - Tenez le produit éloigné des sources de chaleur, telles que les radiateurs, les cuisinières, les chauffages et autres produits générant de la chaleur.
- Eau et humidité - N'utilisez pas le produit dans ou près de l'eau, ni dans des zones très humides, comme une salle de bain.
Entretien de votre produit
- Ne nettoyez aucune partie de votre téléphone avec du benzène, du diluant ou d'autres solvants chimiques, car cela pourrait causer des dommages permanents non couverts par la garantie. Si nécessaire, nettoyez-le avec un chiffon humide.
- Éloignez votre téléphone des conditions chaudes, humides ou de la lumière directe du soleil.
- N'immergez jamais l'appareil dans l'eau, n'utilisez pas votre téléphone sous la pluie et ne le manipulez pas avec les mains mouillées.
SÉCURITÉ ET ENTRETIEN
- Ne soumettez pas la base à des forces extrêmes, à des chocs ou à des variations d'humidité.
- Ne modifiez pas les composants internes et ne démontez pas l'appareil.
- Tout a été mis en œuvre pour garantir la plus grande fiabilité de votre téléphone. Cependant, en cas de problème, n'essayez pas de le réparer vous-même – consultez votre fournisseur.
- Ne jetez pas ce produit avec les déchets municipaux non triés. Une collecte séparée de ces déchets pour un traitement spécial est nécessaire.
Attention
- Éliminez la batterie usagée ou défectueuse de manière respectueuse de l'environnement, conformément à la législation en vigueur.
- Ne placez pas de flammes nues, telles que des bougies allumées, à proximité de l'appareil.
- N'utilisez jamais votre téléphone en plein air pendant un orage. Débranchez la base de la ligne téléphonique et de la prise secteur en cas d'orage dans votre région.
- N'installez pas la base près d'un évier, d'une baignoire ou d'une douche, ni à tout autre endroit où elle pourrait être mouillée. L'équipement électrique peut causer des blessures graves s'il est utilisé lorsque vous êtes mouillé ou debout dans l'eau.
- Si la base tombe dans l'eau, ne la récupérez pas avant d'avoir débranché le cordon d'alimentation de la prise secteur et la fiche téléphonique de la prise téléphonique ; puis retirez-la en tirant sur les câbles débranchés.
- Manipulez la batterie avec précaution. Le contact avec des matériaux conducteurs peut court-circuiter la batterie.
- Utilisez uniquement la source d'alimentation indiquée sur l'adaptateur secteur. Si vous n'êtes pas sûr de l'alimentation de votre domicile, consultez votre compagnie d'électricité. Ne placez pas d'objets sur le cordon d'alimentation.
- Ne jamais utiliser cet appareil à proximité d'une fuite de gaz, car cela peut provoquer des explosions.
- Une perte occasionnelle de synchronisation entre le combiné et la base est normale en cas d'interférences importantes provenant de l'environnement.
- Débranchez la ligne téléphonique de la prise murale avant de remplacer la batterie.
POUR COMMENCER
Connexion de l'alimentation et de la ligne téléphonique
Unité de base
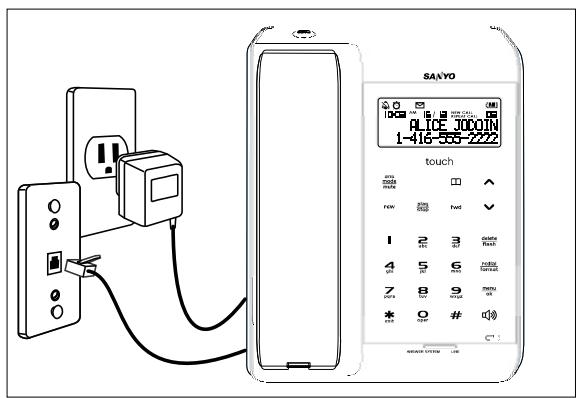
- Branchez l'adaptateur secteur (Modèle : UD4120080050G) dans la prise DC 8V située sous la base. Branchez l'autre extrémité dans une prise murale standard de 120 V CA.
- Branchez le cordon de ligne téléphonique dans la prise TEL LINE située sous la base. Branchez l'autre extrémité dans une prise téléphonique.
- Connectez le cordon spiralé à la base et au combiné filaire.
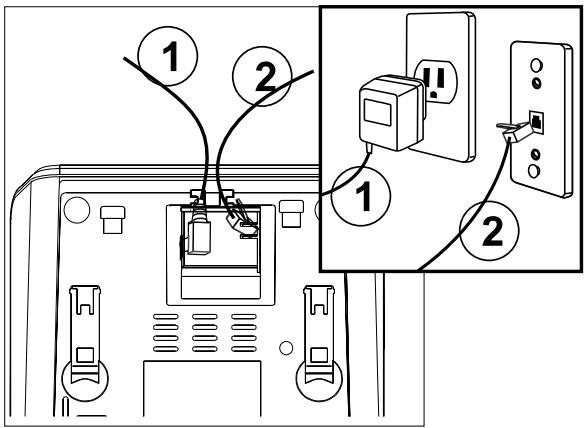
REMARQUE : Pendant l'initialisation, le voyant de la base clignote et émet un bip. Une fois terminée, l'unité passe en mode veille.
Unité sans fil
Branchez l'adaptateur secteur (Modèle : DPX351314) dans la prise DC 6V située à l'arrière du chargeur. Branchez l'autre extrémité dans une prise murale standard de 120 V CA.
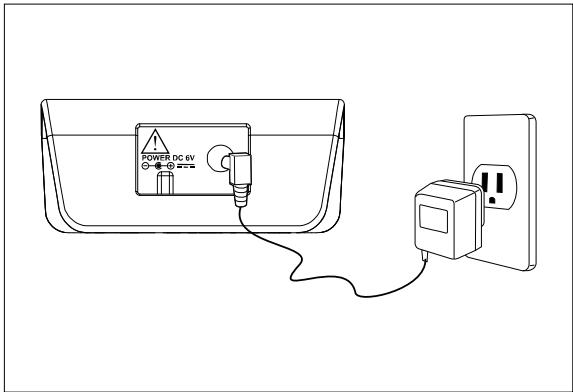
REMARQUE : Assurez-vous que les prises de l'adaptateur et de la ligne téléphonique sont facilement accessibles et proches de l'équipement.
ATTENTION : Utilisez uniquement l'adaptateur secteur SANYO avec ces téléphones. L'utilisation d'un autre adaptateur secteur peut endommager le téléphone.
Si le produit doit être utilisé sur une ligne téléphonique qui dispose également d'une connexion haut débit (par exemple Bell Sympatico haute vitesse, etc.), un micro-filtre ADSL doit être connecté. Sinon, le produit et la connexion haut débit peuvent présenter des problèmes de bruit.
Installation des piles
Unité de base
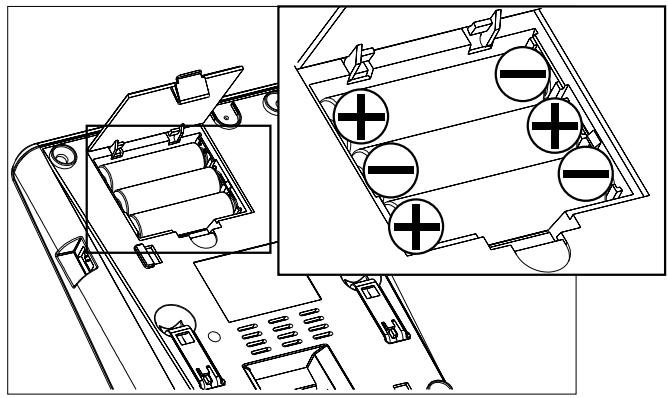
L'unité de base utilise 3 piles alcalines de format AA (non incluses) comme alimentation de secours. En cas de
POUR COMMENCER
panne de courant, les piles maintiendront les réglages de l'unité de base pendant environ cinq heures.
REMARQUE : N'utilisez pas de piles rechargeables car elles perdront toute leur charge en 3 mois même si elles ne sont pas utilisées. L'unité de base NE CHARGE PAS les piles.
Pour installer les piles de l'unité de base :
Débranchez toutes les lignes téléphoniques de l'équipement avant de remplacer les piles.
- Ouvrez le compartiment à piles.
- Insérez les piles en respectant la polarité (+ et -) comme indiqué.
- Fermez le compartiment.
ATTENTION :
- Utilisez uniquement la pile spécifiée.
- Ne mélangez pas différents types de piles (par exemple alcalines et carbone-zinc) ni des piles usagées avec des neuves.
- Si elles ne doivent pas être utilisées pendant une longue période, retirez les piles pour éviter tout dommage ou blessure dû à une éventuelle fuite des piles.
Combiné sans fil
Le combiné utilise une batterie rechargeable haute performance NiMH de 650 mAh, 3,6 V (AAA).
Pour charger la batterie :
- La batterie amovible est déjà préinstallée ; il suffit de retirer délicatement la languette isolante.
- Placez le combiné dans le socle du chargeur.
- L'icône de la batterie clignotera et le voyant de charge s'allumera pour indiquer que la charge est en cours.

- Pour prolonger la durée de vie de la batterie, chargez le combiné pendant au moins 15 heures avant la première utilisation.
Lorsque la batterie est complètement chargée, l'icône de la batterie cesse de clignoter et s'affiche en continu.
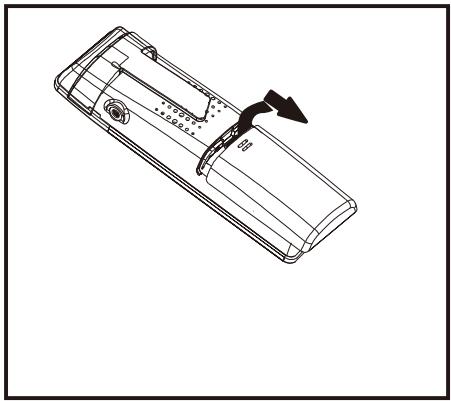
AVERTISSEMENT : il y a un risque d'explosion si la batterie est remplacée par un type de batterie incorrect. Éliminez la batterie usagée conformément aux instructions.
POUR COMMENCER
Avertissement de batterie faible
L'icône de la batterie indique l'état de la batterie :
PLEINE



FAIBLE
Lorsque la batterie du combiné est faible, l'écran du combiné affiche BATTERIE FAIBLE.
Fixation de la pince ceinture
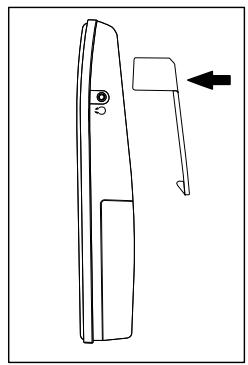
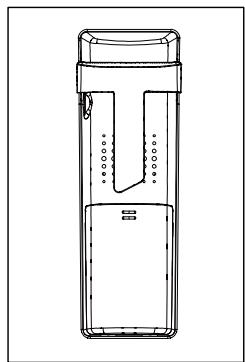
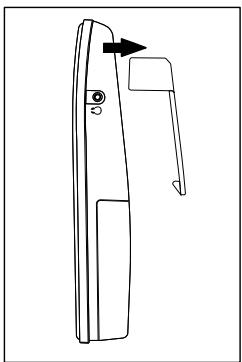
Installation de la pince ceinture
- Fixez la pince ceinture en insérant les côtés de la pince dans les fentes.
- Encliquetez les extrémités de la pince ceinture en place.
Montage mural de la base
- Faites passer les cordons téléphonique et d'adaptateur à travers le support de montage.
- Branchez les cordons téléphonique et d'adaptateur dans les prises de la base.
- Insérez les crochets du support mural dans les fentes situées en bas de la base.
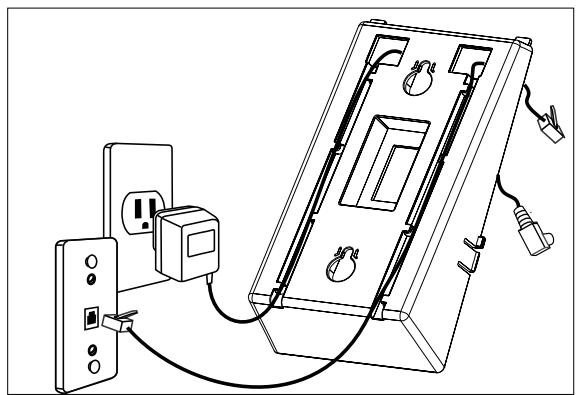
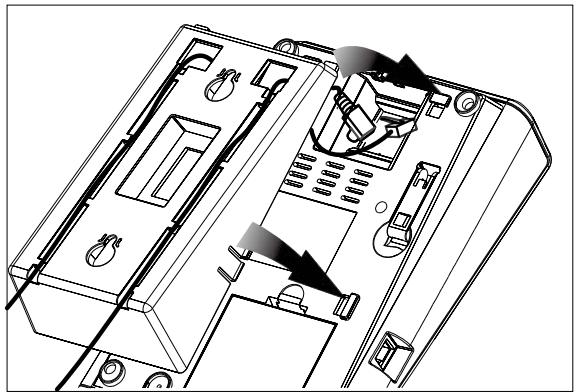
- Retirez le petit crochet de montage mural du berceau de la base. Faites-le pivoter de 180° et reclipspez-le dans la fente.
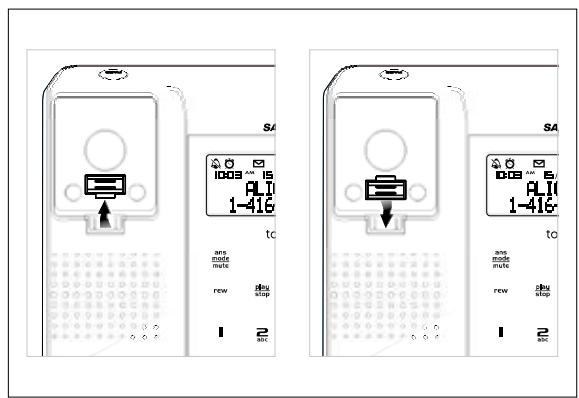
POUR COMMENCER
- Montez le support sur 2 clous au mur et branchez les cordons téléphonique et d'adaptateur.
REMARQUE : Si les cordons sont trop longs, vous pouvez les attacher avec un serre-câble et les ranger sous la base.
Réception entre la base et le combiné sans fil
La portée entre votre base et le combiné sans fil dépend principalement du type de construction de votre maison ou de votre bureau. Dans une structure en bois, attendez-vous généralement à une couverture de 3 étages dans un rayon d'environ 20 mètres. Les murs et planchers en béton limiteront la portée plus que le bois. Vous devrez peut-être expérimenter l'emplacement de la base. Si vous êtes hors de portée ou si le signal est interrompu, T disparaîtra et OUT OF RANGE s'affichera.
REMARQUE : En raison des caractéristiques essentiellement bidirectionnelles de la radio, une perte occasionnelle de synchronisation entre le combiné sans fil et la base peut se produire. Si cela se produit, la base passera très rapidement à un autre canal automatiquement pour rétablir la synchronisation.
MENUS DU TÉLÉPHONE
État et messages
Le tableau suivant donne la liste des états possibles du téléphone ou des messages affichés pendant une fonction.
| MESSAGES | DESCRIPTION |
| HH:MM | In Standby mode, the time shows. |
| MEMORY FULL | The memory is full. No additional record can be saved unless some records are deleted first. |
| XX MISSED CALLS | Shows the number of missed calls. The call log can be consulted to see the caller ID. NOTE: When viewing the Caller ID of the missed calls, the following will show: • NEW CALL shows that the call has not been viewed previously. • REPT or REPEAT CALL shows that the repeat call has not been viewed previously. |
| xx NEWMESSAGES | Shows the number of new messages in the mailbox. |
| EXTERNAL CALL | The message shows when an incoming call arrives. |
| TALK HH:MM | Shows the duration of the conversation. |
| TALK | Talk mode. |
| MUTE | Mute mode. |
Navigation dans le menu principal du téléphone
| KEY | FUNCTION | |
| Base Unit | Cordless Handset | |
| menu ok | menu ok | To access the menu, enter a menu option or confirm the selection of a value. |
| / | / | To scroll up / down through current menu and submenu. |
| delete flash | flash clear | To exit the main menu or return to the previous menu level. |
| exit | end | To exit and return to Standby mode. |
Comment naviguer dans les menus :
En mode veille
- Appuyez sur /ok pour entrer dans le menu principal ou un sous-menu.
- Utilisez et pour faire défiler les options du menu. Le clavier peut également être utilisé pour saisir directement le numéro correspondant à l'option du sous-menu. L'icône indique l'option de menu ou le réglage à sélectionner.
- Appuyez sur menu pour confirmer ou sélectionner l'option de menu suivante. Après confirmation d'un réglage, vous revenez au niveau de menu précédent.
- Appuyez sur flash clear sur le combiné sans fil ou sur delete sur la base pour revenir au menu précédent.
- Appuyez sur end sur le combiné sans fil ou sur exit sur la base pour quitter tous les menus.
REMARQUE :
- Vous ne pouvez pas entrer dans le menu si vous êtes en communication ou si vous avez précomposé une partie d'un numéro de téléphone.
MENUS DU TÉLÉPHONE
Menus de la base
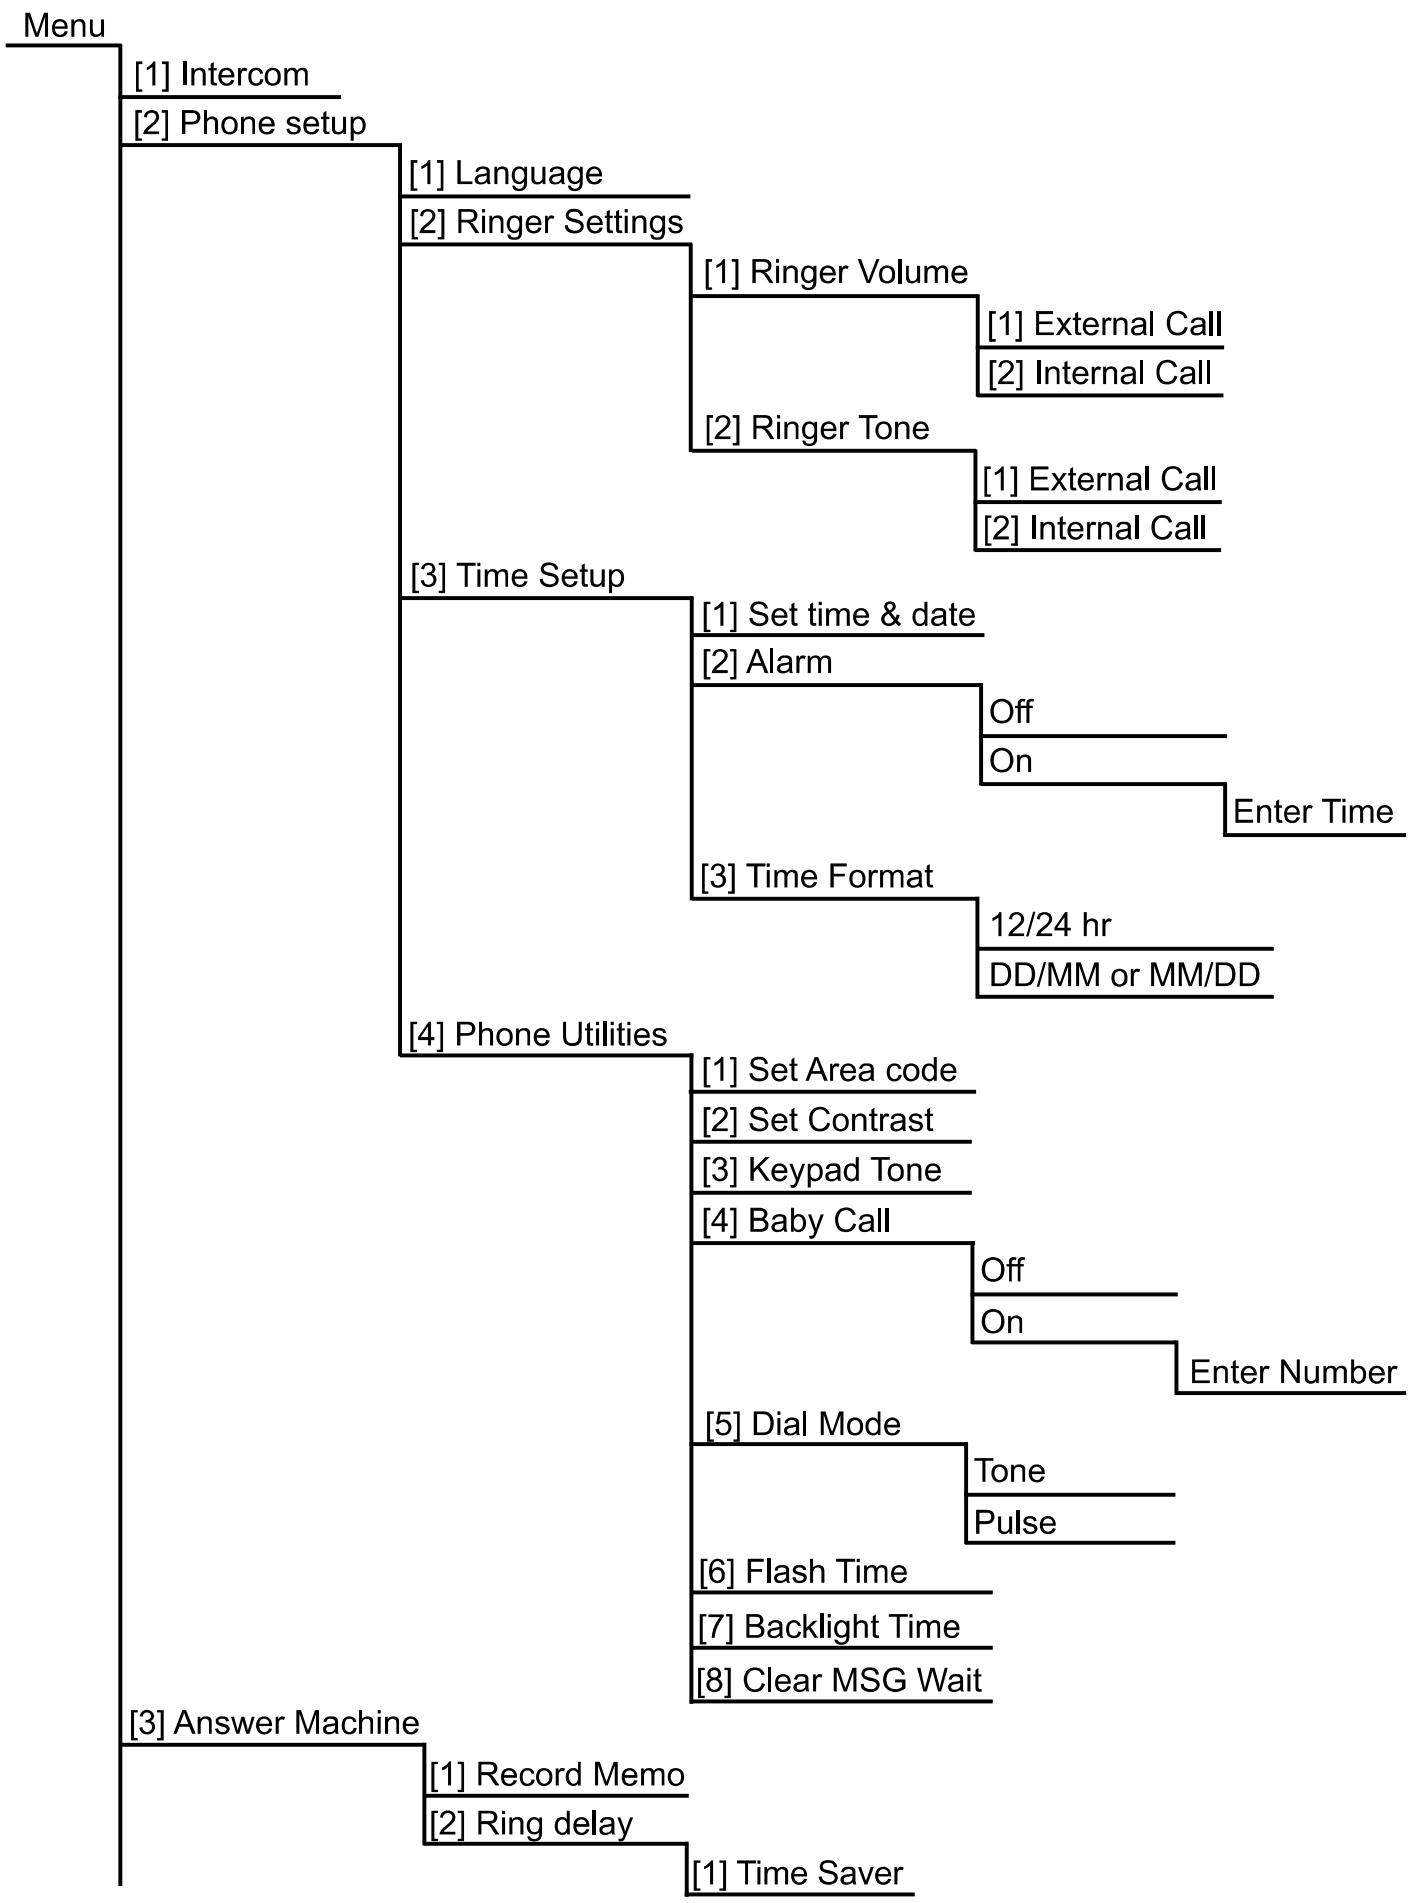
MENUS DU TÉLÉPHONE
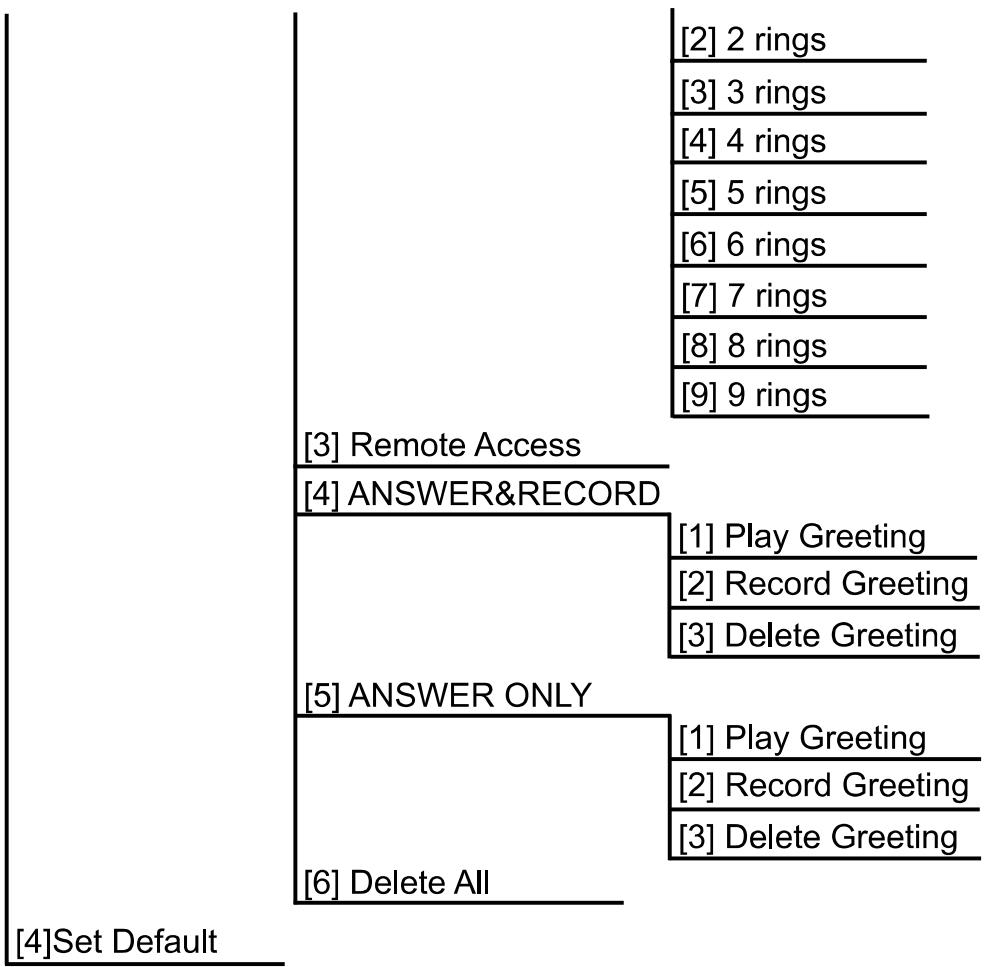
REMARQUE : Le numéro entre crochets [x] est une touche de raccourci qui peut être directement touchée sur le clavier pour accéder directement aux options du sous-menu.
Menus du combiné sans fil
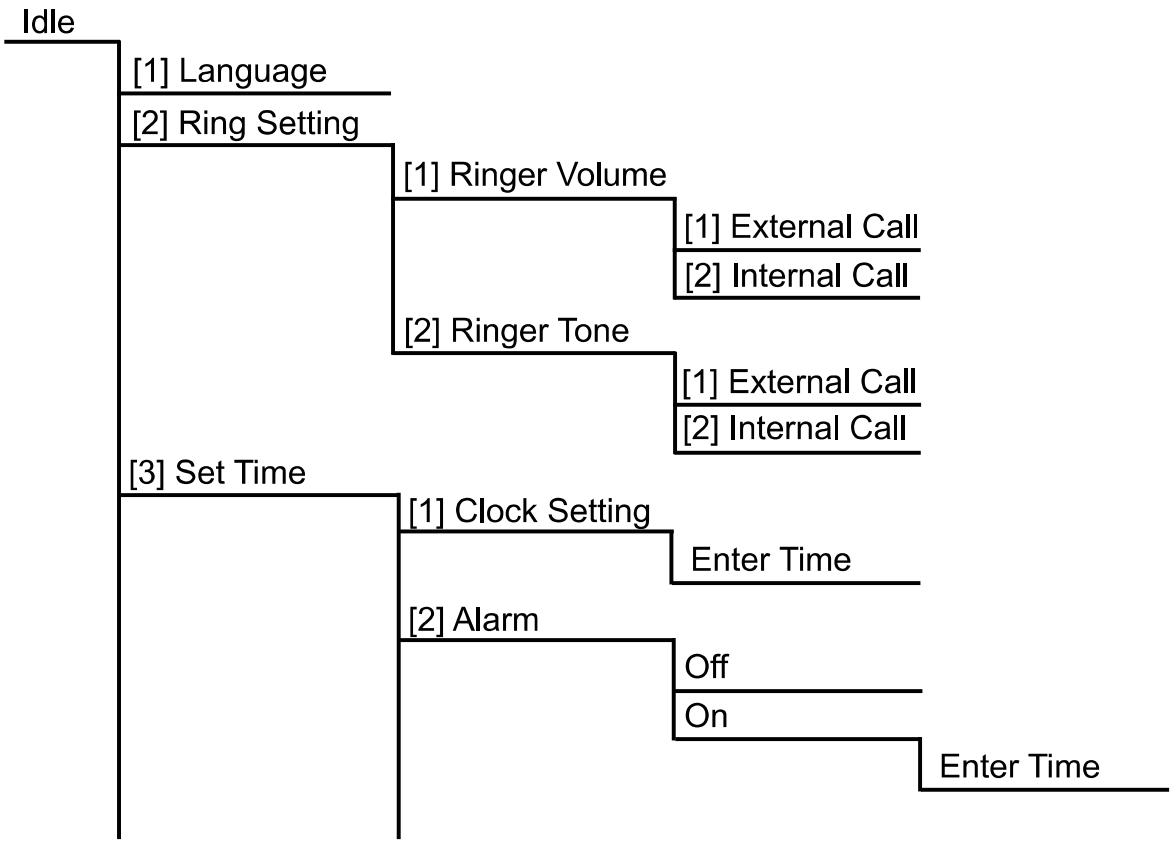
MENUS DU TÉLÉPHONE
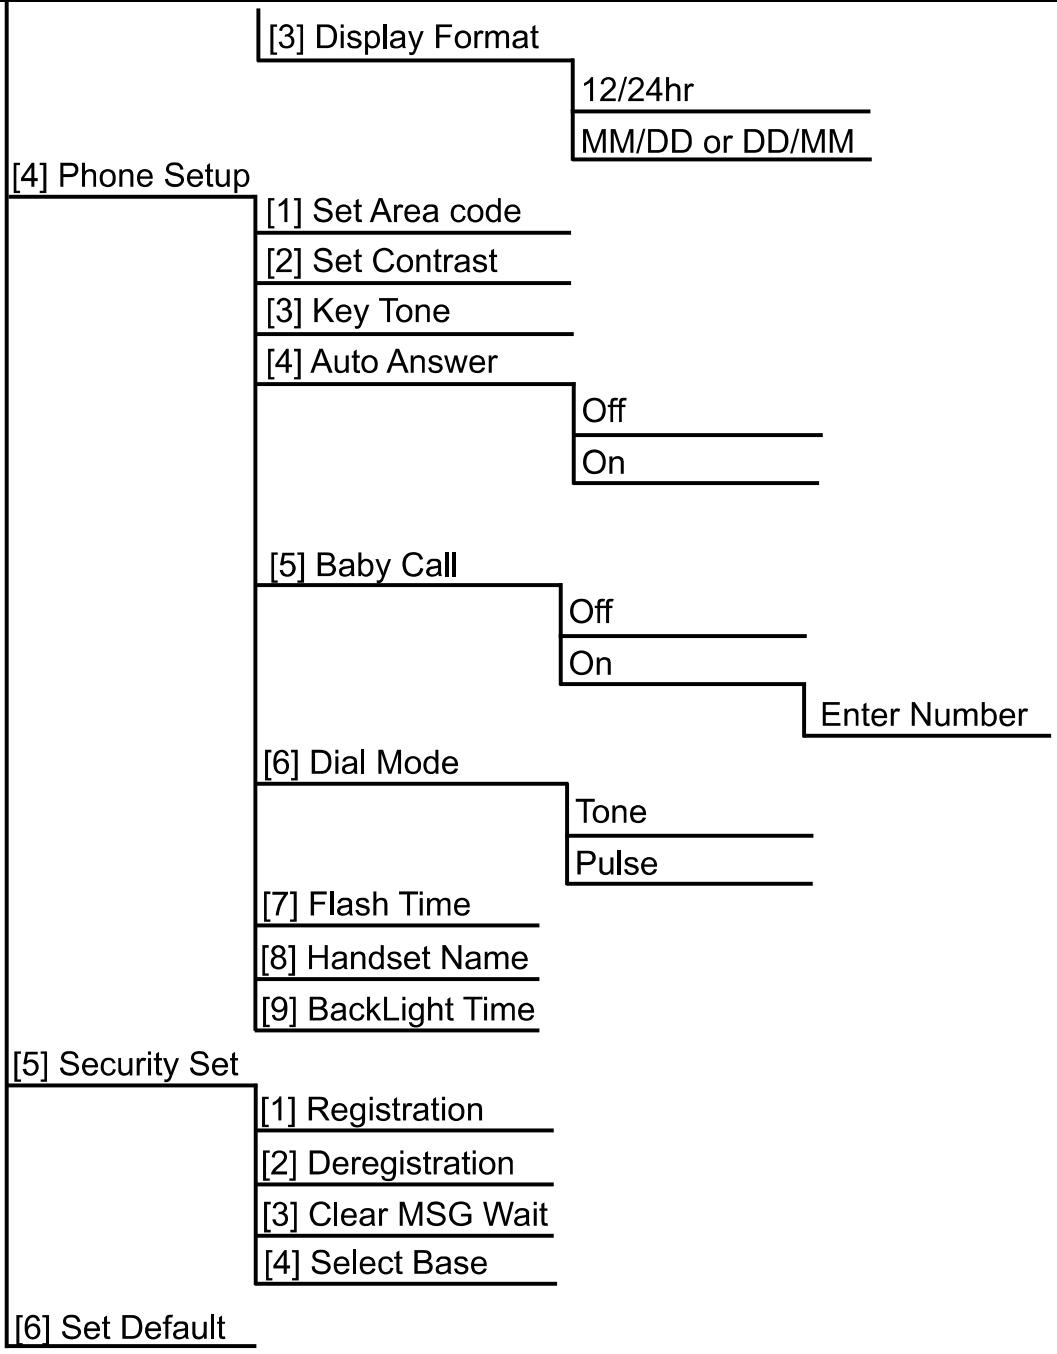
REMARQUE : Le numéro entre crochets [x] est une touche de raccourci qui peut être directement touchée sur le clavier pour accéder directement aux options du sous-menu.
FONCTIONS DE BASE
Mode veille et mode sommeil
Téléphone filaire avec base
Le téléphone est équipé d'un détecteur de mouvement qui détecte tout mouvement d'objet à proximité de la base. Lors de la détection, le rétroéclairage du clavier s'active automatiquement pour indiquer que le téléphone n'est plus en mode sommeil.
Combiné sans fil
Lorsque le combiné est resté inactif pendant un certain temps, il passe en mode sommeil. Le rétroéclairage de l'écran LCD et les touches s'éteignent. Appuyez sur n'importe quelle touche pour revenir en mode veille et rallumer les lumières du combiné.
Pour régler le délai avant le passage du mode veille au mode sommeil, reportez-vous à la section MODIFICATION DES PARAMÈTRES D'AFFICHAGE - Réglage de la durée du rétroéclairage, page 24.
Passer et recevoir des appels
Pour passer un appel :
Vous pouvez passer un appel en utilisant l'une des méthodes suivantes :
- Soulevez le combiné du chargeur et touchez « Parler » ou décrochez le téléphone filaire de la base.
- Composez le numéro de téléphone souhaité à l'aide des touches 0 à 9. Si vous faites une erreur, touchez « Fin » sur le combiné ou reposez le combiné filaire sur la base pour annuler.
- Si vous utilisez le combiné, touchez « Fin » pour raccrocher. Si vous utilisez le téléphone filaire, reposez le combiné sur la base pour raccrocher.
Pour composer un numéro en pré-numérotation :
Vous pouvez composer le numéro avant de toucher « Parler » sur le combiné ou sur la base.
- Composez le numéro. Si vous faites une erreur, touchez « Flash » sur le combiné ou « Effacer » sur la base pour supprimer les chiffres erronés et recomposer.
- Touchez « Parler » sur le combiné ou sur la base, ou décrochez le téléphone filaire pour composer.
Pour insérer une pause :
Lors de la saisie d'un numéro de téléphone, touchez « Bis » . Une pause de 3 secondes sera insérée avant la composition du chiffre suivant. « P » apparaîtra à l'écran.
Pour répondre à un appel :
- Touchez « Parler » sur le combiné. (Si la fonction RÉP. AUTO est activée, il suffit de soulever le combiné du chargeur.)
- Décrochez le téléphone filaire de la base.
REMARQUE : Lorsque vous passez ou recevez un appel, portez le haut du combiné (écouteur) à votre oreille avant de parler. Une fois l'écouteur en contact avec votre oreille, la fonction de verrouillage intelligent des touches du combiné verrouillera automatiquement les touches du combiné et vous pourrez rapprocher le bas du combiné (microphone) de vos lèvres et parler dans le microphone. Manipulez le combiné avec précaution pour éviter de déclencher accidentellement les touches. Si vous rencontrez des difficultés, il existe également un verrouillage manuel des touches (voir la section VERROUILLAGE MANUEL DES TOUCHES pour plus de détails à la page 26).
Pour terminer un appel :
- Touchez « Fin » sur le combiné ou reposez-le dans le chargeur.
- Remettez le téléphone filaire sur sa base.
FONCTIONS DE BASE
Pour activer le haut-parleur :
- Lorsque vous êtes en communication et en mode conversation, TALK s'affiche. Pour activer le haut-parleur, touchez talk sur le combiné ou sur la base, puis reposez le téléphone filaire sur la base.
- Touchez talk sur le combiné, ou soulevez le téléphone filaire de la base pour désactiver le haut-parleur.
OU
- Lorsque la base reçoit un appel entrant, vous pouvez simplement appuyer pour répondre à l'appel en utilisant le haut-parleur.
- Appuyez à nouveau pour l'éteindre.
Pour régler le volume pendant un appel :
Touchez ou pour augmenter ou diminuer le volume.
Pour recomposer un numéro :
Pour recomposer le dernier numéro composé :
- Touchez talk puis redial sur le combiné, ou décrochez le téléphone filaire et touchez redial format
OU
Pour recomposer l'un des 20 derniers numéros composés :
- Touche bis (rappel du dernier numéro)
- Utilisez et pour sélectionner le numéro de téléphone souhaité.
- Touchez la touche conversation sur le combiné, ou décrochez le téléphone filaire, ou touchez la touche sur la base pour démarrer l'appel.
Pour couper le microphone pendant un appel :
Pour avoir une conversation privée hors ligne, utilisez la fonction MUTE (sourdine). Votre correspondant ne peut pas vous entendre, mais vous pouvez toujours l'entendre.
- Touchez menu sur le combiné ou mode sur la base.
- Touchez menu ou mode à nouveau pour revenir à votre conversation téléphonique. ok muet
Pour répondre à un appel en attente :
Lorsque vous êtes en communication et qu'un autre appel arrive, un bip d'appel en attente se fait entendre.
- Touchez flash sur le combiné ou delete sur la base pour répondre à l'appel entrant et mettre votre appel en cours en attente.
- Touchez flash ou delete pour basculer entre les appels. clear flash
S'il y a un problème avec la fonction Flash, la solution est généralement de régler le temps d'intervalle selon les paramètres de votre compagnie de téléphone :
- Sur le combiné, touchez menu/ok > RÉGLAGE DU TÉLÉPHONE > TEMPS DE FLASH.
- Sur la base, touchez menu/ok > RÉGLAGE DU TÉLÉPHONE > UTILITAIRES TÉLÉPHONIQUES > TEMPS DE FLASH.
REMARQUE : Vous devez souscrire au service d'identification de l'appelant avec appel en attente auprès de votre compagnie de téléphone locale pour utiliser cette fonction.
Localisateur de combiné (fonction de recherche) :
Cette fonction permet de retrouver un combiné égaré.
- Appuyez sur PAGE sur la base, l'écran affiche « RECHERCHE ». Le combiné émet des bips continus pendant environ 2 minutes ou jusqu'à ce que vous touchiez une touche du combiné.
FONCTIONS DE BASE
- Pour arrêter la recherche, effectuez l'une des opérations suivantes :
- Appuyez sur PAGE sur la base.
- Touchez « Parler » pour passer en mode conversation.
- Touchez n'importe quelle touche du combiné.
RÉPERTOIRE
Le répertoire peut stocker jusqu'à 60 numéros de téléphone différents sur chaque combiné. Les numéros peuvent comporter jusqu'à 24 chiffres et les noms jusqu'à 16 caractères.
Pour accéder aux options du menu du répertoire :
- Touchez 四
- Touchez menu/ok .
- Naviguez dans le menu à l'aide de ou .
Utilisation des touches pour saisir du texte
Les caractères sont saisis en touchant les touches 0-9 et les touches. Une pression consécutive sur la même touche saisira un caractère différent selon le tableau ci-dessous :
| KEY | CAPITAL LETTERS | SMALL LETTERS | |
| 1 | SPACE 1-_+=^. , ; : | SPACE 1-_+=^. , ; : | |
| 2 | ABC2ÀÀÀÄÄÅAÉç | abc2àáããäàæç | |
| 3 | DEF3ÈÉÊÉD | def3èêëð | |
| 4 | GHI4iīiI | ghi4iīiI | |
| 5 | JKL5 | jkl5 | |
| 6 | MNO6OÓOÖÖØÑ | mno6òóõöøñ | |
| 7 | PQRS7 | pqrs7 | |
| 8 | TUV8ùUÜU | tuv8uúüü | |
| 9 | WXYZ9ýþ | wxyz9þp | |
| 0 | 0‘‘() [] < > {} | 0‘‘() [] < > {} | |
| Base unit | Cordless Handset | ||
| exit | tone | * # ?! $ % / \ | ~ | |
| # | # | Change between capital and small letters | |
| delete flash | flash clear | To delete the previous character | |
| menu ok | menu ok | To enter text | |
| end | To exit to standby mode | ||
RÉPERTOIRE
Enregistrement des numéros
- Touchez 国 .
- Touchez menu OK . Le curseur pointe sur AJOUTER UN ENREGISTREMENT.
- Touchez menu pour confirmer.
REMARQUE : Lorsque la mémoire est pleine, vous entendrez un bip et RÉPERTOIRE PLEIN s'affichera. Vous devrez supprimer un contact avant de continuer.
- Saisissez le nom à l'aide de 1-9 (voir SAISIE DES NOMS ci-dessous).
- Touchez menu pour confirmer et enregistrer le nom.
- Saisissez le numéro à l'aide de 1-9, , #
- Touchez menu/ok pour enregistrer l'entrée.
REMARQUE : Un numéro peut être enregistré sans saisir de nom.
Pour saisir des noms :
- Appuyez plusieurs fois sur une touche numérique (0-9) dans un délai d'une seconde jusqu'à ce que le caractère souhaité apparaisse.
- Appuyez sur une autre touche pour saisir le caractère suivant. Si le caractère suivant utilise la même touche numérique, attendez une seconde jusqu'à ce que le curseur passe au chiffre suivant, puis appuyez sur la même touche pour saisir le caractère.
- Répétez les étapes 1 et 2 jusqu'à ce que le nom soit saisi.
Modification des numéros
- Appuyez sur 国
- Utilisez ou ou le clavier alphabétique pour sélectionner l'entrée à modifier.
- Appuyez sur menu/ok pour confirmer.
- Utilisez ou pour sélectionner MODIFIER L'ENTRÉE.
- Appuyez sur menu pour confirmer.
- Pour modifier le nom :
- Appuyez sur sur le combiné ou sur sur la base pour supprimer des caractères.
- Utilisez ou pour déplacer le curseur à gauche ou à droite.
- Appuyez sur 0-9 pour insérer de nouveaux caractères.
- Touchez menu/ok pour enregistrer.
- Répétez les étapes 6 et 7 pour modifier le numéro.
Appel des numéros enregistrés
- Touchez 4. Le premier numéro du répertoire s'affichera.
- Pour accéder rapidement à une entrée, saisissez la première lettre du nom recherché à l'aide du clavier. OU
Touchez ou pour faire défiler jusqu'à l'entrée souhaitée.
- Touchez conversation sur le combiné ou sur la base pour commencer à composer.
RÉPERTOIRE
Suppression de numéros
Pour supprimer 1 enregistrement :
- Touchez 回
- Touchez ∧ ou ∨ ou la recherche alphabétique pour sélectionner l'enregistrement à supprimer.
- Touchez menu pour confirmer. ok
- Utilisez ou pour sélectionner SUPPRIMER L'ENREGISTREMENT.
- Touchez pour confirmer, l'écran affiche SUPPRIMER ? ou SUPPRIMER L'ENREGISTREMENT ?
- Touchez menu pour confirmer. ok
Pour tout supprimer :
- Touchez 回
- Touchez /ok .
- Utilisez ou pour sélectionner TOUT SUPPRIMER.
- Touchez menu pour confirmer, l'écran affiche TOUT SUPPRIMER ?
- Touchez menu pour confirmer. ok
IDENTIFICATION DE L'APPELANT
Vous devez souscrire au service d'identification de l'appelant auprès de votre compagnie de téléphone locale pour activer cette fonction. L'identification de l'appelant vous montrera le nom et/ou le numéro de l'appelant si vous avez ses coordonnées dans votre répertoire. Jusqu'à 40 identifications d'appelants entrants peuvent être stockées dans le journal des appels.
REMARQUE : Si vous répondez à un appel avant la deuxième sonnerie, les informations de l'appelant peuvent ne pas être stockées. Si la mémoire du journal des appels est pleine, le nouvel appel remplace automatiquement le plus ancien appel en mémoire.
Affichage / appel des enregistrements d'identification de l'appelant
Pour afficher les identifications de l'appelant :
- En mode veille, touchez ou pour afficher toutes les entrées du journal des appels. Le nombre de nouveaux appels et le nombre total d'appels seront affichés.
- Touchez ou pour naviguer vers n'importe quel numéro dans le journal des appels. S'il n'y a aucun enregistrement dans le journal des appels, AUCUN APPEL apparaîtra.
Pour composer un numéro dans le journal des appels :
- Touchez ou pour sélectionner le numéro souhaité.
- Touchez la touche Parler sur le combiné ou sur la base pour composer.
Suppression d'un ou de tous les enregistrements d'identification de l'appelant
- Touchez ou pour afficher le journal des appels (pour supprimer toutes les entrées, passez à l'étape 3).
2. Pour supprimer un enregistrement d'identification de l'appelant :
- Utilisez ou pour sélectionner l'identification de l'appelant que vous souhaitez supprimer.
- Touchez la touche Flash sur le combiné ou la touche Supprimer Flash sur la base.
- Touchez {menu}.
OU
- Touchez \ ok
- Utilisez ou pour sélectionner SUPPRIMER L'ENREGISTREMENT.
- Touchez /ok pour confirmer la sélection.
- Touchez à nouveau pour supprimer.
IDENTIFICATION DE L'APPELANT
3. Pour supprimer tous les identifiants d'appelant :
- Appuyez sur ou , puis sur /ok. Utilisez ou pour sélectionner TOUT SUPPRIMER.
- Appuyez sur menu pour confirmer. 'TOUT SUPPRIMER ?' s'affiche à l'écran.
- Appuyez à nouveau sur menu/ok pour tout supprimer.
Enregistrement des identifiants d'appelant dans le répertoire
- Appuyez sur ou pour parcourir le journal des appels.
- Appuyez sur ou pour sélectionner le numéro que vous souhaitez enregistrer.
- Appuyez sur menu/ok pour accéder au menu du journal des appels. Le curseur pointe sur AJOUTER UN ENREGISTREMENT.
- Appuyez sur menu pour confirmer.
- Appuyez sur menu pour confirmer le nom (si nécessaire, utilisez le clavier pour modifier le nom).
- Appuyez sur menu pour confirmer le numéro et l'enregistrer dans le répertoire (si nécessaire, utilisez le clavier pour modifier le numéro).
Modification du numéro d'identification de l'appelant avant d'appeler
- Appuyez sur ou pour parcourir le journal des appels.
- Appuyez sur ou pour sélectionner le numéro que vous souhaitez modifier.
- Touchez le menu et naviguez jusqu'au sous-menu MODIFIER POUR COMPOSER.
- Touchez le menu pour confirmer.
- Touchez effacer ou supprimer pour effacer les chiffres. Recomposez le numéro correct. effacer clignote
- Touchez parler sur le combiné ou sur la base pour composer.
Formatage des numéros d'identification de l'appelant
- Utilisez ou pour sélectionner un numéro de téléphone dans la mémoire d'identification de l'appelant.
- Touchez recomposer . Le numéro que vous avez sélectionné peut être formaté en touchant recomposer . Par exemple, si le numéro d'identification de l'appelant apparaît comme 1-416-222-5555 mais que ce n'est pas un numéro interurbain, touchez la touche recomposer jusqu'à ce qu'il affiche 416-222-5555, sans le 1.
Appels manqués
En mode veille, tous les appels manqués s'afficheront comme suit : XX APPELS MANQUÉS. Utilisez ou pour consulter vos appels manqués.
- NOUVEL APPEL indique que les appels n'ont pas été consultés.
- RÉP ou APPEL RÉPÉTÉ indique que vous avez reçu des appels répétés du même numéro.
Message en attente
Si vous êtes connecté à un standard/PBX compatible, votre téléphone Touch vous alertera lorsqu'un message vocal aura été reçu.
- apparaîtra sur l'écran du combiné et de la base, et la DEL de ligne de la base clignotera.
- Pour écouter vos messages, suivez les instructions fournies par votre compagnie de téléphone.
REMARQUE : Vous devez vous abonner à ce service auprès de votre compagnie de téléphone locale.
IDENTIFICATION DE L'APPELANT
Pour effacer manuellement les indicateurs de message en attente :
- Sur le combiné, touchez menu/ok > RÉGLAGES SÉCURITÉ > EFFACER MESSAGE EN ATTENTE.
Sur la base, touchez menu/ok > RÉGLAGES TÉLÉPHONE > UTILITAIRES TÉLÉPHONE > EFFACER MESSAGE EN ATTENTE.
- Touchez menu/ok.
- Utilisez ▲ ou ▼ pour sélectionner OUI.
- Touchez menu pour confirmer, puis ok.
RÉGLAGES DES FONCTIONS
En plus des fonctions de base, il existe également un certain nombre de fonctions spéciales.
Modifier les réglages d'affichage
Le combiné peut afficher les informations en anglais, espagnol, français, portugais, italien, néerlandais, allemand, danois, suédois, norvégien et finnois.
La base peut afficher les informations en anglais, français et espagnol.
Pour changer la langue :
- Sur le combiné, touchez menu/ok > sous-menu LANGUE. Sur la base, touchez menu/ok > RÉGLAGES TÉLÉPHONE > sous-menu LANGUE.
- Touchez menu pour entrer dans le menu.
- Utilisez ou pour sélectionner la langue souhaitée.
- Touchez menu pour confirmer.
Pour régler le contraste de l'écran :
- Sur le combiné, touchez menu/ok > PHONE SET sous-menu CONTRASTE. Sur la base, touchez /ok > CONFIGURATION DU TÉLÉPHONE > UTILITAIRES DU TÉLÉPHONE > sous-menu RÉGLER LE CONTRASTE.
- Touchez menu pour entrer dans le menu.
- Utilisez ou pour changer le niveau de contraste.
- Touchez menu pour confirmer.
Pour modifier la durée du rétroéclairage :
- Sur le combiné, touchez menu > CONFIGURATION DU TÉLÉPHONE > sous-menu DURÉE DU RÉTROÉCLAIRAGE. Sur la base, touchez menu > CONFIGURATION DU TÉLÉPHONE > UTILITAIRES DU TÉLÉPHONE > sous-menu DURÉE DU RÉTROÉCLAIRAGE.
- Touchez [menu] pour entrer dans le menu.
- Utilisez ou pour changer la durée du rétroéclairage (20, 30, 40, 50 ou 60 secondes).
- Touchez menu pour confirmer.
Pour attribuer un nom à un combiné – combiné sans fil uniquement
- Touchez menu > CONFIGURATION DU TÉLÉPHONE > sous-menu NOM DU COMBINÉ.
- Utilisez les touches 1 à 9 pour saisir un nom. (voir SAISIE DES NOMS page 21).
- Touchez menu pour confirmer.
Changer les sonneries et les tonalités des touches
Le combiné propose un choix de 10 mélodies polyphoniques et de 4 sonneries. La base dispose de 5 sonneries. Les deux téléphones ont 4 tonalités de touches.
Pour changer le volume de la sonnerie :
- Sur le combiné, touchez menu > RÉGLAGE SONNERIE > VOLUME SONNERIE > APPEL EXTERNE ou APPEL INTERNE.
Sur la base, touchez menu > CONFIGURATION TÉLÉPHONE > RÉGLAGE SONNERIE > VOLUME SONNERIE > APPEL EXTERNE ou APPEL INTERNE.
- Touchez menu pour entrer dans le menu.
- Utilisez ▲ ou ▼ pour sélectionner le niveau de volume OFF, 1-4.
- Touchez menu pour confirmer. ok
REMARQUE : Le niveau de volume OFF signifie VOLUME SONNERIE DÉSACTIVÉ et s'affichera pour indiquer que la sonnerie d'appel externe est coupée.
Pour sélectionner une sonnerie :
- Sur le combiné, touchez menu > RÉGLAGE SONNERIE > TONALITÉ SONNERIE > APPEL EXTERNE ou APPEL INTERNE.
Sur la base, touchez menu > CONFIGURATION TÉLÉPHONE > RÉGLAGE SONNERIE > TONALITÉ SONNERIE > APPEL EXTERNE ou APPEL INTERNE.
- Touchez menu ok pour entrer dans le menu.
- Utilisez ou pour sélectionner la sonnerie souhaitée.
- Touchez menu/ok pour confirmer.
Pour changer la tonalité des touches :
- Sur le combiné, touchez [menu ok] > RÉGLAGE DU TÉLÉPHONE > TONALITÉ DES TOUCHES. Sur la base, touchez [menu OK] > RÉGLAGE DU TÉLÉPHONE > UTILITAIRES DU TÉLÉPHONE > TONALITÉ DU CLAVIER.
- Touchez /ok pour entrer dans le menu.
- Utilisez ou pour sélectionner le niveau de tonalité des touches souhaité : OFF, 1-4.
- Touchez menu pour confirmer. ok
Réglage tonalité/impulsions
Pour sélectionner le mode de numérotation par impulsions ou par tonalité :
Si vous avez un service à tonalité, ne faites rien car votre téléphone a été réglé sur tonalité avant l'expédition. Si vous ne savez pas quel type de service vous avez, contactez votre compagnie de téléphone.
- Sur le combiné, touchez [menu ok] > RÉGLAGE DU TÉLÉPHONE > MODE DE NUMÉROTATION. Sur la base, touchez [menu ok] > RÉGLAGE DU TÉLÉPHONE > UTILITAIRES DU TÉLÉPHONE > MODE DE NUMÉROTATION.
- Touchez menu ok
- Utilisez ou pour sélectionner IMPULSIONS ou TONALITÉ.
- Touchez menu pour confirmer. ok
Accès temporaire à la tonalité (*TONE) :
Cette fonction permet aux utilisateurs du service téléphonique Pulse d'accéder aux services à tonalité proposés par les banques, les sociétés de cartes de crédit, etc.
- Composez le numéro souhaité.
- Appuyez sur * après que votre appel soit répondu.
- Suivez les instructions vocales pour effectuer l'action souhaitée.
- Raccrochez lorsque vous avez terminé. Le téléphone revient au service Pulse.
RÉGLAGES DES FONCTIONS
Durée du flash
Pour modifier la durée du flash :
- Sur le combiné, appuyez sur menu/ok > RÉGLAGE DU TÉLÉPHONE > DURÉE DU FLASH.
Sur la base, appuyez sur menu/ok > RÉGLAGE DU TÉLÉPHONE > UTILITAIRES DU TÉLÉPHONE > DURÉE DU FLASH.
- Appuyez sur menu/ok.
- Utilisez ▲ ou ▼ pour sélectionner une durée de flash (100, 270, 300 ou 600 ms).
- Appuyez sur menu/ok pour confirmer.
REMARQUE : La modification de la durée de flash par défaut de 600 ms peut désactiver la fonction d'appel en attente.
Verrouillage intelligent des touches – combiné sans fil uniquement
La fonction Smart Key Lock empêche l'activation accidentelle des touches du combiné sans fil pendant les appels. Un capteur situé en haut du combiné, là où se trouve l'écouteur, verrouille automatiquement le clavier lorsque votre oreille touche l'écouteur. Pour garantir l'activation de la fonction Smart Key Lock, assurez-vous de placer d'abord l'écouteur du combiné contre votre oreille avant de parler dans le microphone du combiné. Évitez de toucher le clavier avec vos doigts jusqu'à ce que l'écouteur du combiné repose sur votre oreille. Smart Key Lock se désactive dès que vous retirez l'écouteur du combiné de votre oreille.
Verrouillage manuel du clavier
Pour activer/désactiver le verrouillage manuel du clavier :
- Sur le combiné, en mode veille, touchez menu puis immédiatement tonalité. L'icône apparaît à l'écran du combiné pour indiquer que le verrouillage du clavier est activé. Pour désactiver le verrouillage manuel du clavier, touchez menu puis immédiatement tonalité.
- Sur la base, en mode veille, touchez menu puis immédiatement quitter. KEYLOCK apparaît à l'écran de la base pendant 5 secondes pour indiquer que le verrouillage du clavier est activé. Pour désactiver le verrouillage manuel du clavier, touchez menu puis immédiatement quitter. Le verrouillage du clavier est temporairement désactivé lorsque vous décrochez le téléphone filaire.
REMARQUE : Seule la touche menu fonctionne pendant le verrouillage du clavier. Cependant, à la réception d'un appel entrant, la touche parler et la touche se déverrouillent automatiquement pour permettre de répondre à l'appel. Le verrouillage du clavier est temporairement désactivé lorsqu'un numéro d'urgence est composé et que la touche parler ou est enfoncée.
Changer l'indicatif régional
- Sur le combiné, touchez menu/ok > RÉGLAGES TÉL > INDICATIF RÉGIONAL. Sur la base, touchez menu/ok > RÉGLAGES TÉL > UTILITAIRES TÉL > INDICATIF RÉGIONAL.
- Touchez menu/ok
- Utilisez 0-9 pour saisir votre indicatif régional à 3 chiffres.
- Touchez menu pour confirmer.
Appel bébé
La fonction Appel bébé vous permet de définir un numéro à composer automatiquement lorsqu'une touche (autre que menu/ok) est enfoncée.
Pour configurer l'appel bébé :
- Sur le combiné, touchez menu/ok > RÉGLAGES TÉL > APPEL BÉBÉ. Sur la base, touchez menu/ok > RÉGLAGES TÉL > UTILITAIRES TÉL > APPEL BÉBÉ.
- Utilisez ou pour sélectionner 'ON'.
- Touchez menu pour confirmer. ok
RÉGLAGES DES FONCTIONS
- Utilisez 0-9 pour saisir le numéro d'appel bébé. Touchez flash sur le combiné ou supprimer sur la base pour effacer les numéros en cas d'erreur.
- Touchez menu pour confirmer.
Pour désactiver l'appel bébé :
Répétez les étapes 1 à 3, en sélectionnant OFF au lieu de ON.
Réponse automatique – combiné sans fil uniquement
Les appels entrants sont répondus automatiquement lorsque vous soulevez le combiné de son socle lorsque la réponse automatique est activée.
Pour activer la réponse automatique :
- Touchez menu/ok > PHONE SETUP > AUTO ANSWER.
- Utilisez ou pour sélectionner ON.
- Touchez menu pour confirmer. ok
FONCTIONS SPÉCIALES
Réglages de l'horloge et de l'alarme
Pour régler l'heure :
- Sur le combiné, touchez menu/ok > RÉGLER L'HEURE > RÉGLAGE DE L'HORLOGE.
Sur la base, touchez menu > RÉGLAGE DU TÉLÉPHONE > RÉGLAGE DE L'HEURE > RÉGLER L'HEURE ET LA DATE.
- Touchez menu/ok.
- Utilisez les touches 0 à 9 pour saisir l'heure (utilisez # pour basculer entre AM et PM si le format 12 heures est sélectionné). Touchez menu/ok pour confirmer.
Pour modifier le format d'affichage de l'heure :
- Sur le combiné, touchez menu/ok > RÉGLER L'HEURE > FORMAT D'AFFICHAGE. Sur la base, touchez menu > RÉGLAGE DU TÉLÉPHONE > RÉGLAGE DE L'HEURE > FORMAT DE L'HEURE.
- Touchez menu/ok.
- Utilisez ▲ ou ▼ pour sélectionner le format 12/24 heures.
- Touchez menu/ok pour confirmer.
- Utilisez ▲ ou ▼ pour sélectionner le format mois-jour 'MM/JJ' ou 'JJ/MM'.
- Touchez menu pour confirmer.
Pour régler l'alarme :
- Sur le combiné, touchez menu/ok > RÉGLER L'HEURE > ALARME > ACTIVÉE. Sur la base, touchez menu/ok > RÉGLAGE DU TÉLÉPHONE > RÉGLAGE DE L'HEURE > ALARME > ACTIVÉE.
- Touchez menu/ok.
- Utilisez les touches 0 à 9 pour saisir l'heure de l'alarme. (Utilisez # pour basculer entre AM et PM si le format d'affichage 12 heures est sélectionné).
- Touchez menu pour confirmer. L'icône s'affiche pour indiquer que l'alarme est réglée.
REMARQUE :
- Si l'alarme est activée pendant un appel, vous entendrez 2 tonalités d'alarme et clignotera.
Pour désactiver l'alarme :
Suivez les étapes 1 et 2 ci-dessus en sélectionnant OFF au lieu de ON. L'icône ne sera plus affichée.
FONCTIONS SPÉCIALES
Pour couper le son de l'alarme :
Touchez n'importe quelle touche. Si aucune touche n'est touchée, l'alarme sonnera pendant 1 minute puis s'éteindra automatiquement.
Appel de la base vers le combiné
Pour effectuer un appel interne en mode veille depuis la base vers le combiné :
- Touchez menu et le curseur pointera vers INTERCOM.
- Touchez menu/ok pour entrer dans le sous-menu.
- Touchez /ok à nouveau pour appeler le combiné.
REMARQUE : Pour arrêter d'appeler le combiné, touchez sur la base. 4. Le combiné sans fil sonnera. Appuyez sur talk pour répondre (deux fois pour le haut-parleur). Si vous activez AUTO ANSWER, il suffit de soulever le combiné du chargeur. 5. Pour terminer l'appel, touchez end sur le combiné ou sur la base.
REMARQUE : Si le combiné ne répond pas dans les deux minutes, l'opération est annulée.
Pour passer un appel interne en mode veille, du combiné vers la base :
- Touchez Intcm
- Touchez '0' pour appeler la base.
REMARQUE : Pour arrêter d'appeler la base, touchez Intcm sur le combiné. 3. La base sonnera. Décrochez le téléphone filaire ou touchez pour le haut-parleur.
REMARQUE : Si la base ne répond pas dans les deux minutes, l'opération est annulée. Les appels internes sont répondus de la même manière que les appels externes (voir FONCTIONS DE BASE). Si un appel externe est reçu pendant un appel interne, vous entendrez une sonnerie dans le récepteur. Touchez Fin pour terminer l'appel interne, puis touchez Parler sur le combiné ou sur la base pour répondre à l'appel externe. Quel que soit le téléphone qui répond à l'appel, il bénéficiera de la confidentialité de la conversation, c'est-à-dire que le son est coupé pour l'autre téléphone du système combiné, sauf si l'action ci-dessous est entreprise...
Pour faire une conférence à trois avec un appel en cours (c'est-à-dire « inviter » le combiné sans fil à se joindre) :
- En mode Parler, touchez menu/ok pour entrer dans le sous-menu.
- Touchez menu pour appeler le combiné. Si le combiné ne répond pas à l'appel dans les 2 minutes, vous reviendrez automatiquement à l'appel externe.
REMARQUE : Pour annuler l'« invitation », touchez menu/ok ou sur la base. 3. Le combiné sans fil sonnera. Touchez Parler pour répondre (deux fois pour le haut-parleur).
Pour faire une conférence à trois avec un appel en cours (c'est-à-dire « inviter » la base à se joindre) :
- En mode Parler, touchez Intcm
- Touchez '0' pour appeler la base. Si la base ne répond pas à l'appel dans les 2 minutes, vous reviendrez automatiquement à l'appel externe.
REMARQUE : Pour annuler l'« invitation », touchez Parler ou Intcm sur le combiné.
- La base sonnera. Décrochez le téléphone filaire ou touchez pour le haut-parleur.
- Touchez Fin sur le combiné ou reposez le combiné sur la base ou touchez Fin sur la base pour terminer la conférence téléphonique. La connexion restera entre le combiné ou la base restant et la ligne externe.
Pour transférer un appel en cours :
- Répétez les étapes 1 à 3 ci-dessus de la section de conférence à trois correspondante.
- Pour transférer l'appel à la base, touchez Fin sur le combiné. Pour transférer l'appel au combiné, reposez le combiné sur la base ou touchez Fin sur la base.
FONCTIONS SPÉCIALES
Enregistrement
Le combiné et la base sont pré-enregistrés en usine. Par conséquent, l'appareil devrait fonctionner correctement dès la sortie de la boîte. Si un problème survient, suivez cette procédure :
- Sur le combiné, touchez menu > SÉCURITÉ > ENREGISTREMENT.
- Utilisez ou pour sélectionner le numéro de base auquel vous souhaitez vous enregistrer.
- Touchez menu/ok pour confirmer.
- Utilisez 0-9 pour saisir le code PIN par défaut 0000.
- Touchez menu pour confirmer. Maintenez enfoncée la touche PAGE sur la base jusqu'à ce que le voyant de ligne clignote et que 'ENREGISTREMENT...' apparaisse sur l'écran de la base.
- Attendez que le combiné s'enregistre auprès de la base.
- ENREGISTREMENT ACCEPTÉ indique que le combiné est enregistré. RÉESSAYER ? indique que l'enregistrement a échoué. Touchez menu pour réessayer ou Fin pour quitter.
RÉPONDEUR NUMÉRIQUE
Le système de réponse numérique comprend des fonctions de messagerie standard telles que :
- Jusqu'à 13 minutes de temps d'enregistrement et jusqu'à 50 messages.
- Fonctions d'enregistrement, de lecture et de suppression pour les messages reçus.
- Enregistrement de notes mémos.
- Fonction de code d'accès à distance.
- Sélection du délai de sonnerie avant réponse avec fonctions d'économie de temps.
- Invites multilingues sélectionnables (anglais et français).
- Enregistrement des messages avec horodatage
SYSTÈME DE RÉPONSE NUMÉRIQUE
Options du menu
Pour afficher les options du menu du système de réponse :
Sur la base, touchez menu/ok > option de menu RÉPONDEUR.
MENU>
[3] RÉPONDEUR
[1] ENREGISTRER MÉMO [2] DÉLAI DE SONNERIE
[1] TIME SAVER [2] 2 RINGS [3] 3 RINGS [4] 4 RINGS [5] 5 RINGS [6] 6 RINGS [7] 7 RINGS [8] 8 RINGS [9] 9 RINGS
[3] REMOTE ACCESS [4] ANSWER&RECORD
[1] PLAY GREETING [2] RECORD GREETING [3] DELETE GREETING
[5] ANSWER ONLY [6] DELETE ALL
[1] PLAY GREETING [2] RECORD GREETING [3] DELETE GREETING
FONCTIONS DU RÉPONDEUR – UNITÉ DE BASE UNIQUEMENT
Pour activer/désactiver le répondeur :
Appuyez plusieurs fois sur MODE pour sélectionner l'une des options suivantes :
- RÉPONDRE ET ENREGISTRER : Active le répondeur. L'écran LCD affiche RÉPONDRE ET ENREGISTRER.
- RÉPONDRE SEULEMENT : Met le répondeur en mode « Annonce ». L'écran LCD affiche RÉPONDRE SEULEMENT.
- RÉPONDRE DÉSACTIVÉ : Désactive le répondeur. L'écran LCD affiche RÉPONDRE DÉSACTIVÉ. Le voyant du répondeur s'éteint.
Lorsque de nouveaux messages ont été reçus, l'écran affiche le nombre de messages et le voyant du répondeur clignote.
REMARQUE :
- L'appareil revient automatiquement en mode veille lorsqu'aucune saisie n'est effectuée.
- S'il y a de nouveaux messages dans la boîte vocale, le nombre de messages s'affiche.
FONCTIONS DU SYSTÈME DE RÉPONSE – UNITÉ DE BASE UNIQUEMENT
Pour régler le niveau de volume :
Pendant les annonces ou la lecture des messages, touchez ou pour augmenter ou diminuer le volume. Le niveau de volume sélectionné VOL0 à VOL5 s'affiche.
Pour lire les messages du répondeur :
- En mode veille et avec le combiné sur la base, touchez lecture arrêt. Si un nouveau message est présent, PLAY NEWMESSAGE s'affiche. Sinon, PLAY OLDMESSAGE s'affiche.
- Pendant la lecture des messages,
- Touchez deux fois en moins d'une seconde pour lire le message précédent.
- Touchez fwd une fois pour lire le message suivant.
Pour répéter le message en cours, touchez une fois.
Pour arrêter pendant la lecture :
Pendant la lecture d'un message, touchez lecture pour arrêter et quitter le mode lecture.
REMARQUE :
- Le nombre de messages anciens ou nouveaux sera annoncé avant la lecture du message. Le numéro de chaque message, la date et l'heure d'enregistrement seront également annoncés. Les nouveaux messages seront lus en premier.
- Lorsque tous les nouveaux messages auront été lus, l'annonce FIN DES NOUVEAUX MESSAGES sera diffusée. L'icône l disparaîtra et le voyant LED du SYSTÈME DE RÉPONSE cessera de clignoter.
- Lorsque tous les messages auront été lus, l'annonce FIN DES MESSAGES sera diffusée.
- Le répondeur utilise l'heure pour horodater les messages enregistrés.
Pour supprimer un message :
- Pendant la lecture d'un message, touchez supprimer flash . Le message suivant sera lu.
Pour supprimer tous les anciens messages de la boîte vocale :
- En mode veille et avec le combiné sur la base.
- Touchez menu/ok > RÉPONDEUR > TOUT SUPPRIMER .
- Touchez [menu] pour sélectionner l'option. Le message TOUT SUPPRIMER s'affiche.
- Utilisez ou pour sélectionner OUI.
- Touchez menu pour confirmer. ok
REMARQUE : Les nouveaux messages ne peuvent pas être supprimés tant qu'ils n'ont pas été lus.
Pour enregistrer une note mémorandum :
- Touchez /ok > RÉPONDEUR > ENREGISTRER MÉMO.
- Touchez menu ok. Le message d'enregistrement du mémo sera diffusé et un bip de début d'enregistrement retentira. Après le bip, commencez à enregistrer votre mémo. ENREGISTREMENT MÉMO et la durée d'enregistrement s'affichent. La durée maximale d'enregistrement de chaque mémo est de 1 minute.
- Pour terminer l'enregistrement, touchez lecture arrêt
REMARQUE : L'enregistrement s'arrêtera automatiquement si la mémoire est pleine.
Annonces
Il existe deux types d'annonces :
- Une pour les appels normaux – le répondeur diffusera le message d'annonce, puis l'appelant pourra laisser son message.
FONCTIONS DU RÉPONDEUR – UNITÉ DE BASE UNIQUEMENT
- Une pour l'annonce uniquement – le répondeur diffusera le message d'annonce et l'appelant ne pourra pas laisser de message. (Le répondeur doit être réglé sur le mode RÉPONDRE UNIQUEMENT.)
Pour enregistrer une annonce personnalisée :
- Accédez à RÉPONDRE ET ENREGISTRER ou RÉPONDRE UNIQUEMENT > ENREGISTRER ANNONCE.
- Touchez menu. Le message ENREGISTREMENT ANNONCE s'affiche et un bip de début d'enregistrement retentira pour indiquer que l'enregistrement commence.
- Enregistrez l'annonce souhaitée. La durée d'enregistrement 00:00 (en secondes) s'affichera. La durée maximale d'enregistrement d'une annonce personnalisée est de 1 minute.
- Touchez lecture arrêt pour arrêter l'enregistrement. Le système diffusera automatiquement l'annonce enregistrée.
REMARQUE : Lorsque la mémoire est pleine :
- Aucun message personnalisé ne peut être enregistré.
- L'enregistrement du message s'arrête automatiquement.
REMARQUE : Lorsque le répondeur est réglé sur OFF, il répond aux appels après 20 sonneries. Le système annonce : « Je ne suis pas disponible actuellement et vous ne pouvez pas laisser de message, veuillez rappeler plus tard ».
Pour écouter un message d'accueil :
- Accédez à ANSWER & RECORD ou ANSWER ONLY > PLAY GREETING.
- Touchez menu ok. Le message GREETING PLAYING s'affiche et le message d'accueil enregistré est diffusé.
- Touchez play stop pour arrêter.
Pour supprimer un message d'accueil :
- Pendant la lecture du message d'accueil, touchez delete flash. Le système annonce « CUSTOMER OUTGOING MESSAGE DELETED » suivi du message d'accueil par défaut. Le message par défaut sera utilisé.
Ou
- Accédez à ANSWER & RECORD ou ANSWER ONLY > DELETE GREETING.
- Touchez menu/ok pour confirmer.
REMARQUE : Le message d'accueil par défaut ne peut pas être supprimé de la mémoire permanente du système.
Délai de sonnerie
La fonction de délai de sonnerie vous permet de définir le nombre de sonneries avant que le système ne réponde à un appel externe.
Pour régler le délai de sonnerie :
- Accédez à RÉPONDEUR > DÉLAI DE SONNERIE.
- Touchez menu/ok.
- Utilisez ▲ ou ▼ pour sélectionner TIME SAVER, 2, 3, 4, 5, 6, 7, 8 ou 9 SONNERIES.
- Touchez menu pour confirmer.
Filtrage des appels
Lors d'un appel entrant, vous pouvez laisser le répondeur prendre l'appel et écouter l'enregistrement du message entrant (il sera diffusé par le haut-parleur de la base). Ensuite, décidez si vous voulez prendre l'appel. Touchez conversation sur le combiné ou sur la base si vous voulez prendre l'appel.
FONCTIONS DU RÉPONDEUR – UNITÉ DE BASE UNIQUEMENT
Accès à distance au répondeur
Vous pouvez consulter vos messages à distance depuis n'importe quelle ligne externe. Pour des raisons de sécurité, il est conseillé de définir un code d'accès à distance personnalisé à 4 chiffres avant d'accéder à distance à la boîte vocale.
Pour définir le code d'accès à distance :
- Accédez à RÉPONDEUR > ACCÈS À DISTANCE.
- Touchez menu/ok. Le message ACCÈS À DISTANCE et le code par défaut 0000 s'affichent.
- Saisissez le nouveau code à 4 chiffres à l'aide du clavier numérique 0-9.
- Touchez menu pour confirmer.
Pour accéder à distance au répondeur :
- Appelez le répondeur à l'aide d'un téléphone à tonalité et attendez le message d'accueil du répondeur.
- Appuyez sur # pendant la lecture du message d'accueil, le système jouera 'Veuillez saisir votre code d'accès à distance'
- Saisissez le code d'accès à distance à 4 chiffres. S'il est correct, le message 'CODE D'ACCÈS À DISTANCE ACCEPTÉ' sera joué, puis les commandes pour accéder à distance à la boîte vocale seront annoncées (voir le tableau ci-dessous). S'il est incorrect, le message 'ERREUR DE CODE D'ACCÈS À DISTANCE' sera joué, ressaisissez le code d'accès à distance correct.
| FUNCTION | COMMAND |
| Play mailbox messages | Press 1 to start playing messages |
| Play previous message | During message playback, press 4 twice within 1 second |
| Replay message | During message playback, press 4 |
| Stop message | During message playback or recording, press 5 to stop |
| Play next message | During message playback, press 6 |
| Delete current message | During message playback, press 7 |
| Record memo | During remote access standby, press 8 to record memo |
| Record announcement | Press 9 to record announcement. After recording, the announcement is played back |
| Toggle answering system on, off or “answer only” mode | During remote access standby, press 0 |
| Play the help function on remote access commands | During remote access standby, Press * |
| When you have finished using the remote answer system, end the call to return to standby mode | Timeout |
FONCTIONS DU RÉPONDEUR -- UNITÉ DE BASE UNIQUEMENT
Mémoire pleine
Votre répondeur peut enregistrer jusqu'à 13 minutes de messages. Lorsque la mémoire d'enregistrement est pleine ou que le nombre de messages atteint 50, l'écran LCD affiche MEMORY FULL et l'icône clignote. Dans ce cas, aucun nouveau message ne sera accepté. Le système ne répondra aux appels qu'après 10 sonneries et annoncera MÉMOIRE PLEINE. Effacez certains ou tous les messages de la mémoire pour libérer de l'espace.
RÉINITIALISATION
Pour réinitialiser les paramètres par défaut du téléphone tactile :
- Touchez menu et sélectionnez RÉGLER PAR DÉFAUT.
- Utilisez ou pour sélectionner OUI.
- Touchez menu pour confirmer. ok
REMARQUE : Tous les paramètres que vous avez définis seront restaurés aux paramètres d'usine par défaut si vous réinitialisez.
PARAMÈTRES PAR DÉFAUT
| PARAMETERS--PHONES | DEFAULT VALUE |
| Language | English |
| Internal & external ring volume | 3 |
| External ring pattern | Ring tone 3 |
| Internal ring pattern | Tone 1 |
| Alarm | Off |
| Alarm time | 12:00AM |
| Display format | 12-hour |
| Month-date display format | MM / DD |
| Key click tone | Pattern 2 |
| Baby call | Off |
| Baby call number | Clear |
| Dial mode | Tone Dial |
| Flash time | 600 ms |
| Backlight time | 20s |
| Handset name | Clear |
| LCD contrast level | 5 (base), 10 (handset) |
| Handset volume | Vol. 1 |
| Speaker phone volume | Vol. 3 |
| Area code | Clear |
| PARAMETERS -ANSWERING SYSTEM | DEFAULT VALUE |
| Answer mode | ANSWER AND RECORD |
| Ring delay | 5 |
| Remote access code programming | 0000 |
| Speaker phone volume | 3 |
| Pre-recorded announcement | Clear |
AJOUT DE COMBINÉS SANS FIL SUPPLÉMENTAIRES
Les modèles suivants sont disponibles :
CLTD6620 (noir), CLTD6620WH (blanc) - combiné unique
CLTD6622 (noir), CLTD6622WH (blanc) - 2 combinés
Ils ont la même apparence et fonctionnent de manière largement similaire au combiné sans fil Touch inclus dans le système Combo. Si une seule prise téléphonique est disponible dans tout le logement, leur base peut partager la même prise téléphonique que le Combo en obtenant un adaptateur peu coûteux et largement disponible qui dérive 2 prises à partir d'une seule.
Veuillez visiter Sanyo.ca pour voir les modèles Touch ci-dessus et les détaillants participants.
REMARQUE : En raison des fonctions de sécurité intégrées au système Touch Combo, la conversation confidentielle et les fonctions d'appel interne / interphone ne s'étendront pas aux combinés supplémentaires.
DÉPANNAGE
Voir ci-dessous pour quelques problèmes courants et leurs solutions. Quel que soit le problème, vous devez d'abord vérifier que :
- L'unité de base est connectée à l'alimentation électrique et à la ligne téléphonique.
- L'alimentation principale est allumée à la prise.
- La batterie du combiné est installée et n'est pas déchargée.
N'essayez pas de réparer vous-même, cela annulerait votre garantie.
| PROBLEM | POSSIBLE CAUSES/REMEDIES |
| Can't make a call / OUT OF RANGE appears on the handset | • Out of range to base unit - move closer • De-synchronization has occurred. The base unit will reset synchronization automatically • Handset may not still be registered to base unit, see SPECIAL FEATURES – Registration |
| Can't enter the submenus | • Ensure unit is not in cradle • Return to Standby mode by touching end |
| Every button I touch calls a preset number | • Phone is in Baby Call mode. To deactivate see FUNCTION SETTINGS – Baby Call |
| Caller ID is not displayed | • Check your network subscription to Caller ID • Full name and number (incl. STD code) need to be stored in phonebook for name display |
| Handset and the base unit do not ring | • Ring Volume is OFF, see FUNCTION SETTINGS – Change Ring and Key Tones |
| When I'm talking on the cordless phone I keep activating other keys | • Make sure that your ear is touching the top section of the handset (receiver) when you are talking |
| Mute, intercom, speakerphone don't work during calls | • Check if Manual Key Lock or Smart Key Lock is engaged. see FUNCTION SETTINGS - Smart key lock and Manual key lock |
| Battery pack is low, even if recharged | • Battery pack may need to be replaced. Best to purchase new 1 or 2 in advance (see separate order form) |
| I can't make an internal call | • Only one external call and one internal call can take place at once. Make sure the handset or the base is making a call |
CHANGEMENT DE LA BATTERIE - COMBINÉ SANS FIL UNIQUEMENT
Remplacement et manipulation de la batterie
Lorsque la durée de fonctionnement devient courte même après une recharge, veuillez remplacer la batterie.
En utilisation normale, votre batterie devrait durer environ un an.
Pour une batterie de remplacement, veuillez contacter votre point de vente ou remplir et envoyer le formulaire ci-joint.
ATTENTION :
- Utilisez uniquement le type de batterie spécifié (Ni-MH 3,6 V, 650 mAh).
- Ne retirez pas la batterie du combiné pour la charger.
- Ne jetez jamais la batterie au feu, ne la démontez pas et ne la chauffez pas.
- Ne retirez pas et n'endommagez pas le boîtier de la batterie.
- Retirez la batterie si vous rangez le téléphone pendant plus de 30 jours.
Assurez-vous que le téléphone est éteint avant de remplacer la batterie.
- Faites glisser le couvercle du compartiment à batterie.
- Retirez la batterie du compartiment.
- Insérez la nouvelle batterie en respectant la polarité indiquée.
- Replacez le couvercle du compartiment à batterie.
- Placez le combiné sur le chargeur pour le charger pendant 15 heures.
Chargez la batterie du combiné pendant 15 heures consécutives avant la première utilisation. La charge initiale de la batterie est importante pour des performances optimales.
ATTENTION : Pour réduire les risques d'incendie ou de blessures, utilisez une batterie NI-MH de 3,6 V, 650 mAh.
Numéro de pièce de rechange : 3SN-AAA
PANNE DE COURANT
En cas de coupure de courant, si vous avez installé 3 piles alcalines de format AA (non incluses) dans la base comme alimentation de secours, vous pourrez toujours passer ou recevoir des appels avec le téléphone. Sinon, vous ne pourrez pas passer ni recevoir d'appels avec le téléphone.
RECYCLAGE DES BATTERIES NICKEL-MÉTAL HYDRURE
LES BATTERIES NICKEL-MÉTAL HYDRURE DOIVENT ÊTRE ÉLIMINÉES DE MANIÈRE APPROPRIÉE.
Veuillez apporter votre batterie usagée à un magasin qui recycle les batteries Ni-MH. Appelez le 1-800-822-8837 ou visitez www.rbrc.ca

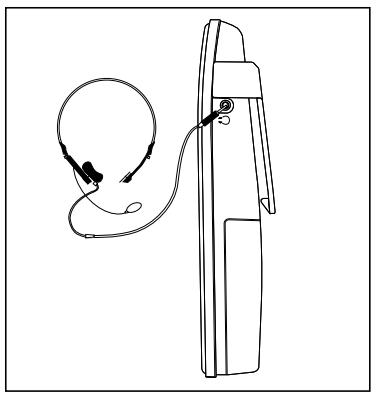
PRISE CASQUE
Connexion du casque (casque non inclus) Pour une conversation mains libres, connectez le casque (non inclus) à la prise CASQUE. L'écouteur et le microphone du combiné sont désactivés lorsque le casque est connecté. Touchez Parler pour répondre ou passer un appel en utilisant le casque.
Pour l'achat, l'entretien ou le remplacement, veuillez contacter notre centre de service.
SANYO Canada Inc.
1-300 Applewood Cres.
Concord, Ont. L4K 5C7
(905) 760-9944
1-800-263-2244
MAINTENANCE
Pour que votre téléphone fonctionne correctement et conserve son aspect, suivez ces recommandations :
- Évitez de placer le téléphone près d'appareils de chauffage ou d'appareils générant des parasites électriques (par exemple, moteurs ou lampes fluorescentes).
- Ne l'exposez pas directement au soleil ni à l'humidité.
- Évitez de faire tomber le téléphone et tout traitement brutal.
- Nettoyez le téléphone avec un chiffon doux.
- N'utilisez jamais de produit nettoyant agressif ni de poudre abrasive, car cela endommagerait la finition. Nettoyez périodiquement les contacts de charge du combiné et du chargeur avec une gomme propre.
- Conservez l'emballage d'origine et votre reçu de vente original au cas où vous auriez besoin d'expédier le téléphone ultérieurement.
OPTIMISER LES PERFORMANCES DE LA BATTERIE
La liberté offerte par votre téléphone sans fil dépend entièrement des performances de la batterie rechargeable du combiné. Pour optimiser les performances de la batterie, suivez ces recommandations :
Chargez-la pendant 15 heures complètes
Avant la première utilisation de votre nouvelle batterie, chargez-la pendant 15 heures sans interruption. Une charge initiale correcte est très importante pour optimiser les performances de la batterie.
Gardez les contacts propres
Vous ne pourrez jamais recharger complètement la batterie si les contacts sont sales. Nettoyez tous les contacts – deux en bas du combiné et deux dans le chargeur – périodiquement. Utilisez une gomme propre ou de la laine d'acier très fine pour nettoyer les contacts de charge. Évitez de toucher la zone du boîtier du téléphone, car des rayures pourraient apparaître.
Rafraîchir la batterie
Si votre batterie semble devoir être rechargée plus souvent que d'habitude, elle a peut-être perdu une partie de sa capacité de charge. Pour lui redonner sa pleine capacité, essayez de « rafraîchir » la batterie :
- Déchargez d'abord la batterie en laissant le combiné en mode TALK jusqu'à ce que l'indicateur de batterie faible s'allume. (Débranchez la base de la ligne téléphonique, afin que votre ligne ne soit pas occupée en permanence.)
- Ensuite, chargez-la pendant 15 heures consécutives.
- Répétez l'opération une fois de plus. Comme votre téléphone utilise une batterie Ni-MH, vous pouvez laisser votre combiné dans le chargeur aussi longtemps que vous le souhaitez, sans affecter la durée de vie de la batterie.
La base filaire
| TYPE | DESCRIPTION |
| Dimension | 196(L)X152(W)X67(H)/mm |
| Weight | 541g |
| Standard | Digital Enhanced Cordless Telecommunications 6.0 (DECT 6.0) |
| Frequency range | 1.9 GHz |
| Channel bandwidth | 1.728 MHz |
| Modulation | GFSK |
| Base power supply | Main supply: 120V / 60Hz, 8VDC, 500mA |
| Battery back up: 3 x AA alkaline | |
| Operating time (back up battery mode) | Standby: Approximately 12 hours Talk time: Approximately 5 hours |
| Operating temperature | 0°C to 40°C (32°F to 113°F) |
| Storage temperature | -20°C to 60°C (-4°F 140°F) |
Le combiné sans fil
| TYPE | DESCRIPTION |
| Handset | 141 x 44 x 24 mm (5.55 x 1.73 x 0.94 in) |
| Handset weight | 125 g (4.41 oz) |
| Charger | 91 x 80 x 45 mm |
| Charger weight | 75g |
| Transmission platform | Digital Enhanced Cordless Telecommunications 6.0 (DECT 6.0) |
| Frequency range | 1.9 GHz |
| Channel bandwidth | 1.728 MHz |
| Modulation | GFSK |
| Charger power supply | 120V / 60Hz, 6VDC, 300mA |
| Rechargeable battery | NiMH 650mAh 3.6V (AAA) battery pack |
| Cordless operating time (new battery) | Standby: Approximately 120 hours Talk: Approximately 5 hours |
| Operating temperature | 0°C to 45°C (32°F to 113°F) |
| Storage temperature | -20°C to 60°C (-4°F 140°F) |
INFORMATIONS TECHNIQUES
Numéro REN :
Le numéro d'équivalence de sonnerie (REN) attribué à chaque terminal donne une indication du nombre maximal de terminaux pouvant être connectés à une interface téléphonique.
Le numéro REN de ce téléphone se trouve au bas de la base. La terminaison sur une interface peut consister en toute combinaison d'appareils, à condition que la somme des numéros d'équivalence de sonnerie de tous les appareils ne dépasse pas 5.
ATTENTION
Ce produit est destiné à être utilisé uniquement au CANADA. La vente ou l'utilisation dans d'autres pays peut violer les lois locales.
Les téléphones sans fil utilisent des radiofréquences pour permettre la mobilité. Cela affecte les performances de votre téléphone.
Pour maintenir la conformité avec les directives d'exposition RF de la FCC, il est recommandé de maintenir une distance typique d'au moins 20 cm entre la base et les personnes à proximité.
1. BRUIT
Des impulsions de bruit électrique sont présentes dans la plupart des foyers à un moment ou à un autre. Elles sont plus intenses pendant les orages électriques.
Certains types d'équipements électriques, tels que les gradateurs de lumière, les ampoules fluorescentes, les moteurs, les ventilateurs, etc., génèrent également des impulsions de bruit.
Comme les fréquences radio y sont sensibles, il est possible que vous entendiez parfois des impulsions de bruit à travers le combiné. Cela ne représente généralement qu'une gêne mineure et ne doit pas être interprété comme un défaut du téléphone.
2. PORTÉE
Comme des fréquences radio sont utilisées, l'emplacement de la base peut affecter la portée de fonctionnement du téléphone. Essayez plusieurs emplacements et choisissez celui qui donne le signal le plus clair au combiné. En général, une zone centrale à l'étage le plus élevé d'une résidence à plusieurs étages donne les meilleurs résultats.
3. INTERFÉRENCES
Les circuits électroniques activent un relais pour connecter
l'unité à votre ligne téléphonique. Ces circuits électroniques fonctionnent dans le spectre des fréquences radio. Bien que plusieurs circuits de protection soient utilisés pour empêcher les signaux indésirables, il peut y avoir des périodes où ces signaux indésirables entrent dans la base. Vous pouvez entendre un clic ou entendre le relais s'activer lorsque vous n'utilisez pas le combiné sans fil. Si cela se produit fréquemment, ou déplacez la base.
4. ÉQUIPEMENT RADIO
Le terme « IC : » avant le numéro de certification radio signifie uniquement que les spécifications techniques d'Industrie Canada ont été respectées. Le fonctionnement est soumis aux deux conditions suivantes (telles qu'établies par Industrie Canada) : (1) cet appareil ne doit pas causer d'interférences nuisibles, et (2) cet appareil doit accepter toute interférence, y compris les interférences qui peuvent provoquer un fonctionnement indésirable de l'appareil.
AVIS :
Les téléphones sans fil sont des appareils radio.
Les communications entre le combiné et la base de votre téléphone sans fil sont effectuées au moyen d'ondes radio qui sont diffusées sur les voies aériennes ouvertes. En raison des propriétés physiques inhérentes aux ondes radio, vos communications peuvent être reçues par des dispositifs de réception radio autres que votre propre téléphone sans fil. Par conséquent, la confidentialité des communications peut ne pas être assurée lors de l'utilisation de ce téléphone.
L'étiquette d'Industrie Canada identifie l'équipement certifié. Cette certification signifie que l'équipement répond à certaines exigences de protection, de fonctionnement et de sécurité des réseaux de télécommunications. Le ministère ne garantit pas que l'équipement fonctionnera à la satisfaction de l'utilisateur.
INFORMATIONS TECHNIQUES
Avant d'installer cet équipement, les utilisateurs doivent s'assurer qu'il est permis de le connecter aux installations de la compagnie de téléphone locale. L'équipement doit également être installé en utilisant une méthode de construction acceptable. Dans certains cas, le câblage interne de la compagnie associé au service individuel à ligne unique peut être prolongé au moyen d'un ensemble de connecteurs certifié (cordon de prolongation téléphonique). Le client doit être conscient que le respect des conditions ci-dessus peut ne pas empêcher la dégradation du service dans certaines situations.
Les réparations de l'équipement certifié doivent être effectuées par un centre de maintenance canadien autorisé désigné par le fournisseur. Toute réparation ou modification effectuée par l'utilisateur sur cet équipement, ou tout dysfonctionnement de l'équipement, peut donner à la compagnie de télécommunication des raisons de demander à l'utilisateur de débrancher l'équipement.
L'utilisateur doit s'assurer, pour sa propre protection, que les connexions de mise à la terre électrique du réseau électrique, des lignes téléphoniques et du système de tuyauterie métallique interne, s'il y en a, sont reliées ensemble. Cette précaution peut être particulièrement importante dans les zones rurales.
ATTENTION
Les utilisateurs ne doivent pas tenter de faire ces connexions eux-mêmes, mais doivent contacter l'autorité compétente en matière d'inspection électrique, ou un électricien, selon le cas. Le point d'exclamation dans un triangle équilatéral est destiné à alerter l'utilisateur de la présence d'instructions importantes de fonctionnement et de maintenance (entretien) dans la documentation accompagnant le produit.
Ce symbole sur le produit est utilisé pour identifier les informations importantes suivantes. Utiliser uniquement avec l'adaptateur secteur SANYO spécifié.
AVIS : Ce produit est conforme aux spécifications techniques applicables d'Industrie Canada. Ceci est confirmé par le numéro d'enregistrement. L'abréviation IC, avant le numéro d'enregistrement, signifie que l'enregistrement a été effectué sur la base d'une déclaration de conformité indiquant que les spécifications techniques d'Industrie Canada ont été respectées. Cela n'implique pas qu'Industrie Canada a approuvé l'équipement.
Cet appareil numérique de classe B est conforme à la norme canadienne ICES-003.
GARANTIE DE CONFORT SANYO
APPLICATION DE LA GARANTIE
Les produits de communication SANYO achetés neufs, non utilisés au Canada auprès d'un revendeur agréé SANYO sont garantis contre les défauts de fabrication des matériaux et de la main-d'œuvre pendant UN AN, couvrant les pièces et la main-d'œuvre, à compter de la date d'achat par l'acheteur au détail initial. Cette garantie ne s'applique qu'en faveur de l'acheteur au détail initial du produit garanti.
RESPONSABILITÉ DE SANYO CANADA INC.
Pendant la période de garantie, SANYO Canada Inc. réparera ou, à notre option, remplacera un produit de communication qui présente des preuves d'un défaut de fabrication dans les matériaux ou la main-d'œuvre. Les PIÈCES de remplacement sont garanties pour la partie restante de la période de garantie.
Pendant la période de garantie, SANYO Canada Inc. réparera ou, à notre discrétion, remplacera un produit de communication présentant des signes de défaut de fabrication dans les matériaux ou la main-d'œuvre. Les pièces de rechange sont garanties pour la partie restante de la période de garantie.
CE QUI N'EST PAS COUVERT
a. Produits de communication achetés à l'extérieur du Canada. b. Produits de communication achetés d'occasion. c. Produits de communication achetés auprès d'un revendeur non agréé SANYO.
GARANTIE DE CONFORT SANYO
d. Produits de communication non destinés à une utilisation au Canada ou produits sans les approbations réglementaires canadiennes appropriées. e. Problèmes dus à la configuration et à l'installation du produit. f. Réglages décrits dans le manuel d'utilisation. g. Accessoires, y compris l'antenne et les piles. h. Dommages pendant ou dus au transport. i. Dommages dus à un entretien inadéquat, un accident, un abus, une mauvaise utilisation ou une négligence. j. Dommages causés par la foudre et les surtensions.
RESPONSABILITÉ DE L'ACHETEUR AU DÉTAIL ORIGINAL
Vous, l'acheteur au détail original, devez présenter votre facture originale datée, accompagnée de cette garantie, à SANYO Canada Inc. ou à un centre de service agréé SANYO lorsque vous faites une réclamation au titre de cette garantie.
Vous, l'acheteur au détail original, êtes responsable de tous les frais de TRANSPORT du produit vers et depuis SANYO Canada Inc. ou un centre de service agréé SANYO.
Vous êtes également responsable du coût de tout ENTRETIEN nécessaire concernant le produit.
NULLITÉ DE LA GARANTIE
Cette garantie devient nulle si les numéros de série du produit sont modifiés ou retirés, ou si une réparation du produit est effectuée par une personne autre que SANYO Canada Inc. ou un centre de service agréé SANYO.
LIMITATIONS
a. SANYO Canada Inc. se réserve le droit de modifier ou d'améliorer la conception du modèle du produit garanti aux présentes sans encourir aucune obligation de modifier ou d'installer toute amélioration sur le produit. b. En aucun cas, SANYO Canada Inc. ou l'un de ses revendeurs agréés ne sera responsable des dommages spéciaux ou consécutifs découlant de l'utilisation de ce produit.
GARANTIES LÉGALES
Les dispositions ci-dessus n'empêchent pas l'application de toute loi provinciale applicable qui, dans certaines circonstances, peut ne pas permettre certaines des limitations et exclusions décrites dans cette garantie.
Si certaines conditions de cette garantie sont interdites par une telle loi, elles seront réputées nulles et non avenues, mais le reste de cette garantie restera en vigueur.
COMMENT OBTENIR LE SERVICE DE GARANTIE
Veuillez contacter le revendeur agréé SANYO auprès duquel le produit a été acheté, ou contactez-nous directement à :
SANYO Canada Inc.
1-300 Applewood Cres.
Concord, Ont. L4K 5C7
(905) 760-9944
1-800-263-2244
LIGNE D'ASSISTANCE SOS
Chez SANYO, répondre aux besoins de nos clients est une priorité. C'est pourquoi nous avons créé notre programme de service à la clientèle SOS qui garantit votre satisfaction.
SOUTIEN À LA CLIENTÈLE À L'ÉCHELLE NATIONALE
SOS est là pour vous aider. Nos spécialistes de produits, sympathiques et compétents, répondront rapidement à vos questions sur l'installation et l'utilisation des produits téléphoniques SANYO. Il vous suffit d'appeler sans frais de partout au Canada pour vous connecter à notre réseau de soutien et de service SOS sans frais :
1-800-263-2244
Ou visitez notre site Web à www.sanyoservice.com et cliquez sur le bouton Relations avec la clientèle pour accéder à nos FAQ (foire aux questions) et à d'autres fonctionnalités utiles.
CONFORT À DOMICILE
C'est une nuisance de faire un autre voyage au magasin quand vous êtes coincé. Maintenant avec SOS, tout ce qui est nécessaire est un appel rapide à votre domicile pour obtenir de l'aide sur le produit.
ÉCHANGE SANS TRACAS
Si votre téléphone SANYO nécessite une réparation en raison d'un défaut de fabrication pendant la période de garantie, SANYO Canada expédiera, en port payé, un appareil de remplacement* dans les deux jours ouvrables suivant la réception de votre appareil défectueux. Les frais d'expédition de l'appareil vers SANYO sont à la charge du consommateur.
Pour les modèles plus anciens ou hors catalogue, les appareils de remplacement peuvent ne pas être disponibles ; dans ce cas, nos conditions de garantie habituelles s'appliquent.
QUALITÉ GARANTIE
Tous les appareils de remplacement SOS sont vérifiés et réparés par des techniciens agréés par l'usine avant d'être expédiés.
SOS signifie que vous n'avez plus jamais à vous inquiéter.
Les envois en C.O.D. et/ou en port dû ne seront pas acceptés.
L'appareil doit être retourné à SANYO dans son emballage d'origine avec tous les accessoires, c'est-à-dire : le manuel de l'utilisateur, la batterie, l'adaptateur, le cordon téléphonique, etc.

- MANUEL D'INSTRUCTIONS
- CLT-D6720
- IMPORTANT
- CONSIGNES DE SÉCURITÉ IMPORTANTES
- TABLE DES MATIÈRES
- INTRODUCTION 4
- NOMS ET COMMANDES 5
- SÉCURITÉ ET ENTRETIEN 8
- POUR COMMENCER 10
- MENUS DU TÉLÉPHONE 13
- FONCTIONS DE BASE 18
- RÉPERTOIRE 20
- IDENTIFICATION DE L'APPELANT 22
- RÉGLAGES DES FONCTIONS 24
- SOMMAIRE
- FONCTIONS SPÉCIALES 27
- RÉPONDEUR NUMÉRIQUE 29
- FONCTIONS DU RÉPONDEUR - UNITÉ DE BASE UNIQUEMENT 30
- RESET 34
- PARAMÈTRES PAR DÉFAUT 34
- AJOUT DE COMBINÉS SANS FIL SUPPLÉMENTAIRES 35
- DÉPANNAGE 35
- REMPLACEMENT DE LA BATTERIE - COMBINÉ SANS FIL UNIQUEMENT 36
- COUPURE DE COURANT 36
- RECYCLAGE DES BATTERIES NICKEL-MÉTAL HYDRURE 36
- PRISE POUR CASQUE D'ÉCOUTE 37
- ENTRETIEN 37
- OPTIMISER LES PERFORMANCES DE LA BATTERIE 37
- CARACTÉRISTIQUES TECHNIQUES 38
- INFORMATIONS TECHNIQUES 39
- GARANTIE SANYO COMFORT 40
- LIGNE D'ASSISTANCE SOS 42
- INTRODUCTION
- CARACTÉRISTIQUES PRINCIPALES
- UNITÉ DE BASE AVEC FIL
- COMBINÉ SANS FIL
- CONTENU DE L'EMBALLAGE
- ARTICLES GÉNÉRAUX
- UNITÉ DE BASE - VUE DE FACE
- BASE - VUE DE DESSOUS ET SUPPORT MURAL
- TÉLÉPHONE SANS FIL À COMBINÉ TACTILE - VUE DE FACE
- SÉCURITÉ ET ENTRETIEN
- PRÉCAUTIONS DE SÉCURITÉ
- ENTRETIEN DE VOTRE PRODUIT
- ATTENTION
- POUR COMMENCER
- CONNEXION DE L'ALIMENTATION ET DE LA LIGNE TÉLÉPHONIQUE
- UNITÉ DE BASE
- UNITÉ SANS FIL
- INSTALLATION DES PILES
- POUR INSTALLER LES PILES DE L'UNITÉ DE BASE
- POUR CHARGER LA BATTERIE
- AVERTISSEMENT DE BATTERIE FAIBLE
- FIXATION DE LA PINCE CEINTURE
- INSTALLATION DE LA PINCE CEINTURE
- MONTAGE MURAL DE LA BASE
- RÉCEPTION ENTRE LA BASE ET LE COMBINÉ SANS FIL
- MENUS DU TÉLÉPHONE
- ÉTAT ET MESSAGES
- NAVIGATION DANS LE MENU PRINCIPAL DU TÉLÉPHONE
- COMMENT NAVIGUER DANS LES MENUS
- EN MODE VEILLE
- REMARQUE
- MENUS DE LA BASE
- MENUS DU COMBINÉ SANS FIL
- FONCTIONS DE BASE
- MODE VEILLE ET MODE SOMMEIL
- TÉLÉPHONE FILAIRE AVEC BASE
- PASSER ET RECEVOIR DES APPELS
- POUR PASSER UN APPEL
- POUR COMPOSER UN NUMÉRO EN PRÉ-NUMÉROTATION
- POUR INSÉRER UNE PAUSE
- POUR RÉPONDRE À UN APPEL
- POUR TERMINER UN APPEL
- POUR ACTIVER LE HAUT-PARLEUR
- OU
- POUR RÉGLER LE VOLUME PENDANT UN APPEL
- POUR RECOMPOSER UN NUMÉRO
- POUR COUPER LE MICROPHONE PENDANT UN APPEL
- POUR RÉPONDRE À UN APPEL EN ATTENTE
- LOCALISATEUR DE COMBINÉ (FONCTION DE RECHERCHE)
- RÉPERTOIRE
- POUR ACCÉDER AUX OPTIONS DU MENU DU RÉPERTOIRE
- UTILISATION DES TOUCHES POUR SAISIR DU TEXTE
- ENREGISTREMENT DES NUMÉROS
- POUR SAISIR DES NOMS
- MODIFICATION DES NUMÉROS
- APPEL DES NUMÉROS ENREGISTRÉS
- SUPPRESSION DE NUMÉROS
- POUR SUPPRIMER 1 ENREGISTREMENT
- POUR TOUT SUPPRIMER
- IDENTIFICATION DE L'APPELANT
- AFFICHAGE / APPEL DES ENREGISTREMENTS D'IDENTIFICATION DE L'APPELANT
- POUR AFFICHER LES IDENTIFICATIONS DE L'APPELANT
- POUR COMPOSER UN NUMÉRO DANS LE JOURNAL DES APPELS
- SUPPRESSION D'UN OU DE TOUS LES ENREGISTREMENTS D'IDENTIFICATION DE L'APPELANT
- POUR SUPPRIMER UN ENREGISTREMENT D'IDENTIFICATION DE L'APPELANT
- POUR SUPPRIMER TOUS LES IDENTIFIANTS D'APPELANT
- ENREGISTREMENT DES IDENTIFIANTS D'APPELANT DANS LE RÉPERTOIRE
- MODIFICATION DU NUMÉRO D'IDENTIFICATION DE L'APPELANT AVANT D'APPELER
- FORMATAGE DES NUMÉROS D'IDENTIFICATION DE L'APPELANT
- APPELS MANQUÉS
- MESSAGE EN ATTENTE
- POUR EFFACER MANUELLEMENT LES INDICATEURS DE MESSAGE EN ATTENTE
- RÉGLAGES DES FONCTIONS
- MODIFIER LES RÉGLAGES D'AFFICHAGE
- POUR CHANGER LA LANGUE
- POUR RÉGLER LE CONTRASTE DE L'ÉCRAN
- POUR MODIFIER LA DURÉE DU RÉTROÉCLAIRAGE
- POUR ATTRIBUER UN NOM À UN COMBINÉ – COMBINÉ SANS FIL UNIQUEMENT
- CHANGER LES SONNERIES ET LES TONALITÉS DES TOUCHES
- POUR CHANGER LE VOLUME DE LA SONNERIE
- POUR SÉLECTIONNER UNE SONNERIE
- POUR CHANGER LA TONALITÉ DES TOUCHES
- RÉGLAGE TONALITÉ/IMPULSIONS
- POUR SÉLECTIONNER LE MODE DE NUMÉROTATION PAR IMPULSIONS OU PAR TONALITÉ
- ACCÈS TEMPORAIRE À LA TONALITÉ (*TONE)
- DURÉE DU FLASH
- POUR MODIFIER LA DURÉE DU FLASH
- VERROUILLAGE INTELLIGENT DES TOUCHES – COMBINÉ SANS FIL UNIQUEMENT
- VERROUILLAGE MANUEL DU CLAVIER
- POUR ACTIVER/DÉSACTIVER LE VERROUILLAGE MANUEL DU CLAVIER
- CHANGER L'INDICATIF RÉGIONAL
- APPEL BÉBÉ
- POUR CONFIGURER L'APPEL BÉBÉ
- POUR DÉSACTIVER L'APPEL BÉBÉ
- RÉPONSE AUTOMATIQUE – COMBINÉ SANS FIL UNIQUEMENT
- POUR ACTIVER LA RÉPONSE AUTOMATIQUE
- FONCTIONS SPÉCIALES
- RÉGLAGES DE L'HORLOGE ET DE L'ALARME
- POUR RÉGLER L'HEURE
- POUR MODIFIER LE FORMAT D'AFFICHAGE DE L'HEURE
- POUR RÉGLER L'ALARME
- POUR DÉSACTIVER L'ALARME
- POUR COUPER LE SON DE L'ALARME
- APPEL DE LA BASE VERS LE COMBINÉ
- POUR EFFECTUER UN APPEL INTERNE EN MODE VEILLE DEPUIS LA BASE VERS LE COMBINÉ
- POUR PASSER UN APPEL INTERNE EN MODE VEILLE, DU COMBINÉ VERS LA BASE
- POUR FAIRE UNE CONFÉRENCE À TROIS AVEC UN APPEL EN COURS (C'EST-À-DIRE « INVITER » LE COMBINÉ SANS FIL À SE JOINDRE)
- POUR FAIRE UNE CONFÉRENCE À TROIS AVEC UN APPEL EN COURS (C'EST-À-DIRE « INVITER » LA BASE À SE JOINDRE)
- POUR TRANSFÉRER UN APPEL EN COURS
- ENREGISTREMENT
- RÉPONDEUR NUMÉRIQUE
- SYSTÈME DE RÉPONSE NUMÉRIQUE
- OPTIONS DU MENU
- POUR AFFICHER LES OPTIONS DU MENU DU SYSTÈME DE RÉPONSE
- FONCTIONS DU RÉPONDEUR – UNITÉ DE BASE UNIQUEMENT
- POUR ACTIVER/DÉSACTIVER LE RÉPONDEUR
- FONCTIONS DU SYSTÈME DE RÉPONSE – UNITÉ DE BASE UNIQUEMENT
- POUR RÉGLER LE NIVEAU DE VOLUME
- POUR LIRE LES MESSAGES DU RÉPONDEUR
- POUR ARRÊTER PENDANT LA LECTURE
- POUR SUPPRIMER UN MESSAGE
- POUR SUPPRIMER TOUS LES ANCIENS MESSAGES DE LA BOÎTE VOCALE
- POUR ENREGISTRER UNE NOTE MÉMORANDUM
- ANNONCES
- POUR ENREGISTRER UNE ANNONCE PERSONNALISÉE
- POUR ÉCOUTER UN MESSAGE D'ACCUEIL
- POUR SUPPRIMER UN MESSAGE D'ACCUEIL
- DÉLAI DE SONNERIE
- POUR RÉGLER LE DÉLAI DE SONNERIE
- FILTRAGE DES APPELS
- ACCÈS À DISTANCE AU RÉPONDEUR
- POUR DÉFINIR LE CODE D'ACCÈS À DISTANCE
- POUR ACCÉDER À DISTANCE AU RÉPONDEUR
- FONCTIONS DU RÉPONDEUR -- UNITÉ DE BASE UNIQUEMENT
- MÉMOIRE PLEINE
- RÉINITIALISATION
- POUR RÉINITIALISER LES PARAMÈTRES PAR DÉFAUT DU TÉLÉPHONE TACTILE
- PARAMÈTRES PAR DÉFAUT
- AJOUT DE COMBINÉS SANS FIL SUPPLÉMENTAIRES
- DÉPANNAGE
- CHANGEMENT DE LA BATTERIE - COMBINÉ SANS FIL UNIQUEMENT
- REMPLACEMENT ET MANIPULATION DE LA BATTERIE
- ASSUREZ-VOUS QUE LE TÉLÉPHONE EST ÉTEINT AVANT DE REMPLACER LA BATTERIE
- PANNE DE COURANT
- RECYCLAGE DES BATTERIES NICKEL-MÉTAL HYDRURE
- PRISE CASQUE
- MAINTENANCE
- OPTIMISER LES PERFORMANCES DE LA BATTERIE
- CHARGEZ-LA PENDANT 15 HEURES COMPLÈTES
- GARDEZ LES CONTACTS PROPRES
- RAFRAÎCHIR LA BATTERIE
- INFORMATIONS TECHNIQUES
- NUMÉRO REN
- BRUIT
- PORTÉE
- INTERFÉRENCES
- ÉQUIPEMENT RADIO
- AVIS
- APPLICATION DE LA GARANTIE
- LES PRODUITS DE COMMUNICATION SANYO ACHETÉS NEUFS, NON UTILISÉS AU CANADA AUPRÈS D'UN REVENDEUR AGRÉÉ SANYO SONT GARANTIS CONTRE LES DÉFAUTS DE FABRICATION DES MATÉRIAUX ET DE LA MAIN-D'ŒUVRE PENDANT UN AN, COUVRANT LES PIÈCES ET LA MAIN-D'ŒUVRE, À COMPTER DE LA DATE D'ACHAT PAR L'ACHETEUR AU DÉTAIL INITIAL. CETTE GARANTIE NE S'APPLIQUE QU'EN FAVEUR DE L'ACHETEUR AU DÉTAIL INITIAL DU PRODUIT GARANTI
- PENDANT LA PÉRIODE DE GARANTIE, SANYO CANADA INC. RÉPARERA OU, À NOTRE OPTION, REMPLACERA UN PRODUIT DE COMMUNICATION QUI PRÉSENTE DES PREUVES D'UN DÉFAUT DE FABRICATION DANS LES MATÉRIAUX OU LA MAIN-D'ŒUVRE. LES PIÈCES DE REMPLACEMENT SONT GARANTIES POUR LA PARTIE RESTANTE DE LA PÉRIODE DE GARANTIE
- CE QUI N'EST PAS COUVERT
- GARANTIE DE CONFORT SANYO
- RESPONSABILITÉ DE L'ACHETEUR AU DÉTAIL ORIGINAL
- NULLITÉ DE LA GARANTIE
- LIMITATIONS
- GARANTIES LÉGALES
- COMMENT OBTENIR LE SERVICE DE GARANTIE
- LIGNE D'ASSISTANCE SOS
- SOUTIEN À LA CLIENTÈLE À L'ÉCHELLE NATIONALE
- 1-800-263-2244
- CONFORT À DOMICILE
- ÉCHANGE SANS TRACAS
- QUALITÉ GARANTIE
Marque : SANYO
Modèle : CLT-D6720
Catégorie : Téléphone fixe