
HT30547 - Téléviseur SANYO - Notice d'utilisation et mode d'emploi gratuit
Retrouvez gratuitement la notice de l'appareil HT30547 SANYO au format PDF.


| Type de produit | Téléviseur SDTV 30 pouces |
| Marque | SANYO |
| Modèle | HT30547 |
| Alimentation | 120 V CA, 60 Hz, 97 W (moyenne) |
| Taille d'écran | 30 pouces (diagonale) |
| Résolution | Définition standard (SDTV) |
| Connecteurs d'entrée | Antenne RF 75 ohms, entrée AV composite (vidéo jaune + audio L/R), S-Vidéo, entrée composante (Y, Pb, Pr) via prise verte/bleue/rouge |
| Sortie audio | Audio analogique fixe (L/R) |
| Fonctions de la télécommande | Sélection d'entrée, volume, chaînes numériques, navigation dans les menus, info, mise en sourdine, veille, format d'image, sous-titres, rappel, réinitialisation |
| Recherche des chaînes | Recherche automatique des chaînes analogiques et numériques (antenne ou câble) |
| Mémoire des chaînes | Liste personnalisable : ajout et suppression de chaînes |
| Contrôle parental | V-Guide : blocage par émission et contenu (D, L, S, V) conforme à la norme FCC |
| Minuterie de sommeil | Jusqu'à 3 heures, par incréments de 30 minutes |
| Sous-titres | Sous-titres analogiques (CC1-CC4) et numériques (DCC1-DCC6), mode QuikCap |
| Format d'image | Réglable via touche PI X SHAPE (selon le rapport d'aspect diffusé) |
| Nettoyage | Débrancher l'appareil, utiliser un chiffon sec. Ne pas appliquer de liquide directement. |
| Sécurité | Mise à la terre de l'antenne, éviter l'humidité, ne pas obstruer les fentes de ventilation, utilisation de pièces détachées agréées |
| Garantie | 1 an pièces et main-d'œuvre (États-Unis, Canada, Porto Rico) ; échange en magasin les 90 premiers jours |
FOIRE AUX QUESTIONS - HT30547 SANYO
Questions des utilisateurs sur HT30547 SANYO
0 question sur cet appareil. Repondez a celles que vous connaissez ou posez la votre.
Poser une nouvelle question sur cet appareil
Téléchargez la notice de votre Téléviseur au format PDF gratuitement ! Retrouvez votre notice HT30547 - SANYO et reprennez votre appareil électronique en main. Sur cette page sont publiés tous les documents nécessaires à l'utilisation de votre appareil HT30547 de la marque SANYO.
MODE D'EMPLOI HT30547 SANYO
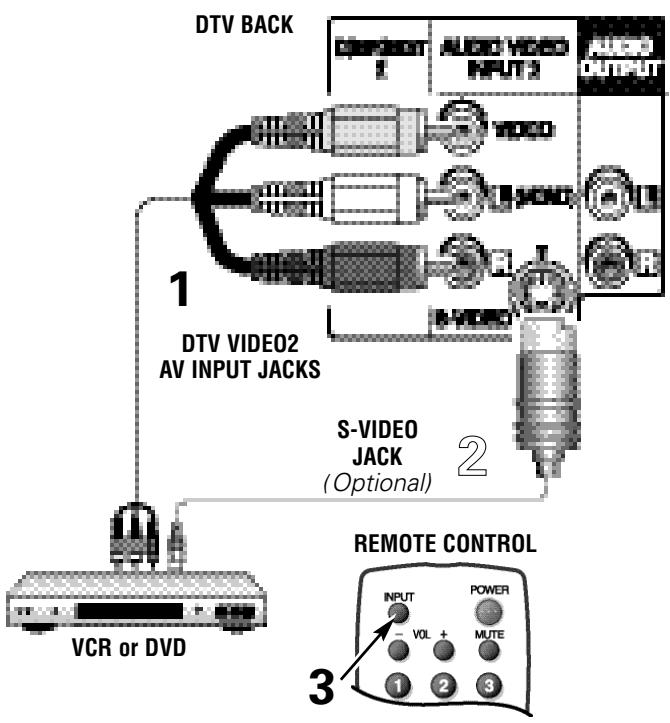
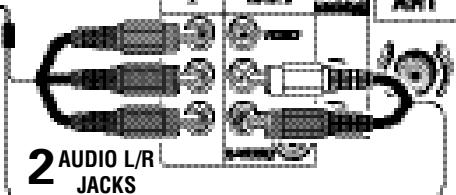
CONNECTING A VCR OR DVD TO THE TV
ANALOG AV INPUT2 JACKS
1 Connect a Composite Cable to the AV INPUT 2 Yellow, White, and Red AV jacks as shown
OPTIONAL
Connect DVD to the TV's S-Video jack as shown.
Note: S-Video jack connection overrides a Video jack connection (VIDEO2).
3 Press INPUT to select Video2 to view the VCR or DVD program.
OPERATING TIPS:
For Mono VCR (Single Audio Jack), connect VCR Audio Out to DTV Audio (L) Input.
"No Signal" will appear randomly on the screen when no signal is detected at the video jack.
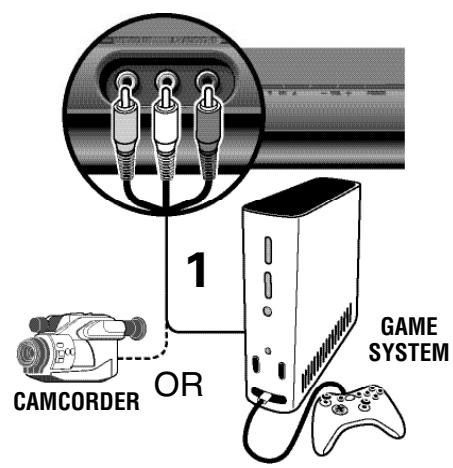
CONNECTING A VIDEO GAME TO THE DTV
FRONT A/V (VIDEO1) JACKS
1 Connect a Game System or other external equipment as shown.
2 Press INPUT to select Video1.
CONNECTING A STEREOMAMPLIFIER TO THE DTV
AUDIO OUT (FIXED ANALOG) JACKS
1 Connect a Stereo Amplifier to the DTV Audio Out jacks as shown.
Note: Do not connect external speakers directly to the DTV.
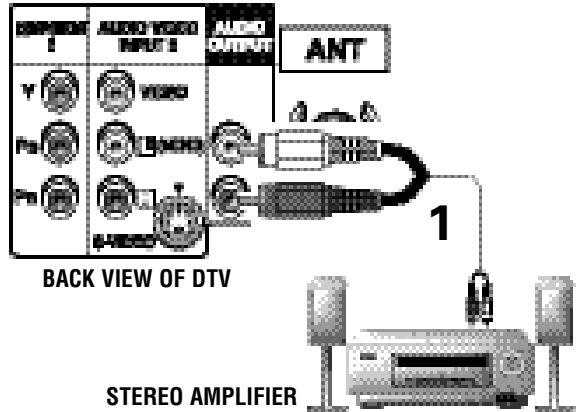
OPERATING TIP: Position your DTV at least 2 feet from stereo speakers. The magnets in the speakers may affect the picture quality.
REMOTE CONTROL OPERATION
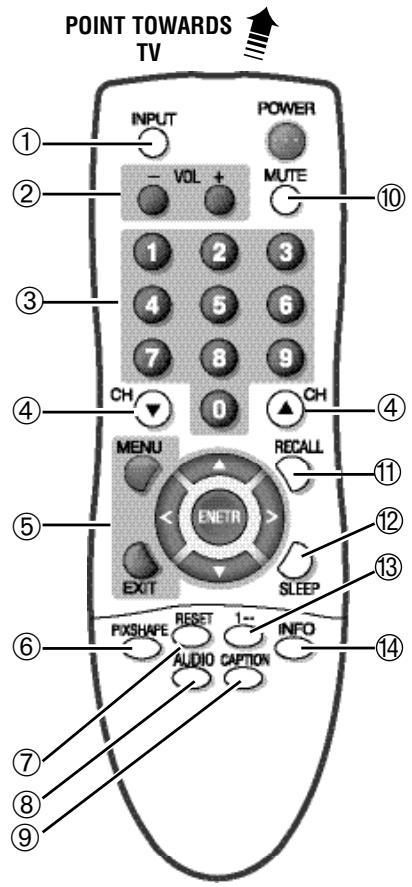
① Input Key—Press to select the program source to watch: TV, Video1, Video2, or Component2.
② Volume Keys—Press VOL- + to adjust.
③ Number Keys—Press two keys to select a channel. Example: Press 0 then 6 to select channel 6. (See #13.)
④ Channel Scanning (CH ▲▼) Keys—Press to scan through the channels in memory and AV inputs.
⑤ Menu Navigational Keys:
Menu—Press to display on-screen menu.
Cursor (up) (down) keys—Press these keys to move the cursor up and down within the menu.
Cursor < (left) > (right) keys—Press these keys to move the cursor left and right within the menu.
Enter Key—Press to select an option from the menu system, when required.
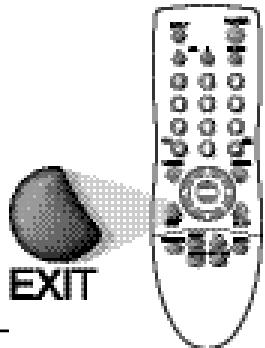
Exit Key—Press to exit from the menu system.
If you experience problems, please call 1-800-877-5032, We Can Help!
⑥ PI X Shape Key—Use to change the video display format. Available options depend on signal received and the broadcast's aspect ratio. Note: Cannot display picture on a full screen. Check Aspect Ratio of broadcast. Then press PI X SHAPE key to change setting.
⑦ Reset Key—Press this key twice to restore factory settings. The TV will automatically start Channel Search and clear all customized settings. Note: Channel scan memory database list of digital and analog channels will be replaced. If desired, personal settings can be made again using the menu options.
⑧ Audio Key—Press to select the desired audio mode (if available).
9 Caption Key—Captioning is text information transmitted along with the picture and sound so it can be displayed on the TV screen. Press CAPTION to select mode options: Digital CC1 ~ Digital CC6, or Analog CC1 ~ CC4, OFF, or QuikCap. (QuikCap switches captions on and off with the Mute function.) Digital Captions can be changed using the menu settings.
10 Mute Key—Press once to mute the sound; press again to restore.
⑪ Recall Key—Press to switch between the last two channels selected. The RECALL key cannot toggle between a Digital channel and an Analog channel.
12 Sleep Key—Press this key then the "0" key to set the Sleep Off Timer. Time can be set in 30-minute increments up to 3 hours. Note: The Sleep Timer cancels when the TV is turned off or if a power failure occurs.
13 1- - Key-For Analog Cable channels above 100, press this key, then press the other two numbers.
14 Info Key—Press to display the Digital and Analog Full Banner information. The banner contains the following: program title, station ID, program rating, signal strength, channel number, tuner ID, and audio information.
ENGLISH
SDTV Owner's Manual
Part No.: 1JC6P1P0256--
PLEASE CALL US AT
1.800.877.5032 IF YOU NEED
ASSISTANCE WITH YOUR NEW
SANYO 30-INCH SDTV.
WE CAN HELP!
Model No.
HT30547
Visit us at www.sanyoctv.com
for more information about this model.
Printed in U.S.A. SMC, March 2007 · 32-H3FAM-BM · VB9H · GXCB
FIRST-THINGS-FIRST (REQUIRED INITIAL SETUP)
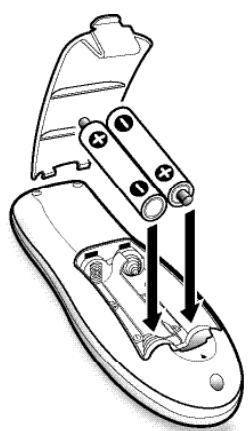
1 Install batteries in remote control (2AA, not included)
PRECAUTIONS
To ensure safe operation, please observe the following precautions:
Replace both batteries at the same time. Do not use a new battery with a used battery.
Risk of explosion, if battery is replaced by an incorrect type. Do not expose the Remote Control Unit to moisture or heat.
2 Connect Signal to the TV's Integrated Analog / Digital 75 ohm Antenna Input terminal
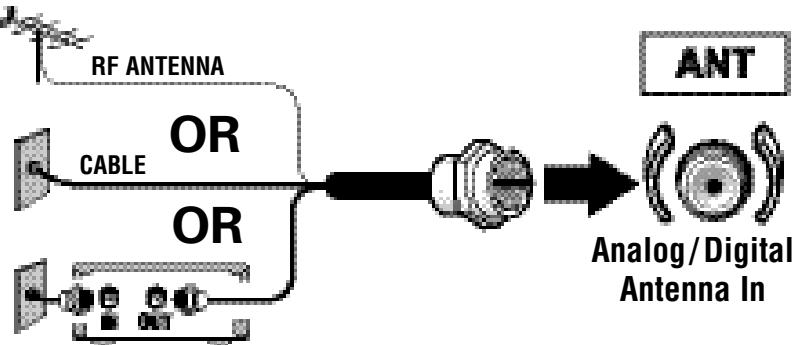
VCR, CABLE BOX, or SATELLITE BOX
3 Plug in AC power cord (120V AC, 60 Hz.)
4 Press the POWER key.
(Follow on-screen instructions)
5 Perform "All Channel Search." The All Channel Search will search for off-air digital and analog channels, and analog cable channels. The DTV will receive cable or off-air channels, but not at the same time. If after two searches the DTV still fails to detect any channels, the DTV will tune to Video2.
Note: If EXIT is pressed, the DTV will skip Channel Search and tune to VIDEO2 without storing any channels in the Channel Map database.
The Tuner in this DTV can receive:
- Digital and/or Analog Off-Air Signals from an RF antenna.
OR - Analog or ClearQAM cable channels.
Note: You must search for ClearQAM channels using the "Digital Cable Search" menu option.
On
- The output from a VCR, Cable or Satellite box.
Signals from a DVD should be received through the Component In jacks.
This DTV can receive ANY unscrambled RF signal being broadcast.
Initial on-screen
ALL Channel Search
First
Please connect all signals and antennas to jacks and the terminals on the back.
Then press the Channel UP key.
Press EXIT key to cancel setup
Analog
Digital
Please wait while
Your TV searches
for available channels.
Analog channel 12
Please wait
while Your TV searches
for available channels.
Digital channel 12
Specifications
Power Requirement: Source: AC 120V, 60Hz
Power Consumption: 97 watts (Average)
COMPONENT2: GREEN, BLUE, RED
CONNECTING A DVD OR GAME SYSTEM
1 Connect a Component Cable to the Green, Blue, and Red video jacks as shown.
2 Connect an Audio Cable to the AV INPUT 2 White and Red audio jacks.
3 Press INPUT to select Component2.
Note: Audio/Video INPUT 2 and Component inputs share the same audio (R/L) input jacks.
IMPORTANT NOTE: These jacks accept only 480i (standard interlaced) signals.
OPERATING TIPS:
Press the INPUT key after connecting cables to access the AV Inputs. There is NO need to tune to a blank channel.
You DO NOT need to tune the DTV to Channel 3 or 4 to view a DVD program.
External device must be set to output 480i signal.
DVD PLAYER or
similar device
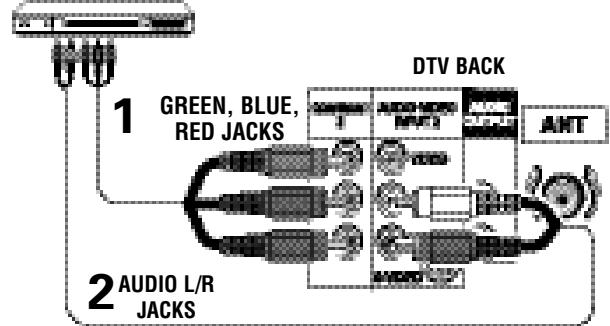
GAME
SYSTEM
GREEN, BLUE
RED JACKS
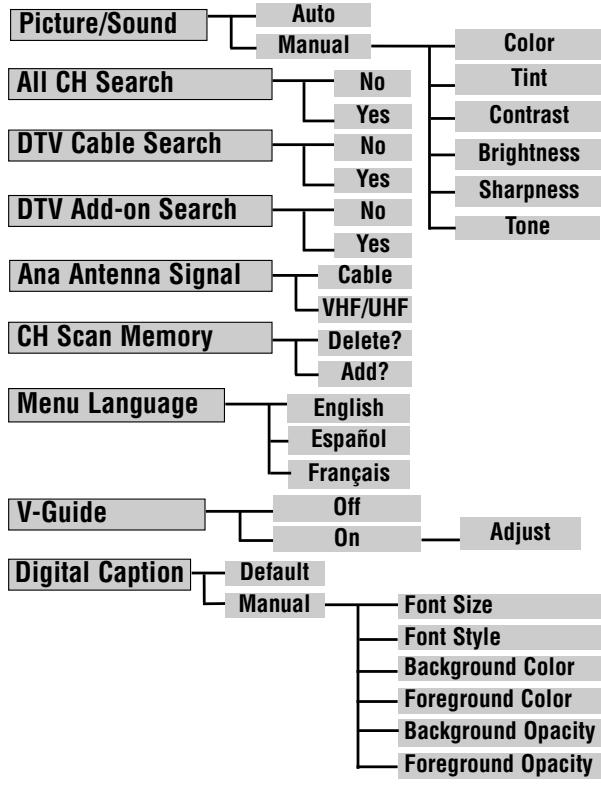
ON-SCREEN MENU OPERATION MENU NAVIGATION MAP (Composite) H
HOW TO OPERATE THE MENU
NOTES:
Some Menu options are specific to Digital and Analog signals. To access these options, you must first tune the DTV to a digital or analog channel.
Not available" will be displayed on the screen if an unavailable menu option is selected.
1 Press the MENU key to display the Main menu.
Use the CURSOR keys to highlight menu item.
3 Use the CURSOR < > keys to select or adjust menu item.
4 Press ENTER to activate setting, if needed.
When you have finished making adjustments, press the EXIT key to return to normal TV viewing.
Note: For menu items that have sub menus, follow on-screen instructions to select and make adjustments.
ONE-YEAR LIMITED PARTS AND LABOR WARRANTY
THIS LIMITED PARTS AND LABOR WARRANTY IS VALID ONLY ON SANYO TELEVISIONS PURCHASED AND USED IN THE UNITED STATES OF AMERICA, CANADA, AND PUERTO RICO, EXCLUDING ALL OTHER U.S. TERRITORIES AND PROTECTORATES. THIS LIMITED WARRANTY APPLIES ONLY TO THE ORIGINAL RETAIL PURCHASER, AND DOES NOT APPLY TO PRODUCTS USED FOR INDUSTRIAL OR COMMERCIAL PURPOSES.
WARRANTY APPLICATION
FOR ONE YEAR from the date of original retail purchase Sanyo Manufacturing Corporation (SMC) warrants this TV to be free from manufacturing defects in materials and workmanship under normal use and conditions for parts and labor.
For the FIRST 90 DAYS from the date of original retail purchase, Sanyo Manufacturing Corporation will replace any defective TV via exchange at the retailer. To ensure proper warranty application, keep the original-dated-sales receipt for evidence of purchase. Return the defective TV to the retailer along with the receipt and the included accessories, such as the remote control. The defective TV will be exchanged for the same model, or a replacement model of equal value, if necessary. Replacement model will be contingent on availability and at the sole discretion of Sanyo Manufacturing Corporation.
THE FOREGOING WARRANTY IS EXCLUSIVE AND IN LIEU OF ALL OTHER WARRANTYES OF MERCHANTABILITY OR FITNESS FOR A PARTICULAR PURPOSE.
OBLIGATIONS
For one year from the date of purchase, Sanyo Manufacturing Corporation warrants this product to be free from defects in material and workmanship under normal use and conditions. During the first 90 days under this warranty for any manufacturing defect or malfunction Sanyo Manufacturing Corporation will provide a new TV via exchange at the retailer.
HOW TO MAKE A CLAIM UNDER THIS WARRANTY
Please call 1-800-877-5032. Please be prepared to give us the television's model number and serial number when you call. The model number and serial number are printed on a label attached to the back of the unit.
For customer assistance, call toll free 1-800-877-5032.
Weekdays 7:30 AM - 7:00 PM Central Time
Saturday 7:30 AM - 4:00 PM Central Time
This warranty expresses specific contractual rights; retail purchasers may have additional statutory rights which vary from state to state.
(EFFECTIVE: March 1, 2007)
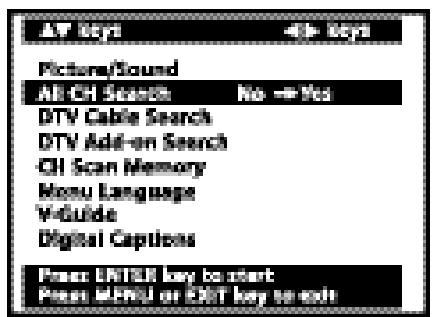
ALL Channel Search

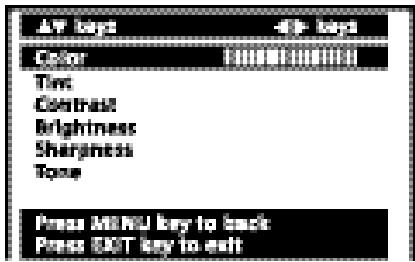
Picture/Sound Manual Adjustment

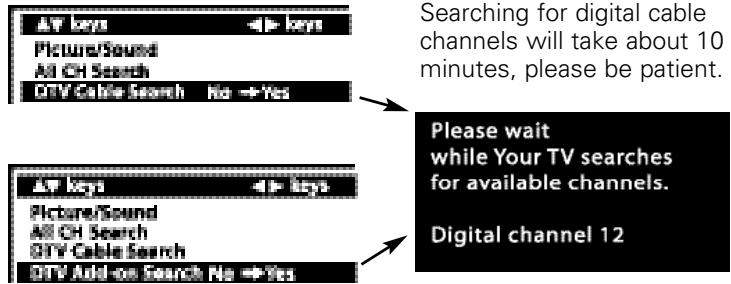
DTV Cable or Add-On Search
Important Facts:
- During Channel Search, current Digital and Analog channel databases are deleted and new ones created. To receive digital cable channels, if available, you must perform a DTV Cable Search.
To add new digital channels to the existing database, use DTV Add-on Search. Use the this feature to add new channels to the digital antenna channel database. Also, use this feature to add channels when broadcast towers are in multiple directions from your location.
- Go to www.antennaweb.org and type in your zip code to obtain specific tower and antenna information.
- This DTV maintains only one database of digital channels. Therefore, when you search for ClearQAM digital cable channels, the database of antenna digital channels will be deleted. You will be able to receive only those ClearQAM channels your cable company provides.
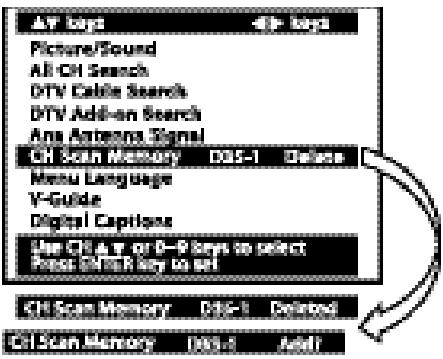
Channel Scan Memory
The Channel Scan Memory is a list of active channels that you can customize by deleting and/or adding channels. HINT: Use the CURSOR > key to select the channel number area.
After 3 seconds the TV screen will display "Add?"
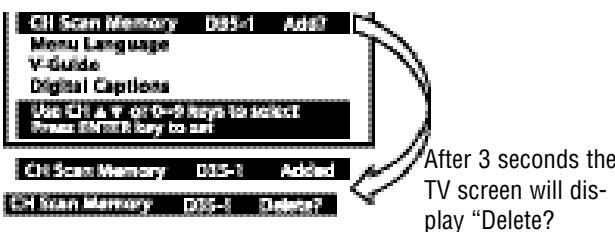
OPERATING TIPS:
When a digital channel is deleted, all of that channel's subchannels are deleted as well.
Only previously deleted digital channels can be added back to the Channel Scan Memory.
Channels deleted from Channel Scan Memory can be tuned using the number keys.
If the last remaining digital channel is deleted, the entire previous Channel Scan Memory list will be restored automatically.
If the last remaining analog channel is deleted (cable or off-air channels), ALL analog channels (cable or off-air) will be restored automatically, regardless of the previous Analog Channel Scan Memory list.
V-Guide (Parental Control)
Note: This feature is designed to comply with the United States of America's FCC V-Chip regulations. Therefore, it may not function with broadcasts that originate in other countries.
Use this feature to supervise the television viewing of young children. This TV can be set to automatically block programs with content you deem as inappropriate for your children to view.
OPERATING TIPS:
- You can block portions of a DTV rating by choosing one or more of the Content ratings (D, L, S, and V). By blocking just the L and S content ratings of TV-14, for example, TV-14 rated programs with a D and/or V content rating could still be viewed.
V-Guide rating limits on programming received via the Analog antenna input, Digital antenna input, Video2 input, and any 480i signals received through the video Component jacks are controlled by this DTV.
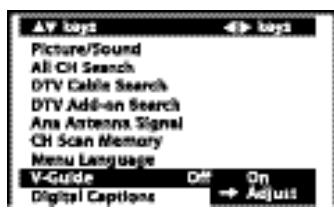
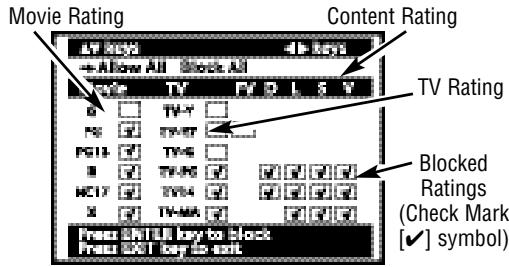
V-GUIDERATINGS-AT-A-GLANCE
For your protection in the event of theft or loss of this product, please fill in the information requested below and KEEP IN A SAFE PLACE FOR YOUR OWN PERSONAL RECORDS.
Model No. Date of Purchase
Serial No.
Where Purchased
Purchase Price
located on back of unit)

Sanyo Manufacturing Corp. 3333 Sanyo Road, Forrest City, AR 72335
Trademarks Information:
Manufactured under license from Dolby Laboratories. "Dolby" is a trademark of Dolby Laboratories.

LISTED
This symbol on the nameplate means the product is Listed by Underwriters' Laboratories Inc. It is designed and manufactured to meet rigid U.L. safety standards against risk of fire, casualty, and electrical hazards.

RISK OF ELECTRIC SHOCK DO NOT OPEN
"As an ENERGY STAR® Partner, Sanyo Manufacturing Corporation has determined that this product meets the ENERGY STAR® guidelines for energy efficiency."
CAUTION: TO REDUCE THE RISK OF ELECTRIC SHOCK, DO NOT REMOVE COVER (OR BACK). NO USER-SERVICEABLE PARTS INSIDE. REFER SERVICING TO QUALIFIED SERVICE PERSONNEL.
VIZON with a double "Z" is a registered
trademark of Sanyo Manufacturing Corporation

THIS SYMBOL INDICATES THAT DANGEROUS VOLTAGE CONSTITUTING A RISK OF ELECTRIC SHOCK IS PRESENT WITHIN THIS UNIT.
THIS SYMBOL INDICATES THAT THERE ARE IMPORTANT OPERATING AND MAINTENANCE INSTRUCTIONS IN THE LITERATURE ACCOMPANYING THIS UNIT.


WARNING: TO REDUCE THE RISK OF FIRE OR ELECTRIC SHOCK, DO NOT EXPOSE THIS APPLIANCE TO RAIN OR MOISTURE.
IMPORTANT SAFETY INSTRUCTIONS
CAUTION: PLEASE ADHERE TO ALL WARNINGS ON THE PRODUCT AND IN THE OPERATING IN-STRUCTIONS. BEFORE OPERATING THE PRODUCT, PLEASE READ ALL OF THE SAFETY AND OPERATING INSTRUCTIONS. RETAIN THIS LITERATURE FOR REFERENCE. Follow all instructions...
Positioning the appliance
- Do not place your appliance on an unstable cart, stand, shelf or table. Serious injury to an individual, and damage to the appliance, may result if it should fall. Your salesperson can recommend approved carts and stands or shelf and wall mounting instructions. An appliance and cart combination should be moved with care. Quick stops, excessive force, and uneven surfaces may cause the appliance and cart combination to overturn.
- Slots and openings in the cabinet and in the back or bottom are provided for ventilation. To ensure reliable operation of the appliance and to protect it from overheating, these openings must not be blocked or covered. The openings should never be covered with a cloth or other material, and the bottom openings should not be blocked by placing the unit on a bed, sofa, rug, or other similar surface. This appliance should never be placed near or over a radiator or heat register. This appliance should not be placed in a built-in installation such as a bookcase unless proper ventilation is provided.
- Do not expose the appliance to rain or use near water . . . for example, near a bathtub, swimming pool, kitchen sink, in a wet basement, etc. Hooking Up Outdoor Antenna
LIGHTNING PROTECTION FOR YOUR ANTENNA AND SET AS PER NATIONAL ELECTRICAL CODE INSTRUCTIONS.
EXAMPLE OF ANTENNA GROUNDING ACCORDING TO NATIONAL ELECTRICAL CODE, ANSI/NFPA 70
Plug in the power cord
- This product should be operated only from the type of power source indicated on the marking label. If you are not sure of the type of power supply to your home, consult your product dealer or local power company. This product is equipped with a polarized alternating current line plug (a plug having one blade wider than the other). This plug will fit into the power outlet only one way. This is a safety feature. If you are unable to insert the plug fully into the outlet, try reversing the plug. If the plug should still fail to fit, contact your electrician to replace your obsolete outlet. Do not defeat the safety purpose of this polarized plug. Do not overload wall outlets, extension cords, or integral convenience receptacles as this can result in a risk of fire or electric shock.
- Power-supply cords should be routed so that they are not likely to be walked on or pinched by items placed upon or against them, paying particular attention to cords at plugs, convenience receptacles, and the point where they exit from the product.
Cleaning
- Before cleaning, unplug the unit from the wall outlet. Do not apply liquid cleaners or aerosol cleaners directly to the unit. Use a dry cloth for cleaning.
Service & Repair
- Unplug the appliance from the wall outlet and refer servicing to qualified service personnel under the following conditions:
A. If the power cord or plug is damaged or frayed.
B. If liquid has been spilled into the appliance.
C. If the appliance has been exposed to rain or water.
D. If the appliance has been dropped or the cabinet has been damaged.
E. If the appliance exhibits a distinct change in performance.
F. If the appliance does not operate normally by following the operating instructions, adjust only those controls that are covered in the operating instructions. Improper adjustment of other controls may result in damage and will often require extensive work by a qualified technician to restore the appliance to normal operation.
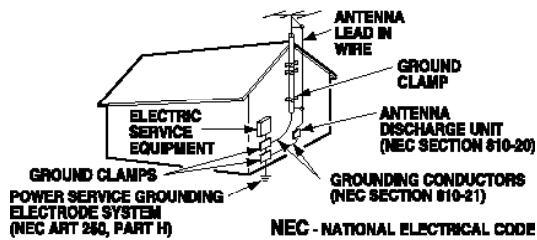
Note to CATV system installer:
This reminder is provided to call the CATV system installer's attention to Article 820-40 of the NEC that provides guidelines for proper grounding and, in particular, specifies that the cable ground shall be connected to the grounding system of the building, as close to the point of cable entry as practical."
- If an outside antenna is connected to the receiver, be sure the antenna system is grounded so as to provide some protection against voltage surges and built up static charges. Article 810 of the National Electrical Code, ANSI/NFPA 70, provides information with respect to proper grounding of the mast and supporting structure, grounding of the lead in wire to an antenna discharge unit, size of grounding conductors, location of antenna discharge unit, connection to grounding electrodes, and requirements for the grounding electrode.
An outside antenna system should not be located in the vicinity of overhead power lines or other electric light or power circuits, or where it can fall into such power lines or circuits. When installing an outside antenna system extreme care should be taken to keep from touching such power lines or circuits as contact with them might be fatal.
- Upon completion of any service or repair, request the service technician's assurance that only Factory Authorized Replacement Parts that have the same characteristics as the original parts were used, and that routine safety checks have been performed to determine that the appliance is in safe operating condition. Unauthorized substitutions may result in fire, electrical shock, or other hazards.
- Never add accessories that have not been specifically designed for use with this appliance as they may cause hazards.
- For added protection during a lightning storm, or when the set is left unattended and unused for long periods of time, unplug it from the wall outlet and disconnect the antenna. This will prevent damage to the set due to lightning or power line surges.
- Never push objects of any kind into this product through openings as they may touch dangerous voltage points or short-out parts that could result in a fire or electric shock. Never spill liquid of any kind on the product.
- CONNECTING A VCR OR DVD TO THE TV
- ANALOG AV INPUT2 JACKS
- OPERATING TIPS:
- CONNECTING A VIDEO GAME TO THE DTV
- FRONT A/V (VIDEO1) JACKS
- CONNECTING A STEREOMAMPLIFIER TO THE DTV
- AUDIO OUT (FIXED ANALOG) JACKS
- REMOTE CONTROL OPERATION
- If you experience problems, please call 1-800-877-5032, We Can Help!
- ENGLISH
- IF YOU NEED
- FIRST-THINGS-FIRST (REQUIRED INITIAL SETUP)
- Install batteries in remote control (2AA, not included)
- PRECAUTIONS
- Connect Signal to the TV's Integrated Analog / Digital 75 ohm Antenna Input terminal
- Plug in AC power cord (120V AC, 60 Hz.)
- Press the POWER key.
- Specifications
- COMPONENT2: GREEN, BLUE, RED
- CONNECTING A DVD OR GAME SYSTEM
- Press INPUT to select Component2.
- HOW TO OPERATE THE MENU
- ONE-YEAR LIMITED PARTS AND LABOR WARRANTY
- WARRANTY APPLICATION
- OBLIGATIONS
- HOW TO MAKE A CLAIM UNDER THIS WARRANTY
- Important Facts:
- V-Guide (Parental Control)
- Trademarks Information:
- IMPORTANT SAFETY INSTRUCTIONS
- Positioning the appliance
- Plug in the power cord
- Cleaning
- Service & Repair
Marque : SANYO
Modèle : HT30547
Catégorie : Téléviseur