
CSU 38 - Aspirateur robot MPMAN - Notice d'utilisation et mode d'emploi gratuit
Retrouvez gratuitement la notice de l'appareil CSU 38 MPMAN au format PDF.


| Type d'appareil | Aspirateur robot |
| Alimentation | Batterie rechargeable |
| Autonomie | Jusqu'à 90 minutes |
| Temps de charge | Environ 4 heures |
| Capacité du réservoir | Non précisé |
| Type de filtration | Filtre HEPA |
| Niveau sonore | Moins de 65 dB |
| Modes de nettoyage | Automatique, bordure, spot |
| Détection d'obstacles | Oui, capteurs infrarouges |
| Retour automatique à la base | Oui |
| Contrôle | Manuel et télécommande |
| Dimensions | Environ 30 cm de diamètre |
| Poids | Environ 3 kg |
| Accessoires inclus | Brosses latérales, station de charge |
| Garantie | Non précisé |
FOIRE AUX QUESTIONS - CSU 38 MPMAN
Questions des utilisateurs sur CSU 38 MPMAN
0 question sur cet appareil. Repondez a celles que vous connaissez ou posez la votre.
Poser une nouvelle question sur cet appareil
Téléchargez la notice de votre Aspirateur robot au format PDF gratuitement ! Retrouvez votre notice CSU 38 - MPMAN et reprennez votre appareil électronique en main. Sur cette page sont publiés tous les documents nécessaires à l'utilisation de votre appareil CSU 38 de la marque MPMAN.
MODE D'EMPLOI CSU 38 MPMAN

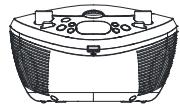
Portable CD Player with AM/FM Stereo Tuner


Please read this manual before connection and use
INSTRUCTION MANUAL
Important Safety Instructions

The lightning flash with arrowhead symbol within an equilateral triangle is intended
In 100% of the rest of the process of uninsulated "shoes" xmas" within this
product's disclosure that may be of sufficient magnitude to constitute risk of effect.

The systemain within an equilateral triad is in sded to also the wgr
PROOF OF INNOVANT OPERATING AND MAINTENANCE (SERVICING) INSTRUCTIONS IN DE
1
(1) Read these instructions: All the safety and operating instructions should be read before the product is operated.
(2) Keep these instructions: The safety and operating instructions should be retained for future reference.
(3) Heed all warnings: All warnings on the product and in the operating instructions should be adhered to.
(4)Follow all instructions. All operating and usage instructions should be followed.
[5] Do not use this apparatus near water: (e.g., near a bath tub, washbow, kitchen sink, laundry tin, in wet basements, or near a swimming pool and the like).
(5)Clean only with dry cloth.
(7) Do not block any ventilation openings. Install in accordance with the manufacturer's instructions. Slots and openings in the cabinet are provided for ventilation to ensure that the ventilation is properly controlled.
The number of hours that a patient has been hospitalized in the past 24 hours is not shown because it may be higher than the number of hours that a patient has been hospitalized in the past 24 hours.
(1) Do not include any mean sources such as residents' hospital registers, stores, or other information sources.
(2) Do not include any other sources such as electronic medical records.
(6) Do not default the safety purpose of the platoonized o ring地质 plug. A polarized plug has two blades with one wider than the other. A grounding type plug has two blades and a third grounding pro. The wide blade or the third prong are provided you're your replacement. If you're willing to fit your oil outlet consult an electrician for replacement of the obsolete outlet.
(10) Protect the power cord from being walked on or pinched particularly at plugs convenience receptacles, and the point where they exit from the apparatus.
(11)Only use attachments/accessories specified by the manufacturer.
(12) Use only with the cart stand, tripod bracket, or table specified by the manufacturer, or sit on with the apparatus. When a cart is used, use caution when mounting the cart/stand to the floor.
[13] Uncapling this apparatus during lightning storms or when uneventful for long periods of time has been demonstrated to be a major obstacle to the operation of the system. The apparatus has been split or objects have fallen into the apparatus; the apparatus has been removed from the apparatus and the object has been placed in the apparatus.
[15] WARNING: To reduce the risk of fire or electric shock, do not expose this apparatus to rain or moisture. The apparatus shall not be exposed to splashing and that it should be protected against the use of any other means.
(16) WARNING: The mains plug is used as disconnect device, the disconnect device shall remain readily operable.
(17) Battery shall not be exposed to excessive heat such as the sunshine, fire or the like. Danger of explosion if battery is incorrectly replaced. Replace only with the same or different battery.
[18]WARNING: Excessive sound pressure from earphones and headphones can cause hearing loss.
(19) The marking is located on the bottom enclosure.
(21) Do not install this equipment in a confined or building-in space such as a book case or office, or in an area that is protected by the law. The equipment should be impeded by covering the ventilation openings with items such as newspaper.
Table-Clots, Curtains etc

2)Double insulation
This is class II apparatus.
ATTENTION
The CD mechanism and the sensitive circuitry may cause interference to a radio tuner nearby. Do not operate this unit while operating other radio devices.
Danger This product utilizes invisible laser radiation. Avoid direct exposure to the beam.
C
radiation exposure.

CONCERNING COMPACT DISC
Only compact discs identified with this mark can be played by this player.

PCC NOTICE: This equipment has been tested and found to comply with the limits for a Class B or Class C earthquake. The equipment is designed to be used in an earthquake to provide reasonable protection against harmful interference in a residential building.
This equipment generates, uses and can radiate radio frequency energy. And if the user is in a room with the instruction may cause harmful interference to radio communication.

The sign indicates that a product may not be disposed of with your company. The sign indicates that the product is not to be disposed of with your company. The product is your responsibility. Please drop off the above-mentioned information and contact us at 180-234-5679.
If you do not know where to drop off your waste equipment for recycling. Please contact your local city office or household waste collection servio
2
Table of Contents
IMPORTANT SAFETY INSTRUCTIONS
INDEX TO THE PARTS AND CONTROLS
POWER SUPPLY/CONNECTING TO A HEADPHONE 2
RADIO OPERATION 2
CD OPERATION/USB&STOP MODE 3
CARES OF DISC SPECIFICATION 4
TROUBLESHOOTING 5
WARRANTY INFORMATION 6
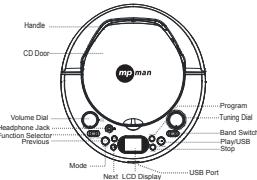
Index to the Parts and Controls
TOPVIEW
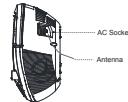
RIGHTVIEW
Power Supp
- Using AC power
Before connecting the AC power cord, please make sure the power supply is 120V and the voltage of the AC power supply is equal to the AC socket on the rear of the unit and the other end into a standard wall socket.
Bottom View

Battery
- Using batteries
Insert 6 × ^aC^d size batteries (not included) in the battery compartment on the bottom of the unit by matching the polarities.
The unit will not operate on battery power when the AC power cord is plugged into the AC socket.
Replace batteries when the power indicator dims, the volume decreases or the sound distorts.
Use batteries of high quality and check them regularly. Alkaline batteries are recommended.
Do not mix new batteries with old or used batteries. Use only batteries of the same brand and type.
Batteries should not be left in the unit if they are exhausted or if the unit is not to be used for other purposes. If they may leak and damage the unit. Battery leaking is not covered under the warranty.
Connecting to a Headphone
You can use headphones with 3.5mm diameter stereo plug and an impedance of 32 mΩ. When the headphones are connected, the speakers are disconnected automatically.
Set the VOLUME to a low level before using headphones and gradually adjust the volume dial to the comfortable listening level.
Do not play the VOLUME too loud for extended periods of time to avoid any damage to your hearing.
RadioOp
-
Slide the Function Selector (USB/CD OFF RADIO) switch to radio.
-
Select AM, FM by sliding the Band Selector switch to corresponding position. 3. Turn the desired direction by turning the Turning Control.
3.1. Rate the desired amount by turning the Bearing Center
3.2. Adjust the volume with Volume dial as desired.
- Set the Function Switch to the CD/OFF position to stop radio
CDOperation
Slide the Function Selector to the USB/CD position and insert a CD disc.
PLAY/USB/STOP
-
Press the PLAY/USB button once to start playing (Some discs will start playback automatically). The current playing track number appears on the LCD panel.
-
Press the PLAY/USB button twice to stop playing temporarily during playback. The current track number is flashing while pausing.
-
Press the PLAY/USB button again to resume normal playback
-
Press the STOP button to stop playing
NOTE: To remove disc from CD player, always press STOP and wait for complete stop.
REPEAT mode
-
Press the MODE button once to repeat playing the current track only
-
Press the MODE button twice to repeat all tracks (Repeat ALBUM in MP3 mode)
TRACKING mode
-
To go back to the beginning of current track, press the button once.
-
To go back to the previous tracks, press the button repeatedly
-
To go to the next track, press the button once or repeatedly to play your desired track.
-
To fast backward/fast forward through the disc, press and hold the / button.
RANDOMPLAY
- Press the MODE button three times to start playing the disc in a random order (Repeat ALL in MP3 mode)
PROGRAM PLAY (IN STOP MODE)
-
Press the PROGRAM button at stop mode
-
Press the button to select the desired track number, and then press PROG./RPT to confirm.
-
Repeat step 2 to set up to 18 tracks
-
Press the PLAY/USB button to start playing the programmed tracks
-
To cancel the program play, press the STOP button
Slide the Function Selector to the USB/CD position and insert a CD disc
INTROPLXY
Press MODE button four times for INTRO playback, in which the tracks will be played several seconds in sequence as a introduction. (See below.)
USB&STOP MODE
Slide the Function Selector to USB/CD position and insert a USB drive
-
Press and hold PLAY/USB for usb playback, the audio tracks stored in USB stick will be played in sequence automatically.
-
Press and hold PLAY/USB again for CD playback. The LCD will display CD/MP3 playback screen.
-
Press STOP to stop playback. LCD will display total number of tracks and total playback time. (In MP3 mode, LCD show total number of tracks only)
Cares of Disc
- Handle discs by their outer edges and/or the center spindle holes to prevent fingerprints and scratches.


- Do not bend or press the disc. Do not expose the disc to direct sunlight or heating sources.

To remove stains or fingerprints from the surface of a disc, use a soft, lint-free and dry cloth. Wipe in straight movements from the center of the disc to the edge of the disc. The edge is then removed by using a sharp knife.


Do not write on or attach labels to the surface of the disc.
- To minimize exposure to dust and dirt. Replace discs in their cases after use. Store each disc in its case, out of direct sunlight, high temperature and humid
Specification
Power Supply:230V~50Hz
Applicable disc: CD/CD-R MP3 CD+RW
Power Consumption: 9 W
Output Power: 1W x2
Speaker:8.OHM
Dimension
Weight
RADIC
Frequency Range: AM: 530KHz - 1600KHz
FM:88MHz-108ME
CD Player
Laser Wavelength: 760~800 nm
Tracking Method: 3-spot error detection/3.86 mm lens
Design and specifications are subject to change without notice.
m = 311 ;
Trouble shooting
Trouble shooting
Should your player develop a problem, please check below before requesting service.
| Symptom | Check and Action |
| System does not function at all | * Check if the power cord has been properly connected to the power outlet. * Be sure to select a sound source. (C2: ACD, AMTMC etc.) * Upcharge the main unit, and then reconnect it. This allows the unit to rest itself after a power surge or power interruption. |
| No sound | * Increase the volume. * Disconnect any headphones. |
| CD does not play | * No disc. Load a disc. * Disc has been loaded upside down. Place the disc with the label side down. * Disc is damaged or dirty. Clean the disc or try another |
( x - 2x) t - xy^2 = ( x - 2x) f^ t
- the disc and leave the unit power on for one or two hours.
-
-
- incorrect type for the player.
-
Radio does not work
This is to certify that the portable DVD palyer is confoemity with
council directive 2004 / 108 / EC(EMC) Directive
A
EN55013-2001+A1+A2
EN61000-3-22006
EN61000-3-2-2009
EN55020.2007
For more information please visit our website
www.mpghanecuopec.com

portable DVD palyer is confoemity with
08/EC(EMC Directive)
N590132001+A1+A2
N61000-3-22005
26100032700
N550202007
For more information please visit our website
www.mpghanecuopec.com
