
ST120 - ENCASTREMENT DANS LES MEUBLES - Encastrement dans les meubles SMEG - Notice d'utilisation et mode d'emploi gratuit
Retrouvez gratuitement la notice de l'appareil ST120 - ENCASTREMENT DANS LES MEUBLES SMEG au format PDF.


| Marque | SMEG |
| Modele | ST120 |
| Type de produit | Lave-linge encastrable dans les meubles |
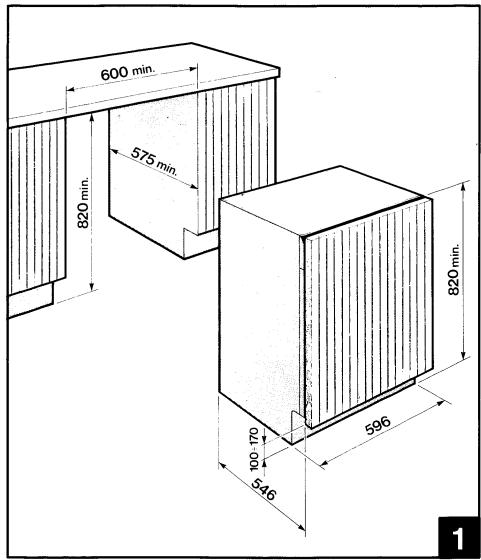
| Hauteur minimale du vide d'encastrement | 820 mm |
| Largeur minimale du vide d'encastrement | 600 mm |
| Profondeur minimale du vide d'encastrement | 575 mm |
| Alimentation electrique | 230 V, 50 Hz, 10 A (estimation) |
| Poids approximatif | 70 kg (estimation) |
| Fonctions principales | Lavage, essorage, programmes varies (non detailles) |
| Entretien et nettoyage | Nettoyage du filtre de pompe, maintenance du joint de porte |
| Securite | Debrancher l'appareil avant toute intervention de montage ou de panneautage |
| Pieces detachees et reparabilite | Non specifie, contacter le service apres-vente SMEG |
| Informations generales | Lave-linge encastrable, livre sans plan de travail, panneau avant amovible pour harmonisation avec le mobilier |
FOIRE AUX QUESTIONS - ST120 - ENCASTREMENT DANS LES MEUBLES SMEG
Questions des utilisateurs sur ST120 - ENCASTREMENT DANS LES MEUBLES SMEG
0 question sur cet appareil. Repondez a celles que vous connaissez ou posez la votre.
Poser une nouvelle question sur cet appareil
Téléchargez la notice de votre Encastrement dans les meubles au format PDF gratuitement ! Retrouvez votre notice ST120 - ENCASTREMENT DANS LES MEUBLES - SMEG et reprennez votre appareil électronique en main. Sur cette page sont publiés tous les documents nécessaires à l'utilisation de votre appareil ST120 - ENCASTREMENT DANS LES MEUBLES de la marque SMEG.
MODE D'EMPLOI ST120 - ENCASTREMENT DANS LES MEUBLES SMEG
ISTRUZIONI DI MONTAGGIO DELLE LAVATRICI INTEGRABILI
INSTRUCTIONS DE MONTAGE DU LAVE-LINGE INTEGRABLES F
ASSEMBLY INSTRUCTIONS FOR BUILT-IN WASHING MACHINES GB
INSTRUCCIONES DE INSTALLACION DE LAS LAVADORAS INTEGRABLES E
INSTRUKTIES VOOR DE MONTAGE VAN INBOUWWASAUTOMATEN NL
MONTAGEANLEITUNG FÜR DIE INTEGRIERBAREN WASCHVOLLAUTOMATEN D
INSTRUÇÉS DE MONTAGEM PARA MAQUINAS DE LAVAR ROUPA ENCASTRÁVEIS P
Built-in washing machines
| Important - The machine complies with the current safety provisions governing electrical equipment. It must be installed by a specialized technician in compliance with the current standards in order to prevent it from becoming a potential danger for the user. | |
| Technical instructions for recessing | These washing machines can be built into modular furniture, under flush work tops or under sinks. They are made like true built-in appliances. In view of its final installation position, the appliance is supplied without a work top since this is unnecessary. Panels can be mounted on the front of the washing machine. This means that the washing machine will fully match the surrounding. The housing recess must measure: minimum 820 mm., minimum width 600 mm. and minimum depth 575 mm. (see figure 1). |
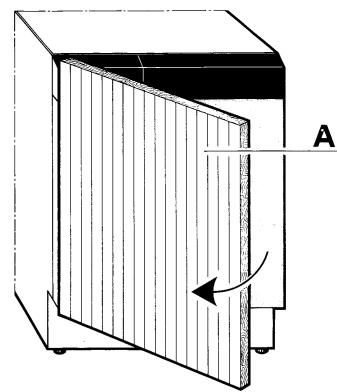
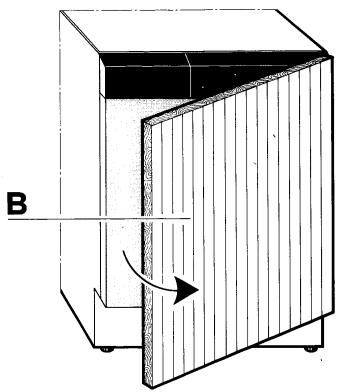
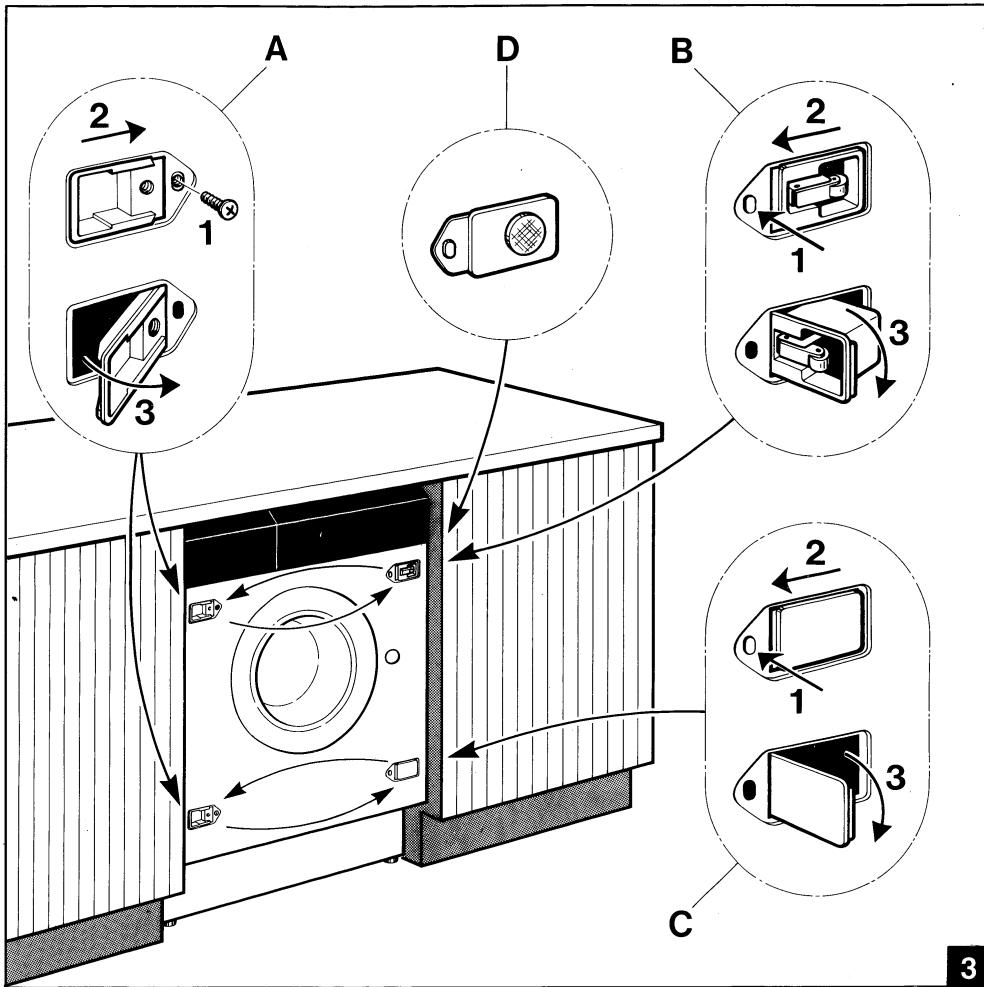
| How to fit on the panel | The panel that covers the front can be hinged on either the left side or right side (fig. 2). For practical reasons, it is advisable to maintain the same opening direction as the glass door (with hinges applied to the left-hand side). The appliance has hinge supports on the left-hand side, while the push-pull closing system is mounted on the upper right-hand part. If the magnetic closing mechanism is required, remove the existing support (fig. 3B) and install the supplied one fitted with this mechanism (fig. 3D) Important! It is absolutely essential to disconnect the appliance from the electricity main when fitting the panel (during which all hinging and closing mechanisms must be removed from the front) on to the washing machine. |
Warning - To hinge the panel on the right-hand side (opening direction opposite to that of the glass door), completely remove the hinge supports (fig. 3A), the closing hook (fig. 3B), the lower bearing plug of the rubber plug (fig. 3C) from the front part of the machine and fit them to the opposite side.
All parts fitted to the front of the washing machine must be correctly remounted (no hole must be left open). This will prevent users from touching live parts of the appliance.
Our company declines all responsibility for damages caused by failures to comply with these safety provisions.
- Totally retracting washing machines
Calculate the height of the wooden panel by first establishing the height of the plinth.
Example: a 100 mm. plinth corresponds to a maximum panel height of 720 mm..
Reduce the height of the wooden panel if the plinth height must be increased.
Use of the template
Proceed in the following way when applying the wooden panel to the washing machine:
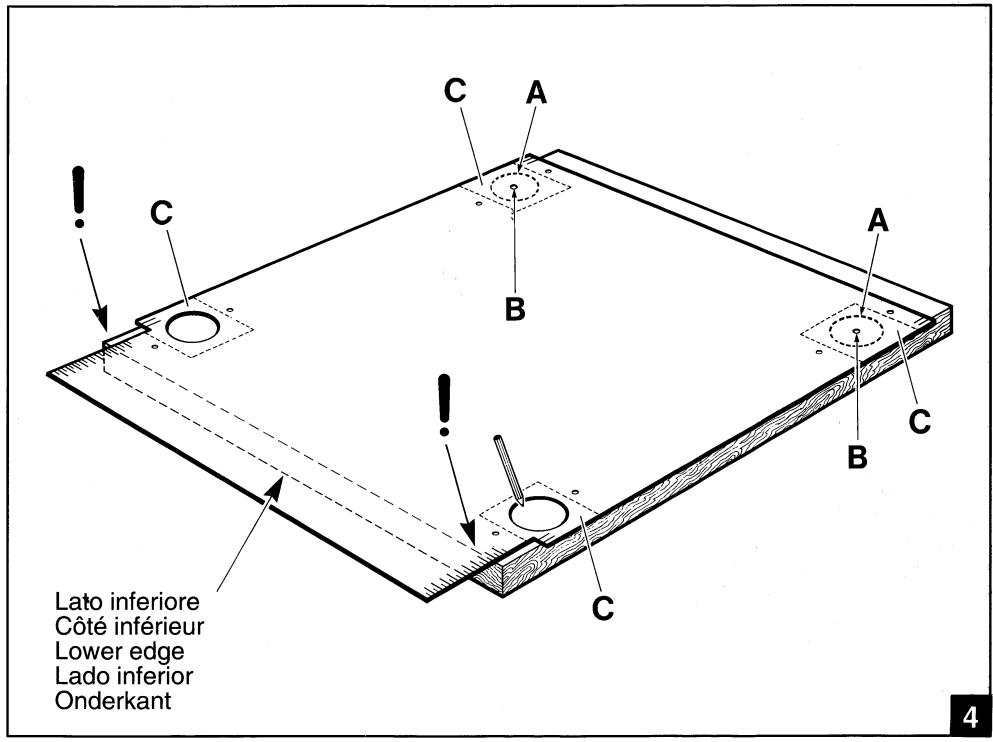
- Totally retracting washing machines (fig. 4)
1) Calculate the height of the plinth.
2) There are two holes «A» in the upper part of the template. These will have been partially broken through and are used to mark the holes that will subsequently house the upper hinge and the support for the push-pull closing mechanism. Remove the precut internal part in order to free hole «A».
The small central hole «B» is used to mark the position of the metal plate fixing hole when the magnetic closing device is required.
3) Remove the four pieces of protective film from self-adhesive areas «C» of the template.
4) Position the template on the inner part of the panel and match the established plinth height with the lower edge of the panel itself.
5) After having set the template in its correct position and after having also checked that it is centered in a horizontal direction with reference to the lines marked at the ends, mark the positions of the holes using the tip of a pencil.
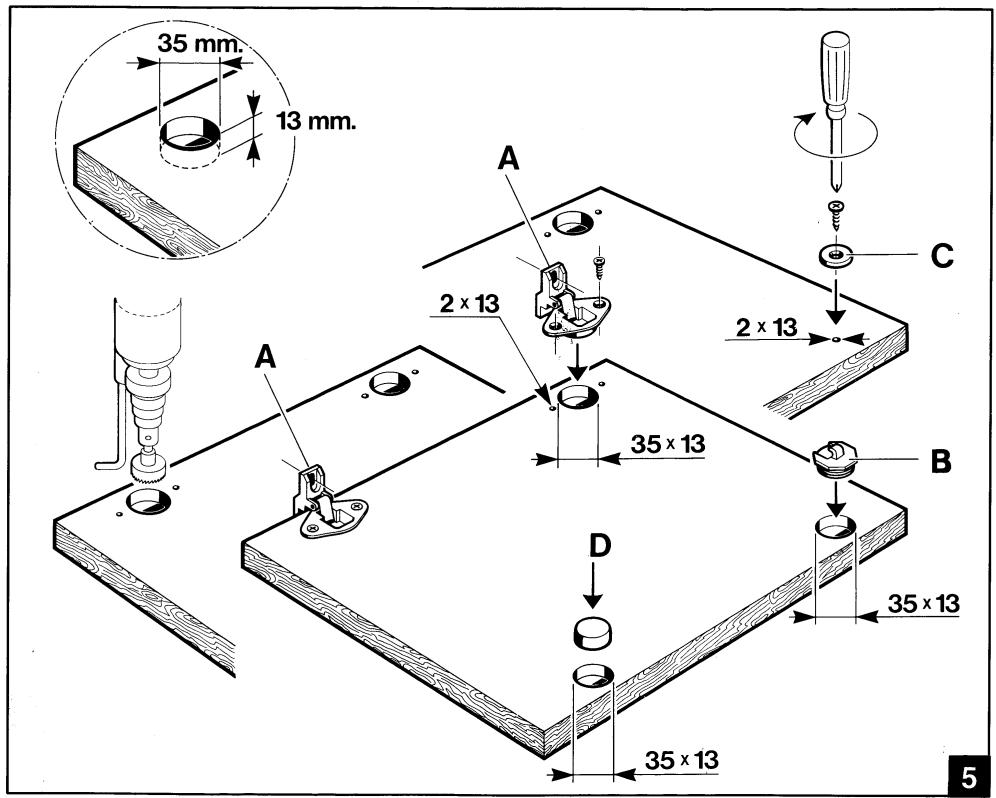
Fitting the hinging components to the panel (fig. 5)
1) Make holes in the wooden panel for the hinges, the rubber block and the closing hook, or the metal plate if the magnetic closing device is required.
2) The depth of the 2mm . diameter holes used to fix the hinges and metal plate should be 13mm . in solid wood panels. Just drill the top veneer in chipboard panels.
3) Screw the two hinges «A» to the wooden panel.
4) Mount closing hook «B» on to the side opposite the hinges, or metal plate «C» into the upper hole, then close the underlying hole with the relative rubber plug «D».
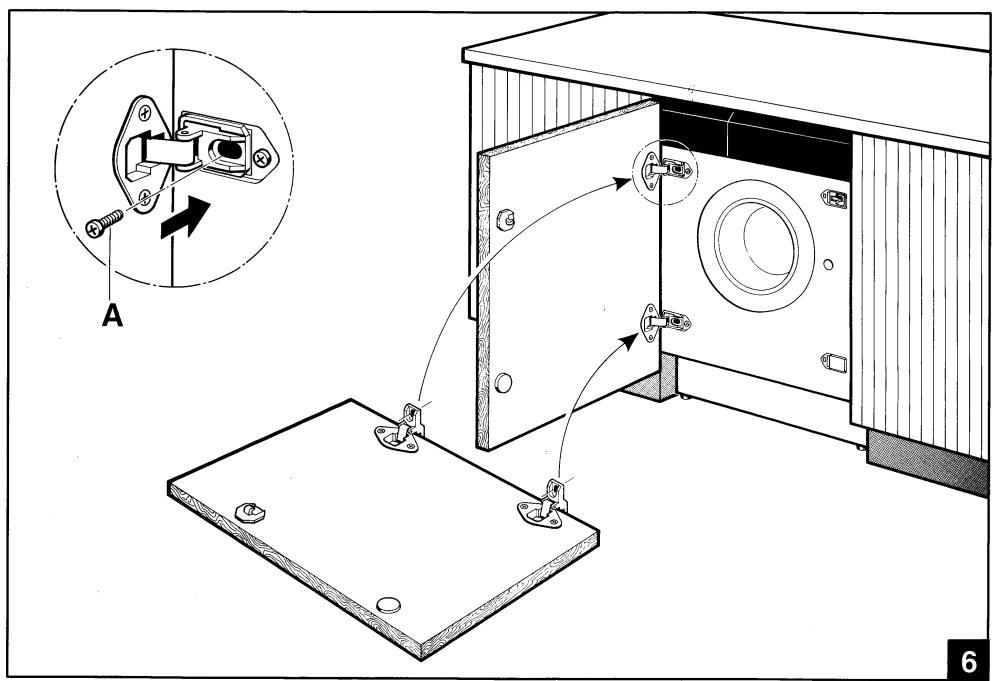
5) Following these operations, the panel will be ready to be fitted to the front of the appliance. Use the two supplied screws «A» for this operations (see fig. 6)
Adjusting the hinges
If, after having been fitted to the washing machine, the panel is slightly tilted or misaligned in relation to the front part of the machine, these imperfections may be corrected by means of the mobile part of the hinges. Slacken the two screws «A» (fig. 6) to correct the position of the panel, then tighten screws «A» again.
Recessing the appliance
Push the washing machine into its recess. Turn the feet to horizontally level the machine if necessary, and lock them in place with the relative check nut.
To prevent vibrations from the machine from being transmitted to the surrounding furniture, check that the sides and top of the appliance are unable to touch the furniture itself. There must be a space of at least 2 mm. all round. The rear part of the machine must also remain some distance away from the back wall. If the recessing cavity is higher than 820~mm , the opening between the floor and the lower side of the plinth and between the floor and sides of the machine (when this is installed at the end of a line of furniture), must be completeli closed in compliance with the relative safety provisions.
The covering must make it impossible for users to touch live parts of the electrical system and must require tools in order to be removed.
Our company declines all responsibility for damages caused by failures to comply with these safety provisions.
Fitting the plinth
The full length plinth at the base of modular furniture must be removable to allow the drain pump to be cleaned if this becomes clogged with buttons, fasteners or similar objects and the water is prevented from draining away.
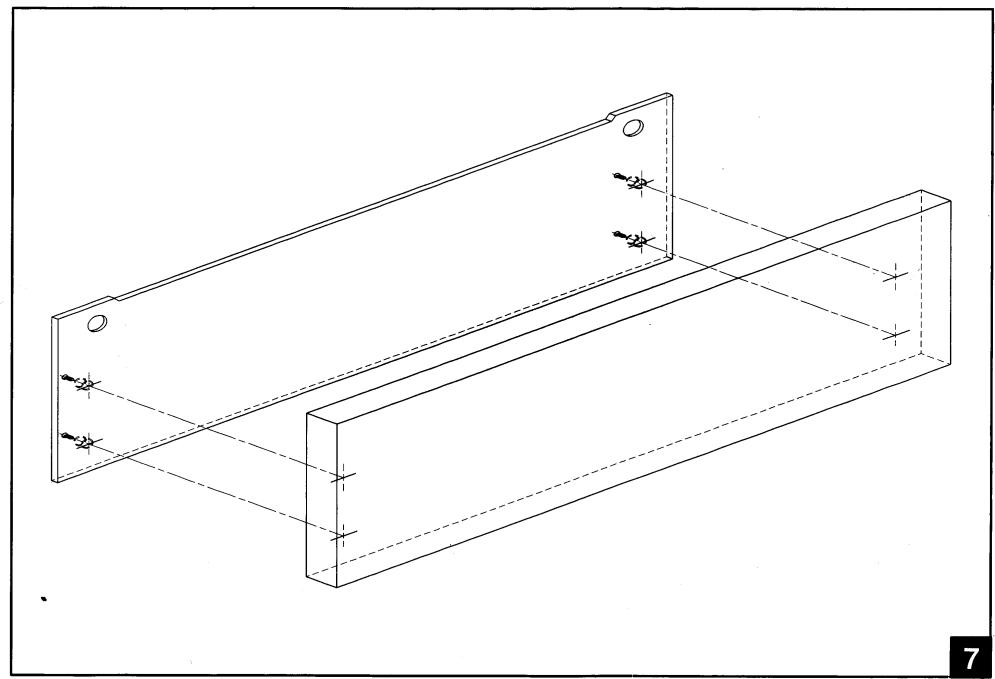
In certain cases the plinth of modular furniture is not continuous, but is limited only to the width of the washing machine. In this case, the plinth of the furniture must be screwed to the plinth of the washing machine by 4 screws using the four preset holes on the same (see fig. 7).
Application of the plinth to the furniture must not involve elimination or modification of the washing machine plinth. Owing to safety reasons, this may not be removed. It must absolutely remain intact and fixed to the washing machine.
2
- ISTRUZIONI DI MONTAGGIO DELLE LAVATRICI INTEGRABILI
- INSTRUCTIONS DE MONTAGE DU LAVE-LINGE INTEGRABLES F
- ASSEMBLY INSTRUCTIONS FOR BUILT-IN WASHING MACHINES GB
- INSTRUCCIONES DE INSTALLACION DE LAS LAVADORAS INTEGRABLES E
- INSTRUKTIES VOOR DE MONTAGE VAN INBOUWWASAUTOMATEN NL
- MONTAGEANLEITUNG FÜR DIE INTEGRIERBAREN WASCHVOLLAUTOMATEN D
- INSTRUÇÉS DE MONTAGEM PARA MAQUINAS DE LAVAR ROUPA ENCASTRÁVEIS P
- Built-in washing machines
- - Totally retracting washing machines
- Use of the template
- - Totally retracting washing machines (fig. 4)
- Fitting the hinging components to the panel (fig. 5)
- Adjusting the hinges
- Recessing the appliance
- Fitting the plinth
Marque : SMEG
Modèle : ST120 - ENCASTREMENT DANS LES MEUBLES
Catégorie : Encastrement dans les meubles