
DC22P - Aspirateur SMEG - Notice d'utilisation et mode d'emploi gratuit
Retrouvez gratuitement la notice de l'appareil DC22P SMEG au format PDF.

| Type de produit | Lave-vaisselle |
| Marque | SMEG |
| Modèle | DC22P |
| Dimensions (L x P x H) | 60 x 57 x 82 cm |
| Capacité | 12 couverts standard |
| Pression d'eau d'alimentation | 0,5 - 10 bar |
| Alimentation électrique | Voir plaque signalétique (230 V ~ 50 Hz typique) |
| Programmes de lavage | Trempage, Lavage intense 65°C, Lavage normal 65°C (IEC 436), Lavage délicat 55°C, Lavage rapide 45°C |
| Distributeur de détergent et liquide de rinçage | Oui, avec réglage de dosage |
| Adoucisseur d'eau | Oui, avec réservoir à sel régénérant |
| Minuteur de départ différé | Oui (sur certains modèles), de 1 à 9 heures |
| Bras gicleurs | Supérieur et inférieur, réglables en pression (sur certains modèles) |
| Filtre | Unité de filtration plastique ou inox, nettoyable |
| Entretien | Nettoyage régulier des bras gicleurs, filtre et filtre d'entrée d'eau |
| Sécurité | Mise à la terre obligatoire, arrêt automatique en fin de cycle |
| Accessoires inclus | Panier supérieur, panier inférieur, corbeille à couverts, entonnoir pour sel |
FOIRE AUX QUESTIONS - DC22P SMEG
Questions des utilisateurs sur DC22P SMEG
0 question sur cet appareil. Repondez a celles que vous connaissez ou posez la votre.
Poser une nouvelle question sur cet appareil
Téléchargez la notice de votre Aspirateur au format PDF gratuitement ! Retrouvez votre notice DC22P - SMEG et reprennez votre appareil électronique en main. Sur cette page sont publiés tous les documents nécessaires à l'utilisation de votre appareil DC22P de la marque SMEG.
MODE D'EMPLOI DC22P SMEG
Lavastoviglie Lave-vaisselle Geschirrspüler Dishwasher Lavavajillas Máquina de lavar-loiça Afwasautomaat
Istruzioni per l'installazione e l'uso Instructions pour l'installation et l'emploi Informationen für Installation und Gebrauch Instructions for installation and use Instrucciones para la instalación y el uso Instruções de utilização Instructies voor installatie en gebruik
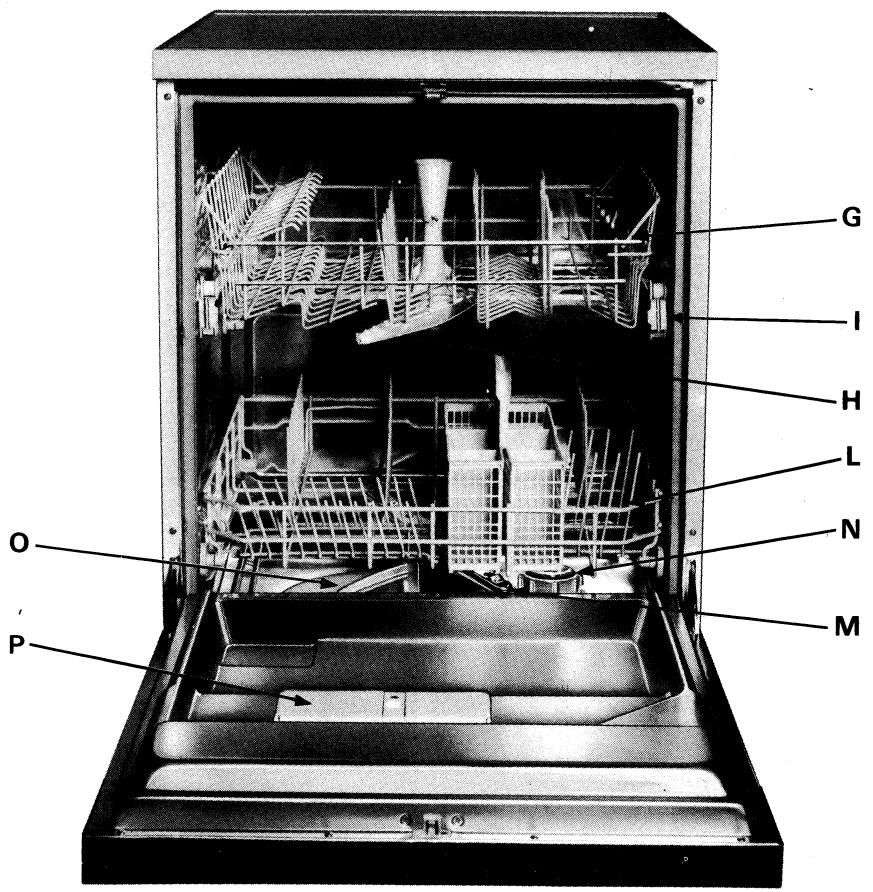
Description of the Dish Washer
(drawing on last cover page)
A - Selection - Programme push-button
B - End of the cycle led
C - Machine «on» led
D - No salt led (only on some models)
E - «Off» push-button
F - «Start» push-button
G - Upper basket
H - Upper spayer
I - Basket level adjustment
L - Bottom Basket
M - Bottom Sprayer
N - Salt Container
O - Wash Filter
P - Container for detergent and rinse aid
R - Delay timer push-button
T - Delay timer display
Technical Characteristics
| Size of the buil - in dish wasser - Width, Depth, Height | cm. 60, 57, 82 |
| Capacity | 12 standard covers |
| Water input pressure | 0,5 - 10 bar |
| Power Supply | see table of specifications |
| Total input | see table of specifications |
| Fuses | see table of specifications |
This appliance complies with the provisions of the community regulation EEC 89/336 dated 3.5.87 on the prevention and elimination of radio interference.
Installation
To Unpack the Dish Washer
Remove the outside carton, the corner supports, the plastic covering and the wooden support on which the machine is placed. Open the door of the dish washer and remove the parts which fix the baskets.
How to Position the Dish Washer
Place the machine into the position selected. The back or sides of the machine may be in direct contact with walls or furniture. The water input and output pipes of the dish washer may be installed either to the left or to the right, as required.
How to Level the Dish Washer
Once the dish washer has been placed into position, adjust the feet by screwing them up or down in order to level the machine.
Proper levelling will ensure that the dish washer functions properly.
If the unit is installed on a carpeted floor it is important that the opening of the lower parts of the machine are not obstructed by the carpet.
To Connect the Cold water
Connect the input water pipe to a cold water input with a 3/4 gas threaded inlet. Remember to install the small filter which is provided with the dish washer, between these and to screw it firmly to the tap (fig.1).
If the piping is new or has not been used for a long period of time, allow the water to run until limpid and clean before connecting. Failure to do so may result in clogging which could damage the dish washer.
To Connect the Hot Water
Water from the mains, (central system or central heating), not exceeding 60äC, may be used.
In this case the washing time will be some 15 minutes shorter and washing efficiency slightly reduced.
To connect the hot water, follow the same instructions illustrated for the cold water connection.
How to connect the discharge pipe
Connect the discharge pipe to a discharge conduit with a diameter of at least 4 cm. or place it into a sink. Ensure that the pipe is not twisted or bent.
The free end should be placed at a height between 32 e 80 cm. and should be above the water level.
Electric Connection
Before connecting the plug to a socket, which should have an efficient grounding connection, (the grounding is a safety measure which is required by law), ensure that the voltage and frequency indicated on the plate at the back the dish washer correspond to the mains voltage of your home and that the electric system to which the dish washer is to be connected can absorb the maximum voltage indicated on this plate.
If the socket to which the dish washer is to be connected is not compatible to the plug, replace the plug with a suitable one rather than using adaptors or derivators which could cause overheating or burning.
Instructions for Use
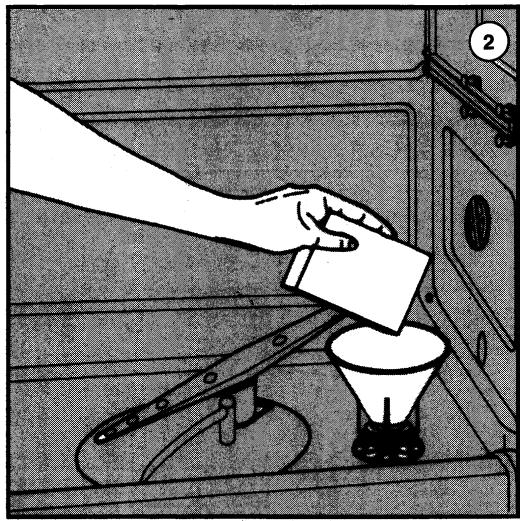
Water decalcifier (fig. 2)
The appliance is fitted with a decalcifier which removes calcium and magnesium salts, which would form mineral deposits on the dishes, from the water.
This decalcifier contains resins which have to be reactivated by adding salt in the special compartment at the bottom of the tub.
A special funnel which comes with the appliances makes it easy to add the salt.
When the appliance is new, carry out the following operations:
- unscrew plug "N" by turning it counter-clockwise;
- place the funnel over the hole; pour in 1 liter of water and then 1.5 kg. of salt; continue until the operation is completed, even if the water overflows;
- it is normal for the pilot lamp to stay on for several wash cycles.
After every 20 wash cycles and whenever the “No Salt” led switches on (only on some models), refill the compartment with regenerating salt for dish water decalcifiers or kitchen salt which does not contain calcareous binders.
Remember that it is normal for water to overflow when adding the salt.
We recommend topping the salt compartment immediately before each wash cycle.
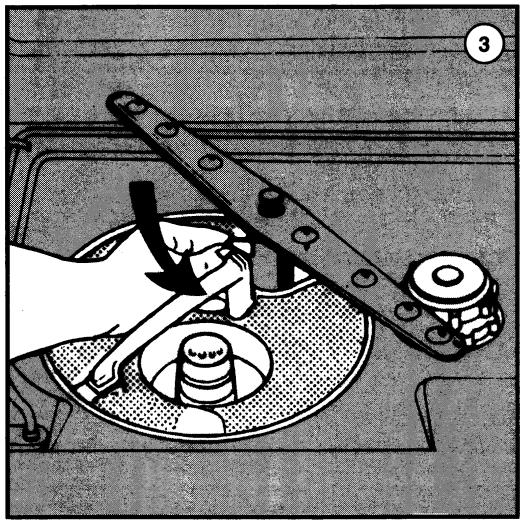
How to adjust the wash pressure of the sprayers (only on some models)
The water washing pressure of the upper and bottom sprayers can be modified by using the adjusting device under the bottom sprayer (fig. 3-A).
Move the lever completely to the left to position 1 (normal functioning) to obtain maximum pressure for the upper sprayer, move the lever to position 2 to reduce the pressure of the upper sprayer and consequently increase the pressure of the bottom sprayer.
Move the lever to position 3 for maximum pressure of the bottom sprayer.
How to arrange the dishes in the Dish Washer
Preliminary precautions:
- Remove all the larger pieces of leftovers and scraps from the dishes in order to avoid clogging the filter and the formation of bad smells.
- If the pots and pans have pieces of burnt or cooked food stuck to them they should be allowed to soak with water before washing.
There are two baskets inside the dish washer for the dishes.
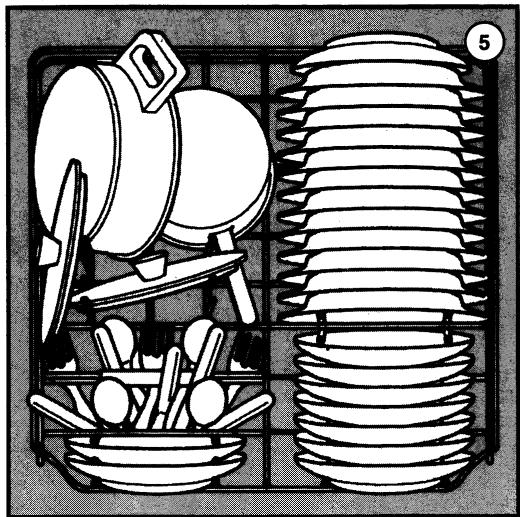
How to use the bottom basket (fig. 4 and 5)
Place very dirty dishes into the bottom basket since the washing action of the bottom sprayer is particularly strong.
The 12 standard cover version has dividers for plates and a special basket for all types of cutlery.
Plates, soup plates, dessert plates, pots and pans, lids and serving dishes should be placed in the bottom basket.
Soup and dessert plates should be placed on the appropriate dividers, remembering to leave some space between one plate and another. Plates should always be placed in an upright position to allow water to circulate freely. Pots and pans should always be turned upside down.
Dishes can be arranged in any way as long as the dirty surfaces of the dishes and the pots and pans are exposed to the jets of water from the bottom sprayers and water is allowed to circulate freely.
For best washing results, place cutlery with handles towards the bottom of the container.
How to use the upper basket (fig. 6)
The upper basket, which can be removed completely, is for small and medium sized dishes like glasses, saucers, tea and coffee cups, shallow salad dishes and slightly soiled shallow pots.
Plates should always be arranged vertically while glasses, cups, pots and pans should be turned upside down.
Place fragile dishes between the ends of the supports so that they are not moved by the jets of water. Place plates on the appropriate dividers with the curved part of the plate turned towards the bottom of the basket.
The dish washer has a device for adjusting the upper basket into two different positions. Large plates can be loaded with the basket in the lower position. Change the position of the basket as illustrated in fig. 7.
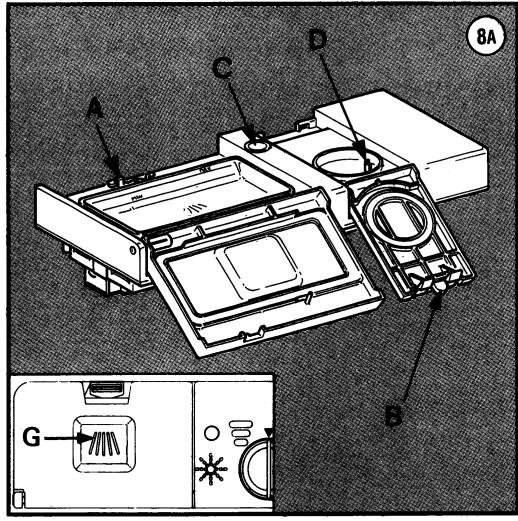
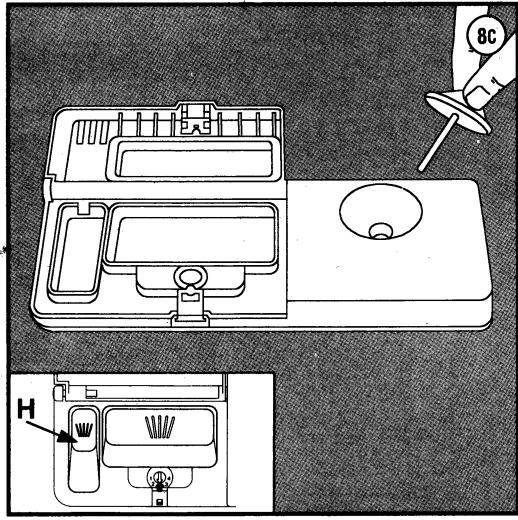
Detergent and polisher distributor (fig. 8A - 8B - 8C)
On the inside of the door there is a detergent and polish dispenser. The dishwasher can be made with different types of dispenser. Model are illustrated in fig. 8A, fig. 8B and 8C.
To fill with detergent
This is the same for all dispenser.
Press the appropriate pushbutton to open the detergent container A "and fill with detergent; close the lid until it snaps shut.
Use approx. 25 grams of detergent for each wash (use the spoon provided with the dish washer for this purpose).
The detergent will be introduced automatically into the water during the washing phase.
If the energetic programme is selected, other than the dosage previously put in, a further quantity is needed so that chamber "G", which is above the dispenser door, is filled, or the small tub "H", which is situated inside of the dispenser.
To fill with polisher
Dispenser in fig. 8A: Press the appropriate pushbutton to open the container "B" and pour in the liquid; close the lid until is snaps shut.
Dispenser in fig. 8B-8C: Open the container by turning cap "E" in an anti-clockwise direction and pour in the liquid; turn the cap in clockwise direction to close it.
This additive is introduced automatically during the last rinsing cycle and ensures that the dishes dry quickly as well as avoiding the formation of marks and opaque lime deposits. Use only rinsing additives specifically for automatic dish washers.
Check the level of the polisher periodically through the visual display C "; when it becomes clear add extra liquid. O container empty ● container full.
Approx. 50 wash cycles may be carried out with a full tank.
Dispenser in fig. 8A: Regulate the quantity of polisher to be used for each cycle with pin "D" inside the load compartment.
Dispenser in fig. 8B-8C: To adjust the dosage, rotate the plug "F" in the container to the position required.
Dispenser in fig. 8C: turn screw "I" to obtain the best additive dosage for the hot rinse.
We suggest keeping to the original position initially and after several washes it can eventually be modified as follows:
- increase the measure by one position each time if the dishes are opaque or have circular marks after washing
- decrease the measure if the dishes are sticky or have whitish stripes after washing
After having loaded the dishes, the detergent and the polisher, close the door well: the machine will not start if the door is not closed.
How to set the program
Note carefully - When choosing the washing programme with this particular model of dishwasher, which is fully integrable, the door must be partially opened.
Follow the table illustrated in this booklet, especially at first when you are not familiar with the dish washer, in order to select the best wash cycle programs. The many programs illustrated in this table depend on the type of dishes to be washed, their mechanical and thermic resistance and on how dirty they are.
Once the most suitable wash program has been selected, set the program by turning the dial until the program number reaches the arrow.
Having chosen the suitable programme, press the appropriate button which is on the left hand side of the front panel.
To Start the Dish Washer
After having followed all the operations indicated previously and after having opened the water tap completely press the «START» button. At this point, the machine is on and the on-off leds and the of the cycle led are on.
Also, any button must be kept pressed in for about two seconds until the end of the cycle led switches off.
Close the door to start the programme.
Stop
Delay timer (only in some models)
A delay timer is assembled that can delay the start of the washing programmes by a minimum of 1 hour to a maximum of 9. This allows you to make the dishwasher work at the time you prefer.
To delay the start of a programme
After having started the appliance and before closing the door, set the desired delay by pressing the push button "R". The delayed time will be visualized on display "I".
At the end of the programme, the end of the cycle led switches on.
Program selection Guide
| Program | Pushbuttons to press | Detergents and additives | Type and condition of dishes | Description of program | ||
| Detergent | Polisher | |||||
| SOAK PROGRAM | START | Pots and dishes for additional wash | Short cold wash cycle for to prevent drying of food residue on the dishes | |||
| STRONG WASH 65°C | START | 10 g25 g | ● | Very dirty pots and dishes (with exception of fragile pieces) | Prewash with hot water at 45°C and long wash cycle at 65°C. Two cold rinses and hot rinse cycle at 67°C. Dried with hot air | |
| NORMAL WASH 65°C (IEC 436) | START | 25 g | ● | Normally dirty dishes | Prewash with cold water and long wash at 65°C. Cold rinse and hot rinse cycle at 67°C. Dried with hot air. | |
| DELICATE WASH 55°C | 55° | START | 25 g | ● | Immediate wash after use for normally dirty dishes | Prewash with cold water and wash at 55°C. Cold rinse cycle and hot rinse cycle. Dried with hot air. |
| FAST WASH 45°C | R | START | 25 g | Immediate wash after use for slightly soiled dishes maximum 6 covers. | Short wash at 45°C. Two cold rinse cycles no drying cycle. | |
By pressing the «OFF» push-button, the machine is switched off. To stop a programme that is in progress it is enough to select, after having opened the door, the soak programme and then close the door again.
Afetr a few minutes the machine will go into the end of the cycle position.
Maintenance Instructions
How to clean the sprayers
The sprayers can be removed very easily in order clean the nozzles periodically and avoid possible clogging.
Remove the upper sprayer by unscrewing the milled nut. To remove the bottom sprayer, simply pull it upwards.
Wash the sprayers thoroughly under a jet of water and replace them.
How to clean the filtering unit
Check the filtering unit after each wash and if necessary remove any deposits.
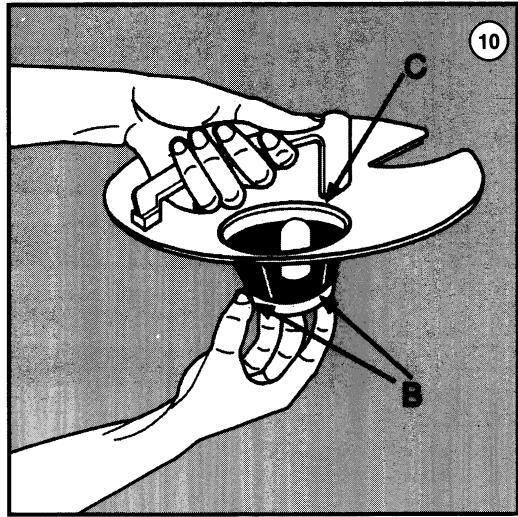
Dishwashers with plastic filter
Remove the circular filter "A" (fig. 9). Press the two tabs "B" (fig. 10) in order to slide off the middle filter "C".
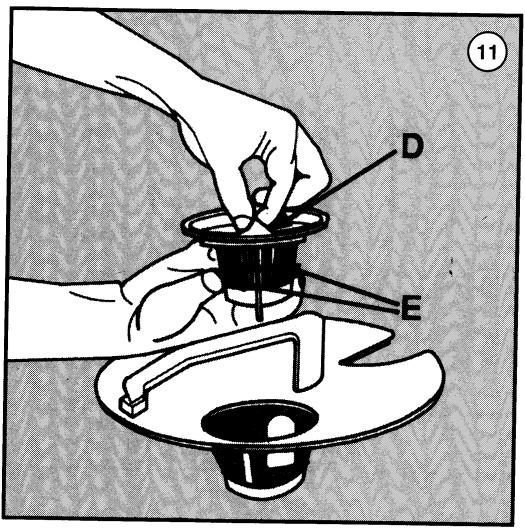
Remove the discharge conduit "D" (fig. 11) by pressing the two tabs "E".
Dishwashers with stainless steel filter
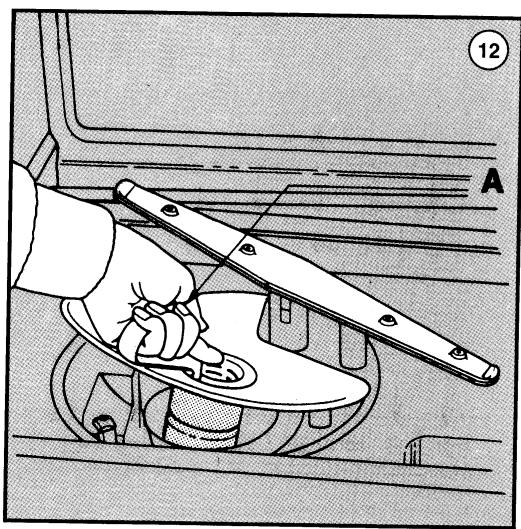
Remove the circular filter "A" (fig. 12). Press the two tabs "B" (fig. 13) in order to slide off the middle filter "C" (fig. 14).
Clean the filters under running water with a hard brush.
Remember that it is essential to clean the filters as illustrated above since the dish washer will not operate if the filter is clogged.
Once the filters have been cleaned we recommend replacing them properly into the correct position in order to avoid damage to the wash pump.
How to clean the water input filter
Clean the water input filter "A" (fig.1) placed at the mouth of the tap, periodically.
Close the tap and unscrew the end of the water discharge pipe, remove the filter and clean it very carefully under running water; replace the filter and rescrew the pipe.
Precautions and advice
The purchaser is responsible for installation.
The manufacturer assumes no responsibility for damage caused by incorrect installation or failure to complete the earthing connection as described in this booklet. Before starting the dish washer check that all the installation
If your dish washer is not working properly check the following before calling a Specialized Technician:
- that the door is closed properly
- that the plug has been inserted into the socket
- that the water has not been cut off
- that the filters are clean
-that the input and output pipes are not bent - that the rotors are not jammed
Disconnect the electricity and water supplies before carrying out any maintenance operations whatsoever.
Do not put dishes made of materials (plastic etc.) or with finishes (decorations) which are not resistant in dish washers. For better washing results remove all large pieces of leftover food from the dishes before placing them into the dish washer.
Clean the external panels with a damp cloth: do not use abrasive detergents or solvents. To remove any stains from the inside surface of the tub, clean with a cloth soaked with water and a little vinegar. Clean and dry the tub thoroughly if it is not to be used for a long period of time.
If the machine is not to be used for a long period of time, disconnect the electricity and water supplies, fill with polisher, leave the door slightly open to avoid the formation of bad smells. Remember to always leave the door slightly open when the machine is not used between one wash cycle and the next.

natural_image
Illustration of a hand pouring liquid into a funnel inside a kitchen appliance (no text or symbols)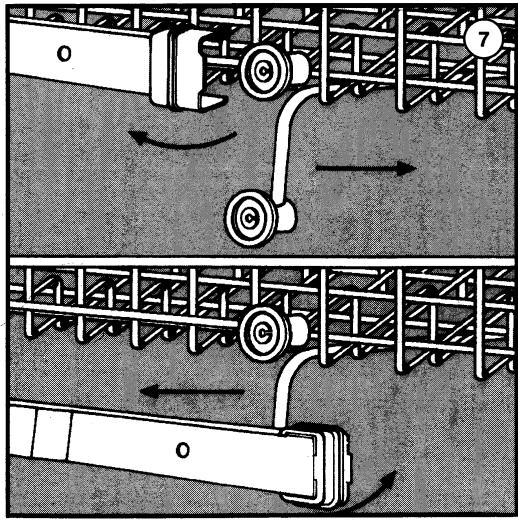
flowchart
graph TD
    A["Component 1"] --> B["Flow Path 1"]
    B --> C["Component 2"]
    C --> D["Flow Path 2"]
    D --> E["Component 3"]
    E --> F["Flow Path 3"]
    F --> G["Component 4"]
    G --> H["Flow Path 4"]
    H --> I["Component 5"]
    I --> J["Flow Path 5"]
    J --> K["Component 6"]
    K --> L["Flow Path 6"]
    L --> M["Component 7"]
natural_image
Mechanical assembly diagram showing a hand turning a component into a fan or dial (no text or symbols visible)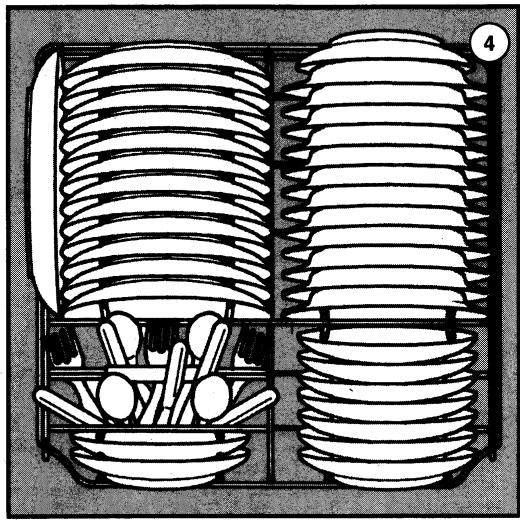
natural_image
Illustration of two stacked cylindrical containers with spoons and spoons in the foreground, no text or symbols present.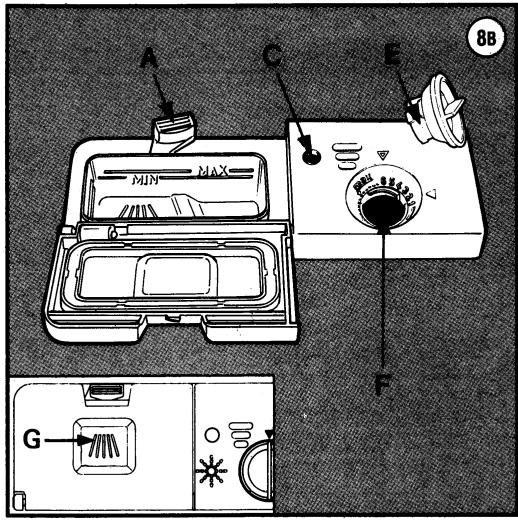
natural_image
Illustration of kitchen utensils and a bed with a lid, showing various kitchen items (no text or symbols)
natural_image
Diagram of a grid-like arrangement of mechanical components or parts, no text or symbols present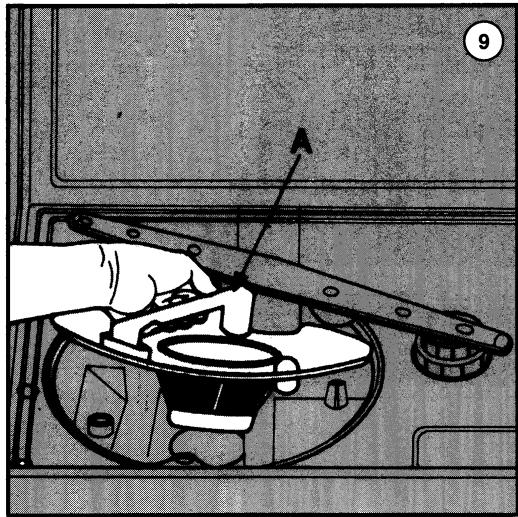
natural_image
Illustration of a hand using a tool to clean or inspect the interior of a vehicle (no text or symbols visible)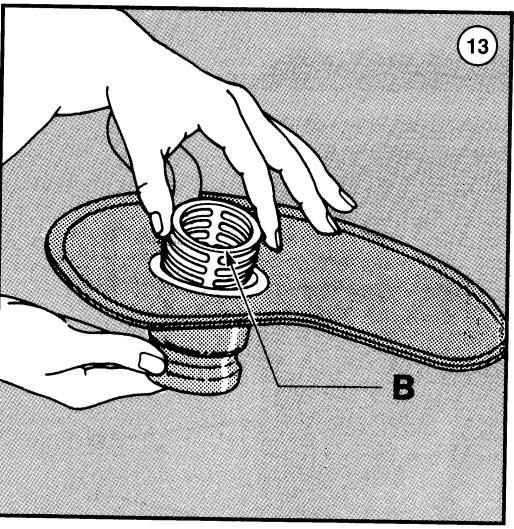
natural_image
Illustration of hands installing a circular component on a mechanical component, labeled B (no text or symbols present)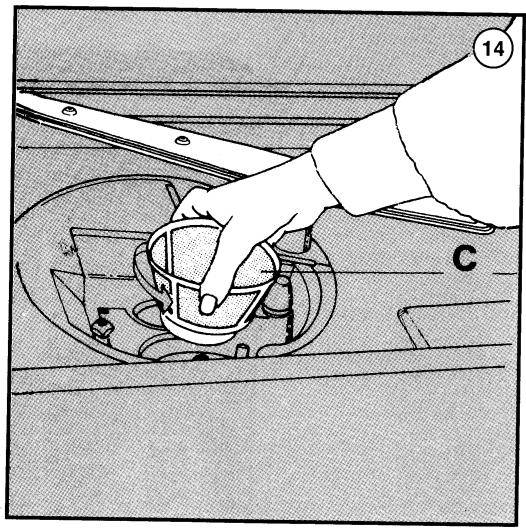
natural_image
Illustration of a hand pouring liquid into a container with a label 'C' and number 14 (no text or symbols on the diagram itself)
flowchart
graph TD
    A["Start"] --> R["R"]
    R --> 55C["55°C"]
    55C --> S["S"]
    S --> O["O"]
    O --> START["START"]
    style A fill:#f9f,stroke:#333
    style B fill:#ccf,stroke:#333

flowchart
graph TD
    A["A"] --> R["R"]
    R --> 55°C["55°C"]
    55°C --> D["DT"]
    D --> Timer["Timer"]
    T["T"] --> Timer
    Timer --> B["B"]
    B --> C["C"]
    C --> D["D"]
    D --> S["S"]
    S --> E["E"]
    E --> F["F"]
    F --> START["START"]
- Lavastoviglie Lave-vaisselle Geschirrspüler Dishwasher Lavavajillas Máquina de lavar-loiça Afwasautomaat
- Description of the Dish Washer
- Technical Characteristics
- Installation
- To Unpack the Dish Washer
- How to Position the Dish Washer
- How to Level the Dish Washer
- To Connect the Cold water
- To Connect the Hot Water
- How to connect the discharge pipe
- Electric Connection
- Instructions for Use
- How to arrange the dishes in the Dish Washer
- Preliminary precautions:
- How to use the bottom basket (fig. 4 and 5)
- How to use the upper basket (fig. 6)
- Detergent and polisher distributor (fig. 8A - 8B - 8C)
- To fill with detergent
- To fill with polisher
- How to set the program
- To Start the Dish Washer
- Delay timer (only in some models)
- To delay the start of a programme
- Maintenance Instructions
- How to clean the sprayers
- How to clean the filtering unit
- Dishwashers with plastic filter
- Dishwashers with stainless steel filter
- How to clean the water input filter
- Precautions and advice
- Disconnect the electricity and water supplies before carrying out any maintenance operations whatsoever.
Marque : SMEG
Modèle : DC22P
Catégorie : Aspirateur