
INTERVAL DATA BACK - Accessoires photo PENTAX - Notice d'utilisation et mode d'emploi gratuit
Retrouvez gratuitement la notice de l'appareil INTERVAL DATA BACK PENTAX au format PDF.

| Type de produit | Dos dateur pour reflex PENTAX SFX/SF1 |
| Marque | PENTAX |
| Modèle | Interval Data Back F |
| Dimensions (L x H x P) | 144 x 57 x 25,5 mm |
| Poids | 82 g (sans piles) |
| Alimentation | 2 piles mini 1,5 V alcalines ou à oxyde d'argent |
| Affichage | Écran LCD 7 segments, 6 chiffres |
| Modes d'impression | Année/mois/jour, mois/jour/année, jour/mois/année, jour/heure/minute, AM/PM heure/minute, compteur, nombre fixe |
| Calendrier automatique | Correction automatique des années bissextiles et des mois (jusqu'en 2099) |
| Plage de réglage | Année : '00-'99, Mois : 1-12, Jour : 1-31, Heure : 0-23 ou 1-12 AM/PM, Minute : 00-59 |
| Emplacement des données imprimées | Coin inférieur droit de la photo, caractères de 0,7 x 0,4 mm |
| Fonctions intervalle | Heure de début, durée de l'intervalle, nombre de vues, pose longue |
| Plage de réglage intervalle | 1 seconde à 99 heures 59 minutes 59 secondes |
| Nombre de vues en intervalle | 1 à 99 vues |
| Sensibilité du film | ISO 25 à 1600, réglage automatique |
| Température de fonctionnement | 0 °C à 50 °C pour l'impression |
| Autonomie (estimée) | Environ 5 000 impressions avec piles alcalines ; durée de vie LCD ~10 ans |
| Accessoires fournis | Étui de rangement |
| Compatibilité flash | AF400FTZ (charge 30 s avant déclenchement en mode intervalle) |
| Entretien et nettoyage | Ne pas toucher la fenêtre d'impression ; utiliser un soufflet pour enlever la poussière, chiffon doux si sali |
| Sécurité | Ne pas démonter, recharger ou jeter les piles au feu ; retirer les piles en cas d'inutilisation prolongée |
| Réparabilité | Pièces détachées non spécifiées ; contacter un centre de service agréé PENTAX |
| Informations générales | Fabriqué par Asahi Optical Co., Ltd. ; notice d'utilisation disponible au format PDF |
FOIRE AUX QUESTIONS - INTERVAL DATA BACK PENTAX
Questions des utilisateurs sur INTERVAL DATA BACK PENTAX
0 question sur cet appareil. Repondez a celles que vous connaissez ou posez la votre.
Poser une nouvelle question sur cet appareil
Téléchargez la notice de votre Accessoires photo au format PDF gratuitement ! Retrouvez votre notice INTERVAL DATA BACK - PENTAX et reprennez votre appareil électronique en main. Sur cette page sont publiés tous les documents nécessaires à l'utilisation de votre appareil INTERVAL DATA BACK de la marque PENTAX.
MODE D'EMPLOI INTERVAL DATA BACK PENTAX
PENTAX®
INTERVAL DATA BACK F
text_image
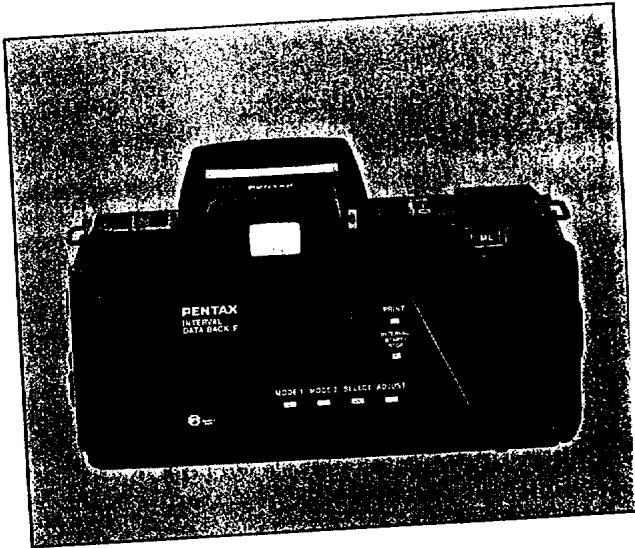
PENTAX INTERNAL DATA BACK F PRINT MODEL 1 MODEL 2 SELECT ADJUSTThank you very much for purchasing the PENTAX Interval Data Back F. Replacing the camera's back cover with the Interval Data Back F cover will enable you to imprint the year/month/day, month/day/year, day/month/year, day/hour/minute (A/P hour/minute) as well as count and fix numbers on the pictures you take. Also, the INTERVAL function enables automatic camera control such as setting the time to take a picture, changing the picture taking intervals, and setting the number of frames. Please read this manual carefully and familiarize yourself with all the features and functions so that you can fully benefit from all it has to offer.
CONTENTS
Names of Parts 1
General Precautions 2
How to Fit the Interval Data Back Cover On ... 3
How to Insert the Batteries 4
On Batteries 5
Data Adjustment 6
Precautions When Taking Pictures 14
How to Use the Interval Functions 15
Specifications 22
NAMES OF PARTS

text_image
Film confirmation window Battery cover Data display window PENTAX HATUAL GREENE F MODE 1 MODE 2 SELECT ADJUST PRINT button START/STOP button ADJUST button MODE 1 button MODE 2 button SELECT button Data recording window Connector pin Back cover fitting/detaching pinGENERAL PRECAUTIONS
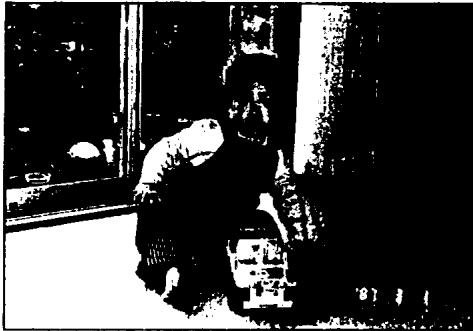
The data (year/month/day or hour: minute) is printed on the lower right-hand corner of the picture, as shown in the accompanying photograph. Select the desired imprint data on the display window and simply set the PRINT function, and the selected data will be imprinted on the picture whenever the shutter is released. This data will be hard to see if this part of the picture is whitish or yellowish in color, so try to take pictures in such a way as to make this part of the picture have a dark background whenever possible.
natural_image
Black-and-white photo of a person sitting near a window, possibly in a room or industrial setting (no visible text or symbols)HOW TO FIT THE DATA BACK COVER ON
natural_image
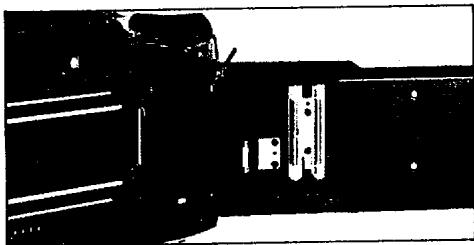
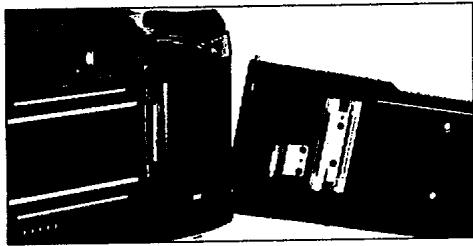
Pure mechanical assembly diagram without any text, numbers, or symbolsWhen replacing the back cover with the Data Back cover, first remove the back cover by flipping it open and inclining it outward while pushing on the fitting/detaching pin shown by the arrow. Store the removed back cover in the accessory casing in order to keep it from deforming. When fitting Interval Data Back F on, first fit the lower shaft stem into the camera, and then fit the upper
natural_image
Two black electronic components with metallic contacts, no visible text or symbolsshaft stem in while pushing on the fitting/detaching pin, then replease the fitting/detaching pin.
Caution: Do not tamper with the data recording window. Blow off any dust with a blower, and whenever soiled, clean with a soft cloth.
HOW TO INSERT THE BATTERIES
text_image
PENTAX H1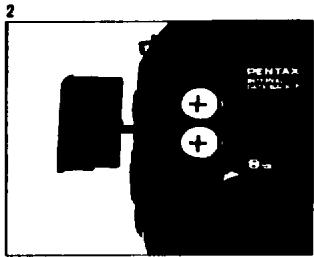
text_image
2 PENTAX θm + + +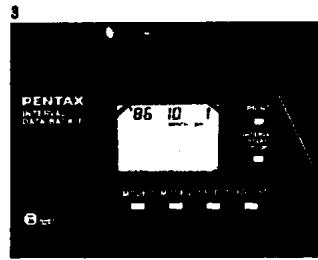
text_image
PENTAX INTENDED DATA: MAX 1 86 10 1 8- As shown in the photograph, remove the battery cover by pulling it in the direction of the arrow.
-
Insert two batteries into the battery compartment with the positive terminals facing upward, then replace the cover by flitting it into its grooves and pushing it in until it clicks.
-
Inserting the batteries will light the data display window. If the display lamp is not properly lit (no display, weak or flickering), check to make sure the batteries have been properly inserted, or replace with new batteries.
- After inserting the batteries, adjust the display in conformance with the data adjusting instructions, which are explained on page 6\~10.
ON BATTERIES
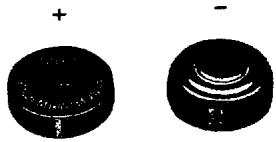
- Two batteries of either of the following types can be used:
1.5V alkaline mini battery
1.5V silver-oxide mini battery
Batteries with the same shape but having different voltages cannot be used.
- Be sure to insert the batteries in correctly. Otherwise, electrolyte leakage, excessive heating, or damage to the camera may result.
natural_image
Two black circular objects with internal patterns, one labeled '+' and the other '-', both without any visible text or symbols.- When replacing batteries with new ones, change both batteries at the same time, using the same kind of batteries made by the same manufacturer. Do not use an old and new battery or different kinds of batteries together.
- When not using the camera for long periods of time, remove the batteries. Old batteries may leak and damage the camera's casing. Store the removed batteries in a safe place, out of the reach of children. - Tearing apart the batteries, recharging them, or casting them into a fire may cause them to explode.
DATA SETTING
text_image
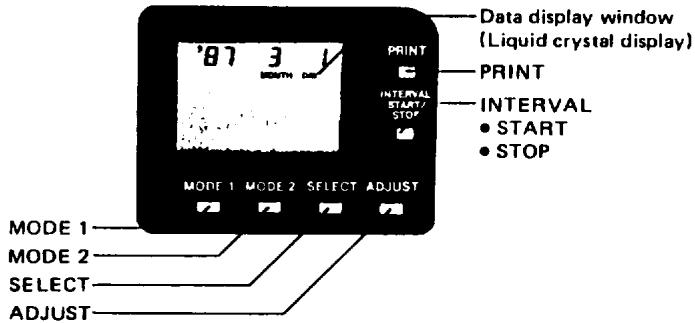
Data display window (Liquid crystal display) PRINT PRINT INTERVAL START/ STOP INTERVAL • START • STOP MODE 1 MODE 2 SELECT ADJUST MODE 1 MODE 2 SELECT ADJUST*Push these pushbuttons with finger or matchstick.
flowchart
graph TD
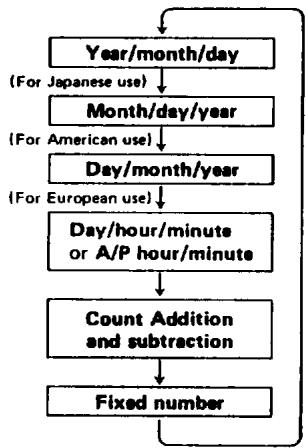
A["Year/month/day\n(For Japanese use)"] --> B["Month/day/year\n(For American use)"]
B --> C["Day/month/year\n(For European use)"]
C --> D["Day/hour/minute or A/P hour/minute"]
D --> E["Count Addition and subtraction"]
E --> F["Fixed number"]
Mode Switching
As shown in the accompanying diagram, pushing the MODE 1 pushbutton will sequentially shift the mode to the six different modes of year/month/day, month/day/year, day/hour/minute (A/P hour/minute), count, and fixed number, with each push of the button, to determine the data on the data display window. Release the button when the desired mode is obtained. Pushing the PRINT button will display "PRINT" on the button left of the display window, which will flicker for a few seconds to indicate the data imprint when the shutter is released. Pushing the PRINT button once again will cut the switch off, erase the PRINT indication, and terminate data imprint on the pictures.
Day/Hour/Minute←→A/P Hour/Minute Switching
-
Push the MODE 1 button to switch to day/hour/minute (24-hour display) or to A/P hour/minute (12-hour display).
-
Pushing the ADJUST pushbutton for 2\~3 seconds will permit alternate switching to the date or to A/P (morning/afternoon).
For example: 21 15:30 P 3:30 (A)
For A↔P switching, push the ADJUST pushbutton for 2\~3 seconds.
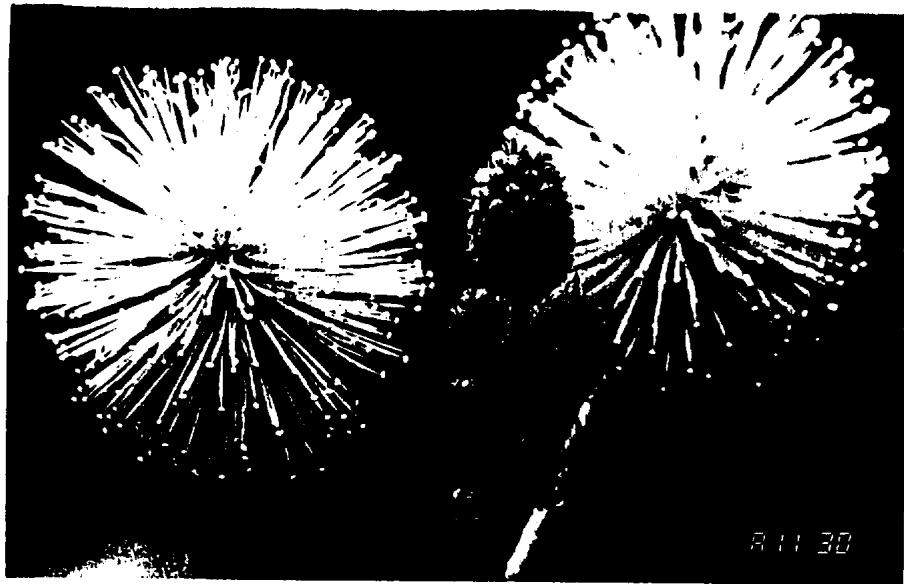
Photographed at 11:30 a.m.
natural_image
Black-and-white illustration of two dandelion seed pods with radiating spikes against a black background (no text or symbols)Data Adjustment
- Pushing the SELECT pushbutton will cause the display to flicker, and pushing it again will shift the display each time, so push the button until the display data you want to adjust appears.
- Push the ADJUST pushbutton when changing the display data that is to be adjusted. The numerical value will advance each time the ADJUST pushbutton is pushed, and pushing the pushbutton for 2\~3 seconds will result in the fast forward of numerical values. In this case, the pushbutton will have to be released before the desired numerical value is reached in order to prevent overrunning it. After making the adjustment, push the MODE 1. button to stop the flickering.
text_image
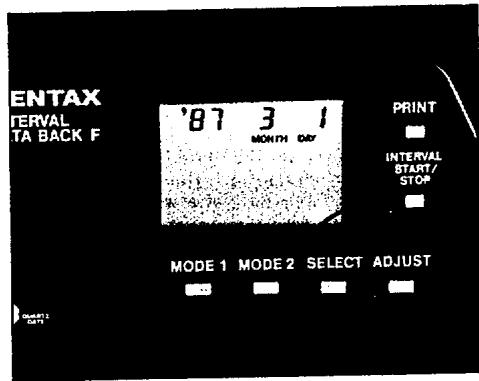
ENTAX INTERVAL TA BACK F '87 3 1 MONTH DAY PRINT INTERVAL START/ STOP MODE 1 MODE 2 SELECT ADJUST 0.5Adjustment of "Second" Display
- With the setting matched to "day/hour:minute" or to "A/P hour:minute," push the SELECT pushbutton and cause the colon(:) to flicker.
- Keeping track of the time, push the ADJUST pushbutton when the second indicator reaches zero, which will set the "second" indication at zero (the flickering will stop for an instant).
Adjustment of Hour/Minute and Year/Month/Day Display
-
Push the SELECT pushbutton and cause the numerical values of the hour/minute or year/month/day display to flicker, whichever is to be adjusted.
-
Push the ADJUST pushbutton and adjust the numerical values.
$$ \text { Year } = ^ {\prime} 0 1 \sim^ {\prime} 9 9 $$
$$ \text { Month } = 1 \sim 1 2 (\text { January to December }) $$
$$ \text { Day } = 1 \sim 3 1 \quad \text { Hour } = 0 \sim 2 3 (\mathrm{A/P} 1 \sim 1 2) $$
$$ \text { Minute } = 0 0 \sim 5 9 $$
The diagram at right shows an example of how the display data "12:00 A.M., January 1, 1985" is changed to "3:30 P.M., March 21, 1987."
- Adjusting the year/month/day or the hour/minute in a given mode will automatically adjust the other mode.
- Releasing the shutter during "flickering" display will not enable data imprint, so be sure to push the MODE 1 pushbutton and stop the flickering after the adjustment is made. Incidentally, the flickering will automatically stop after about two minutes if left as is.
Adjustment of "Day/Hour/Minute" Display
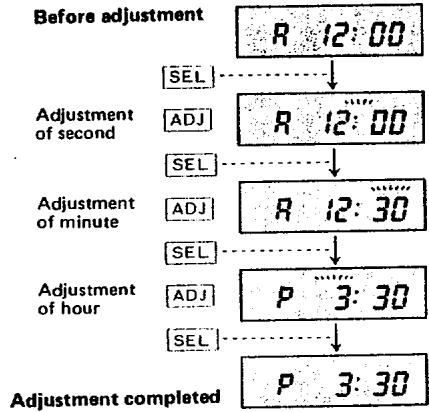
flowchart
graph TD
    A["Before adjustment"] --> B["Adjustment of second"]
    B --> C["Adjustment of minute"]
    C --> D["Adjustment of hour"]
    D --> E["Adjustment completed"]

    subgraph Before adjustment
        F["R 12:00"] --> G["↓"]
    end

    subgraph Second Adjustment
        H["ADJ"] --> I["R 12:00"]
    end

    subgraph Minute Adjustment
        J["ADJ"] --> K["R 12:30"]
    end

    subgraph Hour Adjustment
        L["ADJ"] --> M["P 3:30"]
    end

    N["Adjustment completed"] --> O["P 3:30"]
Adjustment of "Year/Month/Day" Display
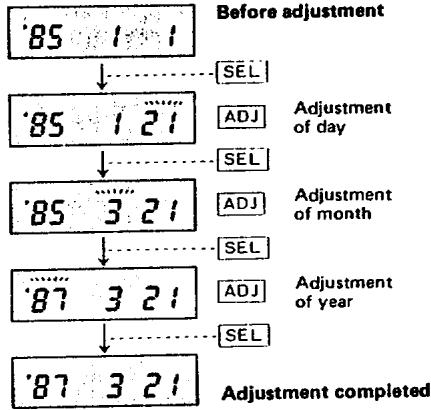
flowchart
graph TD
    A["85 1 1"] --> B["85 1 21"]
    B --> C["85 3 21"]
    C --> D["87 3 21"]
    D --> E["87 3 21"]
    style A fill:#f9f,stroke:#333
    style B fill:#f9f,stroke:#333
    style C fill:#f9f,stroke:#333
    style D fill:#f9f,stroke:#333
    style E fill:#f9f,stroke:#333
Setting of Count Display
The COUNT number will increase or decrease from the preset number with each releasing of the shutter, in an endless progression.
$$ \begin{array}{l}\text { Up(addition): } \rightarrow 0 0 \rightarrow 0 1 \rightarrow 0 2 \rightarrow 0 3 \dots 9 9 \rightarrow 0 0\\leftarrow \dots 9 7 \leftarrow 9 8 \leftarrow 9 9 \leftarrow (\text { subtraction }) \text { DOWN }\end{array} $$
In addition, the counter may be used to indicate a group of pictures such as in time lapse photography.
- Switch to either addition (UP) or subtraction (DOWN) as desired by setting to COUNT. Continued pushing of the ADJUST pushbutton will enable switching to UP or DOWN display.
-
Selecting and setting one of the letters from A to F displayed at the left will enable continuous imprint of that particular character.
-
The COUNT number will be imprinted from the preset display value.
-
Whenever a switch is made to other displays, such as year/month/day or day/hour/minute during photography, the COUNT will stop temporarily and will not advance any further. Therefore, it is possible to take a separate picture and then return to taking the original series of pictures.
-
UP and DOWN are memorized separately.
- The COUNT number will continue to be added or subtracted on as long as the COUNT display is on, even if no data is being imprinted.
Fixed Number Setting (NO INPUT)
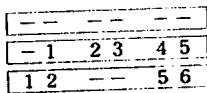
This function may be used for arranging technical data or sample numbers neatly. Numerical values can be input into a maximum of six spaces. The set values are fixed, and the same numerical values will be imprinted continuously unless the setting is changed.
- Any optional numerical value from among (0\~9, -, or blank) can be inscribed into the [-] positions.
text_image
- - - - - - - 1 2 3 4 5 1 2 - - 5 6
text_image
(All blank) 4 5 6 1 5 - 1- The symbol [-] will be imprinted as [-] . In order to imprint this symbol as an empty space, push the COUNT pushbutton once more to erase the symbol [-] .
PRECAUTIONS WHEN TAKING PICTURES
- "Year/month/day" and "hour:minute" cannot be printed on the picture simultaneously.
- Releasing the shutter causes the PRINT indication in the data display window to flicker for 2\~3 seconds and the data to be imprinted onto the picture.
- The working temperature for data printing is 0^ 50^ C .
- The films that can be used are those with ISO 25\~1600, and the camera is automatically set with the ISO film speed.
- Using high-speed films (ISO 1,000\~1,600) may blur the printed characters.
- Using films with speeds that are less than ISO 50 may result in the characters and numerals coming out dim.
Regarding Batteries
Whenever the clock function performs abnormally, or the data display flickers, becomes dim, or disappears, replace the batteries as quickly as possible.
Regarding the Liquid Crystal Display
- Avoid storing or leaving the camera for long periods of time in a place that is too warm. Such place as the automobiles or near heaters are considered to be unsuitable.
- The liquid crystal display darkens at temperatures as high as 60^ , but its functions are restored when the temperature goes down to normal.
- At extra low temperature, the liquid crystal's display response may be delayed, but this is due to the properties of liquid crystal and not to any trouble.
HOW TO USE THE INTERVAL FUNCTION
Interval Function
Each time the MODE 2 pushbutton is pushed, the display will change from ① Shooting Start Time to ② Interval Length, ③ Number of frames, and ④ Bulb Long-Time Exposure, as shown in the following diagram. Regarding each of these items, cause the related numbers and letters displayed on the upper right-hand side to flicker with the SELECT pushbutton, and then set the desired number with the ADJUST pushbutton. When all these numbers and letters have been set, push the MODE 2 pushbutton to stop their flickering.
- Switch the camera's main switch to ON, set the drive mode to single shot, then start taking pictures.

text_image
(Day) (Hour) (Minute) (Within one month) INTERVAL START TIME Shooting Start Time (1 day: 24-hr display)
text_image
(Hour) (Minute) (Second) (1 sec~99 hrs 59 min 59 sec) INTERVAL TIME Interval Length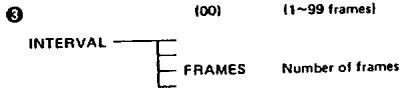
text_image
3 (00) (1~99 frames) INTERVAL FRAMES Number of frames
text_image
(Hour) (Minute) (Second) (1 sec~99 hrs 59 min 59 sec) INTERVAL LONG TIME EX Bulb Long-Time Exposure● Shooting Start Time (START TIME)
- Push the MODE 2 pushbutton and set to Interval Start Time.
- On the upper part of the display is the current "day/hour/minute" (in 24-hr units). Set this to the desired shooting start time, then push the MODE 2 pushbutton to stop the flickering.
-
Pushing the Interval Start pushbutton on the right-hand side starts the time, and the shutter will automatically be released when the preset time arrives.
-
The shooting start time can be set to a day/hour/minute lying within the period of one month.
- The interval function, after being set, can be canceled whenever desired simply by pushing the Interval Stop pushbutton.
- This Shooting Start Time function is unnecessary when taking pictures immediately, and set to ②, ③ and ④.
② Interval Length (TIME)
- Push the MODE 2 pushbutton and set to Interval Time.
- Set to the desired photography interval "hour/minute/second" at the upper part of the display. This is possible within 1 sec\~99 hrs, 59 min. and 59 sec (roughly 4 days and 4 hrs), then push the MODE 2 pushbutton to stop the flickering.
-
Pushing the Interval Start pushbutton on the right-hand side will start the function, and the shutter will be released repeatedly and automatically in the preset time interval.
-
Pictures can be taken repeatedly for the number of times set with the "number of frames" (explained on the next page) and this function stops automatically when the preset number of times expires.
- The display will continue to flicker during the interval function.
③ Number of Frames (FRAMES)
- Push the MODE 2 pushbutton and set to Interval Frame.
- Set to the desired number of frames in the upper part of the display. This is possible within 1\~99 frames. Then push the MODE 2 pushbutton to stop the flickering.
-
Pushing the Interval Start pushbutton on the right-hand side will start the function, and the shutter will be released repeatedly and automatically up to the preset number of frames.
-
This function serves to designate the number of frames to be photographed with the preset INTERVAL function ②.
- Starting the INTERVAL function without setting it to function ② and with the display indicating "zero (0)" will not open the shutter. An improper setting alarm is indicated by flickering.
- Be sure to set the number of frames over 1. The shutter will not be released when set at 0 (zero).
④ Bulb Long-Time Exposure (LONG TIME EX)
- Push the MODE 2 pushbutton and set to LONG TIME EX interval.
- Set to the desired exposure time "hour/minute/second" with the bulb in the upper part of the display. This is possible within 1 sec\~99 hrs, 59 min and 59 sec. Then push the MODE 2 pushbutton to stop the flickering.
- Set the SFX/SF1 camera's display panel to MANUAL, BULB, SINGLE, then select the proper f/stop to obtain proper exposure.
- Pushing the INTERVAL START pushbutton will start the function, making a long-time exposure according to the preset exposure time.
- Set the ② Interval (TIME) to a time longer than the preset Bulb time; otherwise the exposure will not start and the display in the LCD window will flicker, warning you of the error.
Interval Warning Display
- When using the INTERVAL function, an improper or inadequate setting will lock the START pushbutton and all the mistaken settings will be indicated by their flickering.
- Any erroneous setting on the camera will also lock the START pushbutton.
- When normal operation starts by pushing the START pushbutton all items related to the function will flicker.
Precautions
- To reduce the camera's power consumption, its power supply is cut off automatically about 2 seconds after the shutter is closed.
- The shutter can be released whenever necessary during the INTERVAL function. In this case, TIME will continue to proceed and the count to increase or decrease (within the range of the number of preset frames).
- The display contents of MODE 2 will not be printed out on the pictures.
Termination of Interval Function
- The INTERVAL function will be automatically stopped whenever the preset time or number of frames is reached.
- The camera's power unit will shut off about 2 seconds after the INTERVAL function end.
- The INTERVAL function, once started, can be stopped by pushing the INTERVAL STOP or MODE 2 pushbutton. Pushing the START pushbutton once again will restart the INTERVAL function from where it was earlier stopped.
Combined Use with Dedicated Flash Unit
- When using the AF400FTZ, the changing signal will enter the flash about 30 seconds before the preset INTERVAL TIME. Therefore, be sure to set the Interval Length (TIME) to exceed 30 seconds. If the Interval Length (TIME) exceeds 5 minutes or INTERVAL function was stopped, the flash power unit will be temporarily shut off to save the flash's batteries.
- When taking pictures with this function, leave the dedicated flash unit's power ON.
SPECIFICATIONS
Camera used:
Mounting method:
Method of Data Imprint:
Data display window:
Data modes:
PENTAX SFX/SF1
Use in place of camera's back cover
Prints out on back of film with 7-segment, 6-figure liquid crystal display (LCD) device
7-segment, 6-figure liquid crystal display (LCD), selectable of printout or not, flickering of "PRINT" for 2\~3 sec at the time of printout
Six modes: "year/month/day," "day/month/year," "month/day/year," "day/hour/minute" or "A/P hour/minute," by MODE pushbutton switching.
Also provided with auto-calendar function (Automatic correction of year, leap year, long and short months)
Year ('00\~'99) = (2-digit display of last two numbers of calendar year)
Month (1\~12) = January to December
Day (1\~31)
Hour (0\~23) or A/P 1\~12
Minute (00\~59)
Monthly tolerance ±20 sec
Usable: Letters A\~F, COUNT numbers up to 6 digits (including blank)
Lower right-hand side of picture, with each character 0.7 x 0.4mm.
Location and Size of Imprinted Data:
Data Adjustment:
Possible (fast-feed changing also possible)
| INTERVAL Functions | START TIME: settable in day/hour/minuteTIME: setting of repetitive photography interval (1 sec~99 hrs, 59 min, 59 sec)FRAMES: setting of number of photography frames (1~99 frames)LONG TIME EX: setting of long-time exposure (1 sec~99 hrs, 59 min, 59 sec)Use of AF400FTZ enables charging 30 seconds before photography by INTERVAL function, also issuance of instructions for stopping the charging 5 minutes later. |
| Film Speed: | ISO 25~1600, automatic setting. |
| Power Source: | Two 1.5V alkaline or silver-oxide mini batteries. |
| Battery Warning: | Data display flickers when voltage drops |
| Number of Flashes: | Approximately 5,000 times with alkaline batteries, liquid crystal service life of approximately 10 years (tested by our company under normal temperature and humidity conditions). |
| Time Laps Photography: | Possible below about 2 frames/sec. |
| Accessories: | Case. |
| Size and Weight: | 144 (width) x 57 (height) x 25.5 (thickness) mm, 82g (without batteries) |
| * The batteries that come with Interval Data Back F are provided as a sample at the time the camera is shipped from the factory, so they may have become weak due to natural discharge. | |
natural_image
Black-and-white street scene with trees and buildings, no visible text or symbols
Asahi Optical Co., Ltd. C.P.O. 895, Tokyo 100-91, JAPAN
Pentex Europe n.v. Weiveldlean 3.5, 1930 Zaventem Zuid-7, BELGIUM
Pentax Handelschaft mbH Postisch 54 0169, 2000 Hamburg 54, WEST GERMANY
Pentax UK, Limited Pentax House, South Hill Avenue, South Harrow, Middlesex HA2 O.T. U.K.
Pantax, France S. A. Z. I. Argenteuil, 12. Rue Ambroise-Croizet, 95100 Argenteuil, FRANCE
Pentax (Schweiz) AG Industriestrasse 2, 8305 Dietlikon ZH, SWITZERLAND
Pentax Scandinavia AB Box 650, S-751 27 Uppsala, SWEDEN
Pentax Nederland Spinveld 25, 4815 HR Broda, THE NETHERLANDS
Pentax Norge A.S. Cecilio Thoresens VE1 11, Lambertseter, NORWAY
Pentax Corporation 35 Inverness Drive East, Englewood, Colorado 80112, U.S.A.
Pentax Canada Inc. 3131 Universal Drive, Mississauga, Ontario L4X 2E5, CANADA
Asahi Optical Brasileira Ind. e Com. Ltda. Rua Capitko Antonio Rosa 376, Sale 121 Ed. PBK, São Paulo, BRASIL